Samsung Electronics Co 05SPUH External HDD Storage User Manual
Samsung Electronics Co Ltd External HDD Storage Users Manual
Users Manual
Precautions / Please read the manual carefully for proper use and to avoid
the damage in property.
*Samsung Electronics’Internet Home Page
United Kingdom http://www.sansungelectronics.co.uk
Samsung Smart Pocket HDD User Manual
Smart Pocket USB HDD
AD68-00814A

32
Function
Getting to Know Your Smart Pocket
Getting to Know Your Smart Pocket
Wishing you the enjoyment with conveniences using
various functions.
Chapter 1 Arrangement
Mass Storage Device
With built-in 1.8″20G storage device, it is
available to supply super mini storage device
function which enabling storing up to 30kinds of
camcorder video data and common videos as
well.
USB Host function
Connecting to Digital Camcorder, Digital Camera, USB Memory, Portable HDD such as storage device, you can
transfer and receive the data without PC. Besides you can make a film outdoors with digital camcorder without
concerning of memory.
Supports various operating system
The unit is detected automatically under MAC OS 9.0 or above as well as Windows 98SE/2000/XP, it is
available to use without separate drive installation. However under Windows98, it is needed to install separate
driver.
Data Copy/Delete function
Data copy, delete and Back-up from external device which is connected to smart pocket with USB as well as
USB Host function are supported so that free data transfer/receive outdoors is available.
Convenient resume function
Supports RESET function so that you can actuate a hardware reset by press RESET button in the event of
operating problem caused.
Portable Pocket type design
It is emphasized on GRIP feeling which enabling
lifting 20G mass storage device at one hand
and designed as pocket type for the portability.
Slim Size
It is designed as slim size so that it is available to
carry in the pocket conveniently and with 25mm
of super slim light weight, even women can
carry easily.
High speed data transfer
With USB1.1 and USB2.0 support, high speed
data transfer is available and also available as
backup device of digital camcorder or camera.
※ Smart Pocket is designed for back-up the recording
video/photo image of digital camcorder and
compatible with Samsung Electronics Digital
Camcorder M102/M105/M110.
Getting to Know Your Smart Pocket
Chapter 1 Arrangement

4 5
Notices and Safety Precaution
Chapter 1 Arrangement
Chapter 1 Arrangement
Please note the following precautions for use
Please keep the device in a safe place. The device contains a HDD that can be damaged by shock.
■ Do not place your device in a wet place. Moisture and water may cause the device to malfuction.
■ To avoid electric shock, do not touch your device or power cable wet hands.
■ If the device is not working properly, please consult your nearest dealer or authorized Samsung service facility.
Disassembling the device yourself may cause irrecoverable damage which will be difficult to repair.
■ Clean the device with a dry, soft cloth. Use a soft moistened with a mild detergent solution for removing stains.
■ Do not use any type of solvent, especially benzene, as they may seriously damage the finish.
■ Keep your device away from rain and saltwater. After using, clean the device. Saltwater may cause the parts to corrode.
Precautions on the Smart Pocket Care
Television programmes, movie video tapes, DVD title, films and other programme materials may be copyrighted.
Unauthorized recording of copyrighted materials may infringe on the rights of the rights of the Copyright owners amd is
contrary to copyright laws.
All the trade names and registered trademarks mentions in this manual or other documentation provided with your
Samsung product are trademarks or registered trademarks of their respective holders.
1. A sudden rise in atmospheric temperature may cause condensation to from inside the Smart Pocket.
For Example :
. Entering or leaving a heated place on a cold day might cause condensation inside the product.
. To prevent condensation, place the product in a carrying case or a plastic bag before exposing it to a sudden change of
temperature.
1. Do not leave the Smart Pocket exposed to high temperature ( above 60℃ or 140℉).
For example, in a parked closed car in summer or exposed to direct sunlight.
2. Do not let Smart Pocket get wet.
Keep the Smart Pocket away from rains, salt water, or any other form of moisture.
The Smart Picket will be damaged if immersed in water or subjected to high levels of moisture.
Notes Regarding COPYRIGHT
Notes Regarding Moisture Condensation
Notes Regarding the Smart Pocket

6 7
Notices and Safety Precaution
Chapter 1 Arrangement
Chapter 1 Arrangement
Make sure the built-in battery pack is fully charged before staring to record.
To preserve battery power, keep the Smart Pocket turned off when you are not operating it.
If your device is left in stand-by mode without being operated for more than 5 minutes, it will automatically turn itself off to
protect against unnecessary battery discharge.
Do not drop the Smart Pocket. Dropping the built-in battery may damaged it.
Fully discharging a Lithium Polymer battery damaged the internal cells. The built-in battery may be prone to leakage
when fully discharged.
To avoid damage to the battery pack, make sure to remove the battery when no charge remanins.
Clean the terminal to remove foreign substance before inserting the battery pack.
The logos regarding DivX, DivX Licensed are the trademark of DivX, Network, Inc and can be used after contractiong
license.
Notes Regarding the Built-in Battery
Notes Regarding a Trademark
Do not film with the camera lens pointing directly at the sun.
Direct sunlight can damage the CCD (Charge Coupled Device, the imaging sensor).
1. The LCD monitor has been manufactured using the high precision technology. However, there may be tiny dots(red, blue
or green in colour) that appear on the LCC monitor. These dots are normal and do not affect the recorded picture in any
way.)
2. When you use the LCD monitor under direct sunlight or outdoors, it maybe difficuit to see the picture clearly.
3. Direct sunlight can damage the LCD monitor.
Do not attempt to service the Smart Pocket yourself.
Refer all servicing to qualified personnel.
When replacement parts are required. Be sure the service technician has used replacement parts specified by the
manufacturer and having the characteristics as the original parts.
Unauthorized substitutions may result in fire, electric shock or other hazards.
Notes Regarding the Lens
Notes Regarding the LCD Display
Precautions Regarding Service
Precautions Regarding Service
※ When the built-in battery reaches the end of its life, please contact local dealer. Battery must be
disposed of as chemical waste.
※ Be careful not to drop the battery pack when you release it ffrom the CAM.

Getting to Know Your Smart Pocket
Function 2
Notices and Safety Precaution 4
Contents 6
Components and accessories 10
Name and function of each part
Front side of Player 12
Top Panel & Bottom Panel 13
Before using
LCD Screen 14
Connecting adapter and charging 15
Setting the CAM : Using Usb Mode 16
Windows 98SE driver installation 17
98
Additional Info.
FAQ 50
USB Device & file system support 51
Message displayed 52
Specification 54
Warranty Conditions 57
Getting to Know Your Smart Pocket
Chapter 1 Arrangement
Getting to Know Your Smart Pocket
Chapter 1 Arrangement
Contents
Getting to Know Your Smart Pocket
Chapter 1 Arrangement
Chapter 2 Operating mode of each part
Chapter 3 Menu screen Chapter 4 Setting Mode Chapter 5 Additional Info.
Setting
Setting 42
LCD Contrast 43
Backlight Time 44
Auto Off 45
Language Select 46
Version 47
Before using
Power on/off 20
Connecting PC 21
Connecting USB 22
RESET function 23
HOLD function (Hold Mode) 24
Battery Level Check 25
Using Jog button 26
LED indication 27
Menu screen
Main Screen 30
Browser
Browser 31
HDD searching 32
USB Device 36
File Manape 38
USB (USB Backup)
USB (USB Backup) 40
1110
Components and accessories
Intro
Getting to Know Your Smart Pocket
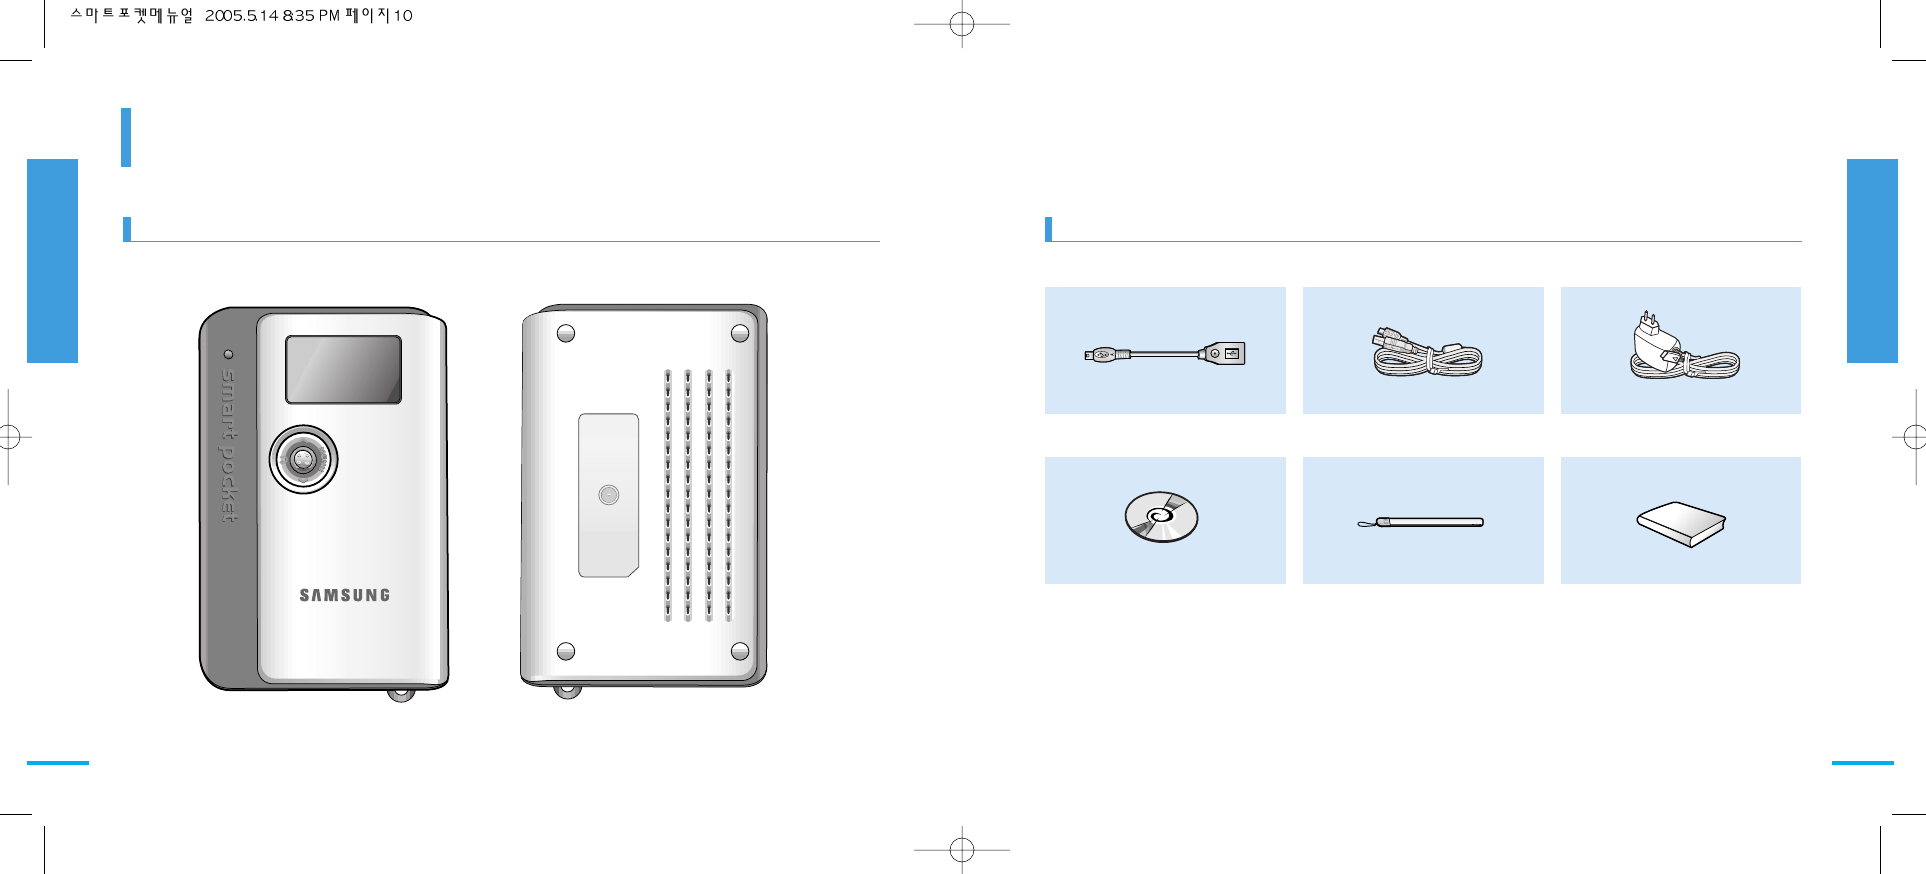
Please check the necessary components
inside the box before using the unit.
Chapter 1 Arrangement
Getting to Know Your Smart Pocket
Chapter 1 Arrangement
Front side Panel & Rear side Panel Accessories
USB Cable - A Type USB Cable - B Type Power Supply
Software CD Hand string User manual/Quick guide
(Front side) (Rear side)
1312
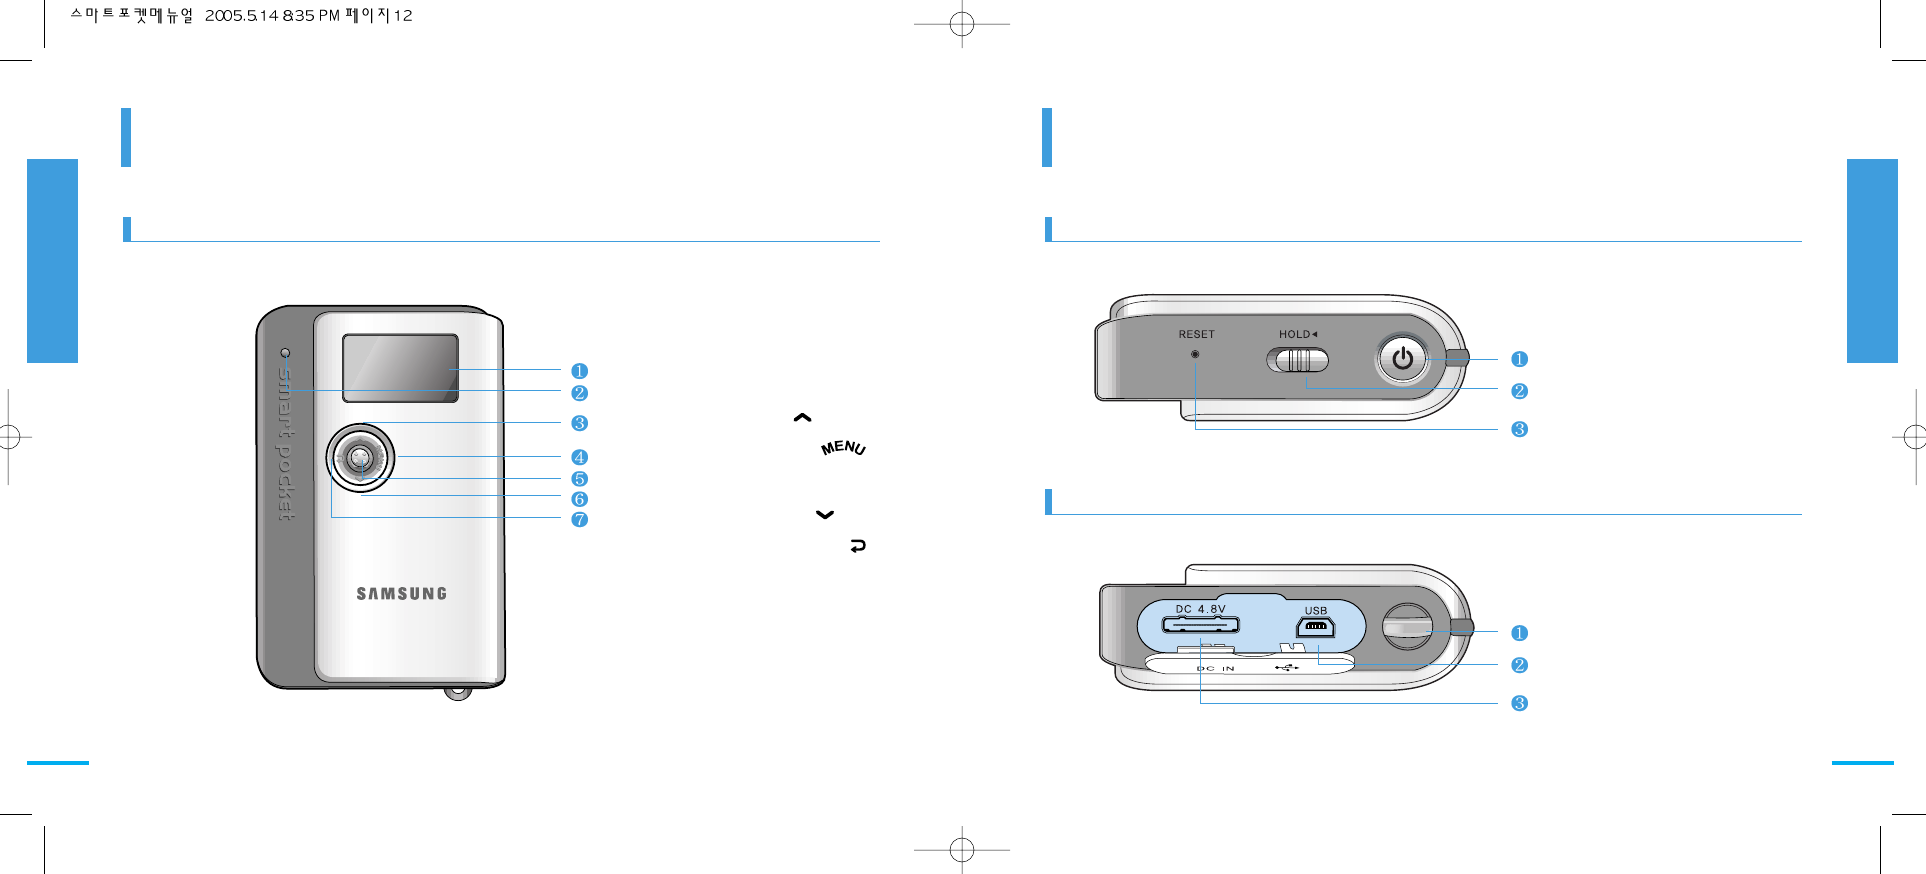
Front side of Player
Name and function of each part
1LCD screen
2On indicator (LED)
3Move Up( )
4Menu button( )
5Select button
6Move Down( )
7Previous screen( )
1Power button
2HOLD switch
3RESET
1Hand string port
2USB port
3Power port
Top Panel & Bottom Panel
Name and function of each part
Name and function of each part
Chapter 1 Arrangement
Name and function of each part
Chapter 1 Arrangement
Front side of Player Upper end of the unit
Lower end of the unit
1514
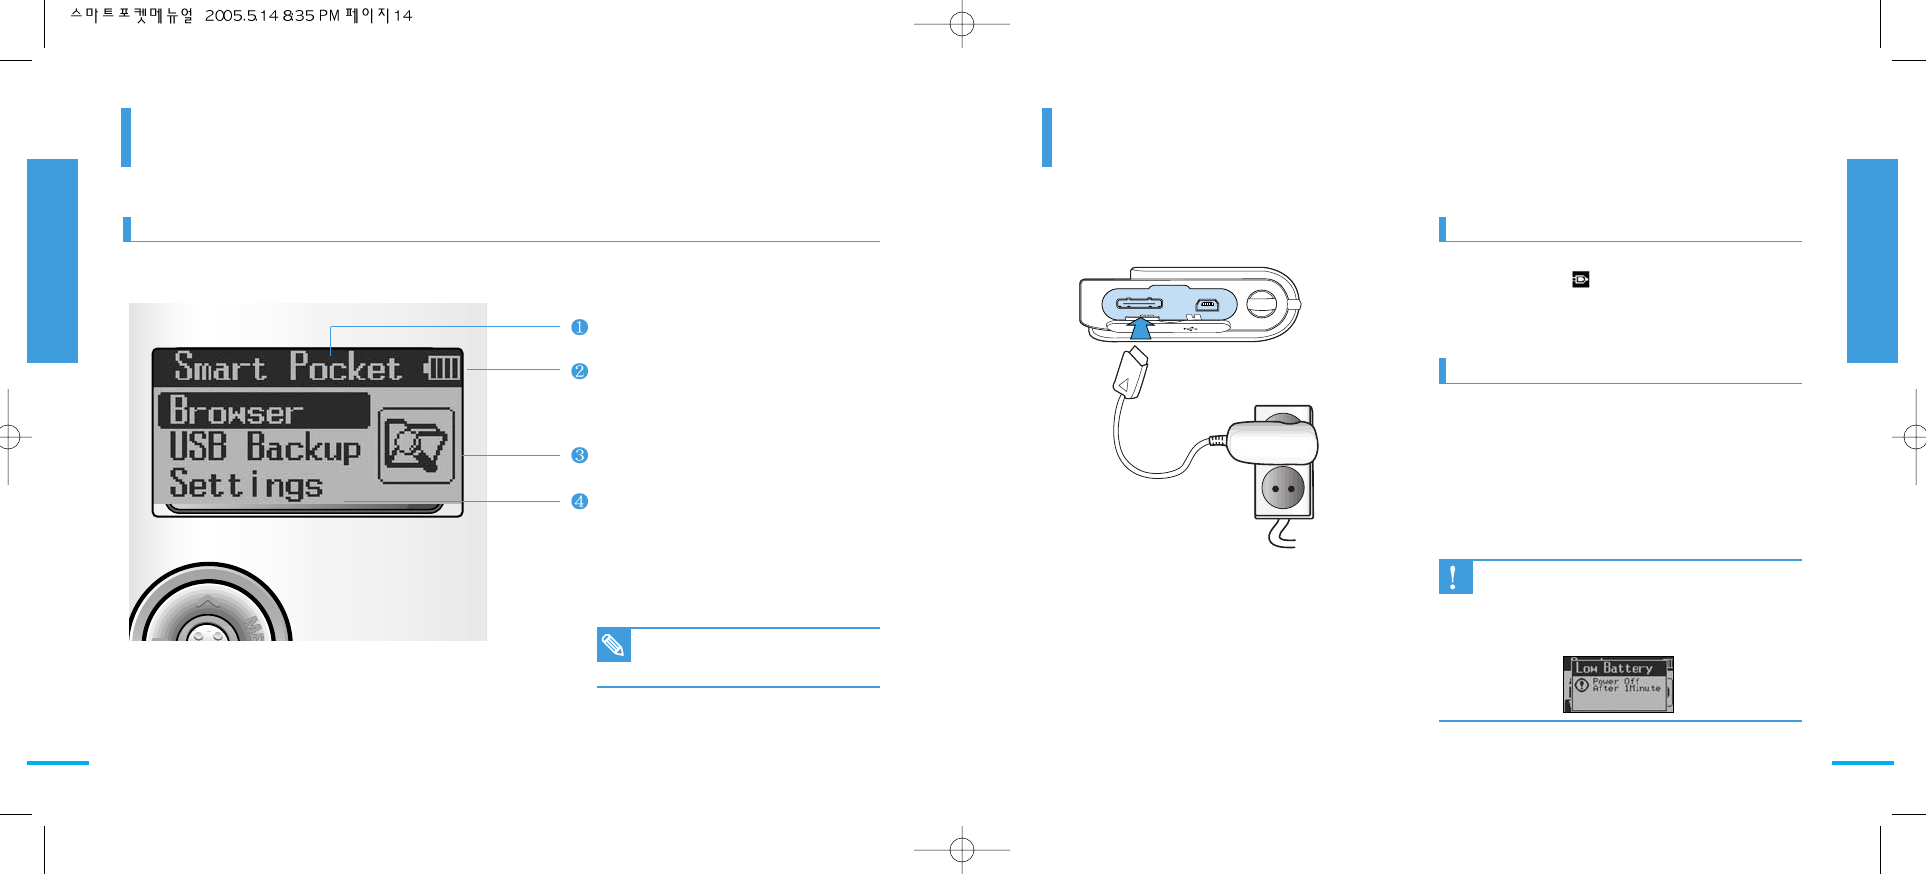
LCD Screen
Before using
Connecting adapter and charging
Before using
Before using
Chapter 1 Arrangement
Before using
Chapter 1 Arrangement
LCD Screen
Connecting adapter when it is powered on.
1Product name (upper menu)
2Battery status
3Menu icon
4Menu
DC IN
USB
DC 4.8V
Note
■ It is available to check the LCD
screen indication when power is
on.
Precautions
■ In the event of low Battery status, it is indicated
on the LEC screen as follows. At this moment,
please connect power adapter and charge the
player. In case it is not powered on, the unit is
power is down in 1 minute automatically.
■ Battery remaining indicator will be disappeared and
power adapter( ) connecting indication will be
appeared.
■ After using, power off and charge the player for
further use.
Connecting adapter when it is powered off.
■ l LEC color turns red and it indicates the charging
status.
■ l LED color turns green and it indicated the
completion of charging so that you can remove the
power adapter.
■ When battery is fully charged, in the event of
connecting power adapter, green light will be
indicated.
1716
Setting the CAM : Using Usb Mode
Before using
Windows 98SE driver installation
Before using
Before using
Chapter 1 Arrangement
Before using
Chapter 1 Arrangement
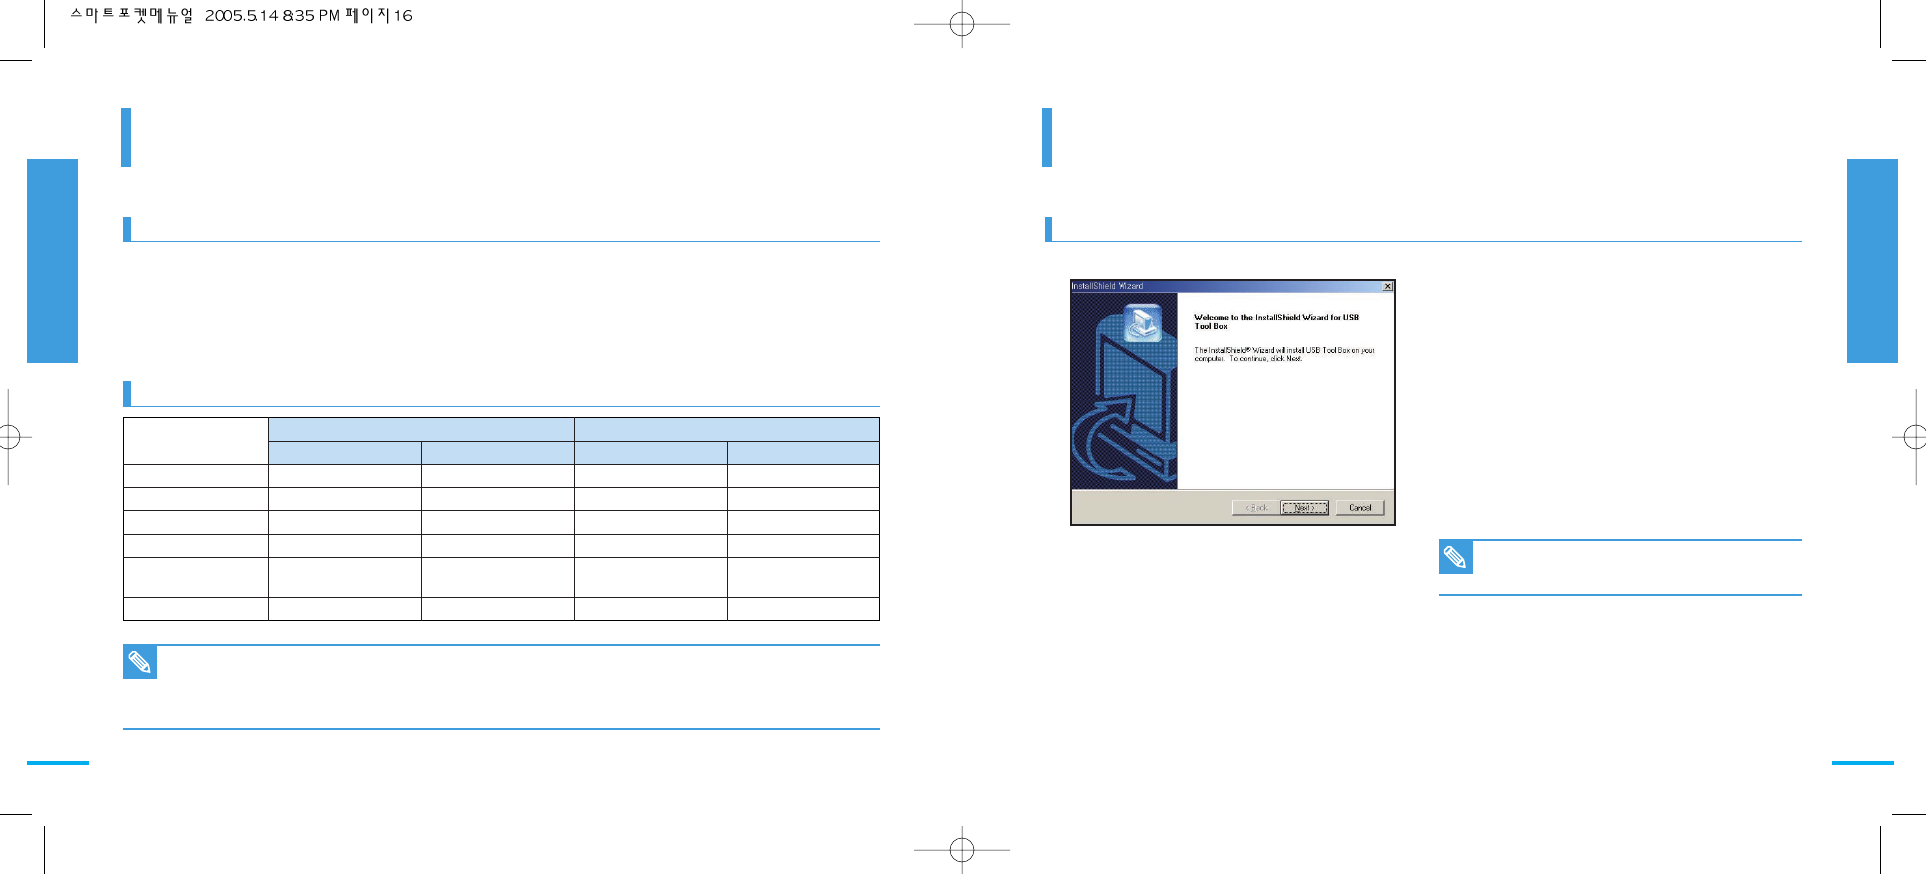
USB Speed depending on the System
System Environment
Windows 98SE driver installation
Complete the file or folder in working and
insert the supplied Windows 98SE
installation CD to CD-ROM.
Click the drive installation program of CD-
ROM drive.
Install according to the indication of screen
and after it is completed restart the player.
USB drive is usable after restarting.
1
2
3
Hi Speed USB is not guaranteed except for Microsoft(Windows) or Apple(Mac OS X) or supplied Driver.
■ Windows 98SE/ME - Full Speed USB
■ Windows 2000 - Over Service Pack 4-Hi Speed USB
■ Windows XP - Over Service Pack 1-Hi Speed USB
■ Mac OS X - Over 10.3.-Hi Speed USB
Note
■ Not all PCs configured with the above environment are guaranteed to
operate properly.
■ PCs used via a USB hub or with a USB card are out of the scope of
guarantee.
■ If your OS is Windows 2000/XP, log in as the [Administrator (admini-
strator of the PC)] (or a user with equivalent privileges) to install the OS.
■ If the capacity of PC is low, the video ffile may not be played normally
or the file is often stopped.
■ If the capacity of PC is low, it may take long time to edit the video file.
CPU
OS
Memory
Free space on the hard disk
Display Resolution
USB
Minimum
PentiumⅢ, 600MHz
Windows 98SE/ME
128MB
1GB or above
800×600 dots
16bit colour
USB1.1
Recommended
Pentium Ⅳ, 2GHz
Windows 2000/XP
512MB or above
2GB or above
1024×768 dots
24bit colour
USB2.0 High Speed
Minimum
G3 500MHz
Mac OS 10.2
128MB
1GB or above
800×600 dots
16bit colour
USB1.1
Recommended
G4 Processor
Mac OS 10.3
512MB or above
2GB or above
1024×768 dots
24bit colour
USB2.0 High Speed
Windows Environment Macintosh Environment
Note
■ In the event of using under Windows 98SE,
Windows 98SE driver should be installed.

1918
Operating mode of each part
MEMO
Before using
Power on/off 20
Connecting PC 21
Connecting USB 22
RESET function 23
HOLD function (Hold Mode) 24
Battery Level Check 25
Using Jog button 26
LED indication 27
Chapter
2
2120
Power On/Off
Before using
Connecting PC
Before using
Before using
Chapter 2 Operating mode of each part
Before using
Chapter 2 Operating mode of each part
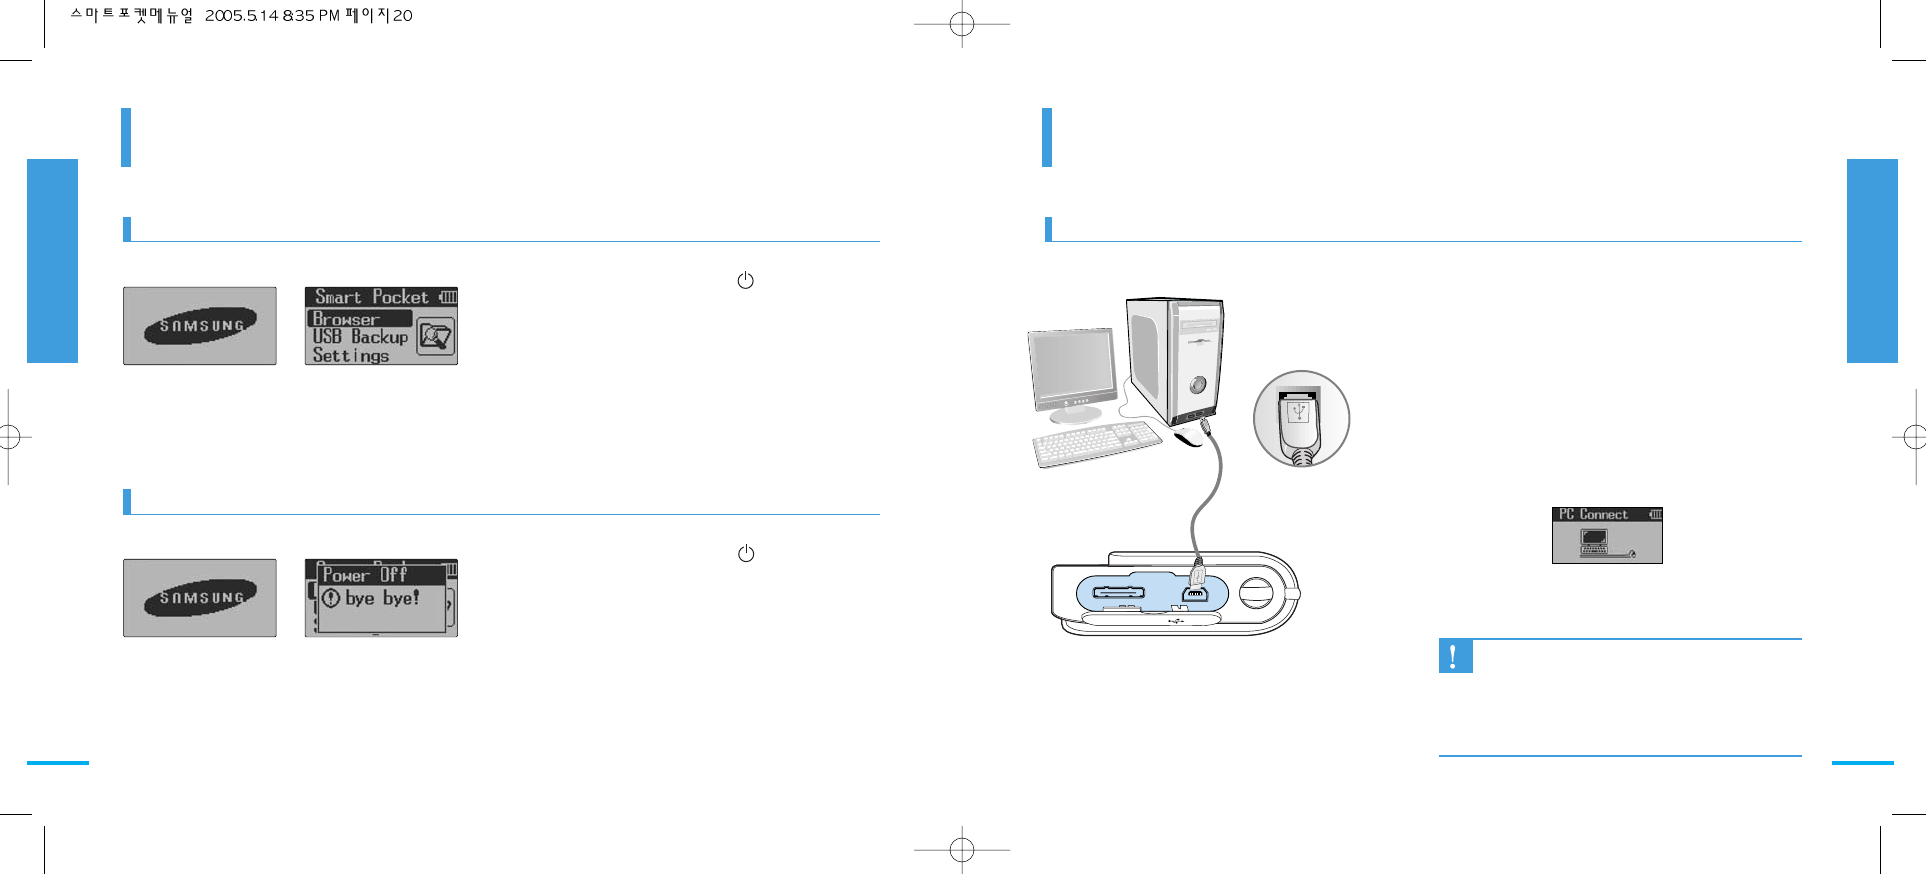
POWER ON Connecting PC with Smart Pocket
POWER OFF
Precautions
■ In the event that Smart Pocket is not detected
to PC, then pull out the USB cable and
connect it again.
■ Under Windows 98SE, separate Smart Pocket
driver installation is needed.
(Refer to Page17 for installation)
DC IN
DC 4.8V USB
Power on both PC and Smart Pocket.
(B Type)
Connect PC with Smart Pocket using USB
Cable.
It is detected as mass storage device on
the PC, so it is detected as ‘Samsung
Smart Pocket’.
You can use the same way you use other
memory product.
1
2
3
4
Press the Power button( ) on the top of
player for 1second.
It will be powered on with initiation screen
by blinking LED and Samsung Logo is
displayed on the LCD.
It is turned on correctly and the initiation
screen will be displayed.
1
2
3
Press the Power button( ) on the top of
player for 3 seconds.
The power off message will be pop up on
the LCD screen and it is powered off.
1
2
(LCD screen when Smart Pocket is connected to PC)

2322
Connecting USB
Before using
RESET function
Before using
Before using
Chapter 2 Operating mode of each part
Before using
Chapter 2 Operating mode of each part
Connecting USB Device with Smart Pocket RESET function
DC IN
USB
DC 4.8V
Precautions
■ Please refer to power.
[Compatibility exceptional device]
■Separate driver installation is needed device
■In case of using a chip which there is Hub function on the device
(How to check the Hub function)
·System control of Windows XP → System → Hardware → Device
Manager → USB controller check
·In case of USB memory, mass storage device and common USB
Hub are indicated additionally.
■USB device which is separate power source using USB device
·It is supportable when separate power source can be used.
·It is not detected without connection of separate power source.
Precautions
■ The system can be easily recovered with
above function in the event of arising system
errors through carelessness in using or errors
caused by system itself.
Power on the Smart Pocket
Connect the USB cable with USB Device
and connect to Smart Pocket. (A Type)
The USB Device will be detected on the
Smart Pocket and below message will be
displayed.
You can do desired operation such as
Browser/USB Backup etc.
After completion of operation, remove the
USB cable.
1
2
3
4
5
Press RESET button on the top of Smart
Pocket using small pincette.
LCD screen will be powered on with one
time of LED blinking by pressing RESET
button.
If you power on the Smart Pocket, it will be
displayed with initial main screen.
1
2
3
Press
→
2524
HOLD function(Hold Mode)
Before using
Battery Level Check
Before using
Before using
Chapter 2 Operating mode of each part
Before using
Chapter 2 Operating mode of each part
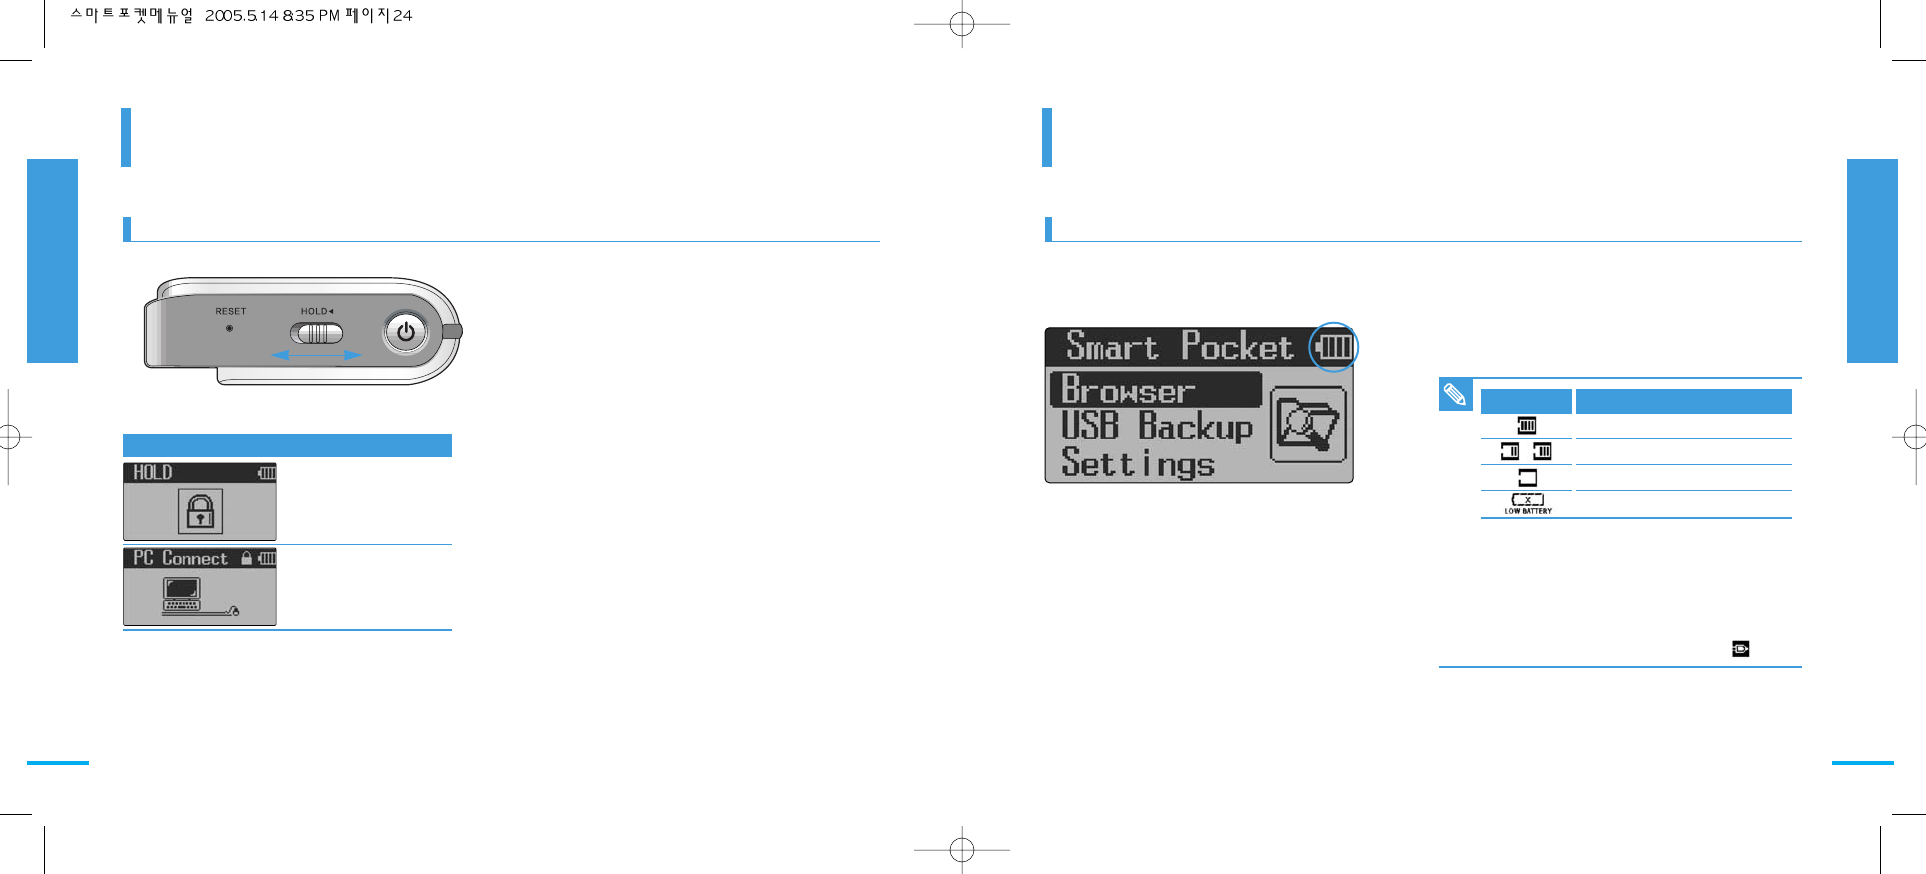
HOLD Mode(Hold function) Battery Level Check
With chargeable battery built-in, Smart Pocket can
be used outdoors with built-in battery and the
battery remaining is indicated on the top right of
LCD.
You can pause the button function of Smart Pocket
to avoid mistake in button operation while file copying
by connecting Smart Pocket to PC or USB Device
Note
■ After display of Low Battery indication on the
LCD screen, it is powered off in 1minute
automatically. Charge the player with recharge
device or connect to power source.
■ When it is connected to recharge device,
battery level indication on the right above will
be changed into external power icon( ).
Switch to the left the Hold button on the top
or Smart Pocket.
Under Hold mode, the function of each
button is paused and it will be backed to
normal by pressing Release button.
Under Hold mode with power off, if you
power on the player
- Under DC power source :
Display of Hold mode screen
- Under Battery power source :
Automatically powered off after display of
Hold mode screen
1
2
3
Battery Mode
PC Connecting
HOLD Screen Mode
Level Indication
Battery full
Remaining of Battery
Low Battery Level
Low Battery indication on the LCD
Category Description
Hold Mode Release

2726
Using Jog button
Before using
LED Indication
Before using
Before using
Chapter 2 Operating mode of each part
Before using
Chapter 2 Operating mode of each part
Jog Button (Using Jog button) Host Mode (Connecting USB Device)
Button Indication
How to use: Move Jog Button upward
Function: Move the menu one level above, increasing of setting value
How to use: Move Jog Button downward
Function: Move the menu one level down, decreasing of setting value
How to use: Move Jog Button leftward
Function: Move to previous screen, same function with returns under menu
How to use: Move Jog Button rightward
Function: Disk information, Format menu indication, Display of copy and delete
menu of file or folder
How to use: Press Jog Button
Function: Enter into the selected folder while browsing the folder, Execution of
selected
Category(LED) POWER ON POWER OFF
Power of Battery
Connecting Adapter
Standby
Data transfer
Disconnected
Charging
Charging completed
GREEN RED GREEN RED
ON
BLINK
ON
ON
ON
OFF
OFF
OFF
OFF
OFF
OFF
OFF
OFF
OFF
ON
OFF
OFF
ON
ON
OFF
Device Mode(Connecting PC)
Category(LED) POWER ON POWER OFF
Power of Battery
Connecting Adapter
Standby
Data transfer
Disconnected
Charging
Charging completed
GREEN RED GREEN RED
ON
BLINK
ON
ON
ON
OFF
OFF
OFF
OFF
OFF
OFF
OFF
OFF
OFF
ON
OFF
OFF
ON
ON
OFF
Note
Move to the Direction of arrow

2928
MEMO
File searching mode
Menu screen
Main Screen 30
Browser
Browser 31
HDD searching 32
USB Device 36
File Manape 38
USB (USB Backup)
USB (USB Backup) 40
Chapter
3
3130
Main Screen
Menu Screen
Browser
File searching
Menu Screen
Chapter3 File searching mode
File searching
Chapter3 File searching mode
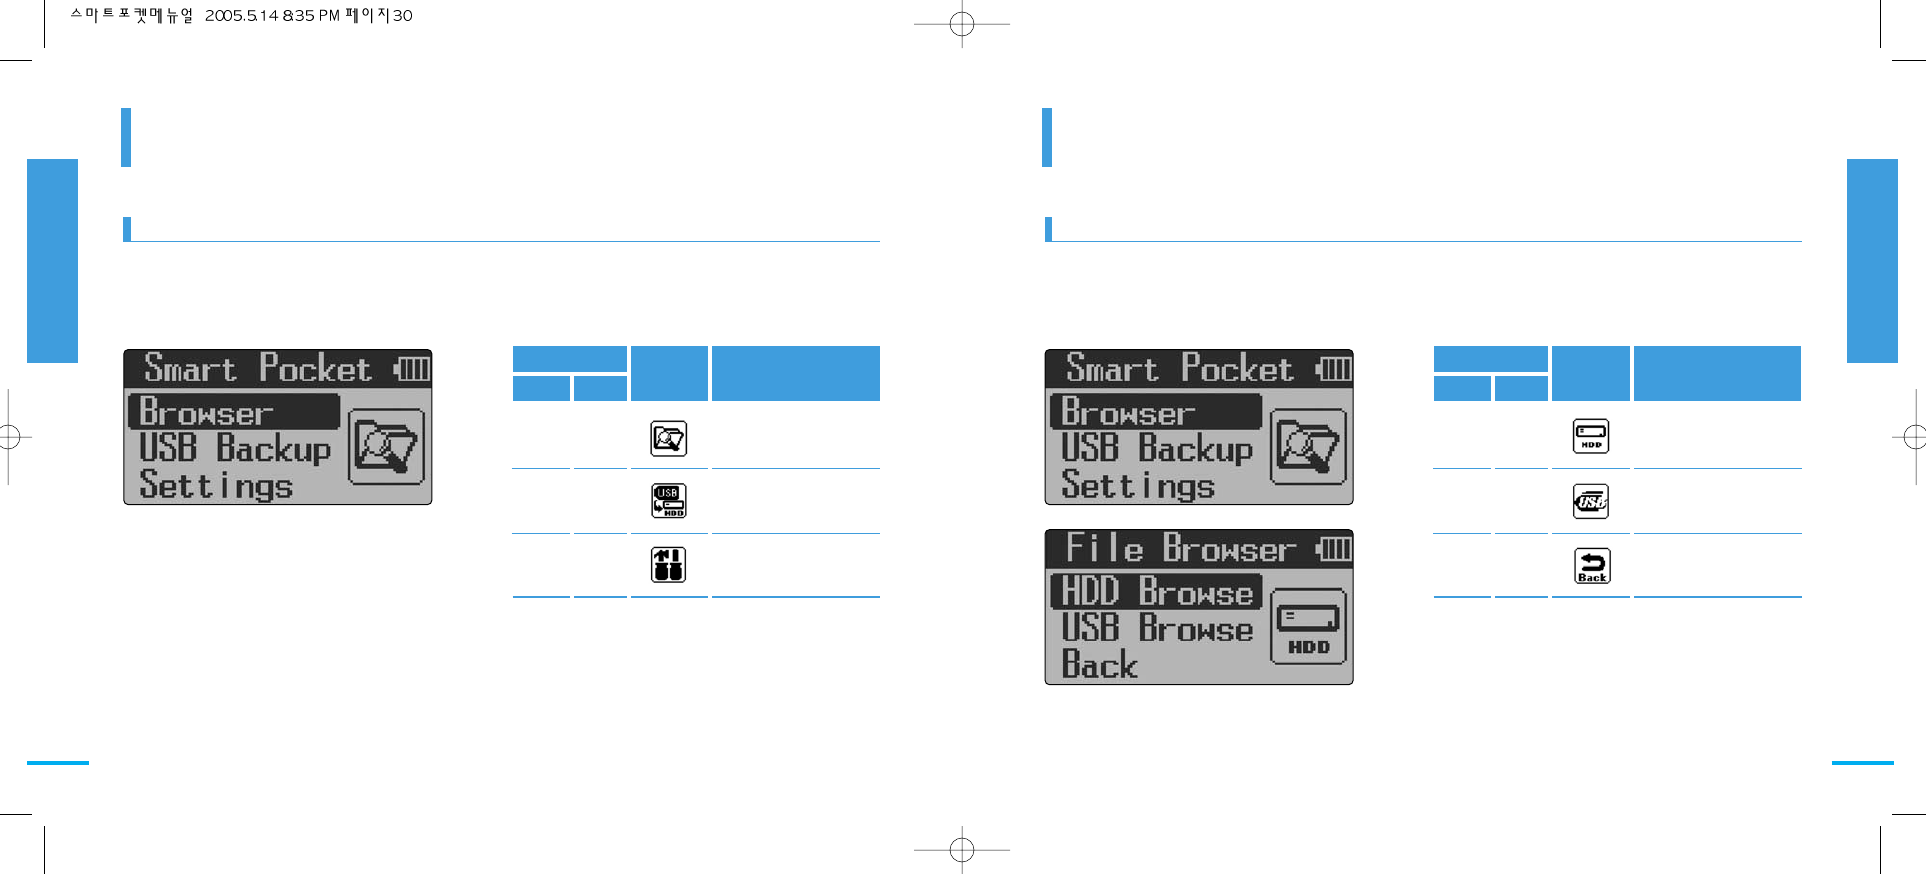
Main Screen Browser
Main Screen will be displayed when it is powered on. The function of menu which is displayed on Main
screen are as follows:
This is to execute browsing files, information and copy function of Smart Pocket Hard Disk and USB Device
which are connected as USB.
Category Icon Function
파일
탐색
USB
백업
환경
설정
Browser
USB
Backup
Setting
Korean
English
File browsing, delete,
copy of Hard Disk and
USB Device
Copy of entire data which
is connected with USB
Device to Hard Disk
Setting management of
Smart Pocket
Category Icon Function
HDD
탐색
USB
장치
돌아
가기
Hard
Disk
USB
Device
Back
Korean
English
Browsing files of Hard
Disk
Browsing files of USB
Device
Back to main screen
Selet
3332
Hard Disk (HDD browsing)
Hard Disk
Hard Disk
Chapter3 File searching mode
Hard Disk
Chapter3 File searching mode
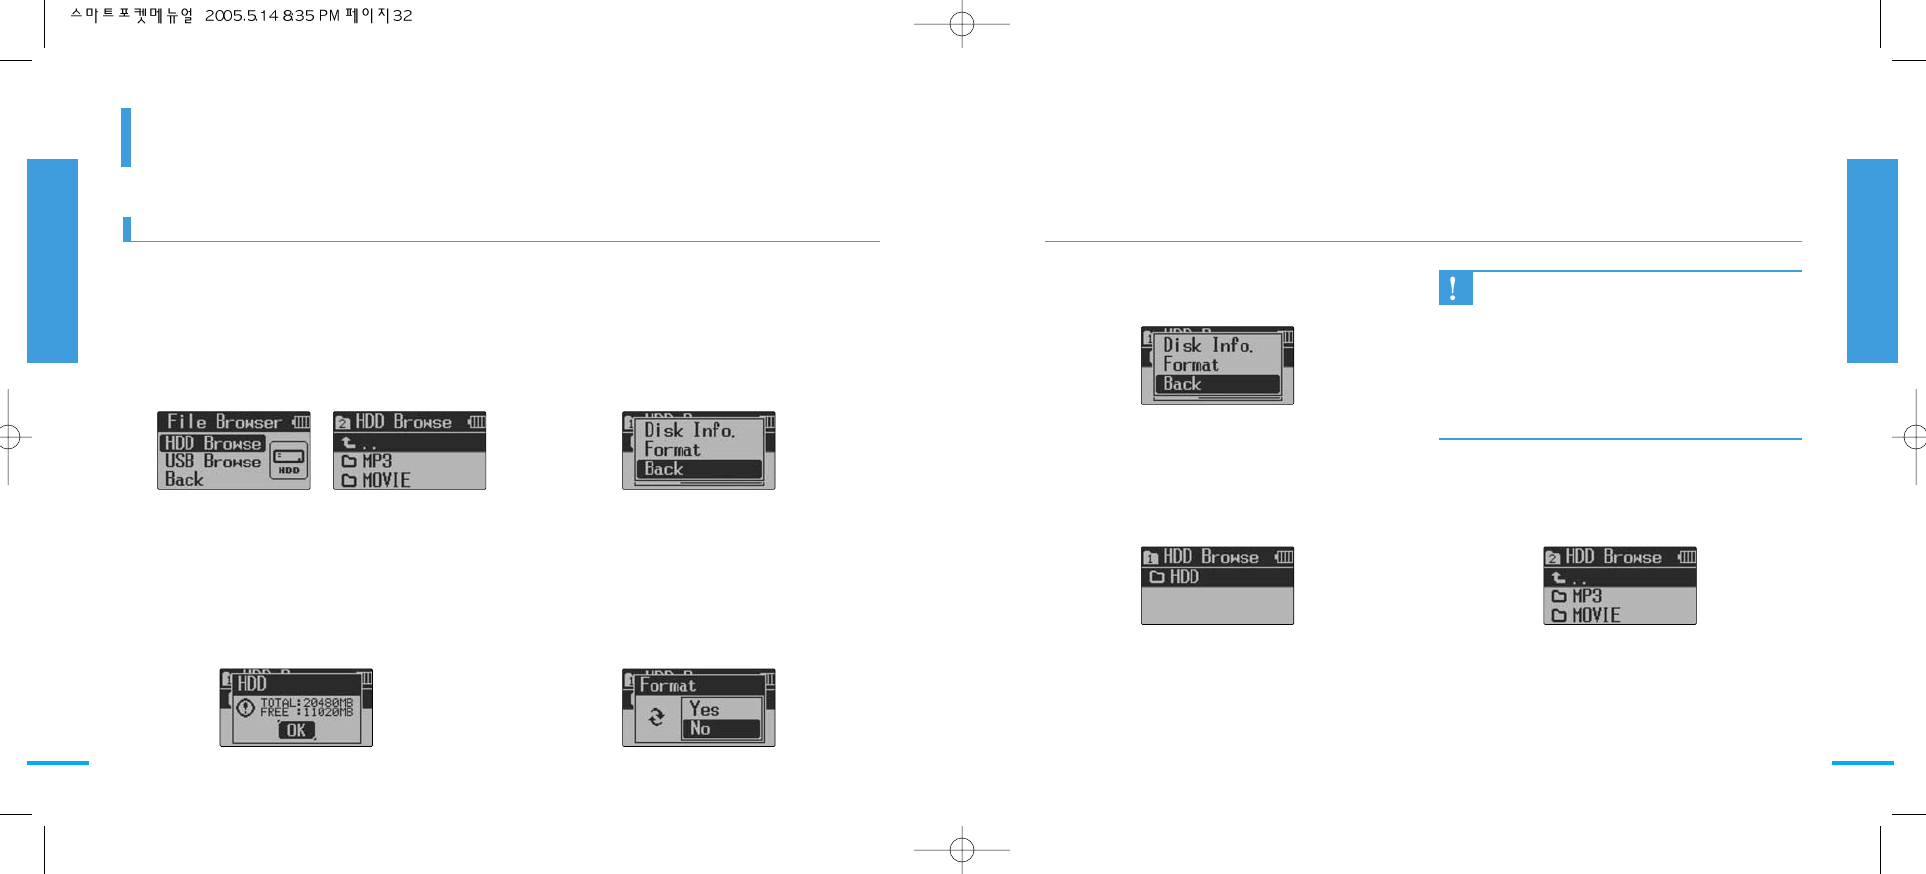
Hard Disk (HDD browsing)
1
2-1
Execute the ‘Menu’ on the ‘Hard Disk’
main screen, you will see the available
menu of Hard Disk from the left of screen.
‘When ‘Format’is executed, you will see
the message whether you would like to
format ‘Hard Disk’. If you select ‘YES’,
Hard Disk will be formatted and all data will
be erased. Please make sure of safe
formatting.
2
2-2
❶ Hard Disk main screen ❷ Hard Disk Menu
❸ Hard Info ❹ Format
‘When ‘Back’is executed, it will be moved
to previous screen.
‘By pressing execution button on the ‘Hard
Disk’menu, left screen will be displayed.
(Hard Disk main screen)
2-3
3By pressing ‘execution’ button on the
‘Hard Disk’, you will see the folders and
files stored in Hard Disk.
4
❺Back
❼ Hard Disk execution❻ Hard Disk main screen
Precautions
■ Through formatting, all the data stored in the
HDD will be deleted. Formatted data are not
recovered. Please make format with attention.
■ In the event of removing the connected USB
external storage device while formatting,
system can be down. Do not remove the
external device while it is formatting.
■ When format is executed, the volume of built-
in HDD will be erased.
Click the execute button on the ‘Hard Disk’
menu then below scWhen ‘Disk Info’ is
executed, the volume status of ‘Hard Disk’
will be displayed. By pressing ‘execute’
button at this time, it will be moved to
previous screen of ‘Hard Disk’.
When ‘Disk Info’is executed, the volume
status of ‘Hard Disk’will be displayed. By
pressing ‘execute’button at this time, it will
be moved to previous screen of ‘Hard
Disk’.
3534
HDD browsing (Hard Disk)
File browsing
File browsing
Chapter3 File searching mode
File browsing
Chapter3 File searching mode
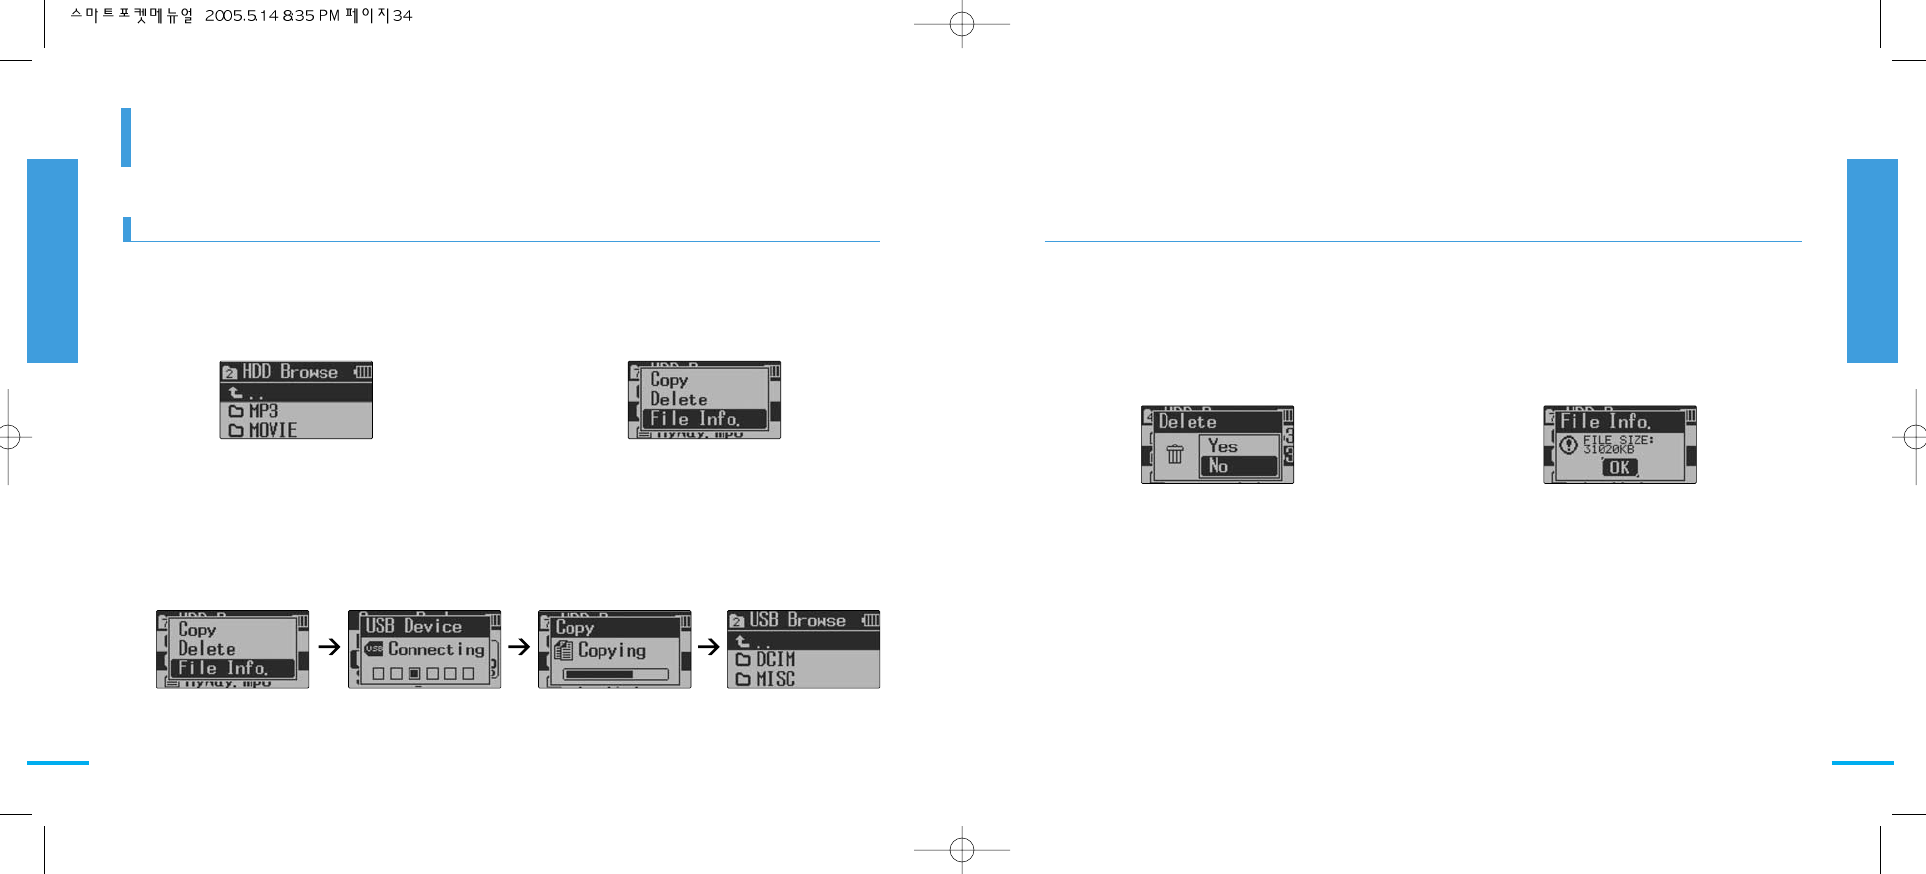
File Manage (File Management)
Press execution button on the ‘Hard Disk
main screen’, you will see below screen
and files under the Hard Disk will be
displayed.
1
2
Move the cursor to desired file and execute
the ‘Menu’then it will show you the menu
If you execute ‘Copy’, the confirm message which showing the connecting of USB external
device where the desired file is contained is connected to Smart Pocket. And when USB
external device is connected, ‘Copy’message will pop up and after ‘Copy’is completed, the
message will be move to USB external memory directory. In case the USB external memory is
not connected, it will show you the message that there is no connection to USB memory. It will
be moved to previous screen if you press the execution button.
3If you execute ‘Delete’, you will see the
check message whether you will execute
the delete. Execute ‘YES’at this time, then
the selected file will be deleted. If you
execute ‘NO’it will be moved to previous
screen.
4you execute ‘File Info’, it will show you the
used volume of ‘File’. Execute ‘Execution’
button, it will be moved to previous screen.
5
3736
USB Device
File browsing
File browsing
Chapter3 File searching mode
File browsing
Chapter3 File searching mode
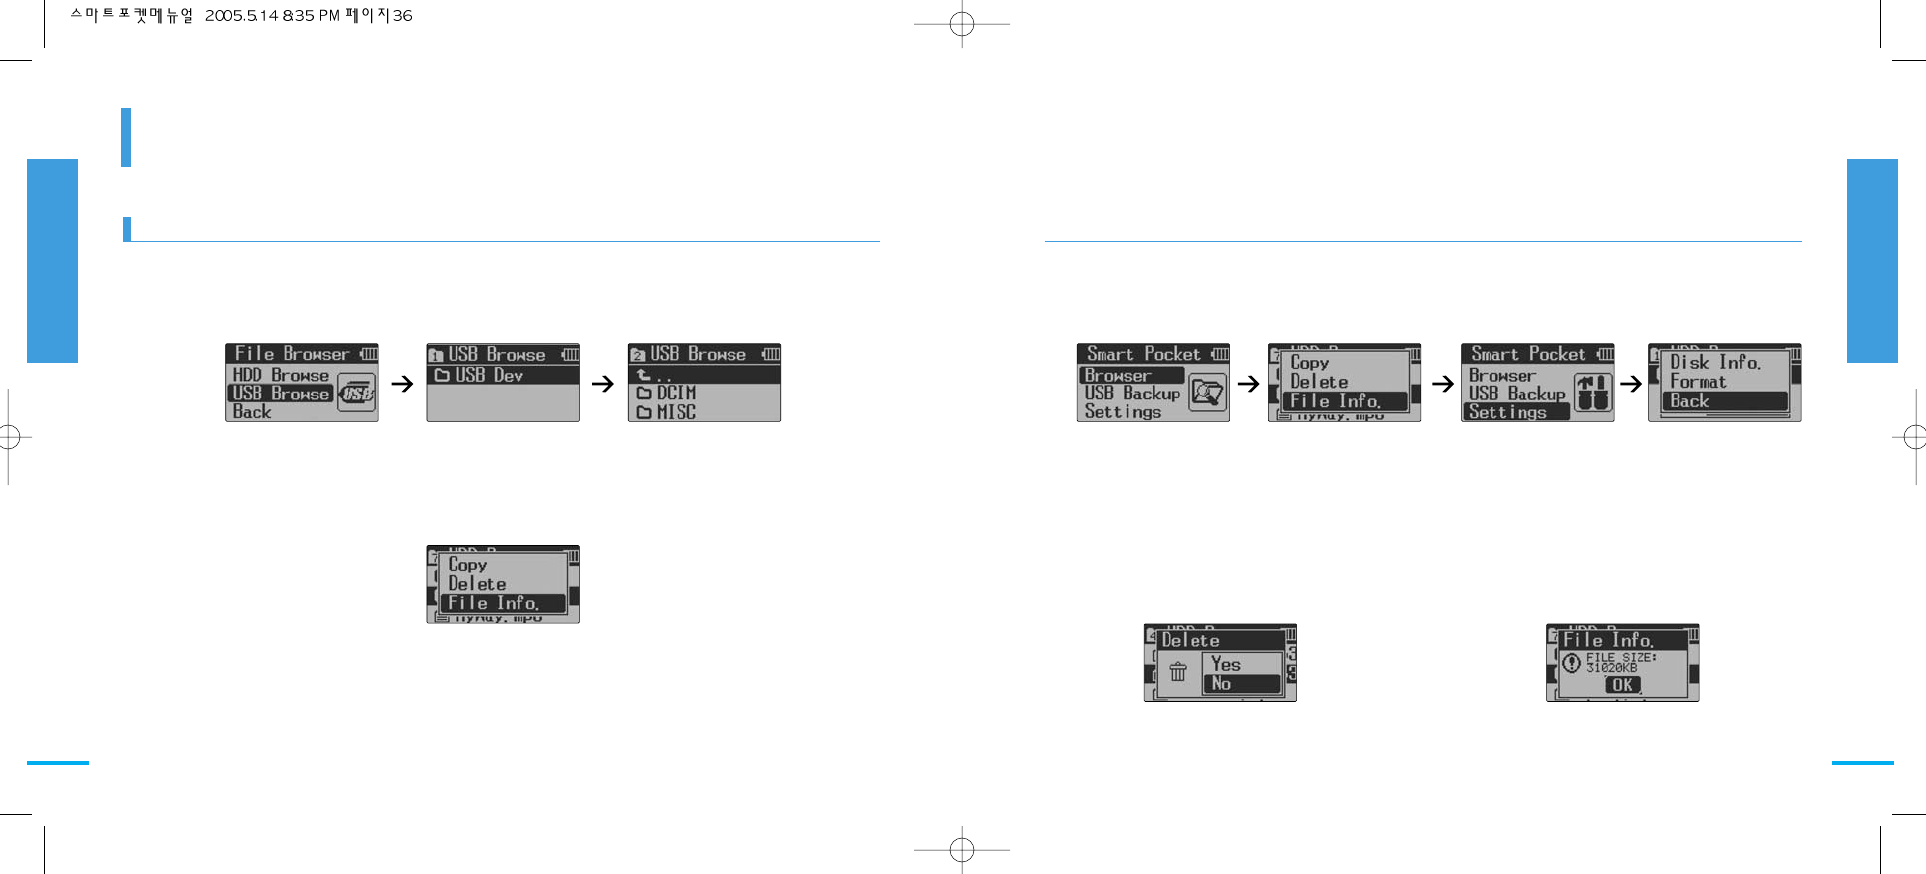
USB Device (External Device)
Move the cursor to desired file and execute ‘Menu’then it will show you the menu that is
available to execute on the screen.
1
2
Execute ‘Copy’, the selected file or folder will be saved in Smart Pocket. At this time, the copied
file or folder will be saved under C;/. After saving, it is moved to C:/ automatically.
If you execute the ‘Browser’menu, you will see below screen.
Select ‘USB Device’at this time and execute, then it will show you the Sub-File of USB Device. 3
If you execute ‘Delete’ you will see the
check message whether you will execute
the ‘Delete’. Execute ‘YES’ at this time,
then the selected file will be deleted. If you
execute ‘NO’it will be moved to previous
screen.
4If you execute ‘File Info’, it will show you
the used volume of ‘File’. Execute
‘Execution’ button, it will be moved to
previous screen.
5

3938
File Manape
File browsing
File browsing
Chapter3 File searching mode
File browsing
Chapter3 File searching mode
File Name Manage (File name management)
Copy
1
File Root Support status
Copy from HDD to HDD
Copy from HDD to USB
Copy from USB to HDD
Copy from USB to USB
Does not support
Supports (Refer to Page 34)
upports (Refer to Page 34)
Does not support
Standard of file naming
2
Item FAT 32 FAT 16 FAT 12
Display
File Name
Max. 12 Digit
Max. 64 Digit
Max. 8-3 Digit
Max. 8-3 Digit
Not Service
Not Service
Folder Level
3
HDD Disk USB DiskCategory
Level 1
Level 2
Level 3
예
HDD Disk
HDD sub-folder
Level 2/sub-folder
HDD Disk
HDD sub-folder
Level 2/sub-folder
The meaning of File Level is that the depth where file exists. Under Tree structure, the HDD/USB
Disk of Smart Pocket is set as level 1. The HDD/USB Disk can be a datum point and the level
of lower folder depth can be set as 2, 3, 4....So that you can use for easy file browsing.
Note
The maximum folder depth are supported up to 20
level.
Level 1
4140
Setting Mode
Chapter
4
USB(USB Back Up)
File Search
USB Back Up
Chapter3 File searching mode
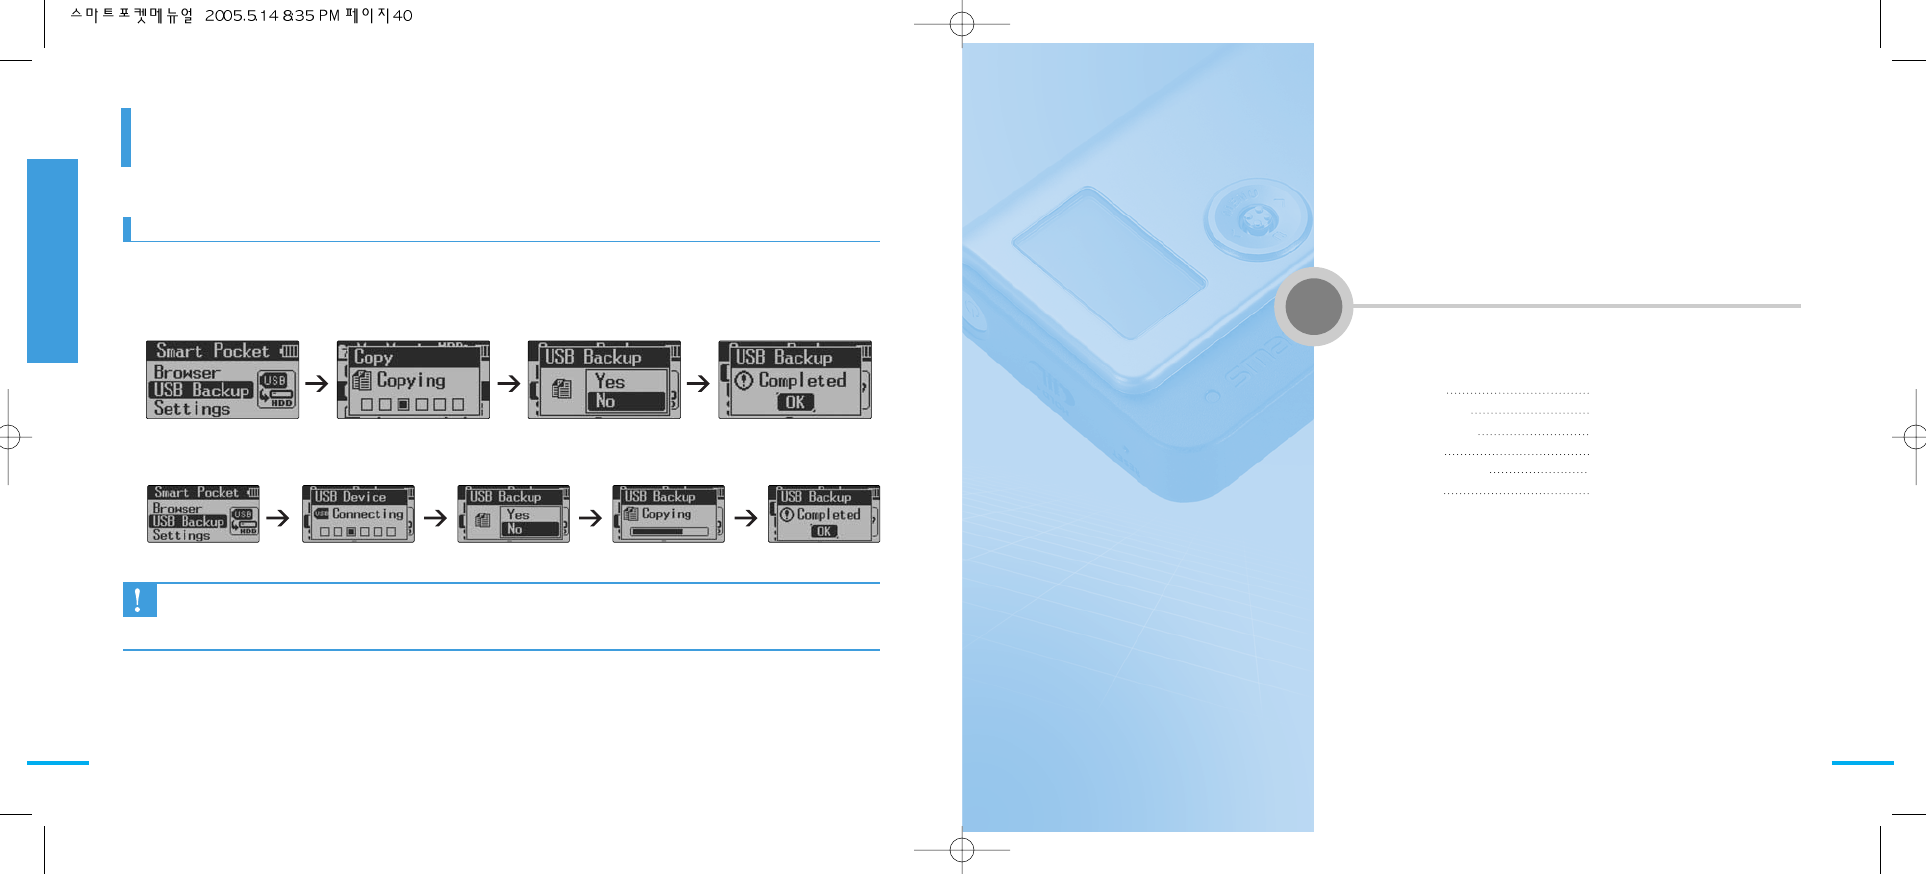
USB Backup
USB Backup function enables you to store all data of USB storage device which is connected to Smart
Pocket at once. You can use Smart Pocket as an additional storage for ‘Digital Camcorder’Hand ‘Digital
Camera’.
Precautions
■ USB storage devices - memory stick, digital camcorder, digital camera, USB memory stick - may not support
functions like USB backup, file search, file name display according to file system. You can find more information
at page 47.
Finishing the function, you can move to up level by clicking ‘OK’
Setting
Contrast 42
LCD Contrast 43
Backlight Time 44
Auto Off 45
Language Select 46
Version 47
4342
Setting
Setting
LCD Contrast
Setting
Setting
Chapter 4 Setting Mode
Setting
Chapter 4 Setting Mode
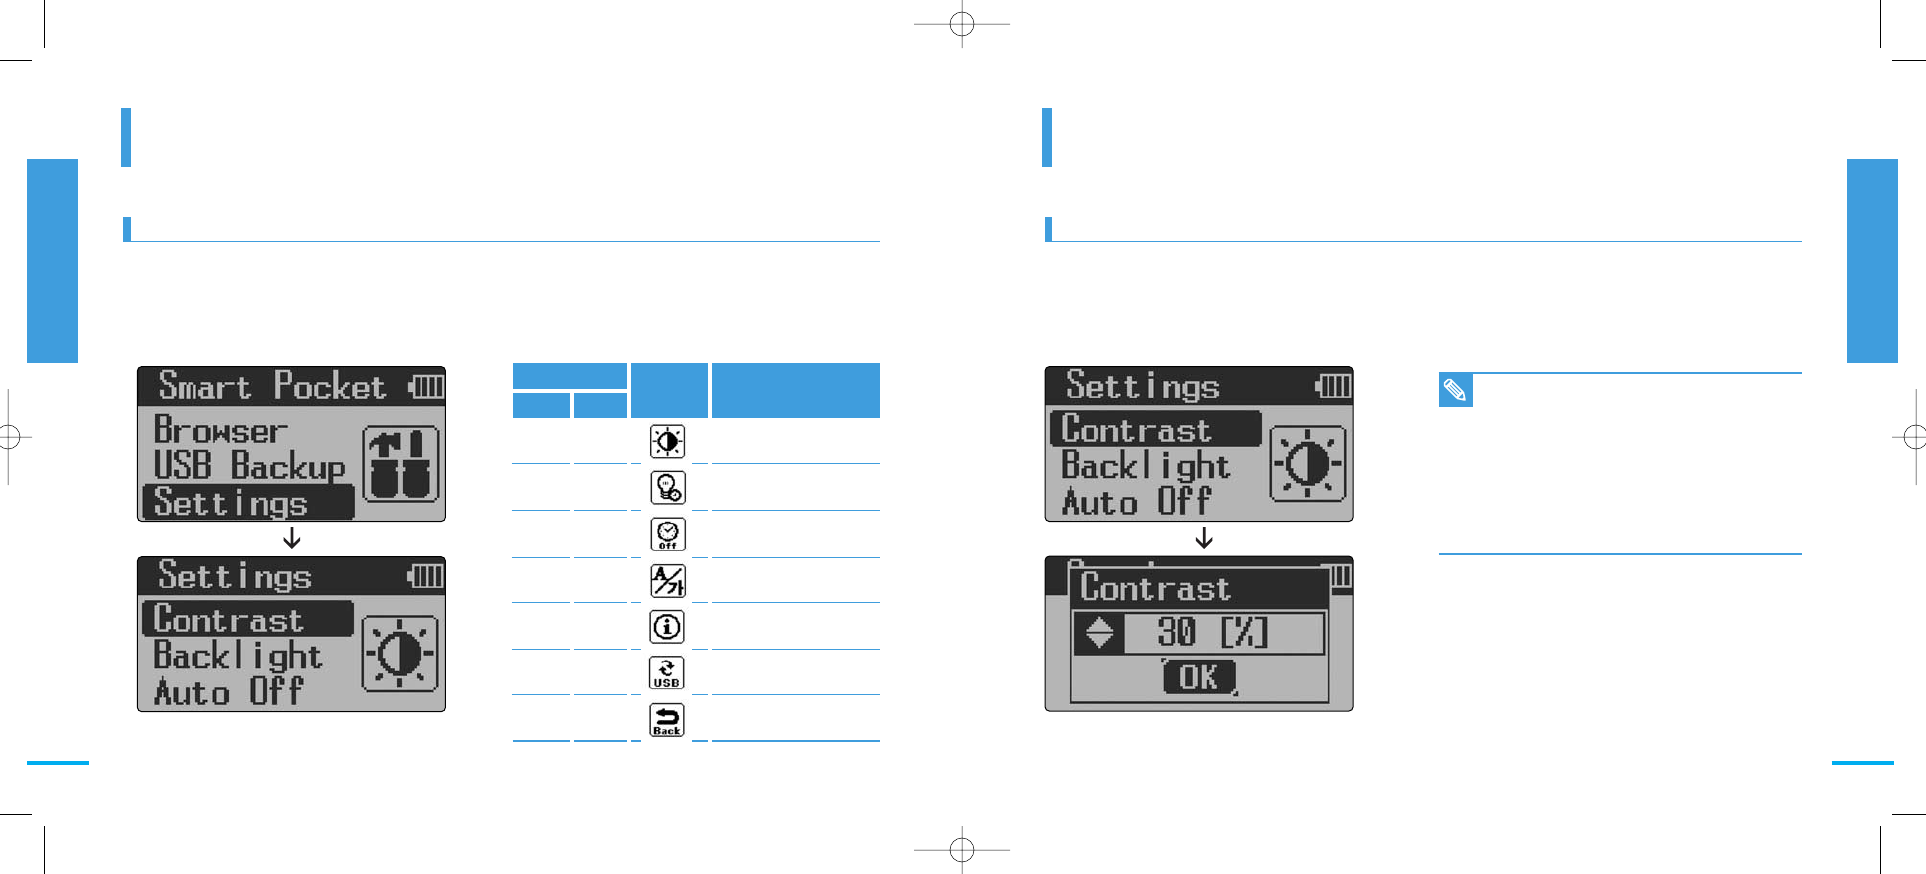
Smart pocket Setting menu LCD Contrast
Setting?
Setting means that you can set Smart Pocket function like LCD contrast, language and etc. for your
convenience.
LCD contrast function is to select the LCD screen contrast.
You can select LCD contrast for your convenience and press ‘OK’and you can see setting save popup
and setting parameter is saved.
Notice
■ LCD contrast parameter is set in 30 as factory
mode.
■ You can set LCD contrast parameter from 0 to
100.
■ You can change LCD contrast parameter by
unit of 10 moving jog button up and down.
■ If you lock ‘old’ key, you can see hold
message and make job button hold. If you
release ‘old’key, you can move jog button.
Category
명암
설정
조명
설정
자동
종료
언어
선택
버전
정보
USB
리셋
돌아
가기
Contrast
Backlight
Auto Off
Language
Version
USB Reset
Back
Korean English
Setting LCD display
contrast
Setting timer for
backlight off
Setting timer for
automatic power off
Language Selection as
English/Korean
Info. on Smart Pocket
S/W Version
Resetting USB Host
Function
Move to main menu
Icon Detailed function
4544
Backlight Time
Setting
Auto Off
Setting
Setting
Chapter 4 Setting Mode
Setting
Chapter 4 Setting Mode
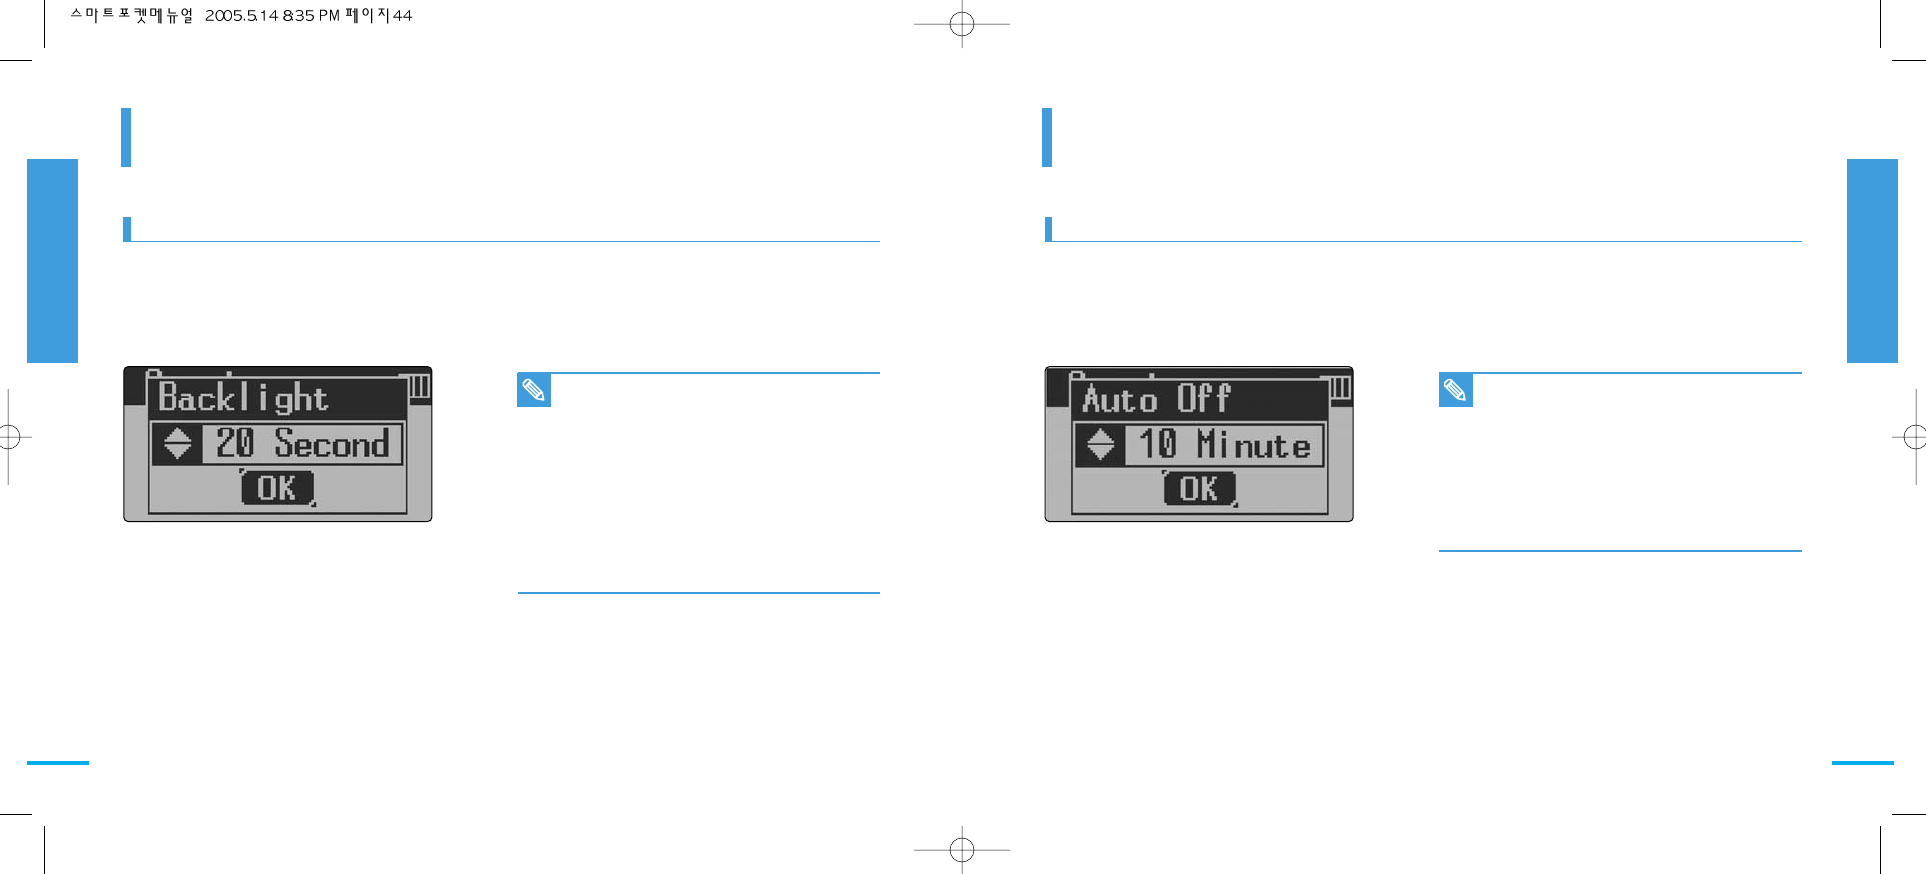
Backlight Auto Off
Backlight function is to set the automatic LCD backlight off timer when there is no key input for battery power
saving.
You can select backlight off timer for your convenience and press ‘OK’and you can see setting save
popup and setting parameter is saved.
Auto off function is to set the automatic power off timer to save battery life when there is no key input.
You can select Auto off timer for your convenience and press ‘OK’and you can see setting save popup and
setting parameter is saved.
Notice
■ Backlight Time parameter is set in 10 as
factory mode.
■ You can set Backlight off timer as off, 10 se-
cond, 20 Second, 30 Second, On(Always On).
■ You can select backlight timer moving jog
button up and down.
■ If you lock ‘Hold’�key, you can see hold me-
ssage and make job button hold.
■ If you lock ‘Hold’ key, you can see hold
message and make job button hold. If you
release ‘Hold’key, you can move jog button.
Notice
■ Auto off parameter is set in 10 minute as fac-
tory mode.
■ You can set Auto off timer in 4 levels as No
use, 5 minutes, 10 minutes, 30 Second.
■ You can select Auto off timer moving jog
button up and down.
■ If you press old�key to lock, you can see
hold message and make job button hold.If you
release old�key, you can move jog button.

4746
Language
Setting
Version
Setting
Setting
Chapter 4 Setting Mode
Setting
Chapter 4 Setting Mode
Language Select Version
Language function is to firmware language. Smart pocket support 2 languages as English and Korean.
You can select language you want and press ‘OK’and you can see setting save popup and setting
parameter is saved.
Version function can show firmware version of Smart Pocket.
Notice
■ Language is set in English as factory mode.
■ You can set language as English and Korean.
■ You can select language moving jog button up
and down.
■ If you press ‘Hold’key to lock, you can see
hold message and make job button hold. If
you release Hold’key, you can move jog
button.

4948
Additional Info.
Additional Info.
FAQ 50
USB Device & file system support 51
Message displayed 52
Specification 54
Warranty Conditions 57
MEMO
Chapter
5

5150
FAQ
Additional Info
USB Device & file system support
Additional Info
Additional Info.
Chapter 5 Additional Info
Additional Info.
Chapter 5 Additional Info
FAQ What is USB device?
USB Device file system support info
When you use Smart Pocket with other USB
Storage device like USB memory stick and etc,
Smart Pocket is working as USB Host and
connected external USB device is working as USB
Device.
When you connect Smart Pocket with PC and
laptop computers, Smart Pocket is working as
USB Device and PC(or laptop computer) is working
as USB Host.
What is USB Device file system?
In a computer, a file system (sometimes written
filesystem) is the way in which files are named and
where they are placed logically for storage and
retrieval. The DOS, Windows, OS/2, Macintosh,
and UNIX-based operating systems all have file
systems in which files are placed somewhere in a
hierarchical (tree) structure. For example, FAT32,
NTFS is a file system used in Microsoft Window.
Notice
■ FAT12 is used for USB storage system under
15Mbyte.
■ PTP(Picture Transfer Protocol) is used for
Digital Camera.
FAT 32
FAT 16
FAT 12
PTP System
File System Backup Search
Long FileName displayed
○
○
○
○
○
○
×
×
○
×
×
×
Problem SolutionCategory
·Nothing is displayed on the LCD
screen when power in on.
·External storage device is not
recognized while connecting to
Smart Pocket.
·No file name is displayed in
External storage device
·Digital camera is not recognized
while connecting to Smart Pocket
·HDD unavailable message is
displayed.
·How to format Smart Pocket in
PC
·Do I have to format Smart Pocket
to use with Mackintosh PC or iMac
·File name is wrong like ?????
Power
USB
HDD
Etc.

5352
Message Displayed
Additional Info
Additional Info.
Chapter 5 Message Displayed
Message
Function English Message Korea Message Category
HDD, USB Device Info.,
Format Selection
In Disk Format
포맷 진행 중일 경우
포맷이 완료된 경우
Press Power key during formatting
USB Cable connected
USB device connected
USB device removed
USB reset selected
USB reset selected while USB
cable is connected
Disk Info.,
Format
Disk Info.
Format [Back]
(Delete All)
OTG
Disk Info.
Format [Back]
[Format]
[ ] [Yes] [No]
[Format]
[ ] Formating
[Format]
[ ] Completed <Ok>
[Format]
[ ] Power Off
After Completion
[USB Port]
[ ] Connected
[USB Device]
[ ] Connecting
[USB Device]
[ ] Disconnect
[USB Reset]
[ ] [Yes] [No]
[USB Port]
[ ] Remove Port
After Retry
디스크 정보
[포맷] [돌아가기]
[포맷]
[ ] [예] [아니오]
[포맷]
[ ] 포맷중
[포맷]
[ ] 완료 <Ok>
[포맷]
[ ] 완료후종료
[USB Port]
[ ] 연결됨
[USB Device]
[ ] 연결중
[USB Device]
[ ] 연결해제됨
[USB 리셋]
[ ] [예] [아니오]
[USB Port]
[ ] 제거후시도
Function English Message Korea Message Category
Data backup from USB Device
Backup in progress
Backup in progress
Press Power key during backup
in progress
When backup is finished
There is no data in USB device
File Info.
To copy or delete File or To view
file info.
To copy a file
File copy is in progress
When copy is finished
Press Power key during copy in progress
To Delete a file
File deleting is in progress
Press Power key during copy in progress
Low battery
Power Off
USB Backup
(Copy All)
File Info.
Copy, Delete
File Copy
File Delete
[USB Backup]
[ ] [Yes] [No]
[USB Backup]
[ ] Copying
[USB Backup]
[ ] Power Off
After Stop
[USB Backup]
[ ] Completed <Ok>
[USB Device]
[ ] No Data
Copy
Delete [File Info.]
[Paste] [ ] [Yes] [No]
[Copy] [ ] Copying
[Copy] [ ] Completed
[Copy] [ ] Power Off
After Stop
[Delete]
[ ] [Yes] [No]
[Delete] [ ] Deleting
[Delete] [ ] Power Off
After Completion
[Low Battery]
[!]
Power Off After 1Minute
[Power Off]
[!] bye bye!
[USB 백업]
[ ] [예] [아니오]
[USB 백업]
[ ] 복사중
[USB 백업]
[ ] 중지후종료
[USB 백업]
[ ] 완료 <Ok>
[USB 장치]
[ ] 데이터없음
복사 삭제
[파일 정보]
[붙여넣기] [ ] [예] [아니오]
[복사] [ ] 복사중
[복사] [ ] 완료
[복사]
[ ] 중지후종료
[삭제]
[ ] [예] [아니오]
[삭제] [ ] 삭제중
[삭제]
[ ] 완료후종료
[배터리 저전압]
[!] 1분후종료
[전원 종료]
[!] bye bye!
Additional Info.
Chapter 5 Additional Info

5554
Specifications
Additional Info
Additional Info.
Chapter 5 Additional Info
Main Unit Dimensions
MEMO
LCD Dots
Lcd Type
Operating
System
Power
Supply
General
OS
File System
AC Adapter
Built-In Battery
Product Dimension
Weight Net
Packing
Operating Temperature
Storage
Interface
Speed
SpecificationsCategory
20GB 1.8″HDD
128×64
FSTN, Transmissive/Positive
USB 1.1 & USB 2.0 (Host & Device)
Max. 480Mbps
Windows 98 SE/ME/2000/XP/
FAT16, FAT32 File System
DC 4.8V 1A
900mAh Lithium Polymer
68.5(W)×104(H)×25(D)
162g
617g
-5°C~60°C

56
MEMO
1. The warranty is only if, when warranty service is
required. The warranty card is fully and properly
completed and is presented with the original
invoice or sales slip or confirmation, and the
serial number on the product has not been
defaced.
2. Samsung’s obligations are limited to the repair or,
at its discretion, replacement of product or the
defective part.
3. Warranty repairs must be carried out by
Authorized Samsung Dealers or Authorized
Service Centers. No reimbursement will be made
for repairs carried out by non Samsung Dealers
and, any such repairs work and damage to the
products caused by such repair work will not be
covered by this warranty.
4. This product is not considered to be defective in
materials nor workmanship that it requires
adaptation in order to confirm to national or local
technical or safety standards in force in any
Country other than the one for which the product
was originally designed and manufactured,. This
warranty will not cover, and no reimbursement
will be made for such adaptation nor any damage
which may result.
5. This warranty covers none of the following :
a) Periodic check ups, maintenance and repair or
replacement of parts due to normal wear and
tear.
b) Cost relating to transport, removal or installation
of product
c) Misuse, including the failure to use this product
for its normal purposes or incorrect installation.
d) Damage caused by Lighting, Water, Fire, acts
of God, War, Public Disturbances, incorrect
mains voltage, improper ventilation or any other
cause beyond the control of Samsung.
6. This warranty is valid for any person who legally
acquired possession of the product during the
warranty period.
7. The consumers statutory rights in any applicable
national legislation whether or against the retailer
arising from the purchase contract or otherwise
are not affected by this warranty. Unless there is
national legislation to the contrary, the rights
under this warranty are consumers sole rights
and Samsung, its subsidiaries and distributors
shall not be liable for indirect or consequential
loss or any damage to records, compact discs or
any other related equipment or material.
WARRANTY CONDITIONS

FCC Compliance
THIS DEVICE COMPLIES WITH PART 15 OF THE FCC RULES.
OPERATION IS SUBJECT TO THE FOLLOWING TWO CONDITIONS:
(1) THIS DEVICE MAY NOT CAUSE HARMFUL INTERFERENCE,
AND (2) THIS DEVICE MUST ACCEPT ANY INTERFERENCE
RECEIVED, INCLUDING INTERFERENCE THAT MAY CAUSE
UNDESIRED OPERATION
THE MANUFACTURER IS NOT RESPONSIBLE FOR ANY RADIO OR TV
INTERFERENCE CAUSED UNAUTHORIZED MODIFICATIONS TO THIS
EQUIPMENT. SUCH MODIFICATIONS COULD VOID THE USER'S
AUTHORITY TO OPERATE THE EQUIPMENT.
USER INFORMATION
This equipment has been tested and found to comply with the limits
for a Class B digital device, pursuant to Part 15 of the FCC Rules.
These limits are designed to provide reasonable protection against
harmful interference in a residential installation.
This equipment generates, uses and can radiate radio frequency energy
and, if not installed and used in accordance with the instructions,
may cause harmful interference to radio communications. However,
there is no guarantee that interference will not occur in a particular
installation. If this equipment does cause harmful interference to radio or
television reception, which can be determined by turning the equipment
off and on, the user is encouraged to try to correct the interference by
one or more of the following measures:
- Reorient or relocate the receiving antenna.
- Increase the separation between the equipment and receiver.
- Connect the equipment into an outlet on a circuit different from that to
which the receiver is connected.
- Consult the dealer or an experienced radio/TV technician for help.