Samsung Electronics Co 30118 Multi Function Monitor User Manual
Samsung Electronics Co Ltd Multi Function Monitor
User Manual
1
iCEBOX Owner’s Manual
Owner’s Manual
•email
•internet
•monitoring
•security
•music
•DVD video
•TV

2 ©CMi Worldwide, August 2000
Contacting CMi Worldwide
All of us at CMi Worldwide are committed to excellence in our products and
services. Your input is important to us, especially if questions or problems arise.
Please phone, write, or email with your concerns and our team will strive to
resolve each issue to your ultimate satisfaction.
You can reach us at:
Customercare@cmiworldwide.com
CMi Worldwide, 600 Stewart St., Suite 700, Seattle, WA 98101
Please refer to the warranty service card for additional information and
phone numbers.

3
iCEBOX Owner’s Manual
Table of Contents
1. Getting Started with the iCEBOX ...................................................page 6
Introduction .......................................................................................................6
Unpacking the iCEBOX ....................................................................................7
Installing the batteries .......................................................................................8
Connecting cable TV or antenna ......................................................................9
Connecting the phone line ..............................................................................10
Connecting to power .......................................................................................11
Optional connections ......................................................................................11
TV setup .........................................................................................................12
Viewing the Welcome CD ...............................................................................13
2. Push Buttons and Connectors ......................................................page 14
TV/monitor front panel push buttons ..............................................................14
TV/monitor rear panel connections ................................................................15
TV/monitor side panel buttons ........................................................................16
Remote control - TV and CD functions ...........................................................18
Remote control - Internet functions ................................................................19
Keyboard ........................................................................................................20
3. Internet ................................................................................................page 19
Registration ...................................................................................................19
Accessing Web sites outside the CMi Web portal .........................................25
Error messages .............................................................................................25
4. Security and Monitoring .................................................................page 29
Monitor mode .................................................................................................29
Security mode ................................................................................................29

4 ©CMi Worldwide, August 2000
5. Troubleshooting ................................................................................page 30
6. Privacy Policy .....................................................................................page 31
Scope of the privacy policy .............................................................................31
Personal identification information .................................................................31
Cookies ..........................................................................................................32
Privacy of children .........................................................................................32
How we use and disclose your information ...................................................33
Other sites .....................................................................................................33
Security information .......................................................................................33
7. Specifications ....................................................................................page 35
Appendix ..................................................................................................page 37
Analog vs digital phone lines .........................................................................37
Advantage 2000 printer compatibility .............................................................38
Caring for your Advantage 2000 ....................................................................38
Service .....................................................................................................38
Cleaning ...................................................................................................38

5
iCEBOX Owner’s Manual
List of Figures
Figure 1. Unpacking the iCEBOX .................................................................page 7
Figure 2. Remote control battery installation ..........................................................8
Figure 3. Keyboard battery installation ...................................................................9
Figure 4. Cable/antenna connector .......................................................................9
Figure 5. Phone cord with splitter ........................................................................10
Figure 6. Phone connector ..................................................................................10
Figure 7. Power connectors .................................................................................11
Figure 8. TV adjustment buttons (right side of TV/monitor) .................................12
Figure 9. TV/monitor front panel push buttons ....................................................14
Figure 10. TV/monitor rear panel connectors ......................................................15
Figure 11. TV/monitor side panel buttons ............................................................16
Figure 12. Remote control - TV and CD functions ...............................................18
Figure 13. Remote control - Internet functions ....................................................19
Figure 14. iCEBOX keyboard ..............................................................................20
6 ©CMi Worldwide, August 2000
1. Getting Started with the iCEBOX
Introduction
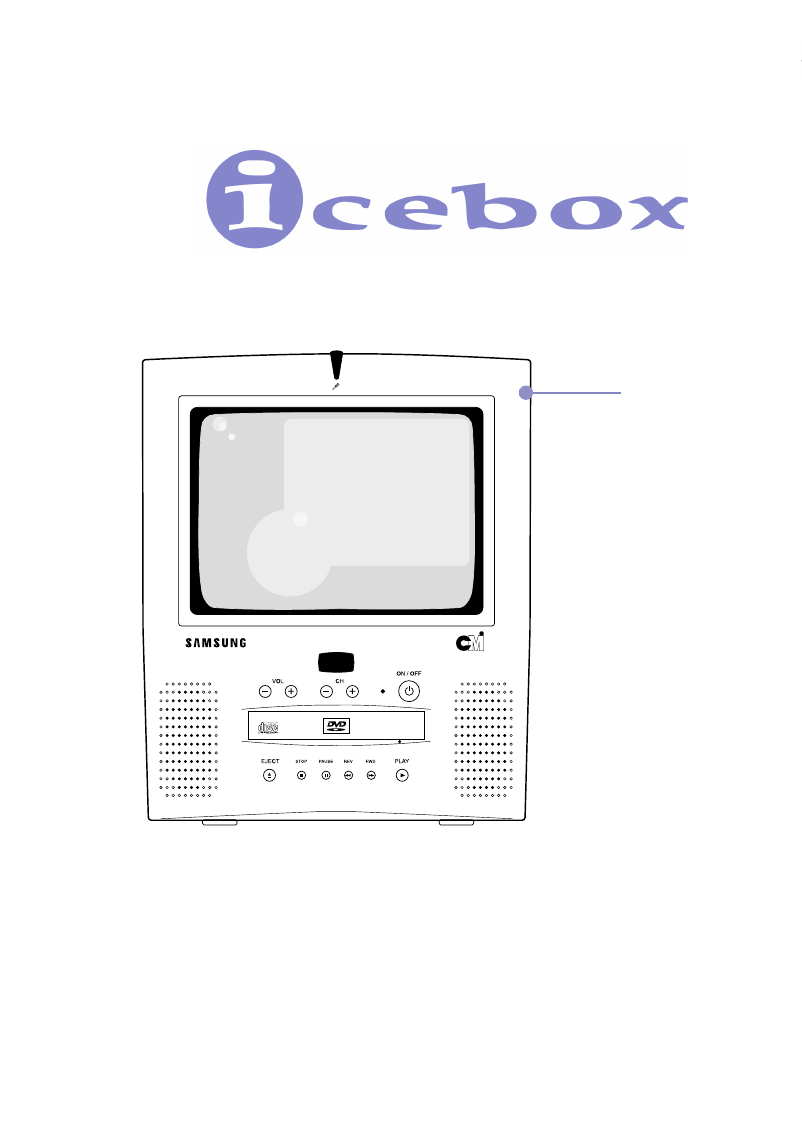
The iCEBOX® is a powerful, versatile, flexible entertainment and information
appliance that gives you easy one touch access to:
TV, music, and video entertainment
Email and the Internet
Monitoring of security cameras
The iCEBOX is designed for simple, intuitive operation. To take advantage of the
complete range of features it offers, take a few minutes to familiarize yourself with
the information in this booklet. The next few pages explain how to:
•Unpack the iCEBOX
•Install the batteries
•Connect the TV cable or antenna
•Connect the phone line
•Connect to power
•Set up the TV
•View the Welcome CD
Getting Started
7
iCEBOX Owner’s Manual
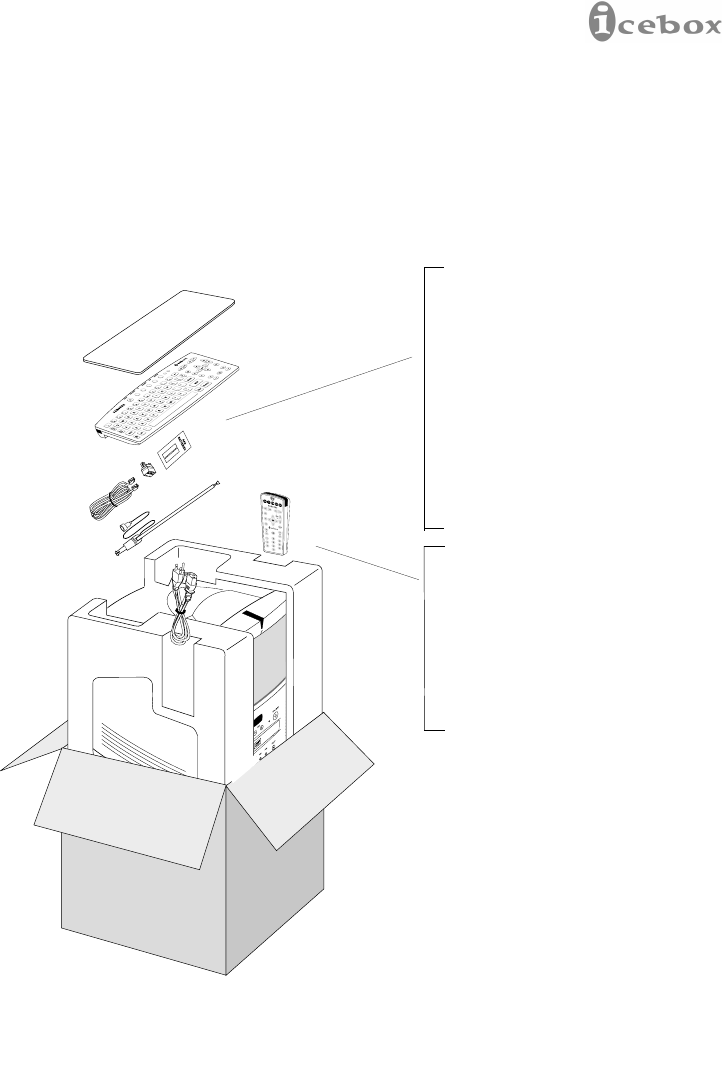
Unpacking the iCEBOX
Set the shipping container right side up and carefully open the top flaps (do not
insert anything sharp through the top of the box). Remove the contents and verify
that you have received everything listed below.
Important Safety Instructions (list)
General Warnings and Cautions (list)
Remote control guide (laminated card)
Owner’s Manual
Gift/Warranty Registration Card
Quick Start Reference Guide
Keyboard
Antenna
Remote control
Phone cord and splitter
AC power cord
Welcome CD
AAA batteries (2)
AA batteries (3)
Getting Started
Figure 1. Unpacking the iCEBOX
8 ©CMi Worldwide, August 2000
Keyboard Batteries
The keyboard requires 3 AA batteries to operate (supplied). To install the
batteries:
1. On the back of the keyboard, remove both screws.
2. Install 3 AA batteries (supplied). Place the negative end (-) on the spring.
3. Reinstall the rear panel. Make sure it is seated securely in order to maintain
the keyboard's waterproof seal. Install the screws so that the battery cover
is firmly seated but do not over-tighten.
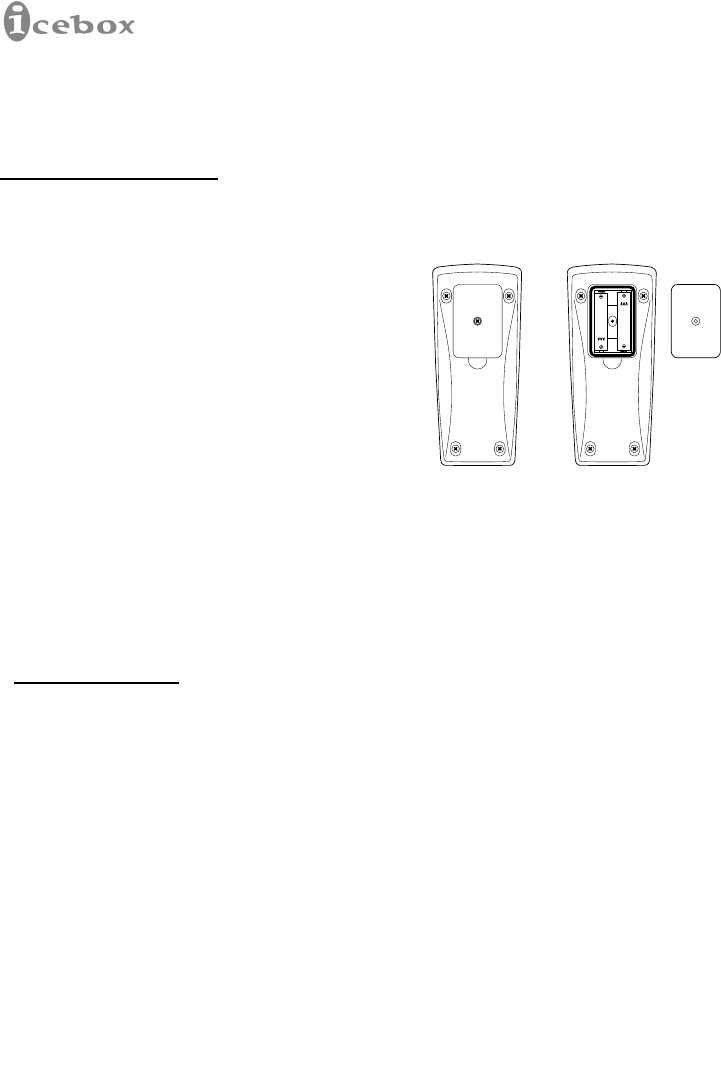
Remote Control Batteries
The remote control requires two AAA batteries to operate (supplied). To install
the batteries:
1. On the back of the remote control, remove
the small screw in the center panel.
2. Install 2 AAA batteries (supplied). Place
the negative end (-) on the spring.
3. Reinstall the battery cover. Make sure it is
seated securely in order to maintain the
waterproof seal. Install the screw so that the battery cover is firmly seated
but do not over-tighten.
Figure 2. Remote control battery
installation
Installing the batteries
Getting Started
9
iCEBOX Owner’s Manual
Figure 3. Keyboard battery installation
Connecting the TV cable or antenna
Screw your existing TV cable into the coaxial connector on the rear of the TV/
monitor to enable cable programming. If cable service is not available, use the
supplied antenna to enhance local broadcast reception. To use the antenna:
Insert the plastic base at the bottom of the antenna into the mounting
hole on top of the unit.
Using firm pressure, plug the antenna connector into the ANTENNA/
CATV connection.
Cable/antenna connector
Figure 4. Cable/antenna connector (rear of TV/monitor)
Getting Started
10 ©CMi Worldwide, August 2000
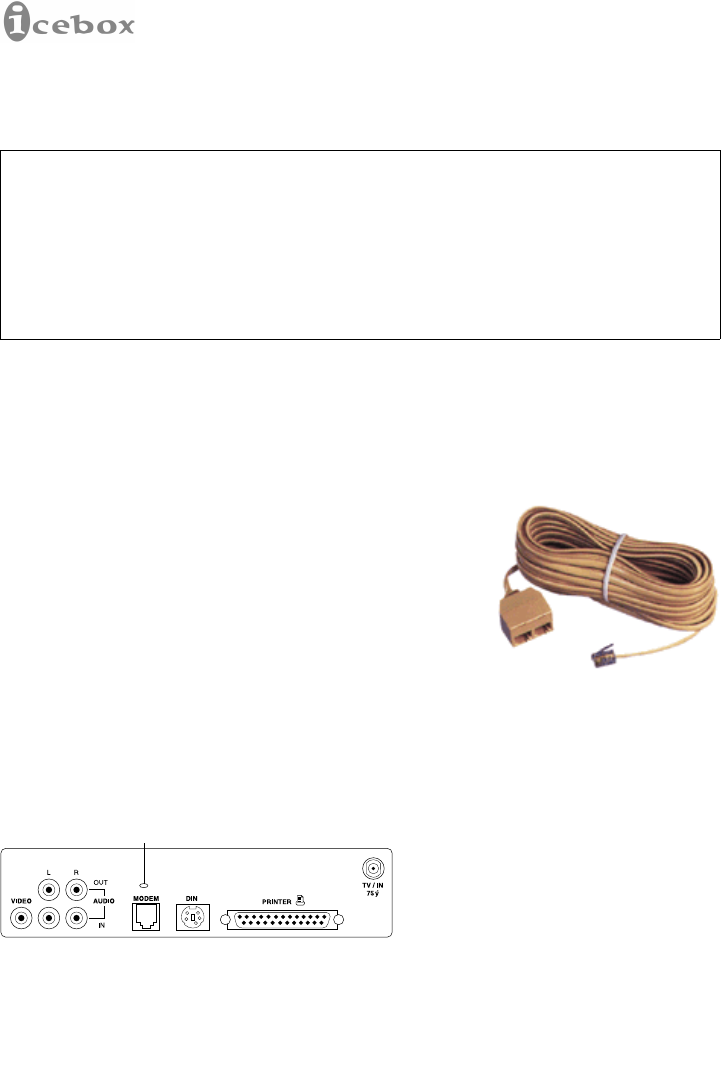
Connecting the phone line
Your phone line is your connection to the Internet. To access these features,
insert one end of the supplied phone line into the phone connector on the rear of
the TV/monitor. Insert the other end into an existing phone line with a dial tone.
If you wish to connect your regular phone line and the
iCEBOX to the same phone jack, use the phone splitter
provided. To connect both lines to one jack:
1. Unplug your regular phone cord.
2. Plug the splitter into your phone jack.
3. Plug your telephone’s line into one side of the
splitter and plug the iCEBOX’s phone line into the
other side of the splitter. Figure 5. Phone cord with
splitter
WARNING! DO NOT connect the iCEBOX to a digital phone line. Connecting the
iCEBOX to a digital phone line will cause permanent damage to the unit.
Digital phone lines are mainly used in industrial and commercial settings. Most homes
are wired with analog phone lines. Consult the Appendix of this manual for more
information about digital and analog phone lines. If you aren’t sure what type of phone
line you have, contact your phone company.
Phone connector
Figure 6. Phone connector (rear of TV/monitor)
Getting Started
11
iCEBOX Owner’s Manual
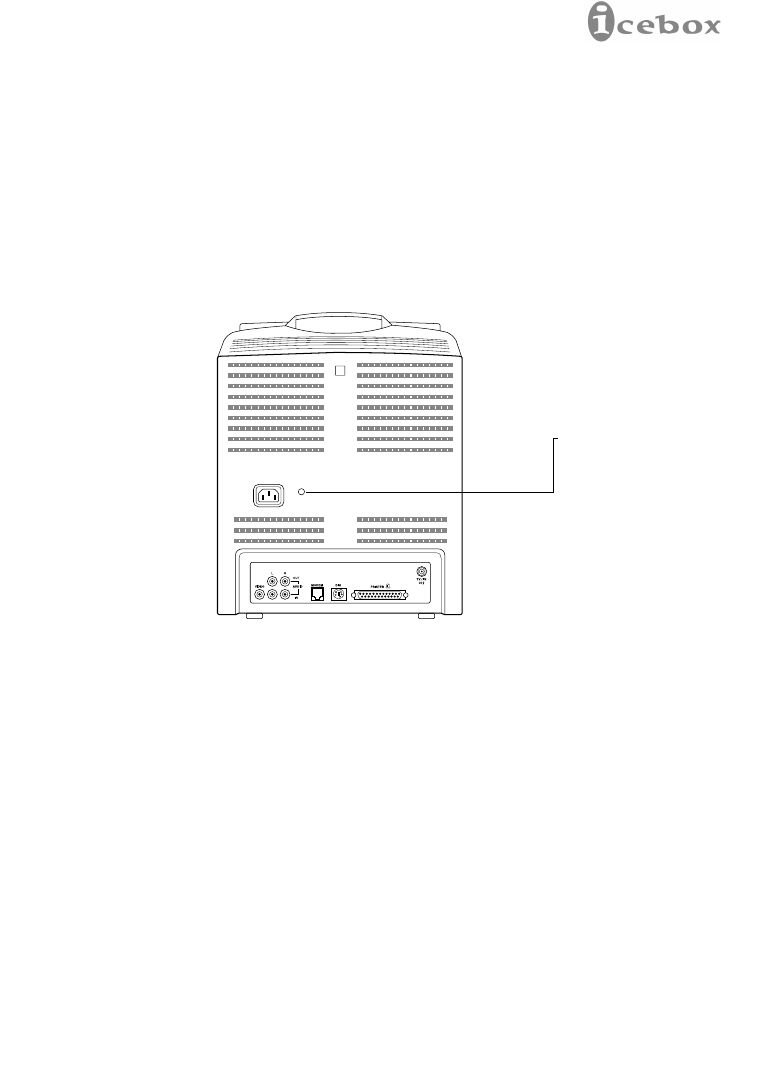
Connecting to power
The iCEBOX operates with normal household electrical current: 120Vac 60Hz.
The 120Vac power cord is supplied with your iCEBOX.
To use the iCEBOX with 120 Vac household current, plug the supplied
AC power cord into the AC connection on the rear panel of the TV/
monitor and plug the other end into a wall socket.
120 Vac power connector
Figure 7. Power connectors (rear of TV/monitor)
Optional Connections
The iCEBOX may be connected to a PCL 3-compatible printer. Refer to the
Appendix for printer specifications and a list of compatible printers. The printer
connector is located on the rear of the TV/monitor (see Figure 10).
To provide security functions, the iCEBOX may be connected with previously
installed electronic locks and intercom speakers. The lock and intercom speaker
connectors are located on the rear of the TV/monitor (see Figure 10). For more
detailed information about security features, please consult your warranty service
card.
Getting Started

12 ©CMi Worldwide, August 2000
TV setup
The first time the iCEBOX is turned on (or after it has been unplugged), it takes
about 5 seconds to setup and program itself. Once it has finished, you will be
able to access all of the iCEBOX features.
You can adjust the autoprogramming settings by using the Options button on
the remote or keyboard:
1. Under Options, select TV CHANNEL SETUP. Select the ANTENNA or
CABLE option by pressing GO. Select ANTENNA if cable service is not
available. Select CABLE to view cable-supplied programming.
2. To automatically scan and store all available TV channels, press the
“Options” key, select TV CHANNEL SETUP, and select AUTOSCAN
CHANNELS. When Autoscan is complete, press the “Go” key and then
“Options” key to exit.
3. To manually add or erase channels in memory, press the “Options” key and
select TV CHANNEL SETUP. Select EDIT CHANNEL LIST. To delete a
channel, press that number on the keyboard and then hit the zero or “0”
key. To add a channel, press that number on the keyboard and press the
“Enter” or “Go” key.
To erase a previously stored channel number, for example, channel
8: Press 8 and then 0 (zero key) and then press enter.
To add an unstored channel number, for example, channel 8:
Press 8, screen will say Add Program 8, and press “Enter.”
4. To allow all channels to be viewed, press the “Options” key, select TV
CHANNEL SETUP, and CLEAR CHANNEL LIST. Press “Enter” to
complete.
Getting Started

13
iCEBOX Owner’s Manual
Viewing the Welcome CD
The Welcome CD provides a complete and entertaining guide on how to set up
and use the iCEBOX. To view the CD:
1. Press EJECT (on the monitor) to open the CD tray. Insert the Welcome CD
label side up.
2. Press PLAY on the TV, or DVD on the remote control or keyboard.
The welcome CD begins to play automatically. If you wish, press NEXT ! to
skip the introductory material and go directly to the main menu.
3. At the main menu, press the numbered key on the remote control or
keyboard that corresponds to the menu number of the program you want to
watch.
While viewing a CD, you may switch to TV or Internet mode at any time by
pressing the corresponding buttons on your remote control or keyboard. The CD
pauses until you return to CD mode.
Tips on Inserting and Handling CDs
When inserting a CD in the CD tray, make sure that the CD is positioned in
the center of the tray with the printed side facing up. If the CD is positioned
incorrectly after the tray door closes, the CMi logo is displayed, followed by
the message: PRESS PLAY or CD.
Make sure the CD remains clean and free of dirt and moisture. If necessary,
wash the CD with a solution of mild soap and warm water. Do not scrub the
CD surface with any abrasive material.
Getting Started
14 ©CMi Worldwide, August 2000
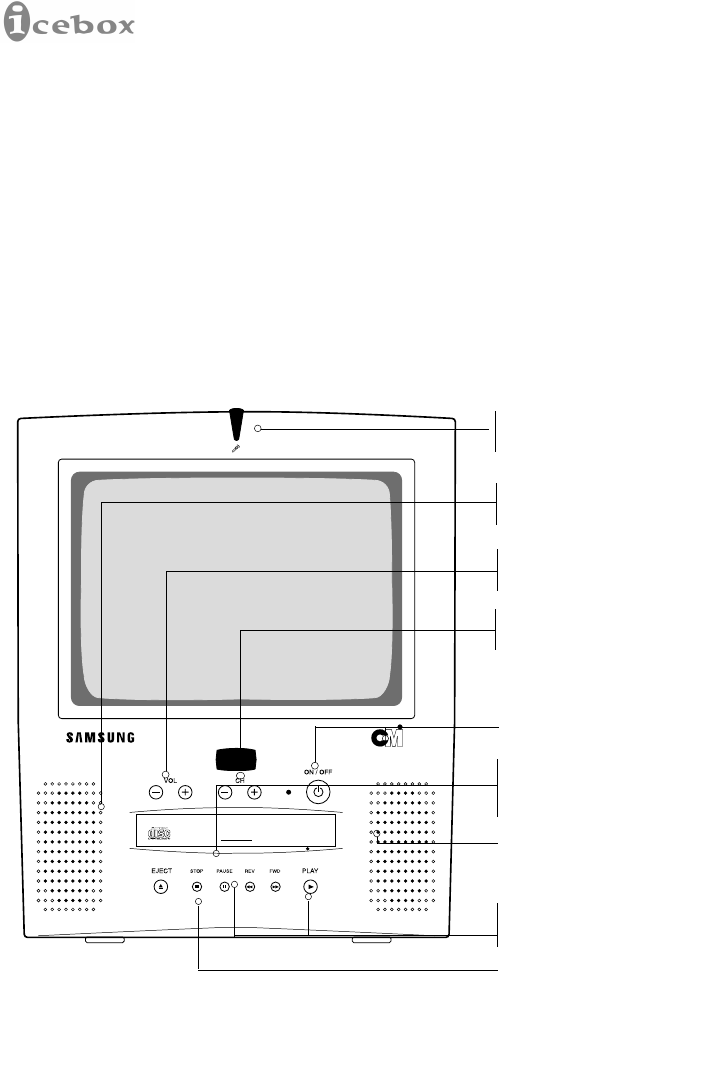
Figure 9. TV/monitor front panel push buttons
Press to open or close CD
tray.
Press to back up or move
ahead one CD track.
Press to stop CD play.
Press to begin CD play.
Press to select higher or
lower TV channels.
Press to raise or lower the
sound level.
Press power on or off.
Press to pause CD play.
Press again to resume play at
the point of interruption.
Security intercom
Push Buttons and Connectors
2. Push Buttons and Connectors
This section provides detailed descriptions of the push buttons and connectors on
the iCEBOX TV/monitor, remote control, and keyboard. These controls and
connectors allow you to access and control all the features of the iCEBOX:
television, CD/DVD player, Internet, and security monitor.
TV/monitor front panel push buttons
The front of the TV/monitor is shown in Figure 8, below:
15
iCEBOX Owner’s Manual
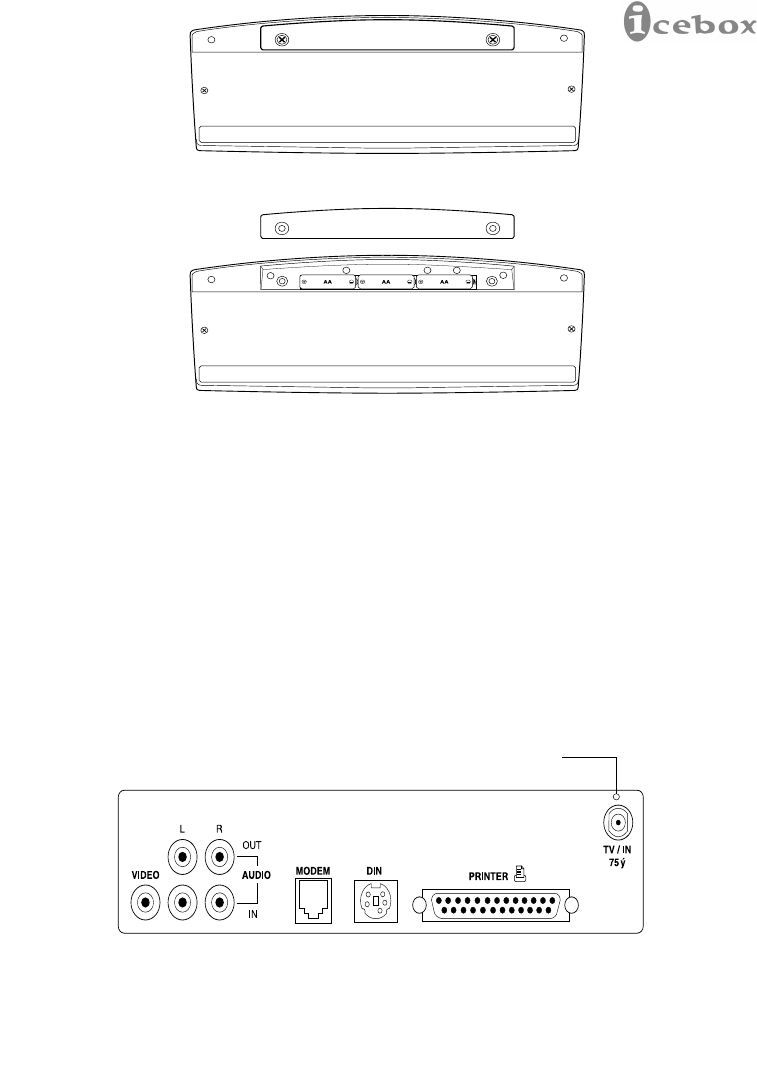
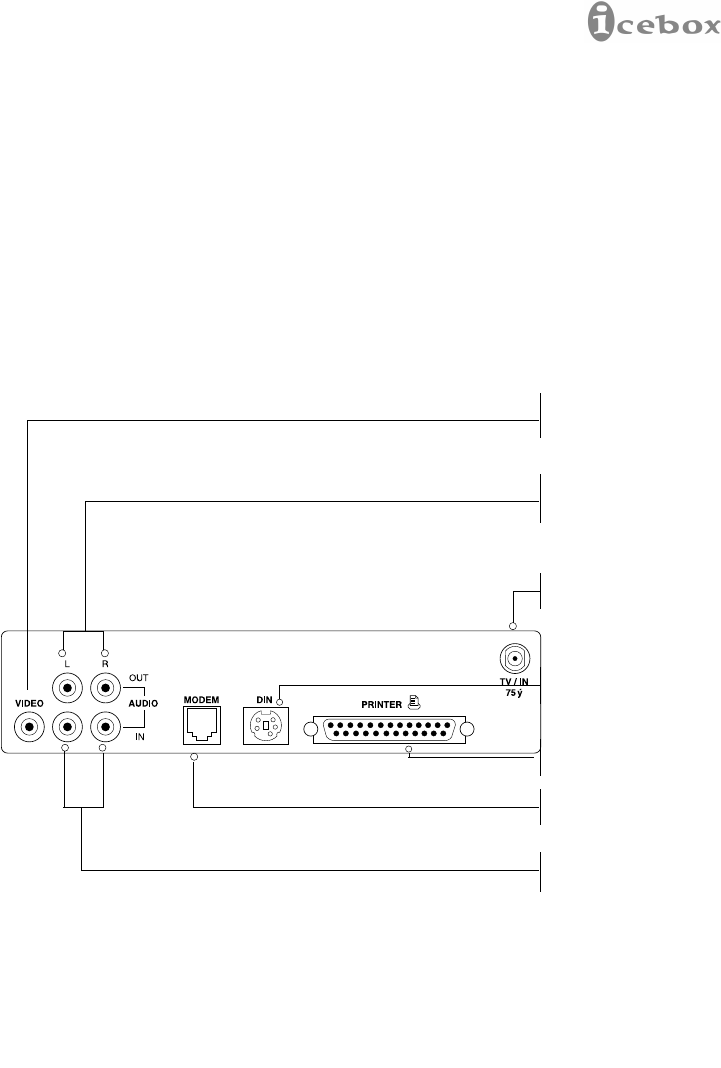
TV/monitor rear panel connectors
The rear panel of the TV/monitor is illustrated in Figure 10, below.
Cable TV or Antenna
Modem/internet (analog
phone line phone only!)
Optional audio connection
to larger speakers
Video monitor
Security intercom audio
Electronic security lock
Printer
Figure 10. TV/monitor rear panel connectors
Push Buttons and Connectors
16 ©CMi Worldwide, August 2000
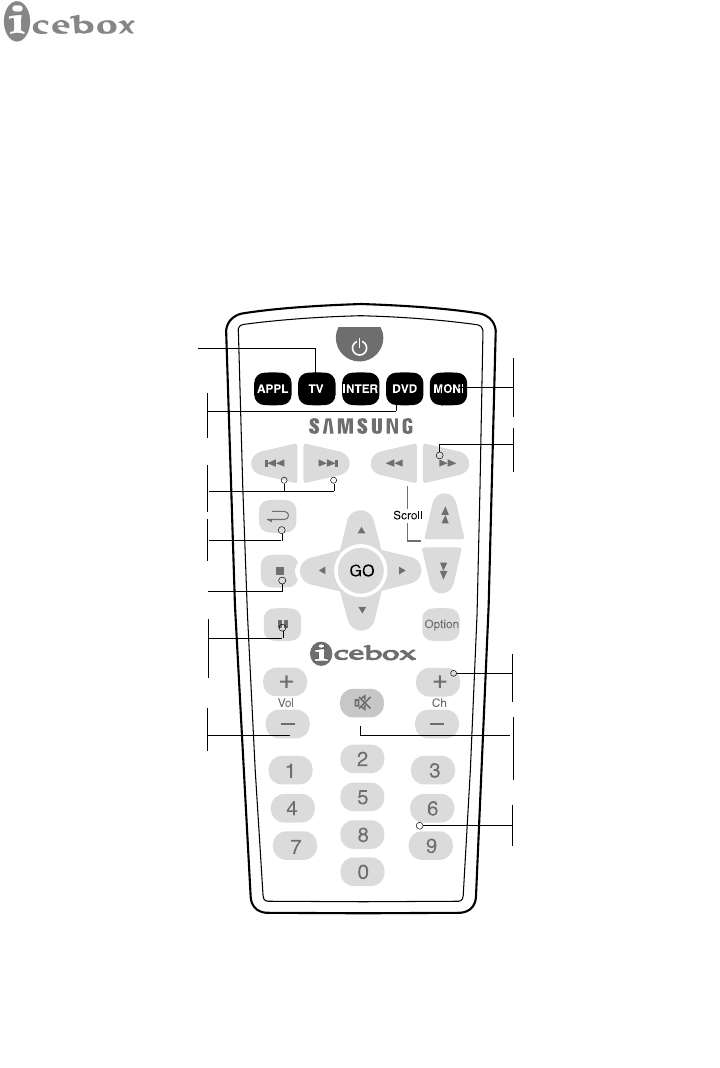
Remote control - TV and CD functions
The iCEBOX remote control is omnidirectional and waterproof. The remote is
illustrated in Figure 12, below with button functions for TV and CD modes.
Unidentified buttons do not function in TV and CD modes. You may also refer to
the Remote Control Quick Reference Card for more information about using the
remote control.
Figure 12. Remote control, TV and CD mode functions
Press to watch TV.
Press to start audio or
video CD play.
Press to view the area
where a video camera is
connected.
Press to back up or move
ahead one CD track.
Buttons speed up or slow
disc.
Press to return to the first
CD track.
Press to enter CD program
selections or TV channels.
Press to raise or lower the
sound volume.
Press to select the next
higher or lower channel.
Press to mute sound. To restore
sound or press mute button again
or Volume + or -.
Press to stop CD play.
Press to pause CD play.
Press again to resume play
at the point of interruption.
Push Buttons and Connectors
17
iCEBOX Owner’s Manual
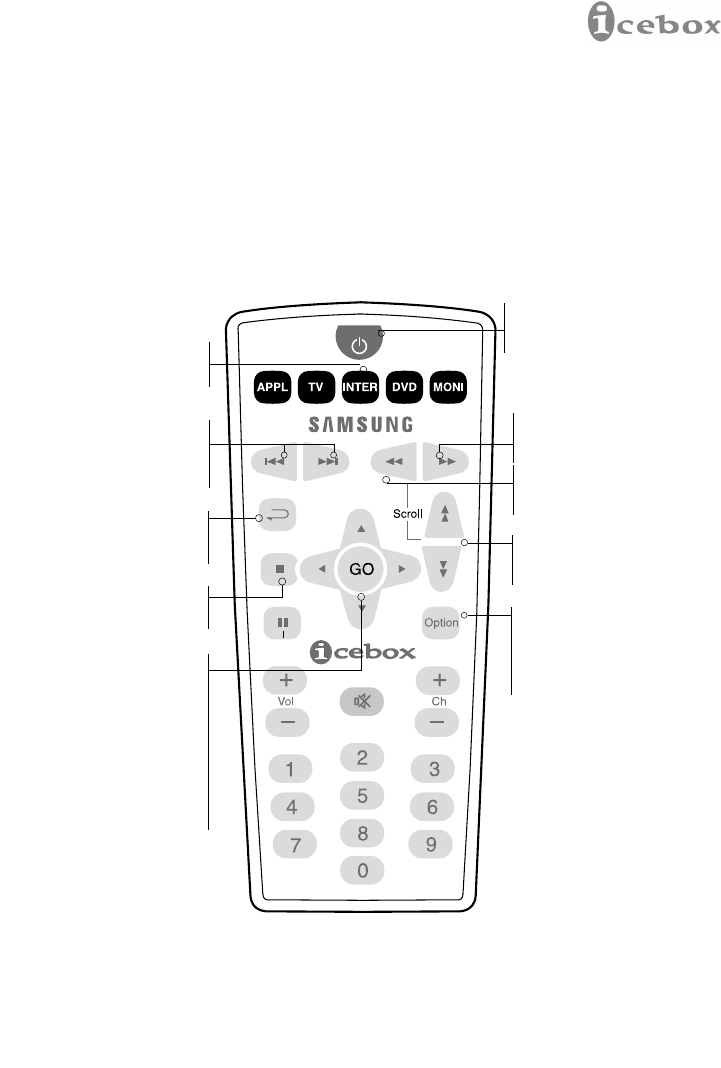
Remote control - Internet functions
The remote control is illustrated below with button functions for Internet mode.
Unidentified buttons do not function in Internet mode. You can also refer to the
Remote Control Quick Reference Card for more information about using the
remote control.
Figure 13. Remote control, Internet functions
Press to automatically be
connected to the Internet
Press PREV to back up one
Internet page.
Press NEXT to advance to
the next viewable page. Press to move the viewable
area of a Web page to the
left.
Press to move the viewable
area of a Web page to the
right.
Press to return your home
page from anywhere on the
Internet
Press to stop an Internet
page from loading.
Press to move the viewable
area of a Web page up or
down.
Press to make an Options
Selections box appear with
the selections: GO-TO,
HANG-UP/REFRESH,
SETUP.
Press the arrows to move
an on-screen Selection Box
to select links or options.
Once the Selection box is
over the desired link or
option, press GO. The
Selection Box changes
color to confirm the
command.
Press to turn power on or
off.
Push Buttons and Connectors
18 ©CMi Worldwide, August 2000
Q W E R T Y U I O P {
[}
]
A S D F G H J K L :
;"
'
Z X C V B N M ?
/
>
.
<
,
~
`
Shift
Alt
Enter
Shift
Esc Delete
Caps
Lock
Tab
@
2
$
4
%
5
^
6
&
7
*
8
(
9
)
0
–
-
+
=
!
1
#
3
APPLIANCE TV INTERNET DVD MONITOR
ON/OFF
GO
Opt'n
++
/
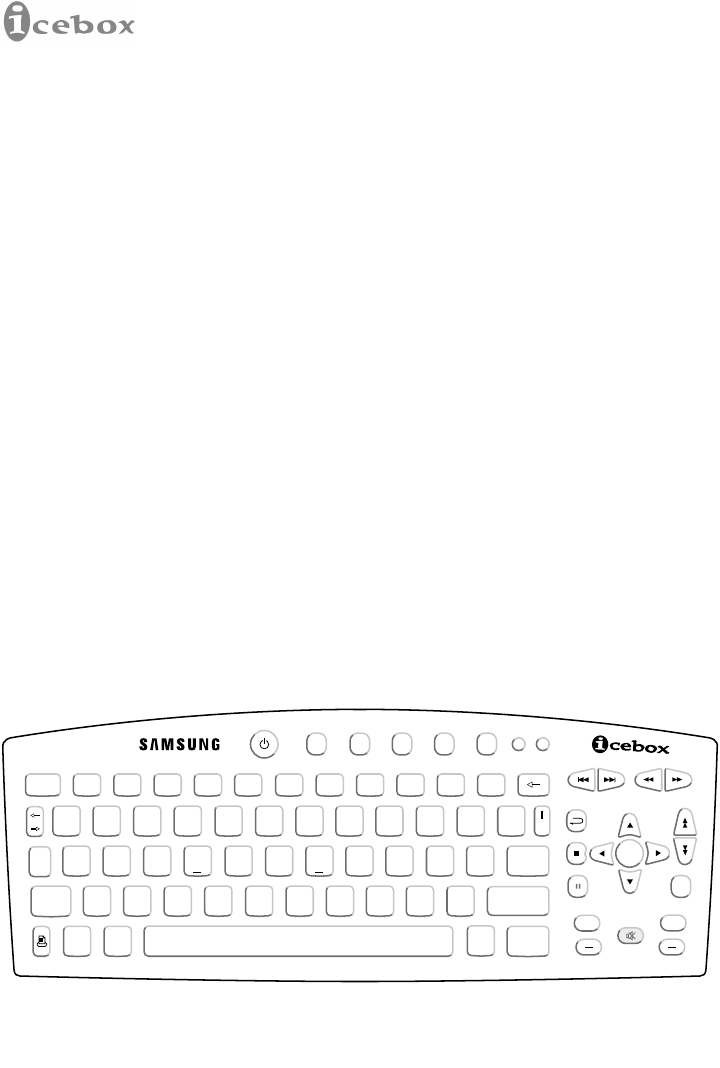
Figure 14. iCEBOX keyboard
Push Buttons and Connectors
Keyboard
The iCEBOX comes with a full-size wireless, omnidirectional, QWERTY
keyboard. The keyboard’s patented design is rugged and waterproof, making it
ideal for kitchen use. In addition to using the keyboard to type messages, the
Mode keys (across the top of the keyboard) and the keys below the iCEBOX logo
duplicate the functions of the corresponding remote control keys.
If a video camera and security devices are connected to the iCEBOX, you can:
Press MONITOR to view a video camera display.
Press TALK to talk on a security intercom.
Press UNLOCK to unlock electronic locks controlled by the iCEBOX
Other special key functions:
Press PRINT to print an Internet screen.
Press ESC to instantly terminate any Internet function.
Press TAB to move an on-screen Selection Box to the right or down
one link or option at a time.

19
iCEBOX Owner’s Manual
3. Internet
Registration
Thank you for purchasing the iCEBOX. To access the Internet, you will have to
sign up for Internet service. You will be required to enter a credit card number to
pay for Internet service. Follow the instructions below to register your Internet
account:
!To navigate through the registration form, use the arrow keys ("#$%) to
move up, right, down, or left, respectively.
!Use the numeric keys on your keyboard to enter your credit card number.
FIRST NAME: Type your first name. Press $ to move to the next field.
LAST NAME: Type your last name. Press $ to move to the next field.
HOME PHONE: Type your area code. Press # and type your phone number then
press TAB to move to the next field.
INCLUDE AREA CODE WHEN DIALING?: If you are required to use ten digits to
make a local telephone call, choose YES. If you need only seven digits to make a
local call, choose NO. To make your choice, press GO and $ for YES or NO.
When your choice appears, press GO. Press $ to move to the next field.
BIRTH DATE: Press GO and then $ to find your birth month. When your birth
month appears, press GO. Press # to move to next field. Type your day of birth.
Press # to move to next field. Type your year of birth. Press $ to move to the
next field.
GENDER: Press GO. Choose gender, press GO. Press $ to move to the next
field.
CONTINUE: Press GO.
ADDRESS: Type your street address. Press $ to move to the next field.
CITY: Type your city. Press $ to move to the next field.
Internet

20 ©CMi Worldwide, August 2000
STATE: Press GO and then $ or press the first letter of your state to find your
state. Press GO to choose your state. Press $ to move to the next field.
POSTAL CODE: Type your zip or postal code. Press $ to move to the next field.
COUNTRY: Press GO. Press $ to find your country. When you find your country,
press GO. Press $ to move to the next field.
CONTINUE: Press GO.
Accessing Web sites
1. Press the OPTIONS button on your keyboard or remote.
2. Select GO TO and press GO.
3. Type the Internet address and press GO.
4. When your website appears, use the scroll buttons " $ and REV ' or FWD
(to navigate around pages.
5. To return to the home Page, press HOME on the remote control or keyboard.
Internet

21
iCEBOX Owner’s Manual
Error Messages
The iCEBOX is not enabled for some Web sites which require proprietary
software (for example Java or Shockwave). If you attempt to log on to one of
these sites, you will receive an error message. You must press PREV on the
remote control or keyboard to exit the site. However, error messages can occur at
compatible Web sites. If you receive an error message from a compatible Web
site:
1. First read the message to see if it offers any further instructions.
2. If there are no further instructions, press HOME to return to your home page.
3. If this still doesn't produce the desired result, press OPTIONS. The Options
menu should appear. Move the Selection Box to "hangup" and press GO.
This will disconnect you from the Internet. Press OPTIONS again to redial.
4. If you’re continuing to have problems, refer to your warranty service card for
further information.
Internet

22 ©CMi Worldwide, August 2000
4. Security and Monitoring
Monitor Mode
Monitor mode allows you to view live video input from anywhere a video camera
is installed: for example the baby’s nursery, or your front door. The iCEBOX is
configured to accept one video camera or video lease (available at many
electronics stores) without additional components.
To activate the monitoring feature:
1. Connect any video camera with a video out connection to the VIDEO INPUT
connection on the rear of the iCEBOX’s TV/monitor.
2. Select Monitor mode by pressing MONITOR on either the remote control or
the keyboard.
3. Live images from the video camera will appear on the iCEBOX’s monitor.
Security Mode
Security mode allows you to electronically unlock, talk with, and listen to someone
at your door. This feature requires an additional accessory available from CMi
and requires installation by an authorized service technician. For more
information contact a customer service representative at 1-800-897-8554.
Security and Monitoring Modes

23
iCEBOX Owner’s Manual
5. Troubleshooting
Error Screens: While using the Internet you will periodically come across
screens that read “Error” followed by the type of error. In these cases you may
either press GO on the remote control or the keyboard, and try again, or repeat
your previous action.
You will receive an error screen on sites that utilize web technologies that the
iCEBOX does not support, such as Shockwave, Java Script, Flash, etc.
Unit Freezes: If your iCEBOX should freeze (unit will not respond to user input
when you use keyboard or remote) turn the unit off, unplug it for a moment, and
then turn the unit back on. Call technical support if problems persist.
Internet Connect Failure/Error Connecting to Internet: If your unit has
problems dialing or connecting, turn the unit off, unplug it for a moment, and then
turn the unit back on. Call technical support if problems persist.
Be sure to verify the following:
1. Make sure voice mail (if you have this service) is not interfering. The
message waiting tone will interrupt the dialing process.
2. Check your phone jack to verify the unit is properly plugged in.
3. Does your phone system require you to dial a prefix (e.g., “9”)? The setup
screen, found under the OPTIONS key, allows you to add this requirement.
Email Attachments: The only attachments you can receive through the iCEBOX
are images or pictures (must be a .jpeg or .gif type of image).
Troubleshooting

24 ©CMi Worldwide, August 2000
6. Privacy Policy
CMi is committed to protecting the privacy and security of iCEBOX users. This
privacy policy will advise you about how we protect your personal information and
address your potential concerns over the use of this information. We may need to
change this policy from time to time in order to address new issues and changes
in our product. We will notify you of these changes. Please refer back to this
policy regularly. If you have any questions or concerns about your privacy, please
contact us through email at privacy@cmiworldwide.com.
Personal identification information
CMi will never intentionally disclose any personal identification information about
you as an individual user, such as your address, name, or telephone number. We
may request personal identification information for the use of our services. We
have two exceptions to this policy:
1. We will release specific information about your account to comply with any
valid legal process, such as a search warrant, subpoena, statute, or court
order.
2. We will release specific information in special cases, such as when there is a
physical threat to you or others.
emailing us at privacy@cmiworldwide.com.
Privacy of children
We urge all parents to participate in their children’s Internet and online
experience. Please teach children about protecting their personal information
while online.
Privacy Policy

25
iCEBOX Owner’s Manual
Other sites
If you should give out personal information online, through bulletin boards or other
web sites, that information can be used by third parties. You disclose information
in these areas at your own risk. We encourage you to investigate and ask
questions before disclosing information to third parties.
Security information
Protecting your privacy and information is a priority of CMi. We have taken careful
measures to secure both our information and our physical premises. We exercise
great care in providing secure transmissions of your personal information from
your unit to our servers. Our server software encrypts information, which is
intended to ensure all CMi transactions remain private (unless sent by an
unsecured means such as email). We also make use of firewalls and Secure
Socket Layers where appropriate.
Notwithstanding our use of technology to provide appropriate security, in this time
of rapidly changing technology, any responsible internet related business must
recognize and acknowledge that there are individuals and even businesses that
may attempt to use unethical or illegal means to access information or disrupt
communications.
Therefore, (at our lawyers’ insistence) we must advise you that no security
system is perfect and that your use of the iCEBOX product constitutes a waiver of
any claim against CMi for direct, consequential and all other damages arising
from the unauthorized access, use, or disclosure of information maintained on
our systems, unless such damages are due to our intentional wrongdoing or
gross negligence.
Privacy Policy

26 ©CMi Worldwide, August 2000
7. Specifications
Size: 11.63 in x 12.80 in x 12.20 in
Weight: 22 pounds (10 kg)
Environment: Operating Temperature 0°C to 45°C (32°F to 113°F) Storage
Temperature –20°C to 60°C (-4°F to 140°F)
TV Case: Injection molded, high impact ABS plastic.
Remote Control Case: Injection molded, high impact ABS plastic.
Power Source: 120Vac, 60Hz
Switch Controls: On/Off, Channel +/-, Volume +/-, Play, Eject, Stop, Pause,
Previous, Next,
Video Inputs/Outputs: Coaxial CATV Antenna In (F-type jack), Stereo Audio In/Out
(RCA type), Composite Video In/Out (CVBS), Video CD 2.0
and CMI Turbo 2.0
Telephone Connection RJ-11
Internet Connection 56k V.90 Modem
Other Connections Security lock, printer (PCL 3), intercom audio out
Display 9 inch viewable CRT Display
Specifications

27
iCEBOX Owner’s Manual
Specifications (continued)
Keyboard Housing Injection molded, high impact ABS plastic.
Keyboard Keys: On/Off, TV, Internet, CD, Monitor, Talk, Unlock, Tab, Caps Lock,
Shift, Print, Alt, Escape, Delete, Backspace, Previous, Next, Re-
verse, Forward, Home, Scroll +/-, Stop, Home, Pause, Options, Go
(Multidirectional), Volume +/-, Channel +/-, Program direct select
1 – 9, Full Alpha/Numeric keyboard with punctuation.
Remote Control: On/Off, TV, Internet, CD, Monitor, Previous, Next, Reverse, For-
ward, Home, Scroll +/-, Stop, Home, Pause, Options, Go
(Multidirectional), Volume +/-, Channel +/-, Program direct select
1 – 9
Speakers Two 3 inch speakers
Resistance: 8 Ohms
Specifications

28 ©CMi Worldwide, August 2000
Specifications

29
iCEBOX Owner’s Manual
Appendix
Analog vs digital phone lines
There are two types of phone lines commonly available: analog and digital. Most
homes are wired with analog phone lines. Digital lines are usually found in
commercial and industrial sites. However, newer homes, apartments, and
condominiums may be pre-wired with high speed digital phone lines.
All modems, including the modem in the iCEBOX, require an analog phone line.
Connecting a modem to a digital line will cause permanent damage to the
modem.
To determine which type of line you have, look at the phone line connector. An
analog phone connector is terminated with 2 or 4 copper wires. A digital
connector is terminated with 6 or 8 copper wires. If you cannot determine for
certain which type of phone line you have, contact your phone service provider.
If you have a digital phone line
In commercial buildings, apartment buildings, and condominiums, digital phone
lines usually come from a "telephone switch" or PBX located in the building.
These telephone switches will also support analog phone lines. The telephone
system administrator can arrange for an analog phone line to be brought to your
location from the local telephone switch.
If you live in a house wired with a digital line, you can arrange with your phone
company to have an analog line brought into your home. In addition, many
digital phone manufacturers offer inexpensive adapters that plug into the digital
phone line and convert it to an analog line. These adapters usually work best at
lower modem speeds.
Appendix

30 ©CMi Worldwide, August 2000
iCEBOX printer compatibility
Only printers compatible with Hewlett Packard’s PCL 3 printer language can be
connected to the iCEBOX, for example, the HP DeskJet series, such as the HP
DeskJet 840/842C.
Appendix
Caring for your iCEBOX
Service
Do not disassemble the iCEBOX TV/monitor, remote control, or keyboard. There
are no user-serviceable components and dangerous voltages may be present. All
service must be performed by an authorized service technician. Call
1.800.897.8554 between 8am and 5pm, Pacific time if your iCEBOX requires
service.
Cleaning
Never use solvents or abrasive cleaners on any of the iCEBOX components.
TV/monitor: Clean the exterior plastic surface using a slightly damp sponge
and mild detergent or dish soap. Clean the screen by first applying a small
amount of glass cleaner to a lint free cloth.
Remote control and keyboard: The remote control and keyboard may be
briefly immersed or rinsed off under running water. Use a soft, non-abrasive
sponge and mild detergent or dish soap. DO NOT put the remote control or
keyboard in the dishwasher!

31
iCEBOX Owner’s Manual
Appendix

32 ©CMi Worldwide, August 2000
Corporate Headquarters
CMi Worldwide
600 Stewart St, Suite 700
Seattle WA USA 98101
www.cmiworldwide.com
tel: 800.897.8554
tel: 206.448.0354
fax: 206.448.0359
CMi Worldwide and iCEBOX are registered
trademarks of CMi Worldwide.
Specifications subject to change without notice.
Printed in USA
©CMi Worldwide, August 2000
PN 121299A