Samsung Electronics Co 62230ANH Intel Centrino Advanced-N 623 User Manual Amor2 eng indb
Samsung Electronics Co Ltd Intel Centrino Advanced-N 623 Amor2 eng indb
Contents
- 1. User Manual
- 2. User manaul
- 3. User manual
- 4. user manual
User manual

38
39
Chapter 2.
Using the computer
The Gesture Function of the Touchpad (Optional)
The Touchpad Gesture function may not be provided and •
the version of the function may di er depending on the
model. Some usage procedures may di er depending on
the version.
For detailed usage procedures, refer to the description in •
the Touchpad Settings window.
Using the Touchpad, you can use the following additional Gesture
functions.
Scroll function•
Zoom functions•
Page Move Function•
Con guring the Gesture Function
Some gesture functions may not be con gured.
In this case, you can con gure them using the following path.
1 ► When using the Elan driver
Click the Start > Control Panel > Hardware and Sound >
Mouse > ELAN > Options button.
► When using the Synaptics driver
Click the Start > Control Panel > Hardware and Sound >
Mouse > Device Settings tab > Settings button.
2 The Touchpad Settings window appears. Click over the
corresponding item to select the item in the Select an item
and click OK.
To cancel the Gesture function, unselect the corresponding
item in the Touchpad Settings window and click OK.
Touchpad
40
Chapter 2.
Using the computer
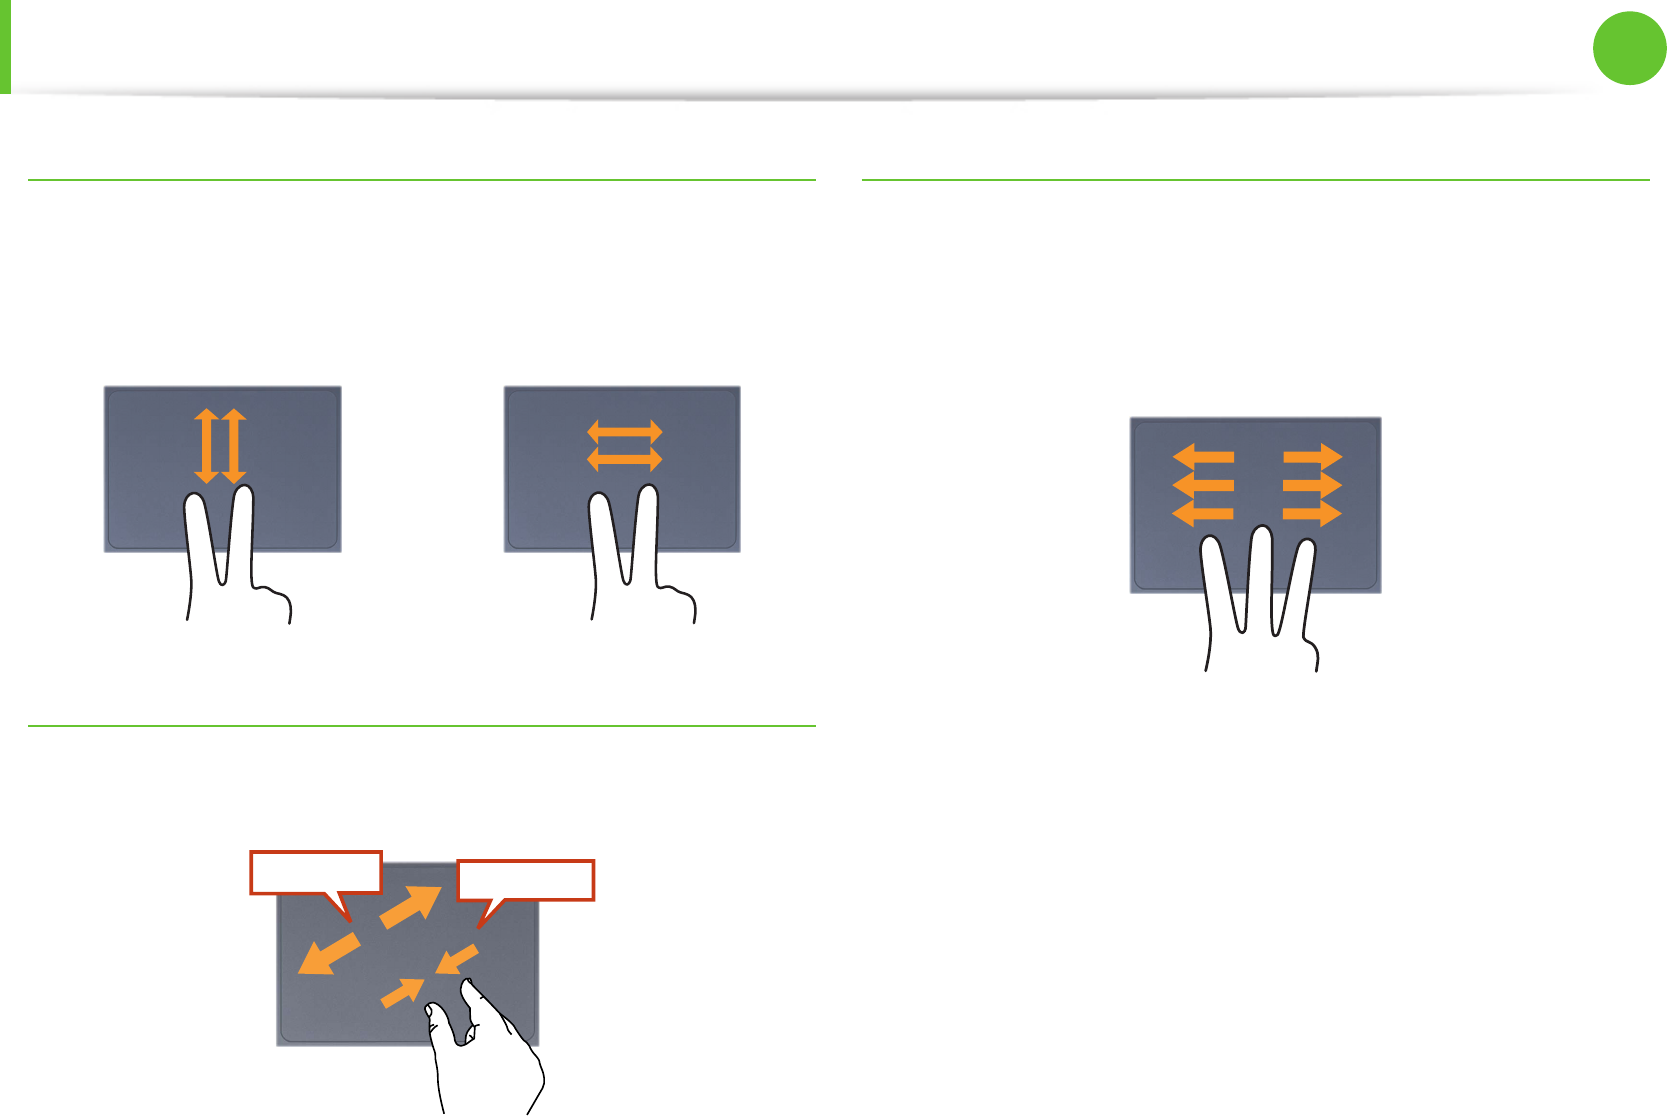
The Scroll Function
This function is the same as the scroll area of the Touchpad.
If you place two ngers over the Touchpad and move them up,
down, left or right, the screen is scrolled up, down, left or right
accordingly.
or
Zoom Functions
If you place two ngers over the Touchpad together or apart, the
current image or text is zoomed in or out.
Zoom-out
Zoom-in
or
Page Move Function
You can move to the previous or next page when you are looking
at a photo or surng the Internet.
For example, if you lightly brush three ngers to the left while you
are looking at a web site, you will return to the previous page.
Touchpad

40
41
Chapter 2.
Using the computer
Touchpad On/O Function
Locking with shortcut keys
If you want to use the mouse only without using the touchpad,
you can turn the touchpad o .
To lock the touchpad function, press the + keys.
Alternatively, press the key and then press the key to
turn the touchpad function o .
You can set the touchpad and touchpad button settings in
the tabs that appear when clicking Start > Control Panel >
Hardware and Sound > Mouse.
Auto-locking when connecting USB mouse
► When using the Elan driver
Click Start > Control Panel > Hardware and Sound > Mouse
> ELAN, and check the Disable When external USB mouse
plug in option. This will turn the touchpad o when a USB
mouse is connected.
► When using the Synaptics driver
Click Start > Control Panel > Hardware and Sound > Mouse
> Device Settings, and check the Disable internal pointing
device when external USB pointing device is attached in
option. This will turn the touchpad o when a USB mouse is
connected.
In case of some touch-screen model, checking option locks
touchpad even though you did not connect a USB mouse.
This auto-locking function is not provided for some models.
Touchpad

42
Chapter 2.
Using the computer
This computer supports an external USB CD-ROM drive (can be
additionally purchased).
Check if the interface type of the external CD-ROM drive is a USB
type. For detailed speci cations, refer to the catalog.
Do not insert a cracked or scratched CD.•
Otherwise, the CD may break and damage the optical disk
drive when the CD rotates at a high speed.
When you clean a CD or DVD title, wipe with a soft cloth •
from inside to outside.
Do not eject a CD when the CD operating LED is on.•
The gures used for the description are of a representative •
model. Therefore the gures may di er from the real ones.
Using a CD that is not in the shape of a circle is not •
recommended.
Connecting the CD Drive
Connect the CD drive to the USB port.
USB port
External-type CD drive (ODD, To be purchased)

42
43
Chapter 2.
Using the computer
Inserting and Ejecting a CD
1 Press the Eject button of the CD drive.
Status Indicator
Eject Button
Emergency Hole
2 When the CD tray opens, insert a CD or DVD and push the
tray in until it clicks.
3 Push the CD tray inward until it clicks.
The CD drive status indicator is turned on.
A CD drive’s reading and writing speed may di er •
depending on the condition and type of the media.
To eject a CD when the CD drive does not work or the •
computer is o , place the end of a paper clip ( ) into
the Emergency Hole until the CD tray is ejected.
External-type CD drive (ODD, To be purchased)

44
Chapter 2.
Using the computer
Multi Card Slot (Optional)
Using the multi card slot, you can read and write data to cards.
You can use a card as a removable disk and conveniently
exchange data with digital devices such as a digital camera, digital
camcorder, MP3, etc..
Supported Cards : SD Card, SDHC Card, SDXC Card, MMC•
You have to additionally purchase a multi card with the •
necessary capacity depending on your requirements.
You can use a multi card just like any data storage device. •
A copyright protection function is not supported.
Since you can lose a card when moving the computer, •
keep the card separately.
The gures used for the description are of a representative •
model. Therefore the gures may di er from the real ones.
If a slot protection dummy card is inserted into your •
computer, remove the dummy card before using the
computer.
Using the card
1 Insert the card into the multi card slot in the indicated
direction.
Example) SD Card
44
45
Chapter 2.
Using the computer
Multi Card Slot (Optional)
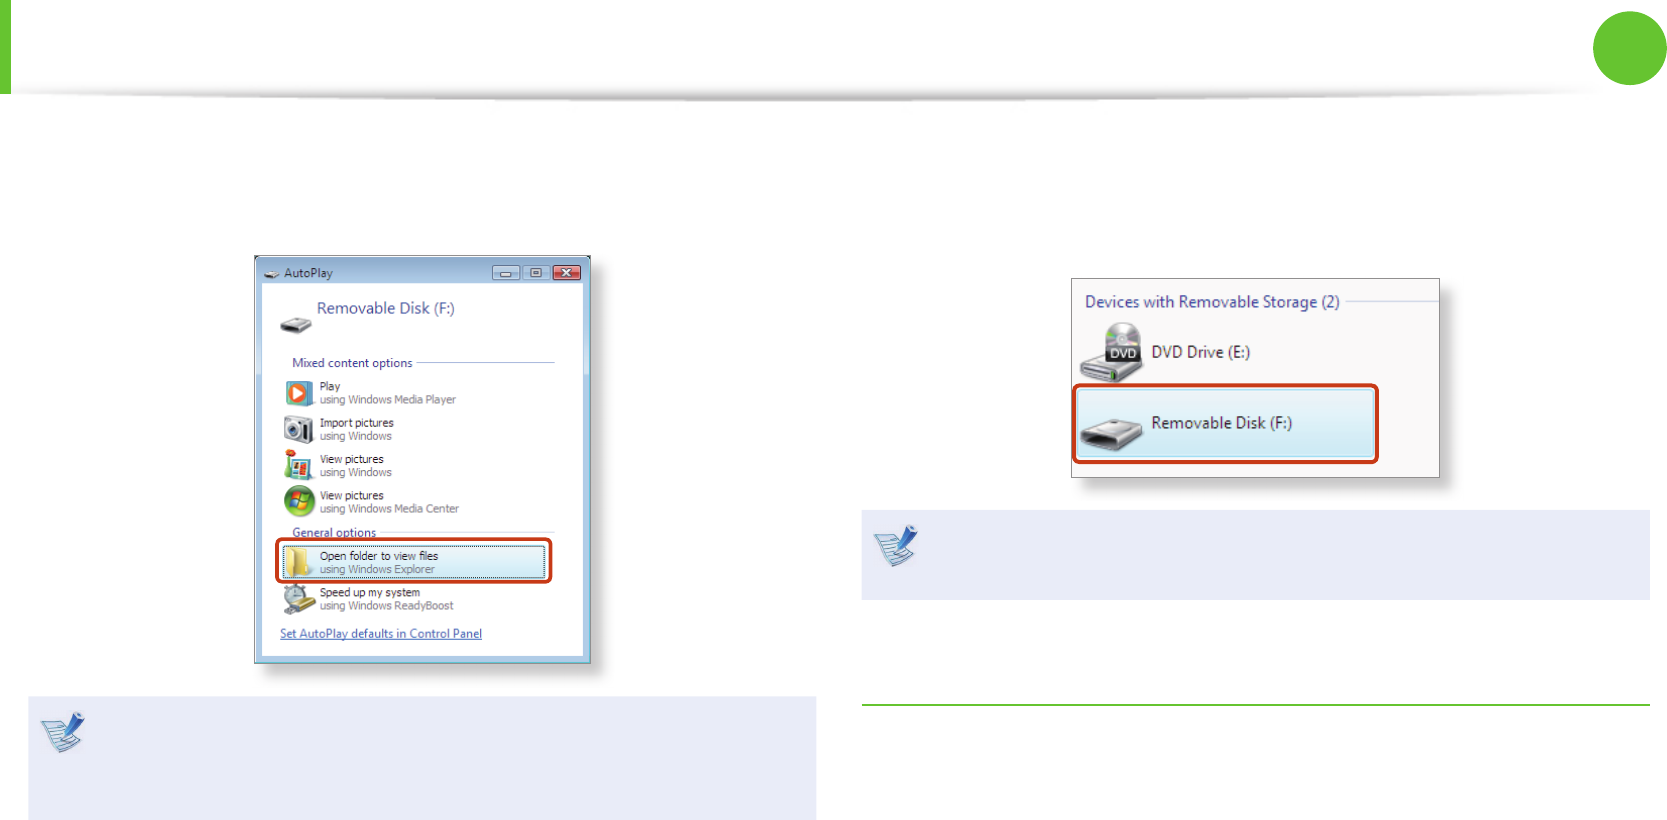
2 The card drive appears. Click Open folder and view les.
If the window does not appear, click Start > Computer.
If a window asking to scan and change appears, click
Continue Without Scanning. This will proceed to Step 2
above.
3 You can save, move and delete data by double-clicking the
corresponding drive.
You can only use the card after formatting it.
The device name of the card drive may di er depending on
your computer model.
Using a Mini SD and RS-MMC
Since the above cards are too small, you cannot insert the cards
into the slot directly.
Insert the card into the dedicated adapter (available from most
electronic retailers) and then insert the adapter into the multi card
slot.
However, depending on the adapter’s body material, some
RS-MMC cards may not be recognized properly. Samsung
recommend that you check the card is recognized correctly prior
to purchasing.

46
Chapter 2.
Using the computer
To remove a memory card
Take hold of the end of the card and remove the card.
To format a memory card
When using the memory card for the rst time, you must format
the card before using it.
Formatting a card deletes all data saved on the card. If the
card includes data, backup the data before formatting it.
1 Click Start > Computer.
2 Right-click over a card drive with the touchpad and select
Format.
3 Click Start to the formatting.
To use a card to exchange data with a digital device such •
as a digital camera, formatting the data using the digital
device is recommended.
When you try to use a card, which is formatted in the •
computer, in another digital device, you may have to
format the card again in the device.
You cannot format, write or delete data from a SD, or SDHC •
card with a write protection tab when it is in the Lock
position.
Inserting and removing a memory card repeatedly may •
damage the memory card.
Multi Card Slot (Optional)

46
47
Chapter 2.
Using the computer
Connecting an External Display Device
If you connect an external display device such as a monitor, TV,
projector, etc., you can view the picture on the wider screen of the
external device when you give a presentation or watch a video or
movie.
There is an analog monitor port (RGB) and a micro digital video
and audio port (Micro HDMI).
Since the visual quality is higher for Micro HDMI than VGA, if more
than one port is available, connect the port that provides the
higher visual quality.
Before you start, check the port and cable of the external •
display device and then connect the display device to the
computer.
Due to restrictions of the operating system the DualView •
function is not supported for Windows 7 Starter.
About the connection cable
Users should additionally purchase the necessary connection
cables.
Analog Monitor (RGB) Cable
HDMI to micro HDMI Cable
Connecting to the monitor port (Optional)
You can experience a wider screen by connecting the computer to
a monitor, TV or projector with a monitor port.
You can give better presentations by connecting the computer to
a projector.
The VGA adapter is optional and may not be provided
depending on the model.
1 Connect the VGA adapter to the monitor port of the
computer.

48
Chapter 2.
Using the computer
2 Connect the VGA cable (15-pin) to the connected VGA
adapter and then connect the other end of the VGA cable to
the VGA port of the monitor or the TV.
x
External
Monitor TV
Projector
x
z
VGA
Adapter
3 Connect the power cord of the connected monitor, TV or
projector and turn the power on.
4 Press the + key combination once. Then the
setting screen appears where you can select the monitor
mode.
Since pressing the key while holding down the key
changes the selection, select a display device.
LCD
CRT
LCD+CRT Clone
LCD+CRT Dual View
If the screen is not switched even if you press the •
+ key combination, you have to install the Easy
Settings program.
Alternatively, to set up dual view:•
Open the Display Settings window in the Control Panel,
select Monitor 2 and select the Expand to t to this
monitor checkbox to set dual view. For more detailed
information, refer to the Windows online help.
Connecting an External Display Device
48
49
Chapter 2.
Using the computer
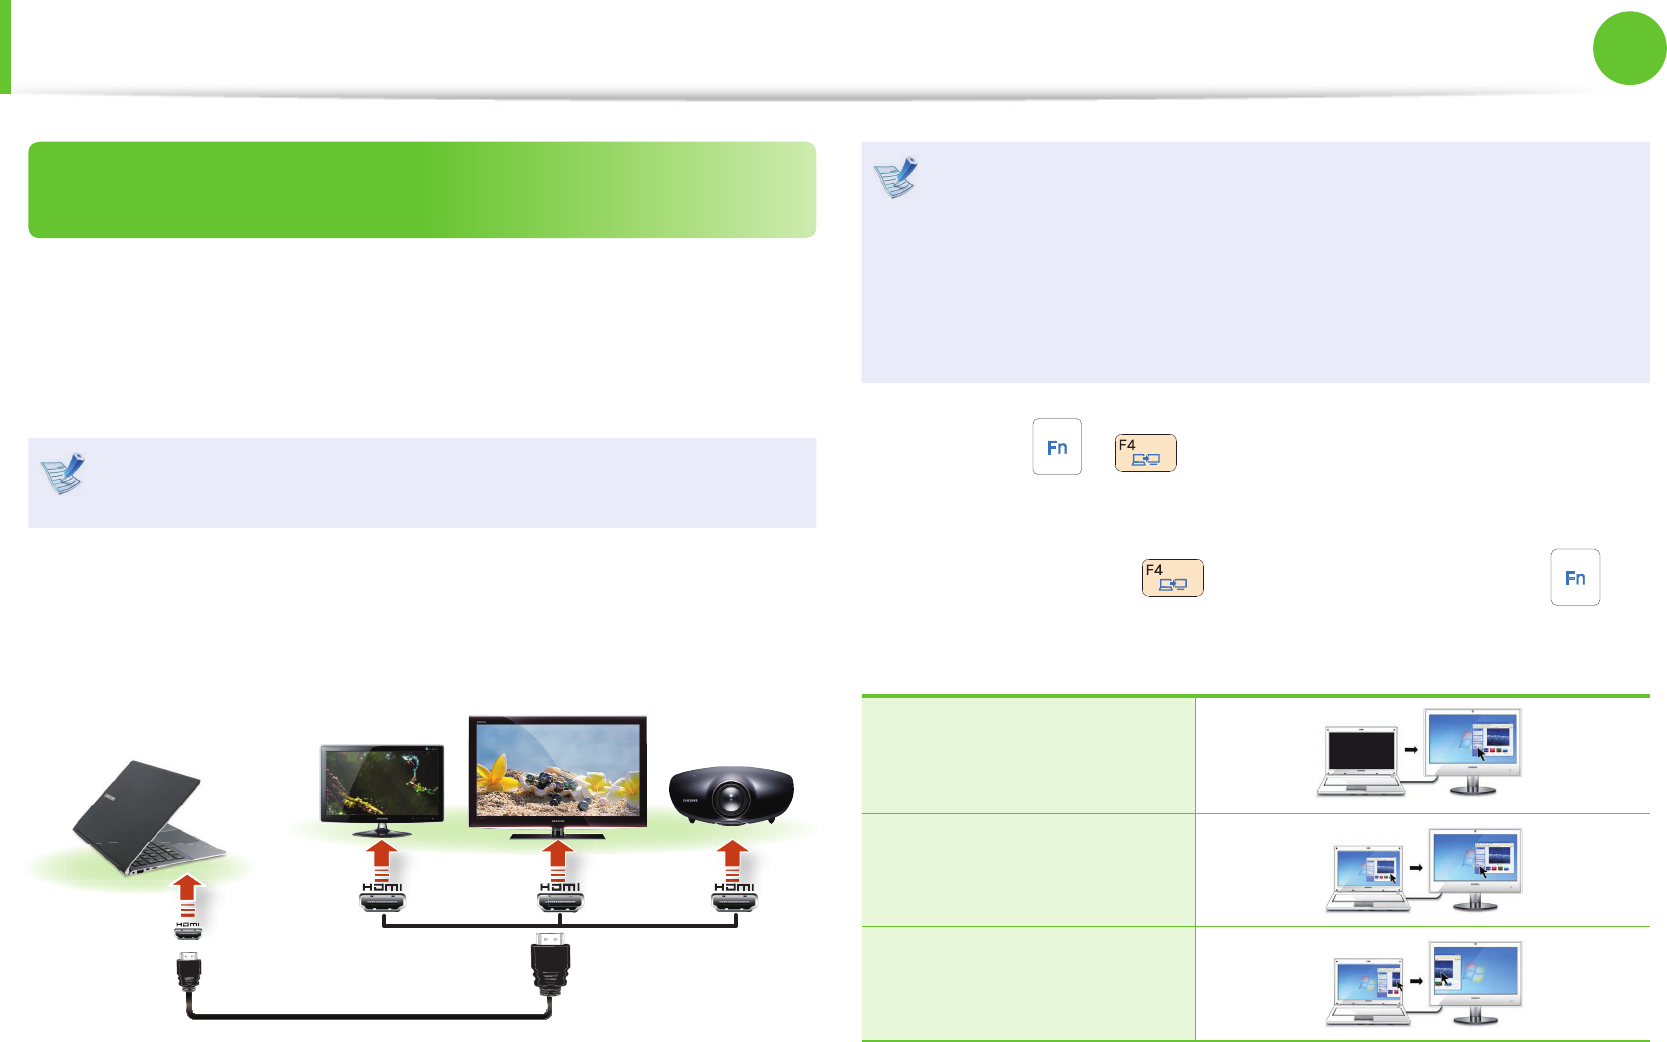
Connecting through the Micro HDMI port
(Optional)
By connecting the computer to a TV with a HDMI port, you can
enjoy both a high visual quality and a high sound quality.
After connecting a TV through HDMI, you have to con gure the
screen and sound.
You have to additionally purchase the HDMI to micro HDMI
cable.
1 Connect the HDMI to micro HDMI cable to the HDMI port of
the TV.
External
Monitor TV
Projector
HDMI to
micro HDMI
This is only supported for models that support a TV output •
port (HDMI).
When a TV provides more than one HDMI port, connect •
the computer to the DVI IN port.
When connecting the computer to a TV, switch the •
external input mode of the TV to HDMI.
2 Press the + key combination once.
Then the setting screen appears where you can select the
monitor mode.
Since pressing the key while holding down the key
changes the selection, select a display device.
HDMI
LCD+HDMI Clone
LCD+HDMI Dual View
Connecting an External Display Device
50
Chapter 2.
Using the computer
External Monitor / TV is not supported in the DOS •
Command Prompt window.
Simultaneous output to all 3 (LCD + CRT + HDMI) is not •
supported.
If the screen is not switched even if you press the •
+ key combination, you have to install the Easy
Settings program.
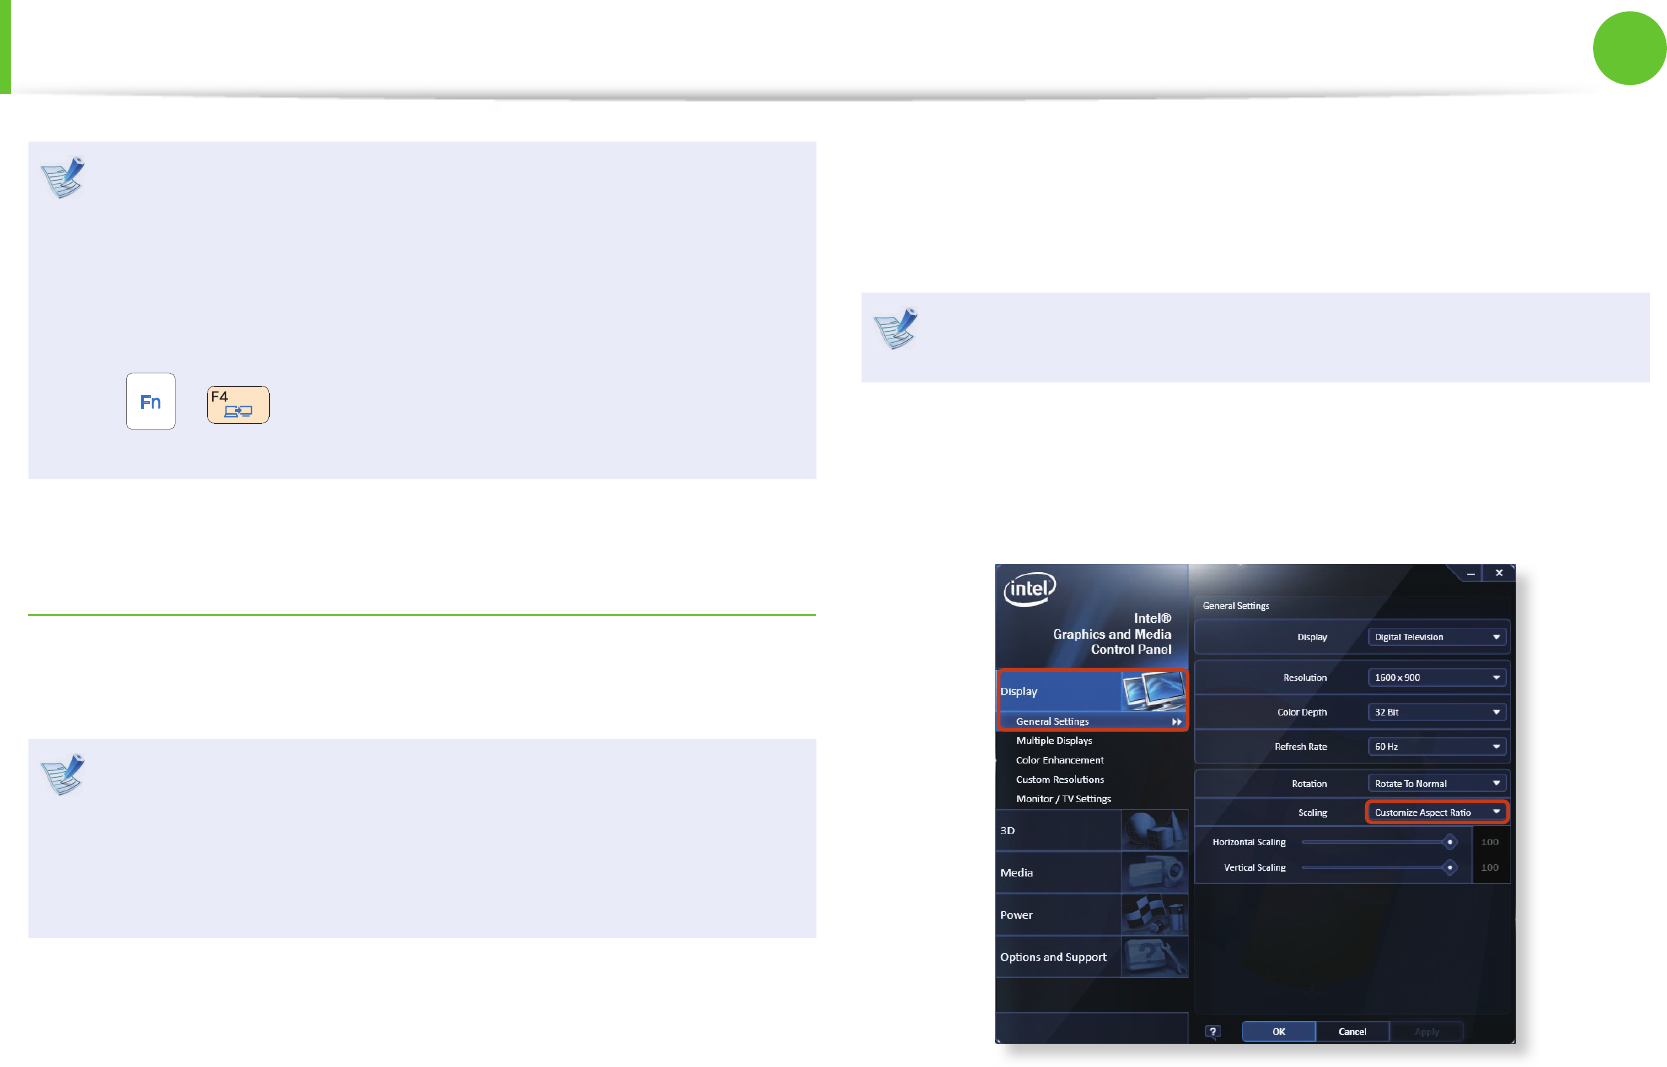
Setting up HDMI TV video (Optional)
If the Desktop screen displayed on the TV does not t to the TV
screen, con gure it as follows depending on the graphics card.
You can view the graphics card type by selecting • Device
Manager > Display adapters and then clicking the +
symbol.
The screen images and terms may di er from actual product •
depending on the computer model and driver version.
► For Intel graphics cards
1 Right-click over the Desktop and select Graphics Properties.
If a window appears where you can select the mode, select
Basic Mode and click OK.
2 Click Display > General Settings, select Customize Aspect
Ratio in the Scaling eld, t the Desktop to the TV screen
and click OK.
Connecting an External Display Device
50
51
Chapter 2.
Using the computer
Setting up HDMI TV audio (Optional)
You can con gure the sound of the computer to be played
through the HDMI TV.
You have to con gure the sound device in the Control Panel
whenever you connect the HDMI TV in order to hear sound from
the computer on the TV.
The screen images and terms may di er from actual product
depending on the computer model.
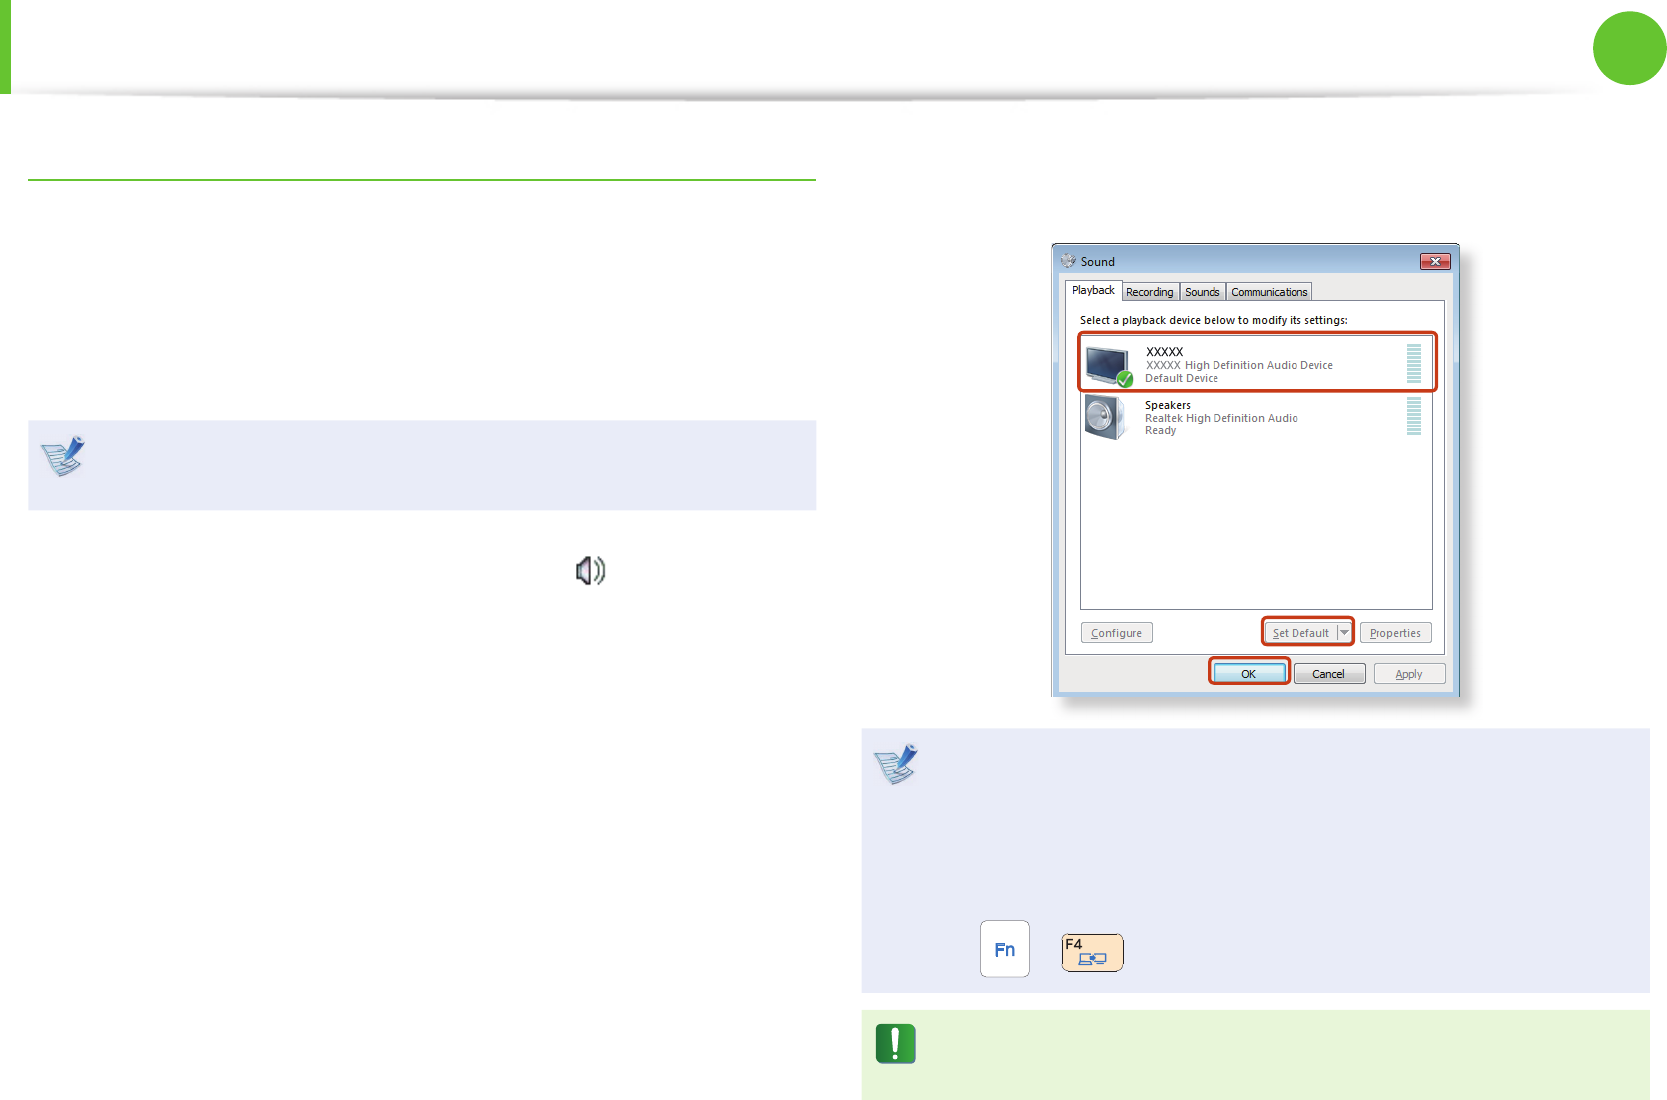
1 Right-click over the Volume Control icon in the
noti cation area at the bottom right of the Desktop and
select Playback Devices.
(Alternatively, click the Control Panel > Hardware and
Sound > Sound.)
2 Change the setting to Digital Audio (HDMI), HDMI Device or
Digital Output Device, click Set Default and click OK.
HDMI Output Device may not appear on the playback device
list depending on the computer model.
In this case, turn on the TV, connect the TV to the computer
using a HDMI cable and then switch to HDMI or LCD+HDMI
Clone or LCD+HDMI DualView mode using the Shortcut
Key( + ).
To listen to sound on the computer after disconnecting the
HDMI TV, you have to set the Playback Device to Speakers.
Connecting an External Display Device
52
Chapter 2.
Using the computer
Connecting an External Digital Device
You can save a le stored on a device onto the computer by
connecting a digital device such as a camera, camcorder or mobile
phone to the computer and using the le management functions.
Connecting and using a camera or camcorder
If a digital device such as a camera or camcorder is connected with
the computer, it is recognized as a removable disk so that you can
copy or move the les on the device.
1 Connect the USB port of the notebook computer and the
USB port of the digital device such as a camera using the USB
cable.
Both the computer and the digital device must be turned •
on.
You have to additionally purchase the USB cable necessary •
to connect the computer and the device.
Camera Camcorder
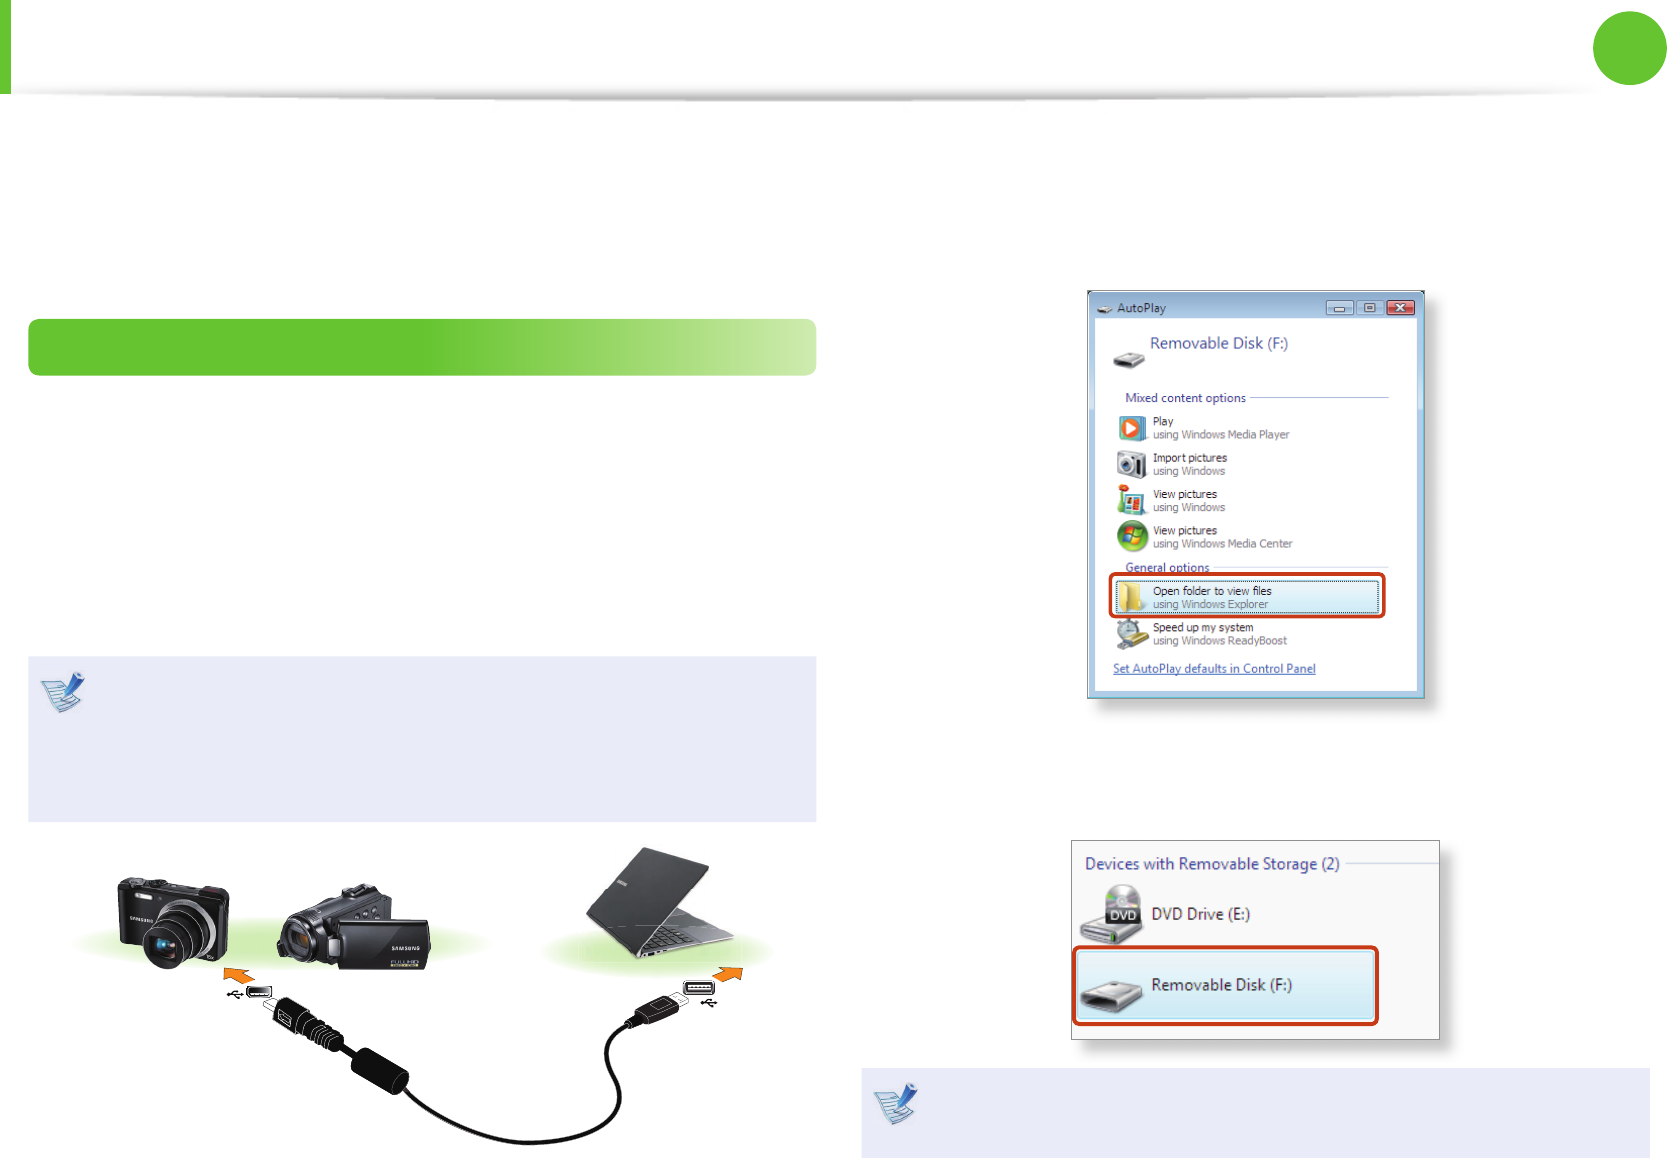
2 The Auto run window appears. Click Open folder and view
l e s .
If the window does not appear, click Start > Computer.
3 Double-click the corresponding drive. You can then save,
move or delete data.
The device name of the card drive may di er depending on
the model.
52
53
Chapter 2.
Using the computer
Adjusting the Volume
You can adjust the volume using the keyboard and the volume
control program.
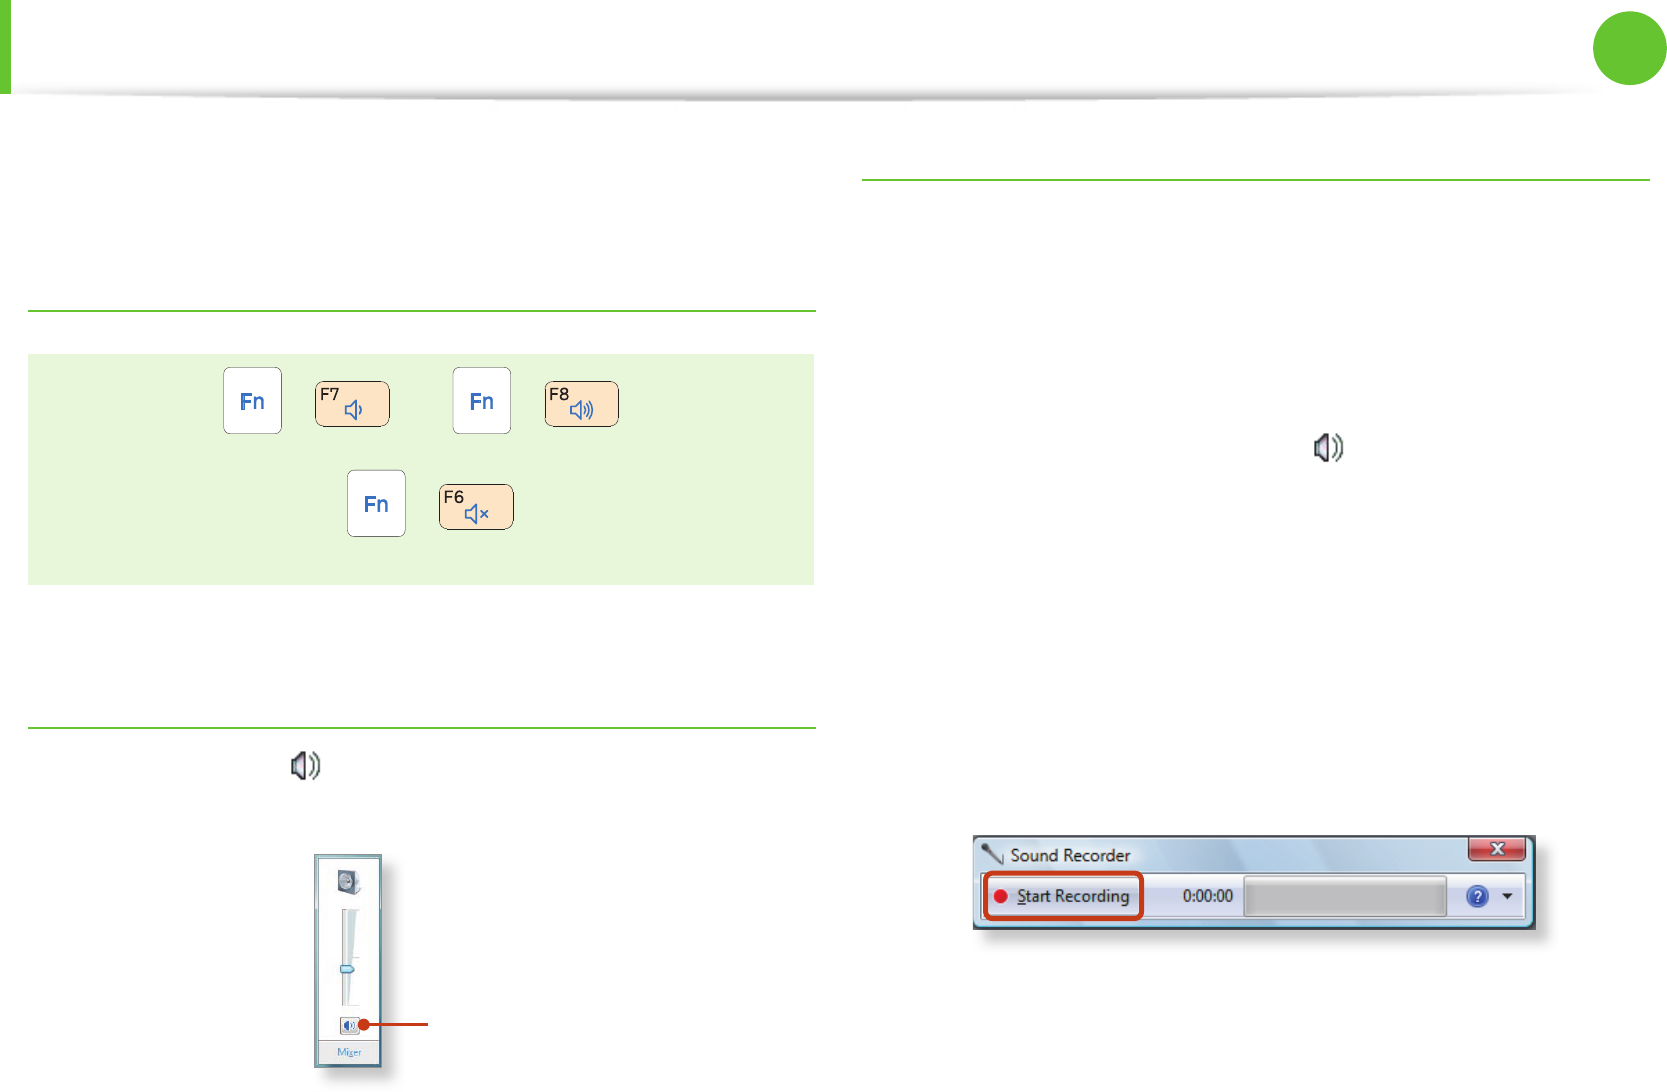
Adjusting the Volume using the Keyboard
+ or +
Alternatively, press the + key combination to turn
the volume on or o .
Adjusting the Volume using the Volume Adjustment
Program
Click the Volume icon on the taskbar and slide the volume
control bar to adjust the volume.
Mute
Using the Sound Recorder
The procedures to record sound using the Windows Recorder are
described below.
1 Connect a microphone to the microphone jack.
You can also use the internal MIC.
2 Right-click over the Volume icon on the taskbar and select
Recording Device.
3 Check if the microphone is set as the default recording
device.
If this is the case, it is already set as the default device. If not,
right-click over the microphone and select Set default.
4 Click Start > All Programs > Accessories > Sound Recorder
and click Start recording to start a recording.

54
Chapter 2.
Using the computer
Using SoundAlive (Optional)
The SoundAlive function enables you to experience more
stereophonic sound using stereo speakers.
SoundAlive is only supported in Windows 7.•
The software programs provider may vary, depending on •
your computer model.
In addition, some pictures may di er from actual product •
depending on the computer model and software version.
1 Right-click over the Volume Control icon in the
noti cation area at the bottom right of the Desktop and
select Playback Devices. (Alternatively, click the Control
Panel > Hardware and Sound > Sound.)
2 Right-click over the Speakers and select Properties.
3 Select the SoundAlive tab and select one of the modes.
► Basic Mode
Music Select this mode to listen to music.
Movie Select this mode to watch a movie.
Speech Emphasizes voice over other sounds.
Silver Silver mode is for people who have di culty in
hearing.
3D Depth
Sound Mode Select this mode to play a 3D movie or game.
► Advanced Mode
Finely tuned 25 presets are arranged on a square according to
their relative sound characteristics.
► User Mode
You can control a variety of sound e ects.
Adjusting the Volume
54
55
Chapter 2.
Using the computer
Wired Network
A wired network is a network environment used for a company
network or broadband internet connection at home.
You can use wired LAN by using the LAN adapter (Optional).•
The gures used for the description are of a representative •
model. Therefore the gures may di er from the real ones.
Connecting to a Wired LAN through Windows
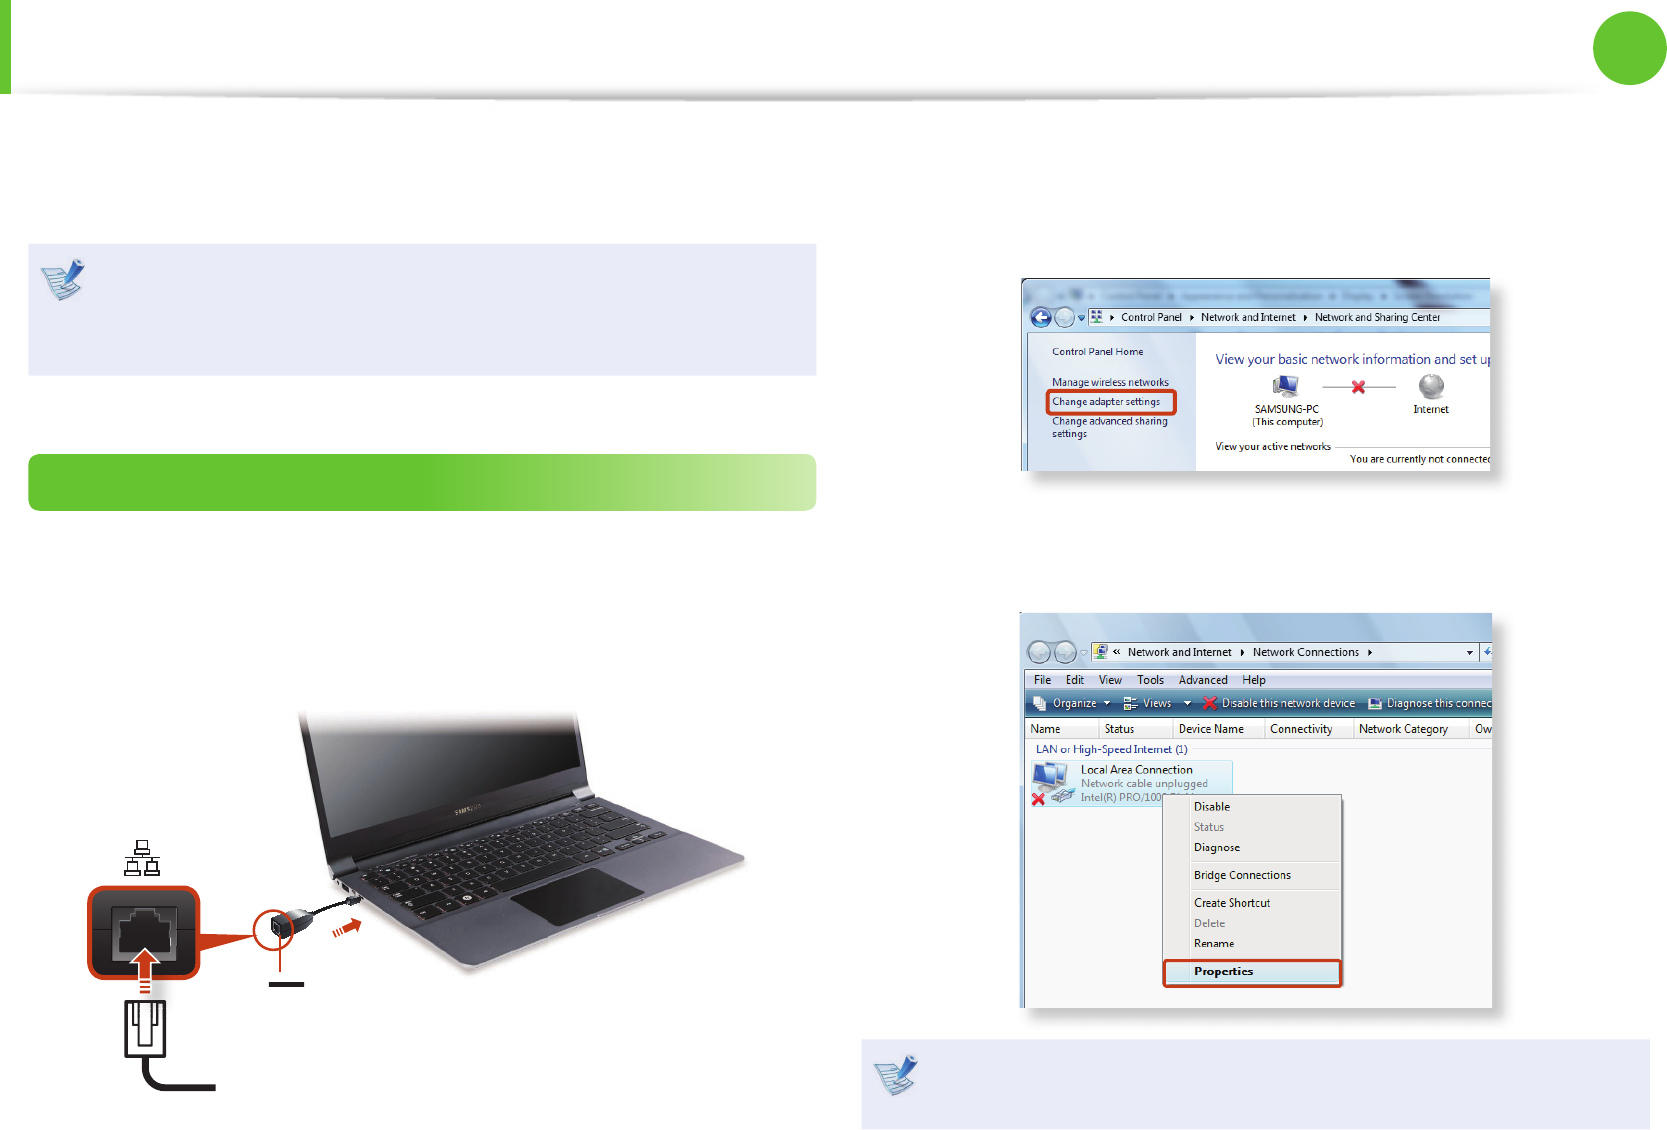
1 Connect the LAN adapter to the wired LAN port.
2 Connect the LAN cable to the connected LAN adapter.
LAN
adapter
LAN
z
x
3 Click Start > Control Panel > Network and Internet >
Network and Sharing Center and click on Change adapter
settings in the left menu pane.
4 Select Local Area Connection and click the right button of
the touch pad and select Properties.
The LAN Device name may di er depending on your
computer’s Network Device.

56
Chapter 2.
Using the computer
5 Select Internet Protocol Version 4(TCP/IPv4) from the list
of Network Components and click Properties.
The Network Component name may di er depending on •
the Operating System Installed.
To add a network component, click • Install in the screen
shown in the gure above. You can add clients, services,
and protocols.
6 Con gure the IP settings.
When using DHCP, select Obtain an IP address
automatically. To use a static IP address, select Use the
following IP address, and set the IP address manually.
When not using DHCP, ask your network administrator for the
IP address.
7 When you have completed the settings, click the OK button.
The network settings have been completed.
Wired Network

56
57
Chapter 2.
Using the computer
Wired Network
Using the <Wake On LAN> Function
<Wake On LAN> is a function that activates the system from Sleep
mode when a signal (such as a ping or magic packet command)
arrives over the network (wired LAN).
1Click Start > Control Panel > Network and Internet >
Network and Sharing Center and click on Change adapter
settings in the left menu pane.
2Right-click on the Local Area Connection and select
Properties.
3Click Con gure > Power Management tab. Select Allow
this device to bring the computer out of standby, then
click OK. Restart the system.
- If the system wake up from Sleep mode even though there
is no received signal, use the system after disabling the
<Wake On LAN> function.
- The LAN LED may not be turned o if System is shutdown
without disabling the WOL <Wake on LAN> option.
- Connecting a wired LAN while using a wireless LAN may not
activate the <Wake On LAN> function. Set the Wireless LAN
to Disable to use the <Wake On LAN> function.
- <Wake On LAN> feature may not work while using Hybrid
power saving feature.
For Windows 7, Wake On LAN is not supported Ping.
When connected to a 100Mbps/1Gbps wired LAN and the
computer exits Sleep/hibernation mode, a message appears
informing you of a connection to a 10Mbps/100Mbps
wired LAN. This happens because when the computer exits
standby/hibernate mode, restoring the network takes about
3 seconds. When the network is restored, it operates at
100Mbps/1Gbps.
When system is running on battery, some time it takes about
20sec after inserting LAN cable to be able to connect to
internet. This symptom happen as a result of power saving
feature to reduce battery consumption.
When system is running on battery, the Wired LAN speed
is decreased automatically to reduce battery consumption.
In such case, a 1Gbps /100Mbps LAN would function at
100Mbps/10Mbps speed.
58
Chapter 2.
Using the computer
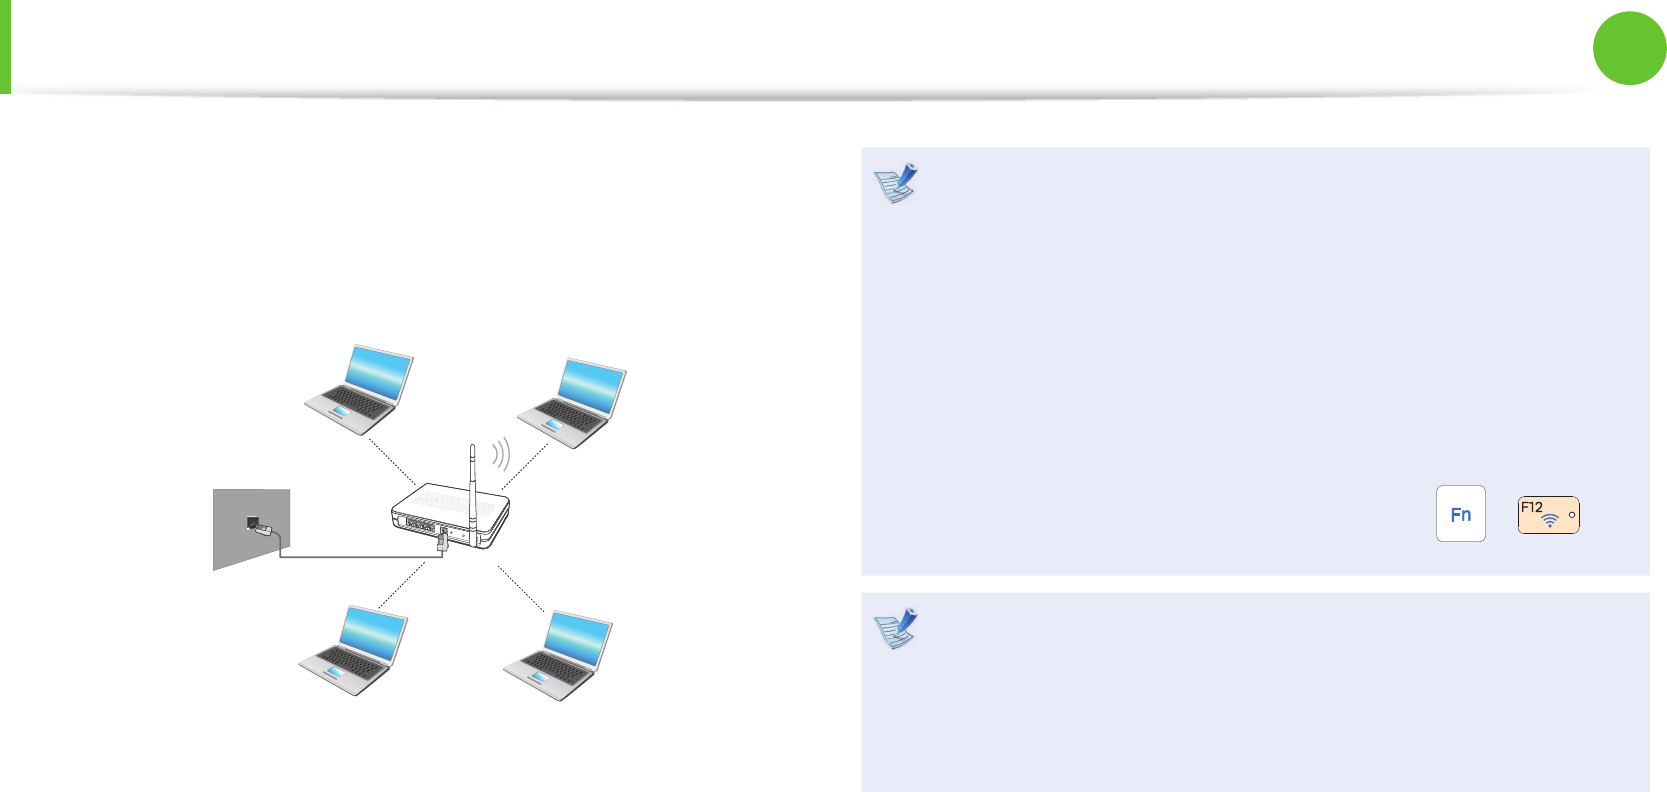
A wireless network (Wireless LAN) environment is a network
environment that enables communicating between multiple
computers at home or a small-size o ce through wireless LAN
devices.
The screen gures and terms may di er depending on the •
model.
Depending on the program version, some functions may •
not be provided or di erent functions may be provided.
The descriptions below are for computer models with •
a Wireless LAN card or device. A Wireless LAN device is
optional.
The pictures in this manual may di er from the actual
product depending on your wireless LAN device model.
If the wireless LAN is turned o , press the • + key
combination to turn it on.
What is an Access Point ( AP)?
An AP is a network device that bridges wired and wireless
LANs, and corresponds to a wireless hub in a wired network.
You can connect multiple wireless LAN installed computers
to an AP.
Wireless Network (Optional)
58
59
Chapter 2.
Using the computer
Wireless Network (Optional)
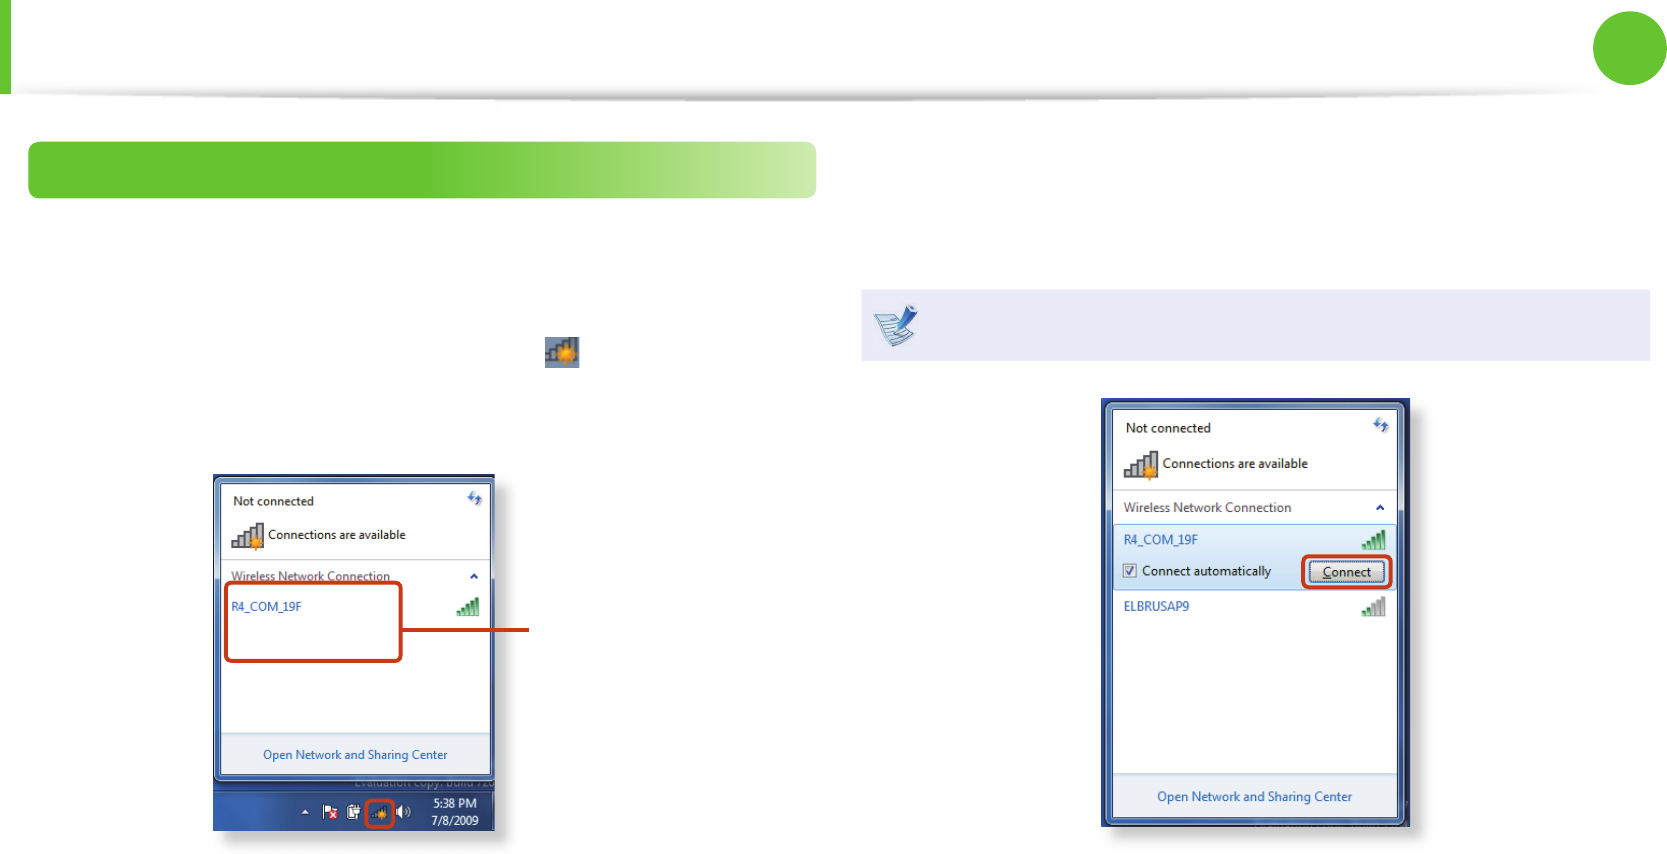
Connecting to a Wireless LAN through Windows
If there is an AP, you can connect to the Internet via the AP using
the Wireless LAN connection method provided by Windows.
1 If you click the Network Connections icon in the system
tray, a list of available APs appears. If you select an AP to
connect to, the Connect button appears.
AP List
2 Click Connect.
If a network key is set for the AP, enter the network key and
then click Connect.
For the network key, please ask your network administrator.
3 When Connected to the AP is displayed, click the Close
button.
You can access the network.
60
Chapter 2.
Using the computer
Wireless Network (Optional)
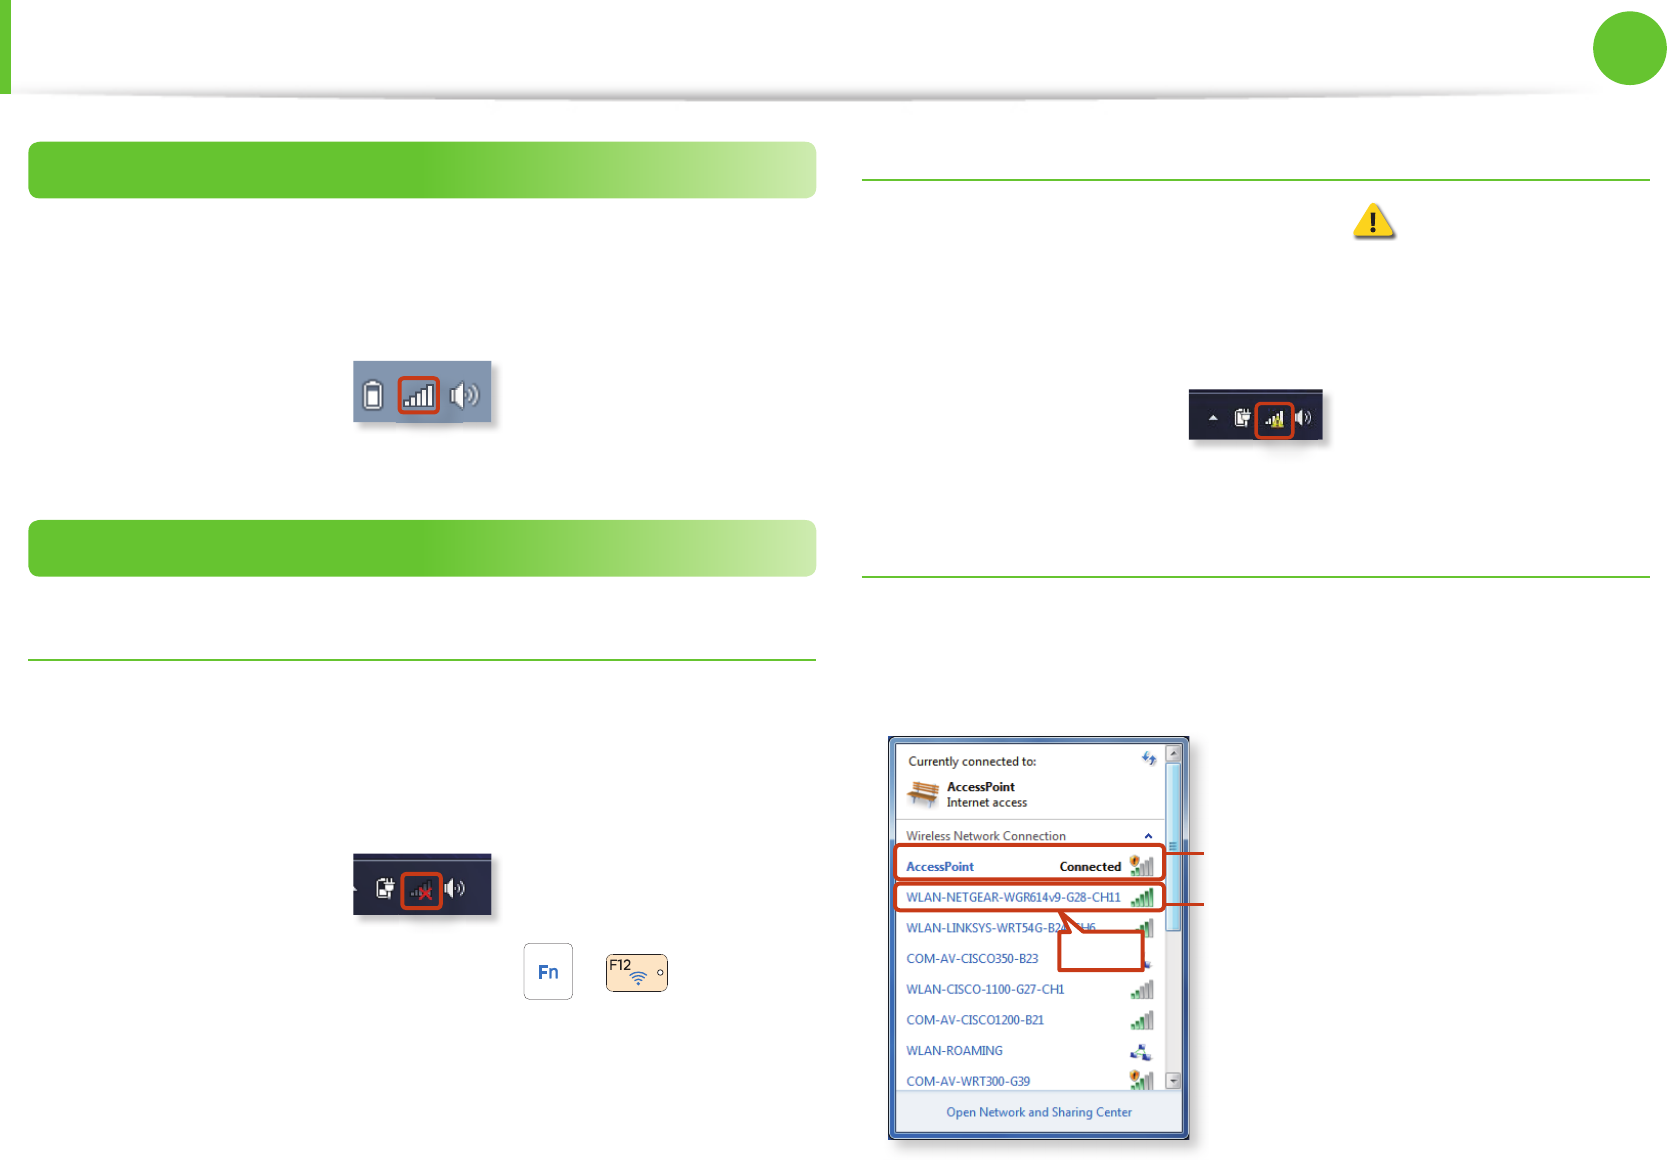
Normal Wireless LAN Status
If the wireless LAN icon is displayed in the system tray of the
Taskbar, it indicates that the computer is connected to the Internet
properly (see below).
Abnormal Wireless LAN Status
When the wireless LAN is not connected
If the wireless LAN icon is displayed with an “X” in the system
tray of the Taskbar, it indicates that the wireless LAN device is
turned o or that there are no available APs. Or the wireless LAN is
disconnected.
If the wireless LAN is turned o , press the + key
combination to turn it on.
When you are not connected to the Internet
This is indicated by the wireless LAN icon in the system tray of
the Taskbar. In this case, you have to check the IP address settings.
Please contact your network administrator and recon gure the IP
address.
When APs are found but your computer is not
connected to the Internet
This is the case when an AP with a weak signal has been set to
a high priority. Connect to an AP with a strong signal by clicking
it.
An AP with a strong signal strength
The currently connected AP.
The signal strength is low.
Click

60
61
Chapter 2.
Using the computer
Using the TPM Security Device (Optional)
A TPM (Trusted Platform Module) security device is a security
solution that protects your personal information by saving
the user authentication data on the TPM chip installed on the
computer.
To use the TPM security device, you have to initialize the TPM chip
in the BIOS Setup, initialize the TPM program, and then register
the user.
This function is only supported for models with TPM •
(security chip).
For more information, refer to the online help for the •
program.
The program version described in this manual is subject to •
change and the screenshots and terms used in this manual
may di er from the actual product.
Setting Up the TPM
To use the TPM function, you have to complete the following
steps.
1 Initializing the TPM chip
Initializes the authentication information saved on the TPM
chip.
2 Installing the TPM program
Installs the TPM program.
3 Registering the TPM program
Registers the TPM program.
If you complete the steps above, you can use the TPM function.

62
Chapter 2.
Using the computer
Using the TPM Security Device (Optional)
Initializing the TPM chip
When you use the TPM function for the rst time or you want to
register the user again, you have to initialize the TPM chip.
Initializing the TPM chip erases all authentication •
information saved on the TPM chip. Any decision to
initialize must be taken carefully.
To initialize the TPM chip again while the TPM function is •
in use, you have to decrypt any existing les and folders
encrypted by the TPM function rst. Otherwise, you
will not be able to access the les and folders after re-
initialization.
1 Restart the computer.
When the Samsung logo screen appears, press the F2 key
repeatedly.
2 If the BIOS screen appears, select the Security > TPM
Con guration item and press Enter.
Phoenix SecureCore Tiano Setup
SysInfo
Supervisor Password
User Password
HDD Password
Set Supervisor Password
Set User Password
Set HDD Password
Password on Boot
Advanced SecurityBoot
Clear
Clear
Clear
[Enter]
[Enter]
[Enter]
[Enabled]
▶ TPM Configuration
Exit
▶
TP
M C
onfiguration
3 Set the TPM Support item to Enabled and set the Change
TPM Status to Clear.
Phoenix SecureCore Tiano Setup
TPM Conguration
TPM Support
Change TPM Status
Current TPM State
Security
[Enabled]
[No Change]
Disabled and Deactivated
No Change
Clear
Enable and Activate
Disable and Deactivate
No Change
Clear
Clear
Enable and
Ac
tivate
D
isable and Deac
tivate
4 Press the F10 key to save the changes.