Samsung Electronics Co BT07PS Wireless Photo Player User Manual file E pdf 549F 04 manual eng 01 htm Index
Samsung Electronics Co Ltd Wireless Photo Player file E pdf 549F 04 manual eng 01 htm Index
Contents
- 1. User manual 1 of 2
- 2. User manual 2 of 2
User manual 1 of 2
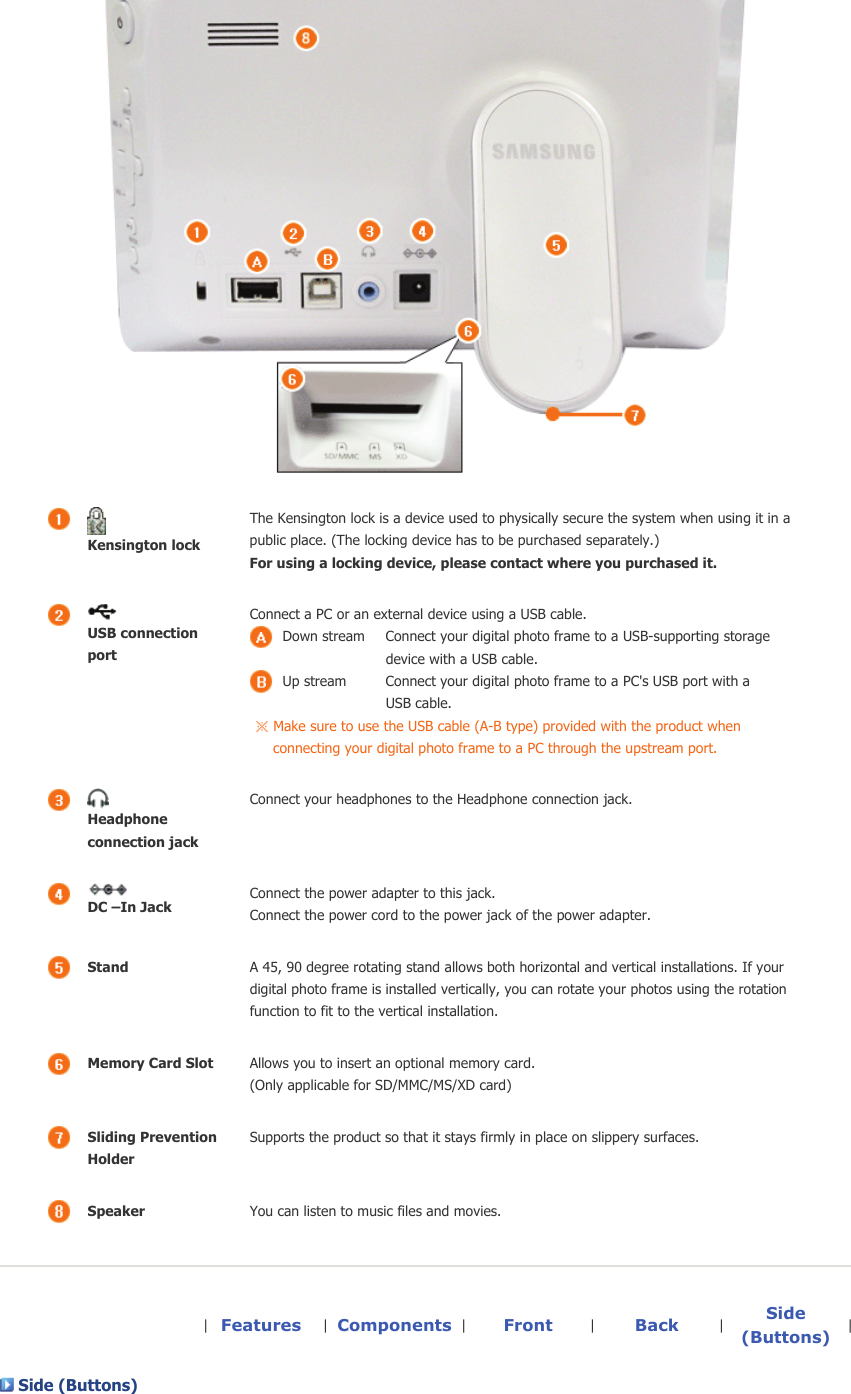
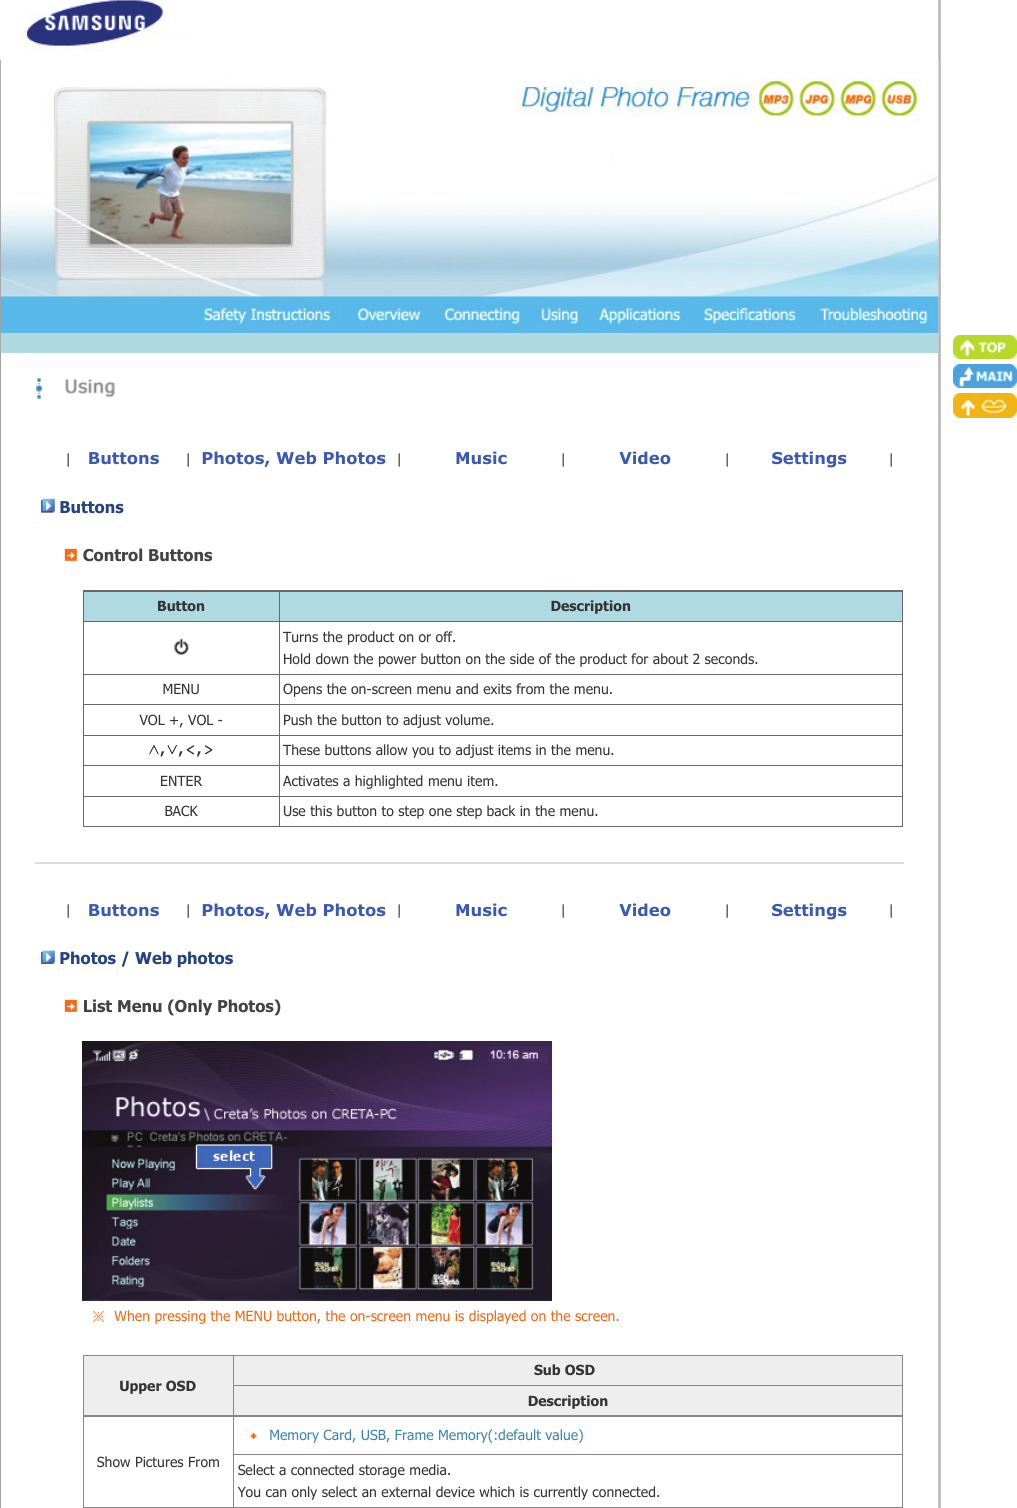
![[] Power ButtonTurns the product on or off. Hold down the power button at the right of the product for about 2 seconds.Power Indicator Shows the power status. When the product is powered on, the power light turns on.[MENU] Menu Button Displays the menu window at the bottom left corner of the screen.[VOL +] Volume ButtonAdjusts the sound volume when playing music files or movies.[] Up Button Used for moving up.[] Left Button Used for moving left.[ ] Right Button Used for moving right.[VOL +] Volume ButtonAdjusts the sound volume when playing music files or movies.[ ] Down Button Used for moving down.[ENTER( )] Enter Button Used for selection.[ ▶ll ] Play / Pause ButtonPlay / Pause during playback. [BACK] Back Button Return to the previous menu.](https://usermanual.wiki/Samsung-Electronics-Co/BT07PS.User-manual-1-of-2/User-Guide-891995-Page-10.png)

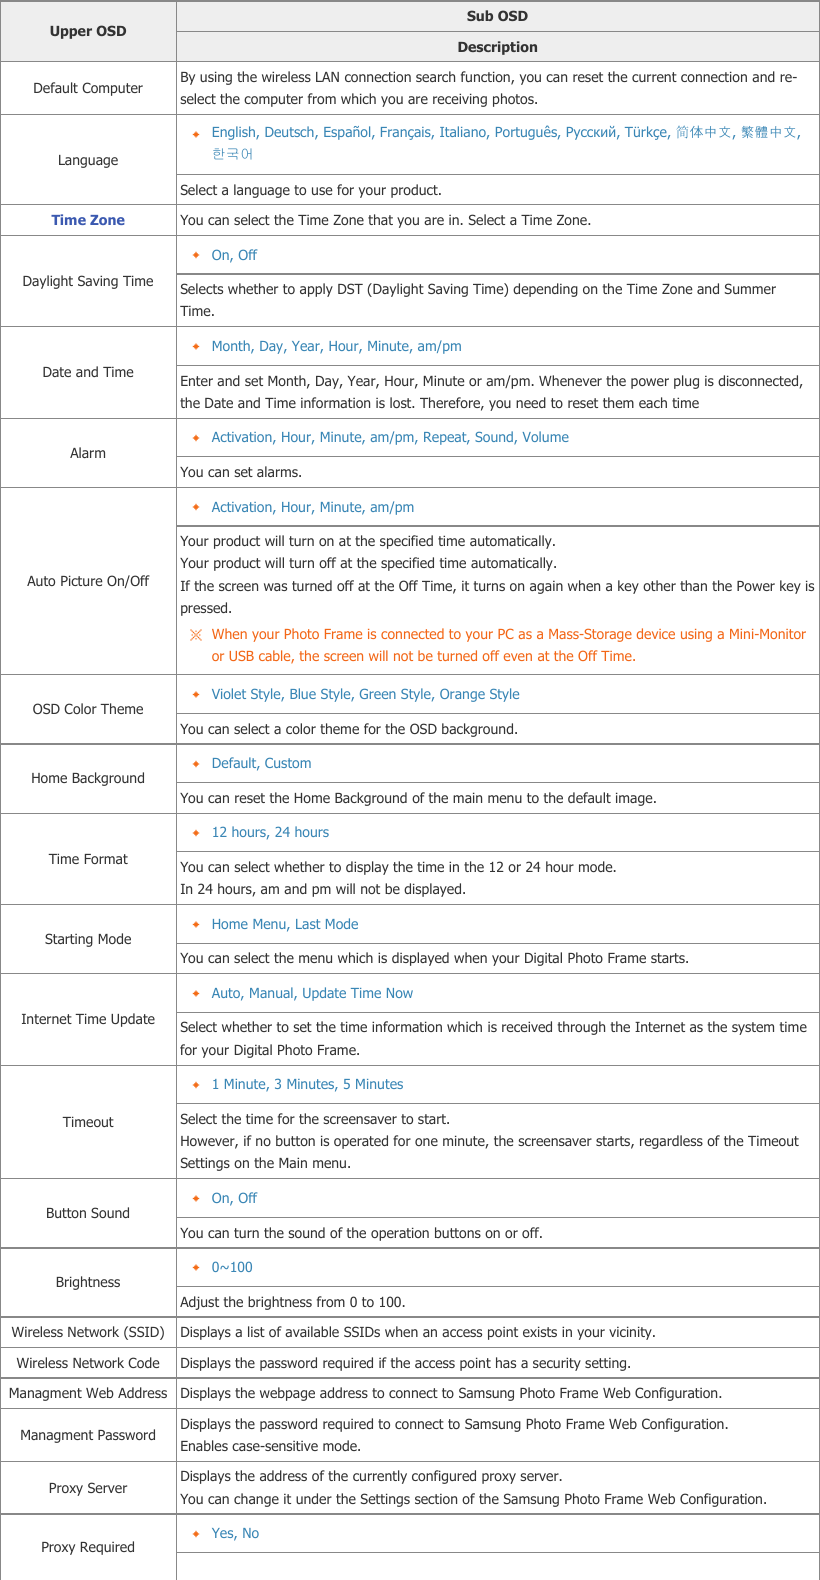
![You can specify whether to use a proxy server. Firmware Update Update the product using external memory(SD/MMC/MS/XD,USB). Please visit www.samsung.com for the latest firmware update. Reset Settings Yes, NoReverts the product Settings to factory defaults. Product Information Model, Firmware Version, CopyrightView the product information. Management Web Go to [Settings]-[Management Web Address] in your Photo Frame and then open this URL using Internet Explorer on your PC. When connected, the Welcome page will be displayed. Enter the Password which you can see in the [Settings]-[Management Password] of your Photo Frame in the [Password] box on the Welcome page, and click the [sign in] button. Upper Menu Sub Menu Description Welcome PasswordEnter the password displayed in Management Password. Enables case-sensitive mode. Photo Frame Now Playing You can monitor the photos which are being displayed in the slide show at the same time. Web Photos Photo Feeds, Photos Windows Live Spaces You can add or remove a website address from which you can receive photos. Storage Photo Feeds, Photos Windows Live Spaces You can check the size of the photos in the addresses listed in Web Photos. Settings Basic, Administrator Password, Date and Time, Network Settings You can enter and change the product name, administrator password, time, and network proxy server, etc. Help Displays the help section for using Samsung Photo Frame Web Configuration.](https://usermanual.wiki/Samsung-Electronics-Co/BT07PS.User-manual-1-of-2/User-Guide-891995-Page-20.png)
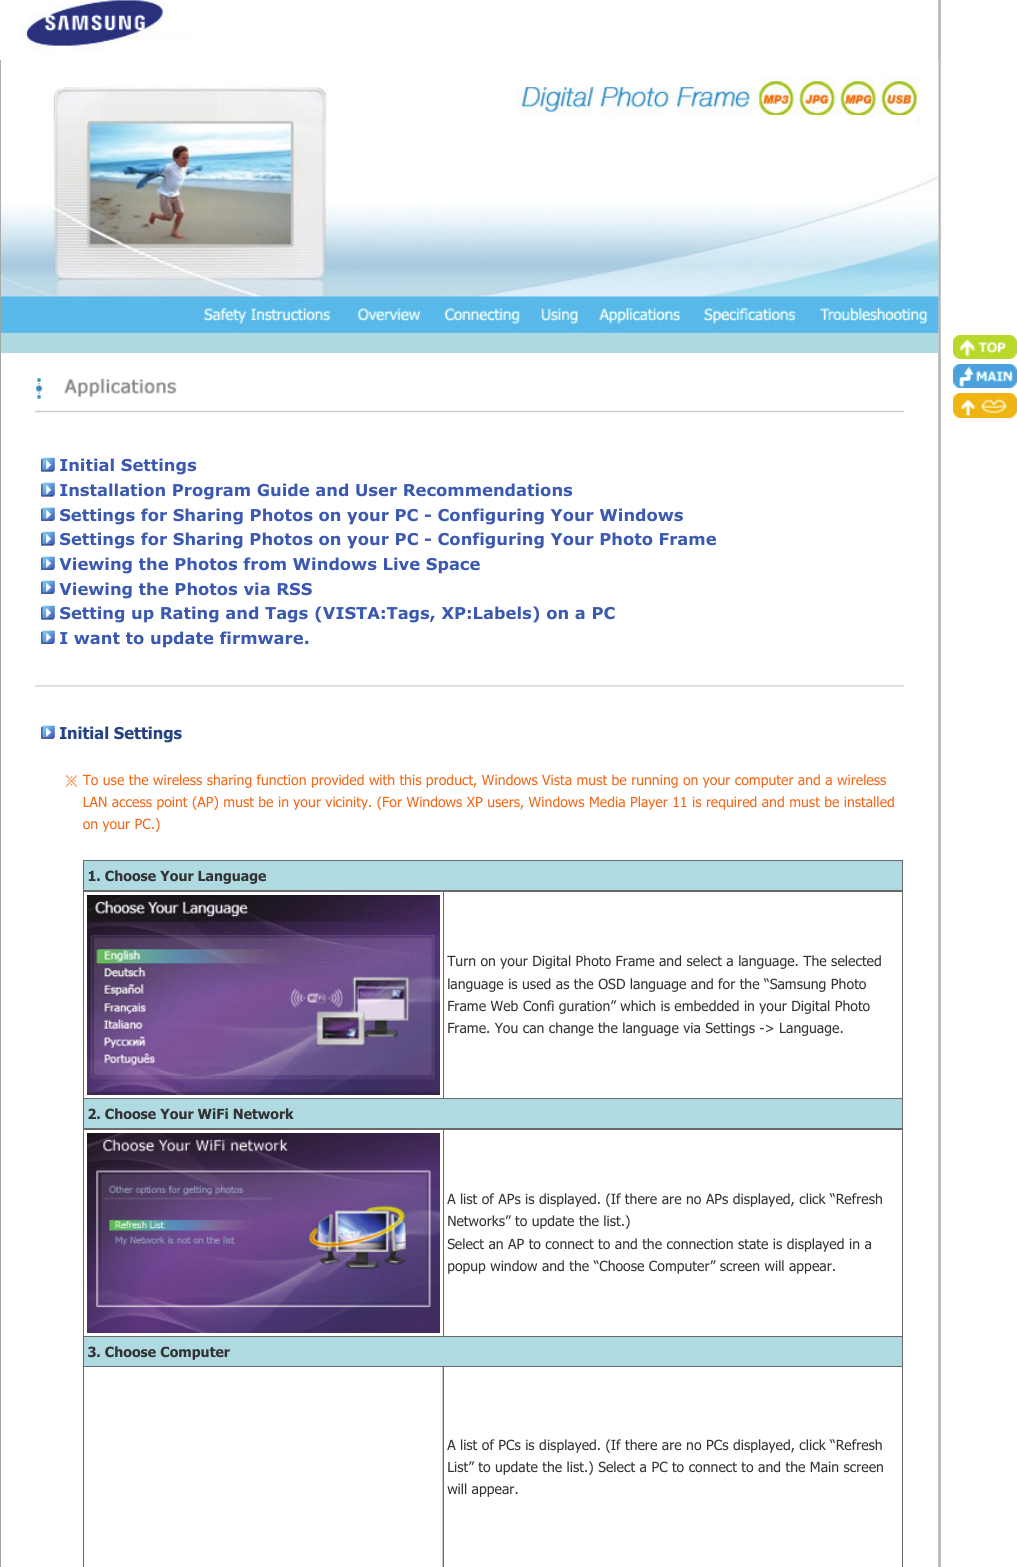
![Ensure that the settings are confi gured as shown below. Otherwise, your PC may not be displayed in the list or you may not be able to connect to it. In Vista, select Control Panel > Network and Sharing Center > Customize. Check whether the Location type is set to Private. Select Digital Photo Frame from the Windows Media Player > Library > Media Sharing list. Check whether it is set to Allow. Installation Program Guide and User Recommendations Windows XP We highly recommend installing .Net Framework 3.0.Click on the "Frame Manager" icon in the Manual - Main screen to run the installation file. Installing Frame Manager Windows Media Player 11 or later must be installed.Digital Image Library Starter Edition (DISE) : This program allows you to change the ratings for the photos on your Digital Photo Frame via your PC.Recommendations when using the Digital Photo Frame: Internet Explorer 7.0 or higherWindows Vista Click on the "Frame Manager" icon in the Manual - Main screen to run the installation file. Installing Frame Manager Frame Manager Frame Manager is a program needed to use Samsung Photo Frame Web Configuration. You can find the installed Frame Manager in C:/Program Files/Samsung/Frame Manager. To run Frame Manager, click Start and point to Programs, and then click Frame Manager > Frame Manager. Settings for Sharing the Photos on your PC - Configuring Your Windows Vista Adding Photos to the Library Run Windows Media Player. Click the [Library] tab at the top.](https://usermanual.wiki/Samsung-Electronics-Co/BT07PS.User-manual-1-of-2/User-Guide-891995-Page-22.png)
![Click [Add To Library] in the [Library] tab. In the [Add To Library] window, select [My personal folders] under the [Select the folders to monitor] section and select the folder containing photos and click [Add]. Select the folder to share and click [OK] to add it. When you click [OK], the [Add To Library] window is closed and the [Add to Library by Searching Computer] is displayed. Wait until it finishes the operation and click [Close] when it is completed. Checking Shared Photos In the Windows Media Player, set the Category, which is under the [ , ] symbol at the top left, to [Picture]. In the [Library], select Recently added, All Pictures, Keywords, Date Taken, Rating, or Folder settings and check whether the added photos exist in the library.](https://usermanual.wiki/Samsung-Electronics-Co/BT07PS.User-manual-1-of-2/User-Guide-891995-Page-23.png)
![Sharing Settings for Accepting Connections from Your Photo Frame In the [Library] tab, click on [Media Sharing]. In the [Media Sharing] window, check the [Share my media] checkbox under [Sharing settings]. If no [Available device] is displayed in the [Media Sharing] window, proceed to steps 4. If displayed, proceed to step 5. In the [Media Sharing] window, click [Networking] and check whether the current network is set to [Private network]. If not, set it to [Private Network]. If your network is a Private network, the [Available Device] list and the [Settings] button are displayed in the [Media Sharing] window.](https://usermanual.wiki/Samsung-Electronics-Co/BT07PS.User-manual-1-of-2/User-Guide-891995-Page-24.png)
![In the [Media Sharing] window, click [Settings]. The [Media Sharing-Default Settings] window is displayed. In the [Media Sharing-Default Settings] window, set the [Media Type] to [Picture], both [Star ratings] and [Parental ratings] to [All ratings] or a required rating under the [Default Settings] section. If you want to add a device or computer which tries to connect to the library to the list automatically, check the [Add new devices and computers automatically] checkbox. Only photos can be transmitted via PC sharing. Settings for Sharing the Photos on Your PC - Configuring Your Photo Frame Checking Network Connections Check whether the Network icon is displayed at the left top of the Main screen. If the Network icon is displayed, proceed to the Checking Computer Connections section described below. If it is not displayed, move to [Settings]-[Wireless Network(SSID)]. SSID : Service Set Identifier In the [Wireless Network(SSID)] window, select the SSID to which you want to connect your Digital Photo Frame to. If no available SSID is displayed, click [Refresh Networks] to update the list. If you select this when the SSID is encrypted, a password input window is displayed. You can only be connected to the network if you enter the correct password. If the "Connected" message is displayed, it means that your Digital Photo Frame is connected to the network.](https://usermanual.wiki/Samsung-Electronics-Co/BT07PS.User-manual-1-of-2/User-Guide-891995-Page-25.png)