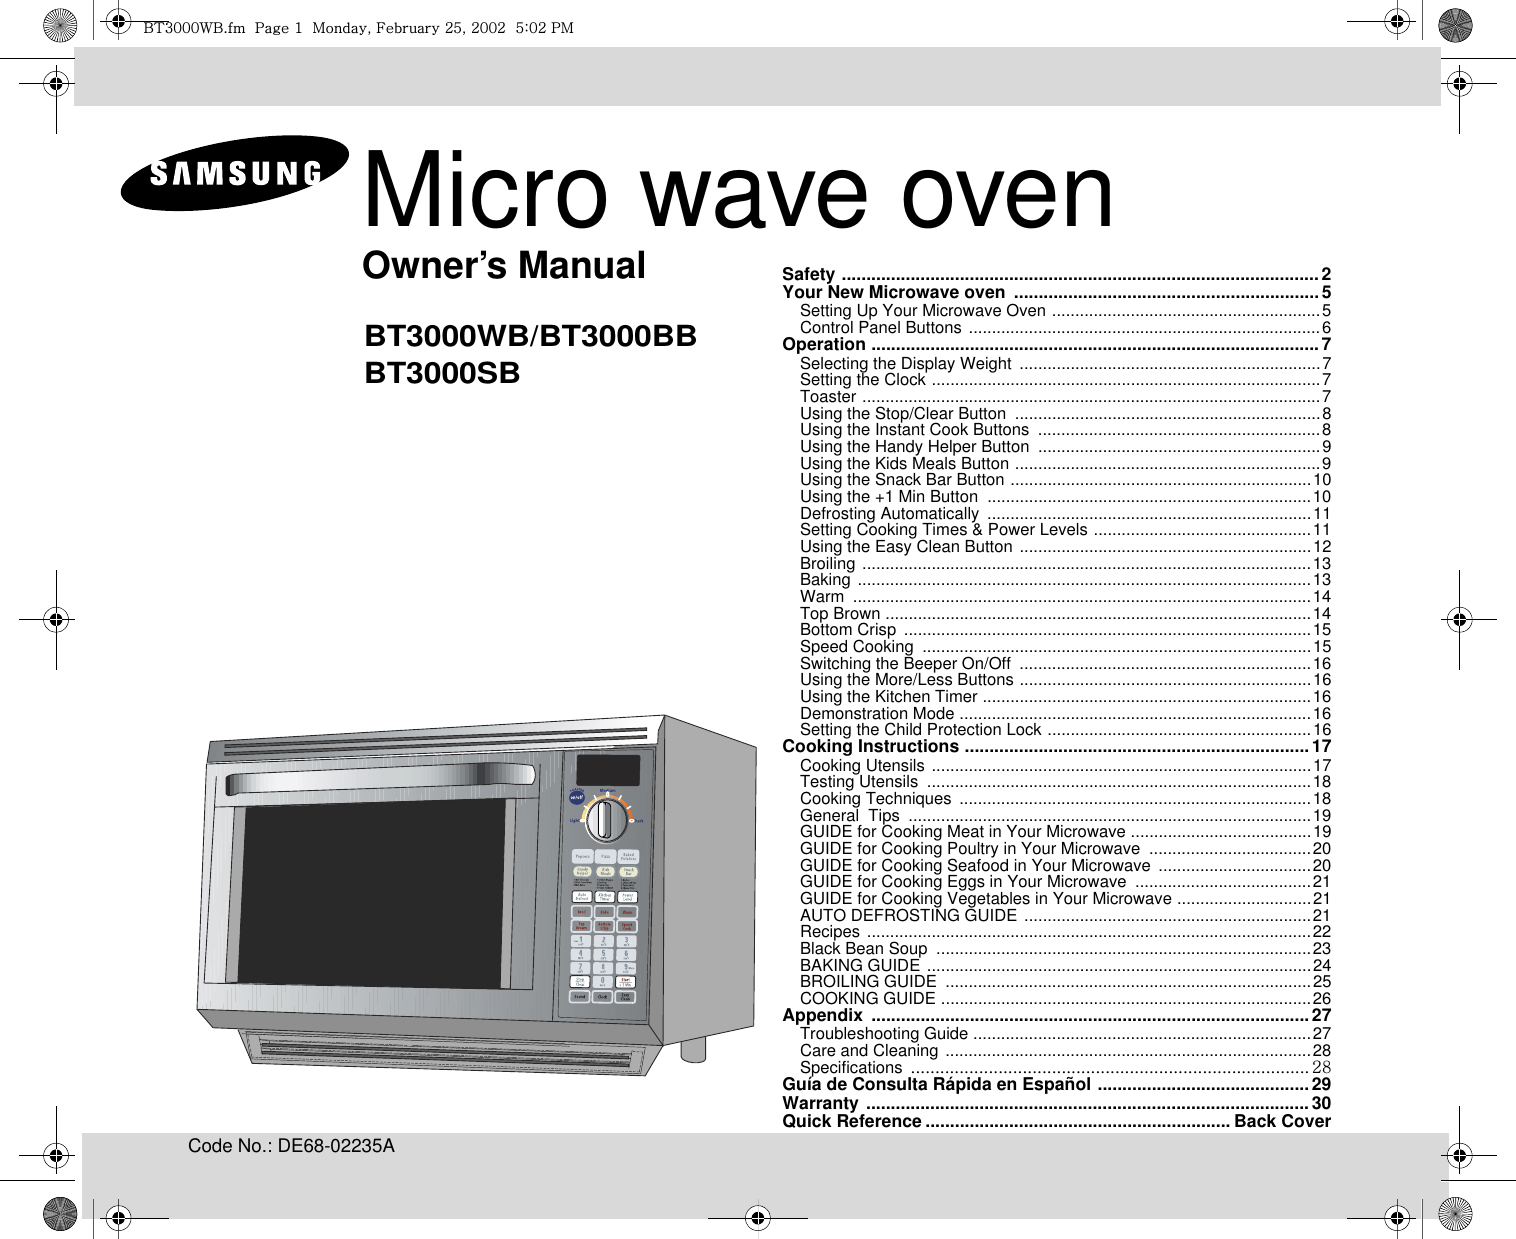
Samsung Electronics Co BT3000 Microwave Oven User Manual BT3000WB
Samsung Electronics Co Ltd Microwave Oven BT3000WB
UserManual.wiki
>
Samsung Electronics Co
>
BT3000 User Manual
Users Manual
Navigation menu
Upload a User Manual
Namespaces
Wiki Guide
HTML
PDF
Info
Views
User Manual
Discussion / Help
Navigation

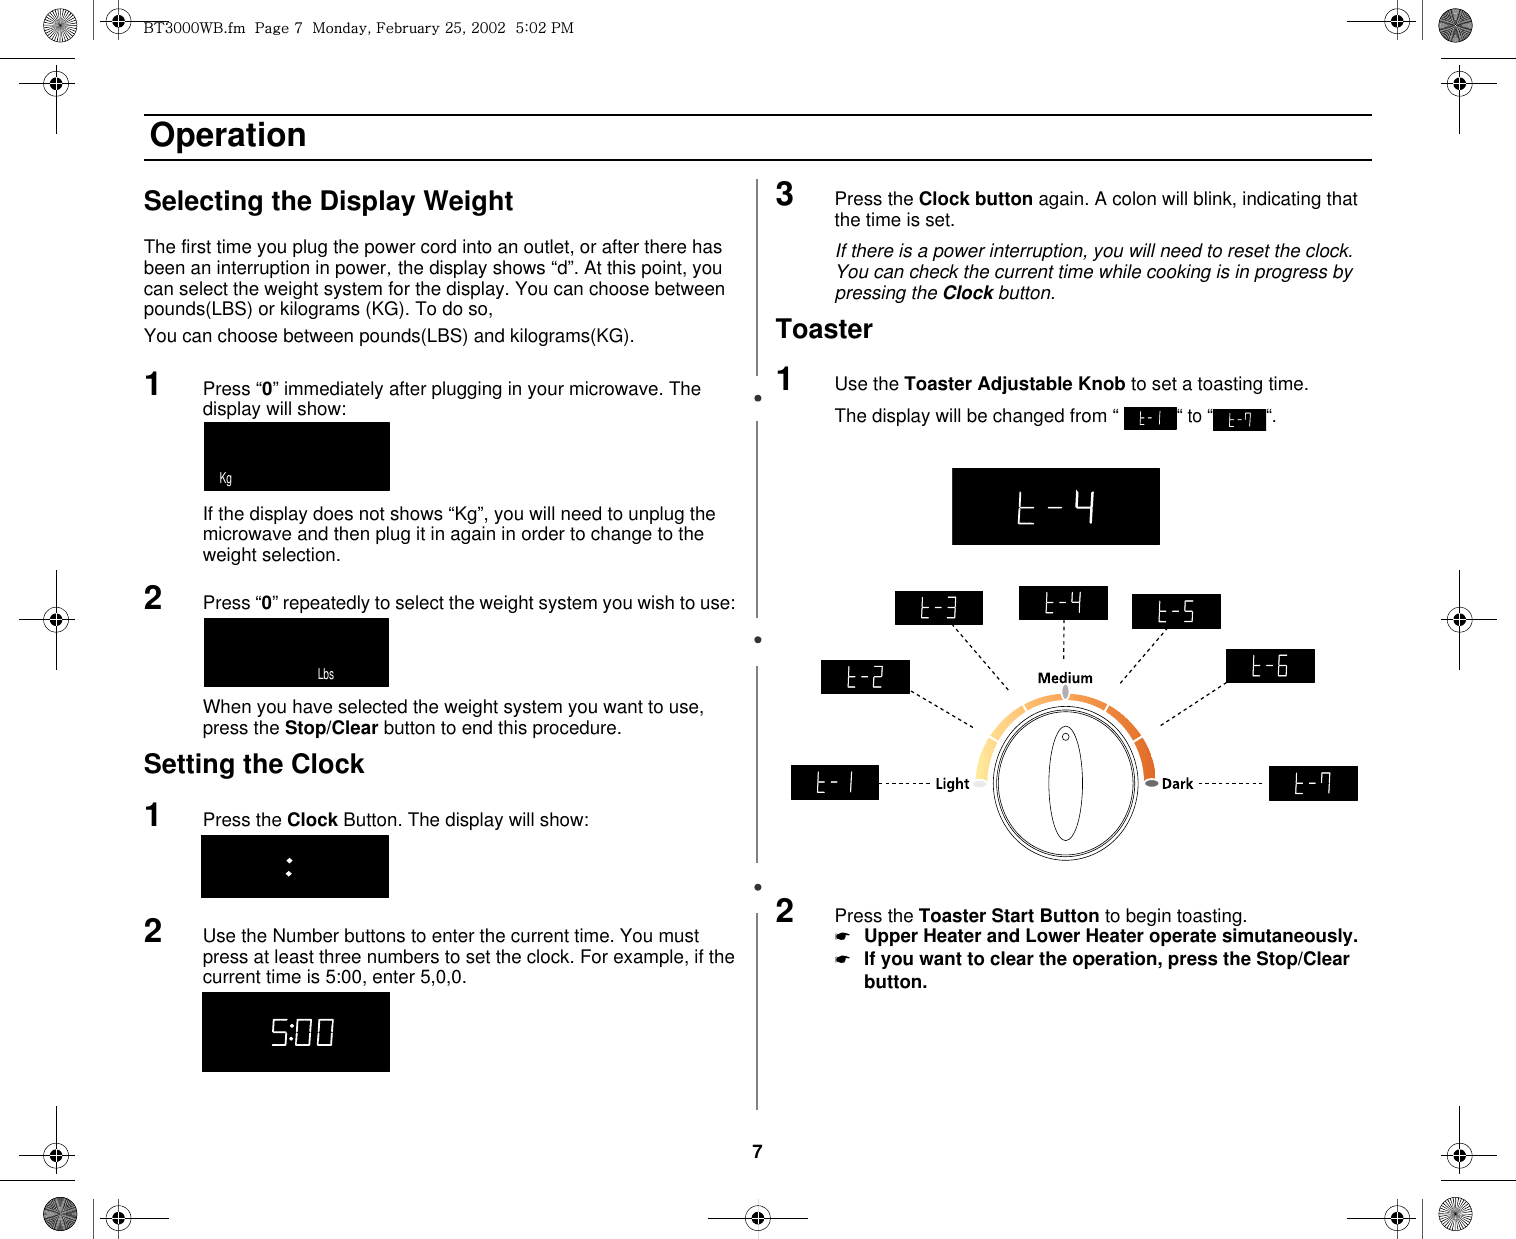
![6 Your New Microwave ovenControl Panel Buttons 1. Toaster Start Button 2. Toaster Adjustable Knob3. Instant Cook Buttons p. 8Instant settings to cook popular foods. 4. Handy Helper, Kids Meal, Snack Bar p. 9Selects type of dish to be reheated.5. Auto Defrost p. 11Sets weight of food to be defrosted.6. Broil p. 13Press to brown and cook with the electric coil.7. Top Brown p. 148. Bottom Crisp p. 159. Number/Cooking Temperature Buttons Sets cooking times or amounts and power levels.10. Stop/Clear p. 8Press to stop oven or clear instructions.11. Sound12. Power Level p. 11Press to select Auto cook and weight.13. Kitchen Timer p. 16Set kitchen or convenience timer.14. Warm p. 1415. Bake p. 1316. Speed Cook p. 1517. Start/ +1 Min p. 1018. Easy Clean19. Clock p. 7Set current time.12345678910111213161415171819i{ZWWW~iUGGwG]GGtSGmGY\SGYWWYGG\aWYGwt](https://usermanual.wiki/Samsung-Electronics-Co/BT3000/User-Guide-235088-Page-7.png)


![16 OperationSwitching the Beeper On/OffYou can switch the beeper off whenever you want.1Press the Sound button. The display shows “ON”.(“START” will flash)2Press the Sound button to turn the volume off. The display shows:”OFF”.(“START” will flash)3Press the Start/+1 Min button.The display returns to the time of day or “ “.Using the More/Less ButtonsThe More/Less buttons allow you to adjust pre-set cooking times.Use the More/Less button only after you have already begun cooking.The More/Less feature cannot be used with the Auto Defrost button.1To ADD more time to an automatic cooking procedure: Press the More(9) button. 2To REDUCE the time of an automatic cooking procedure: Press the Less(1) button.If you wish to increase/decrease in Time Cook mode by 10 sec, press the More(9) or Less(1) button.Using the Kitchen Timer1Press the Kitchen Timer button.1Use the Number buttons to set the length of time you want the timer to run.2Press Start to begin Kitchen Timer3The display counts down and beeps when the time has elapsed.Note: The microwave does not turn on when the Kitchen timer is used.Demonstration ModeYou can use the Demonstration Mode to see how your microwave oven operates without the oven heating.1Hold the “0” button and then press the “1” button.To turn demo mode off, repeat step 1 above.Setting the Child Protection LockYou can lock your microwave oven so it can’t be used by unsupervised children.1Hold the “0” button and then press the “2” button.At this point, the microwave oven can not be used until it is unlocked. To unlock it, repeat step 1 above.START ENTER COOK TIME TIME2 START ENTER COOK TIME TIME2 i{ZWWW~iUGGwGX]GGtSGmGY\SGYWWYGG\aWYGwt](https://usermanual.wiki/Samsung-Electronics-Co/BT3000/User-Guide-235088-Page-17.png)

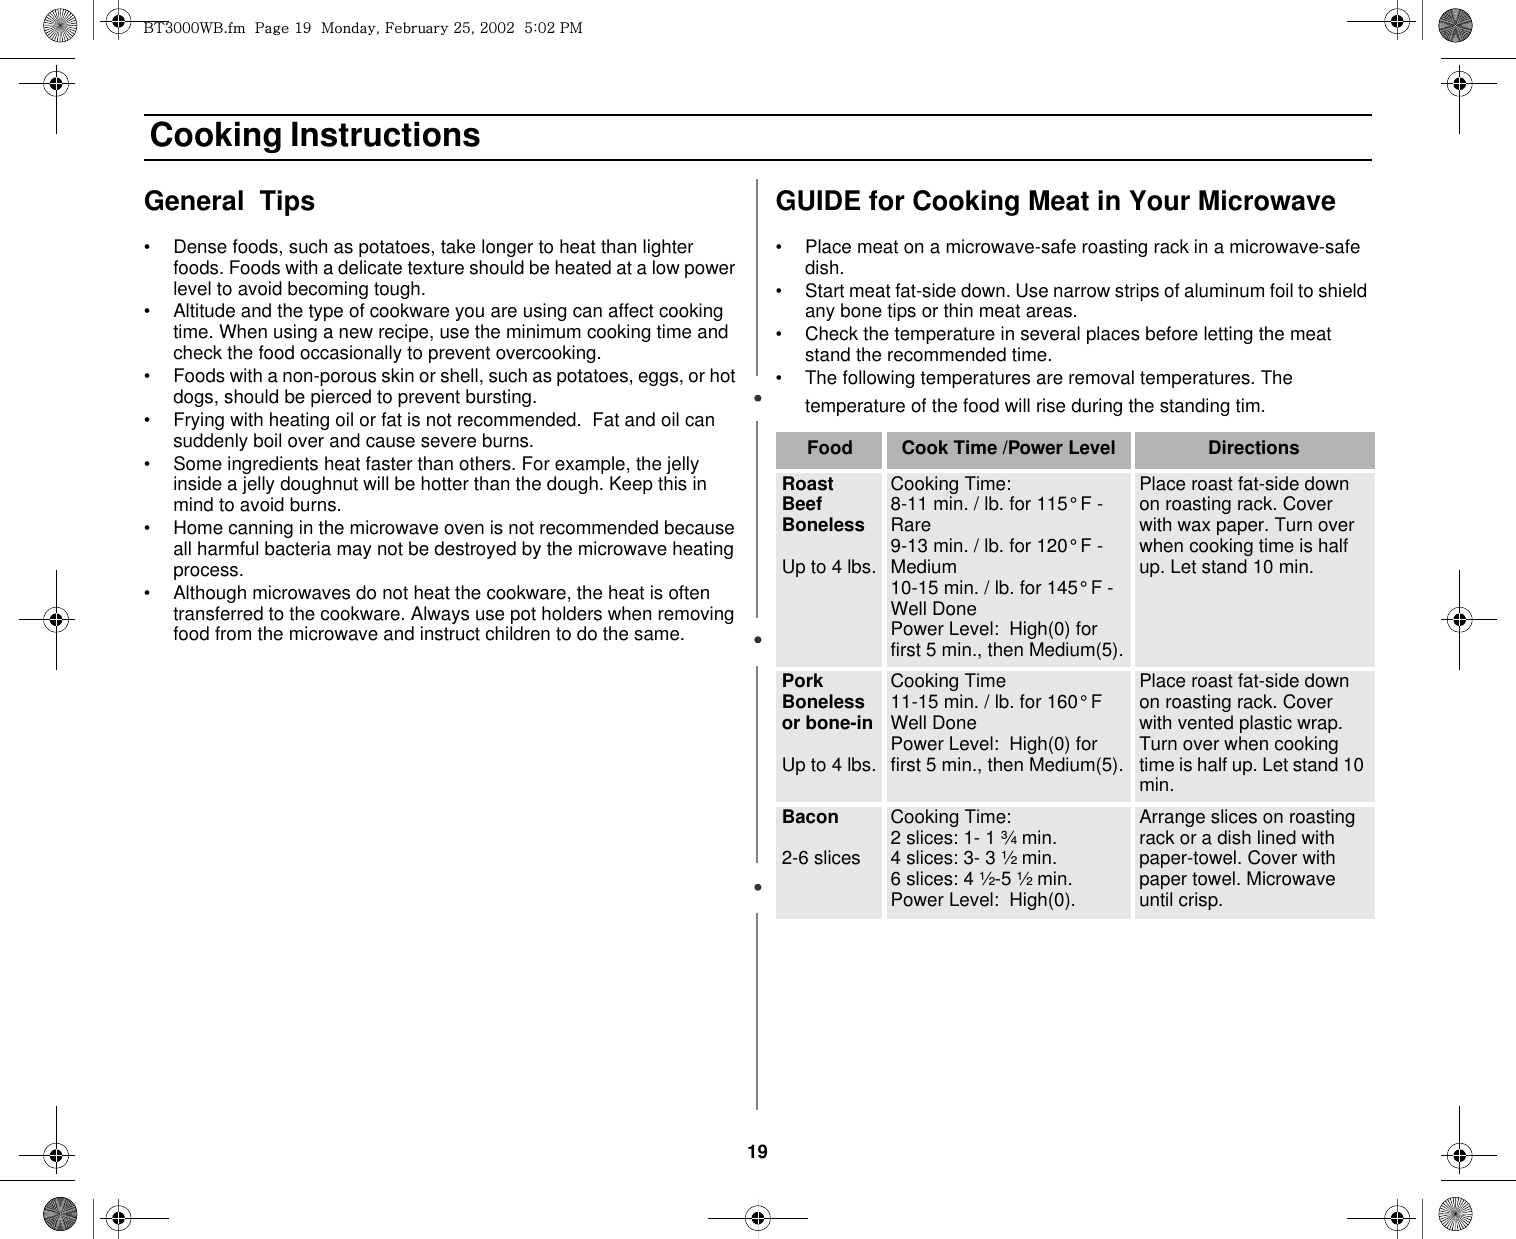
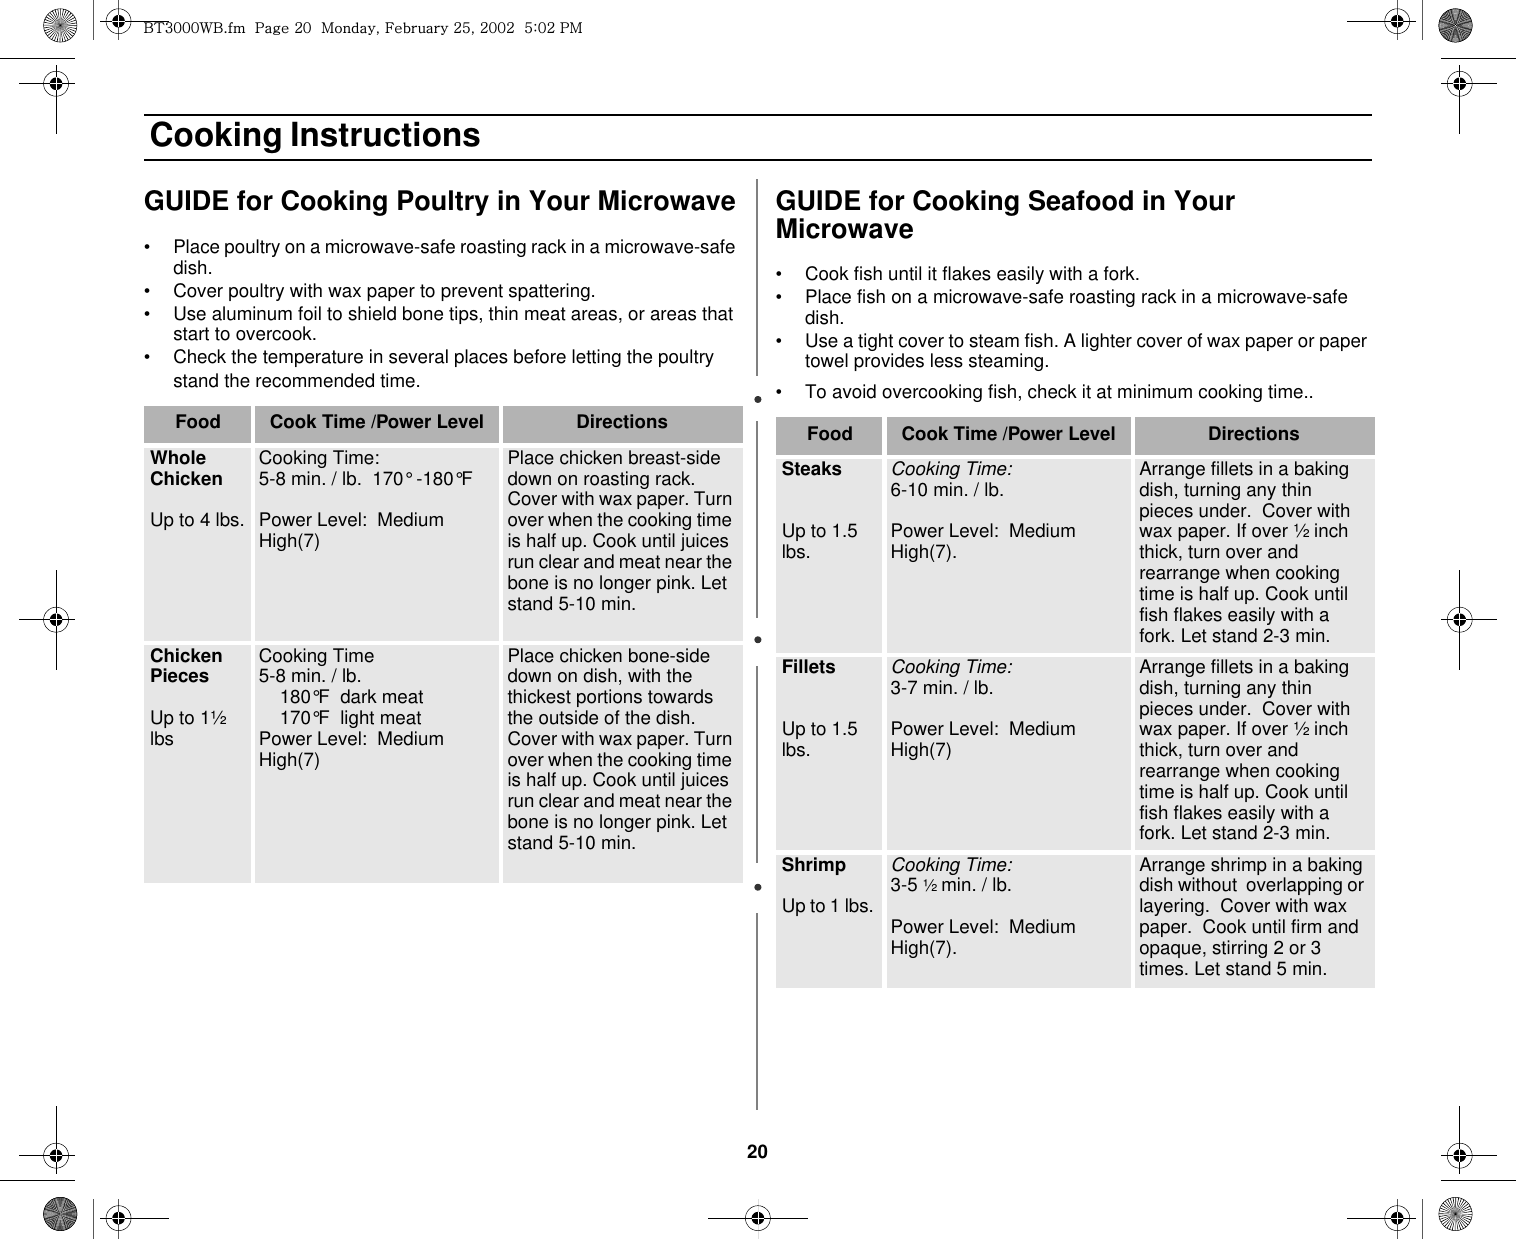
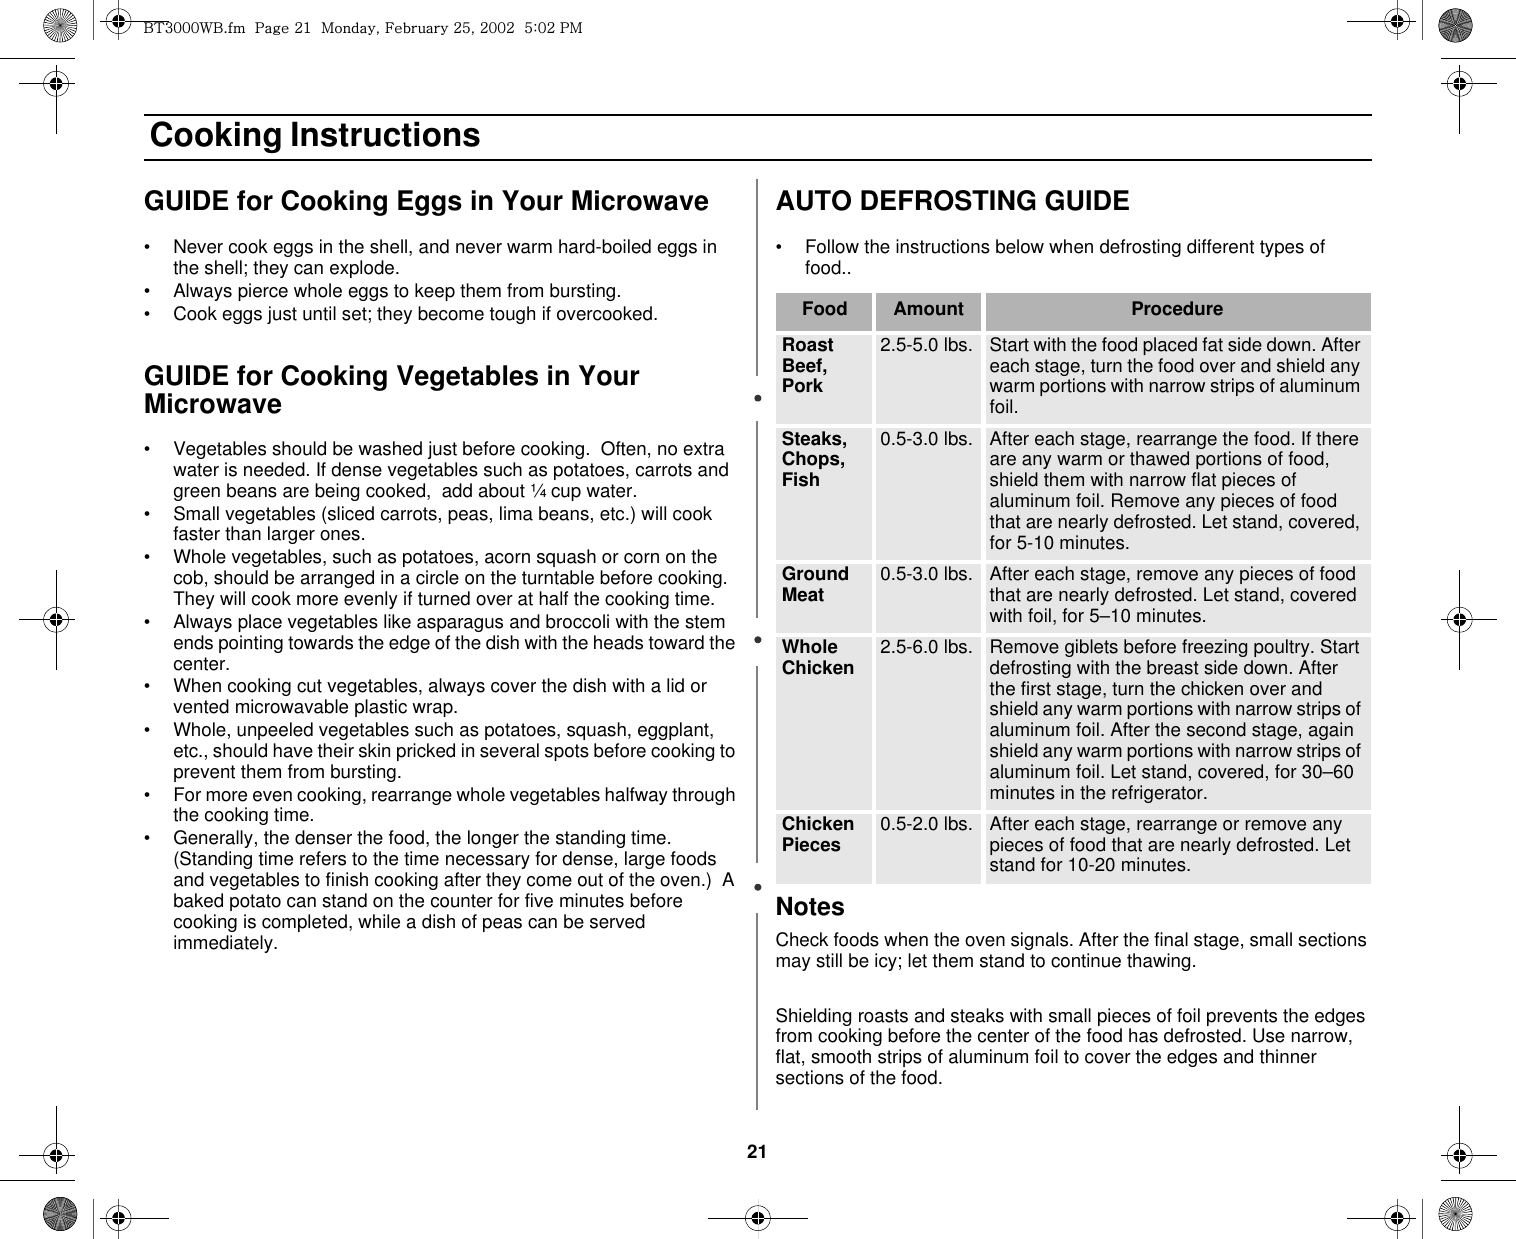
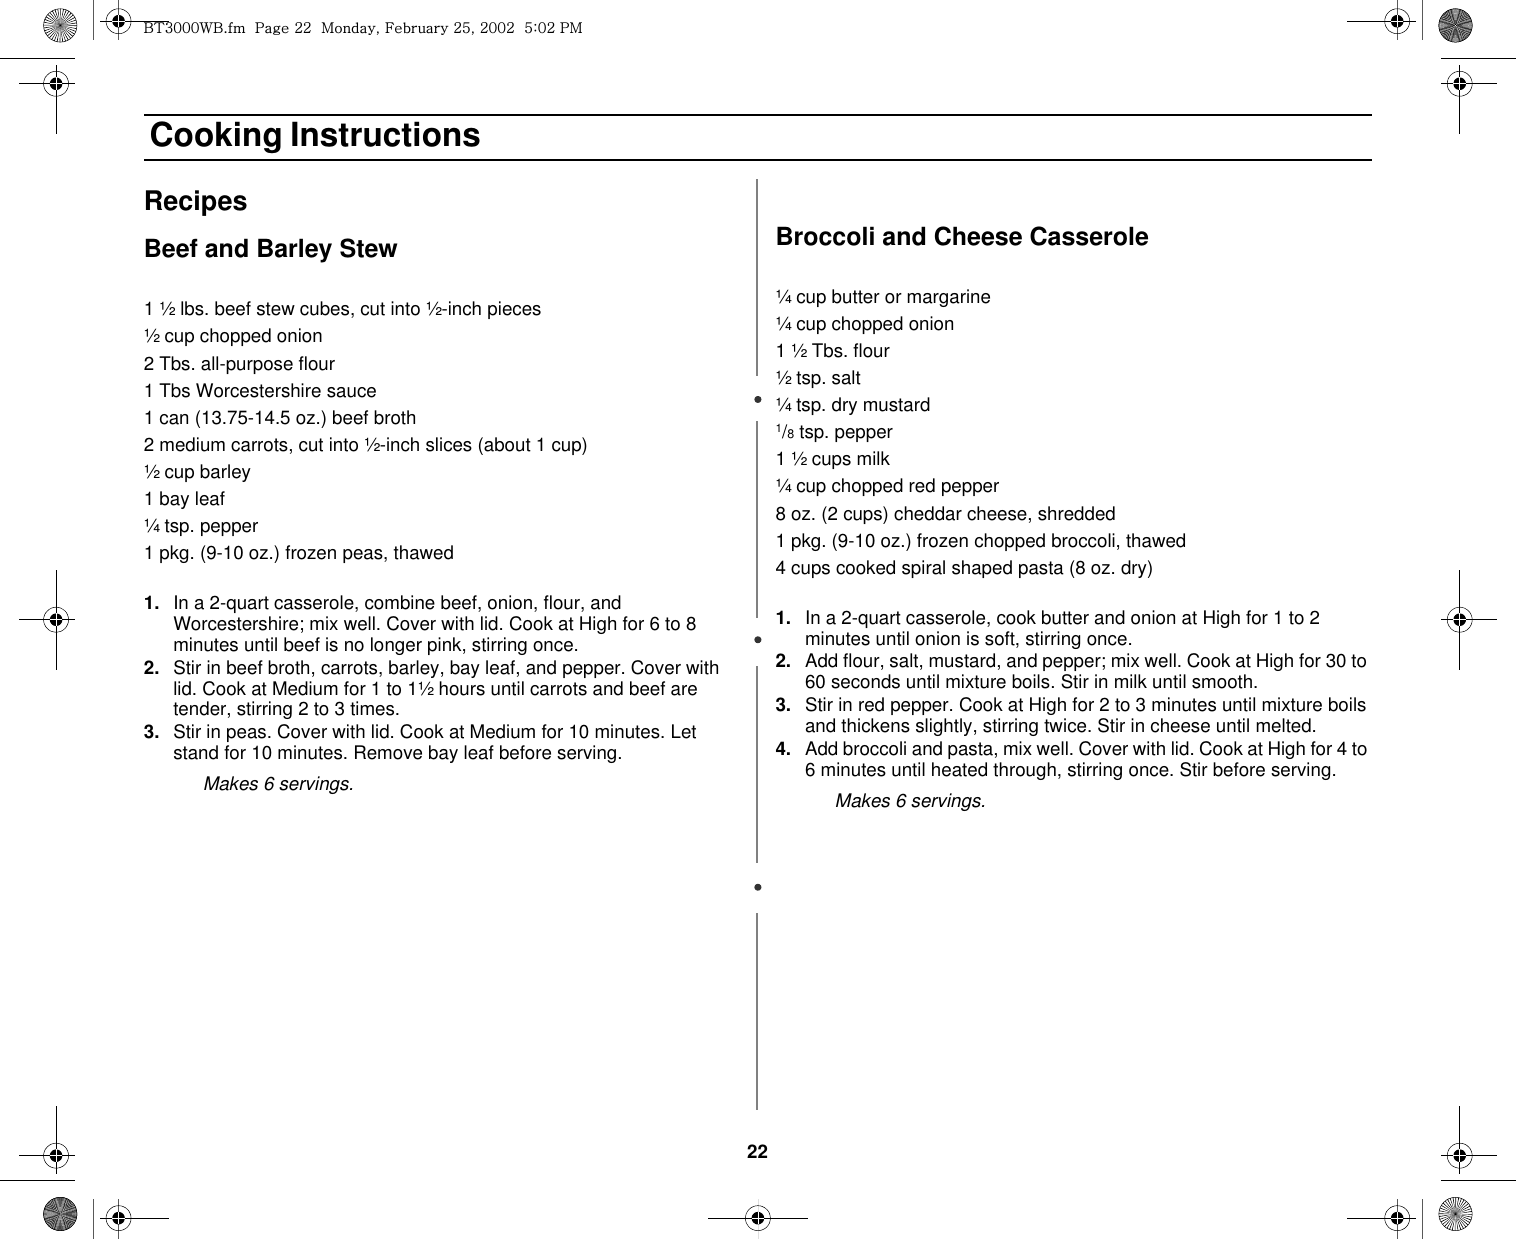
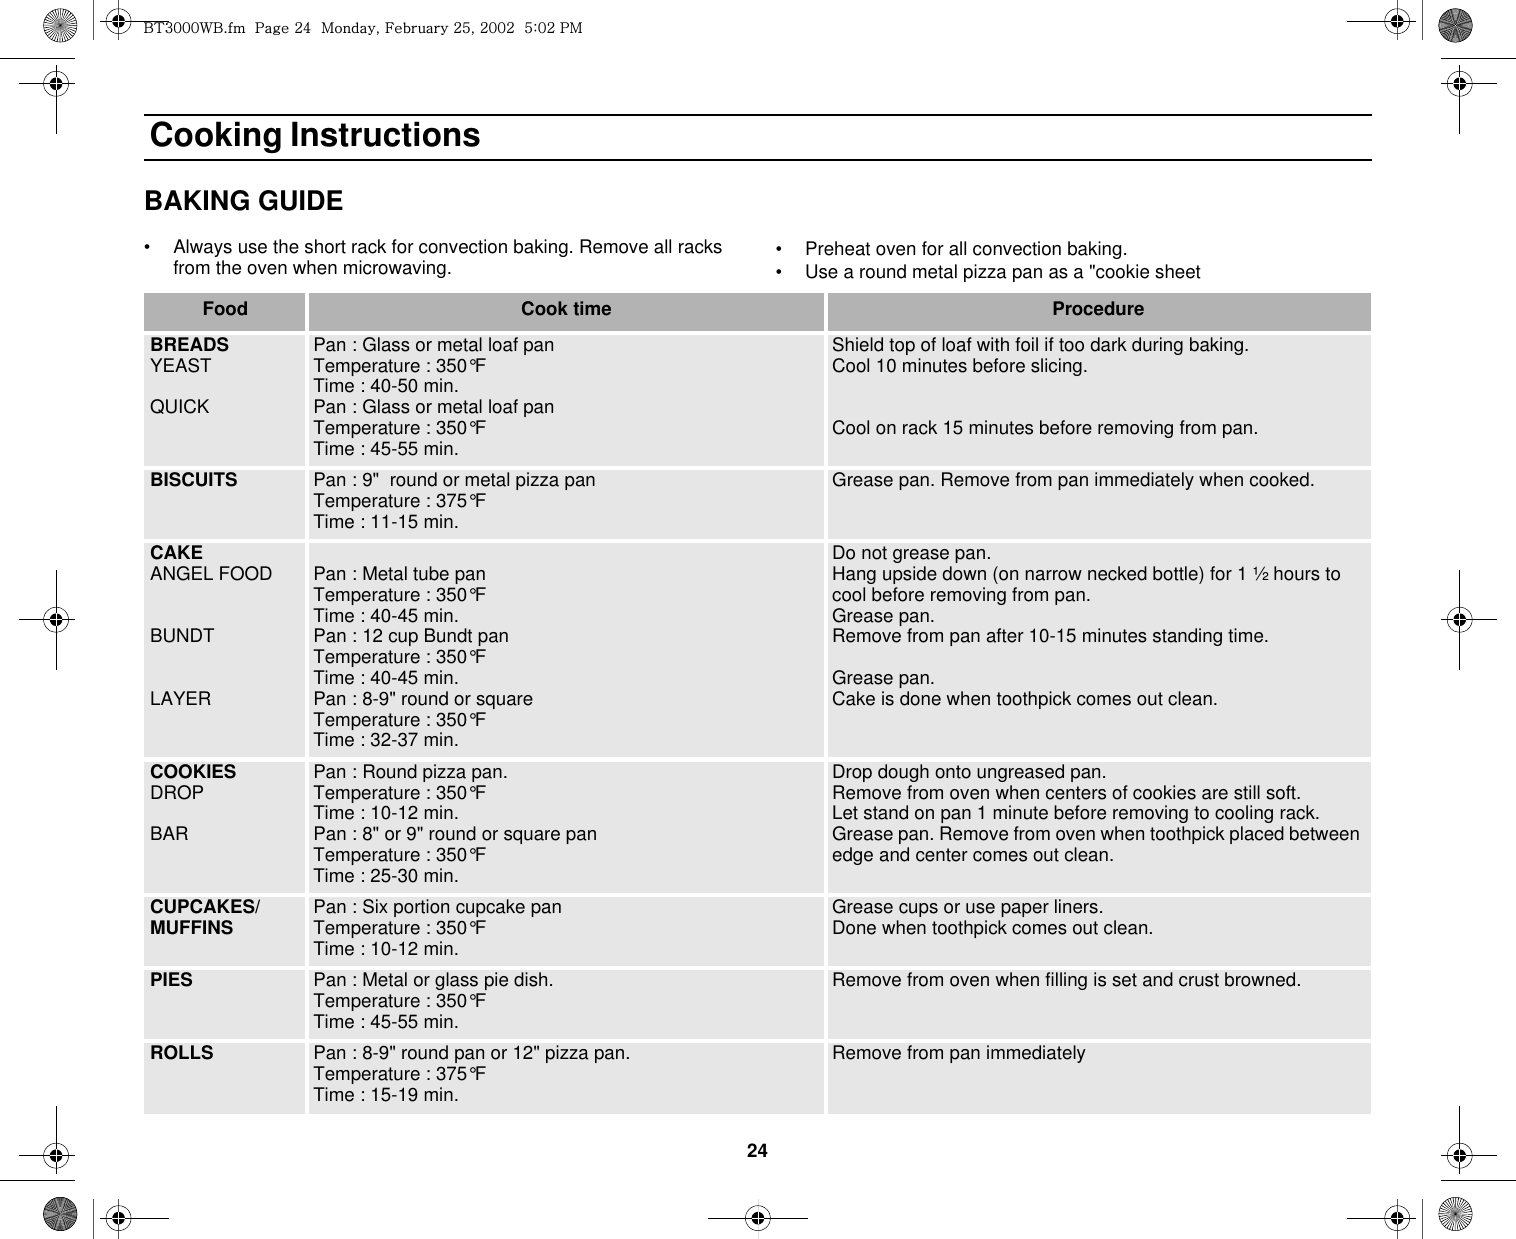
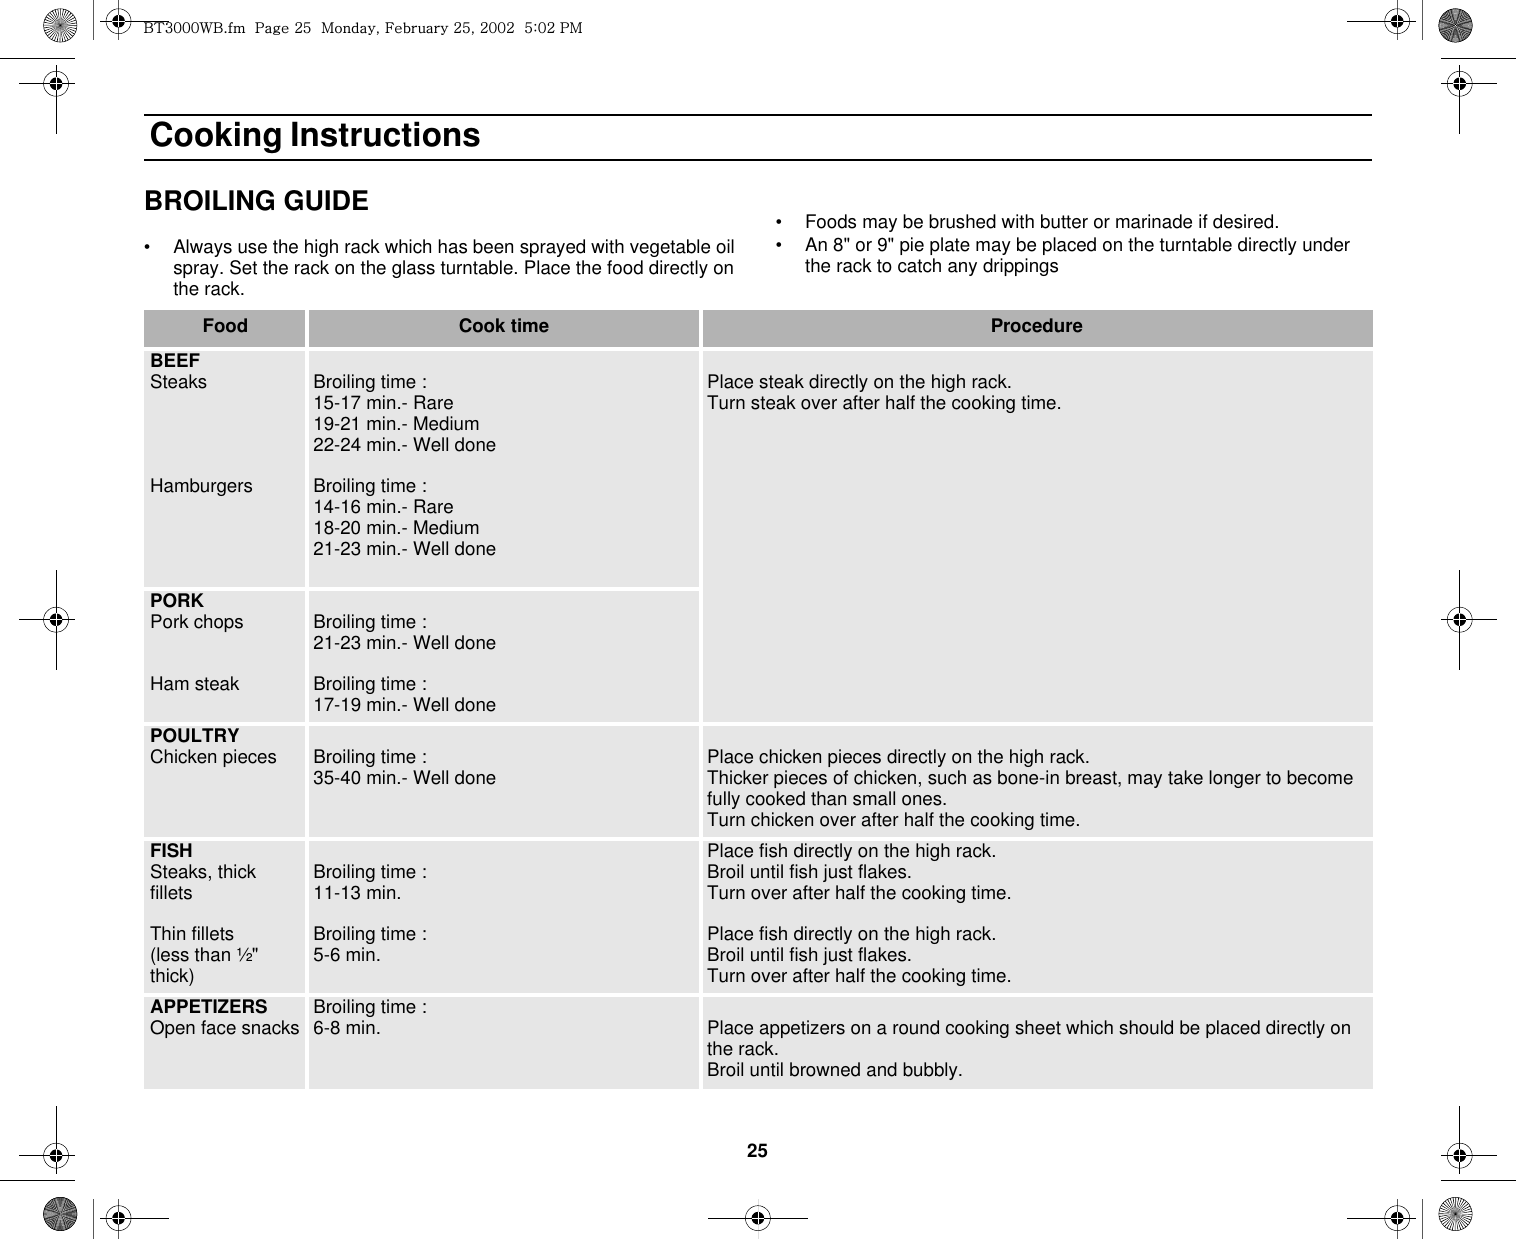
![26 Cooking InstructionsCOOKING GUIDE• When roasting meats and poultry, place meat directly on the low rack, which has been placed on the glass turntable and sprayed with vegetable cooking spray.• When using Combination cooking, multiply the weight of the meat by the minutes per pound, factor in the table below. After half the cooking time, turn the meat over, remove any accumulated drippings, return to the oven, and press Start.• Temperatures given below are removal temperatures. The meat continues to cook after removal from the oven and the temperatures will rise.Food Cook time ProcedureBEEFRoasts Roasting time :13-15 min./lb. for 115°F-Rare15-17 min./lb. for 125°F-Medium17-19 min./lb. for 145-150°F-Well donePlace the food directly on low rack which has been sprayed with vegetable cooking spray.POULTRYWhole chicken Roasting time :12-17 min./lb. for 170°F-white meat185°F-dark meatPORKBoneless roastSmoked hamRoasting time :23-26 min./lb. for 160°FRoasting time :12-15 min./lb. for 130°FCASSEROLE Baking time :35-40 min. Place dish on low rack.Bake on combination at 350°F until heated though.i{ZWWW~iUGGwGY]GGtSGmGY\SGYWWYGG\aWYGwt](https://usermanual.wiki/Samsung-Electronics-Co/BT3000/User-Guide-235088-Page-27.png)


![Quick ReferenceFeature OperationSet Clock 1. Press CLOCK.2. Use Number buttons to enter time.3. Press CLOCK again.One Stage Cooking1. Use Number buttons to set cooking time.2. Set power level or leave at high. 3. Press START.One Minute+ Cooking1. Press the ONE MINUTE + button once for each minute of cooking.2. The time will display and the oven will start.Instant Cook Buttons1. Press button that corresponds to the food you are cooking (for example, POPCORN).2. Press the button repeatedly to select serving size. Auto Defrost 1. Press AUTO DEFROST.2. Enter weight of food by pressing AUTO DEFROST button repeatedly or using the Number buttons.3. When prompted by oven display, press PAUSE/CANCEL button and turn food over. Press START to resume defrosting cycle.Auto Reheat 1. Press AUTO REHEAT repeatedly to select type of dish to reheat.2. To increase serving size, press the corresponding Number button.3. Press START to begin reheating cycle.Set Cooking Time and Power Levels1. Use Number buttons to set cooking time.2. To set power level at other than HIGH, press POWER LEVEL and use the number buttons to enter the power level. 3. Press START to begin cooking. Samsung Electronics Co., Ltd.February. 2002Printed in koreaSamsung Electronics America, Inc.Headquarters105 Challenger RoadRidgefield Park, New Jersey 07660-0511i{ZWWW~iUGGwGZ]GGtSGmGY\SGYWWYGG\aWYGwt](https://usermanual.wiki/Samsung-Electronics-Co/BT3000/User-Guide-235088-Page-37.png)