Samsung Electronics Co DVDVR300 DVD Recorder/ Video Cassette Recorder User Manual 1
Samsung Electronics Co Ltd DVD Recorder/ Video Cassette Recorder Users Manual 1
UserManual.wiki
>
Samsung Electronics Co
>
DVDVR300 User Manual
>
Users Manual 1
Contents
1.
Users Manual 1
2.
Users Manual 2
Users Manual 1
Navigation menu
Upload a User Manual
Namespaces
Wiki Guide
HTML
PDF
Info
Views
User Manual
Discussion / Help
Navigation

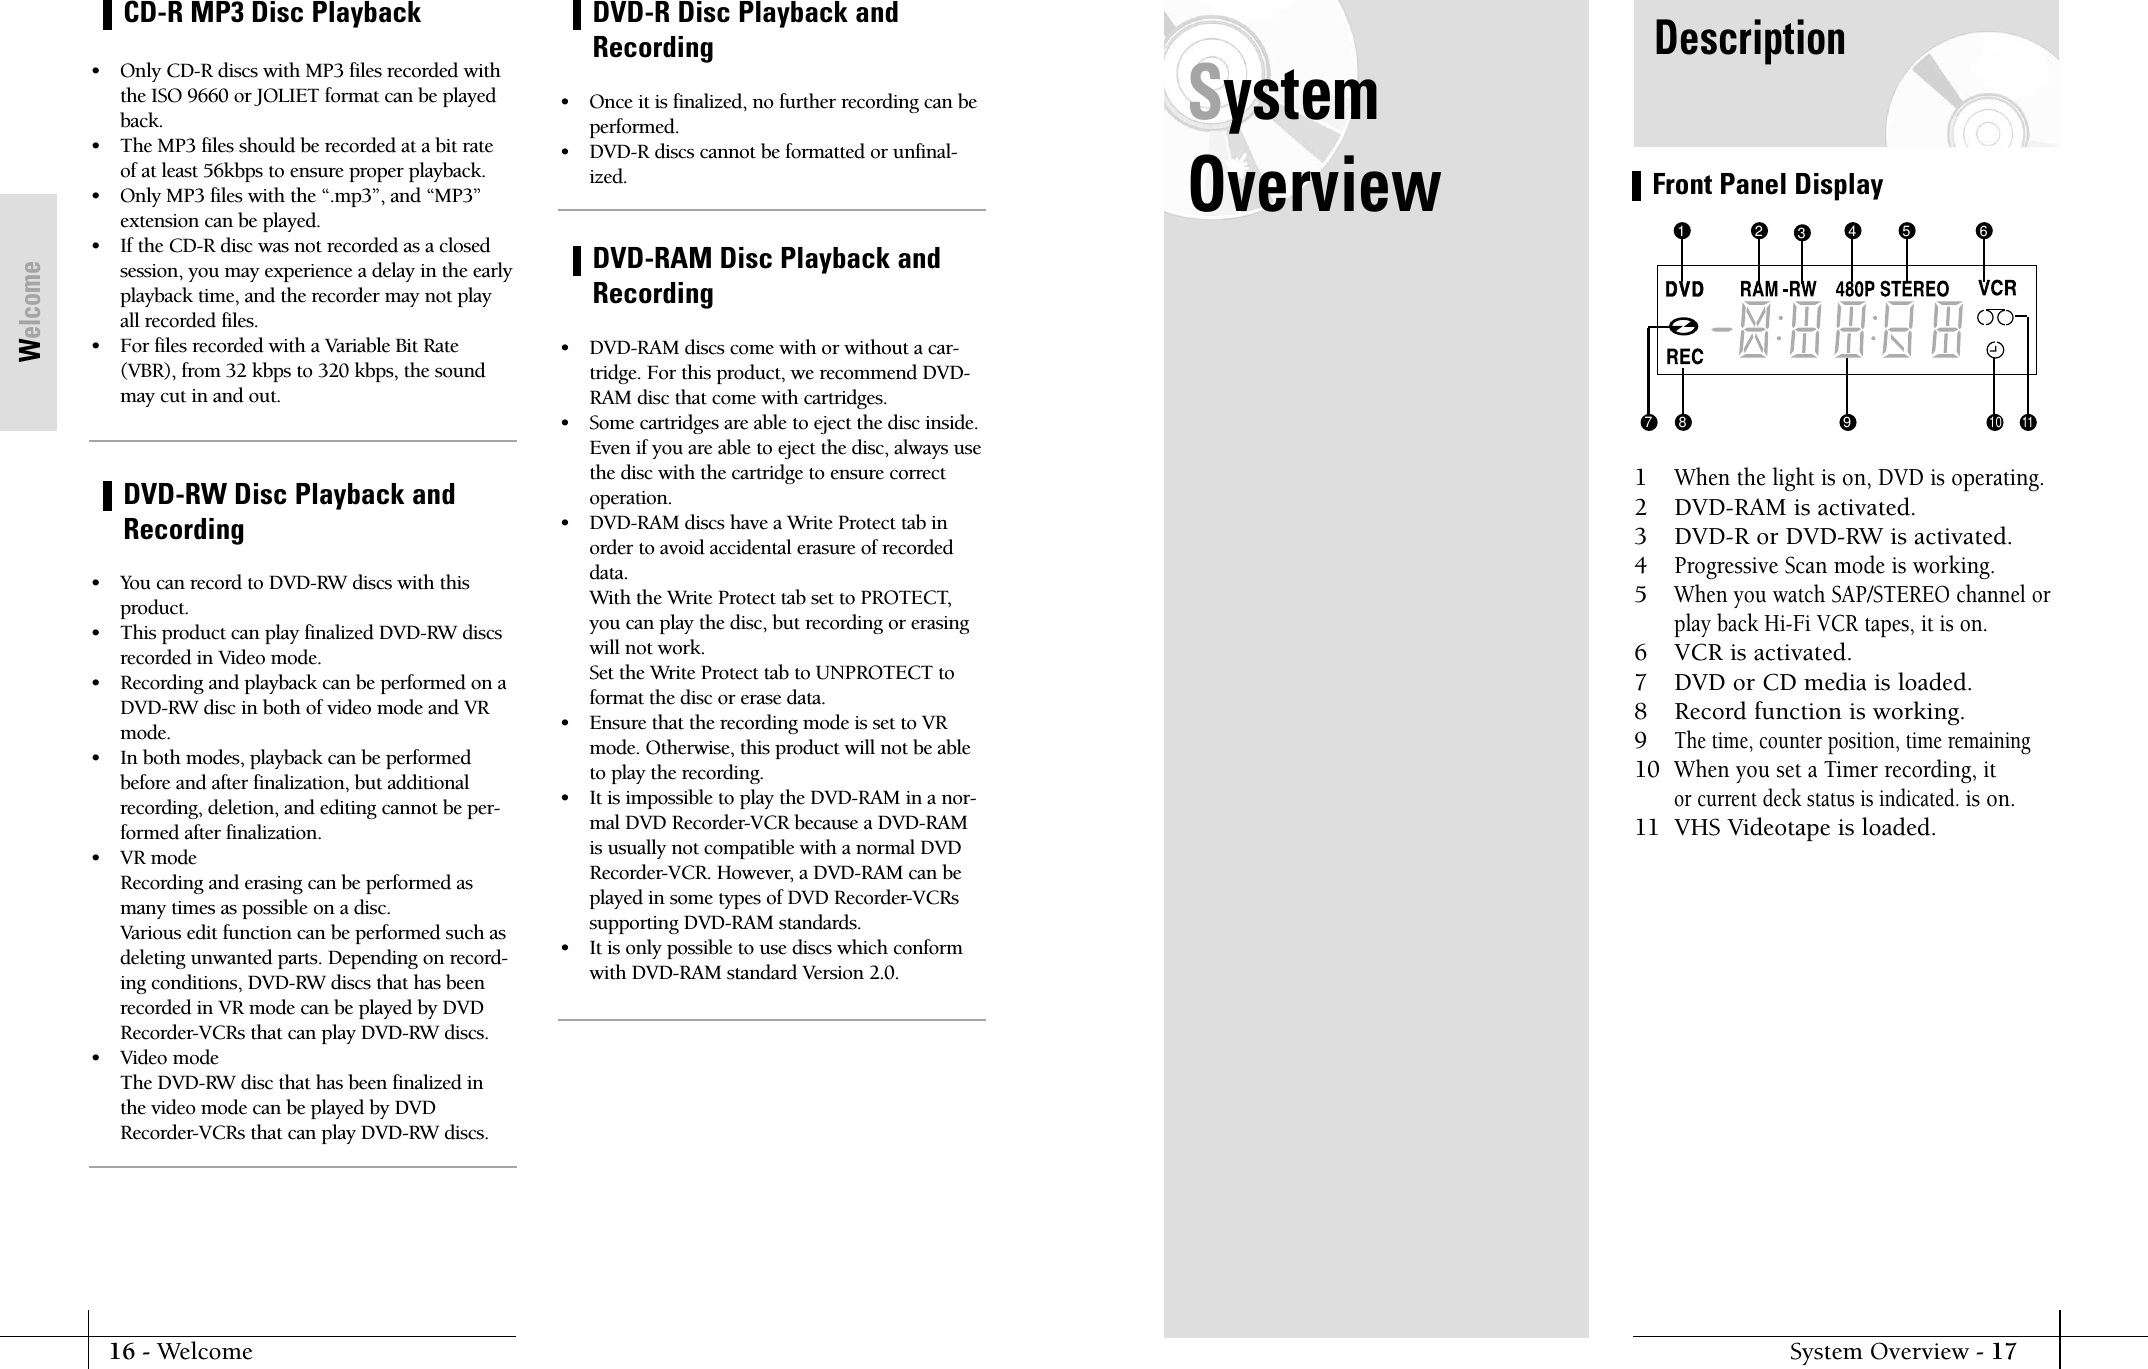
![Getting StartedGetting Started - 9Getting Started8- Getting StartedProtectionThis DVD Recorder-VCR can allow you toprotect the contentsof your discs, asdescribed in the ways below.• Cartridge-protected:With the write-protect tab located at the pro-tect position, the contents of the disc cannotbe recorded, edited, or erased.• Program-protected: See page 80 “Locking thetitle List”• Disc-protected: See page 93 “Disc Protection”❊ Illegal copies of DVD-RAM/DVD-RW/DVDdiscs that are incompatible with the DVD-VIDEO format can not be played with thisproduct.❊ For more information on recording a DVD,consult your DVD-RAM/DVD-RW/DVD-Rmanufacturer.❊ If poor quality DVD-RAM/DVD-RW/DVD-Rdiscs are used, your recordings may fail.• LD, CD-G, CD-I, CD-ROM, DVD-ROM,DVD+R and DVD+RW discs should not beused in this product.[Note]Disc types that can be played : CD/CD-R/CDRW/MP3/JPEG/DVD-Video/DVD-RAM/DVD-RW/DVD-R. However, if yourDVD-RW disc was recorded with anotherdevice, it can be played only if it was recordedand finalized in video mode.• Some commercial discs and DVD discs pur-chased outside your region may not beplayable with this product. When these discsare played, either “No disc.” or “Please checkthe regional code.” will be displayed.• If your DVD-RW disc is an illegal copy or isnot in DVD video format, it may also not beplayable.Do not use the following discs!• Many DVD discs are encoded with copyprotection. Because of this, you shouldonly connect your DVD Recorder-VCRdirectly to your TV, not to a VCR.Connecting to a VCR results in a distortedpicture from copy-protected DVD discs.• This product incorporates copyright pro-tection technology that is protected bymethods claims of certain U.S. patents andother intellectual property rights ownedby Macrovision Corporation and otherrights owners. Use of this copyright pro-tection technology must be authorized byMacrovision Corporation, and is intendedfor home and other limited viewing usesonly unless otherwise authorized byMacrovision Corporation. Reverse engi-neering or disassembly is prohibited.COPY PROTECTION• Recording and playback can be performed ona DVD-RW discs in both of Video Mode andVR Mode.• Once a DVD-RW recorded in VR Mode isfinalized,you cannot perform addtional record-ing.• Once a DVD-RW recorded in Video Mode isfinalized, it becomes DVD-Video.• In both modes, playback can be performedbefore and after finalization, but additionalrecording, deleting and editing can not be per-formed after finalization. see below the table...• If you want to record the disc in VR Mode andthen record in V Mode, be sure to executeFormat. Be careful when executing Formatbecause all the recorded data may be lost.• A DVD-RW blank disc is initialized to VideoMode when first initialized.DVD-RW (VR mode)- This is a format that is used for recording dataon a DVD-RAM or DVD-RW disc. You canrepeat recording, editing, deleting, partial dele-tion, creation of playlist, and etc.- A disc that is recorded in this mode may not beplayed by an existing DVD player.DVD-RW (Video mode)- This is a format that is used for recording dataon a DVD-RW or DVD-R disc. The disc can beplayed by an existing DVD player once it hasbeen finalized.- If a disc that has been recorded in V Mode buthas not been finalized by a different maker’srecorder, it cannot be played or additionally berecorded by this recorder.DVD-RW Disc Playback and Recording• DVD-RAM discs come with or without a car-tridge. For this product, we recommend DVD-RAM discs that come with cartridges.• Some cartridges are able to eject the discinside. Even if you are able to eject the disc,always use the disc with the cartridge toensure correct operation.• DVD-RAM discs have a Write Protect tab inorder to avoid accidental erasure of recordeddata. With the Write Protect tab set to PRO-TECT, you can play the disc, but recording orerasing will not work. Set the Write Protecttab to UNPROTECT to format the disc orerase data.• Ensure that the recording mode is set to VRmode. Otherwise, this product will not be ableto play the recording.• You cannot play a DVD-RAM in a normalDVD player because a DVD-RAM is usuallynot compatible with a normal DVD player.However, a DVD-RAM can be played in sometypes of DVD players supporting DVD-RAMstandards.• DVD-RAM recorded on this unit may notwork with other DVD players. For the deter-mination of compatibility with these DVD-RAM discs, refer to the user’s manual for theplayer.• DVD-RAM recorded on this product may notbe compatible with other DVD players, referto the manual for the player to determinecompatibility with these DVD-RAM disc.• This unit is compatible with both non-car-tridge and cartridge DVD-RAM, but the write-protect tabs on cartridge-type discs give betterprotection to your recordings.DVD-RAM Disc Playback and RecordingPrecaution](https://usermanual.wiki/Samsung-Electronics-Co/DVDVR300.Users-Manual-1/User-Guide-426694-Page-5.png)