Samsung Electronics Co DVDVR320A DVD Recorder/ Video Cassette Recorder User Manual 00588A 00 VR320 1 XAA eng
Samsung Electronics Co Ltd DVD Recorder/ Video Cassette Recorder 00588A 00 VR320 1 XAA eng
Contents
- 1. Users Manual 1
- 2. Users Manual 2
Users Manual 2
English - 45
Playback
Playing back an Audio
CD (CD-DA)
Each disc has a variety of menu functions available.
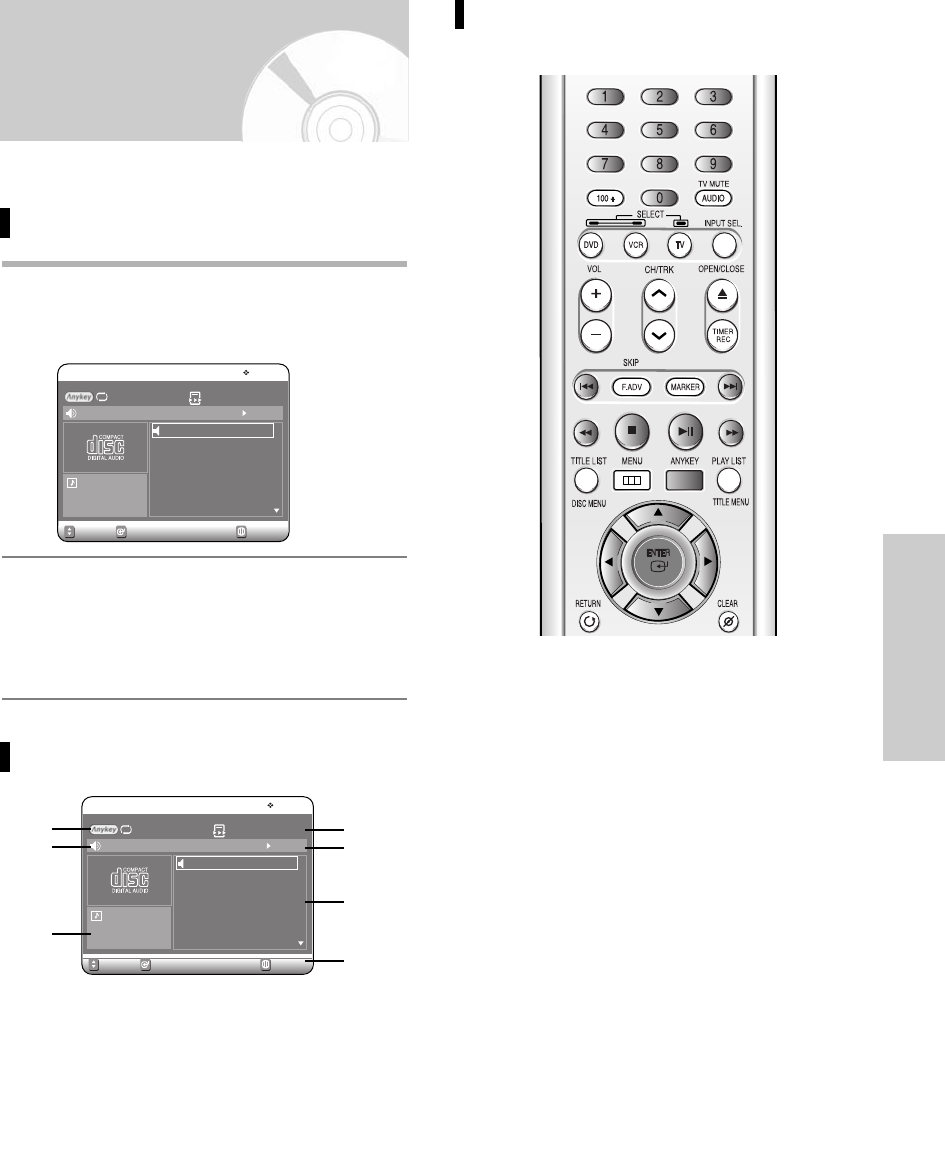
Playing an Audio CD(CD-DA)
1
Insert an Audio CD (CD-DA) into the disc tray.
• The Audio CD menu appears and the tracks
(songs) are played automatically.
2
Press the
……††
buttons to select the track (song) to
start playback from, and then press the ENTER
button.
• You can also select the track (song) by pressing
the number buttons on the remote.
Audio CD(CD-DA) Screen Elements
1. Repeat mode: Repeat off/Repeat Track/Repeat Disc.
2. Current track (song): Displays the number of the track
currently being played.
3. Displays the current play index and total track number.
4. This shows the operating state of a disc and a playback
time corresponding to a portion that is currently played.
5. Displays the track list (song list) and the playing time of
each track.
6. Button display.
7. Play Option: Normal, Random, Intro or Playlist
SELECT MENUMOVE
Music
CD
Repeat : Off Play Option : Normal
01. TRACK 1
02. TRACK 2
03. TRACK 3
04. TRACK 4
05. TRACK 5
06. TRACK 6
4:39
4:31
4:30
3:53
4:23
4:24
00 : 5201. TRACK 1
01/12
SELECTMOVE
Music
CD
Repeat : Off Play Option : Normal
01. TRACK 1
02. TRACK 2
03. TRACK 3
04. TRACK 4
05. TRACK 5
06. TRACK 6
4:39
4:31
4:30
3:53
4:23
4:24
00 : 5201. TRACK 1
01/12
!
@
#
^
%
$
&
Buttons on the Remote Control used
for CD playback
1.
……††
, 0~9: Selects a track (song).
2.
√√
:Plays the selected track (song).
3. ENTER button: Plays the selected track (song).
4.
√√l
button: Plays the next track.
5.
lœœ
button: Returns to the beginning of the current
track when pressed during playback. If pressed
again, your DVD Recorder & VCR moves to and
plays the previous track.
If you press this button within three seconds after
playback starts, the previous track will be played.
If you press this button after three seconds, the
current track will be replayed from the beginning.
6. Press the (œœ /√√) button:Fast Play
(FF1/FR1, FF2/FR2, FF3/FR3)
7. ■:Stops a track(song).
8. √ll : Plays a track(song) or pauses playback.
9. ANYKEY : To select the top menu on screen display
(Repeat or Play Option).
MENU
00588A(00)-VR320-2/XAA-eng 6/7/05 7:14 PM Page 45
46 - English
Playback
Playing back an MP3 CD
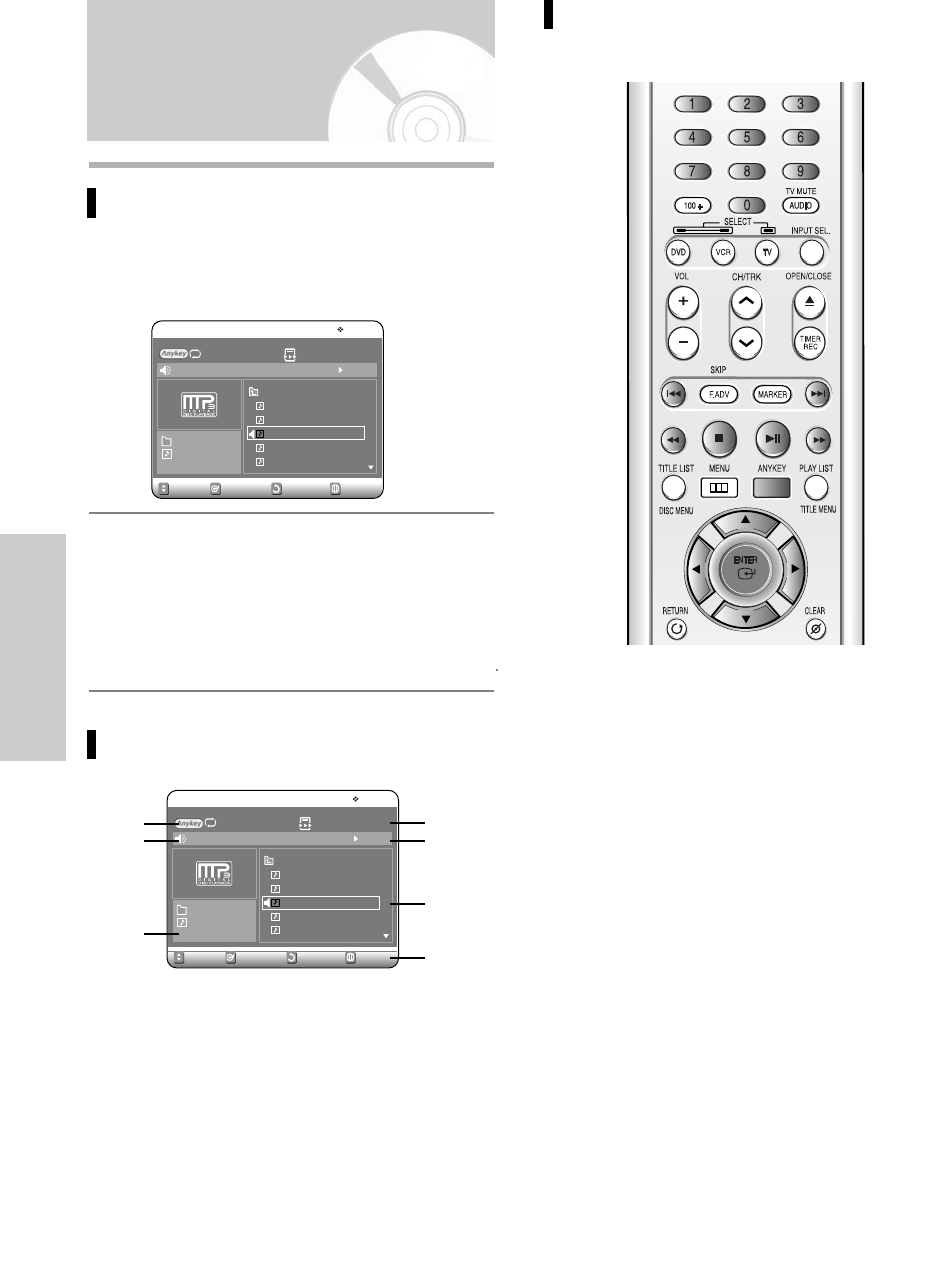
Playing an MP3 Disc
1
Insert an MP3 CD into the disc tray.
• The MP3 menu is displayed and the tracks
(songs) are played automatically.
2
Press the
……††
buttons to select the folder you
want to hear, and then press the ENTER button.
• Press the
……††
buttons to select the track (song)
you want to hear, and then press the ENTER
button.
• You can also select the desired track (song) by
pressing the number buttons on the remote.
MP3 Screen Elements
1. Repeat mode: Repeat off, Repeat Track, Repeat
Folder or Repeat Disc
2. Current track (song): Displays the name of the track
being played.
3. Displays the current folder and play index.
4. This shows the operating state of a disc and a play-
back time corresponding to a portion that is currently
played.
5. Displays the information for the folder and its tracks.
6. Button display.
7. Play Option : Normal, Random, Intro or Playlist
SELECT RETURNMOVE
Music
MP3
Repeat : Off Play Option : Normal
ROOT
Bryan Adams
Bryan Adams_2
Straight from the heart
Run to you
Heaven
00 :22Straight from the heart
ROOT
03/06
SELECT RETURNMOVE
Music
MP3
Repeat : Off Play Option : Normal
ROOT
Bryan Adams
Bryan Adams_2
Straight from the heart
Run to you
Heaven
00 :22Straight from the heart
ROOT
03/06
!
@
#
&
$
%
^
Buttons on the Remote Control
used for MP3 CD playback
1.
……††
, 0~9:
Selects a track (song).
2.
√√
:Plays the selected track (song).
3. ENTER button:Plays the selected track (song) or
displays the files in the selected folder.
4. RETURN button:Moves to the folder to which the
current song belongs.
5. √√
l
button:Plays the next track.
6.
l
œœ button:Returns to the beginning of the current
track when pressed during playback. If pressed
again, your DVD Recorder & VCR moves to and
plays the previous track.
If you press this button within three seconds after
playback starts, the previous track will be played.
If you press this button after three seconds, the
current track will be replayed from the beginning.
7. ■:Stops a track(song).
8. √ll : Plays a track(song) or pauses playback.
9. ANYKEY : To select the top menu on screen display
(Repeat
or Play Option).
MENU
MENU
00588A(00)-VR320-2/XAA-eng 6/7/05 7:14 PM Page 46
Playback
Play Option Mode
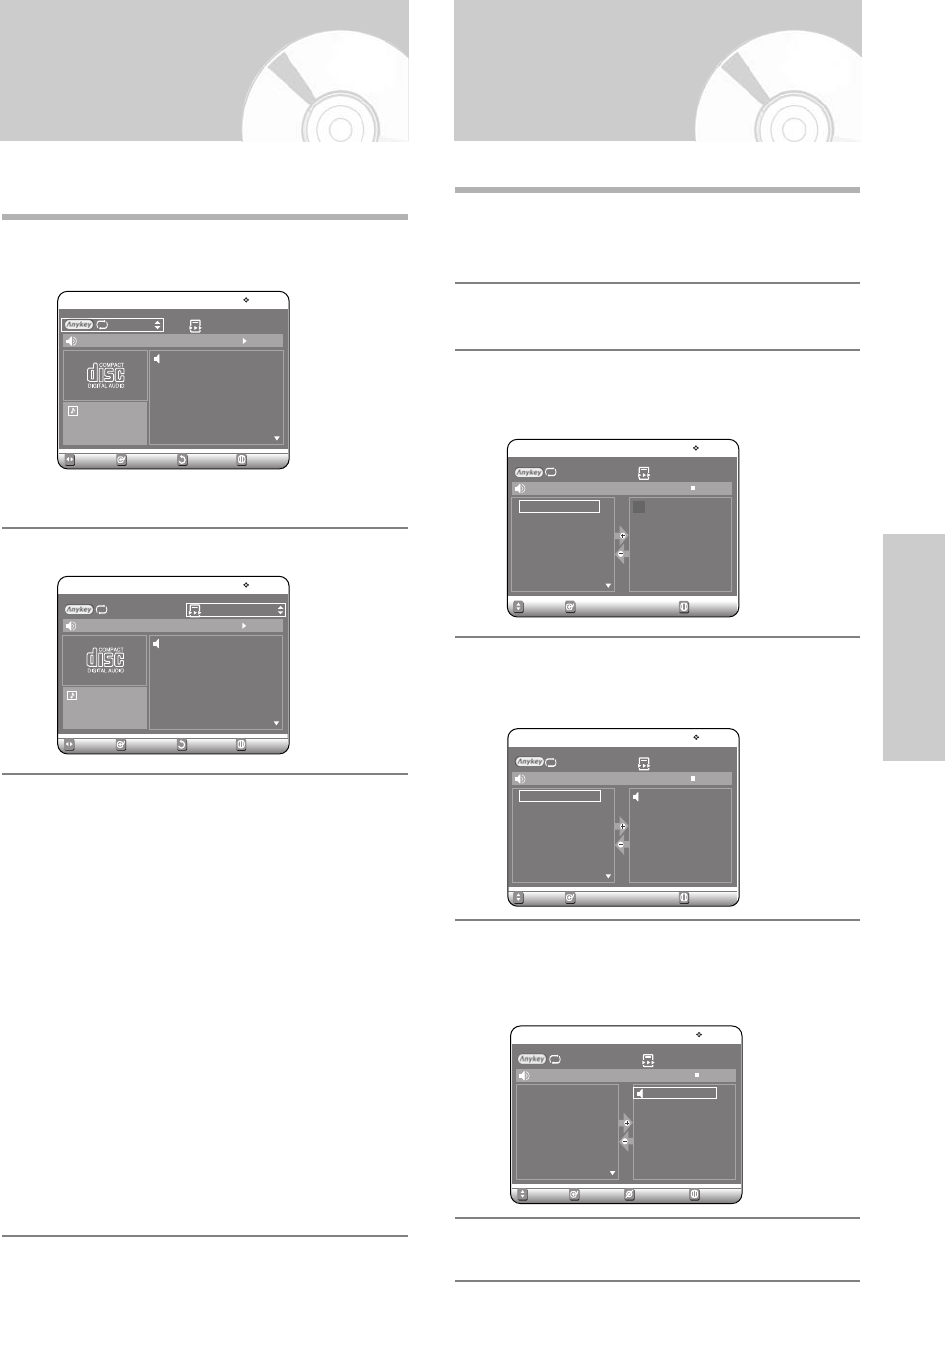
The Play Option can be used with an Audio CD or MP3
in the Play or Stop mode.
1
Press the ANYKEY button during playback.
Repeat mode will be highlighted.
• During Stop, Play option will be highlighted.
2
Press the œ √ buttons to select Play Option.
3
Press the …† buttons to select a desired Play
Option, then press the ENTER button.
•Normal: Tracks on a disc are played in the
order in which they were recorded on the disc.
•Random: The Random option plays a disc’s
tracks in random order. After a random list is
generated and played completely, another
random list is generated and played.
Random Play is continued until the play option
is changed.
•Intro: The first 10 seconds of each track will be
played.If you want to listen to the music that you
have selected, press the ENTER button or √ll
button. The play option will be changed to
Normal Play. When Intro Play is completed,
Normal Play is performed.
• Playlist: The Playlist playback option allows you
to select the order in which you want tracks to
play.
You can register a maximum 30 tracks in the playlist.
1
Press the ANYKEY button during playback.
Repeat mode will be highlighted.
• During Stop, Play option will be highlighted.
2
Press the œ √ buttons to select Play Option.
3
Press the …† buttons to select Playlist, then
press the ENTER button.
Playlist screen is displayed.
4
Press the …† buttons to select tracks in the order
in which you want them to play, then press the
ENTER button.
5
If you playlisted a wrong track, press the √ button,
then press the …† buttons to select wrong track.
Press the CLEAR button. The wrong track will be
removed.
6
Press the PLAY button to playback the playlist.
SELECT RETURN MENU
MOVE
Music
CD
Repeat : Off Play Option : Normal
01. TRACK 1
02. TRACK 2
03. TRACK 3
04. TRACK 4
05. TRACK 5
06. TRACK 6
4:39
4:31
4:30
3:53
4:23
4:24
00 : 5201. TRACK 1
01/12
SELECTMOVE
Music
CD
Repeat : Off
Play Option : Normal
01. TRACK 1
02. TRACK 2
03. TRACK 3
04. TRACK 4
05. TRACK 5
06. TRACK 6
4:39
4:31
4:30
3:53
4:23
4:24
00 : 5201. TRACK 1
01/12
To Program Tracks
SELECT MENU
MOVE
Music
CD
Repeat : Off Play Option : Playlist
01. TRACK 1
02. TRACK 2
03. TRACK 3
04. TRACK 4
05. TRACK 5
06. TRACK 6
00 : 00
1. P_TRACK 1
2. P_TRACK 2
3. P_TRACK 3
4. P_TRACK 4
SELECT MENUMOVE
Music
CD
Repeat : Off Play Option : Playlist
01. TRACK 1
02. TRACK 2
03. TRACK 3
04. TRACK 4
05. TRACK 5
06. TRACK 6
00 : 00
SELECT CANCEL MENU
MOVE
Music
CD
Repeat : Off Play Option : Playlist
01. TRACK 1
02. TRACK 2
03. TRACK 3
04. TRACK 4
05. TRACK 5
06. TRACK 6
01 : 36P_TRACK 1
1. P_TRACK 1
2. P_TRACK 2
3. P_TRACK 3
RETURN MENU
English - 47
00588A(00)-VR320-2/XAA-eng 6/7/05 7:14 PM Page 47
48 - English
Playback
Playing a picture CD
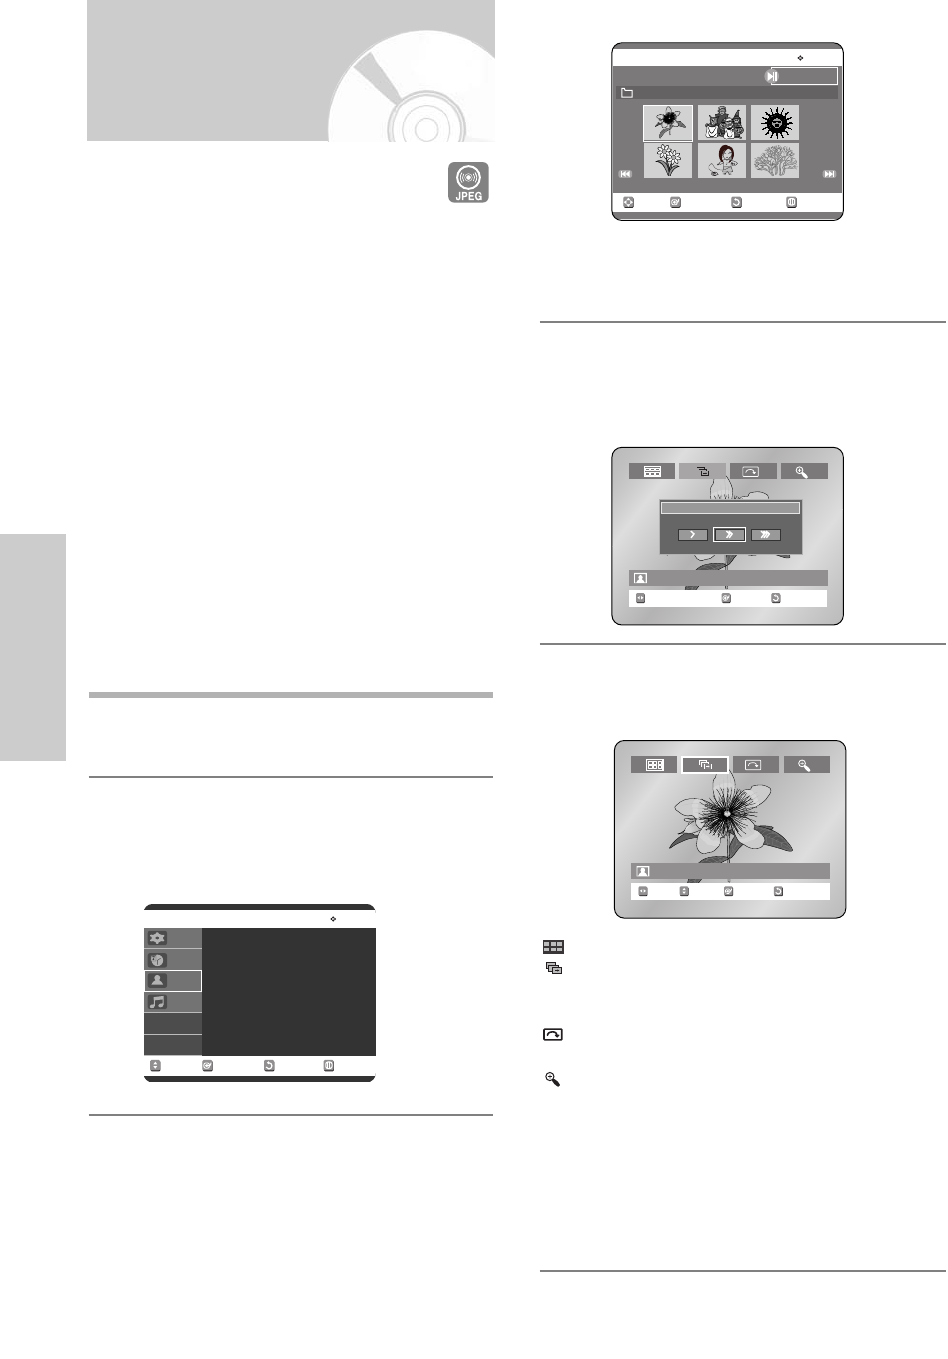
There are two types of Picture CDs. One is a CD
with only JPEG files. The other one is a CD with
JPEG files and MP3 files.(mixed CD)
1. When a mixed CD is played, a menu will be
shown in order to let you choose which con-
tents, either JPEG or MP3, you want to play.
1-1. If you want to play MP3 files on a mixed CD,
choose Music on the menu, then it will take
you to the MP3 play back screen.
1-2. If you want to play JPEG files on a mixed
CD, choose Photo on the menu, then it will
take you
to photo playback screen. See number 3 on
this page.
2. When a Picture CD(CD with only JPEG files) is
played, the recorder will show the Album
screen,with thumbnail images. See number 3
on this page.
1
Insert a Picture CD(JPEG only) or Mixed
CD(JPEG + MP3)into the disc tray.
2
When playing a Mixed CD, press the …† buttons
to select Photo, then press the ENTER or √but-
ton. (when playing a Picture CD, see number 3 on
this page.)
3
Press the …† œ √ buttons to select a picture.
• To see the next 6 pictures, press the
√√l
button.
• To see the previous 6 pictures, press the
l
œœ button.
4
-1
If you press the √ll button, the Slide show
screen will appear.
Press the œ √ buttons to set the slide show
speed, then press the ENTER button.
4
-2
Press the œ √ buttons to select a picture file in
Album screen and then press the ENTER
button.
: Returns to the Album screen.
: The unit enters slide show mode.
Before the slide show can begin, the picture
interval (Slide show speed) must be set.
: Each time the ENTER button is pressed, the
picture rotates 90 degrees clockwise.
: Each time the ENTER button is pressed, the
picture is enlarged up to 4X(four times the
normal size).
Normal
➝
2X
➝
4X
➝
2X
➝
Normal
• Press the ANYKEY button to display menu bar.
• Press the RETURN button to clear the menu bar.
RETURNSELECTMOVE EXIT
Photo
JPEG+MP3
Press [ENTER] or Right button :
Photo
SELECT RETURN MENUMOVE
Photo
JPEG
Index 6 / 73 Slide Show
ROOT / DSC01189
Page 2 / 13
RETURNSELECTMOVE
DSC01189
Slide Show Speed
RETURNSELECTMOVE PHOTO
DSC01189
Setup
Timer Rec.
Photo
Music
00588A(00)-VR320-2/XAA-eng 6/7/05 7:14 PM Page 48
English - 49
Playback
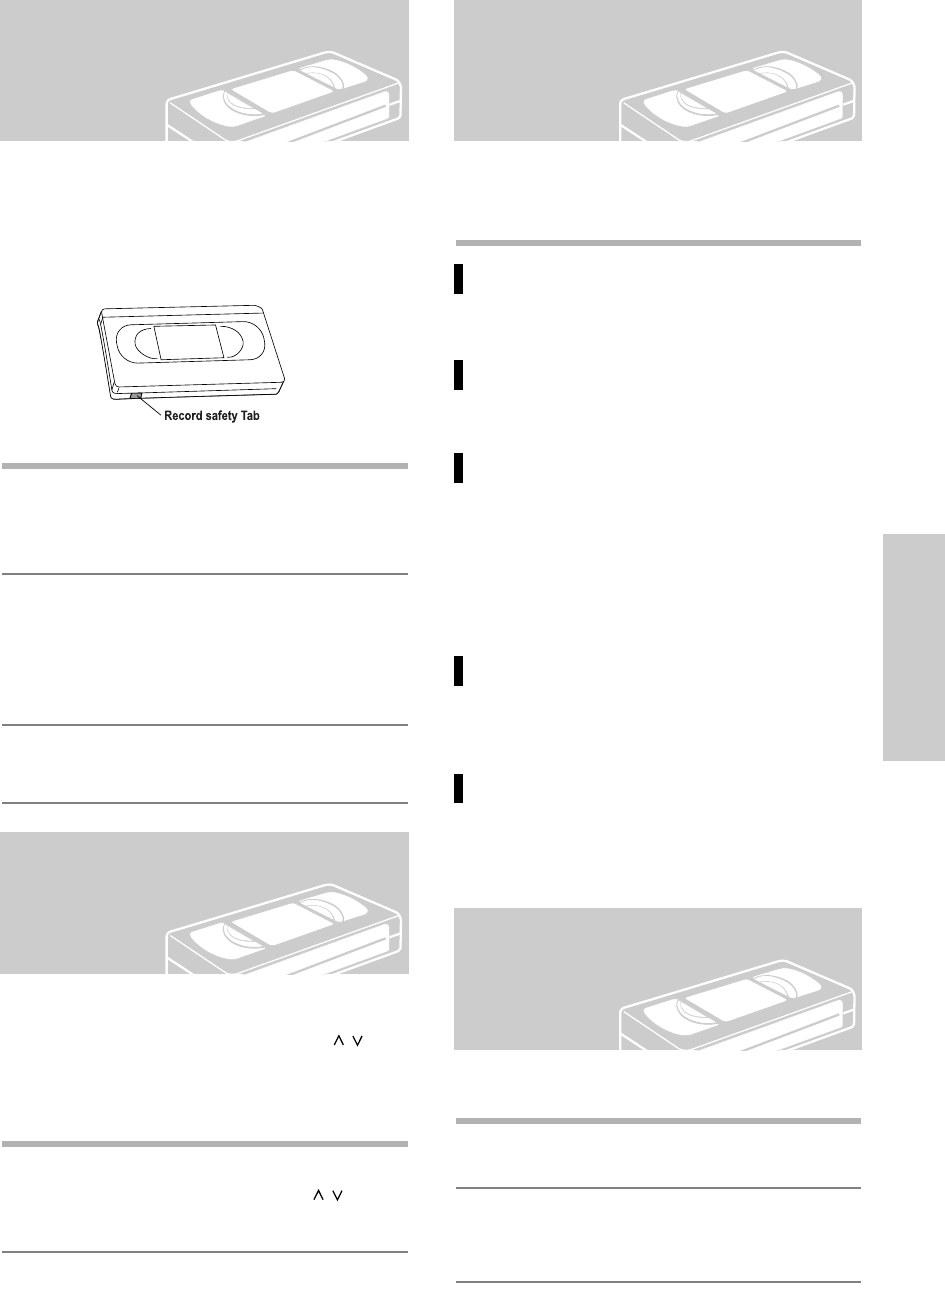
To play a standard VHS tape, just insert it into the VCR
deck and press the PLAY button. You can turn on the
Auto Play to enable the VCR deck to play automatically
when you insert a videotape that is missing the Record
Safety Tab.
1
Insert a standard VHS tape into the VCR deck.
• When a tape is inserted, power will turn on auto-
matically.
2
Press the √
II
(PLAY/PAUSE) button on the
remote control or on the front panel of the unit.
The videotape will begin to play automatically if
the Record Safety Tab is removed and Auto Play
is turned on.
3
Press the
(STOP) button on the remote control
or on the front panel of the unit.
The Tracking adjustment removes the white lines that
sometimes appear during playback because of slight
differences in recording decks. The CH/TRK (/
)
button will automatically align the recorded tracks with
the playback heads to solve this problem. You may also
set tracking manually.
1
Adjust Tracking Manually
During playback, press the CH/TRK (/
)
buttons to remove white lines from the picture.
While a videotape is playing, you can enjoy a variety of
special playback features, including Still, Frame
Advance, Skip, Slow motion, and more.
Pause
In Play mode, press √
II
(PLAY/PAUSE)button to still
a single frame.
Frame Advance
In the pause mode, press F.ADV/SKIP button to
advance to the next frame.
Fps/Review
In Play mode, press Forward (√√)button or Rewind
(œœ)button to Cue/review at two speeds:
• Picture Search - Press and release repeatedly to
advance the tape forward or backward at 2,3,5,7
times normal speed.
• Jet Search - Press and hold to advance the tape
forward or backward at 7 times normal speed.
Skip
In Play mode, press F.ADV/SKIP button to cue
ahead exactly 30 seconds. Press F.ADV/SKIP button
repeatedly up to 4 times to cue ahead 2 minutes.
Slow motion
In pause mode, press √√ button for slow motion.
Press the √√ button repeatedly to vary slow motion
speed from 1/5 to 1/30 of normal playback. Press
the PLAY button twice to resume normal viewing.
The DVD Recorder & VCR allows you to playback high
quality S-VHS tapes.
1
Insert an S-VHS tape into the VCR deck.
2
Press √
II
(PLAY/PAUSE)button on the remote
control or on the front panel to begin playback of
the S-VHS tape.
Playing the VCR
Tracking
Special VCR Playback
Features
S-VHS Playback
00588A(00)-VR320-2/XAA-eng 6/7/05 7:14 PM Page 49
Each time you record a cassette on this DVD Recorder
& VCR, an “index” is automatically marked on the tape
when recording starts.The Search function allows you to
fast-forward or rewind to a specific index and start play-
back from that point. Depending on the direction select-
ed, the indexes are numbered as follows
• This DVD Recorder & VCR uses a standard indexing
system (VISS). As a result, it will recognize any index-
es marked by other VCRs using the same system and
vice versa.
Go To [0:00:00] Stop
Use this feature when you want to search for the
0:00:00 counter position on a cassette.
1
Press the CLEAR button at the point on the tape
where you want to set the counter to 0:00:00.
2
While a cassette is stopped, press the ANYKEY
button.
3
Press the …† buttons to select Go To Zero, then
press the ENTER button.
The VCR will rewind or fast forward, searching for
the 0:00:00 counter position, and then automati-
cally stop at that position.
End Search
Use this feature when you want to search for a blank
position to record a program on a cassette.
50 - English
Playback
Variable Search
System
1
While a cassette is stopped, press the ANYKEY
button.
2
Press the …† buttons to select End Search, then
press the ENTER button.
The VCR will fast forward, searching for a blank
position, and then automatically stop at that posi-
tion. If the VCR reaches the end of the tape during
end search, the tape will be ejected.
Forward/Backward Intro Scan
Use scan and play when you don’t know exactly
where a program is located on a cassette tape.
1
While a cassette is stopped, press the ANYKEY
button.
2
Press the …† buttons to select Forward Intro
Scan or Reverse Intro Scan, then press the
ENTER button. When an Index mark is found, the
DVD Recorder & VCR will playback the tape for 5
seconds, after which it will continue searching for
the next Index mark.
Go To Zero
œœ
0 : 00 : 03
End Search
√√
0 : 00 : 03
Scan and Play
√√
0 : 00 : 23
SELECTMOVE
VCR
Go To Zero
End Search
Forward Intro Scan
Reverse Intro Scan
SELECTMOVE
VCR
Go To Zero
End Search
Forward Intro Scan
Reverse Intro Scan
SELECTMOVE
VCR
Go To Zero
End Search
Forward Intro Scan
Reverse Intro Scan
00588A(00)-VR320-2/XAA-eng 6/7/05 7:14 PM Page 50
Recording
■
Finalize
- This closes the DVD-RW/-R so no additional
recording can be done.
■
Unfinalize
- This allows additional recording on a DVD-
RW disc originally recorded on the DVD-
VR320.
- A DVD-RW disc that has been recorded by
DAO(Disc At Once) in a PC cannot be unfi-
nalized.
- A DVD-RW disc that has been recorded
in Video Mode of a different maker’s
recorder cannot be unfinalized.
- A DVD-R disc cannot be unfinalized.
Note
Recording
This section shows various DVD recording
methods.
Before Recording
This unit can record on various types of discs. Before
recording, read the following instructions and select the
disc type according to your preference.
Recordable discs
This recorder can record on the following discs.
•DVD-RWs and DVD-RAMs are rewritable.
•DVD-Rs are non-rewritable.
Compatibility between Samsung and
Other Company’s Recorder.
Disc Types Recording Recording Device Finalizing Additional Recording
format in Samsung Recorder
DVD-RAM VR Mode
VR Mode
V Mode
V Mode
Samsung
Other Company
Samsung
Other Company
Samsung
Other Company
Samsung
Other Company
X
X
finalized
not finalized
finalized
not finalized
finalized
not finalized
finalized
not finalized
finalized
not finalized
Not recordable
Recordable
Not recordable
Recordable
Not recordable
Not recordable
Not recordable
Recordable
Not recordable
Not recordable
Not recordable
Recordable
finalized
not finalized
Recordable
Recordable
DVD-RW
DVD-R
DVD-RAM DVD-RW DVD-R
DVD Recording
Before Recording ...............................................................51
Recordable discs ...............................................................51
Recording Formats ...........................................................52
Recording Mode................................................................52
Unrecordable video ..........................................................52
Recording the current channel you are watching .............53
Recording From External Devices .....................................54
Recording through a DV Input jack...................................54
Making a One Touch Recording(OTR) ..............................55
Making a Timer Recording ................................................55
Editing the Scheduled Record List .....................................57
Deleting a the Scheduled Record List................................58
VCR Recording
Basic VCR Recording.........................................................59
Check Remaining Time ....................................................59
Special Recording Features ..............................................60
Copy to DVD or VCR........................................................61
English - 51
00588A(00)-VR320-2/XAA-eng 6/7/05 7:14 PM Page 51
52 - English
Recording
Recording Formats
When you insert an unused disc, the following message
appears. Since available functions differ depending on
the disc type, select a disc that best fits your prefer-
ences.
DVD-RAM: Use after formatting the disc.
DVD-RW: When an unused DVD-RW disc is first insert-
ed, the message “Uninitialized Disc/Do you
want to initialize this disc?” will be displayed.
If you select Yes, the disc will be formatted in
VR mode.
If you want to change the mode, refer to
Formatting a Disc on page 78.
DVD-R: Formatting DVD is unnecessary and only
Video Mode Recording is supported.
DVD-RW(Video mode)/-R
•Chapters will be created automatically when you final-
ize recording on DVD-R/DVD-RW discs in Video
mode.
• Simple editing (erasing titles/changing title name).
DVD-RAM/-RW(VR mode)
• This mode involves multiple editing functions (such as
deletion of the whole title, partial deletion of a title,
etc.).
• Various editing options using a created Playlist.
Unformatted Disc
Do you want to format this disc?
Yes No
Uninitialized Disc
Do you want to initialize this disc?
Yes No
RETURNSELECTMOVE EXIT
Disc Manager
DVD-RW(VR)
Disc Name :
√√
Disc Protection : Not Protected
√√
Disc Format
√√
Delete All Title Lists
√√
Cartridge Protect Inf
√√
Setup
Timer Rec.
Copy
Title List
Playlist
Disc Manager
Choose the recording format fot DVD-RW.
DVD-VR DVD-V
Recording Mode
Select one of four recording modes by pressing the
REC SPEED button repeatedly while the unit is in Stop
mode for the desired recording time and picture quality.
In general, picture quality improves as the recording
time decreases.
In AUTO mode, the most suitable record mode is
adjusted automatically, according to remaining time on
the disc and length of the timer recording.
This function is selected only one mode in XP,SP,LP
and EP modes. And you can use this mode for timer
recording.
Unrecordable video
Pictures with copy protection cannot be recorded on this
DVD Recorder & VCR.
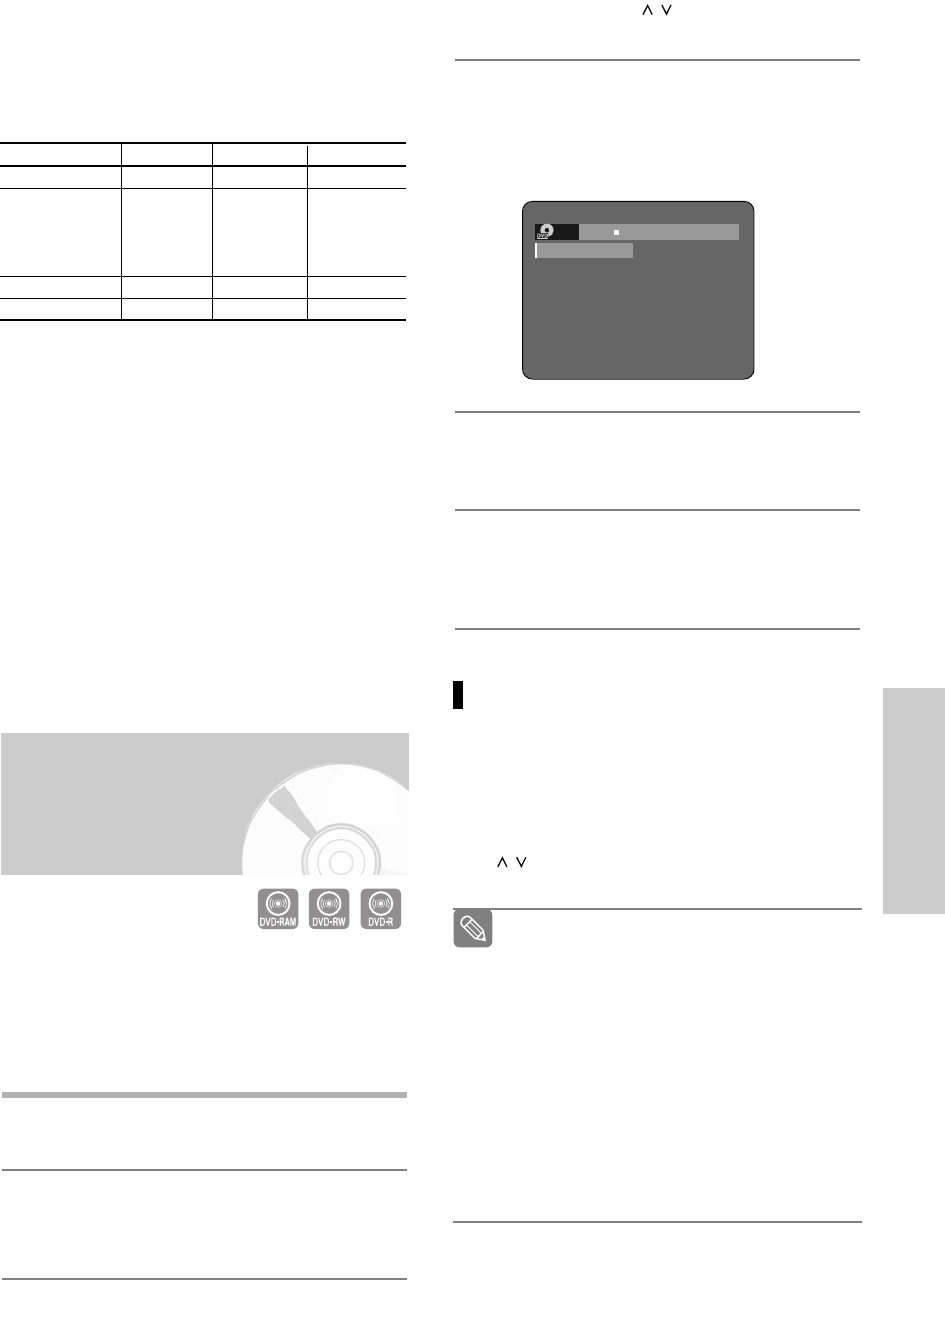
When the DVD Recorder & VCR receives a copy guard
signal while recording, recording stops and the following
message appears on the screen.
Mode Characteristic
XP Select when the
(high quality mode)
video quality is
important.
SP Select to record in
(standard quality mode)
standard quality.
LP Select when a long
(long recording mode)
recording time is
required.
EP Select when a long
(extended mode)
recording time is
required.
AUTO for timer recording only
see page 56.
Recording Times
Data Rates
Approx. 1 hours
about 8 Mbps
Approx. 2 hours
about 4 Mbps
Approx. 4 hours
about 2 Mbps
Approx. 6 hours/
about 1.2 Mbps
Approx. 8 hours
/
about 0.8 Mbps
Approx 60 to 480 Min
approx 0.8 to 8Mbps
You cannot record copy protected movie.
00588A(00)-VR320-2/XAA-eng 6/7/05 7:14 PM Page 52
English - 53
Recording
Concerning Copy Control Signals
TV broadcasts that contain copy control signals may have
one of the following three signal types, Copy-Free, Copy-
Once and Copy-Never. If you want to record a copy-once
type program, use DVD-RW with CPRM in VR Mode and
DVD-RAM.
Once “Copy Once” has been recorded, additional recording
cannot be performed.
This * marked parts are compatible with CPRM.
- Content Protection for Recordable Media (CPRM)
CPRM is a mechanism that ties a recording to the
media on which it is recorded. It is supported by some
DVD recorders, but not by many DVD players. Each
blank recordable DVD has a unique 64-bit media ID
etched in the BCA. When protected content is recorded
onto the disc, it can be encrypted with a 56-bit C2
(Cryptomeria) cipher derived from the media ID.
During playback, the ID is read from the BCA and used
to generate a key to decrypt the contents of the disc.
If the contents of the disc are copied to other media, the
ID will be absent or wrong and the data will not be
decryptable.
Recording the current
channel you are watching
1. Check the antenna cable is connected.
2. Check the remaining time on the disc.
DVD-RAM/DVD-RW discs should be formatted in
advance before beginning recording. Most new discs
are sold unformatted. Make sure to format your unfor-
matted discs before recording.
1
Press the OPEN/CLOSE button and place a
recordable disc on the disc tray.
2
Press the OPEN/CLOSE button to close the disc
tray.
Wait until “LOAD” disappears from the front panel
display.
3
Press the CH/TRK (/ ) buttons or number
buttons to select the channel you want to record.
4
Press the REC SPEED button repeatedly, to select the
recording speed (quality).
• XP(High, approx. 1 hour)
➝
SP(Standard,
approx. 2 hours)
➝
LP(Low, approx. 4 hours)
➝
EP(Extended Play, approx. 6 hours/8hours)
5
Press the REC button.
• “
” is displayed on the screen and recording
begins.
6
Press the STOP button to stop or finish a recording
in progress.
• The message “Updating the information of disc.
Please wait for a moment” is displayed.
Pausing / Resuming
•Press the REC PAUSE button to pause a recording
in progress.
•Press the REC PAUSE button again during pause to
resume recording.
•You can switch channels by pressing the CH/TRK
(/ ) buttons while recording pauses.
You can not change the recording mode and
the channel while recording.
Recording will stop automatically if there is
no free space left for recording.
Up to 99 titles can be recorded onto a disc.
If the power interrupted due to power failure
or other reasons, the title being recorded will
not be saved onto the disc.
Recording will stop automatically if a copy
protected image is selected.
Do not use DVD-R authoring discs with this
unit.
Note
RW
VR XP CH 11
Recordable Time 02:08
Copy-Free Copy-Once Copy-Never
DVD-RW(Ver.1.1)
O
- -
DVD-RW(Ver.1.1)
with CPRM
VR mode
OO
* -
Video mode
O
-
DVD-R
O
- -
DVD-RAM(Ver.2.0)
OO
* -
00588A(00)-VR320-2/XAA-eng 6/7/05 7:14 PM Page 53
Recording
Recording through a DV
Input jack
Recording From
External Devices
Follow these directions to record onto a disc or a tape
from External Devices.
1
Connect the AV out jack of your External Devices
to the AV IN jack on the front or rear of your DVD
Recorder & VCR using Audio/Video Cable.
2
Power on your DVD Recorder & VCR and switch
to AV In mode by pressing the INPUT SEL. button
on the remote control .
The front panel display changes in the following
sequence depending on the Video input setting in
the menu.
AV1: ➝Channel Number ➝ AV 1 ➝ AV 2 ➝ DV
S-Video: ➝Channel Number ➝ SUPER ➝ AV 2 ➝ DV
3
Press the REC SPEED button repeatedly to select
the recording speed(quality).
➝SP ➝LP ➝EP ➝XP
4
When your DVD Recorder & VCR is in the stop
mode, set the operation mode of your External
Devices to play mode.
5
Press the REC button on your DVD Recorder &
VCR to start recording when the desired video is
displayed from the external device.
6
Press the STOP button on your DVD Recorder &
VCR when the recording is finished.
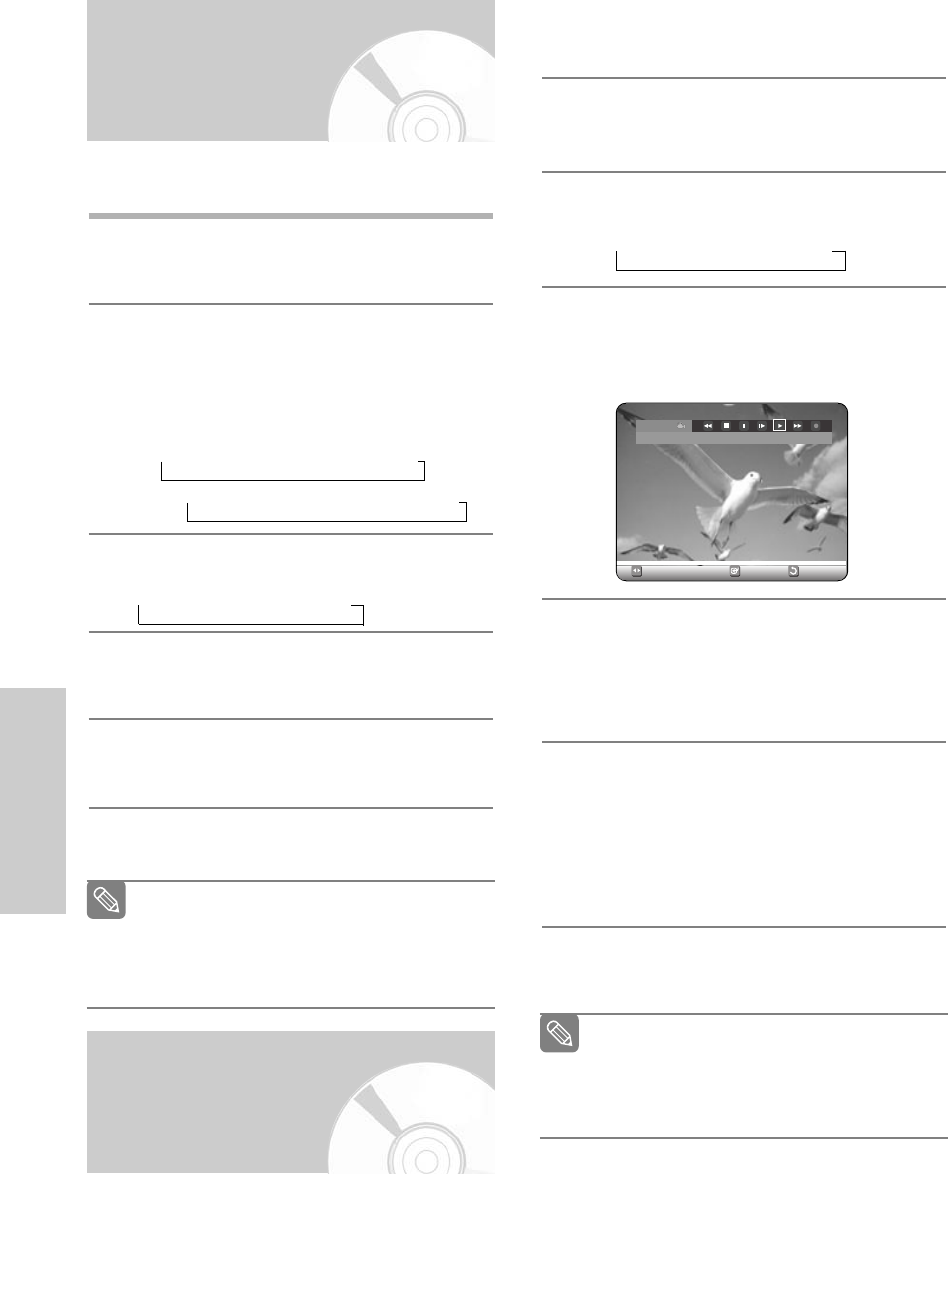
1
Connect the DV output jack of your camcorder to
the DV input jack on the front of your DVD
Recorder & VCR using a DV cable.
2
Power on your DVD Recorder & VCR and switch
to DV mode by pressing the INPUT SEL. on the
remote control.
3
Press the REC SPEED button repeatedly to select
the recording speed(quality).
➝SP ➝LP ➝EP ➝XP
4
Press the INPUT SEL. button to select DV.
If the input is set to DV, a playback/record menu that
enables camcorder control appears on the top of the
screen.
5
Select the Play icon on the upper part of the
screen to playback the camcorder and find the
starting position to copy.
You can press the PLAY button on the remote
control to playback the camcorder.
6
To start recording, Press the œ √ button to select
rec(●)icon in the top side of the screen, then
press the ENTER button.
You can press the REC button of the remote con-
trol to start recording. To display playback related
icons on the screen, press any direction button on
the remote control.
7
Press the STOP button on your DVD Recorder &
VCR when the recording is finished.
You may control the Camcorder using the IEEE1394
(DV) interface.
Follow these directions to record onto a disc or tape
from a camcorder that has a DV output jack.
Note
Also refer to the user manual for your External
Devices when recording through AV In jacks on
the DVD/VCR using Audio/Video cables.
For more information on changing the Video Input
from AV1 to S-Video, see page 32(Video Input).
Some camcorders may not work with your
DVD Recorder & VCR even if they have a DV
output jack.
Also refer to the user manual for your cam-
corder when recording through a DV jack.
Note
DV
The DV device is connected
RETURNSELECTMOVE
54 - English
00588A(00)-VR320-2/XAA-eng 6/7/05 7:14 PM Page 54
English - 55
Recording
Making a Timer
Recording
Making a One Touch
Recording (OTR)
One-Touch Recording (OTR) allows you to add record-
ing time in 30-minute increments up to 4 hours by
pressing the REC button.
1
Press the CH/TRK (/) buttons or number but-
tons to select the channel to record.
If you want to record through a connected external
component, press the INPUT SEL. button to
select an appropriate external input(AV1, AV2 or
DV).
• CATV channel: 1 to 125
• TV channel: 2 to 69
2
Press the REC button to start recording.
3
While in Record mode, press the REC button
again to activate One-Touch Recording (OTR).
• Record length 0:30 appears on the On-Screen
Display and the DVD Recorder & VCR will record
for exactly 30 minutes.
4
Continue pressing REC to add recording time in
30 minute increments up to 4hours.
(see page 52)
• The DVD Recorder & VCR stops recording auto-
matically when the time has elapsed.
To stop recording
Press the STOP () button.
The message “Press Stop button once more to can-
cel Timer Record” is displayed.
Press the STOP () button again.
The message”Updating the Information of disc.
Please wait for a moment” is displayed.
The timer counter decreases by the minute
from 4:00 to 0:00, then the DVD Recorder
& VCR stops recording.
Note
The clock (Initial Setup – Clock Set) must be set before
proceeding with a timer recording. (See page 24)
1
Press the OPEN/CLOSE button, and place a
recordable disc on the disc tray.
2
Press the OPEN/CLOSE button to close the disc
tray.
Wait until “LOAD” disappears from the front panel
display.
3
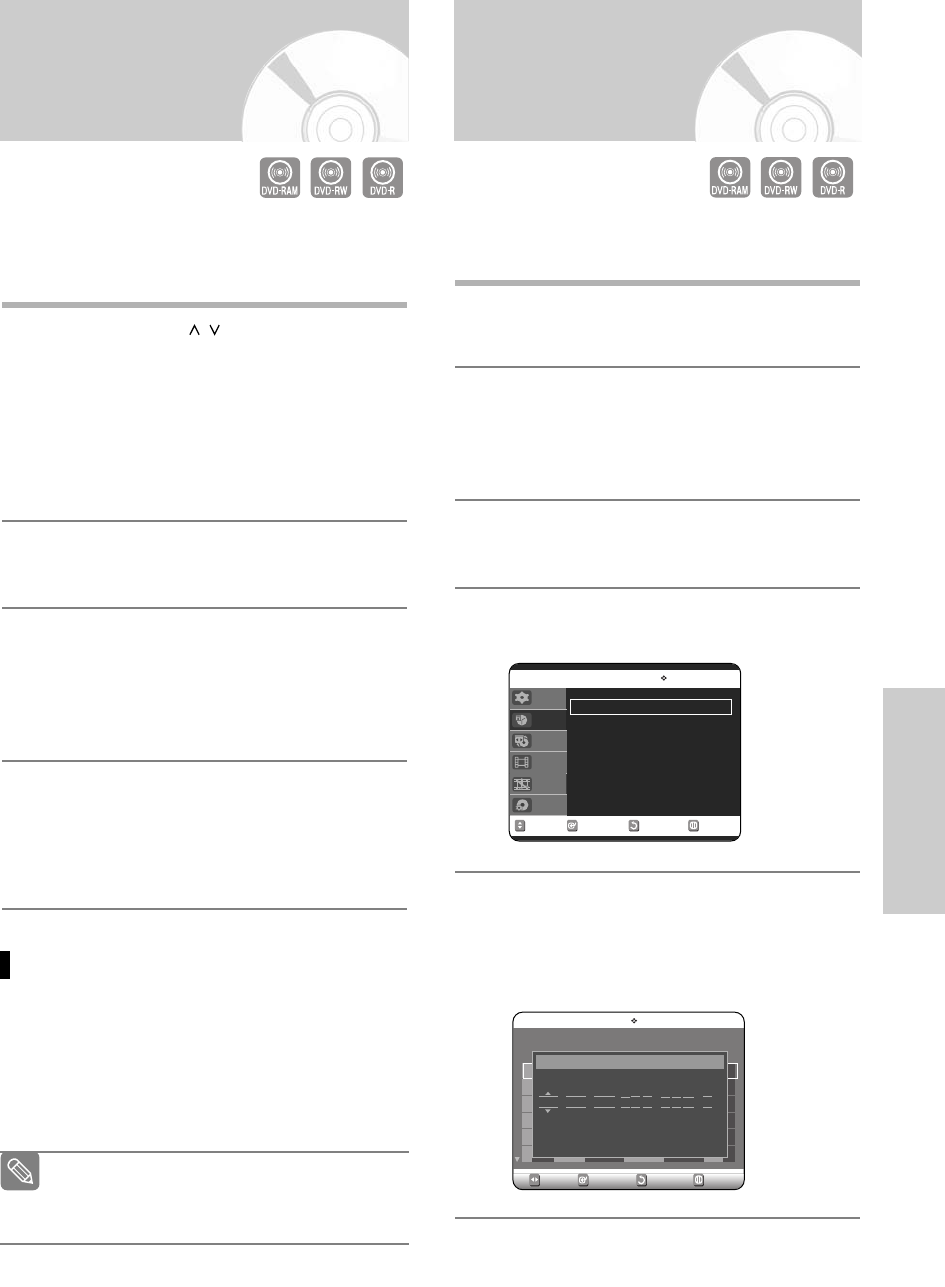
With the unit in Stop mode, press the MENU
button.
4
Press the …† buttons to select Timer Rec., then
press the ENTER or √ button.
5
Press the …† buttons to select Timer Record,
then press the ENTER or √button.
You can also set a timer recording via the TIMER
REC button.
The Timer Recording screen are displayed.
RETURNSELECTMOVE EXIT
Timer Record
DVD-RAM(VR)
Timer Record
√√
Scheduled Record List
√√
Setup
Timer Rec.
Copy
Title List
Playlist
Disc Manager
RETURNSELECTMOVE EXIT
Scheduled Record List
DVD-RAM(VR)
01
---
--
/
--
--:-- -- --:---- -- --
√√
No. Source Date Start End Type Mode Edit
No. 01
To Source Date Start End Mode
DVD CH 01 01/01 12:00 AM 02:00 AM SP
Recordable Time 01:23 SP
Press numeric keys or
…†
keys.
00588A(00)-VR320-2/XAA-eng 6/7/05 7:14 PM Page 55

Recording
•
Recording mode (VCR)
AUTO : Select when you want to set video quality auto-
matically. It depends on remaining time of VCR
tape.
SP : Standard Play, for best picture quality.
SLP : Super Long Play, for maximum recording time (3
times SP).
7
Press the ENTER button.
• will appear on the front panel. It means that a
timer recording is registered.
If the timer settings overlap
The programs are recorded in order of priority.
If timer recording is set for the first program and
then again for the second program and both
programs overlap, the following message will
appear on the screen: “This setting is identical with
1.2” The message shows that the first program has
priority. After recording of the first program is
complete, the second program starts being
recorded.
To exit without saving the current setting
Press the MENU or TIMER REC button.
To return to the previous menu
Press the RETURN button if you don’t want to set a
timer recording.
8
Turn the power off to finish the timer recording.
• will blink if disc or tape is not inserted.
The timer recording time may differ from the set
time depending on disc status and overall timer
recording status (for example, recording times
overlapping, or when the previous recording
ends within 3 minutes before the start time of
the next recording.)
Note
6
Fill in the items using the …†œ √ buttons.
œ √ : Moves to the previous/next item,
…† 0~9 : Sets a value.
• To : Select the media to record DVD or VCR.
• Source : The video input source (AV 1, AV 2 ), or
the broadcasting channel you want to
make a timer recording of.
• Date: Date that the timer recording starts
…
01/31
01/30
:
01/02
Present Date 01/01
MON-FRI
Sun's
Mon's
:
Sat's
†
• Start/End Time : Start and end time of the timer
recording.
•
Recording mode (DVD)
AUTO : Select when you want to set video quality auto-
matically. In AUTO mode, the most suitable
record mode is adjusted automatically, accord-
ing to remaining time on the disc and length of
the timer recording.
This function is selected only one mode in
XP,SP,LP and EP modes. And you can use this
mode for timer recording.
XP (high quality) : Select when audio and video qualities
are important. (Approx. 1 hour)
SP (standard quality) : Select to record in standard qual-
ity. (Approx. 2 hours)
LP (low quality) : Select when a long recording time is
required.(Approx. 4 hours)
EP (extended mode) : Select when a longer recording
time is required. (Approx.6 hours
at 1.2 Mbps or Approx.8 hours
at 0.8 Mbps )
When you are recording at EP mode on a
DVD-RW(V)/R disc, it may not record the full 6
or 8 hours because the unit uses the
VBR(Variable Bit Rate) ENCODING system.
For example, if you record a program with a lot
of action, it uses a higher bit rate which in turn
consumes more disc memory.
Note
56 - English
00588A(00)-VR320-2/XAA-eng 6/7/05 7:14 PM Page 56
English - 57
Recording
Editing the Scheduled
Record List
Follow these directions to edit the timer record list.
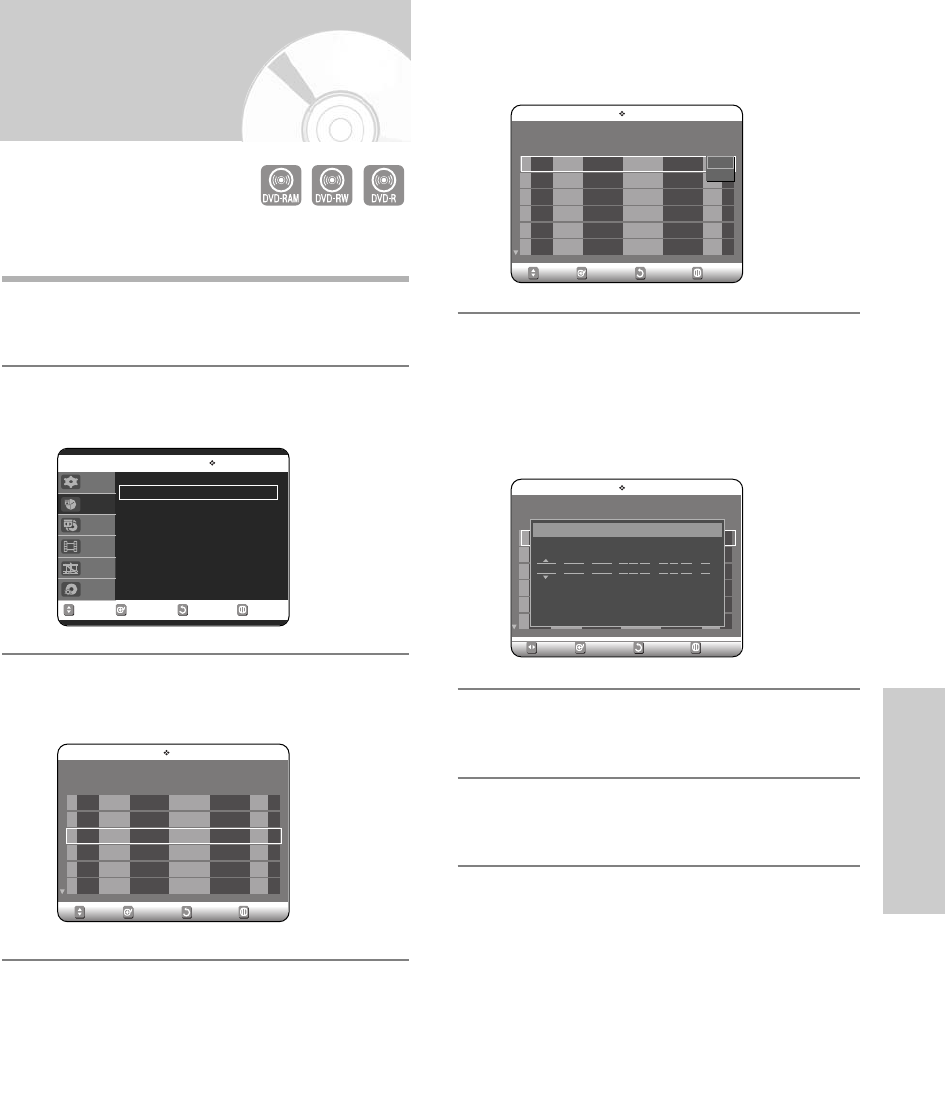
1
Press the MENU button.
2
Press the
…†
button to select Timer Rec., then
press the ENTER or √button.
3
Press the
…†
button to select Scheduled Record
List, then press the ENTER or √button.
4
Press the …† button to select the number of the
scheduled record list you want to edit, then press
the ENTER or √ button.
• The Edit and Delete items are displayed.
5
Press the …† button to select Edit, then press
the ENTER button.
• The Timer Recording screen is displayed.
Edit the items you want to modify. See the Timer
Recording section for more information on Timer
Recording Input items.(See page 56)
6
Press the ENTER button to confirm the edited set-
ting.
7
Press the MENU button after finishing the opera-
tion. The menu screen will disappear.
RETURNSELECTMOVE EXIT
Timer Record
DVD-RAM(VR)
Timer Record
√√
Scheduled Record List
√√
Setup
Timer Rec.
Copy
Title List
Playlist
Disc Manager
RETURNSELECTMOVE EXIT
Scheduled Record List
DVD-RAM(VR)
01 DVD CH 09 11/22 09:22AM 10:30AM SP
√√
02 DVD CH 09 12/20 07:30AM 10:30AM SP
√√
03
--
---
--
/
--
--:-- -- --:---- --
√√
No. To Source Date Start End Mode Edit
RETURNSELECTMOVE EXIT
Scheduled Record List
DVD-RAM(VR)
01 DVD CH 09 11/22 09:22AM 10:30AM SP
√√
02 DVD CH 09 12/20 07:30AM 10:30AM SP
√√
03
--
---
--
/
--
--:-- -- --:---- --
√√
No. To Source Date Start End Mode Edit
Edit
Delete
RETURNSELECTMOVE EXIT
Scheduled Record List
DVD-RAM(VR)
01 DVD CH 09 11/22 09:22AM 10:30AM SP
√√
01 DVD CH 09 12/20 07:30AM 10:30AM SP
√√
03
--
---
--
/
--
--:-- -- --:---- --
√√
No. To Source Date Start End Mode Edit
No. 01
To Source Date Start End Mode
DVD CH 01 01/01 12:00 AM 02:00 AM SP
Recordable Time 01:23 SP
Press numeric keys or
…†
keys.
00588A(00)-VR320-2/XAA-eng 6/7/05 7:14 PM Page 57
58 - English
Recording
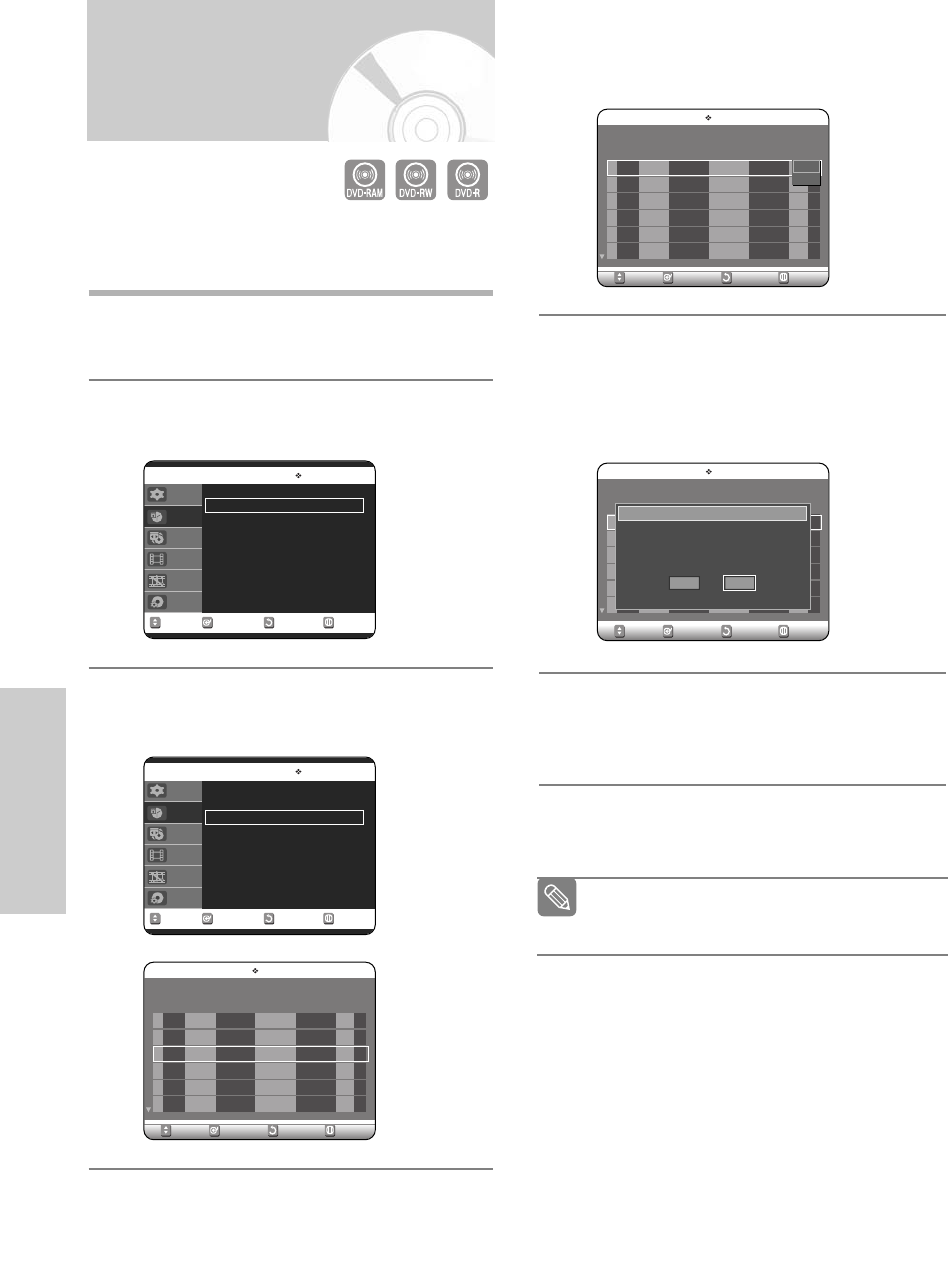
Deleting the
Scheduled Record List
Follow these directions to delete a title from the timer
record list.
1
Press the MENU button.
2
Press the …† button to select Timer Rec., then
press the ENTER or √button.
3
Press the …† button to select Scheduled
Record List, then press the ENTER or √button.
4
Press the …† button to select the number of the
scheduled record list you want to delete, and then
press the ENTER button.
• The Edit and Delete items are displayed.
5
Press the …† button to select Delete, then press
the ENTER or √button.
• You will be prompted with the delete confirm
message such as ‘Do you want to delete
No.01?’.
6
Press the œ √ buttons to select Yes, then press
the ENTER button.
• The selected title will be deleted from the list.
7
Press the MENU button after finishing the opera-
tion. The menu screen will disappear.
RETURNSELECTMOVE EXIT
Timer Record
DVD-RAM(VR)
Timer Record
√√
Scheduled Record List
√√
Setup
Timer Rec.
Copy
Title List
Playlist
Disc Manager
RETURNSELECTMOVE EXIT
Timer Record
DVD-RAM(VR)
Timer Record
√√
Scheduled Record List
√√
Setup
Timer Rec.
Copy
Title List
Playlist
Disc Manager
RETURNSELECTMOVE EXIT
Scheduled Record List
DVD-RAM(VR)
01 DVD CH 09 11/22 09:22AM 10:30AM SP
√√
01 DVD CH 09 12/20 07:30AM 10:30AM SP
√√
03
--
---
--
/
--
--:-- -- --:---- --
√√
No. To Source Date Start End Mode Edit
You can not delete programs that are cur-
rently recording.
Note
RETURNSELECTMOVE EXIT
Scheduled Record List
DVD-RAM(VR)
01 DVD CH 09 11/22 09:22AM 10:30AM SP
√√
01 DVD CH 09 12/20 07:30AM 10:30AM SP
√√
03
--
---
--
/
--
--:-- -- --:---- --
√√
No. To Source Date Start End Mode Edit
Edit
Delete
RETURNSELECTMOVE EXIT
Scheduled Record List
DVD-RAM(VR)
01 DVD CH 09 11/22 09:22AM 10:30AM SP
√√
01 DVD CH 09 12/20 07:30AM 10:30AM SP
√√
03
--
---
--
/
--
--:-- -- --:---- --
√√
No. To Source Date Start End Mode Edit
No. 01
Do you want to delete ‘No. 01’?
NoYes
00588A(00)-VR320-2/XAA-eng 6/7/05 7:14 PM Page 58
English - 59
Recording
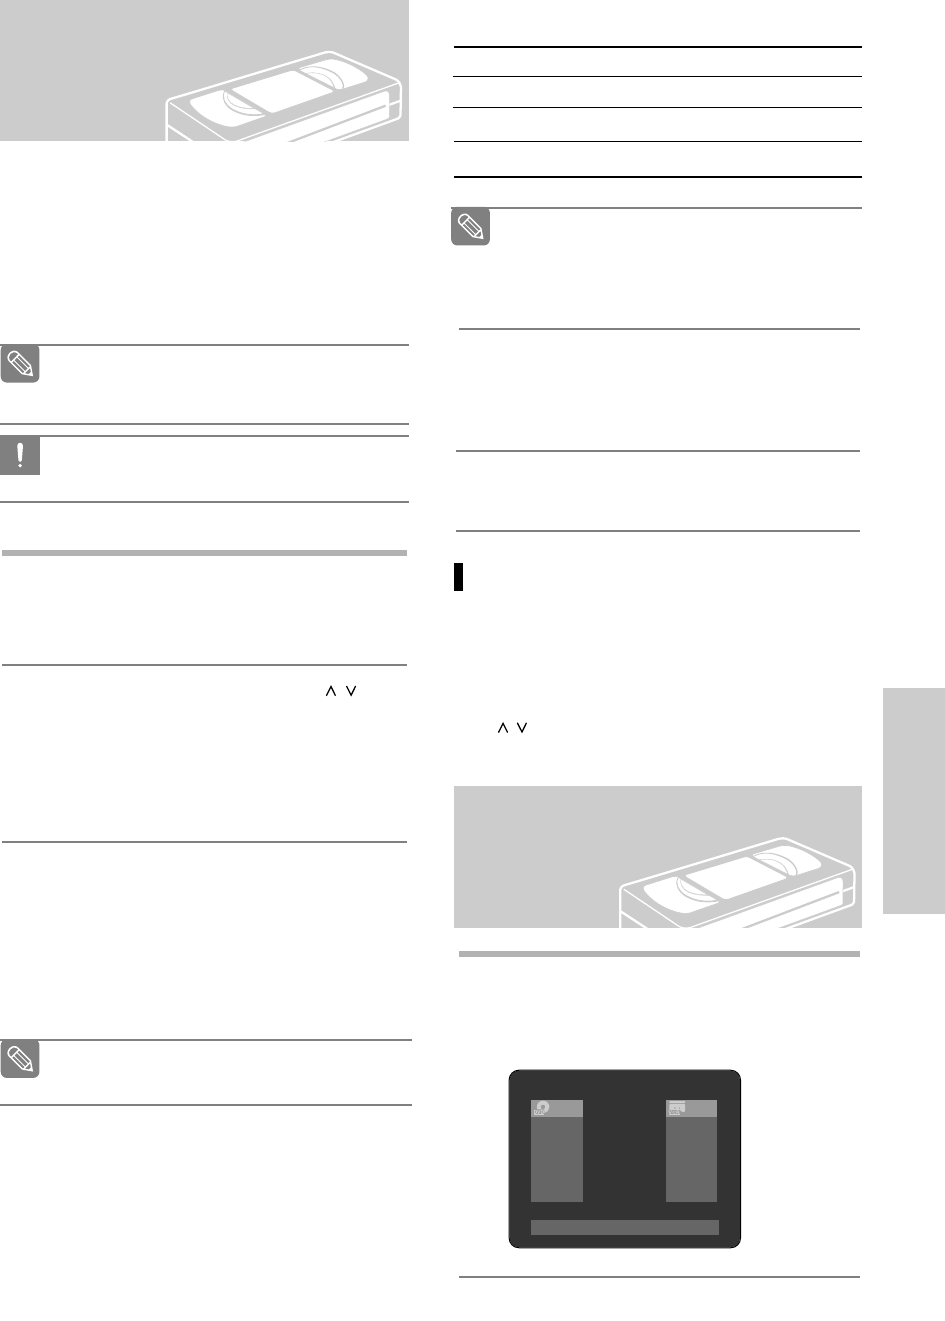
Basic VCR Recording
Before starting
1. Check TV channel and Antenna connections.
2. Check the remaining time on the tape.
You can record a TV show in progress by inserting a
blank tape and pressing the
(REC) button. You can
even add time in 30-minute increments up to 4 hours by
pressing the
(REC)button repeatedly.
1
Insert a blank VHS tape into the VCR deck.
• Make sure the tape is long enough to record the
entire program.
2
Press the 0–9 buttons or the CH/TRK (/)
buttons to select the desired channel.
Press the INPUT SEL. button to select AV 1, AV 2
or DV if recording from an external
device connected to the front or rear AV inputs,
respectively.
3
Press the REC SPEED button on the remote con-
trol to set the Record Speed to one of the follow-
ing options:
• SP – Standard Play, for best picture quality.
• SLP – Super Long Play, for maximum recording
time (3 times SP).
4
Press the (REC) button on the remote control or
front panel.
For options while recording is in progress, see
“Special Recording Features”.( see page 60)
5
Press the STOP button to stop or finish a record-
ing in progress.
Be sure your videotape has a Record Safety
Tab. If the tab is missing, you can cover the
opening with a small piece of tape.
Warning: Do not cover this opening unless you
are sure you want to record over the tape.
Note
CAUTION
When you watch or record on the VCR
during DVD Recording, some function buttons
may not operate.
The message “This function is not available.”
will be displayed.
Note
Maximum Recording Time - SP vs. SLP
Tape Length SP (Standard Play) SLP (Super Long Play)
T-120 2 hrs 6 hrs
T-160 2hrs 40 mins 8 hrs
T-180 3 hrs 9 hrs
The selected Record Speed will appear on the
front panel display and on-screen display.
Note
1
Press INFO. button on the remote control.
Following information will be displayed.
(Current deck status, recording speed, remaining
time, input channel, current time.)
Check Remaining Time
RAM
STOP
0:00:02
EP
Rem 06:07
CH 10
VCR
STOP
0:00:03
SLP
Rem 05:41
CH 10
Wed Jan 19. 2005 09 : 51 PM
Pausing / Resuming
•Press the REC PAUSE button to pause a recording
in progress.
•Press the REC PAUSE button again during pause to
resume recording.
•You can switch channels by pressing the CH/TRK
(/ ) buttons while recording pauses.
00588A(00)-VR320-2/XAA-eng 6/7/05 7:14 PM Page 59

60 - English
Recording
While a recording is in progress, you can watch a differ-
ent channel, watch a different media, or add recording
time in 30-minute increments.
1
Watch a Different Channel
When you watching through the Antenna input
during recording, press the TV/VCR button on the
remote control. Change the channel you want to
watch.
- When you watching through AV input during
recording, change the input of your TV from AV
to Antenna.
Change the channel you want to watch.
2
Watch a different media during record-
ing
You can watch a DVD during VCR recording or
watch a Video tape during DVD recording.
• During VCR recording, insert a DVD in the DVD
deck. The output will automatically change to the
DVD and start playback.
• During DVD recording, insert a Video tape in the
VCR deck. The output will automatically change
to the VCR and start playback. (Only if tape is
missing the safety tab)
3
Add Recording Time
Refer to the One-Touch Recording (OTR).
(See page 55)
4
Recording DVD and VCR at the same
time
You can record DVD and VCR at the same time,
but both modes must be set up to record
separately.
• Press the DVD/VCR button to set the unit to
DVD or VCR mode.
• Choose AV input mode (CH, AV1, AV2 or DV).
for DVD or VCR.
• Choose REC mode for DVD or VCR.
• Press REC button for DVD or VCR.
Special Recording
Features
When DVD Recorder & VCR is connected to
your TV using S-Video or component video
cable, the playback screen on the video tape
will not display during DVD recording.
You cannot record different channels at the
same time.
The DVD and VCR cannot start recording at
the exact same time. You must set one mode
to start recording, then the other.
Note
00588A(00)-VR320-2/XAA-eng 6/7/05 7:14 PM Page 60
English - 61
Recording
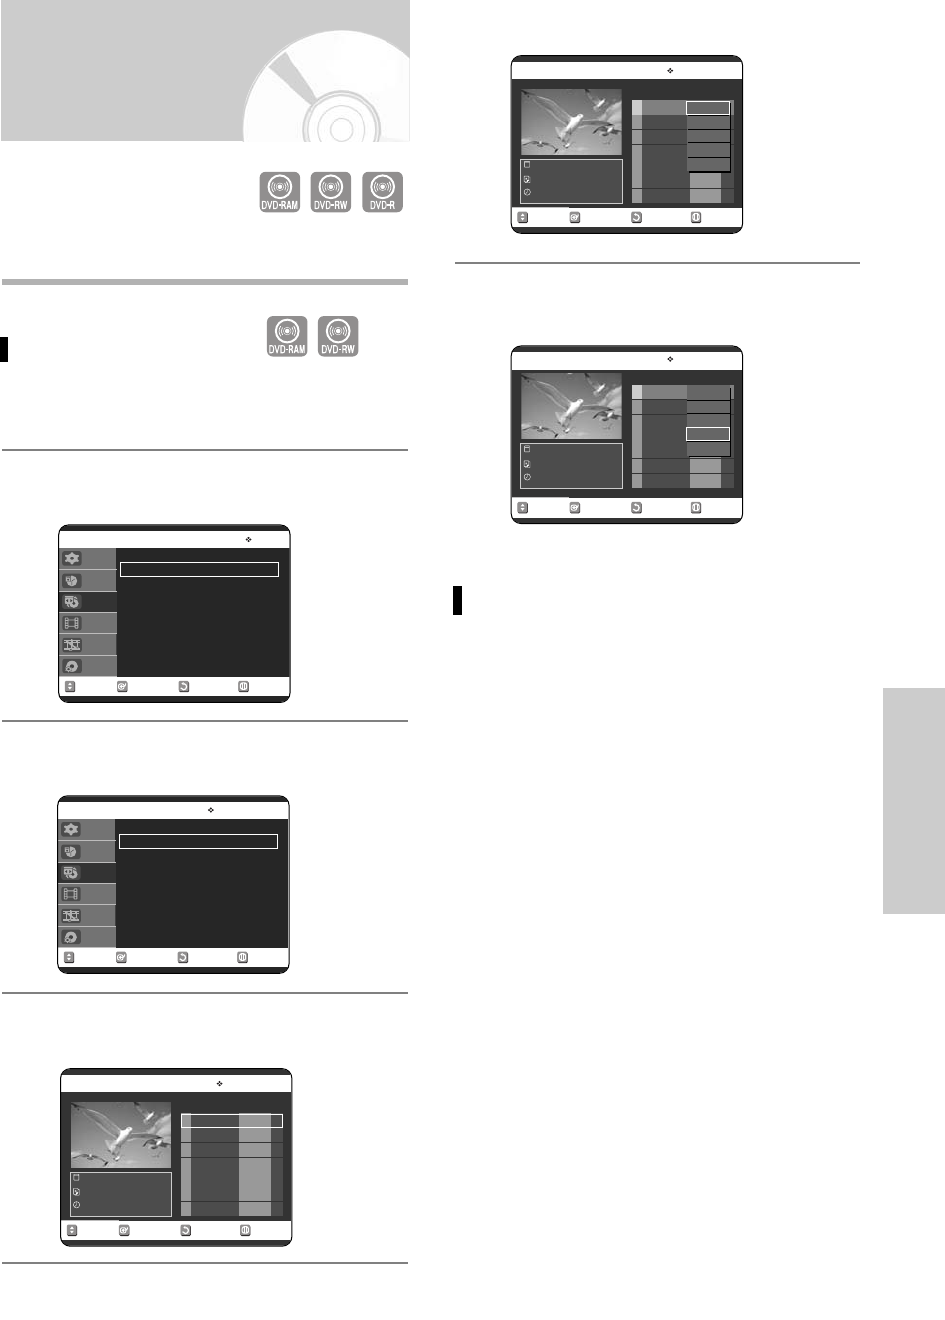
You can copy from the DVD to VCR or VCR to DVD.
Check the remaining time on the tape and Disc.
To copy from DVD to VCR
1
With the unit in Stop mode, press the MENU
button.
2
Press the …† buttons to select Copy, then press
the ENTER or √ button.
3
Press the …† buttons to select DVD --> VCR,
then press the ENTER or √button.
4
Press the …† buttons to select Edit Copylist,
then press the ENTER or √button.
5
Press the
…†
buttons to select desired copylist,
then press the ENTER or √button.
6
Press the
…†
buttons to select Copy, then press
the ENTER or √button.
Direct copy DVD to VCR
• Insert a DVD disc you want to copy.
• Insert a VHS tape.
• Press the VCR copy button on front panel or
remote control(TO VCR).
• To stop recording, press the STOP button.
Copy to DVD or VCR
RETURNSELECTMOVE EXIT
Copy
DVD-RAM(VR)
DVD - -> VCR
√√
VCR - -> DVD
√√
Setup
Timer Rec.
Copy
Title List
Playlist
Disc Manager
RETURNSELECTMOVE EXIT
DVD - -> VCR
DVD-RAM(VR)
New Copylist
√√
Edit Copylist
√√
Direct Copy
√√
Setup
Timer Rec.
Copy
Title List
Playlist
Disc Manager
RETURNSELECTMOVE EXIT
Edit Copylist
DVD-RAM(VR)
No. Title Length Edit
JAN/19/2005 12:00 AM
7 Scenes
JAN/19/2005 12:00 AM
01 JAN/19/2005 1 00:00:21 √√
Play
Rename
Edit Scene
Copy
Delete
RETURN
SELECTMOVE EXIT
Edit Copylist
DVD-RAM(VR)
No. Title Length Edit
JAN/19/2005 12:00 AM
7 Scenes
JAN/19/2005 12:00 AM
01 JAN/19/2005 1 00:00:21 √√
Play
Rename
Edit Scene
Copy
Delete
RETURNSELECTMOVE EXIT
Edit Copylist
DVD-RAM(VR)
No. Title Length Edit
JAN/19/2005 12:00 AM
7 Scenes
JAN/19/2005 12:00 AM
01 JAN/19/2005 1 00:00:21 √√
(VR mode)
00588A(00)-VR320-2/XAA-eng 6/7/05 7:14 PM Page 61
62 - English
Recording
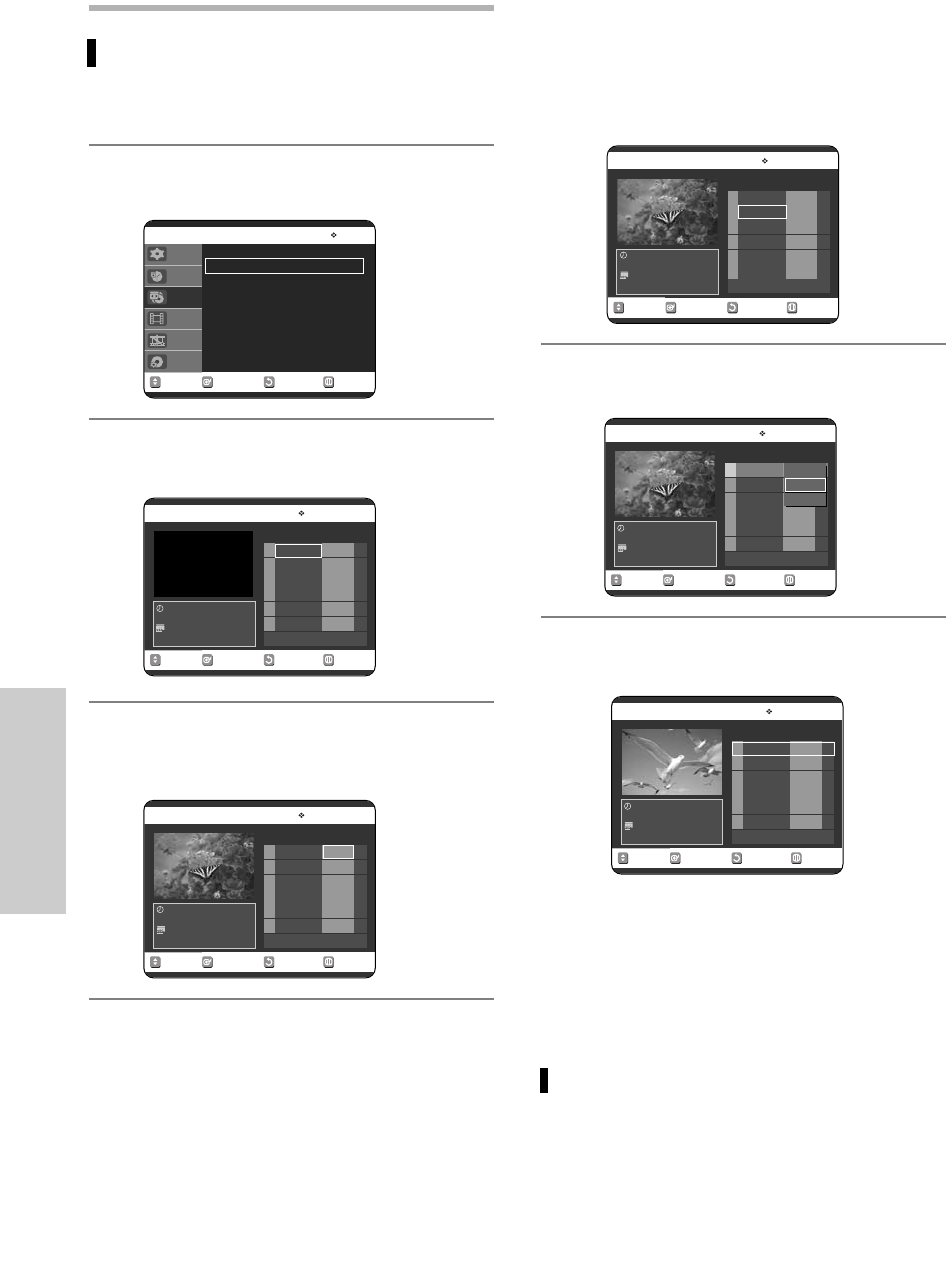
To copy from VCR to DVD
1
With the unit in Stop mode, press the MENU
button in stop mode.
2
Press the …† buttons to select Copy, then press
the ENTER or √button.
3
Press the …† buttons to select VCR-->DVD, then
press the ENTER or √button.
4
You can use the √
II
,
I
œœ or √√
I
, œœ or √√
buttons to search for the Start position.
Press the ENTER button at the start point.
5
You can use the √
II
,
I
œœ or √√
I
, œœ or √√
buttons to search for the end position.
Press the ENTER button at the end point.
•Acopylist will be generated.
Repeat the above steps to create the copylist.
•In VCR mode, the copylist cannot be saved.
6
Press the …† buttons to select desired copylist,
then press the ENTER or √button.
7
Press the …† buttons to select Copy, then press
the ENTER or √ button.
• The VCR will fast forward, searching for a start
position and then automatically start a copy.
• It may not be match up with Start and END point
exactly.
•
l
If you want to copy all content, select Copy All.
Direct copy VCR to DVD
• Insert the VHS tape you want to copy.
•Insert Recordable DVD disc.
• Press DVD copy button on front panel or remote
control(TO DVD).
• To stop recording press the STOP button.
RETURNSELECTMOVE EXIT
Copy
DVD-RAM(VR)
DVD - -> VCR
√√
VCR - -> DVD
√√
Setup
Timer Rec.
Copy
Title List
Playlist
Disc Manager
RETURNSELECTMOVE EXIT
VCR - -> DVD
DVD-RAM(VR)
No. Start End Edit
00:00:10
STOP
01
--:--:-- --:--:--
√√
Copy All
RETURNSELECTMOVE EXIT
VCR - -> DVD
DVD-RAM(VR)
No. Start End Edit
00:00:30
PLAY
01
00:00:21
--:--:--
√√
Copy All
RETURNSELECTMOVE EXIT
VCR - -> DVD
DVD-RAM(VR)
No. Start End Edit
00:01:07
PLAY
01
00:00:21 00:01:04
√√
02
--:--:-- --:--:--
√√
Copy All
RETURNSELECTMOVE EXIT
VCR - -> DVD
DVD-RAM(VR)
No. Start End Edit
00:00:21
RPS
01
00:00:21 00:01:04
√√
02
--:--:--
--:--:--
√√
Copy All
RETURNSELECTMOVE EXIT
VCR - -> DVD
DVD-RAM(VR)
No. Start End Edit
00:01:10
PLAY
01
00:00:21 00:01:04
√√
02
--:--:--
--:--:--
√√
Copy All
Play
Copy
Delete
00588A(00)-VR320-2/XAA-eng 6/7/05 7:14 PM Page 62
Editing
Editing
This section introduces basic functions of DVD
editing and explains both edit functions for the
recording on a disc and edit functions for the
entire disc.
Playing the Title List .........................................................63
Basic Editing (Title List) ...................................................65
Renaming(Labeling) a Title .............................................65
Locking(Protecting) a Title ..............................................66
Deleting a Title ................................................................66
Deleting a Section of a Title ............................................67
Advanced Editing (Play List).............................................69
Creating a playlist ...........................................................69
Playing Titles in the Playlist............................................70
Renaming a Playlist Title.................................................71
Editing a Scene for the Playlist........................................72
Copying a Playlist Title to the VCR ................................75
Deleting a Playlist Title from the Playlist .......................76
Disc Manager ...................................................................77
Disc Protection.................................................................78
Formatting a Disc ............................................................78
Finalizing a disc...............................................................79
Delete All Title Lists ........................................................80
Unfinalizing a disc (V/VR mode).....................................81
Playing the Title List
Follow these instructions to play back a scene from the
Title List.
Using the TITLE LIST button
1
Press the TITLE LIST button.
The Title List screen is displayed.
2
Press the …† buttons to select a title you want to
play from Title List, and then press the PLAY but-
ton.
The selected title will be played back.
3
To stop title play, press the STOP button.
To return the title list screen, press the TITLE
LIST button.
Using the MENU button
1
Press the MENU button.
RETURNSELECTMOVE EXIT
Title List
DVD-RAM(VR)
No. Title Length Edit
JAN/19/2005 12:00 AM
JAN/19/2005
12:00 AM SP
01 JAN/19/2005 00:00:21 √√
02 JAN/19/2005 00:00:03 √√
03 JAN/20/2005 00:00:15 √√
04 JAN/20/2005 00:00:16 √√
English - 63
RETURNSELECTMOVE EXIT
Setup
DVD-RAM(VR)
System √√
Clock Set √√
Channel Set √√
Language √√
Audio √√
Video √√
Parental Control √√
Setup
Timer Rec.
Copy
Title List
Playlist
Disc Manager
00588A(00)-VR320-2/XAA-eng 6/7/05 7:14 PM Page 63
64 - English
Editing
2
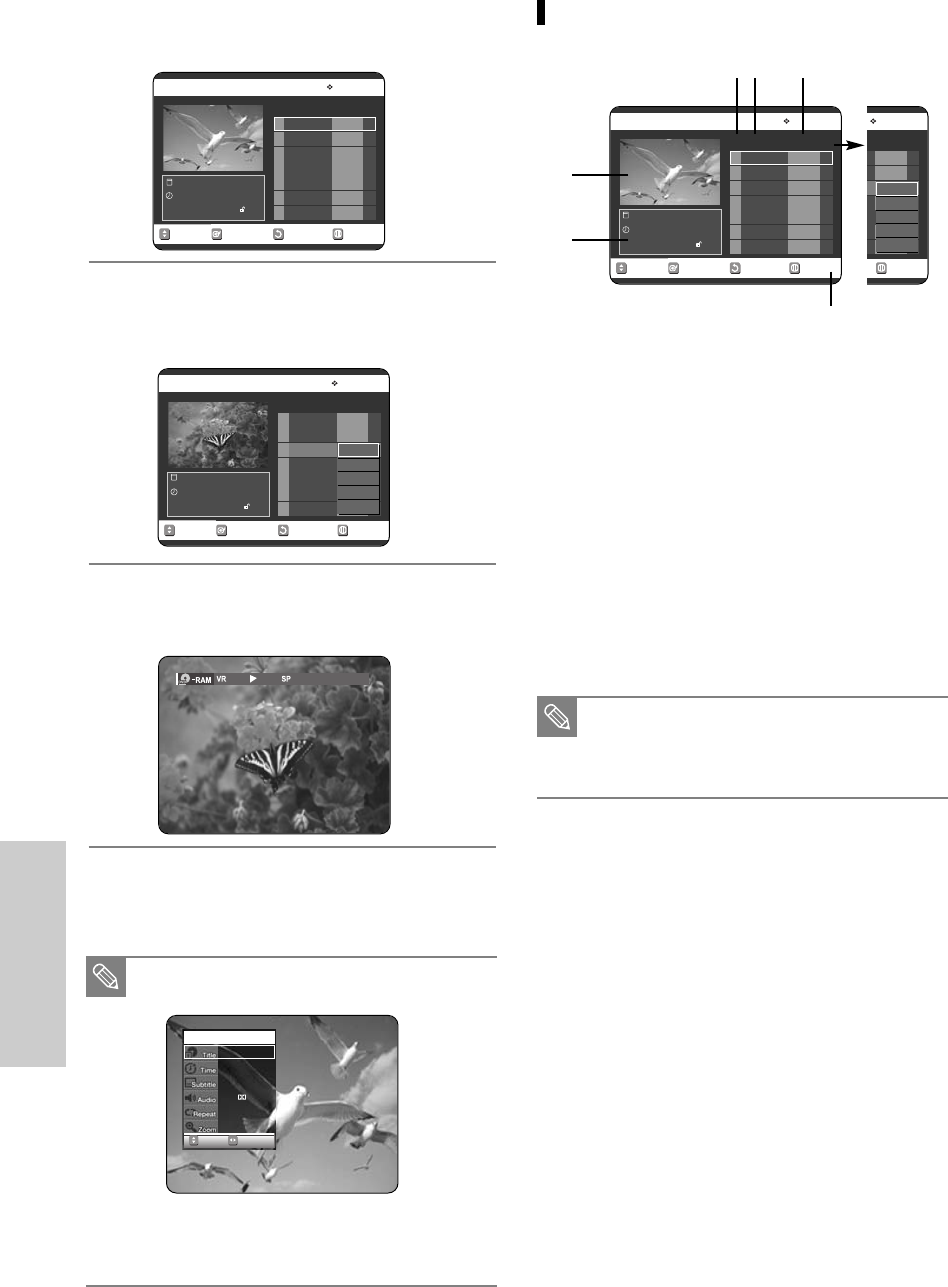
Press the …† buttons to select Title List, then
press the ENTER or √
button twice.
The Title List screen is displayed.
3
Press the
…†
buttons to select a Title, then press
the ENTER or √button.
The Edit menu is displayed:
Play, Rename, Delete,
Edit, Protection(See pages 69~72)
4
Press the
…†
buttons to select Play to play the
title list, then press the ENTER button.
The selected title will be played back.
5
Press the STOP button to stop playing.
To return the title list screen, press the TITLE LIST
button.
RETURNSELECTMOVE EXIT
Title List
DVD-RAM(VR)
No. Title Length Edit
JAN/19/2005 12:00 AM
JAN/19/2005
12:00 AM SP
01 JAN/19/2005 1 00:00:21 √√
02 JAN/19/2005 1 00:00:03 √√
03 JAN/20/2005 1 00:00:15 √√
04 JAN/20/2005 1 00:00:16 √√
You can also play a recorded program by
pressing the ANYKEY button.
Press the
…†
buttons to select Title.
Press the œ √ buttons to select to play the
title list, then press the ENTER button.
Note
CHANGEMOVE
DVD-RAM(VR)
1/4
00:01:45
Off
ENG D 5.1CH
Off
Off
Title List Screen Elements
!Playback screen for recorded titles.
@Information window for the selected title: Title name,
recording date, recording time, lock status, recording
mode
#Recorded title No.
$Recorded title name
%Recording Length (i.e., the playing time)
^Edit menu
Play: Plays the selected title.
Rename: Renames the title of a selected title.
Delete: Deletes the selected title from the list.
Edit: Deletes a section of title.
Protection: Locks or unlocks the selected title.
&Button display.
RETURNSELECTMOVE EXIT
Title List
DVD-RAM(VR)
No. Title Length Edit
02/01/01
00:25:30(PM) SP
01 00:00:21 √√
02 00:00:03 √√
03 Sports 00:00:15 √√
04 Movie 00:00:16 √√
05 00:06:32 √√
06 06 00:08:16 √√
07 07 00:09:36 √√
Play
Rename
Delete
Edit
Protection
RETURNSELECTMOVE EXIT
Title List
DVD-RAM(VR)
No. Title Length Edit
JAN/20/2005 12:00 AM
JAN/20/2005
12:00 AM SP
01 JAN/19/2005 1 00:00:21 √√
02 JAN/19/2005 1 00:00:03 √√
03 JAN/20/2005 2 00:00:15 √√
04 JAN/20/2005 2 00:00:16 √√
Play
Rename
Delete
Edit
Protection
RETURNSELECTMOVE EXIT
Title List
DVD-RAM(VR)
No. Title Length Edit
JAN/19/2005 12:00 AM
JAN/19/2005
12:00 AM SP
01 JAN/19/2005 1 00:00:21 √√
02 JAN/19/2005 1 00:00:03 √√
03 JAN/20/2005 1 00:00:15 √√
04 JAN/20/2005 1 00:00:16 √√
!
#$ %
&
^
@
This may depend on the disc type.
DVD-R/DVD-RW(Video) has limited editing
function.
Note
00588A(00)-VR320-2/XAA-eng 6/7/05 7:14 PM Page 64
English - 65
Editing
Basic Editing (Title List)
Renaming(Labeling) a Title
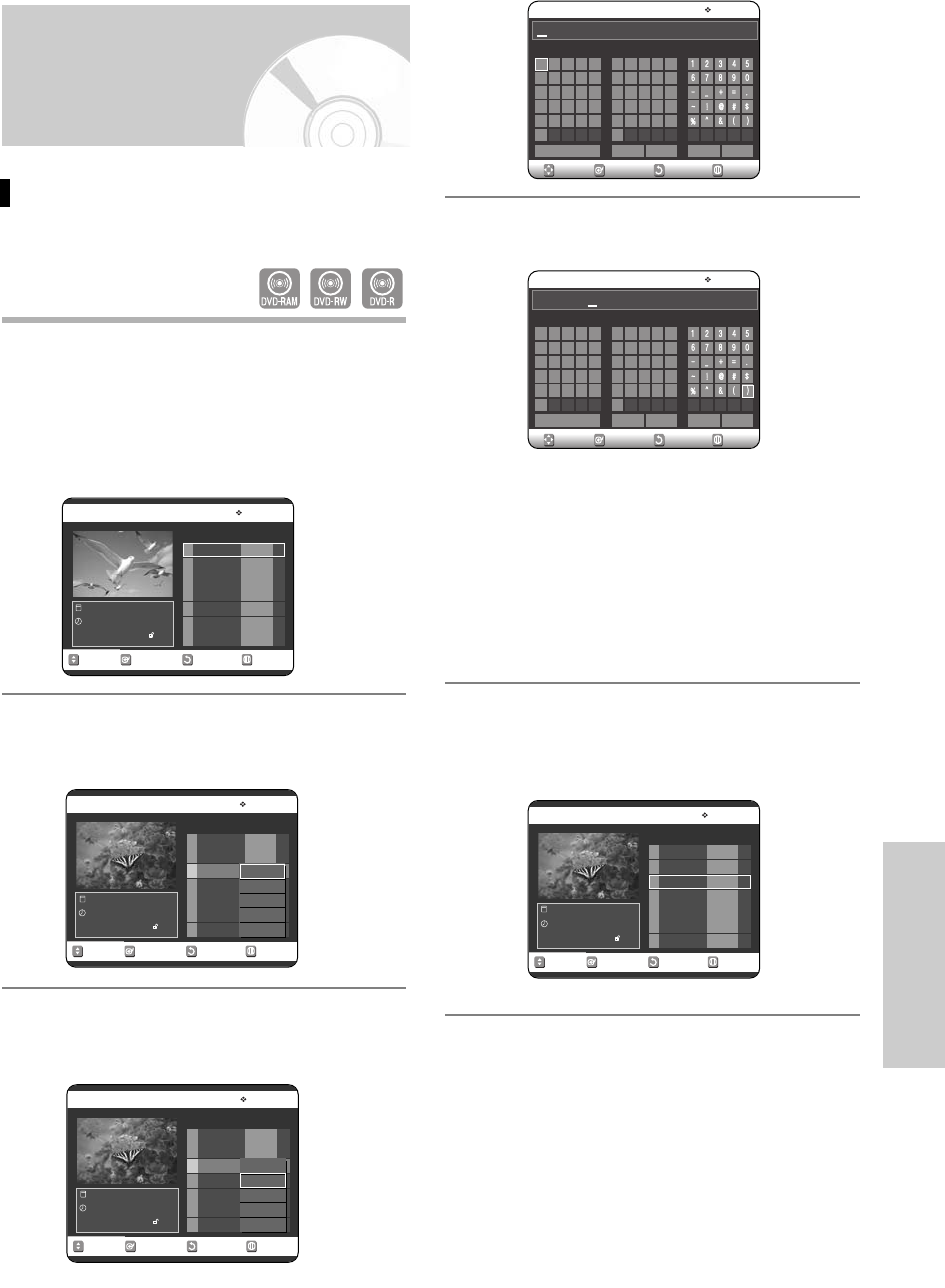
Follow these instructions to rename a title list name,
i.e., to edit the title of a recorded program.
1
Press the TITLE LIST button.
The Title List screen is displayed.
Using the MENU button.
• Press the MENU button.
• Press the …† buttons to select Title List, then
press the ENTER or √button twice.
2
Press the …† buttons to select a title you want to
rename from the Title List, then press the ENTER
or √button.
3
Press the …† buttons to select Rename, then
press the ENTER or √button.
The Rename screen is displayed.
4
Select the desired characters using the …† œ √
buttons, press the ENTER button.
• Back Space: Moves the cursor one position
backwards.(Equivalent to the CLEAR button)
• Space: Enters a blank and moves the cursor one
forward (to the right).
• Delete: Deletes the character at the cursor
position.
• Clear: Deletes all the character inputs.
•Save: Registers the character inputs.
5
Press the …† œ √ buttons to select Save, and
then press the ENTER button.
The changed title name is displayed in the title field
of the selected title.
RETURNSELECTMOVE EXIT
Title List
DVD-RAM(VR)
No. Title Length Edit
Sports (A1)
JAN/20/2005
12:00 AM SP
01 JAN/19/2005 1 00:00:21 √√
02 JAN/19/2005 1 00:00:03 √√
03 Sports (A1) 00:00:15 √√
04 JAN/20/2005 1 00:00:16 √√
ABCDE a b c d e
fghi j
klmno
pq rst
u
z
nwxy
FGH I J
KL MNO
PQRST
UVWXY
Z
Back Space Space Delete Clear Save
RETURNSELECTMOVE EXIT
Rename
DVD-RAM(VR)
ABCDE a b c d e
fghi j
klmno
pq rst
u
z
nwxy
FGH I J
KL MNO
PQRST
UVWXY
Z
Back Space Space Delete Clear Save
RETURNSELECTMOVE EXIT
Rename
DVD-RAM(VR)
Sports(A1)
JAN / 20 / 2005 12:00 AM
RETURNSELECTMOVE EXIT
Title List
DVD-RAM(VR)
No. Title Length Edit
JAN/19/2005 12:00 AM
JAN/19/2005
12:00 AM SP
01 JAN/19/2005 1 00:00:21 √√
02 JAN/19/2005 1 00:00:03 √√
03 JAN/20/2005 1 00:00:15 √√
04 JAN/20/2005 1 00:00:16 √√
RETURNSELECTMOVE EXIT
Title List
DVD-RAM(VR)
No. Title Length Edit
JAN/20/2005 12:00 AM
JAN/20/2005
12:00 AM SP
01 JAN/19/2005 1 00:00:21 √√
02 JAN/19/2005 1 00:00:03 √√
03 JAN/20/2005 2 00:00:15 √√
04 JAN/20/2005 2 00:00:16 √√
Play
Rename
Delete
Edit
Protection
RETURNSELECTMOVE EXIT
Title List
DVD-RAM(VR)
No. Title Length Edit
JAN/20/2005 12:00 AM
JAN/20/2005
12:00 AM SP
01 JAN/19/2005 1 00:00:21 √√
02 JAN/19/2005 1 00:00:03 √√
03 JAN/20/2005 2 00:00:15 √√
04 JAN/20/2005 2 00:00:16 √√
Play
Rename
Delete
Edit
Protection
00588A(00)-VR320-2/XAA-eng 6/7/05 7:14 PM Page 65
Editing
Locking(Protecting) a Title
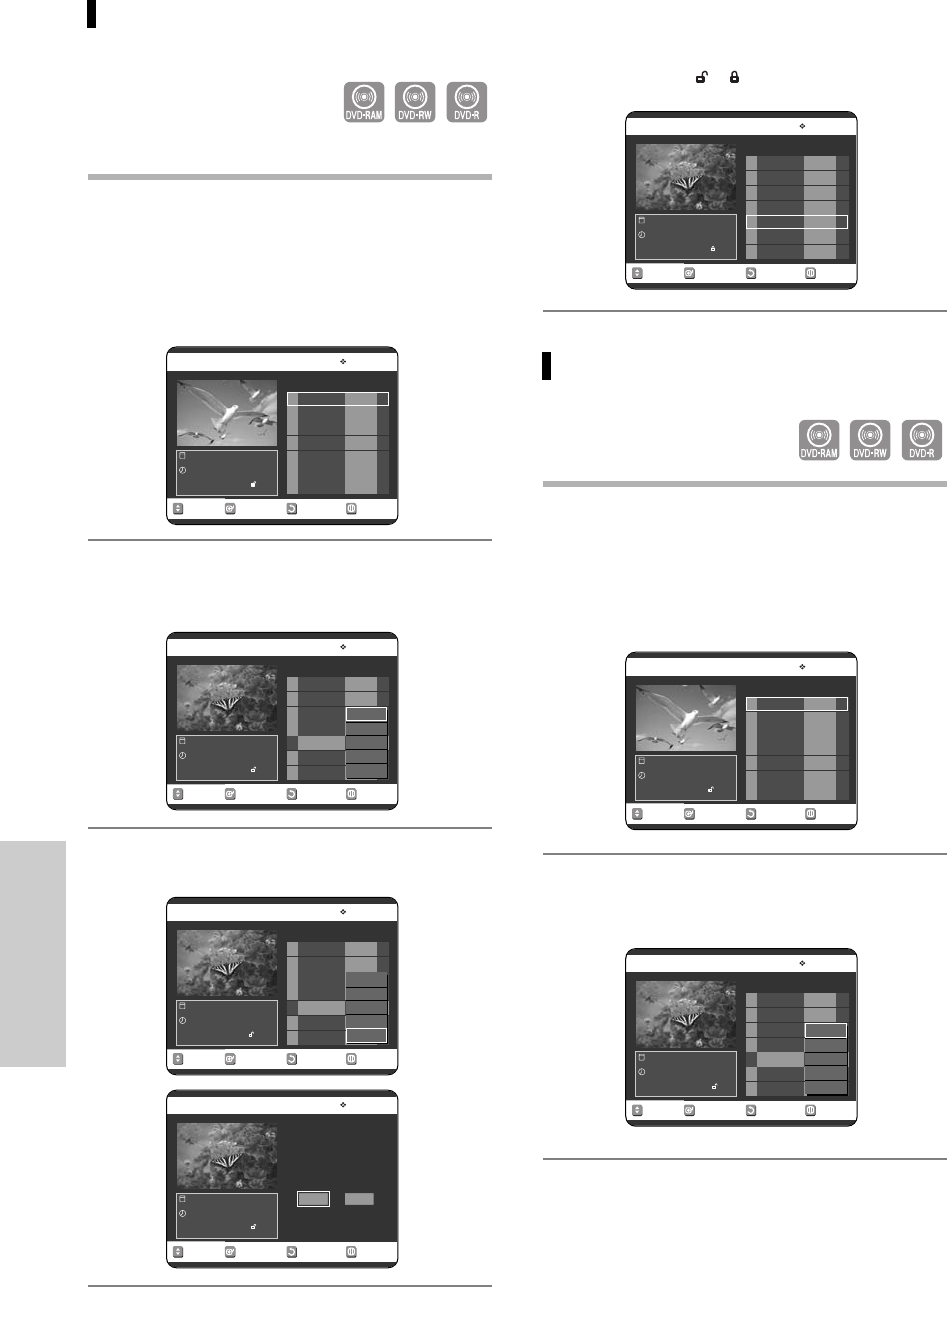
Follow these instructions to lock a title to protect it from
accidental deletion.
1
Press the TITLE LIST button.
The Title List screen is displayed.
Using the MENU button.
• Press the MENU button.
• Press the …† buttons to select Title List, then
press the ENTER or √button twice.
2
Press the …† buttons to select a title you want to
protect in the Title List, then press the ENTER or
√button.
3
Press the …† buttons to select Protection, then
press the ENTER or √button.
4
Press the œ √ buttons to select On, then press
the ENTER button. The key icon on the informa-
tion window for the selected title changes to the
locked status. ( ➝)
Deleting a Title
Follow these instructions to delete a title from the Title
List.
1
Press the TITLE LIST button.
The Title List screen is displayed.
Using the MENU button.
• Press the MENU button.
• Press the …† buttons to select Title List, then
press the ENTER or √button twice.
2
Press the …† buttons to select a title you want to
delete in the Title List, then press the ENTER or √
button.
RETURNSELECTMOVE EXIT
Title List
DVD-RAM(VR)
No. Title Length Edit
Drama
JAN/19/2005
12:00 AM SP
01 Drama 00:00:21 √√
02 Music 00:00:03 √√
03 Sports 00:00:15 √√
04 Movie 00:00:16 √√
05 Sports(A1) 00:06:32 √√
06 Edu 1 00:08:16 √√
RETURNSELECTMOVE EXIT
Title List
DVD-RAM(VR)
No. Title Length Edit
Sports(A1)
JAN/19/2004
12:00 AM SP
01 Drama 00:00:21 √√
02 Music 00:00:03 √√
03 Sports 00:00:15 √√
04 Movie 00:00:16 √√
05 Sports(A1) 00:06:32 √√
06 Edu 1 00:08:16 √√
Play
Rename
Delete
Edit
Protection
RETURNSELECTMOVE EXIT
Title List
DVD-RAM(VR)
No. Title Length Edit
Sports(A1)
JAN/19/2005
12:00 AM SP
01 Drama 00:00:21 √√
02 Music 00:00:03 √√
03 Sports 00:00:15 √√
04 Movie 00:00:16 √√
05 Sports(A1) 00:06:32 √√
06 Edu 1 00:08:16 √√
Play
Rename
Delete
Edit
Protection
RETURNSELECTMOVE EXIT
Title List
DVD-RAM(VR)
Sports(A1)
JAN/19/2005
12:00 AM SP
Title Protection:
OffOn
RETURNSELECTMOVE EXIT
Title List
DVD-RAM(VR)
No. Title Length Edit
Drama
JAN/19/2005
12:00 AM SP
01 Drama 00:00:21 √√
02 Music 00:00:03 √√
03 Sports 00:00:15 √√
04 Movie 00:00:16 √√
05 Sports(A1) 00:06:32 √√
06 Edu 1 00:08:16 √√
RETURNSELECTMOVE EXIT
Title List
DVD-RAM(VR)
No. Title Length Edit
Sports(A1)
JAN/19/2005
12:00 AM SP
01 Drama 00:00:21 √√
02 Music 00:00:03 √√
03 Sports 00:00:15 √√
04 Movie 00:00:16 √√
05 Sports(A1) 00:06:32 √√
06 Edu 1 00:08:16 √√
Play
Rename
Delete
Edit
Protection
RETURNSELECTMOVE EXIT
Title List
DVD-RAM(VR)
No. Title Length Edit
Sports(A1)
JAN/19/2005
12:00 AM SP
01 Drama 00:00:21 √√
02 Music 00:00:03 √√
03 Sports 00:00:15 √√
04 Movie 00:00:16 √√
05 Sports(A1) 00:06:32 √√
06 Edu 1 00:08:16 √√
66 - English
00588A(00)-VR320-2/XAA-eng 6/7/05 7:15 PM Page 66
English - 67
Editing
Deleting a Section of a Title
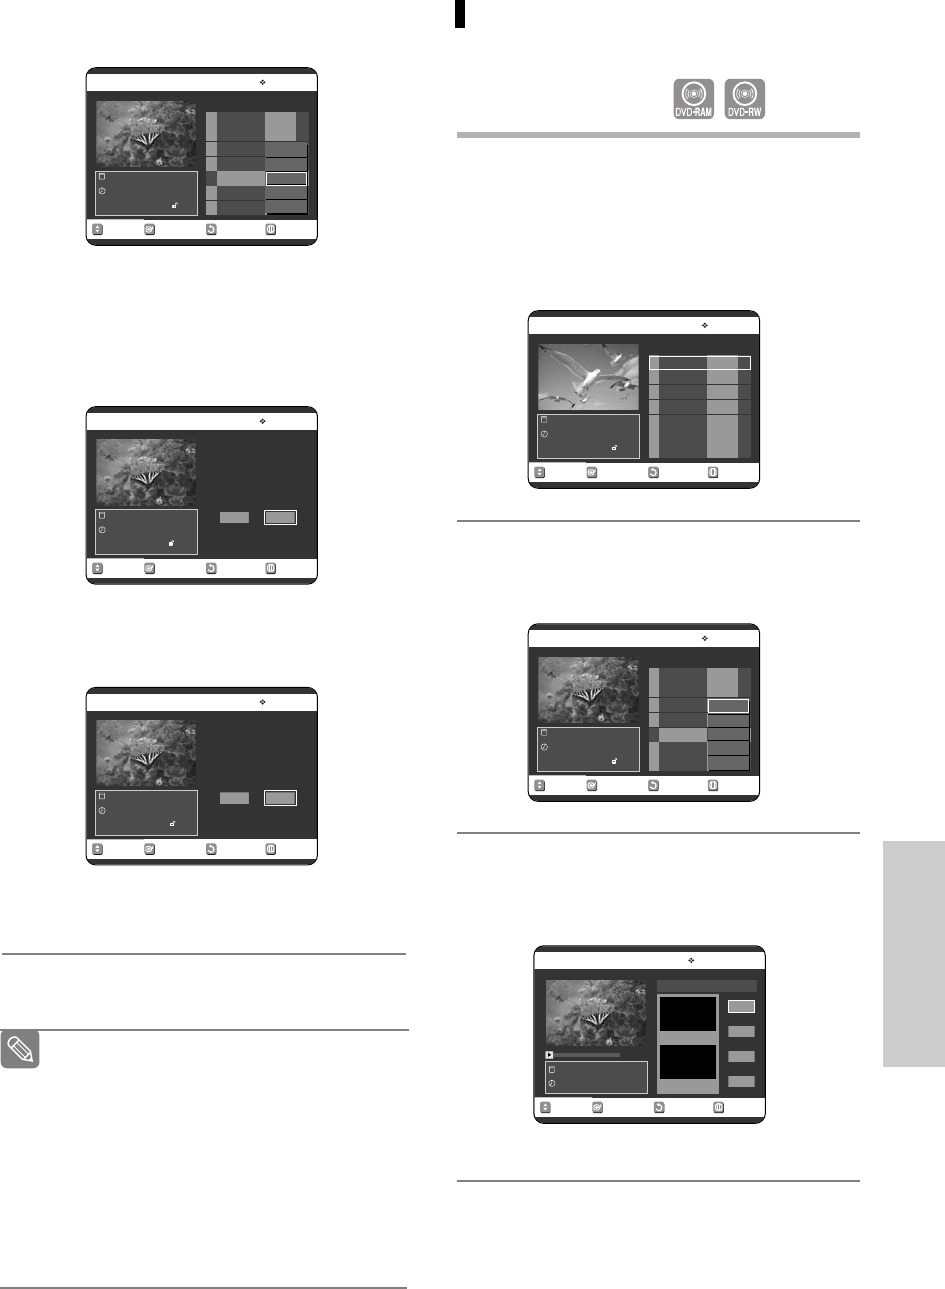
Follow these instructions to delete a section of a
Title List title.
1
Press the TITLE LIST button.
The Title List screen is displayed.
Using the MENU button.
• Press the MENU button.
• Press the …† buttons to select Title List, then
press the ENTER or √button twice.
2
Press the …† buttons to select a title you want to
delete from the Title List, then press the ENTER
or √ button.
3
Press the …† buttons to select Edit, then press
the ENTER or √button.
The Edit Title List screen is displayed.
RETURNSELECTMOVE EXIT
Edit Title List
DVD-RAM(VR)
Sports(A1)
JAN/19/2005 11:50 PM
00:00:00
Start
End
Delete
Return
Title List No. 05
Start 00:00:00
End 00:00:00
3
Press the …† buttons to select Delete, then
press the ENTER or √button.
You will be prompted with a confirmation mes-
sage.
DVD-RAM(VR), DVD-RW(VR mode): Since
Playlist is present, the message ‘Do you want to
delete?(Related playlists may be deleted.)’ is
displayed.
DVD-RW(Video mode), DVD-R: Since Playlist is
not present, the message ‘Do you want to delete?’
is displayed.
• The message may depend on the type of disc.
4
Press the œ √ buttons to select Yes, then press
the ENTER button.
RETURNSELECTMOVE EXIT
Title List
DVD-RAM(VR)
Sports(A1)
JAN/19/2005
12:00 AM SP
Do you want to delete?
(Related playlists
may be deleted.)
NoYes
RETURNSELECTMOVE EXIT
Title List
DVD-RW(V)
Sports(A1)
JAN/19/2005
12:00 AM SP
Do you want to delete?
NoYes
RETURNSELECTMOVE EXIT
Title List
DVD-RAM(VR)
No. Title Length Edit
Sports(A1)
JAN/19/2005
12:00 AM SP
01 Drama 00:00:21 √√
02 Music 00:00:03 √√
03 Sports 00:00:15 √√
04 Movie 00:00:16 √√
05 Sports(A1) 00:06:32 √√
06 Edu 1 00:08:16 √√
Play
Rename
Delete
Edit
Protection
You cannot delete a protected title.
If you want to delete a protected title, select
Off in the Title Protection menu.
Once a title is deleted from the Title List it
cannot be recovered.
Once DVD-R, DVD-RW is finalized, it cannot
be deleted.
With DVD-R, titles are only deleted from the
menu, however, the Title remains physically
on the disc.
Note
(VR mode)
RETURNSELECTMOVE EXIT
Title List
DVD-RAM(VR)
No. Title Length Edit
Drama
JAN/19/2005
12:00 AM SP
01 Drama 00:00:21 √√
02 Music 00:00:03 √√
03 Sports 00:00:15 √√
04 Movie 00:00:16 √√
05 Sports(A1) 00:06:32 √√
06 Edu 1 00:08:16 √√
RETURNSELECTMOVE EXIT
Title List
DVD-RAM(VR)
No. Title Length Edit
Sports(A1)
JAN/19/2005
12:00 AM SP
01 Drama 00:00:21 √√
02 Music 00:00:03 √√
03 Sports 00:00:15 √√
04 Movie 00:00:16 √√
05 Sports(A1) 00:06:32 √√
06 Edu 1 00:08:16 √√
Play
Rename
Delete
Edit
Protection
00588A(00)-VR320-2/XAA-eng 6/7/05 7:15 PM Page 67
68 - English
Editing
4
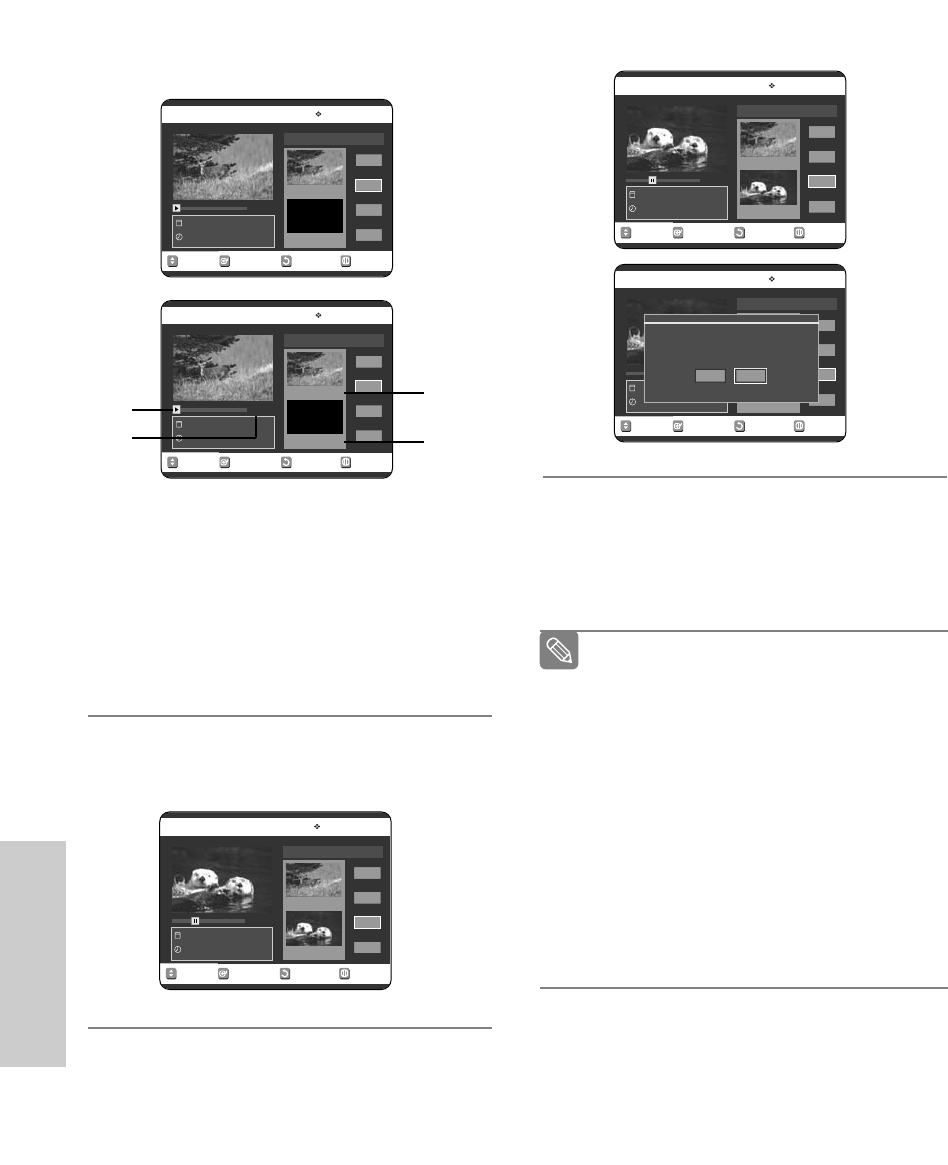
Press the ENTER button at the starting point.
The image and starting point time are displayed in
the section deletion starting point window.
Edit Title List Screen Elements
1 Playback bar
2 Playtime
3 Section deletion starting point window and time
4 Section deletion end point window and time
• Select the start and end points of the section
you want to delete using the playback related
buttons.
• Playback related buttons:
(√II,Iœœ ,œœ ,√√).
5
Press the ENTER button at the end point.
The image and end point time are displayed in the
Section deletion ending point window.
6
Press the …† buttons to select Delete, then
press the ENTER button.
7
Press the œ√buttons to select YES, then press
the ENTER button.
The selected section has been deleted.
To return to the Title List screen, press the
…†
buttons to select Return.
RETURN
SELECTMOVE EXIT
Edit Title List
DVD-RAM(VR)
Sports(A1)
JAN/19/2005 11:50 PM
00:10:10
Start
End
Delete
Return
Title List No. 05
Start 00:00:10
End 00:10:10
RETURNSELECTMOVE EXIT
Edit Title List
DVD-RAM(VR)
Sports(A1)
JAN/19/2005 11:50 PM
00:00:10
Start
End
Delete
Return
Title List No. 05
Start 00:00:10
End 00:00:00
①
②
➂
➃
RETURNSELECTMOVE EXIT
Edit Title List
DVD-RAM(VR)
Sports(A1)
JAN/19/2005 11:50 PM
00:00:10
Start
End
Delete
Return
Title List No. 05
Start 00:00:10
End 00:00:00
RETURNSELECTMOVE EXIT
Edit Title List
DVD-RAM(VR)
Sports(A1)
JAN/19/2005 11:50 PM
00:10:10
Start
End
Delete
Return
Title List No. 05
Start 00:00:10
End 00:10:10
RETURNSELECTMOVE EXIT
Edit Title List
DVD-RAM(VR)
Sports(A1)
JAN/19/2005 11:50 PM
00:10:15
Start
End
Delete
Return
Title List No. 05
Start 00:00:06
End 00:10:10
Do you want to delete?
(Deleted part will not be restored.)
Yes No
The length of the section to be deleted must
be at least 5 seconds long.
If the length of the section to be deleted is
less than 5 seconds, you will be prompted
with the message 'The range is too short.'.
If the end time precedes the starting time,
you will be prompted with the message ‘End
point cannot be marked earlier than start
point’.
The section cannot be deleted when it
includes a still picture.
Press the MENU button after the operation
has finished.
The Title List screen will disappear.
Note
00588A(00)-VR320-2/XAA-eng 6/7/05 7:15 PM Page 68
English - 69
Editing
Advanced Editing
(Playlist)
Creating a Playlist
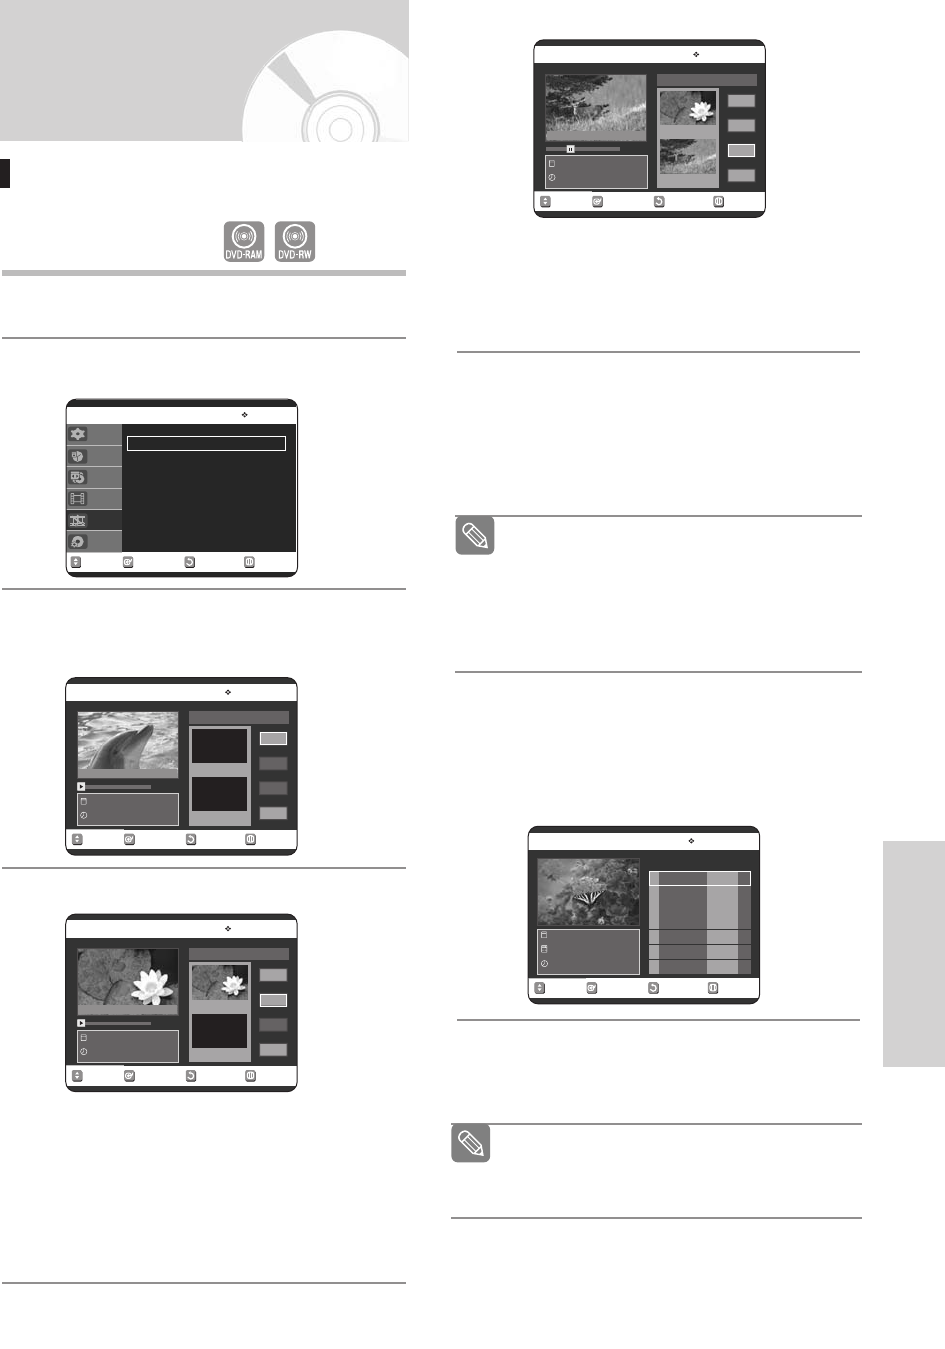
Follow these instructions to create a new playlist title
from a recorded title.
1
With the unit in Stop mode, press the MENU
button.
2
Press the …† buttons to select Playlist, then
press the ENTER or √button.
3
Press the …† buttons to select New Playlist,
then press the ENTER or √button.
The Make Scene screen is displayed.
4
Press the ENTER button at the start point.
•The image and time at the start point are dis-
played on the Start window.
•The yellow-colored selection bar moves to the
End item.
•Select the starting point of the section from
which you want to create a new scene using the
playback related buttons (√II,Iœœ ,√√I,œœ ,√√).
5
Press the ENTER button at the end point.
• The image and end point time are displayed in
the End window.
• The yellow-colored selection bar moves to the
Make icon.
- To make a new playlist -
6
Press the …† buttons to select Make, then press
the ENTER button.
Anew Scene will be added to the current Playlist.
Anew Make Scene screen is displayed.
- To return to Edit Playlist menu -
7
Press the …† buttons to select Return, then
press the ENTER button.
The Edit Playlist screen is displayed.
8
Press the MENU or PLAY LIST button after the
operation has finished.
The Edit Playlist screen will disappear.
(VR mode)
RETURNSELECTMOVE EXIT
Make Scene
DVD-RAM(VR)
New Playlist
JAN/20/05 12:00 AM
00:00:00
Start
End
Make
Return
Scene No. 001
Start 00:00:00
End 00:00:00
RETURNSELECTMOVE EXIT
Make Scene
DVD-RAM(VR)
New Playlist
JAN/20/05 12:00 AM
00:00:10
Start
End
Make
Return
Scene No. 001
Start 00:00:10
End 00:00:00
RETURNSELECTMOVE EXIT
Make Scene
DVD-RAM(VR)
New Playlist
JAN/19/05 12:00 AM
00:10:00
Start
End
Make
Return
Scene No. 001
Start 00:00:10
End 00:10:00
You can create up to 99 playlist titles.
Depending on the kind of disc, the displayed
screen may have a slight difference.
Note
You can check and see all the scenes on
Edit Playlist screen.
Repeat steps 1~6 if you want to make a new
playlist.
Repeat steps 3~6 if you want to make
scenes of the playlist.
Note
RETURNSELECTMOVE EXIT
Edit Playlist
DVD-RAM(VR)
No. Title Length Edit
JAN/19/2005 12:00 AM
7 Scenes
JAN/19/2005 12:00 AM
01 JAN/19/2005 00:00:21 √√
02 JAN/19/2005 00:00:03 √√
03 JAN/20/2005 00:00:15 √√
04 JAN/20/2005 00:00:16 √√
RETURNSELECTMOVE EXIT
Playlist
DVD-RAM(VR)
New Playlist
√√
Edit Playlist
√√
Setup
Timer Rec.
Copy
Title List
Playlist
Disc Manager
Title List : 1/6
Title List : 1/6
Title List : 1/6
00588A(00)-VR320-3/XAA-eng 6/7/05 7:17 PM Page 69
70 - English
Editing
3
Press the …† buttons to select Play, then press
the ENTER or √button.
The playlist titles will be played back.
4
Press the STOP button to stop playing.
The screen returns to the Edit Playlist screen.
Playing Titles in the Playlist
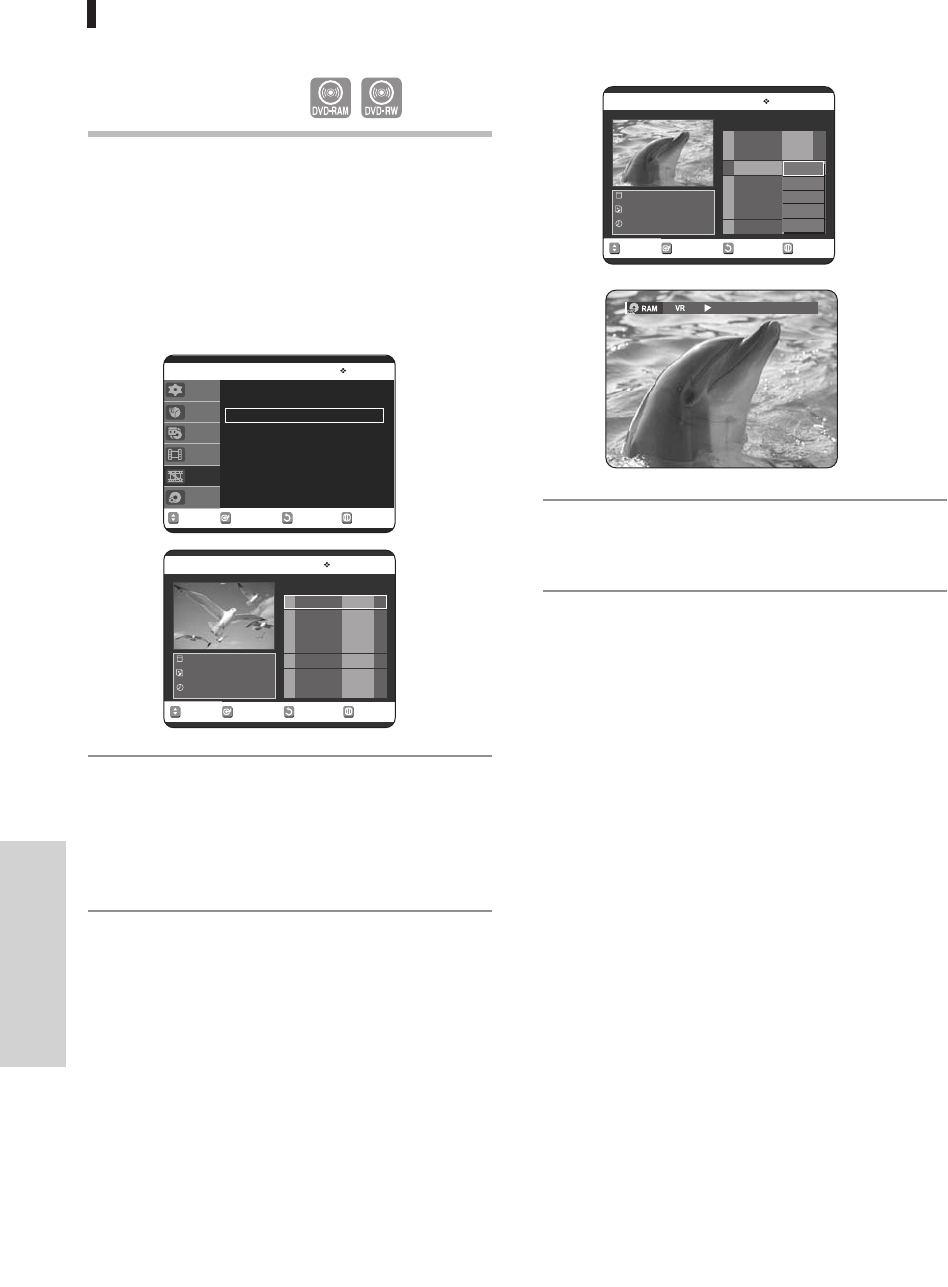
Follow these instructions to play the playlist titles.
1
Press the PLAY LIST button with the disc stopped.
The Edit Playlist screen is displayed.
Using the MENU button.
• Press the MENU button with the disc stopped.
• Press the …† buttons to select Playlist, then
press the ENTER or √button.
• Press the …† buttons to select Edit Playlist,
then press the ENTER or √button.
2
Press the …† buttons to select the title you want
to play from the Playlist, then press the ENTER or
√button.
The Edit Playlist menu is displayed : Play,
Rename, Edit Scene, Copy, Delete.
RETURNSELECTMOVE EXIT
Edit Playlist
DVD-RAM(VR)
No. Title Length Edit
JAN/19/2005 12:00 AM
4 Scenes
JAN/19/2005 12:00 AM
01 JAN/19/2005 00:00:21 √√
02 JAN/19/2005 00:00:03 √√
03 JAN/20/2005 00:00:15 √√
04 JAN/20/2005 00:00:16 √√
(VR mode)
RETURNSELECTMOVE EXIT
Edit Playlist
DVD-RAM(VR)
No. Title Length Edit
JAN/20/2005 12:00 AM
4 Scenes
JAN/20/2005 12:00 AM
01 JAN/19/2005 00:00:21 √√
02 JAN/19/2005 00:00:03 √√
03 JAN/20/2005 00:00:15 √√
04 JAN/20/2005 00:00:16 √√
Play
Rename
Edit Scene
Copy
Delete
RETURNSELECTMOVE EXIT
Playlist
DVD-RAM(VR)
New Playlist
√√
Edit Playlist
√√
Setup
Timer Rec.
Copy
Title List
Playlist
Disc Manager
00588A(00)-VR320-3/XAA-eng 6/7/05 7:17 PM Page 70
English - 71
Editing
Renaming a Playlist Title
Follow these instructions to rename a playlist title, i.e.
to edit the title of a playlist title.
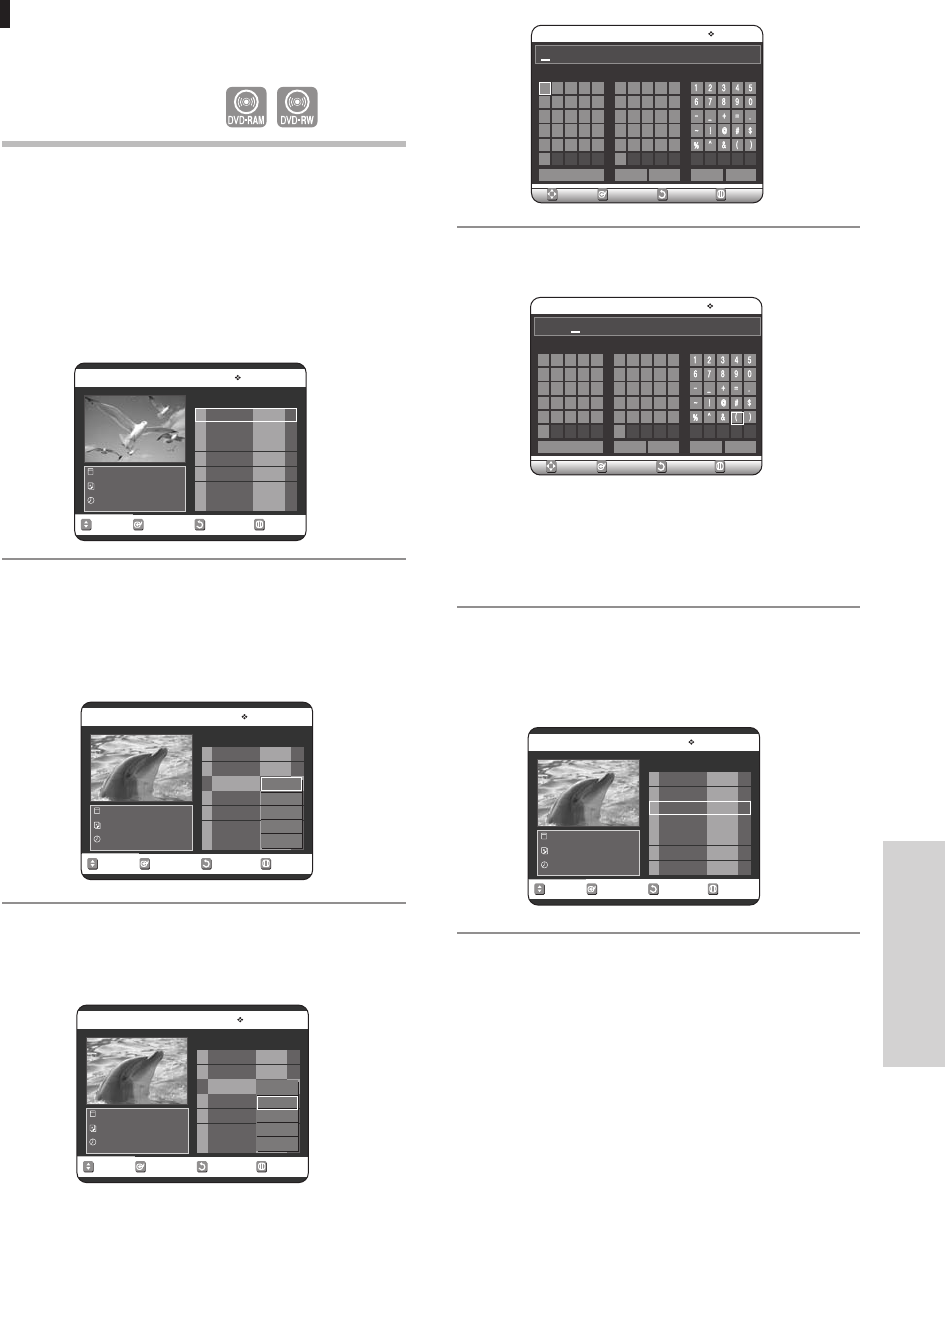
1
Press the PLAY LIST button with the disc stopped.
The Edit Playlist screen is displayed.
Using the MENU button.
• Press the MENU button with the disc stopped.
• Press the …† buttons to select Playlist, then
press the ENTER or √button.
• Press the …† buttons to select Edit Playlist,
then press the ENTER or √button.
2
Press the …† buttons to select the title you want
to rename from the Playlist, then press the
ENTER or √button.
The Edit menu is displayed :Play, Rename, Edit
Scene, Copy, Delete
3
Press the …† buttons to select Rename, then
press the ENTER or √button.
The Rename screen is displayed.
4
Enter the desired characters using the …† œ √
buttons.
• This function is the same as the Rename func-
tion in renaming the title list. (See page 65.)
• The maximum number of characters that can be
entered is 31.
5
Press the …† œ √ buttons to select Save, then
press the ENTER button.
The changed title is displayed in the title field of
the selected title.
RETURNSELECTMOVE EXIT
Edit Playlist
DVD-RAM(VR)
No. Title Length Edit
JAN/19/2005 12:00 AM
4 Scenes
JAN/19/2005 12:00 AM
01 JAN/19/2005 00:00:21 √√
02 JAN/19/2005 00:00:03 √√
03 JAN/20/2005 00:00:15 √√
04 JAN/20/2005 00:00:16 √√
(VR mode)
RETURNSELECTMOVE EXIT
Edit Playlist
DVD-RAM(VR)
No. Title Length Edit
JAN/20/2005 12:00 AM
4 Scenes
JAN/20/2005 12:00 AM
01 JAN/19/2005 00:00:21 √√
02 JAN/19/2005 00:00:03 √√
03 JAN/20/2005 00:00:15 √√
04 JAN/20/2005 00:00:16 √√
Play
Rename
Edit Scene
Copy
Delete
RETURNSELECTMOVE EXIT
Edit Playlist
DVD-RAM(VR)
No. Title Length Edit
JAN/20/2005 12:00 AM
4 Scenes
JAN/20/2005 12:00 AM
01 JAN/19/2005 00:00:21 √√
02 JAN/19/2005 00:00:03 √√
03 JAN/20/2005 00:00:15 √√
04 JAN/20/2005 00:00:16 √√
Play
Rename
Edit Scene
Copy
Delete
ABCDE a b c d e
fghi j
klmno
pq rst
u
z
nwxy
FGH I J
KL MNO
PQRST
UVWXY
Z
Back Space Space Delete Clear Save
RETURNSELECTMOVE EXIT
Rename
DVD-RAM(VR)
Dolphin
ABCDE a b c d e
fghi j
klmno
pq rst
u
z
nwxy
FGH I J
KL MNO
PQRST
UVWXY
Z
Back Space Space Delete Clear Save
RETURNSELECTMOVE EXIT
Rename
DVD-RAM(VR)
JAN / 20 / 2005 12:00 AM
RETURNSELECTMOVE EXIT
Edit Playlist
DVD-RAM(VR)
No. Title Length Edit
Dolphin
4 Scenes
JAN/20/2005 12:00 AM
01 JAN/19/2005 00:00:21 √√
02 JAN/19/2005 00:00:03 √√
03 Dolphin 00:00:15 √√
04 JAN/20/2005 00:00:16 √√
00588A(00)-VR320-3/XAA-eng 6/7/05 7:17 PM Page 71
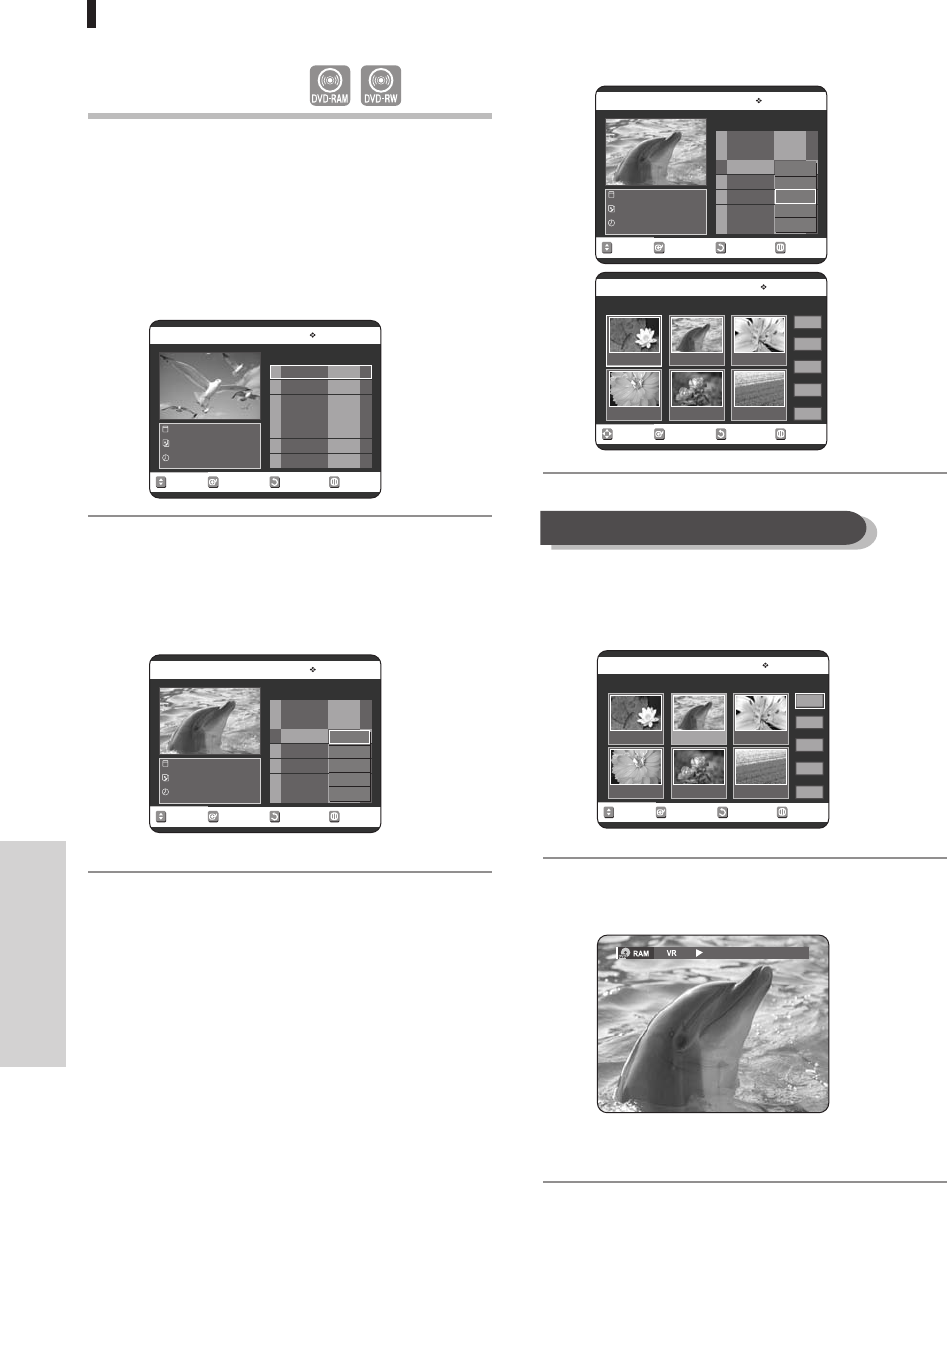
3
Press the …† buttons to select Edit Scene, then
press the ENTER or √button.
The Edit Scene screen is displayed.
4
Press the …†œ √ buttons to select the scene
you want to play, then press the ENTER button.
The playlist title to be played is selected.
5
Press the ENTER button.
The selected scene will be played back.
• To stop scene play, press the STOP button.
Editing
Editing a Scene for the Playlist
Follow these instructions to edit scenes for a playlist.
1
Press the PLAY LIST button with the disc stopped.
The Edit Playlist screen is displayed.
Using the MENU button.
• Press the MENU button with the disc stopped.
• Press the …† buttons to select Playlist, then
press the ENTER or √button.
• Press the …† buttons to select Edit Playlist,
then press the ENTER or √button.
2
Press the …† buttons to select the title you want
to edit from the Playlist, and then press the
ENTER or √button.
The Edit Playlist menu is displayed:Play, Rename,
Edit Scene, Copy, Delete
RETURNSELECTMOVE EXIT
Edit Playlist
DVD-RAM(VR)
No. Title Length Edit
Science
7 Scenes
JAN/20/2005 06:43 AM
01 Science 00:00:17 √√
02 Sky 00:00:06 √√
03 Dolphin 00:00:06 √√
04 Natural 00:00:37 √√
Play
Rename
Edit Scene
Copy
Delete
RETURNSELECTMOVE EXIT
Edit Playlist
DVD-RAM(VR)
No. Title Length Edit
Dolphin
7 Scenes
JAN/20/2005 06:43 AM
01 Science 00:00:17 √√
02 Sky 00:00:06 √√
03 Dolphin 00:00:06 √√
04 Natural 00:00:37 √√
Play
Rename
Edit Scene
Copy
Delete
RETURNSELECTMOVE EXIT
Edit Playlist
DVD-RAM(VR)
No. Title Length Edit
Science
7 Scenes
JAN/20/2005 06:43 AM
01 Science 00:00:17 √√
02 Sky 00:00:06 √√
03 Dolphin 00:00:06 √√
04 Natural 00:00:37 √√
(VR mode)
RETURNSELECTMOVE EXIT
Edit Scene
DVD-RAM(VR)
Scene No. 1/7 Playlist No. 3
Play
Modify
Move
Add
Delete
01 00:00:26 02 00:03:07 03 00:00:04
04 00:00:03 05 00:00:11 06 00:00:04
RETURNSELECTMOVE EXIT
Edit Scene
DVD-RAM(VR)
Scene No. 2/7 Playlist No. 3
Play
Modify
Move
Add
Delete
01 00:00:26 02 00:03:07 03 00:00:04
04 00:00:03 05 00:00:11 06 00:00:04
Playing a Selected Scene
72 - English
00588A(00)-VR320-3/XAA-eng 6/7/05 7:17 PM Page 72
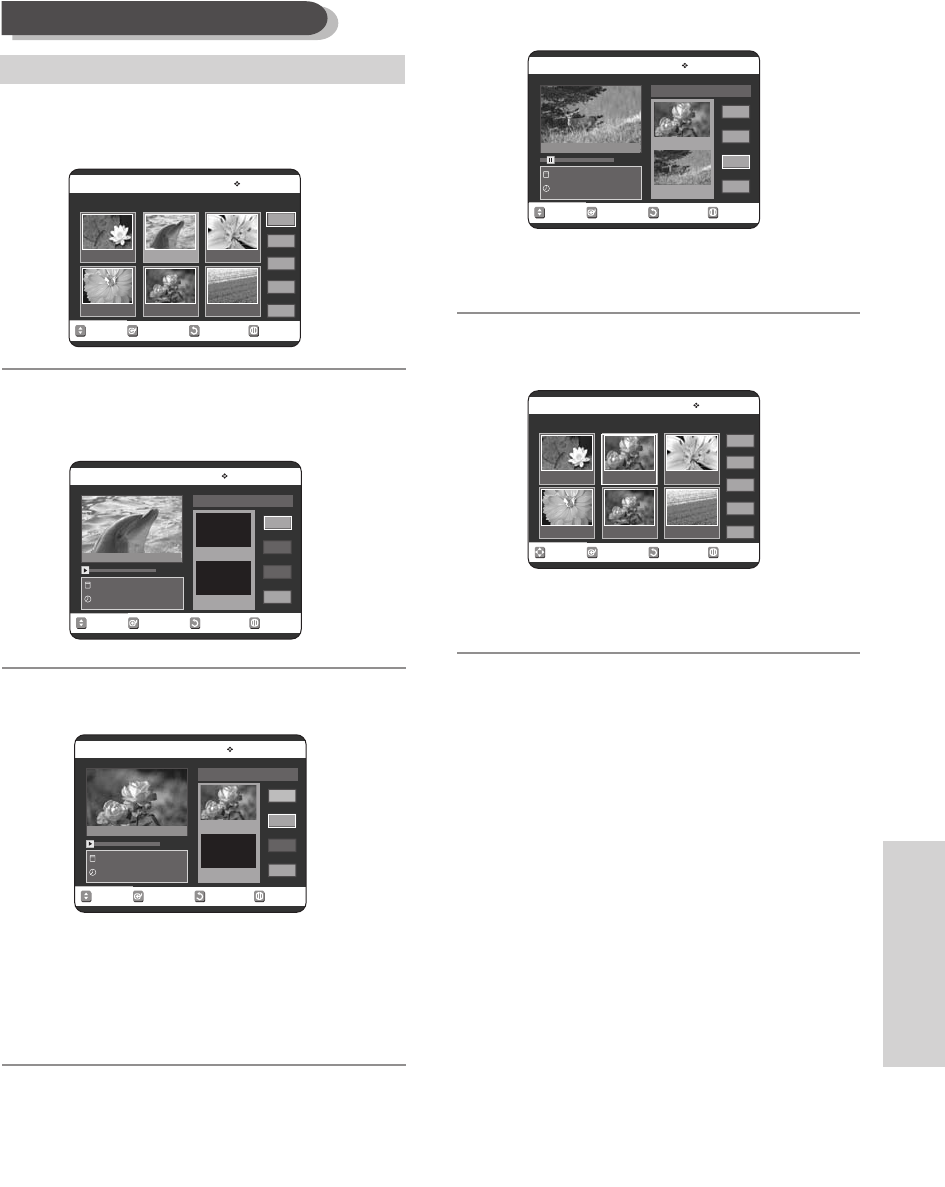
English - 73
Editing
4
Press the …† œ √ buttons to select the scene
you want to modify, then press the ENTER button.
5
Press the …† buttons to select Modify, then
press the ENTER button.
The Modify Scene screen is displayed.
6
Press the ENTER button at the start point of the
scene.
• The image and starting point time are displayed
on the Start window.
• Select the starting or ending point of the section
you want to modify using the playback related
buttons (√II,Iœœ ,√√I,œœ ,√√).
7
Press the ENTER button at the end point of the
scene.
• The image and ending point time are displayed
in the End window.
8
Press the …† buttons to select Change, then
press the ENTER button.
• The scene you want to modify is changed with
the selected section.
Modifying a Scene (Replacing a Scene)
RETURNSELECTMOVE EXIT
Modify Scene
DVD-RAM(VR)
Dolphin
JAN/20/2005 06:43 AM
00:00:20
Start
End
Change
Return
Scene No. 002
Start 00:00:20
End 00:00:00
RETURNSELECTMOVE EXIT
Modify Scene
DVD-RAM(VR)
Dolphin
JAN/20/2005 06:43 AM
00:00:30
Start
End
Change
Return
Scene No. 002
Start 00:00:20
End 00:00:30
RETURNSELECTMOVE EXIT
Edit Scene
DVD-RAM(VR)
Scene No. 2/7 Playlist No. 3
Play
Modify
Move
Add
Delete
01 00:00:26 02 00:00:07 03 00:00:04
04 00:00:03 05 00:00:11 06 00:00:04
RETURNSELECTMOVE EXIT
Modify Scene
DVD-RAM(VR)
Dolphin
JAN/20/2005 06:43 AM
00:00:00
Start
End
Change
Return
Scene No. 002
Start 00:00:00
End 00:00:00
RETURNSELECTMOVE EXIT
Edit Scene
DVD-RAM(VR)
Scene No. 2/7 Playlist No. 3
Play
Modify
Move
Add
Delete
01 00:00:26 02 00:03:07 03 00:00:04
04 00:00:03 05 00:00:11 06 00:00:04
Title List : 1/7
Title List : 1/7
Title List : 1/7
To setup, follow steps 1 to 3 in page 72.
00588A(00)-VR320-3/XAA-eng 6/7/05 7:18 PM Page 73
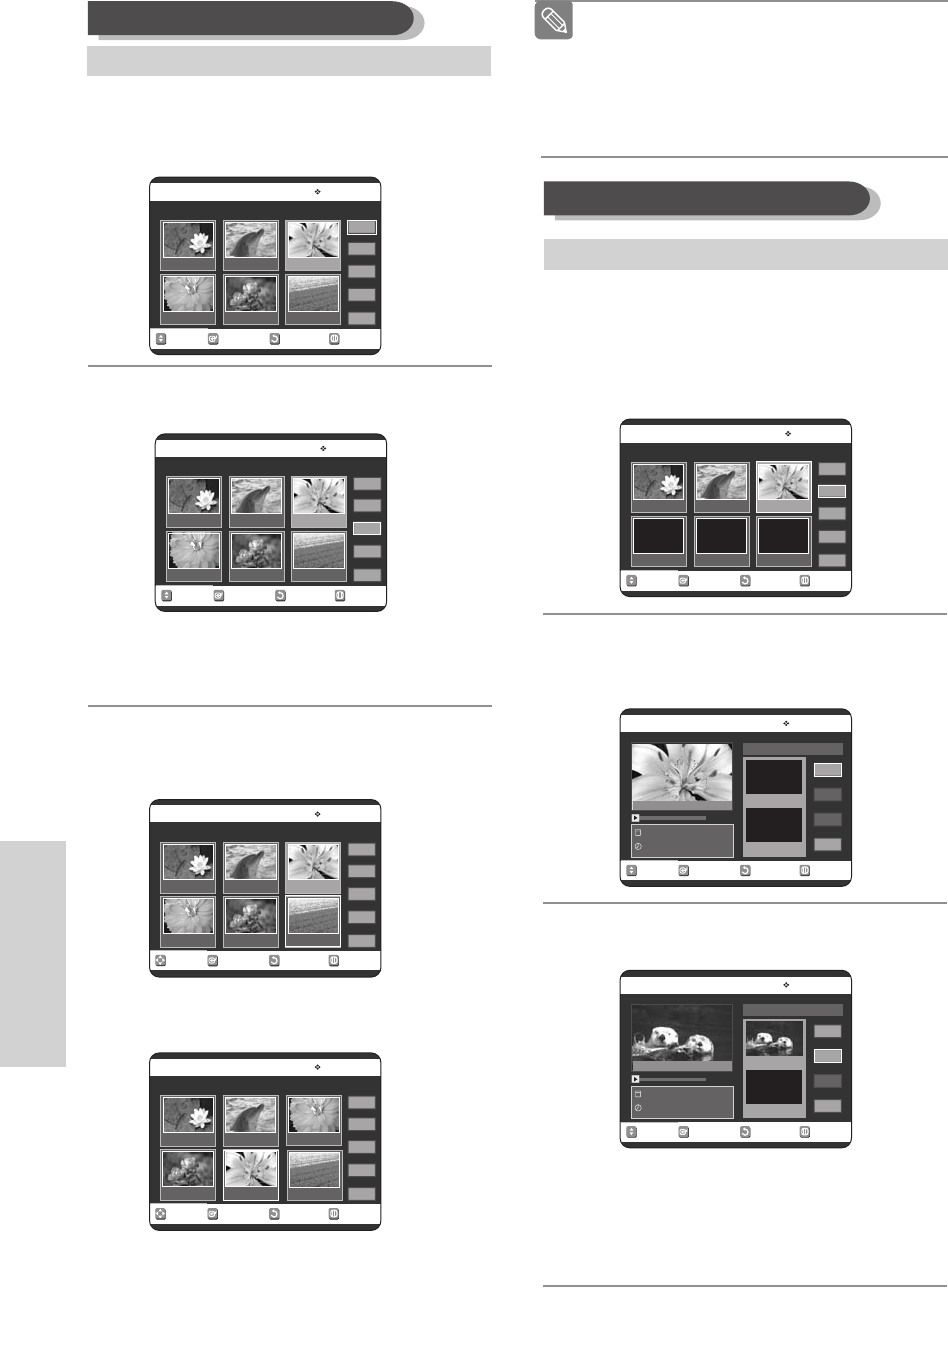
74 - English
Editing
4
Press the …† œ √ buttons to select the scene you
want to move (change the position), then press the
ENTER button.
5
Press the …† buttons to select Move, then press the
ENTER button.
•
Ayellow selection window is displayed on the
scene to be moved.
6
Press the
…† œ √
buttons to select the position
to which you want to move the selected scene,
then select the ENTER button.
•
The selected scene is moved to the selected
position.
4
Press the …† œ √ buttons to select the scene
that will have a new scene inserted before it, then
press the ENTER button.
Ayellow selection window is displayed on the
scene to be added as the new scene.
5
Press the …† buttons to select add, then press
the ENTER button.
The Add Scene screen is displayed.
6
Press the ENTER button at the starting point of
the scene.
• The image and starting point time are displayed
in the Start window.
• Select the end point of the section where you
want to add the new scene using the playback
related buttons (√II,Iœœ ,√√I,œœ ,√√).
Moving a Scene (Changing the Position of a Scene)
Adding a Scene
■
You cannot move the selected scene to the
position of the next scene, because the
selected scene should be inserted before that
position, which requires no action.
■
Depending on the kind of disc, the displayed
screen may have a slight difference.
Note
RETURNSELECTMOVE EXIT
Edit Scene
DVD-RAM(VR)
Scene No. 3/7 Playlist No. 3
Play
Modify
Move
Add
Delete
01 00:00:26 02 00:00:07 03 00:00:04
04 00:00:03 05 00:00:11 06 00:00:04
RETURNSELECTMOVE EXIT
Edit Scene
DVD-RAM(VR)
Scene No. 6/7 Playlist No. 3
Play
Modify
Move
Add
Delete
01 00:00:26 02 00:00:07 03 00:00:04
04 00:00:03 05 00:00:11 06 00:00:04
RETURNSELECTMOVE EXIT
Edit Scene
DVD-RAM(VR)
Scene No. 5/7 Playlist No. 3
Play
Modify
Move
Add
Delete
01 00:00:26
02 00:00:07
03 00:00:04 04 00:00:03
05 00:00:11 06 00:00:04
RETURNSELECTMOVE EXIT
Edit Scene
DVD-RAM(VR)
Scene No. 4/3 Playlist No. 3
Play
Modify
Move
Add
Delete
01 00:00:26 02 00:00:07 03 00:00:04
04 00:00:00
RETURNSELECTMOVE EXIT
Add Scene
DVD-RAM(VR)
Science
JAN/20/2005 06:43 AM
00:00:00
Start
End
Add
Cancel
Scene No. 003
Start 00:00:00
End 00:00:00
RETURNSELECTMOVE EXIT
Add Scene
DVD-RAM(VR)
Science
JAN/20/2005 06:43 AM
00:00:15
Start
End
Add
Cancel
Scene No. 003
Start 00:00:15
End 00:00:00
RETURNSELECTMOVE EXIT
Edit Scene
DVD-RAM(VR)
Scene No. 3/7 Playlist No. 3
Play
Modify
Move
Add
Delete
01 00:00:26 02 00:00:07 03 00:00:04
04 00:00:03 05 00:00:11 06 00:00:04
Title List : 1/7
Title List : 1/7
To setup, follow steps 1 to 3 in page 72.
To setup, follow steps 1 to 3 in page 72.
00588A(00)-VR320-3/XAA-eng 6/7/05 7:18 PM Page 74
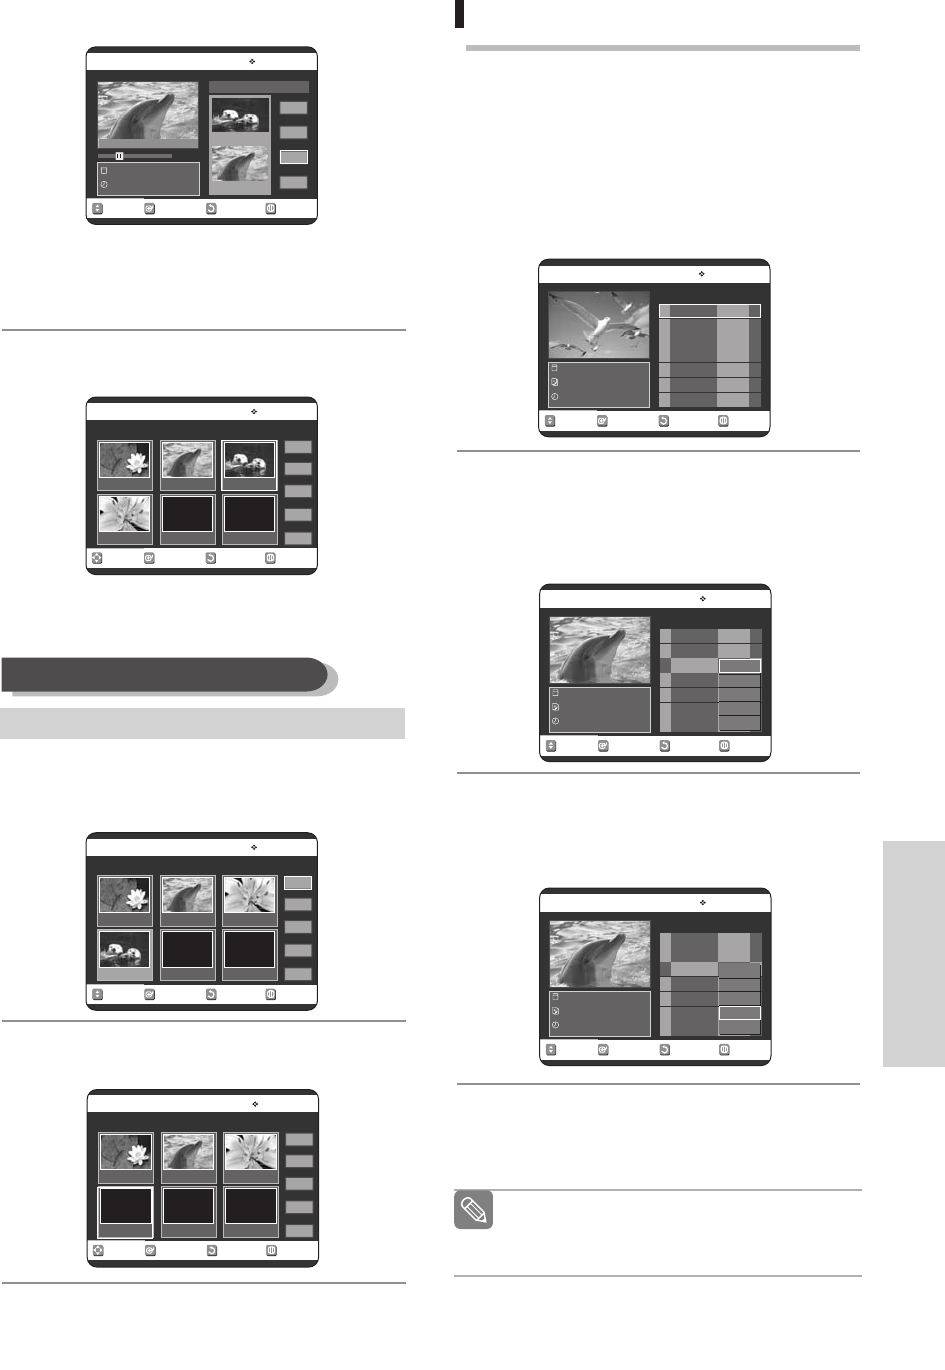
Editing
7
Press the ENTER button at the end point of the
scene.
• The image and time of the end point are dis-
played in the End window.
• To cancel, press the …† buttons to select
cancel and then press the ENTER button.
8
Press the …† buttons to select Add, then press
the ENTER button.
• The section you want to add is inserted prior to
the scene selected in step.
4
Press the …† œ √ buttons to select the scene
you want to delete, and then press the ENTER
button.
5
Press the …† buttons to select Delete, then
press the ENTER button.
Copying a Playlist Title to the VCR
1
Press the PLAY LIST button with the disc stopped.
The Edit Playlist screen is displayed.
Using the MENU button.
• Press the MENU button with the disc stopped.
• Press the …† buttons to select Playlist, then
press the ENTER or √button.
• Press the …† buttons to select Edit Playlist,
then press the ENTER or √button.
2
Press the …† buttons to select the title you want
to copy to the VCR, and then press the ENTER or
√button.
The Edit Playlist menu is displayed:Play, Rename,
Edit Scene, Copy, Delete.
3
Press the …† buttons to select Copy, then press
the ENTER button.
• The title you choose is played and copied to
VCR tape.
4
Press the MENU button after the operation has
finished. The menu screen will disappear.
RETURNSELECTMOVE EXIT
Add Scene
DVD-RAM(VR)
Sclence
JAN/20/2005 06:43 AM
00:00:35
Start
End
Add
Cancel
Scene No. 003
Start 00:00:15
End 00:00:35
RETURNSELECTMOVE EXIT
Edit Scene
DVD-RAM(VR)
Scene No. 4/4 Playlist No. 4
Play
Modify
Move
Add
Delete
01 00:00:26 02 00:00:07 03 00:00:04
04 00:00:20
Deleting a Scene
RETURNSELECTMOVE EXIT
Edit Scene
DVD-RAM(VR)
Scene No. 4/4 Playlist No. 4
Play
Modify
Move
Add
Delete
01 00:00:26 02 00:00:07 03 00:00:04
04 00:00:35
RETURNSELECTMOVE EXIT
Edit Scene
DVD-RAM(VR)
Scene No. 4/3 Playlist No. 4
Play
Modify
Move
Add
Delete
01 00:00:26 02 00:00:07 03 00:00:04
04 00:00:00
RETURNSELECTMOVE EXIT
Edit Playlist
DVD-RAM(VR)
No. Title Length Edit
Science
7 Scenes
JAN/20/2005 06:43 AM
01 Science 00:00:17 √√
02 Sky 00:00:06 √√
03 Dolphin 00:00:06 √√
04 Natural 00:00:37 √√
RETURNSELECTMOVE EXIT
Edit Playlist
DVD-RAM(VR)
No. Title Length Edit
Dolphin
7 Scenes
JAN/20/2005 06:43 AM
01 Science 00:00:17 √√
02 Sky 00:00:06 √√
03 Dolphin 00:00:06 √√
04 Natural 00:00:37 √√
Play
Rename
Edit Scene
Copy
Delete
RETURNSELECTMOVE EXIT
Edit Playlist
DVD-RAM(VR)
No. Title Length Edit
Dolphin
7 Scenes
JAN/20/2005 06:43 AM
01 Science 00:00:17 √√
02 Sky 00:00:06 √√
03 Dolphin 00:00:06 √√
04 Natural 00:00:37 √√
Play
Rename
Edit Scene
Copy
Delete
Title List : 1/7
To setup, follow steps 1 to 3 in page 72.
English - 75
The playlist can contain up to 99 playlist
titles (titles).
Note
05 00:00:00
05 00:00:00
00588A(00)-VR320-3/XAA-eng 6/7/05 7:18 PM Page 75
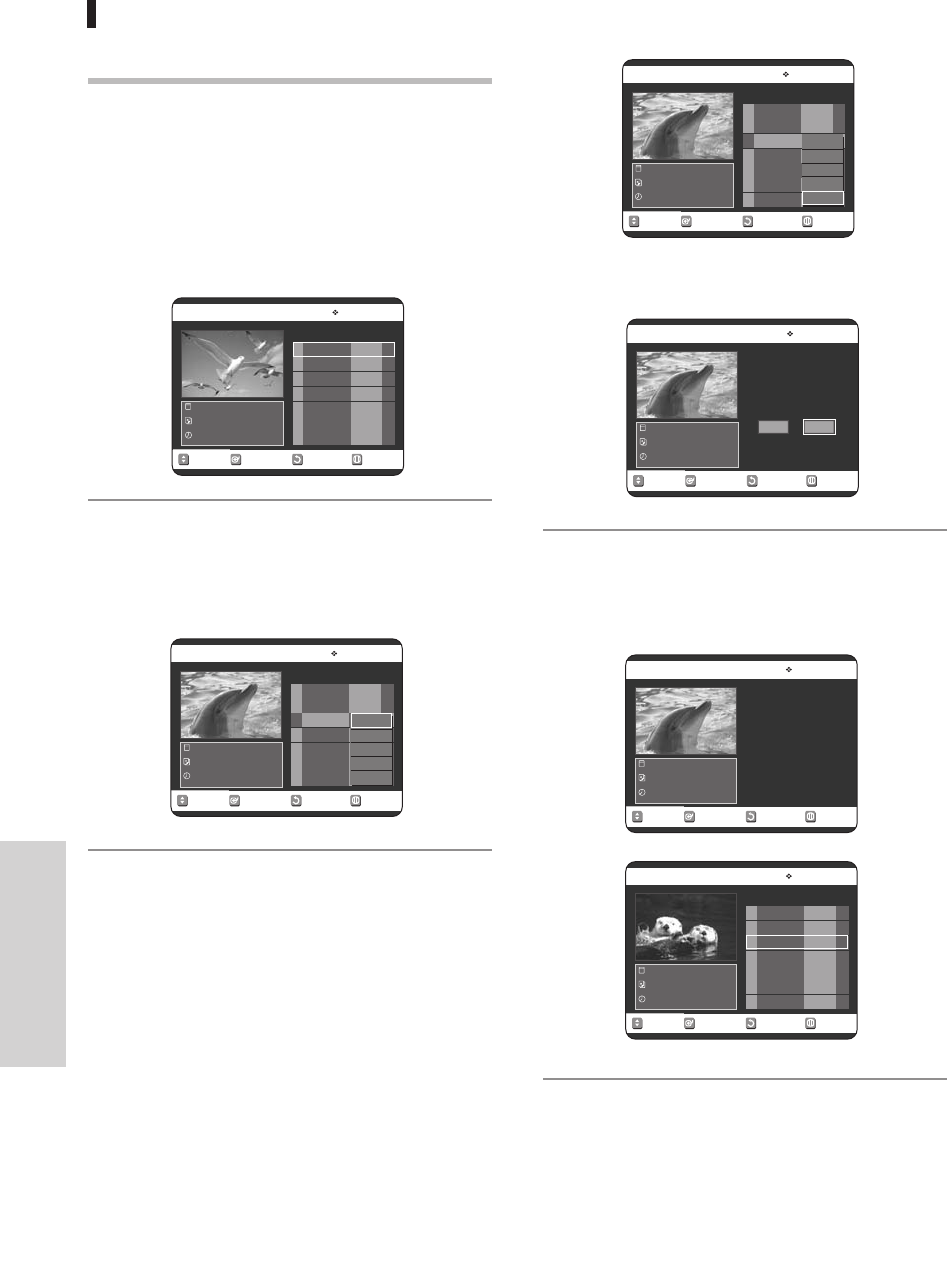
76 - English
Editing
Deleting a Playlist Title from the
Playlist
1
Press the PLAY LIST button with the disc stopped.
The Edit Playlist screen is displayed.
Using the MENU button.
• Press the MENU button with the disc stopped.
• Press the …† buttons to select Playlist, then
press the ENTER or √button.
• Press the …† buttons to select Edit Playlist,
then press the ENTER or √button.
2
Press the …† buttons to select the title you want
to delete from the Playlist, then press the ENTER
or √button.
The Edit Playlist menu is displayed:Play, Rename,
Edit Scene, Copy, Delete
3
Press the …† buttons to select Delete, then
press the ENTER button.
• You will be prompted with the delete confirma-
tion message ‘Do you want to delete?.
4
Press the œ √ buttons to select Yes, then press
the ENTER button.
It automatically returned to the Edit Playlist screen
after the delete operation has finished.
RETURNSELECTMOVE EXIT
Edit Playlist
DVD-RAM(VR)
No. Title Length Edit
Science
7 Scenes
JAN/20/2005 06:43 AM
01 Science 00:00:17 √√
02 Sky 00:00:06 √√
03 Dolphin 00:00:06 √√
04 Natural 00:00:37 √√
RETURNSELECTMOVE EXIT
Edit Playlist
DVD-RAM(VR)
No. Title Length Edit
Dolphin
7 Scenes
JAN/20/2005 06:43 AM
01 Science 00:00:17 √√
02 Sky 00:00:06 √√
03 Dolphin 00:00:06 √√
04 Natural 00:00:37 √√
Play
Rename
Edit Scene
Copy
Delete
RETURNSELECTMOVE EXIT
Edit Playlist
DVD-RAM(VR)
No. Title Length Edit
Natural
7 Scenes
APR/23/2005 06:43 AM
01 Science 00:00:17 √√
02 Sky 00:00:06 √√
03 Natural 00:00:37 √√
RETURNSELECTMOVE EXIT
Edit Playlist
DVD-RAM(VR)
No. Title Length Edit
Dolphin
7 Scenes
APR/20/2005 06:43 AM
01 Science 00:00:17 √√
02 Sky 00:00:06 √√
03 Dolphin 00:00:06 √√
04 Natural 00:00:37 √√
Play
Rename
Edit Scene
Copy
Delete
RETURNSELECTMOVE EXIT
Edit Playlist
DVD-RAM(VR)
Dolphin
7 Scenes
JAN/20/2005 06:43 AM
Do you want to delete?
NoYes
RETURNSELECTMOVE EXIT
Edit Playlist
DVD-RAM(VR)
Dolphin
7 Scenes
JAN/20/2005 06:43 AM
Deleting...
(Please wait)
00588A(00)-VR320-3/XAA-eng 6/7/05 7:18 PM Page 76
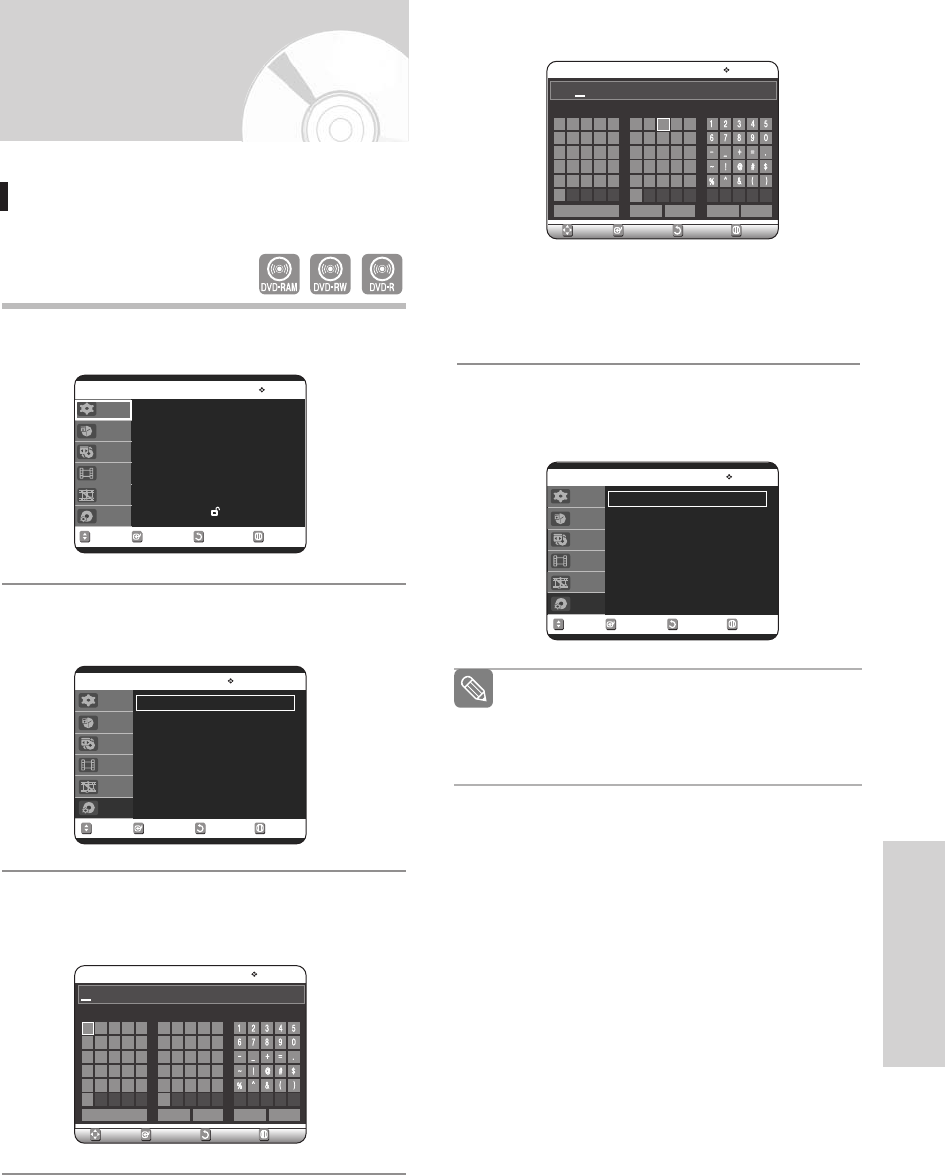
English - 77
Editing
Editing the Disc Name
Follow these instructions to give a name to a disc.
1
With the unit in Stop mode, press the MENU
button.
2
Press the …† buttons to select Disc Manager,
then press the ENTER or √button.
3
Press the …† buttons to select Disc Name, then
press the ENTER or √button.
The Edit Name screen is displayed.
4
Enter the desired characters using the …† œ √
buttons.
• This function is the same as the Rename
function in renaming the title list. (See page 65.)
• The maximum number of characters that can be
entered is 31.
5
Press the …† œ √ buttons to select Save, then
press the ENTER button.
Adisc name is given to the disc.
Disc Manager
RETURNSELECTMOVE EXIT
Disc Manager
DVD-RAM(VR)
Disc Name :
√√
Disc Protection : Not Protected
√√
Disc Format
√√
Delete All Title Lists
√√
ABCDE a b c d e
fghi j
klmno
pq rst
u
z
nwxy
FGH I J
KL MNO
PQRST
UVWXY
Z
Back Space Space Delete Clear Save
RETURNSELECTMOVE EXIT
Rename
DVD-RAM(VR)
ABCDE a b c d e
fghi j
klmno
pq rst
u
z
nwxy
FGH I J
KL MNO
PQRST
UVWXY
Z
Back Space Space Delete Clear Save
RETURNSELECTMOVE EXIT
Rename
DVD-RAM(VR)
Disc
RETURNSELECTMOVE EXIT
Playlist
DVD-RAM(VR)
Disc Name : Disc
√√
Disc Protection : Not Protected
√√
Disc Format
√√
Delete All Title Lists
√√
You may need to clear disc protection before
beginning editing.(see page 78)
Depending on the kind of disc, the displayed
screen may be different.
Note
Setup
Timer Rec.
Copy
Title List
Playlist
Disc Manager
RETURNSELECTMOVE EXIT
Setup
DVD-RAM(VR)
System √√
Clock Set √√
Channel Set √√
Language √√
Audio √√
Video √√
Parental Control √√
Setup
Timer Rec.
Copy
Title List
Playlist
Disc Manager
Setup
Timer Rec.
Copy
Title List
Playlist
Disc Manager
00588A(00)-VR320-3/XAA-eng 6/7/05 7:18 PM Page 77
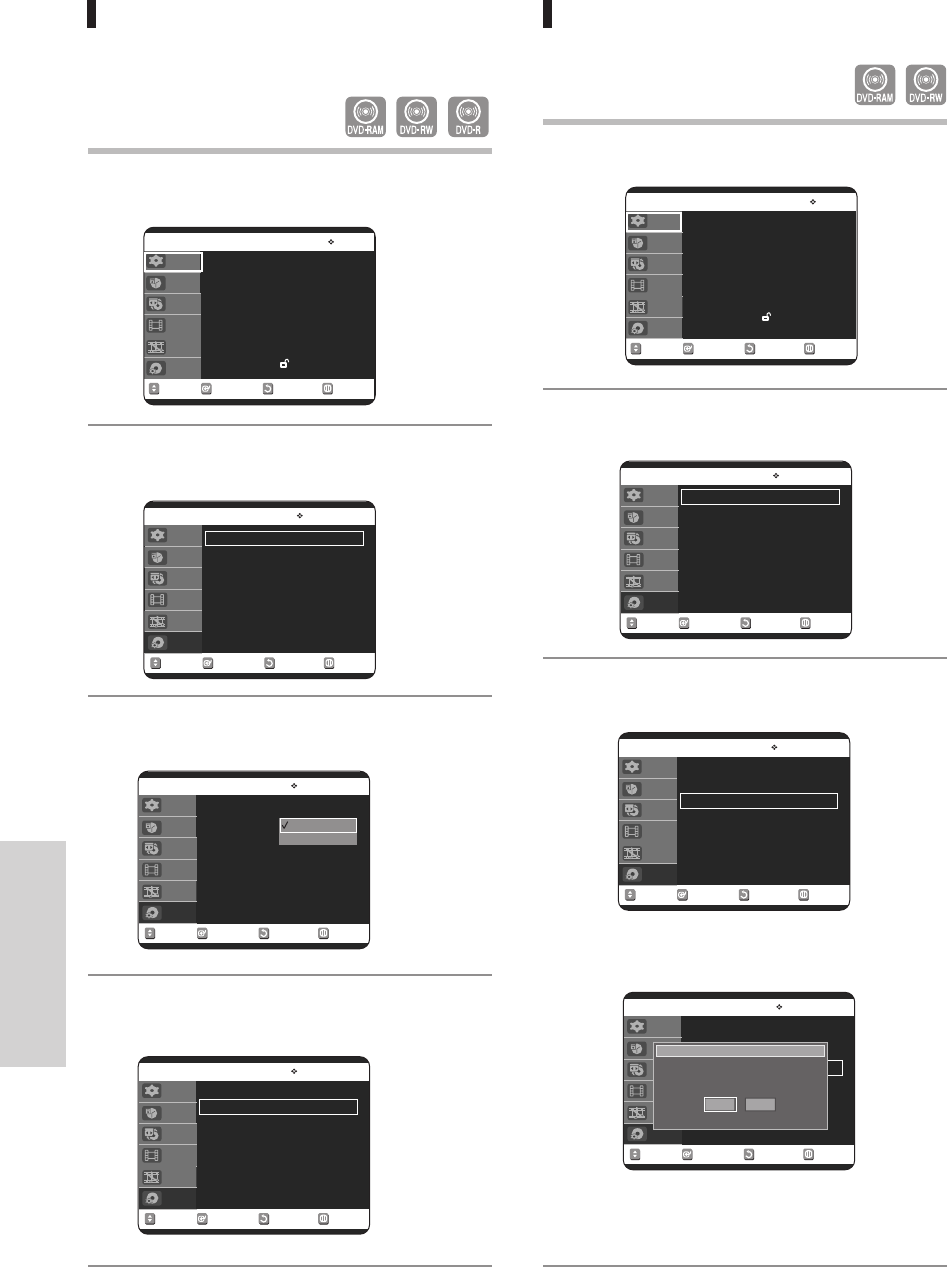
78 - English
Editing
Disc Protection
Disc Protect allows you to protect your discs from being
formatted or deleted due to unintended operations.
1
With the unit in Stop mode, press the MENU
button.
2
Press the …† buttons to select Disc Manager,
then press the ENTER or √button.
3
Press the …† buttons to select Disc Protection,
then press the ENTER or √button.
4
Press the …† button to select Protected, then
press the ENTER or √button.
Formatting a Disc
Use these instructions to format a disc.
The disc protect should be cleared
1
With the unit in Stop mode, press the MENU
button.
2
Press the …† buttons to select Disc Manager,
then press the ENTER or √button.
3
Press the …† buttons to select Disc Format,
then press the ENTER or √button.
DVD-RAM
• You will be prompted with the confirmation
message 'Do you want to format disc?'.
• You will be prompted with the confirmation
message 'All data will be deleted. Do you want
to continue?'.
RETURNSELECTMOVE EXIT
Disc Manager
DVD-RAM(VR)
Disc Name :
√√
Disc Protection : Protected
√√
Disc Format
√√
Delete All Title Lists
√√
RETURNSELECTMOVE EXIT
Disc Manager
DVD-RAM(VR)
Disc Name :
√√
Disc Protection : Not Protected
√√
Disc Format
√√
Delete All Title Lists
√√
Not Protected
Portected
RETURNSELECTMOVE EXIT
Disc Manager
DVD-RAM(VR)
Disc Name :
√√
Disc Protection : Not Protected
√√
Disc Format
√√
Delete All Title Lists
√√
RETURNSELECTMOVE EXIT
Disc Manager
DVD-RAM(VR)
Disc Name :
√√
Disc Protection : Not Protected
√√
Disc Format
√√
Delete All Title Lists
√√
RETURNSELECTMOVE EXIT
Disc Manager
DVD-RAM(VR)
Disc Name :
√√
Disc Protection : Not Protected
√√
Disc Format
√√
Delete All Title Lists
√√
Cartridge Protection Inf
√√
RETURNSELECTMOVE EXIT
Disc Manager
DVD-RAM(VR)
Disc Name :
√√
Disc Protection : Not Protected
√√
Disc Format
√√
Delete All Title Lists
√√
Setup
Timer Rec.
Copy
Title List
Playlist
Disc Manager
Setup
Timer Rec.
Copy
Title List
Playlist
Disc Manager
Setup
Timer Rec.
Copy
Title List
Playlist
Disc Manager
Setup
Timer Rec.
Copy
Title List
Playlist
Disc Manager
Setup
Timer Rec.
Copy
Title List
Playlist
Disc Manager
Setup
Timer Rec.
Copy
Title List
Playlist
Disc Manager
Do you want to format disc?
Yes No
RETURNSELECTMOVE EXIT
Setup
DVD-RAM(VR)
System √√
Clock Set √√
Channel Set √√
Language √√
Audio √√
Video √√
Parental Control √√
Setup
Timer Rec.
Copy
Title List
Playlist
Disc Manager
RETURNSELECTMOVE EXIT
Setup
DVD-RAM(VR)
System √√
Clock Set √√
Channel Set √√
Language √√
Audio √√
Video √√
Parental Control √√
Setup
Timer Rec.
Copy
Title List
Playlist
Disc Manager
00588A(00)-VR320-3/XAA-eng 6/7/05 7:18 PM Page 78
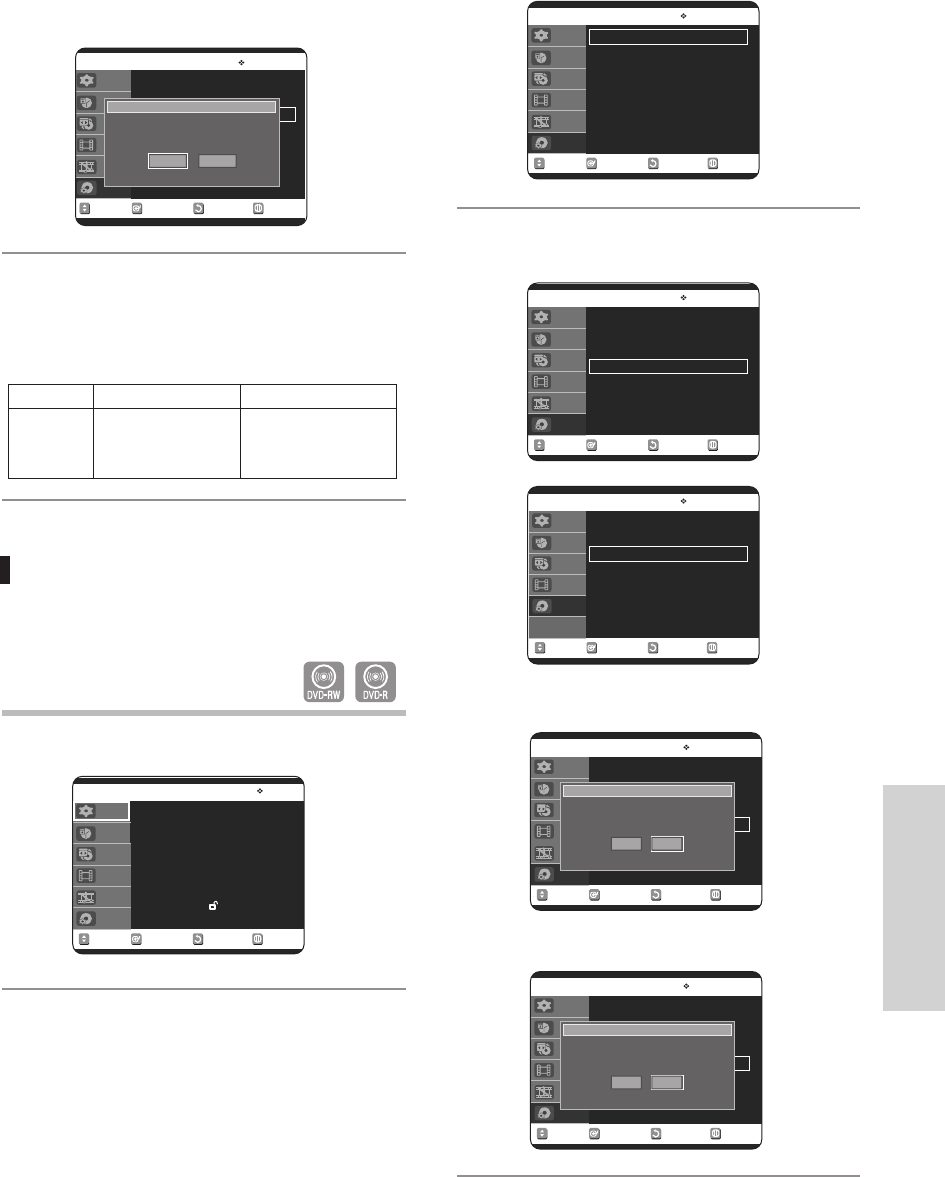
Editing
DVD-RW
• You will be prompted with the confirmation
message ‘Choose the recording format for
DVD- RW.’
4
Press the œ √ buttons to select Yes, then press
the ENTER button. The disc is formatted.
DVD-VR and DVD-V are defined according to
their recording format.
Finalizing a disc
After you record titles onto a DVD-RW/DVD-R disc with
your DVD Recorder & VCR, it needs to be finalized
before it can be played back on external devices.
1
With the unit in Stop mode, press the MENU
button.
DVD-VR DVD-V
DVD-RAM DVD-RW
DVD-RW DVD-R
DISC
RETURNSELECTMOVE EXIT
Disc Manager
DVD-RW(VR)
Disc Name :
√√
Disc Protection : Not Protected
√√
Disc Format : DVD-VR
√√
Disc Finalize
√√
Delete All Title Lists
√√
Setup
Timer Rec.
Copy
Title List
Playlist
Disc Manager
Choose the recording format for DVD-RW.
DVD-VR DVD-V
RETURNSELECTMOVE EXIT
Setup
DVD-RW(VR)
System √√
Clock Set √√
Channel Set √√
Language √√
Audio √√
Video √√
Parental Control √√
Setup
Timer Rec.
Copy
Title List
Playlist
Disc Manager
2
Press the …† buttons to select Disc Manager,
then press the ENTER or √button.
3
Press the …† button to select Disc Finalize, then
press the ENTER or √
You will be prompted with the message 'Do you want to
finalize disc?'.
If you select Yes, you will be prompted again with the
message ' Disc will be finalized. Do you want to continue?'
RETURNSELECTMOVE EXIT
Disc Manager
DVD-RW(VR)
Disc Name :
√√
Disc Protection : Not Protected
√√
Disc Format : DVD-VR
√√
Disc Finalize
√√
Delete All Title Lists
√√
RETURNSELECTMOVE EXIT
Disc Manager
DVD-RW(VR)
Disc Name :
√√
Disc Protection : Not Protected
√√
Disc Format : DVD-VR
√√
Disc Finalize
√√
Delete All Title Lists
√√
RETURNSELECTMOVE EXIT
Disc Manager
DVD-R(V)
Disc Name :
√√
Disc Protection : Not Protected
√√
Disc Finalize
√√
Delete All Title Lists
√√
Setup
Timer Rec.
Copy
Title List
Playlist
Disc Manager
Setup
Timer Rec.
Copy
Title List
Playlist
Disc Manager
Setup
Timer Rec.
Copy
Title List
Disc Manager
RETURNSELECTMOVE EXIT
Disc Manager
DVD-RW(VR)
Disc Name :
√√
Disc Protection : Not Protected
√√
Disc Format : DVD-VR
√√
Disc Finalize
√√
Delete All Title Lists
√√
RETURNSELECTMOVE EXIT
Disc Manager
DVD-RW(VR)
Disc Name :
√√
Disc Protection : Not Protected
√√
Disc Format : DVD-VR
√√
Disc Finalize
√√
Delete All Title Lists
√√
Setup
Timer Rec.
Copy
Title List
Playlist
Disc Manager
Do you want to finalize disc?
Yes No
Setup
Timer Rec.
Copy
Title List
Playlist
Disc Manager
Disc will be finalized.
Do you want to continue?
Yes No
English - 79
00588A(00)-VR320-3/XAA-eng 6/7/05 7:18 PM Page 79
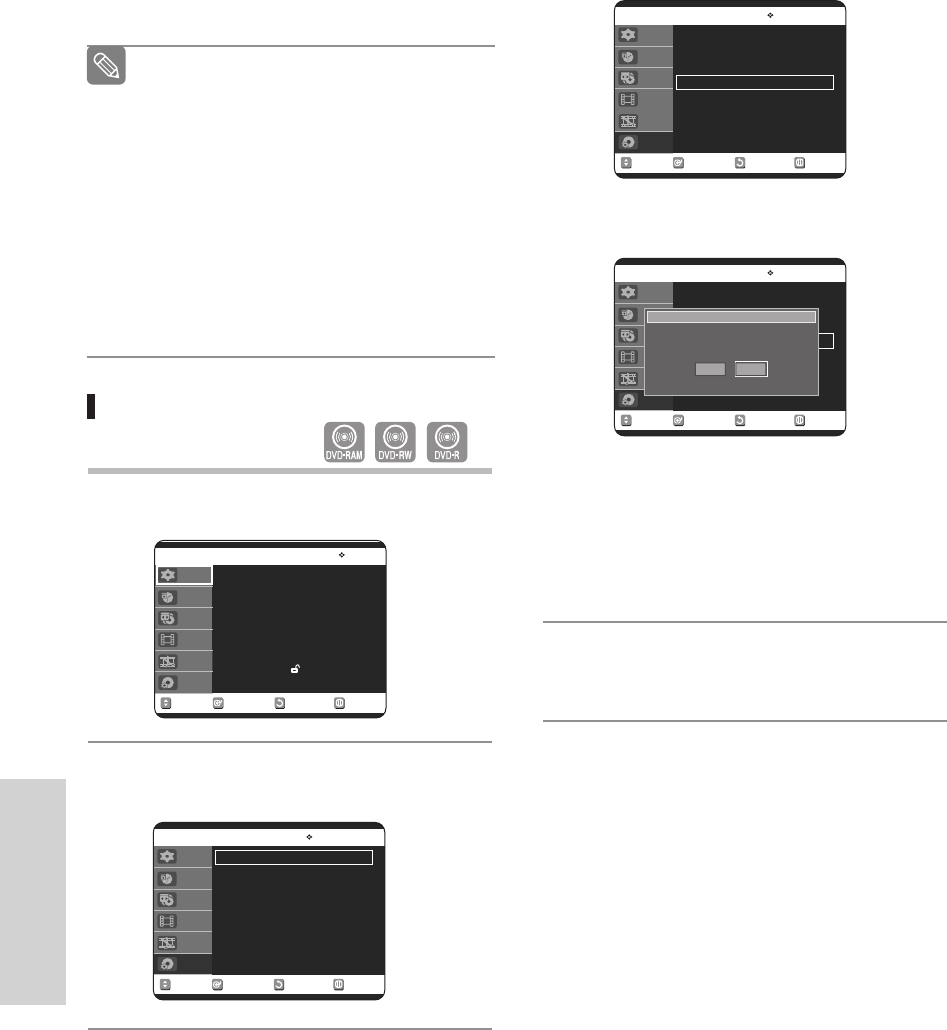
80 - English
Editing
Delete All Title Lists
1
With the unit in Stop mode, press the MENU
button.
2
Press the …† buttons to select Disc Manager,
then press the ENTER or √button.
4
Press the
œ √
buttons to select Yes, then press the
ENTER button.
The disc is finalized.
Once a disc is finalized, you cannot delete
titles from the record list.
After being finalized, the DVD-R/DVD-
RW(video mode) operates in the same man-
ner as a DVD-Video.
Depending on the disc type, the displayed
screen may be different .
Finalizing time may be different depending
on the amount of data recorded on the disc.
Data on the disc will be damaged if the
recorder is powered off during finalize
process.
Note
RETURNSELECTMOVE EXIT
Setup
DVD-RAM(VR)
System √√
Clock Set √√
Channel Set √√
Language √√
Audio √√
Video √√
Parental Control √√
Setup
Timer Rec.
Copy
Title List
Playlist
Disc Manager
3
Press the …† button to select Delete All Title
Lists, then press the ENTER or √button.
•You will be prompted with the confirmation mes-
sage 'Do you want to delete all title lists?'.
• When Protected Title exists: The Delete All Title
List function will not operate. If there is a title
containing a still picture, however, that function
will not operate.
If you want to delete a protected title, disable
Protect for it on the Lock item.
4
Press the œ √ buttons to select Yes, then press
the ENTER button.
All title lists are deleted.
RETURNSELECTMOVE EXIT
Disc Manager
DVD-RAM(VR)
Disc Name :
√√
Disc Protection : Not Protected
√√
Disc Format
√√
Delete All Title Lists
√√
RETURNSELECTMOVE EXIT
Disc Manager
DVD-RAM(VR)
Disc Name :
√√
Disc Protection : Not Protected
√√
Disc Format
√√
Delete All Title Lists
√√
RETURNSELECTMOVE EXIT
Disc Manager
DVD-RAM(VR)
Disc Name :
√√
Disc Protection : Not Protected
√√
Disc Format
√√
Delete All Title Lists
√√
Setup
Timer Rec.
Copy
Title List
Playlist
Disc Manager
Setup
Timer Rec.
Copy
Title List
Playlist
Disc Manager
Do you want to delete all title lists?
Yes No
Setup
Timer Rec.
Copy
Title List
Playlist
Disc Manager
00588A(00)-VR320-3/XAA-eng 6/7/05 7:18 PM Page 80
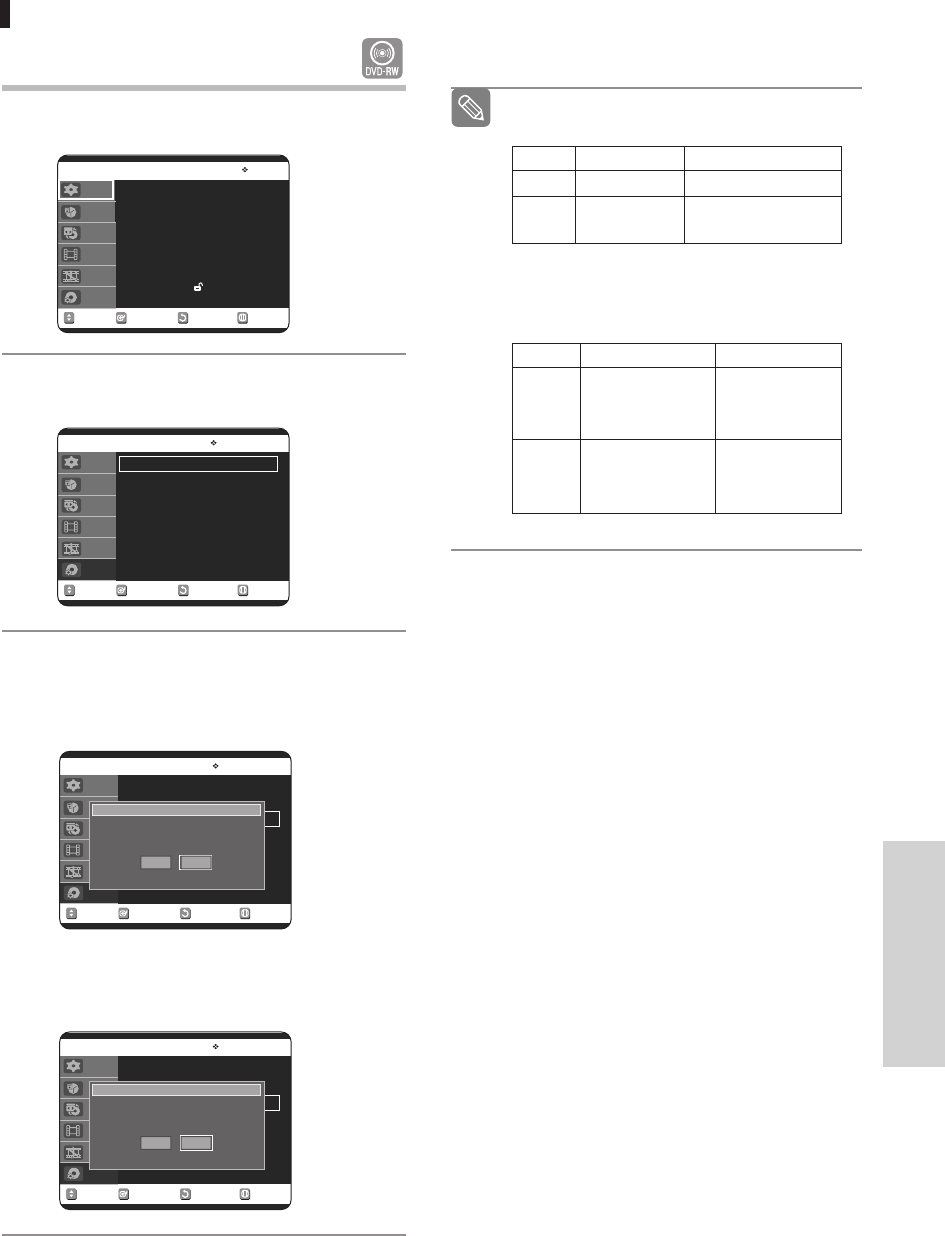
English - 81
Editing
Unfinalizing a disc (V/VR mode)
1
With the unit in Stop mode, press the MENU
button.
2
Press the …† buttons to select Disc Manager,
then press the ENTER or √button.
3
Press the …† button to select Disc Unfinalize,
then press the ENTER or √button.
You will be prompted with the message 'Do you
want to unfinalize disc?'.
If you select Yes, you will be prompted again with
the message ' Disc will be unfinalized. Do you
want to continue?'
4
Press the œ √ buttons to select Yes, then press
the ENTER button.
The disc is unfinalized.
RETURNSELECTMOVE EXIT
Disc Manager
DVD-RW(VR:F)
Disc Name :
√√
Disc format : DVD-VR
√√
Disc Unfinalize
√√
RETURNSELECTMOVE EXIT
Disc Manager
DVD-RW(VR:F)
Disc Name :
√√
Disc format : DVD-VR
√√
Disc Unfinalize
√√
■
ADVD-RW can be finalized or unfinalized in
Video mode.
■
ADVD-RW can be finalized or unfinalized in
VR mode.
Note
Finalize Unfinalize
Mark DVD-Video(RW) DVD-RW(V)
Operation Same as DVD-Video Additional recording, protection
and deletion are possible.
Finalize Unfinalize
Mark DVD-RW(VR:F) DVD-RW(VR)
Additional recording, Additional recording,
Operation deletion, editing, and deletion, editing, and
protection are impossible. protection are possible.
RETURNSELECTMOVE EXIT
Setup
DVD-RW(VR:F)
System √√
Clock Set √√
Channel Set √√
Language √√
Audio √√
Video √√
Parental Control √√
Setup
Timer Rec.
Copy
Title List
Playlist
Disc Manager
RETURNSELECTMOVE EXIT
Disc Manager
DVD-RW(VR:F)
Disc Name :
√√
Disc format : DVD-VR
√√
Disc Unfinalize
√√
Setup
Timer Rec.
Copy
Title List
Playlist
Disc Manager
Setup
Timer Rec.
Copy
Title List
Playlist
Disc Manager
Do you want to unfinalize disc?
Yes No
Disc will be unfinalized.
Do you want to continue?
Yes No
Setup
Timer Rec.
Copy
Title List
Playlist
Disc Manager
00588A(00)-VR320-3/XAA-eng 6/7/05 7:18 PM Page 81

82 - English
Reference
Reference
Troubleshooting
Specifications
LIMITED WARRANTY TO ORIGINAL
PURCHASER
†
†
Troubleshooting
(DVD-VIDEO/DVD-RAM/DVD-RW/DVD-R) ..................83
Troubleshooting(DVD) ......................................................84
Troubleshooting(VCR).......................................................85
Specifications ....................................................................86
00588A(00)-VR320-3/XAA-eng 6/7/05 7:18 PM Page 82

English - 83
Reference
If your product malfunctions, go through the check points below before contacting a Samsung authorized ser-
vice center,
Problem Explanation/Solution
•
Check whether the power cord is securely plugged into the power outlet.
•
Did you press the power button of your DVD Recorder & VCR.
•
The DVD Recorder & VCR requires some time to initialize after it is turned on.
•
Check whether the power cord is securely plugged into the power outlet.
•
Did you set the DVD Recorder & VCR channel settings correctly?
•
Check the free space on your DVD-RAM/DVD-RW/DVD-R disc.
•
Check the antenna cable is connected.
•
Check the recording time, end time and current time settings again.
•
Recording will be cancelled if the power is interrupted due to a power
failure or other reason during recording.
•
Check whether the disc is formatted. This product can record on
formatted discs only. (See page 78.)
•
Check whether your DVD-RAM/DVD-RW/DVD-R disc has a sufficient free space.
•
Recording is available on DVD-RAM/DVD-RW/DVD-R discs only.
•
If a program is copy protected, you cannot record it.
•
Press the
√
and
√√I
buttons of your DVD Recorder & VCR at the same time when the
power is on, and then press the POWER OFF/ON button. All settings including password
will revert to factory settings. Do not use it if not absolutely required.
(Note that this function is available only when there is no disc inserted.)
•
Check whether the disc is inserted correctly with the label facing up.
•
Check the regional code of your DVD disc.
•
This DVD Recorder & VCR cannot playback some types of disc. (See page 5.)
•
Are you watching a program in slow or skip mode?
If you are playing a program at a speed other than normal speed, sound
is not output.
•
Check the connections and initial settings.
•
Check whether the disc is damaged.
Clean up the disc, if necessary.
•
Check whether the disc is inserted correctly with the label facing up.
The input is displayed
for a while when the
power turns on.
Cannot record TV
programs.
Timer recording does
not work properly.
Cannot record.
I pressed the REC
button but there is
no response.
I forget the password
for parental lock.
Cannot play the disc.
No sound.
No power.
Troubleshooting
(DVD-VIDEO/DVD-RAM/DVD-RW/DVD-R)
00588A(00)-VR320-3/XAA-eng 6/7/05 7:18 PM Page 83

84 - English
Reference
Troubleshooting (DVD)
Problem Explanation/Solution
You cannot use the operation or function due to one of the following reasons:
(1) Your DVD disc does not support the feature (for example, angles)
(2) You've requested a title, chapter, or scan time that is out of the correct range.
The disc does not support all the selected functions.
In this case, some settings you configure on the Setting menu may not work properly.
Aspect ratio is fixed for DVD disc.
Check whether you selected correct digital output options in the Audio Output Options menu.
Did you move your DVD Recorder & VCR suddenly from a cold place to a warm place?
In this case, do not connect the plug to the power outlet and wait for two hours. Then insert
the disc and try to playback again. It will work properly when condensation has evaporated.
Angle operation is available only when the disc contains images captured at different
angles.
• Check whether there is damage or foreign materials on your disc.
• Some discs with bad manufacturing quality may not be played back.
• If the scene changes from dark to bright suddenly, the screen
may jitter temporarily, but it is not a defect.
Sound languages and subtitle languages are disc-specific.
Only the sound and subtitle languages contained on a DVD disc are
available and displayed on the disc menu.
• Check whether PSO is displayed on front panel.
• Make sure to change the component video output using the Progressive button when the
disc is stopped.
• Point the remote control at the remote control sensor on your DVD Recorder & VCR.
Operate within distance. (15ft)
Remove obstacles between your DVD Recorder & VCR and remote control.
• Check whether the batteries are depleted.
• Read the table of contents and then find and read the sections
describing your problem, and follow the directions given.
• Turn the unit off and on.
• If your problem still persists, contact your nearest Samsung service center.
Play mode settings are
different from the set-
tings configured with
the Setting menu.
Cannot change the
aspect ratio.
No audio output.
No video or audio output.
The disc tray is ejected
after 2 to 5 seconds.
Angle operation does not
work during playback of a
DVD disc.
The disc revolves, but
no image or bad quali-
ty images are output.
Desired sound
language and
subtitle language are
not played.
No progressive
output.
icon appears on
the screen.
The remote control
doesn't work.
Other problems
00588A(00)-VR320-3/XAA-eng 6/7/05 7:18 PM Page 84

English - 85
Reference
Troubleshooting (VCR)
Before contacting a Samsung authorized service center, perform the following simple checks.
Problem Explanation/Solution
No power
•
Check that the power plug is connected to a wall outlet.
•
Have you pressed the POWER button?
You cannot insert a video cassette
•
Avideo cassette can only be inserted with the window
side up and the safety tab facing you.
The television program was not recorded
•
Check the DVD Recorder & VCR antenna connections.
•
Is the DVD Recorder & VCR tuner properly set?
•
Check if the safety tab is intact on the cassette.
Timer recording was unsuccessful
•
Re-check the recording start/stop time settings and the current time
•
Check whether you insert a tape which has enough time record
No playback picture or the picture
•
Check to see if you are using a prerecorded tape.
is distorted
You cannot see normal broadcasts
•
Check the tuner/external setting. It should be on tuner.
•
Check the TV antenna connections.
Noise bars or streaks on playback
•
Press the CH/TRK ( / ) buttons to minimize this effect.
When the √
II
button is pressed
•
Astill picture may have “noise bars”, depending on the
during playback, the still picture condition of the tape. Press the CH/TRK ( / ) buttons
has severe “noise bar” streaks during slow motion to minimize this effect.
Video Head Cleaning
•
If poor pictures appear on a variety of cassettes, the video
heads may need cleaning. This is not a common problem
and unless it appears, the heads should not be cleaned.
When cleaning the video heads, read all instructions
provided with the head cleaning cassette. Incorrect head
cleaning can permanently damage the video heads.
If you are unable to solve the problem after reading the above instructions, note:
•The model and serial number on the rear of your DVD Recorder & VCR
•The warranty information
•Aclear description of the problem
Then contact your nearest SAMSUNG authorized service center.
00588A(00)-VR320-3/XAA-eng 6/7/05 7:18 PM Page 85
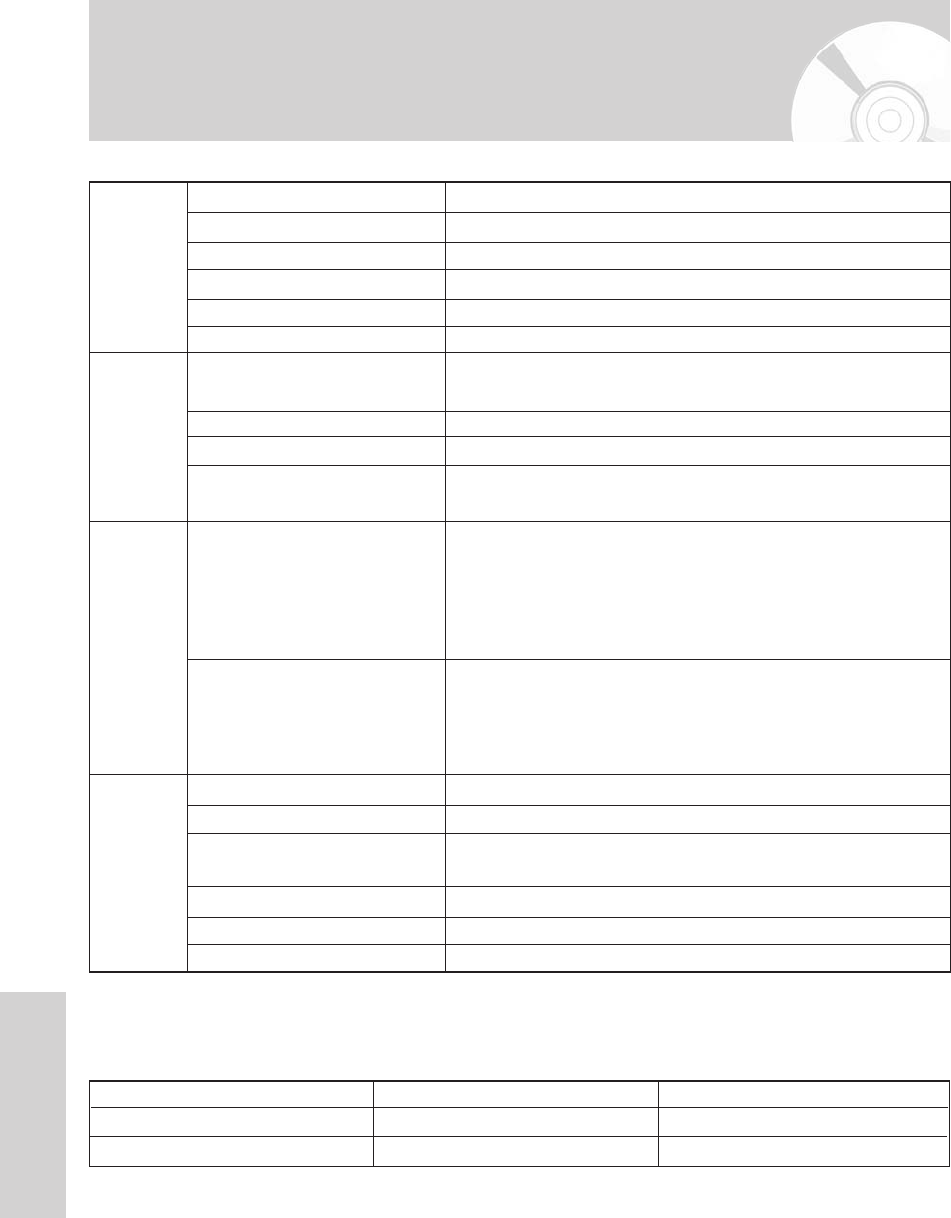
86 - English
Reference
Power requirements 120V AC, 60Hz
Power consumption 45 Watts
General Weight 9.03 lb
Dimensions 16.9 in(W) x 12.6 in(D) x 3.3 in(H)
Operating temp. +41°F to +95°F
Other conditions
Keep level when operating. Less than 75% operating humidity
Video 1.0 V p-p at 75Ωload, sync negative
S-Video input (Y: 1.0Vp-p, C: 0.286Vp-p at 75Ωload)
Input Max. Audio Input Level 2Vrms
DV Input IEEE 1394(4p) compatible jack
Receivable Channels Regular TV broadcasting: VHF (2~13), UHF (14~69)
Cable TV broadcasting: 1~125
Audio Audio output jacks 1, 2
Optical/Coaxial digital audio output support
Min. 100 dB signal-to-noise ratio
Output Max. 0.005% total harmonic distortion (T.H.D)
at average 1 KHz
Video Video output jacks 1
S-Video output 1 (Y:1.0Vp-p, C:0.286Vp-p at 75Ωload)
Component output
(Y: 1.0Vp-p, Pb: 0.70Vp-p, Pr: 0.70Vp-p at 75Ωload)
Picture Compression format MPEG-II
Audio Compression format Dolby AC-3 256kbps
DVD Recording Quality XP (about 8 Mbps), SP (about 4 Mbps), LP (about 2 Mbps),
EP (about 1.2 Mbps)
Video S/N Ratio Min. 50dB at standard recording
Audio S/N Ratio Min. 75dB
Audio frequency characteristics
20 Hz ~ 20 KHz
Disc Type DVD AUDIO CD(CD-DA)
Analog Audio Output 48 / 96KHz 44.1KHz
Digital Audio Output 48KHz 44.1KHz
Audio Output
For DVD discs, audio signals recorded at 96kHz sampling frequency are converted into and output at 48kHz.
Specifications
00588A(00)-VR320-3/XAA-eng 6/7/05 7:18 PM Page 86

SAMSUNG DVD RECORDER & VCR
LIMITED WARRANTY TO ORIGINAL PURCHASER
This SAMSUNG brand product, as supplied and distributed by Samsung Electronics America, Inc. (SAMSUNG)
and delivered new, in the original carton to the original consumer purchaser, is warranted by SAMSUNG against
manufacturing defects in materials and workmanship for a limited warranty period of:
One (1) Year Parts / Ninety (90) days Labor
(90 days Parts and Labor for Commercial Use)
This limited warranty begins on the original date of purchase, and is valid only on products purchased and used
in the United States. To receive warranty service, the purchaser must contact SAMSUNG for problem determina-
tion and service procedures. Warranty service can only be performed by a SAMSUNG authorized service center.
The original dated bill of sale must be presented upon request as proof of purchase to SAMSUNG or
SAMSUNG’s authorized service center. Transportation of the product to and from the service center is the
responsibility of the purchaser.
SAMSUNG will repair or replace this product, at our option and at no charge as stipulated herein, with new or
reconditioned parts or products if found to be defective during the limited warranty period specified above. All
replaced parts and products become the property of SAMSUNG and must be returned to SAMSUNG.
Replacement parts and products assume the remaining original warranty, or ninety (90) days, whichever is
longer.
SAMSUNG ís obligations with respect to software products distributed by SAMSUNG under the SAMSUNG
brand name are set forth in the applicable end user license agreement. Non-SAMSUNG hardware and software
products, if provided, are on an ”AS IS” basis. Non-SAMSUNG manufacturers, suppliers, publishers, and service
providers may provide their own warranties.
This limited warranty covers manufacturing defects in materials and workmanship encountered in normal, and
except to the extent otherwise expressly provided for in this statement, noncommercial use of this product, and
shall not apply to the following, including, but not limited to: damage which occurs in shipment; delivery and
installation; applications and uses for which this product was not intended; altered product or serial numbers;
cosmetic damage or exterior finish; accidents, abuse, neglect, fire, water, lightning or other acts of nature; use of
products, equipment, systems, utilities, services, parts, supplies, accessories, applications, installations, repairs,
external wiring or connectors not supplied and authorized by SAMSUNG, or which damage this product or result
in service problems; incorrect electrical line voltage, fluctuations and surges; customer adjustments and failure to
follow operating instructions, cleaning, maintenance and environmental instructions that are covered and pre-
scribed in the instruction book; product removal or reinstallation; reception problems and distortion related to
noise, echo, interference or other signal transmission and delivery problems. SAMSUNG does not warrant unin-
terrupted or error-free operation of the product.
THERE ARE NO EXPRESS WARRANTIES OTHER THAN THOSE LISTED AND DESCRIBED ABOVE, AND NO WAR-
RANTIES WHETHER EXPRESS OR IMPLIED, INCLUDING, BUT NOT LIMITED TO, ANY IMPLIED WARRANTIES OF
MERCHANTABILITY OR FITNESS FOR A PARTICULAR PURPOSE, SHALL APPLY AFTER THE EXPRESS WAR-
RANTY PERIODS STATED ABOVE, AND NO OTHER EXPRESS WARRANTY OR GUARANTY GIVEN BY ANY PER-
SON, FIRM OR CORPORATION WITH RESPECT TO THIS PRODUCT SHALL BE BINDING ON SAMSUNG. SAM-
SUNG SHALL NOT BE LIABLE FOR LOSS OF REVENUE OR PROFITS, FAILURE TO REALIZE SAVINGS OR
OTHER BENEFITS, OR ANY OTHER SPECIAL, INCIDENTAL OR CONSEQUENTIAL DAMAGES CAUSED BY THE
USE, MISUSE OR INABILITY TO USE THIS PRODUCT, REGARDLESS OF THE LEGAL THEORY ON WHICH THE
CLAIM IS BASED, AND EVEN IF SAMSUNG HAS BEEN ADVISED OF THE POSSIBILITY OF SUCH DAMAGES.
NOR SHALL RECOVERY OF ANY KIND AGAINST SAMSUNG BE GREATER IN AMOUNT THAN THE PURCHASE
PRICE OF THE PRODUCT SOLD BY SAMSUNG AND CAUSING THE ALLEGED DAMAGE. WITHOUT LIMITING
THE FOREGOING, PURCHASER ASSUMES ALL RISK AND LIABILITY FOR LOSS, DAMAGE OR INJURY TO PUR-
CHASER AND PURCHASERíS PROPERTY AND TO OTHERS AND THEIR PROPERTY ARISING OUT OF THE USE,
MISUSE OR INABILITY TO USE THIS PRODUCT SOLD BY SAMSUNG NOT CAUSED DIRECTLY BY THE NEGLI-
GENCE OF SAMSUNG. THIS LIMITED WARRANTY SHALL NOT EXTEND TO ANYONE OTHER THAN THE ORIGI-
NAL PURCHASER OF THIS PRODUCT, IS NONTRANSFERABLE AND STATES YOUR EXCLUSIVE REMEDY.
Some states do not allow limitations on how long an implied warranty lasts, or the exclusion or limitation of inci-
dental or consequential damages, so the above limitations or exclusions may not apply to you. This warranty
gives you specific legal rights, and you may also have other rights which vary from state to state.
To obtain warranty hardware service, please contact SAMSUNG at:
SAMSUNG CUSTOMER CARE CENTER
400 Valley Road, Suite 201, Mt. Arlington, NJ 07856
1-800-SAMSUNG (1-800-726-7864) and WWW.SAMSUNG.com
00588A(00)-VR320-3/XAA-eng 6/7/05 7:18 PM Page 87

SAMSUNG ELECTRONICS AMERICA, INC.
HEADQUARTERS
105 Challenger Road, Ridgefield Park, N.J.
07660-0511
TEL: 1-800-SAMSUNG
SERVICE DIVISION
400 Valley Road, Suite 201, Mount Arlington, NJ 07856
1-800-SAMSUNG (1-800-726-7864)
www.samsung.com
AK68-00588A-02
ELECTRONICS
00588A(00)-VR320-3/XAA-eng 6/7/05 7:18 PM Page 88