Samsung Electronics Co GTB7610 Cellular/PCS GSM/EDGE Phone with WLAN and Bluetooth User Manual C0CCB8A7BEF8C0BD32
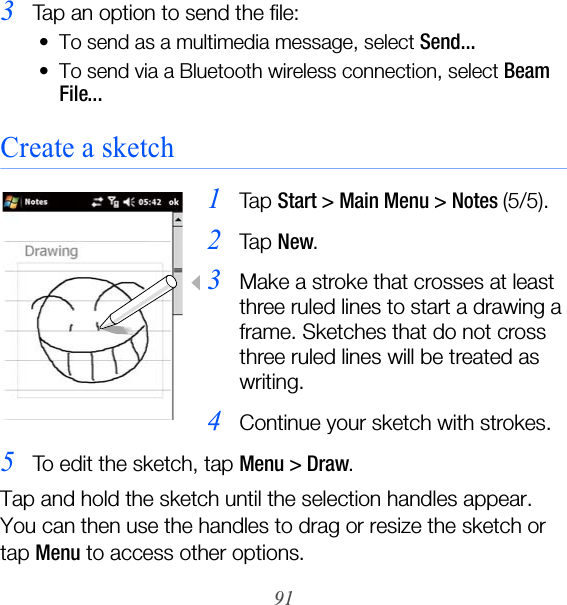
Samsung Electronics Co Ltd Cellular/PCS GSM/EDGE Phone with WLAN and Bluetooth C0CCB8A7BEF8C0BD32
UserManual.wiki
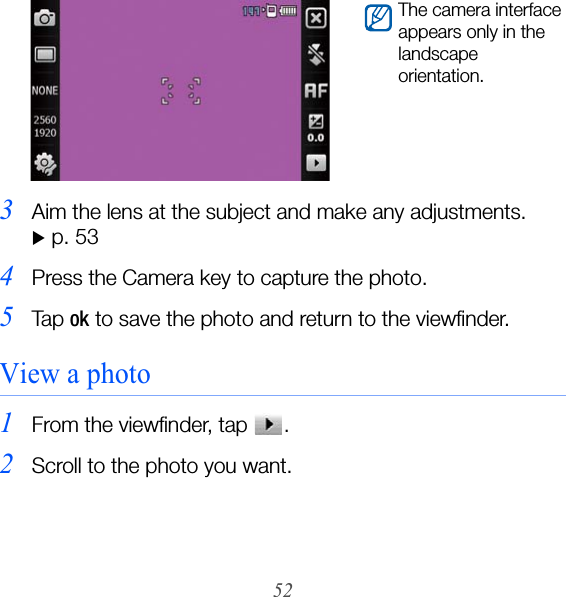
>
Samsung Electronics Co
>
GTB7610 User Manual
Users Manual
Navigation menu
Upload a User Manual
Namespaces
Wiki Guide
HTML
PDF
Info
Views
User Manual
Discussion / Help
Navigation
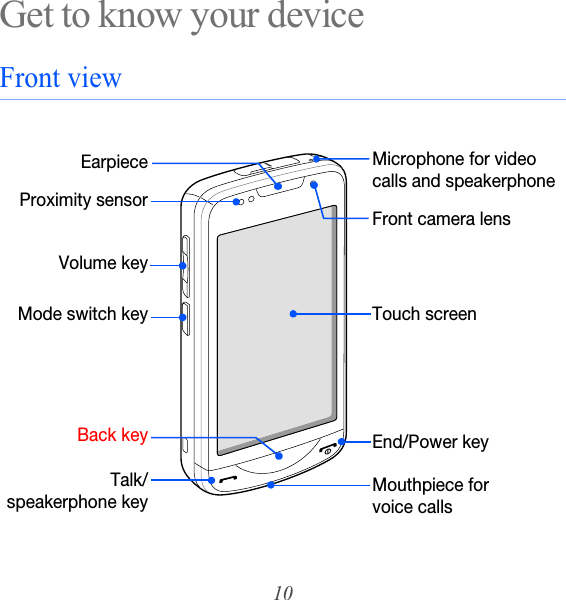
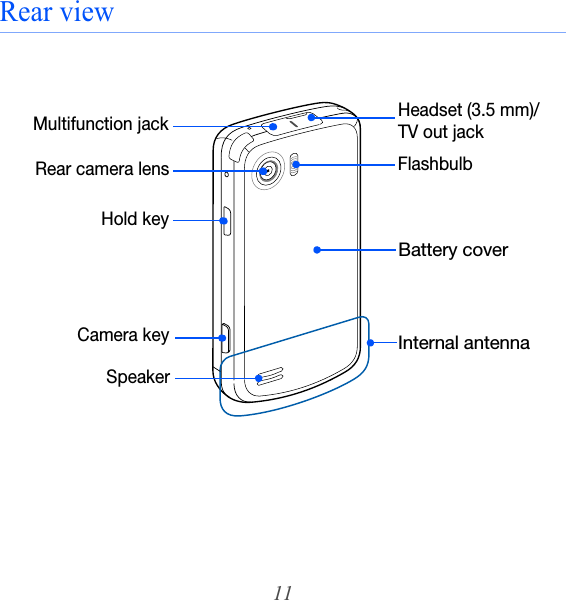
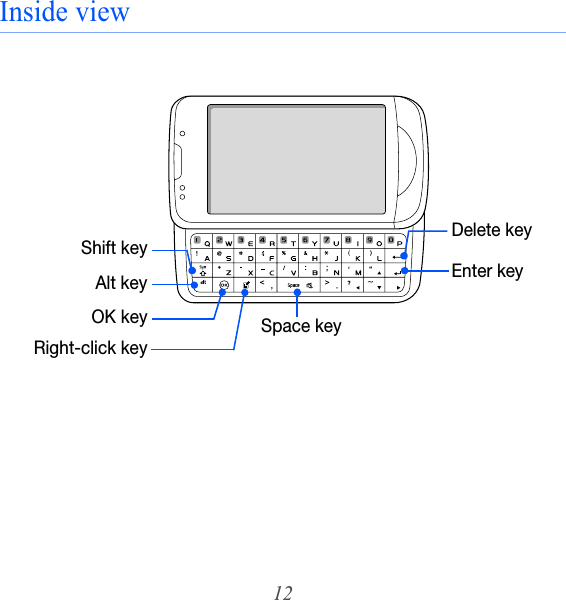
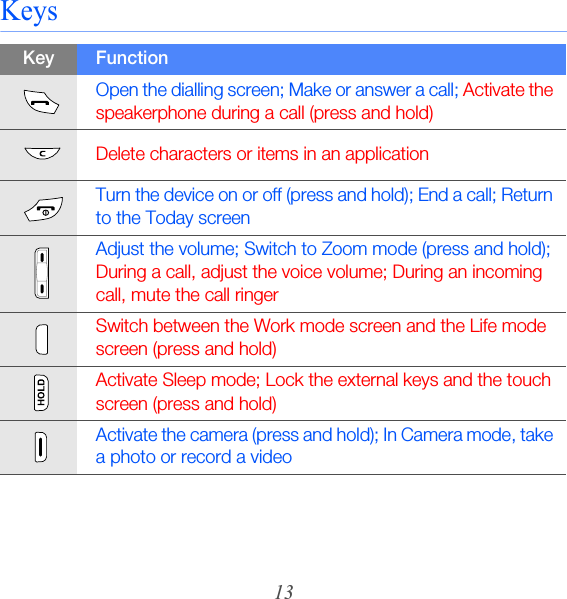
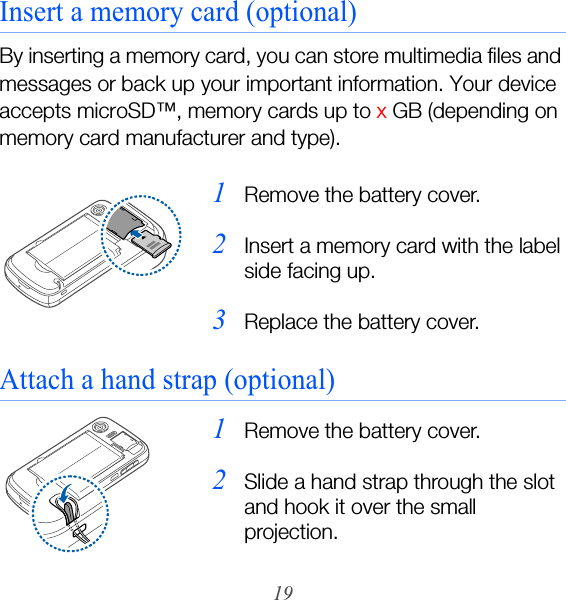
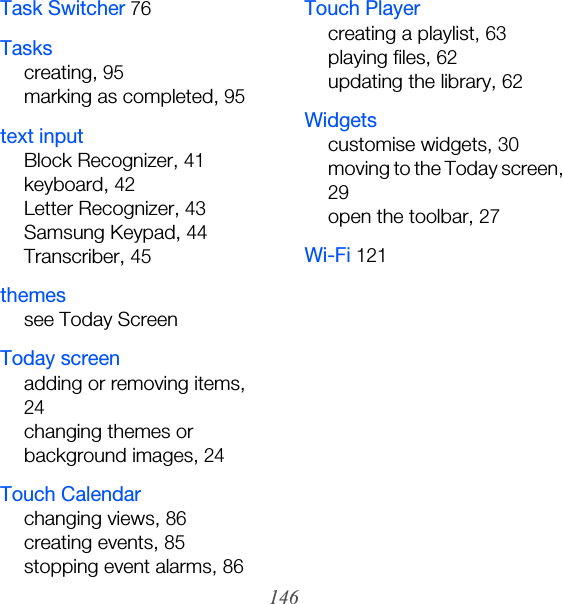
![3Instructional IconsBefore you start, familiarise yourself with the icons you will see in this manual:Warning – situations that could cause injury to yourself or othersCaution – situations that could cause damage to your device or other equipmentNote – notes, usage tips, or additional information XRefer to – pages with related information; for example: X p. 12 (represents "see page 12") >Followed by – the order of options or menus you must select to perform a step; for example: Tap Start > Messaging (represents Start, followed by Messaging) [ ]Square brackets – device keys; for example: [ ] (represents the End/Power key)](https://usermanual.wiki/Samsung-Electronics-Co/GTB7610/User-Guide-1109156-Page-4.png)
![5ABOUT DIVX VIDEODivX® is a digital video format created by DivX, Inc. This is an official DivX Certified device that plays DivX video. Plays DivX® video up to 320x240.ABOUT DIVX VIDEO-ON-DEMANDThis DivX® Certified device must be registered with DivX in order to play DivX Video-on-Demand (VOD) content. First generate the DivX VOD registration code for your device and submit it during the registration process. [Important: DivX VOD content is protected by a DivX DRM (Digital Rights Management) system that restricts playback to registered DivX Certified devices. If you try to play DivX VOD content not authorised for your device, the message "Authorization Error" will be displayed and your content will not play.] Learn more at http://vod.divx.com.](https://usermanual.wiki/Samsung-Electronics-Co/GTB7610/User-Guide-1109156-Page-6.png)

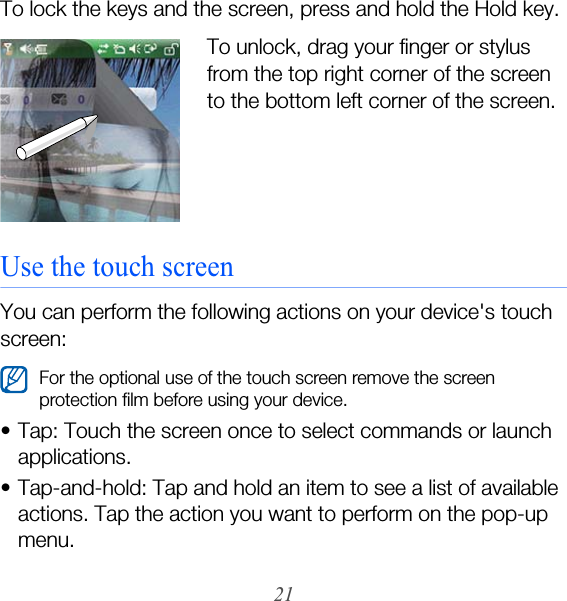
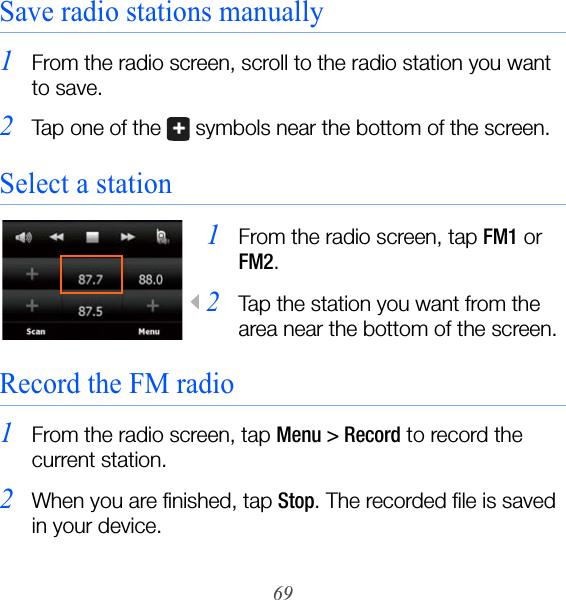
![20Turn on your device for first time1Press and hold [ ] to turn on your device. 2Follow the on-screen instructions. Your device will automatically connect to the cellular network.Activate Sleep modeYou can activate Sleep mode to save power when you do not use your device.To activate Sleep mode, press the Hold key. Your device will turn off the screen. To deactivate Sleep mode, press the Hold key again.Lock external keys and touch screenYou can lock the external keys and the touch screen to prevent any unwanted device operations from accidentally pressing any of the keys and the screen.](https://usermanual.wiki/Samsung-Electronics-Co/GTB7610/User-Guide-1109156-Page-21.png)
![37CallingLearn to make and receive calls, reject calls, and adjust the call volume.Make a call1Press [].2Enter an area code and phone number.3Ta p o r pr e ss [ ].• For a video call, tap Menu > Video Call.4To end the call, press [ ].Make a call from Phonebook1Ta p Start > Phonebook.2Tap a contact.3Tap the number you want to dial.](https://usermanual.wiki/Samsung-Electronics-Co/GTB7610/User-Guide-1109156-Page-38.png)
![38Make a call from the Call Log1Ta p Start > Main Menu > Call Log (1/5).2Select one of the following filters for your call log results:3Tap an entry in the call log.4Tap the number you want to dial.Answer a call1Press [].2For a video call, tap Show me to allow the caller to see you.3To end the call, press [ ].Icon FunctionAll callsIncoming callsOutgoing callsMissed calls](https://usermanual.wiki/Samsung-Electronics-Co/GTB7610/User-Guide-1109156-Page-39.png)
![39Reject a callPress [ ]. When you reject a call, the caller will hear a busy tone.Adjust the call volumeTo adjust the call volume, press the Volume key up or down during a call.Call an international number1Press [].2Ta p Keypad (if necessary).3Tap and hold to insert the + character (this replaces the international access code).4Tap the number keys to enter the complete number you want to dial (country code, area code, and phone number), and then tap or press [ ] to dial.5To end the call, press [ ].](https://usermanual.wiki/Samsung-Electronics-Co/GTB7610/User-Guide-1109156-Page-40.png)


![128Your device does not show a signal (no bars next to the network icon)• If you just turned on the device, wait about 2 minutes for your device to find the network and receive a signal.• You may not be able to receive a signal in tunnels or elevators. Move to an open area.• You may be between service areas. You should receive a signal when you enter a service area.You forgot a security code, PIN, or PUKIf you forget or lose this or another code, contact the seller or your service provider.Your display shows white linesThe display may show white lines if you have turned the device on after a long period of disuse or if you removed the battery without first turning off the device. The display should correct itself in a short time.You enter a number, but the call is not dialled• Ensure that you have pressed [ ].• Ensure that you have accessed the right cellular network.• Ensure that you have not set call barring for the phone number.](https://usermanual.wiki/Samsung-Electronics-Co/GTB7610/User-Guide-1109156-Page-129.png)
![11Safety and usage informationSAR tests are conducted using standard operating positions accepted by the FCC with the phone transmitting at its highest certified power level in all tested frequency bands. Although the SAR is determined at the highest certified power level, the actual SAR level of the phone while operating can be well below the maximum value. This is because the phone is designed to operate at multiple power levels so as to use only the power required to reach the network. In general, the closer you are to a wireless base station antenna, the lower the power output.Before a new model phone is available for sale to the public, it must be tested and certified to the FCC that it does not exceed the exposure limit established by the FCC. Tests for each model phone are performed in positions and locations (e.g. at the ear and worn on the body) as required by the FCC.The highest SAR values for this model phone as reported to the FCC are [GSM 850] Head : 0.219 W/Kg, Body-worn: 0.619 W/Kg ,[GSM1900] Head: 0.198 W/kg,Body-worn: 0.634 W/Kg.For body worn operation, this model phone has been tested and meets the FCC RF exposure guidelines when used with a Samsung accessory designated for this product or when used with an accessory that contains no metal and that positions the handset a minimum of 1.5 cm from the body. Non-compliance with the above restrictions may result in violation of FCC exposure guidelines.](https://usermanual.wiki/Samsung-Electronics-Co/GTB7610/User-Guide-1109156-Page-141.png)
![Declaration of Conformity (R&TTE)We, Samsung Electronicsdeclare under our sole responsibility that the productGSM Mobile Phone : B7610to which this declaration relates, is in conformity with the following standards and/or other normative documents.Position onlySAFETY EN EMC EN EN EN EN SAR EN EN RADIO EN EN EN EN We hereby declare that [all essential radio test suites have been carried out and that] the above named product is in conformity to all the essential requirements of Directive 1999/5/EC.The conformity assessment procedure referred to in Article 10 and detailed in Annex[IV] of Directive 1999/5/EC has been followed with the involvement of the following Notified Body(ies):BABT, Balfour House, Churchfield Road, Walton-on-Thames, Surrey, KT12 2TD, UK* Identification mark: 0168The technical documentation kept at :Samsung Electronics QA Lab.which will be made available upon request. (Representative in the EU)Samsung Electronics Euro QA Lab. Blackbushe Business Park, Saxony Way, Yateley, Hampshire, GU46 6GG, UK* Yong-Sang Park / S. Manager(place and date of issue) (name and signature of authorised person)* It is not the address of Samsung Service Centre. For the address or the phone number of Samsung Service Centre, see the warranty card or contact the retailer where you purchased your phone.](https://usermanual.wiki/Samsung-Electronics-Co/GTB7610/User-Guide-1109156-Page-152.png)