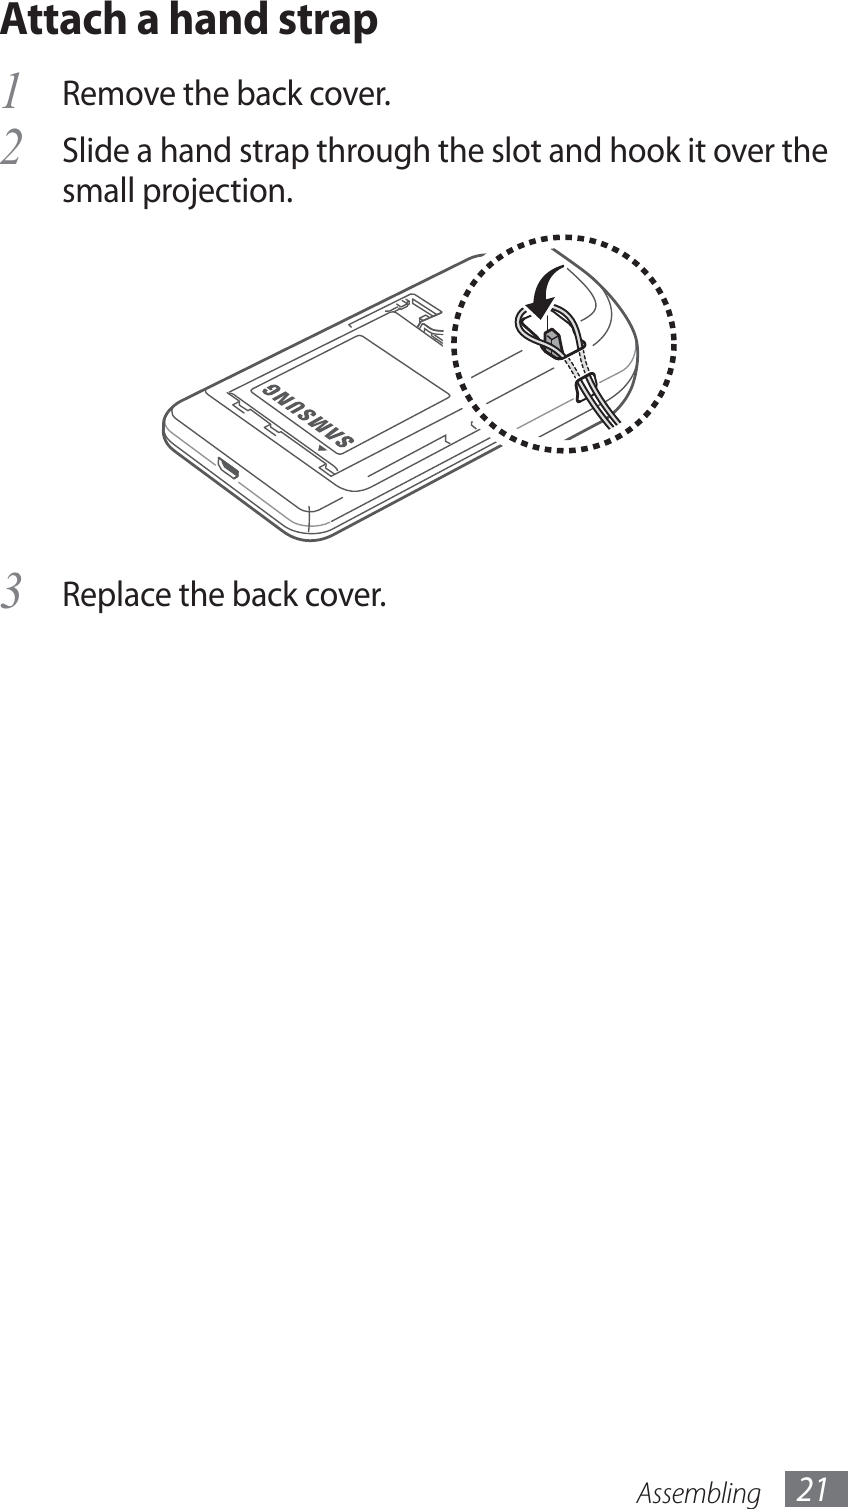
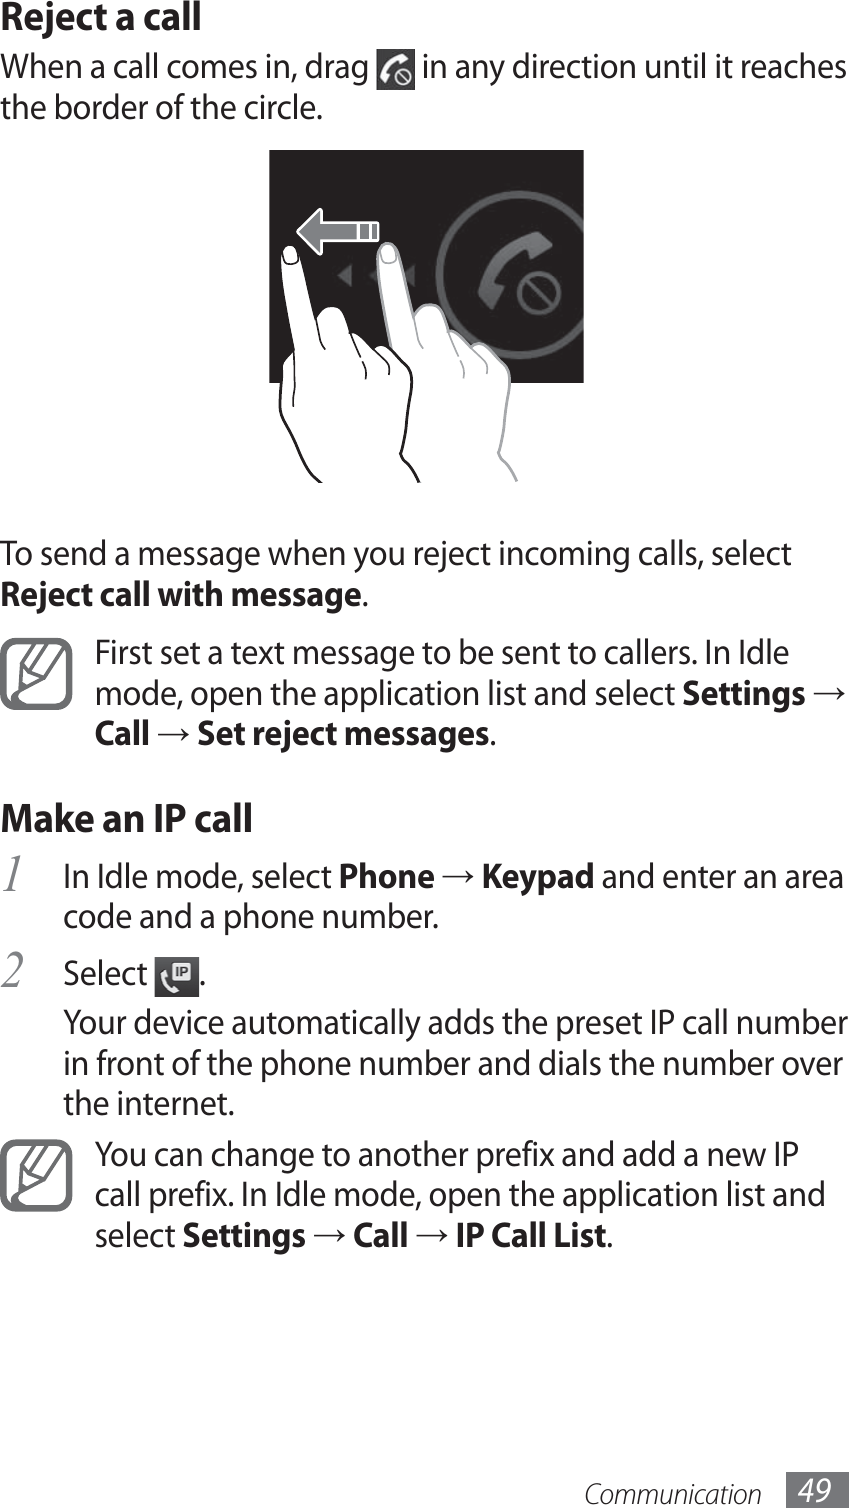
Samsung Electronics Co GTB9062 PCS GSM/EDGE Phone with WLAN and Bluetooth User Manual 09 GT B9062
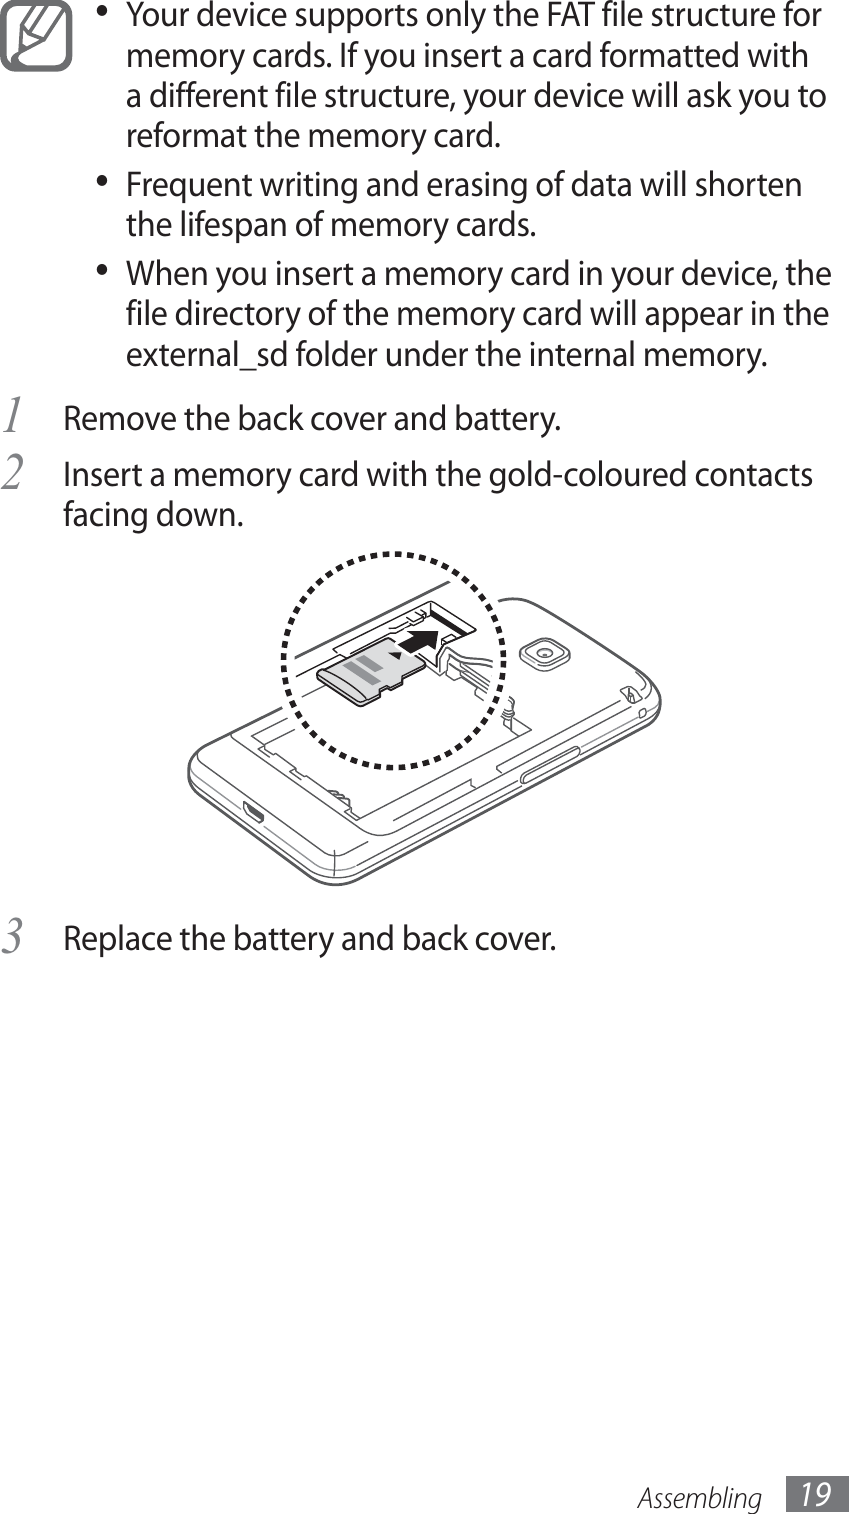
Samsung Electronics Co Ltd PCS GSM/EDGE Phone with WLAN and Bluetooth 09 GT B9062
UserManual.wiki
>
Samsung Electronics Co
>
GTB9062 User Manual
Users Manual
Navigation menu
Upload a User Manual
Namespaces
Wiki Guide
HTML
PDF
Info
Views
User Manual
Discussion / Help
Navigation

![&RQVXPHU,QIRUPDWLRQRQ:LUHOHVV3KRQHV:KDWNLQGVRISKRQHVDUHWKHVXEMHFWRIWKLVXSGDWH"'RZLUHOHVVSKRQHVSRVHDKHDOWKKD]DUG":KDWLV)'$VUROHFRQFHUQLQJWKHVDIHW\RIZLUHOHVVSKRQHV"](https://usermanual.wiki/Samsung-Electronics-Co/GTB9062/User-Guide-1629150-Page-7.png)


![Using this manual4Note—notes, usage tips, or additional information ►Refer to—pages with related information; for example: ► p. 12 (represents “see page 12”)→Followed by—the order of options or menus you must select to perform a step; for example: In Idle mode, open the application list and select Settings → About phone (represents Settings, followed by About phone)[]Square brackets—device keys; for example: [ ] (represents the Menu key)CopyrightCopyright © 2011 Samsung ElectronicsThis user manual is protected under international copyright laws.No part of this user manual may be reproduced, distributed, translated, or transmitted in any form or by any means, electronic or mechanical, including photocopying, recording, or storing in any information storage and retrieval system, without the prior written permission of Samsung Electronics.](https://usermanual.wiki/Samsung-Electronics-Co/GTB9062/User-Guide-1629150-Page-23.png)
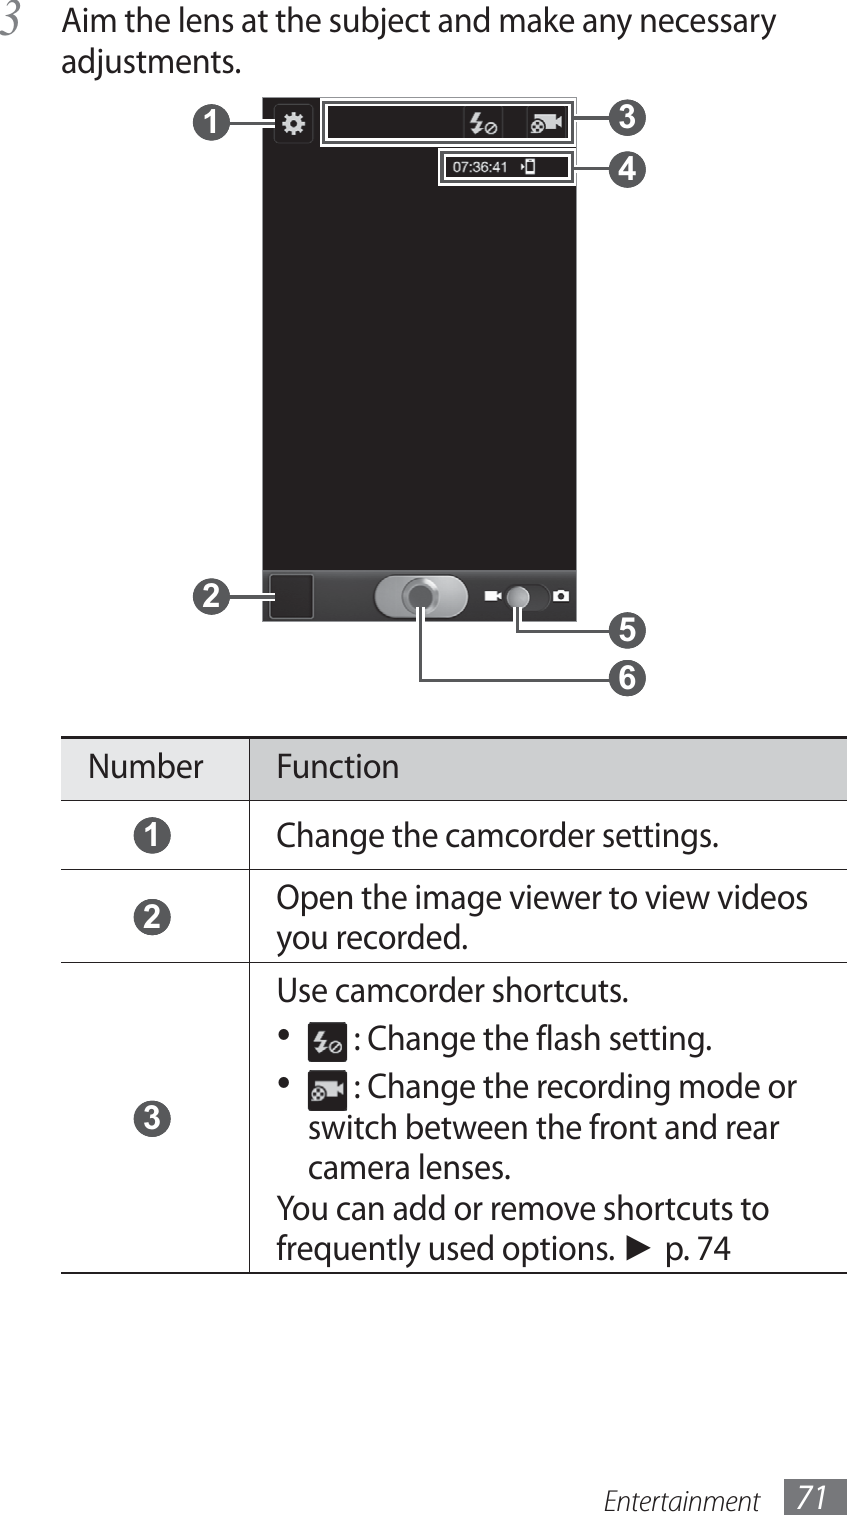
![Getting started 31Get to know the idle screenWhen the device is in Idle mode, you will see the idle screen. From the idle screen, you can view indicator icons, widgets, shortcuts to applications, and other items.The idle screen has multiple panels. Scroll left or right to a panel of the idle screen. You can also select a dot at the bottom of the screen to move directly to the corresponding screen. ›Add items to the idle screenYou can customise the idle screen by adding shortcuts to applications or items in applications, widgets, or folders. To add items to the idle screen,Press [1 ] → Add or tap and hold the empty area on the idle screen.Select the item category 2 → an item:Widgets• : Add widgets to the idle screen.Shortcuts• : Add shortcuts to items, such as applications, bookmarks, and contacts.Folders• : Create a new folder or add folders for your contacts.Wallpapers• : Set a background image.Move items on the idle screen ›Tap and hold an item to move. 1 Drag the item to the location you want.2](https://usermanual.wiki/Samsung-Electronics-Co/GTB9062/User-Guide-1629150-Page-50.png)
![Getting started 33 ›Add or remove panels to the idle screenYou can add or remove panels of the idle screen to organise widgets according to your preferences and needs.In Idle mode, press [1 ] → Edit.You can also place your two fingers on the screen and pinch to switch to Edit mode. Add or remove panels by using the following features:2 To remove a panel, tap and hold the thumbnail of a • panel and drag it to the trash bin at the bottom of the screen.To add a new panel, select • .To change the order of the panels, tap and hold the • thumbnail of a panel and drag it to the location you want.When you are finished, press [3 ].Access applicationsTo access your device’s applications,In Idle mode, select 1 Applications to access the application list.Scroll left or right to another screen.2 You can also select a dot at the bottom of the screen to move directly to the corresponding screen.Select an application.3 You can add a shortcut to an application by tapping and holding the application icon from the application list. You can move the icon to the location you want on the idle screen.](https://usermanual.wiki/Samsung-Electronics-Co/GTB9062/User-Guide-1629150-Page-52.png)
![Getting started34Press [4 ] to return to the previous screen; Press the Home key to return to the idle screen.If you rotate the device while using some features, • the interface will automatically rotate as well. To prevent the interface from rotating, open the shortcuts panel and select Auto rotation.While using the device, you can capture an image of • a screen by pressing and holding Home key and the Power key simultaneously. The image will be saved in My files → ScreenCapture.Organise applications ›You can reorganise the applications in the application list by changing their order or grouping them into categories to suit your preferences and needs.In the application list, press [1 ] → Edit → OK. Tap and hold an application.2 Drag the application icon to the location you want.3 You can move an application icon to another main menu screen. You can also move most-used applications next to Home.Press [4 ] → Save. To add a folder or panel to the menu screen,In the application list, press [1 ] → Edit.Tap and hold an application.2 Drag the application icon to 3 Add Folder or Add Page at the bottom of the screen.Repeat steps 2-3 to add more applications.4](https://usermanual.wiki/Samsung-Electronics-Co/GTB9062/User-Guide-1629150-Page-53.png)
![Getting started 35Drag 5 Add Folder or Add Page to the menu screen.A new folder or panel containing the applications is added to the menu screen. If you added a folder, enter a name and select 6 Yes.Press [7 ] → Save. To change the order of the main menu screens,In the application list, place your two fingers on the 1 screen and pinch.Tap and hold the thumbnail of a screen and drag it to 2 the location you want.Access recent applications ›Press and hold the Home key to view the applications 1 you have accessed recently.Select an application to access.2 Use the task manager ›Your device is a multitasking device. It can run more than one application at the same time. However, multitasking may cause hang-ups, freezing, memory problems, or additional power consumption. To avoid these problems, end unnecessary programs using the task manager.In Idle mode, open the application list and select 1 Task manager → Active applications.The list of all the applications currently running on your device appears.To close an application, select 2 Exit.To close all active applications, select Exit all.](https://usermanual.wiki/Samsung-Electronics-Co/GTB9062/User-Guide-1629150-Page-54.png)
![Getting started 37Switch to Silent mode ›To mute or unmute your device, do one of the following:In Idle mode, select • Phone → Keypad and tap and hold #.Open the shortcuts panel from the top of the screen and • select Sound.Press and hold the Power key and select • Silent mode.You can set the device to alert you to various events in Silent mode. In Idle mode, open the application list and select Settings → Sound settings → Vibration → Always or Only in Silent mode. When you switch to Silent mode, will appear in place of .Activate animation for switching windows ›In Idle mode, open the application list and select Settings → Display → Animation → Some animations or All animations.Select a wallpaper for the idle screen ›In Idle mode, press [1 ] → Wallpaper → an option.Select an image.2 Select 3 Save or Set wallpaper.Samsung is not responsible for any use of default images or wallpapers provided on your device.Adjust the brightness of the display ›In Idle mode, open the application list and select 1 Settings → Display → Brightness.Clear the check box next to 2 Automatic brightness.](https://usermanual.wiki/Samsung-Electronics-Co/GTB9062/User-Guide-1629150-Page-56.png)
![Getting started40Switch SIM or USIM cardsOnce you insert two SIM or USIM cards, you can switch back and forth between each card.To switch between SIM or USIM cards, press [ ] except for when the device is sending or receiving messages or data from the network. ›Activate the SIM or USIM cardIn Idle mode, open the application list and select 1 Settings → SIM cards management → Network.You can also press and hold [ ].Select the SIM or USIM card you want to activate.2 Select the check box next to 3 Activate.Select 4 Save. ›Change the names and icons of the SIM or USIM cardsIn Idle mode, open the application list and select 1 Settings → SIM cards management → Register Card.Select a SIM or USIM card.2](https://usermanual.wiki/Samsung-Electronics-Co/GTB9062/User-Guide-1629150-Page-59.png)
![Communication50Use a pauseLearn to add a pause between your numbers when entering a PIN or account number on an automatic answering system, such as mobile banking.In Idle mode, select 1 Phone → Keypad and enter an area code and a phone number.Press [2 ] → Add 2 sec pause or Add wait.Enter additional numbers.3 Select 4 to dial the phone number.For a 2-second pause, the additional numbers will be • sent to the system automatically after 2 seconds.For a waiting pause, select • Yes when a pop-up window appears.Call an international numberIn Idle mode, select 1 Phone → Keypad, and tap and hold 0 to insert the + character. Enter the complete number you want to dial (country 2 code, area code and phone number), and then select to dial the number.Use a headset ›By plugging a headset into the device, you can answer and control calls hands-free:To answer a call, press the headset button.• To reject a call, press and hold the headset button.•](https://usermanual.wiki/Samsung-Electronics-Co/GTB9062/User-Guide-1629150-Page-69.png)
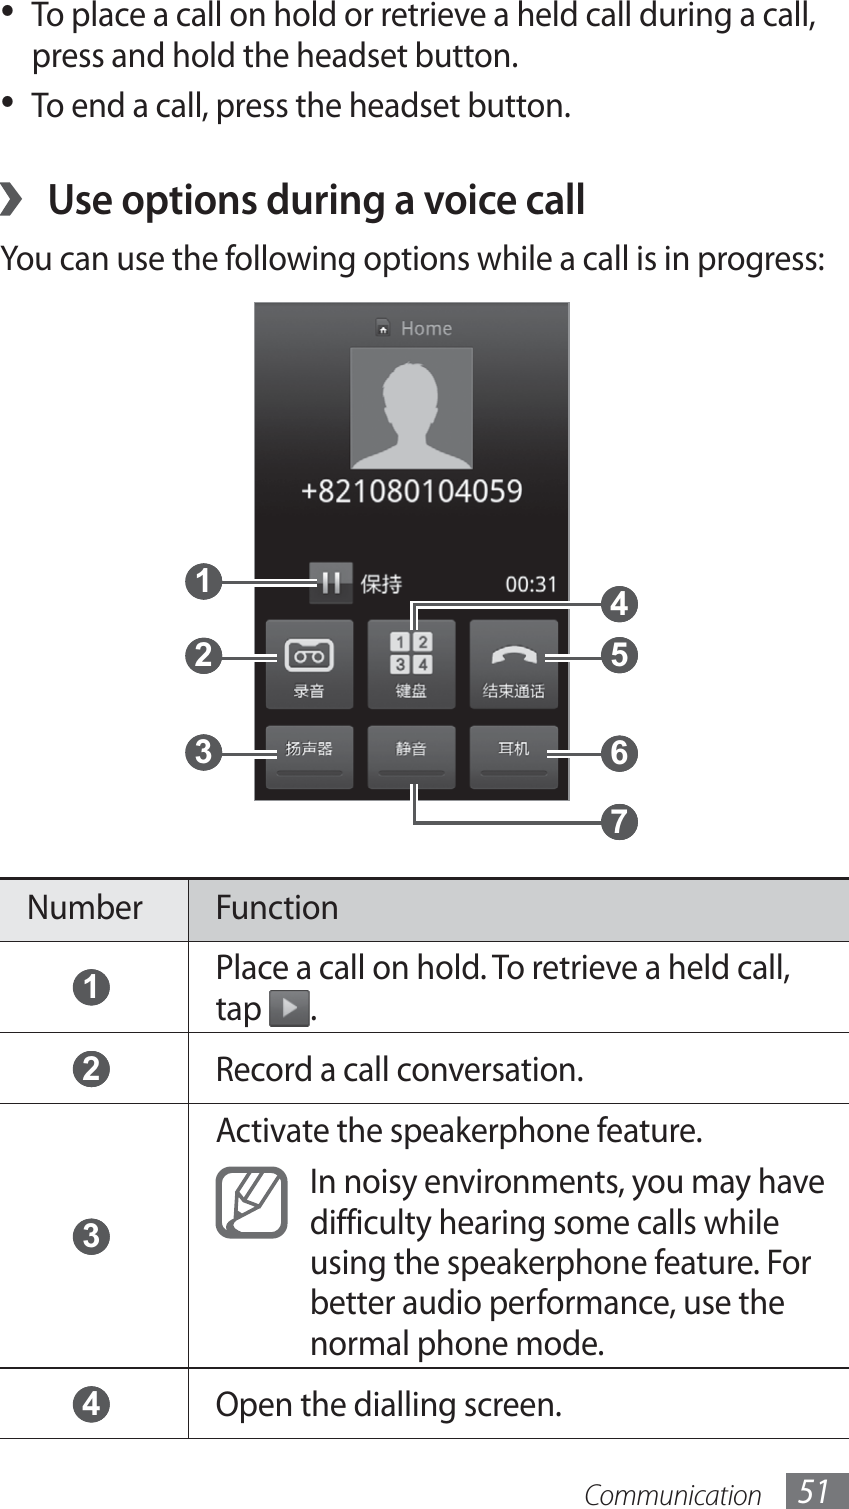
![Communication52Number Function 5 End a current call. 6 Converse with the other party via a Bluetooth headset. 7 Turn off the microphone so that the other party cannot hear you.You can use the following options while a voice call is in progress:To adjust the voice volume, press the Volume key up or • down.To answer a second call, drag • right when a call waiting tone sounds. The device asks whether to end or hold the first call. You must subscribe to the call waiting service to use this feature.To open the phonebook, press [• ] → Contacts.To add a memo, press [• ] → Memo.To switch between the two calls, select • Swap.To make a multiparty call (conference call), make or • answer a second call and select Merge when connected to the second party. Repeat to add more parties. You must subscribe to the multiparty call service to use this feature.](https://usermanual.wiki/Samsung-Electronics-Co/GTB9062/User-Guide-1629150-Page-71.png)
![Communication 53Use options during a video call ›You can use the following options while a video call is in progress:To switch between the front and rear camera lens, select • Switch camera.To turn off the microphone so that the other party cannot • hear you, select Mute.To hide your image from the other party, press [• ] → Hide me.To select an alternative image to be shown to the other • party, press [ ] → Outgoing image.To open the dialling screen, press [• ] → Dialpad.To listen and talk to the other party via a Bluetooth • headset, press [ ] → Switch to headset.To activate the speakerphone feature, press [• ] → Speaker on.To use the other party’s image, tap and hold the other • party’s image. You can capture an image of the screen or record the video call.View and dial missed calls ›Your device will display calls you have missed on the display. To dial the number of a missed call, open the shortcuts panel and select the missed call.](https://usermanual.wiki/Samsung-Electronics-Co/GTB9062/User-Guide-1629150-Page-72.png)
![Communication56In Idle mode, open the application list and select 1 Settings → Call → Additional settings → a SIM or USIM card → Call barring → a call type.Select a call barring option.2 Enter a call barring password and select 3 OK.Your setting will be sent to the network.Set call waitingCall waiting is a network feature to alert you of an incoming call while you are on a previous call. This feature is available only for voice calls.In Idle mode, open the application list and select Settings → Call → Additional settings → a SIM or USIM card → Call waiting. Your setting will be sent to the network.View call logs ›You can view logs of your calls filtered by their types. In Idle mode, select 1 Phone → Logs.Press [2 ] → View by → an option to sort the call logs. From the call logs, you can make a call or send a message directly to a contact by quickly flicking the contact to the left or right.Select a log to view its details.3 From the detail view, you can dial the number, send a message to the number or add the number to the phonebook or reject list.](https://usermanual.wiki/Samsung-Electronics-Co/GTB9062/User-Guide-1629150-Page-75.png)
![Communication 57MessagingLearn to create and send text (SMS) or multimedia (MMS) messages, and view or manage messages you have sent or received.Send a text message ›1 In Idle mode, select Messaging.Select 2 .Add recipients of your message.3 Enter phone numbers manually and separate them by • inserting a semicolon or comma.Select phone numbers from the lists by selecting • .Select 4 Tap to enter message and enter your message text.To insert emoticons, press [• ] → Insert smiley.To insert a text template, select • → a template.Select 5 Send to send the message.Send a multimedia message ›1 In Idle mode, select Messaging.Select 2 .](https://usermanual.wiki/Samsung-Electronics-Co/GTB9062/User-Guide-1629150-Page-76.png)
![Communication58Add recipients of your message.3 Enter phone numbers or email addresses manually • and separate them by inserting a semicolon or a comma.Select phone numbers or email addresses from the • lists by selecting .When you enter an email address, the device will convert the message as a multimedia message.Press [4 ] → Add subject and add a subject for the message.Select 5 Tap to enter message and enter your message text.To insert emoticons, press [• ] → Insert smiley.To insert a text template, select • → a template.Select 6 and add an item.You can select a file from the file list or create a new photo, video, or sound.Select 7 Send to send the message.View a text or multimedia message ›1 In Idle mode, select Messaging.Your messages are grouped into message threads by contact, like a messenger.Select a contact.2 Select a message to view the details.3](https://usermanual.wiki/Samsung-Electronics-Co/GTB9062/User-Guide-1629150-Page-77.png)
![Communication 61View an email message ›When you open an email account, you can view previously retrieved emails offline or connect to the email server to view new messages. After retrieving email messages, you can view them offline.In Idle mode, open the application list and select 1 Email → an email account.Press [2 ] → Refresh to update the message list.Select an email message.3 From the message view, use the following options:To move to the previous or next message, select • or .To move the message to another folder, select • .To delete the message, select • .To reply to the message, select • → Reply.To forward the message to other people, select • → Forward.To view an attachment, select • → the attachment. To save it to your device, select .ࠀᄪLearn to chat with friends and family via the Fetion messenger. With Fetion, you can stay available to other users by receiving and sending instant messages. For more information, contact your service provider.](https://usermanual.wiki/Samsung-Electronics-Co/GTB9062/User-Guide-1629150-Page-80.png)
![Communication62Log in to the Fetion messenger ›In Idle mode, open the application list and select 1 ࠀᄪ.Enter your user name and password and select 2 ݂.Start a chat ›In Idle mode, open the application list and select 1 ࠀᄪ.Select a contact from the 2 All list. The chat screen opens.If you are not logged in, you can send a text message to one of your phonebook contacts. Select Local contact → a contact.Enter your message and select 3 Send.To end the chat, press [4 ] → End chat.139 MailYou can receive emails from your preset account assigned by your service provider, and reply promptly when a new email arrives. For more details, contact your service provider.Set up an email account using 139 mail ›In Idle mode, open the application list and select 1 139 Mail.Start the 139 Mail wizard to create a 139 Mail account.2 The account will be added to the message centre automatically.](https://usermanual.wiki/Samsung-Electronics-Co/GTB9062/User-Guide-1629150-Page-81.png)
![Entertainment66To zoom in, place two fingers on the screen and spread • them apart. To zoom out, move your fingers closer together. You can also double-tap the screen.To send a photo to others, select • Share.To delete a photo, select • Delete.To use additional features with a photo, select • More and use the following options:Set as - : Set a photo as wallpaper or a caller ID image for a contact.Rename - : Rename a photo file.Capture a photo by using preset options for ›various scenesYour camera provides you with predefined settings for various scenes. You can simply select the proper mode for your shooting conditions and subjects. For example, when you take photos at night, select the night mode that uses an extended exposure. In Idle mode, open the application list and select 1 Camera to turn on the camera.Select 2 → Scene mode → a scene.Press [3 ]. Make any necessary adjustments.4 Select 5 to take a photo.](https://usermanual.wiki/Samsung-Electronics-Co/GTB9062/User-Guide-1629150-Page-85.png)
![Entertainment74 ›Edit the shortcut iconsYou can add or remove shortcuts to frequently used options.From the preview screen, 1 select → Edit shortcuts or press [ ] → Edit shortcuts.Tap and hold an icon from the option list and drag it to 2 the shortcut area.To remove shortcuts, tap and hold an icon and drag it to the option list.Press [3 ] to return to the preview screen.VideosLearn to use the video player to play various kinds of videos. The video player supports the following file formats: 3gp, mp4, avi, wmv, flv, mkv, rm, rmvb (Codec: MPEG4, H.263, H.264, DivX®, RV30, RV40).Avoid locking the device’s screen while playing a • DivX Video-On-Demand. Each time you lock the screen while playing a DivX Video-On-Demand, one of your available rental counts will be decremented.Some file formats are not supported depending on • the software of the device.If the file size exceeds the available memory, an • error can occur when you open files. Playback quality may vary by content type.• Some files may not play properly depending on • how they are encoded.In Idle mode, open the application list and select 1 Videos.Select a video to play.2](https://usermanual.wiki/Samsung-Electronics-Co/GTB9062/User-Guide-1629150-Page-93.png)
![Entertainment 77To send a photo to others, select • Send via.To delete a photo, select • Delete → Confirm deletions.To share a photo with others via AllShare or community • websites, press [ ] → Share via.To set a photo as wallpaper or a caller ID image for a • contact, press [ ] → Set as.To use additional features with a photo, press [• ] → More and use the following options:Copy - : Copy a photo file.Print - : Print a photo using a WLAN or connection. Your device is compatible only with some Samsung printers.Edit - : Edit a photo file.Crop - : Crop an image from a photo.Rotate left - : Rotate a photo anti-clockwise.Rotate right - : Rotate a photo clockwise.Slideshow - : Start a slideshow in the selected folder.Rename - : Rename a photo file.Details - : View photo details.Play a video ›1 In Idle mode, open the application list and select Gallery.Select a video (with the 2 icon) to play.Rotate the device to landscape view.3 Control playback with the virtual keys. 4 ► p. 74](https://usermanual.wiki/Samsung-Electronics-Co/GTB9062/User-Guide-1629150-Page-96.png)
![Entertainment78Photo editorYou can edit photos and apply various effects.In Idle mode, open the application list and select 1 Photo editor.Select 2 Select picture → a folder → an image.To take a new photo, select Capture picture.Select 3 → New selection → OK.To add to or subtract from the selection border, select • → Add to selection or Remove from selection.To reverse the selection, select • → Inverse selection.To change the selection size, select • .To rotate or flip the image, select • .To crop the image, select • .To undo or redo your last action, select • or .Drag your finger over the area you want to select.4 Select 5 to apply a colour effect, or select to apply a filter effect.To use additional tools, such as copying and warping, select .Adjust the image as desired (if necessary) and select 6 Done.When you are finished, press [7 ] → Save.](https://usermanual.wiki/Samsung-Electronics-Co/GTB9062/User-Guide-1629150-Page-97.png)
![Entertainment80Control playback with the following icons:3 Icon FunctionAdjust the volume. Activate the 5.1 channel surround sound system when a headset is connected.Activate Shuffle mode.Change the repeat mode (off, repeating a file, or repeating all files).Restart playback; Skip backward (double-tap); Scan backward in a file (tap and hold).Pause playback; Select to resume playback.Stop playback.Skip forward; Scan forward in a file (tap and hold).You can control the music player with a headset. In Idle mode, press and hold the headset button to launch the music player. Press the headset button to start or pause playback.Create a playlist ›In Idle mode, open the application list and select 1 Music.Select 2 Playlists.Press [3 ] → Create.](https://usermanual.wiki/Samsung-Electronics-Co/GTB9062/User-Guide-1629150-Page-99.png)
![Entertainment 81Enter a title for your new playlist and select 4 Save.Select 5 Add music.Select the files you want to include and select 6 Add.During playback, you can add files to a playlist by pressing [] → Add to playlist.Add songs to the quick list ›You can add songs to the quick list and save them as a playlist. During playback, press [ ] → Add to quick list to add the current song to the quick list.To go to the quick list, from the music library screen, select Playlists → Quick list. To save the quick list as a playlist, press [ ] → Save as playlist.Customise music player settings ›In Idle mode, open the application list and select 1 Music.Press [2 ] → Settings.Adjust the following settings to customise your music 3 player:Option FunctionEqualiser Select a default equaliser type.Sound effect Select a sound effect.Music menu Select music categories to display on the music library screen.Visualisation Display an animated visualisation during playback.](https://usermanual.wiki/Samsung-Electronics-Co/GTB9062/User-Guide-1629150-Page-100.png)
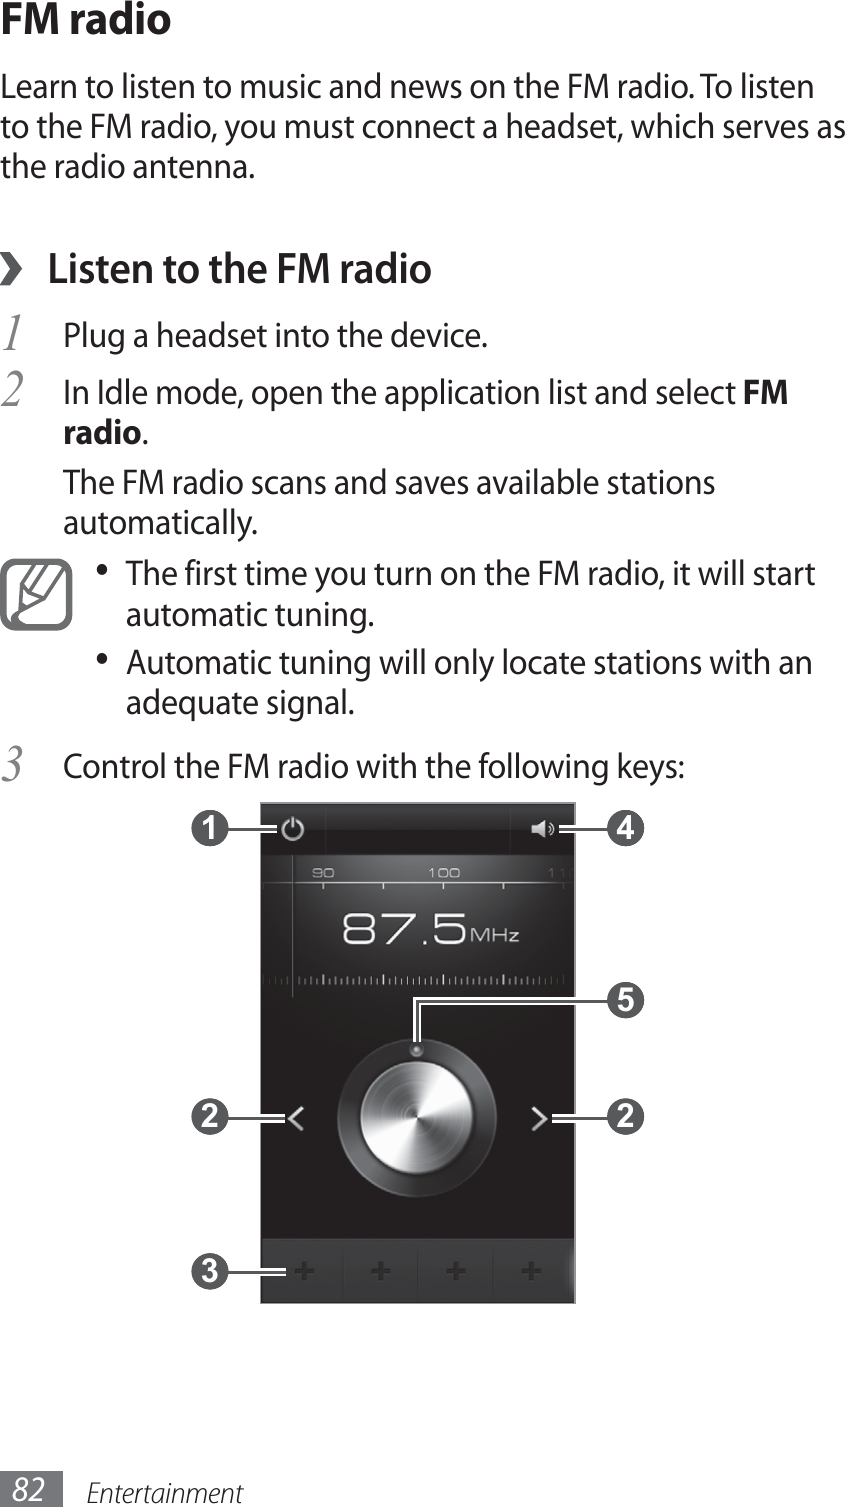
![Entertainment 83Number Function 1 Turn the FM radio on or off. 2 Search for an available radio station. 3 Add the current radio station to the favourites list. 4 Adjust the volume. 5 Fine-tune the frequency.Save a radio station automatically ›Plug a headset into the device.1 In Idle mode, open the application list and select 2 FM radio.Press [3 ] → Scan → a scanning option. The FM radio scans and saves available stations automatically.Add a radio station to the favourites list ›Plug a headset into the device.1 In Idle mode, open the application list and select 2 FM radio.Select 3 to turn on the FM radio.](https://usermanual.wiki/Samsung-Electronics-Co/GTB9062/User-Guide-1629150-Page-102.png)
![Entertainment84Scroll to the radio station you want.4 Select 5 to add the radio station to the favourites list.You can add a name for a radio station or remove a radio station; Tap and hold a radio station on the favourites list and select Remove or Rename.Customise FM radio settings ›In Idle mode, open the application list and select 1 FM radio.Press [2 ] → Settings.Adjust the following settings to customise your FM 3 radio:Option FunctionBackground playingSet whether or not to run the FM radio in the background while using other applications. If this feature is on, you can control the FM radio from the shortcuts panel.FM auto offSet the FM radio to automatically turn off after a specified length of time.](https://usermanual.wiki/Samsung-Electronics-Co/GTB9062/User-Guide-1629150-Page-103.png)
![Personal information86Select 3 Add to Contacts → .Select a memory location.4 If you have more than one account, select an account to which you want to add the contact.Enter contact information.5 Select 6 Save to add the contact to memory.Find a contact ›1 In Idle mode, select Contacts.Scroll up or down on the contact list.2 You can also drag your finger along the index on the right side to quickly scroll through the list.Select a contact’s name.3 Once you find a contact, you can use the following options:To make a voice call, select • .To make a video call, select • Video call.To make an IP call, select • IP call.To send a message, select • .To send an email message, select an email address.• To edit the contact information, press [• ] → Edit.To set as a favourite, select • .Set a speed dial number ›In Idle mode, select 1 Contacts.Press [2 ] → Speed dial settings.Select a location number 3 → a contact.](https://usermanual.wiki/Samsung-Electronics-Co/GTB9062/User-Guide-1629150-Page-105.png)
![Personal information 87Select a phone number (if necessary).4 You can quickly dial this number by tapping and holding the location number from the dialling screen.Create your namecard ›In Idle mode, select 1 Contacts.Press [2 ] → My profile.Enter your own personal details.3 Select 4 Save.You can send your namecard by attaching it to a message or email or transferring it via the Bluetooth wireless feature.Retrieve contacts from your community ›accountsYou can view the list of community website accounts and select an account to add a contact from the website to your phone contacts.In Idle mode, select 1 Contacts.Press [2 ] → More → View Friends.Select an account.3 Follow the on-screen instructions.4 Create a group of contacts ›By creating groups of contacts, you can manage multiple contacts and send messages or email to an entire group. Start by creating a group.In Idle mode, select 1 Contacts.](https://usermanual.wiki/Samsung-Electronics-Co/GTB9062/User-Guide-1629150-Page-106.png)
![Personal information88Scroll left or right to 2 Groups.Press [3 ] → Create.Enter a name and select a ringtone for the group.4 Select 5 Add member, select contacts to add to the group, and select Add.Select 6 Save. ›Copy contactsTo copy contacts from the SIM or USIM card to your device,In Idle mode, select 1 Contacts.Press [2 ] → Import/Export → Import from SIM card → a SIM or USIM card.Select a memory location.3 If you have more than one account, select an account to which you want to add the contact.Select contacts to copy and select 4 Import.To copy contacts from your device to the SIM or USIM card,In Idle mode, select 1 Contacts.Press [2 ] → Import/Export → Export to SIM card → a SIM or USIM card.Select contacts to copy and select 3 Export → Yes. Import or export contacts ›To import contact files (in vcf format) from a memory card to your device,In Idle mode, select 1 Contacts.Press [2 ] → Import/Export → Import from SD card.](https://usermanual.wiki/Samsung-Electronics-Co/GTB9062/User-Guide-1629150-Page-107.png)
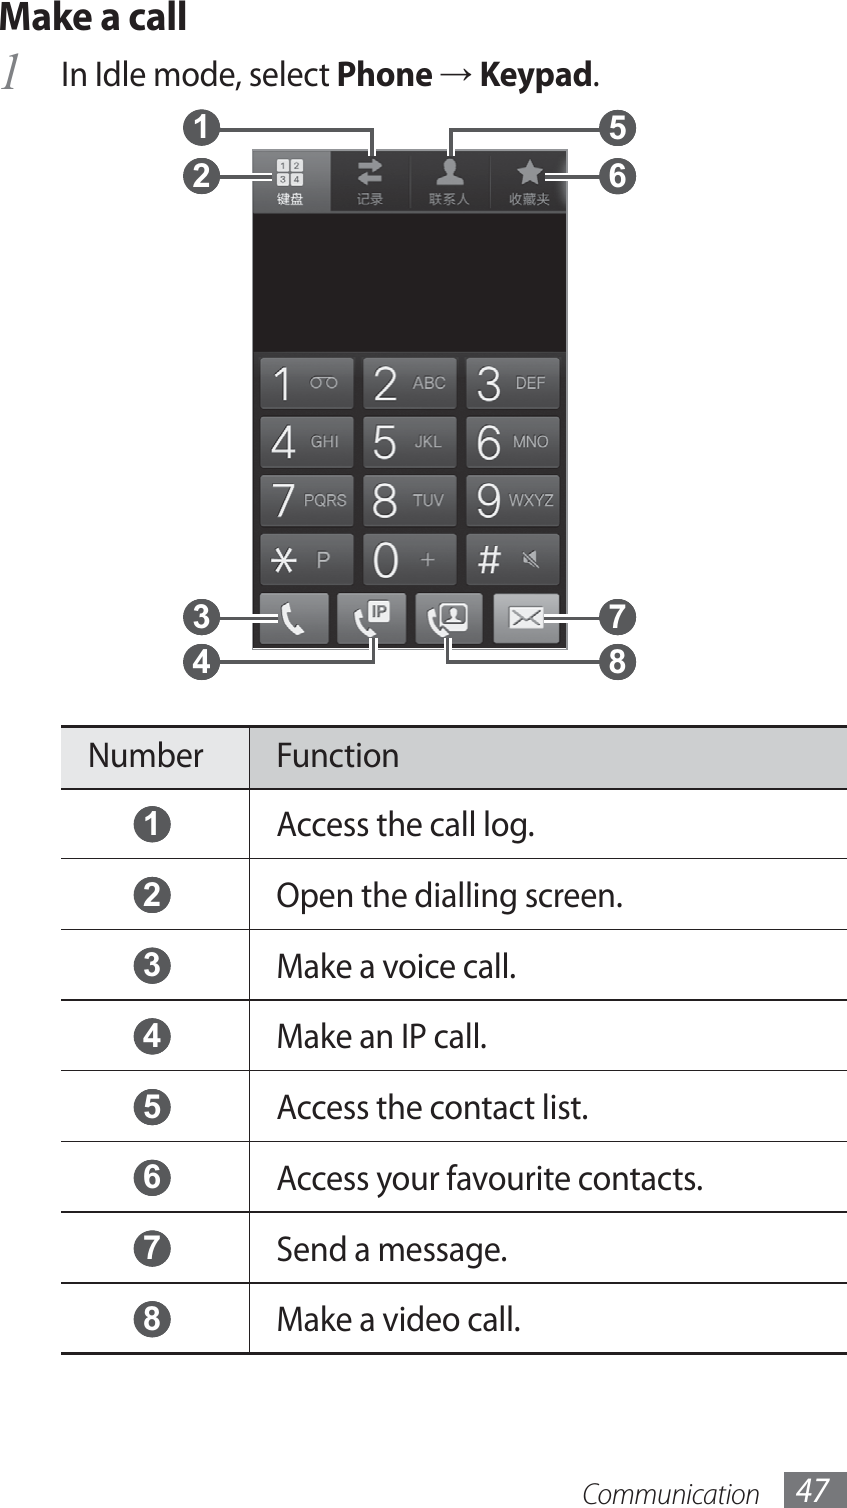
![Personal information 89Select a memory location.3 If you have more than one account, select an account to which you want to add the contact.Select an option for importing a single contact file, 4 multiple contact files, or all contact files, and select OK.Select contact files to import and select 5 OK.To export contacts from your device to a memory card,In Idle mode, select 1 Contacts.Press [2 ] → Import/Export → Export to SD card.Select 3 OK to confirm.CalendarLearn to create and manage daily, weekly or monthly events, and set alarms to remind yourself of important events. Create an event ›In Idle mode, open the application list and select 1 Calendar.Select 2 Tap to create event or press [ ] → Create.Enter the details of the event as required.3 Select 4 Save.View events ›To change the calendar view,In Idle mode, open the application list and select 1 Calendar.](https://usermanual.wiki/Samsung-Electronics-Co/GTB9062/User-Guide-1629150-Page-108.png)
![Personal information90Select a view mode from the top of the calendar.2 To view events of a specific date,In Idle mode, open the application list and select 1 Calendar.Select a date on the calendar. In month view, days with 2 scheduled events are indicated by a small square.To move to a specific day by entering a date manually, • press [ ] → Go to, enter the date by selecting + or -, and select Set.To select today’s date, press [• ] → Today.Select an event to view its details.3 You can send the event to others by pressing [ ] → Send via → an option.Stop an event alarm ›If you set an alarm for a calendar event, the event alarm icon will appear at the specified time. Open the shortcuts panel from the top of the screen.1 Select a reminder to view more details about the event.2 To snooze or dismiss the reminder, select the check box 3 and then select Snooze all or Dismiss all.TaskLearn to create a task list and set alarms to remind yourself of important tasks or set priority.](https://usermanual.wiki/Samsung-Electronics-Co/GTB9062/User-Guide-1629150-Page-109.png)
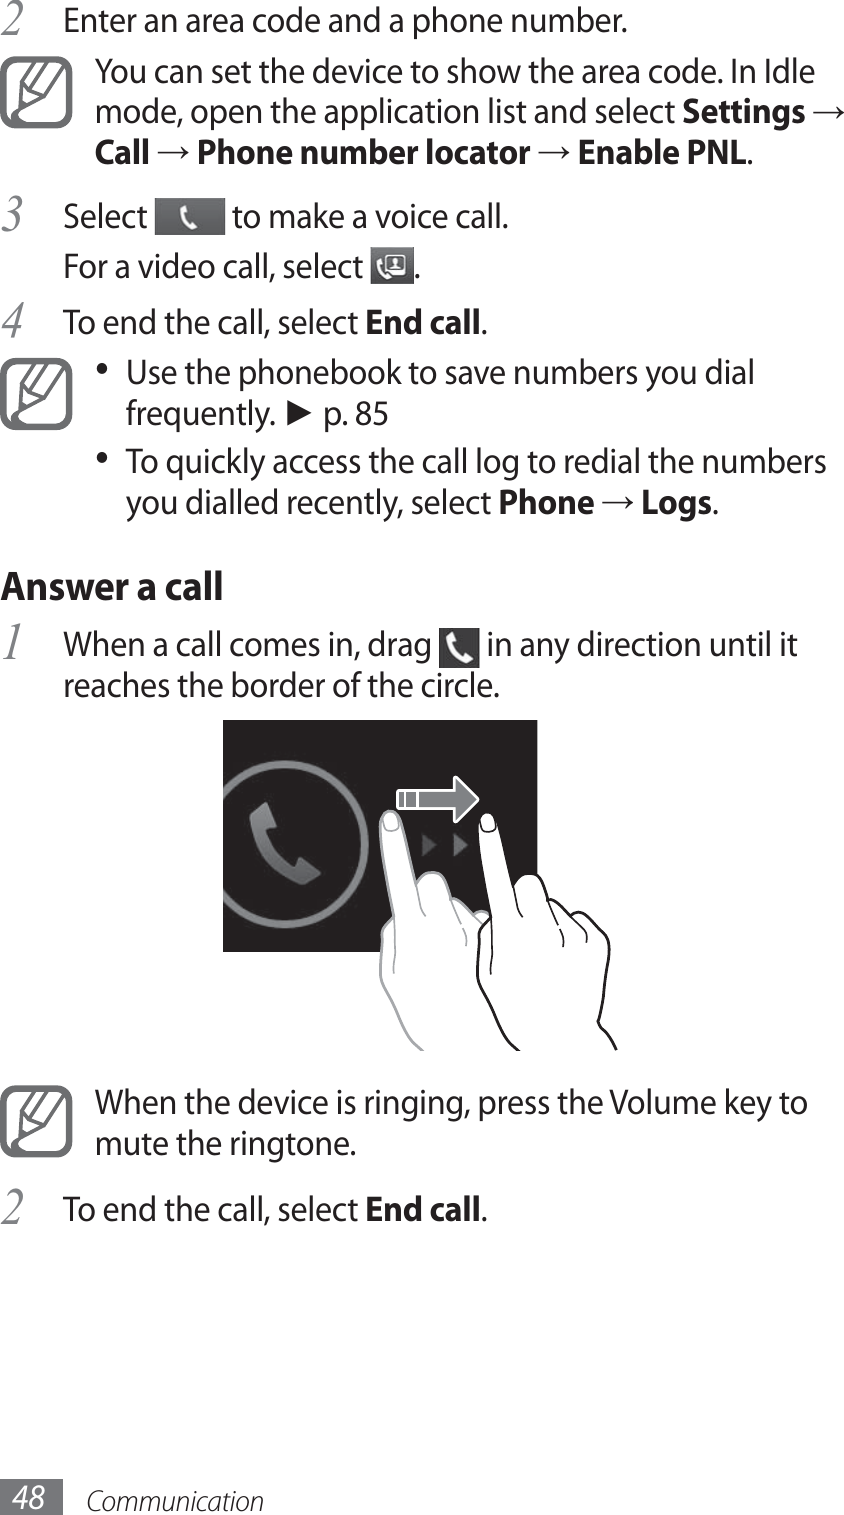
![Personal information 91Create a task ›In Idle mode, open the application list and select 1 Task.Select 2 Create task or press [ ] → Create to create a task.Enter the details of the task.3 Select 4 Save.View a task ›In Idle mode, open the application list and select 1 Task.Press [2 ] → List by → an option to sort the tasks.Select a task to view its details.3 For completed tasks with an expired deadline, you can set their status to completed by selecting the check box.You can send the task to others by pressing [ ] → Share → an option.MemoLearn to record important information to save and view at a later date. Create a memo ›In Idle mode, open the application list and select 1 Memo.If there is a memo saved, select 2 Create memo or press [] → Create to create a memo.Enter your memo text and select 3 Save.](https://usermanual.wiki/Samsung-Electronics-Co/GTB9062/User-Guide-1629150-Page-110.png)
![Personal information92View memos ›In Idle mode, open the application list and select 1 Memo.Press [2 ] → Search or press and hold [ ] to search for a memo (if necessary).Select a memo to view its details.3 To use additional features with a memo, select .Option FunctionEdit the memo.Delete a memo.Change the colour of the memo.Lock the memo.Print the memo using WLAN connection.You can send the memo by pressing [• ] → Send → an option.You can upload the memo to a community website • by pressing [ ] → Update SNS.](https://usermanual.wiki/Samsung-Electronics-Co/GTB9062/User-Guide-1629150-Page-111.png)
![Personal information 93Voice recorderLearn to operate your device’s voice recorder.Record a voice memo ›In Idle mode, open the application list and select 1 Voice recorder.Select 2 Record to start recording.Speak into the microphone.3 When you are finished, select 4 Stop.Your memo is saved automatically.To record more voice memos, select 5 Record again.Play a voice memo ›In Idle mode, open the application list and select 1 Voice recorder.Select 2 List.Select a voice memo to play.3 You can send the voice memo to others by pressing [] → Share → an option.](https://usermanual.wiki/Samsung-Electronics-Co/GTB9062/User-Guide-1629150-Page-112.png)
![Web 95Number Function 2 Open a list of saved bookmarks, frequently visited pages and recent internet history.While browsing the web page, use the following options:To zoom in, place two fingers on the screen and spread • them apart. To zoom out, move your fingers closer together. You can also double-tap the screen.To open a new window, press [• ] → New window.To view the currently active windows, press [• ] → Windows. You can open multiple pages and switch back and forth between them.To adjust the brightness of the screen, press [• ] → Browser brightness. This feature may be unavailable depending on your region.To reload the current web page, press [• ] → Refresh.To go to a next page in history, press [• ] → Forward.To bookmark the current web page, press [• ] → More → Add bookmark.To add a shortcut to the current web page to the idle • screen, press [ ] → More → Add shortcut to home screen.To search for text on the web page, press [• ] → More → Find on page.To view the web page details, press [• ] → More → Page info.To send the web address (URL) of the web page to others, • press [ ] → More → Share page.To view the web browser in Full screen mode, press [• ] → More → Toggle fullscreen.](https://usermanual.wiki/Samsung-Electronics-Co/GTB9062/User-Guide-1629150-Page-114.png)
![Web96To view the download history, press [• ] → More → Downloads.To customise the browser settings, press [• ] → More → Settings.To print the current web page or screen using a WLAN or • USB connection, press [ ] → More → Print. Your device is compatible only with some Samsung printers.To close the web browser, press [• ] → More → Exit.Bookmark your favourite web pages ›If you know the web address of the web page, you can manually add a bookmark. To add a bookmark,In Idle mode, open the application list and select 1 Internet.Select 2 → Bookmarks.Select 3 Add or press [ ] → Bookmark last-viewed page.To bookmark the web page you were viewing, skip to step 5.Enter a page title and a web address (URL).4 Select 5 OK.From the bookmark list, tap and hold a bookmark and use the following options:To open the web page in the current window, select • Open.To open the web page in a new window, select • Open in new window.To edit the bookmark details, select • Edit bookmark.To add the bookmark shortcut to the idle screen, select • Add shortcut to home screen.](https://usermanual.wiki/Samsung-Electronics-Co/GTB9062/User-Guide-1629150-Page-115.png)

![Connectivity 105 ›Connect to a WLAN using a WLAN Protected Setup (WPS)Using WPS, you can connect to a secured network. To connect to a WLAN with a WPS button,In Idle mode, open the application list and select 1 Settings → Wireless and network → WLAN settings.Select 2 WPS button connection.Press a WPS button on the access point within 3 2 minutes.To connect to a WLAN with a WPS PIN,In Idle mode, open the application list and select 1 Settings → Wireless and network → WLAN settings.Select a network indicated by the WPS icon and select 2 WPS PIN.On the access point, enter the PIN and press the start 3 button.WLAN DirectLearn to use the WLAN Direct feature to connect two devices via a WLAN without requiring an access point.Connect your device to another device ›In Idle mode, open the application list and select 1 Settings → Wireless and network → WLAN Direct settings → OK → OK → WLAN Direct.Press [2 ] → Scan.](https://usermanual.wiki/Samsung-Electronics-Co/GTB9062/User-Guide-1629150-Page-124.png)
![Connectivity 107Customise DLNA settings for sharing media ›filesTo allow other DLNA-enabled devices to access media files on your device, you must activate media sharing. In Idle mode, open the application list and select 1 AllShare.Press [2 ] → Settings.Adjust the following settings to customise the DLNA 3 feature:Option FunctionDevice name Enter a name for your device as a media server.Share videos Turn on video sharing with other DLNA-enabled devices.Share photos Turn on image sharing with other DLNA-enabled devices.Share music Turn on music sharing with other DLNA-enabled devices.Upload from other devicesSet whether or not to accept the upload from other devices.Default memorySelect the default memory location for saving downloaded media files.Subtitles Set to display subtitles.Play your files on another DLNA-enabled ›deviceIn Idle mode, open the application list and select 1 AllShare.](https://usermanual.wiki/Samsung-Electronics-Co/GTB9062/User-Guide-1629150-Page-126.png)

![Connectivity 115Option FunctionSet L2TP secret Enter the L2TP secret password.Set user certificateSelect a user certificate that the VPN server uses to identify you. You can import certificates from the VPN server or download from the web.Set CA certificateSelect a certificate authority (CA) certificate that the VPN server uses to identify you. You can import certificates from the VPN server or download from the web.DNS search domainsEnter the domain name server (DNS) address.When you are finished, press [4 ] → Save.Connect to a private network ›In Idle mode, open the application list and select 1 Settings → Wireless and network → VPN settings.Select a private network.2 Enter the user name and password and select 3 Connect.](https://usermanual.wiki/Samsung-Electronics-Co/GTB9062/User-Guide-1629150-Page-134.png)
![Tools116ToolsClockLearn to set and control alarms and world clocks. You can also use the stopwatch and the desk clock.Set a new alarm ›In Idle mode, open the application list and select 1 Clock → Alarm.Select 2 Create alarm or press [ ] → Create.Set alarm details.3 Select the check box next to Smart alarm to activate simulated nature sounds with the alarm screen prior to the main alarm.When you are finished, select 4 Save.Stop an alarm ›When the alarm sounds,To stop the alarm, drag • in any direction until it reaches the border of the circle.To repeat the alarm after a specified length of time, drag • in any direction until it reaches the border of the circle.](https://usermanual.wiki/Samsung-Electronics-Co/GTB9062/User-Guide-1629150-Page-141.png)
![Tools 117Delete an alarm ›In Idle mode, open the application list and select 1 Clock → Alarm.Press [2 ] → Delete.Select alarms to delete.3 Select 4 Delete.Create a world clock ›In Idle mode, open the application list and select 1 Clock → World clock.Select 2 Add city or press [ ] → Add. Enter a city name or select one from the city list.3 To select a city in the world map view, select .To add more world clocks, repeat steps 2-3.4 To apply the summer time to the clocks, tap and hold a clock and select DST settings.Use the stopwatch ›In Idle mode, open the application list and select 1 Clock → Stopwatch.Select 2 Start to begin the stopwatch.Select 3 Lap to record lap times.When you are finished, select 4 Stop. Select 5 Reset to clear recorded times.](https://usermanual.wiki/Samsung-Electronics-Co/GTB9062/User-Guide-1629150-Page-142.png)
![Tools118Use the count-down timer ›In Idle mode, open the application list and select 1 Clock → Timer.Set the length of time to count down.2 Select 3 Start to begin the countdown.When the timer expires, drag 4 in any direction until it reaches the border of the circle.Use the desk clock ›The desk clock displays the current time and date, and weather.In Idle mode, open the application list and select 1 Clock → Desk clock.Select 2 to set an idle clock.Press [3 ] → Settings. Change the following options:4 Option FunctionHide status barSet whether to show the status bar at the top of the screen.Wallpaper Select a background image for the idle clock.Time/Calendar display Set to display the clock or calendar.Brightness Set the brightness of the display.Reset to defaultReset the desk clock settings to the factory default values.](https://usermanual.wiki/Samsung-Electronics-Co/GTB9062/User-Guide-1629150-Page-143.png)
![Tools 119CalculatorLearn to perform mathematical calculations directly on your device like a typical hand-held or desktop calculator.Perform the calculation ›In Idle mode, open the application list and select 1 Calculator.Use the keys that correspond to the calculator display to 2 perform basic mathematical operations.Rotate the device to landscape view to use the scientific calculator. If you deactivate the auto rotation, press [ ] → Scientific calculator.View the calculation history ›In Idle mode, open the application list and select 1 Calculator.Perform the calculation.2 Select 3 to close the calculator keypad.The calculation history appears.To clear the history, press [4 ] → Clear history.CoolDictLearn to look up English or Chinese words in your dictionary.Look up a word ›In Idle mode, open the application list and select 1 CoolDict.](https://usermanual.wiki/Samsung-Electronics-Co/GTB9062/User-Guide-1629150-Page-144.png)
![Tools120If you are launching this application for the first time, 2 select Accept.Enter a Chinese or English word.3 Select the word.4 To add the word to your wordbook, select .View your wordbook ›In Idle mode, open the application list and select 1 CoolDict.Press [2 ] → New word.Select a word from your wordbook.3 Customer ServiceLearn to access customer services from your device or view information about where you can contact customer services. For details, contact your service provider.In Idle mode, open the application list and select 1 Customer Service.Call numbers and connect to wep pages to get a variety 2 of services and information.Option FunctionService GuideView the hotline number and web page address where you can receive after-sales services for your device.Service HotlineMake a call to the China Mobile service centre.](https://usermanual.wiki/Samsung-Electronics-Co/GTB9062/User-Guide-1629150-Page-145.png)
![Tools122Kies airKies air allows you to connect a PC to your device via a WLAN. From the PC browser, you can view and control media files, contacts, messages, and any other data saved on your device.Customise Kies air settings ›In Idle mode, open the application list and select 1 Kies air.Press [2 ] → Settings. Change the following options:3 Option FunctionAccess requestSet to receive authorisation requests from other devices while using Kies air.Enable visibility Set the device to be visible to a PC.Time-outSelect the length of time the device waits before ending the connection.Lock contentsSelect the types of date that should not display on the PC browser. Reset settings Reset your settings to the factory default values.](https://usermanual.wiki/Samsung-Electronics-Co/GTB9062/User-Guide-1629150-Page-147.png)
![Tools124View a Mini diary ›In Idle mode, open the application list and select 1 Mini diary.Select a diary.2 To upload a mini diary to your community website, • press [ ] → More→ Publish.To send a mini diary to others, press [• ] → More → Send via. My filesLearn to quickly and easily access all of your images, videos, music, sound clips, and other types of files stored in your device and memory card. In Idle mode, open the application list and select 1 My files. Select a folder.2 To return to the Home directory, select • Home.To move up one level in the file directory, select • Up. Select a file to open.3 In a folder, press [ ] to use the following options:To send a file to others, select • Share.To create a new folder, select • Create folder.To delete files or folders, select • Delete.To change the view mode, select • View by.To sort files or folders, select • List by.To use additional features using a file, such as moving, • copying or renaming option, select More.](https://usermanual.wiki/Samsung-Electronics-Co/GTB9062/User-Guide-1629150-Page-149.png)
![Tools 125Namecard RecognitionLearn to take a photo of a namecard and extract contact information from the card.Capture a namecard ›Place the name card on a flat, well-lit surface.1 In Idle mode, open the application list and select 2 Namecard Recognition.Position the device over the name card, so that the 3 frame on the viewfinder aligns with the edges of the name card.The device automatically captures and reads the contact information from the namecard.Edit any contact details that were not converted 4 correctly.Press [5 ] → Add to phonebook.Customise the namecard recognition ›settingsIn Idle mode, open the application list and select 1 Namecard Recognition.Select 2 .Adjust the following settings:3 Option FunctionAuto saving Set the device to save a photo of a namecard you captured.](https://usermanual.wiki/Samsung-Electronics-Co/GTB9062/User-Guide-1629150-Page-150.png)
![Tools126Option FunctionAuto recognitionSet the device to automatically capture a namecard when it is properly aligned with the frame.Polaris OfficeLearn to view and edit document files. If you have an account with the Polaris Office web services, you can manage documents online. documents. This application supports the following file formats: doc, docx, ppt, pptx, xls, xlsx.Create a document ›In Idle mode, open the application list and select 1 Polaris Office.Read the registration information and select 2 Later or Register.Select 3 → a document type.Create the document.4 When you are finished, press [5 ] → Save. Enter a name for the document and select the saving 6 location.Select 7 Save.](https://usermanual.wiki/Samsung-Electronics-Co/GTB9062/User-Guide-1629150-Page-151.png)
![Tools 127Open a document ›In Idle mode, open the application list and select 1 Polaris Office.Select 2 My files or Recent documents → a document file.View the document as desired.3 To zoom in, place two fingers on the screen and • spread them apart. To zoom out, move your fingers closer together. You can also press [ ] → Zoom → an option.To open the toolbar to edit the document (word, • presentation, or excel file), press [ ] → Edit mode.To search for text in a document, press [• ] → Find.To bookmark the current page, press [• ] → Bookclip.To adjust a document to fit the screen, press [• ] → Reflow text.To send a file to others, press [• ] → More → Send file.To print a file via a WLAN or USB connection, press • [] → More → Print. Your device is compatible only with some Samsung printers.To read a document via the text-to-speech feature, • press [ ] → More → Text to speech.To customise the settings for displaying or managing • documents, press [ ] → More → Settings.Available options may vary depending on a document type.](https://usermanual.wiki/Samsung-Electronics-Co/GTB9062/User-Guide-1629150-Page-152.png)