Samsung Electronics Co HMXQF20BN Digital Camcorder User Manual
Samsung Electronics Co Ltd Digital Camcorder
UserManual.wiki
>
Samsung Electronics Co
>
HMXQF20BN User Manual
>
User manual 1 of 3
Contents
1.
User manual 1 of 3
2.
User manual 2 of 3
3.
User manual 3 of 3
User manual 1 of 3
Navigation menu
Upload a User Manual
Namespaces
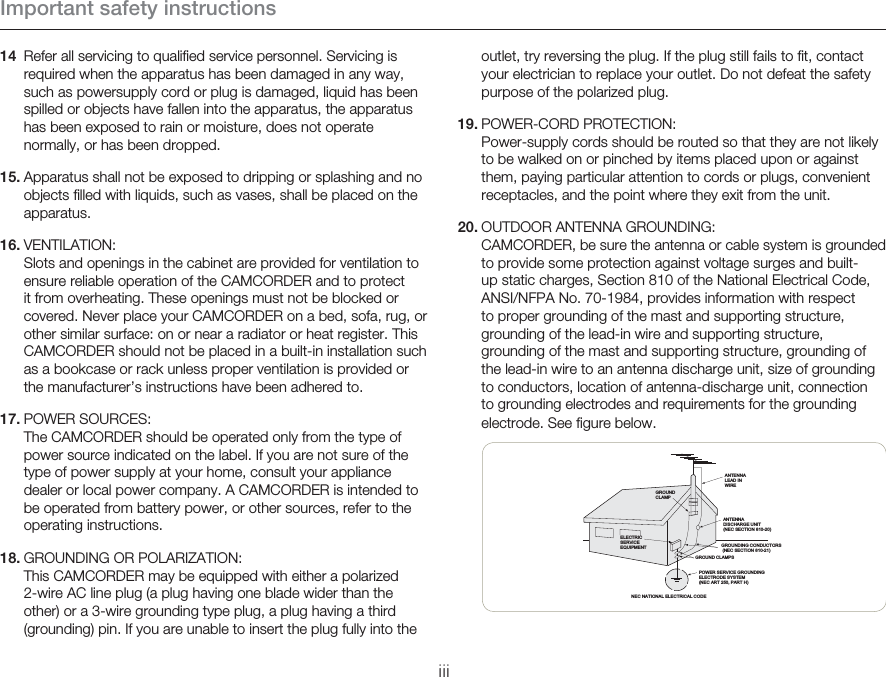
Wiki Guide
HTML
PDF
Info
Views
User Manual
Discussion / Help
Navigation
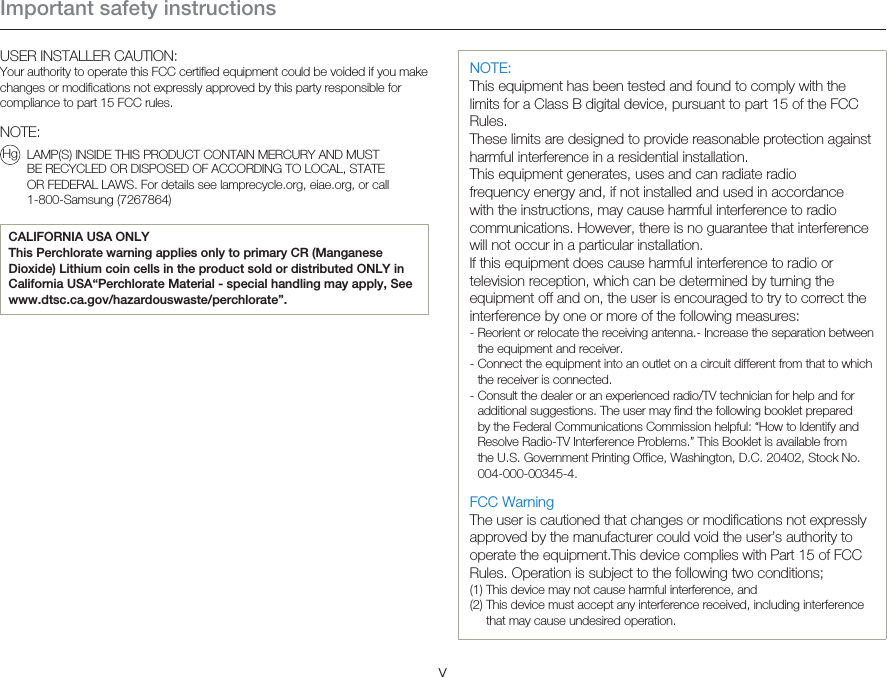
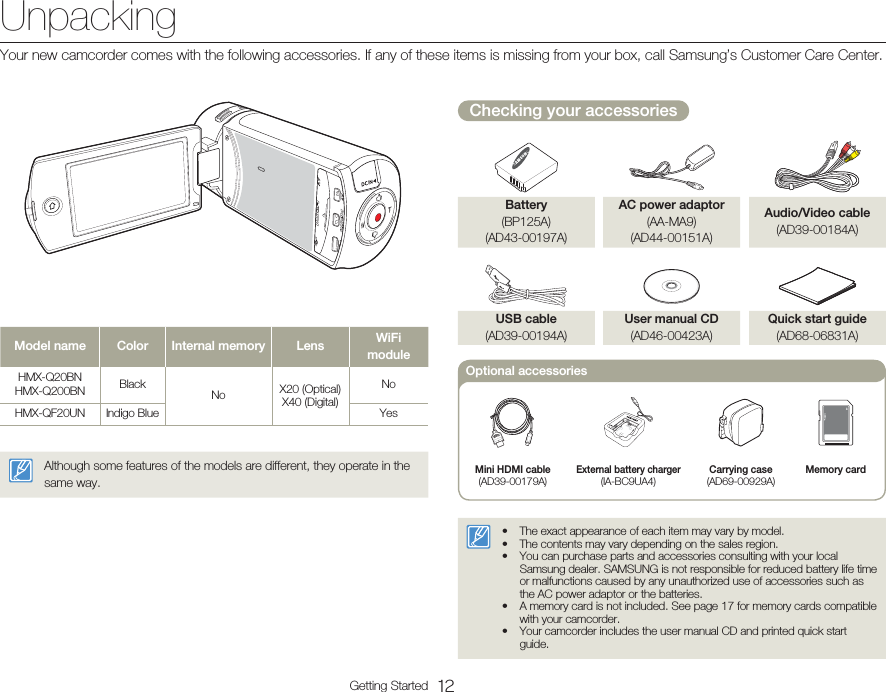
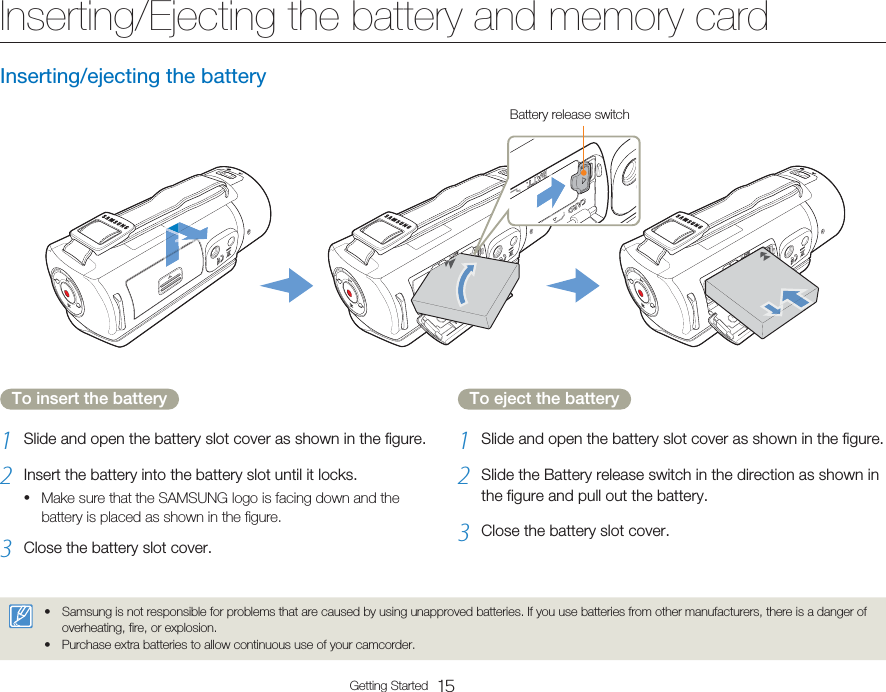
![Inserting/Ejecting the battery and memory card16Getting StartedInserting/ejecting a memory card (not supplied)To insert a memory card1 Slide and open the memory card cover as shown in the figure.2 Insert the memory card into the card slot until it softly clicks.Make sure that the label portion of the card is facing up and the camcorder is placed as shown in the figure.3 Close the memory card cover.•To eject a memory card1 Slide and open the memory card cover as shown in the figure.2 Gently push the memory card to eject it.3 Close the memory card cover.To avoid the data loss, turn off the camcorder by pressing and hold the [Home ( )] button before inserting or ejecting the memory card.Be careful not to push the memory card too hard. The memory card may suddenly pop out.••](https://usermanual.wiki/Samsung-Electronics-Co/HMXQF20BN.User-manual-1-of-3/User-Guide-1611596-Page-20.png)

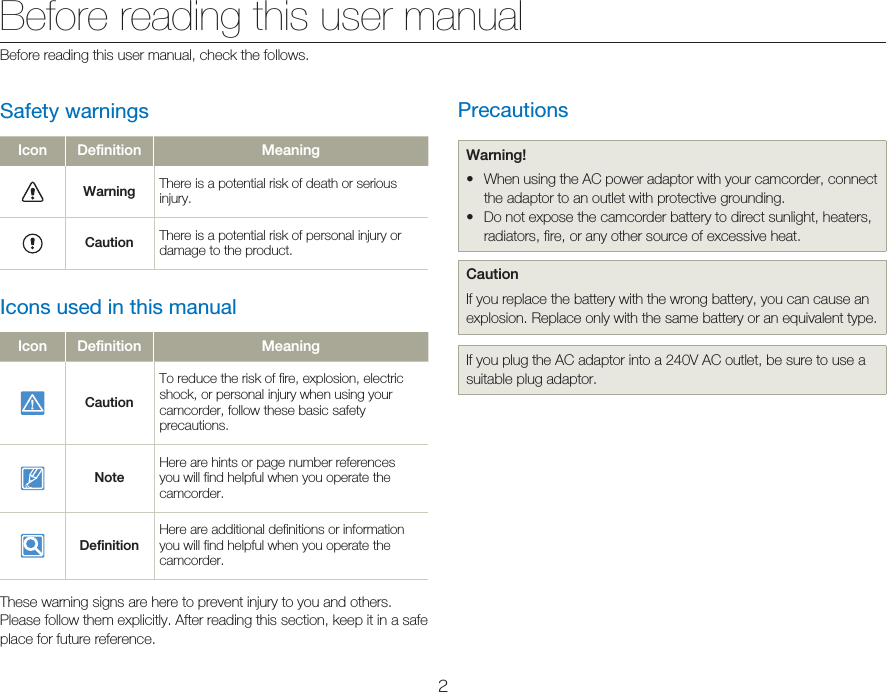
![Charging the battery21Getting StartedChecking the battery stateYou can check the charging state and remaining battery capacity.To check the charging stateThe color of the LED indicates the power or charging state.LED color Description(Orange) Charging(Green) Fully charged(Orange Blink)ErrorBattery level displayThe battery level display shows the amount of battery power remaining in the battery.Battery level icon State MessageFully charged -25~50% used -50~75% used -75~95% used -95~98% used -Exhausted (flickers): The camcorder will be forced to turn off after 3 minutes. Change the battery as soon as possible.-- After 3 seconds, the camcorder turns off. Low BatteryThe figures above are based on a fully charged battery at a normal temperature. Low ambient temperature may affect the use time.STBY 00:00:00 [253Min]](https://usermanual.wiki/Samsung-Electronics-Co/HMXQF20BN.User-manual-1-of-3/User-Guide-1611596-Page-25.png)
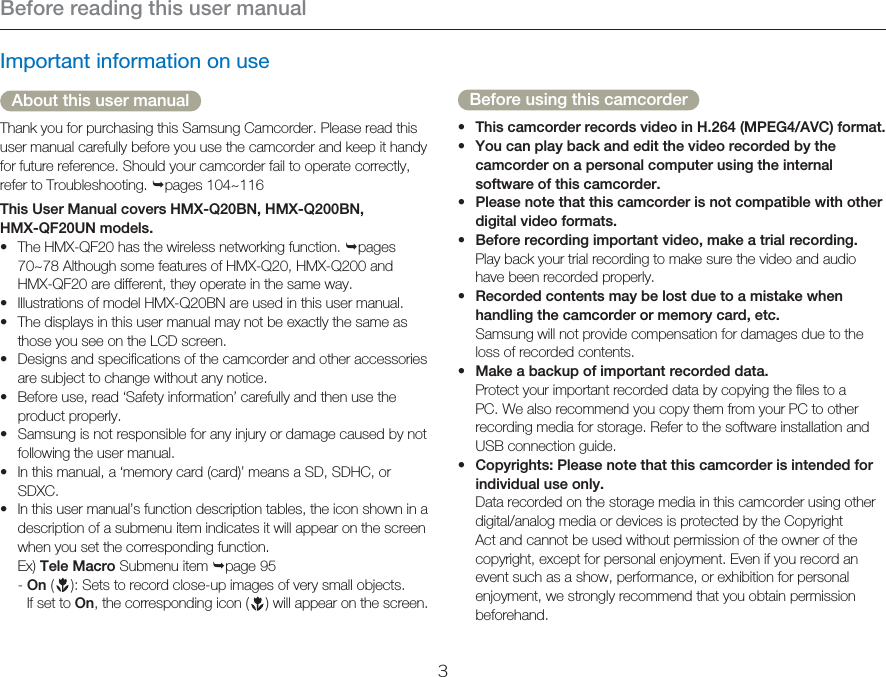
![24Getting StartedTurning your camcorder on/off[Home ( )] buttonLCD screen1 Turn on the camcorder by opening the LCD screen.Your camcorder turns on automatically when you open the LCD screen.To turn the camcorder on when the LCD screen is already open, press and hold the [Home ( )] button.2 To turn off the camcorder, press and hold the [Home ( )] button.Your camcorder does not turn off even when you close the LCD screen.•••The camcorder operates the self-diagnosis function when you turn it on. pages 104~109If the Quick On STBY function is set to 5 Min and you close the LCD screen when the power is on, the power saving mode activates. page 101The camcorder turns on automatically if connecting the AC power adaptor or inserting the battery to the camcorder with the LCD screen open.•••When using this camcorder for the first timeWhen you use your camcorder for the first time or reset it, the time zone screen appears at start-up. Select your geographical location and then set the date and time. page 25If you do not set the date and time, the time zone screen appears every time you turn on the camcorder.](https://usermanual.wiki/Samsung-Electronics-Co/HMXQF20BN.User-manual-1-of-3/User-Guide-1611596-Page-28.png)
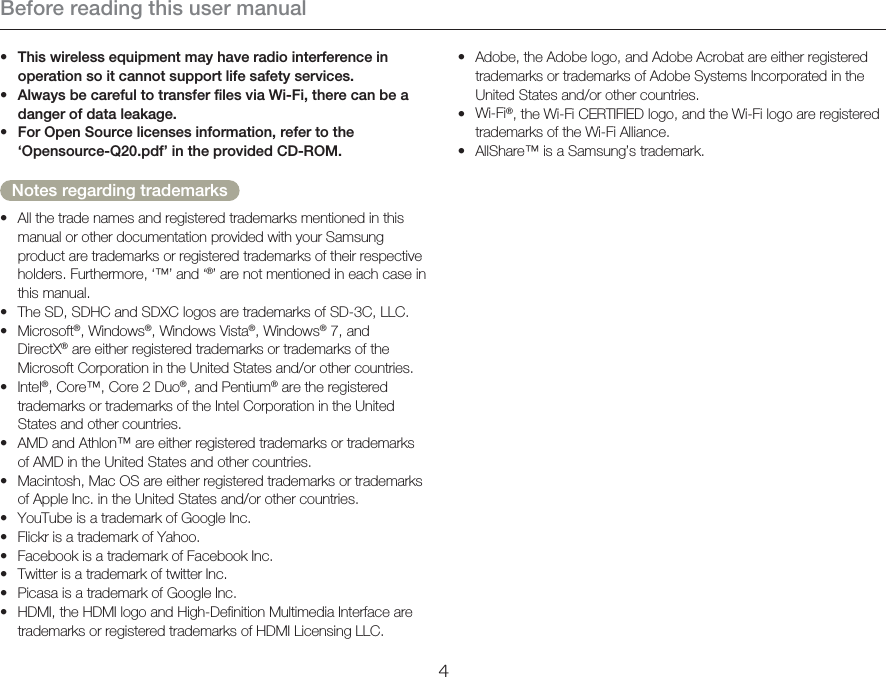
![25Getting StartedPerforming the initial setup1 Open the LCD screen to turn on the camcorder.The time zone (Home) screen appears based on Lisbon and London (Greenwich Mean Time).2 Select your local area on the map by touching the or tab on the LCD screen, and then press the tab.HomeLondon,Lisbon[GMT-00:00] JAN/01/2012 12:00AM3 Touch the up or down arrows to set the date.JAN 01 2012Date / Time SetMonth Date Year4 Touch the time ( ) tab, and then set the time.Date / Time SetHour Min12 00 AM•5 Make sure the clock is correctly set, and then touch the tab.The date/time setting finishes.You can set the year up to 2037, based on Home.Set Date/Time Display to On. page 98Activating the icon moves the time forward by 1 hour. •••Internal rechargeable batteryYour camcorder includes a internal rechargeable battery that retains the date and time settings even after the power is turned off.If the battery is depleted, the current date/time values are reset to the default values. If this occurs, you need to recharge the internal rechargeable battery (see below), and then re-set the current date and time.Charging the internal rechargeable batteryThe internal battery is always recharged while your camcorder is connected to the AC power or while the battery is attached.If you have not used the camcorder for about 2 weeks and you have not connected the AC power or the battery to it, the internal battery fully discharges. If this occurs, charge the internal battery by connecting the camcorder to the supplied AC adaptor for 24 hours.•••••Set the date and time of your local area when turning on this camcorder for the first time.](https://usermanual.wiki/Samsung-Electronics-Co/HMXQF20BN.User-manual-1-of-3/User-Guide-1611596-Page-29.png)
![26Getting Started1 Press the [Home ( )] button, and then drag the Home screen left. 2 Touch Settings General Language. GeneralDefault SetDemoLanguageFormat3 Touch the desired language.Language⦽ǎᨕDeutschFrançaisEnglish4 Touch the Return ( ) tab to complete the setting.The camcorder displays the menus screen and messages in the language you selected.•Supported languages English ⦽ǎᨕ Français DeutschItaliano Español Português NederlandsSvenska Suomi Norsk DanskPolski eština Slovensky MagyarRomân SrpskiHrvatski ፩ၭ )࿒፩ၭ*፩ၭ )ߨ࿒፩ၭ* 瀌煓铅 ęðû TürkçeLanguage options may be changed without prior notice.The camcorder retains the language you select even when not connected to the battery or AC power.The date and time format may change depending on the language you selected.•••Selecting the languageYou can select the language in which the camcorder displays the menu screen or messages. The camcorder retains the language setting even when you turn it off.](https://usermanual.wiki/Samsung-Electronics-Co/HMXQF20BN.User-manual-1-of-3/User-Guide-1611596-Page-30.png)
![27Getting StartedSTBY 00:00:00 [253Min]JAN/01/2012 12:00AMLeft of the LCD screenIcon Description / / / / Smart Auto mode/Manual mode/Art Film mode/Art Time Lapse mode/Vertical HD Recording modeVideo/Photo recording mode tabZoom tabPlayback tabCenter of the LCD screenIcon DescriptionSTBY / z/ Operating status (standby/recording/pause)00:00:00 Time counter (video recording time)[253Min] Remaining recordable timeLike ItTime Zone (Visit)JAN/01/2012 12:00 AM Date/TimeRight of the LCD screenIcon DescriptionStorage media (Memory card)Battery information (remaining charge level)Optical zoom/Digital zoom barVideo resolutionTele MacroOIS DuoThe icons are based on an 32GB SDHC memory card capacity.The screen above is an example and may differ from the actual display.For warning icons and messages, see pages 104~109The illustrated items above and their positions can be changed without notice to improve performance.••••Video recording modeLearning iconsThe available functions vary depending on the operation mode you have selected. Different icons appear depending on the setting values.](https://usermanual.wiki/Samsung-Electronics-Co/HMXQF20BN.User-manual-1-of-3/User-Guide-1611596-Page-31.png)
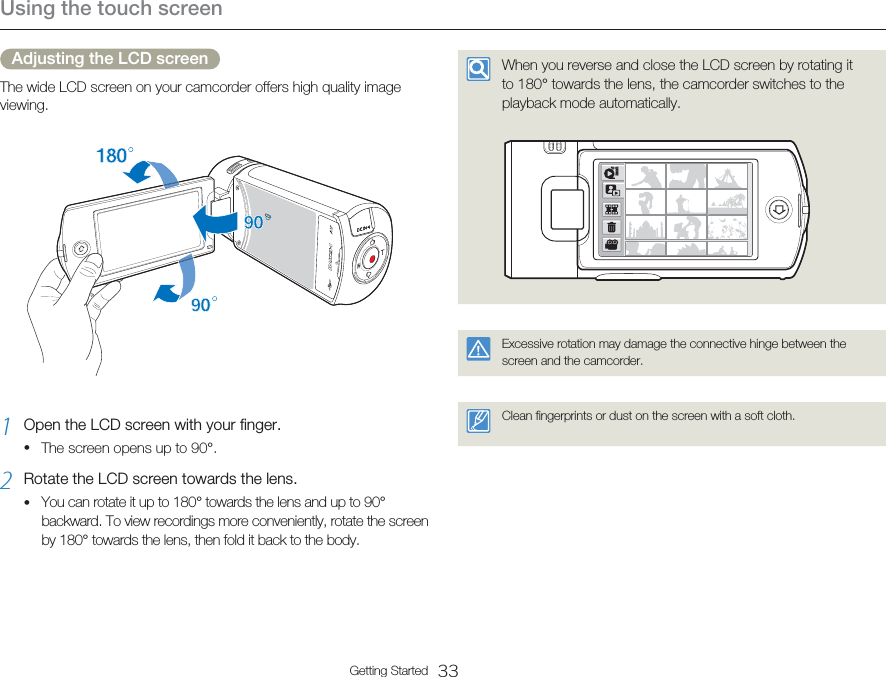
![31Getting StartedDragDrag the touch screen up, down, left, or right to select the desired items or files. Manual Art FilmSocial SharingAuto BackupVertical HD Recording Album Settings1•Albu1Albu11111•11111TouchSlightly touch the items to select or execute with your finger. STBY 00:00:00 [253Min]Do not place any protective film on the LCD screen.If you leave a film attached for a long while, strong adhesion between the film and the surface of the screen may cause a malfunction of the touch screen.••Be careful not to accidentally press the button near the LCD screen while using the touch screen.The tabs and icons that appear on the LCD screen depend on the current recording/playback status of your camcorder.The camcorder does not recognize touches if you touch more than two points on the screen at the same time. Touch one point at a time. •••Using the touch screenThe touch screen lets you playback and recording with a simple touch of your finger. Place your hand on the rear side of the LCD screen to support it. Then, touch the items displayed on the screen.](https://usermanual.wiki/Samsung-Electronics-Co/HMXQF20BN.User-manual-1-of-3/User-Guide-1611596-Page-35.png)
![Using the touch screen32Getting StartedSwitching the information display modeYou can switch the on-screen information display mode.Each time you touch the LCD screen, the full and minimum display modes alternate.Minimum display modeSTBYFull display modeSTBY 00:00:00 [253Min]Warning icons and messages may appear, depending on the recording conditions. pages 104~109](https://usermanual.wiki/Samsung-Electronics-Co/HMXQF20BN.User-manual-1-of-3/User-Guide-1611596-Page-36.png)
![34Getting StartedUsing the Home screenAccessing the Home screenYou can select a operating mode or access the settings menu by touching the icons on the Home screen.Press the [Home ( )] button to access the Home screen.12Smart Auto Manual Art FilmArt TimeLapse Vertical HD Recording Album1•No. Description1Touch an icon to access a mode or function.Drag or flick your finger on the LCD screen to move to the next page.2The number of the current page (1, 2)Icons on the Home screenIcon DescriptionSmart Auto: Records a video or photo using a scene mode selected automatically by the camcorder. page 42Manual: Records a video or photo using manually setting items for scene conditions. pages 45~50Art Film: Records a video or photo using items for a fun and unique look.pages 51~52Art Time Lapse: Records a time lapse video using Art Time Lapse items. pages 53~54Vertical HD Recording: Records a video in portrait mode. page 39Album: Views videos or photos using playback or editing items. pages 56~68Social Sharing: Uploads videos or photos to share web sites. page 74 (HMX-QF20 model only)Auto Backup: Sends videos or photos to a PC using Auto Backup. pages 76~78 (HMX-QF20 model only)TV Link: Views videos or photos on an AllShare-enabled TV. page 75 (HMX-QF20 model only)Settings: Adjusts settings to match your preferences. pages 94~102](https://usermanual.wiki/Samsung-Electronics-Co/HMXQF20BN.User-manual-1-of-3/User-Guide-1611596-Page-38.png)
![35Getting StartedUsing the grip beltAdjust the length of grip belt so that the camcorder is stable when you press the [Recording start/stop] button with your thumb.90˚ Vertical gripSelect Vertical HD Recording to record in vertical position. page 39Rotate your camcorder to the vertical position.STBY 00:00:00 [253Min]180˚ Switch gripThe camcorder is designed for you to use conveniently with either your right or left hand. If you want to use this function, set Switch Grip to On in the Settings menu. page 101<When you hold the camcorder with your right hand>STBY 00:00:00 [253Min]<When you hold the camcorder with your left hand>STBY 00:00:00 [253Min]If you make the grip belt too tight and use excessive force to insert your hand, the grip belt hook of the camcorder may be damaged.When you change the Switch Grip direction while recording, the recording may be temporarily interrupted.••](https://usermanual.wiki/Samsung-Electronics-Co/HMXQF20BN.User-manual-1-of-3/User-Guide-1611596-Page-39.png)
![37Basic functions[Recording start/stop] button1 In STBY mode, touch the Video recording mode ( ) tab.STBY 00:00:00 [253Min]2 Select a subject to record.Adjust the LCD screen to the best angle for recording.Use the [T/W] button or Zoom ( ) tab on the LCD screen to adjust the size of the subject. page 43••3 Press the [Recording start/stop] button.The recording ( ) icon appears and recording starts. 00:00:00 [253Min]4 To stop recording, press the [Recording start/stop] button again.Recording pause/resumeThe camcorder allows you to pause temporarily while recording a video. With this function, you can record your favorite scenes as a single video. Touch the Pause ( ) tab to pause while recording. Touch the Recording ( ) tab to resume. 00:00:00 [253Min]•Recording videosLearn how to record videos easily and quickly in the video recording mode.](https://usermanual.wiki/Samsung-Electronics-Co/HMXQF20BN.User-manual-1-of-3/User-Guide-1611596-Page-41.png)
![Recording videos38Basic functionsIf the power is interrupted or an error occurs during recording, the video may not be recorded/edited.Samsung is not responsible for any damage caused by a failure of normal recording or playback operation because of memory card error.Note that damaged data cannot be recovered.Do not turn off the camcorder or remove the memory card while accessing the storage media. Doing so may damage the storage media or the data in the storage media.••••Videos are compressed in the H.264 (MPEG-4.AVC) format.Eject the battery when you have finished recording to prevent unnecessary battery power consumption.For the on-screen information display, see page 27.For approximate recording time, see page 19.Sound is recorded by the internal stereo microphone located on the front of the camcorder. Make sure that the microphone is not blocked.Before recording an important video, make sure to test the recording function to see if there any problems with the audio or video recording.For various functions available during recording, see pages 45~54.If the power cable/battery is disconnected or recording is disabled during recording, the system is switched to the data recovery mode. While data is being recovered, no other function is enabled. When the recording time is short, the data recovery might fail.You can adjust the brightness of the LCD screen in the menu options. Adjusting the LCD screen does not affect the image being recorded. page 97The menu setting tabs shown on the LCD screen do not affect the image being recorded.The [Home ( )] button cannot be used during video recording.Recording videos in a quiet environment increases microphone sensitivity that may record surrounding ambient noise. The increasing microphone sensitivity can let the camcorder record zoom noises during zooming (the sound of the zoom mechanism etc).When you record indoors or in the dark places, ISO sensitivity is automatically adjusted. It can make interference effects on images and you cannot view the images recorded in the dark places correctly. We recommend you to use professional camcorders like an infrared camcorder when recording at night.An image can be shaken when the OIS Duo function is enabled if the camcorder is mounted on a tripod or fixed on a place. Release the OIS Duo function when the camcorder is mounted on a tripod.••••••••••••••](https://usermanual.wiki/Samsung-Electronics-Co/HMXQF20BN.User-manual-1-of-3/User-Guide-1611596-Page-42.png)
![Recording videos39Basic functionsRecording videos in portrait modeThe camcorder can record videos in portrait mode. Set your camcorder to the vertical position.1 Press the [Home ( )] button touch Vertical HD Recording.The camcorder switches to portrait mode (vertical position).Smart Auto Manual Art FilmArt TimeLapse Vertical HD Recording Album1•2 Rotate the camcorder to 90º for vertical recording.STBY 00:00:00 [253Min]•3 Select a subject to record.4 Press the [Recording start/stop] button.The recording ( ) icon appears and recording starts.00:00:00 [253Min]5 To stop recording, press the [Recording start/stop] button again. In portrait mode, you can record videos in 1920x1080/30p resolution only.•](https://usermanual.wiki/Samsung-Electronics-Co/HMXQF20BN.User-manual-1-of-3/User-Guide-1611596-Page-43.png)
![Recording videos40Basic functionsTagging great moments while recordingUsing the Like It function, you can tag good scenes while recording and enjoy the scenes tagged as Like It ( ) from a long video.[Like It ( )] button1 In STBY mode, touch the Video recording mode ( ) tab.STBY 00:00:00 [253Min]2 Select a subject to record.3 Press the [Recording start/stop] button.The recording ( ) icon appears and recording starts.4 Press the [Like It ( )] button every great moment while recording.The camcorder tags the scene as Like It ( ).•• 00:00:00 [253Min]5 To stop recording, press the [Recording start/stop] button again.Understanding the Like It functionWhen the camcorder extracts the scenes tagged as Like It ( ) and creates one file with them, the file is saved on the video thumbnail view. Like It ( ) Like It ( ) Like It ( )During a video recordingThe camcorder tags the scene recorded between before 3 seconds and after 5 seconds when pressing the [Like It ( )] button while recording in all video recording modes.You can also tag any scenes of a video by pressing [Like It ( )] button during a video playback. page 60To skip boring parts of a video and enjoy exciting parts, you can combine the tagged scenes sequentially. page 64The camcorder can tag up to 999 as Like It ( ) from a video.When the Like It function completes, the Like It ( ) icon on the LCD screen disappears after 3 seconds.•••••](https://usermanual.wiki/Samsung-Electronics-Co/HMXQF20BN.User-manual-1-of-3/User-Guide-1611596-Page-44.png)
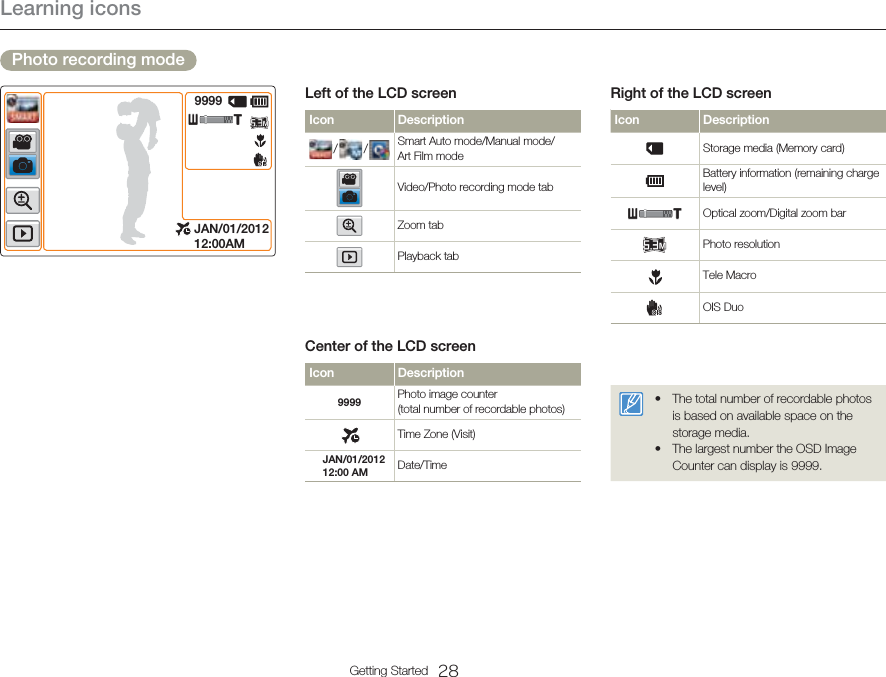
![41Basic functions[Recording start/stop] button1 In STBY mode, touch the Photo recording mode ( ) tab.99992 Select a subject to record.Adjust the LCD screen to the best angle for recording.Use the [T/W] button or Zoom ( ) tab on the LCD screen to adjust the size of the subject. page 43••3 Adjust the subject at the center of the LCD screen, and press the [Recording start/stop] button.The shutter sound is heard and the photo is recorded.Do not turn off the camcorder or remove the memory card when taking photos as it may damage the storage media or data.The recordable number of photos varies depending on the photo resolution. page 19The camcorder does not record audio when you take photos.You can adjust the brightness of the LCD screen in the menu options. Adjusting the LCD screen does not affect the image being recorded. page 97For on-screen display information, see page 28.For various functions available during recording, see pages 45~52.Photo files conform to the DCF (Design rule for Camera File system) standard, established by JEITA (Japan Electronics and Information Technology Industries Association.)•••••••Recording photosLearn how to capture photos easily and quickly in the photo recording mode.](https://usermanual.wiki/Samsung-Electronics-Co/HMXQF20BN.User-manual-1-of-3/User-Guide-1611596-Page-45.png)
![42Basic functions1 Press the [Home ( )] button touch Smart Auto.Smart Auto Manual Art FilmArt TimeLapse Vertical HD Recording Album1•2 Align your subject in the frame.The camcorder automatically detects the scene (Landscape, etc.) and adjusts the camcorder settings accordingly.The appropriate scene icon appears on the LCD screen. STBY 00:00:00 [253Min]3 To record the video or photo, press the [Recording start/stop] button.••Icon DescriptionAppears when the camcorder fails to recongnize the recording situations.Appears when recording at night. (Night)Appears when recording images of landscapes with backlighting. (Backlight)Appears when recording people. (Portrait)Appears when recording a very bright scene. (White)Appears when recording an outdoor scene. (Landscape)Appears when recording images using close-up. (Macro)Appears when recording images of clear skies. (Blue sky)Appears when recording images of forested areas. (Natural green)Appears when recording images of sunsets. (Sunset)Appears when the camcorder and subject are stationary for a while. (Tripod)Most settings are automatically adjusted in the Smart Auto mode. To set or adjust functions on your own, select Manual on the Home screen.The camcorder may not select the correct scene depending on shooting conditions, such as camcorder shake, lighting, and distance to the subject. The camcorder may not detect the portrait mode depending on the orientation or the brightness of faces.•••Recording with ease for beginners (SMART AUTO)User-friendly SMART AUTO optimizes your camcorder to the recording conditions automatically, providing beginners with the best performance.](https://usermanual.wiki/Samsung-Electronics-Co/HMXQF20BN.User-manual-1-of-3/User-Guide-1611596-Page-46.png)
![43Basic functionsSTBY 00:00:00 [253Min]T: Recording enlarged image (telephoto)W: Recording wide area (wide-angle)To zoom inPress the [T] button (telephoto). Or touch the Zoom ( ) tab, and then touch the Telephoto ( ) tab.The distant subject is gradually magnified.The highest zoom magnification ratio is X20 in the normal zoom-in.To zoom outPress the [W] button (wide-angle). Or touch the Zoom ( ) tab, and then touch the Wide-angle ( ) tab.The subject gets smaller and further away.The smallest zoom ratio is the subject’s original size in the zoom-out.••••Example of zoom-in/outW: Wide-angleT: TelephotoUsing the optical zoom function does not degrade the image quality and clarity.Use the digital zoom function when you want to zoom more than the optical zoom range. page 96Focusing may become unstable when you record with a fast zoom or zoom into a subject standing too far away. If this occurs, use the manual focus function. (Video recording mode only) page 48The minimum distance you can have between the camcorder and subject while maintaining sharp focus is about 1cm (about 0.4 inches) for wide angle and about 1m (about 40 inches) for telephoto. If you want to shoot the subject close to the lens at a wide angle, use the Tele Macro function. page 95Frequent use of the zoom function consumes more power.The camcorder can record the sound of the zoom mechanism.••••••ZoomingThis camcorder allows you to record using optical X20 zoom and digital X40 zoom by pressing the [T/W] button or touching the Zoom ( ) tab on the LCD screen.](https://usermanual.wiki/Samsung-Electronics-Co/HMXQF20BN.User-manual-1-of-3/User-Guide-1611596-Page-47.png)
![45Extended functionsWhite Balance The color of your image depends on the type and quality of the light source. If you want the color of your image to be realistic, select an appropriate lighting condition to calibrate the white balance.1 Press the [Home ( )] button touch Manual White Balance ( ) tab.2 Touch the desired submenu item.STBY 00:00:00 [253Min]White Balance : AutoIcon DescriptionAuto: Adjusts the white balance automatically according to the recording conditions.Daylight: Use outdoors in normal daylight. Adjusts the white balance according to outdoor lighting conditions.Cloudy: Use when recording in the shade or cloudy weather.Fluorescent: Use when recording under white fluorescent lights.Tungsten: Use when recording under halogen lamps and incandescent lights.Custom WB: Manually adjust the white balance to match the light source or situation.Understanding White BalanceWhite balance (WB) is the process of removing unrealistic color casts, so that objects which appear white are rendered white in your image. Proper white balance has to take into account the color temperature of a light source, which refers to the relative warmth or coolness of white light. Using the Manual modes](https://usermanual.wiki/Samsung-Electronics-Co/HMXQF20BN.User-manual-1-of-3/User-Guide-1611596-Page-49.png)
![Using the Manual modes46Extended functionsTo set the white balance manually1 In Manual mode, touch White Balance ( ) tab Custom WB ( ) tab.The Set White Balance icon appears.2 Fill the screen with a white object, and then touch the tab.The white balance setting is stored.The stored white balance setting will be applied the next time you record.When setting the white balance manually, the subject must be white, otherwise, your camcorder may not detect an appropriate setting value.The adjusted setting remains until you set the white balance again.During normal outdoor recording, setting to Auto may provide better results.Cancel the digital zoom function for clear and precise setting. page 96Reset the white balance if light conditions change.••••••••EV (Exposure Value)Depending on the intensity of the ambient light, your videos and photos may be too bright or dark. In these cases, you can adjust the exposure to get a better videos and photos.1 Press the [Home ( )] button touch Manual EV ( ) tab.2 Touch the / tab to adjust the setting values.The setting values range from -2.0 to +2.0STBY 00:00:00 [253Min]EV : 0Understanding EV (Exposure Value)Exposure value is the total amount of light allowed to fall on the photographic medium (Image sensor) during the process of taking photos or videos. The higher the number, the greater the exposure. For example, +0.3 lets in more light than -0.3.EV : 0•](https://usermanual.wiki/Samsung-Electronics-Co/HMXQF20BN.User-manual-1-of-3/User-Guide-1611596-Page-50.png)