Samsung Electronics Co HMXQF20BN Digital Camcorder User Manual
Samsung Electronics Co Ltd Digital Camcorder
UserManual.wiki
>
Samsung Electronics Co
>
HMXQF20BN User Manual
>
User manual 3 of 3
Contents
1.
User manual 1 of 3
2.
User manual 2 of 3
3.
User manual 3 of 3
User manual 3 of 3
Navigation menu
Upload a User Manual
Namespaces
Wiki Guide
HTML
PDF
Info
Views
User Manual
Discussion / Help
Navigation
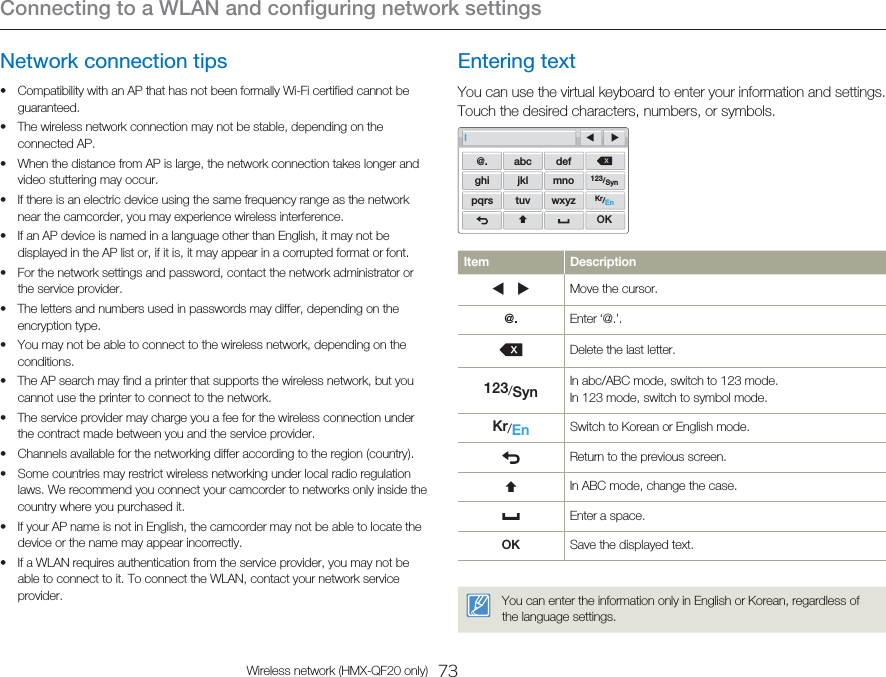
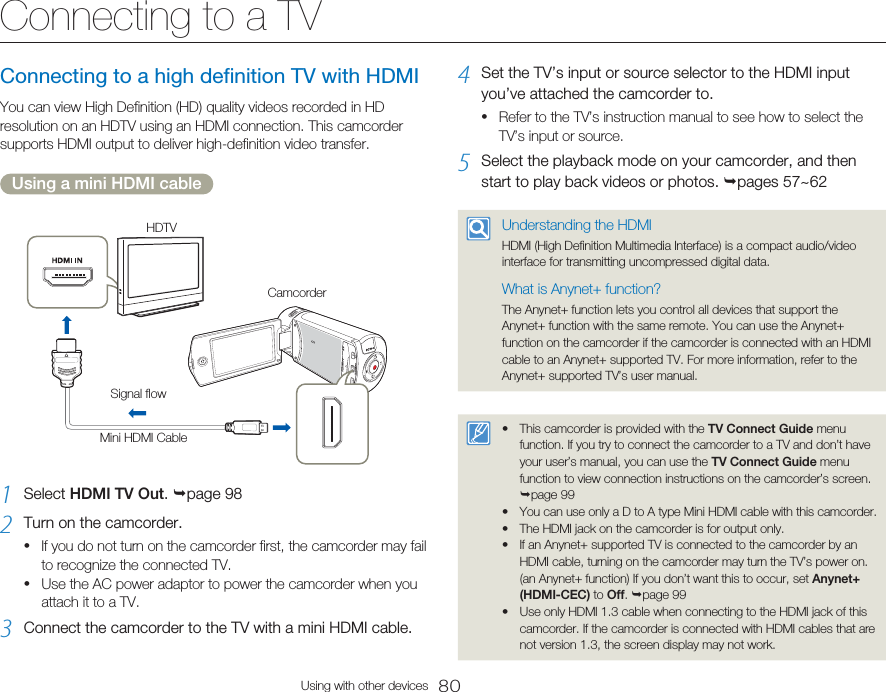
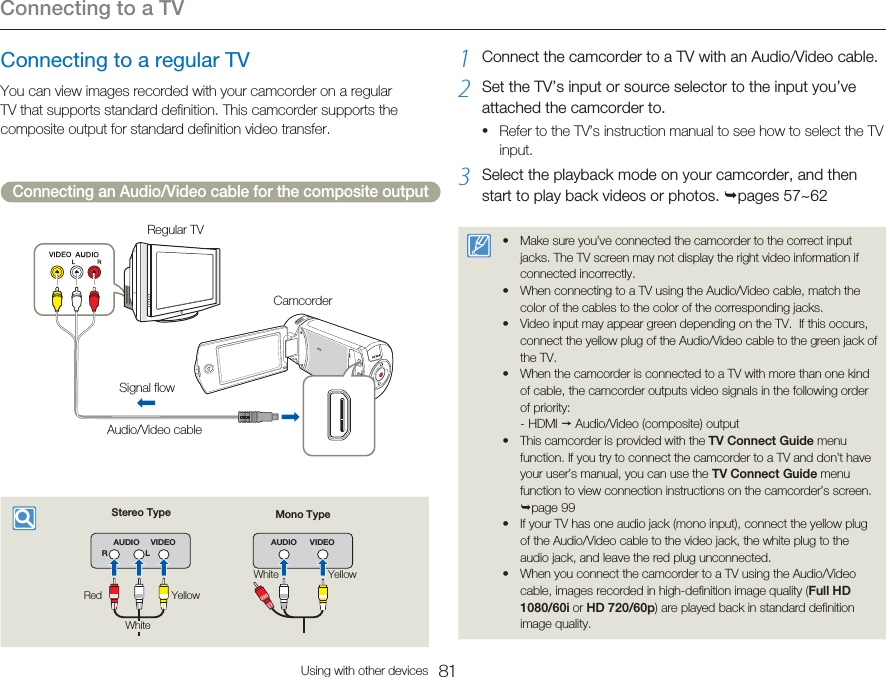
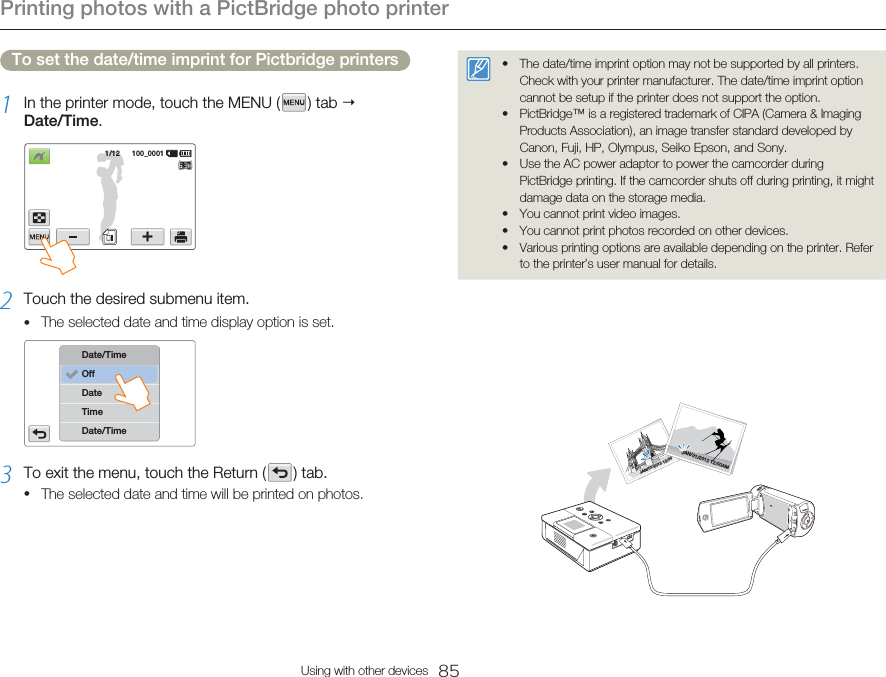
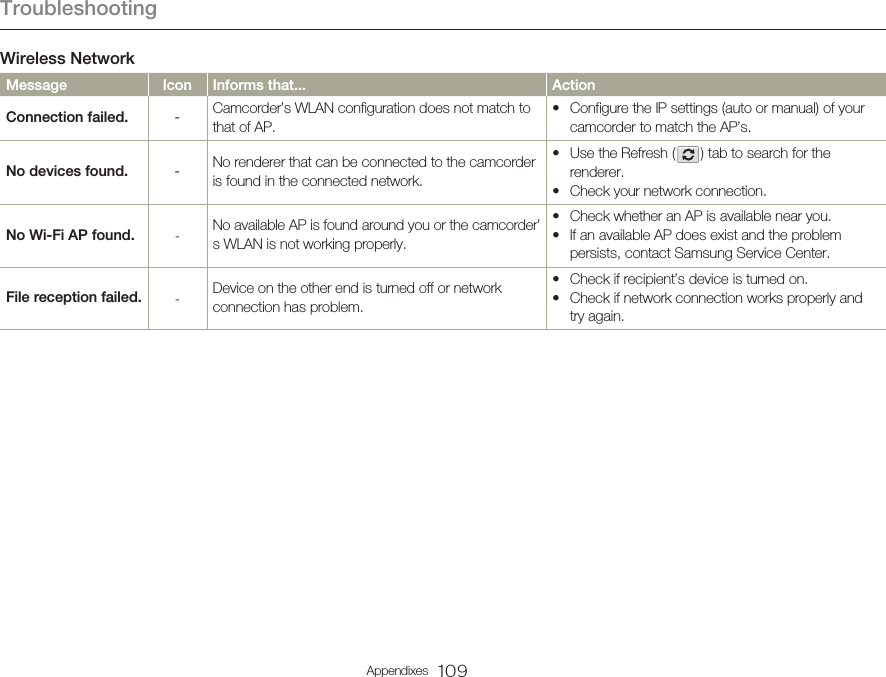
![70Wireless network (HMX-QF20 only)Connecting to a WLANYou can connect to a WLAN using an AP (access point) in the wireless network service area.1 Press the [Home ( )] button touch Social Sharing. 2 Touch the AP setting ( ) tab. The camcorder automatically searches for available AP devices.3 Touch an AP.When you select an unsecured AP, the camcorder will connect to the network.When you select a secured AP, input the required passwords with the virtual keyboard to connect to the WLAN. page 73If you select a WPS profile supported AP, touch the tab WPS PIN, and then enter the PIN code at the AP device. You can also connect to a WPS profile supported AP by dragging the current screen down, touching WPS PBC, and then pressing the [WPS] button on the AP device.If there is not the desired AP on the AP devices list, drag the current screen down and then touch Add Wi-Fi Network to input and search the desired AP name manually.Samsung 2Samsung 4Samsung 3Samsung 1AP Setting•••••Icon DescriptionAd hoc APSecured APWPS APSignal strengthAP setting optionsRefreshing connectable APsYou can check the signal strength in the top right corner of the screen.Icon Signal strengthNot connectedVery weakWeakNormalVery strongConnecting to a WLAN and configuring network settings](https://usermanual.wiki/Samsung-Electronics-Co/HMXQF20BN.User-manual-3-of-3/User-Guide-1611598-Page-1.png)
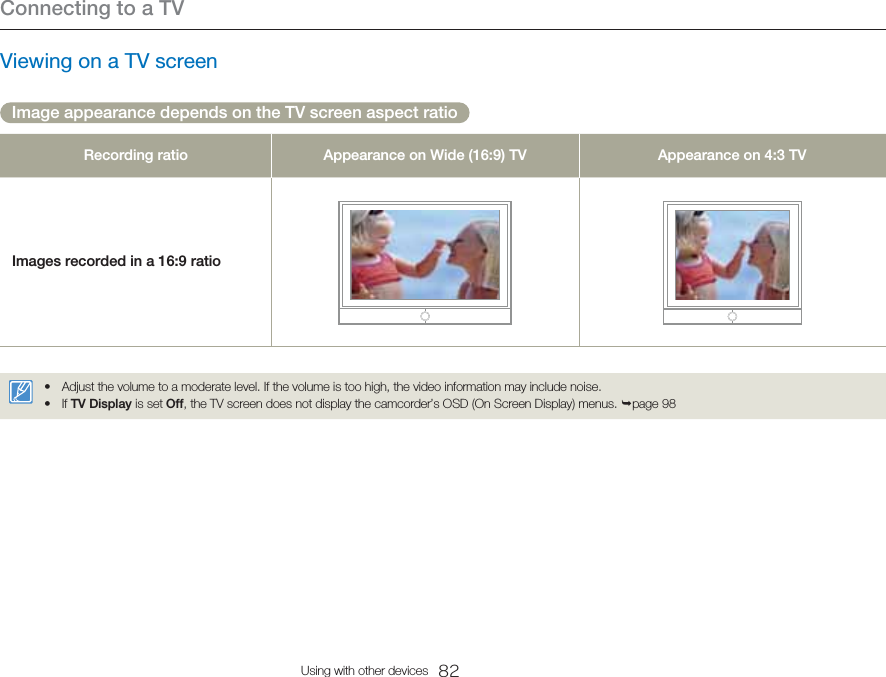
![Connecting to a WLAN and configuring network settings71Wireless network (HMX-QF20 only)Configuring the network settings1 Press the [Home ( )] button touch Social Sharing.2 Touch the AP setting ( ) tab. The camcorder automatically searches for available AP devices.3 Touch the tab next to an AP.Samsung 2Samsung 4Samsung 3Samsung 1AP Setting4 Touch each submenu and enter the required information.item DescriptionAuthenticationSelect an authentication type according to your AP’s setting. (Open, Shared, WPA-PSK, WPA2-PSK, WPA-PSK/WPA2-PSK). When you select Open or Shared, WPA is automatically set.Data Encryption Select an encryption type according to your AP’s setting.(Disabled, WEP, TKIP, AES, TKIP/AES Mixed)Network Key Enter the password using the virtual keyboard. page 73 IP Setting The default is Auto. Set the IP address manually.•5 Touch the tab.The camcorder connects to the network via the selected AP.Even if AP authentication and Data Encryption have been detected, set the authentication mode to Open or Shared.If the camcorder does not detect the AP automatically, you can set the network properties directly. page 72Data encryption settings by authentication type are below:- Open Disabled or WEP- Shared WEP- WPA-PSK TKIP, AES, or TKIP/AES Mixed- WPA2-PSK TKIP, AES, or TKIP/AES Mixed- WPA-PSK/WPA2-PSK TKIP, AES, or TKIP/AES MixedWhen the Data Encryption function is set to WEP or TKIP for 802.11n AP connection, you can access in the 802.11g mode. In the 802.11g mode, the network connection and speed are not guaranteed.•••••](https://usermanual.wiki/Samsung-Electronics-Co/HMXQF20BN.User-manual-3-of-3/User-Guide-1611598-Page-2.png)
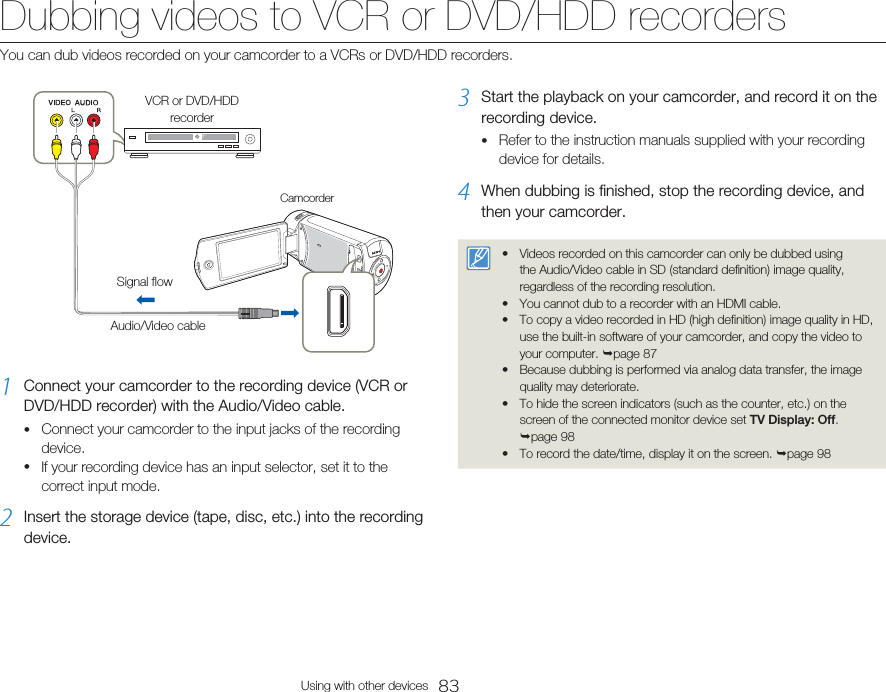
![Connecting to a WLAN and configuring network settings72Wireless network (HMX-QF20 only)Manually setting the IP addressBy entering the IP address, you can connect to a WLAN via an AP (access point) in the wireless network service area.1 Press the [Home ( )] button touch Social Sharing.2 Touch the AP setting ( ) tab. The camcorder automatically searches for available AP devices.3 Touch the tab next to an AP.4 Touch IP Setting Manual.Subnet MaskDNS ServerGatewayIPManual . . . . . . . . . . . . •5 Touch each submenu item and then enter the required value by using the virtual keyboard. page 73Item DescriptionIP Enter the static IP address.Subnet Mask Enter the subnet mask.Gateway Enter the gateway.DNS Server Enter the DNS address.6 Touch the tab. The camcorder connects to the network via the selected AP.For more information about the network settings, contact the network administrator or the service provider.The network settings may differ, depending on network conditions.Do not try to connect to a network that you have no permission to access.Use a fully charged battery while you are using network services.•••••](https://usermanual.wiki/Samsung-Electronics-Co/HMXQF20BN.User-manual-3-of-3/User-Guide-1611598-Page-3.png)
![74Wireless network (HMX-QF20 only)Accessing a web site1 Press the [Home ( )] button touch Social Sharing.2 Select a web site.The camcorder will automatically attempt to connect to a WLAN via the most recently connected AP device.If the camcorder has not previously been connected to a WLAN, it will search for available AP devices. page 70Social SharingFacebook Picasa YouTube3 Enter your ID and password, and then touch the Login ( ) tab.You may be logged in automatically, if you have previously logged in to the web site.ID or Email IPassword IYou must have an existing account on the file sharing web site to use this feature.•••Uploading videos or photos1 Access a sharing web site with your camcorder.2 Touch files the tab.You can select up to 20 photos and the total size must be 10 MB or less.3 Touch the Comment box input your comments. 4 Touch the Upload ( ) tab.The maximum photo resolution you can upload is 2M, and the longest video you can upload is 30 seconds at 480/60p resolution. If the selected photo resolution is higher than, it will be automatically resized to a lower resolution.The method of uploading videos or photos may differ depending on the selected web site.If you cannot access a web site because of firewall or user authentication settings, contact your network administrator or network service provider.The speed of your internet connection may affect how quickly videos or photos upload or web pages open.•••••Using video or photo sharing web sites](https://usermanual.wiki/Samsung-Electronics-Co/HMXQF20BN.User-manual-3-of-3/User-Guide-1611598-Page-5.png)
![75Wireless network (HMX-QF20 only)Viewing videos or photos on an AllShare-enabled TVView your videos or photos on a TV that supports the AllShare function. Your camcorder acts as a server and you can search for shared videos or photos with the TV remote control.AllShareAllShare is an international technology standard for sharing media files between networked devices in your home. With this technology, you can view your videos or photos on a widescreen TV.1 Press the [Home ( )] button touch TV Link the tab.The camcorder will automatically attempt to connect to a WLAN via the most recently connected AP device.If the camcorder has not previously been connected to a WLAN, it will search for available AP devices. page 702 Connect your TV to a WLAN via an AP device.Refer to your TV’s user manual for more information.3 On the TV, search for the camcorder and browse the shared videos or photos.For information about searching for the camcorder and browsing the videos or photos on the TV, refer to the TV user manual.••••On a TV, you can play back only the videos and photos recorded by the camcorder.The effective network connection range between the camcorder and the TV may differ depending on the AP.If the camcorder is turned off abnormally (ex: network disconnection) while you are playing a video or photo on the TV, the TV considers itself still connected to the camcorder.Depending on the size of the video or photo file, it may take longer to connect to the TV and display.You cannot enable this function if there are no recorded videos or photos in your camcorder.When playing HD quality videos on a TV, use an 802.11n AP and set it to 802.11n. Important: If you set the Data Encryption function on your network to WEP or TKIP, the network defaults to 802.11g and the camcorder cannot play HD quality videos on the TV.You can select up to 1000 photos and videos files to watch through your TV. The more files you select, the slower the camcorder operates. We recommend selecting fewer than 1000 files.This function may not operate properly on a Samsung HDTV that has no AllShare™ mark on it.Video stuttering may occur, depending on the TV type and network status.If video stuttering occurs, record videos you intend to play through a wireless connection at lower video resolution.If video stuttering occurs frequently when you use a wireless connection, change to HDMI or AV cable. pages 80~81If you play back videos on a Samsung HDTV supporting AllShare™ and video stuttering occurs repeatedly for over 3 seconds, consult the Samsung call center. See the back cover for the phone number.••••••••••••AP](https://usermanual.wiki/Samsung-Electronics-Co/HMXQF20BN.User-manual-3-of-3/User-Guide-1611598-Page-6.png)
![76Wireless network (HMX-QF20 only)Using Auto Backup to send videos or photosInstalling the program for Auto backup on your PC1 Connect the camcorder to a PC with the USB cable.2 Turn on the camcorder.The computer recognizes the camcorder and Intelli-studio launches automatically.3 When the pop-up appears, touch OK.The program will be installed automatically.Before install the program, ensure that the PC is connected to a network.pages 70~72If no internet connection is available, you must install the program from the provided CD.This program is for backing up files to the PC based on Windows OS.Refer to the Auto Backup instruction manual for more information.••••Sending photos or videos to a PC1 Press the [Home ( )] button touch Auto Backup.Social Sharing Auto Backup TV LinkSettings•2••2 Touch the tab.The camcorder will automatically attempt to connect to a WLAN via the most recently connected AP device.If the camcorder has not previously been connected to a WLAN, it will search for available AP devices. page 70If your PC has turned on, the PC recognizes the camcorder and Intelli-studio launches automatically.If your PC supports the Wake on LAN (WOL) feature, you can turn on the PC automatically by searching for the PC from your camcorder. pages 77~783 The camcorder will prepare to send the files and send them to the PC.You cannot select individual files to send. This function is available only for newly stored files on the camcorder.The progress will be shown on the PC monitor.The camcorder will search for available access points even if you are connecting to the same access point again.If you turn off the camcorder or remove the battery while sending files, the file transfer will be interrupted.While you are using this feature, the buttons on the camcorder will be disabled.You can connect only one camcorder to the PC at a time for sending files.The backup may be canceled due to network conditions.Videos or photos can be sent to a PC one time only.Files cannot be sent again even if you reconnect your camcorder.•••••••••••••](https://usermanual.wiki/Samsung-Electronics-Co/HMXQF20BN.User-manual-3-of-3/User-Guide-1611598-Page-7.png)
![94SettingsSettings menuAccessing the settings menuThe instructions below are an example of how to access and use the Settings menu items. When you access and use other Settings menu items (pages 95~102), use this example as a guide.1 Press the [Home ( )] button touch Settings.2 Touch a menu.SettingsPlaybackConnectivityDisplayShootingMenu DescriptionShooting: Set the items in the video or photo recording mode. pages 95~96Playback: Set the items in the video or photo playback mode. pages 96~97Display: Customize the display settings. pages 97~98Connectivity: Set the connection items. page 99General: Change the settings for the camcorder system such as memory format and default set. pages 100~1023 Touch a submenu. The OIS Duo function is used here as an example.ShootingPhoto ResolutionTele MacroVideo ResolutionOIS Duo4 Touch the desired submenu item.OIS DuoOnPlus0GG5 To exist the menu setting, touch the Return ( ) tab.•](https://usermanual.wiki/Samsung-Electronics-Co/HMXQF20BN.User-manual-3-of-3/User-Guide-1611598-Page-25.png)
![Settings menu 95SettingsShooting* : DefaultItem DescriptionVideo Resolution Set the video resolution.Full HD 1080/60i* ( ): Records in the Full HD (1920x1080/60i) format.HD 720/60p ( ): Records in the HD (1280x720/60p) format.••60i indicates the camcorder will record in interlaced scan mode at 60 fields per second.60p indicates the camcorder will record in progressive scan mode at 60 frames per second.Recorded files are encoded using Variable Bit Rate (VBR). VBR is an encoding system that automatically adjusts the bit rate in response to the image being recorded.The available video recording time differs according to the video resolution you select. page 19••••Photo ResolutionSet the photo resolution. 5.3M 3072X1728* ( ): Records in the 2944x1656 resolution.2M 1920X1080 ( ): Records in the 1920x1080 resolution.••The number of recordable images differs according to the photo resolution you select. page 19Photos that are recorded on your camcorder may not playback properly on other digital devices that do not support these photo sizes.••Item DescriptionOIS DuoSet to compensate for camcorder shake/blur. Off*: Disables the function.On ( ): Enables to compensate for camcorder shake.••Tele MacroSet to record close-up images of very small objects. Off*: Disables the function.On ( ): Focuses on a small portion of a large object at a tele angle.••When recording in the Tele Macro mode, the focus speed may be lowered.Use a tripod (not supplied) to prevent camcorder shake in the Tele Macro mode.Avoid shadows when recording in the Tele Macro mode.As the distance to the subject decreases, focusing area narrows.When the distance between the camcorder and a subject is too close and the camcorder cannot be in the focus, press the [W] button and then adjust the focal distance between them.When the Tele Macro function is On and the camcorder magnifies a subject in tele mode, the minimum focal distance between the camcorder and a subject is 50cm.••••••* : Default](https://usermanual.wiki/Samsung-Electronics-Co/HMXQF20BN.User-manual-3-of-3/User-Guide-1611598-Page-26.png)
![Settings menu96SettingsItem DescriptionDigital ZoomSet to increases the amount of zoom available with a zoom lens. Off*: Disables the digital zoom function. Only optical zoom is available.On: Enables higher digital zoom magnification. ••When you use the digital zoom, the camcorder processes the image digitally more than in the optical zoom mode. As a result, the image resolution may deteriorate.The top of the bar shows the digital zooming zone. The zooming zone appears when you press the [T/W] button or use the Zoom ( ) tab.;PPNJOEJDBUPS%JHJUBMSBOHF0QUJDBMSBOHFShake ItSet to apply digital effects by shaking the camcorder. Off*: Disables the Shake It function.On: Enables to apply the digital effects in order by shaking the camcorder in Art Film or Art Time Lapse mode. 00:00:00 [253Min] 00:00:00 [253Min]00 [253M••Playback* : DefaultItem DescriptionThumbnail Set the 3x3 or 4x4 type as the thumbnail view display.3X3*: Displays the 3x3 type as the thumbnail view display.4X4: Displays the 4x4 type as the thumbnail view display.••Video Play OptionSet a specific playback style according to your preference.Play All* ( ): Plays video clips in succession starting from the selected video to the last one, then returns to the thumbnail view.Play One ( ): Plays the selected video only, and returns to the thumbnail view.Repeat All ( ): Plays all the video clips repeatedly until the Thumbnail view ( ) tab is touched.Repeat One ( ): Plays the selected video only repeatedly until the Thumbnail view ( ) tab is touched. ••••Smart BGM OptionSet the desired background music to play back a video with it.The Flea Waltz*: Plays back The Flea Waltz.Canon In D: Plays back Canon in D.Cello Suite No.1: Plays back Cello Suite No.1.Nocturne: Plays back Nocturne.Random: Plays back from The Flea Waltz to Nocturne randomly.•••••Shooting* : Default](https://usermanual.wiki/Samsung-Electronics-Co/HMXQF20BN.User-manual-3-of-3/User-Guide-1611598-Page-27.png)
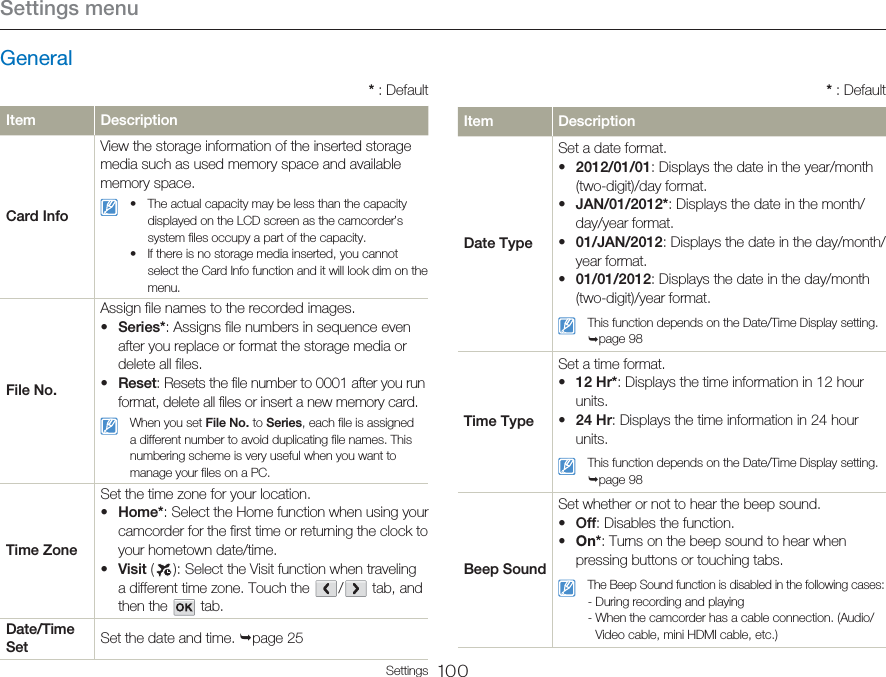
![Settings menu 101SettingsItem DescriptionShutter SoundSet whether or not to hear the shutter sound.Off: Disables the function.On*: Turn on the shutter sound to hear when taking a photo with the [Recording start/stop] button.••The Shutter Sound function is disabled in the following cases:- When the camcorder has a cable connection. (Audio/Video cable, mini HDMI cable, etc.)Auto Power OffSet the camcorder to automatically turn off when performing no operations for 5 minutes.Off*: Disables the function.5 Min: Turns off the camcorder when performing no operations for 5 minutes.••The Auto Power Off function does not work in the following situations:- When the camcorder has a cable connection. (USB cable, AC power adaptor, etc.)- While the Demo function is in operation.- While you are recording (including the recording pause), playing (except pause), or running a photo slide show.To turn the camcorder on again, close the LCD screen and then open it.••Item DescriptionQuick On STBYUse to reduce energy consumption and battery drain when recording frequently for an extended time.Off*: Turns off the camcorder by closing the LCD screen.5 Min: Starts the Quick On STBY mode by closing the LCD screen after a short period of time. After 5 minutes in Quick On STBY mode, the camcorder turns off.••We recommend turning off the camcorder after use to reduce energy consumption. However, as an alternative, you can use the Quick On STBY function under most shooting conditions to reduce energy consumption effectively.The charging indicator keeps blinking in Quick On STBY mode. The Quick On STBY mode is not available under the following conditions:- When the LCD screen is open.- When operating the buttons on the camcorder.- While recording.•••Switch GripSet to use the camcorder conveniently with either your right or left hand.Off : Disables the function.On* : Uses the camcorder easily with both your hands.••When you change the Switch Grip direction while recording, the recording may be temporarily interrupted.* : DefaultGeneral* : Default](https://usermanual.wiki/Samsung-Electronics-Co/HMXQF20BN.User-manual-3-of-3/User-Guide-1611598-Page-32.png)
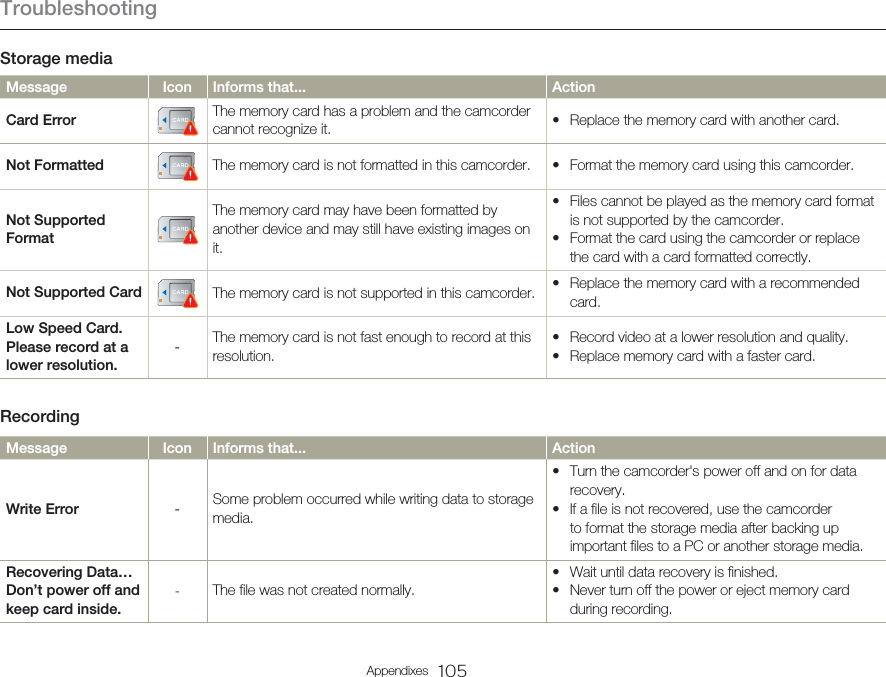
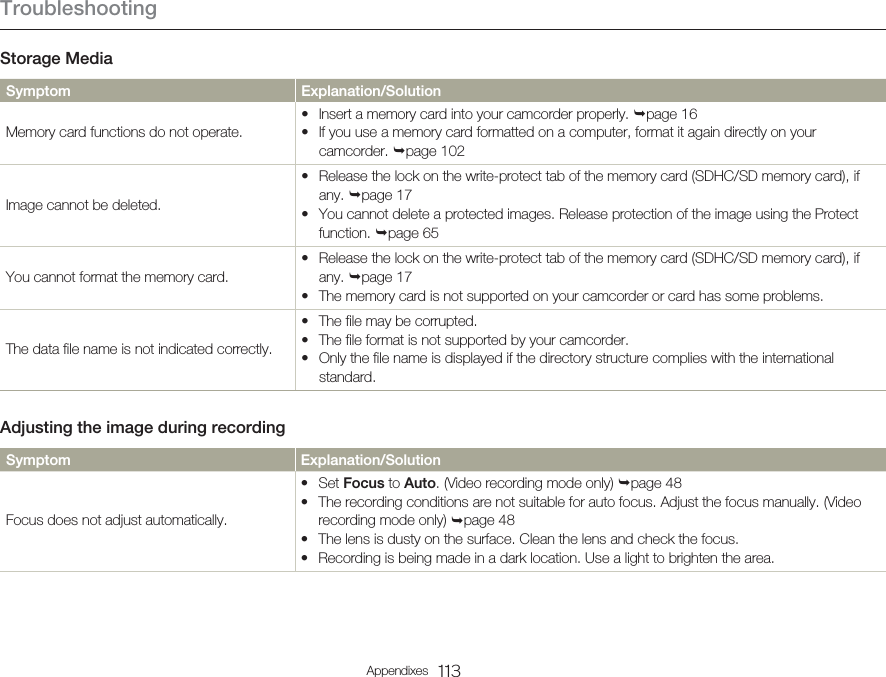
![Troubleshooting111AppendixesDisplaySymptom Explanation/SolutionUnknown icon appears on the screen. A warning icon or message appears on the screen. pages 104~109•An afterimage remains on the LCD screen. This occurs if you disconnect the AC power adaptor or remove the battery before turning the power off.•The image on the LCD screen looks dark. Ambient light is too bright. Adjust the brightness and angle of the LCD.•RecordingSymptom Explanation/SolutionPressing the [Recording start/stop] button does not start recording.Set your camcorder to the recording mode. page 37There is not enough free space to record on the storage media.Check if memory card is not inserted or write-protect tab is set to lock.•••The actual recording time is less than the estimated recording time.The estimated recording time may vary depending on content and features used.When you record an object that moves fast, the actual recording time may be shortened.••The recording stops automatically.There is no more free space for recording on the storage media. Back up important files on your PC and format the storage media or delete the unnecessary files.If you make recordings or delete files frequently, the performance of the storage media deteriorates. If this occurs, format the storage media again.If you use a memory card with low writing speed, the camcorder automatically stops recording videos and a corresponding message appears on the LCD screen.•••When recording a subject illuminated by bright light, a vertical line appears. This is not a malfunction.•When the screen is exposed to direct sunlight during recording, the screen becomes red or black for an instant.This is not a malfunction.•](https://usermanual.wiki/Samsung-Electronics-Co/HMXQF20BN.User-manual-3-of-3/User-Guide-1611598-Page-42.png)
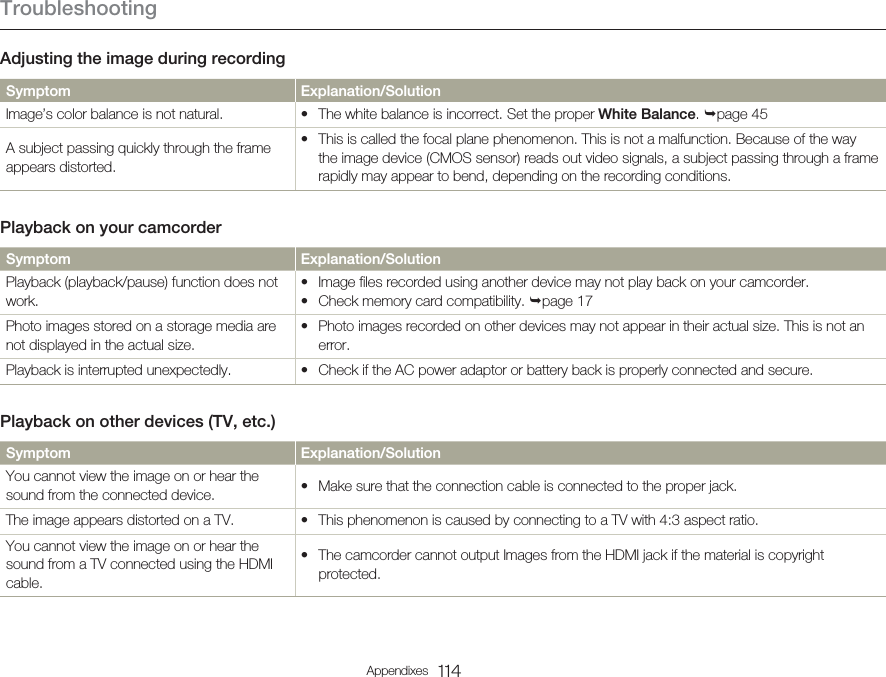
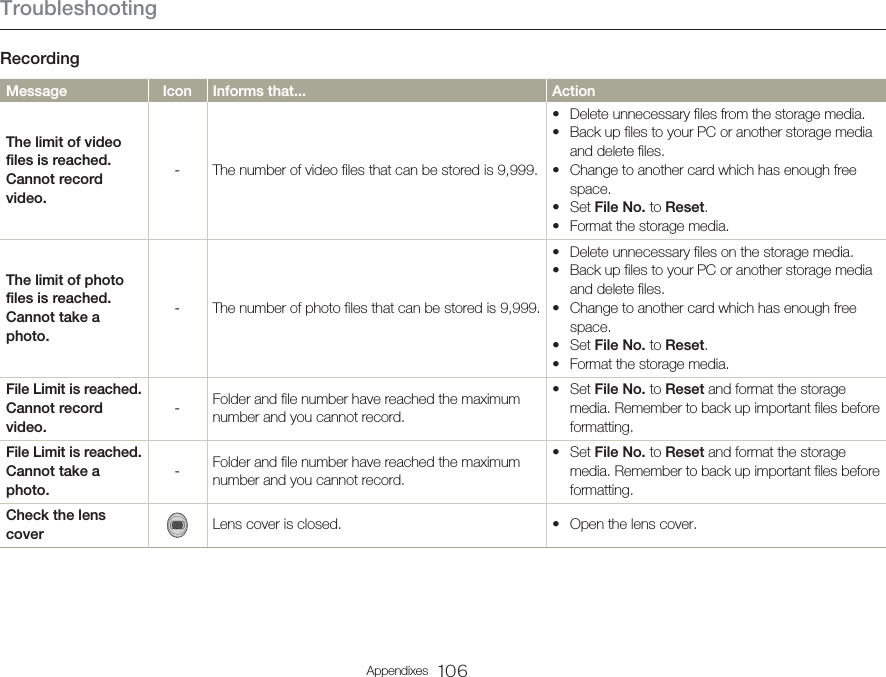
![Troubleshooting112AppendixesRecordingSymptom Explanation/SolutionDuring recording, the date/time does not display. Date/Time Display is set to Off. Set the Date/Time Display to On. page 98•You cannot record a photo image.Set your camcorder to the photo recording mode. page 41Release the lock on the write-protection tab of the memory card if any.The storage media is full. Use a new memory card or format the storage media. page 102 Or remove unnecessary images. page 63•••You don’t hear the shutter sound when you record a photo image.Set Shutter Sound to On.When the Mini HDMI cable or Audio/Video cable is connected to the camcorder, the Shutter Sound is not available.••You don’t hear the beep sound.Set Beep Sound to On.Beep sound is temporally off while recording videos.When the Mini HDMI cable or Audio/Video cable is connected to the camcorder, the Beep Sound is not available.•••There is a time difference between the point where you press the [Recording start/stop] button and the point where the recorded video starts/stops.On your camcorder, there may be a slight time delay between the point when you press the [Recording start/stop] button and the actual point where the recorded video starts/stops. This is not an error.•Horizontal stripes appear on the images. This occurs when recording images under a fluorescent lamp, sodium lamp, or mercury lamp. This is not a malfunction.•](https://usermanual.wiki/Samsung-Electronics-Co/HMXQF20BN.User-manual-3-of-3/User-Guide-1611598-Page-43.png)