Samsung Electronics Co HTDS690 DVD Receiver User Manual A3LHTDS690
Samsung Electronics Co Ltd DVD Receiver A3LHTDS690
Contents
- 1. User Manual 1
- 2. User Manual 2
- 3. User Manual 3
User Manual 2
2827
•
Depending on the recording mode, some MP3-CDs may not play.
•
Table of contents of a MP3-CD varies depending on the MP3 track format
recorded on the disc.
Note
MP3-CD Playback
Data CDs (CD-R, CD-RW) encoded in MP3 format can be played.
JPEG Disc Playback
Images captured with a digital camera or camcorder, or JPG files on a PC can be stored on a CD and then
played back with this unit.
2
In Stop mode, use
to select
the album, and
then press the
ENTER button.
•
The MP3 menu screen will appear
and playback will start.
•
Depending on the MP3 disc, the
appearance of the menu may be
different.
1
Press the
OPEN/CLOSE
button to open the
disc tray, and then
load the MP3 disc.
4
Press the STOP
button to stop
playback.
•
To select another album and track,
repeat Steps 2 and 3 above.
3
To change the album,
use to
select another album
in Stop mode, and
then press the
ENTER button.
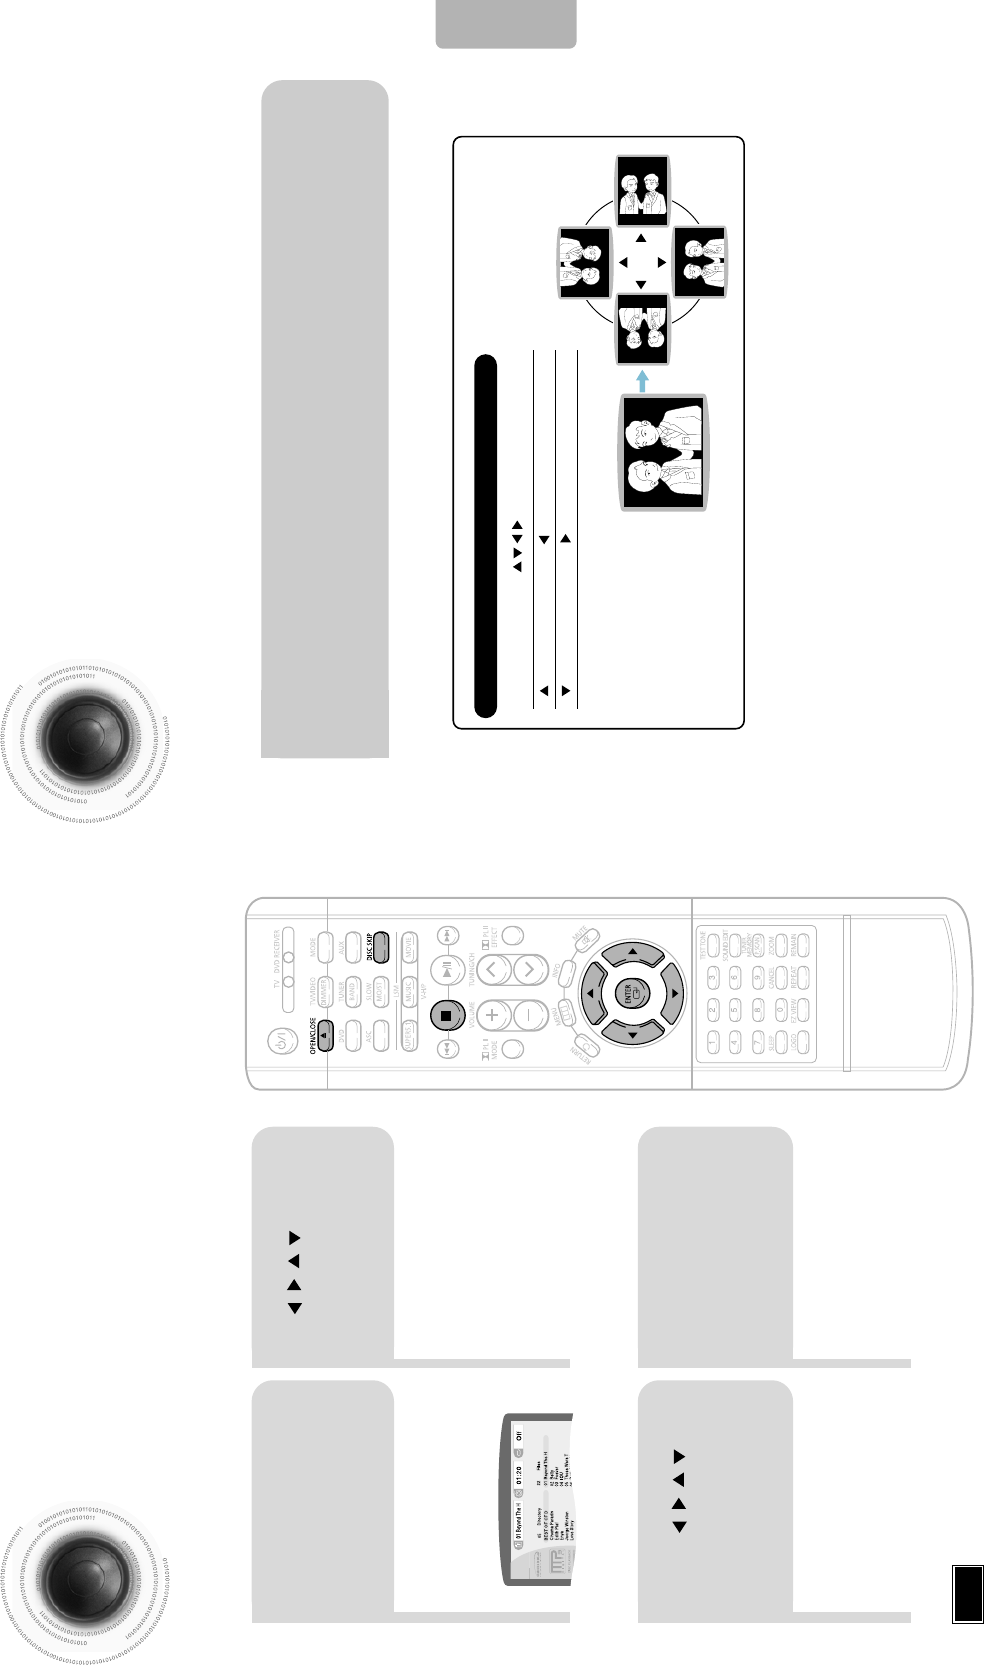
OPERATION
Press the OPEN/CLOSE button to open the disc tray, and then
load the JPEG disc.
•Playback will start automatically and each image will show for 5 seconds before moving to
the next image.
Rotate vertically Rotate 90° counterclockwise
Rotate horizontally Rotate 90° clockwise
During playback, press .
To rotate the image
Displaying Disc Information
You can view disc playback information on the TV screen.
30
Press INFO button.
•
Each time the button is pressed, the display changes as follows:
DVD
Display disappears
Display disappears Display disappears
Something like you
Back for good
Love of my life
More than words
DVD RECEIVER SMART NAVI
MP3 JPEG
•
What is a Group?
A group of tracks contained in a DVD-AUDIO disc.
•
What is a Title?
A movie contained in a DVD-VIDEO disc.
•
What is a Chapter?
Each title on a DVD disc is divided into several smaller sections called "chapters".
•
What is a Track (File)?
A section of video or a music file recorded on a DVD-AUDIO, CD, or MP3-CD.
•
appears on the TV screen!
If this symbol appears on the TV screen while buttons are being operated, that
operation is not possible with the disc currently being played.
•
Depending on the disc, the disc
information display may appear different.
•
Depending on the disc, you can also
select DTS, DOLBY DIGITAL, or PRO
LOGIC.
29
Note
OPERATION
Checking the Remaining Time
CHAPTER REMAIN
TITLE REMAIN
CHAPTER ELAPSED
TITLE ELAPSED
Each time the REMAIN button is pressed
Press the REMAIN button.
•
For checking the total and remaining time of a title or chapter
being played.
DVD-
VIDEO
TRACK REMAIN
GROUP REMAIN
TRACK ELAPSED
GROUP ELAPSED
DVD-
AUDIO
CD
TRACK REMAIN
TOTAL ELAPSED
TOTAL REMAIN
TRACK ELAPSED
MP3
TOTAL ELAPSED
TRACK REMAIN
CD
Screen Display
DVD display
CD display
MP3 CD display
DVD-AUDIO display TITLE display GROUP display
CHAPTER display
TRACK (FILE) display
ELAPSED TIME display
AUDIO LANGUAGE display
SUBTITLE display
ANGLE display
STEREO (L/R) display
DOLBY DIGITAL display
REPEAT PLAYBACK display
DVD
AUDIO
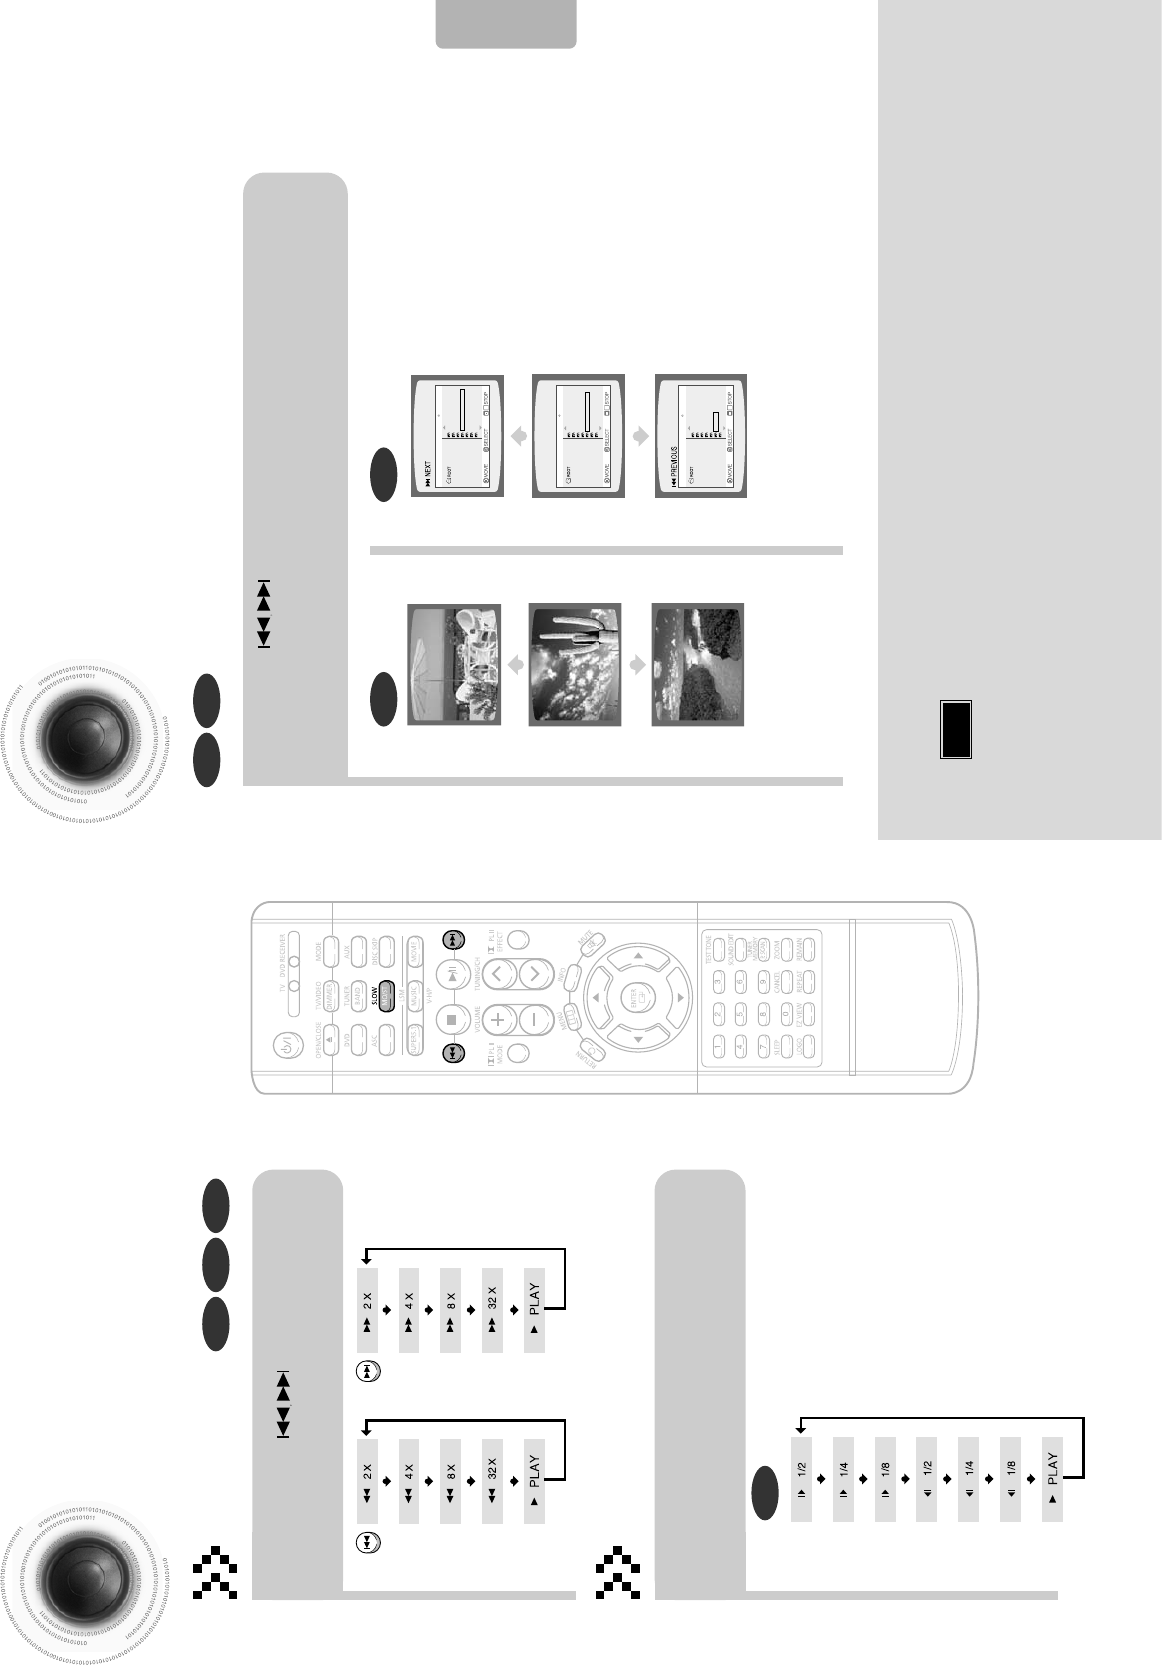
Skipping Scenes/Songs
32
DVD MP3
DVD MP3
Briefly press .
•
Each time the button is pressed briefly during playback, the previous or next chapter, track,
or directory (file) will be played.
•
You cannot skip chapters consecutively.
•
During fast playback of a CD or MP3-CD, sound is heard only at 2x speed,
and not at 4x, 8x, and 32x speeds.
•
No sound is heard during slow playback and step motion playback.
TITLE 01/05 CHAPTER 002/040
TITLE 01/05 CHAPTER 004/040
Fast/Slow Playback
Fast Playback
DVD CD MP3
Press and hold .
•
Each time the button is held down during playback,
the playback speed changes as follows:
Press SLOW button.
•
Each time the button is pressed during playback,
the playback speed changes as follows:
Slow Playback
DVD
31
Note
OPERATION
Something like you
Back for good
Love of my life
More than words
I need you
My love
Uptown girl
DVD RECEIVER SMART NAVI
Something like you
Back for good
Love of my life
More than words
I need you
My love
Uptown girl
DVD RECEIVER SMART NAVI
Something like you
Back for good
Love of my life
More than words
I need you
My love
Uptown girl
DVD RECEIVER SMART NAVI
34
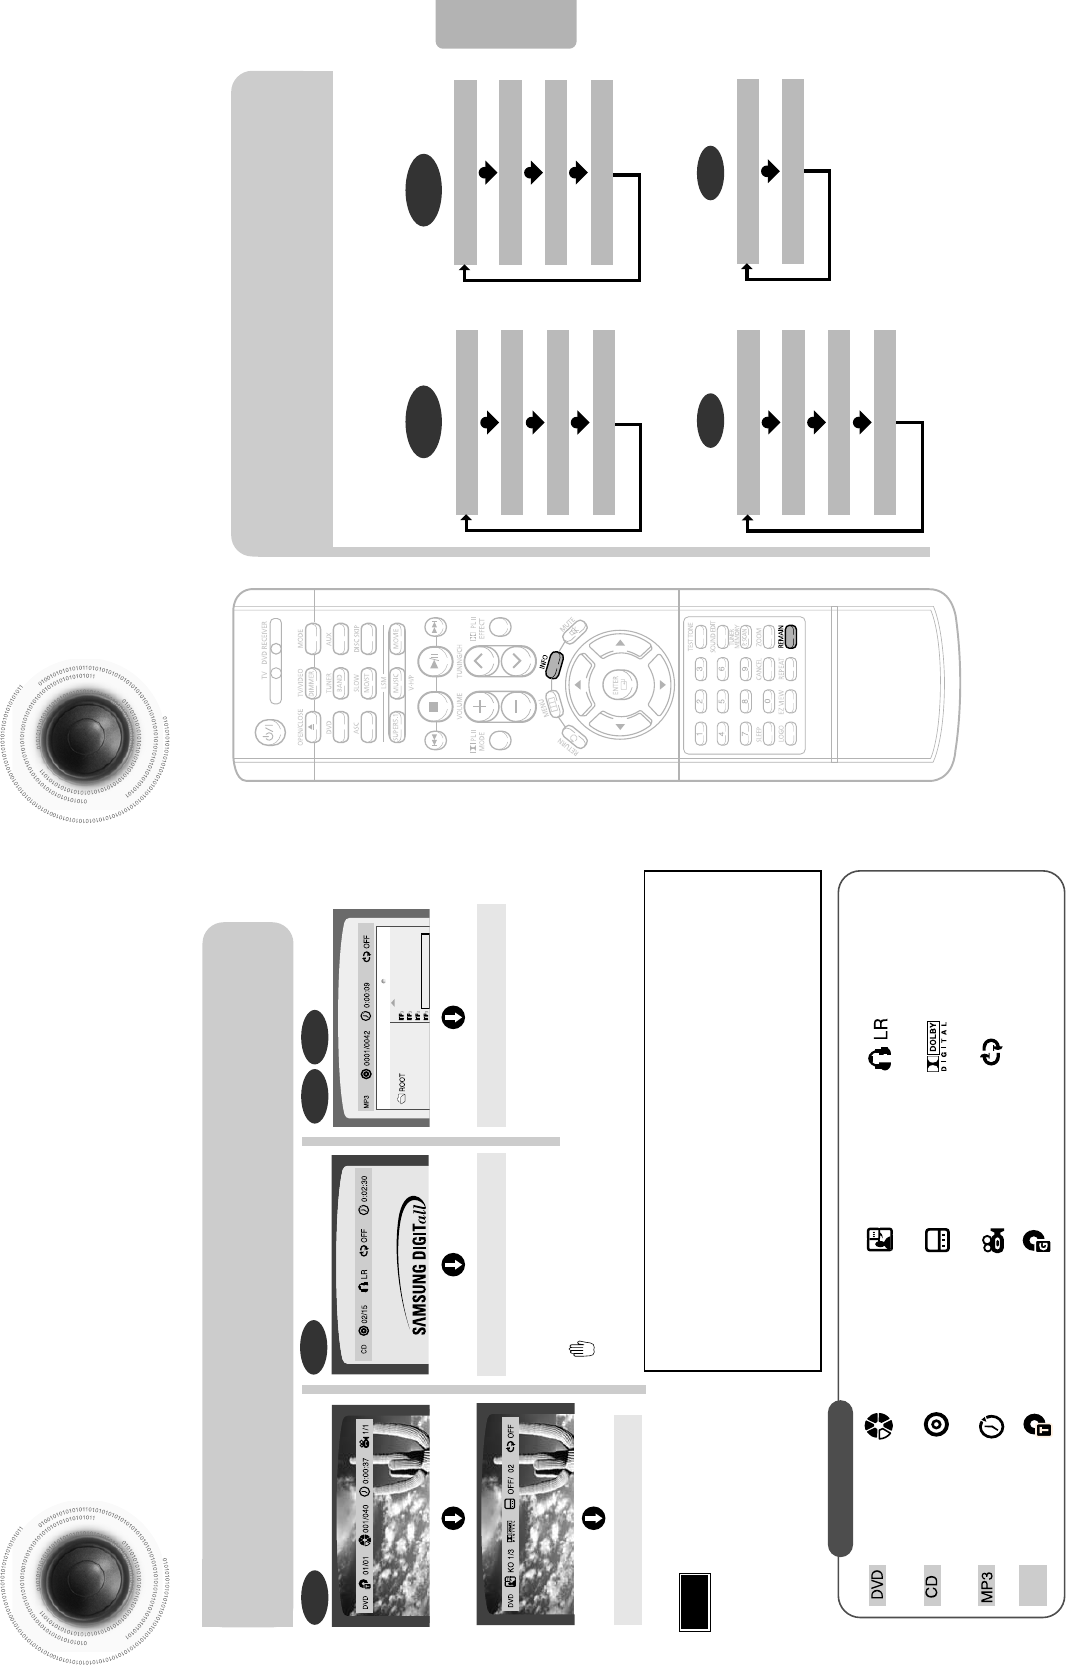
Repeat Playback
Repeat playback allows you to repeatedly play a chapter, title, track (song), or directory (MP3 file).
33
Press REPEAT button.
•
Each time the button is pressed during playback, the repeat playback
mode changes as follows:
CDMP3 JPEG
• CHAPTER : Repeatedly plays the selected chapter.
• TITLE : Repeatedly plays the selected title.
• GROUP : Repeatedly plays the selected group.
• RANDOM : Plays tracks in random order.
(A track that has already been played may be played again.)
• TRACK : Repeatedly plays the selected track.
• DIR : Repeatedly plays all tracks in the selected folder.
• DISC : Repeatedly plays the entire disc.
• OFF : Cancels Repeat Playback.
DVD CD MP3 JPEG
OPERATION
DVD-
VIDEO DVD-
AUDIO
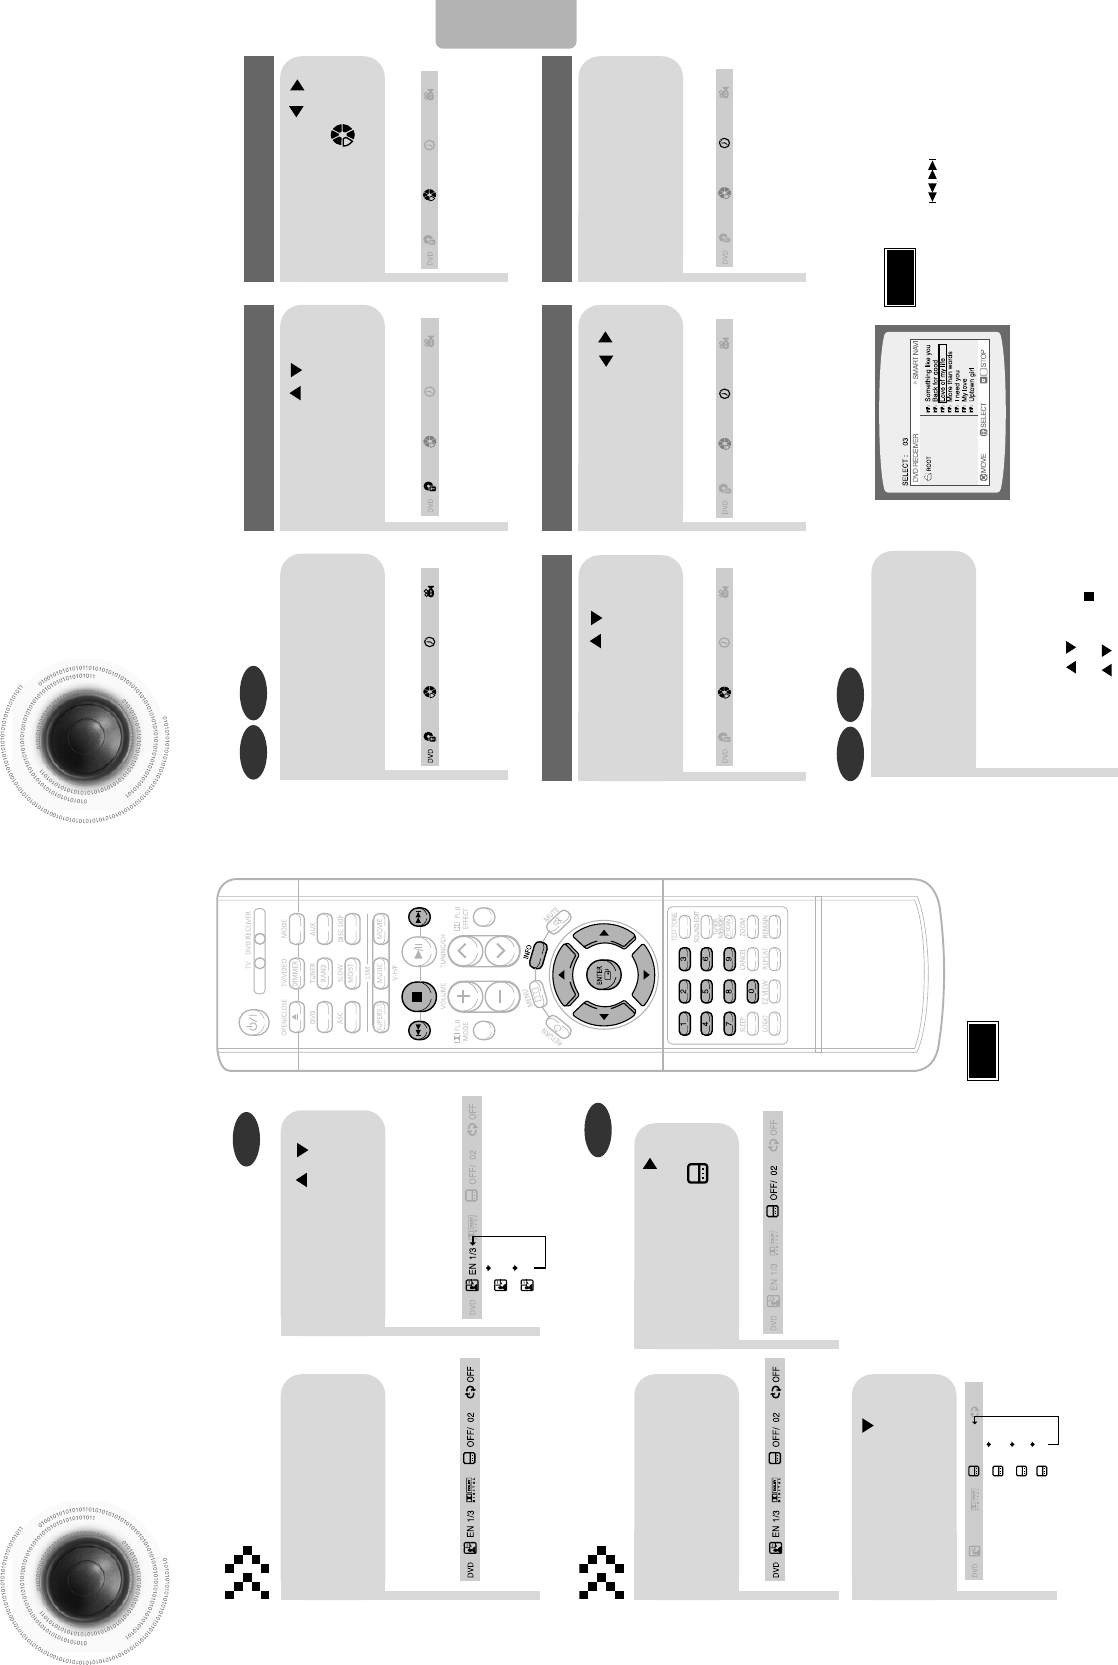
To Select a Repeat Playback Mode in the Disc Information Screen
Press INFO button twice.
1
Press Cursor button to move to
REPEAT PLAYBACK( ) display.
2
Press Cursor button to select the
desired Repeat Playback mode.
3
DVD
CD
*
For MP3 and JPEG discs, you cannot select
Repeat Play from the information display screen.
Press ENTER button.
4
Repeat Playback Options

A-B Repeat Playback
•
The A-B Repeat function will not work on an MP3 or JPEG disc.
2
Press Cursor
button to move to
REPEAT PLAYBACK
( ) display.
•
For a CD, press INFO button once.
1
Press INFO button
twice.
A -
A -?
REPEAT : A—
A - B
REPEAT : A—B
•
The specified segment will be played
repeatedly.
4
Press ENTER
button at the end
of the segment.
•
When ENTER button is pressed,
the selected position will be stored in
memory.
3
Press Cursor ,
buttons to select ‘A-’ and then
press ENTER button at the
beginning of the segment.
To return to normal playback, press Cursor ,
buttons to select OFF.
DVD CD
Note
Angle Function
This function allows you to view the same scene in different angles.
DVD
2
Press Cursor
button to move to
ANGLE
( )
display.
1
Press INFO button.
1/3
•
Each time the button is pressed, the angle changes as follows:
3
Press Cursor , or numeric buttons to
select the desired angle.
2/3
3/3
1/3
1/3
•
The Angle function works only with discs on which multiple angles have been recorded.
Note
3635
OPERATION
38
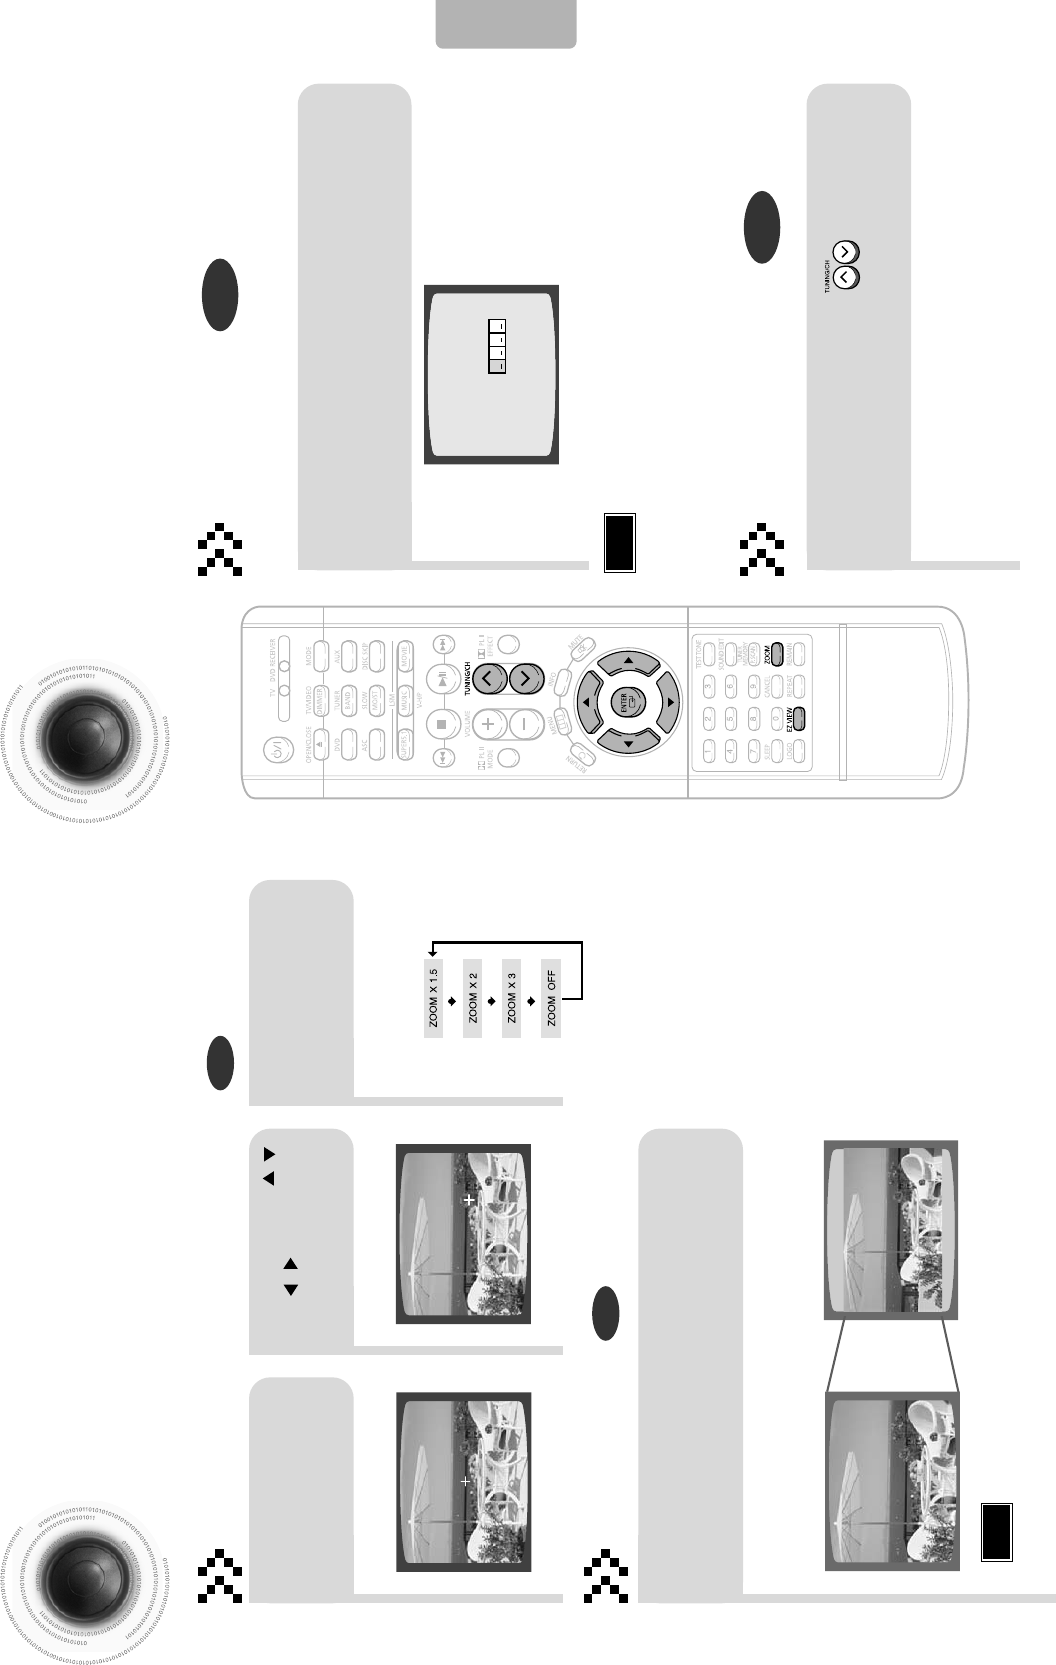
Zoom Function
This function allows you to enlarge a particular area of the displayed image.
Bonus Group / Navigating Pages
Some DVD-Audio discs have an extra ‘bonus’ group that requires a 4-digit key
number to access. See the disc packaging for details and the-key number.
Zoom (Screen Enlarge) Function
DVD
Bonus Group
Aspect Ratio
DVD
2
Press Cursor , ,
, buttons to
move to the area
you want to enlarge.
1
Press ZOOM
button. When you play a DVD-Audio disc that has a
bonus group, the key number input screen
appears automatically.
•
Each time the button is pressed,
the zoom level changes as
follows:
3
Press ENTER
button.
Press EZ VIEW button.
•
Each time the button is pressed, the zoom function will switch between On
and Off.
•
When a movie is played in Widescreen format, black bars at the top and
bottom of the TV screen can be removed by pressing the EZ VIEW button.
•
You can select the desired image from a DVD-Audio disc containing still images.
•
With some discs, you may not be able to select images depending on how the
disc was manufactured.
•
This function will not work if the DVD is recorded with multi-camera angle format.
•
Black bars may not disappear because some DVD discs have a built-in horizontal to vertical ratio.
37
Note
•
If you eject the disc, switch the power off, or unplug the player, you will need to re-enter
the key number.
Note
OPERATION
EZ VIEW OFFEZ VIEW
ENTER SELECT
DVD-
AUDIO
BONUS GROUP
KEY NUMBER :
Navigating Pages
During playback, press the button on the
remote control.
DVD-
AUDIO
40
Moving Directly to a Scene/Song
•
The selected file will be played.
•
An MP3 or JPEG disc cannot be moved
from the disc information screen.
•
When playing an MP3 or JPEG disc, you
cannot use , to move a folder.
To move a folder, press (Stop) and
then press , .
DVD CD
MP3 JPEG
2
Press Cursor , buttons
or numeric buttons to select
the desired title/track and then
press ENTER button.
1
Press INFO button.
01/05
001/040 0:00:37 1/1
03/05
001/002 0:00:01 1/1
01/05
001/040 0:00:01 1/1
Moving to a Title/Track
4
Press Cursor , buttons
or numeric buttons to select
the desired chapter and
then press ENTER button.
01/05
025/040 0:00:01 1/1
Moving to a Chapter
6
Press the numeric
buttons to select the
desired time and then
press ENTER button.
01/05
028/040 1:30:00 1/1
Moving to a Specific Time
3
Press Cursor ,
buttons to move to
Chapter ( )
display.
Moving to a Chapter
01/05
025/040 1:17:30 1/1
5
Press Cursor ,
buttons to move to
time display.
Moving to a Specific Time
Press the numeric
buttons.
•
You can press on the remote
control to move directly to the desired
title, chapter, or track.
•
Depending on the disc, you may not be
able to move to the selected title or time.
39
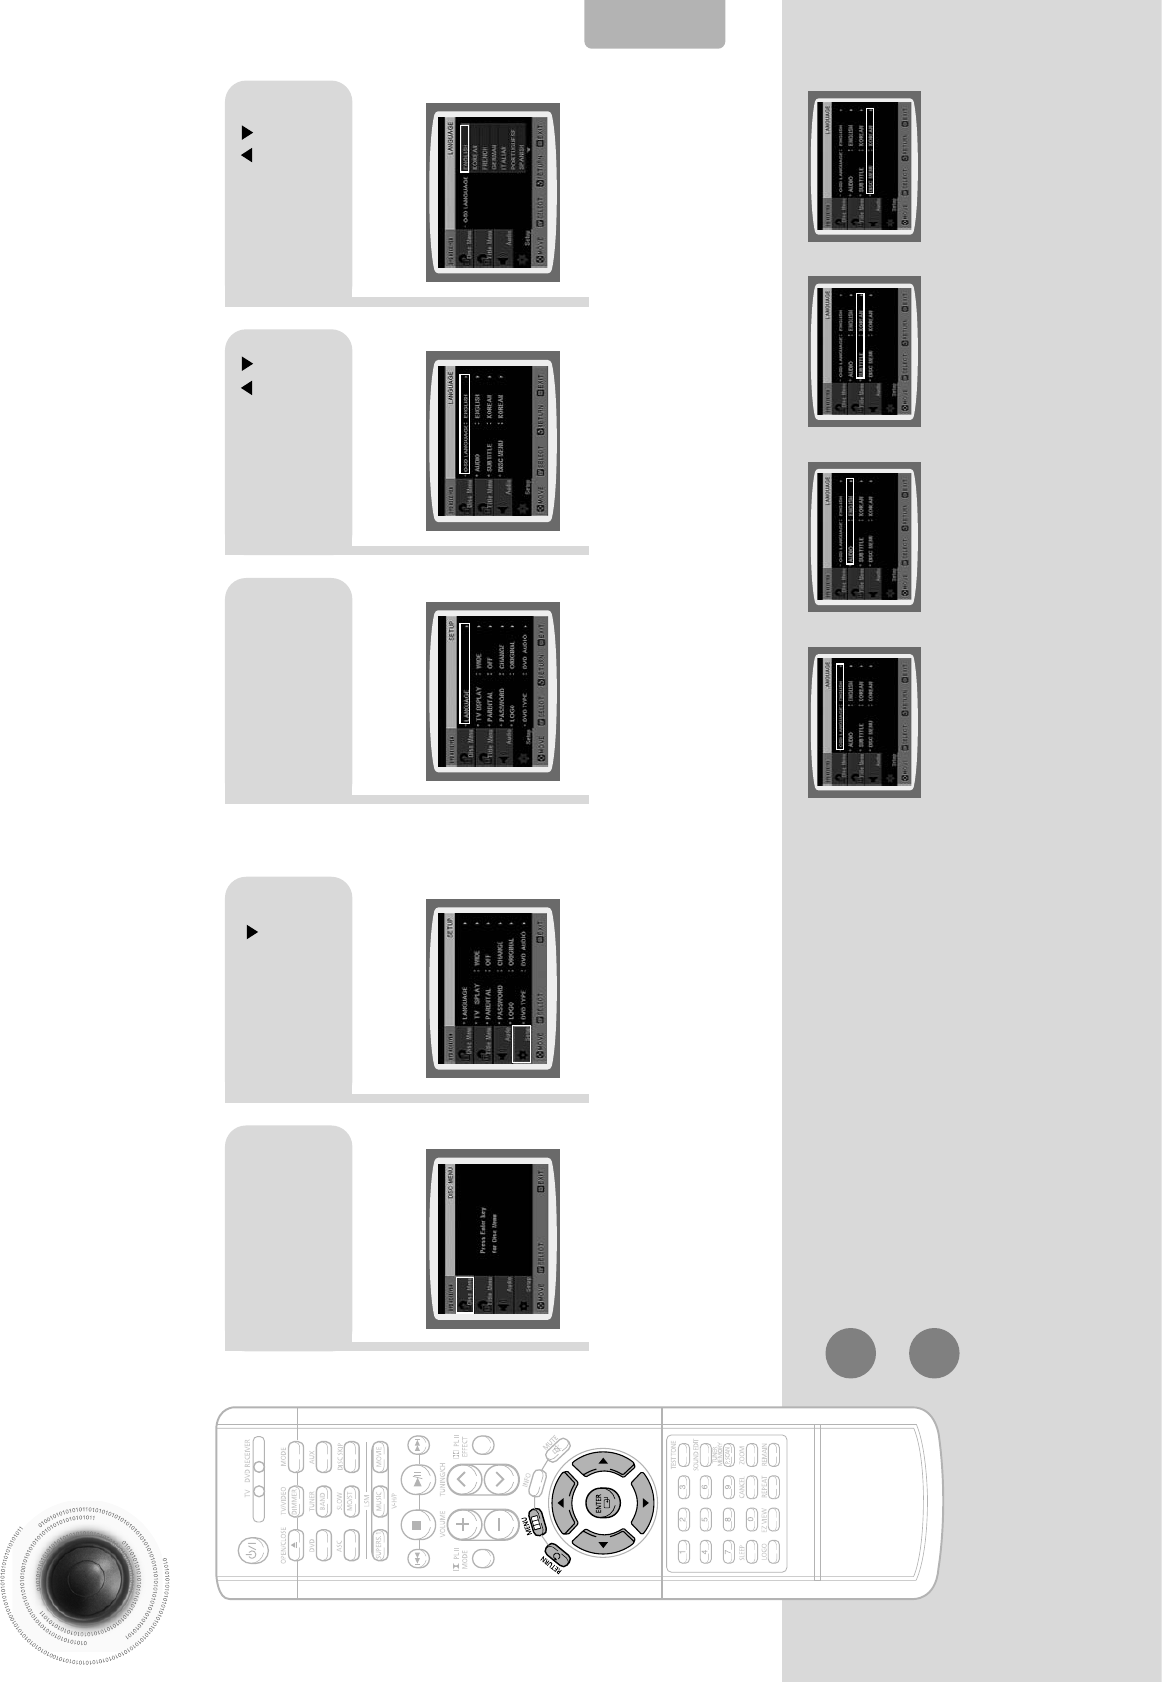
Selecting Audio/Subtitle Language
•
Depending on the number of languages on a
DVD disc, a different audio language
(ENGLISH, SPANISH, FRENCH, etc.) is
selected each time the button is pressed.
2Press Cursor ,
buttons or numeric
buttons to select the
desired audio language.
1
Press INFO button
twice.
SP 2/3
FR 3/3
•
Depending on the disc, the
Subtitle and Audio Language
functions may not work.
Audio Language Selection Function
DVD
Subtitle Language Selection Function
DVD
Note
Note
OPERATION
EN 1/3 EN 01/ 03
OFF
SP 02/ 03
FR 03/ 03
OFF / 03
2
Press Cursor
button to move to
SUBTITLE ( )
display.
1
Press INFO button
twice.
3
Press Cursor
button or numeric
buttons to select the
desired subtitle.
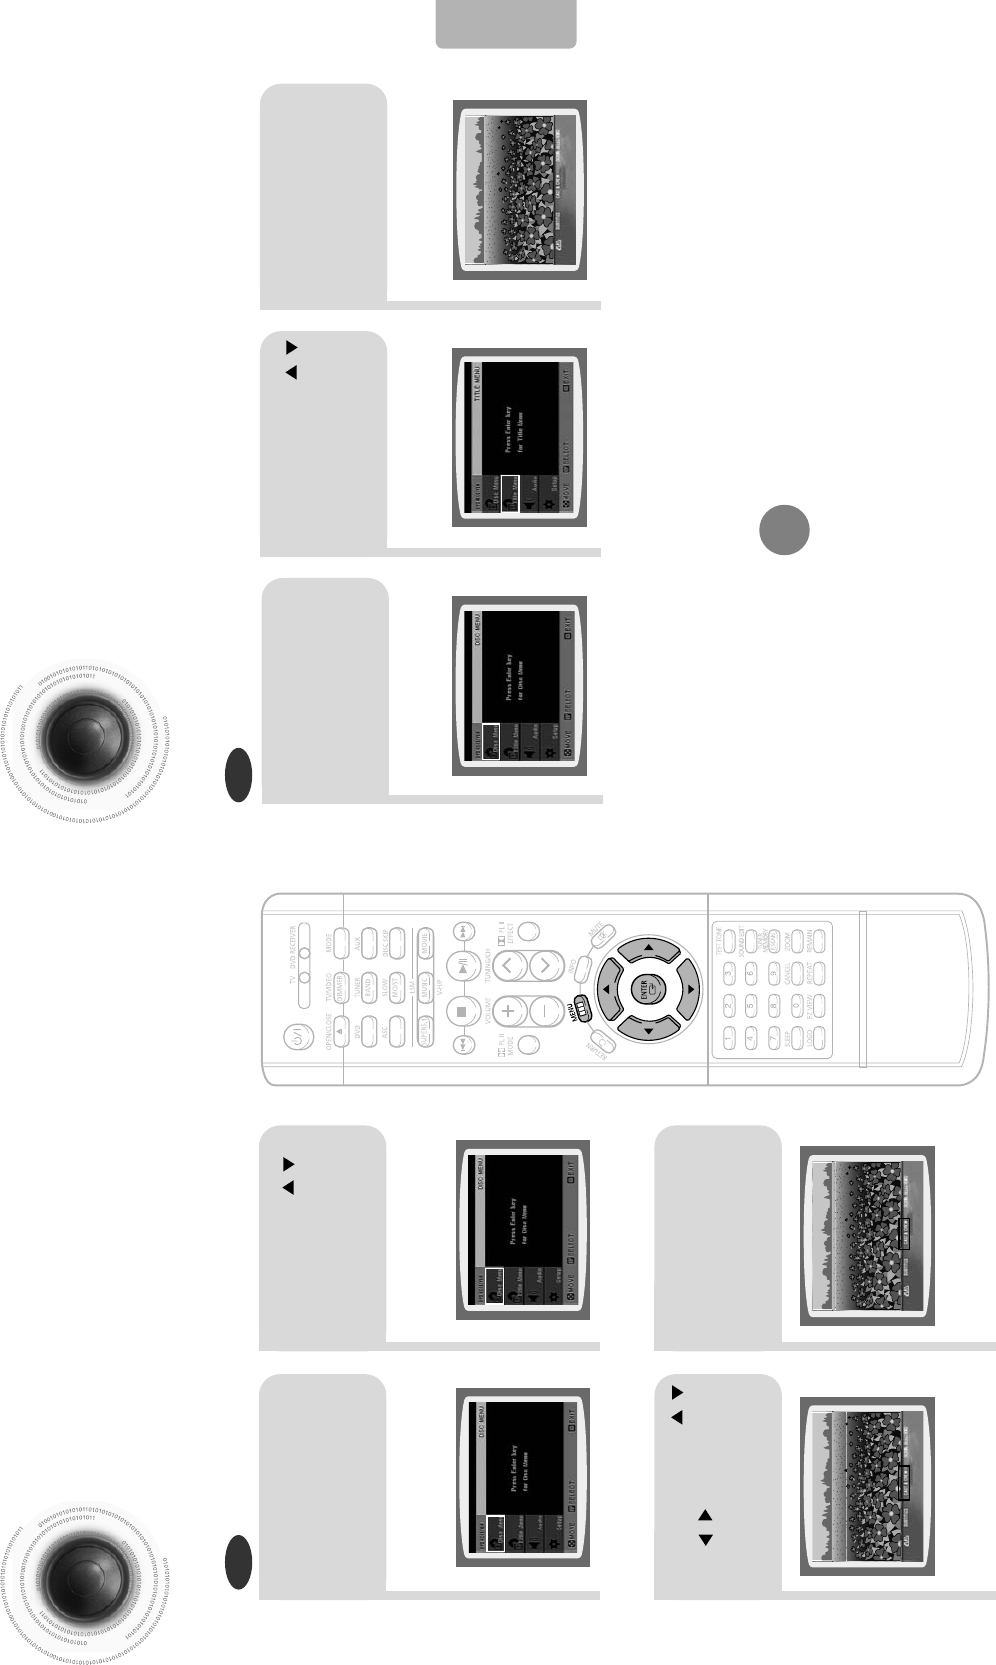
Using the Title Menu
For DVDs containing multiple titles, you can view the title of each movie.
Depending on the disc, this function may either not work at all or may work differently.
2
Press Cursor ,
button to move to
‘Title Menu’.
DVD
1
In Stop mode,
press MENU
button.
3
Press ENTER
button.
•
The title menu appears.
42
Press MENU button to exit the setup screen.
Using Disc Menu
You can use the menus for the audio language, subtitle language, profile, etc.
DVD menu contents differ from disc to disc.
DVD
41
2
•
When you select the disc menu that is not
supported by the disc, the "This menu is not
supported" message appears on the screen.
1
In Stop mode,
press MENU
button.
Press Cursor ,
buttons to move to
‘DISC MENU’ and then
press ENTER button.
4
Press ENTER
button.
3
Press Cursor , ,
, buttons to
select the desired
item.
OPERATION
43 44
*
If the language you selected is
not recorded on the disc, menu
language will not change even
if you set it to your desired
language.
Selecting the
OSD Language Selecting the
Audio Language
(recorded on the disc)
Setting the Language
OSD language is set to English by default.
21
In Stop mode,
press MENU
button.
Press Cursor
button to move to
‘Setup’ and then
press ENTER button.
4
•
Once the setup is complete, if the language was
set to English, OSD will be displayed in English.
3
Selecting the
Subtitle Language
(recorded on the disc)
Selecting the Disc Menu
Language (recorded on the disc)
Press ENTER
button.
5
Press Cursor ,
button to select the
desired item and then
press ENTER button.
Press Cursor ,
button to select the
desired language and then
press ENTER button.
Press RETURN button to return to the previous level.
Press MENU button to exit the setup screen.
SETUP

45 46
Setting TV Screen type
Depending on your TV type (Wide Screen TV or conventional 4:3 TV), you can select
the TV's aspect ratio.
21
43
In Stop mode,
press MENU
button.
Press Cursor
button to move to
‘Setup’ and then
press ENTER button.
•
Once the setup is complete, you will
be taken to the previous screen.
Press Cursor
button to move to ‘TV
DISPLAY’ and then
press ENTER button.
Press Cursor ,
button to select the
desired item and then
press ENTER button.
Press RETURN button to return to the previous level.
Press MENU button to exit the setup screen.
SETUP
The horizontal to vertical screen size ratio of conventional TVs is 4:3, while that of wide screen and high
definition TVs is 16:9. This ratio is called the aspect ratio. When playing DVDs recorded in different
screen sizes, you should adjust the aspect ratio to fit your TV or monitor.
✱ For a standard TV, select either "4:3LB" or "4:3PS" option according to
personal preference. Select "16:9" if you have a wide screen TV.
: Select this to view a 16:9 picture in the full-screen
mode on your wide screen TV.
• You can enjoy the wide screen aspect.
: Select this to play a 16:9 picture in the letter box
mode on a conventional TV.
• Black bars will appear at the top and bottom of the screen.
: Select this to play a 16:9 picture in the pan & scan
mode on a conventional TV.
• You can see the central portion of the screen only (with the
sides of the 16:9 picture cut off).
4:3LB
(4:3 Letterbox)
WIDE
4:3PS
(4:3 Pan&Scan)
• If a DVD is in the 4:3 ratio, you cannot view it in wide screen.
• Since DVD discs are recorded in various image formats, they will look different depending on
the software, the type of TV, and the TV aspect ratio setting.
Note
Adjusting the TV Aspect Ratio (Screen Size)
47 48
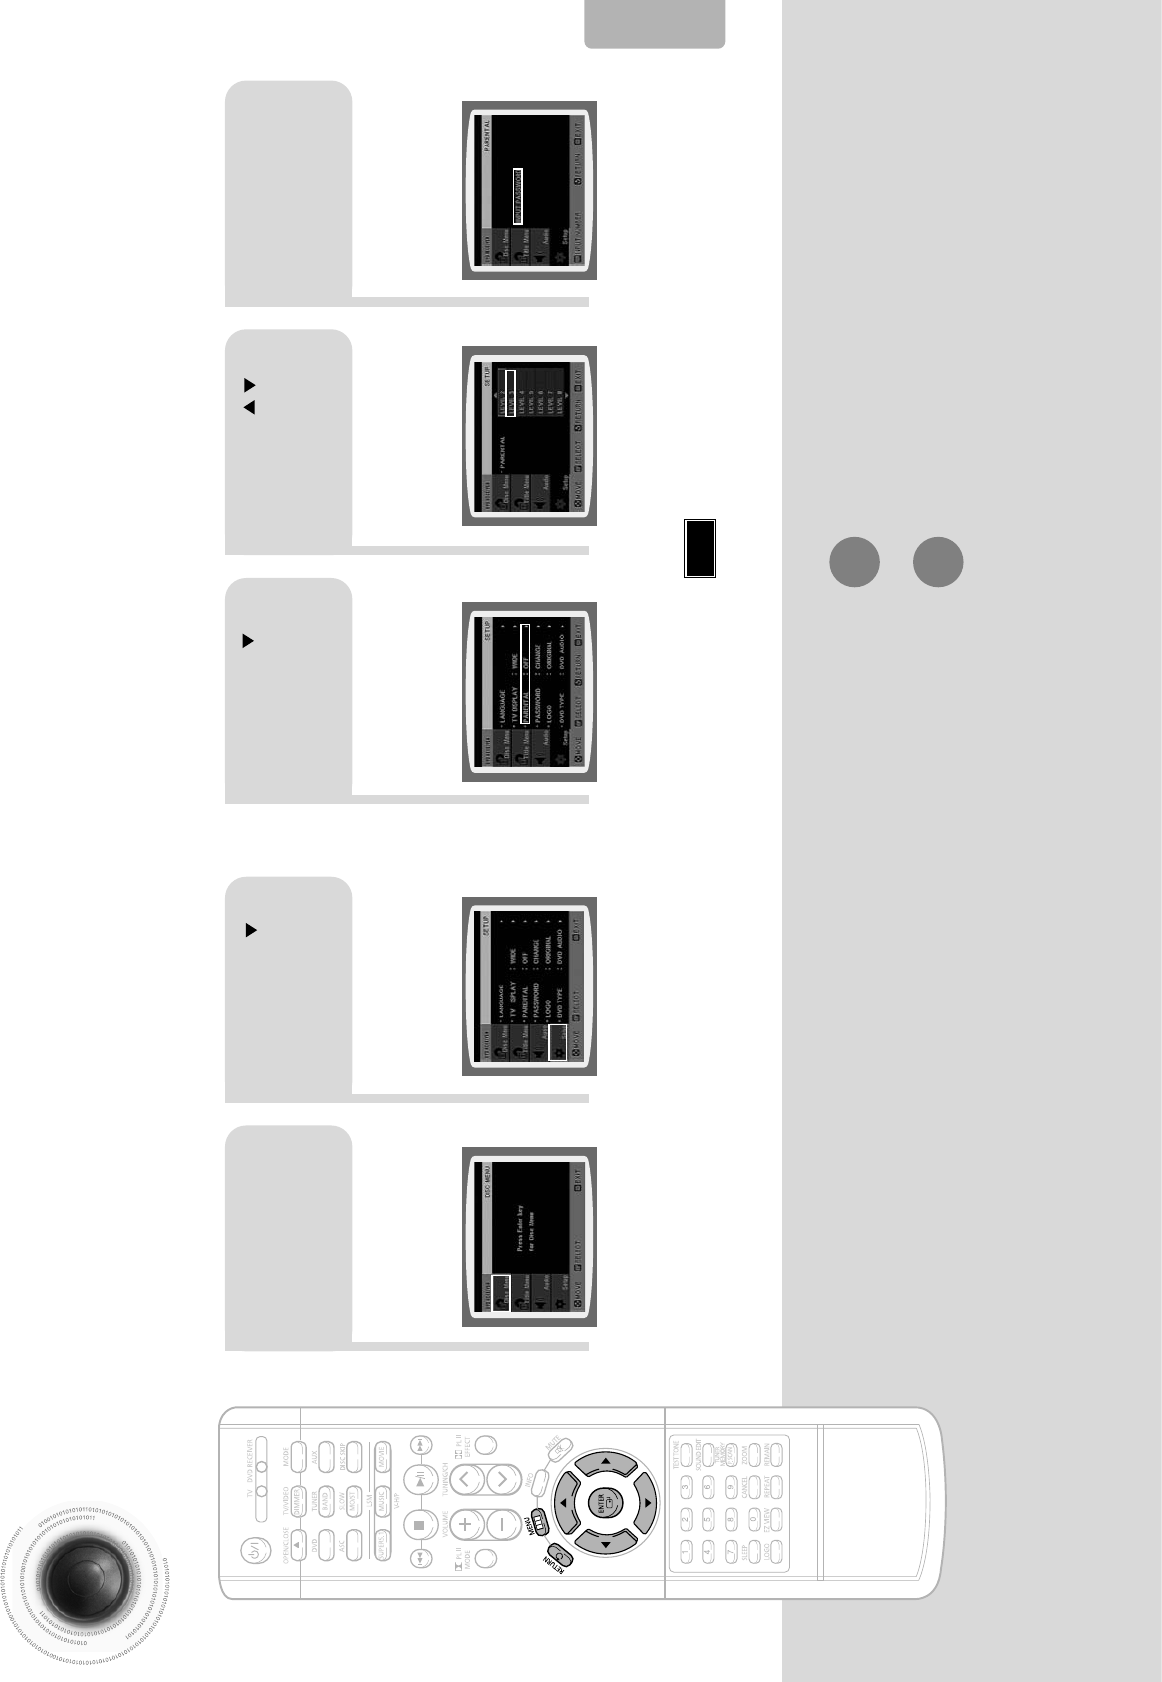
Setting Parental Controls (Rating Level)
Use this to restrict playback of adult or violent DVDs you do not want children to view.
•
This function works only if a DVD disc contains the rating level information.
Press RETURN button to return to the previous level.
Press MENU button to exit the setup screen.
21
In Stop mode,
press MENU
button.
Press Cursor
button to move to
‘Setup’ and then
press ENTER button.
4
•
The password is set to "7890" by default.
•
Once the setup is complete, you will be
taken to the previous screen.
•
If you have selected Level 6, you
cannot view DVDs with Level 7 or
higher.
•
The higher the level, the closer the
content is to violent or adult material.
3 5
Press Cursor
button to move to
‘PARENTAL’ and then
press ENTER button.
Press Cursor , button
to select the desired rating
level and then press
ENTER button.
Enter the password
and then press
ENTER button.
Note
SETUP

21
Press MENU button.
Press Cursor
button to move to
‘Setup’ and then
press ENTER button.
4
•
Enter the old password, a new
password, and confirm new password.
•
The setting is complete.
3 5
Press RETURN button to return to the previous level.
Press MENU button to exit the setup screen.
49 50
Press Cursor button to
move to ‘PASSWORD’
and then press ENTER
button.
Press ENTER
button. Enter the password
and then press
ENTER button.
SETUP
Setting the Password
You can set the password for the Parental (rating level) setting.
•
The password is set to "7890" by default.
Note
51 52
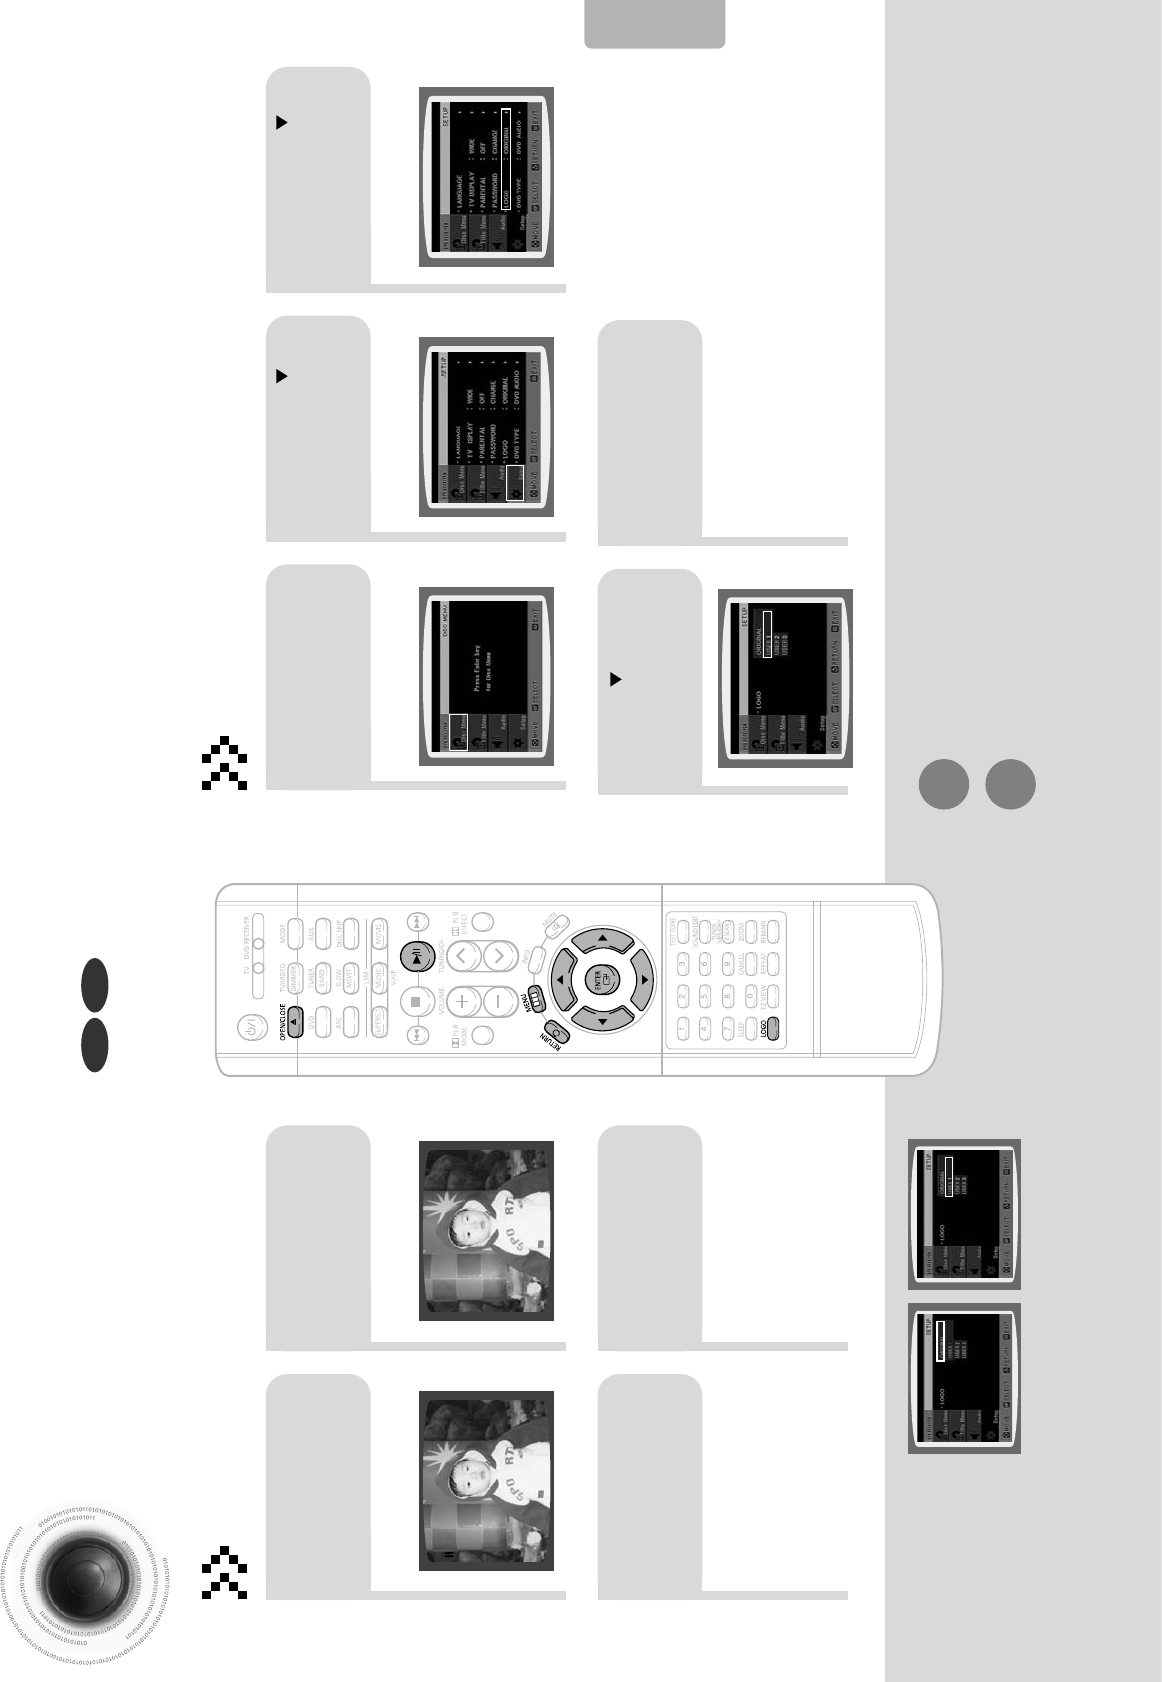
Setting the Wallpaper
While watching a DVD or JPEG CD, you can set the image you like as background wallpaper.
DVDJPEG
SETUP
•
“COPY LOGO DATA” will be
displayed on the TV screen.
•
The selected wallpaper will be
displayed.
•
You can repeat Steps 1 and 2 to
set up to 3 wallpapers.
21
43
During playback, press
PLAY/PAUSE button
when the image you
like comes up.
Press LOGO
button.
Press OPEN/
CLOSE to close
the disc tray.
The power will turn off
and then back on and
the disc tray will open
automatically.
PAUSE COPY LOGO DATA
Setting the Wallpaper
21 3
In Stop mode,
press MENU
button.
Press Cursor
button to move to
‘Setup’ and then
press ENTER button.
Press Cursor
button to move to
‘LOGO’ and then
press ENTER button.
To Change the Wallpaper
54
Press MENU
button to exit the
setup screen.
Press to select
the desired ‘USER’,
and then press
ENTER.
Select this to set the
Samsung Logo image as
your wallpaper.
Select this to set the desired
image as your wallpaper.
Press RETURN button to return to the previous level.
Press MENU button to exit the setup screen.

21
Press the MENU
button while the
disc tray is open.
Press Cursor
button to move to
‘Setup’ and then
press ENTER button.
43
Press RETURN button to return to the previous level.
Press MENU button to exit the setup screen.
53 54
Press Cursor
button to move to
‘DVD TYPE’ and then
press ENTER button.
Press Cursor ,
button to move to
‘DVD VIDEO’ and then
press ENTER button.
SETUP
DVD Playback Mode
•
DVD Play mode is set to DVD Audio as factory default setting.
Note
Some DVD-Audio discs contain DVD-Video as well as DVD-Audio.
To play back the DVD-Video portion of the DVD-Audio disc, set the unit to DVD-Video mode.
•
Set steps 1 ~ 4 again if you want to
switch to DVD AUDIO Play mode.
When Selecting DVD Play Mode:
•
DVD VIDEO : set to play the DVD video
contents contained in DVD
audio disc.
•
DVD AUDIO : set to play the default DVD
audio.
21
43
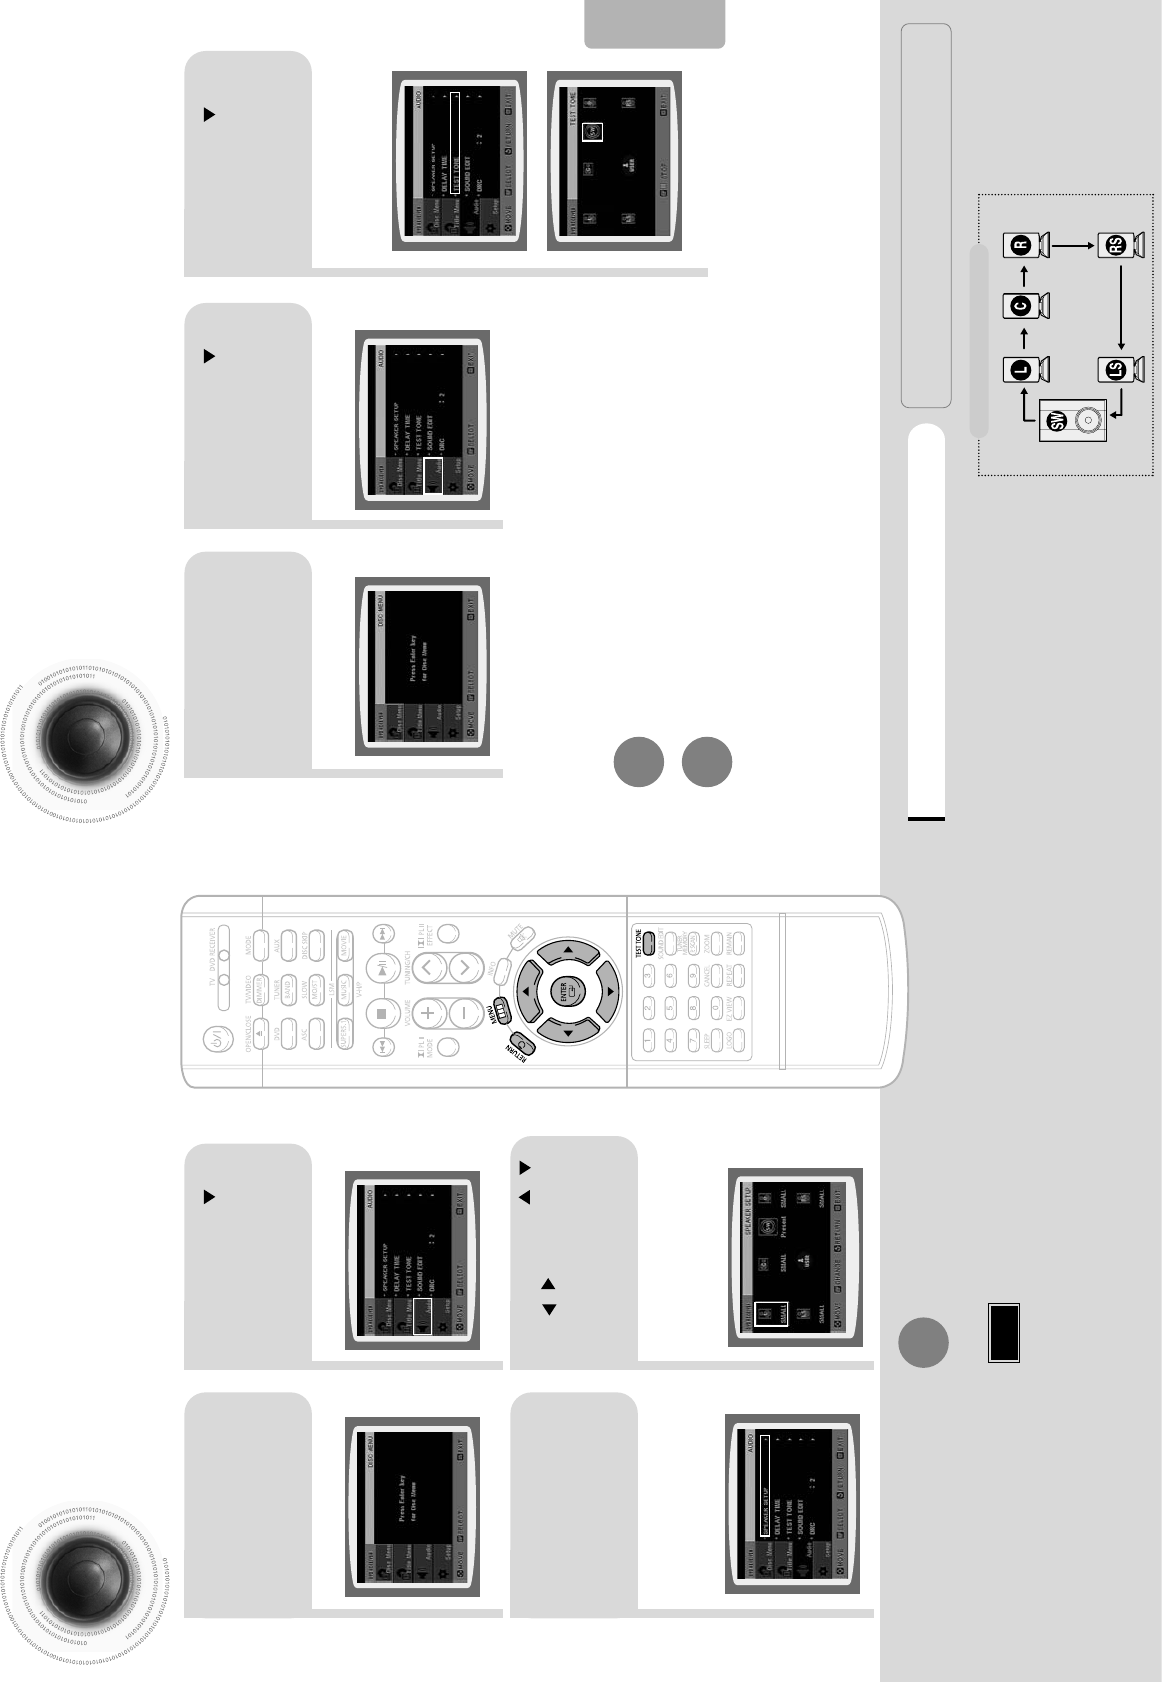
Setting the Speaker Mode
Signal outputs and frequency responses from the speakers will automatically be adjusted
according to your speaker configuration and whether certain speakers are used or not.
Setting the Test Tone
Use the Test Tone feature to check the speaker connections and to adjust the speaker levels.
In Stop mode,
press MENU
button.
Press Cursor
button to move to
‘Audio’ and then
press ENTER button.
In the Speaker
Setup, press the
ENTER button again.
L: Front Speaker (L) C: Center Speaker SW: Subwoofer
R: Front Speaker (R) LS: Rear Speaker (L) RS: Rear Speaker (R)
Press Cursor , ,
, buttons to move
to the desired
speaker and then
press ENTER button.
•
For C, LS, and RS, each time the button
is pressed, the mode switches
alternately as follows: SMALL ➝ NONE.
•
For L and R, the mode is set to SMALL.
•
Depending on PRO LOGIC and STEREO, the speaker mode may vary.
Press RETURN button to return to the previous level.
Press MENU button to exit the setup screen.
55 56
Note
SETUP
SMALL
: Select this when using the speakers.
NONE : Select this when no speakers are installed.
21
In Stop mode,
press MENU
button.
Press Cursor
button to move to
‘Audio’ and then
press ENTER button.
3Press Cursor button
to move to ‘TEST
TONE’ and then press
ENTER button.
•
The test tone will be sent to L ➝ C➝
R➝ RS ➝ LS ➝ SW in that order.
If the ENTER button is pressed again
at this time, the test tone will stop.
To end the test tone,
press TEST TONE button again.
Press TEST TONE button.
•
Test tone will be produced as follows:
When playing a DVD or CD, this will work
only in Stop mode.
•
Use this function to check that each speaker is
correctly connected and that there is no problem.
Alternate method: press the TEST TONE button on the remote.
Multi-Channel Pro Logic Mode
Start
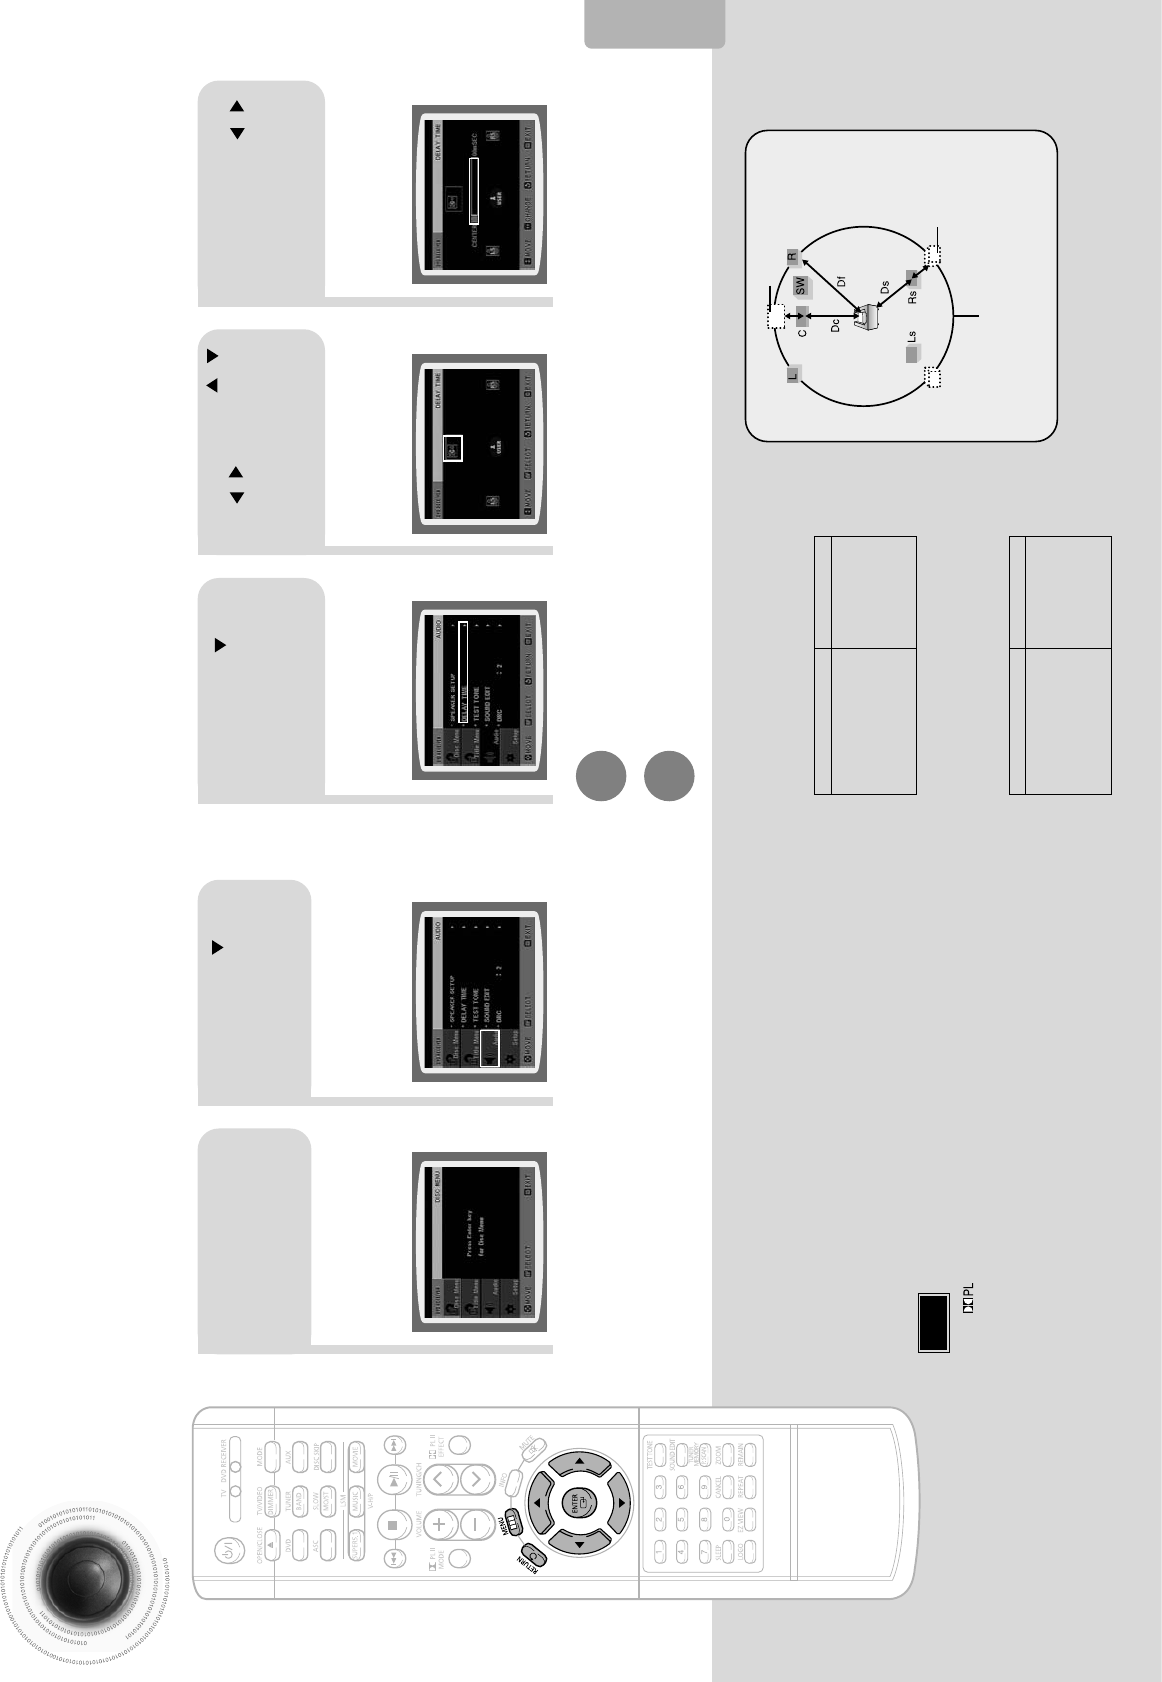
Setting the Delay Time
If the speakers cannot be placed at equal distances from the listening position, you can adjust the
delay time of the audio signals from the center and rear speakers.
57 58
•Setting REAR (SURROUND) SPEAKERS
If the distance of Df is equal to the distance of Ds
in the figure, set the mode as 0ms. Otherwise,
change the setting according to the table.
•Setting CENTER SPEAKER
If the distance of Dc is equal to or longer than the
distance of Df in the figure, set the mode as 0ms.
Otherwise, change the setting according to the table.
Setting up the Speaker Delay Time
When 5.1CH Surround Sound is played, you can enjoy the best sound if
the distance between you and each speaker is the same. Since the sounds
arrive at the listening position at different times depending on the
placement of speakers, you can adjust this difference by adding a delay
effect to the sound of the Center Speaker and Surround Speakers.
Df: The distance from FRONT SPEAKER
Dc: The distance from CENTER SPEAKER
Ds: The distance from SURROUND SPEAKER
Ideal CENTER
SPEAKER placement
It is desirable to place all speakers within this circle.
Ideal
SURROUND
SPEAKER
placement
SETUP
2
1
In Stop mode,
press MENU
button.
Press Cursor button
to move to ‘Audio’ and
then press ENTER
button.
•
You can set the delay time for C
between 00 and 05mSEC and for
LS and RS between 00 and
15mSEC.
43 5
Press Cursor button
to move to ‘DELAY
TIME’ and then press
ENTER button.
Press Cursor , ,
, buttons to move
to the desired
speaker and then
press ENTER button.
Press Cursor ,
to set the Delay
time.
Press RETURN button to return to the previous level.
Press MENU button to exit the setup screen.
•
With (Dolby Pro Logic II), the delay time may be different for each mode.
•
With AC-3 and DTS, the delay time can be set between 00 and 15mSEC.
Note
Distance between Df and Dc Delay Time
0 ms
1 ms
2 ms
3 ms
4 ms
5 ms
0 inch
13.6 inches
27.2 inches
40.8 inches
4.5 feet
5.6 feet
Distance between Df and Ds Delay Time
0 ms
3 ms
6 ms
9 ms
12 ms
15 ms
0 inch
40.8 inches
6.7 feet
10.0 feet
13.4 feet
16.7 feet