Samsung Electronics Co HWN300 SoundBar User Manual for IC
Samsung Electronics Co Ltd SoundBar for IC
User manual

HW-N300
USER MANUAL
ENG - 2
SAFETY INFORMATION
SAFETY WARNINGS
TO REDUCE THE RISK OF ELECTRIC SHOCK, DO
NOT REMOVE THE COVER (OR BACK).
NO USER-SERVICEABLE PARTS ARE INSIDE.
REFER SERVICING TO QUALIFIED SERVICE
PERSONNEL.
CAUTION
RISK OF ELECTRIC SHOCK.
DO NOT OPEN.
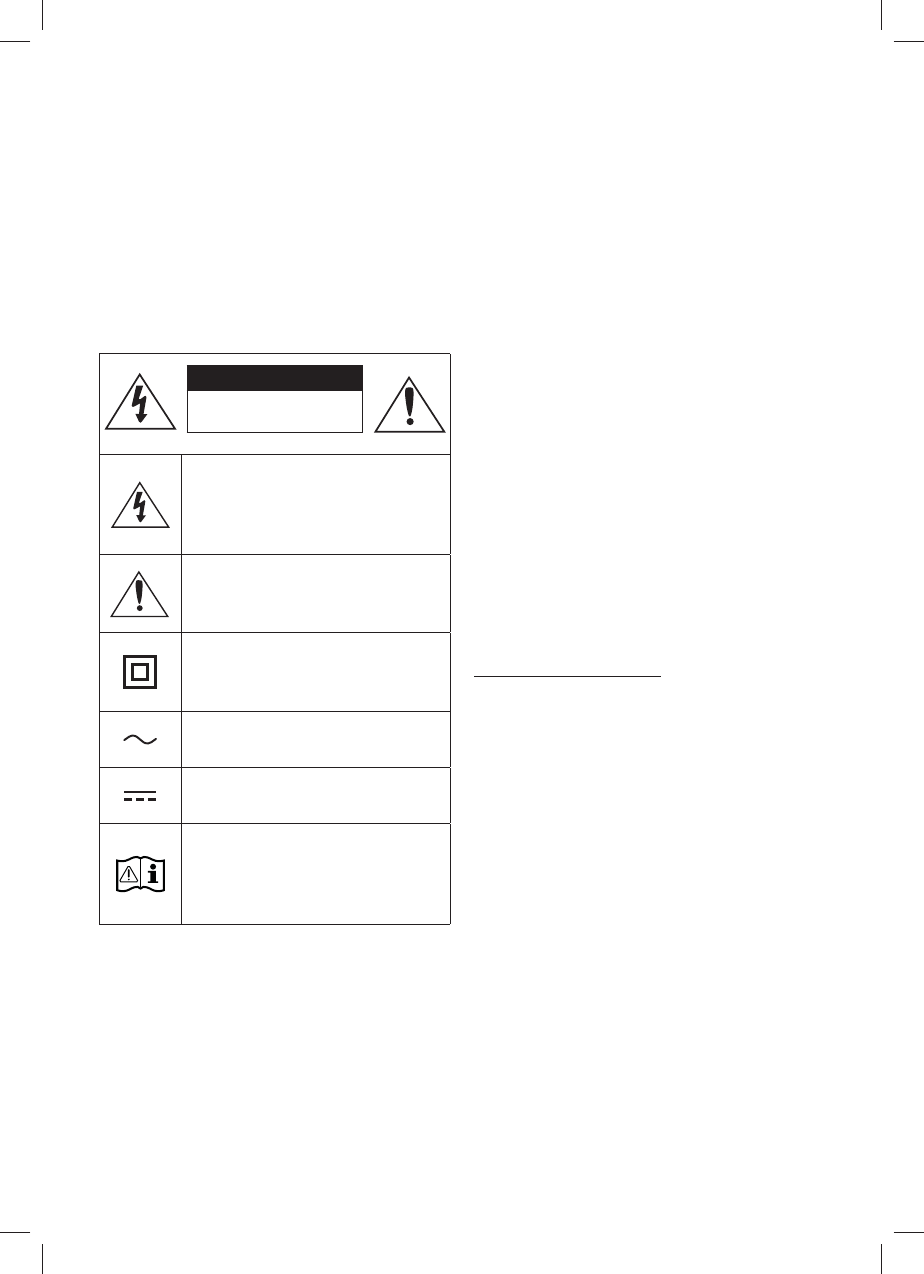
This symbol indicates that high voltage
is present inside. It is dangerous to
make any kind of contact with any
internal part of this product.
This symbol indicates that this product
comes with important literature
concerning operation and maintenance.
Class II product : This symbol indicates
that a safety connection to electrical
earth (ground) is not required.
AC voltage : Rated voltage marked
with this symbol is AC voltage.
DC voltage : Rated voltage marked
with this symbol is DC voltage.
Caution. Consult Instructions for use :
This symbol instructs the user to
consult the user manual for further
safety related information.
WARNING
࡙ ƟͱθʪʒЇʀʪϩ˵ʪθ̈ϑ̧ͱ˙ѣθʪͱθʪ̷ʪʀϩθ̈ʀϑ˵ͱʀ̧ࡡʒͱ
not expose this appliance to rain or moisture.
࡙To prevent injury, this apparatus must be
ϑʪʀЇθʪ̷цɇϩϩɇʀ˵ʪʒϩͱϩ˵ʪѤͱͱθࢥиɇ̷̷̈͝
accordance with the installation instructions.
࡙This product contains chemicals known to the
State of California to cause cancer and birth
defects or other reproductive harm.
CAUTION
࡙Do not expose this apparatus to dripping or
ϑΧ̷ɇϑ˵̈͝˝ࢋUͱ͝ͱϩΧЇϩͱɵ̟ʪʀϩϑѣ̷̷ʪʒӥϩ˵
liquids, such as vases, on the apparatus.
࡙To turn this apparatus off completely, you
must pull the power plug out of the wall
socket. Consequently, the power plug must
be easily and readily accessible at all times.
FCC NOTE (for U.S.A):
Class B FCC Statement
The included module(s) has been tested and
found to comply with the limits for a Class B
digital device, pursuant to Part 15 of the FCC
Rules. These limits are designed to provide
reasonable protection against harmful
interference in a residential installation. This
equipment generates, uses and can radiate radio
frequency energy and, if not installed and used in
accordance with the instructions, may cause
harmful interference to radio communications.
However, there is no guarantee that interference
will not occur in a particular installation. If this
equipment does cause harmful interference to
radio or television reception, which can be
determined by turning the equipment off and on,
the user is encouraged to try to correct the
interference by one of the following measures:

ENG - 3
࡙Reorienting or relocating the receiving
antenna.
࡙Increasing the separation between the
equipment and receiver.
࡙Connecting the equipment to an outlet that is
on a different circuit than the radio or TV.
࡙Consulting the dealer or an experienced
θɇʒ̈ͱࢥƟǤϩʪʀ˵̈͝ʀ̈ɇ͝˙ͱθ˵ʪ̷Χࢋ
FCC Radiation Exposure Statement :
This equipment complies with FCC radiation
exposure limits set forth for an uncontrolled
environment.
This equipment should be installed and operated
so there is at least 8 inches (20 cm) between the
radiator and your body. This device and its
antenna(s) must not be co-located or operated in
conjunction with any other antenna or
transmitter.
FCC Caution :
࡙ ͝цʀ˵ɇ͝˝ʪϑͱθ͔ͱʒ̈ѣʀɇϩ̈ͱ͝ϑ͝ͱϩʪуΧθʪϑϑ̷ц
approved by the party responsible for
compliance could void the user’s authority to
operate this equipment. This device complies
with Part 15 of the FCC Rules. Operation is
subject to the following two conditions: (1)
This device may not cause harmful
interference, and (2) this device must accept
any interference received, including
interference that may cause undesired
operation.
࡙ Ɵ˵̈ϑΧθͱʒЇʀϩϑɇϩ̈ϑѣʪϑAAθʪ˝Ї̷ɇϩ̈ͱ͝ϑи˵ʪ͝
shielded cables and connectors are used to
connect the unit to other equipment. To
prevent electromagnetic interference with
electric appliances, such as radios and
televisions, use shielded cables and
connectors for connections.
Important Safety Instructions
Read these operating instructions carefully
before using the unit. Follow all the safety
instructions listed below. Keep these operating
instructions handy for future reference.
1. Read these instructions.
2. Keep these Instructions.
3. Heed all warnings.
4. Follow all instructions.
5. Do not use this apparatus near water.
6. Clean only with a dry cloth.
7. Do not block any ventilation openings.
Install in accordance with the manufacturer’s
instructions.
8. Do not install near any heat sources such as
radiators, heat registers, stoves, or other
ɇΧΧɇθɇϩЇϑ࣍̈͝ʀ̷Їʒ̈͝˝ɇ͔Χ̷̈ѣʪθϑ࣎ϩ˵ɇϩΧθͱʒЇʀʪ
heat.
9. Do not defeat the safety purpose of the
polarized or grounding-type plug.
A polarized plug has two blades with one
wider than the other. A grounding type plug
has two blades and a third grounding prong.
The wide blade or the third prong are
provided for your safety. If the provided plug
ʒͱʪϑ͝ͱϩѣϩ̈͝ϩͱцͱЇθͱЇϩ̷ʪϩࡡʀͱ͝ϑЇ̷ϩɇ͝
electrician for replacement of the obsolete
outlet.
10. Protect the power cord from being walked
on or pinched particularly at plugs,
convenience receptacles, and the point
where they exit from the apparatus.
11. Į̷͝цЇϑʪɇϩϩɇʀ˵͔ʪ͝ϩϑࢥɇʀʀʪϑϑͱθ̈ʪϑϑΧʪʀ̈ѣʪʒ
by the manufacturer.
ENG - 4
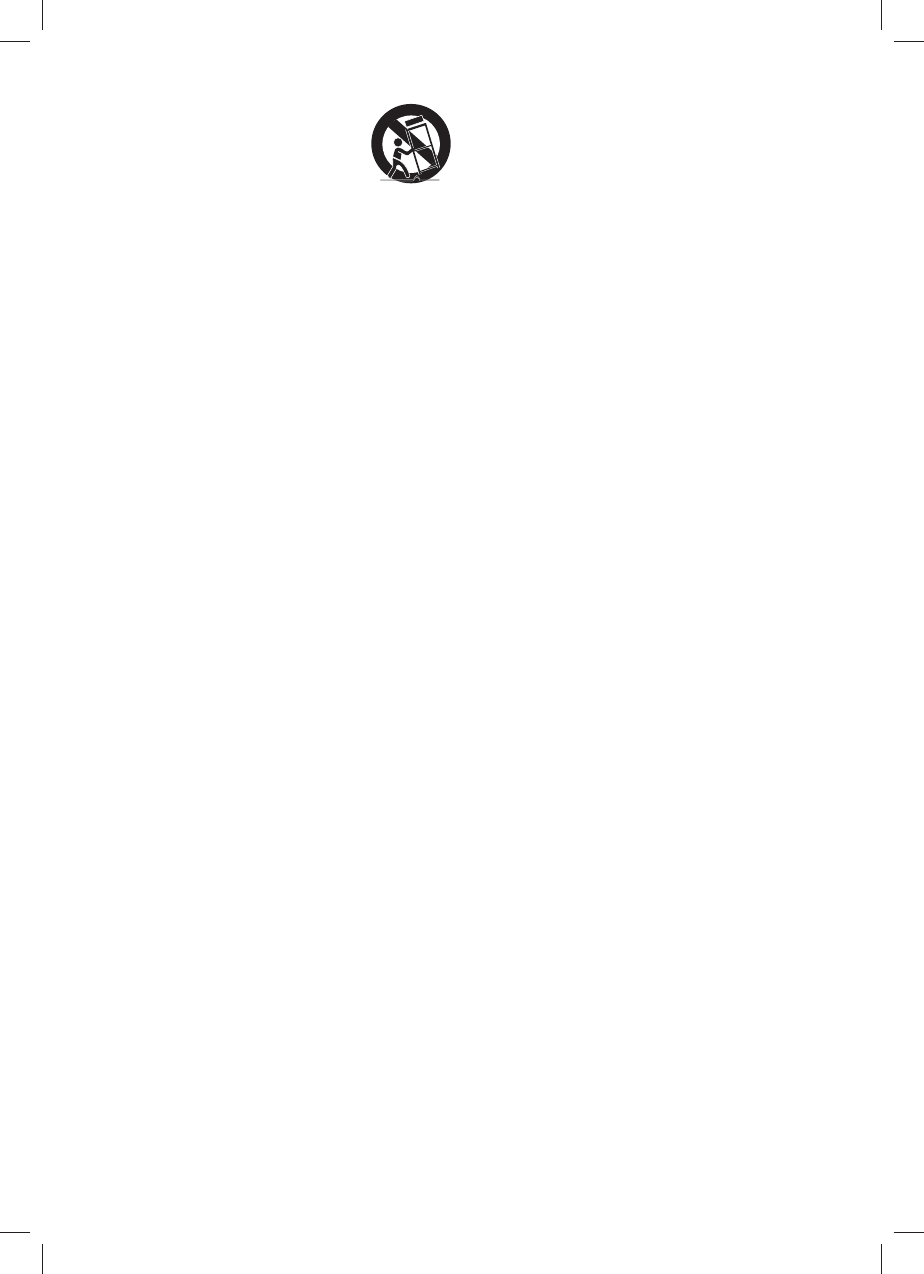
12. Use only with the cart, stand,
tripod, bracket, or table
ϑΧʪʀ̈ѣʪʒɵцϩ˵ʪ͔ɇ͝Ї˙ɇʀϩЇθʪθࡡ
or sold with the apparatus.
When a cart is used, use caution when
͔ͱӬ͝˝ϩ˵ʪʀɇθϩࢥɇΧΧɇθɇϩЇϑʀͱ͔ɵ̈͝ɇϩ̈ͱ͝ϩͱ
avoid injury from tip-over.
13. Unplug this apparatus during lightning
storms or when unused for long periods of
time.
14. ŵʪ˙ʪθɇ̷̷ϑʪθӬʀ̈͝˝ϩͱαЇɇ̷̈ѣʪʒϑʪθӬʀʪ
personnel. Servicing is required when the
apparatus has been damaged in any way,
such as when the power-supply cord or plug
is damaged, liquid has been spilled or objects
have fallen into the apparatus, the apparatus
has been exposed to rain or moisture, does
not operate normally, or has been dropped.
PRECAUTIONS
1. Ensure that the AC power supply in your
house complies with the power
θʪαЇ̈θʪ͔ʪ͝ϩϑ̷̈ϑϩʪʒͱ͝ϩ˵ʪ̈ʒʪ͝ϩ̈ѣʀɇϩ̈ͱ͝
sticker located on the bottom of your
product. Install your product horizontally, on
a suitable base (furniture), with enough
space around it for ventilation (3~4 inches).
Make sure the ventilation slots are not
ʀͱЭʪθʪʒࢋUͱ͝ͱϩΧ̷ɇʀʪϩ˵ʪЇ̈͝ϩͱ͝ɇ͔Χ̷̈ѣʪθϑ
or other equipment which may become hot.
This unit is designed for continuous use. To
fully turn off the unit, disconnect the AC plug
from the wall outlet. Unplug the unit if you
intend to leave it unused for a long period of
time.
2. During thunderstorms, disconnect the AC
plug from the wall outlet. Voltage peaks due
to lightning could damage the unit.
3. Do not expose the unit to direct sunlight or
other heat sources. This could lead to
overheating and cause the unit to
malfunction.
4. Protect the product from moisture (i.e.
Эɇϑʪϑ࣎ࡡɇ͝ʒʪуʀʪϑϑ˵ʪɇϩ࣍ʪࢋ˝ࢋɇѣθʪΧ̷ɇʀʪ࣎ͱθ
equipment creating strong magnetic or
ʪ̷ʪʀϩθ̈ʀѣʪ̷ʒϑࢋƸ͝Χ̷Ї˝ϩ˵ʪΧͱиʪθʀͱθʒ˙θͱ͔
the AC wall socket if the unit malfunctions.
Your product is not intended for industrial
use. It is for personal use only. Condensation
may occur if your product has been stored in
cold temperatures. If transporting the unit
during the winter, wait approximately
2 hours until the unit has reached room
temperature before using.
5. The battery used with this product contains
chemicals that are harmful to the
environment. Do not dispose of the battery
in the general household trash. Do not
expose the battery to excess heat, direct
ϑЇ̷̈͝˝˵ϩࡡͱθѣθʪࢋUͱ͝ͱϩϑ˵ͱθϩʀ̈θʀЇ̈ϩࡡ
disassemble, or overheat the battery.
Danger of explosion if the battery is replaced
incorrectly. Replace only with the same or
equivalent type.
ENG - 5
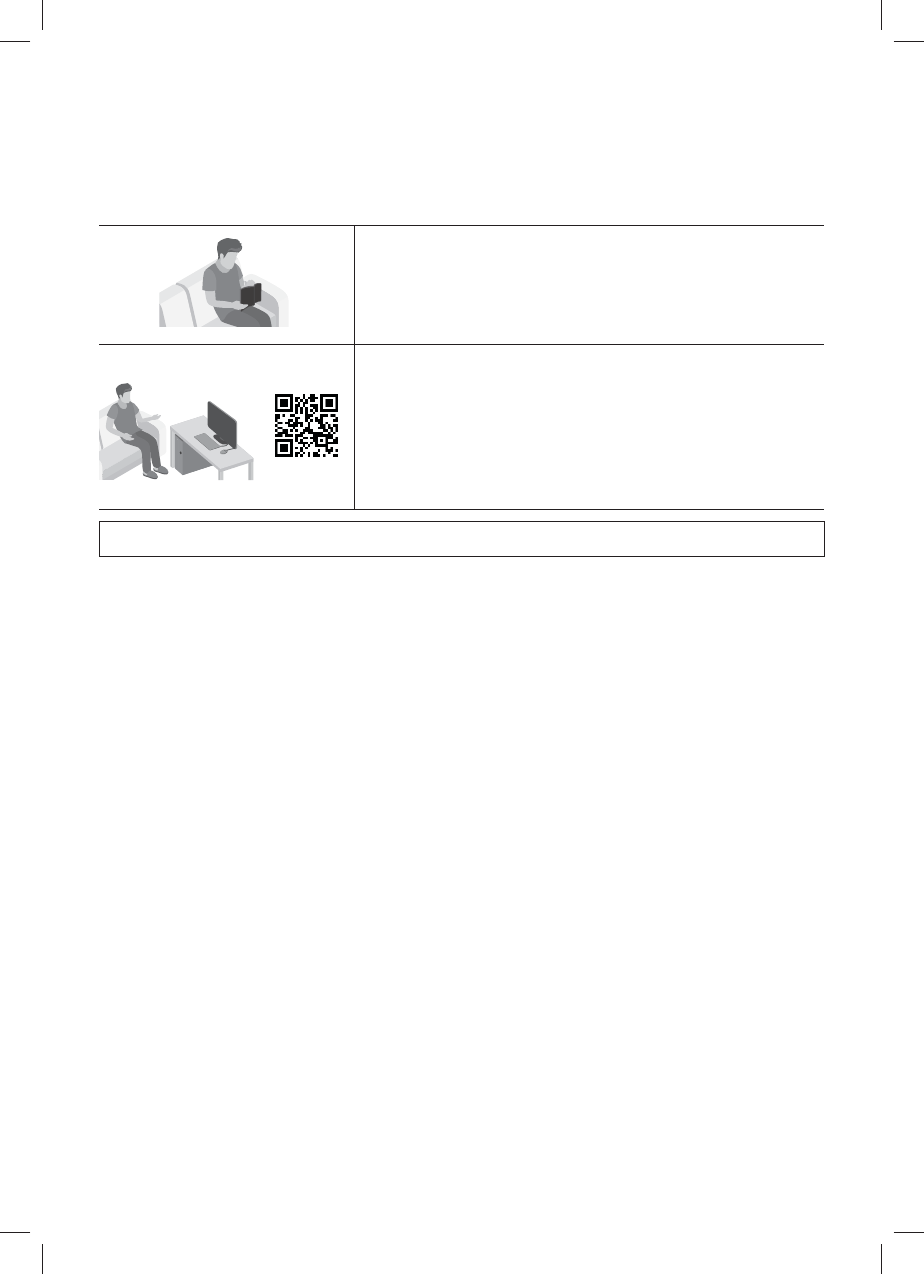
ABOUT THIS MANUAL
The user manual has two parts: this simple paper USER MANUAL and a detailed FULL MANUAL you can
download.
USER MANUAL
See this manual for safety instructions, product installation,
ʀͱ͔Χͱ͝ʪ͝ϩϑࡡʀͱ͝͝ʪʀϩ̈ͱ͝ϑࡡɇ͝ʒΧθͱʒЇʀϩϑΧʪʀ̈ѣʀɇϩ̈ͱ͝ϑࢋ
FULL MANUAL
You can access the FULL MANUAL on Samsung’s on-line
customer support center by scanning the QR code. To see the
manual on your PC or mobile device, download the manual in
document format from Samsung’s website.
࣍˵ϩϩΧࡠࢥࢥиииࢋϑɇ͔ϑЇ͝˝ࢋʀͱ͔ࢥϑЇΧΧͱθϩ࣎
Uʪϑ̈˝͝ɇ͝ʒϑΧʪʀ̈ѣʀɇϩ̈ͱ͝ϑɇθʪϑЇɵ̟ʪʀϩϩͱʀ˵ɇ͝˝ʪӥϩ˵ͱЇϩΧθ̈ͱθ͝ͱϩ̈ʀʪࢋ

ENG - 6
CONTENTS
01 Checking the Components 8
Inserting battery into the Remote Control ------------------------- 8
02 Product Overview 9
θͱ͝ϩࢥŵ̈˝˵ϩƊ̈ʒʪťɇ͝ʪ̷ͱ˙ϩ˵ʪƊͱЇ͝ʒɵɇθ ------------------------- 9
Bottom Panel of the Soundbar ------------------------- 10
03 The Remote Control 11
Adjusting the Soundbar volume with a TV remote control -------------------------
12
04 Connecting the Soundbar 14
Connecting Electrical Power -------------------------
14
05 Connecting to a TV 15
Connecting using an Optical Cable -------------------------
15
Connecting a TV or Bluetooth Device via Bluetooth -------------------------
17
06 Connecting an External Device 19
Connecting using an Optical Cable -------------------------
19
Connecting using an Analog Audio (AUX) Cable -------------------------
20
07 Connecting a USB Storage Device 21
Setting Repeat Play Options -------------------------
22
Software Update -------------------------
22

ENG - 7
08 Installing the Wall Mount (Optional) 23
Installation Precautions -------------------------
23
Wall mount Components -------------------------
23
09 Troubleshooting 26
10 License 27
11 Open Source License Notice 27
12 Important Notes About Service 27
ߢߤ ƊΧʪʀ̈ѣʀɇϩ̈ͱ͝ϑɇ͝ʒЇ̈ʒʪ ߣߩ
ƊΧʪʀ̈ѣʀɇϩ̈ͱ͝ϑ -------------------------
28
ENG - 8
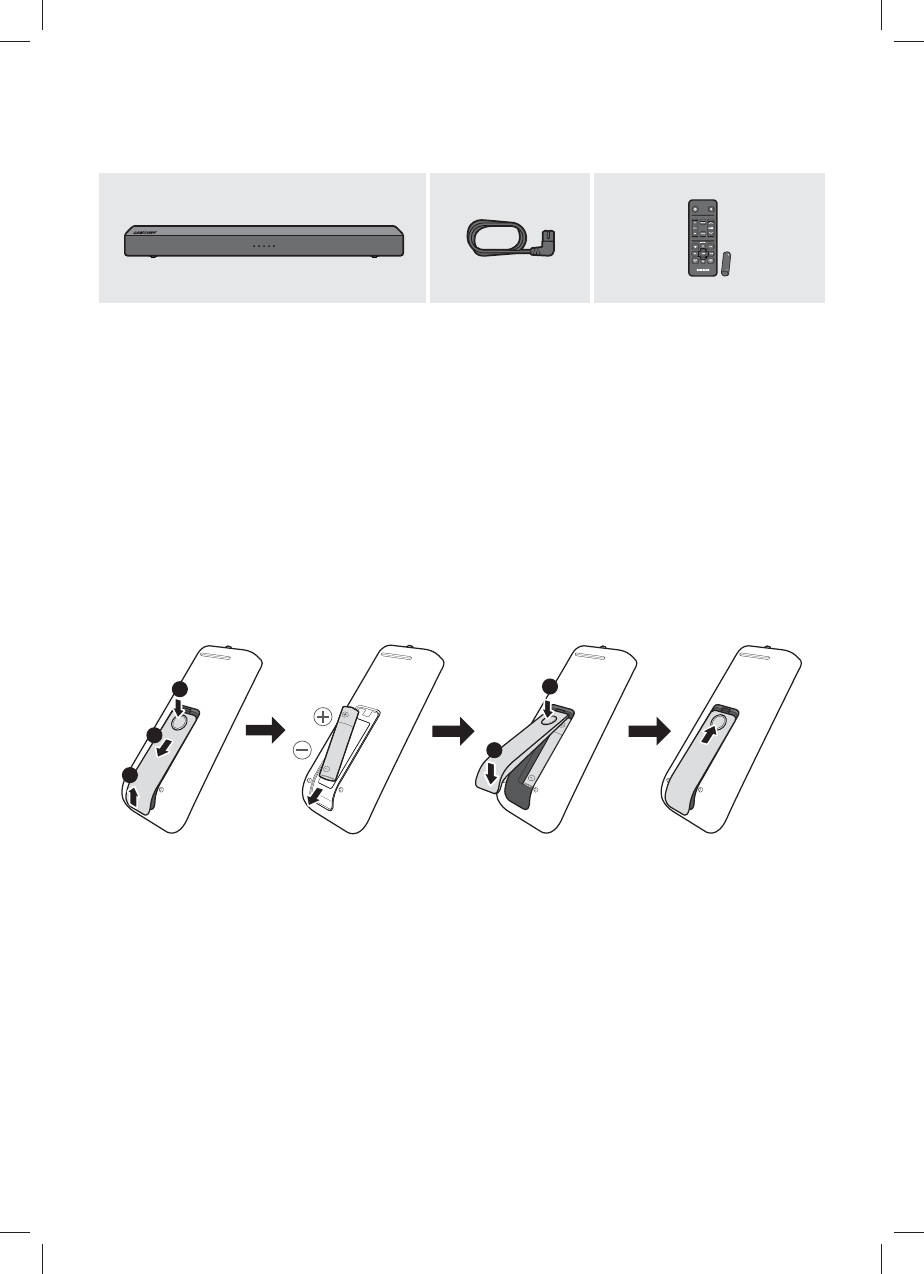
01 CHECKING THE COMPONENTS
Soundbar Main Unit Power Cord
(AH81-09663A)
Remote Control (A²81-09662A)/
Battery (AAA x 1)
࡙ Ƹϑʪθđɇ͝Їɇ̷ࢥǮɇθθɇ͝ϩцAɇθʒࢥŵʪ˝Ї̷ɇϩͱθцЇ̈ʒʪ࣍ĘͱϩɇЭɇ̷̈ɇɵ̷ʪ̈͝ϑͱ͔ʪ̷ͱʀɇϩ̈ͱ͝ϑ࣎ࢋ
࡙For more information about the power supply and power consumption, refer to the label attached
to the product. (Label : Bottom of the Soundbar Main Unit)
࡙To purchase additional components or optional cables, contact a Samsung Service Center or
Samsung Customer Care.
Inserting battery into the Remote Control
Match the polarity of the battery to the symbols on the battery compartment.
44
6
5
5
ENG - 9
02 PRODUCT OVERVIEW
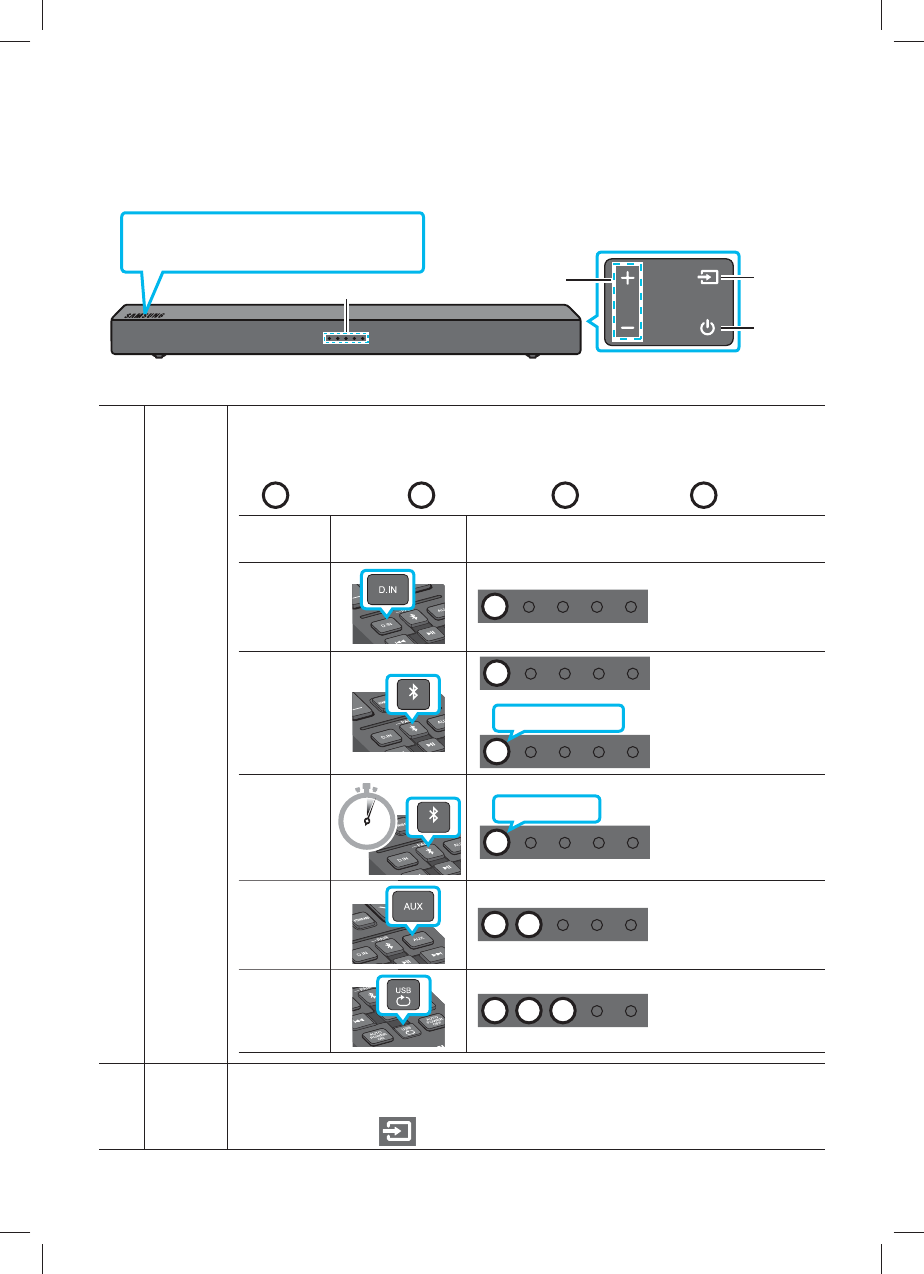
Front / Right Side Panel of the Soundbar
Volume
Power
Position the product so that the
SAMSUNG logo is located on the top.
Front of the Soundbar Right Side of the Soundbar
LED
indicator
Ɵ˵ʪøkUÃ͝ʒ̈ʀɇϩͱθѤɇϑ˵ʪϑࡡ˝̷ͱиϑࡡͱθʀ˵ɇ͝˝ʪϑʀͱ̷ͱθʒʪΧʪ͝ʒ̈͝˝ͱ͝ϩ˵ʪƊͱЇ͝ʒɵɇθϑʀЇθθʪ͝ϩ
mode or status. The color of the LED indicator and the number of lights indicate the active
mode as described below.
W White LED B Blue LED R Red LED G Green LED
Mode Remote control
Button LED indicator
D.IN W
Bluetooth
BConnected status
B
Slow-Blinking
Disconnected status
Bluetooth
pairing 5 Sec B
Fast-Blinking
AUX W W
USB W W W
Source
Selects the source input mode. (D.INࢥBluetoothࢥAUX ࢥUSB)
࡙To turn on “Bluetooth pairing” mode, change the source to “Bluetooth” mode and then
press and hold the button for more than 5 seconds.

ENG - 10
Bottom Panel of the Soundbar
Bottom of the Soundbar
AUX IN
POWER DIGITAL AUDIO IN
(OPTICAL)
USB (5V 0.5A)
AUX
IN
P
O
WER DI
G
ITAL AUDI
O
IN
(O
PTI
C
AL
)
U
S
B
(
5V 0.5A
)
AUX IN
DIGITAL AUDIO IN
(OPTICAL)
USB (5V 0.5A)
POWER
POWER Aͱ͝͝ʪʀϩϩ˵ʪƊͱЇ͝ʒɵɇθϑAΧͱиʪθʀͱθʒࢋ
AUX Connect to the Analog output of an external device.
D.IN Connect to the digital (optical) output of an external device.
USB Aͱ͝͝ʪʀϩɇƸƊ9ʒʪӬʀʪ˵ʪθʪϩͱΧ̷ɇц͔Їϑ̈ʀѣ̷ʪϑͱ͝ϩ˵ʪƸƊ9ʒʪӬʀʪϩ˵θͱЇ˝˵ϩ˵ʪƊͱЇ͝ʒɵɇθࢋ

ENG - 11
03 THE REMOTE CONTROL
࡙The images, buttons, and functions of the remote control may differ depending on the model.
Turns the Soundbar on and off.
Press this button to mute the sound.
Press it again to unmute the sound.
Press this button to turn off the Auto
Power Link function.
Press to enter the "USB" mode.
Push this button up or down to
adjust the bass volume within a -6 to
+6 range.
Press to enter the "AUX" mode.
Press the button to select the
ΧθʪӬͱЇϑ͔Їϑ̈ʀѣ̷ʪࢋ
Press the ɵЇϩϩͱ͝ϩͱΧ̷ɇцࢥΧɇЇϑʪ
ɇ͔Їϑ̈ʀѣ̷ʪࢋ
Press the button to select the
͝ʪуϩ͔Їϑ̈ʀѣ̷ʪࢋ
Press to select the desired
sound effect by choosing
SURROUND or STANDARD.
Push this button up or down to
adjust the volume.
Press this button to turn on the
Auto Power Link function. See
"Connecting using an Optical
Cable" on pages 15 and 16
for details.
Press to enter the “D.IN” mode.
Press to enter the “Bluetooth”
mode.
You can use your Bluetooth
device in this mode.
To pair a new Bluetooth device,
press and hold this button for
5 seconds or more.
ENG - 12
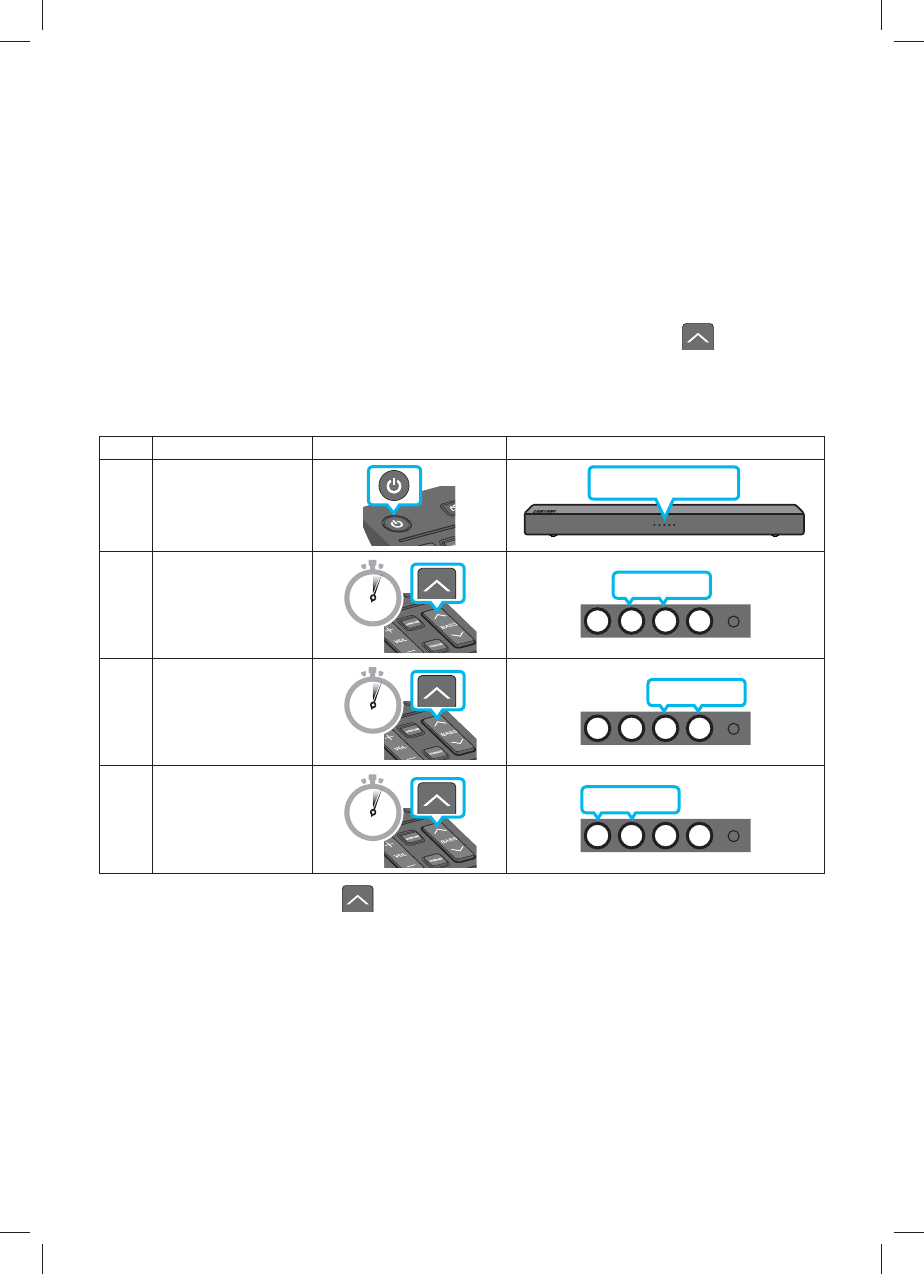
Adjusting the Soundbar volume with a TV remote control
If you have a Samsung TV, you can adjust the Soundbar’s volume using the IR remote
control that came with your Samsung TV.
First use the TV menu to set the TV audio on your Samsung TV to external speakers, then use your
Samsung remote to control the Soundbar’s volume. For more information, see the TV’s user manual.
The default mode for this function is control by a Samsung TV.
1. If your TV is not a Samsung TV and you want your TV’s remote to control the Soundbar’s volume,
you can change the settings of this function by pressing and holding the BASS button
repeatedly. To have your TV’s remote adjust the Soundbar’s volume, follow Steps 1 through 3
below.
2. If you want to turn off this function completely, follow Steps 1 and 2.
Mode Remote control Button LED indicator
1. Turn off
All LED’s Off
2. “OFF” mode 5 Sec W W W W
Blinking
3. “All TV” mode 5 Sec W W W W
Blinking
4. “Samsung TV” mode
(Default mode) 5 Sec W W W W
Blinking
–Each time you press the BASS button and hold it for 5 seconds, the mode switches in the
following order:
“Samsung TVࣩ࣍Uʪ˙ɇЇ̷ϩ͔ͱʒʪ࣎२ࣨOFFࣩ२ࣨAll TV”.
– The LED’s blink for 3~4 seconds, then return to the standby power off mode.
– This function may not be available, depending on your TV`s remote control.
– For a list of manufacturers that support this feature, refer to the FULL MANUAL of your Soundbar
ͱ͝ϩ˵ʪƊɇ͔ϑЇ͝˝иʪɵϑ̈ϩʪ࣍иииࢋϑɇ͔ϑЇ͝˝ࢋʀͱ͔ࢥϑЇΧΧͱθϩ࣎ࢋ

ENG - 13
– This volume control function works with IR TV remotes only. It does not work with Bluetooth TV
remotes (remotes that require pairing).
NOTE
– Not all TV manufacturers support this feature. For a list of manufacturers that do support this
feature, refer to the FULL MANUAL of your Soundbar on the Samsung web site
࣍иииࢋϑɇ͔ϑЇ͝˝ࢋʀͱ͔ࢥϑЇΧΧͱθϩ࣎ࢋ
ENG - 14
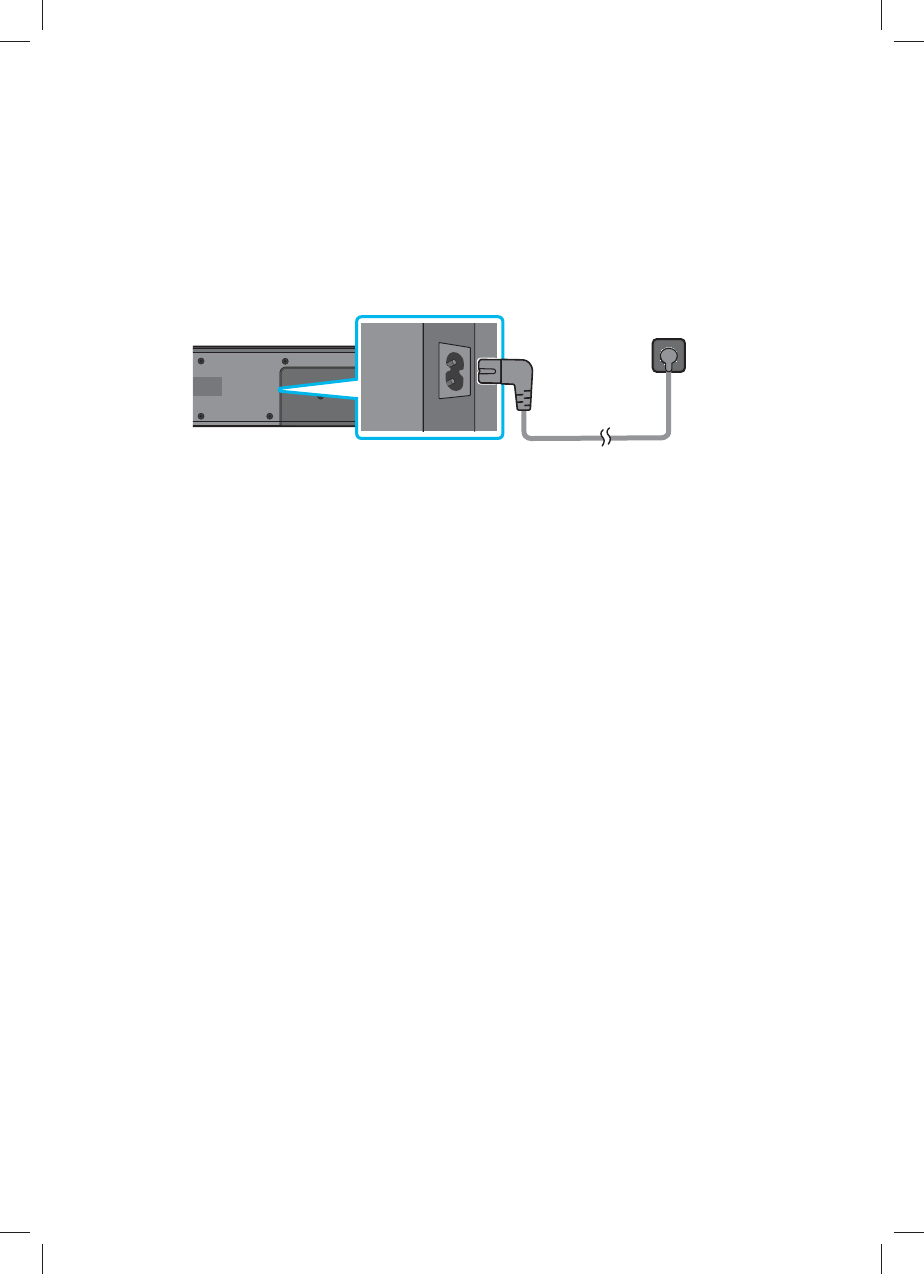
04 CONNECTING THE SOUNDBAR
Connecting Electrical Power
࡙For information about the required electrical power and power consumption, refer to the label
attached to the product. (Label : Bottom of the Soundbar Main Unit)
AUX IN
POWER DIGITAL AUDIO IN
(OPTICAL)
USB (5V 0.5A)
POWER
Power Cord
Electrical Outlet
Bottom of the Soundbar Main Unit
ENG - 15
05 CONNECTING TO A TV
Hear TV sound from your Soundbar through wired or wireless connections.
࡙When the Soundbar is connected to selected Samsung TVs, you can control the Soundbar using the
TV’s remote control.
– This feature is supported by 2017 and later Samsung Smart TVs that support Bluetooth when
you connect the Soundbar to the TV using an optical cable.
– Ɵ˵̈ϑ˙Ї͝ʀϩ̈ͱ͝ɇ̷ϑͱɇ̷̷ͱиϑцͱЇϩͱЇϑʪϩ˵ʪƟǤ͔ʪ͝Їϩͱɇʒ̟Їϑϩϩ˵ʪϑͱЇ͝ʒѣʪ̷ʒɇ͝ʒЭɇθ̈ͱЇϑϑʪϩϩ̈͝˝ϑ
as well as the volume and mute.
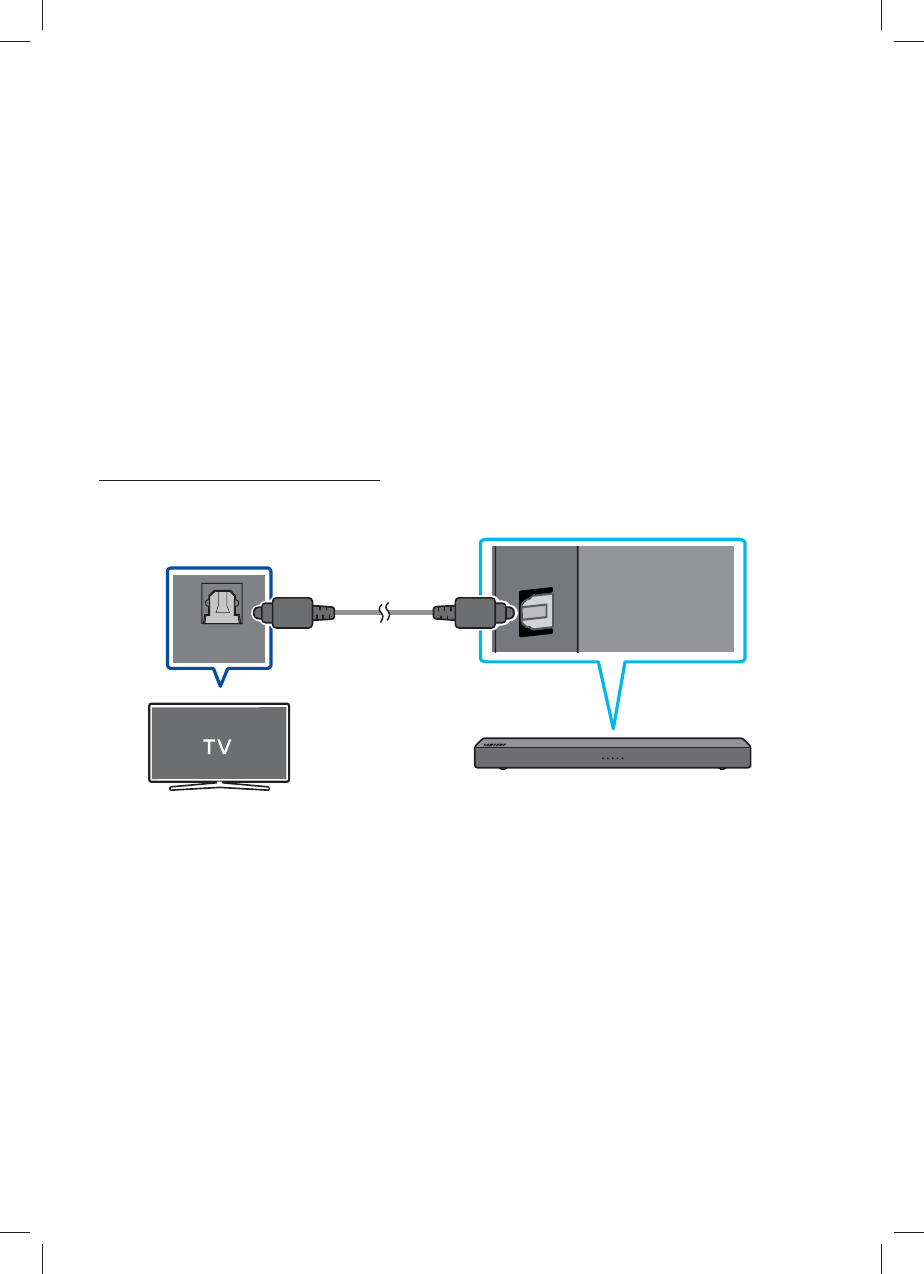
Connecting using an Optical Cable
Step 1. Connect an Optical Cable
DIGITAL AUDIO IN
(OPTICAL)
ĮťƟÃAøĮƸƟ
Optical Cable
(not supplied)
Bottom of the Soundbar
NOTE
– When the audio in a broadcast is encoded in Dolby Digital and the “Digital Output Audio Format” on
your TV is set to PCM, we recommend that you change the setting to Dolby Digital. When the
setting on the TV is changed, you will experience better sound quality. (The TV menu may use
different words for Dolby Digital and PCM depending on the TV manufacturer.)

ENG - 16
Step 2. Change the Soundbar’s mode to D.IN
Right Side of the Soundbar
(OR)
W
Auto Power Link
This Function automatically turns on the Soundbar when the TV is turned on if the Soundbar is
connected to the TV by an Optical Cable (not supplied).
Press the button on the remote control to turn on this function.
࡙Auto Power Link is set to ON by default. (To turn off this function, press the button on the
remote control.)
࡙Depending on the connected device, Auto Power Link may not function.
࡙This function is only available in the “D.IN” mode.
Mode Remote control Button LED indicator
OFF
W W R
Blinking
ON
W W G
Blinking
ENG - 17
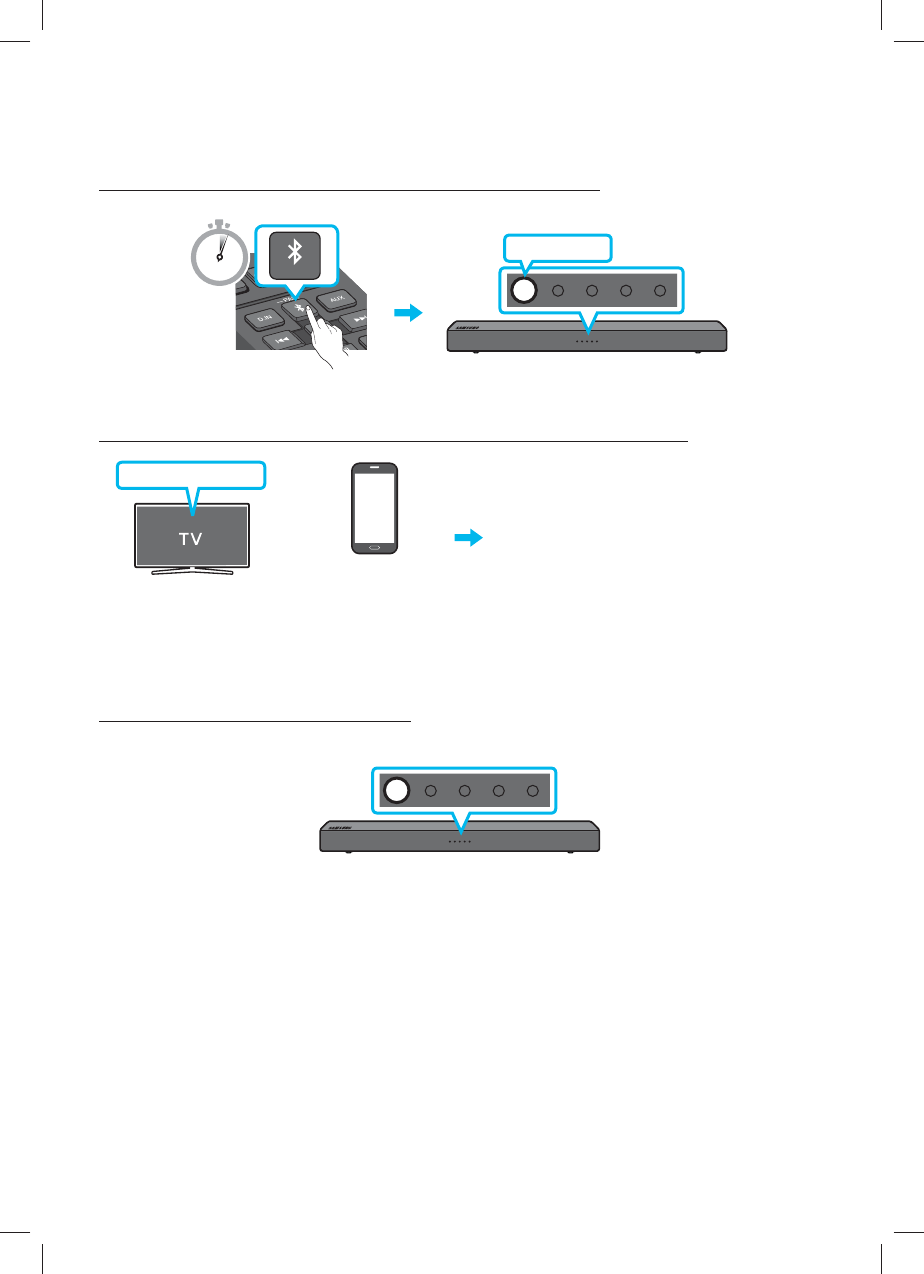
Connecting a TV or Bluetooth Device via Bluetooth
Step 1. Change the Soundbar mode to “Bluetooth Pairing”
B
Fast-Blinking
5 Sec
Step 2. Select the Soundbar in your TV’s or Bluetooth device’s Menu
Select
“[AV] Samsung Soundbar Nxxx N-Series”
Bluetooth device
(OR)
Bluetooth menu
NOTE
– You cannot connect more than one TV or Bluetooth device at a time.
Step 3. Check the Soundbar’s status
The blue LED should not be blinking once the Bluetooth connection is complete.
B
If the TV or device fails to connect
࡙If a previously connected Soundbar listing appears in the device list of your TV or Bluetooth device,
delete it. (e.g. “[AV] Samsung Soundbar Nxxx N-Series”)
࡙Then repeat steps 1 through 3.
ENG - 18
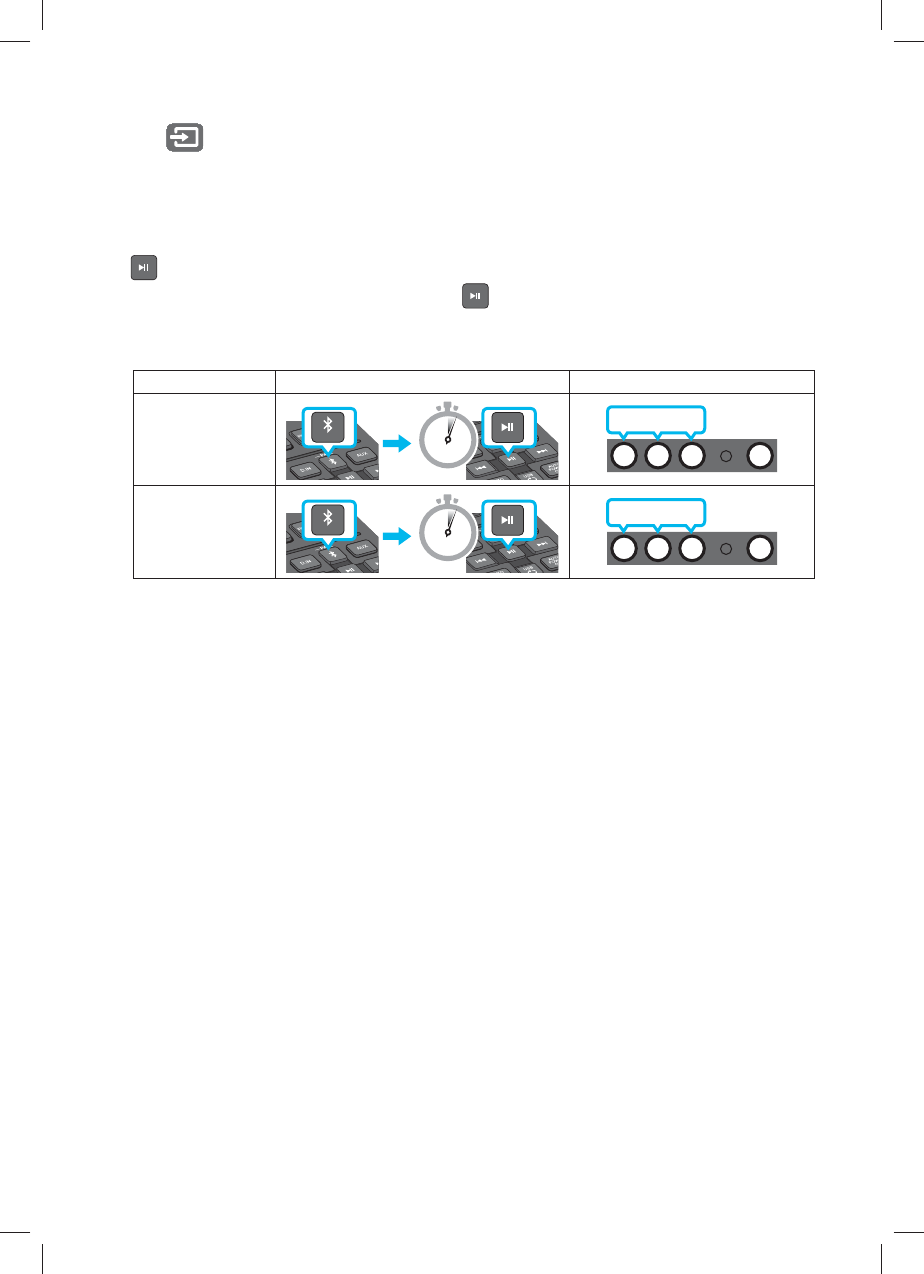
Disconnecting the Soundbar from the TV
Press the button on the right side panel or on the remote control and switch to any mode but
“Bluetooth”.
࡙Disconnecting takes time because the TV must receive a response from the Soundbar.
(The time required may differ, depending on the TV model.)
࡙To cancel the automatic Bluetooth connection between the Soundbar and TV, press and hold
button for 5 seconds in “Bluetooth” mode. TV Connect is turned OFF.
࡙To turn TV Connect back on, press and hold the button for 5 seconds with the Soundbar in
“Bluetooth” mode.
࡙TV Connect is set to ON by default.
Mode Remote control Button LED indicator
TV Connect-OFF 5 Sec BW W R
Blinking
TV Connect-ON 5 Sec BW W G
Blinking
NOTES
– If asked for a PIN code when connecting a Bluetooth device, enter <0000>.
– In Bluetooth connection mode, the Bluetooth connection will be lost if the distance between the
Soundbar and the Bluetooth device exceeds 32.8 ft.
– The Soundbar automatically turns off after 5 minutes in the Ready state.
– The Soundbar may not perform Bluetooth search or connection correctly under the following
circumstances:
– Ã˙ϩ˵ʪθʪ̈ϑɇϑϩθͱ͝˝ʪ̷ʪʀϩθ̈ʀɇ̷ѣʪ̷ʒɇθͱЇ͝ʒϩ˵ʪƊͱЇ͝ʒɵɇθࢋ
– If several Bluetooth devices are simultaneously paired with the Soundbar.
– If the Bluetooth device is turned off, not in place, or malfunctions.
– Electronic devices may cause radio interference. Devices that generate electromagnetic waves
must be kept away from the Soundbar main unit - e.g., microwaves, wireless LAN devices, etc.
ENG - 19
06 CONNECTING AN EXTERNAL DEVICE
Connect to an external device via an optical cable or analog cable to play the external device’s sound
through the Soundbar.
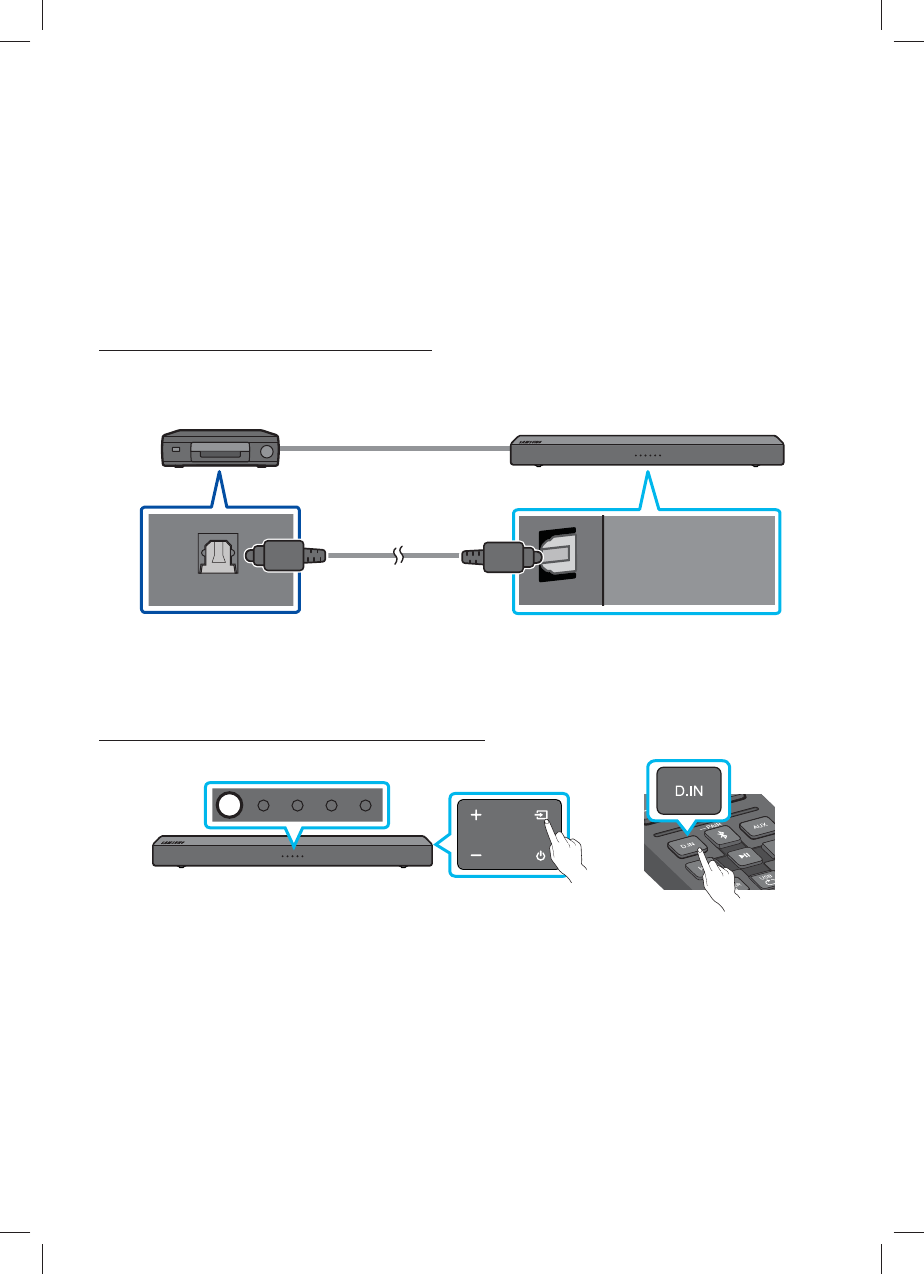
Connecting using an Optical Cable
Step 1. Connect using an Optical Cable
DIGITAL AUDIO IN
(OPTICAL)
ĮťƟÃAøĮƸƟ
Bottom of the Soundbar
Optical Cable
(not supplied)
BD / DVD player / Set-top box /
Game console
Step 2. Change the Soundbar’s mode to D.IN
Right Side of the Soundbar
(OR)
W
ENG - 20
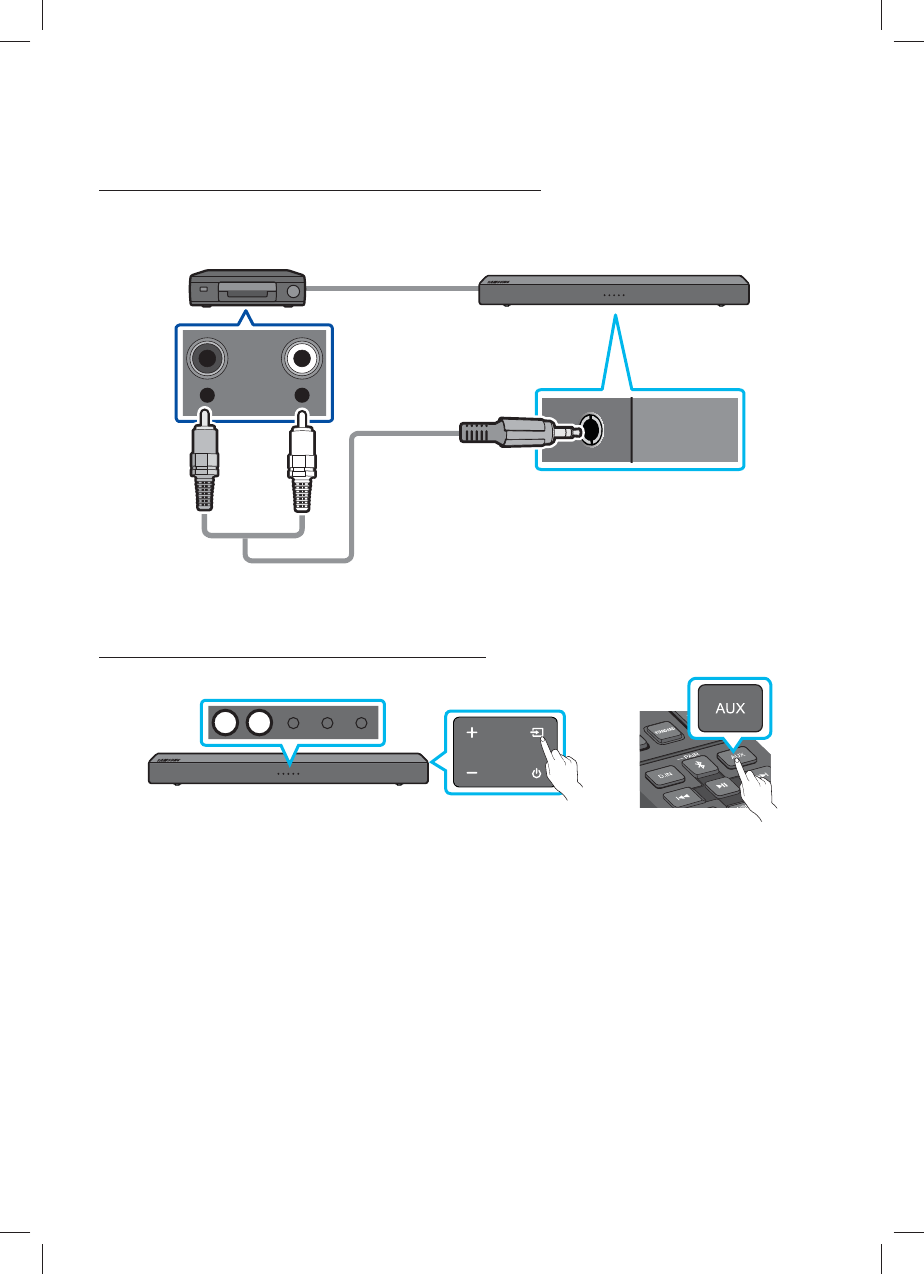
Connecting using an Analog Audio (AUX) Cable
Step 1. Connect using an Analog Audio (AUX) Cable
AUX IN
فƸUÃĮف
ŵ ø
Bottom of the Soundbar
Audio (AUX) Cable
(not supplied)
BD / DVD player / Set-top box /
Game console
Step 2. Change the Soundbar’s mode to AUX
Right Side of the Soundbar
(OR)
W W
ENG - 21
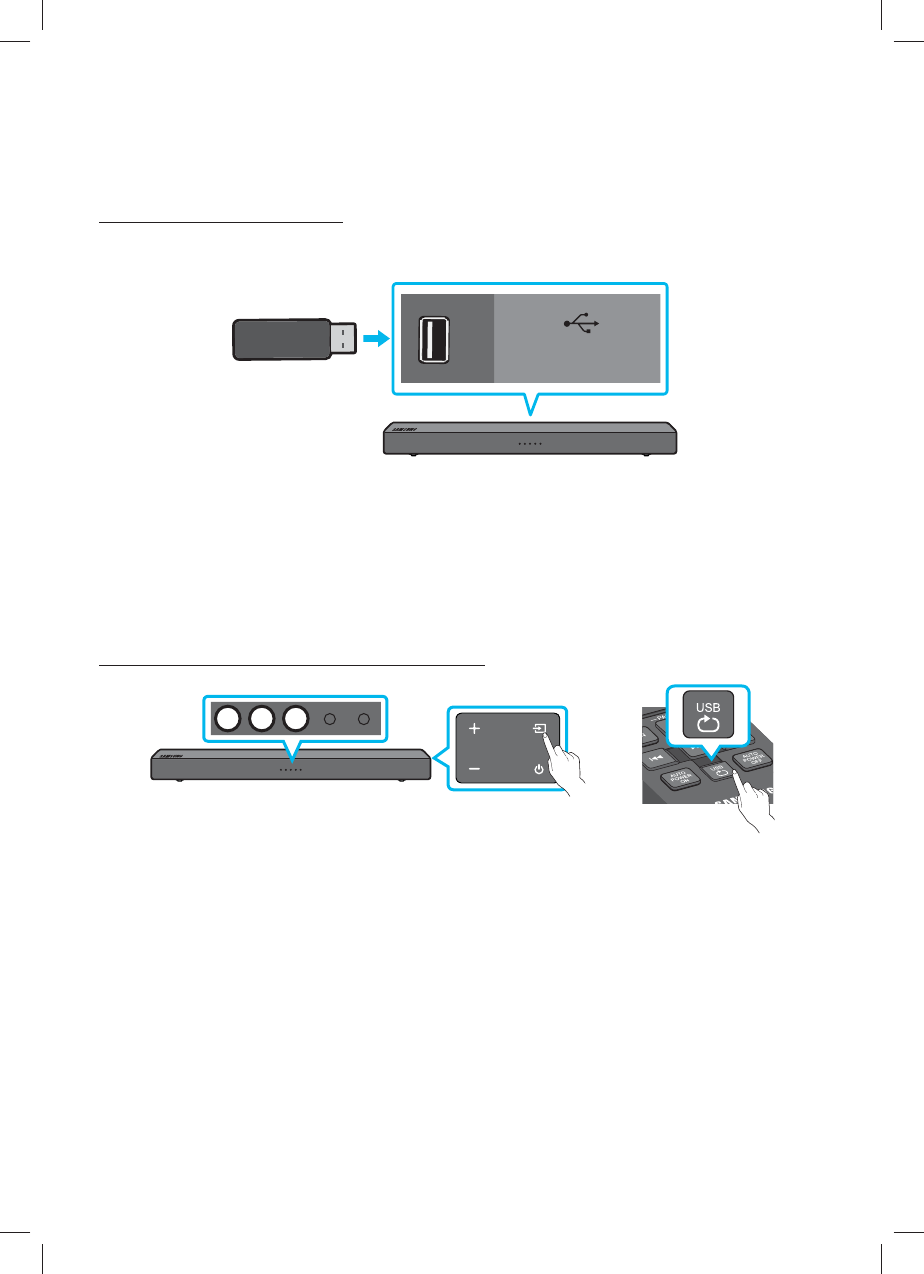
07 CONNECTING A USB STORAGE DEVICE
Step 1. Connect a USB Drive
USB (5V 0.5A)
Bottom of the Soundbar
NOTE
– The Soundbar automatically turns off (Auto Power Off) if you do not connect a USB device to the
Soundbar within 5 minutes.
Step 2. Change the Soundbar’s mode to USB
Right Side of the Soundbar
(OR)
W W W
ENG - 22
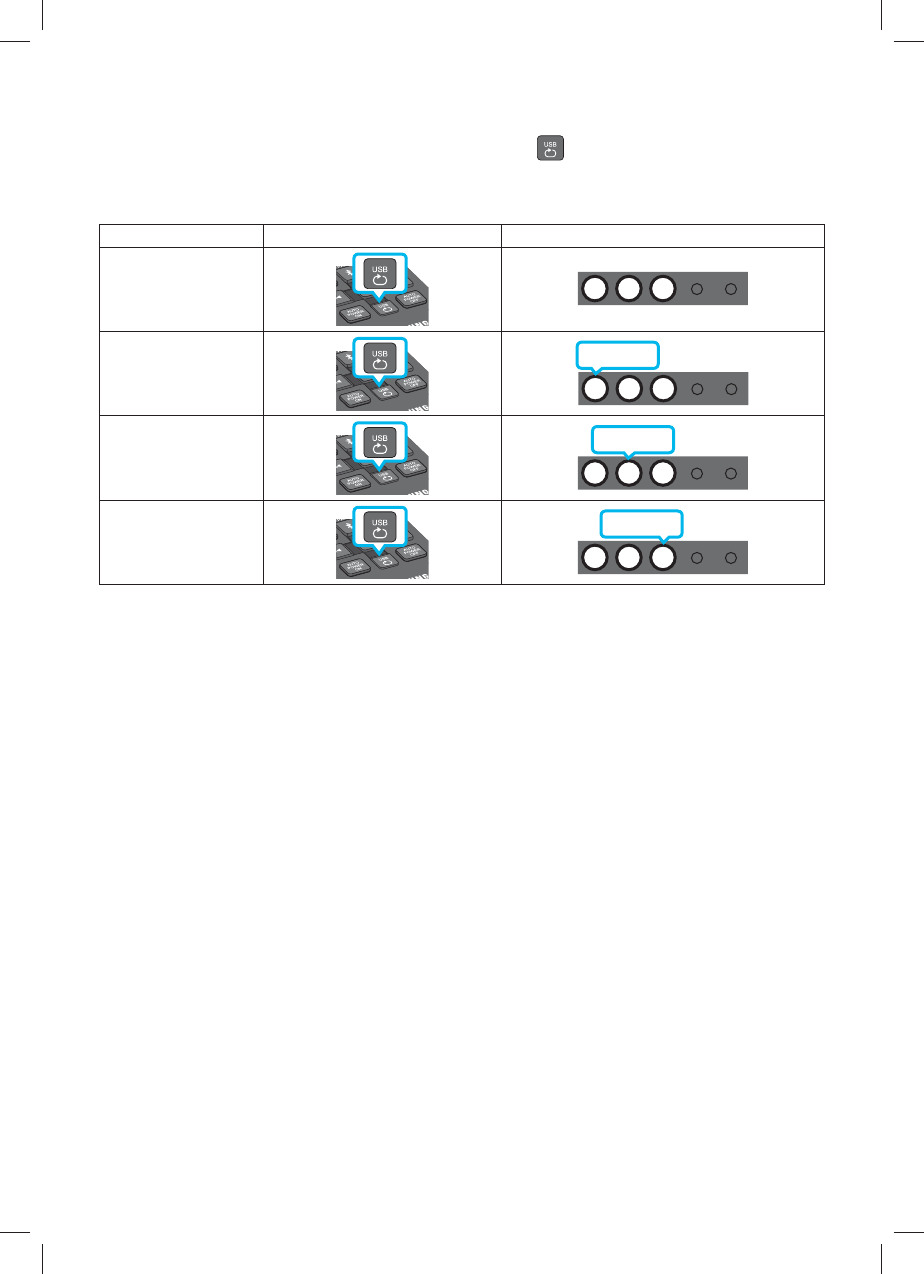
Setting Repeat Play Options
When the Soundbar is in “USB” mode, each time you press the button the “USB” mode changes
how it plays tracks in the following order: Repeat - Off > Repeat - 1 song > Repeat - All songs >
Repeat - Random. See the table below for details.
Mode Remote control Button LED indicator
Repeat - Off W W W
Repeat - 1 song W W W
Blinking
Repeat - All songs W W W
Blinking
Repeat - Random W W W
Blinking
Software Update
Ɗɇ͔ϑЇ͝˝͔ɇцͱ˙˙ʪθЇΧʒɇϩʪϑ˙ͱθϩ˵ʪƊͱЇ͝ʒɵɇθ࣭ϑϑцϑϩʪ͔ѣθ͔иɇθʪ̈͝ϩ˵ʪ˙ЇϩЇθʪࢋ
Ã˙ɇ͝ЇΧʒɇϩʪ̈ϑͱ˙˙ʪθʪʒࡡцͱЇʀɇ͝ЇΧʒɇϩʪϩ˵ʪѣθ͔иɇθʪɵцʀͱ͝͝ʪʀϩ̈͝˝ɇƸƊ9ʒʪӬʀʪӥϩ˵ϩ˵ʪѣθ͔иɇθʪ
update stored on it to the USB port on your Soundbar. For more information about how to download
ЇΧʒɇϩʪѣ̷ʪϑࡡ˝ͱϩͱϩ˵ʪƊɇ͔ϑЇ͝˝k̷ʪʀϩθͱ̈͝ʀϑиʪɵϑ̈ϩʪɇϩ࣍иииࢋϑɇ͔ϑЇ͝˝ࢋʀͱ͔
J
Support).
Then, enter or select the model number of your Soundbar, select the Software & Apps option, and then
Downloads. Note that the option names can vary.
ENG - 23
08 INSTALLING THE WALL MOUNT
(OPTIONAL)
Installation Precautions
࡙Install on a vertical wall only.
࡙Do not install in a place with high temperature or humidity.
࡙Verify whether the wall is strong enough to support the product’s weight. If not, reinforce the wall
or choose another installation point.
࡙ ťЇθʀ˵ɇϑʪɇ͝ʒЇϑʪϩ˵ʪѣӱ͝˝ϑʀθʪиϑͱθɇ͝ʀ˵ͱθϑɇΧΧθͱΧθ̈ɇϩʪ˙ͱθϩ˵ʪ̧̈͝ʒͱ˙иɇ̷̷цͱЇ˵ɇЭʪ࣍Χ̷ɇϑϩʪθ
board, iron board, wood, etc.).
Ã˙Χͱϑϑ̈ɵ̷ʪࡡѣуϩ˵ʪϑЇΧΧͱθϩϑʀθʪиϑ̈͝ϩͱиɇ̷̷ϑϩЇʒϑࢋ
࡙Purchase wall mounting screws according to the type and thickness of the wall you want to mount
the Soundbar on.
–Diameter: M4
– Length: 1.37 inches or longer recommended.
࡙Connect cables from the unit to external devices before you install the Soundbar on the wall.
࡙Make sure the unit is turned off and unplugged before you install it. Otherwise, it may cause an
electric shock.
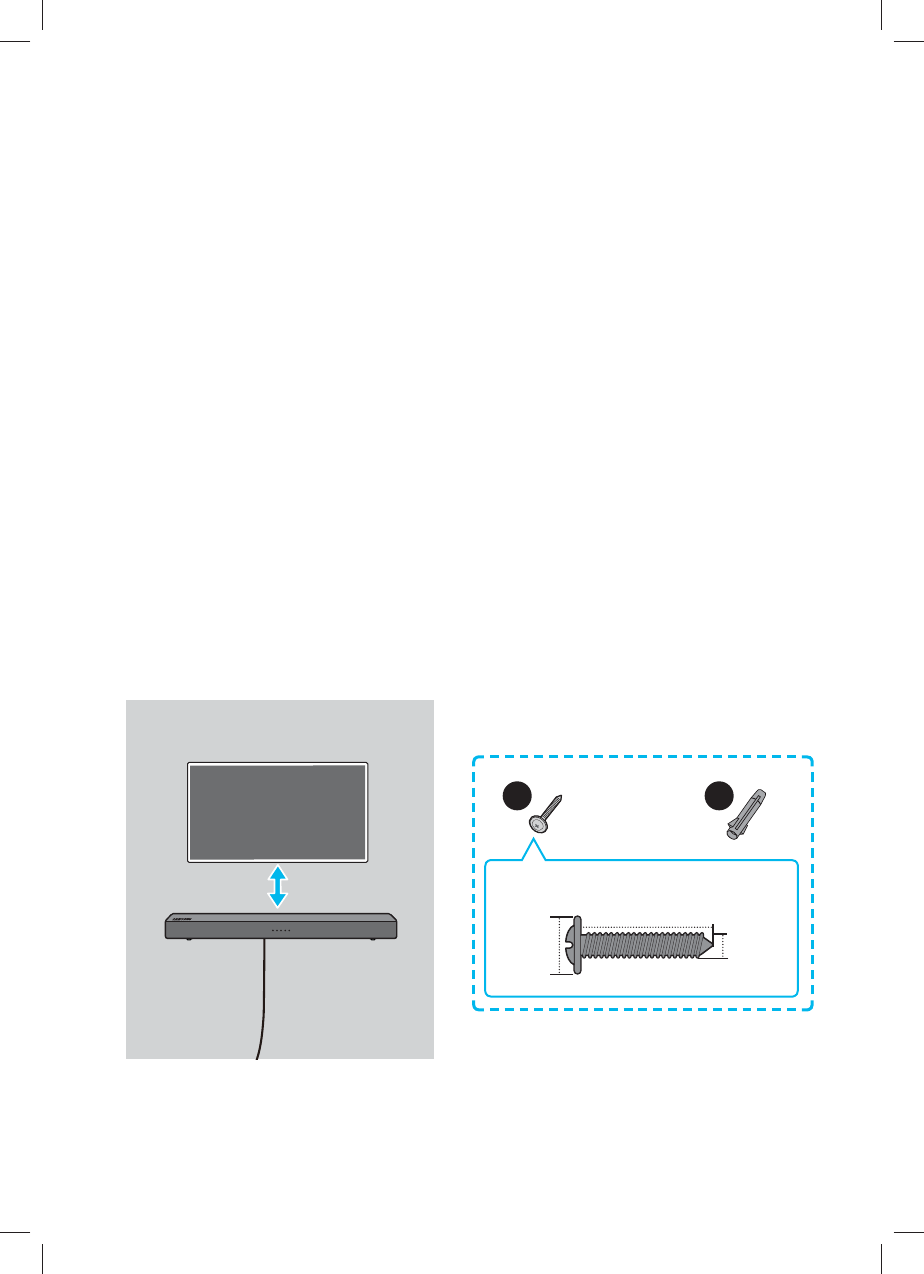
Wall mount Components
2 inches (5cm) or more
For Installation on Concrete Walls
(not supplied)
A
x 2 (M4 x L40)
B
x 2
1.6’’ (40 mm) or longer
0.15”
(4 mm)
0.31”
(8 mm)
ŵʪʀͱ͔͔ʪ͝ʒʪʒϑΧʪʀ̈ѣʀɇϩ̈ͱ͝
NOTE
– Installations on other types of walls will require
different kinds of screws.
ENG - 24
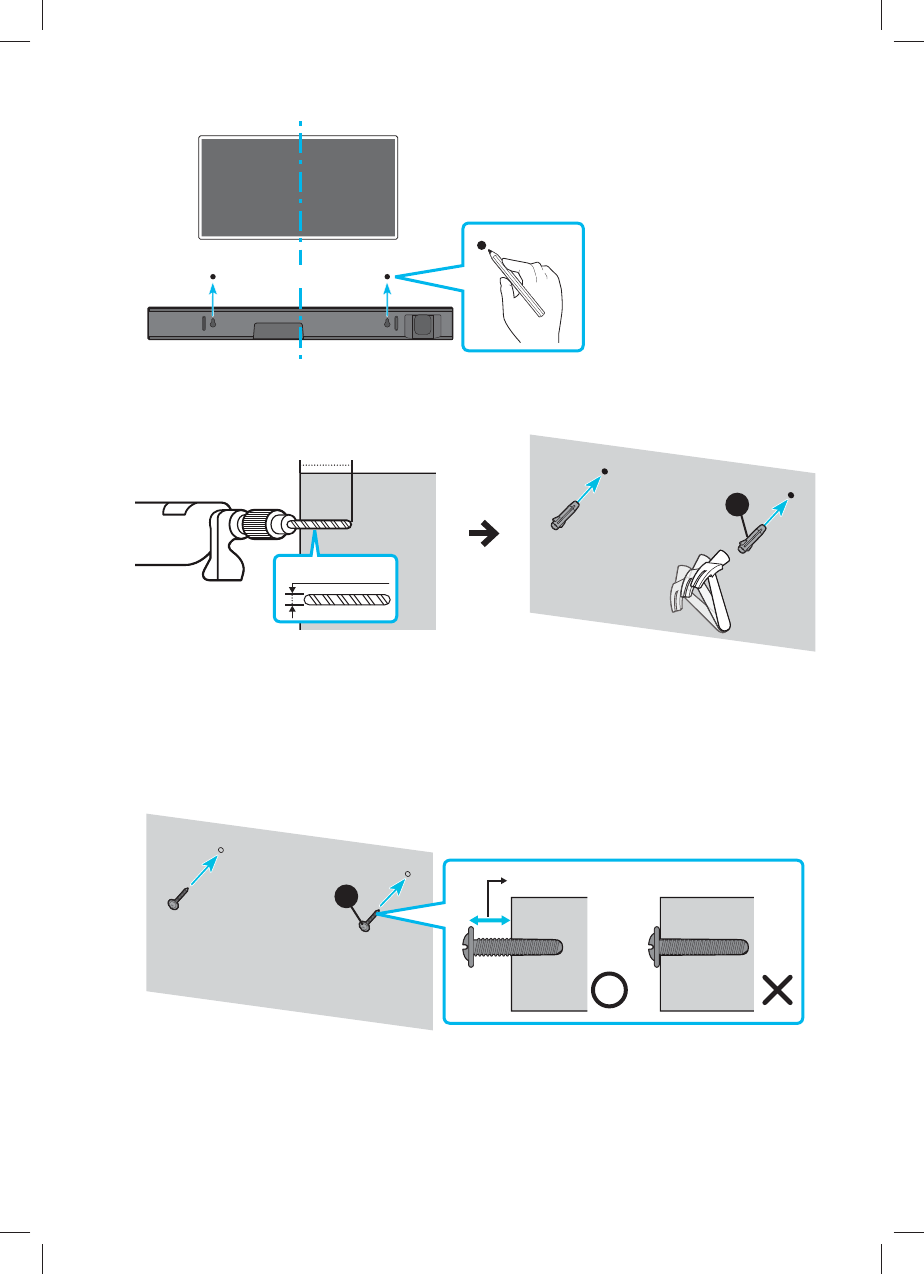
1.
--- 14.6” (370 mm) ---
CENTER LINE
NOTES
– If your TV is installed on
the wall, install the
Soundbar 2 inches (5cm) or
more below your TV.
– Use a pencil to mark the
holes’ positions.
2.
0.25’’ (6 mm)
2’’ (50 mm)
B
IMPORTANT NOTE
– The installation method shown here is for CONCRETE walls. Installation methods will vary
depending on the wall type. For installation on dry wall, we strongly recommend you drill screw
support holes into the underlying wood studs.
3.
A
0.41’’ (10.5mm)
ENG - 25
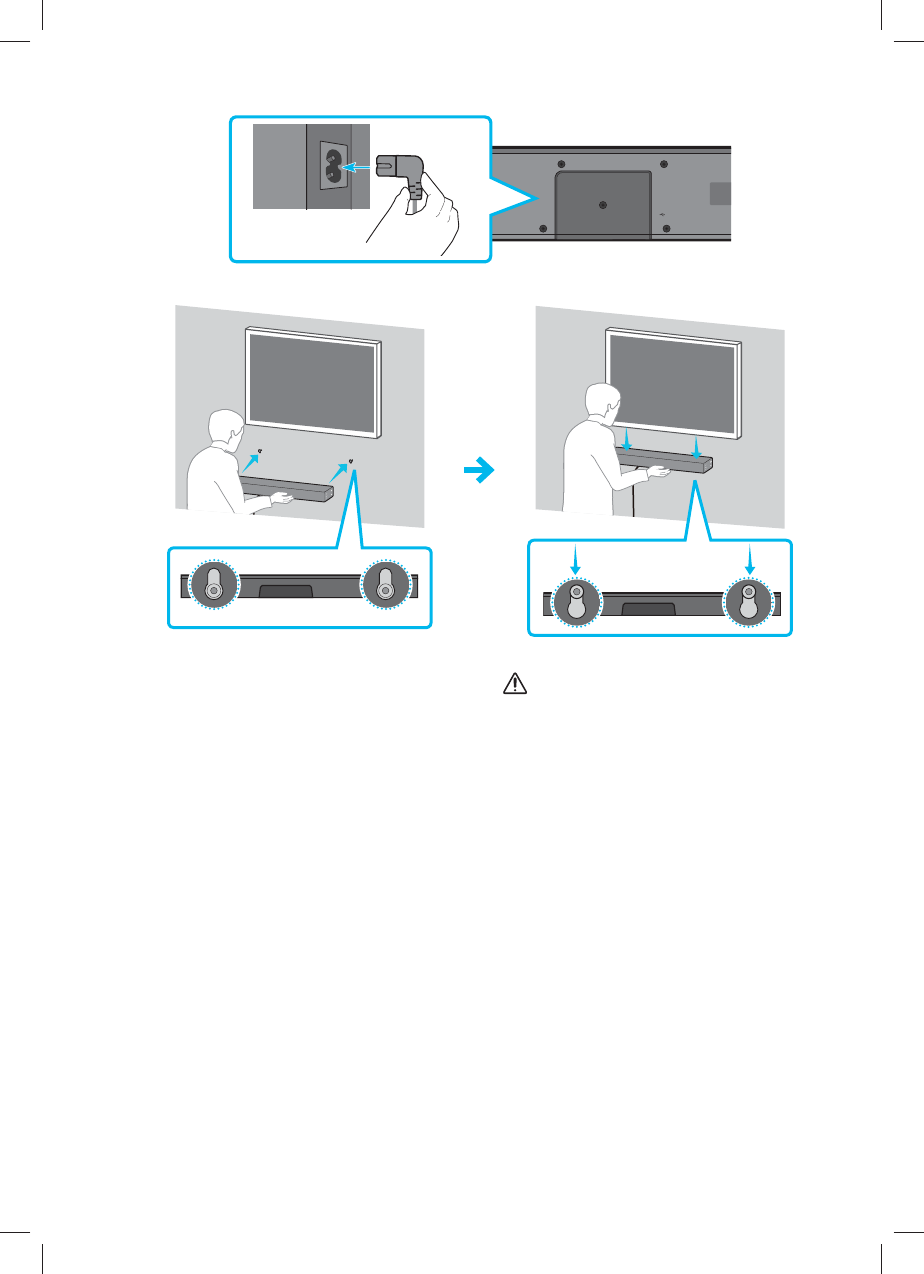
4.
AUX IN
POWER DIGITAL AUDIO IN
(OPTICAL)
USB (5V 0.5A)
POWER
5.
NOTE
– Supports for wall installation are built into
the back of the Soundbar.
CAUTION
– ťθʪϑϑϩ˵ʪƊͱЇ͝ʒɵɇθʒͱи͝ӥϩ˵ϑЇ˙ѣʀ̈ʪ͝ϩ
˙ͱθʀʪϩͱѣӱϩϩͱϩ˵ʪиɇ̷̷ࢋÃ˙ϩ˵ʪƊͱЇ͝ʒɵɇθ
̈ϑ͝ͱϩѣθ̷͔цѣуʪʒϩͱϩ˵ʪиɇ̷̷ࡡ̈ϩʀͱЇ̷ʒɵʪ
accidently detached, resulting in
personal injury.
– Do not bump into or strike the Soundbar
(especially from the bottom). The impact
could detach the Soundbar from the
wall, resulting in personal injury.

ENG - 26
09 TROUBLESHOOTING
Refer to the table below if this product does not function properly. If the problem you are experiencing
is not listed below or if the instructions below do not help, turn off the product, disconnect the power
cord, and contact Samsung Electronics at 1-800-SAMSUNG (1-800-726-7864).
The unit will not turn on.
Is the power cord plugged into an outlet?
Connect the power plug to an outlet.
A function does not work when the button is pressed.
Is there static electricity in the air?
Disconnect the power plug and connect it again.
Sound dropouts occur in Bluetooth mode.
See the Bluetooth connection sections on pages 17 and 18.
Sound is not produced.
Is the Mute function on?
Press the VOL button to cancel the function.
Is the volume set to minimum?
Adjust the Volume.
The remote control does not work.
Is the battery drained?
Replace with new batteries.
Is the distance between the remote control and Soundbar main unit too far?
Move the remote control closer to the Soundbar main unit.
ENG - 27
10 LICENSE
Manufactured under license from Dolby
Laboratories. Dolby, Dolby Audio, Pro Logic, and
the double-D symbol are trademarks of Dolby
Laboratories.
ͱθUƟƊΧɇϩʪ͝ϩϑࡡϑʪʪ˵ϩϩΧࡠࢥࢥΧɇϩʪ͝ϩϑࢋʒϩϑࢋʀͱ͔ࢋ
Manufactured under license from DTS
Licensing Limited. DTS, the Symbol, DTS in
combination with the Symbol, and DTS 2.0
Channel are registered trademarks or
trademarks of DTS, Inc. in the United States
ɇ͝ʒࢥͱθͱϩ˵ʪθʀͱЇ͝ϩθ̈ʪϑࢋংUƟƊࡡÃ͝ʀࢋ̷̷ŵ̈˝˵ϩϑ
Reserved.
11 OPEN SOURCE
LICENSE NOTICE
To send inquiries and requests regarding open
sources, contact Samsung via Email
(oss.request@samsung.com).
12 IMPORTANT
NOTES ABOUT
SERVICE
࡙Figures and illustrations in this User Manual
are provided for reference only and may differ
from actual product appearance.
࡙An administration fee may be charged if either:
a. An engineer is called out to your home at
your request and there is no defect in the
product.
b. You bring the unit to a repair center and
there is no defect in the product.
࡙You will be advised of the amount of the
administration fee before any work is done or
a home visit is made.
࡙If you have a problem with this product, we
strongly recommend you read the
appropriate section of this manual, visit the
Support page for your product at
www.samsung.com, or call Samsung Product
ƊЇΧΧͱθϩ࣍ߢࣗߩߡߡࣗߨߣߧࣗߨߩߧߥ࣎ϩͱѣ͝ʒɇ͝ɇ͝ϑиʪθ
before you contact a service center for a
repair.
ENG - 28
13 SPECIFICATIONS AND GUIDE
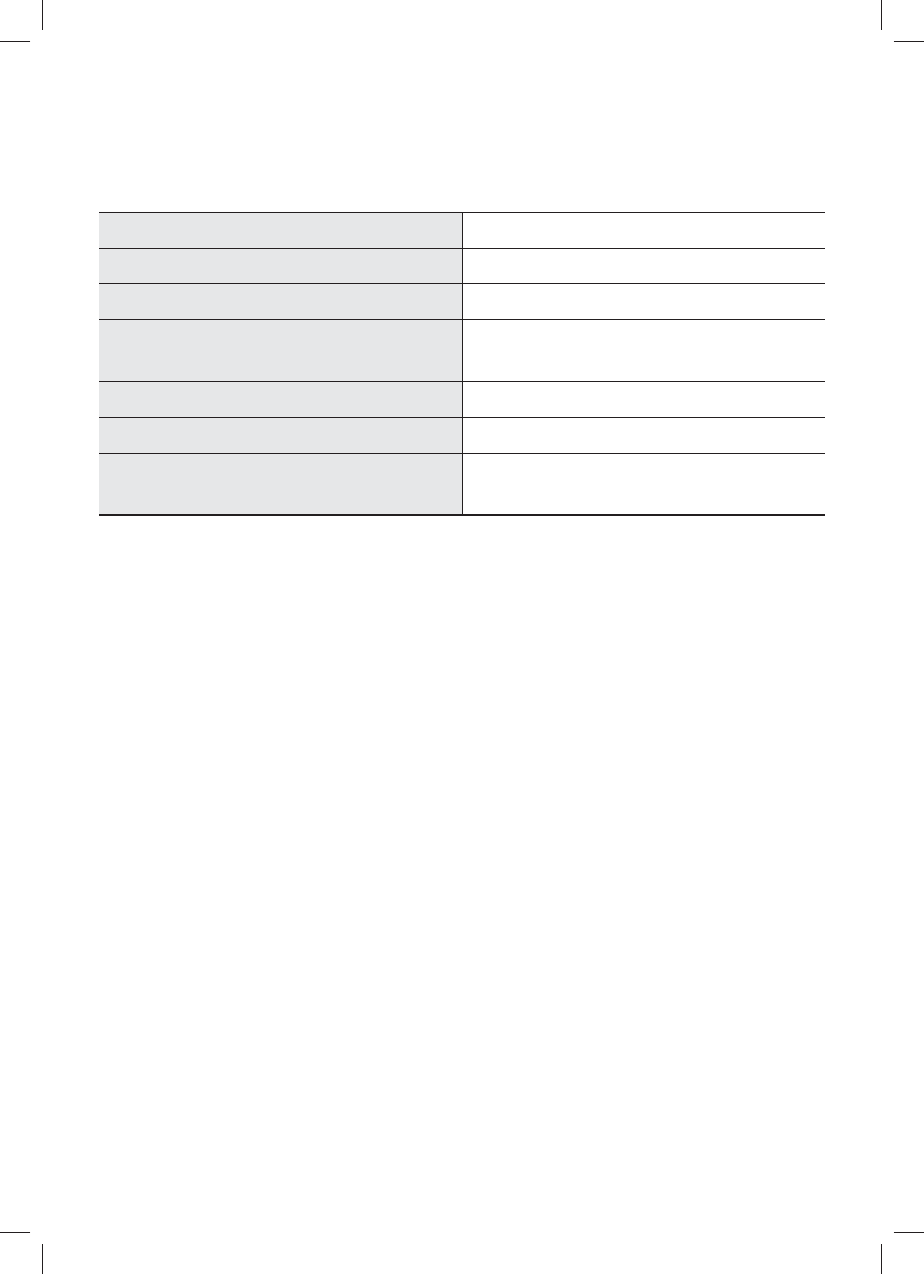
ƊΧʪʀ̈ѣʀɇϩ̈ͱ͝ϑ
Model Name HW-N300
USB ߦǤࢥߡࢋߦ
Weight 4.4 lbs (2.0 kg)
Dimensions (W x H x D) 25.2 x 2.6 x 4.2 inches
(641.0 x 65.0 x 107.0 mm)
Operating Temperature Range +41°F to +95°F (+5°C to +35°C)
Operating Humidity Range 10 % ~ 75 %
Supported play formats
(DTS 2.0 sound is played in DTS format.)
LPCM 2ch, Dolby Audio™
(supporting Dolby® Digital), DTS
NOTES
– Ɗɇ͔ϑЇ͝˝k̷ʪʀϩθͱ̈͝ʀϑAͱࢋࡡøϩʒθʪϑʪθЭʪϑϩ˵ʪθ̈˝˵ϩϩͱʀ˵ɇ͝˝ʪϩ˵ʪϑΧʪʀ̈ѣʀɇϩ̈ͱ͝ϑӥϩ˵ͱЇϩ͝ͱϩ̈ʀʪࢋ
– Weight and dimensions are approximate.
– Dispose unwanted electronics through an approved recycler.
Ɵͱѣ͝ʒϩ˵ʪ͝ʪɇθʪϑϩθʪʀцʀ̷̈͝˝̷ͱʀɇϩ̈ͱ͝ࡡ˝ͱϩͱͱЇθиʪɵϑ̈ϩʪࡠиииࢋϑɇ͔ϑЇ͝˝ࢋʀͱ͔ࢥθʪʀцʀ̷̈͝˝ʒ̈θʪʀϩͱθʀɇ̷̷
(877) 278 - 0799

LIMITED WARRANTY TO ORIGINAL PURCHASER
This SAMSUNG brand product, as supplied and distributed by SAMSUNG and delivered new, in the original carton to the original
consumer purchaser, is warranted by SAMSUNG against manufacturing defects in materials and workmanship for a limited
warranty period of:
One (1) Year Parts and Labor*
(*90 Days Parts and Labor for Commercial Use)
This limited warranty begins on the original date of purchase, and is valid only on products purchased and used in the
United States. To receive warranty service, the purchaser must contact SAMSUNG for problem determination and
service procedures. Warranty service can only be performed by a SAMSUNG authorized service center. The original
dated bill of sale must be presented upon request as proof of purchase to SAMSUNG or SAMSUNG’s authorized service
center. Transportation of the product to and from the service center is the responsibility of the purchaser.
SAMSUNG will repair or replace this product, at our option and at no charge as stipulated herein, with new or
θʪʀͱ͝ʒ̈ϩ̈ͱ͝ʪʒΧɇθϩϑͱθΧθͱʒЇʀϩϑ̈˙˙ͱЇ͝ʒϩͱɵʪʒʪ˙ʪʀϩ̈ЭʪʒЇθ̈͝˝ϩ˵ʪ̷͔̈̈ϩʪʒиɇθθɇ͝ϩцΧʪθ̈ͱʒϑΧʪʀ̈ѣʪʒɇɵͱЭʪࢋ
All replaced parts and products become the property of SAMSUNG and must be returned to SAMSUNG.
Replacement parts and products assume the remaining original warranty, or ninety (90) days, whichever is longer.
SAMSUNG’s obligations with respect to software products distributed by SAMSUNG under the SAMSUNG brand
name are set forth in the applicable end user license agreement. Non-SAMSUNG hardware and software products,
if provided, are on an “AS IS” basis.
Non-SAMSUNG manufacturers, suppliers, publishers, and service providers may provide their own warranties.
This limited warranty covers manufacturing defects in materials and workmanship encountered in normal, and
except to the extent otherwise expressly provided for in this statement, noncommercial use of this product, and
shall not apply to the following, including, but not limited to: damage which occurs in shipment; delivery and
installation; applications and uses for which this product was not intended; altered product or serial numbers;
ʀͱϑ͔ʪϩ̈ʀʒɇ͔ɇ˝ʪͱθʪуϩʪθ̈ͱθѣ̈͝ϑ˵ࢤɇʀʀ̈ʒʪ͝ϩϑࡡɇɵЇϑʪࡡ͝ʪ˝̷ʪʀϩࡡѣθʪࡡиɇϩʪθࡡ̷̈˝˵ϩ̈͝͝˝ͱθͱϩ˵ʪθɇʀϩϑͱ˙͝ɇϩЇθʪࢤЇϑʪͱ˙
products, equipment, systems, utilities, services, parts, supplies, accessories, applications, installations, repairs,
external wiring or connectors not supplied and authorized by SAMSUNG, or which damage this product or result in
ϑʪθӬʀʪΧθͱɵ̷ʪ͔ϑࢤ̈͝ʀͱθθʪʀϩʪ̷ʪʀϩθ̈ʀɇ̷̷̈͝ʪЭͱ̷ϩɇ˝ʪࡡѤЇʀϩЇɇϩ̈ͱ͝ϑɇ͝ʒϑЇθ˝ʪϑࢤʀЇϑϩͱ͔ʪθɇʒ̟Їϑϩ͔ʪ͝ϩϑɇ͝ʒ˙ɇ̷̈Їθʪϩͱ
follow operating instructions, cleaning, maintenance and environmental instructions that are covered and
prescribed in the instruction book; product removal or reinstallation; reception problems and distortion related to
noise, echo, interference or other signal transmission and delivery problems. SAMSUNG does not warrant
uninterrupted or error-free operation of the product.
THERE ARE NO EXPRESS WARRANTIES OTHER THAN THOSE LISTED AND DESCRIBED ABOVE, AND NO
WARRANTIES WHETHER EXPRESS OR IMPLIED, INCLUDING, BUT NOT LIMITED TO, ANY IMPLIED WARRANTIES OF
MERCHANTABILITY OR FITNESS FOR A PARTICULAR PURPOSE, SHALL APPLY AFTER THE EXPRESS WARRANTY
PERIODS STATED ABOVE, AND NO OTHER EXPRESS WARRANTY OR GUARANTY GIVEN BY ANY PERSON, FIRM OR
CORPORATION WITH RESPECT TO THIS PRODUCT SHALL BE BINDING ON SAMSUNG. SAMSUNG SHALL NOT BE
LIABLE FOR LOSS OF REVENUE OR PROFITS, FAILURE TO REALIZE SAVINGS OR OTHER BENEFITS, OR ANY OTHER
SPECIAL, INCIDENTAL OR CONSEQUENTIAL DAMAGES CAUSED BY THE USE, MISUSE OR INABILITY TO USE THIS
PRODUCT, REGARDLESS OF THE LEGAL THEORY ON WHICH THE CLAIM IS BASED, AND EVEN IF SAMSUNG HAS
BEEN ADVISED OF THE POSSIBILITY OF SUCH DAMAGES. NOR SHALL RECOVERY OF ANY KIND AGAINST
SAMSUNG BE GREATER IN AMOUNT THAN THE PURCHASE PRICE OF THE PRODUCT SOLD BY SAMSUNG AND
CAUSING THE ALLEGED DAMAGE. WITHOUT LIMITING THE FOREGOING, PURCHASER ASSUMES ALL RISK AND
LIABILITY FOR LOSS, DAMAGE OR INJURY TO PURCHASER AND PURCHASER’S PROPERTY AND TO OTHERS AND
THEIR PROPERTY ARISING OUT OF THE USE, MISUSE OR INABILITY TO USE THIS PRODUCT SOLD BY SAMSUNG
NOT CAUSED DIRECTLY BY THE NEGLIGENCE OF SAMSUNG. THIS LIMITED WARRANTY SHALL NOT EXTEND TO
ANYONE OTHER THAN THE ORIGINAL PURCHASER OF THIS PRODUCT, IS NONTRANSFERABLE AND STATES YOUR
EXCLUSIVE REMEDY.
Some states do not allow limitations on how long an implied warranty lasts, or the exclusion or limitation of incidental or
ʀͱ͝ϑʪαЇʪ͝ϩ̈ɇ̷ʒɇ͔ɇ˝ʪϑࡡϑͱϩ˵ʪɇɵͱЭʪ̷͔̈̈ϩɇϩ̈ͱ͝ϑͱθʪуʀ̷Їϑ̈ͱ͝ϑ͔ɇц͝ͱϩɇΧΧ̷цϩͱцͱЇࢋƟ˵̈ϑиɇθθɇ͝ϩц˝̈ЭʪϑцͱЇϑΧʪʀ̈ѣʀ̷ʪ˝ɇ̷θ̈˝˵ϩϑࡡɇ͝ʒ
you may also have other rights which vary from state to state.
To obtain warranty service, please contact SAMSUNG customer care center.
Ɵ˵ʪɵʪ͝ʪѣϩϑͱ˙ϩ˵̈ϑø͔̈̈ϩʪʒǮɇθθɇ͝ϩцʪуϩʪ͝ʒͱ̷͝цϩͱϩ˵ʪͱθ̈˝̈͝ɇ̷ΧЇθʀ˵ɇϑʪθͱ˙Ɗɇ͔ϑЇ͝˝ΧθͱʒЇʀϩϑ˙θͱ͔ɇ͝ɇЇϩ˵ͱθ̈іʪʒ
Samsung reseller. THIS LIMITED WARRANTY SHALL NOT APPLY TO ANY SAMSUNG PRODUCTS PURCHASED
FROM UNAUTHORIZED RESELLERS OR RETAILERS, EXCEPT IN STATES WHERE SUCH RESTRICTION MAY BE
PROHIBITED. For a list of Samsung authorized retailers, please go to:
˵ϩϩΧࡠࢥࢥиииࢋϑɇ͔ϑЇ͝˝ࢋʀͱ͔ࢥЇϑࢥΧʪɇʀʪͱ˙͔̈͝ʒࢥɇЇϩ˵ͱθ̈іʪʒࢸθʪϑʪ̷̷ʪθϑࢋ˵ϩ̷͔ࢋ
The party responsible for product compliance:
Samsung Electronics Co., LTD.
America QA lab of Samsung
19 Chapin Rd. Building D,
Pine Brook, New Jersey 07058
© 2018 Samsung Electronics Co., Ltd. All rights reserved.
QUESTIONS OR COMMENTS?
COUNTRY
IN THE US 1-800-SAMSUNG
(726-7864)
www.samsung.com/us/support
Samsung Electronics America, Inc.
85 Challenger Road
ŵ̈ʒ˝ʪѣʪ̷ʒťɇθ̧ࡡĘâߡߨߧߧߡ
CALL
OR VISIT US ONLINE AT WRITE
72-SAMUSA-MANB1-SS 72-SAMUSA-MANB1-SS