Samsung Electronics Co LS19B420BW LCD Monitor User Manual SB420 BN46 00232A Eng 13
Samsung Electronics Co Ltd LCD Monitor SB420 BN46 00232A Eng 13
UserManual.wiki
>
Samsung Electronics Co
>
LS19B420BW User Manual
>
SB420_BN46-00232A-Eng-13
Contents
1.
SB420_BN46-00232A-Eng-13
2.
user manual
SB420_BN46-00232A-Eng-13
Navigation menu
Upload a User Manual
Namespaces
Wiki Guide
HTML
PDF
Info
Views
User Manual
Discussion / Help
Navigation
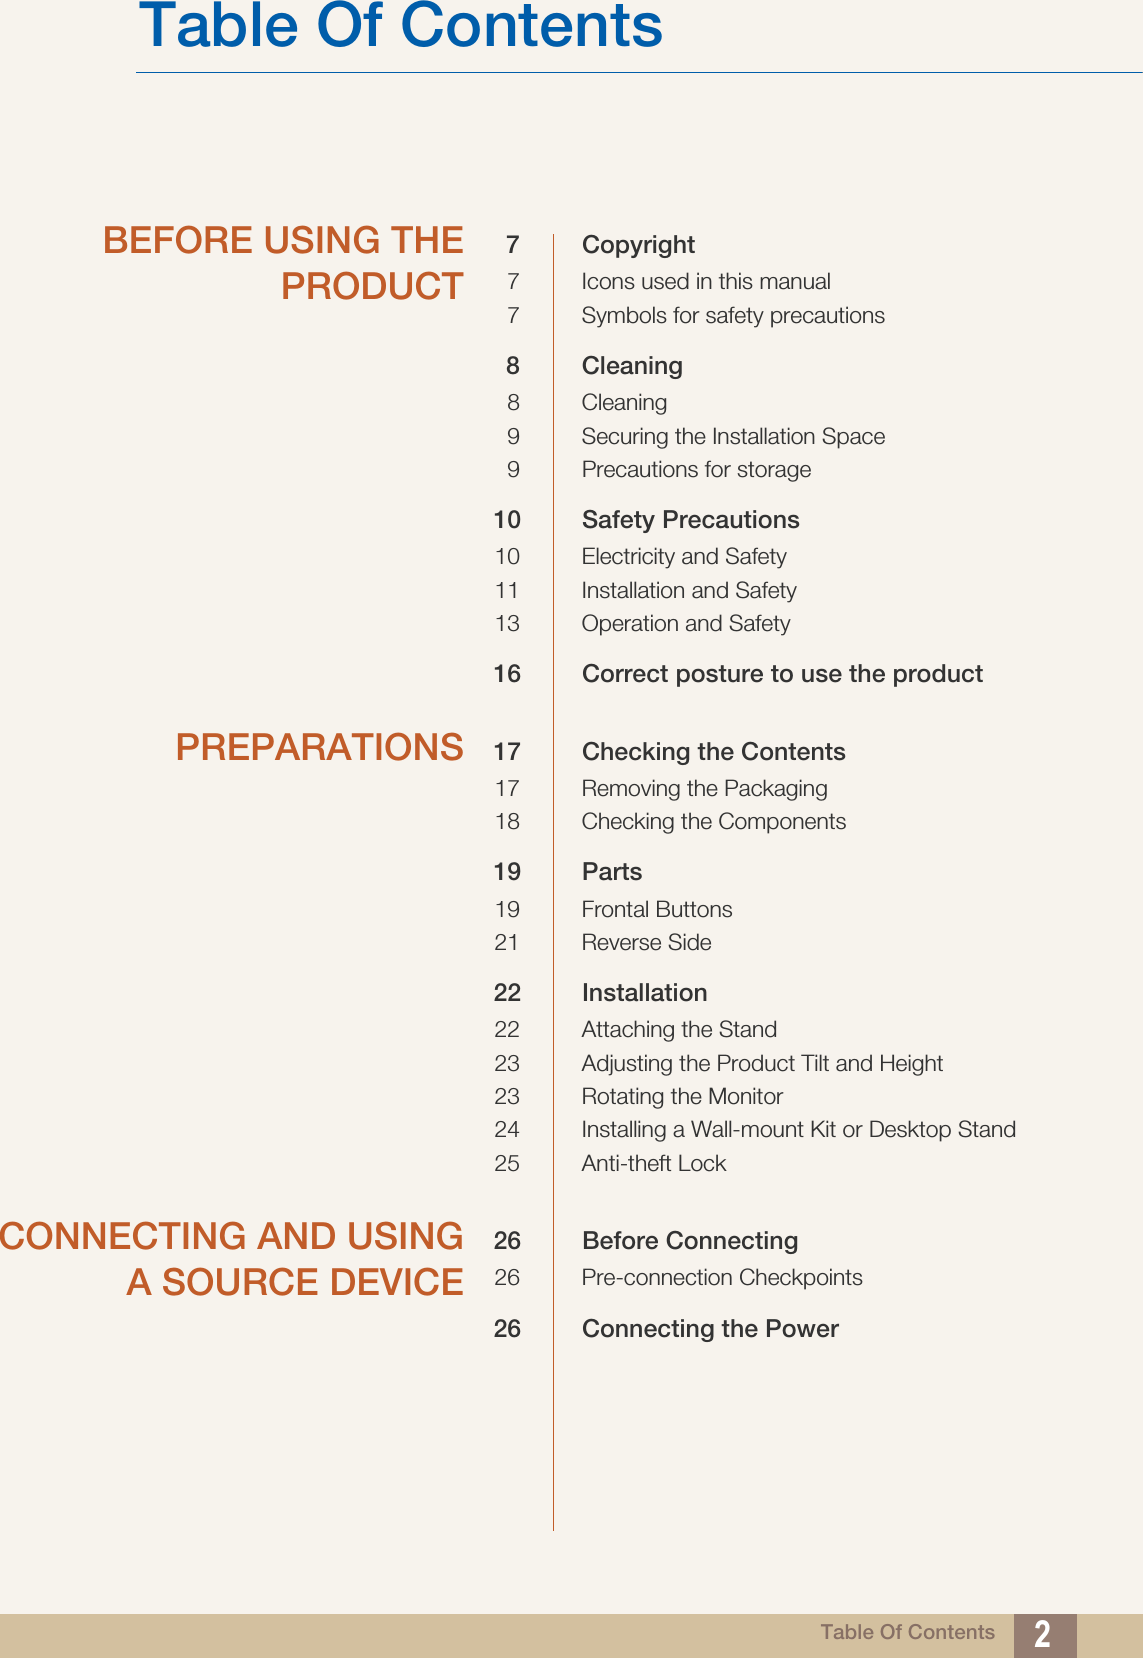


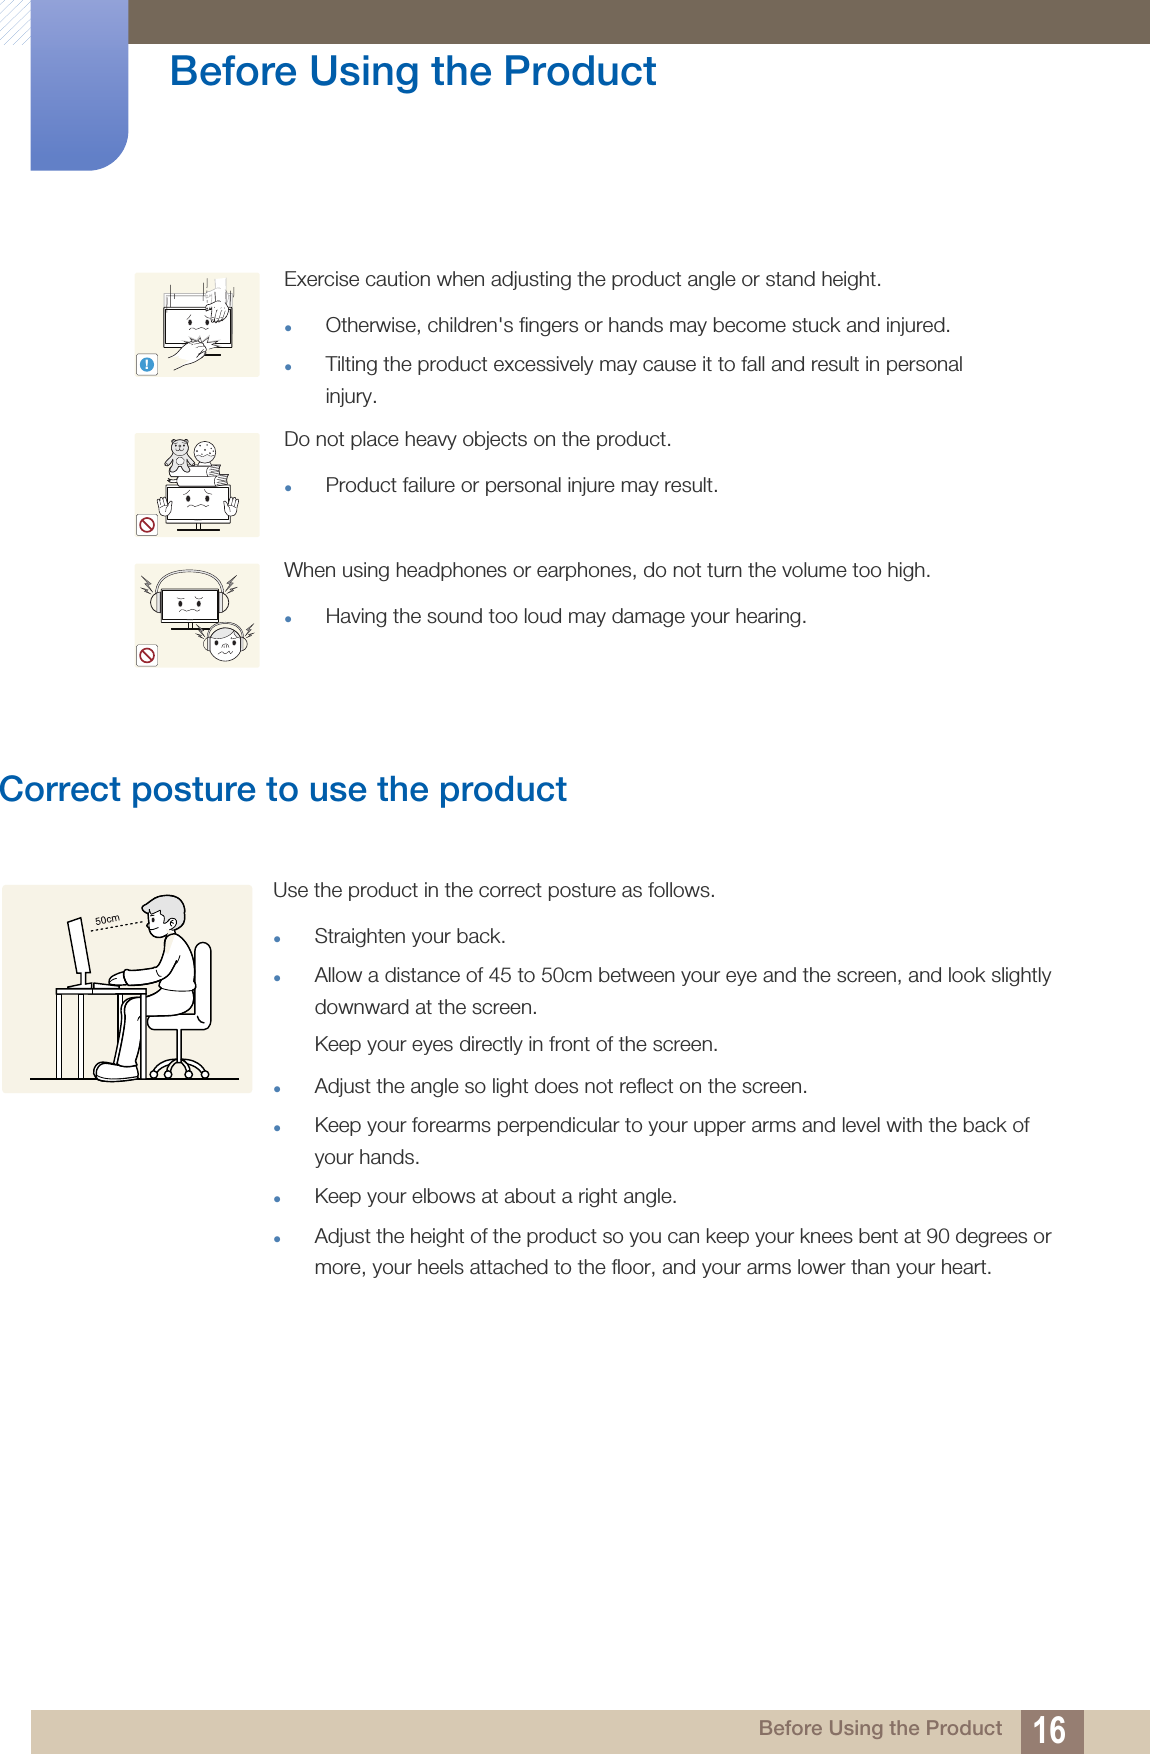
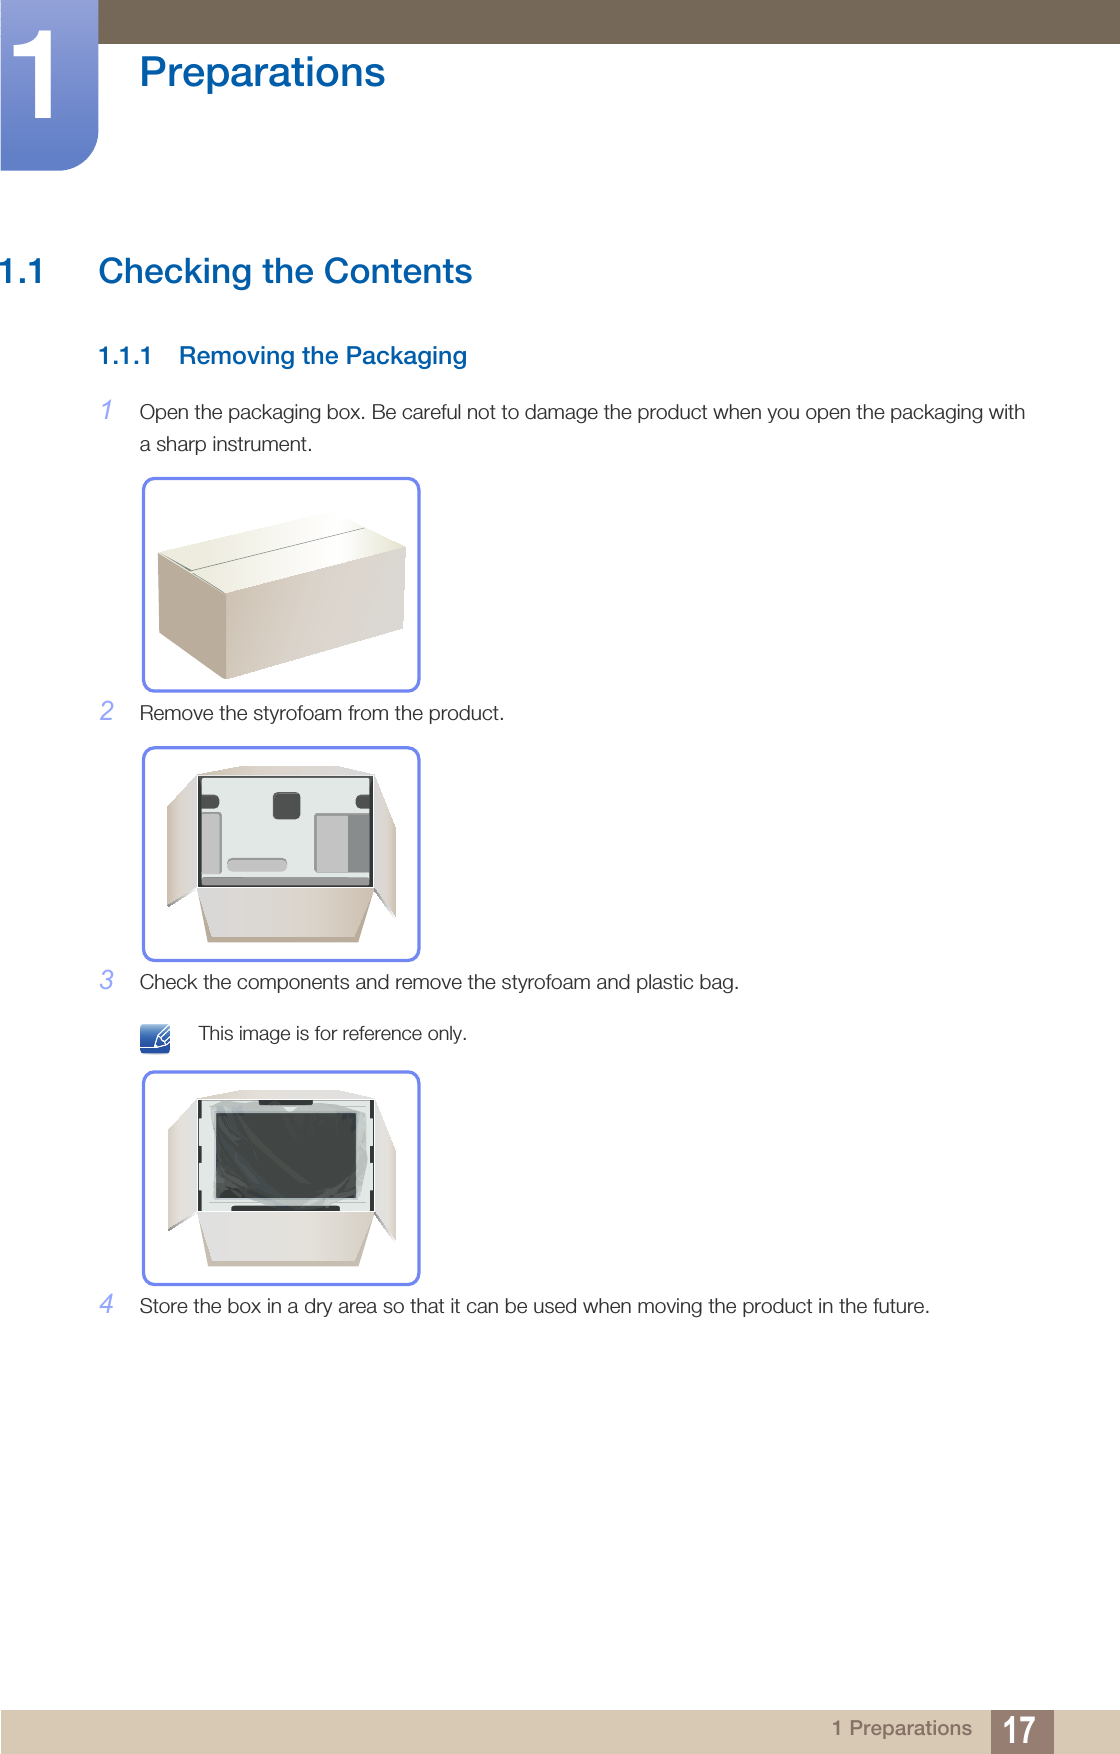
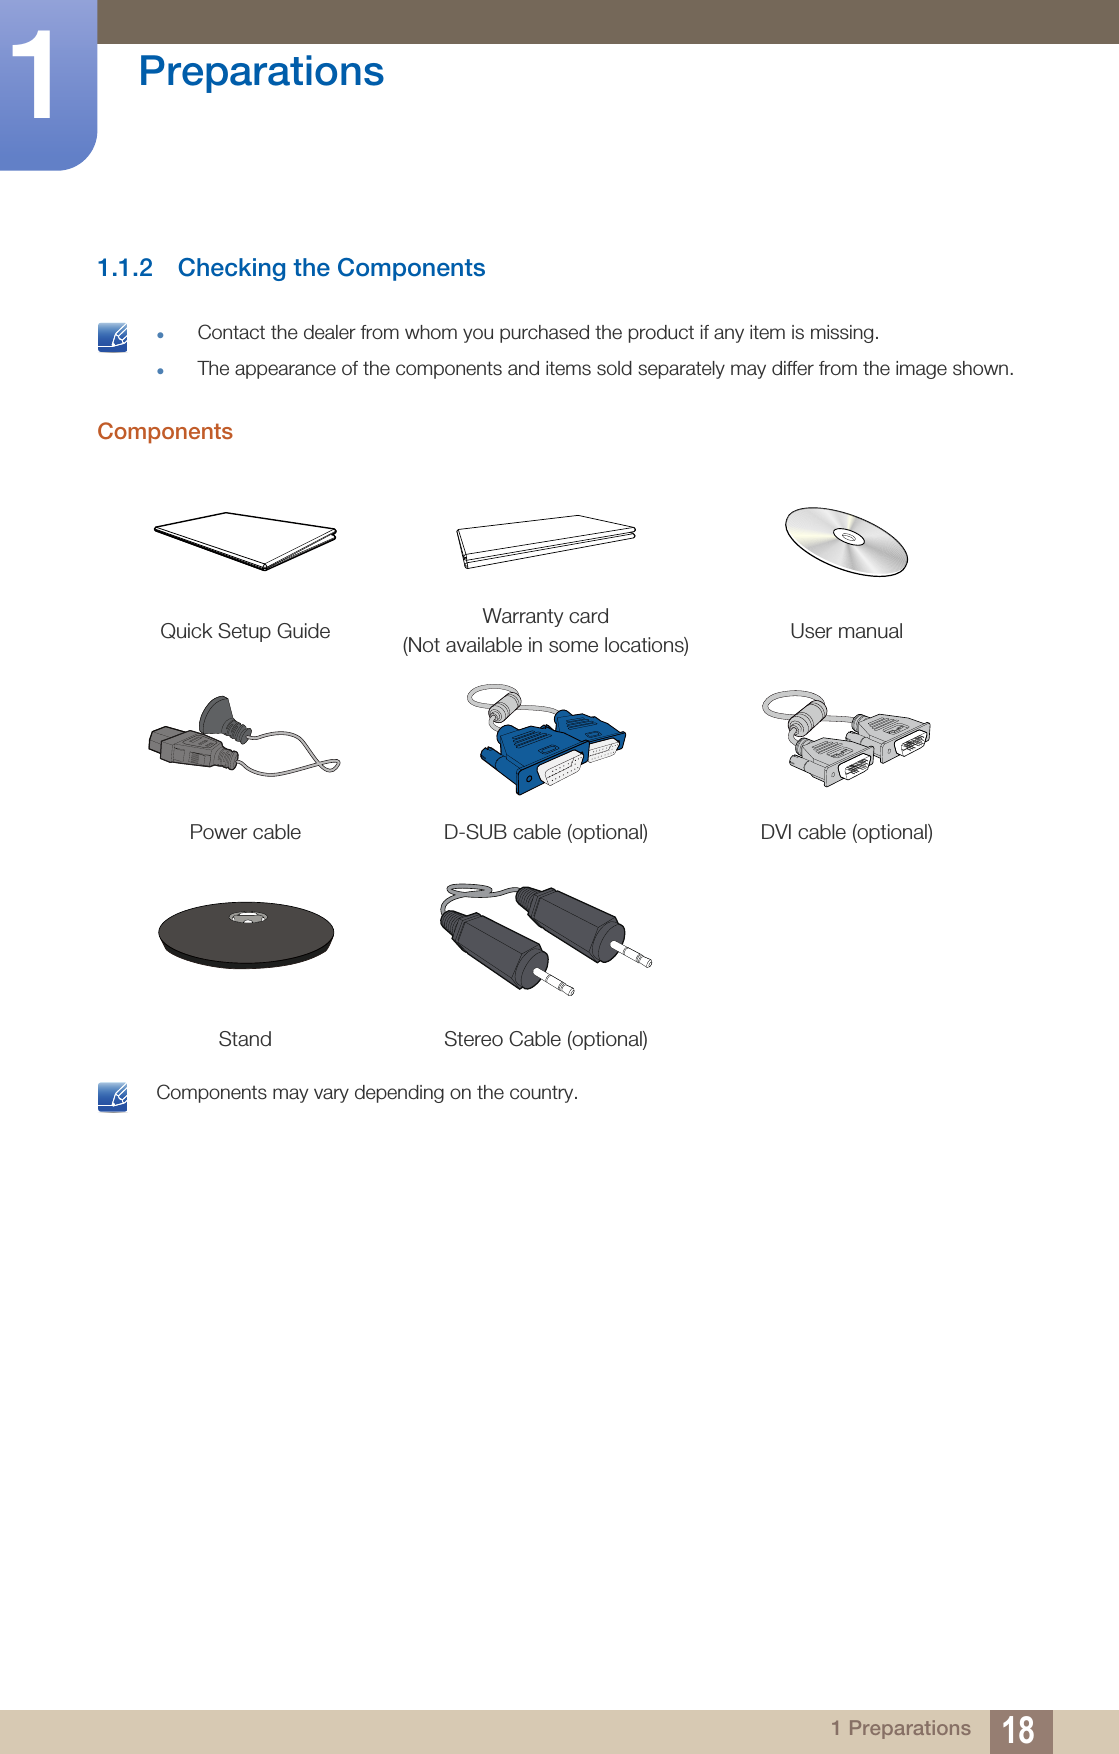
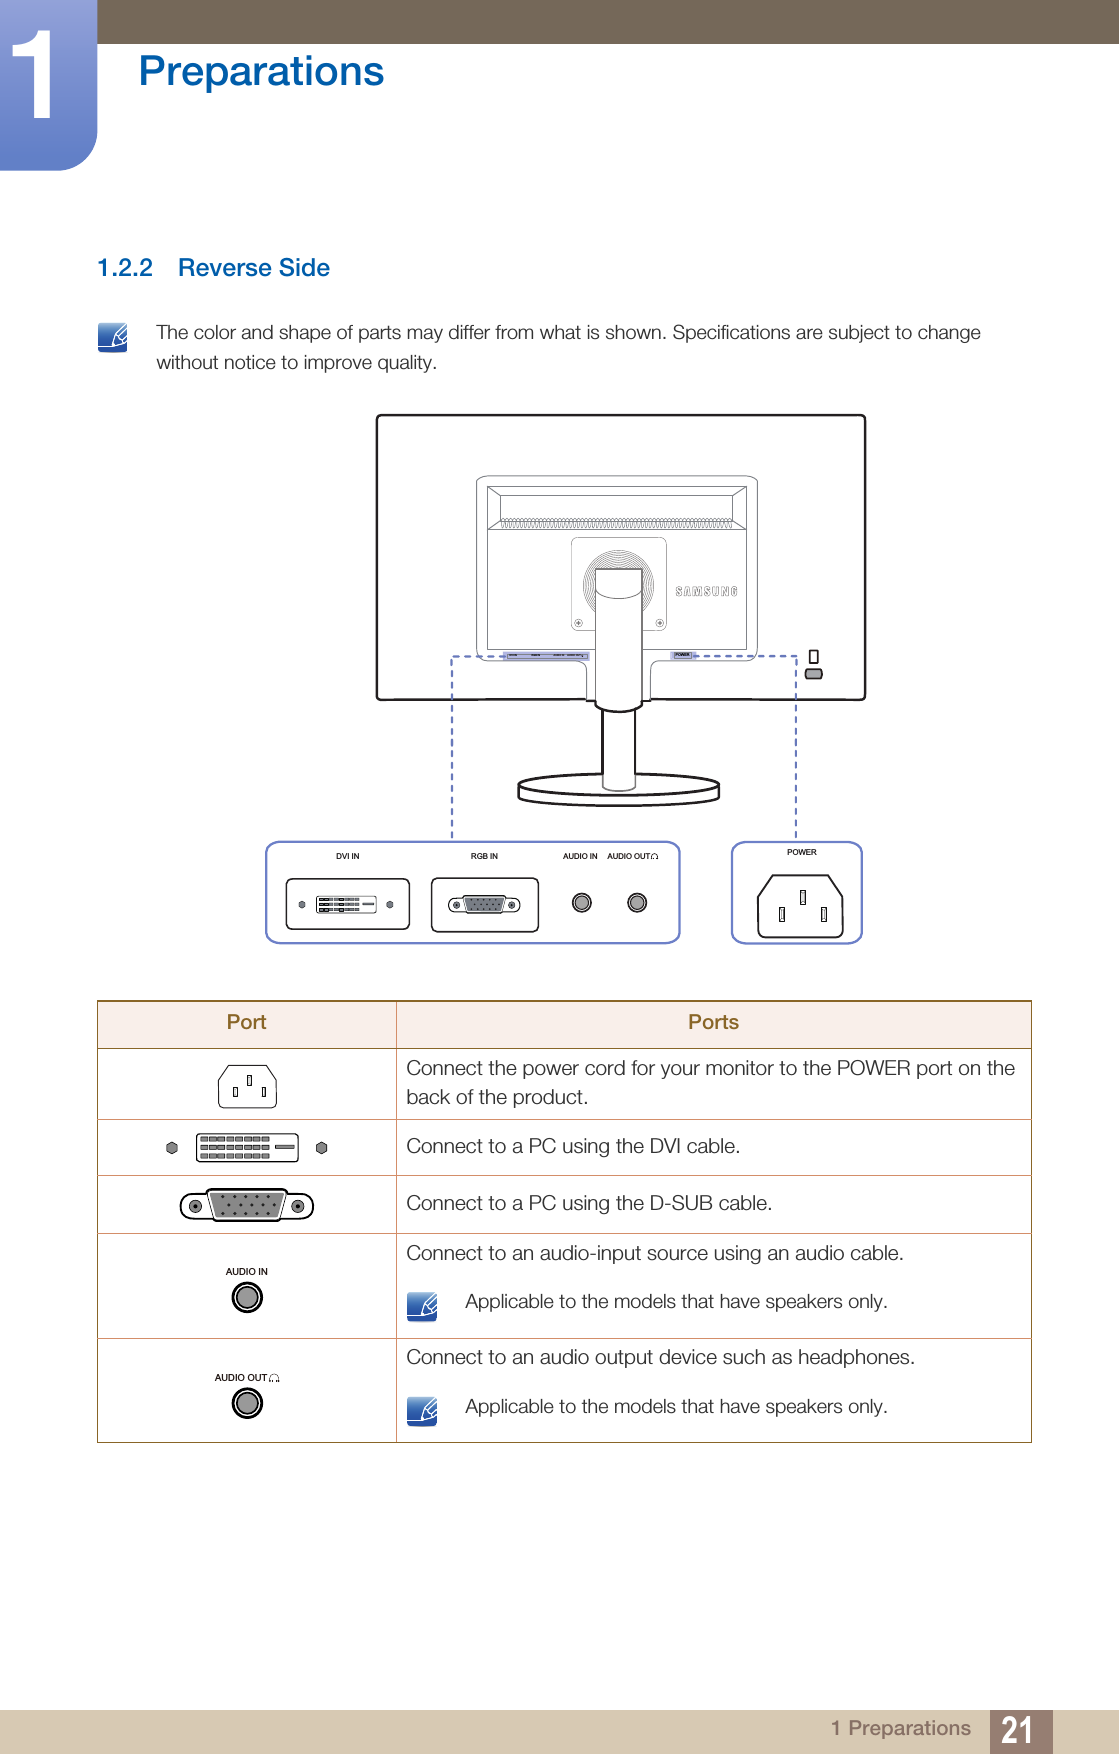
![19Preparations11 Preparations1.2 Parts1.2.1 Frontal Buttons The color and shape of parts may differ from what is shown. Specifications are subject to change without notice to improve quality. Icons DescriptionOpen or close the onscreen display (OSD) menu, or return to the parent menu.OSD control lock: Maintain the current settings, or lock the OSD control to prevent unintended changes to settings. Enable: To lock the OSD control, press the [ ] button for 10 seconds. Disable: To unlock the locked OSD control, press the [ ] button for more than 10 seconds. If the OSD control is locked,Brightness and Contrast can be adjusted, and INFORMATION can be viewed.The Customized Key function can be used by pressing the [ ] button. (The Customized Key function specified before the OSD control was locked is available even when the OSD control is locked.) Configure Customized Key and press [ ]. The following options will be enabled.Angle - Bright - Eco Saving - Image Size To configure Customized Key, go to SETUP&RESET Customized Key and select the mode you want. Key GuideSAMSUNGMAGICBRIGHTVOLAUTOSAMSUNGMAGICBRIGHTAUTOSAMSUNGMAGICBRIGHTAUTOVOLMENUMENUMENUSAMSUNGMAGICSAMSUNGMAGIC→](https://usermanual.wiki/Samsung-Electronics-Co/LS19B420BW.SB420-BN46-00232A-Eng-13/User-Guide-2352667-Page-19.png)
![20Preparations11 PreparationsMove to the upper or lower menu or adjust the value for an option on the OSD menu.Adjust the screen brightness. Volume can be adjusted if a cable is connected to the [AUDIO IN] port. Confirm a menu selection.Pressing the [ ] button when the OSD menu is not displayed will change the input source (Analog/DVI). If you power on the product or change the input source by pressing the [ ] button, a message that shows the changed input source will appear at the top left corner of the screen. Press the [ ] button to automatically adjust the screen settings. Changing the resolution in Display Properties will activate the Auto Adjustment function.This function is only available in Analog mode. Turn the screen on or off. Key GuideWhen a control button on the product is pressed, the Key Guide will be displayed before the onscreen menu opens. (The guide shows the function of the button pressed.)To access the onscreen menu when the guide is displayed, press the corresponding button again.The Key Guide may vary depending on the function or product model. Refer to the actual product.Icons DescriptionAUTOAUTO](https://usermanual.wiki/Samsung-Electronics-Co/LS19B420BW.SB420-BN46-00232A-Eng-13/User-Guide-2352667-Page-20.png)
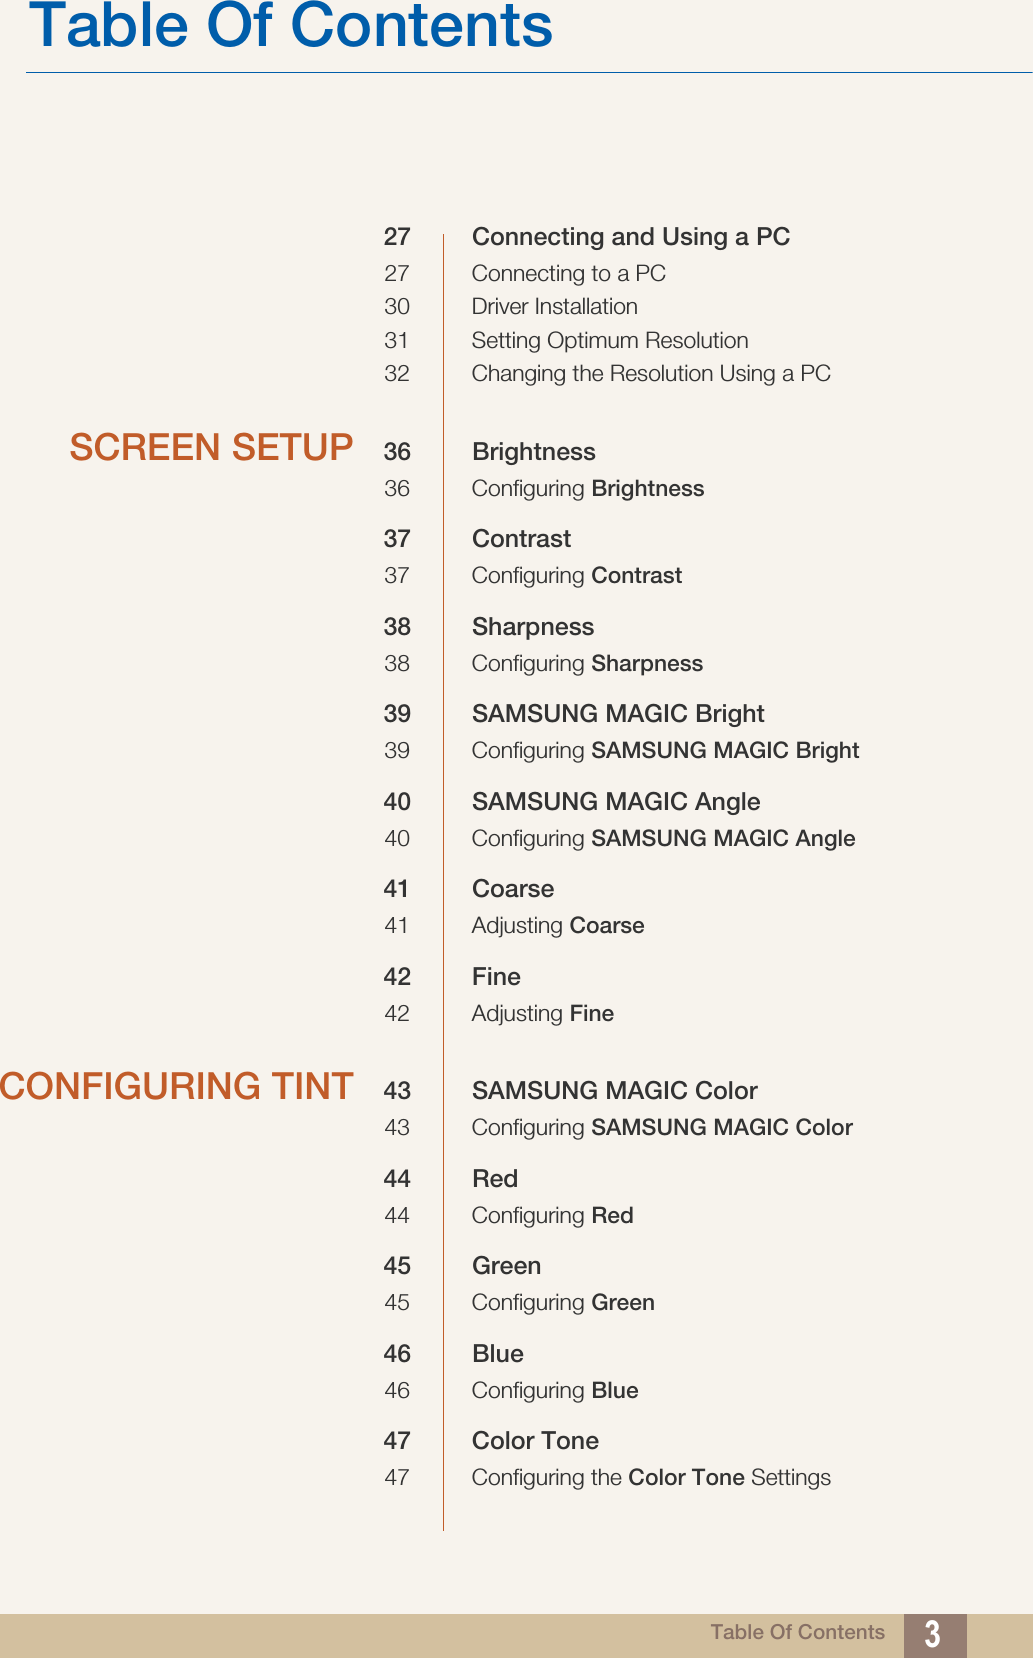
![262 Connecting and Using a Source Device2 Connecting and Using a Source Device2.1 Before Connecting2.1.1 Pre-connection CheckpointsBefore connecting a source device, read the user manual provided with it.The number and locations of ports on source devices may differ from device to device.Do not connect the power cable until all connections are completed.Connecting the power cable during connection may damage the product.Check the types of ports at the back of the product you want to connect.2.2 Connecting the PowerTo use the product, connect the power cable to a power outlet and the [POWER] port on the product.(The input voltage is switched automatically.)POWERDVI IN RGB INAUDIO IN AUDIO OUTPOWER](https://usermanual.wiki/Samsung-Electronics-Co/LS19B420BW.SB420-BN46-00232A-Eng-13/User-Guide-2352667-Page-26.png)
![27Connecting and Using a Source Device22 Connecting and Using a Source Device2.3 Connecting and Using a PC2.3.1 Connecting to a PCSelect a connection method suitable for your PC. Connecting parts may differ in different products. Connection Using the D-SUB Cable (Analog Type) Do not connect the power cable before connecting all other cables. Ensure you connect a source device first before connecting the power cable. 1Connect the D-SUB cable to the [RGB IN] port on the back of the product and the RGB port on the PC.2Press [ ] to change the input source to Analog.Connection Using the DVI Cable Do not connect the power cable before connecting all other cables. Ensure you connect a source device first before connecting the power cable. 1Connect the DVI cable to the [DVI IN] port on the back of the product and the DVI port on the PC.2Press [ ] to change the input source to Digital.RGB INDVI IN](https://usermanual.wiki/Samsung-Electronics-Co/LS19B420BW.SB420-BN46-00232A-Eng-13/User-Guide-2352667-Page-27.png)
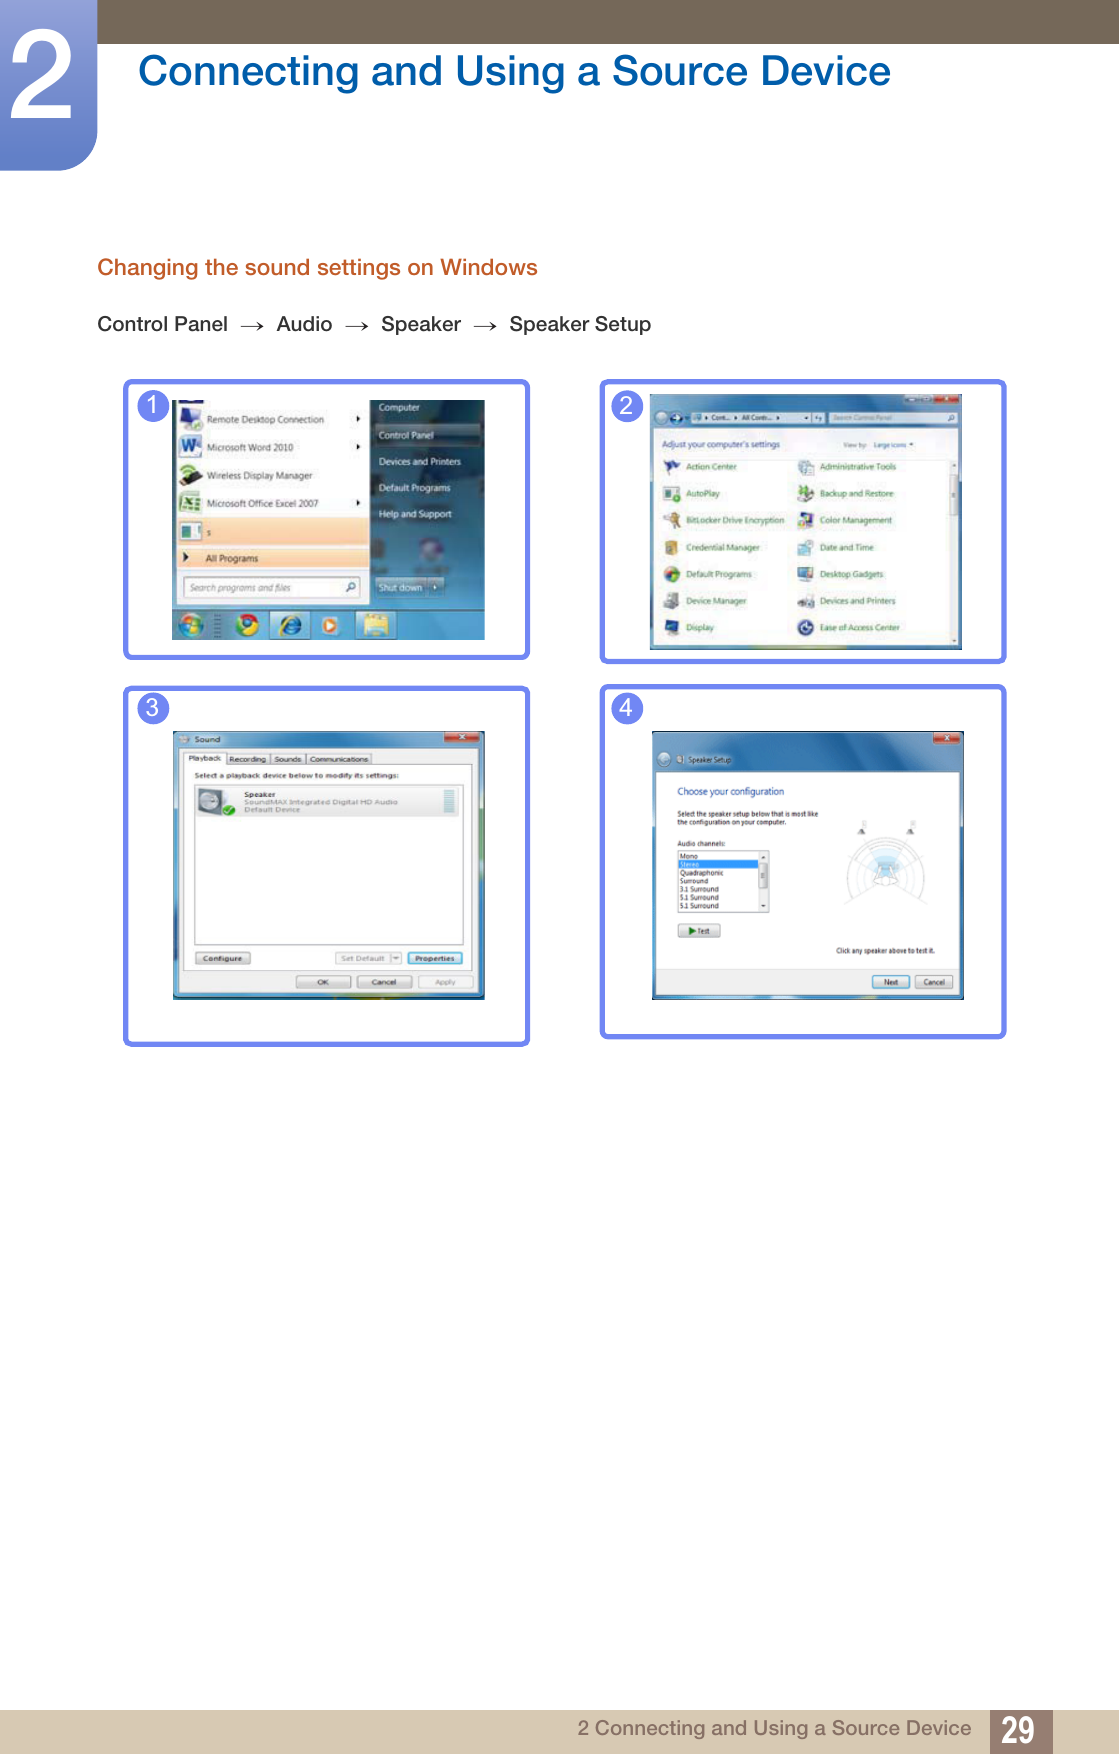
![28Connecting and Using a Source Device22 Connecting and Using a Source DeviceConnecting to Headphones or Speakers Do not connect the power cable before connecting all other cables. Ensure you connect a source device first before connecting the power cable. 1Connect an audio output device such as headphones or speakers to [ ] on the product. Applicable to the models that have speakers only. AUDIO OUTAUDIO INAUDIO OUT](https://usermanual.wiki/Samsung-Electronics-Co/LS19B420BW.SB420-BN46-00232A-Eng-13/User-Guide-2352667-Page-28.png)
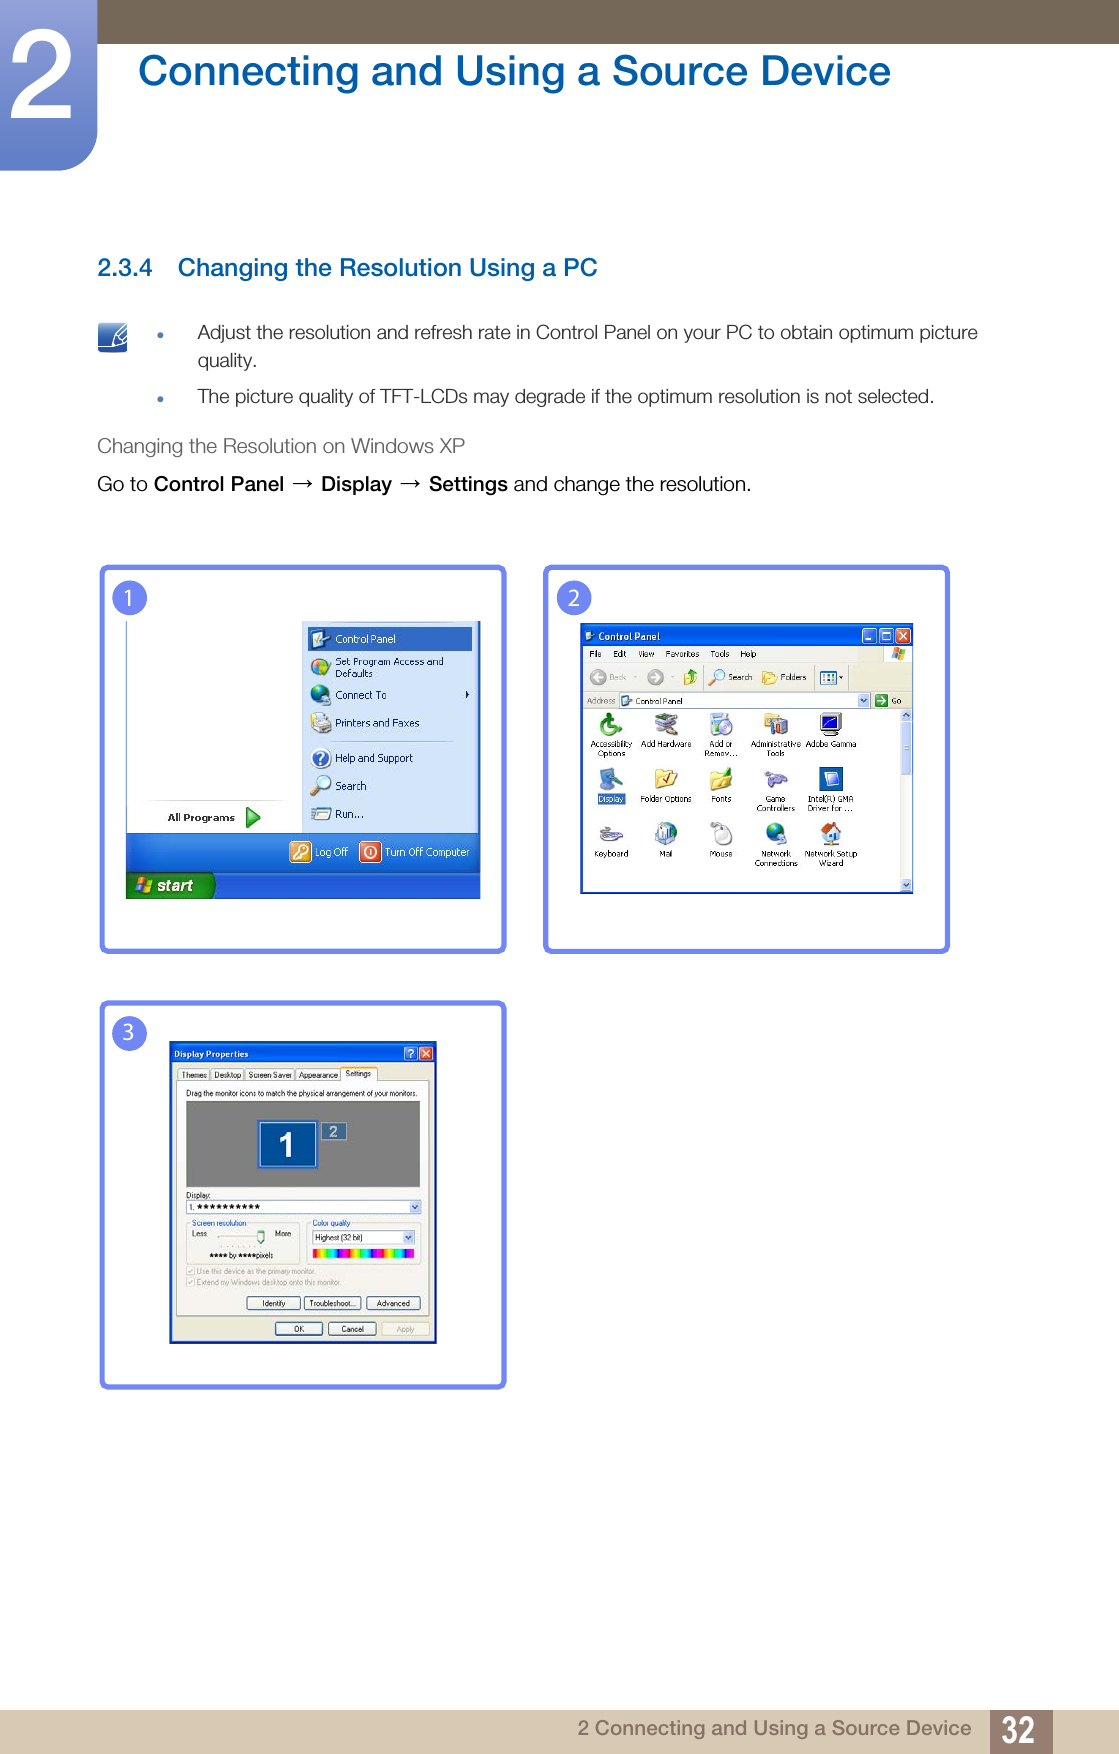
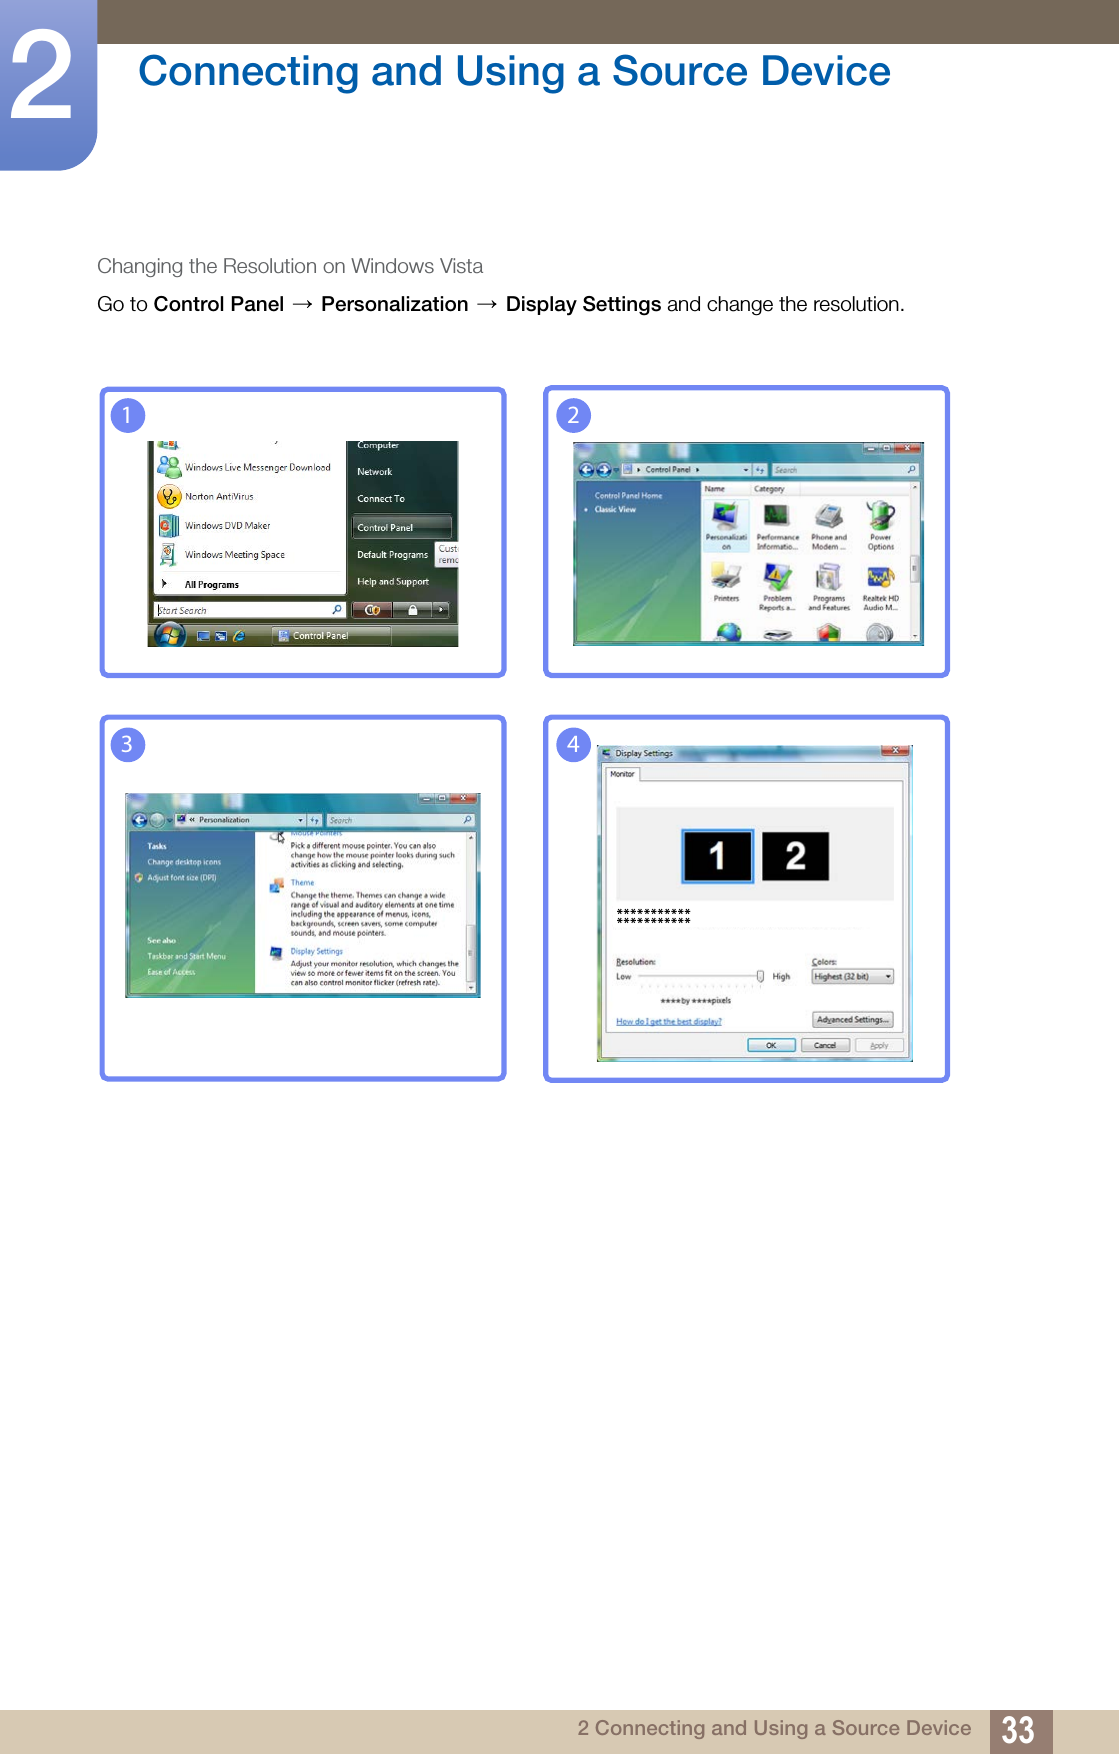
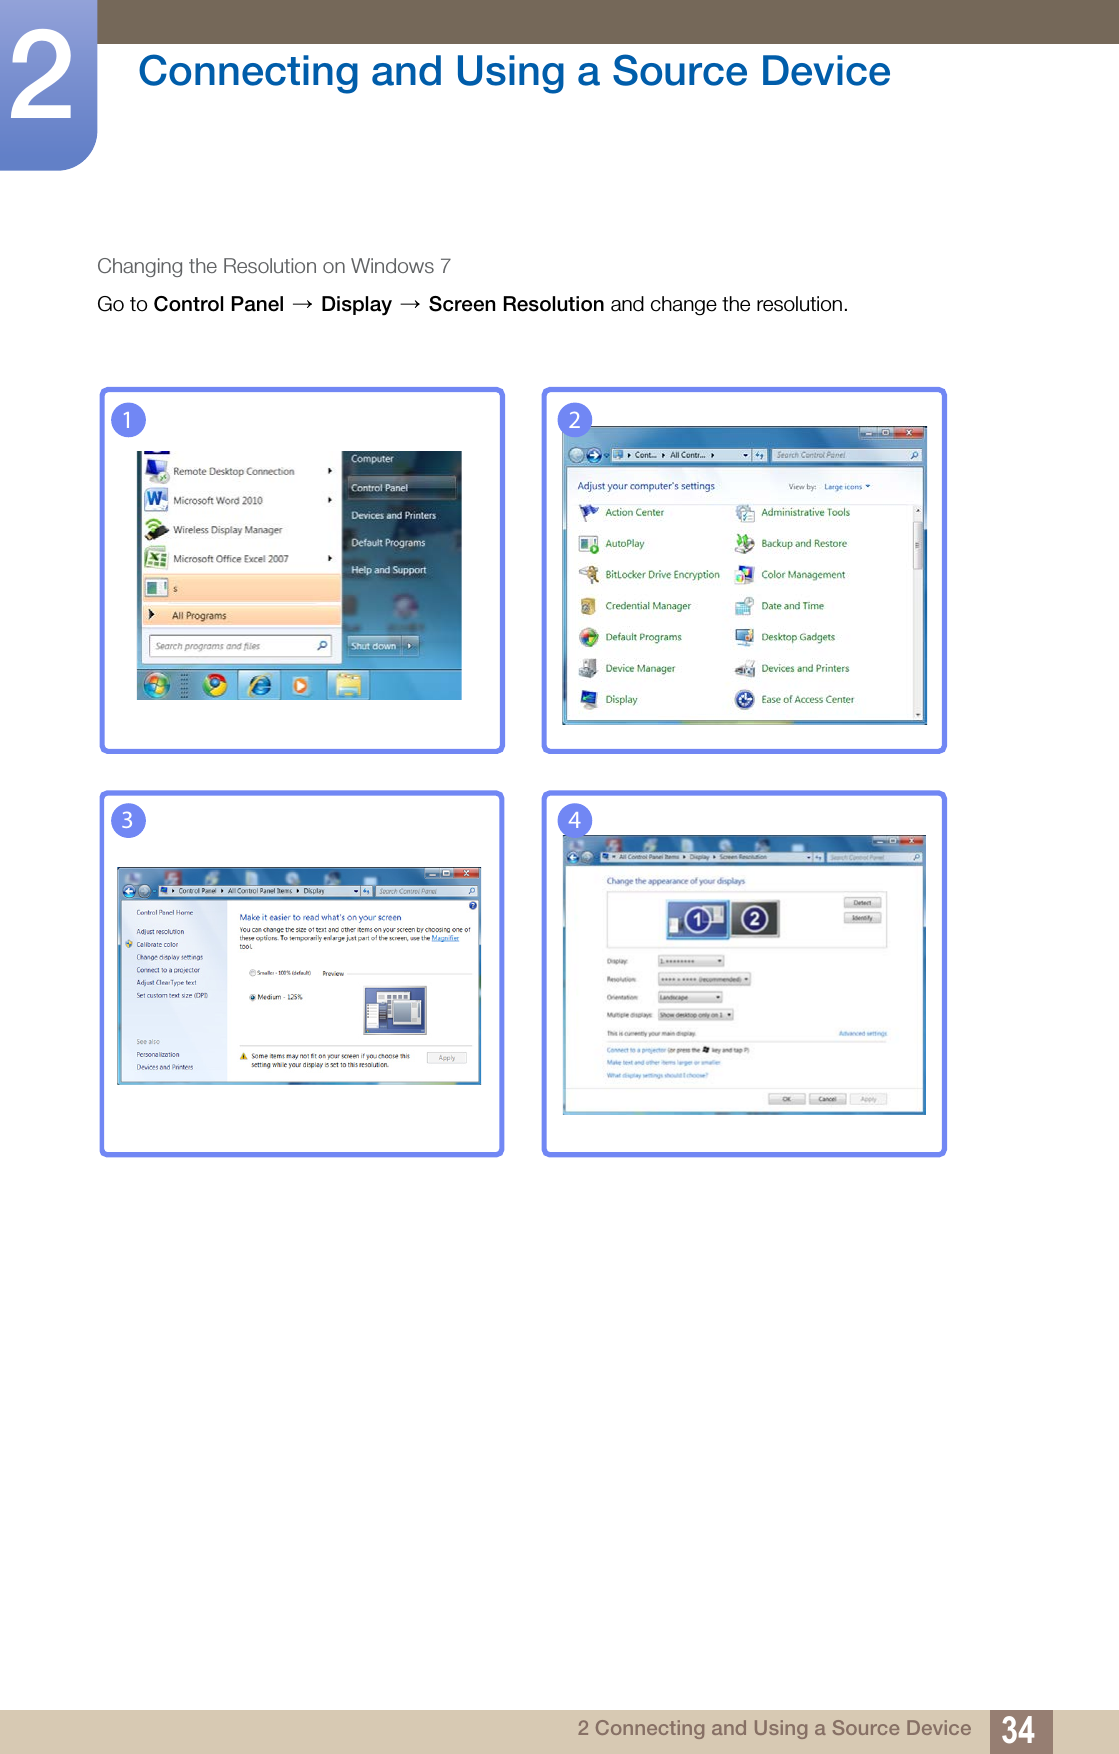
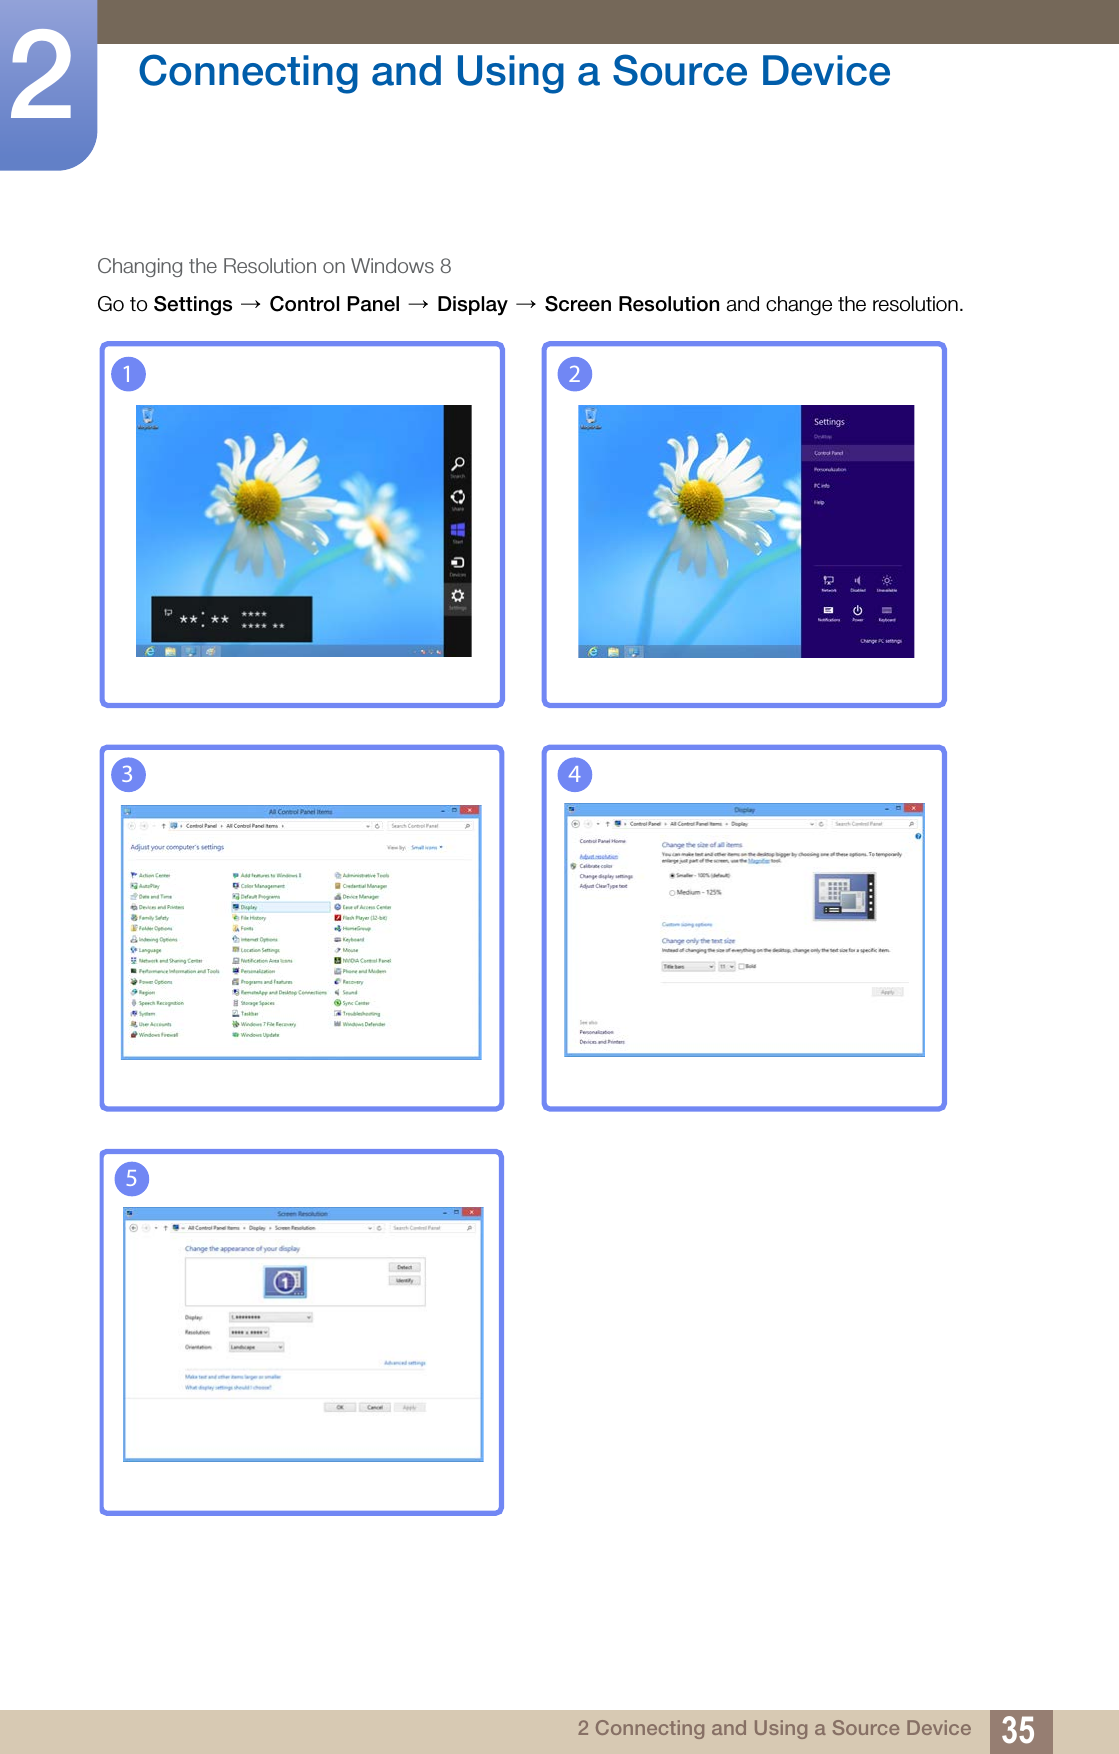
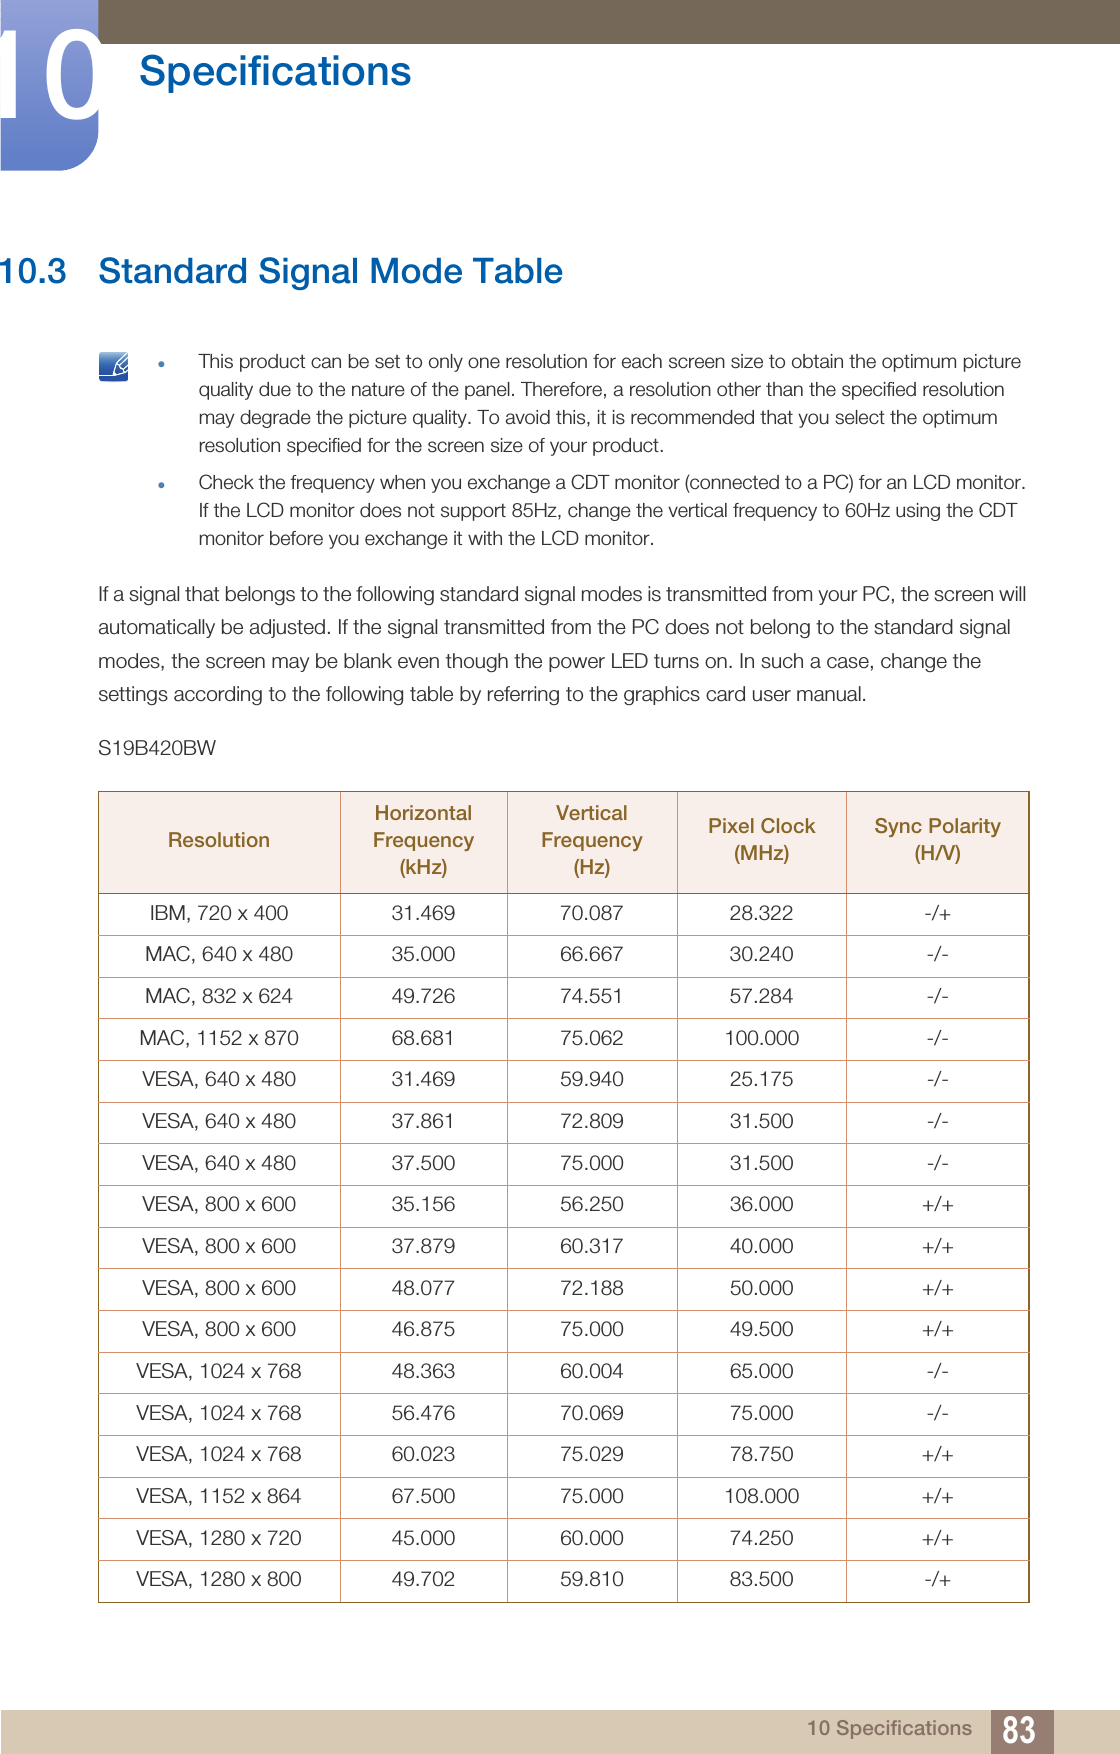
![31Connecting and Using a Source Device22 Connecting and Using a Source Device2.3.3 Setting Optimum ResolutionAn information message about setting optimum resolution will appear if you power on the product for the first time after purchase.Select a language on the product and change the resolution on your PC to the optimum setting.1Press [ ] to move to the language you want and press [ ].2To hide the information message, press [ ]. If the optimum resolution is not selected, the message will appear up to three times for a specified time even when the product is turned off and on again.The optimum resolution can also be selected in Control Panel on your PC. The optimal resolution for this monitor is as follows: **** x **** **HzUse the above settings to set the resolution on your PC.EnglishAUTOEXITMENU](https://usermanual.wiki/Samsung-Electronics-Co/LS19B420BW.SB420-BN46-00232A-Eng-13/User-Guide-2352667-Page-31.png)
![363 Screen Setup3 Screen SetupConfigure the screen settings such as brightness.3.1 BrightnessYou can adjust the general brightness of the picture. (Range: 0~100)A higher value will make the picture appear brighter. This menu is not available when Bright is set to Dynamic Contrast mode.Not available if Eco Saving is set to On. 3.1.1 Configuring Brightness1Press any button on the front of the product to display the Key Guide. Next, press [ ] to display the corresponding menu screen.2Press [ ] to move to Picture and press [ ] on the product.3Press [ ] to move to Brightness and press [ ] on the product. The following screen will appear.4Adjust the Brightness using the [ ] buttons.SAMSUNGMAGICMENUCustom OffPICTUREBrightness Contrast Sharpness CoarseFineSAMSUNGMAGIC BrightSAMSUNGMAGIC AngleAUTO](https://usermanual.wiki/Samsung-Electronics-Co/LS19B420BW.SB420-BN46-00232A-Eng-13/User-Guide-2352667-Page-36.png)
![37Screen Setup33 Screen Setup3.2 ContrastAdjust the contrast between the objects and background. (Range: 0~100)A higher value will increase the contrast to make the object appear clearer. This menu is not available when Bright is in Cinema or Dynamic Contrast mode.This menu is not available when Color is in Full or Intelligent mode. 3.2.1 Configuring Contrast1Press any button on the front of the product to display the Key Guide. Next, press [ ] to display the corresponding menu screen.2Press [ ] to move to Picture and press [ ] on the product.3Press [ ] to move to Contrast and press [ ] on the product. The following screen will appear.4Adjust the Contrast using the [ ] buttons.SAMSUNGMAGICSAMSUNGMAGICMENU&XVWRP2IIPICTURESAMSUNGMAGICBrightSAMSUNGMAGICAngleBrightness Contrast Sharpness CoarseFineAUTO](https://usermanual.wiki/Samsung-Electronics-Co/LS19B420BW.SB420-BN46-00232A-Eng-13/User-Guide-2352667-Page-37.png)
![38Screen Setup33 Screen Setup3.3 SharpnessMake the outline of objects more clear or blurry. (Range: 0~100)A higher value will make the outline of objects clearer. This menu is not available when Bright is in Cinema or Dynamic Contrast mode.This menu is not available when Color is in Full or Intelligent mode. 3.3.1 Configuring Sharpness1Press any button on the front of the product to display the Key Guide. Next, press [ ] to display the corresponding menu screen.2Press [ ] to move to Picture and press [ ] on the product.3Press [ ] to move to Sharpness and press [ ] on the product. The following screen will appear.4Adjust the Sharpness using the [ ] buttons.SAMSUNGMAGICSAMSUNGMAGICMENUCustomOffPICTURESAMSUNGMAGICBrightSAMSUNGMAGICAngleBrightness Contrast Sharpness CoarseFineAUTO](https://usermanual.wiki/Samsung-Electronics-Co/LS19B420BW.SB420-BN46-00232A-Eng-13/User-Guide-2352667-Page-38.png)
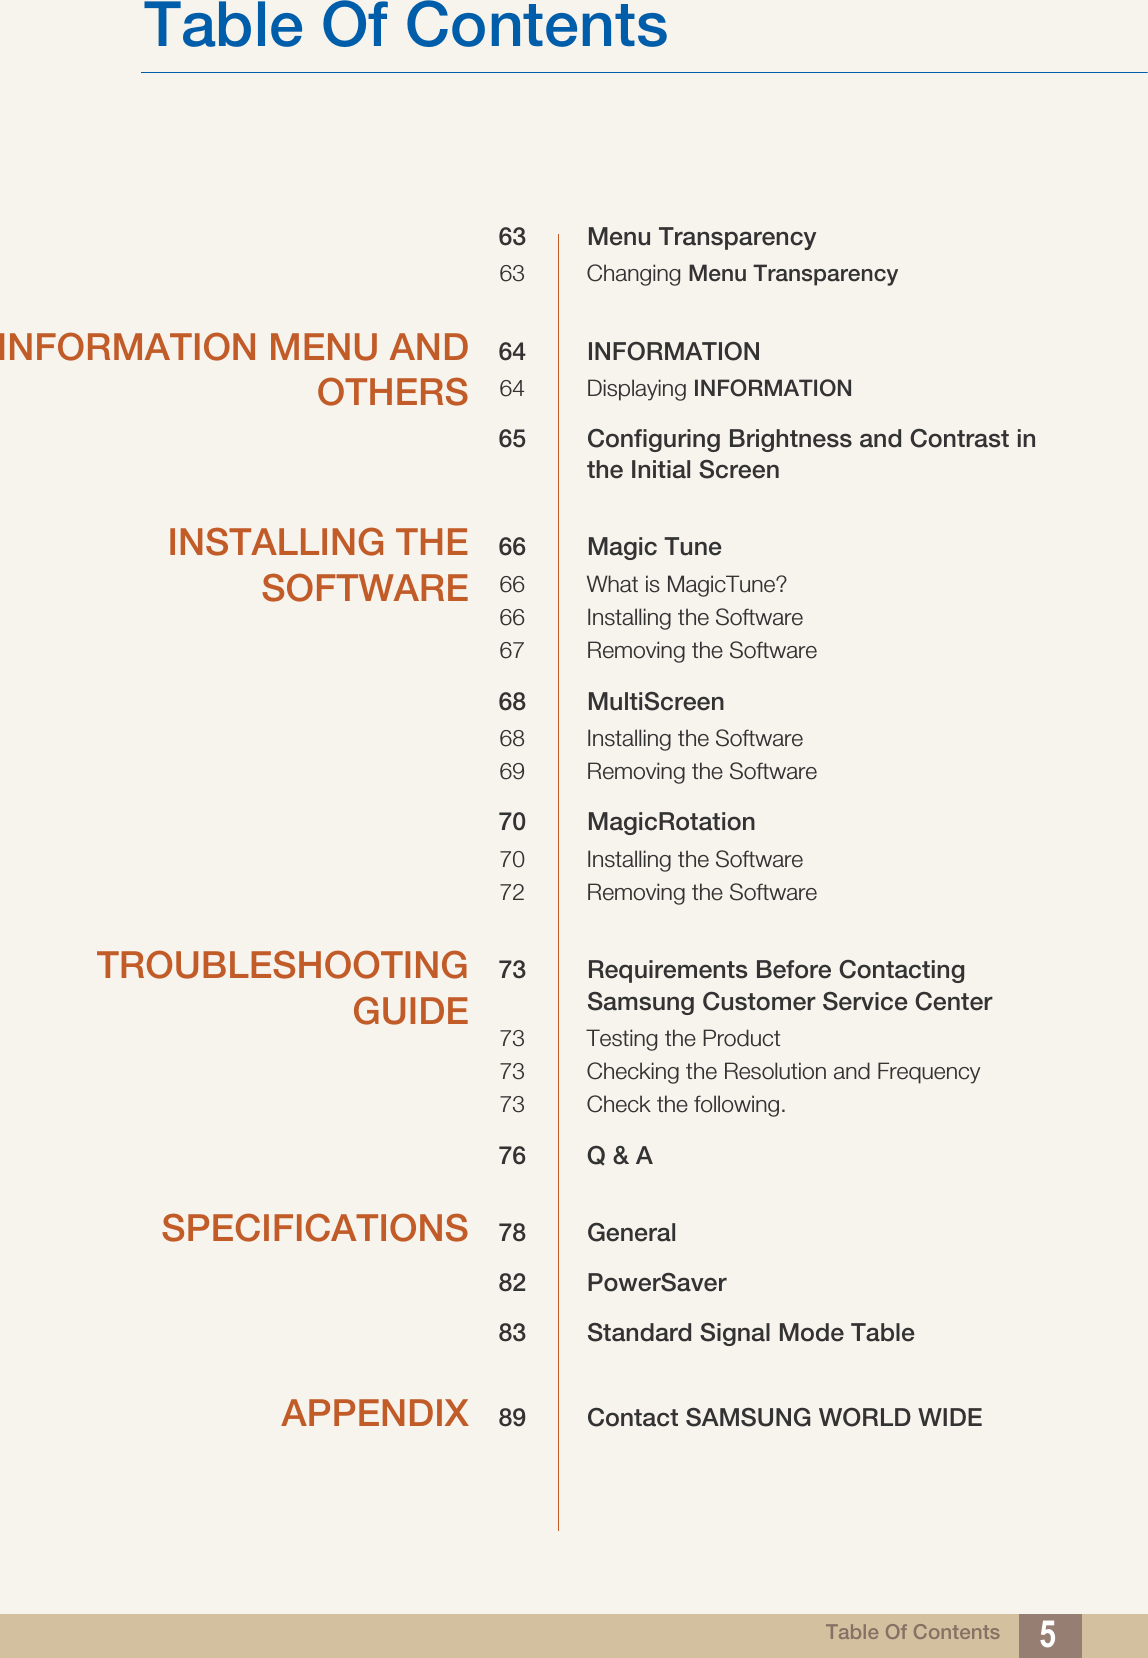
![39Screen Setup33 Screen Setup3.4 SAMSUNG MAGIC BrightThis menu provides an optimum picture quality suitable for the environment where the product will be used. Not available if Eco Saving is set to On.This menu is not available when Angle is enabled. You can customize the brightness to suit your preferences.3.4.1 Configuring SAMSUNG MAGIC Bright1Press any button on the front of the product to display the Key Guide. Next, press [ ] to display the corresponding menu screen.2Press [ ] to move to Picture and press [ ] on the product.3Press [ ] to move to Bright and press [ ] on the product. The following screen will appear.Custom: Customize the contrast and brightness as required.Standard: Obtain a picture quality suitable for editing documents or using Internet.Game: Obtain a picture quality suitable for playing games that involve many graphic effects and dynamic movements.Cinema: Obtain the brightness and sharpness of TVs suitable for enjoying video and DVD content.Dynamic Contrast: Obtain balanced brightness through automatic contrast adjustment.4Press [ ] to move to the option you want and press [ ].5The selected option will be applied.SAMSUNGMAGICMENUSAMSUNGMAGICیࡈ࣏ࢽଥࢿPICTURESAMSUNGMAGICBrightCustomStandardGameCinemaDynamic ContrastSAMSUNGMAGIC AngleBrightness Contrast Sharpness CoarseFineAUTO](https://usermanual.wiki/Samsung-Electronics-Co/LS19B420BW.SB420-BN46-00232A-Eng-13/User-Guide-2352667-Page-39.png)
![40Screen Setup33 Screen Setup3.5 SAMSUNG MAGIC AngleAngle allows you to configure the settings to obtain the optimum picture quality according to your viewing angle. This menu is not available when Bright is in Cinema or Dynamic Contrast mode.This menu is not available when Color is enabled. You can customize the angle to suit your preferences.3.5.1 Configuring SAMSUNG MAGIC Angle1Press any button on the front of the product to display the Key Guide. Next, press [ ] to display the corresponding menu screen.2Press [ ] to move to Picture and press [ ] on the product.3Press [ ] to move to Angle and press [ ] on the product. The following screen will appear.Off : Select this option to view directly in front of the product.Lean Back Mode 1 : Select this option to view from a place slightly lower than the product.Lean Back Mode 2 : Select this option to view from a place lower than Lean Back Mode 1.Standing Mode : Select this option to view from a place higher than the product.Side Mode : Select this option to view from either side of the product.Group View: Select this option for more than one viewer to view from places , , and .Custom: Lean Back Mode 1 will be applied by default if Custom is selected.4Press [ ] to move to the option you want and press [ ].5The selected option will be applied.SAMSUNGMAGICSAMSUNGMAGICSAMSUNGMAGICMENUSAMSUNGMAGICیࡈ࣏ࢽଥࢿPICTURESAMSUNGMAGIC AngleOffLean Back Mode 1Lean Back Mode 2Standing Mode Side ModeGroup ViewCustom SAMSUNGMAGIC BrightBrightness Contrast Sharpness CoarseFineAUTO15 54231①② ③④⑤①④⑤](https://usermanual.wiki/Samsung-Electronics-Co/LS19B420BW.SB420-BN46-00232A-Eng-13/User-Guide-2352667-Page-40.png)
![41Screen Setup33 Screen Setup3.6 CoarseAdjust the screen frequency. This menu is available in Analog mode only. 3.6.1 Adjusting Coarse1Press any button on the front of the product to display the Key Guide. Next, press [ ] to display the corresponding menu screen.2Press [ ] to move to Picture and press [ ] on the product.3Press [ ] to move to Coarse and press [ ] on the product. The following screen will appear.4Adjust the Coarse using the [ ] buttons.MENUCustomOffPICTURESAMSUNGMAGICBrightSAMSUNGMAGICAngleBrightness Contrast Sharpness CoarseFineAUTO](https://usermanual.wiki/Samsung-Electronics-Co/LS19B420BW.SB420-BN46-00232A-Eng-13/User-Guide-2352667-Page-41.png)
![42Screen Setup33 Screen Setup3.7 FineFine-adjust the screen to obtain a vivid picture. This menu is available in Analog mode only. 3.7.1 Adjusting Fine1Press any button on the front of the product to display the Key Guide. Next, press [ ] to display the corresponding menu screen.2Press [ ] to move to Picture and press [ ] on the product.3Press [ ] to move to Fine and press [ ] on the product. The following screen will appear.4Adjust the Fine using the [ ] buttons.MENUCustomOffPICTURESAMSUNGMAGICBrightSAMSUNGMAGICAngleBrightness Contrast Sharpness CoarseFineAUTO](https://usermanual.wiki/Samsung-Electronics-Co/LS19B420BW.SB420-BN46-00232A-Eng-13/User-Guide-2352667-Page-42.png)
![434 Configuring Tint4 Configuring TintAdjust the tint of the screen. This menu is not available when Bright is set to Cinema or Dynamic Contrast mode.SAMSUNGMAGIC4.1 SAMSUNG MAGIC ColorColor is a new picture-quality improvement technology developed independently by Samsung, which delivers vivid natural colors without picture quality degradation. This menu is not available when Angle is enabled. 4.1.1 Configuring SAMSUNG MAGIC Color1Press any button on the front of the product to display the Key Guide. Next, press [ ] to display the corresponding menu screen.2Press [ ] to move to COLOR and press [ ] on the product.3Press [ ] to move to Color and press [ ] on the product. The following screen will appear.Off: Disable Color.Demo: Compare normal screen mode with Color mode.Full: Obtain a vivid picture quality for all areas including the flesh colors in the picture.Intelligent: Improve the chroma for all areas except the flesh colors in the picture.4Press [ ] to move to the option you want and press [ ].5The selected option will be applied.SAMSUNGMAGICSAMSUNGMAGICMENUSAMSUNGMAGICCOLOROffDemoFullIntelligent::::::SAMSUNGMAGICColorRedGreenBlueColor ToneGamma Mode1NormalAUTOSAMSUNGMAGICSAMSUNGMAGIC](https://usermanual.wiki/Samsung-Electronics-Co/LS19B420BW.SB420-BN46-00232A-Eng-13/User-Guide-2352667-Page-43.png)
![44Configuring Tint44 Configuring Tint4.2 RedAdjust the value of the color red in the picture. (Range: 0~100)A higher value will increase the intensity of the color. This menu is not available when Color is in Full or Intelligent mode. 4.2.1 Configuring Red1Press any button on the front of the product to display the Key Guide. Next, press [ ] to display the corresponding menu screen.2Press [ ] to move to COLOR and press [ ] on the product.3Press [ ] to move to Red and press [ ] on the product. The following screen will appear.4Adjust the Red using the [ ] buttons.SAMSUNGMAGICMENUCOLOR::::::SAMSUNGMAGICColorOffRedGreenBlueColor ToneGamma Mode1NormalAUTO](https://usermanual.wiki/Samsung-Electronics-Co/LS19B420BW.SB420-BN46-00232A-Eng-13/User-Guide-2352667-Page-44.png)
![45Configuring Tint44 Configuring Tint4.3 GreenAdjust the value of the color green in the picture. (Range: 0~100)A higher value will increase the intensity of the color. This menu is not available when Color is in Full or Intelligent mode. 4.3.1 Configuring Green1Press any button on the front of the product to display the Key Guide. Next, press [ ] to display the corresponding menu screen.2Press [ ] to move to COLOR and press [ ] on the product.3Press [ ] to move to Green and press [ ] on the product. The following screen will appear.4Adjust the Green using the [ ] buttons.SAMSUNGMAGICMENUCOLOR::::::SAMSUNGMAGIC ColorRedGreenBlueColor ToneGamma Mode1NormalOffAUTO](https://usermanual.wiki/Samsung-Electronics-Co/LS19B420BW.SB420-BN46-00232A-Eng-13/User-Guide-2352667-Page-45.png)
![46Configuring Tint44 Configuring Tint4.4 BlueAdjust the value of the color blue in the picture. (Range: 0~100)A higher value will increase the intensity of the color. This menu is not available when Color is in Full or Intelligent mode. 4.4.1 Configuring Blue1Press any button on the front of the product to display the Key Guide. Next, press [ ] to display the corresponding menu screen.2Press [ ] to move to COLOR and press [ ] on the product.3Press [ ] to move to Blue and press [ ] on the product. The following screen will appear.4Adjust the Blue using the [ ] buttons.SAMSUNGMAGICMENUCOLOR::::::SAMSUNGMAGIC ColorMode1 NormalOffRedGreenBlueColor ToneGammaAUTO](https://usermanual.wiki/Samsung-Electronics-Co/LS19B420BW.SB420-BN46-00232A-Eng-13/User-Guide-2352667-Page-46.png)
![47Configuring Tint44 Configuring Tint4.5 Color ToneAdjust the general color tone of the picture. This menu is not available when Color is in Full or Intelligent mode.This menu is not available when Angle is enabled. 4.5.1 Configuring the Color Tone Settings1Press any button on the front of the product to display the Key Guide. Next, press [ ] to display the corresponding menu screen.2Press [ ] to move to COLOR and press [ ] on the product.3Press [ ] to move to Color Tone and press [ ] on the product. The following screen will appear.Cool 2: Set the color temperature to be cooler than Cool 1.Cool 1: Set the color temperature to be cooler than Normal mode.Normal: Display the standard color tone.Warm 1: Set the color temperature to be warmer than Normal mode.Warm 2: Set the color temperature to be warmer than Warm 1.Custom: Customize the color tone.4Press [ ] to move to the option you want and press [ ].5The selected option will be applied.SAMSUNGMAGICSAMSUNGMAGICMENUCOLOR::::::SAMSUNGMAGICColorֻҖࣱOff&RRO&RRO1RUPDO:DUP:DUP&XVWRPRedGreenBlueColor ToneGammaAUTO](https://usermanual.wiki/Samsung-Electronics-Co/LS19B420BW.SB420-BN46-00232A-Eng-13/User-Guide-2352667-Page-47.png)
![48Configuring Tint44 Configuring Tint4.6 GammaAdjust the mid-range brightness (Gamma) of the picture. This menu is not available when Angle is enabled. 4.6.1 Configuring Gamma1Press any button on the front of the product to display the Key Guide. Next, press [ ] to display the corresponding menu screen.2Press [ ] to move to COLOR and press [ ] on the product.3Press [ ] to move to Gamma and press [ ] on the product. The following screen will appear.4Press [ ] to move to the option you want and press [ ].5The selected option will be applied.SAMSUNGMAGICMENUCOLOR::::::SAMSUNGMAGIC ColorֻҖNormalOffMode1 Mode2Mode3RedGreenBlueColor ToneGammaAUTO](https://usermanual.wiki/Samsung-Electronics-Co/LS19B420BW.SB420-BN46-00232A-Eng-13/User-Guide-2352667-Page-48.png)
![495 Resizing or Relocating the Screen5 Resizing or Relocating the Screen5.1 H-Position & V-PositionH-Position: Move the screen to the left or right.V-Position: Move the screen up or down. Available only when Image Size is set to Screen Fit.This menu is available in Analog mode only.When a 720P or 1080P signal is input in AV mode ,select Screen Fit to adjust horizontal position in 0-6 levels. 5.1.1 Configuring H-Position & V-Position1Press any button on the front of the product to display the Key Guide. Next, press [ ] to display the corresponding menu screen.2Press [ ] to move to SIZE&POSITION and press [ ] on the product.3Press [ ] to move to H-Position or V-Position, and press [ ]. The following screen will appear.4Press [ ] to configure H-Position or V-Position.MENUAutoSIZE&POSITIONH-PositionV-PositionImage SizeMenu H-PositionMenu V-PositionAUTOAutoSIZE&POSITIONH-PositionV-PositionImage SizeMenu H-PositionMenu V-PositionAUTO](https://usermanual.wiki/Samsung-Electronics-Co/LS19B420BW.SB420-BN46-00232A-Eng-13/User-Guide-2352667-Page-49.png)
![50Resizing or Relocating the Screen55 Resizing or Relocating the Screen5.2 Image SizeChange the picture size.5.2.1 Changing the Image Size1Press any button on the front of the product to display the Key Guide. Next, press [ ] to display the corresponding menu screen.2Press [ ] to move to SIZE&POSITION and press [ ] on the product.3Press [ ] to move to Image Size and press [ ] on the product. The following screen will appear.Auto: Display the picture according to the aspect ratio of the input source.Wide: Display the picture in full screen regardless of the aspect ratio of the input source.4:3: Display the picture with an aspect ratio of 4:3. Suitable for videos and standard broadcasts.16:9: Sets the picture to 16:9 wide mode.Screen Fit: Display the picture with the original aspect ratio without cutting off.MENUѰSIZE&POSITION$XWR:LGHH-PositionV-PositionImage SizeMenu H-PositionMenu V-PositionAUTOѰSIZE&POSITION6FUHHQ)LWH-PositionV-PositionImage SizeMenu H-PositionMenu V-PositionAUTO](https://usermanual.wiki/Samsung-Electronics-Co/LS19B420BW.SB420-BN46-00232A-Eng-13/User-Guide-2352667-Page-50.png)
![51Resizing or Relocating the Screen55 Resizing or Relocating the Screen4:3: Display the picture with an aspect ratio of 4:3. Suitable for videos and standard broadcasts.Wide: Display the picture in full screen regardless of the aspect ratio of the input source.Screen Fit: Display the picture with the original aspect ratio without cutting off. Changing the screen size is available when the following conditions are satisfied.A digital output device is connected using the DVI cable.The input signal is 480p, 576p, 720p, or 1080p.This can only be set when the external input is connected through DVI and PC/AV Mode is set to AV. 4Press [ ] to move to the option you want and press [ ].5The selected option will be applied.ѰSIZE&POSITION:LGH6FUHHQ)LWH-PositionV-PositionImage SizeMenu H-PositionMenu V-PositionAUTO](https://usermanual.wiki/Samsung-Electronics-Co/LS19B420BW.SB420-BN46-00232A-Eng-13/User-Guide-2352667-Page-51.png)
![52Resizing or Relocating the Screen55 Resizing or Relocating the Screen5.3 Menu H-Position & Menu V-PositionMenu H-Position: Move the menu position to the left or right. Menu V-Position: Move the menu position up or down. 5.3.1 Configuring Menu H-Position & Menu V-Position1Press any button on the front of the product to display the Key Guide. Next, press [ ] to display the corresponding menu screen.2Press [ ] to move to SIZE&POSITION and press [ ] on the product.3Press [ ] to move to Menu H-Position or Menu V-Position, and press [ ]. The following screen will appear.4Press [ ] to configure Menu H-Position or Menu V-Position.MENU$XWRSIZE&POSITIONH-PositionV-PositionImage SizeMenu H-PositionMenu V-PositionAUTO$XWRSIZE&POSITIONH-PositionV-PositionImage SizeMenu H-PositionMenu V-PositionAUTO](https://usermanual.wiki/Samsung-Electronics-Co/LS19B420BW.SB420-BN46-00232A-Eng-13/User-Guide-2352667-Page-52.png)
![536 Setup and Reset6 Setup and Reset6.1 ResetReturn all the settings for the product to the default factory settings.6.1.1 Initializing Settings (Reset)1Press any button on the front of the product to display the Key Guide. Next, press [ ] to display the corresponding menu screen.2Press [ ] to move to SETUP&RESET and press [ ] on the product.3Press [ ] to move to Reset and press [ ] on the product. The following screen will appear.4Press [ ] to move to the option you want and press [ ].5The selected option will be applied.MENUSETUP&RESETOff(QJOLVKOffAccelerationResetLanguageEco SavingOff Timer On/Off Off Timer SettingPC/AV Mode Key Repeat Time AUTOReset all settings?Yes NoEXIT AUTO](https://usermanual.wiki/Samsung-Electronics-Co/LS19B420BW.SB420-BN46-00232A-Eng-13/User-Guide-2352667-Page-53.png)
![54Setup and Reset66 Setup and Reset6.2 LanguageSet the menu language. A change to the language setting will only be applied to the onscreen menu display.It will not be applied to other functions on your PC. 6.2.1 Changing the Language1Press any button on the front of the product to display the Key Guide. Next, press [ ] to display the corresponding menu screen.2Press [ ] to move to SETUP&RESET and press [ ] on the product.3Press [ ] to move to Language and press [ ] on the product. The following screen will appear.4Press [ ] to move to the language you want and press [ ].5The selected option will be applied.MENUଥࢿଥࢿ3&ɼܖ؆ـ'HXWVFK(QJOLVK(VSDxRO)UDQoDLV,WDOLDQR0DJ\DU3ROVNL3RUWXJXrVƧNJLjLjǁƿǀ6YHQVND7UNoH ଞ˲߭∝䇁ᣣᧄ⺆5HVHW/DQJXDJH(FR6DYLQJ2II7LPHU2Q2II2II7LPHU6HWWLQJ3&$90RGH.H\5HSHDW7LPHSETUP&RESETAUTO](https://usermanual.wiki/Samsung-Electronics-Co/LS19B420BW.SB420-BN46-00232A-Eng-13/User-Guide-2352667-Page-54.png)
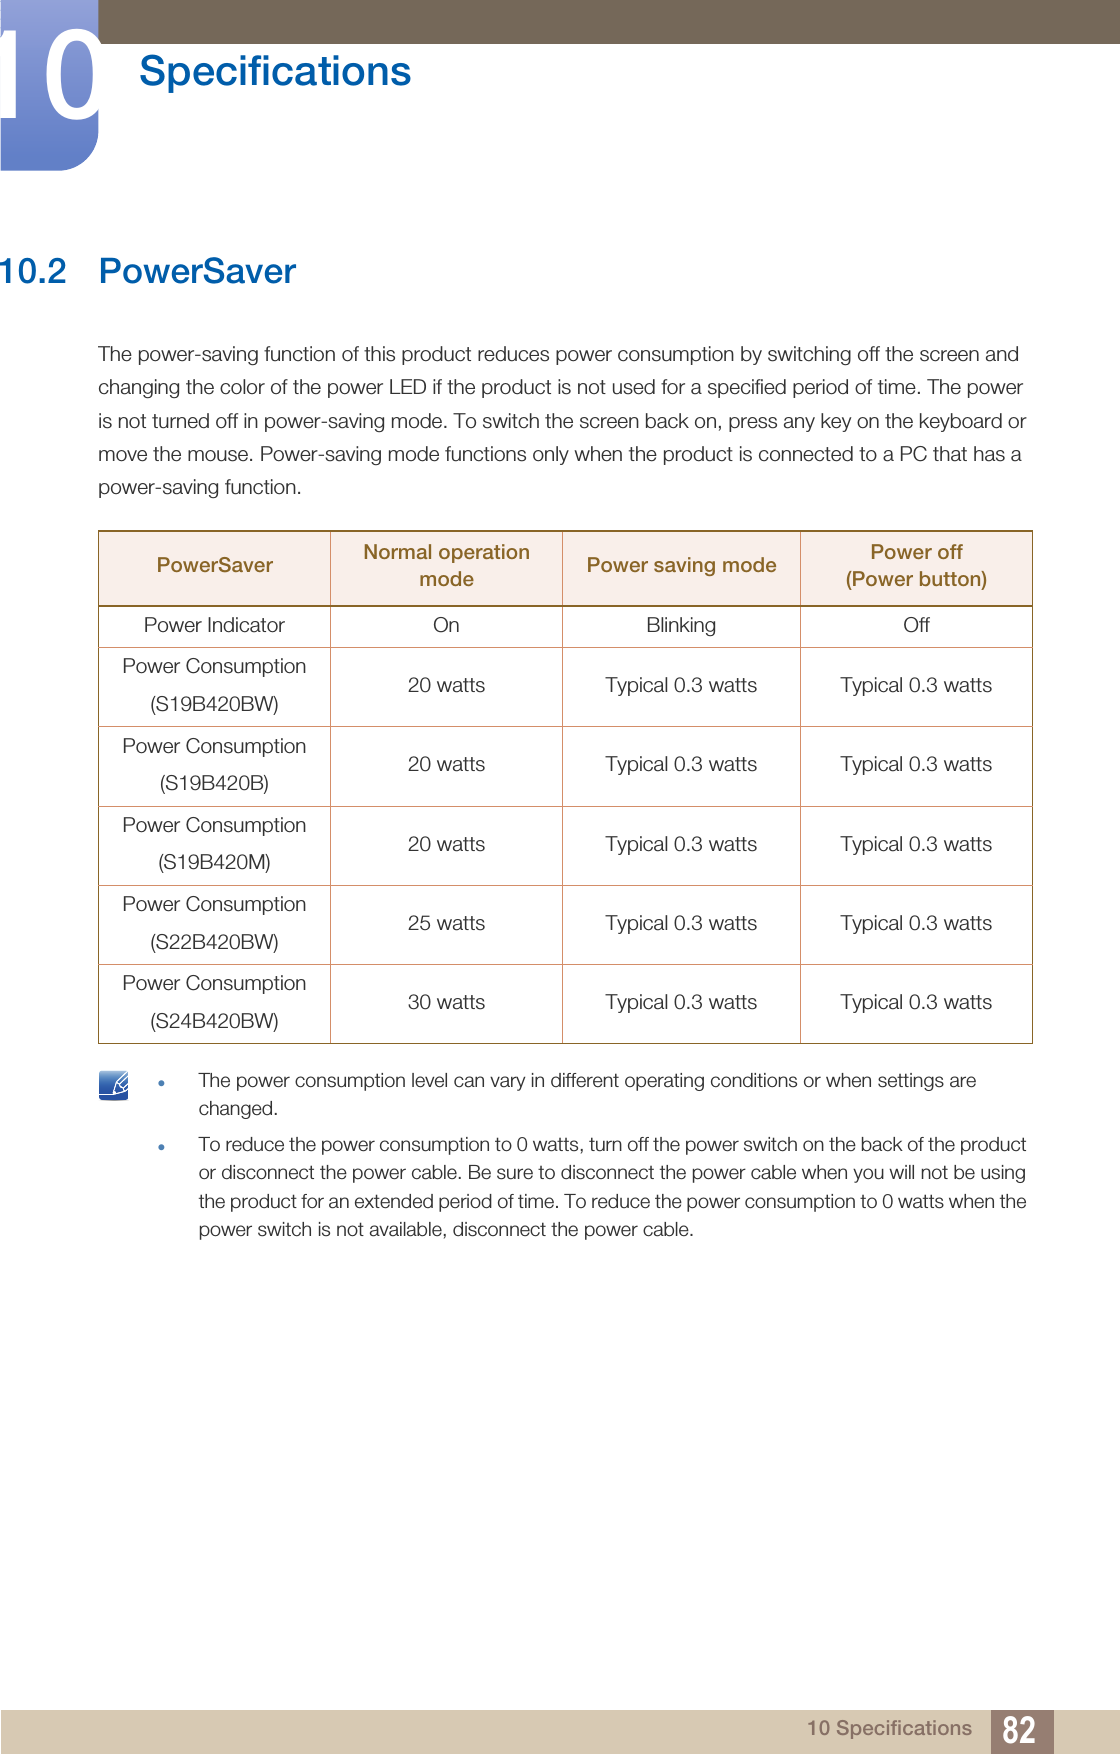
![55Setup and Reset66 Setup and Reset6.3 Eco SavingThe Eco Saving function reduces power consumption by controlling the electric current used by the monitor panel. This menu is not available when Bright is in Dynamic Contrast mode. 6.3.1 Configuring Eco Saving1Press any button on the front of the product to display the Key Guide. Next, press [ ] to display the corresponding menu screen.2Press [ ] to move to SETUP&RESET and press [ ] on the product.3Press [ ] to move to Eco Saving and press [ ] on the product. The following screen will appear.75% : Change the monitor power consumption to 75% of the default level.50% : Change the monitor power consumption to 50% of the default level.Off: Deactivate the Eco Saving function.4Press [ ] to move to the option you want and press [ ].5The selected option will be applied.SAMSUNGMAGICMENUEnglishSETUP&RESETଥࢿଥࢿAccelerationOff5HVHW/DQJXDJH(FR6DYLQJ2II7LPHU2Q2II2II7LPHU6HWWLQJ3&$90RGH.H\5HSHDW7LPHAUTO](https://usermanual.wiki/Samsung-Electronics-Co/LS19B420BW.SB420-BN46-00232A-Eng-13/User-Guide-2352667-Page-55.png)
![56Setup and Reset66 Setup and Reset6.4 Off Timer On/Off You can set the product to automatically turn off.6.4.1 Configuring Off Timer On/Off1Press any button on the front of the product to display the Key Guide. Next, press [ ] to display the corresponding menu screen.2Press [ ] to move to SETUP&RESET and press [ ] on the product.3Press [ ] to move to Off Timer On/Off and press [ ] on the product. The following screen will appear.Off: Deactivate the off timer so that the product does not power off automatically.On: Activate the off timer so that the product powers off automatically.4Press [ ] to move to the option you want and press [ ].5The selected option will be applied.MENU(QJOLVK: OffSETUP&RESETAcceleration5HVHW/DQJXDJH(FR6DYLQJ2II7LPHU2Q2II2II7LPHU6HWWLQJ3&$90RGH.H\5HSHDW7LPHOff OnAUTO](https://usermanual.wiki/Samsung-Electronics-Co/LS19B420BW.SB420-BN46-00232A-Eng-13/User-Guide-2352667-Page-56.png)
![57Setup and Reset66 Setup and Reset6.5 Off Timer Setting The off timer can be set within a range of 1 to 23 hours. The product will automatically power off after the specified number of hours. This menu is available only when Off Timer On/Off is set to On. 6.5.1 Configuring Off Timer Setting1Press any button on the front of the product to display the Key Guide. Next, press [ ] to display the corresponding menu screen.2Press [ ] to move to SETUP&RESET and press [ ] on the product.3Press [ ] to move to Off Timer Setting and press [ ] on the product. The following screen will appear.4Press [ ] to configure Off Timer Setting.MENUEnglishOffOnSETUP&RESETAcceleration5HVHW/DQJXDJH(FR6DYLQJ2II7LPHU2Q2II2II7LPHU6HWWLQJ3&$90RGH.H\5HSHDW7LPH10hAUTO](https://usermanual.wiki/Samsung-Electronics-Co/LS19B420BW.SB420-BN46-00232A-Eng-13/User-Guide-2352667-Page-57.png)
![58Setup and Reset66 Setup and Reset6.6 PC/AV ModeSet PC/AV Mode to AV. The picture size will be enlarged. This option is useful when you view a movie. This function does not support Analog mode.Supplied for the wide models only such as 16:9 or 16:10.If the monitor (when set to DVI) is in power saving mode or is displaying the message Check Signal Cable, press the [] button to display the On Screen Display (OSD). You can select PC or AV. 6.6.1 Configuring PC/AV Mode1Press any button on the front of the product to display the Key Guide. Next, press [ ] to display the corresponding menu screen.2Press [ ] to move to SETUP&RESET and press [ ] on the product.3Press [ ] to move to PC/AV Mode and press [ ] on the product. The following screen will appear.4Press [ ] to move to the option you want and press [ ].5The selected option will be applied.MENUMENU(QJOLVKOffOn$FFHOHUDWLRQSETUP&RESETResetLanguageEco SavingOff Timer On/Off Off Timer SettingPC/AV Mode Key Repeat Time10hAUTO3&$9ೳPC/AV Mode'9,AUTO](https://usermanual.wiki/Samsung-Electronics-Co/LS19B420BW.SB420-BN46-00232A-Eng-13/User-Guide-2352667-Page-58.png)
![59Setup and Reset66 Setup and Reset6.7 Key Repeat Time Control the response rate of a button when the button is pressed. 6.7.1 Configuring Key Repeat Time1Press any button on the front of the product to display the Key Guide. Next, press [ ] to display the corresponding menu screen.2Press [ ] to move to SETUP&RESET and press [ ] on the product.3Press [ ] to move to Key Repeat Time and press [ ] on the product. The following screen will appear.Acceleration, 1 sec, or 2 sec can be selected. If No Repeat is selected, a command responds only once when a button is pressed.4Press [ ] to move to the option you want and press [ ].5The selected option will be applied.MENUEnglishOffOnSETUP&RESET5HVHW/DQJXDJH(FR6DYLQJ2II7LPHU2Q2II2II7LPHU6HWWLQJ3&$90RGH.H\5HSHDW7LPHݤɾAcceleration1 sec2 secNo RepeatAUTO](https://usermanual.wiki/Samsung-Electronics-Co/LS19B420BW.SB420-BN46-00232A-Eng-13/User-Guide-2352667-Page-59.png)
![60Setup and Reset66 Setup and Reset6.8 Customized KeyYou can customize Customized Key as follows.6.8.1 Configuring Customized Key1Press any button on the front of the product to display the Key Guide. Next, press [ ] to display the corresponding menu screen.2Press [ ] to move to SETUP&RESET and press [ ] on the product.3Press [ ] to move to Customized Key and press [ ] on the product. The following screen will appear.Angle - Bright - Eco Saving - Image Size4Press [ ] to move to the option you want and press [ ].5The selected option will be applied.MENU:::: OnSETUP&RESET$FFHOHUDWLRQ2Q&XVWRPL]HG.H\$XWR6RXUFH'LVSOD\7LPH0HQX7UDQVSDUHQF\Eco SavingImage SizeSAMSUNGMAGICBrightSAMSUNGMAGICAngleAUTOSAMSUNGMAGICSAMSUNGMAGIC](https://usermanual.wiki/Samsung-Electronics-Co/LS19B420BW.SB420-BN46-00232A-Eng-13/User-Guide-2352667-Page-60.png)
![61Setup and Reset66 Setup and Reset6.9 Auto Source You can activate Auto Source.6.9.1 Configuring Auto Source1Press any button on the front of the product to display the Key Guide. Next, press [ ] to display the corresponding menu screen.2Press [ ] to move to SETUP&RESET and press [ ] on the product.3Press [ ] to move to Auto Source and press [ ] on the product. The following screen will appear.Auto: The input source is automatically recognized.Manual: Manually select an input source.4Press [ ] to move to the option you want and press [ ].5The selected option will be applied.MENUEco SavingOnSETUP&RESET&XVWRPL]HG.H\$XWR6RXUFH'LVSOD\7LPH0HQX7UDQVSDUHQF\AutoManualAUTO](https://usermanual.wiki/Samsung-Electronics-Co/LS19B420BW.SB420-BN46-00232A-Eng-13/User-Guide-2352667-Page-61.png)
![62Setup and Reset66 Setup and Reset6.10 Display TimeSet the on-screen display (OSD) menu to automatically disappear if the menu is not used for a specified period of time. Display Time can be used to specify the time after which you want the OSD menu to disappear. 6.10.1 Configuring Display Time1Press any button on the front of the product to display the Key Guide. Next, press [ ] to display the corresponding menu screen.2Press [ ] to move to SETUP&RESET and press [ ] on the product.3Press [ ] to move to Display Time and press [ ] on the product. The following screen will appear.4Press [ ] to move to the option you want and press [ ].5The selected option will be applied.MENU(FR6DYLQJ0DQXDOSETUP&RESET&XVWRPL]HG.H\$XWR6RXUFH'LVSOD\7LPH0HQX7UDQVSDUHQF\VHFVHFVHFVHFAUTO](https://usermanual.wiki/Samsung-Electronics-Co/LS19B420BW.SB420-BN46-00232A-Eng-13/User-Guide-2352667-Page-62.png)
![63Setup and Reset66 Setup and Reset6.11 Menu Transparency Set the transparency for the menu windows: 6.11.1 Changing Menu Transparency1Press any button on the front of the product to display the Key Guide. Next, press [ ] to display the corresponding menu screen.2Press [ ] to move to SETUP&RESET and press [ ] on the product.3Press [ ] to move to Menu Transparency and press [ ] on the product. The following screen will appear.4Press [ ] to move to the option you want and press [ ].5The selected option will be applied.MENU: Eco Saving: Manual: 20 sec:SETUP&RESET&XVWRPL]HG.H\$XWR6RXUFH'LVSOD\7LPH0HQX7UDQVSDUHQF\OffOnAUTO](https://usermanual.wiki/Samsung-Electronics-Co/LS19B420BW.SB420-BN46-00232A-Eng-13/User-Guide-2352667-Page-63.png)
![647 INFORMATION Menu and Others7 INFORMATION Menu and Others7.1 INFORMATIONView the current input source, frequency and resolution.7.1.1 Displaying INFORMATION1Press any button on the front of the product to display the Key Guide. Next, press [ ] to display the corresponding menu screen.2Press [ ] to move to INFORMATION. The current input source, frequency and resolution will appear. The displayed menu items may vary depending on the model. MENUSETUP&RESETAnalog**kHz **Hz NP**** x ****Optimal Mode**** x **** **HzPICTURECOLORSIZE&POSITIONINFORMATIONAUTOEXIT](https://usermanual.wiki/Samsung-Electronics-Co/LS19B420BW.SB420-BN46-00232A-Eng-13/User-Guide-2352667-Page-64.png)
![65INFORMATION Menu and Others77 INFORMATION Menu and Others7.2 Configuring Brightness and Contrast in the Initial ScreenAdjust the Brightness or Contrast setting using the [ ] buttons in the initial screen (where no OSD menu is displayed).1Press any button on the front of the product (when no menu screen is displayed) to display the Key guide. Next, press [ ]. The following screen will appear.2Press the [ ] button to alternate between the Brightness and Contrast settings.3Adjust the Brightness or Contrast setting using the [ ] buttons.Brightness100Contrast75EXIT](https://usermanual.wiki/Samsung-Electronics-Co/LS19B420BW.SB420-BN46-00232A-Eng-13/User-Guide-2352667-Page-65.png)
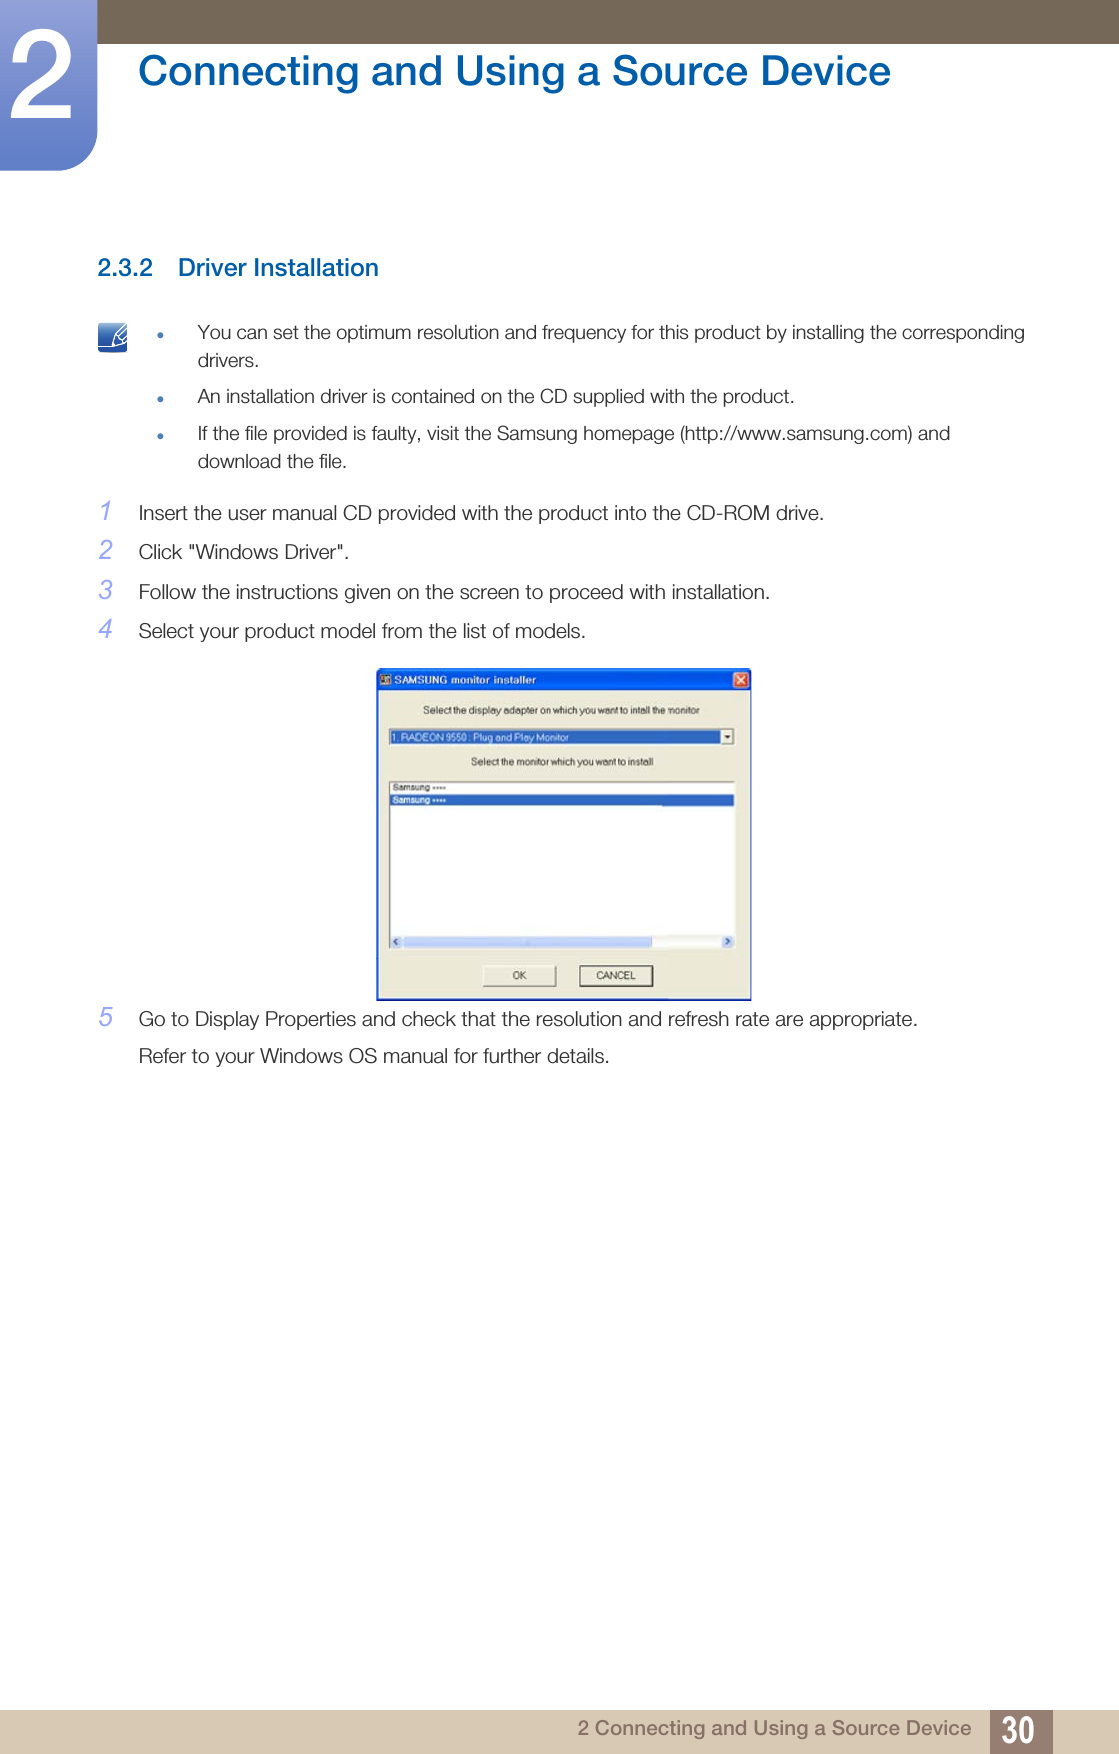
![668 Installing the Software8 Installing the Software8.1 Magic Tune8.1.1 What is MagicTune?MagicTune is a software program that helps with monitor adjustments by providing comprehensive descriptions of monitor functions and easy-to-understand guidelines.You can adjust the product with the mouse and the keyboard without using the operating buttons of the product.8.1.2 Installing the Software1Insert the installation CD into the CD-ROM drive.2Select the MagicTune setup program. If the pop-up screen for the software installation does not appear on the main screen, find and double-click the MagicTune setup file on the CD-ROM. 3Select the installation language and click [Next].4Complete the remaining software installation steps according to the instructions displayed on the screen. The software may not work properly if you do not restart the computer after the installation.The MagicTune icon may not appear depending on the computer system and the product specifications.If the shortcut icon does not appear, press the F5 key. Restrictions and Problems with the Installation (MagicTune™)The installation of MagicTune™may be affected by the graphics card, motherboard and the networking environment.System RequirementsOSWindows XP, Windows Vista, Windows 7, Windows 8](https://usermanual.wiki/Samsung-Electronics-Co/LS19B420BW.SB420-BN46-00232A-Eng-13/User-Guide-2352667-Page-66.png)
![67Installing the Software88 Installing the Software8.1.3 Removing the SoftwareYou can only remove MagicTune™ through [Add or Remove Programs] in Windows.To remove MagicTune™, complete the following steps.1Click [Start] select [Settings], and select [Control Panel] from the menu.For Windows XP, click [Start], and select [Control Panel] from the menu.2Double-click the [Add or Remove Programs] icon in the Control Panel.3In the [Add/Remove] window, find and select MagicTune™so that it is highlighted.4Click [Change or Remove Programs] to remove the software.5Select [Yes] to start removing MagicTune™.6Wait until a message box appears informing you that the software has been removed completely. For technical support, the FAQ (frequently asked questions) or information about the software upgrade for MagicTune™, please visit our website(http://www.samsung.com/us/consumer/learningresources/monitor/magetune/pop_intro.html).](https://usermanual.wiki/Samsung-Electronics-Co/LS19B420BW.SB420-BN46-00232A-Eng-13/User-Guide-2352667-Page-67.png)
![68Installing the Software88 Installing the Software8.2 MultiScreenMultiScreen enables users to use the monitor by partitioning multiple sections.8.2.1 Installing the Software1Insert the installation CD into the [CD-ROM drive].2Select the "MultiScreen" setup program. If the pop-up screen for the software installation does not appear on the main screen, find and double-click the "MultiScreen" setup file on the [CD-ROM]. 3When the Installation Wizard appears, click [Next].4Follow the instructions given on the screen to proceed with installation. The software may not work properly if you do not restart the computer after the installation.The "MultiScreen" icon may not appear depending on the computer system and the product specifications.If the shortcut icon does not appear, press the "F5" key. Restrictions and Problems with the Installation (MultiScreen)The "MultiScreen" installation may be affected by the [Graphics card], [Motherboard] and the [Networking environment].Operating System"OS""Windows 2000""Windows XP Home Edition""Windows XP Professional""Windows Vista 32bit""Windows 7 32bit""Windows 8 32bit" For "MultiScreen", the operating systems "Windows 2000" or later is recommended. "Hardware"At least 32MB of memoryAt least 60MB of free space on the hard disk driveMultiScreen](https://usermanual.wiki/Samsung-Electronics-Co/LS19B420BW.SB420-BN46-00232A-Eng-13/User-Guide-2352667-Page-68.png)
![69Installing the Software88 Installing the Software8.2.2 Removing the SoftwareClick [Start], select [Settings]/[Control Panel], and then double-click [Add or Remove Programs].Select "MultiScreen" from the program list and click the [Add/Delete] button.](https://usermanual.wiki/Samsung-Electronics-Co/LS19B420BW.SB420-BN46-00232A-Eng-13/User-Guide-2352667-Page-69.png)
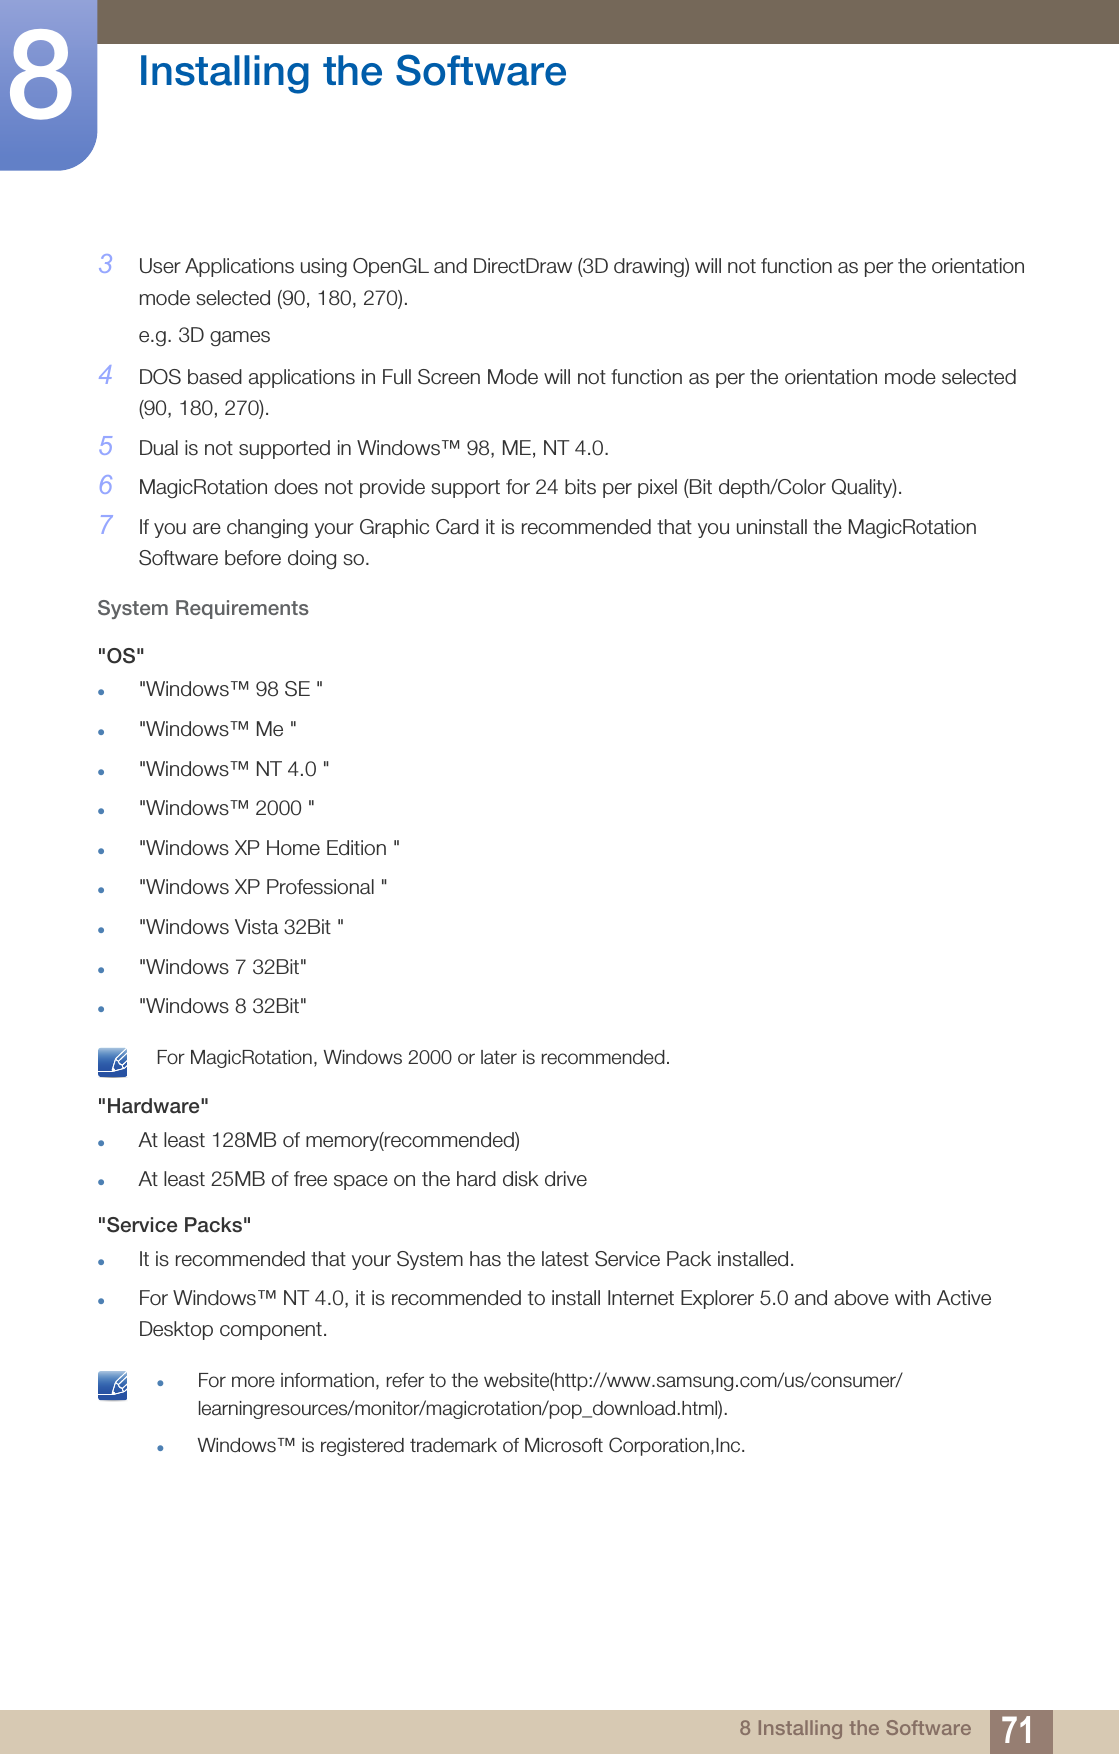
![70Installing the Software88 Installing the Software8.3 MagicRotationThe MagicRotation Software from Samsung Electronics, Inc. provides the user with a rotation feature (0, 90, 180, 270 orientation) that facilitates the optimum utilization of computer display screen, better viewing and improved user productivity. 8.3.1 Installing the Software1Insert the installation CD into the [CD-ROM drive].2Select the "MagicRotation" setup program. If the pop-up screen for the software installation does not appear on the main screen, find and double-click the "MagicRotation" setup file on the [CD-ROM]. 3Select the installation language and click [Next].4Complete the remaining software installation steps according to the instructions displayed on the screen. The software may not work properly if you do not restart the computer after the installation.The "MagicRotation" icon may not appear depending on the computer system and the product specifications.If the shortcut icon does not appear, press the "F5" key. Restrictions and Problems with the Installation (MagicRotation)The installation of "MagicRotation" may be affected by the [Graphics card], [Motherboard] and the [Networking environment].Limitation1The "Display Driver" should be properly loaded for the MagicRotation to work properly.The installed "Display Driver" should be the latest driver supplied by the vendor. 2If some applications like Windows Media Player, Real Player, etc. are not displaying movie files properly in 90, 180 and 270 orientations then do the following : Close the application. Select the Orientation (90, 180, 270) you want to view the application. Relaunch the application. In most cases this should fix the problem.](https://usermanual.wiki/Samsung-Electronics-Co/LS19B420BW.SB420-BN46-00232A-Eng-13/User-Guide-2352667-Page-70.png)
![72Installing the Software88 Installing the Software8.3.2 Removing the SoftwareYou can only remove MagicRotation through [Add or Remove Programs] in Windows.To remove "MagicRotation", complete the following steps.1Click [Start] select [Settings], and select [Control Panel] from the menu.For Windows XP, click [Start], and select [Control Panel] from the menu. 2Double-click the [Add or Remove Programs] icon in the Control Panel. 3In the [Add/Remove] window, find and select MagicRotation so that it is highlighted. 4Click [Change or Remove Programs] to remove the software. 5Select [Yes] to start removing MagicRotation. 6Wait until a message box appears informing you that the software has been removed completely. For technical support, the FAQ (frequently asked questions) or information about the software upgrade for MagicRotation, please visit our website(http://www.samsung.com/us/consumer/learningresources/monitor/magicrotation/pop_download.html).](https://usermanual.wiki/Samsung-Electronics-Co/LS19B420BW.SB420-BN46-00232A-Eng-13/User-Guide-2352667-Page-72.png)

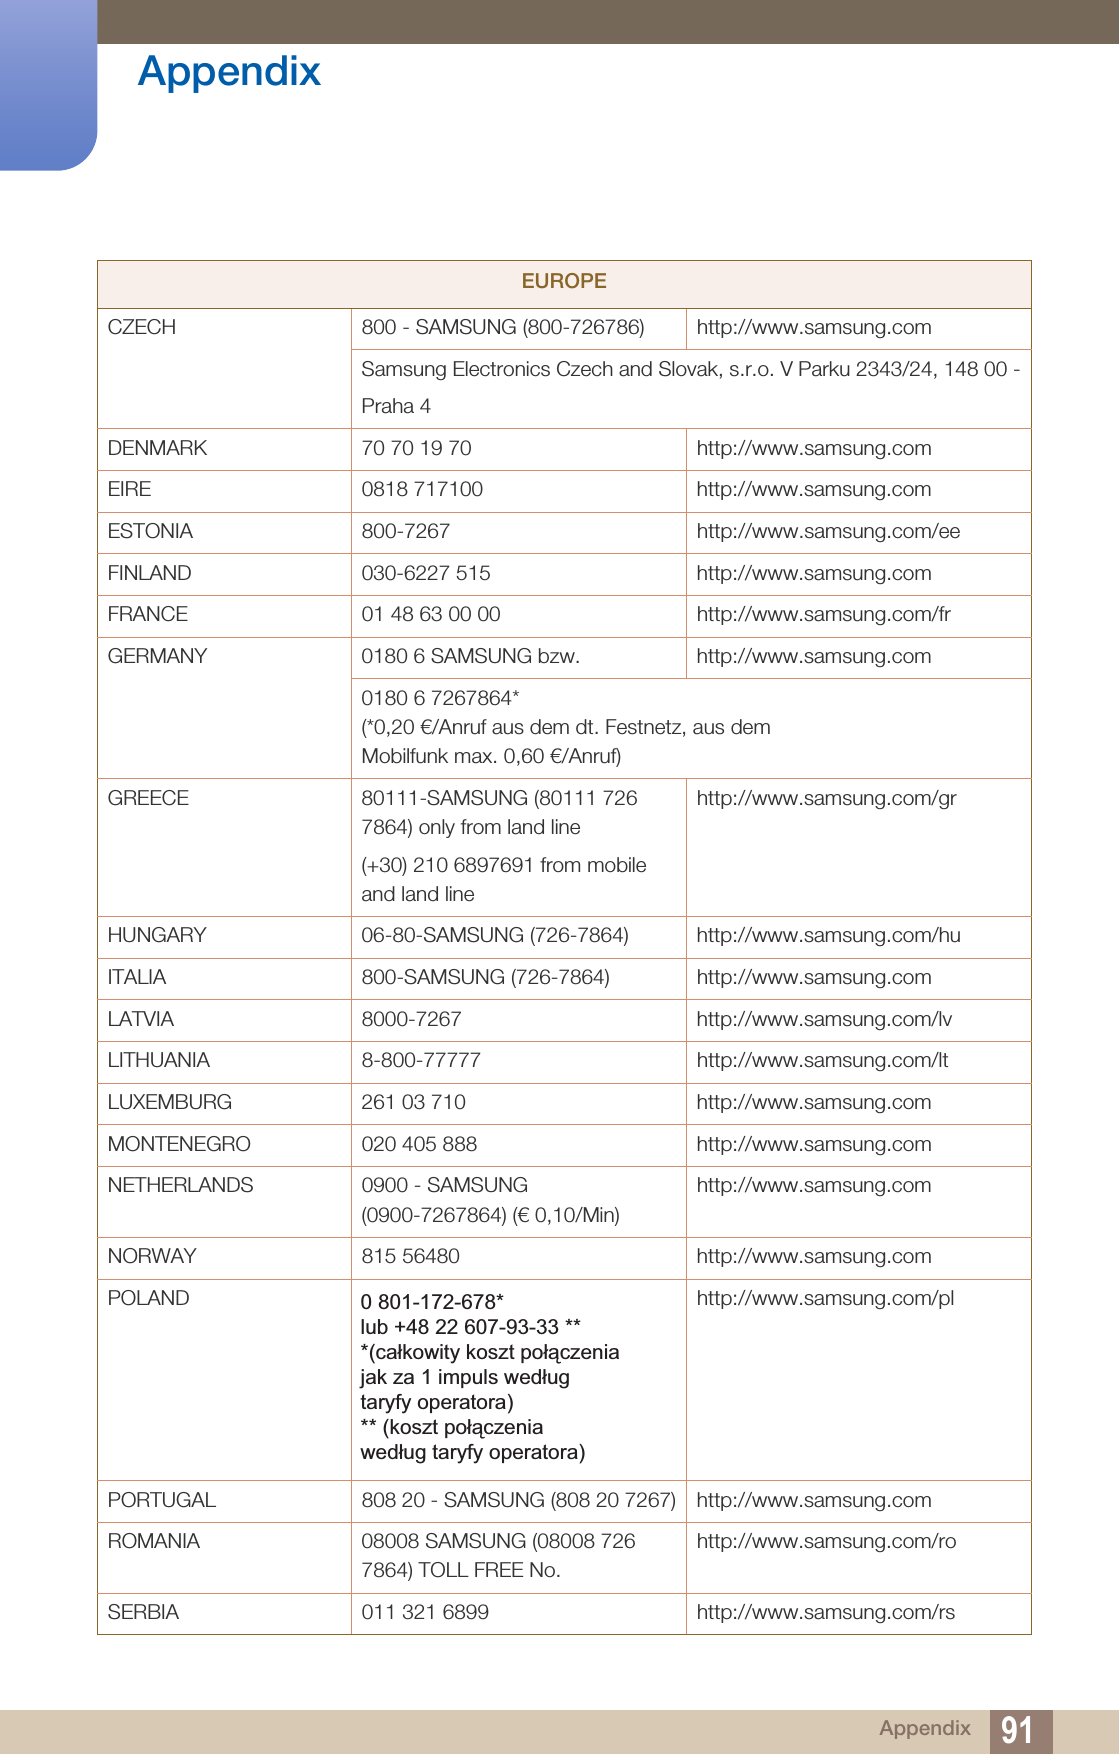
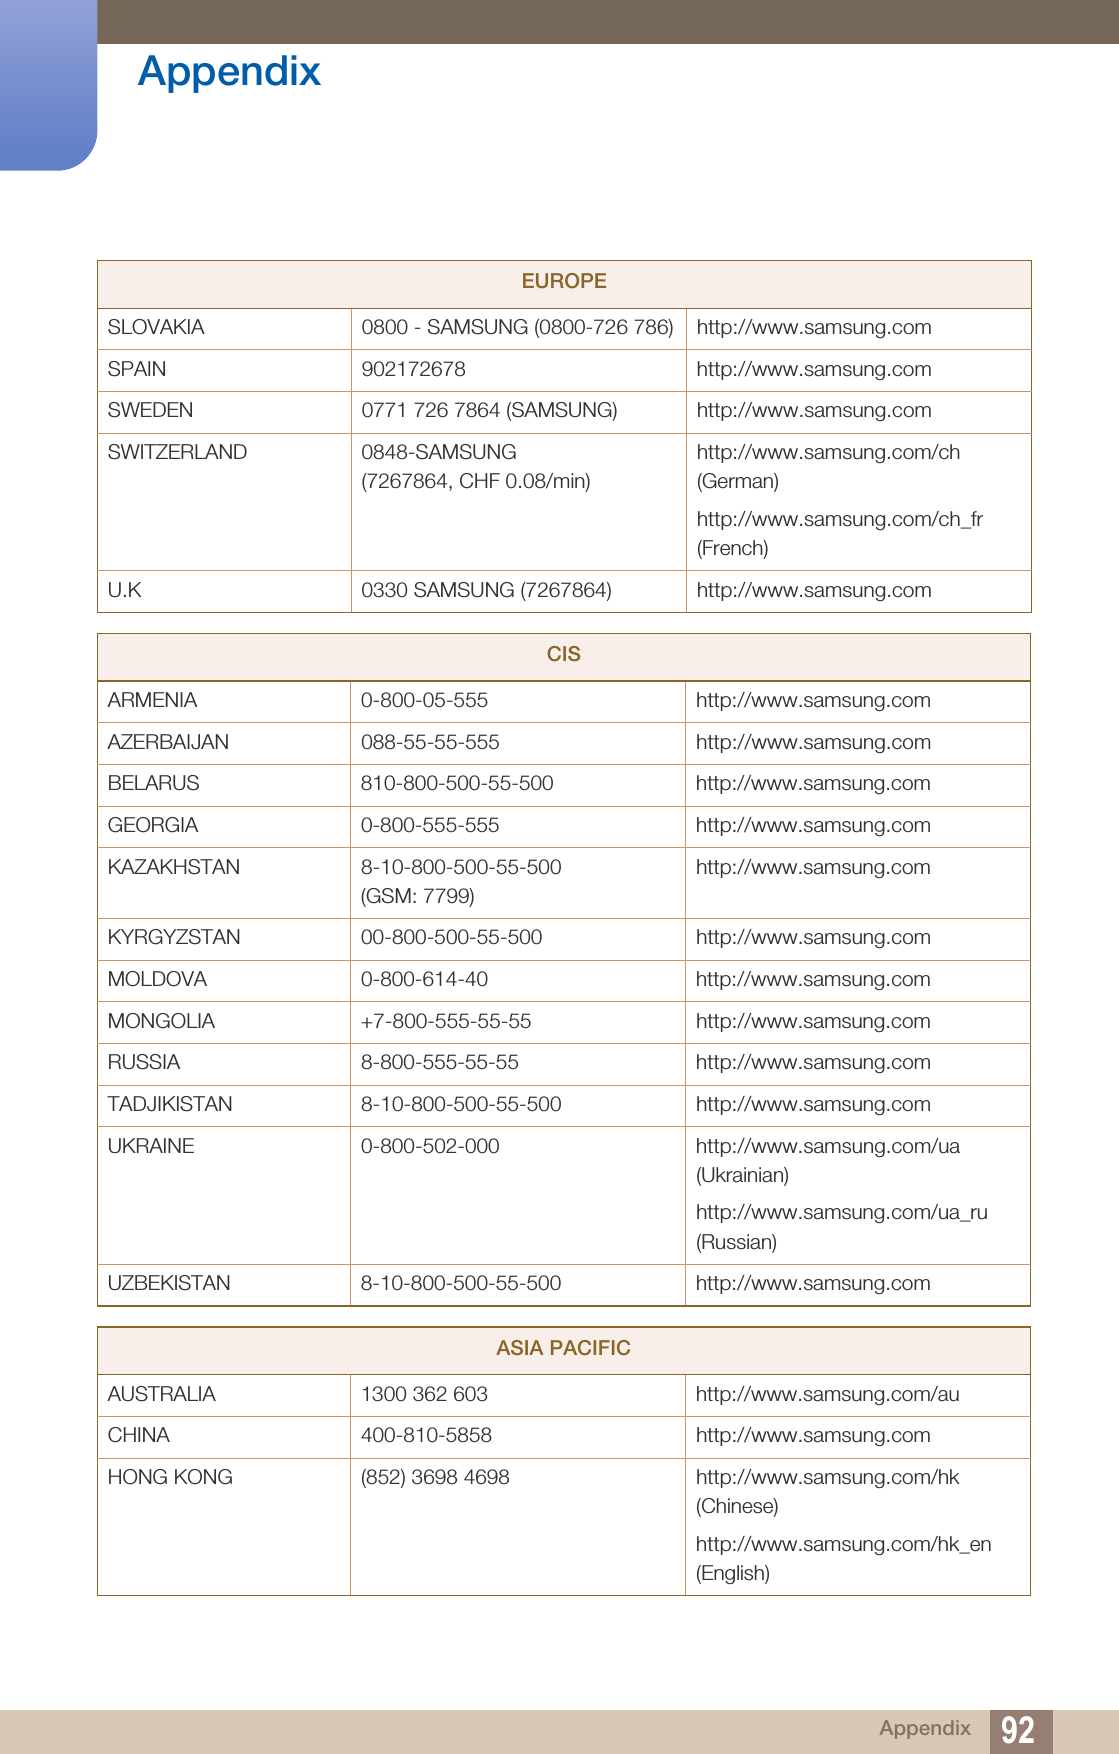
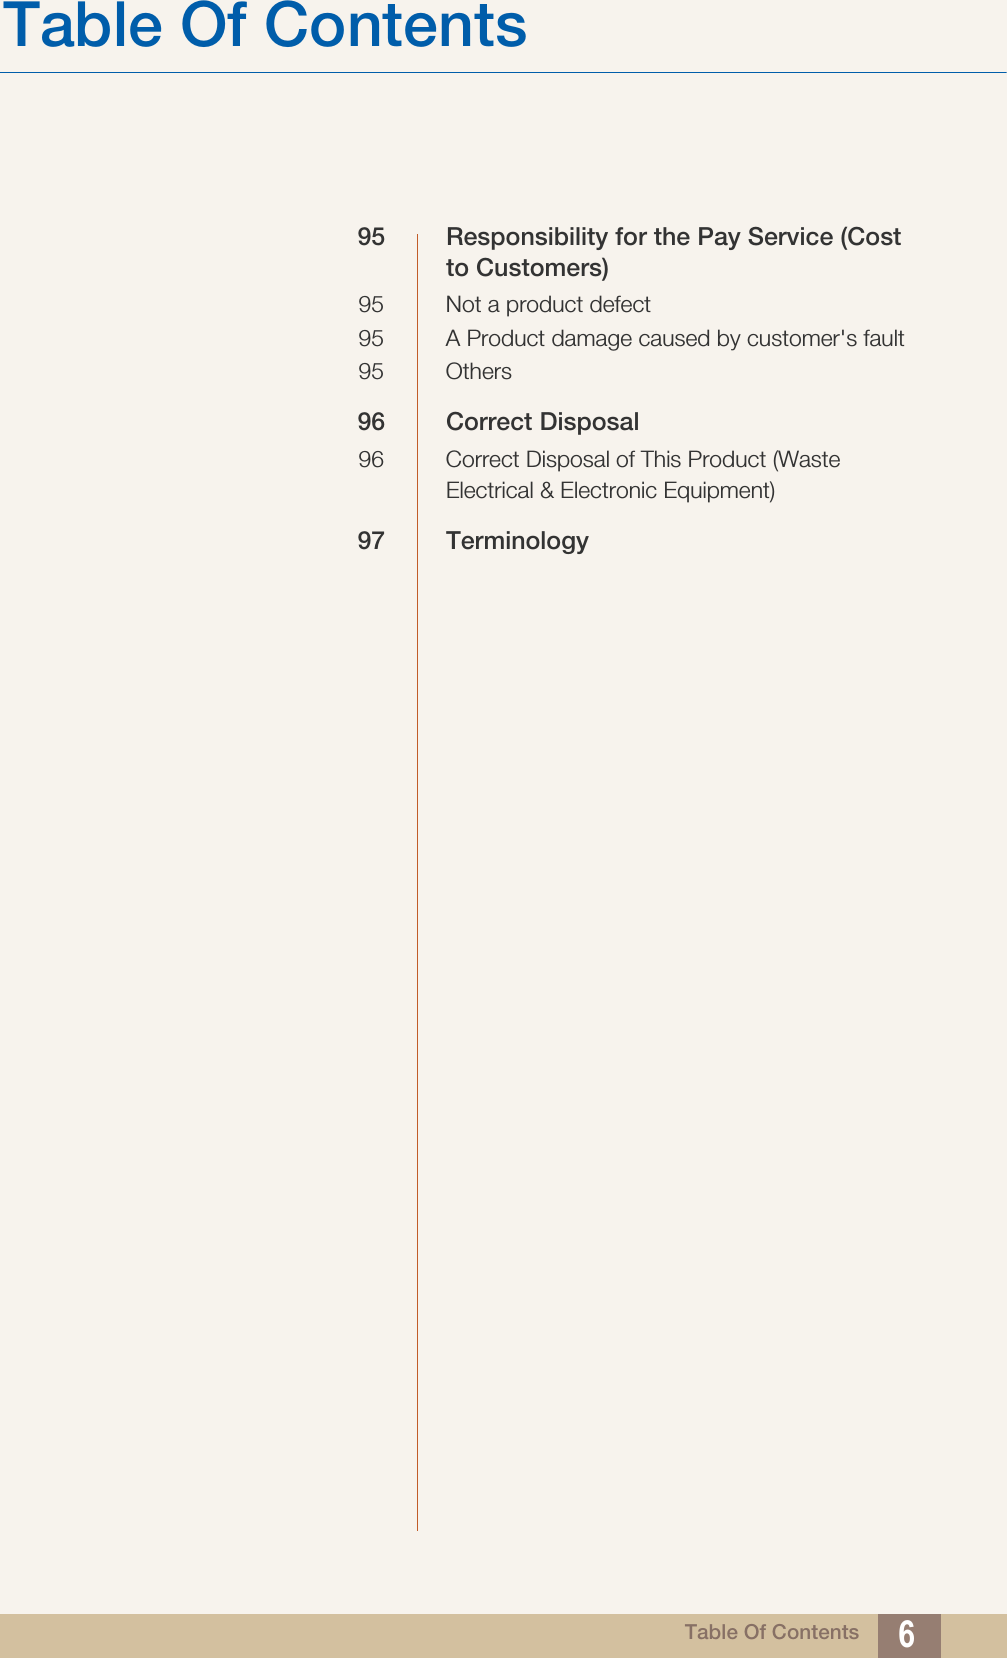
![93Appendix AppendixINDIA 1800 3000 82821800 266 8282http://www.samsung.com/inINDONESIA 0800-112-8888 (Toll Free)(021) 56997777http://www.samsung.com/idJAPAN 0120-327-527 http://www.samsung.comMALAYSIA 1800-88-9999 http://www.samsung.com/myNEW ZEALAND 0800 SAMSUNG (0800 726 786) http://www.samsung.com/nzPHILIPPINES 1-800-10-7267864 [PLDT]1-800-8-7267864 [Globe landlineand Mobile]02-4222111 [Other landline]http://www.samsung.com/phSINGAPORE 1800-SAMSUNG (726-7864) http://www.samsung.com/sgTAIWAN 0800-32-9999 http://www.samsung.com/twTHAILAND 0-2689-3232,1800-29-3232http://www.samsung.com/thVIETNAM 1800 588 889 http://www.samsung.comMENAALGERIA 0800 100 100 http://www.samsung.com/n_africaBAHRAIN 8000-4726 http://www.samsung.com/ae (English)http://www.samsung.com/ae_ar (Arabic)EGYPT 08000-726786 http://www.samsung.comIRAN 021-8255 http://www.samsung.comJORDAN 0800-2227306 5777444http://www.samsung.com/Levant (English)KUWAIT 183-2255 (183-CALL) http://www.samsung.com/ae (English)http://www.samsung.com/ae_ar (Arabic)MOROCCO 080 100 2255 http://www.samsung.comOMAN 800-SAMSUNG (726-7864) http://www.samsung.com/ae (English)http://www.samsung.com/ae_ar (Arabic)ASIA PACIFIC](https://usermanual.wiki/Samsung-Electronics-Co/LS19B420BW.SB420-BN46-00232A-Eng-13/User-Guide-2352667-Page-93.png)