Samsung Electronics Co ML7300N LASER PRINTER User Manual 1 of 2
Samsung Electronics Co Ltd LASER PRINTER 1 of 2
Contents
- 1. user manual 1 of 2
- 2. user manual 2 of 2
user manual 1 of 2

Copyright
The software described in this document is supplied under a license agreement.
The software may be used or copied only in accordance with the terms of this
agreement. It is against the law to copy the software on any medium except as
specifically allowed in the license agreement.
The purchaser may make only one copy of the software for backup purposes.
No part of this manual may be photocopied or transmitted in any form or by any
means, electronic or mechanical including photocopying, recording or information
storage and retrieval systems, for any purpose other than the purchaser’s personal
use, without the expressly written consent of Samsung Electronics Co., Ltd.
Information in this document is subject to change without notice and does not rep-
resent a commitment on the part of Samsung Electronics Co., Ltd. Samsung
Electronics Co., Ltd. or its distributors can in no circumstances be held responsible
for any prejudice, whether direct or indirect, resulting from the use of the software
or the documentation.
August 2000
Trademark Notices
Copyright 2000 SAMSUNG Electronics Co., Ltd. All rights reserved.
All other brand or product names are trademarks or registered trademarks of their
respective companies or organizations.
ML-7300 Series and Samsung logo are trademarks of Samsung Electronics Co., Ltd.
Centronics is a registered trademark of Centronics Data Computer Corporation.
HP, PCL 6, PCL 5e are registered trademarks of Hewlett-Packard Company.
IBM, IBM PC, XT, AT, PS/2 are registered trademarks of International Business
Machines Corporation.
Apple, AppleTalk, LocalTalk, LaserWriter, TrueType, Macintosh are registered
trademarks of Apple Computer Inc.
Microsoft, MS-windows, MS-DOS are registered trademarks of Microsoft Corporation.
CompuServe is a registered trademark of CompuServe Inc.
TrueDoc Ris a registered trademark of Bitstream Inc.
Font NavigatorTM is a registered trademark of Bitstream Inc.
PostScript is a registered trademark of Adobe Systems Inc.
Using Operator Panel
3
STEP1: Unpacking your printer - - - - - - - - - - - -2.1
STEP2: Installing Toner Cartridge - - - - - - - - - - -2.3
STEP3: Load Paper - - - - - - - - - - - - - - - - - - - -2.5
SETP4: Connecting the Parallel Cable - - - - - - - - -2.8
STEP5: Connecting the AC Power Cord - - - - - - -2.10
STEP6: Testing the Printer! - - - - - - - - - - - - - -2.11
STEP7: Setting Up the Printer Driver - - - - - - - -2.12
Operator Panel Buttons - - - - - - - - - - - - - - - - - -3.1
Changing Printer Setting - - - - - - - - - - - - - - - - -3.3
Overview of Printer Setting - - - - - - - - - - - - - - - -3.4
PRINTING MENU - - - - - - - - - - - - - - - - - - - - - -3.5
CONFIG MENU - - - - - - - - - - - - - - - - - - - - - - -3.9
JOB MENU - - - - - - - - - - - - - - - - - - - - - - - - -3.12
TEST MENU - - - - - - - - - - - - - - - - - - - - - - - -3.15
PCL MENU - - - - - - - - - - - - - - - - - - - - - - - - -3.15
I/O MENU - - - - - - - - - - - - - - - - - - - - - - - - - -3.17
PS3 MENU - - - - - - - - - - - - - - - - - - - - - - - - -3.17
NETWORK MENU - - - - - - - - - - - - - - - - - - - - -3.18
Contents
Introduction
1
2
Setting Up your Printer
Safety Precautions - - - - - - - - - - - - - - - - - - - - -1.1
Features and Model Descriptions - - - - - - - - - - - -1.2
Printer Components - - - - - - - - - - - - - - - - - - - -1.3
1
Print Media
4
Printing Tasks
5
Maintaining your Printer
6
Problem Solving
7
Loading Paper - - - - - - - - - - - - - - - - - - - - - - - -4.1
Printing on Envelopes - - - - - - - - - - - - - - - - - - -4.5
Printing on Label - - - - - - - - - - - - - - - - - - - - - -4.7
Printing on Transparencies - - - - - - - - - - - - - - - -4.8
2
Using Features in the Printer Driver - - - - - - - - - - -5.1
Using the Printer Driver - - - - - - - - - - - - - - - - - -5.3
- Paper Tab - - - - - - - - - - - - - - - - - - - - - - - -5.3
- Graphic Tab - - - - - - - - - - - - - - - - - - - - - - -5.5
- Output Tab - - - - - - - - - - - - - - - - - - - - - - -5.7
- Printer Tab - - - - - - - - - - - - - - - - - - - - - - -5.9
- Overlay Tab - - - - - - - - - - - - - - - - - - - - - -5.10
- Watermark Tab - - - - - - - - - - - - - - - - - - - -5.12
Printing Both Sides of Paper - - - - - - - - - - - - - -5.14
Toner Cartridge - - - - - - - - - - - - - - - - - - - - - - -6.1
Cleaning the Printer - - - - - - - - - - - - - - - - - - - -6.4
Cleaning LSU - - - - - - - - - - - - - - - - - - - - - - - -6.6
Clearing Paper Jams - - - - - - - - - - - - - - - - - - - -7.1
Error Messages - - - - - - - - - - - - - - - - - - - - - - -7.5
General Printing Problems - - - - - - - - - - - - - - - - -7.8
Poor Print Quality - - - - - - - - - - - - - - - - - - - - - -7.9
PS(PostScript) Problems - - - - - - - - - - - - - - - - -7.10
Network Problems - - - - - - - - - - - - - - - - - - - - -7.10
Macintosh Problems - - - - - - - - - - - - - - - - - - - -7.11
3
A
Specifications
B
Macintosh User’s Guide
C
Using the Printer on a Network
Printer Specifications - - - - - - - - - - - - - - - - - - -A.1
Paper Specifications - - - - - - - - - - - - - - - - - - - -A.4
Setting Up Your Printer - - - - - - - - - - - - - - - - - -B.1
Installing Software - - - - - - - - - - - - - - - - - - - -B.1
Printing with a Macintosh - - - - - - - - - - - - - - - - -B.5
About Sharing the Printer on a Network - - - - - - - -C.1
Setting Up a Locally Shared Printer - - - - - - - - - - -C.2
Setting Up a Network-Connected Printer - - - - - - - -C.3
D
Using Windows PostScript Driver
Installing PS Driver - - - - - - - - - - - - - - - - - - - -D.1
4
F
Printer Options
GUsing Your Printer in Linux
INDEX
Precautions - - - - - - - - - - - - - - - - - - - - - - - - -F.1
Preparations - - - - - - - - - - - - - - - - - - - - - - - - -F.2
Closing The Printer Cover - - - - - - - - - - - - - - - - -F.3
Understanding the Printer Control Board - - - - - - - -F.4
Printer Memory - - - - - - - - - - - - - - - - - - - - - - -F.5
Network Option Card - - - - - - - - - - - - - - - - - - -F.8
Installing Serial/LocalTalk or Serial/IrDA option card F.12
Serial/LocalTalk - - - - - - - - - - - - - - - - - - - - - -F.14
Serial/IrDA - - - - - - - - - - - - - - - - - - - - - - - - -F.15
Tray 2 - - - - - - - - - - - - - - - - - - - - - - - - - - - -F.17
Linux Driver Installation
- - - - - - - - - - - - - - - -G.1
E
Installing Software from Diskette
Making Installation Diskettes - - - - - - - - - - - - - -E.1
Installing Software from Diskettes - - - - - - - - - - -E.3
5
Environmental and
Safety Consideration
The printer is certified in the U. S. to conform to the requirements of DHHS 21 CFR,
chapter 1 Subchapter J for Class I(1) laser products, and elsewhere is certified as a
Class I laser product conforming to the requirements of IEC 825.
Class I laser products are not considered to be hazardous. The laser system and printer
are designed so there is never any human access to laser radiation above a Class I lev e l
during normal operation, user maintenance, or prescribed service condition.
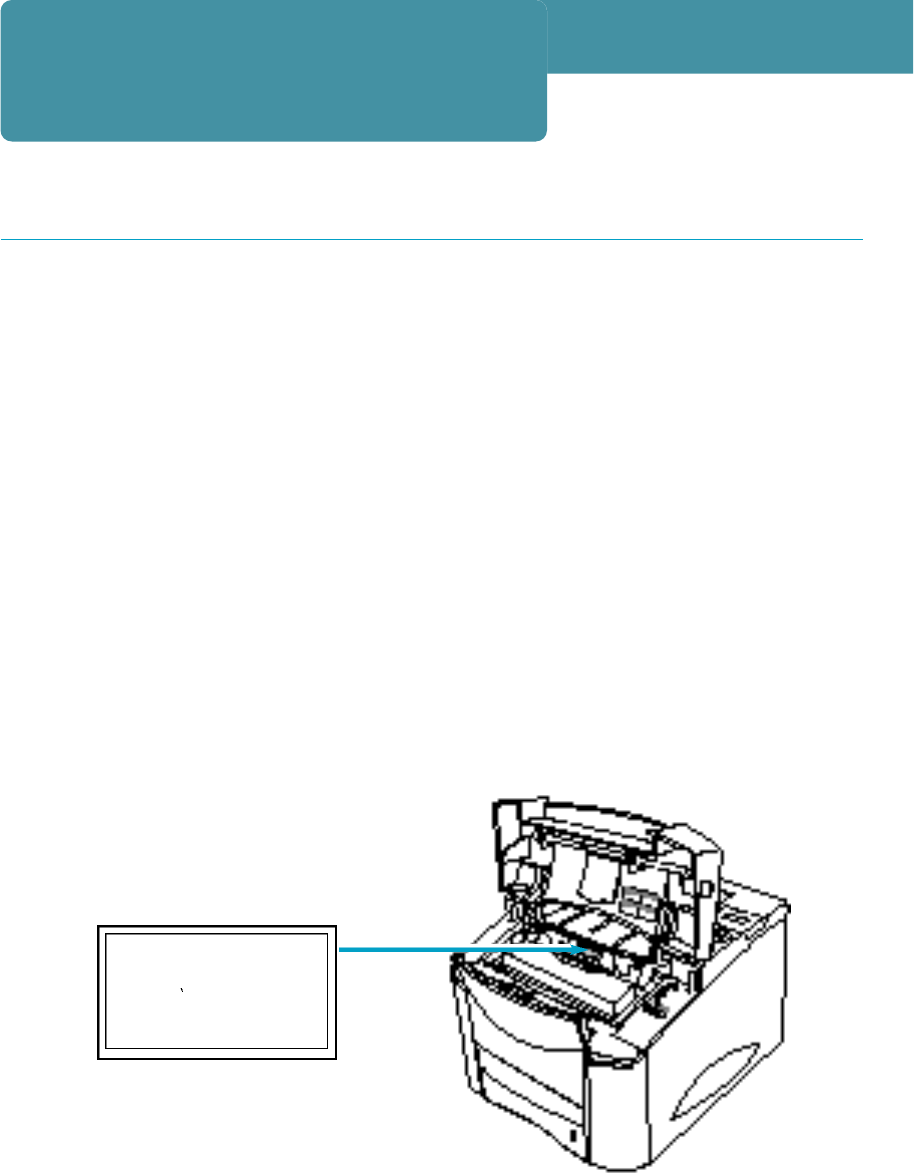
CAUTION
N e ver operate or service the printer with the protective cover removed
from Laser/Scanner assembly. The reflected beam, although invisible,
can damage your eye s .
CLASS 1 LASER PRODUCT
LASER KLASSE 1
LUOKAN 1 LASERLAITE
APPAREIL A LASER DE
CLASSE 1
TO IEC 825
Class 1 Laser Statement Label
Laser safety statement
6
C AU T I O N - I N V I S I B L E L ASER RADIATION WHEN THIS COVER IS
OPEN. DO NOT OPEN THIS COVER.
VORSICHT - UNSICHTBARE LASERSTRAHLUNG, WENN ABDECKUNG
G E Ö F F N E T. NICHT DEM STRAHL AU SS E T Z E N .
ATTENTION - R AYONNEMENT LASER INVISIBLE EN CAS D’OUVERTURE.
DANGEREUSE AU FA I S C E A U.
ATTENZIONE -RADIAZIONE LASER INVISIBILE IN CASO DIAPER T U R A .
E V I TARE L’ESPOSIZIONE AL FAS C I O.
P R E C AUCION -RADIACION LASER IVISIBLE CUANDO SE ABRE.
E V I TAR EXPONERSE AL RAYO.
A D VARSEL - USYNLIG LASERSTRÅLNING VED ÅBNING NÅR SIKKERHEDSBRYDERE
ER UDE AF FUNKTION UNDGÅ UDSA E TTELSE FOR STRÅLNING.
A D VARSER - USYNLIG LASERSTRÅLNING NÅR DEKSEL ÅPNES. STIRR IKKE INN I
STRÅLEN. UNNGÅ EKSPONERING FOR STRÅLEN.
VARNING - OSYNLIG LASERSTRÅLNING NÄR DENNA DEL ÄR ÖPPAND OCH
S P Ä R R E N Å R U R KO P P L A D. BETRAKTA E J S T R Å L E N S T R Å L E N A R FA R L I G .
VARO - AVATTA E SSA JA S U O JA L U K I T U S O H I T E TTA E SSA O L E T A LTT I I N A
N Ä K Y M Ä TTÖMÄLLE LAS E R S Ä T E I LYLLE ÄLÄ KATSO SÄTEESEEN.
Laser caution label
Environmental and Safety Consideration

7
This equipment has been tested and found to comply with the limits for a Class
B digital device, pursuant to Part 15 of the FCC rules.
These limits are designed to provide reasonable protection against harmful
interference in a residential installation.
This equipment generates, uses, and can radiate radio frequency energy and,
if not installed and used in accordance with the instructions, may cause harmful
interference to radio communications. However, there is no guarantee that
interference will not occur in a particular installation. If this equipment does
cause harmful interference to radio or television reception, which can be deter-
mined by turning the equipment off and on, the user is encouraged to try to
correct the interference by one or more of the following measures:
•Re-orient or relocate the receiving antenna.
•Increase the separation between the equipment and receiver.
•Connect the equipment into an outlet on a circuit different from that to
which the receiver is connected.
•Consult the dealer or an experienced radio/TV technician for help.
Shielded interface cables and I/O cords must be used for this equipment to
comply with the relevant FCC regulations.
Changes or modifications not expressly approved in writing by Samsung may
void the user’s authority to operate this equipment.
FCC Compliance
Electronic Emissions

8
We, SAMSUNG ELECTRONICS CO.,LTD
#259, Gong Dan-Dong, Gumi-City, Kyung Buk, Korea
declare sole responsibility that the
ML-7300, ML-7300N Laser Printer
meets the intent of Directive 89/336/EEC for Electromagnetic Compatibility and
Low Voltage Directive 73/23/EEC.
Compliance was demonstrated to the following specifications as listed in the official
journal of the European Communities:
Electromagnetic Interference :
EN 55022 Radiated, Class B
EN 55022 Conducted, Class B
EN 61000-3-2Power Harmonics
EN 50082-1 Electromagnetic Susceptibility :
IEC 801-2 Electrostatic Discharge
IEC 801-3 RF EM Field
IEC 801-4 Fast Transients/Burst
EN 60950-Safety
EC Declaration of Conformity
This Class B digital apparatus meets all requirements of the Canadian
Interference-Causing Equipment Regulations of ICES-003.
Cet appareil numerigue de la Classe B respecte toutes les exigences du
Reglement ICES-003 sur le Materiel brouilleur du Canada.
IC COMPLIANCE NOTICE
Electronic Emissions

9
S a f e ty and Regulatory Listing for this printer.
PRODUCT SAFETY
USA & CANADA Evaluated by UL according to UL 1950
and CSA C22.2 No. 950 for C-UL
EEC(Europe) IEC 60950/EN 60950(TUV GS Certification)
CB IEC 60950
LASER SAFETY
EEC(Europe) HD 194. & EN 60825
USA 21 CFR, Chapter 1, Subchapter J(CDRH Certified)
Safety information
Electronic Emissions

10
Electronic Emissions
I m p o r t a n t
The mains lead for this machine is fitted with a standard (BS
1363) 13 amp plug and has a 13 amp fuse. When you change
or examine the fuse, you must re-fit the correct 13 amp fuse.
You then need to replace the fuse cove r. If you have lost the
fuse cove r, do not use the plug until you get another fuse
c over from the people whom you bought the machine.
The 13 amp plug is the most widely used type in the UK and
should be suitable. Howeve r, some buildings (mainly old ones)
do not have normal 13 amp plug sockets. You need to buy a
suitable plug adaptor. Do not remove the moulded plug.
W a r n i n g
If you cut off the moulded plug, get rid of it
straight away. You cannot rewire the plug or
you may get an electric shock if you put it into a
s o c k e t .
Important warning: You must earth this machine.
The wires in the mains lead have the following colour code:
Green and Ye l l o w : Earth
B l u e : Neutra l
B r o w n : Live
If the wires in the mains lead do not match the colours
m a r ked in your plug, do the following:
You must connect the blue wire to the pin which is marke d
with the letter ‘N’ or coloured black.
You must connect the brown wire to the pin which is marke d
with the letter ‘L’ or coloured red.
You must have a 13 amp fuse in the plug, adaptor, or at the
distribution board.
Replacing the fitted plug (Only in UK)

Introduction
Congratulations on the purchase of your
ML-7300 series printer! This chapter provides information
on the following topics:
◆Safety Precautions
◆Features and Model Descriptions
◆Printer Components
1
1

IN T R O D U C T I O N
1.1
Before using the printer, please read the instructions in this guide carefully
and put the guide in a safe place close to the printer, so that it is ava i l a b l e
when you need it later. Please take the following precautions when using
and maintaining your printer.
●Unplug the printer before cleaning it. Do Not use any liquid or aerosol
cleaners. Simply use a damp cloth. Refer to the page of this guide for
further details.
●Do Not place the printer on an unstable surface or close to a radiator or
source of heat.
●Take care not to block or cover the ventilation holes on the side of the
printer. Do Not insert any object in these holes.
●Check that the electrical power source to which you wish to connect the
printer complies with the electrical specifications of this printer :
(110 ~ 230V)
-Power cord may differ from one country to another.
●Connect all your computer equipment, including the printer to a power
point with earthing device. Avoid plugging your printer into the same
power point as equipment likely to cause voltage variations, such as a
photocopying machine or an air conditioner.
●Check regularly that the power cable is in good condition and is not
damaged in any way.
●If you use an extension cord, check that total intensity of all equipment
connected to it does not exceed the maximum intensity allowed for the
extention cord. Check that the total intensity of the equipment connected
to the same power point does not exceed 15 amps.
●Unless otherwise indicated in this guide, do not attempt to repair the
printer yourself. Should you detect a fault, return your printer to an
authorized service center or your dealer.
●Systematically return your printer to an authorised service center or your
local dealer if one of the following situations occurs :
- The power cord or plug is damaged.
- A liquid has been spilled on and/or in the printer.
- T
he printer has fallen or been dropped or the bodywork is damaged in
any way.
-The printer is not operating correctly or you have noticed a significant
drop in the quality of the printing.
Safety Precautions

IN T R O D U C T I O N
1.2
Your new Laser Printer is designed for use in an
office environment, providing such advantages as :
●Printing on both sides of paper
●High-quality, high-speed text and graphics printing
●Vast choice of paper types and sizes
●Full operating status and error messages on
operator panel display
●On-screen feedback of the printing status
●Various printer menus
This Laser Printer provides the following main features.
●Built in Duplex function which allows printing on both
sides of the paper
●Printing speeds of 21PPM(Pages Per Minute) for
Letter-size paper
●H i g h - q u a l i ty printing at a maximum resolution of 1200
DPI
●Automatic paper feed with a capacity of up to 500 sheets
●Wide range of paper sizes and weights
●Expandable design
- 500-sheet universal paper Tray
- Memory(up to 208 MB)
-Connectors for optional RS-232C/LocalTalk Card and
Network Interface Card
- Connector for optional Infrared Adapter
Features and Model Descriptions
Your new Printer
Printer Information
Main Features
Item Values and Functions
ML-7300 ●The ML-7300 comes equipped with 16MB
RAM and one 500-sheet Tray1 as
standard.
ML-7300N ●
The
ML-7300
N is equipped with network
card (Po r t T h r u )
as standard.
Install the network printer driver
(SyncThru) for network printing.
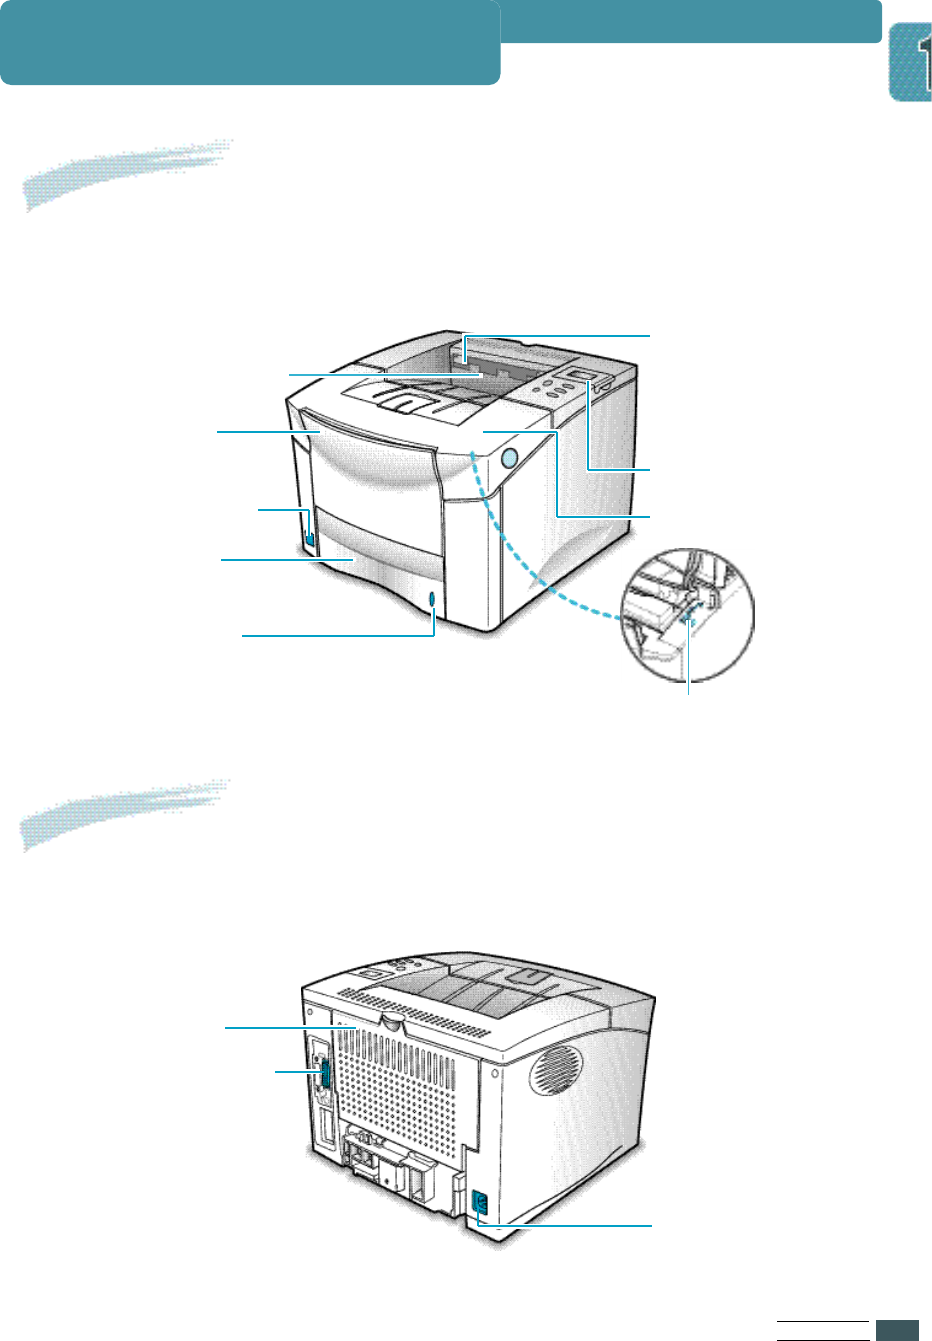
The following illustration shows the front view of your printer and
indicates the various main elements.
IN T R O D U C T I O N
1.3
Top output bin
Operator panel
Print prevention sensor
(It prevents the printer
from printing when 250
sheets of paper are piled
up on the top output bin).
Paper level
indicator
Tray1
(500-sheet, closed)
Top cover
Multi-Purpose tray
(100-sheet, with extension)
Power switch
The following illustration shows the rear view of your printer
and indicates the various main elements.
Rear cover
Power
connector
Parallel interface
connector
LSU cleaner
(When the top
cover is opened)
Printer Components
Front View
Rear View

Setting Up
Your Printer
This chapter provides step by step information
on setting up your printer.
Topics included in this chapter are:
• S T E P 1 :Unpacking Your Printer
• S T E P 2 :Installing Toner Cartridge
• S T E P 3 :Load Pa p e r
• S T E P 4 :Connecting the Pa r allel Cable
• S T E P 5:Connecting the AC Power Cord
• S T E P 6:Testing the Printer!
• S T E P 7:Setting Up the Printer Drive r
2
2

Notes •If you find that any of the above items are missing or damaged,
contact your local dealer.
•
A printer cable is not included in the package items.
•
Cable specifications
- The parallel cable should be compatible with the centronics R
p a rallel interface and IEEE standard 1284.
• * Power cord may differ from one country to another.
When you start unpacking the box of your printer, you will find the following
items in addition to your printer.
SE T T I N G UPYO U R PR I N T E R
2.1
Power cord*
Toner cartridge CD-ROM Disk
This manual
Items Supplied
Unpacking Your Printer
SE T T I N G UPYO U R PR I N T E R
2.2
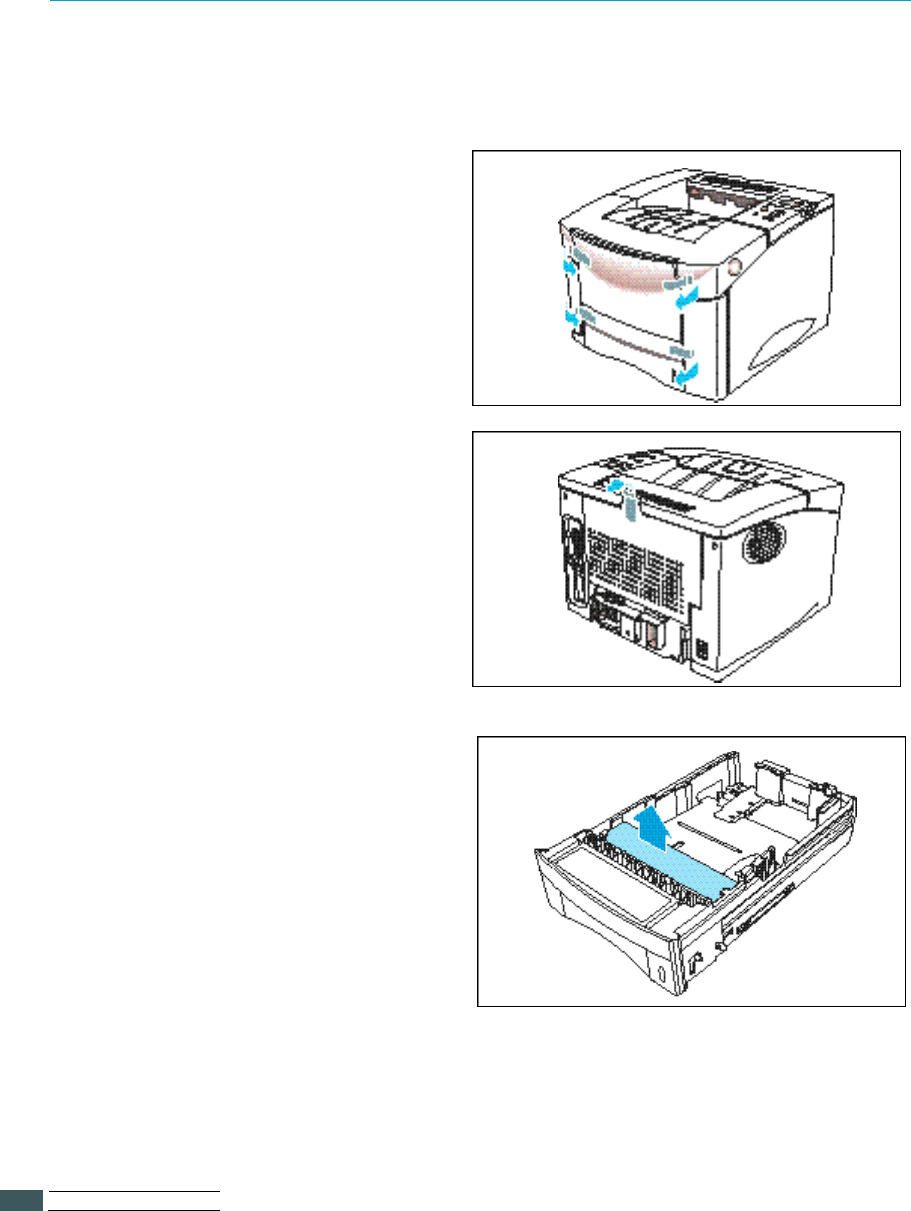
During the storage and transport of your printer, adhesive tape is used to block
some of the elements that may move or open unexpectedly and consequently
be damaged.
1Before connecting up your printer
and starting to use it, you must
therefore remove all the adhesive
tapes, as illustrated in the figure
below.
2Slide tray out of the printer.
Remove the packaging material
from the tray.
Preparation
SE T T I N G UPYO U R PR I N T E R
2.3
Installing Toner Cartridge
To install a toner cartridge in your printer proceed as follows.
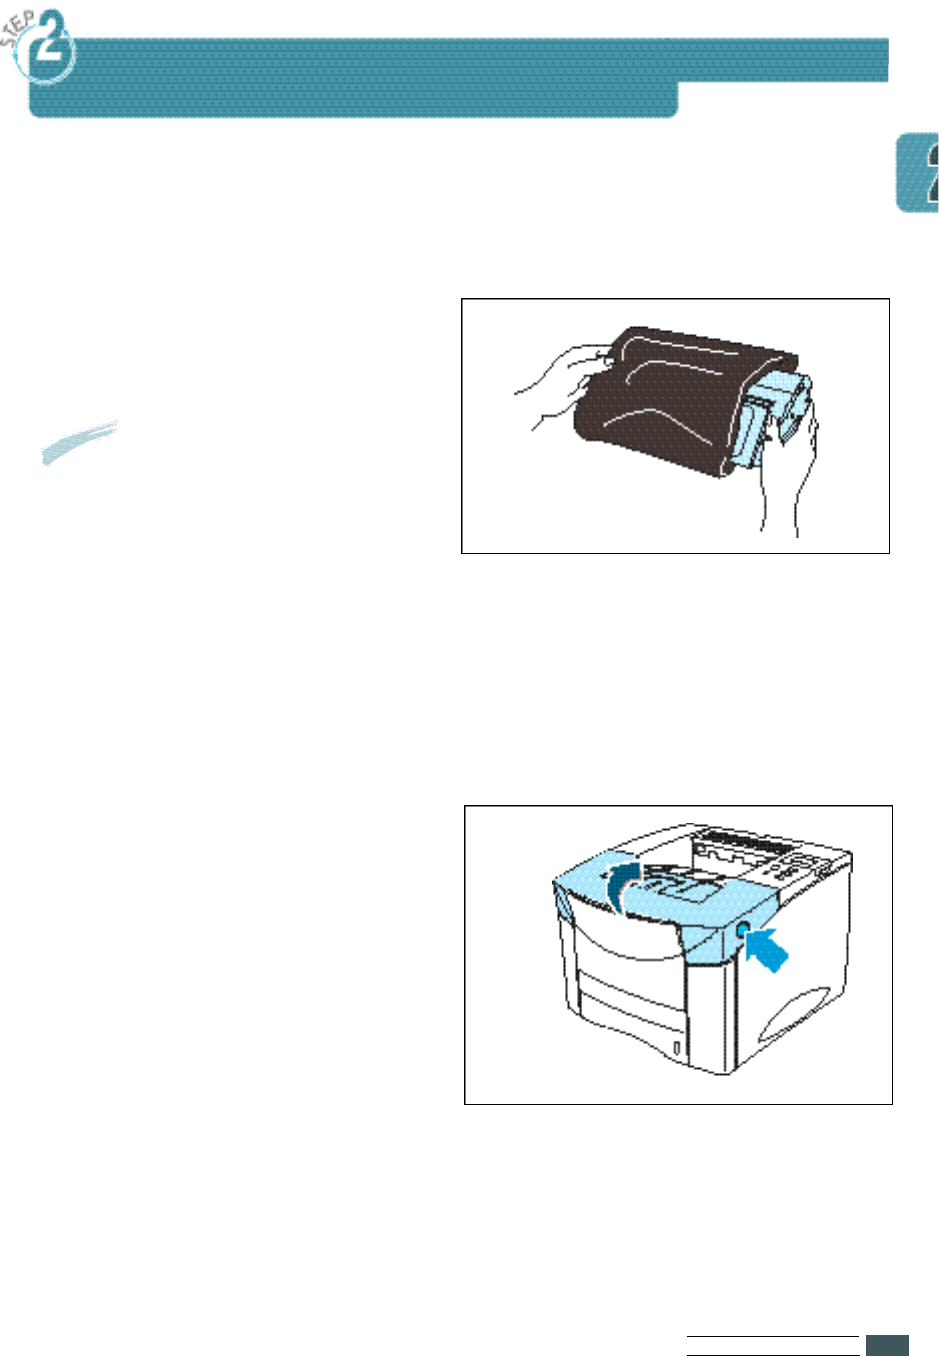
1Remove the toner cartridge from
its packaging.
2Open the top cover of the printer
by pressing the button on right
side of the printer.
Notes •
Do not remove the cartridge
from its packaging until you
are ready to use it.
•
Do not expose the cartridge
to light, it could damage the
cartridge permanently.
SE T T I N G UPYO U R PR I N T E R
2.4
Installing Toner Cartridge
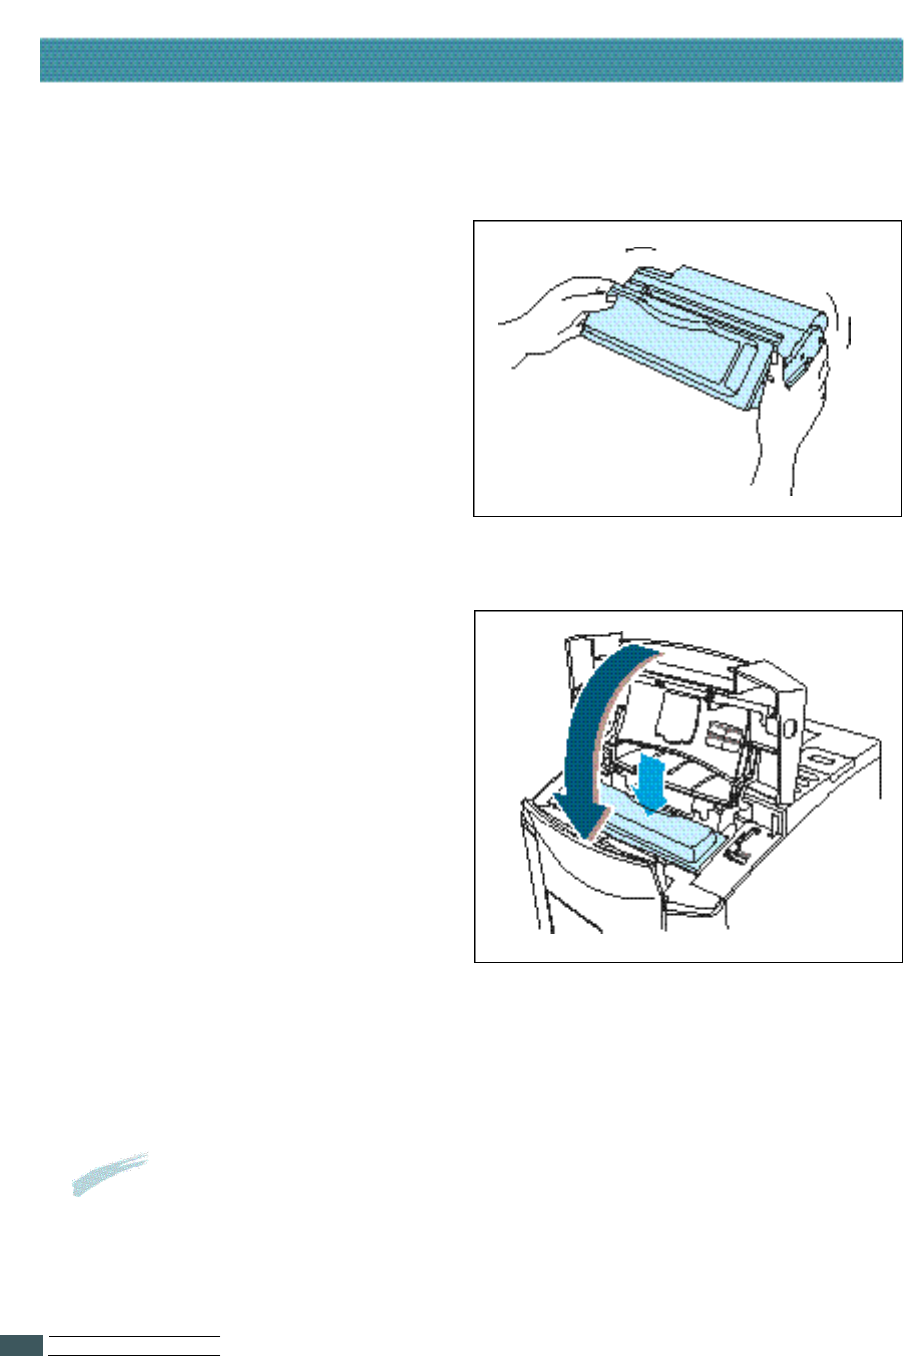
3Rotate the cartridge and gently
shake it from side to side to
distribute the toner evenly inside
the cartridge.
4Position the cartridge as shown
with the arrow pointing into the
printer. Slide the cartridge into
the printer as far as it will go.
Notes
If toner gets on your clothing, wipe it off with a dry cloth and wash clothing
in cold water. When printing text at 5% coverage, a toner cartridge lasts an
average of 10,000pages in simplex mode.
5Close the top cover.
SE T T I N G UPYO U R PR I N T E R
2.5
Load Paper
To load paper in the tray, proceed as follows.
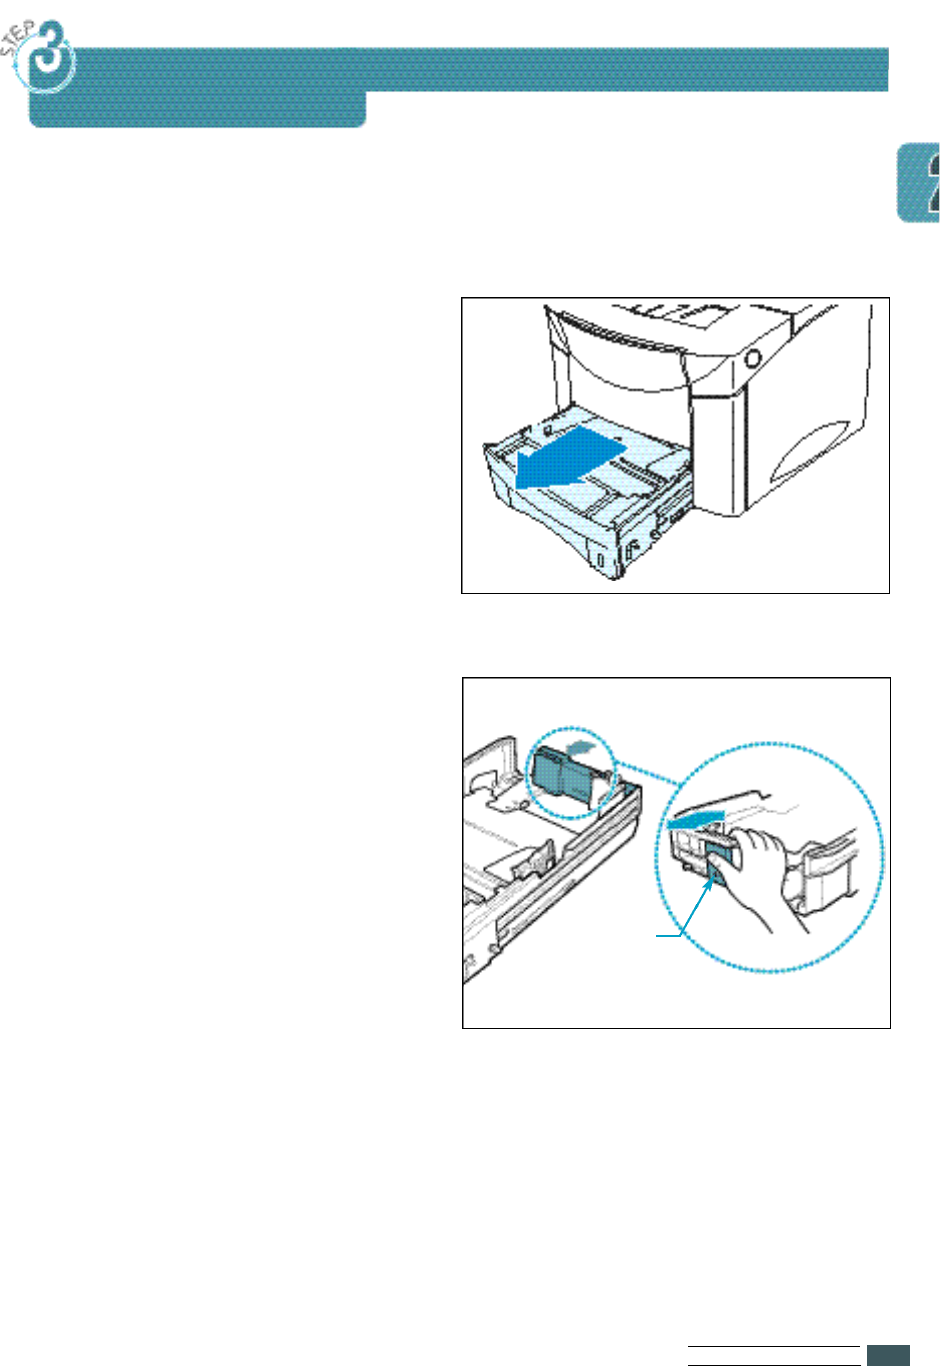
1Pull the Tray1 completely out of
the printer.
2Squeeze the back of the rear
paper guide and slide it to the
desired paper size until it clicks
into place.
The paper sizes are indicated on
the bottom of the tray1.
Rear paper
guide
SE T T I N G UPYO U R PR I N T E R
2.6
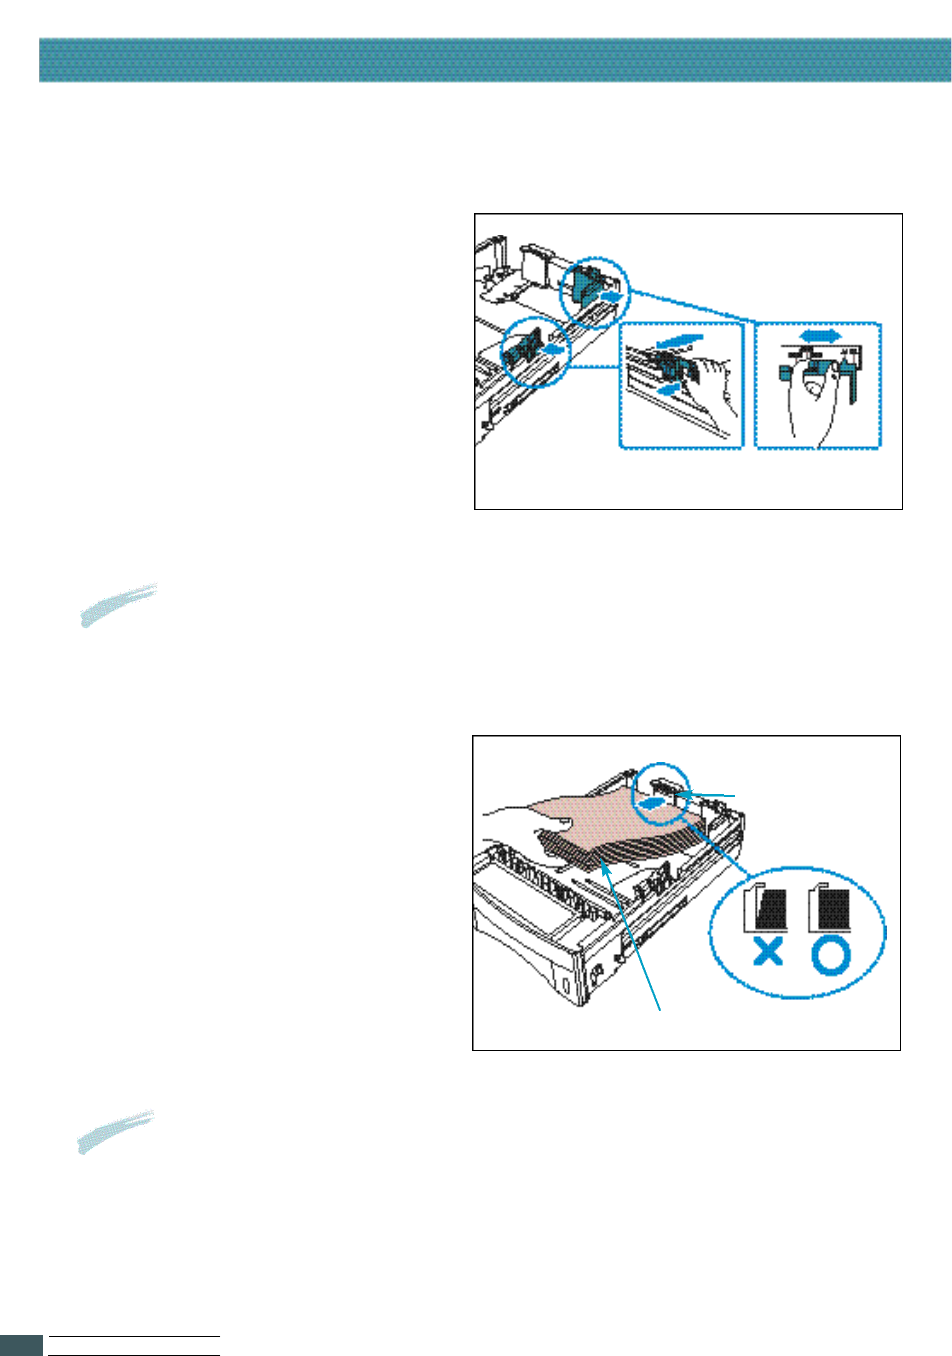
3Lift the rear right guide and slide
it to match the width of the
paper.
The paper sizes are indicated on
the bottom of the tray.
4Squeeze the width guide,
rear right guide and slide it to
the far right side of the tray.
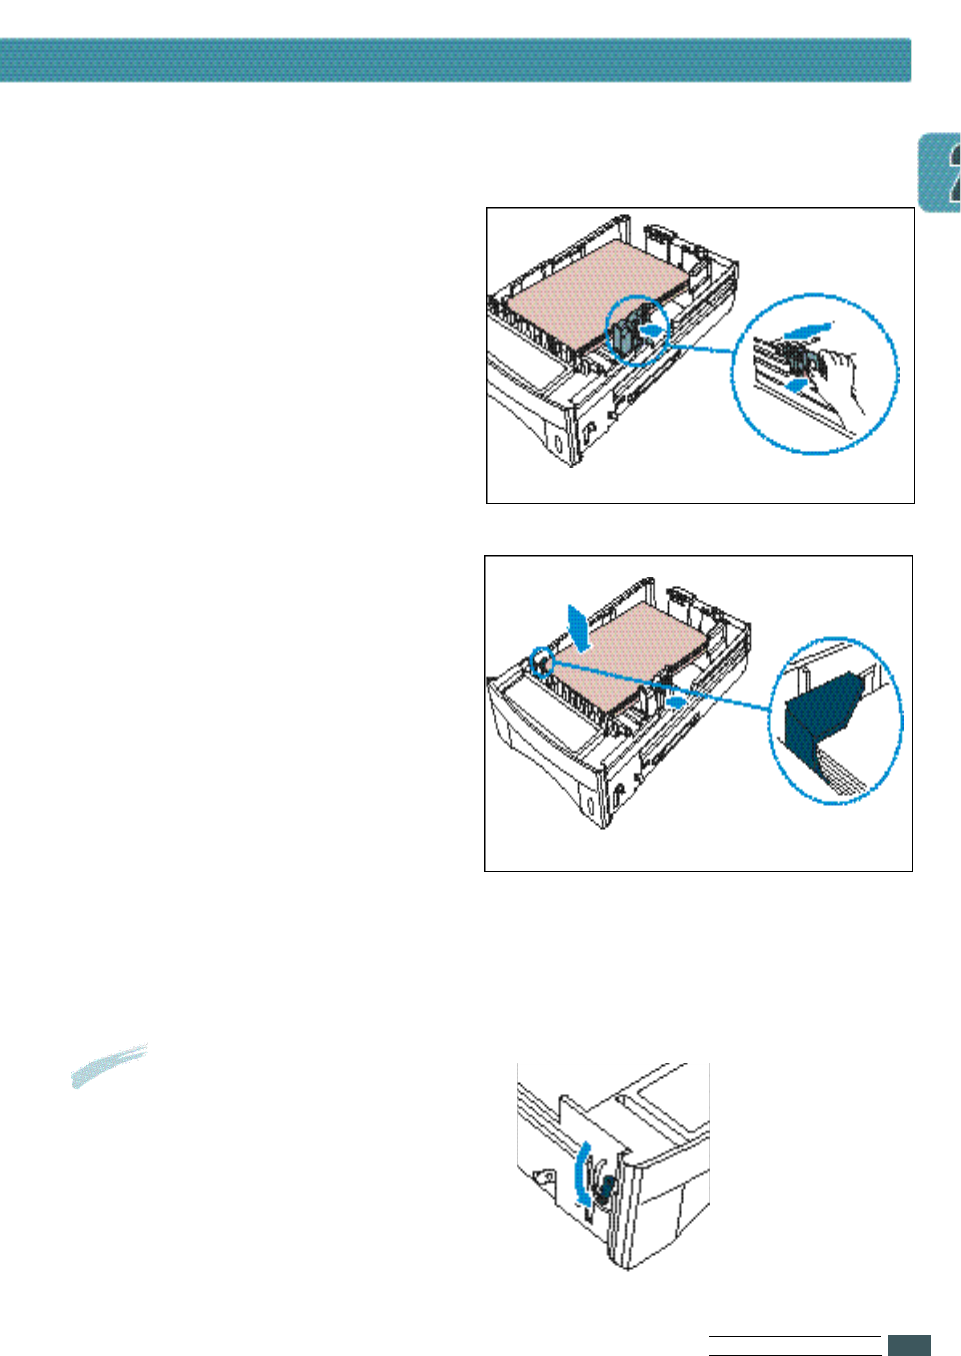
5Place the paper against the left
of the rear paper guide.
Printing side(down)
Paper Limit Line
Width guide Rear right guide
Notes
If the tray is not properly adjusted, the printer might display an error
message or paper might jam.
Notes •
Do not fold or crease the paper.
•
Place the paper with the recommended print side face down.
•
Don’t exceed the paper limit line indicated on the tray when the paper is held up.
Load Paper
SE T T I N G UPYO U R PR I N T E R
2.7
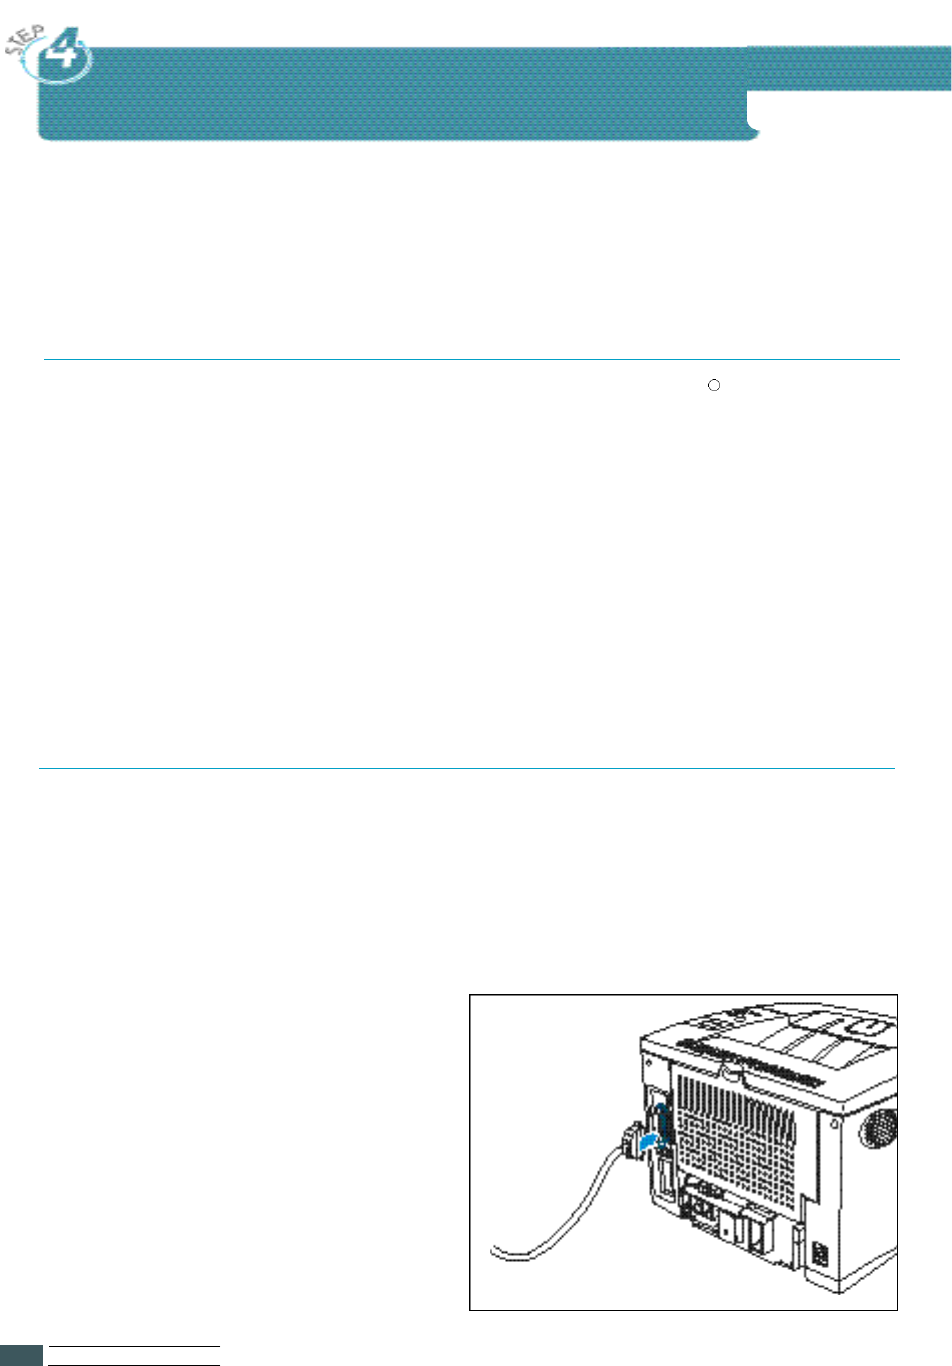
6Squeeze the width guide and
slide it to the left until it lightly
rests against the edge of the
paper.
7Make sure the paper is set below
the tab on the tray.
Notes
To load the paper of the Legal
or Folio(24Ib, 90g/m2) size into
the tray, push down the lever
on the left side of the tray to
lock it.
8Gently slide the tray back into the
printer. The printer automatically
senses the size of paper loaded
if the tray1 is adjusted correctly.
Load Paper
SE T T I N G UPYO U R PR I N T E R
2.8
To print from computer software, you need to connect your printer to your
computer with a parallel interface cable.
The parallel cable should be compatible with the Centronics Rparallel interface
and IEEE standard 1284. If you purchase parallel cable, ensure that it :
•Is compatible with Centronics interface.
•Supports bi-directional communications(IEEE standard 1284).
•Is shielded.
•Has the appropriate connector :
- 25 pin D-Sub connector on the computer side.
- Amphenol 36 connector on the printer side.
Connecting the Parallel Cable
Cable Specifications (Not provided)
Connecting the Parallel Cable
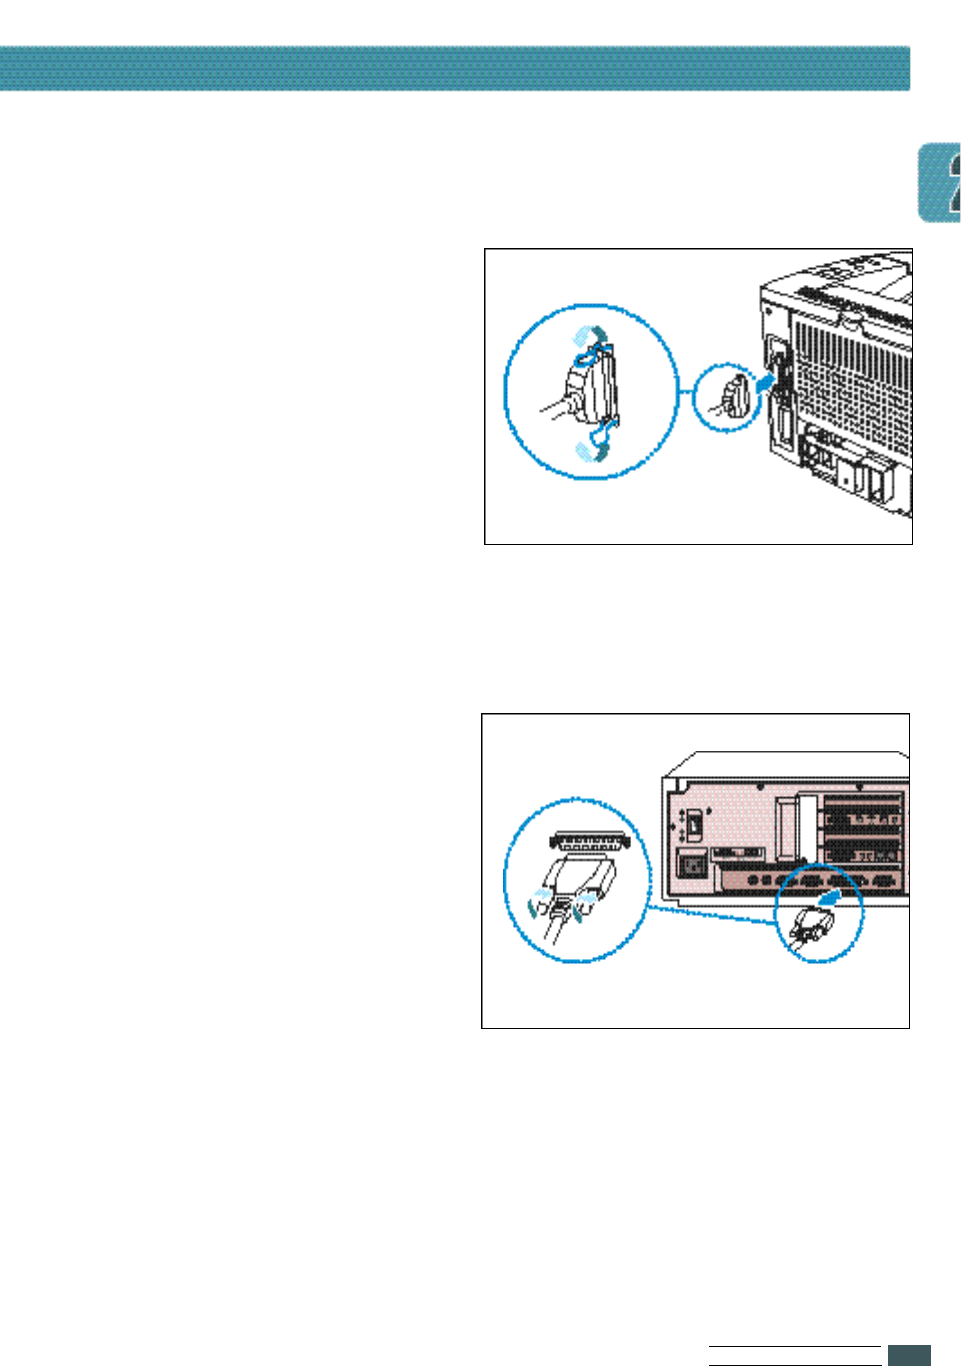
2Plug the appropriate end of the
parallel cable into the connector
on the rear of the printer.
To connect the printer to your computer use a parallel cable and
proceed as follows.
1Check that both the printer and the computer to which it is to be connected
are powered off and disconnected from the power point.
SE T T I N G UPYO U R PR I N T E R
2.9
Connecting the Parallel Cable
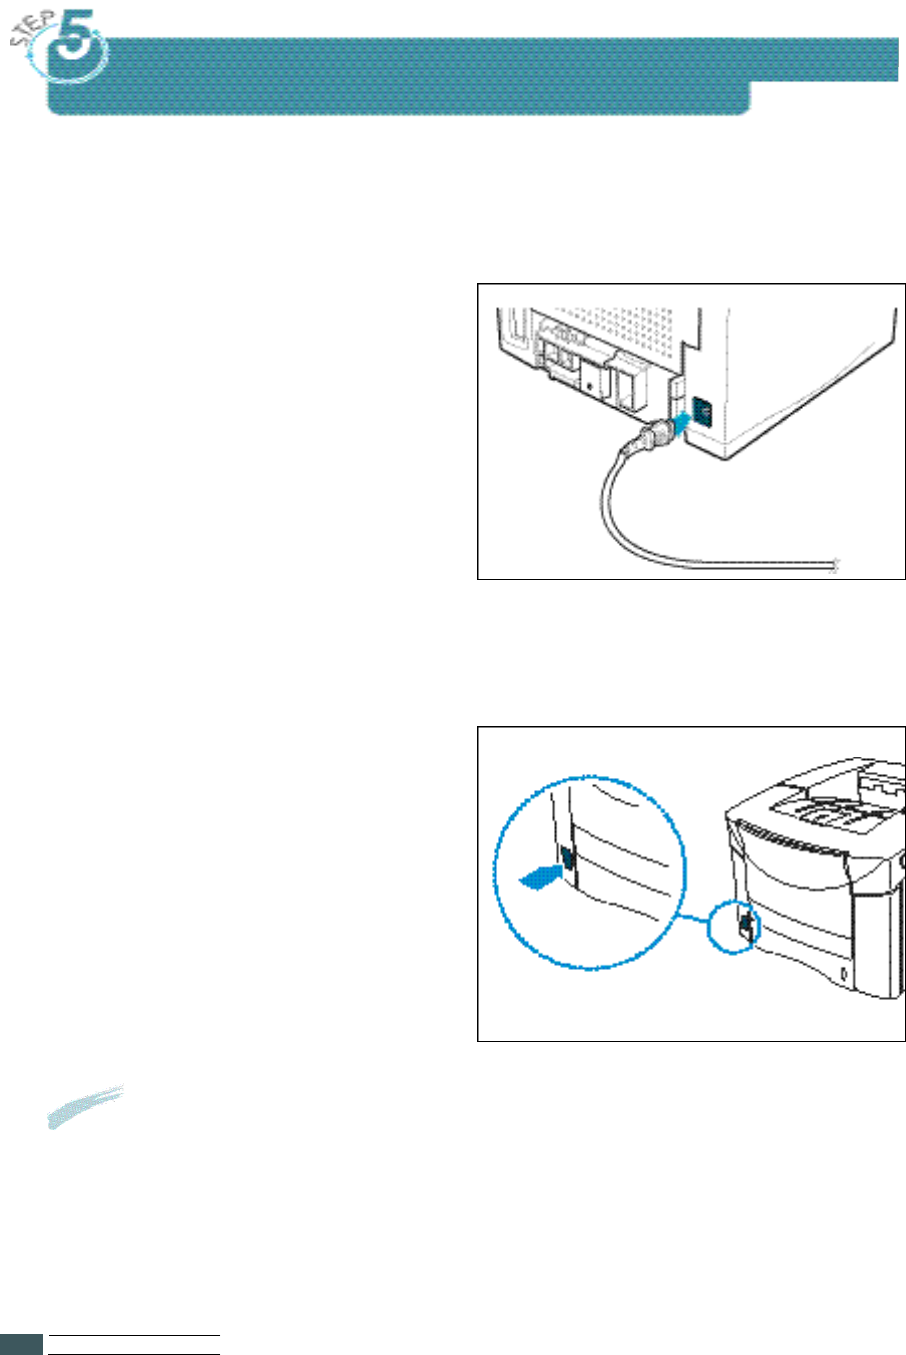
3Push the clip at each end of the
connector down into the notches
on the plug as shown.
4Plug the other end of the cable
into the appropriate parallel
connector on your computer and
tighten the screw.
SE T T I N G UPYO U R PR I N T E R
2.10
Connecting the AC Power Cord
To connect the printer to a power point, proceed as follows.
1Plug the appropriate end of the
power cable supplied to the
connector on the rear of the
printer.
2Plug the other end into a suitable
power point.
•Power cord may differ from
one country to another.
3Power the printer on by pressing
the power on/off button.
Result
You will hear some movement inside the printer.
The printer enters the Ready state.
SE T T I N G UPYO U R PR I N T E R
2.11
Testing the Printer!
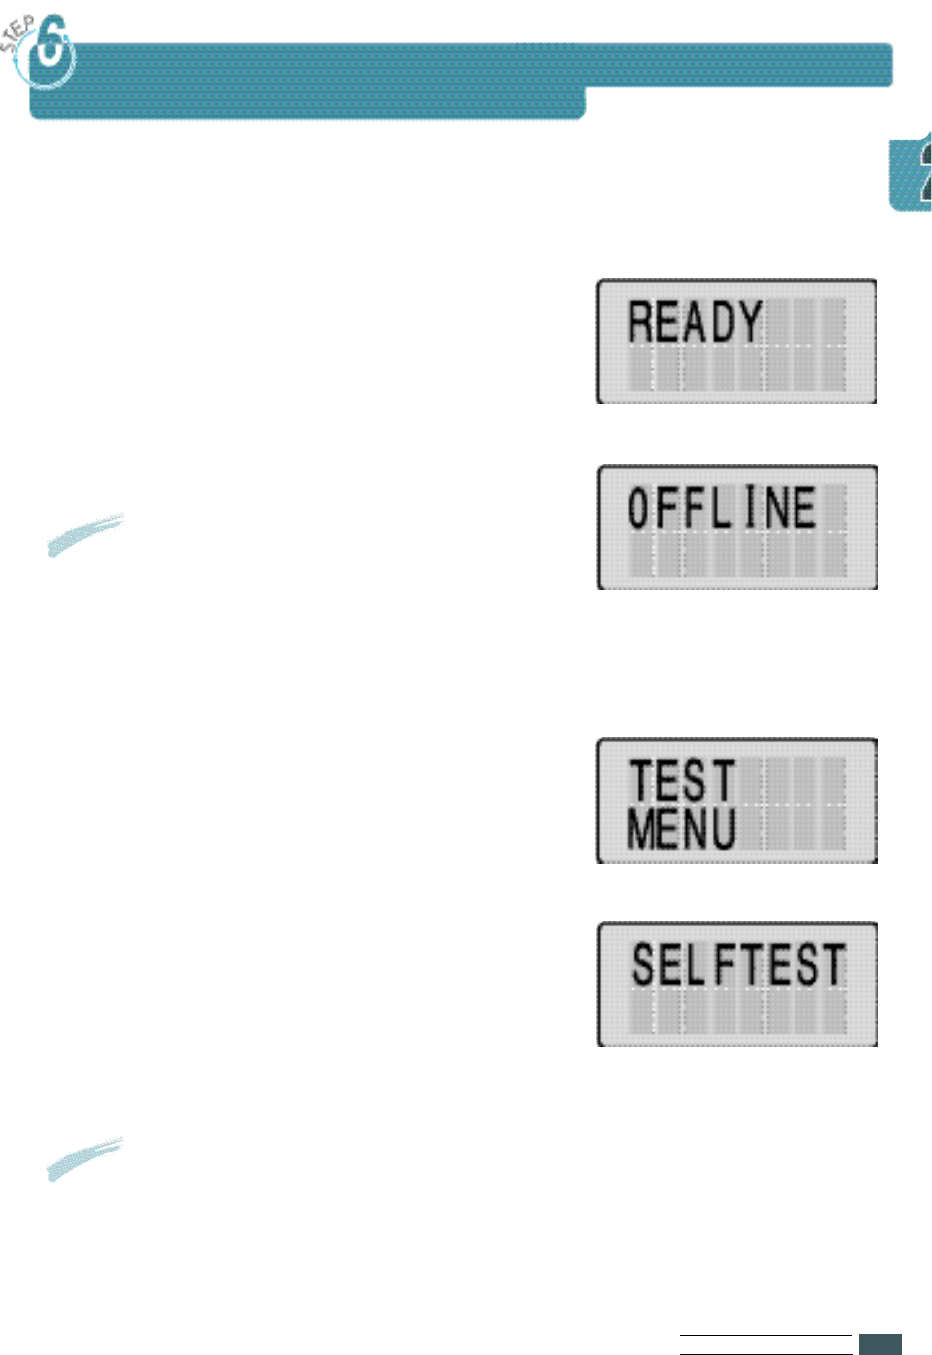
1Make sure the printer is plugged in and
the READY status message appears on
the display.
2Press On Line.
3Press Menu > or < Menu to enter the
menus.
4Press Menu > or < Menu one or more times
until the TEST MENU message is displayed.
5Press Item> or <Item one or more times
until the SELFTEST message is displayed.
Print a configuration page to make sure the printer is operating correctly.
6Press Enter to print.
Result
The OFFLINE message appears on the
display and the printer is off-line.
Notes •
The message ‘PRINTING PCL6’ appears and remains
on the display until the page prints.
•
The printer returns to the Ready state after printing.

SE T T I N G UPYO U R PR I N T E R
2.12
Setting Up the Printer Driver
The printer drivers provided on the CD must be installed to take full
a d vantage of the printer’s features.
Printer drivers access the printer features and allow the computer to
communicate with the printer.
If you install the printer driver using the CD, PCL 6 and PCL 5e are
i n s t a l l e d .
The CD includes the following printer drive r s .
• PCL 5e • PCL 6
- You can use the PCL 5e and PCL 6 driver in Windows 3.x, Windows 95,
Windows 98, Windows NT 4.0, Windows 2000.
In case of the PCL 6 drive r, it supports Watermark, Ove r l a y, N-up printing
and so forth.
• Po s t s c r i p t .
• Font Nav i g a t o r.
• Linux Drive r.
Notes •
You cannot use PostScript in Windows 3.1.
•
PCL 6 is the combination of PCL 5e and the new PCLXL printer language.

SE T T I N G UPYO U R PR I N T E R
2.13
Hardware Requirements
To install and run the PCL printer drive r, you must have the following
minimum hardware configura t i o n .
• PC-compatible 486 microcomputer or better.
• 8MB of RAM for Windows 3.1 and 3.11 (16MB recommended for some
applications) or 16MB for Windows 95/98, Windows NT 4.0,
Windows 2000.
• 20MB available hard-disk space.
• CD-ROM Drive .
Software Requirements
To install and run the printer drive r, you must have one of the following
minimum software configuration :
• Windows 3.1 or Windows for Workgroups (Windows 3.11).
• Windows 95, Windows 98, Windows NT 4.0, Windows 2000.
• Macintosh System 7.5 or later.
Install Procedure
To install the printer driver on your hard disk, make backup copies of the
print driver CD. Keep the original CD in a safe place and use the copies.
Notes
If you do not have access to a CD-ROM drive, contact your local dealer and
request the printer driver diskettes.
Installing the Driver
Setting Up the Printer Driver
SE T T I N G UPYO U R PR I N T E R
2.14
Setting Up the Printer Driver
With Windows 95/98/NT 4.0/2000 installation
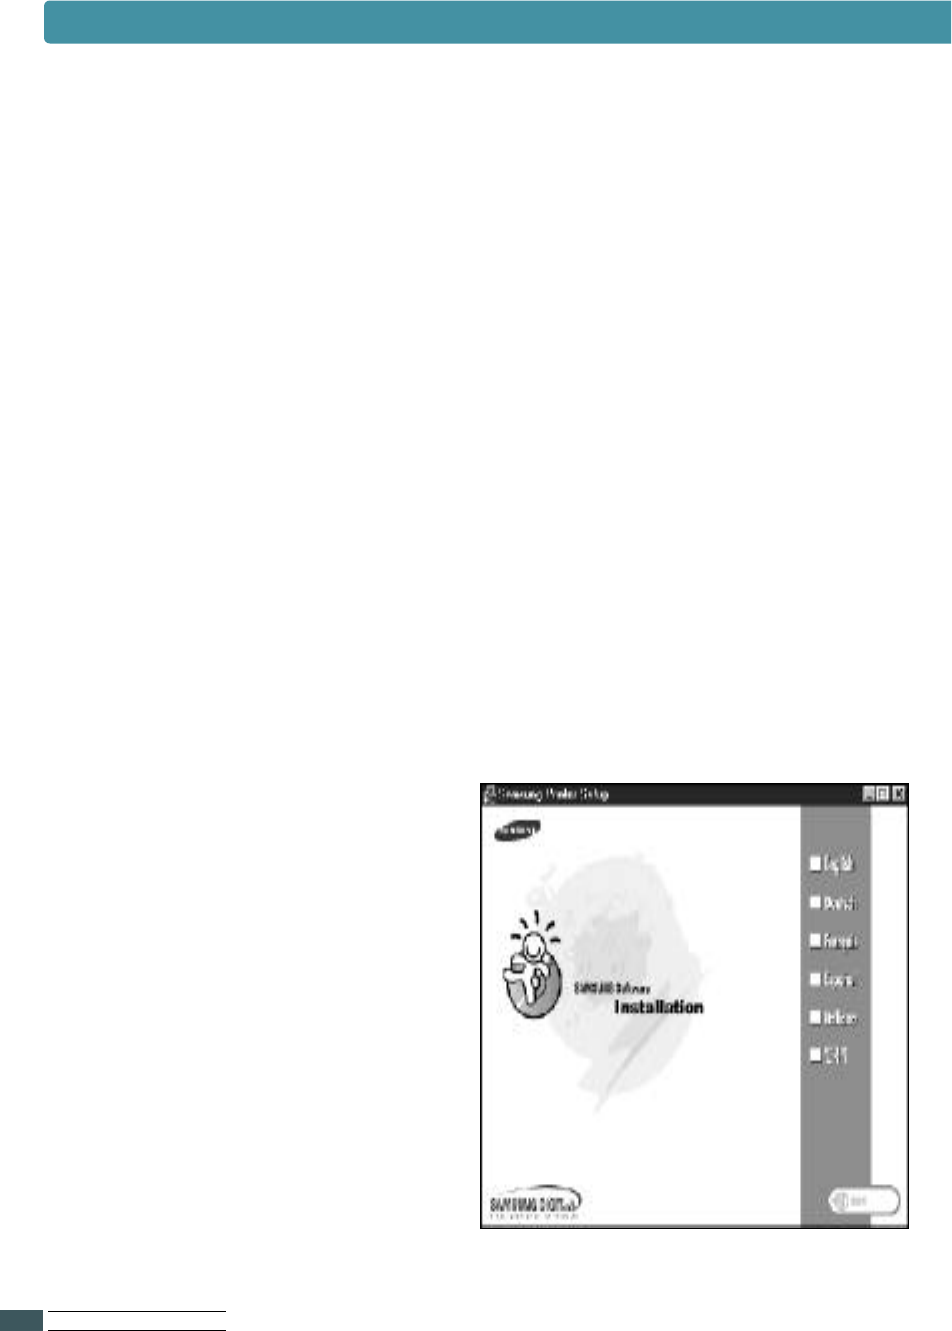
3Select the appropriate
l a n g u a g e .
1
M a k e sure that the printer is plugged in and connected to your computer.
Turn the printer and the computer on, then start Windows.
If Windows 95/98 recognizes the new printer, go to the section
“Windwos 95/98 plug and play” on page 2.16.
2Insert the setup CD-ROM into your CD-ROM drive.
The Samsung Printer Setup windows opens.
If Windows does not automatically run the CD-ROM:
1) Select Run from the Start menu.
2) Type d:\cdsetup. e xe on the command line
(where “d” is your CD-ROM drive letter), then click OK.
3 )
Follow the instructions on the screen.
SE T T I N G UPYO U R PR I N T E R
2.15
Setting Up the Printer Driver
4
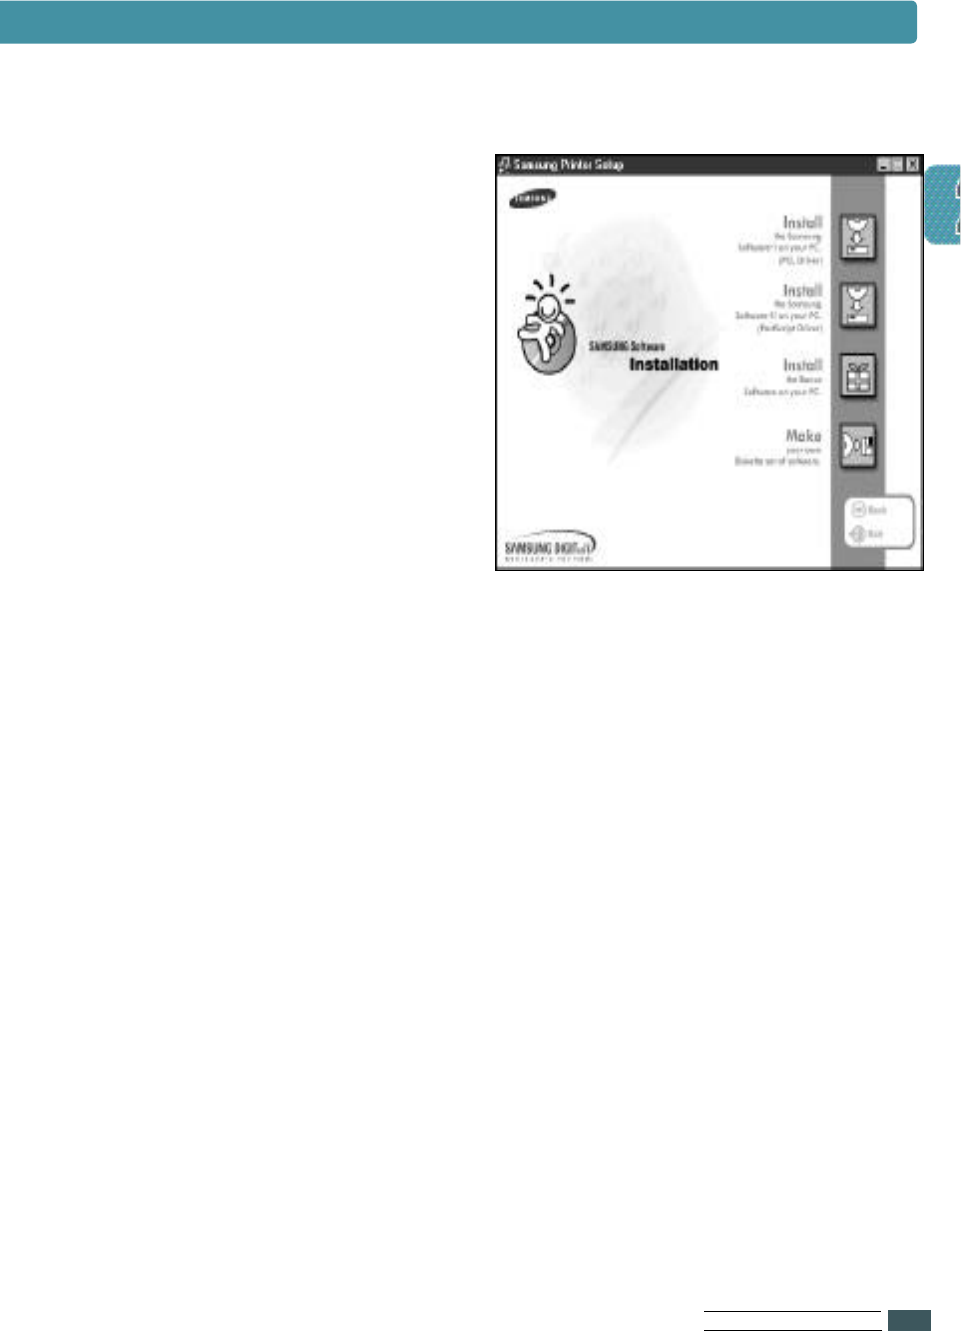
Select Install The Samsung
Software on your PC.
5
Follow the instructions on the screen to complete the installation.

SE T T I N G UPYO U R PR I N T E R
2.16
In case of Win 95
1Make sure the printer is plugged and connected to your computer.
2Turn on the printer and start Windows on your PC.
3Windows recognizes the printer, and ‘New Hardware Found’ dialogue box is
displayed.
4Click on the OK button.
5Insert CD into the CD-ROM drive, and click on the Browse button.
8Select the CD-ROM drive, then click on the OK button.
9Follow step2 through 5 on page 2.14 to complete the installation.
In case of Win 98
1Make sure the printer is plugged and connected to your computer.
2Turn on the printer and start Windows on your PC.
3Windows recognizes the printer, and ‘Add New Hardware Wizard’ dialogue box
is displayed.
4Select search for the best driver for your device(Recommended),
then click on the NEXT button.
5Insert CD into the CD-ROM drive, then click on the Browse button.
6Select the CD-ROM drive, then click on the OK button.
7Follow step2 through 5 on page 2.14 to complete the installation.
In case of Plug & Play
Notes To Install Shared Win 95/98 Printer Driver from NT Server to Client PC
1
Select S h a r i n g in P r o p e r t i e s of the printer driver.
2
Select Windows 95 in Alternate Drivers.
3
Type D : \ 7 3 0 0 \ X X / p c l \ p c l 6 \ w i n 9 x 3 x
(Where “D” is your CD-ROM drive letter and XX is the language code*,
i.e. e n g for English).
4
Install the network printer in the client PC.
* Refer to “language code” (page 2.20) for language codes.

SE T T I N G UPYO U R PR I N T E R
2.17
1Make sure the printer is plugged and connected to your computer.
2Turn on the computer.
3Insert the compact disk into the CD-ROM drive.
4From program manager window, select Run from the file menu.
With Windows 3.1 :
5Type d:\cdsetup.exe on the command line,
(where “d” is your CD-ROM drive letter), then click OK.
6From now on, follow the instructions on page 2.14 to complete the installation.
An uninstall utility is supplied with the printer driver to enable you to
remove the driver and all associated files from your hard disk, if so required.
To uninstall the driver, proceed as follows.
Select Start Programs Samsung 7300 Samsung ML-7300 Driver
uninstall from the windows task bar.
●PCL 6 and PCL 5e drivers are removed from your hard disk.
Notes
The Run dialogue box appears.
Uninstalling the Printer Driver

SE T T I N G UPYO U R PR I N T E R
2.18
Default Printer
After installing the printer driver Samsung ML-7300 PCL 6 is selected
automatically as the default printer.
If you did not select this Laser printer as the default printer when yo u
installed it, you must select it before attempting to print a document on it.
S e l e c t i o n
To select the printer, proceed as follows.
1Select Start Settings P r i n t e r s from the Windows task bar.
2Double click the desired printer drive r s ( PCL 5e, PCL 6) icon.
3Select File Default Printer.
Selecting the Printer
SE T T I N G UPYO U R PR I N T E R
2.19
Font Navigator is a font manager for Windows 95/98, Windows NT(4.0), and
Windows 3.1. It gives a quick and easy way to find fonts, install those fonts,
and view and print font samples.
With Windows 95/98/NT 4.0/2000 and Windows 3.1:
Installing the Font Navigator (FontNav)
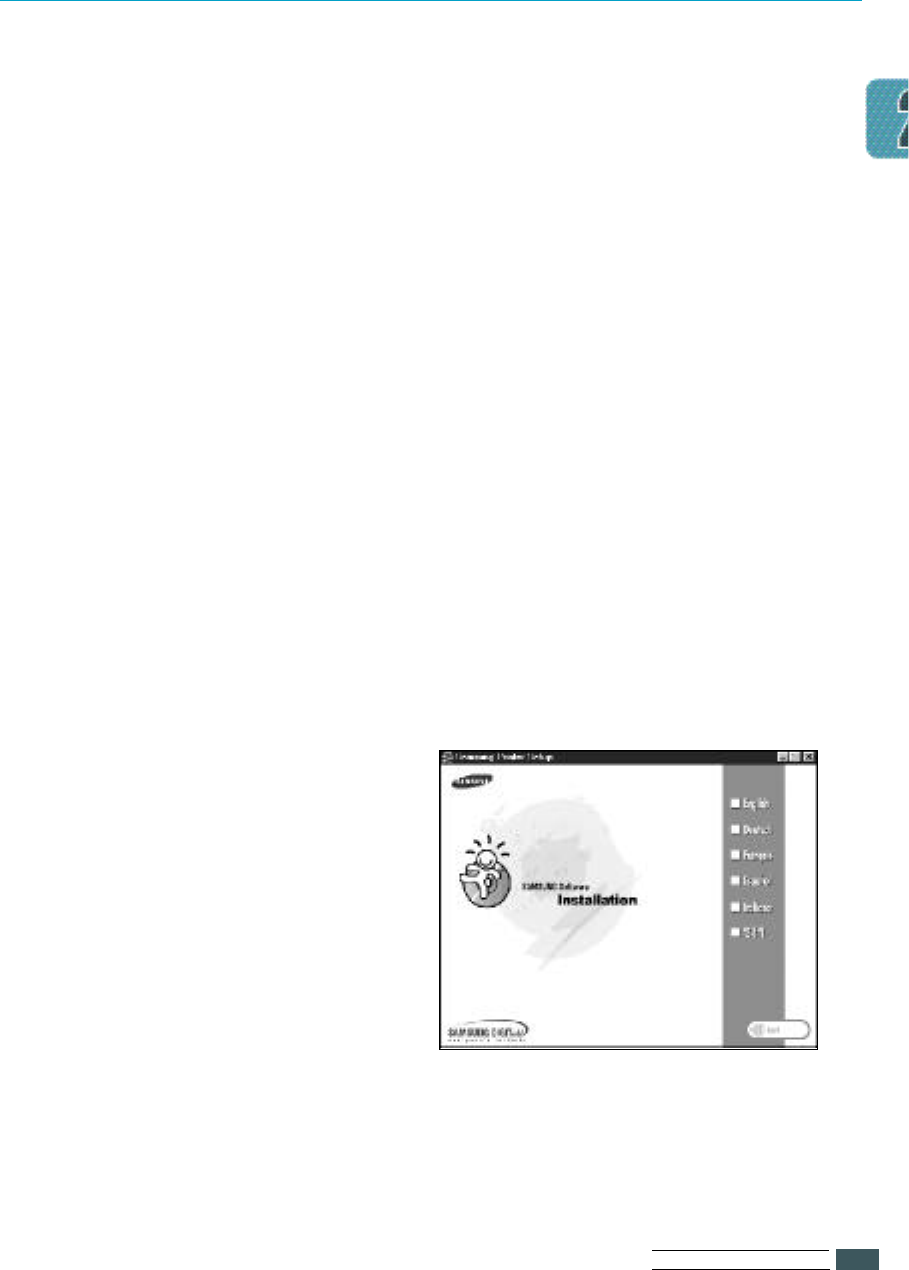
3Select the appropriate language.
1Make sure that the printer is plugged in and connected to your computer.
Turn the printer and the computer on, then start Windows.
If Windows 95/98 recognizes the new printer, go to the section
“Windwos 95/98 plug and play” on page 2.16.
2Insert the setup CD-ROM into your CD-ROM drive.
The Samsung Printer Setup windows opens.
If Windows does not automatically run the CD-ROM:
1) Select Run from the Start menu.
2) Type d:\cdsetup.exe on the command line
(where “d” is your CD-ROM drive letter), then click OK.
4Select “Install the Bonus Software on your PC”.
SE T T I N G UPYO U R PR I N T E R
2.20
Language Codes
Eng English
Deu Deutsch
Frn Français
Esn Español
Ita Italiano
Kor Korean
Codes Language

Using
Operator
Panel
This chapter describes how to use the printer’s Operator
panel. It provides information on the following topics:
◆Operator Panel Buttons
◆Changing Printer Setting
◆Overview of Printer Menu
◆PRINTING MENU
◆CONFIG MENU
◆JOB MENU
◆TEST MENU
◆PCL MENU
◆I/O MENU
◆PS3 MENU
◆NETWORK MENU
3
3
US I N G OP E R AT O R PA N E L
3.1
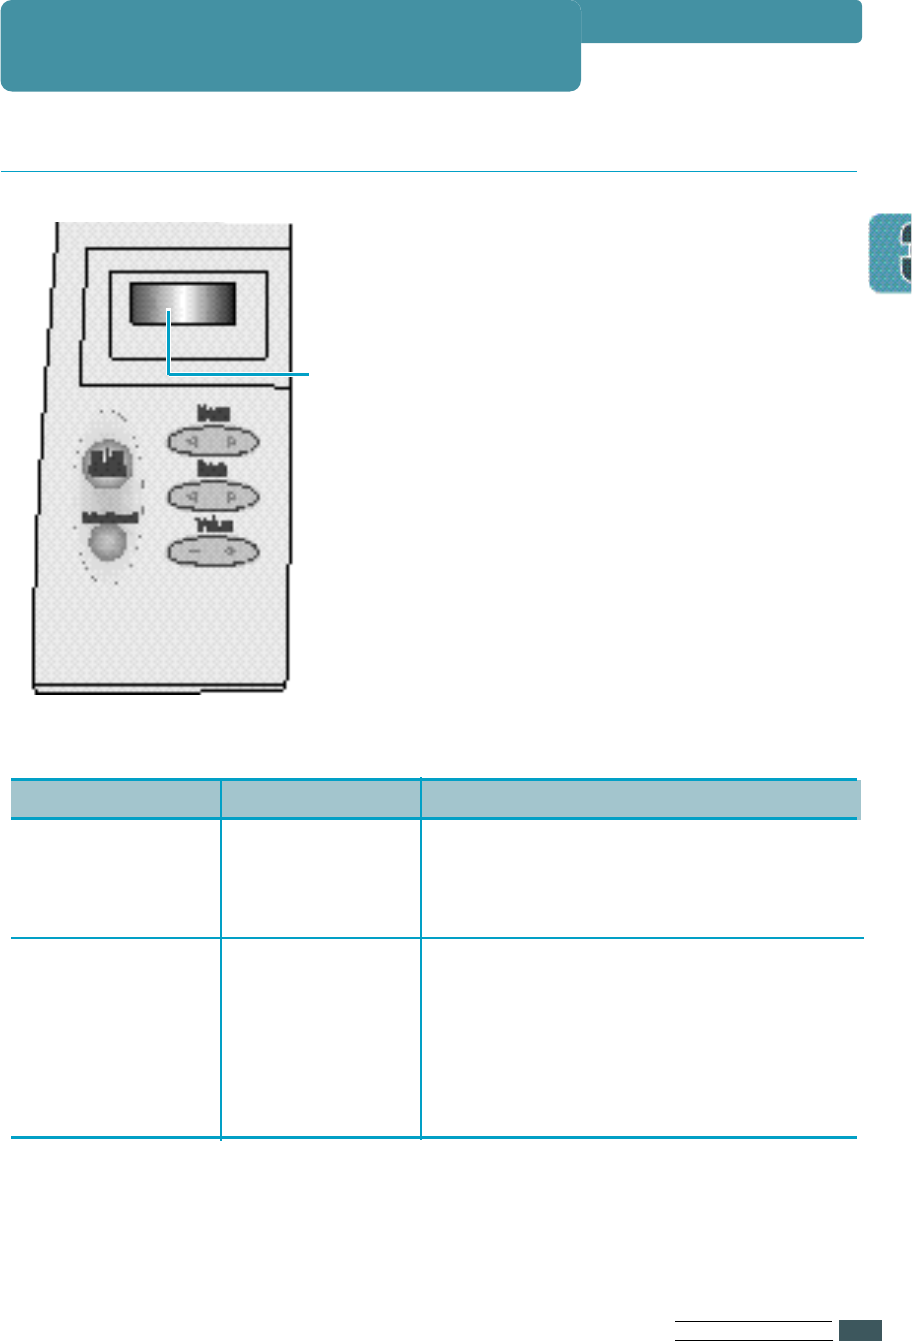
The operator panel, on the front right side
of your printer, has a 2-line LCD(Liquid
Crystal Display) and five buttons.
Operator Panel
Display
Operator Panel Buttons
LCD panel
Light Color
Green
Orange
Light State
On
Off
Blinking
On
Blinking
The Printer IS...
Online
Offline
Processing information
In Non-recoverable error state
•Solve the problems for the
error message, by going
through check lists and tests.
In recoverable error state

US I N G OP E R AT O R PA N E L
3.2
A number of menus are available to make it easy for you to change printer settings.
Some menus are displayed only if a specific option is installed in the printer.
When you select a new setting from the operator panel, the asterisk(❊) moves
next to the selected setting to identify it as the current user default setting.
Use the five operator panel buttons to open a menu, scroll through a list of values,
change printer settings, and respond to printer messages.
The following table describes the functions of each button.
Operator Panel Buttons
Notes
Changes mode from a software application override the user default set -
tings made from the printer operator panel.
Using Panel Buttons
Button
On Line/Continue
Enter/Cancel
Function
•Places the printer either online or offline.
•Allows the printer, to continue printing when the
printer is in recoverable error state.
•Cancels the print job that the printer is processing
when the printer is online.
•Saves the selected value for that item when the
printer is offline.
Menu • Cycles through the operator panel menus.
Item • Cycles through the selected menu’s items.
Value • Cycles through the selected menu item’s values.
Operator Panel Menus

US I N G OP E R AT O R PA N E L
3.3
To change an operator panel setting, proceed as follows.
A value can be :
•A phrase or word that describes a setting.
•A numerical value that you can increase or decrease.
•An On or Off setting.
1Make sure the ‘READY’ message appears on the display.
2Press On Line.
3Press Menu until the menu you need appears on the display.
4
Press Item until the menu item you need appears on the display.
5
Press Value until the setting you need appears on the display.
6Press Enter to save the selection.
Changing Printer Setting
Result
The ‘OFF LINE’ message appears on the display and the
printer is off-line.
Result
An asterisk(❊) appears beside the current user default
setting for that menu item.

US I N G OP E R AT O R PA N E L
3.4
Some menus are displayed only if a required option is installed.
They are as follows.
Overview of Printer Menu
PAPER
MP SIZE
COPIES
ORIENT
TRAY
T-MARGIN
L-MARGIN
DUPLEX
AUTO CR
WIDE A4
QUALITY
PRINTING
MENU
EMUL
SWITCH
LOCKTRAY
PWR SAVE
AUTOCONT
ECONO
JAM RECV
TONERLOW
CONFIG
MENU
SRT MODE
TIMEOUT
DENSITY
PAP.TYPE
MENU CLR
SMET
DUP.TOP
DUP.LEFT
S-BIND
L-BIND
FUSER CLEAN
JOB
MENU
SELFTEST
DEMOPAGE
TEST
MENU
FONTLIST
TYPEFACE
SYMBOL
LINES
PITCH
PT.SIZE
COURIER
PCL
MENU
RESET NIC
CFG NET
TCP/IP
CFG TCP
DHCP
CFG ADRS
BOOTP
RARP
LPD
APL TALK
NETWARE
CFG NWAR
AUTO
EN_8023
EN_II
NETWORK MENU
If the Network card(PortThru)
is installed in your printer
EN_8022
EN_SNAP
UPDATE
BOOT SVR
UNIX
WINDOWS
SV-IP B1
SV-IP B2
SV-IP B3
SV-IP B4
FACTORY DEFAULT
IPP MENU
JOBSHEET
PRINT NET CFG
FONT LIST
PS.ERROR
PS 3 MENU
I/O MENU
If the serial/LocalTalk option
card is installed in your printer
BAUDRATE
ROBU.XON

US I N G OP E R AT O R PA N E L
3.5
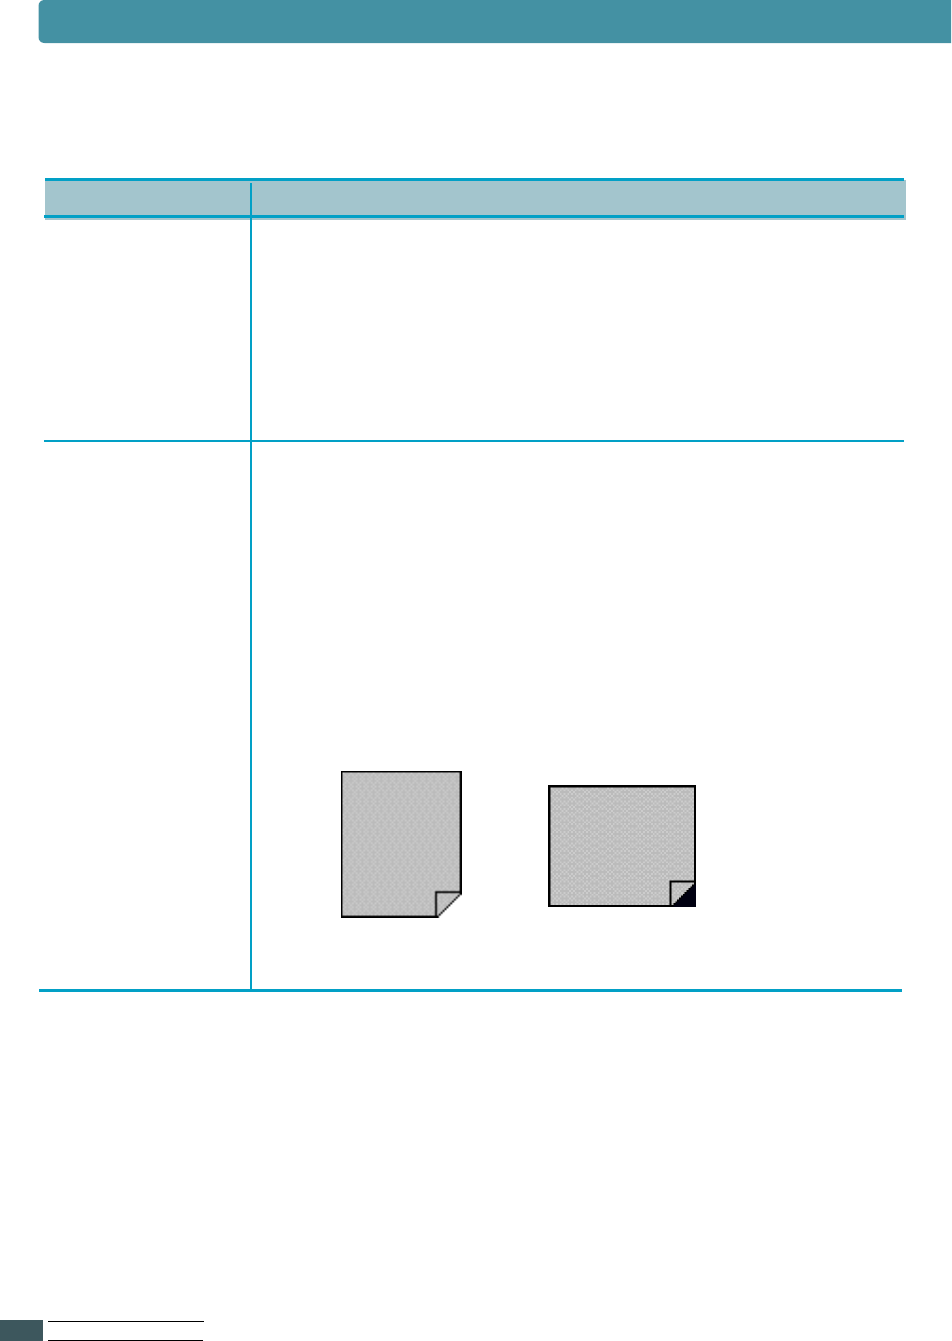
Use the PRINTING MENU to define all settings relating to printer input and
output, as well as the specific print materials you are using with your printer.
Item
PAPER
MP SIZE
Values and Functions
If the TRAY menu is AUTO, MP, MANUAL
A4(country specific), LEGAL, Letter(country specific),
EXE, JIS B5, ISO B5, COM-10, MONARCH, DL, C5, POST
A6, C6, FOLIO A5, STS, A6
If the TRAY menu is 1ST
A4(country specific), LEGAL, Letter(country specific),
EXE, JIS B5, ISO B5, FOLIO
If the TRAY menu is OPT
A4(country specific), LEGAL, Letter(country specific),
EXE, JIS B5, ISO B5, COM-10, MONARCH, DL, C5,
FOLIO
If the DUPLEX menu is not OFF(SHORT or LONG)
A4(country specific), LEGAL, Letter(country specific), FOLIO
If the DUPLEX menu is OFF
A4(country specific), LEGAL, Letter(country specific),
EXE, JIS B5,ISO B5, COM-1 0, MONARCH, DL, C5,
POST A6, C6, FOLIO, A5, STS, A6
If the DUPLEX menu is not OFF
(SHORT or LONG)
A4(country specific), LEGAL, Letter(country specific),
FOLIO
Notes The PAPER SIZE setting identifies the default formatting size for each tray.
It is important to select the correct paper size from the menu when using
trays.
PRINTING MENU
US I N G OP E R AT O R PA N E L
3.6
PRINTING MENU
Item
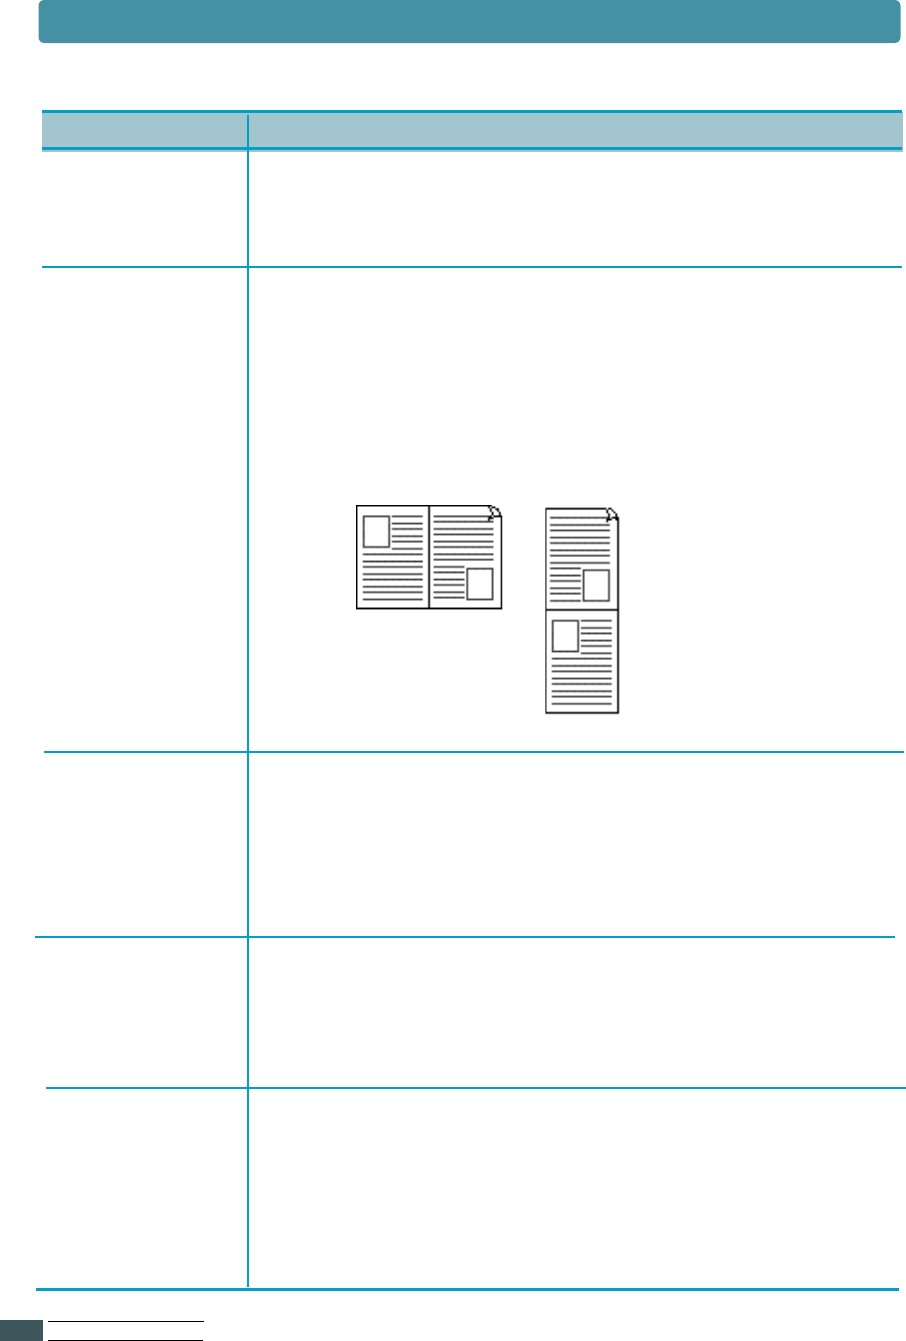
COPIES
ORIENT
Values and Functions
1 to 999 (1; Factory Default)
The COPIES setting determines the number of copies printed
for each page. The printer does not automatically collate the
copies. For example, if you send three pages to print and set
Copies to 2, the printer prints page1, page 1, page 2, page 2,
page 3, page 3.
P : Portrait (Factory Default)
L : Landscape
The ORIENT setting determines how the
printing is oriented on the page.
P(Portrait) means the printing is parallel to the
short edge of the paper.
L(Landscape) means the printing is parallel to
the long edge of the paper.
LandscapePortrait

AUTO(Factory Default)
1ST
MP
OPT(If the optional cassette is installed)
MANUAL
The TRAY setting identifies the default paper tray.
1ST means that the printer feeds print material from Tray
unless it is empty or closed.
MP means that the printer feeds print material
from Multi-Purpose tray unless it is empty or closed.
Use the MANUAL selection when manually feeding
envelopes or other print material through the
Multi-Purpose tray.
OPT is available only if the optional cassette is installed.
See ‘Tray 2’ on page F.17.
Auto means that the printer feeds print material from the
other tray when one tray is empty. If you are using the
same size and type of print material in all the trays, the
t rays are automatically linke d .
0.0” ~ 9.9”
The T-MARGIN menu item lets you select the top margin of
the print materials.
US I N G OP E R AT O R PA N E L
3.7
PRINTING MENU
TRAY
T-MARGIN
Item Values and Functions
US I N G OP E R AT O R PA N E L
3.8
PRINTING MENU
L-MARGIN
DUPLEX
0.0”~ 9.9”
The L-MARGIN menu item lets you select the
left margin of the print materials.
AUTO CR LF(Factory Default)
LF + CR
The AUTO CR setting determines if the printer
automatically performs carriage return after a line feed
control command.
WIDE A4 OFF (default)
O N
The WIDE A4 setting determines if the printer can print
80 columns in A4 size .
QUALITY 3 0 0
600 (Factory Default)
1200
QUALITY setting determines the print resolution while
printing the page.
OFF (Factory Default)
LONG
SHORT
The printer can automatically print on both sides of
paper. Use the OFF selection when printing on one side
of a sheet of paper. For more information, see page
5.14.
Long
Short
Item Values and Functions

US I N G OP E R AT O R PA N E L
3.9
Use the CONFIG MENU to configure a variety of printer features.
EMUL
PWR SAVE
AUTO (Factory Default)
PCL
PS3
HEXDUMP
You can select the emulation for printing a document.
AUTOCONT ON (Factory Default)
OFF
The AUTOCONT setting determines whether the printer
continues printing after it detects paper mismatch.
If an error occurs and AUTOCONT is set to OFF,
the printer stops and waits for operator intervention.
If the Continue button on the operator panel is pressed,
the printer continues printing regardless of paper mis-
match. When AUTOCONT is set to ON, the printer
automatically resumes processing.
OFF
1 5
3 0 (Factory Default)
4 5
6 0
The PWR SAVE menu item lets you reduce power
usage when the printer is idle. The PWR SAVE setting
determines the length of time (in minutes) the printer
waits after a job is printed before it goes to a reduced
power state.
CONFIG MENU
Item Values and Functions

US I N G OP E R AT O R PA N E L
3.10
CONFIG MENU
ECONO
JAM RECV
OFF (Factory Default)
ON
The ECONO setting helps conserve the toner cartridge
by controlling how much toner the printer uses for print
job.
Select O F F if toner conservation is not a concern.
But this setting may affect the print quality of your job.
TONERLOW CONTINU (Factory Default)
STOP
This setting determines whether the printer continue
printing after the printer detects that the toner is low.
If the toner is low and TONERLOW is set to ‘Stop’,
press the Continue button to print. In that case, replace
the toner cartridge or set the TONERLOW menu item to
CONTINU.
OFF (Factory Default)
ON
When JAM RECV is set to OFF, the printer does not
reprint a page that has been jammed after all the image
has been drawn on the page.
When JAM RECV is set to ON, the printer keeps printed
page until the printer signals that the page has
successfully exited the printer. The printer reprints the
jammed page.
Item Values and Functions

US I N G OP E R AT O R PA N E L
3.11
CONFIG MENU
SWITCH
(If the optional
tray 2 is installed)
LOCKTRAY
(If the optional tray
is installed and the
SWITCH
menu item
is set to on)
ON (Factory Default)
OFF
The ON setting makes the printer supply the paper from
another Tray when a cassette is empty.
In case of the OFF setting, an error message is
displayed.
NONE (Factory Default)
1ST
OPT
MP
The cassette set to LOCKTRAY doesn’t occurres tray
change. For example, If LOCKTRAY is set to MP, the
tray is not switched to Multi-Purpose tray.
Item Values and Functions

US I N G OP E R AT O R PA N E L
3.12
Use the JOB MENU to define all settings relating to print quality,
as well as Menu clear.
SRT MODE
(Samsung
Resolution
Enhancement
Technology)
TIMEOUT
ENHANCE (Factory Default)
NORMAL
GRAY
Use the printer’s SRT(Samsung Resolution enhancement
Technology) setting to produce print with smooth angles,
curves, and edges.
ENHANCE : Better Text Image
GRAY : Better Photo Image
DENSITY LIGHT
MEDIUM (Factory Default)
DARK
Lighten or darken the print on the page by changing the
DENSITY setting.
The MEDIUM setting usually produces the best results.
0 ~ 3 0 0
1 5 (Factory Default)
The TIMEOUT Setting determines the amount of time
(in seconds) the printer waits before printing the last
page of a print job that does not end with a command to
print the page. When a print timeout occurs, the printer
prints the data in the print buffer.
0 : No timeout.
JOB MENU
Item Values and Functions

US I N G OP E R AT O R PA N E L
3.13
PAP.TYPE
MENU CLR
NORMAL (Factory Default)
THICK
WET
TRANSP.
The PAP.TYPE setting lets you specify the type of print
material
installed in each tray.
Select NORMAL if the printer material is plain paper.
Select THICK if the printer material is thick paper, high
cotton paper or envelopes.
Select WET if printer material is thin paper(60g)
and the air is humid.
Select T R A N S P . if printer material is tra n s p a r e n c i e s .
(if the TRAY menu is MP or Manual) you select this va l u e .
SMET
(Samsung Memory
Enhancement
Technology)
ON (Factory Default)
OFF
This setting makes the printer process more data by
optimizing the memory.
If the value is set to ON, the complex data can be
processed.
When you select MENU CLR, the printer resets to the
factory default setting for each menu item.
JOB MENU
Item Values and Functions

US I N G OP E R AT O R PA N E L
3.14
JOB MENU
DUP.TOP 5.0 (Factory Default)
0~9.9mm (In increments of 0.1)
This item lets you select the top margin of the print
materials when the Duplex menu item is set to Long.
DUP.LEFT 5.0 (Factory Default)
0~9.9mm (In increments of 0.1)
This item lets you select the left margin of the print
materials when the Duplex menu item is set to Long.
S-BIND 0 (Factory Default)
0~22mm (In increments of 1)
This item lets you select the left margin for the binding
when short edge duplexing.
L-BIND 0 (Factory Default)
0~22mm (In increments of 1)
This item lets you select the left margin for the binding
when long edge duplexing.
FUSER CLEAN If there happens random dirty spots on the back side of
paper, Select FUSER CLEAN.
It cleans fuser contamination.
Item Values and Functions

US I N G OP E R AT O R PA N E L
3.15
Use the TEST MENU to print a variety of listings relating to available
printer resources, printer settings and print jobs.
SELFTEST Select SELFTEST to print a configuration page. This
menu item lets you make sure the printer is operating
correctly. For more information, see page 2.11.
DEMOPAGE Select DEMOPAGE to print the standard demonstration
page.
Use the PCL MENU to change printer settings that only affect jobs
printed using the PCL emulation printer language.
FONTLIST
SYMBOL
You can print a font sample list showing all
the fonts available for PCL emulation.
TYPEFACE PCL 1 ~ PCL 54
PCL 1 (Factory Default)
ROMAN 8
DESKTOP
.
.
PC8 (Factory Default)
List of symbol set name
ASYMBOL set is a set of alphabetic and numeric
characters, punctuation, and specific symbols used when
printing with a selected font.
In PCL emulation, a symbol set also defines which
character will be print for each key on the keyboard (or
more specifically, for each code point).
TEST MENU
PCL MENU
Item Values and Functions
Item Values and Functions

US I N G OP E R AT O R PA N E L
3.16
PCL MENU
LINES 5 ~ 128
60 (Factory Default : USA, Canada)
64 (Factory Default : Others Country)
Use the LINES menu item to change the number of lines
that print on each page.
The setting can range from 5 to 128 lines per page.
The printer sets the amount of space between each line
based on the Lines, Paper size, and Orientation settings.
PITCH 0 . 4 4~ 9 9 . 9 9
10.00 (Factory Default)
If you chose a scalable monospaced font, you can select
the font pitch.
PITCH refers to the number of fixed - space characters
in a horizontal inch of type.
You can select from 0 . 4 4 to 9 9 . 9 9 characters per inch
in increments of 0 . 0 1 cpi.
PT.SIZE You can select the character size for the font.
PITCH or PT.SIZE appears according to the value of
TYPEFACE.
COURIER REGULAR (Factory Default)
DARK
Item Values and Functions

US I N G OP E R AT O R PA N E L
3.17
This menu is only available if the Serial/LocalTalk option card is installed in
your printer.
BAUDRATE This setting lets you select the rate at which data is
being sent to or from your computer.
Setting the COM Port and printer setting at
anything higher that 19200 bps will create
unexpected errors in DOS mode.
3 0 0 ~ 1 1 5 2 0 0
9 6 0 0 (Factory Default)
ROBU.XON ON(Factory Default)
OFF
I/O MENU
FONT LIST
prints the font list showing all the fonts available for
Po s t S c r i p t .
PS.ERROR ON
OFF (Factory Default)
determines what action the printer should take when an
error occurs in PS interpreter. When set to O F F , the
printer does not print error information when error
occurs in PS interpreter. When set to O N , the printer
prints error information when error occurs in PS inter-
p r e t e r.
PS3 MENU
Item Values and Functions
Item Values and Functions
US I N G OP E R AT O R PA N E L
3.18
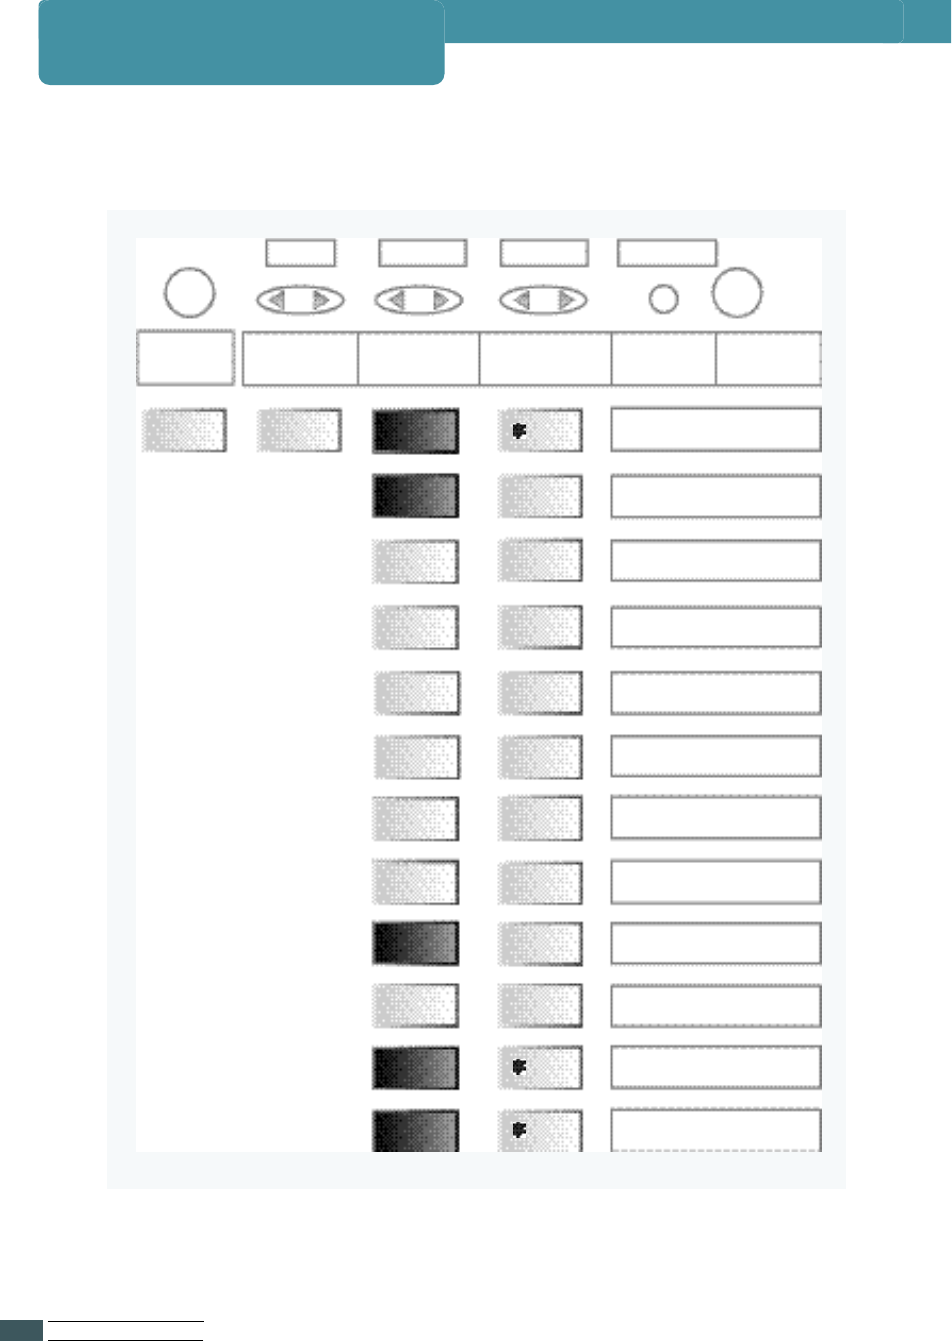
This menu is only available if the Network option card is installed in your printer.
Menu Item Value
E n t e r / C a n c e l
On Line
Pressing
On Line/Continue
OFFLINE NETWORK
MENU RESET NIC
CFG NET
LPD
APL TALK
UPDATE
BOOT SVR
FACTORY
DEFAULT
PRINT
NET CFG
TCP/IP
CFG TCP
NETWARE
CFG NWAR
NO
ON
NO
ON
ON
ON
NO
NO
UNIX
The PortThru card is re s e t
Select YES or NO
Select ON or OFF for enabling
Select YES or NO
Select ON or OFF for LPD printing
Select ON or OFF for enabling
Select ON or OFF for IPX/SPX
Select YES or NO
Select YES or NO or for upgrading
Select Unix or Windows
Select for Factory Default settings
Select for test printing
P r essing Menu cycles
f o r w a rd or backward Pressing Item cycles
forward backward Pressing Value cycles
forward backward Pressing
Enter/Cancel Pressing
On Line/Continue
On Line
NETWORK MENU

US I N G OP E R AT O R PA N E L
3.19
RESET NIC
CFG NET
The PortThru card is reset.
TCP/IP ON
OFF
This menu item lets you enable TCP/IP.
CFG TCP YES
NO
This menu item lets you configure TCP/IP.
LPD ON
OFF
This menu item lets you print using LPD.
APL TALK
NETWARE ON
OFF
You can configure the printer server for IPX/SPX
configuration parameters, and FRAME. When you set it to
ON, you may select the Frame Type.
DHCP
CFG ADRS
BOOTP
RARP
YES
NO
You can configure the print server for TCP/IP configura-
tion parameters, DHCP, CFG ADRS, BOOT P, and RARP.
When you enable TCP/IP protocol, you have to select one
of the IP Address assignment methods, DHCP, CFG
A D R S , BOOT P, RARP. In case of DHCP, RARP, BOOT P, yo u
need to configure the serve r. In case of CFG ADRS, yo u
h ave to enter the IP address, Subnet mask, Default
G a t e way manually.
YES
NO
This menu item lets you configure network settings.
NETWORK MENU
Item Values and Functions
ON
OFF
When you set APL TALK to OFF, this PortThru can not be
detected by Macintosh systems.

US I N G OP E R AT O R PA N E L
3.20
CFG NWAR
AUTO
EN-8023
EN-II
EN-8022
EN-SNAP
YES
NO
This menu item lets you configure IPX/SPX configuration
parameters.
UPDATE YES
NO
You need to set the server that provides the upgrade file.
You can set it to UNIX or WINDOWS. After setting the server
for update, you should reset printer. Upgrade process will be
done.
FACTORY
DEFAULT You can reconfigure the PortThru card to the factory
default value for each menu item. After selecting this
menu, make sure that you reset printer.
PRINT NET CFG
Select this menu item to print configuration pages.
BOOT SVR UNIX
WINDOWS
If you want to set UNIX to the server that provide the
upgrade file,
you have to save the file to be upgraded to it and configure
the file name and path to bootptab of it. If you want to set
WINDOWS to the server that provides the upgrade file, you
have to enter the IP address of the server that has the
upgrade file.
ON
OFF
These items are the frame type for IPX/SPX protocol.
You can select one of these. If you don’t set any value,
Auto(default value) which switches the frame types
automatically is used.
NETWORK MENU
Item Values and Functions

US I N G OP E R AT O R PA N E L
3.21
To reset PortThru
1Press On Line/Continue.OFFLINE appears on the display.
2Press Menu until NETWORK MENU appears on the display.
3Press Item until RESET NIC appears on the display.
4Press Enter and READY appears on the display.
To configure network settings for PortThru.
1Press On Line/Continue.OFFLINE appears on the display.
2Press Menu until NETWORK MENU appears on the display.
3Press Item until CFG NET appears on the display.
4Press Value until YES appears on the display.
5
Press E n t e r and you can configure following network settings now.
6
Skip this step if you don’t want to configure TC P / I P. Press Item until
TCP/IP appears on the display.
aPress Value until ON appears on the display.
bPress Enter and PortThru can use TCP/IP
for communicating.
cPress Item until CFG TCP appears on the display.
dPress Value until YES appears on the display.
ePress Enter and you can select the IP address assign
ment method.
fPress Item until the IP address assignment method
you want appears on the display.
gTake the YES by pressing the Value button.
hPress Enter.
iSkip this step if you don’t select CFG ADRS as the IP address
assignment method. Enter the IP address,
Subnet mask, Default gateway by using Item,
Value and Enter buttons.
NETWORK MENU
Resetting PortThru
Configuring Network setting for PortThru

US I N G OP E R AT O R PA N E L
3.22
7Skip this step if you don’t want to use LPD. LPD appears only if
TCP/IP is ON. Press Item until TCP/IP appears on the display.
aPress Value until ON appears on the display.
bPress Enter.
cPress Item until LPD appears on the display.
dTake the ON by pressing the Value button.
ePress Enter and PortThru can print using LPD.
8Skip this step if you don’t want to use AppleTalk protocol.
Press Item until APL TALK appears on the display.
aTake the ON by pressing the Value button.
bPress Enter and PortThru can communicate with AppleTalk
protocol.
9Skip this step if you don’t want to use IPX/SPX protocol.
Press Item until NETWARE appears on the display.
aPress Value until ON appears on the display.
bPress Enter.
cSkip this step not to configure IPX/SPX. Press Item until CFG
NWAR appears on the display. Take the YES by pressing the
Value button, then Press Enter.
dPress Item until the frame type you want to use appears on
the display.
eTake the ON by pressing the Value button.
fPress Enter.
NETWORK MENU

US I N G OP E R AT O R PA N E L
3.23
To upgrade the firmware of your PortThru.
1Press On Line/Continue.OFFLINE appears on the display.
2Press Menu until NETWORK MENU appears on the display.
3Press Item until UPDATE appears on the display.
4Take the YES by pressing the Value button.
5Press Enter.
6If Unix is the server that provides the upgrade file, go to
step 7. Otherwise go to step 8.
7In case of Unix server:
aPress Item until BOOT SVR appears on the display.
bPress Value until UNIX appears on the display.
cGo to step 9.
8In case of Windows server: This step should be done after
executing the section Upgrading Firmware In Abnormal
Cases in see page 3.26.
aPress Item until BOOT SVR appears on the display.
bPress Value until WINDOWS appears on the display.
cEnter the IP address of the server to provide upgrade file
by using Item,Value and Enter button.
9Reset printer and the firmware will be upgraded.
Upgrading Firmware
NETWORK MENU

NETWORK MENU
US I N G OP E R AT O R PA N E L
3.24
Restoring Factory Defaults
To restore factory default settings to the printer.
1Press On Line/Continue.OFFLINE appears on the display.
2Press Menu until NETWORK MENU appears on the display.
3Press Item until FACTORY DEFAULT appears on the display.
4Press Enter.
5Reset printer and all settings will be reset to factory defaults.
Printing Test Pages
You can use the Front Panel to print out important information
pages describing PortThru settings.
1Press On Line/Continue.OFFLINE appears on the display.
2Press Menu until NETWORK MENU appears on the display.
3Press Item until PRINT NET CFG appears on the display.
4Press Enter and the test pages will be printed out.
US I N G OP E R AT O R PA N E L
3.25
NETWORK MENU
Setting Unix as BOOTP server
1There must be a BOOTP server present in the network
environment in which the network printer is present.
2
On the BOOTP server the / e t c / b o o t p t a b file must be created and an
entry for the boot parameters must be made in the file as follows:
(Please check with your system manual).
npc:\
:pc:\
:ht=ether:\
:ha=000070414243:\
:sm=255.255.255.0:\
:gw=200.160.251.47:\
:lg=200.160.251.51:\
:sa=200.160.251.52:\
:hn:
:ip=200.460.251.18:\
:bf=”/test/Firmwareup”.\
:vm=rfc1048:
:ht=hardware type, ha=hardware add, image:download file name
Upgrading the Firmware
1Set UPDATE to YES in the Network menu on the printer front panel.
2Set BOOT SVR to UNIX.
3Reset the printer.
4It may take 3 minutes to reboot the printer.
Rebooting time depends on network traffic.
Upgrading the Firmware in a Unix Environment
Notes
• Firmware upgrading requires Tftp protocol.
Check whether Tftp daemon is installed in advance.
• Setting IP Address Assignment Method to
DHCP is recommended in order to execute
Firmware upgrading.

US I N G OP E R AT O R PA N E L
3.26
NETWORK MENU
A ny error in the process of upgrading may result in disabling
PortThru. In this case, perform the following steps.
In SyncThru
1Select the Upgrade Firmware menu item under
the Maintenance menu in SyncThru.
2You can see the Choose the Upgrade Firmware File dialog box.
3Check the Wait Printer Request check box.
4Select the Firmware file Name you downloaded and its path,
and then click Start.
5
You will see the message ”Please set the values through
the FRONT Panel to initiate FLASH Upgra d e ”. Click O K.
Select the After this procedure, move to printer which yo u
want to update and do as following procedure.
In Front Panel of the printer
6
Press On Line. O F F L I N E appears on the display.
7
Press M e n u until NETWORK MENU appears on the display.
8
Press I t e m until UPDATE appears on the display.
9
Ta k e the Y E S by pressing the V a l u e b u t t o n .
10
Press E n t e r / C a n c e l.
11
Press I t e m until BOOT SVR appears on the display.
12
Press V a l u e until WINDOWS appears on the display.
13
Press E n t e r / C a n c e l .
Upgrading the Firmware in Abnormal Cases

US I N G OP E R AT O R PA N E L
3.27
14
Set the IP address of the WINDOWS pc running Sy n cT h r u
in step1. For example, if the IP address is
155.213.211.12, do as following steps.
a
Press I t e m until SV-IP B1 appears on the display.
b
Press V a l u e until 1 5 5 appears on the display.
c
Press E n t e r / C a n c e l .
d
Press I t e m until SV-IP B2 appears on the display.
e
Press V a l u e until 2 1 3 appears on the display.
f
Press E n t e r / C a n c e l .
g
Press I t e m until SV-IP B3 appears on the display.
h
Press V a l u e until 2 1 1 appears on the display.
i
Press E n t e r / C a n c e l .
j
Press I t e m until SV-IP B4 appears on the display.
k
Press V a l u e until 1 2 appears on the display.
l
Press E n t e r / C a n c e l .
15
Reset printer and the firmware will be upgra d e d .
NETWORK MENU
Notes
After the ”Completed. Network Card will start about
30secs later” message is displayed on Sy n cThru,
click OK. It may take a few seconds to write the new
file to Firmware. Normally 30 seconds is sufficient.

Print Media
This chapter will help you understand what kind of paper
you can use with the ML-7300 series printer and how to
properly load paper in the different paper trays for the best
print quality.
Topics included in this chapter are:
◆Loading Paper
◆Printing on Envelopes
◆Printing on Label
◆Printing on Transparencies
4
4
PR I N T ME D I A
4.1
Loading Paper
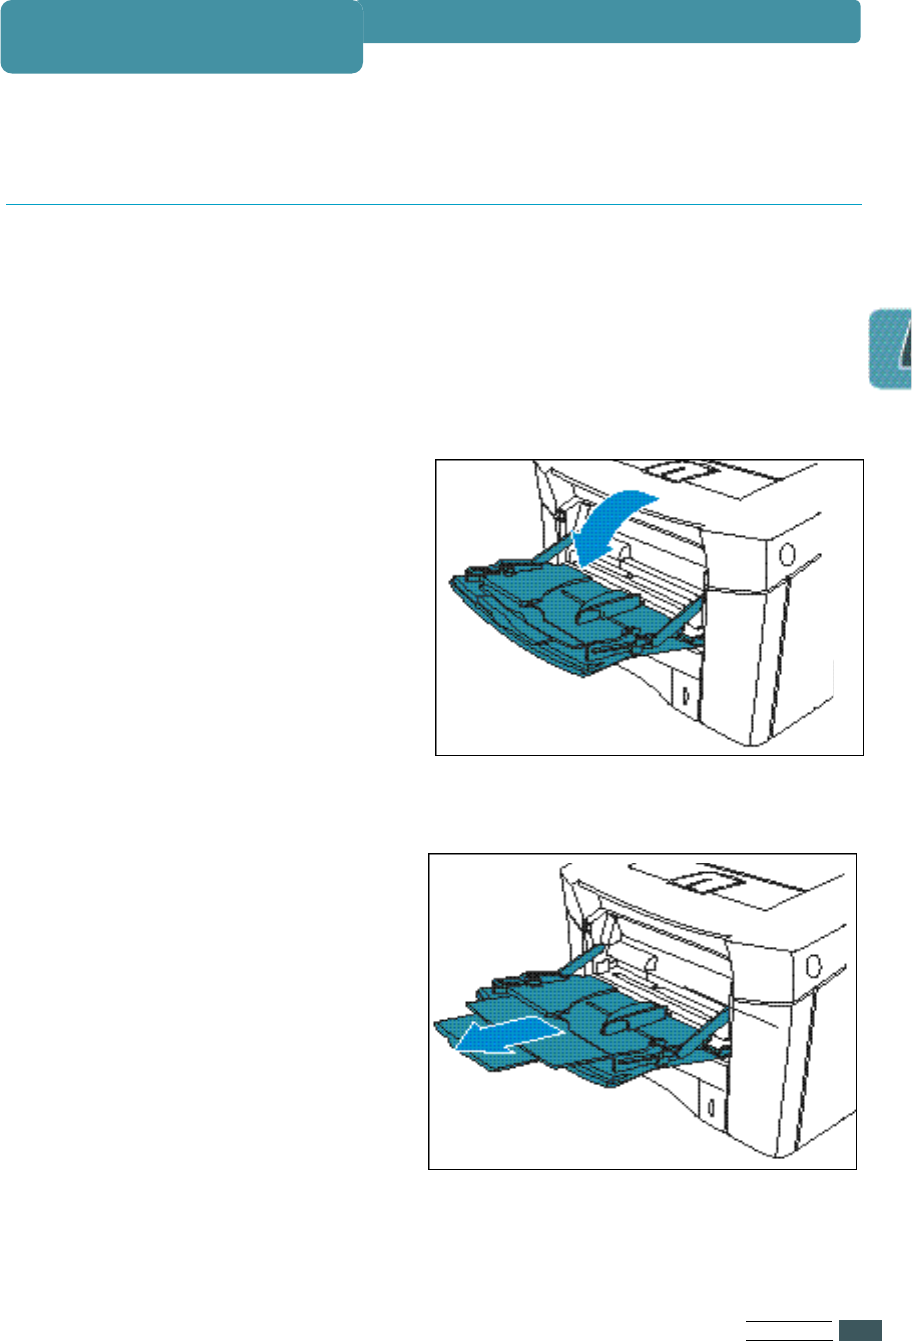
Multi-Purpose tray provides a convenient way to print envelopes, transparencies,
or other type of media without having to unload the other tray.
To load paper in the Multi-Purpose tray, proceed as follows.
Using the Multi-Purpose Tray
1Pull the Multi-Purpose tray
t o wards yo u .
2Slide the length guide out
t o ward yo u .
PR I N T ME D I A
4.2
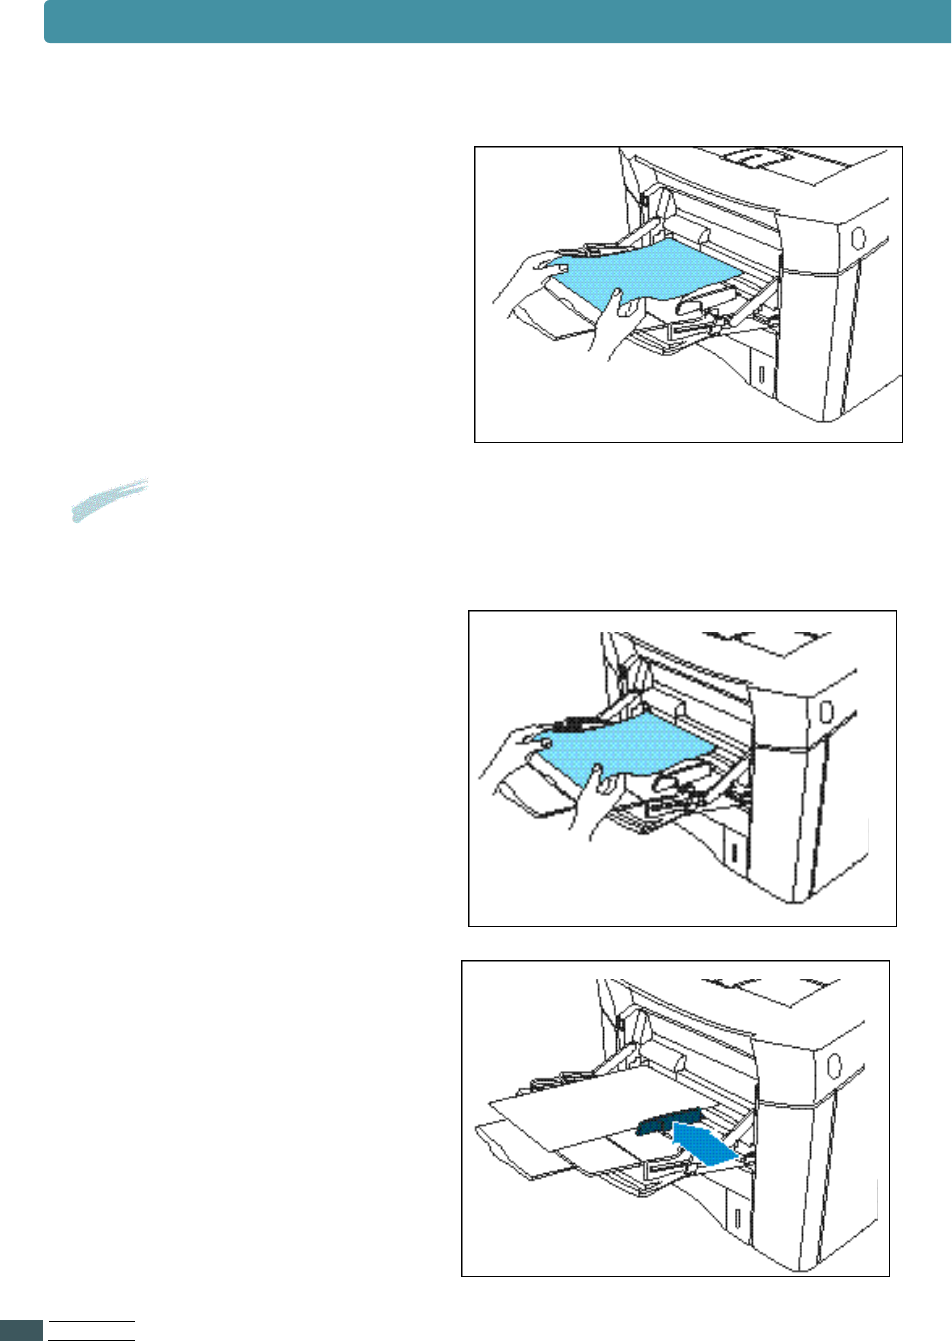
Notes • Do not fold or crease the paper.
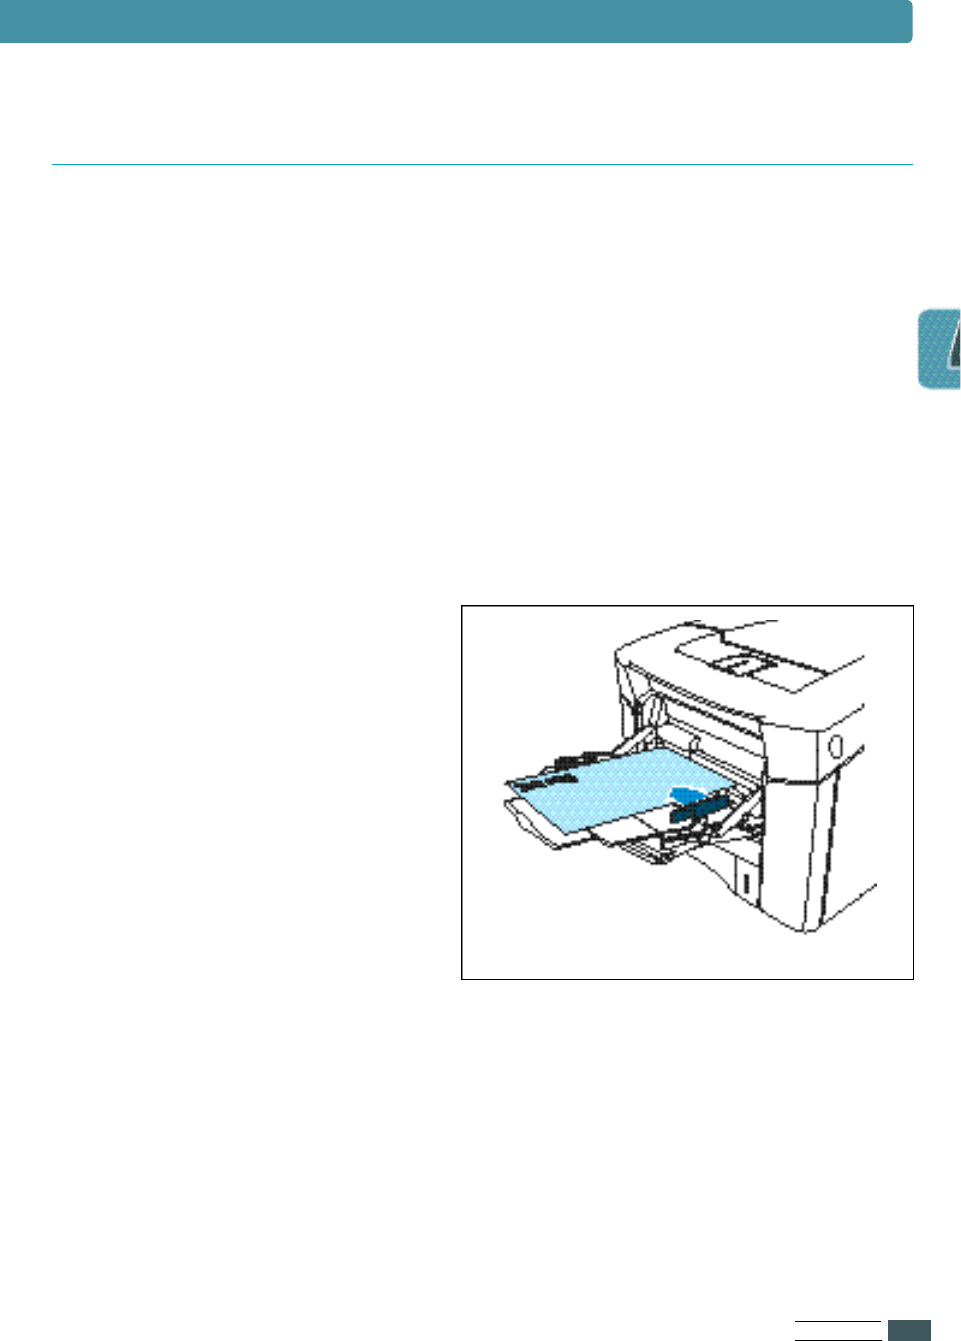
• Place the paper with the recommended print side face up.
3Flex the sheets back and forth
to loosen them, then fan them.
4Place the paper against the side
of the Multi-Purpose tray with
the recommended print side
face up and the top edge going
in first toward the printer as
s h o w n .
5Adjust the paper guide to the
s i ze of the paper inserted by
pushing the guide.
Loading Paper
PR I N T ME D I A
4.3
1Select Manual as the paper source.
•Set the source item in the properties dialogue box to Manual.
•You can select Manual as the paper source by setting the Tray item
of the operator panel menu.
2Print your document.
3Place a sheet of paper in the
Multi-Purpose tray.
4Press continue key when you are
prompted.
The Manual Feed feature allows you to print on special paper from
Multi-Purpose tray such as envelopes or letterhead.
If the Tray menu item is set to Manual, the printer will print only from
Multi-Purpose tray.
Manual Feed is selected through the software or printer driver too.
Loading Paper
Manually Feeding Paper from Multi-Purpose Tray
PR I N T ME D I A
4.4
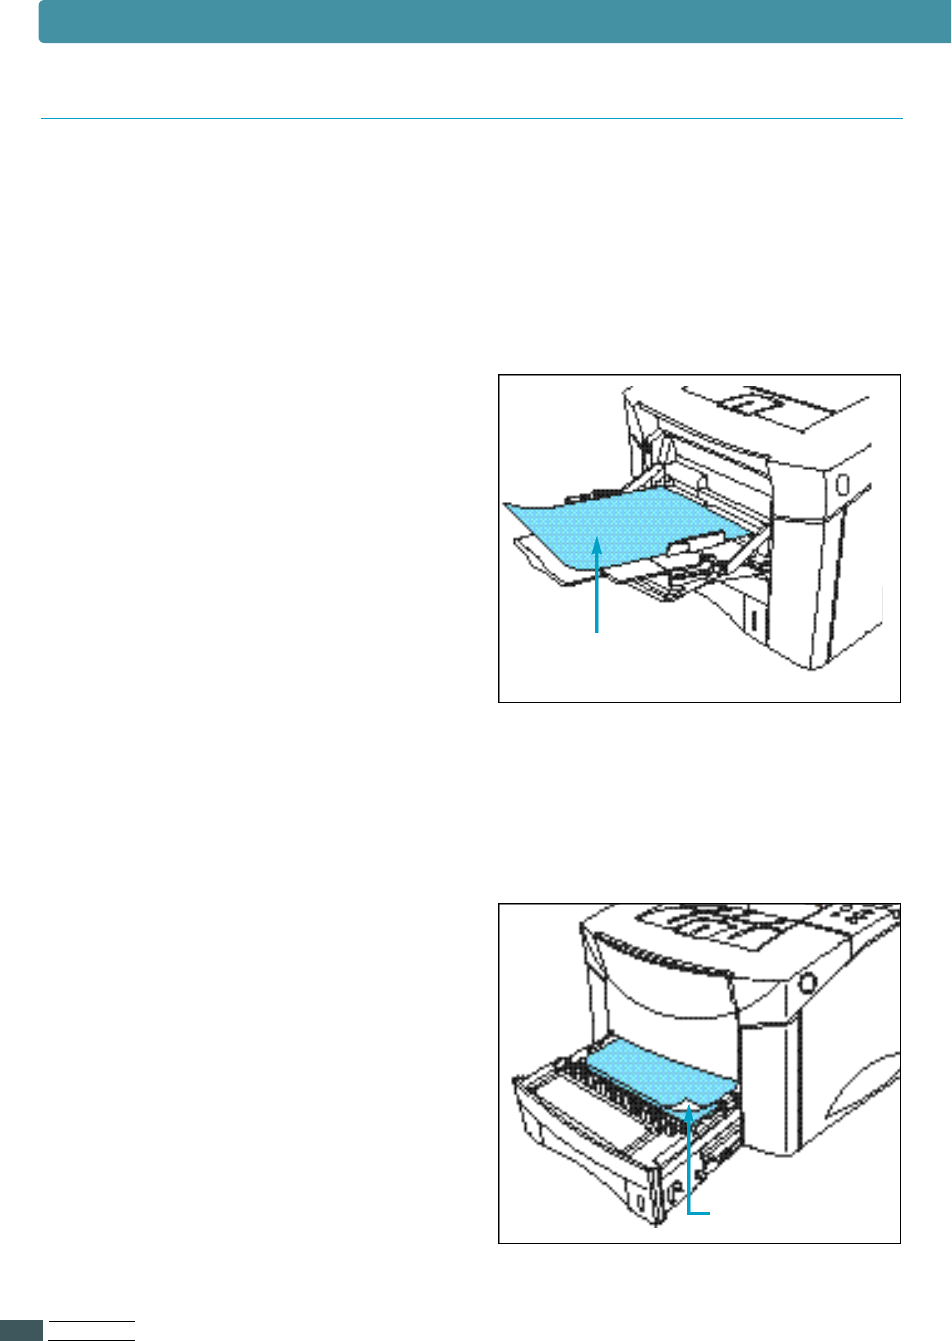
For Multi-Purpose tray,
load the paper with the side-to-be-
printed facing up, and the top, short
edge toward the printer.
• Set the source item in the
properties dialogue box to
Manual or MP.
- To print continuously from
Multi-Purpose tray,
set the source item to MP.
- To print a sheet of paper from
Multi-Purpose tray,
set the source item to Manual.
For All other trays,
load paper with the side-to-be-printed
facing down, and the top, short edge
t o ward yo u .
Loading Paper
Letterhead / Prepunched Paper
Printing Side(down)
Printing Side(up)
Special paper includes letterhead, prepunched, envelopes, labels,
and tra n s p a r e n c i e s .
When printing letterhead, prepunched paper, it is important to load the trays
with the correct orientation.
PR I N T ME D I A
4.5
Many types of envelopes can be printed from Multi-Purpose tray.
The types of envelopes are COM-10, MONARCH, DL, C5 and C6(60~90g/m2).
The printer will automatically feed up to 10 envelopes.
Printing performance depends on the construction of the envelope.
Printing information
•Set margins at least 0.6inch(15mm) from the edge of the envelope.
•Always test a few sample envelopes before purchasing large quantities.
•Select THICK paper for better quality.
Envelopes guidelines
For best performance, use envelopes made from 75g/m2(20lb bond) paper.
Do not use envelopes that :
•Are damaged in any way.
•Use metal claps, string ties, metal folding bars.
•Contain windows, holes, cutouts or embossing.
•Have exposed flap adhesive when the flap is in the sealed or closed
position. For envelope specifications, see page Appendix A.4.
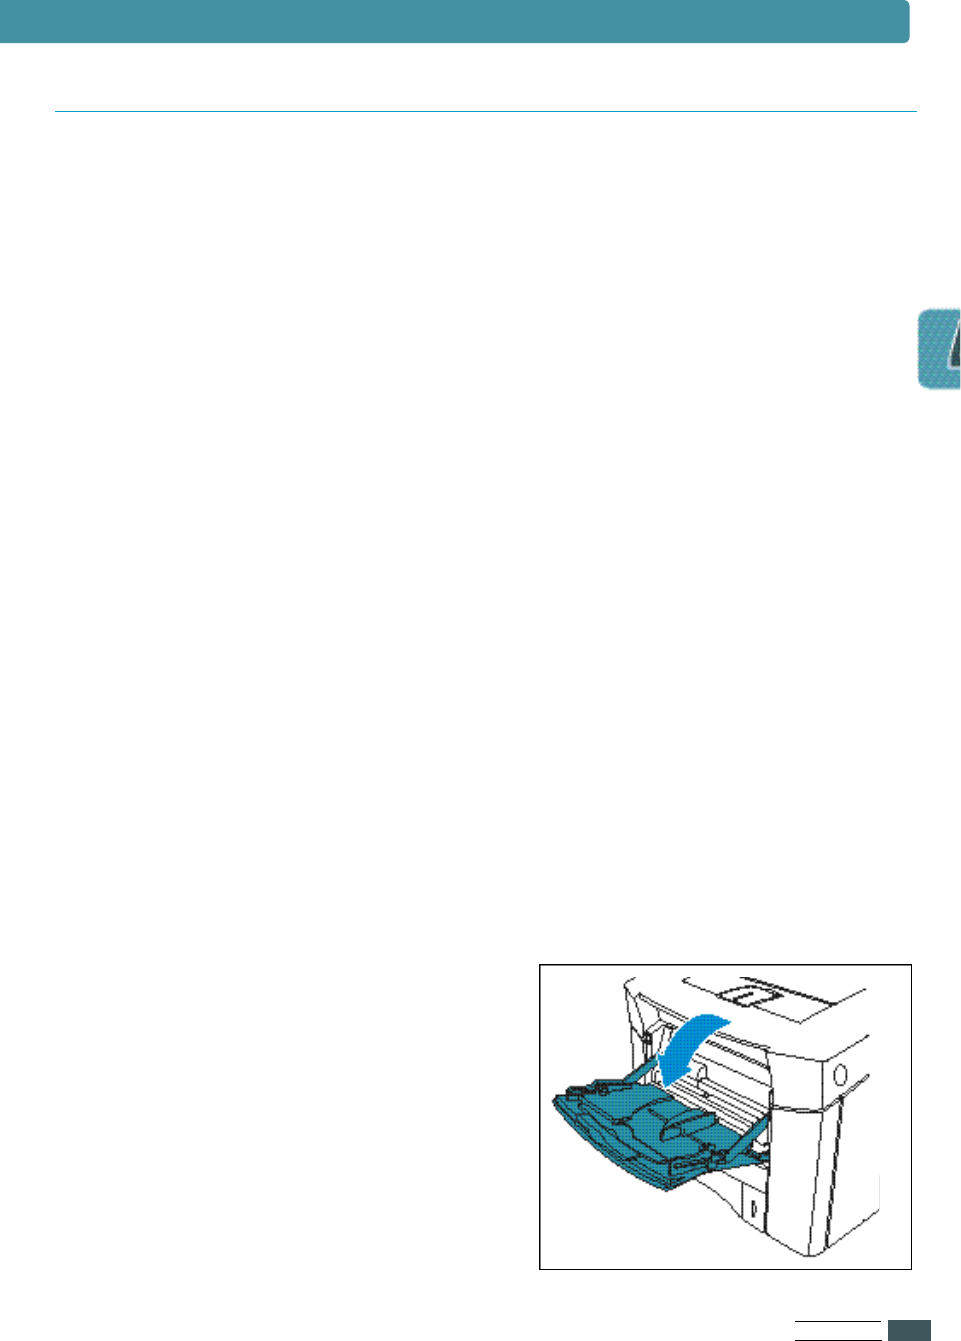
1Open the Multi-Purpose tray.
Pull out the extension.
Envelopes
Loading envelopes
Loading Paper
PR I N T ME D I A
4.6
(Side View)
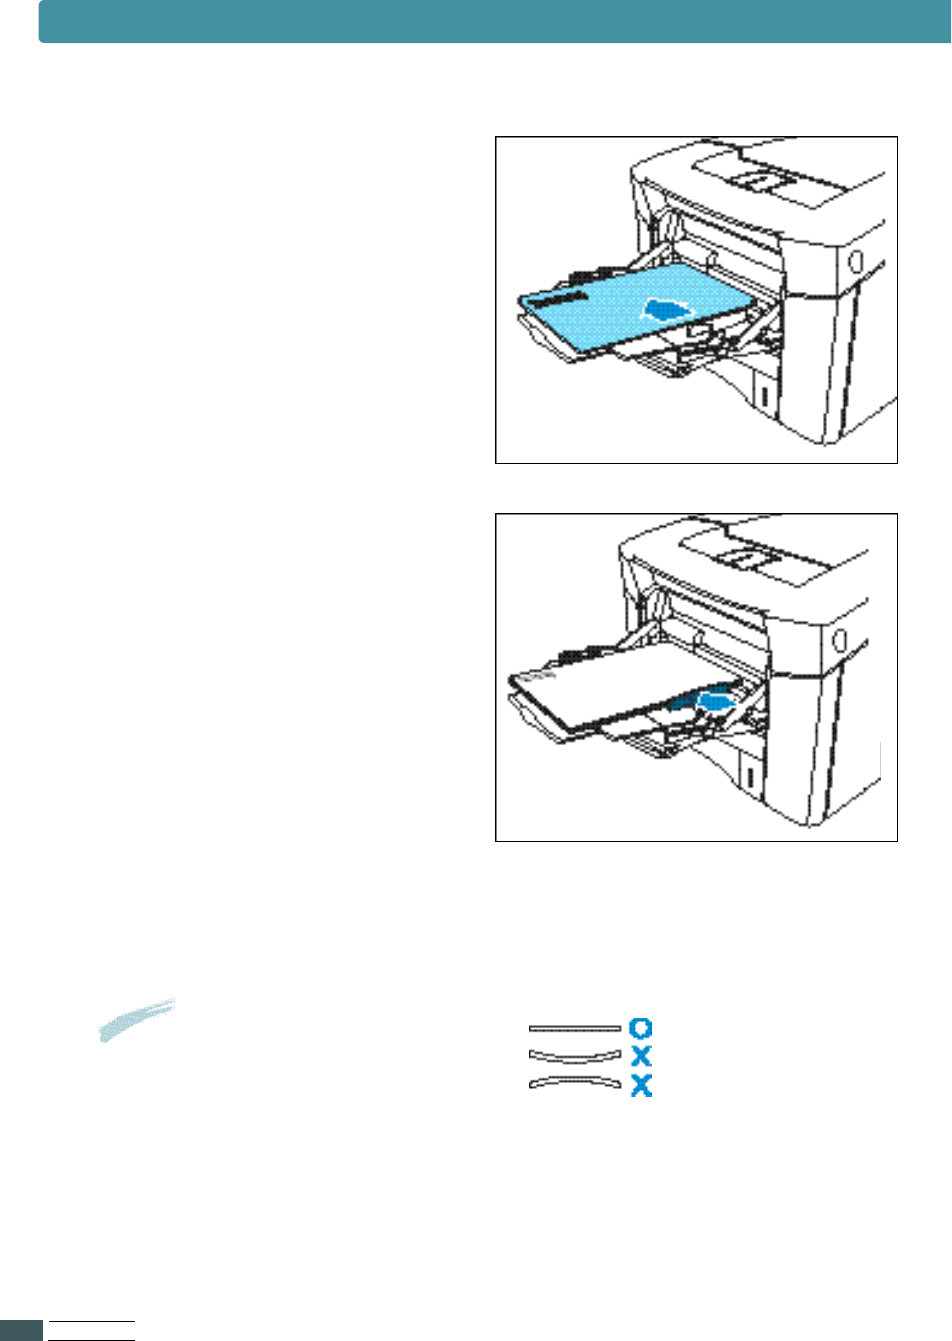
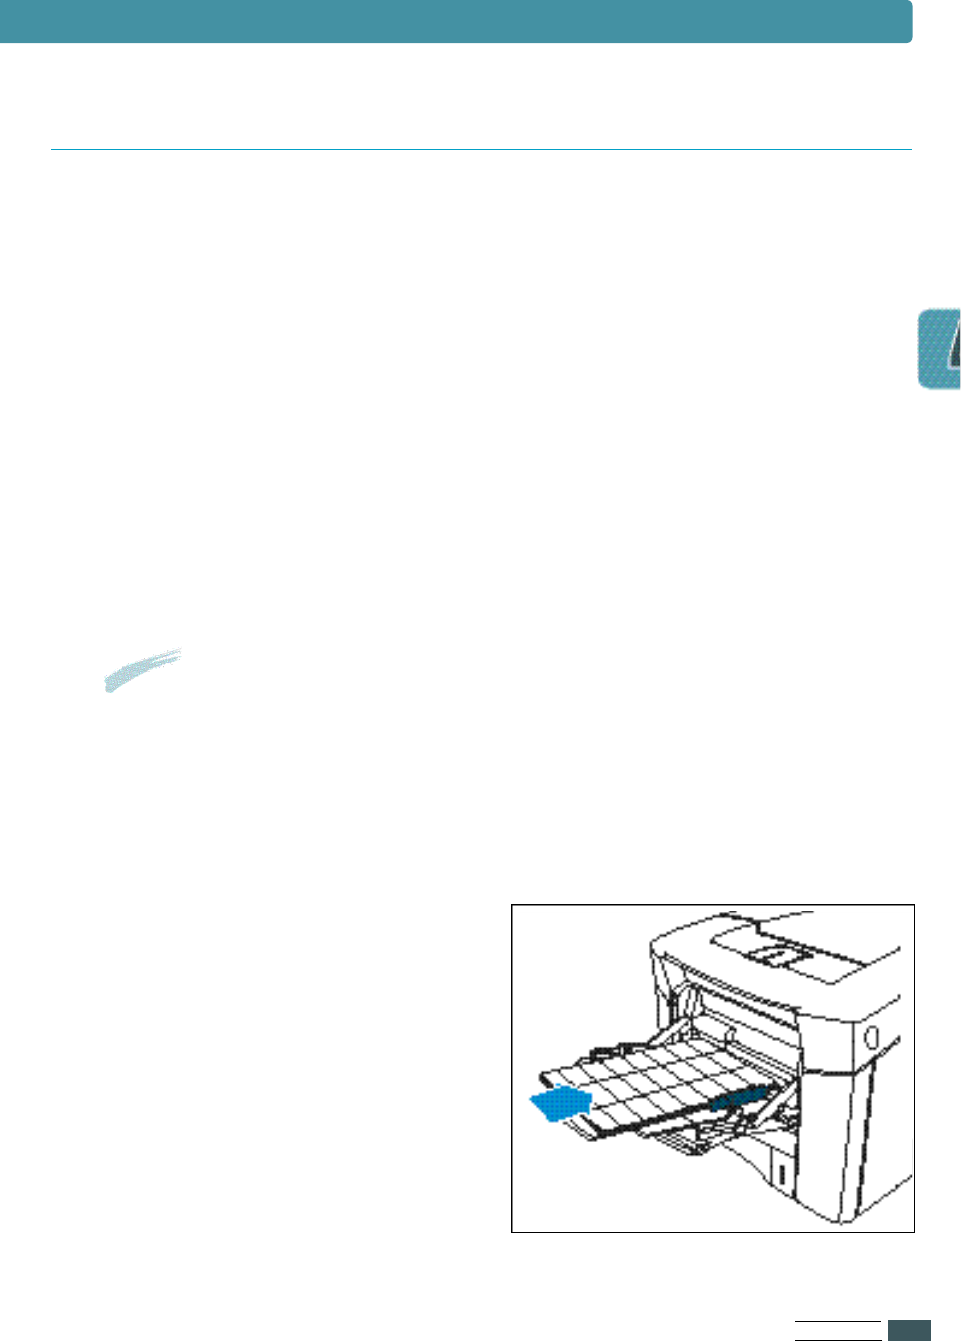
2Load up to 10 envelopes in the
left side of Multi-Purpose tray
with the side-to-be printed
facing up, and the postage-end
t o ward the printer.
3Adjust the guide to touch the
e nvelope stack without bending
the enve l o p e s .
4Set the source item in the properties dialogue box to Manual or MP.
N o t e s Do not use an envelope curled
down side, refer to the figure.
Loading Paper
PR I N T ME D I A
4.7
Labels automatically feed from the Multi-Purpose tray or the other tray s .
Label guidelines
Make sure that labels meet the specifications for the tray you use.
•Use full label sheet. Partial sheets may cause labels to peel off during
printing, resulting in a paper jam.
•The adhesive material should be stable at 400OF(205OC), the printers
maximum temperature.
•Do not use labels that have the backing sheet exposed.
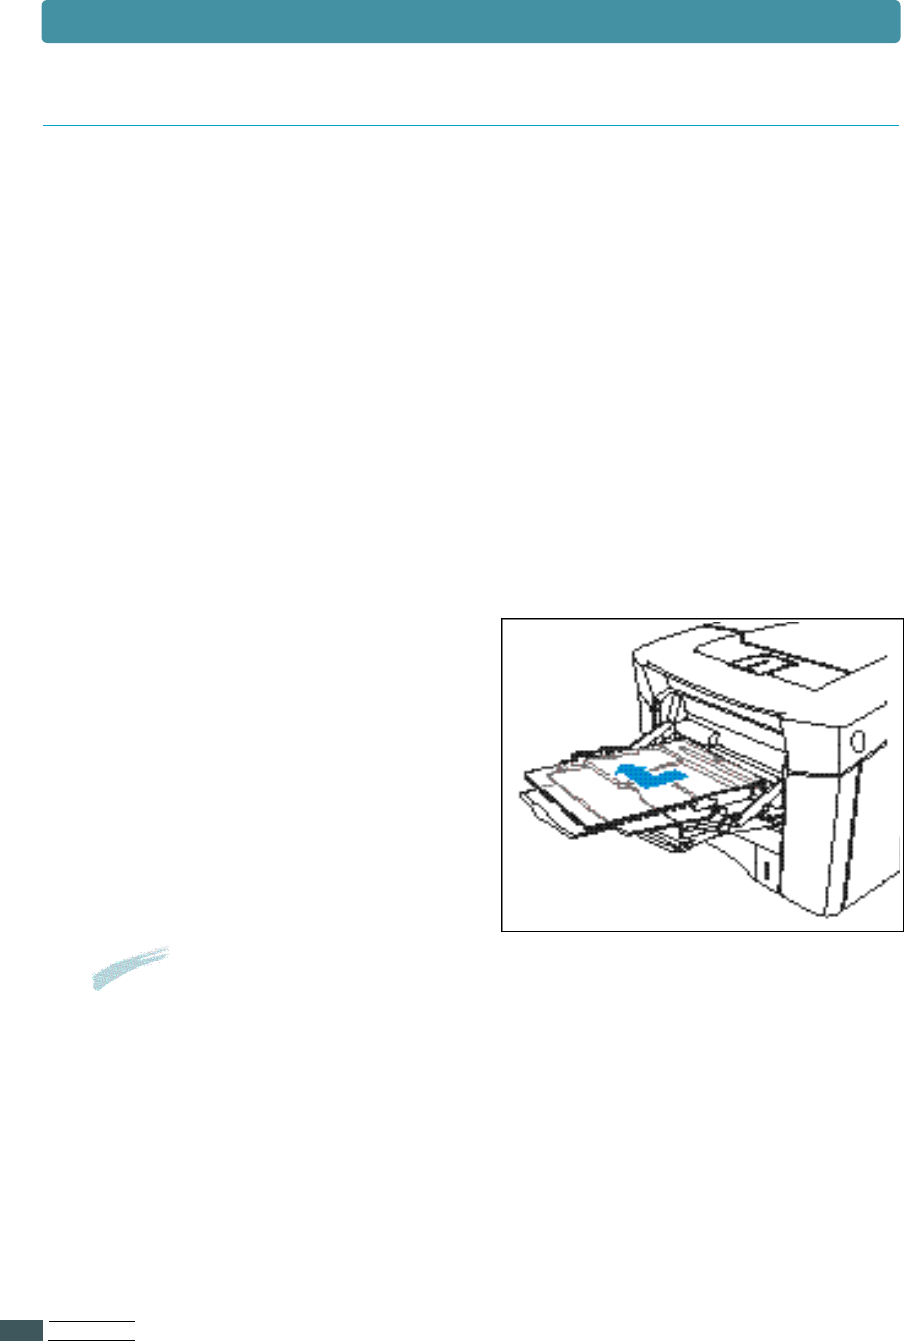
• For Multi-Purpose tray, load the
labels with the side-to-be-printed
facing up, and the short edge
t o ward the printer. Print a stack
of 25 labels from Multi-Purpose
t ray.
Notes
Do not print on both sides of labels.
Loading Paper
L a b e l
Label orientation
PR I N T ME D I A
4.8
• For Multi-Purpose tray, load the
t ransparencies with side-to-be-
printed facing up, and the top
t o ward the printer.
Print a stack of 30 tra n s p a r e n c i e s
from Multi-Purpose tray.
Transparencies automatically feed from the Multi-Purpose tray or the other trays.
Some brand of transparencies may require manual feeding.
The Multi-Purpose tray is a tray that holds the paper of A4 or Letter,
including up to 30 sheets.
Transparencies guidelines
• Use only transparencies recommended for use in laser printers.
• Place transparencies on a flat surface to cool after removing them from
p r i n t e r.
Transparencies orientation
Tr a n s p a r e n c i e s
Notes
• Because transparencies are heavier than paper,
do not load the trays to capacity.
• Remove each transparency from the output bin before
printing another.
Loading Paper

Printing Tasks
5
5
This chapter explains your printing options and give common
printing tasks.
Topics included in this chapter are:
◆
Using Features in the Printer Driver
- With Windows 95/98/NT 4.0/2000
- With Windows 3.1
◆
Using the Printer Driver
- Paper Tab
- Graphics Tab
- Output Tab
- Printer Tab
- Overlay Tab
- Watermark Tab
◆
Printing Both Sides of Paper
PR I N T I N G TA S K S
5.1
Using Features in
the Printer Driver
When you print from software application, many of the printer’s features
are available from the printer driver.
To change the settings from a software application, do the following way.
1Select S t a r t - S e t t i n g s - P r i n t e r s from the Windows task bar.
2Double-Click on the desired printer driver icon.
3Select P r i n t e r - P r o p e r t i e s .
4Click on the appropriate tab.
5Select the required options.
With Windows 95/98/NT 4.0/2000
PR I N T I N G TA S K S
5.2
Using Features in the Printer Driver
1From Program Manager Windows, double-click on the C o n t r o l
P a n e l icon within the Main Program group.
2Double click on the p r i n t e r s icon within the Control Panel
W i n d o w s .
3In the Installed Printers list, click on Samsung ML-7300
(PCL 6 or PCL 5e) if it is not already highlighted.
4Click on the S e t u p b u t t o n .
5Select the required options.
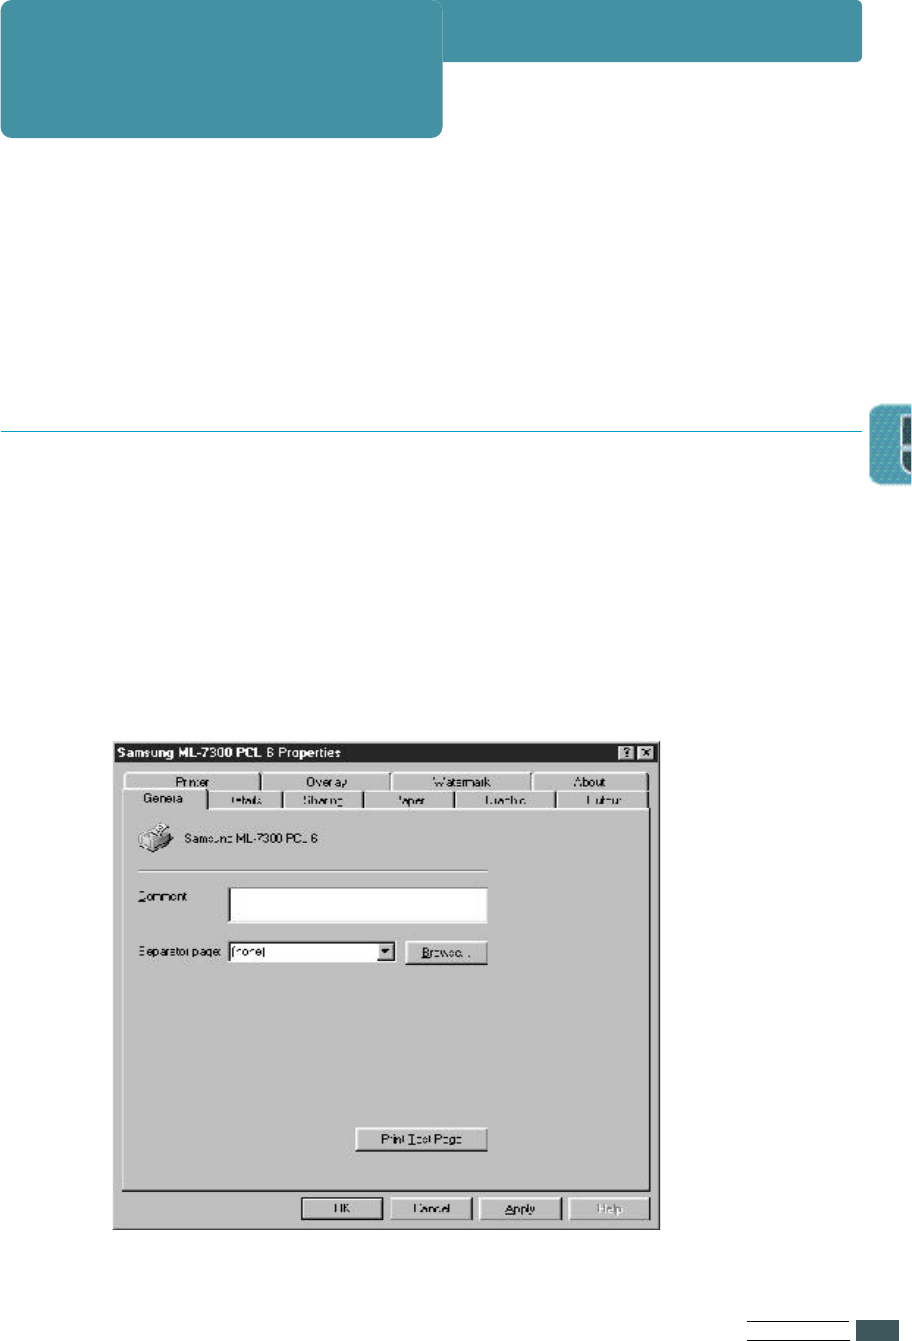
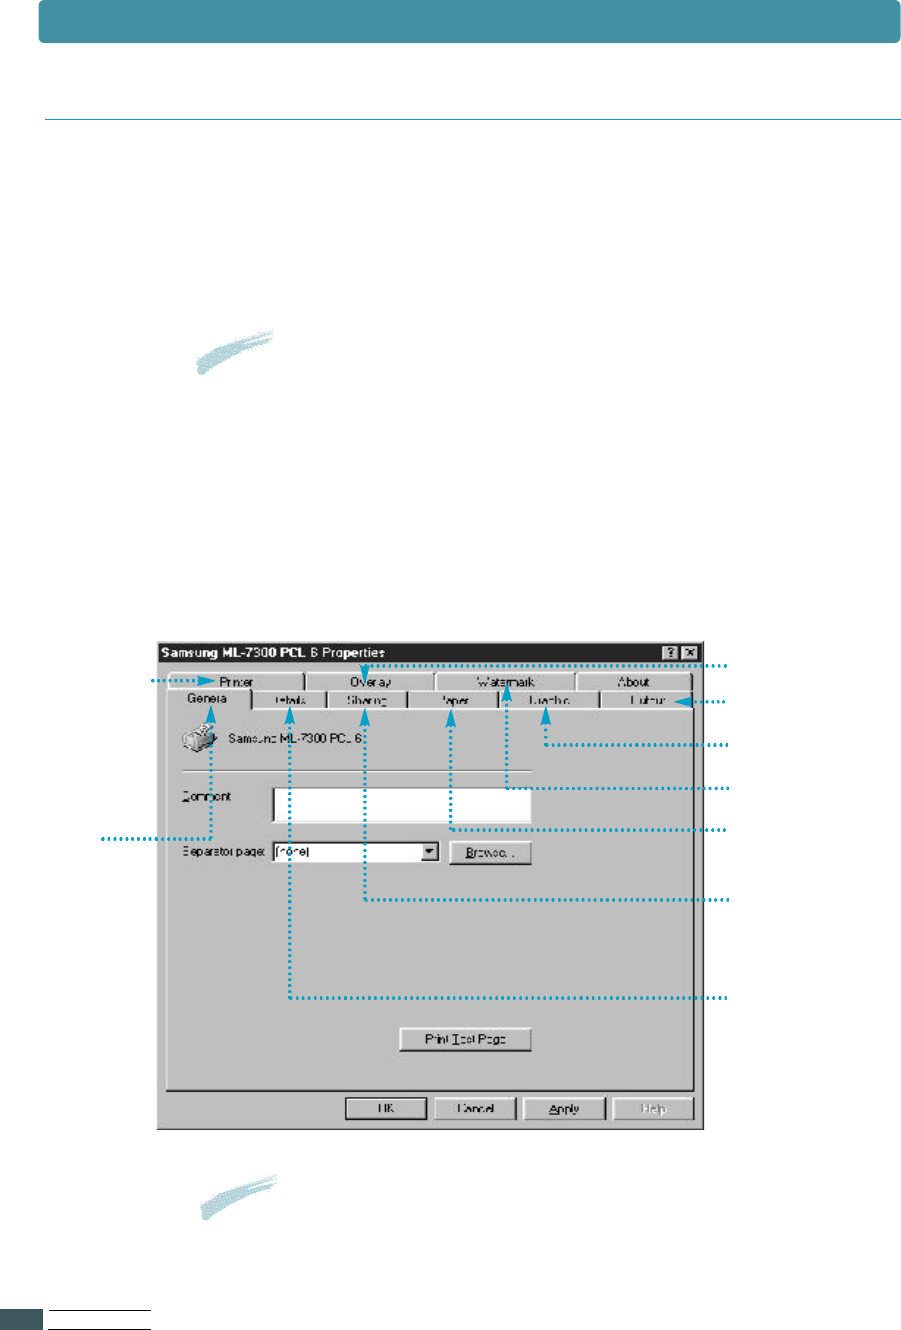
General
You can print a
test page and
view the driver
information.
See page 5.9
Sharing
You can share
the printer.
See page 5.10
Details
You can select
the printer port
and spool setting.
See page 5.7
See page 5.5
See page 5.12
R e s u l t The OFFLINE message appears on the display
and the printer is off-line.
Notes
Changes made from a software application override the user
default setting made from the printer operator panel.
With Windows 3.1
See page 5.3
PR I N T I N G TA S K S
5.3
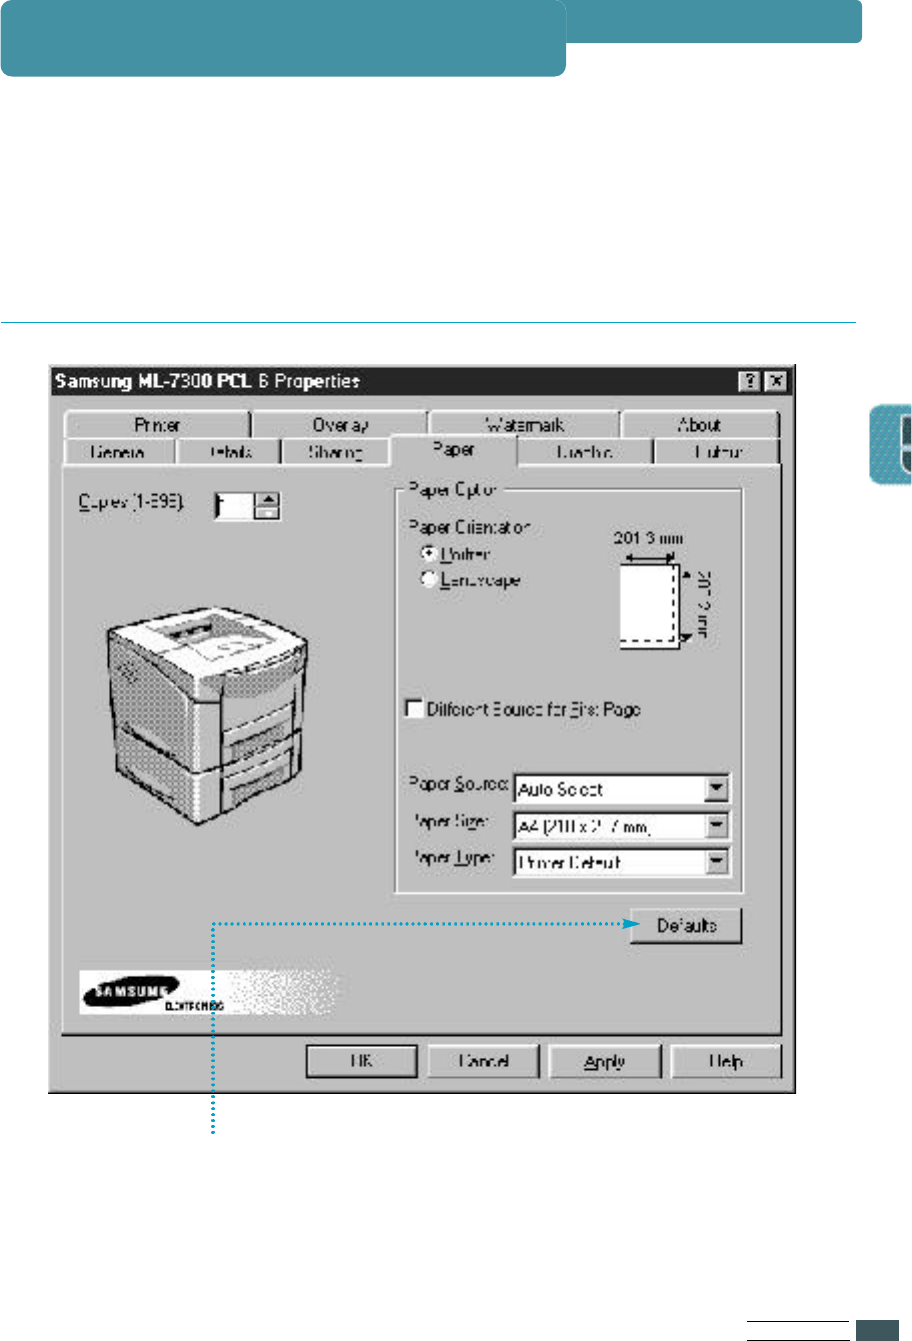
The features of the printer driver are organized under ten tabs :
Click on a tab at the top of the properties window to access one of the nine
dialog boxe s .
Each tab of the properties box is described in this section.
You can restore all the original settings of the PCL 6 printer
d r i ver by clicking Restore Defaults.
Using the Printer Driver
Paper Tab
Using the Printer Driver
PR I N T I N G TA S K S
5.4
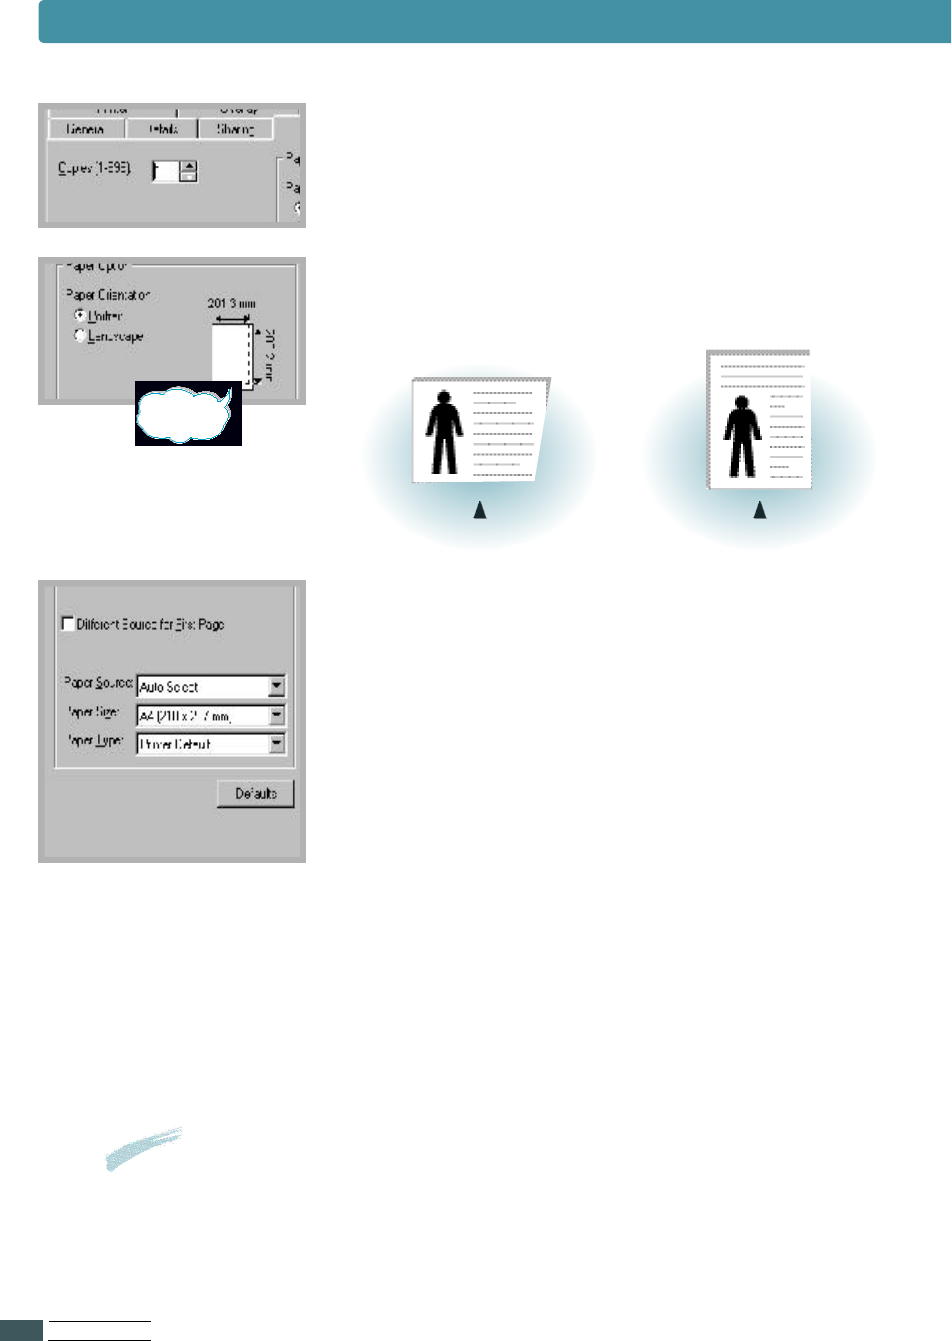
C o p i e s
Use the Copies box to set the number of copies yo u
want to print.
Paper Orientation
Choose Po r t rait or Landscape to select the default
orientation of the printed page.
Different Soruce for First Page
If the box is checked, this feature is enabled and the
dialog box allows you to select the desired paper
source for the Fi r s t Pa g e and Other Pa g e s
i n d e p e n d e n t l y.
If the box is empty, this feature is disabled.
Paper Source
The source setting identifies the default paper tray.
Paper sizes
Use this setting to select the paper size .
Paper type
The Paper type setting lets you specify the type of
print material installed in each tray.
L a n d s c a p e P o r t r a i t
printable
a r e a
Important
If you want to know more about each menu, click on the Help button.
The help screen gives detailed information about each menu.
PR I N T I N G TA S K S
5.5
Using the Printer Driver
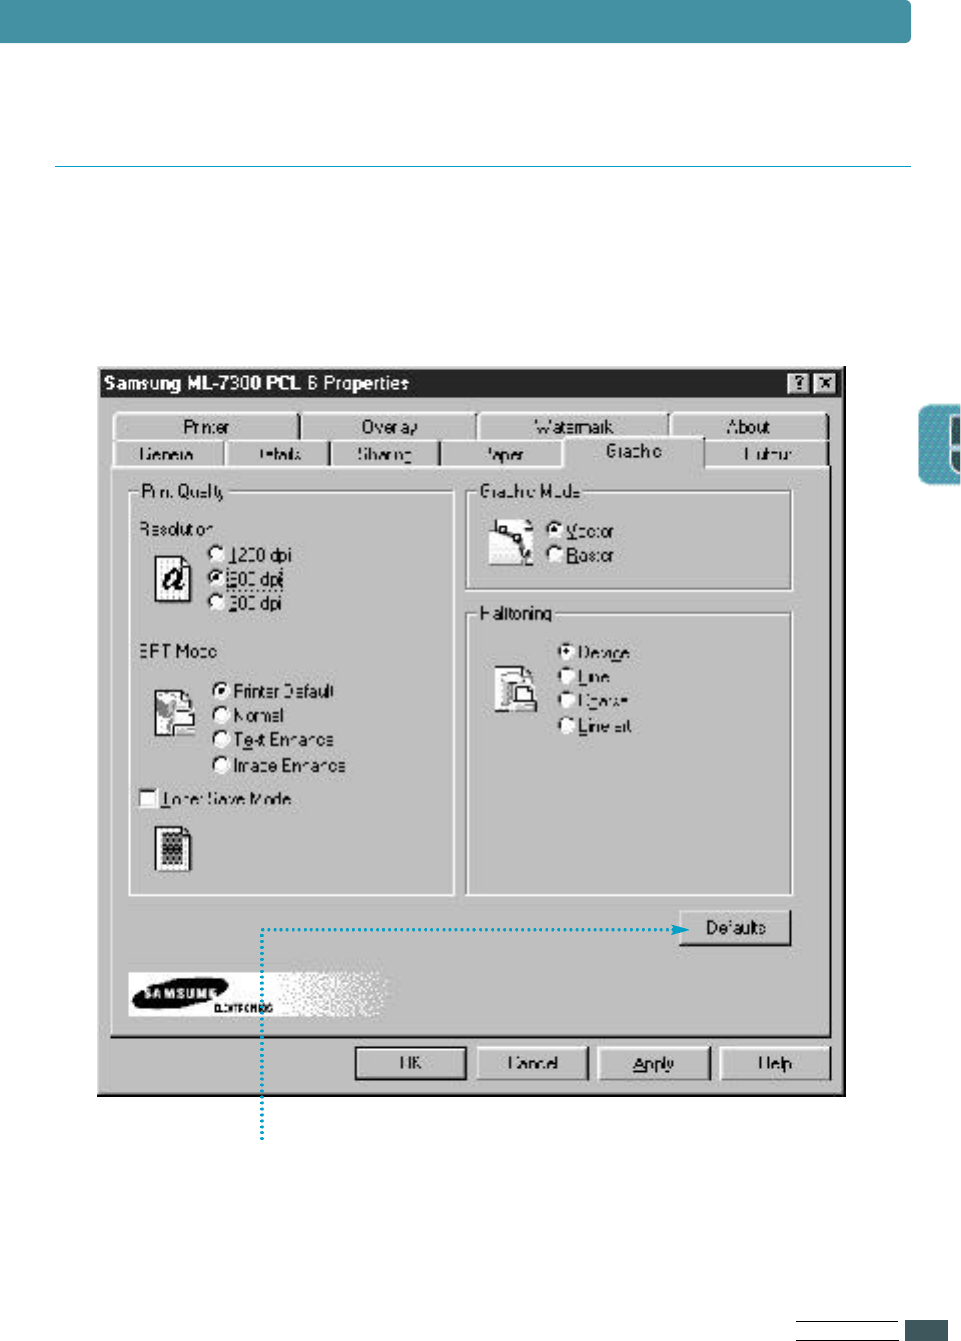
The settings on the Graphic tab allow you to fine tune your image quality
and to balance print quality and print speed.
Graphic Tab
You can restore all the original settings of the PCL 6 printer
driver by clicking Restore Defaults.
PR I N T I N G TA S K S
5.6
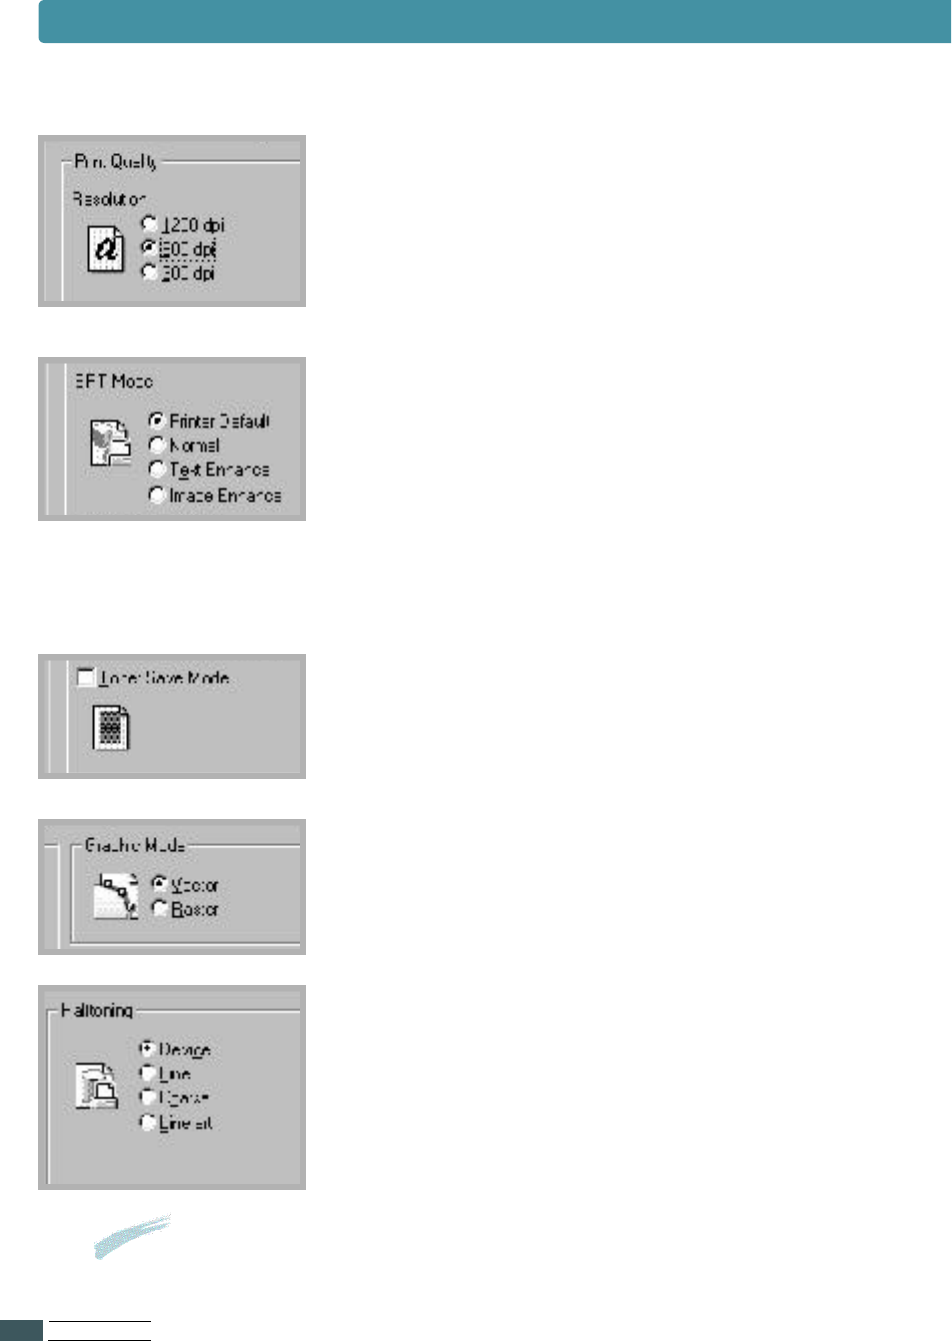
R e s o l u t i o n
Select from the available setting to set the maximum
resolution for your print jobs.
SRT Mode
Some printed characters or images can appear to
h ave jagged or uneven edges. Set this Samsung
Resolution enhancement Technology (SRT) option to
i m p r o ve the print quality of your text and image and
m a ke the characters and images appear smoother.
Toner Save Mode
This determines the amount of toner to be used
while printing a page. The printer uses 50% less
toner when Toner Save Mode is selected.
Graphic Mode
This setting allows you to change the Graphic Mode.
H a l f t o n i n g
This setting lets you fine-tune the way colors in
g r aphic images are converted to gray dot patterns.
Important
If you want to know more about each menu, click on the Help button.
The help screen gives detailed information about each menu.
Using the Printer Driver
Notes SRT Mode is disabled when 1200 dpi settings are
selected.
PR I N T I N G TA S K S
5.7
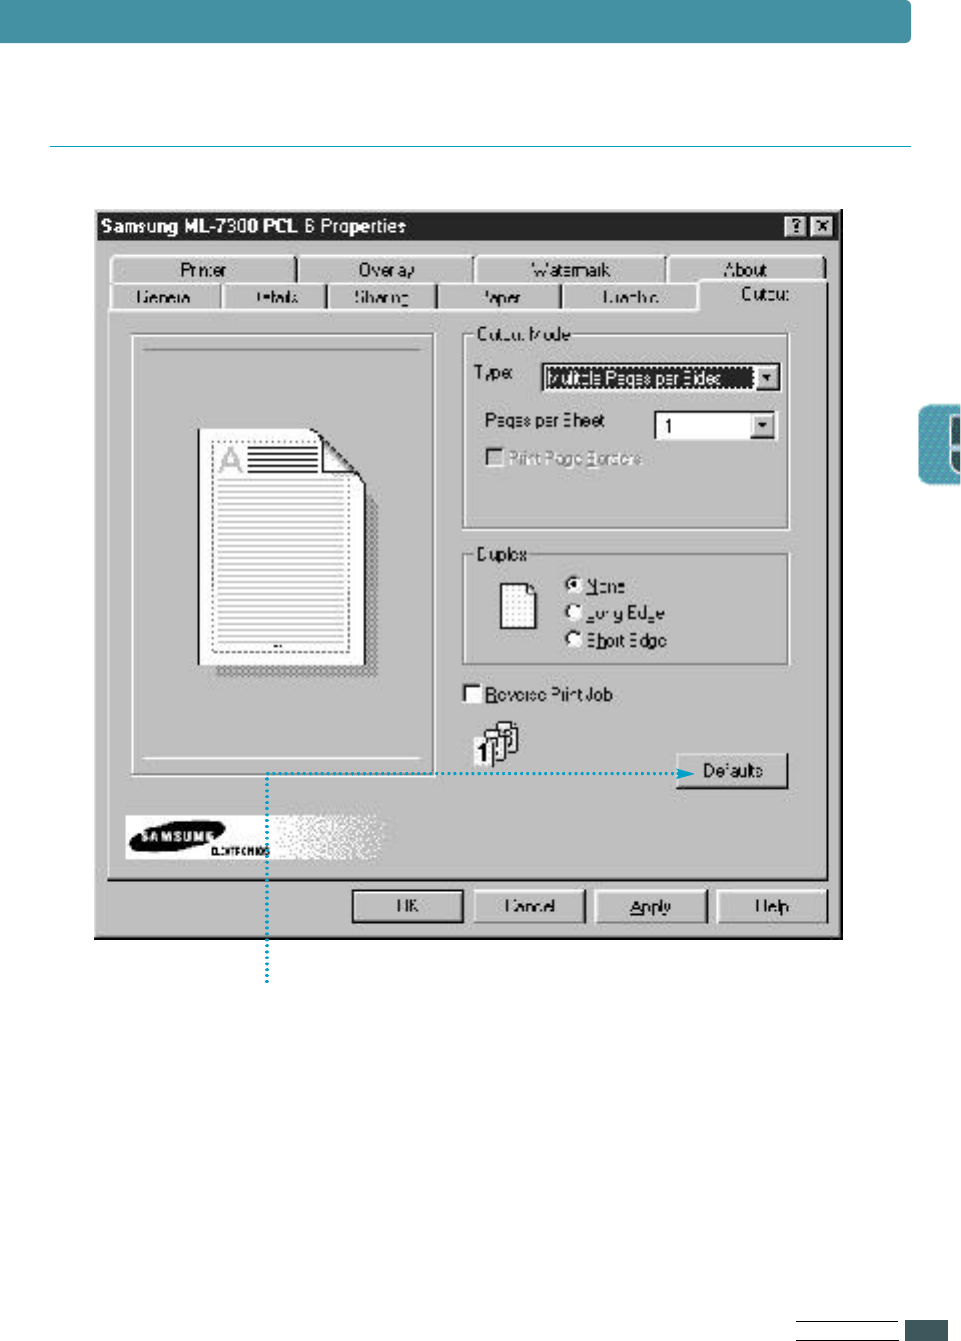
Output Tab
You can restore all the original settings of the PCL 6 printer
d r i ver by clicking Restore Defaults.
Using the Printer Driver