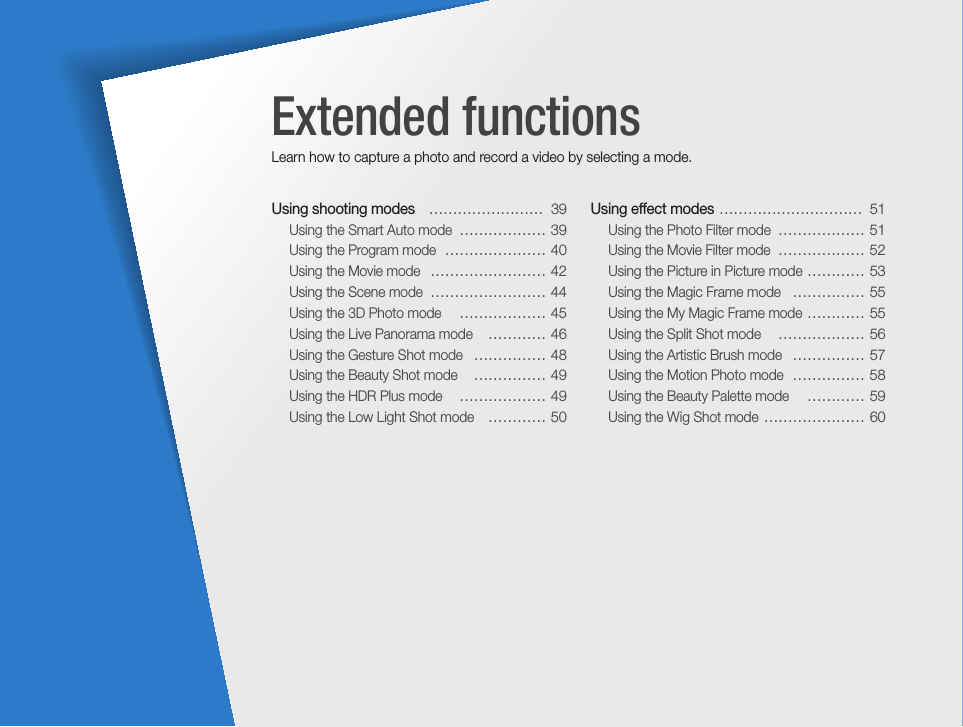
Samsung Electronics Co MV900F Digital Camera User Manual
Samsung Electronics Co Ltd Digital Camera
UserManual.wiki
>
Samsung Electronics Co
>
MV900F User Manual
User Manual
Navigation menu
Upload a User Manual
Namespaces
Wiki Guide
HTML
PDF
Info
Views
User Manual
Discussion / Help
Navigation


![6Icons used in this manualIcon FunctionAdditional informationSafety warnings and precautions[] Camera buttons. For example, [Shutter] represents the shutter button.() Page number of related informationThe order of options or menus you must select to perform a step; for example: Select Face Detection Normal (represents Select Face Detection, and then select Normal).*AnnotationExpressions used in this manualPressing the shutter• Half-press [Shutter]: Press the shutter halfway down• Press [Shutter]: Press the shutter all the way downHalf-press [Shutter] Press [Shutter]Subject, background, and composition• Subject: The main object in a scene, such as a person, animal, or still life • Background: The objects around the subject• Composition: The combination of a subject and backgroundCompositionBackgroundSubjectExposure (Brightness)The amount of light that enters your camera determines the exposure. You can alter the exposure by changing the shutter speed, aperture value, or ISO sensitivity. By altering the exposure, your photos will be darker or lighter.S Normal exposureS Overexposure (too bright)](https://usermanual.wiki/Samsung-Electronics-Co/MV900F/User-Guide-1746705-Page-7.png)
![7Basic troubleshootingLearn to solve common problems by setting shooting options.The subject’s eyes appear red.Red eye occurs when the subject's eyes reflect light from the camera flash.• Set the flash option to Red-eye or Red-eye Fix. (p. 66)• If the photo has already been captured, select Red-eye Fix in the edit menu. (p. 101)Photos have dust spots.If dust particles are present in the air, you may capture them in photos when you use the flash.• Turn off the flash or avoid capturing photos in a dusty place.• Set ISO sensitivity options. (p. 68)Photos are blurred. Blurring can occur if you capture photos in low light conditions or hold the camera incorrectly. Use the OIS function or half-press [Shutter] to ensure the subject is focused. (p. 36)Photos are blurred when shooting at night.As the camera tries to let in more light, the shutter speed slows. This can make it difficult to hold the camera steady long enough to capture a clear photo and may result in camera shake.• Turn on the flash. (p. 66)• Set ISO sensitivity options. (p. 68)• Use a tripod to prevent your camera from shaking.Subjects come out too dark because of backlighting.When the light source is behind the subject or when there is a high contrast between light and dark areas, the subject may appear too dark.• Avoid shooting toward the sun.• Select Backlight in Scene mode. (p. 44)• Set the flash option to Fill in. (p. 66)• Adjust the exposure. (p. 77)• Set the Auto Contrast Balance (ACB) option. (p. 78)• Set the metering option to Spot if a subject is in the center of the frame. (p. 78)](https://usermanual.wiki/Samsung-Electronics-Co/MV900F/User-Guide-1746705-Page-8.png)

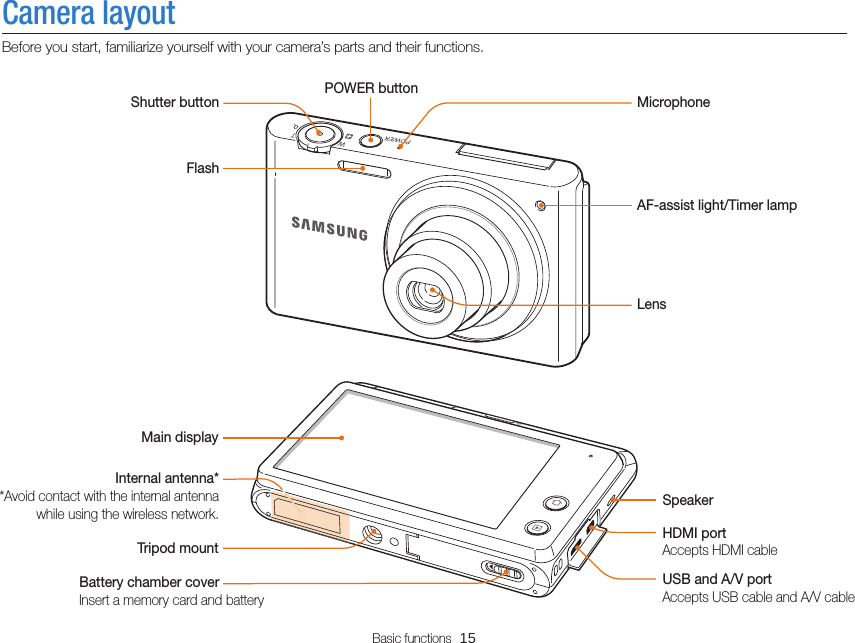
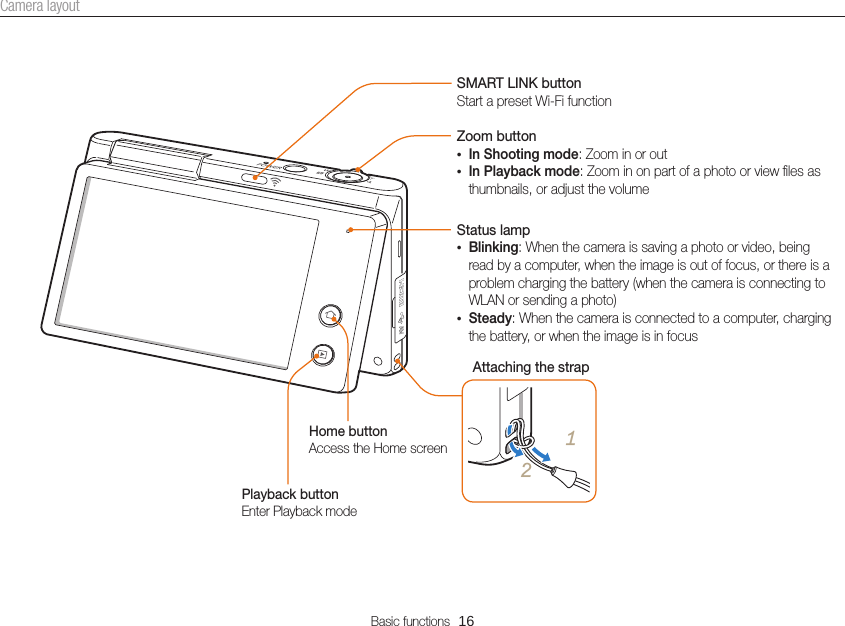
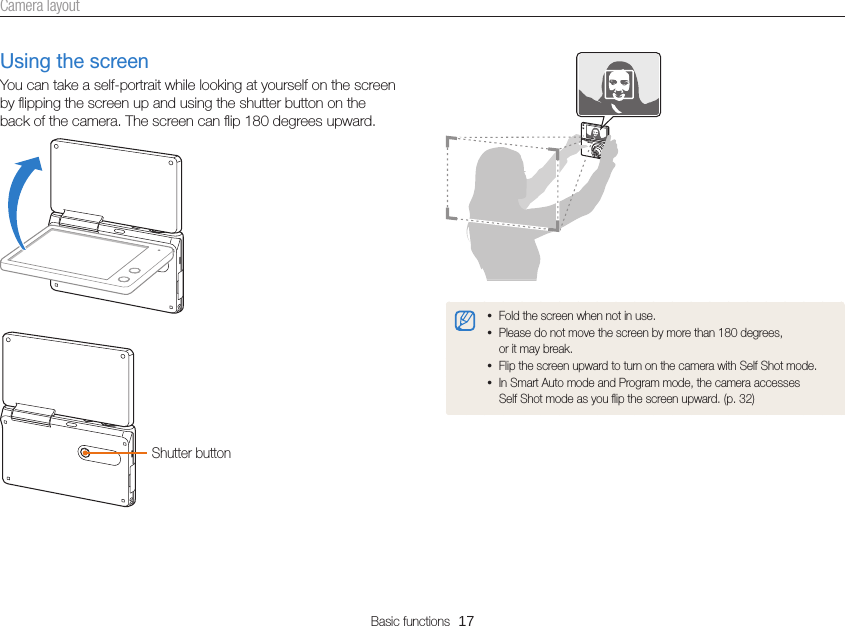

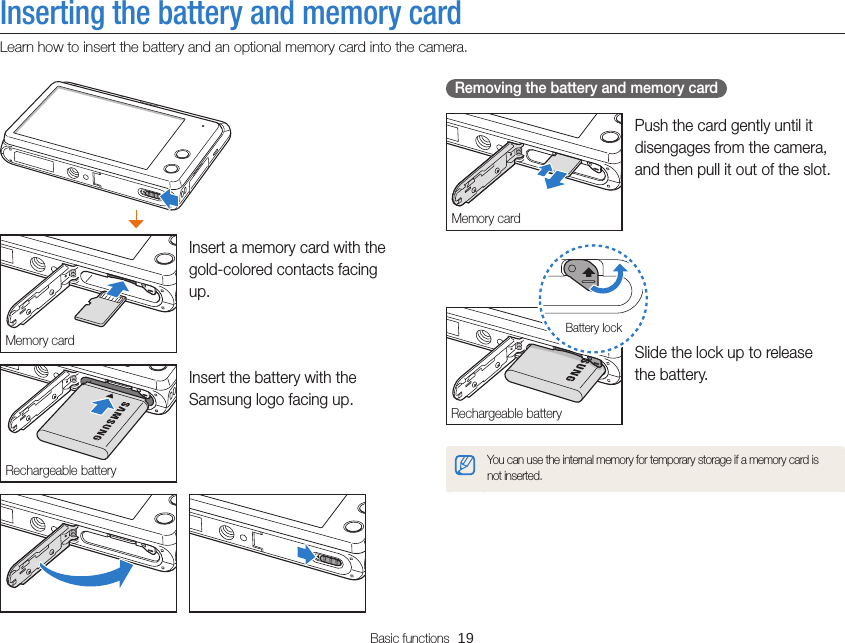
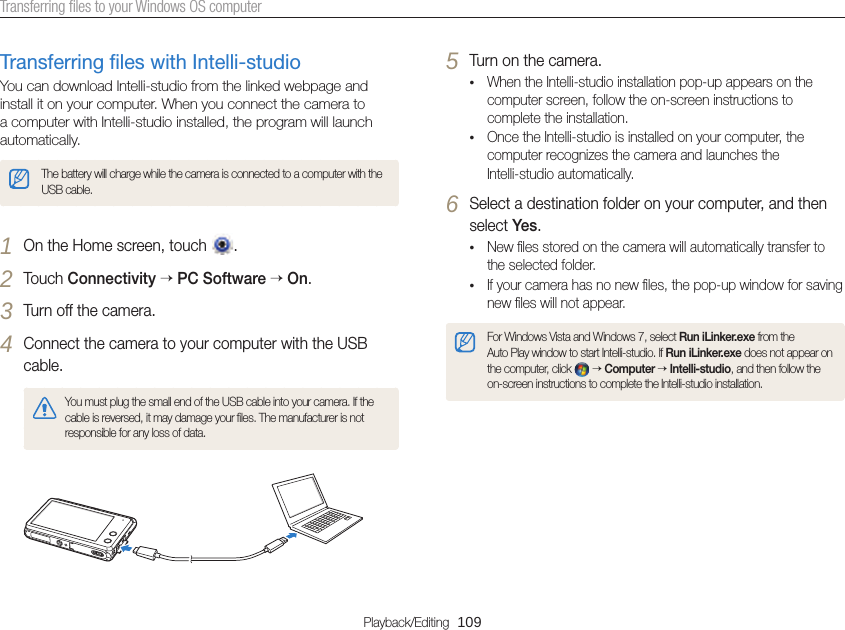
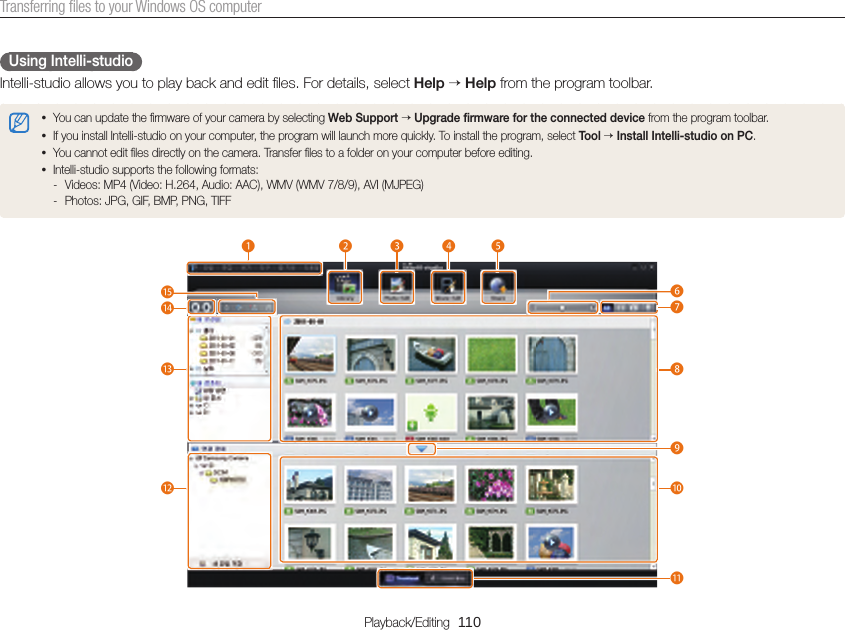
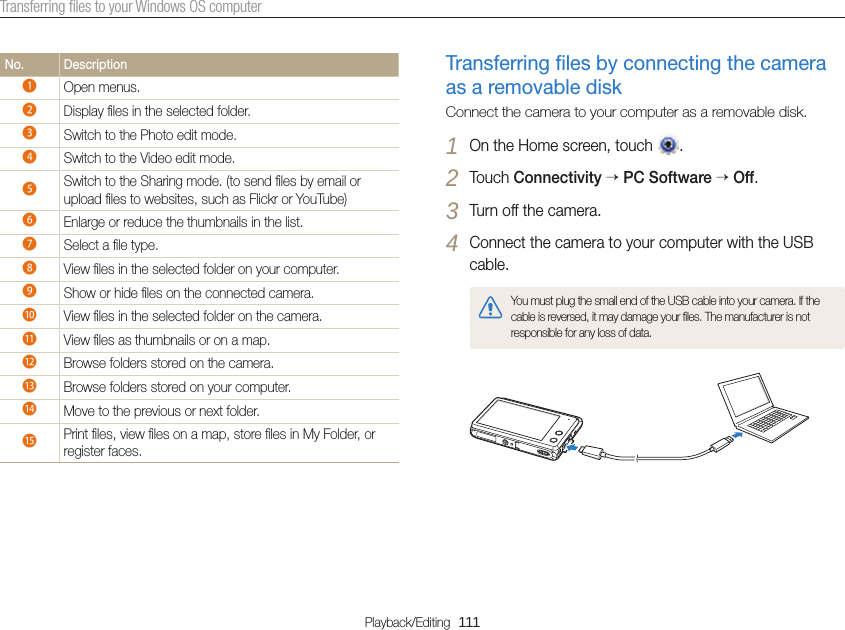
![Basic functions 20Charging the battery and turning on your cameraTurning on your cameraPress [POWER] to turn your camera on or off.• The initial setup screen appears when you turn on the camera for the first time. (p. 21)Turning on your camera in Playback modePress and hold [Playback]. The camera turns on and immediately accesses Playback mode.• If you turn on your camera by pressing and holding [Playback] until the status lamp blinks, the camera does not emit any sounds.• Flip the screen upward. The camera turns on and immediately accesses Self Shot mode. (p. 32)Charging the batteryBefore you use the camera for the first time, you must charge the battery. Plug the small end of the USB cable into your camera, and then plug the other end of the USB cable into the AC adapter.Status lamp• Red light on: Charging• Red light off: Fully charged• Red light blinking: ErrorUse only the AC adapter and USB cable supplied with your camera. If you use another AC adapter (such as SAC-48), the camera battery may not charge or work properly.](https://usermanual.wiki/Samsung-Electronics-Co/MV900F/User-Guide-1746705-Page-21.png)
![Basic functions 26Using the Home screenYou can select a shooting mode or access the settings menu by touching the icons on the Home screen.Icons on the Home screenIcon DescriptionSmart Auto: Capture a photo with a scene mode selected automatically by the camera. (p. 39)Program: Capture a photo with settings you have adjusted manually. (p. 40)Movie: Record a video. (p. 42)Scene: Capture a photo with options that are preset for a specific scene. (p. 44)3D Photo: Capture a photo with 3D effects for a 3D TV. (p. 45)Live Panorama: Capture and combine a series of photos to create a panoramic image. (p. 46)Gesture Shot: Capture photos with hand gestures. Social Sharing: Upload photos or videos to file sharing websites. (p. 123)Email: Send photos or videos stored on the camera via email. (p. 125)MobileLink: Send photos or videos to a smart phone. (p. 120)Accessing the Home screenIn Shooting or Playback mode, press [h]. Press [h] again to return to the previous mode.Smart Auto Movie SceneProgramLive PanoramaSmart AutoMovieSceneProgramLive PanoramaP12No. Description1Touch an icon to access a mode or function.• Scroll to another page by dragging or flicking the touch pen on the screen.2The number of the current page. ( )](https://usermanual.wiki/Samsung-Electronics-Co/MV900F/User-Guide-1746705-Page-27.png)
![Basic functions 28Using the Home screenIcon DescriptionWig Shot: Add various wig styles to your subjects. (p. 60)Album: View files by category in Smart album. (p. 91)Photo Editor: Edit photos with various effects. (p. 98)Creative Movie Maker: Create movies from photos and videos stored on the memory card. (p. 103)Wallpapers: Set wallpaper for the Home scre en with the desired image. (p. 29)Help: View the help and learn how to use the camera. (p. 30)Settings: Adjust settings to match your preferences. (p. 137)Browsing the Home screenRotate [Zoom] to the left to display all the pages of the home screen. Touch the desired page to display it in full screen view.](https://usermanual.wiki/Samsung-Electronics-Co/MV900F/User-Guide-1746705-Page-29.png)
![Basic functions 31Capturing photosLearn how to capture photos easily and quickly in Smart Auto mode.4 Press [Shutter] to capture a photo.5 Press [p] to view the captured photo.• To delete the photo, touch Yes.6 Press [p] to return to Shooting mode.See page 36 for tips to get clearer photos.1 On the Home screen, touch .2 Align your subject in the frame.3 Half-press [Shutter] to focus.• A green frame means the subject is in focus.• A red frame means the subject is out of focus.](https://usermanual.wiki/Samsung-Electronics-Co/MV900F/User-Guide-1746705-Page-32.png)
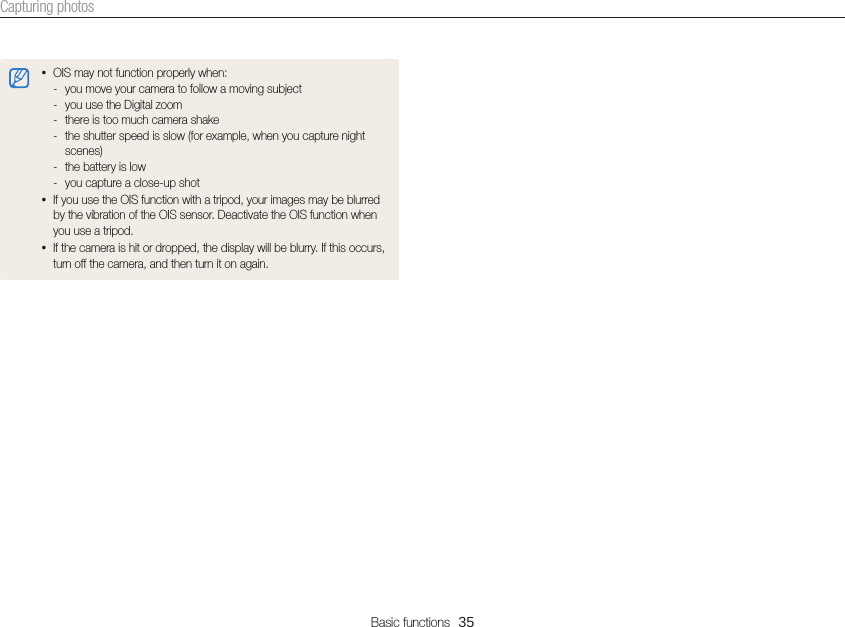
![Basic functions 36 Holding your camera correctlyEnsure nothing is blocking the lens, flash, or microphone. Half-pressing the shutter buttonHalf-press [Shutter] and adjust the focus. The camera adjusts the focus and exposure automatically.The camera sets the aperture value and shutter speed automatically.Focus frame• Press [Shutter] to capture the photo if the focus frame appears in green.• Change the composition and half-press [Shutter] again if the focus frame appears in red. Reducing camera shakeSet the Optical Image Stabilization option to reduce camera shake optically. (p. 34) When is displayedCamera shakeWhen you shoot in the dark, avoid setting the flash option to Slow Sync or Off. The aperture remains open longer and it may be harder to hold the camera steady long enough to capture a clear photo.• Use a tripod or set the flash option to Fill in. (p. 66)• Set ISO sensitivity options. (p. 68)Tips for getting a clearer photo](https://usermanual.wiki/Samsung-Electronics-Co/MV900F/User-Guide-1746705-Page-37.png)
![Basic functions 37 Preventing your subject from being out of focusIt may be difficult to get your subject in focus when: -there is little contrast between the subject and background (for example, when your subject is wearing clothing that is similar in color to the background) -the light source behind the subject is too bright -the subject is shiny or reflective -the subject includes horizontal patterns, such as blinds -the subject is not positioned in the center of the frame• When you capture photos in low lightTurn on the flash. (p. 66)Using the focus lockHalf-press [Shutter] to focus. When the subject is in focus, you can reposition the frame to change the composition. When you are ready, press [Shutter] to capture your photo.• When subjects are moving rapidlyUse the Burst function. (p. 81)](https://usermanual.wiki/Samsung-Electronics-Co/MV900F/User-Guide-1746705-Page-38.png)
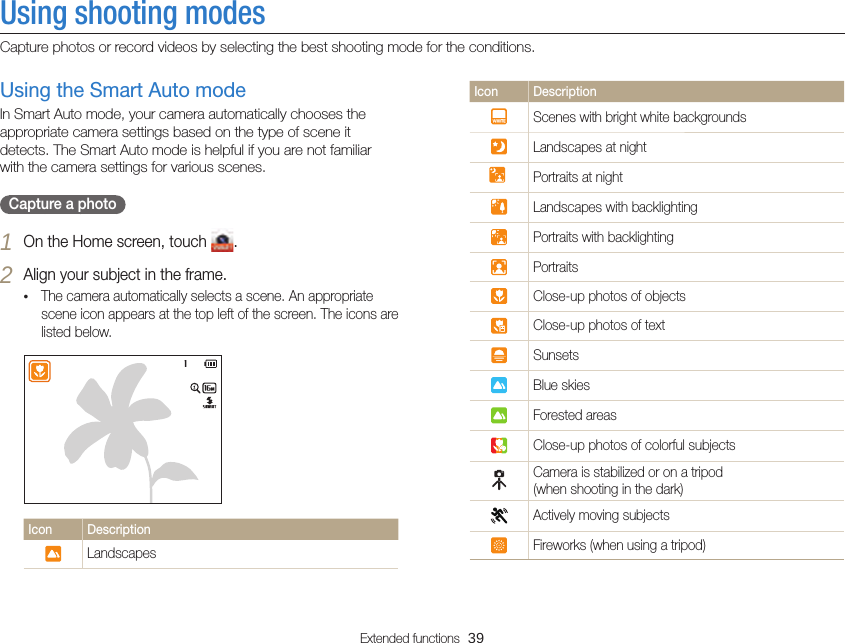
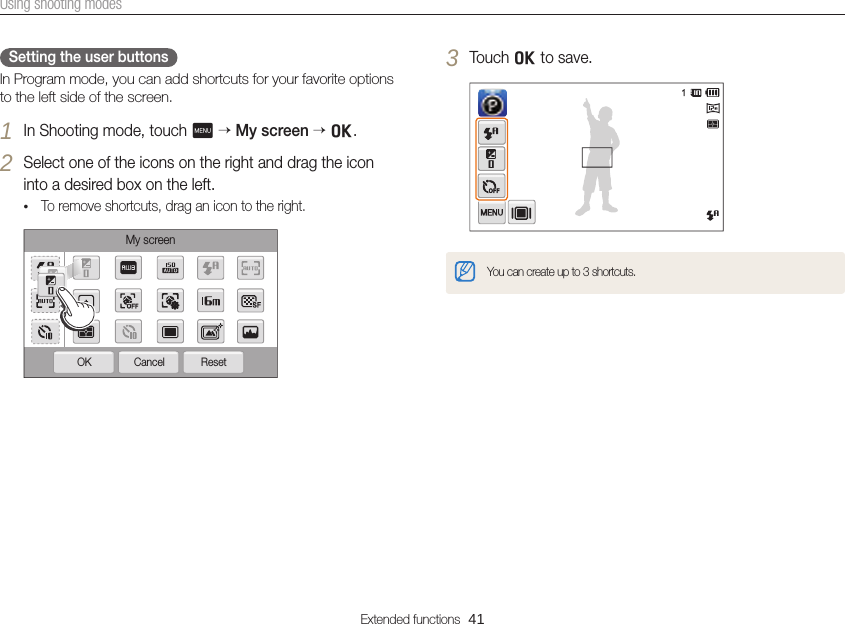
![Extended functions 40Using shooting modes3 Half-press [Shutter] to focus.4 Press [Shutter] to capture the photo.Icon DescriptionLandscapesSunsetsBlue skiesForested areas• If the camera does not recognize an appropriate scene mode, it uses the default settings for Smart Auto mode.• Even if it detects a face, the camera may not select a portrait mode depending on the subject's position or lighting.• The camera may not select the correct scene depending on the shooting conditions, such as camera shake, lighting, or distance to the subject.• Even if you use a tripod, the camera may not detect the mode if the subject is moving.• In Smart Auto mode, the camera consumes more battery power, because it changes settings often to select appropriate scenes.Using the Program modeIn Program mode, you can set most options, except the shutter speed and aperture value, which the camera sets automatically.1 On the Home screen, touch .2 Touch m, and then set the desired options.• For a list of options, refer to "Shooting options". (p. 62)3 Align your subject in the frame, and then half-press [Shutter] to focus.4 Press [Shutter] to capture the photo.](https://usermanual.wiki/Samsung-Electronics-Co/MV900F/User-Guide-1746705-Page-41.png)
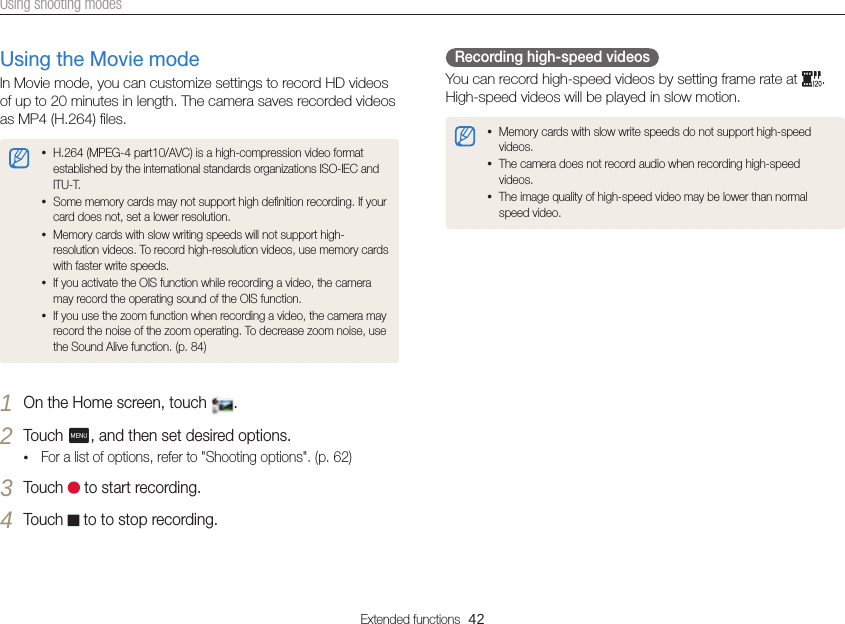
![Extended functions 43Using shooting modesPause recordingThe camera allows you to temporarily pause a video while recording. With this function, you can record separate scenes as a single video.• Touch to pause while recording.• Touch to resume.Capturing still images while recording a videoYou can capture still images while recording a video without switching to the photo shooting modes (up to 6 photos). This feature is available only when you use a memory card.Images captured while recording a video• Press [Shutter] to capture images while recording a video.• Captured images will be saved automatically.• Captured images will be automatically resized, depending on the size of the recorded video.• You cannot capture still images while recording high-speed videos.• You cannot capture still images when you pause the video recording.• The quality of images captured while recording a video may be lower than those captured normally.](https://usermanual.wiki/Samsung-Electronics-Co/MV900F/User-Guide-1746705-Page-44.png)
![Extended functions 44Using shooting modesUsing the Scene modeIn Scene mode, you can capture a photo with options that are preset for a specific scene.1 On the Home screen, touch .2 Select a scene.LandscapePanel offOption DescriptionLandscape Capture still-life scenes and landscapes.Sunset Capture scenes at sunset, with natural-looking reds and yellows.Dawn Capture scenes at sunrise.Backlight Capture backlit subjects.Beach & Snow Reduce underexposure of subjects caused by sunlight reflected from sand or snow.Text Clearly capture text from printed or electronic documents.3 Align your subject in the frame, and then half-press [Shutter] to focus.4 Press [Shutter] to capture the photo.](https://usermanual.wiki/Samsung-Electronics-Co/MV900F/User-Guide-1746705-Page-45.png)
![Extended functions 45Using shooting modesUsing the 3D Photo modeYou can take 3D pictures in 3D Photo mode that can be viewed on a 3D TV or 3D monitor.1 On the Home screen, touch .2 Align your subject in the frame, and then half-press [Shutter] to focus.3 Press [Shutter] to capture the photo.• The camera captures 2 photos in both JPEG and MPO file formats.• When using the 3D Photo mode, limited shooting options are available.• An MPO file for 3D effects can only be displayed on devices supporting the MPO format (3D TV and 3D monitor), while the camera can display only regular JPEG files.• If you want to see the 3D effect of MPO files on a 3D TV or 3D monitor, you need to wear 3D glasses provided by the manufacturer.• The resolution is fixed at in the 3D Photo mode.About 3D Depth ViewerThe 3D Depth Viewer represents 3D effects with a color gradient for 3D shooting. Touch m 3D Depth Viewer to turn on or off the option. Far WhiteBlackNear](https://usermanual.wiki/Samsung-Electronics-Co/MV900F/User-Guide-1746705-Page-46.png)
![Extended functions 46Using shooting modesUsing the Live Panorama modeIn Live Panorama mode, you can capture a wide panoramic scene in a single photo. Capture a 2D-panoramic photo or a3D-panoramic photo that can be viewed on a 3D TV. S Shooting example1 On the Home screen, touch .2 Touch (2D Panorama mode) or (3D Panorama mode).3 Align your subject in the frame, and then half-press [Shutter] to focus.• Align the camera with the far left or the far right, or very top or bottom, of the scene you want to capture.4 Press and hold [Shutter] to start shooting.5 With [Shutter] pressed, slowly move the camera in the direction that will let it capture the rest of the panorama.• If 3D Panorama mode is selected, the panoramic shot can be taken only in a horizontal direction.• Arrows toward the direction of motion are displayed, and the entire shooting image is displayed in the preview box.• When the viewfinder is aligned with the next scene, the camera captures the next photo automatically.6 When you are finished, release [Shutter].• When you have captured all the necessary shots, the camera combines them into one panoramic photo.](https://usermanual.wiki/Samsung-Electronics-Co/MV900F/User-Guide-1746705-Page-47.png)

![Extended functions 49Using shooting modesUsing the HDR Plus modeIn High Dynamic Range (HDR) Plus mode, the camera automatically adjusts the exposure or saturation, to produce images with high tonal detail or to set an artistic mood.S Before S After S Before S After Using the Beauty Shot modeIn Beauty Shot mode, you can capture a portrait with options to hide facial imperfections. 1 On the Home screen, touch .2 Drag the sliders or touch the +/- icons to adjust the Face Tone and Face Retouch.• For example, increase the Face Tone setting to make skin appear lighter.Panel offFace Retouch : 23 Align your subject in the frame, and then half-press [Shutter] to focus.4 Press [Shutter] to capture the photo.When using the Beauty Shot mode, the focus distance will be set to Auto Macro.](https://usermanual.wiki/Samsung-Electronics-Co/MV900F/User-Guide-1746705-Page-50.png)
![Extended functions 50Using shooting modesUsing the Low Light Shot modeIn Low Light Shot mode, the camera captures multiple photos and combines them, to produce one clear photo without any image noise.1 On the Home screen, touch .2 Align your subject in the frame, and then half-press [Shutter] to focus.3 Press [Shutter] to capture the photo.• You can set the resolution to or lower. • In the Low Light Shot mode, the quality is automatically set to Fine.• In the Low Light Shot mode, the focus area is set to Center AF, the focus is set to Auto macro, and OIS is set to On.• Quick View is not available in the Low Light Shot mode. 1 On the Home screen, touch .2 Touch (HDR) or (HDR art).3 Align your subject in the frame, and then half-press [Shutter] to focus.4 Press [Shutter] to capture the photo.5 Check the image with the HDR effect, and then touch o.In the HDR Plus mode, the final image after applying or effect is saved.](https://usermanual.wiki/Samsung-Electronics-Co/MV900F/User-Guide-1746705-Page-51.png)
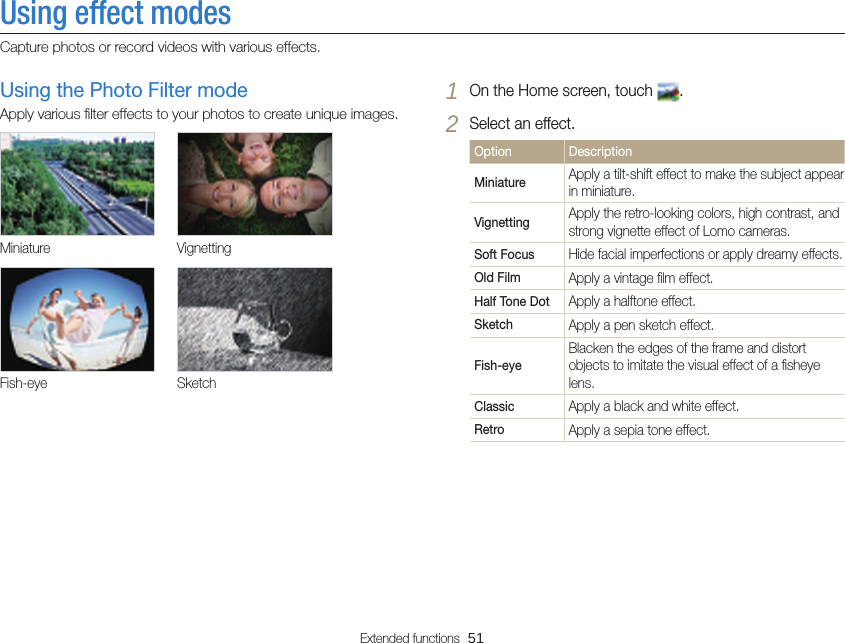
![Extended functions 52Using effect modesOption DescriptionOil Painting Apply an oil painting effect.Ink Painting Apply a watercolor painting effect.Cartoon Apply a cartoon painting effect.Cross Filter Add lines that radiate outward from bright objects to imitate the visual effect of a cross filter.Zooming Shot Blur the edges of a photo to emphasize the subjects in the center.3 Align your subject in the frame, and then half-press [Shutter] to focus.4 Press [Shutter] to capture a photo.• Depending on the option you select, the resolution may change to or smaller automatically.• To apply filter effects to saved photos, touch .Using the Movie Filter mode Apply various filter effects to your videos to create unique images.1 On the Home screen, touch .2 Select an effect.Option DescriptionMiniature Apply a tilt-shift effect to make the subject appear in miniature.Vignetting Apply the retro-looking colors, high contrast, and strong vignette effect of Lomo cameras.Half Tone Dot Apply a halftone effect.Sketch Apply a pen sketch effect.Fish-eye Distort close objects to imitate the visual effect of a fisheye lens.Classic Apply a black and white effect.Retro Apply a sepia tone effect.](https://usermanual.wiki/Samsung-Electronics-Co/MV900F/User-Guide-1746705-Page-53.png)
![Extended functions 53Using effect modesOption DescriptionPalette Effect 1 Create a vivid look with sharp contrast and strong color.Palette Effect 2 Make scenes clean and clear.Palette Effect 3 Apply a soft brown tone.Palette Effect 4 Create a cold and monotone effect.3 Touch to start recording.4 Touch to stop recording.• If you select Miniature, the miniature recording time is also displayed and is shorter than the real recording time.• If you select Miniature, you cannot record the video sound.• Depending on the option you select, the recording speed may change to and the recording resolution may change to or smaller automatically.Using the Picture in Picture modeIn Picture in Picture mode, you can capture or select a full-sized background photo, and then insert a smaller photo or video into the foreground.1 On the Home screen, touch .2 Half-press [Shutter] to focus, and then press [Shutter] to capture a background photo.• To select a background photo from your saved photos, touch . You cannot select a video file or a photo captured in Live Panorama mode.Retake Move Frame3 Press o to set the photo as the background image.• To recapture a background photo, touch Exit.](https://usermanual.wiki/Samsung-Electronics-Co/MV900F/User-Guide-1746705-Page-54.png)
![Extended functions 54Using effect modes4 Drag the Self-shot screen to move it to a desired location.5 Touch the Self-shot screen once again to adjust the screen size.6 Flip the screen and take a self-portrait shot.• The insertion window appears larger when you half-press [Shutter], so that you can determine whether or not the subject is in focus.• To record a video, touch . To stop recording and insert the video, touch .• To recapture a background photo, press Exit.• In the Picture in Picture mode, the resolution is automatically set to .• The final Picture-in-picture photos or videos are saved as one combined file and the inserted photos or videos are not saved separately.• When inserting a video, the resolution for the combined file is automatically set to or smaller.• When capturing a background photo, a vertical photo captured in the vertical position is displayed horizontally without auto rotate.• The maximum size of the insertion window is 1/4 of the screen, and the aspect ratio stays the same when changing the size.• The maximum length of video that can be inserted is 20 minutes.• In Picture in Picture mode, the available zoom range may be less than in other shooting modes.• In Picture in Picture mode, you cannot set the Sound Alive options.• When you select a background photo from your saved photos, black bars may appear at the edges of the image, depending on the aspect ratio.• The background image is saved in the opposite direction as the self shot.](https://usermanual.wiki/Samsung-Electronics-Co/MV900F/User-Guide-1746705-Page-55.png)
![Extended functions 55Using effect modesUsing the My Magic Frame modeIn My Magic Frame mode, you can make part of the photo transparent and then capture a new photo within the transparent area.1 On the Home screen, touch .2 Half-press [Shutter] to focus, and then press [Shutter] to capture a background photo.3 Touch Use.• To recapture a background photo, touch Retake.• To select a background photo from your saved photos, touch .4 Select a desired frame.• To draw a new frame and set the thickness of the pen, touch .Using the Magic Frame modeIn Magic Frame Shot mode, you can apply various frame effects to your photos. The shape and the feel of the photos will change according to the frame you select.1 On the Home screen, touch .2 Select a desired frame.MuralPanel off3 Align your subject in the frame, and then half-press [Shutter] to focus.4 Press [Shutter] to capture the photo.In Magic Frame mode, the resolution is automatically set to .](https://usermanual.wiki/Samsung-Electronics-Co/MV900F/User-Guide-1746705-Page-56.png)
![Extended functions 56Using effect modesUsing the Split Shot modeIn Split Shot mode, you can capture several photos and arrange them with preset layouts.1 On the Home screen, touch .2 Select a split style.• To adjust the sharpness of the dividing line, press m Line Blur a desired value.• To apply a Smart Filter effect to part of the shot, touch an effect o. You can apply different Smart Filter effects to each part of the shot.• To get information about each options, touch . Panel off5 Drag the selected frame to place it to the desired location. 6 To adjust the size, touch the selected frame and then drag the edge of the box that appears around it. 7 Touch o.8 Adjust Transparency by moving the sliders or touch the +/- icons to adjust.9 Align your subject in the frame, and then half-press [Shutter] to focus.10 Press [Shutter] to capture a photo. • When using the My Magic Frame mode, limited shooting options are available.• As the area to be displayed as transparent increases, it may take longer to save the picture.• When using the My Magic Frame mode, the area displayed transparent in the frame is focused.• The resolution is fixed at in the My Magic Frame mode.](https://usermanual.wiki/Samsung-Electronics-Co/MV900F/User-Guide-1746705-Page-57.png)
![Extended functions 57Using effect modes3 Align your subject in the frame, and then half-press [Shutter] to focus.4 Press [Shutter] to capture a photo.• Repeat steps 3 and 4 to capture the rest of the photos.• To recapture a photo, press .• In Split Shot mode, the resolution is automatically set to or smaller.• In Split Shot mode, the available zoom range may be less than in other shooting modes.Using the Artistic Brush modeIn Artistic Brush mode, you can capture a photo, and then view a video that shows the process of how the filter effect is applied.1 On the Home screen, touch .2 Select a filter.Ink PaintingPanel offOption DescriptionInk Painting Apply a watercolor painting effect.Cartoon Apply a cartoon painting effect.Sketch Apply a pen sketch effect.](https://usermanual.wiki/Samsung-Electronics-Co/MV900F/User-Guide-1746705-Page-58.png)
![Extended functions 58Using effect modes3 Align your subject in the frame, and then half-press [Shutter] to focus.4 Press [Shutter] to capture a photo.• After capturing the photo, the video that shows the process of how the filter effect is applied will begin automatically.• Touch XXX to capture a still image from the video that shows the process of how the filter effect is applied. • In Artistic Brush mode, the resolution is automatically set to or smaller.• In Artistic Brush mode, the focus area is automatically set to Multi AF. • In Artistic Brush mode, both the photo with the filter effect and the video that shows how to apply the filter effect are saved.• In Artistic Brush mode, the available zoom range may be less than in other shooting modes.• In Artistic Brush mode, it may take longer to save files.• You cannot upload a video captured in Artistic Brush mode via the wireless networking feature on your camera.Using the Motion Photo modeIn Motion Photo mode, you can capture and combine a series of photos, and then select an area to be animated to create a GIF animation. This mode is available only when you insert a memory card into the camera.1 On the Home screen, touch .2 Align your subject in the frame, and then half-press [Shutter] to focus.3 Press [Shutter] to capture the photo.• The camera captures multiple photos while the status lamp is blinking.](https://usermanual.wiki/Samsung-Electronics-Co/MV900F/User-Guide-1746705-Page-59.png)
![Extended functions 59Using effect modes4 On the screen, draw an area to be animated. • To adjust the motion speed, touch +/- icon. • To adjust the thickness of the brush, touch .• To draw the animated area again, touch .• To recapture a photo, touch .Cancel SaveFrame Size5 Touch to save the photo.• The camera saves an animated GIF and one JPG of the first scene from the GIF file. You cannot view the JPG file on your camera. To view it, connect your camera to a PC. (p. 109)• In Motion Photo mode, the resolution is automatically set to .• Use a tripod to prevent your camera from shaking.• In Motion Photo mode, it may take longer to save files.Using the Beauty Palette mode You can capture a portrait with various beautifying effect.1 On the Home screen, touch .2 Align your subject in the frame, and then half-press [Shutter] to focus.3 Press [Shutter] to capture a photo.4 Touch Use.• Touch , and then select a photo.5 Select a beauty effect.6 Touch to save the photo.• To recapture a photo, touch .](https://usermanual.wiki/Samsung-Electronics-Co/MV900F/User-Guide-1746705-Page-60.png)

![Extended functions 61Using effect modes4 Touch o to save your changes. • Touch to discard your changes.5 Align your subject in the frame, and then half-press [Shutter] to focus.6 Press [Shutter] to capture the photo.• The resolution is fixed at in Wig Shot mode. • You cannot capture a photo in Wig Shot mode while the camera is connected to a TV.](https://usermanual.wiki/Samsung-Electronics-Co/MV900F/User-Guide-1746705-Page-62.png)
![Shooting options 65Using the timerLearn how to set the timer to delay shooting.3 Press [Shutter] to start the timer.• The AF-assist light/timer lamp blinks. The camera will automatically capture a photo after the specified time has elapsed.• Press [Shutter] to cancel the timer.• Depending on the Face Detection option you have selected, the timer function or some of its options may not be available.• Self timer options are not available if you set burst options.1 In Shooting mode, touch m Timer.2 Select an option.Icon DescriptionOff: The timer is not active.10 Sec: Capture a photo after a 10-second delay.2 Sec: Capture a photo after a 2-second delay.Double: Capture one photo after a 10-second delay and another photo after a 2-second delay.Available options may differ depending on the shooting conditions.](https://usermanual.wiki/Samsung-Electronics-Co/MV900F/User-Guide-1746705-Page-66.png)
![Shooting options 70Changing the camera’s focus• If you do not select a focus area, the focus frame will appear in the center of the screen.• Tracking a subject may fail when: - the subject is too small - the subject moves excessively - the subject is backlit or you are shooting in a dark place - colors or patterns on the subject and the background are the same - the subject includes horizontal patterns, such as blinds - the camera shakes excessively• When tracking a subject fails, the focus frame will appear as a white single-line frame ( ).• If the camera fails to track the subject, you must reselect the subject to track.• If the camera fails to focus, the focus frame will change to a red single-line frame ( ).• If you use this function, you cannot set Face Detection options, Timer options, Burst options, and Intelli zoom.Using tracking auto focusTracking AF allows you to track and auto focus on your subject, even when you are moving.1 In Shooting mode, touch m Focus Area.2 Touch Smart Touch AF to select it.3 Touch the subject you want to track in the touch area.• A focus frame appears on the subject and follows the subject as you move the camera.• The white frame means that your camera is tracking the subject.• The green frame means that your subject is in focus when you half-press [Shutter].4 Press [Shutter] to capture the photo.](https://usermanual.wiki/Samsung-Electronics-Co/MV900F/User-Guide-1746705-Page-71.png)
![Shooting options 72Using Face DetectionIf you use Face Detection options, your camera can automatically detect a human face. When you focus on a human face, the camera adjusts the exposure automatically. Use Blink Detection to detect closed eyes or Smile Shot to capture a smiling face. You can also use Smart Face Recognition to register faces and prioritize the focus on them.Detecting facesYour camera automatically detects up to 10 human faces in one scene.1 In Shooting mode, touch m Face Detection.2 Touch Normal to select it.3 Press [Shutter] to capture the photo.The nearest face appears in a white focus frame and the rest of the faces appear in gray focus frames.• The closer you are to the subjects, the quicker your camera will detect faces.• To focus on a subject in a gray focus frame, touch the face in the frame.• The detected faces may not be registered if you set Burst options such as Continuous or AEB.• When your camera detects a face, it tracks the detected face automatically. • Face Detection may not be effective when: - the subject is far from the camera (The focus frame will appear orange for Smile Shot and Blink Detection.) - it is too bright or too dark - the subject is not facing the camera - the subject is wearing sunglasses or a mask - the subject’s facial expression changes drastically - the subject is backlit or the lighting conditions are unstable• Face Detection is not available when you set Image Adjustment options or Smart Touch AF.• Depending on the shooting options you selected, available Face Detection options may differ.• Depending on the Face Detection options you selected, the timer function may not be available.• When you set Face Detection options, the AF area is automatically set to Multi AF.• Depending on the Face Detection options you selected, Burst options may not be available.• When you set Smart Face Recognition option and capture photos of detected faces, they will be registered in the face list.• You can view registered faces in order of priority in Playback mode. (p. 91) Even though faces are registered successfully, they may not be classified in Playback mode.• A face detected with Smart Face Recognition option may not appear in the face list or Smart Album.](https://usermanual.wiki/Samsung-Electronics-Co/MV900F/User-Guide-1746705-Page-73.png)
![Shooting options 73Using Face DetectionCapturing a self portrait shotCapture photos of yourself. The focus distance will be set to close-up and your camera will emit a beep.1 In a Shooting mode, touch m Face Detection.2 Touch Self-Portrait to select it.3 Flip the screen upward.4 When you hear a quick beep, press [Shutter].If you turn Volume off in the sound settings, the camera will not emit a beep. (p. 138)Capturing a smile shotThe camera automatically releases the shutter when it detects a smiling face.1 In Shooting mode, touch m Face Detection.2 Touch Smile Shot to select it.3 Compose your shot.• The camera automatically releases the shutter when it detects a smiling face.When your subject smiles broadly, your camera can detect the smile more easily.](https://usermanual.wiki/Samsung-Electronics-Co/MV900F/User-Guide-1746705-Page-74.png)
![Shooting options 74Using Face DetectionUsing Smart Face RecognitionThe camera automatically registers faces that you frequently photograph. The Smart Face Recognition feature will automatically prioritize the focus on those faces and on favorite faces. The Smart Face Recognition feature is available only when you use a memory card.1 In Shooting mode, touch m Face Detection.2 Touch Smart Face Recognition to select it.3 Press [Shutter] to capture the photo.• : Faces that you have registered as favorites. (To register faces as favorites, refer to page 75.)• : Faces that the camera has automatically registered.Detecting eye blinkingIf your camera detects closed eyes, it will automatically capture 3 photos in succession.1 In Shooting mode, touch m Face Detection.2 Touch Blink Detection to select it.3 Press [Shutter] to capture the photo.](https://usermanual.wiki/Samsung-Electronics-Co/MV900F/User-Guide-1746705-Page-75.png)
![Shooting options 75Using Face DetectionRegistering faces as your favorites (My Star)You can register your favorite faces to prioritize the focus and exposure on those faces. This feature is available only when you use a memory card.1 In Shooting mode, touch m Smart FR Edit.2 Touch My Star to select it.3 Align your subject’s face with the oval guideline, and then press [Shutter] to register the face.• Capture photos of one person at a time when registering faces.• Capture 5 photos of the subject’s face for best results: one each from the front, left, right, above, and below.• When capturing photos from the left, right, above, and below, instruct the subject not to turn his or her face more than 30 degrees.• You can register a face even if you capture only one photo of the subject's face.• The camera may recognize and register faces incorrectly depending on lighting conditions, drastic changes in the subject's pose or face, and whether or not the subject is wearing glasses.• The camera can automatically register up to 12 faces. If the camera recognizes a new face when 12 faces have already been registered, it will replace the lowest priority face with the new one.• The camera can detect up to 5 favorite faces in one scene.](https://usermanual.wiki/Samsung-Electronics-Co/MV900F/User-Guide-1746705-Page-76.png)
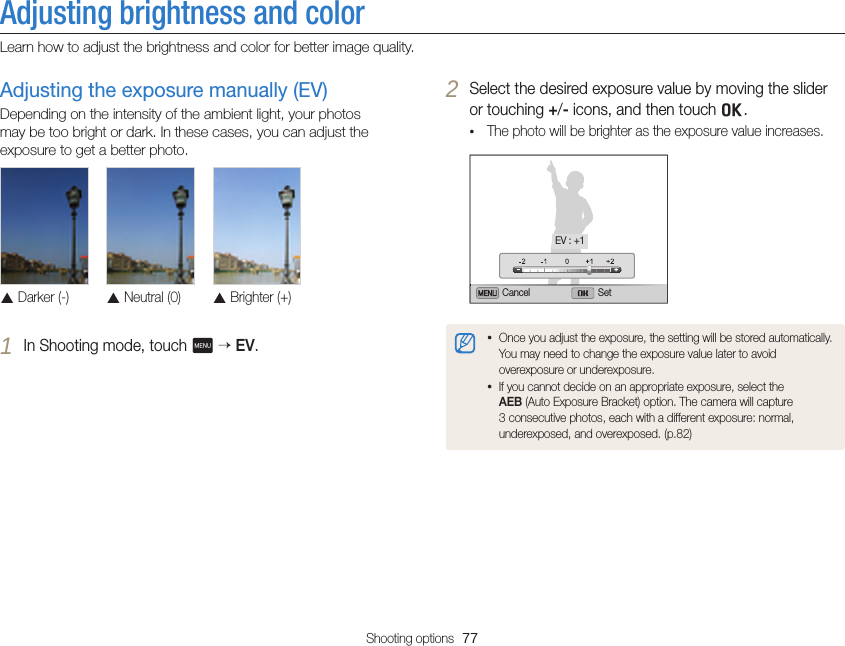
![Shooting options 80Adjusting brightness and colorDefining your own White BalanceYou can customize the White Balance by capturing a photo of a white surface, such as a piece of paper, under the lighting conditions in which you intend to capture a photo. The White Balance feature will help you to match the colors in your photo with the actual scene.1 In Shooting mode, touch m White Balance.2 Touch Custom Set to select it.3 Aim the lens at a piece of white paper, and then press [Shutter].](https://usermanual.wiki/Samsung-Electronics-Co/MV900F/User-Guide-1746705-Page-81.png)
![Shooting options 81Using burst modes (Burst/AEB)It can be difficult to capture photos of fast-moving subjects or capture natural facial expressions and gestures of your subjects in photos. Also, it can be difficult to adjust the exposure correctly and select a proper light source. In these cases, select one of the burst modes.3 Align your subject in the frame, and then half-press [Shutter] to focus.4 Press and hold [Shutter].• While you are pressing [Shutter], the camera captures photos continuously.• You can use the flash and timer only when you select Single.• When you select Motion Capture, your camera will set the resolution to and set the ISO sensitivity to Auto. • Depending on the Face Detection option you selected, some Burst options may not be available.Using High-speed burst mode1 In Shooting mode, touch m Drive.2 Select an option.Icon Description Single: Capture a single photo.3fps: Capture 3 photos per second continuously. (You can capture up to 8 photos in one burst.)5fps: Capture 5 photos per second continuously. (You can capture up to 8 photos in one burst.)10fps: Capture 10 photos per second continuously. (You can capture up to 8 photos in one burst.)](https://usermanual.wiki/Samsung-Electronics-Co/MV900F/User-Guide-1746705-Page-82.png)
![Shooting options 82Using burst modes (Burst/AEB)Using AEB (Auto Exposure Bracketing)1 In Shooting mode, touch m.2 Touch Drive AEB. 3 Align your subject in the frame, and then half-press [Shutter] to focus.4 Press [Shutter].• The camera captures 3 photos continuously.Use a tripod to prevent blurry photos.](https://usermanual.wiki/Samsung-Electronics-Co/MV900F/User-Guide-1746705-Page-83.png)

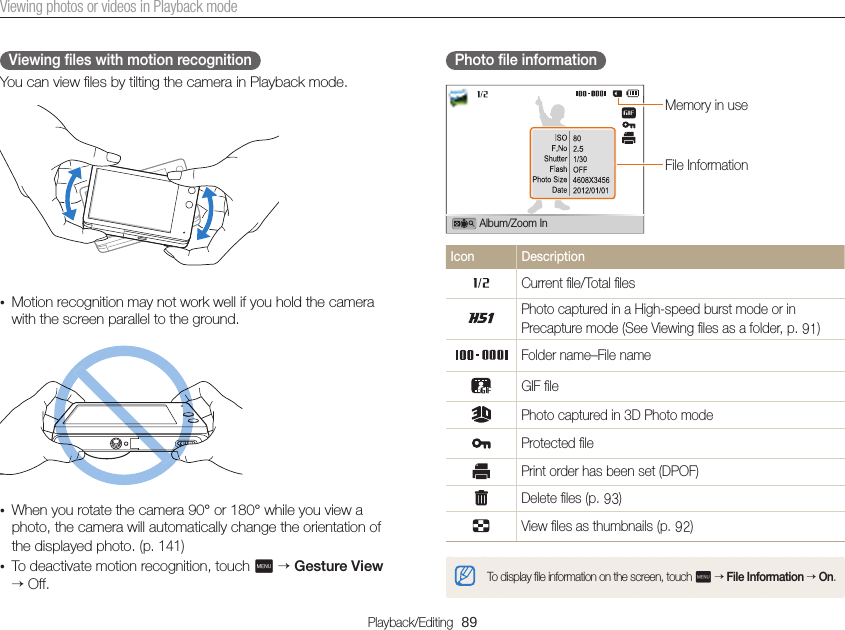
![Playback/Editing 88Viewing photos or videos in Playback modeLearn how to play back photos or videos and how to manage files.The camera will not properly play back files of unsupported sizes or files that were captured with other cameras.Starting Playback modeView photos or play videos and voice memos stored in your camera.1 Press [Playback].• The most recent file will be displayed.• If the camera is off, it will turn on and display the most recent file.• To view files by category, touch on the Home screen. (p. 91)2 Drag the image left or right to move to another file.• To skip files quickly, tilt the camera to the direction you want to flip files. (p. 89)• You can also touch and hold the left end or right end of the screen to skip files quickly.• You can also drag the slider left or right to move to the previous or next file.](https://usermanual.wiki/Samsung-Electronics-Co/MV900F/User-Guide-1746705-Page-89.png)
![Playback/Editing 91Viewing photos or videos in Playback modeViewing files by category in Smart AlbumView files by category, such as date, face, or file type.1 On the Home screen, touch .• You can also access Smart Album by touching or rotating [Zoom] to the left in Playback mode. 2 Touch a category option.Icon DescriptionView files normally.View files by the date they were saved.View files by recognized faces and favorite faces.View files by the file type.• It may take some time for the camera to open Smart Album, change the category, or reorganize files.• If you delete a category, all files in the category will be deleted.Viewing files as a folderPhotos captured in a High-speed burst mode or in Precapture mode appear as a folder.1 In Playback mode, drag the image left or right or move the slider to move to a desired file.• The camera will automatically play back photos in the folder.2 Touch the folder to open it.3 drag the image left or right or move the slider to move to another file. 4 Touch to return to Playback mode.You cannot edit a photo while viewing a folder. To edit a photo in a folder, touch the folder to open it, and then move to the photo.](https://usermanual.wiki/Samsung-Electronics-Co/MV900F/User-Guide-1746705-Page-92.png)
![Playback/Editing 92Viewing photos or videos in Playback modeViewing files as thumbnailsScan thumbnails of files.In Playback mode, rotate [Zoom] to the left to view thumbnails (12 at a time). Rotate [Zoom] to the left once or twice more to display more thumbnails (20 or 48 at a time). Rotate [Zoom] to the right to return to the previous view.Touch a file to display it in full screen view.Drag the screen up or down to move to the previous or next page of thumbnails.Protecting filesProtect your files from accidental deletion.1 Locate the file you want to protect, and then touch m.2 Touch Protect On.You cannot delete or rotate a protected file.](https://usermanual.wiki/Samsung-Electronics-Co/MV900F/User-Guide-1746705-Page-93.png)

![Playback/Editing 94Viewing photos or videos in Playback modeViewing panoramic photosView photos captured in Live Panorama mode.1 In Playback mode, drag the image left or right to move to a desired panoramic photo.• The entire panoramic photo appears on the screen.2 Touch .• The camera automatically scrolls through the photo from left to right for a horizontal panoramic photo and from top to bottom for a vertical panoramic photo. The camera then switches to Playback mode.• While playing back a panoramic photo, touch to pause or touch to resume.• When playback of a panoramic photo pauses, drag the image to move the photo horizontally or vertically, depending on the direction you moved when capturing the photo.3 Touch to return to Playback mode.• You can play the panoramic photo by touching only if the longest side of the photo is two or more times longer than the shortest side.• On your camera’s display, a photo captured in 3D Panorama mode appears as a 2D panoramic photo. To see the 3D effect, connect your camera to a 3D TV or 3D monitor. (p. 107)Viewing photosEnlarge part of a photo or view photos as a slide show.Enlarging a photoIn Playback mode, rotate [Zoom] to the right to enlarge a portion of the photo. Rotate [Zoom] to the left to zoom out.Enlarged areaDrag the screen to see another part of the photo.Icon DescriptionDelete the file.Crop the photo (the camera will save it as a new file).Return to the original view.](https://usermanual.wiki/Samsung-Electronics-Co/MV900F/User-Guide-1746705-Page-95.png)

![Playback/Editing 104Using the Creative Movie Maker modeView a movie made in Creative Movie Maker mode1 On the Home screen, touch .2 Select a movie.3 Touch to play the movie.To view the movie in Playback mode, touch [Playback]. (p. 88)](https://usermanual.wiki/Samsung-Electronics-Co/MV900F/User-Guide-1746705-Page-105.png)

![Wireless network 130Using Auto Backup to send photos or videos • If the PC supports the Wake on LAN (WOL) feature, you can turn on the PC automatically by searching for the PC from your camera. (p. 134)• When you connect the camera to the WLAN, select the AP that is connected to the PC.• The camera will search for available access points even if you are connecting to the same access point again.• If you turn off the camera or remove the battery while sending files, the file transfer will be interrupted.• While you are using this feature, only [POWER] is available on your camera.• You can connect only one camera to the PC at a time for sending files.• The backup may be canceled due to network conditions.• Photos or videos can be sent to a PC one time only. Files cannot be sent again even if you reconnect your camera to another PC.• When there are no files in the camera memory, you cannot use this feature.• You must turn off Windows Firewall and any other firewalls before using this feature.• You can send up to 1,000 files.• On the PC software, the server name must be entered in the Latin alphabet and can contain no more than 48 characters.](https://usermanual.wiki/Samsung-Electronics-Co/MV900F/User-Guide-1746705-Page-131.png)


![Settings 139Settings menu* DefaultItem DescriptionQuick View Set whether or not to review a captured image before returning to the Shooting mode. (Off, On*)Power SaveIf you perform no operations for 30 seconds, the camera automatically switches to Power save mode. (Off*, On)• In Power save mode, press any button other than [POWER] to resume using the camera.• Even if you do not set the Power save mode, the screen will dim 30 seconds after the last operation to save power.Connectivity* DefaultItem DescriptionVideo OutSet the video signal output for your region.• NTSC: USA, Canada, Japan, Korea, Taiwan, Mexico• PAL (supports only BDGHI): Australia, Austria, Belgium, China, Denmark, England, Finland, France, Germany, Italy, Kuwait, Malaysia, Netherlands, New Zealand, Norway, Singapore, Spain, Sweden, Switzerland, ThailandAnynet+ (HDMI-CEC)Set to control the playback feature on the camera with a TV remote control when the camera is connected to an HDTV or 3D TV that supports Anynet+(CEC).• On*: Control the camera with an HDTV remote control.• Off: View files without using an HDTV remote control.](https://usermanual.wiki/Samsung-Electronics-Co/MV900F/User-Guide-1746705-Page-140.png)
![Settings 140Settings menu* DefaultItem DescriptionHDMI SizeSet the resolution of photos when the camera plays back files on an HDTV via the HDMI cable. (NTSC: 1080i*, 720p, 480p/ PAL: 1080i*, 720p, 576p)• If the HDTV does not support the selected resolution, the HDTV automatically selects the next lower resolution.• If you select 480p or 576p, the playback menus and Smart Album will not be available when you connect the camera to a TV.PC Software Set Intelli-studio to launch automatically when you connect your camera to your computer. (Off, On*)General* DefaultItem DescriptionDevice InformationSee the Mac address and serial number of your camera.If the device name is changed, the names for the Wi-Fi network and the upload folder will also be changed.Language Set a language for the display text.Time ZoneSet the time zone for your location. When you travel to another country, select Visit, and then select the appropriate time zone. (Home*, Visit)Date/Time Set Set the date and time.Date TypeSet a date format. (YYYY/MM/DD, MM/DD/YYYY, DD/MM/YYYY)The default date type may differ depending on the language selected.Wi-FiStart a preset Wi-Fi function by pressing [SMART LINK]. (Mobile Link*, Remote Viewfinder, Social Sharing, Email, Cloud, Auto Backup, TV Link)](https://usermanual.wiki/Samsung-Electronics-Co/MV900F/User-Guide-1746705-Page-141.png)


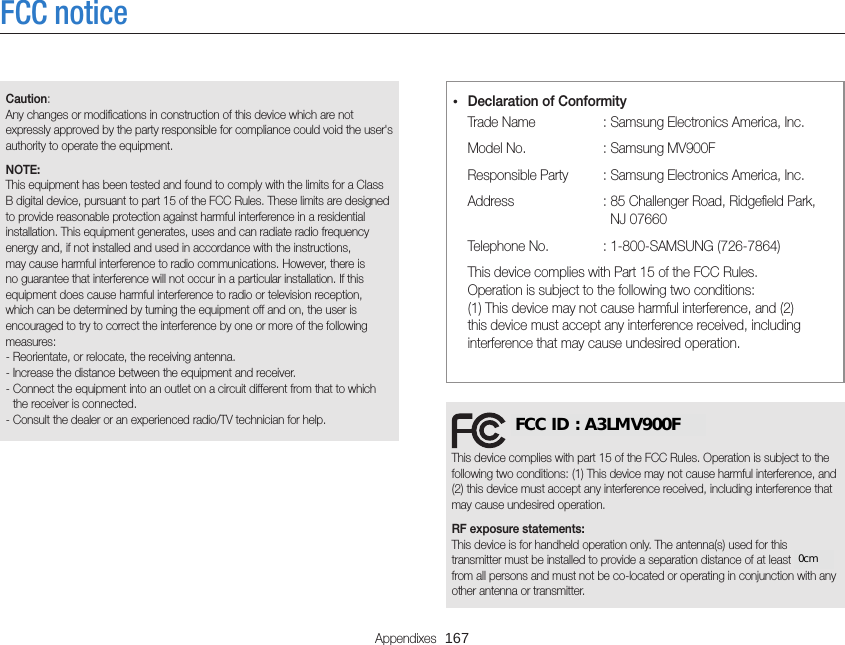
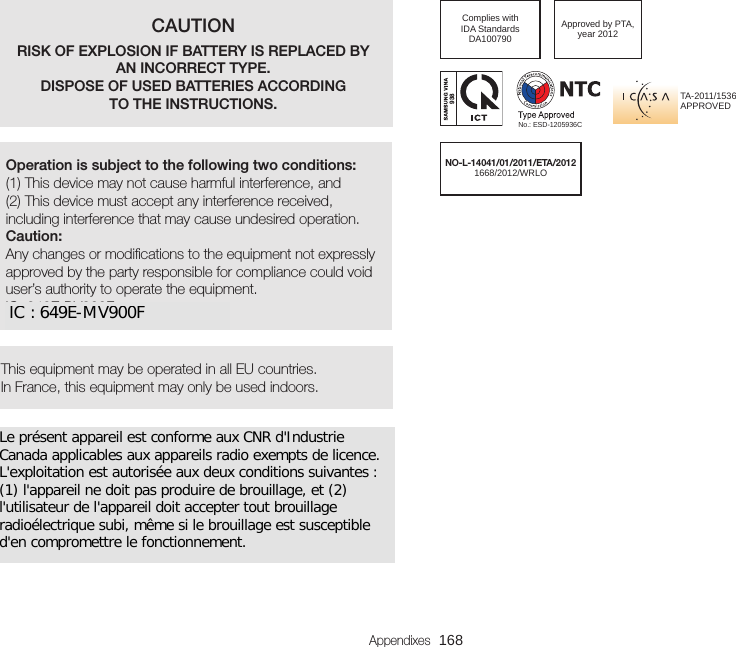
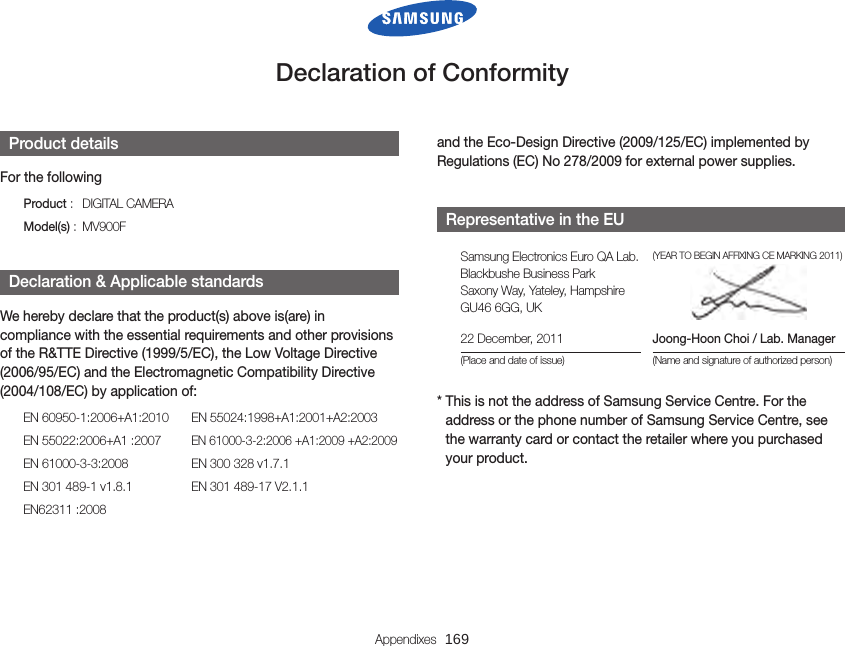
![Appendixes 166Correct Disposal of This Product (Waste Electrical & Electronic Equipment) (Applicable in the European Union and other European countries with separate collection systems)This marking on the product, accessories or literature indicates that the product and its electronic accessories (e.g. charger, headset, USB cable) should not be disposed of with other household waste at the end of their working life. To prevent possible harm to the environment or human health from uncontrolled waste disposal, please separate these items from other types of waste and recycle them responsibly to promote the sustainable reuse of material resources. Household users should contact either the retailer where they purchased this product, or their local government office, for details of where and how they can take these items for environmentally safe recycling. Business users should contact their supplier and check the terms and conditions of the purchase contract. This product and its electronic accessories should not be mixed with other commercial wastes for disposal.PlanetFirst represents Samsung Electronics' commitment to sustainable development and social responsibility through eco-driven business and management activities. Correct disposal of batteries in this product (Applicable in the European Union and other European countries with separate battery return systems)This marking on the battery, manual or packaging indicates that the batteries in this product should not be disposed of with other household waste at the end of their working life. Where marked, the chemical symbols Hg, Cd or Pb indicate that the battery contains mercury, cadmium or lead above the reference levels in EC Directive 2006/66. If batteries are not properly disposed of, these substances can cause harm to human health or the environment. To protect natural resources and to promote material reuse, please separate batteries from other types of waste and recycle them through your local, free battery return system.This Class [B] digital apparatus complies with Canadian ICES-003.Dispose unwanted electronics through an approved recycler. To find the nearest recycling location, go to our website: www.samsung.com/recyclingdirect Or call, (877) 278 - 0799](https://usermanual.wiki/Samsung-Electronics-Co/MV900F/User-Guide-1746705-Page-167.png)