Samsung Electronics Co MYMP200 MP3 Player User Manual
Samsung Electronics Co Ltd MP3 Player
User Manual
ELECTR
MP3 PLAYER
MY-MP200
Instruction Manual
2
MP3 PLAYER
CLASS 1 LASER PRODUCT
This Compact Disc player is classified as a
CLASS 1 LASER product.
Use of controls, adjustments or performance
of procedures other than those specified here-
in may result in hazardous radiation exposure.
CAUTION-Invisible laser radiation
when open and interlocks
defeated, avoid exposure to
beam.
This symbol indicates that dangerous voltage which can cause electric
shock is present inside this unit.
This symbol alerts you to important operating and maintenance instruc-
tions accompanying the unit.
WARNING: To reduce the risk of fire or electric shock, do not expose this appli-
ance to rain or moisture.
CAUTION: To prevent electric shock, match wide blade of plug to wide slot, fully
insert.
Attention: FCC Regulations state that unauthorized changes or modifications to
this equipment may void the user’s authority to operate it.
CLASS 1 LASER PRODUCT
KLASSE 1 LASER PRODUKT
LUOKAN 1 LASER LAITE
KLASS 1 LASER APPARAT
PRODUCTO LASER CLASE 1
RISK OF ELECTRIC SHOCK.
DO NOT OPEN
CAUTION:
TO REDUCE THE RISK OF ELECTRIC
SHOCK, DO NOT REMOVE REAR COVER.
NO USER SERVICEABLE PARTS INSIDE.
REFER SERVICING TO QUALIFIED
SERVICE PERSONNEL.
CAUTION
Safety Warnings
SAFETY WARNINGS

3
MP3 PLAYER
This equipment has been tested and found to comply with the limits for a Class B
digital device, pursuant to Part 15 of the FCC rules.
These limits are designed to provide reasonable protection against harmful inter-
ference in a residential installation.
This equipment generates, uses, and can radiate radio frequency energy and, if
not installed and used in accordance with the instructions, may cause harmful
interference to radio
communications. However, there is no guarantee that interference will not occur
in a particular installation. If this equipment does cause harmful interference to
radio or television reception, which can be deter-mined by turning the equipment
off and on, the user is encouraged to try to correct the interference by one or
more of the following measures:
• Re-orient or relocate the receiving antenna.
• Increase the separation between the equipment and receiver.
• Connect the equipment into an outlet on a circuit different from that to which
the receiver is
connected.
• Consult the dealer or an experienced radio/TV technician for help.
Shielded interface cables and I/O cords must be used for this equipment to com-
ply with the
relevant FCC regulations.
Changes or modifications not expressly approved in writing by Samsung may
void the user’s authority to operate this equipment.
Safety Warnings
FCC COMPLIANCE
4
MP3 PLAYER
Table of Contents
Accessories Supplied
◆Safety Warnings ................................................................................................. 2
◆Accessories Supplied ........................................................................................ 4
◆Location of controls........................................................................................... 5
◆Getting Started................................................................................................... 6
◆MP3 Player
•Connecting to PC.............................................................................................. 7
•Installing the MP3 programs on your PC..................................................... 8
•Using MP3 program......................................................................................... 9
•MP3 playback.................................................................................................. 11
•Special features............................................................................................... 12
◆Recommendations for Use
•Troubleshooting Guide.................................................................................. 14
•Specifications................................................................................................... 14
•Warranty Card ................................................................................................ 15
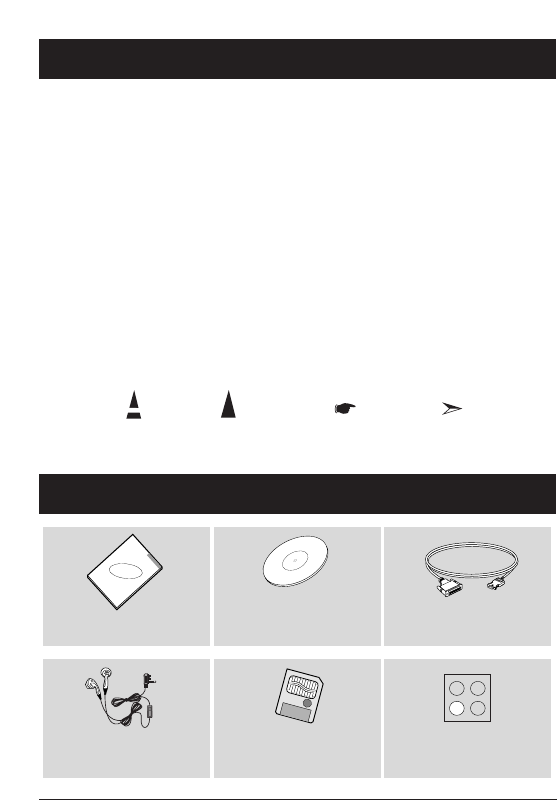
NoteImportantPushPress
Symbols
Owner's Manual
(Including Warranty) CD-ROM DISC Parallel Cable
Earphone Smart Card Recording Protect Sticker
5
MP3 PLAYER
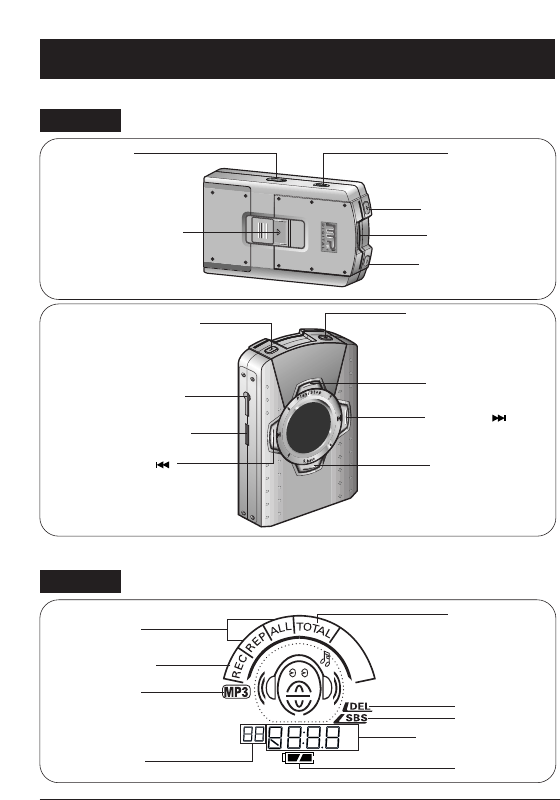
Repeat Button
Volume Increase Button
Volume Decrease Button
SmartMedia Card Slot
Hold Switch
SmartMedia Card Eject Switch
DISPLAY
UNIT
Volume Decrease Button
Headphone Terminal
Skip/Search( )
Data I/O Connector
Repeat
Recording
MP3
Channel
Volume Increase Button
Play/Stop Button
Skip/Search( )
S. bass Button
Total File
Delete Files
S. bass
Display Digits
Battery
Location of controls
6
MP3 PLAYER
Getting Started
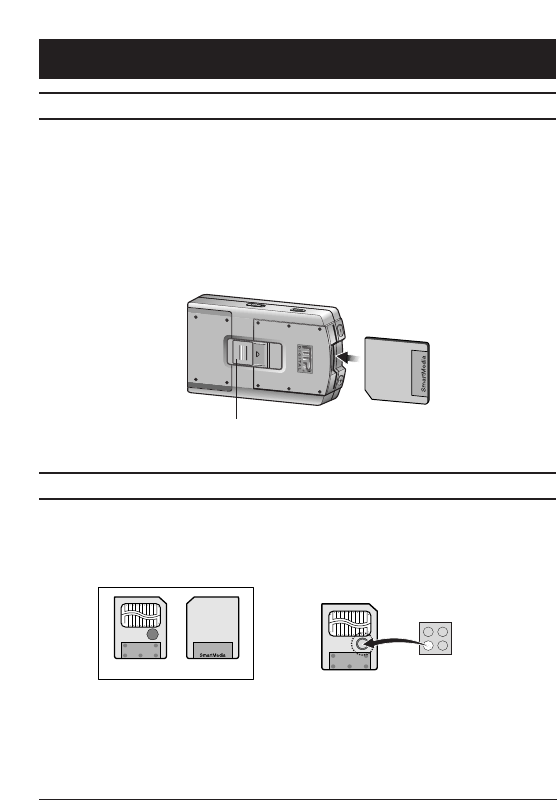
1
Insert a SmartMedia Card into the Unit
2
Downloading MP3 files.
• Refer to pages 7~13.
3
To remove the SmartMedia Card.
• Push the SmartMedia Eject Switch.
Setting the SmartMedia Card
SmartMedia Card Erase Protection Feature
SmartMedia Card Eject Switch
(Front) (Back)
(Recording protect sticker)
• To prevent an MP3 file from being erased, attach the memory erasing protection
sticker to the memory protection tab.
• Be sure to protect SmartMedia Card from magnet, humidity, shock, etc.
• Be sure to power off before inserting or removing the SmartMedia Card. Otherwise, the MP3
files stored in the player may be damaged.
• Only 16MB and 32MB SmartMedia Cards can be used with this product.
☛
7
MP3 PLAYER
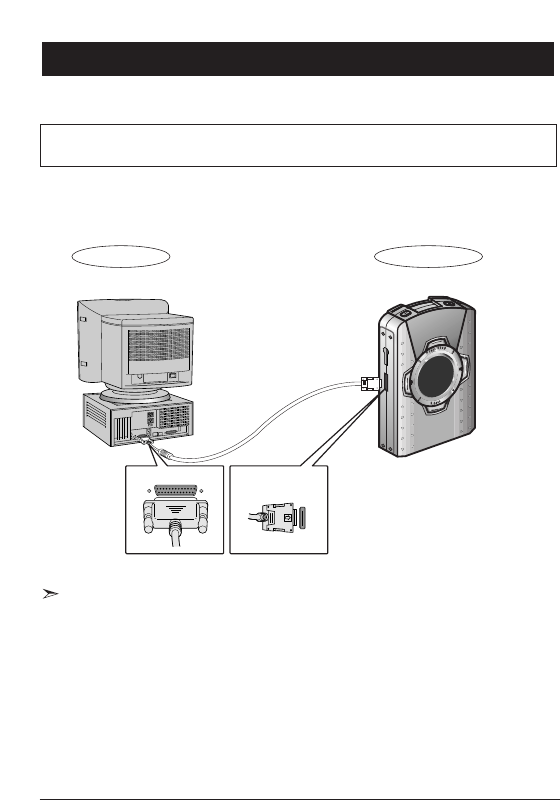
Connecting to a PC
• To download an MP3 file to your MP3 Player, the parallel port should be available
on your computer.
• If a printer is connected to the parallel port of your PC, disconnect it temporarily to
connect your MP3 Player.
• If your PC does not have a parallel port, inquire with the dealers where you
purchased your PC and have a parallel port installed.
• For best results, your system requirements should be as follows:
Taking the steps shown below will prepare your Wingo for downloading MP3 files.
PARALLEL PARALLEL PORT
• Connect the MP3 Player to a PC using a parallel cable.
MP3 Player
PC
- Pentium 120MHz or higher
- Windows 95/98
- At least 20MB Hard Disk space
- Parallel Port supporting ECP
- CD-ROM Drive
- 32MB RAM or higher
PARALLEL DATA I/O
CONNECTOR
8
MP3 PLAYER
Installing the MP3 programs on your PC
In order to download MP3 files to the MP3 Player, you must install programs contained
on the CD-ROM supplied for your PC.
• This program may not be installed correctly if MS EXPLORER version 4.01 or higher has
not been installed on your PC.
• The computer should be set while booting as shown below.
1) Turn on the computer.
2) While testing the RAM, press the F2 or Del key to enter the Setup screen.
3) Move to the Peripheral setting screen to set the Printer port.
4) Set the Printer port to the ECP mode.
5) Save the setting and reboot the computer.
Check the “Environment ➔options” menu of unit, set to the ECP mode by check.
• Refer to page 9.
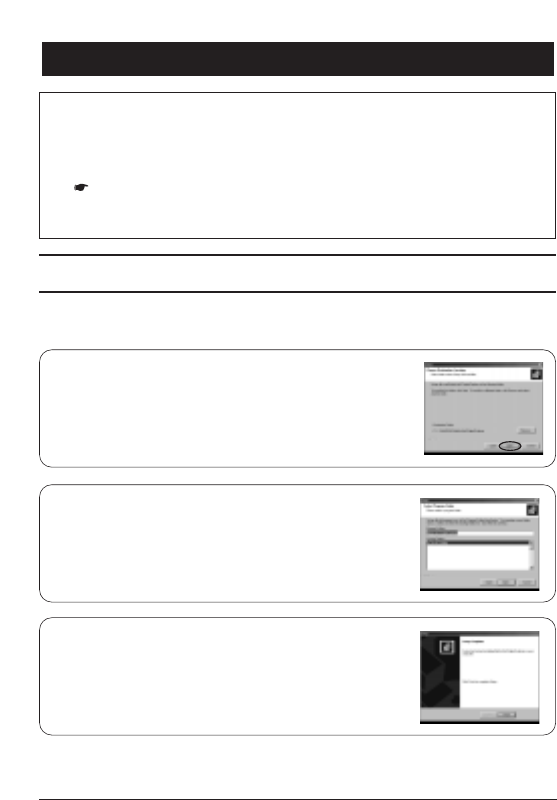
1
Load the supplied software CD into the CD-ROM
drive of your PC and click on the "NEXT" Button.
• The MP3 Player setup program will start automatically.
• If the setup does not start automatically, find the
"setup.exe" file using the File Finder, then double click
on it to execute the program.
•
To install in another directory, use the Browse Button to select.
2
Check the program path icon and then
press the "NEXT" Button.
• An icon will be created automatically.
3
After installation procedures are completed,
click the "Finish" Button to exit the setup
program.
9
MP3 PLAYER
Using MP3 program
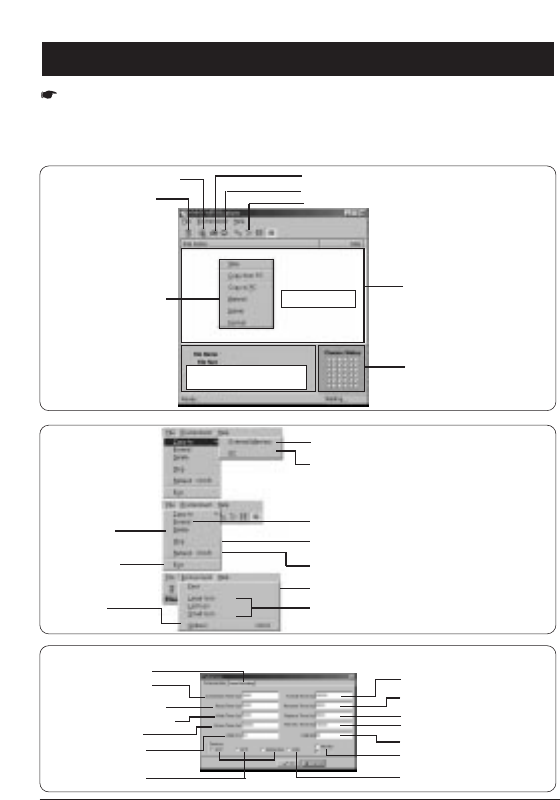
To copy files from PC to the Flash Memory of MP3 Player
To copy files from MP3 Player to PC
To delete all the data on the Flash Memory of MP3 Player
To stop all the current jobs
To restore the updated data on PC or MP3 Player
To adjust the screen font of the program
To select options to show files in the File Window
To move to
Option screen
* Communication: When error occurs, to set "Standby Time" (Unit: millisecond (1 sec. = 1000 millisecond)
When erasing all the data on MP3 Player
Standby time at initial
connection
To delete the
selected file
To finish all jobs
and exit the program
When reading data by PC
When writing on MP3 Player
When deleting files
Not used
Not used
Check these when the
computer supports
ECP mode
To backup files
To update files
To read file information
Not used
Not used
Not used
•
When the MP3 Player is off and the connection cable is disconnected while using this program,
an error may occur. If this happens, turn off the MP3 Player and turn it on again, make the correct
connection, and run this program again.
•
If you stop this program during the downloading or uploading of a file, an error will occur.
Select "REFRESH" menu to initialize the program, and reconnect the communication.
Data transmission progress window
File Window
Press the right
button of the mouse,
then the menu
window will open.
To show the progress of file
copying
To show the files stored in the
MP3 Player
To select options to see files in the File Window
To stop the current job
To copy files from PC to MP3 Player
To delete selected file
To copy files from MP3 Player to PC
10
MP3 PLAYER
Using MP3 program
2
3
4
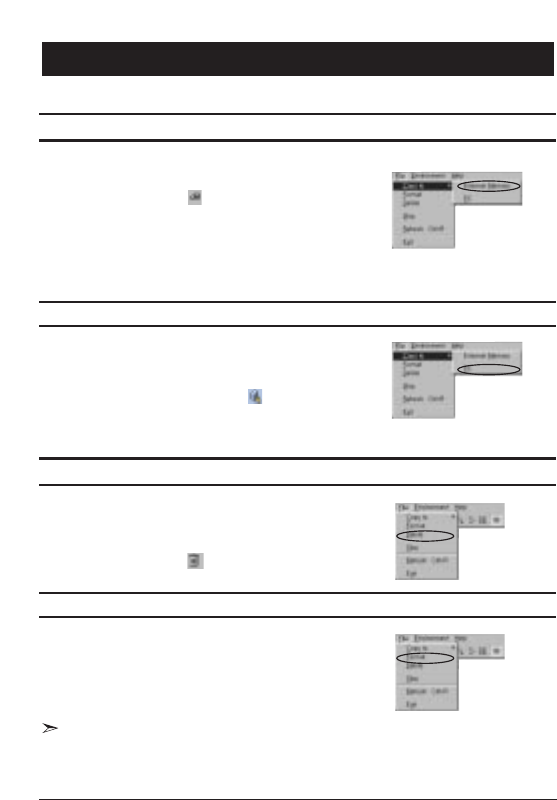
Double click on “MP3 Player Explorer icon” to execute the program.
Then choose "External Memory" command from "Copy to" command.
Alternately, press the Button on the screen.
From the PC window, choose the "File" menu either by clicking
the left button of the Mouse or by using (ins) key.
Press the OPEN button on the screen.
From the MP3 Player window, choose the "File" menu either
by clicking the left button of the Mouse or by using (Ins) key.
Then choose "Flash Memory" command from "Copy to"
command. Alternately, press the Button on the screen.
From the PC window, choose the “Directory”, Press the
“SAVE” Button.
From the MP3 Player window, choose the "File" menu either by
clicking the left button of the Mouse or by using (ins) key.
Then choose the "Delete" command from the File menu.
Alternately, press the Button on the screen.
2
3
2
1
1
1
Choose the "File" menu. Then choose the "Format"
command from the "File" menu to delete all the files.
•
Your unit (MP3 Player) can download up to 32 Mbytes. Hence, depending on the size of
MP3 file, the number of files to be downloaded may be limited.
•
The number on the Total Space of the Data transmission progress window indicates the
remaining space for download.
Transferring files from PC to MP3 Player
Transferring files from MP3 Player to PC
Deleting files
Deleting all files in the MP3 Player
1
11
MP3 PLAYER
MP3 playback
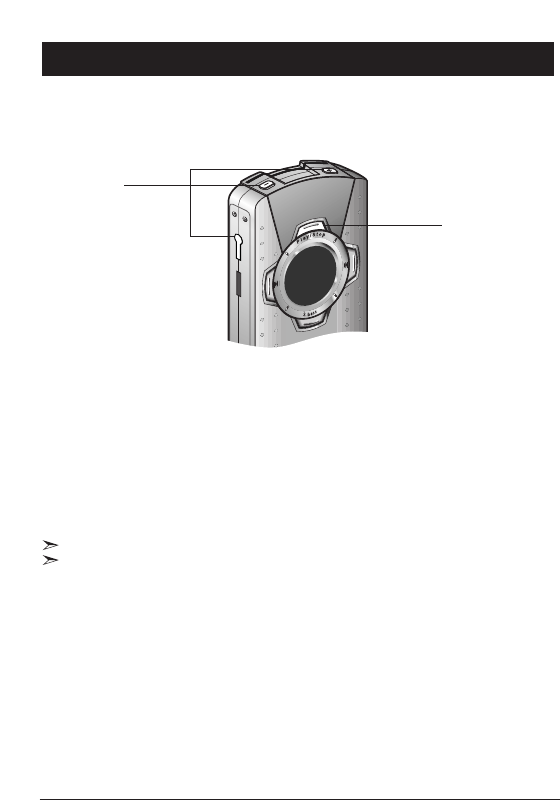
If you want to pause MP3 music, press “Play/Stop” button.
If you want to play MP3 music again,
press "Play/Stop" button again.
-MP3 music will restart to play at the point where it was stopped.
2
2
After connecting headphones, adjust the volume.
• If the power is completely disconnected by replacing the battery, the first MP3 file
will be played.
☛
☛
• The player automatically switches off if no buttons are pressed within 100 seconds of
when playback is stopped, the end of a file is reached, or pause is activated.
☛
Copy audio files from your PC to play them back on the MP3 player.
1
1
Press the Play/Stop Button.
• Switch the player on by pressing Play/Stop.
• Switch the player off by pressing Play/Stop for over 2 seconds.
12
MP3 PLAYER
Special Features
Repeat Button
Press REPEAT button to select “REPEAT” or “REPEAT ALL”
To listen to the present song repeatedly:
• Press the REPEAT button to select, then “REP” appears on the LCD flash.
To repeat all the songs:
• Press the REPEAT button once more, then “REP ALL” appears on the LCD.
If you want to disable the repeat function:
• press the REPEAT button once more. “REP ALL” will disappear from the LCD.
REPEAT Function
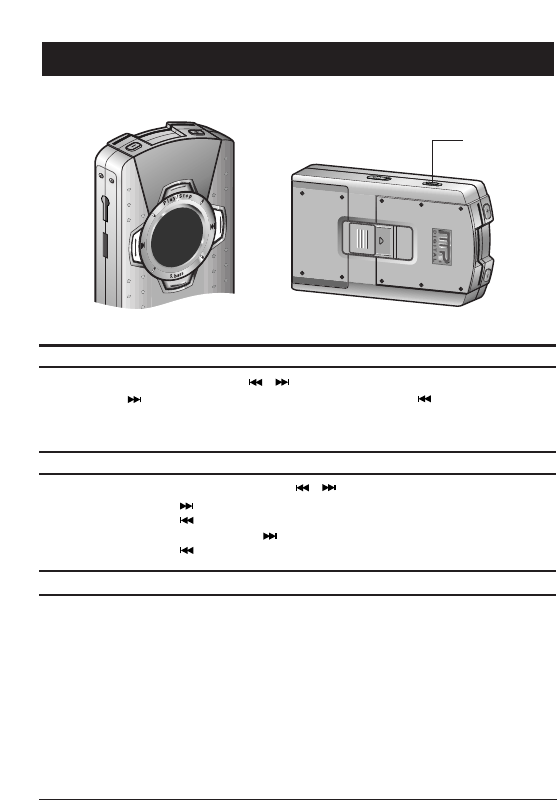
During playback, momentarily press the " , " Button.
•Press and release the " " Button to select the next track.
Press and release the " " Button to replay the current track.
•
When in STOP mode, press and release the " " Button to playback the second track.
Press and release the " " Button to playback the last track.
To select a track
During playback, hold down the " , " Button.
•Hold down " " Button to fast forward the track. Hold down " " Button to search
backwards.
•Release the button for playback at normal speed.
High-Speed Search
13
MP3 PLAYER
2
Press it again to select “OFF”
11
1
Unlock
Lock
➨
➨
11
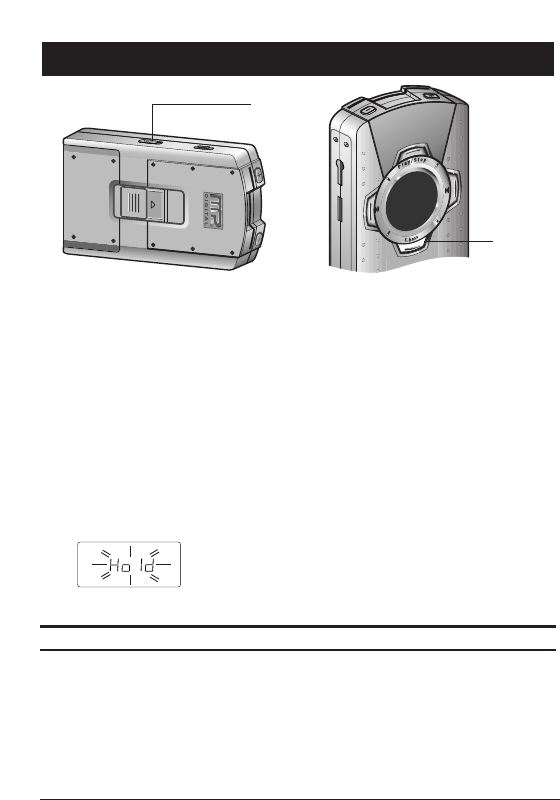
Set the HOLD Switch to Lock position.
•Use the HOLD Function in the following cases:
1)
While in playback mode, if the HOLD Switch is set to the Lock position, none of the other
buttons will not work.
2)Even when the HOLD Switch on main unit is in the Lock position, the Remote Control will
work.
•If you carry this unit in your bag without using it, be sure to check that the unit is in
“HOLD” mode to prevent the power button from being pressed accidentally. (This
function will save the battery life.)
While the HOLD Switch on the main unit is in “Lock” position,
pressing any button on MP3 Player unit will cause the “Hold”
Indicator to flash and the operation corrersponding to the button
will not start.
DEL
AREA
TAPE ST
F
R
SBS
AUTO
ME
REP
FREE
FM
MP3
1
Press the S. bass Button
•” SBS ” will appear on the LCD and the bass will be increased.
S. bass Function
Special Features
14
MP3 PLAYER
MP3
Flash Memory . . . . . . . . . . . . . . . . . . . . . . . . . . . . . . . . . . . . . . . . . . . . . . . . . . . . . . . . . . . . . . . . . . . . . . . . . . . . . . . . . . . . . . . . . . . . . . . . 32MByte
Signal/Noise Ratio . . . . . . . . . . . . . . . . . . . . . . . . . . . . . . . . . . . . . . . . . . . . . . . . . . . . . . . . . . . . . . . . . . . . . . . . . . . . . . . . . . . . . . . . . . . . . . . 70dB
Frequency Range . . . . . . . . . . . . . . . . . . . . . . . . . . . . . . . . . . . . . . . . . . . . . . . . . . . . . . . . . . . . . . . . . . . . . . . . . . . . . . . . . . 20Hz~20KHz
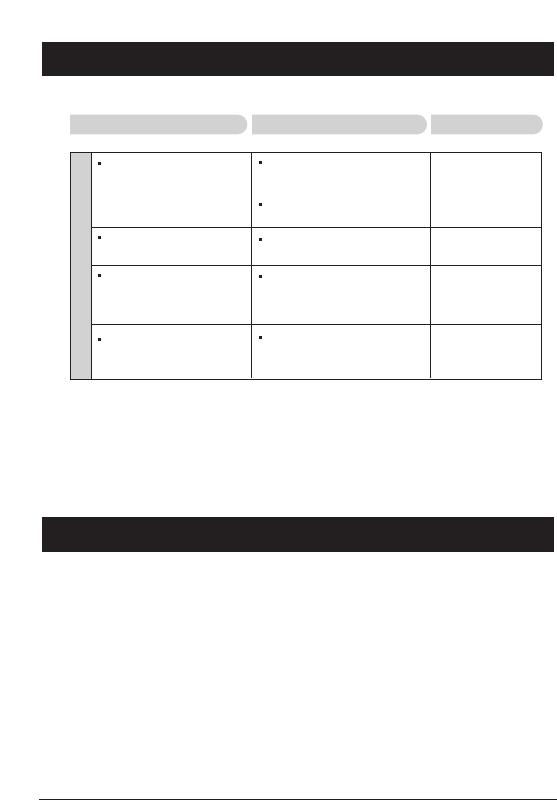
Problem
Check the charge level of the
general or rechargeable
batteries loaded in the set.
Check the polarity (+, -) of the
loaded batteries.
Check if the Hold function is
selected.
Check that MP3 files are stored
in the memory of the player.
Check the connection of the PC
and the player.
If the power cannot be
turned on or no operations
can be performed:
If the buttons on the player do
not work:
If music playback is not
performed even when the
Play button is pressed in the
MP3 mode:
If MP3 file download cannot
be performed: Check the
power is properly supplied.
M
P
3
P
L
A
Y
E
R
Troubleshooting Guide
Specifications
ChecksRemedy

15
MP3 PLAYER
Warranty (for USA users only)
SAMSUNG
LIMITED WARRANTY
Samsung Electronics America Inc.(SEA), warrants that this product is free from defective
materials and workmanship.
SEA further warrants that if this product falls to operate properly within the specified war-
ranty period and the failure is due to improper workmanship or defective materials, SEA
will repair or replace the product at its option.
All warranty repairs must be performed by a SEA Authorized Service Center. (The name
and address of the location nearest you can be obtained by calling toll free: 1-800-SAM-
SUNG)
LABOR PARTS
90 Days (Carry–in) One year
On carry-in models, transportation to and from the service center is the customer’s respon-
sibility.
The original dated sales receipt must be retained by the customer and is the only accept-
able proof of purchase. It must be presented to the authorized service center at the time
service is requested.
EXCLUSIONS (WHAT IS NOT COVERED)
This warranty does not cover damage due to accident, fire, flood and/or other acts of God;
misuse, incorrect line voltage, improper installation, improper or unauthorized repairs,
commercial use or damage that occurs in shipping. Operations explained in the instruction
manual are not covered under the terms of this warranty. This warranty will automatically
be voided for any unit found with a missing or altered serial number. This warranty is valid
only on products purchased and used in the United States and Puerto Rico.
Some states do not allow the exclusions or limitations of incidental or consequential dam-
ages, or allow limitations on how long an implied warranty lasts, so the above limitations
or exclusions may not apply to you. This warranty gives you specific legal rights and you
may also have other rights which vary from state to state.
Warranty (for Canada users only)
SAMSUNG
LIMITED WARRANTY
Samsung Electronics Canada.(SECA), warrants that this product is free from defective
material and workmanship.
SECA further warrants that if this product falls to operate properly within the specified
warranty period and the failure is due to improper workmanship or defective materials,
SECA will repair or replace the product at its option.
All warranty repairs must be performed by a SECA Authorized Service Center. (The name
and address of the location nearest you can be obtained by calling toll free: 1-800-SAM-
SUNG)
LABOR PARTS
90 Days (Carry–in) One year
On carry-in models, transportation to and from the service center is the customer’s respon-
sibility.
The original dated sales receipt must be retained by the customer and is the only accept-
able proof of purchase. It must be presented to the authorized service center at the time
service is requested.
EXCLUSIONS (WHAT IS NOT COVERED)
This warranty does not cover damage due to accident, fire, flood and/ or other acts of God;
misuse, incorrect line voltage, improper installation, improper or unauthorized repairs,
commercial use or damage that occurs in shipping. Exterior and interior finish, lamps,
glass are not covered under this warranty. Customer adjustments which are explained in
the instruction manual are not covered under the terms of this warranty. This warranty will
automatically be voided for any unit found with a missing or altered serial number. This
warranty is valid only on products purchased and used in Canada.

ELECTRONICSELECTRONICS
SAMSUNG ELECTRONICS AMERICA, INC.
HEADQUARTERS
105 Challenger Road, Ridgefield Park, N.J.
07660-0511
TEL : 1-800-SAMSUNG
SERVICE DIVISION
1 Samsung Place Ledgewood, N.J. 07852
1-800-SAMSUNG (1-800-726-7864)
www.samsungsupport.com