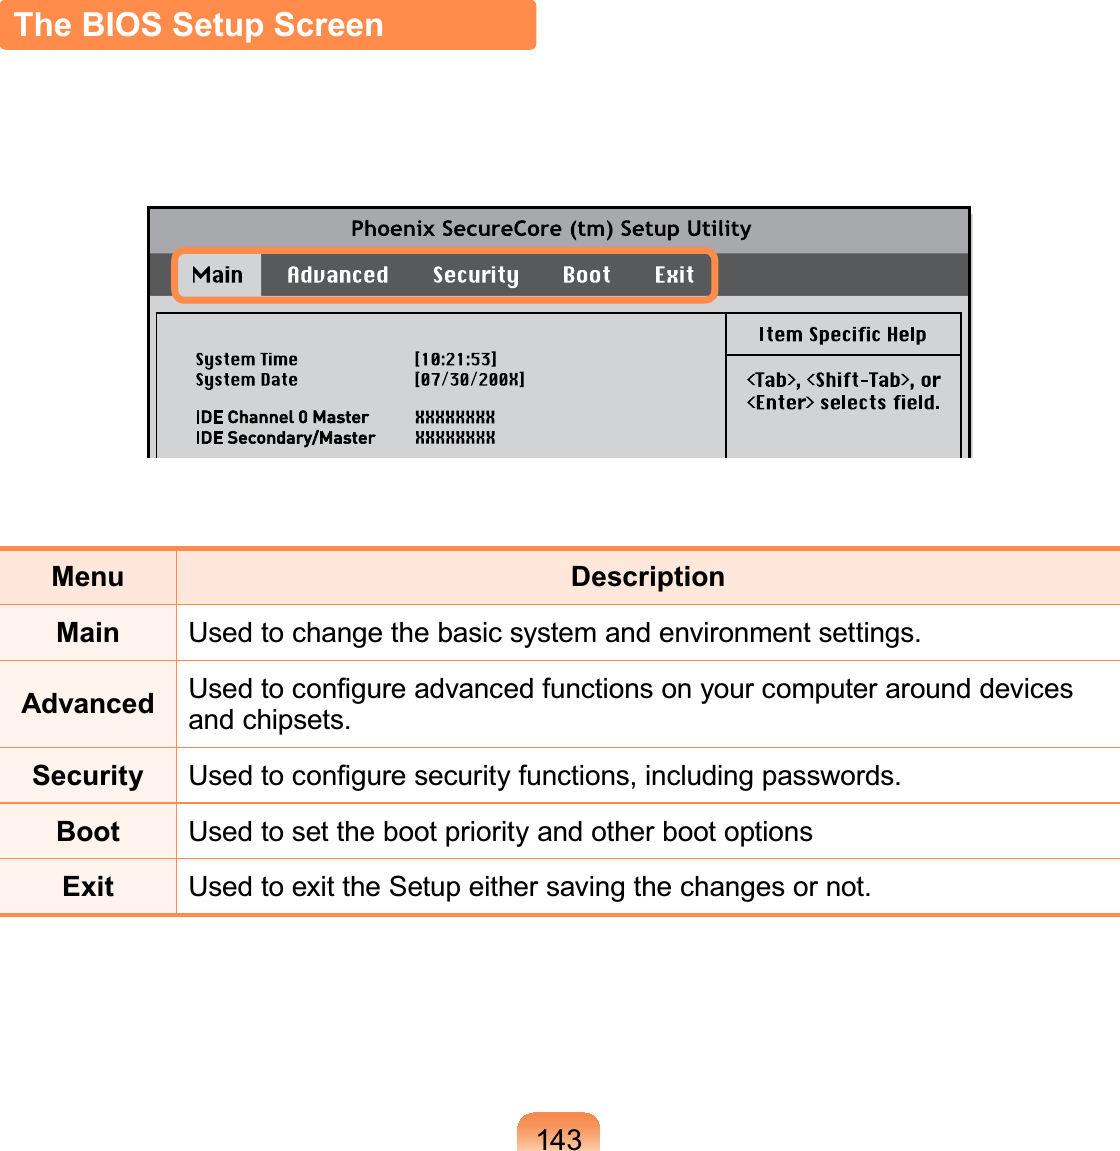
Samsung Electronics Co NC10-512ANXM Notebook Computer User Manual 0908 Winchester NC10 XP Eng
Samsung Electronics Co Ltd Notebook Computer 0908 Winchester NC10 XP Eng
UserManual.wiki
>
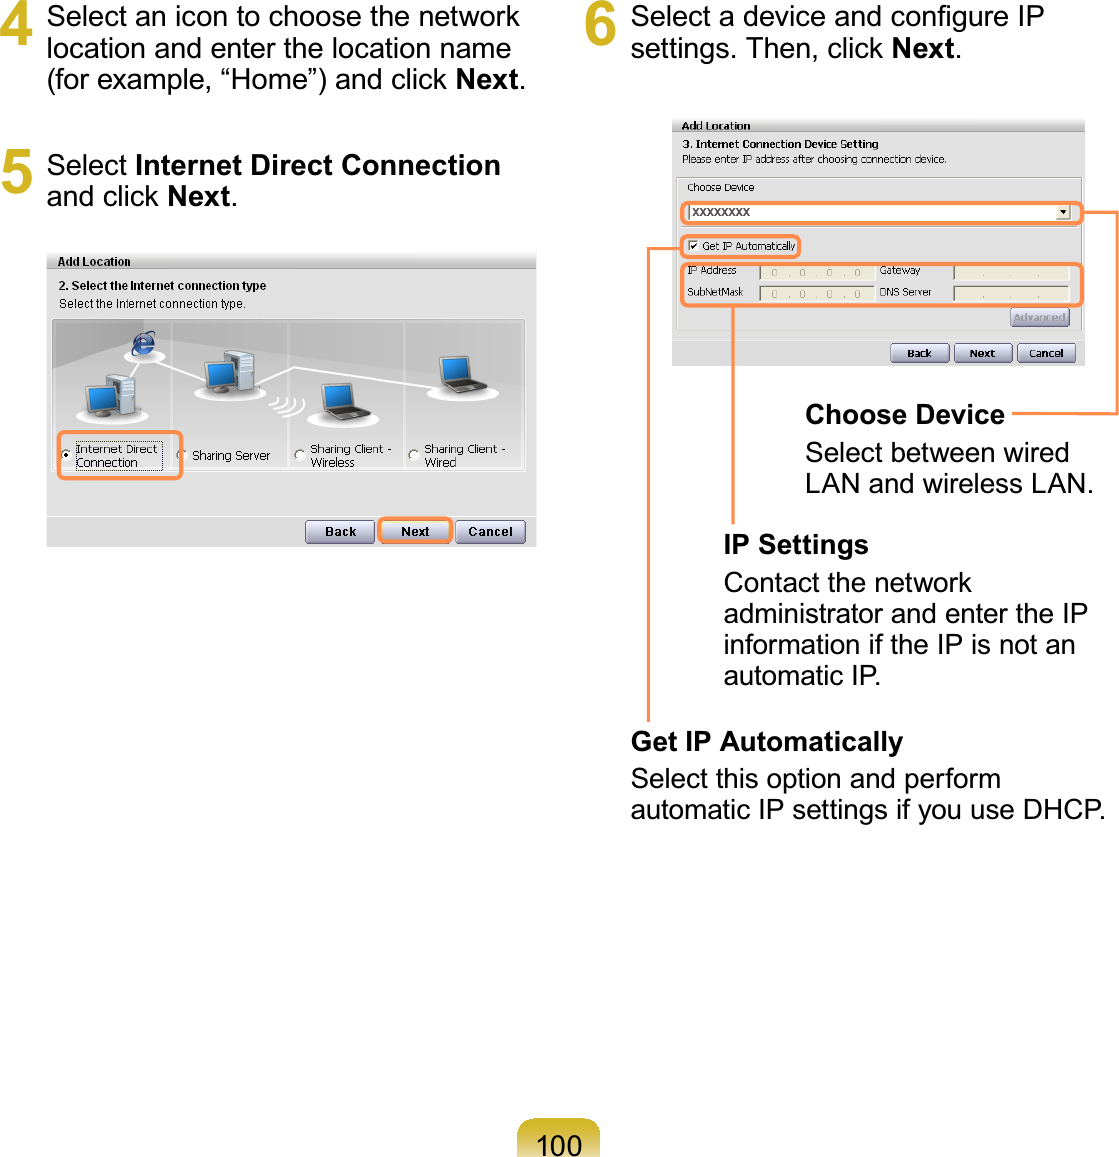
Samsung Electronics Co
>
NC10 512ANXM User Manual
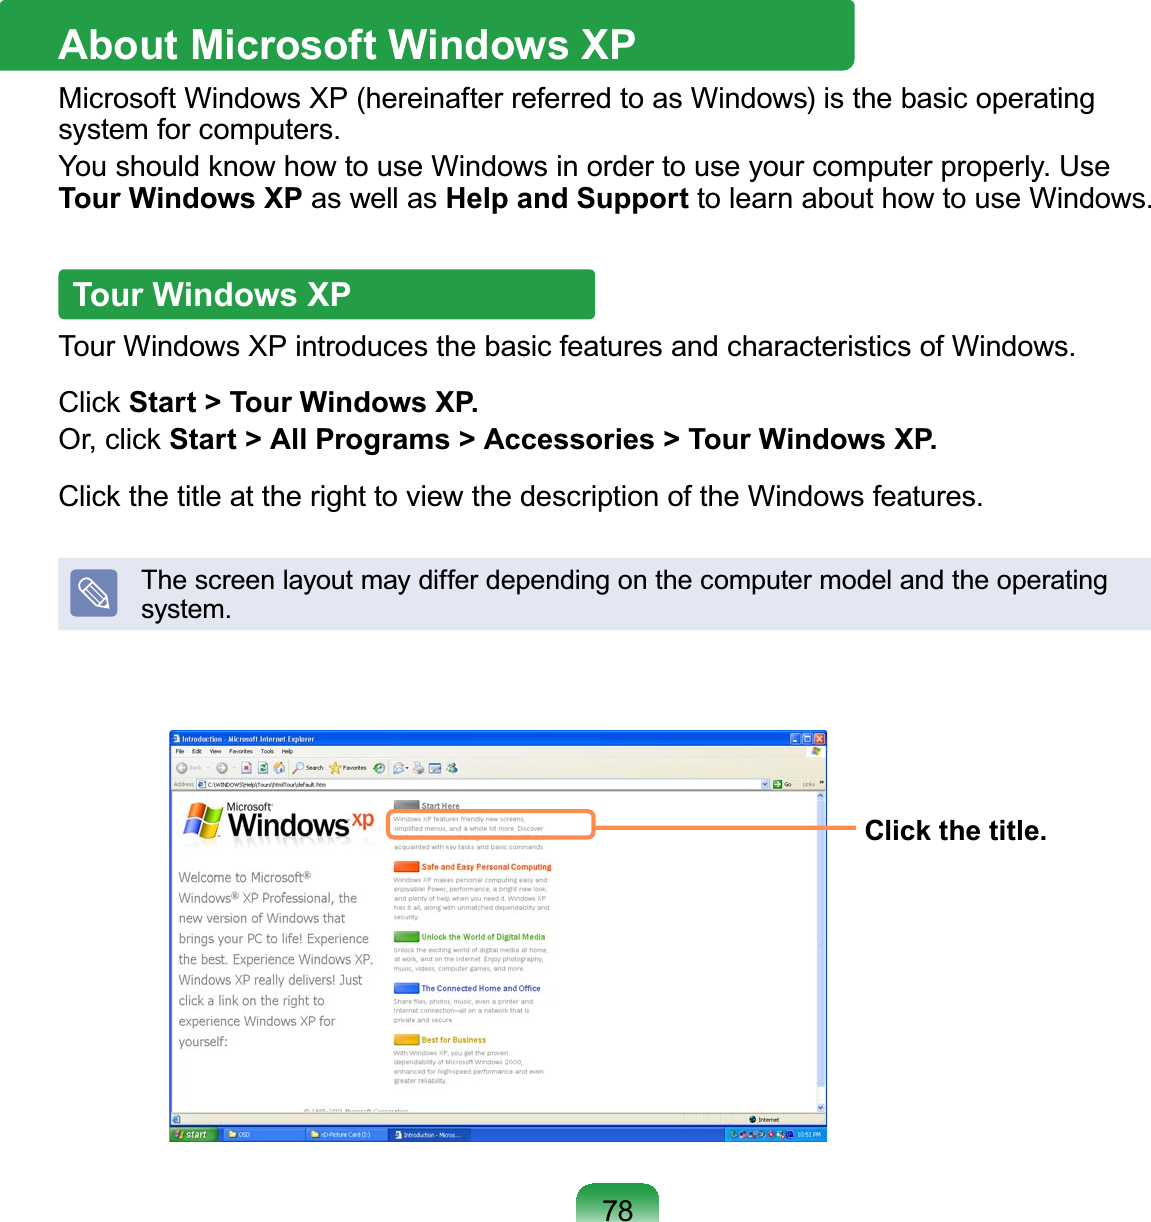
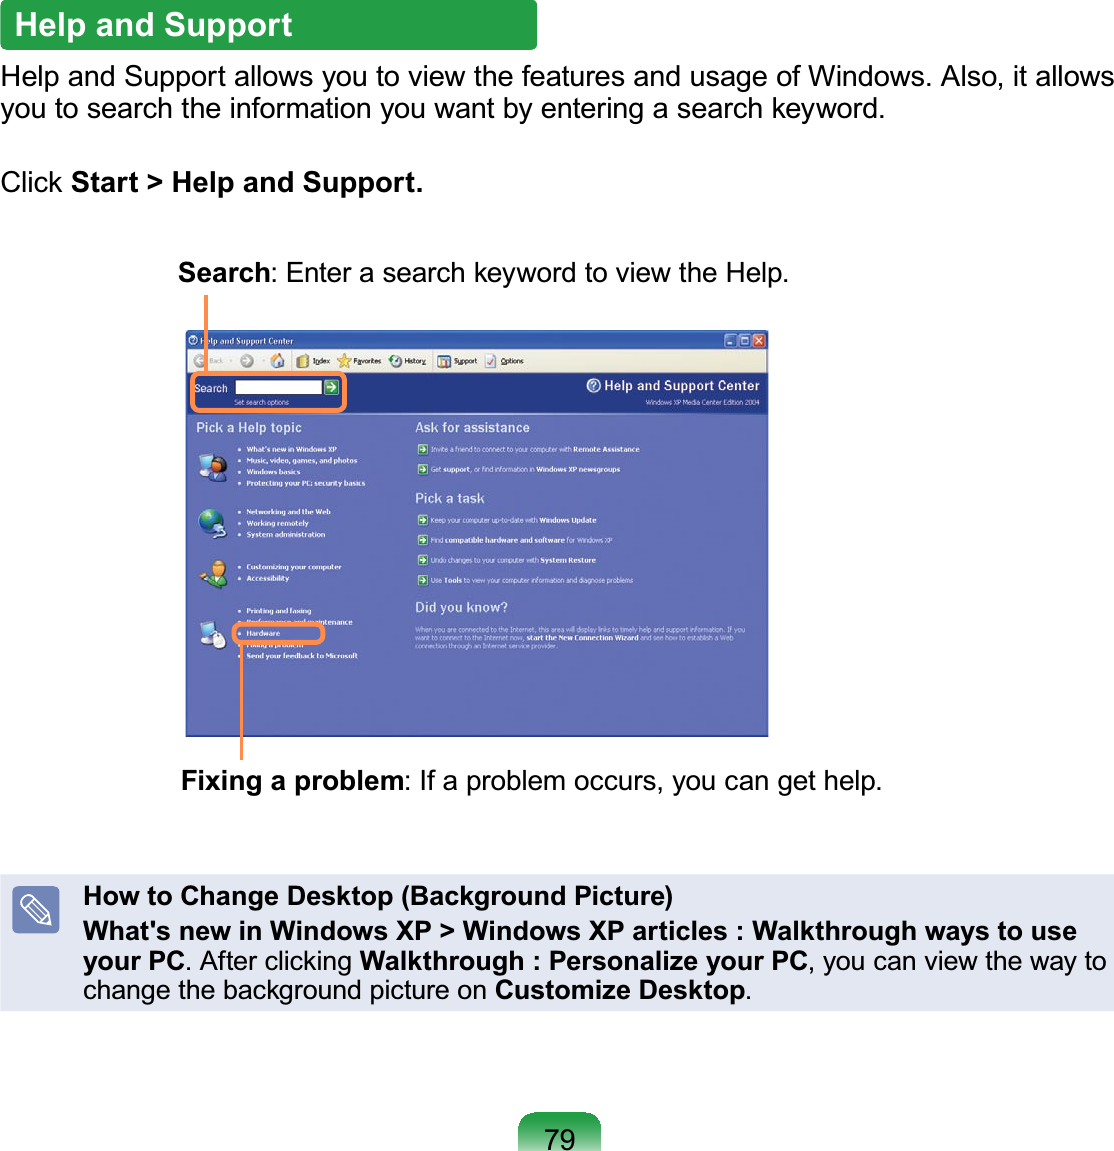
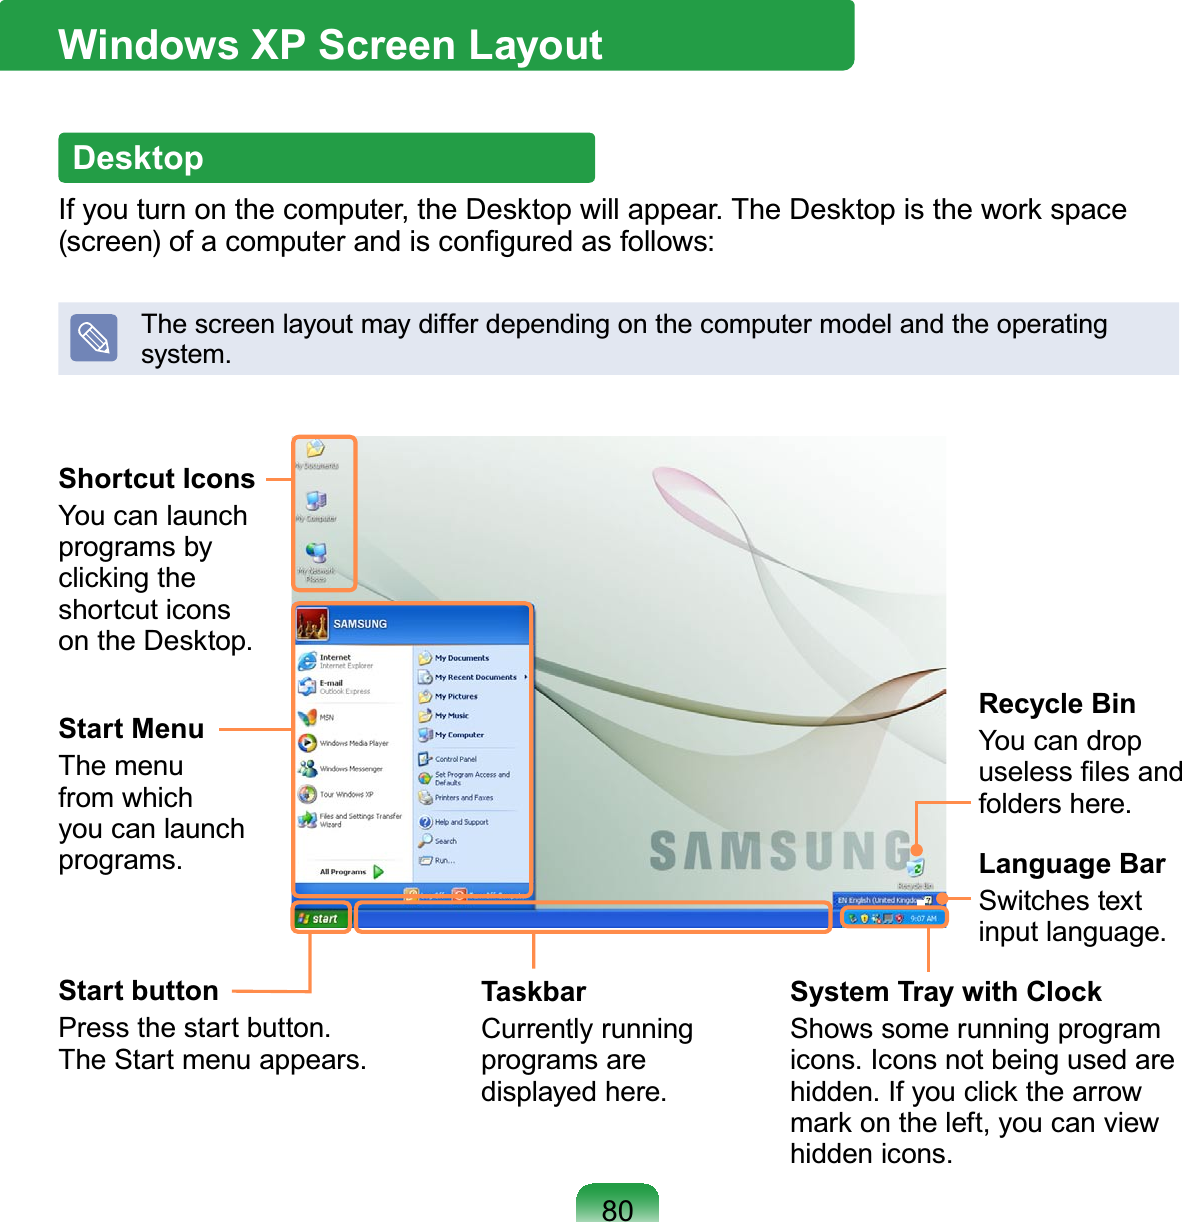
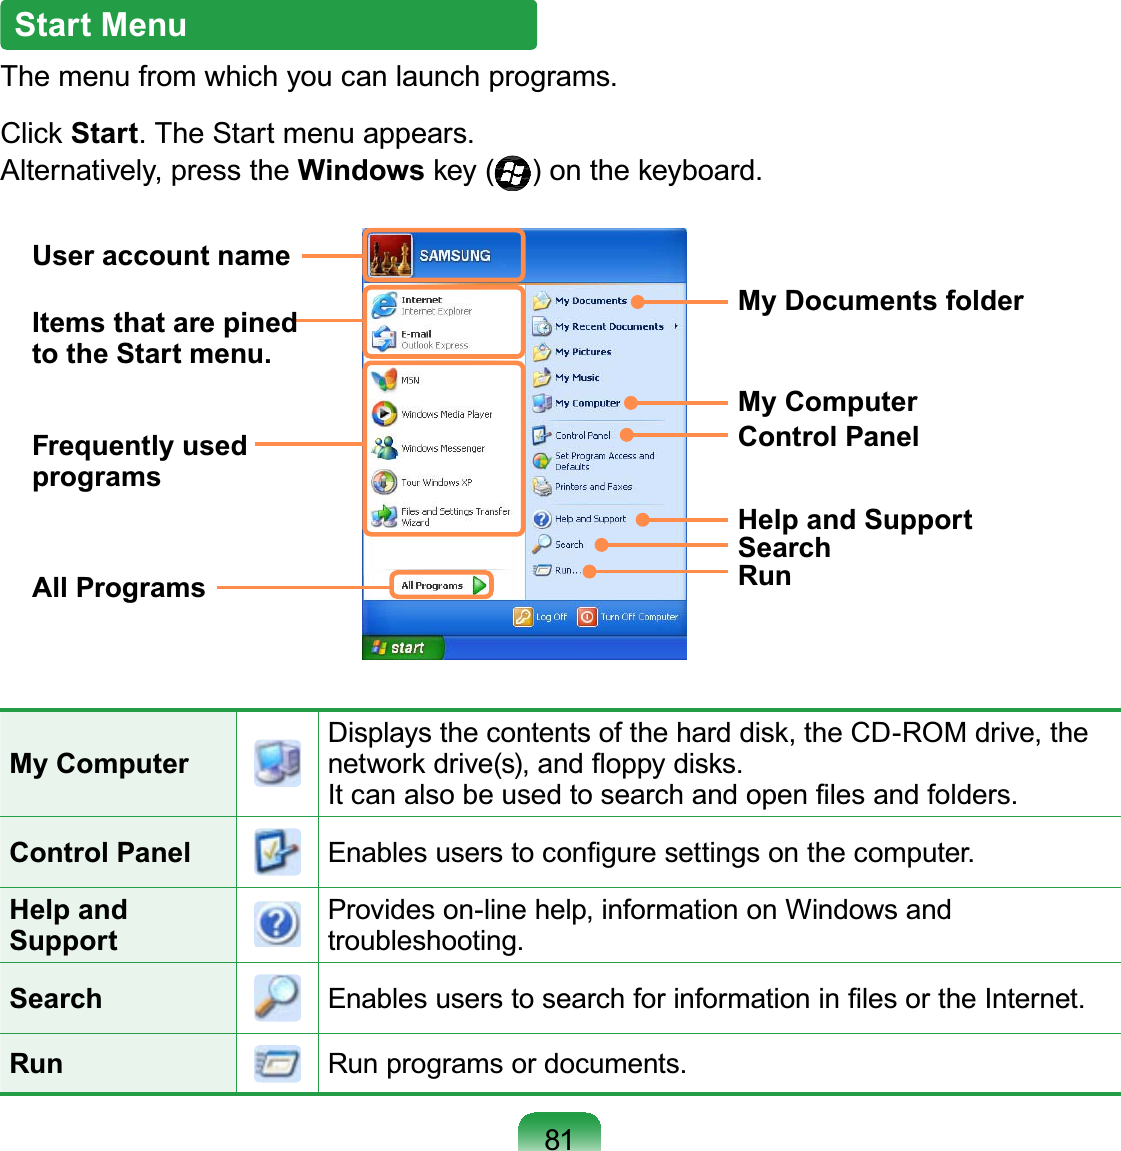
User Manual
Navigation menu
Upload a User Manual
Namespaces
Wiki Guide
HTML
PDF
Info
Views
User Manual
Discussion / Help
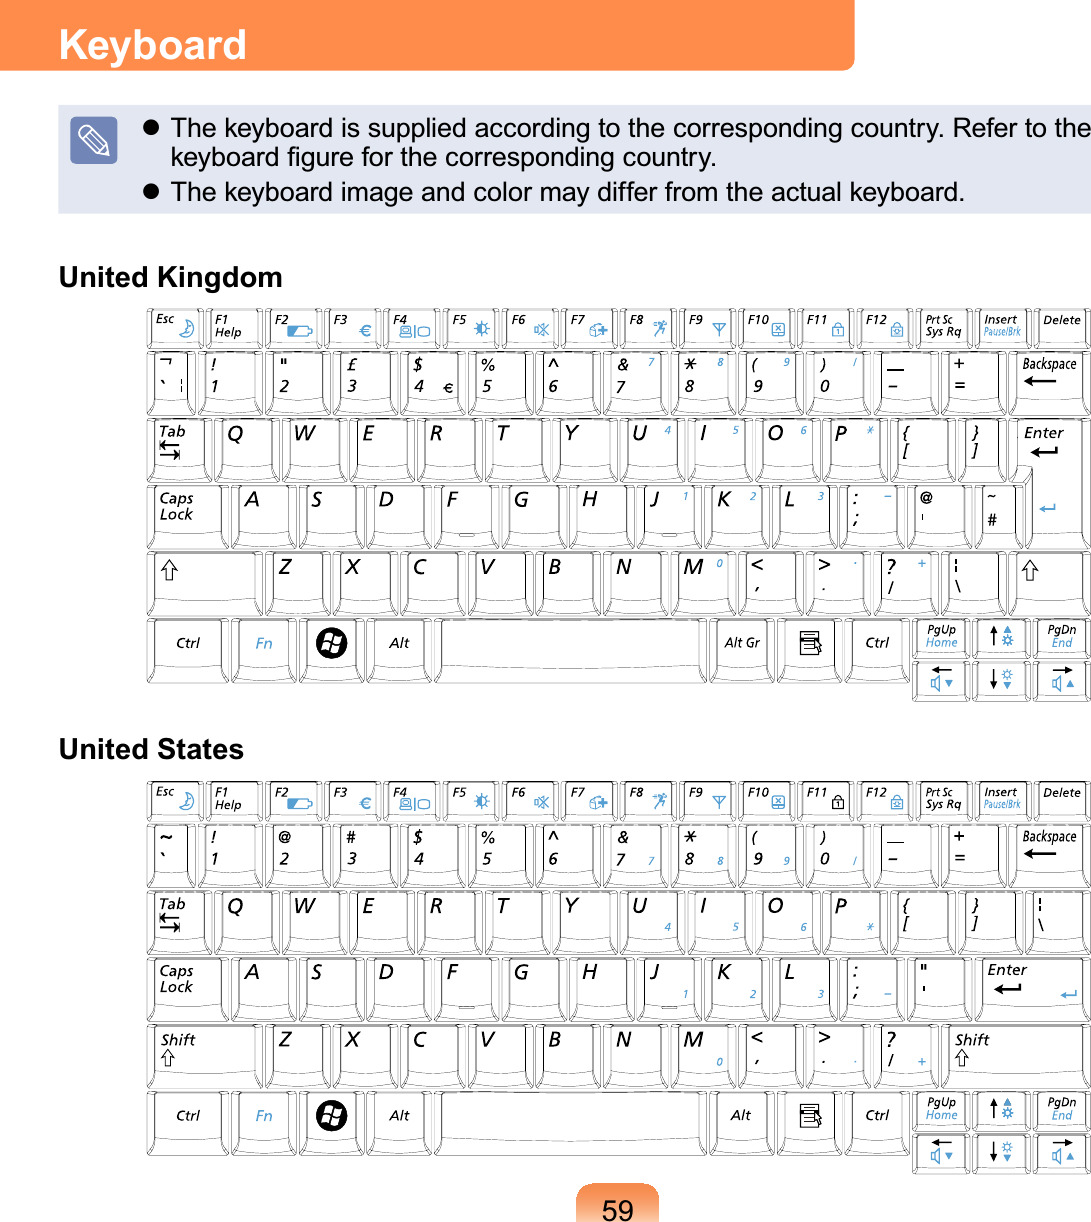
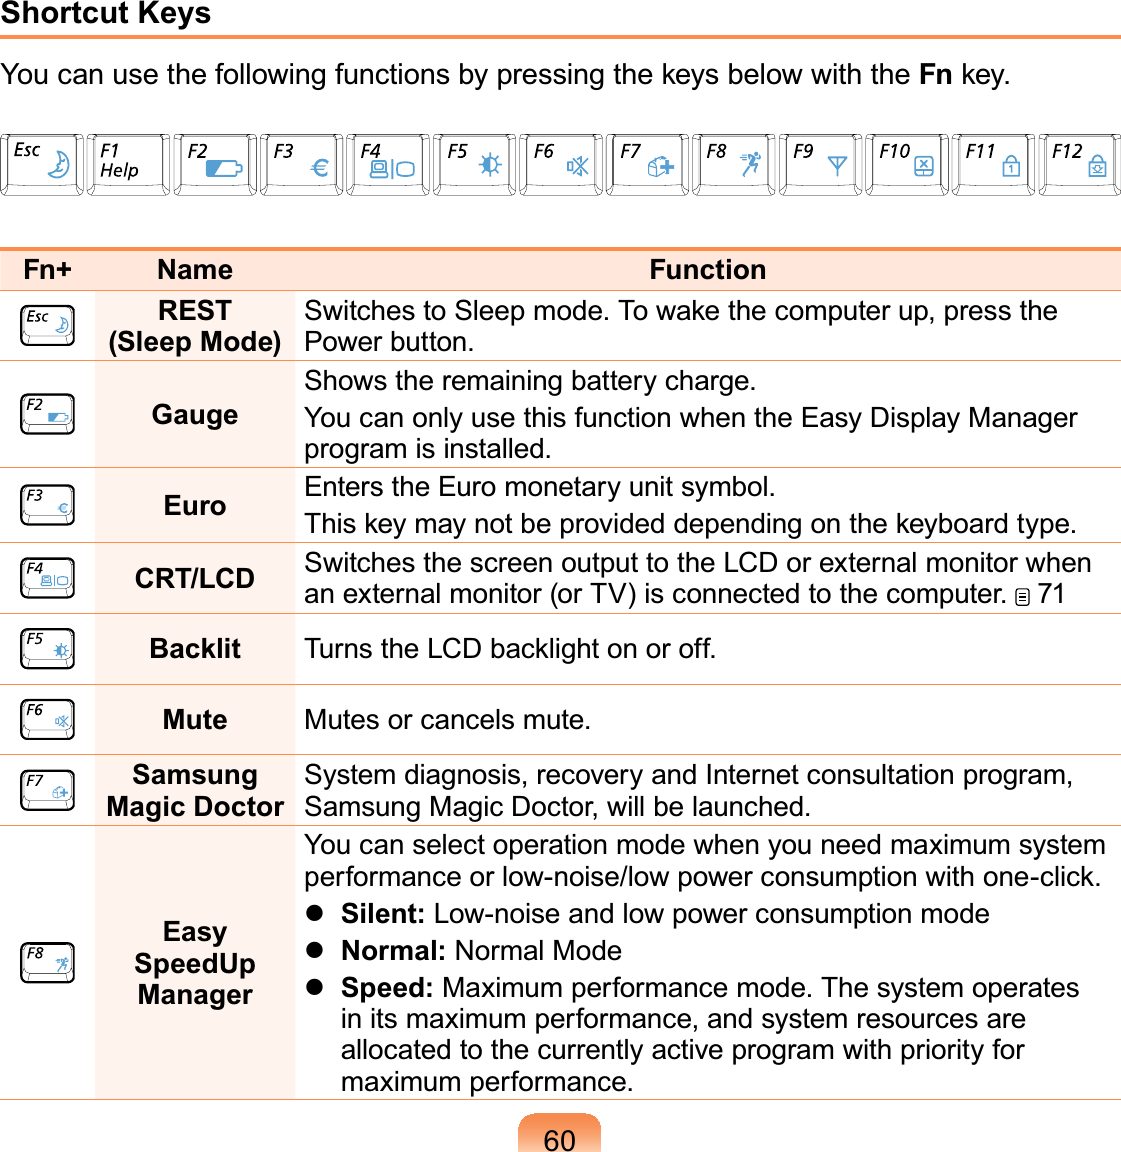
Navigation
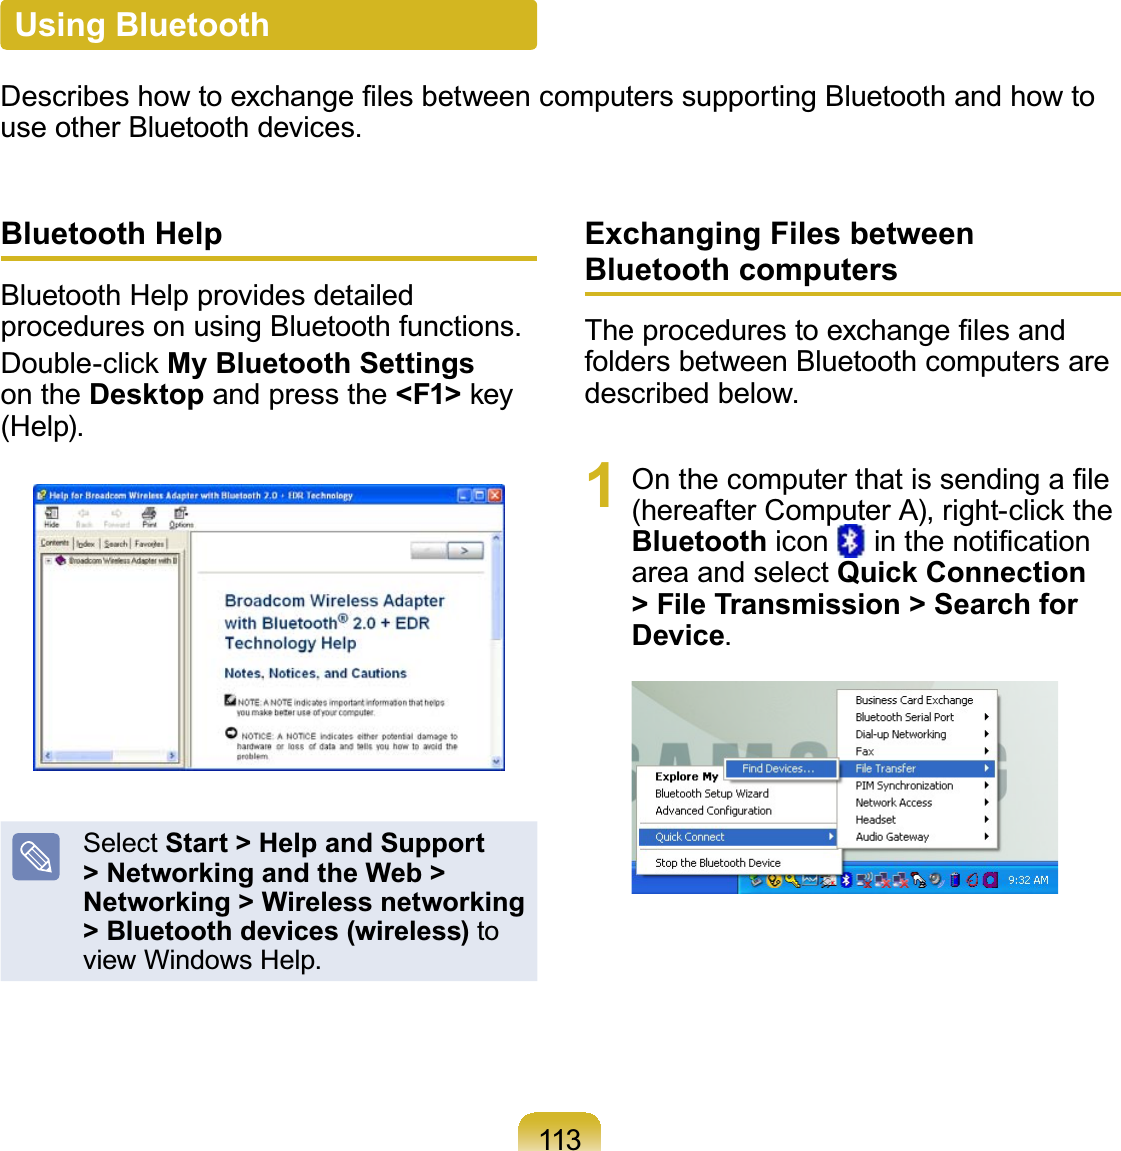
![10Plug the power cord ¿UPO\LQWRWKHSRZHUoutlet and AC adapter.Failingtodosomaycause¿UHKD]DUGDo not unplug the power cord out by pulling the cable only.Ifthecordisdamaged,itPD\FDXVHHOHFWULFVKRFNDo not bend the power cord excessively or do not place a heavy object over the power cord. It is especially important to keep the power cord out of reach of infants and pets.Ifthecordisdamaged,itPD\FDXVHHOHFWULFVKRFNRU¿UHIf water or another substance enters the power input jack, AC adapter or the computer, disconnect the power cord and contact the service center.Damage to the devicewithin the computer mayFDXVHHOHFWULFVKRFNRU¿UHhazard.](https://usermanual.wiki/Samsung-Electronics-Co/NC10-512ANXM/User-Guide-1116856-Page-11.png)
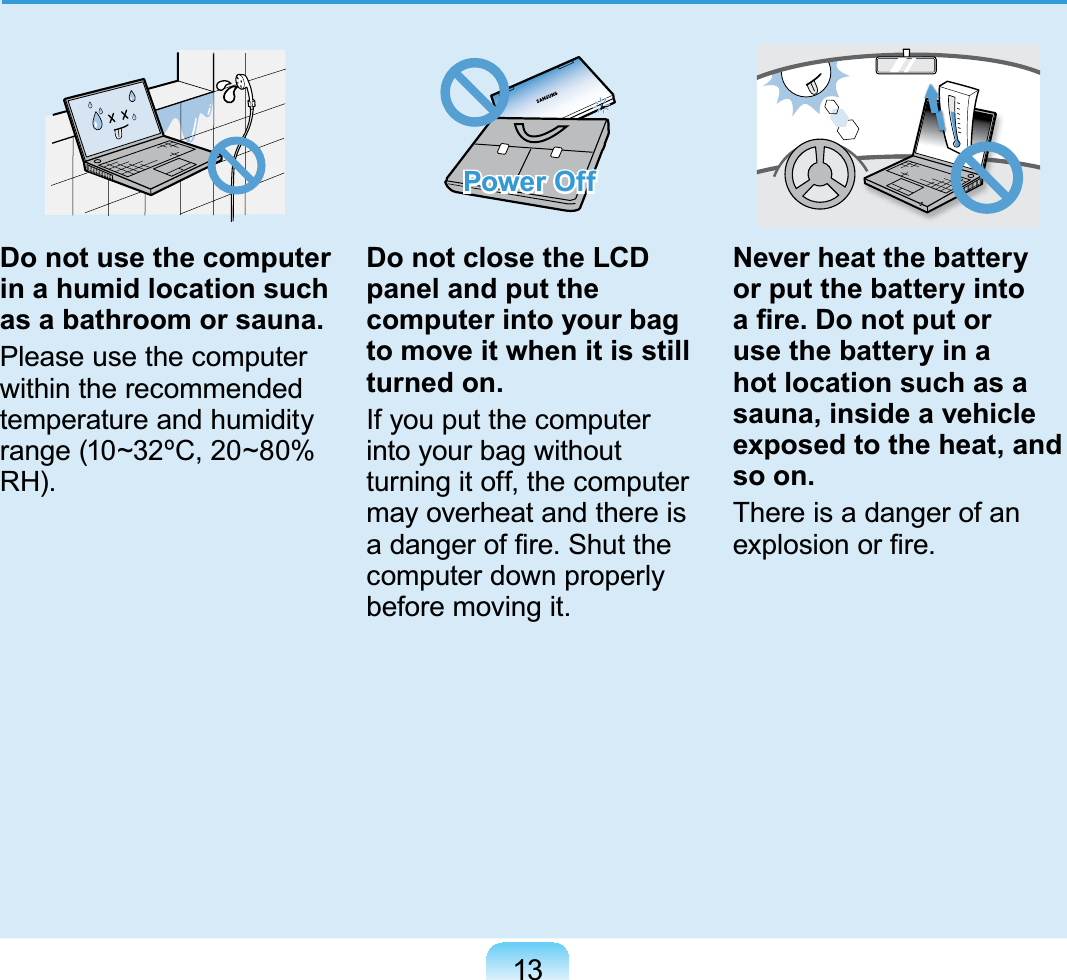
![15Disconnect all cables connected to the computer before cleaning it. If you are using a notebook computer, remove the battery.There is a danger ofHOHFWULFVKRFNRUGDPDJHto the product.Do not connect a phone line connected to a digital phone to the modem.ThereisadangerofaHOHFWULFVKRFN¿UHRUdamage to the product.Do not place any FRQWDLQHU¿OOHGZLWKwater or chemicals over or near the computer.If water or chemicalsenter the computer, thisPD\FDXVH¿UHRUHOHFWULFVKRFNIf the computer is broken or dropped, disconnect the power cord and contact a service center for a safety check.8VLQJDEURNHQFRPSXWHUPD\FDXVHHOHFWULFVKRFNRU¿UHKD]DUGAvoid direct sunlight when the computer is in an air-tight location such as inside a vehicle.7KHUHLVDGDQJHURID¿UHhazard.Thecomputermayoverheat and also presentopportunitytothieves.Usage Related](https://usermanual.wiki/Samsung-Electronics-Co/NC10-512ANXM/User-Guide-1116856-Page-16.png)
![26Volume Control (Headphones and Speakers)&KHFN\RXUYROXPH¿UVWWROLVWHQWRmusic.Check your volume!!z&KHFNLIWKHYROXPHLVWRRORXGEHIRUHusing headphones.z It is not recommended usingheadphones for long periods of time.z Any deviation from the equalizerdefault setting could cause hearingimpairment.z The default setting can be changedthrough software and driver updatesZLWKRXW\RXULQWHUYHQWLRQ3OHDVHFKHFNWKHHTXDOL]HUGHIDXOWVHWWLQJEHIRUH¿UVWusage.Use Time (Break Time)z7DNHDEUHDNIRUPLQXWHVRUPRUHDIWHUDPLQXWHSHULRGZKHQZRUNLQJformorethanonehour.Illuminationz'RQRWXVHWKHFRPSXWHULQGDUNlocations. The illumination level forcomputerusemustbeasbrightsoforUHDGLQJDERRNz Indirect illumination is recommended.8VHDFXUWDLQWRSUHYHQWUHÀHFWLRQRQthe LCD screen.Operation Conditionz Donotusethecomputerinhotandhumid locations.z Usethecomputerwithintheallowedtemperature and humidity rangeVSHFL¿HGLQWKH8VHU*XLGH](https://usermanual.wiki/Samsung-Electronics-Co/NC10-512ANXM/User-Guide-1116856-Page-27.png)

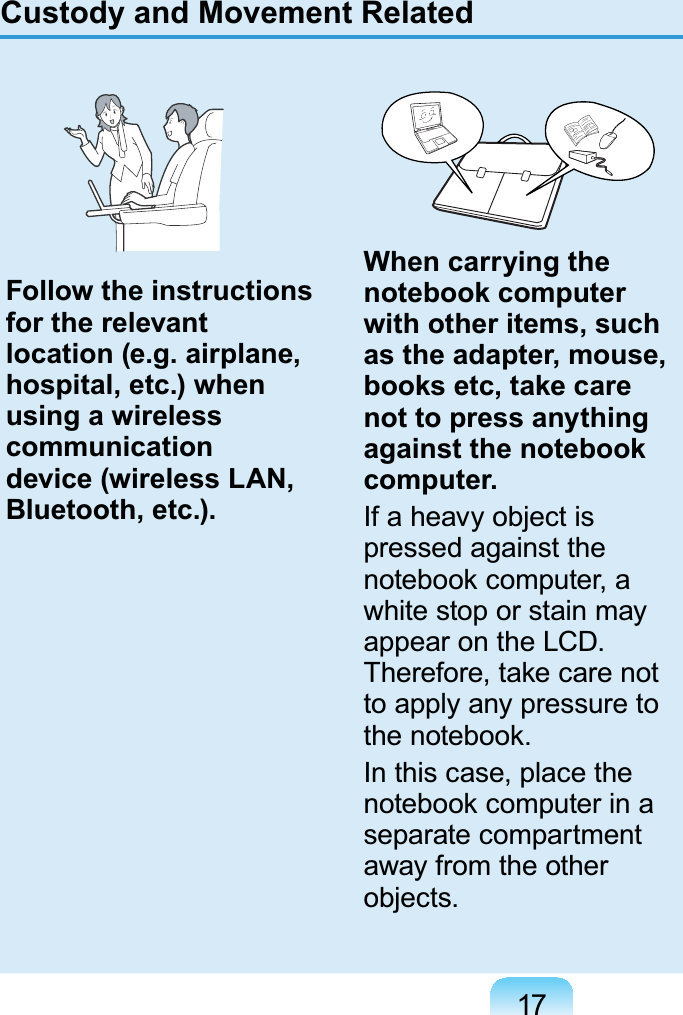
![30Battery DisposalDo not put rechargeable batteries or products powered by non-removablerechargeable batteries in the garbage.ContacttheSamsungHelplineforinformationonhowtodisposeofbatteriesthatyoucannotuseorrechargeanylonger.Follow all local regulations when disposing of old batteries.THEREISARISKOFEXPLOSIONIFBATTERYISREPLACEDBYANINCORRECT TYPE.DISPOSE OF USED BATTERIES ACCORDING TO THE INSTRUCTIONS.Replacement Parts and AccessoriesUseonlyreplacementpartsandaccessoriesrecommendedbymanufacturer.7RUHGXFHWKHULVNRI¿UHXVHRQO\1R$:*RUODUJHUWHOHFRPPXQLFDWLRQVOLQHFRUG'RQRWXVHWKLVSURGXFWLQDUHDVFODVVL¿HGDVKD]DUGRXV6XFKDUHDVLQFOXGHSDWLHQWcare areas of medical and dental facilities, oxygen rich environments, or industrialareas.](https://usermanual.wiki/Samsung-Electronics-Co/NC10-512ANXM/User-Guide-1116856-Page-31.png)
![31Laser SafetyAllsystemsequippedwithCDorDVDdrivescomplywiththeappropriatesafetyVWDQGDUGVLQFOXGLQJ,(&7KHODVHUGHYLFHVLQWKHVHFRPSRQHQWVDUHFODVVL¿HGas“Class1LaserProducts”underaUSDepartmentofHealthandHumanServices(DHHS) Radiation Performance Standard. Should the unit ever need servicing, contactan authorized service location.zLaser Safety Note: UseofcontrolsoradjustmentsorperformanceofproceduresotherthanthoseVSHFL¿HGLQWKLVPDQXDOPD\UHVXOWLQKD]DUGRXVUDGLDWLRQH[SRVXUH7RSUHYHQWexposuretolaserbeams,donottrytoopentheenclosureofaCDorDVDdrive.z Class1Mlaserradiationwhenoperatingpartisopen. Donotviewdirectlywithopticalinstruments.z Class 3B invisible laser radiation when open. Avoidexposuretothebeam.Connect and Disconnect the AC adapter7KHVRFNHWRXWOHWVKDOOEHLQVWDOOHGQHDUWKHHTXLSPHQWDQGVKDOOEHHDVLO\DFFHVVLEOHDo not unplug the power cord out by pulling the cable only.](https://usermanual.wiki/Samsung-Electronics-Co/NC10-512ANXM/User-Guide-1116856-Page-32.png)
![33Regulatory Compliance StatementsWireless GuidanceLow power, Radio LAN type devices (radio frequency (RF) wireless communicationdevices), operating in the 2.4GHz/5GHz Band, may be present (embedded) in yourQRWHERRNV\VWHP7KHIROORZLQJVHFWLRQLVDJHQHUDORYHUYLHZRIFRQVLGHUDWLRQVZKLOHoperating a wireless device.$GGLWLRQDOOLPLWDWLRQVFDXWLRQVDQGFRQFHUQVIRUVSHFL¿FFRXQWULHVDUHOLVWHGLQWKHVSHFL¿FFRXQWU\VHFWLRQVRUFRXQWU\JURXSVHFWLRQV7KHZLUHOHVVGHYLFHVLQ\RXUV\VWHPDUHRQO\TXDOL¿HGIRUXVHLQWKHFRXQWULHVLGHQWL¿HGE\WKH5DGLR$SSURYDO0DUNVonthesystemratinglabel.Ifthecountryyouwillbeusingthewirelessdevicein,isnotlisted,pleasecontactyourlocalRadioApprovalagencyforrequirements.Wirelessdevicesarecloselyregulatedandusemaynotbeallowed.7KH5)¿HOGVWUHQJWKRIWKHZLUHOHVVGHYLFHRUGHYLFHVWKDWPD\EHHPEHGGHGLQ\RXUQRWHERRNDUHZHOOEHORZDOOLQWHUQDWLRQDO5)H[SRVXUHOLPLWVDVNQRZQDWWKLVWLPH%HFDXVHWKHZLUHOHVVGHYLFHVZKLFKPD\EHHPEHGGHGLQWR\RXUQRWHERRNHPLWOHVVenergy than is allowed in radio frequency safety standards and recommendations,manufacturer believes these devices are safe for use. Regardless of the power levels,FDUHVKRXOGEHWDNHQWRPLQLPL]HKXPDQFRQWDFWGXULQJQRUPDORSHUDWLRQAsageneralguideline,aseparationof 20cm(8inches)betweenthewirelessdeviceandthebody,foruseofawirelessdevicenearthebody(thisdoesnotincludeextremities) is typical. This device should be used more than 20 cm (8 inches) from thebody when wireless devices are on and transmitting.This transmitter must not be collocated or operate in conjunction with any other antennaor transmitter except the installed Bluetooth transmitter.Some circumstances require restrictions on wireless devices. Examples of commonrestrictions are listed on the next page:](https://usermanual.wiki/Samsung-Electronics-Co/NC10-512ANXM/User-Guide-1116856-Page-34.png)
![34z Radio frequency wireless communication can interfere with equipment oncommercial aircraft. Current aviation regulations require wireless devices to beturnedoffwhiletravelinginanairplane.$%*1DOVRNQRZQDVZLUHOHVV(WKHUQHWRU:L¿DQG%OXHWRRWKcommunication devices are examples of devices that provide wirelesscommunication.z,QHQYLURQPHQWVZKHUHWKHULVNRILQWHUIHUHQFHWRRWKHUGHYLFHVRUVHUYLFHVLVharmful or perceived as harmful, the option to use a wireless device may beUHVWULFWHGRUHOLPLQDWHG$LUSRUWV+RVSLWDOVDQG2[\JHQRUÀDPPDEOHJDVODGHQatmospheresarelimitedexampleswhereuseofwirelessdevicesmayberestrictedor eliminated. When in environments where you are uncertain of the sanction to useZLUHOHVVGHYLFHVDVNWKHDSSOLFDEOHDXWKRULW\IRUDXWKRUL]DWLRQSULRUWRXVHRUWXUQLQJon the wireless device.z Everycountryhasdifferentrestrictionson the use of wireless devices. Since yoursystem is equipped with a wireless device, when traveling between countries with\RXUV\VWHPFKHFNZLWKWKHORFDO5DGLR$SSURYDODXWKRULWLHVSULRUWRDQ\PRYHRUtrip for any restrictions on the use of a wireless device in the destination country.z If your system came equipped with an internal embedded wireless device, do notoperate the wireless device unless all covers and shields are in place and thesystem is fully assembled.z Wireless devices are not user serviceable. Do not modify them in any way.0RGL¿FDWLRQWRDZLUHOHVVGHYLFHZLOOYRLGWKHDXWKRUL]DWLRQWRXVHLW3OHDVHFRQWDFWmanufacturer for service.z Onlyusedriversapprovedforthecountryinwhichthedevicewillbeused.Seethemanufacturer System Restoration Kit, or contact manufacturer Technical Support foradditional information.](https://usermanual.wiki/Samsung-Electronics-Co/NC10-512ANXM/User-Guide-1116856-Page-35.png)
![36Unintentional Emitter per FCC Part 15This device complies with Part 15 of theFCC Rules. Operation is subject to thefollowing two conditions:(1) this devicemay not cause harmful interference,and (2) this device must accept anyinterference received, includinginterferencethatmaycauseundesiredoperation.This equipment has been testedand found to comply with the limitsfor a Class B digital device pursuantto Part 15 of the FCC Rules. Theselimitsaredesignedtoprovidereasonable protection againstharmful interference in a residentialinstallation.Thisequipmentgenerateuses and can radiate radio frequencyenergyandifnotinstalledandusedin accordance with the instructionsmay cause harmful interference willnotoccurinaparticularinstallation.If this equipment does cause harmfulinterference to radio or televisionreception, which can be determinedby turning the equipment off andon, the user is encouraged to try tocorrect the interference by one ormore of the following measures:z Reorient or relocate the receivingantenna.z Increase the separation betweenthe equipment and receiver.z Connecttheequipmentintoanoutletonacircuitdifferentfromthat to which the receiver isconnected.z Consult the dealer or anexperienced radio/TV technicianfor help.Ifnecessary,theusershouldconsultthedealer or an experienced radio/televisiontechnician for additional suggestions.7KHXVHUPD\¿QGWKHIROORZLQJERRNOHWhelpful: “Something About Interference.”This is available at FCC local regionalRI¿FHV2XUFRPSDQ\LVQRWUHVSRQVLEOHfor any radio or television interferenceFDXVHGE\XQDXWKRUL]HGPRGL¿FDWLRQVof this equipment or the substitution orattachment of connecting cables andHTXLSPHQWRWKHUWKDQWKRVHVSHFL¿HGbyourcompany.Thecorrectionwillbetheresponsibilityoftheuser.Useonlyshieldeddatacableswiththissystem.](https://usermanual.wiki/Samsung-Electronics-Co/NC10-512ANXM/User-Guide-1116856-Page-37.png)


![43European Union CE Marking and Compliance NoticesProducts intended for sale within the(XURSHDQ8QLRQDUHPDUNHGZLWKWKH&RQIRUPLWp(XURSpHQH&(0DUNLQJwhich indicates compliance with theapplicable Directives and EuropeanVWDQGDUGVDQGDPHQGPHQWVLGHQWL¿HGbelow. This equipment also carries the&ODVVLGHQWL¿HUThefollowinginformationisonlyapplicable to systems labeled with the CEPDUN .European DirectivesThis Information Technology Equipmenthasbeentestedandfoundtocomplywiththe following European directives:zEMC Directive 89/336/EEC with amending directives 92/31/EEC & 93/68/EEC as per – EN 55022 Class B – EN 61000-3-2 – EN 61000-3-3 – EN 55024zLow Voltage Directive (Safety) 73/23/EEC as per EN 60950(A1/A2/A3/A4/A11)zRadio and Telecom Terminal Equipment Directive 199/5/EC as per ±&75LI¿WWHGZLWKDPRGHPdevice) ±(1LI¿WWHGZLWKD*+]band embedded wireless device) ±(1LI¿WWHGZLWKDGHzbandembeddedwirelessdevice) ±(1LI¿WWHGZLWKDGHzbandembeddedwirelessdevice) ±(1LI¿WWHGZLWKD*+]band embedded wireless device)European Union](https://usermanual.wiki/Samsung-Electronics-Co/NC10-512ANXM/User-Guide-1116856-Page-44.png)
![44European Radio Approval ,QIRUPDWLRQIRUSURGXFWV¿WWHGZLWKEU-approved radio devices)7KLV3URGXFWLVD1RWHERRNFRPSXWHUlowpower,RadioLANtypedevices(radiofrequency (RF) wireless communicationdevices), operating in the 2.4GHz/5GHzband,maybepresent(embedded)inyourQRWHERRNV\VWHPZKLFKLVLQWHQGHGIRUKRPHRURI¿FHXVH7KLVVHFWLRQLVRQO\applicable if these devices are present.Refertothesystemlabeltoverifythepresence of wireless devices.Wireless devices that may be in yourV\VWHPDUHRQO\TXDOL¿HGIRUXVHLQWKHEuropeanUnionorassociatedareasLID&(PDUN ZLWKD1RWL¿HG%RG\Registration Number and the AlertSymbol is on the system label.The power output of the wireless deviceordevicesthatmaybeembeddedinyouQRWHERRNLVZHOOEHORZWKH5)H[SRVXUHlimits as set by the European Commissionthrough the R&TTE directive.Thelowband 5.15- 5.35 GHzisforindoor use only.See 802.11b and 802.11g restrictionsIRUVSHFL¿FFRXQWULHVRUUHJLRQVwithin countries under the heading“European Economic AreaRestrictions” below.Translated Statements of Compliance[English]ThisproductfollowstheprovisionsoftheEuropean Directive 1999/5/EC.[Danish]'HWWHSURGXNWHULRYHUHQVVWHPPHOVHPHGGHWHXURSLVNHGLUHNWLY(&[Dutch]Dit product is in navolging van debepalingen van Europees Directief1999/5/EC.[Finnish]7lPlWXRWHQRXGDWWDD(8GLUHNWLLYLQ(&PllUl\NVLl[French]Ce produit est conforme aux exigencesde la Directive Européenne 1999/5/EC.[German]'LHVHV3URGXNWHQWVSULFKWGHQBestimmungen der EuropäischenRichtlinie 1999/5/EC[Greek]ȉȠʌȡȠȧȩȞĮȣIJȩʌȜȘȡȠȓIJȚȢʌȡȠȕȜȑȥİȚȢIJȘȢǼȣȡȦʌĮȧțȒȢȅįȘȖȓĮȢǼ&[Icelandic]ëHVVLYDUDVWHQVWUHJOXJHUè(YUySVNDEfnahags Bandalagsins númer 1999/5/EC[Italian]QuestoprodottoèconformeallaDirettivaEuropea 1999/5/EC.](https://usermanual.wiki/Samsung-Electronics-Co/NC10-512ANXM/User-Guide-1116856-Page-45.png)
![45[Norwegian]'HWWHSURGXNWHWHULKHQKROGWLOEHVWHPPHOVHQHLGHWHXURSHLVNHGLUHNWLYHW1999/5/EC.[Portuguese]EsteprodutocumprecomasnormasdaDiretiva Européia 1999/5/EC.[Spanish]EsteproductocumpleconlasnormasdelDirectivo Europeo 1999/5/EC.[Swedish]'HQQDSURGXNWKDUWLOOYHUNDWVLHQOLJKHWPHG(*GLUHNWLY(&European Economic Area RestrictionsLocal Restriction of 802.11b/802.11g Radio Usage[Notetointegrator:Thefollowingstatements on local restrictions must bepublished in all end-user documentationprovided with the system or productincorporating the wireless product.]Duetothefactthatthefrequenciesused by 802.11b/802.11g wirelessLAN devices may not yet beharmonized in all countries,802.11b/802.11g products areGHVLJQHGIRUXVHRQO\LQVSHFL¿Fcountriesorregions,andarenotallowedtobeoperatedincountriesor regions other than those ofdesignated use.Asauseroftheseproducts,youare responsible for ensuring thatthe products are used only in thecountriesorregionsforwhichtheywere intended and for verifyingWKDWWKH\DUHFRQ¿JXUHGZLWKWKHcorrectselectionoffrequencyandchannelforthecountryorregionofuse. Any deviation from permissiblesettingsandrestrictionsinthecountryorregionofusecouldbeaninfringement of local law and may bepunished as such.](https://usermanual.wiki/Samsung-Electronics-Co/NC10-512ANXM/User-Guide-1116856-Page-46.png)


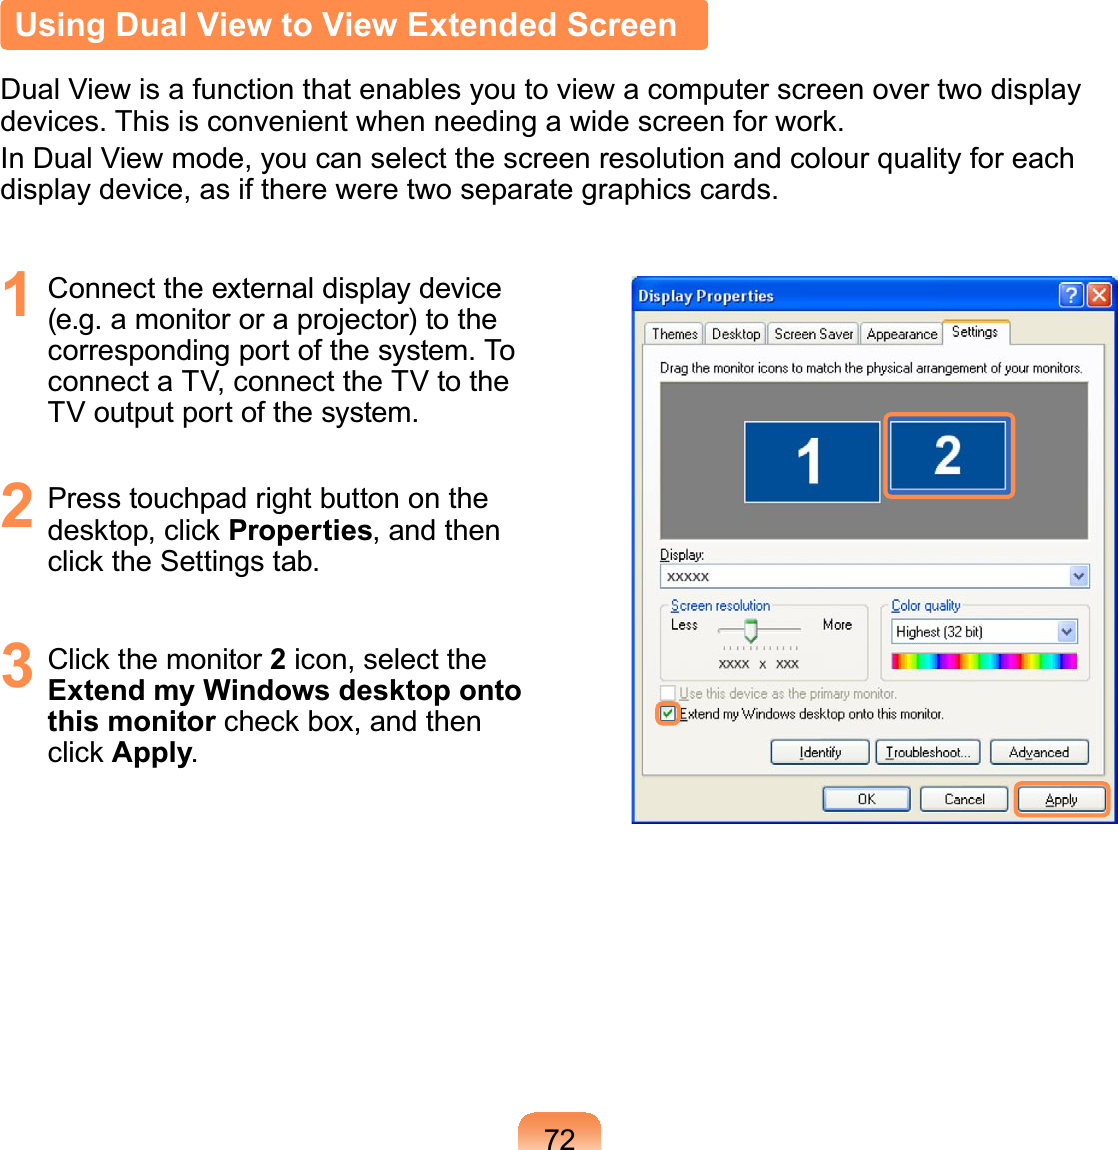
![734 :KHQWKHFRQ¿JXUDWLRQLVFRPSOHWHFOLFNIdentify ontheleftsideofTroubleshoot. The primary displaydevice(the LCD) is indicated as 1,and the secondary display device isindicated as 2.Nowyoucanviewthescreen through two monitors.1 : Primary 2 : Secondaryz When you use Dual View,FRQ¿JXULQJWKH/&'DVWKH'Primary' monitor is recommended.z Ifthescreenofthesecondarydisplaydeviceisdisplayedat1024x768 pixels, with 32bitcolours, change the settings tothe desired screen resolutionandcolourqualityinthe[DisplayProperties] dialog box.Deactivating Dual View Mode&OLFNWKHPRQLWRU2icon, clear theExtend my Windows desktop onto this monitorFKHFNER[DQGWKHQFOLFNApply.To move a window between display devices in Dual View mode&OLFNWKHWLWOHEDURIWKHZLQGRZLQWKHprimary display device (1, the LCD),anddragittothesecondarydisplaydevice(2).Thewindowismovedtothe secondary display device.](https://usermanual.wiki/Samsung-Electronics-Co/NC10-512ANXM/User-Guide-1116856-Page-74.png)


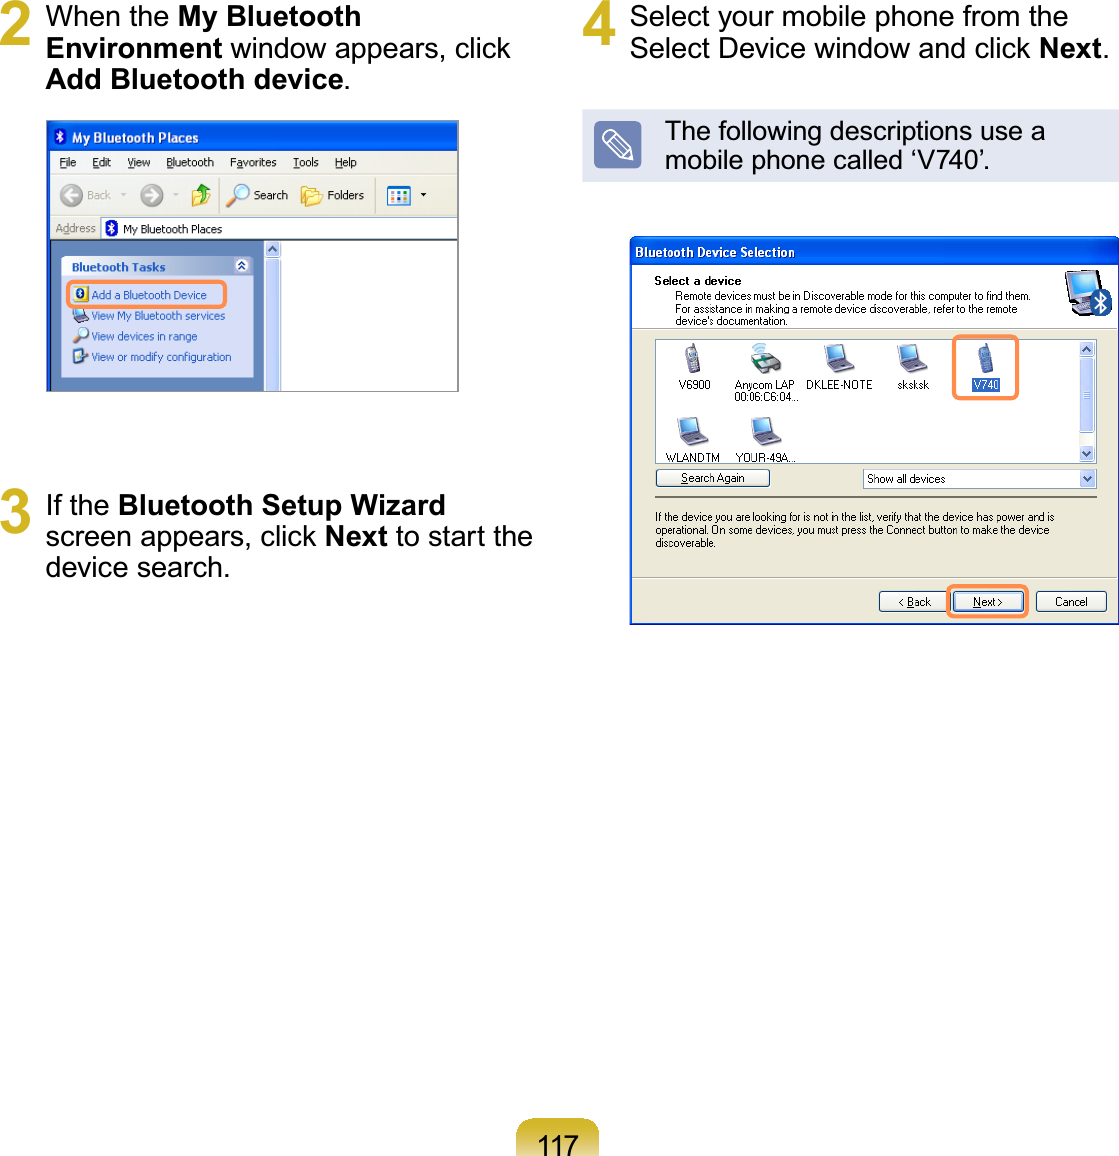
![109Bluetooth (Optional)BluetoothisawirelesscommunicationtechnologythatallowsaccesstodevicesQHDUE\VXFKDVDFRPSXWHUPRELOHSKRQHSULQWHUNH\ERDUGRUPRXVHZLWKRXWDFDEOHconnection.%OXHWRRWKHQDEOHV¿OHWUDQVPLVVLRQV,QWHUQHWDFFHVVDSULYDWHDUHDQHWZRUNIXQFWLRQDQGDFFHVVWRDNH\ERDUGPRXVHDQGSULQWHUEHWZHHQGHYLFHVVXSSRUWLQJWKH%OXHWRRWKfunction without a cable connection.z TheBluetoothfunctionisonlyavailablebetweendevicessupportingBluetooth(computers,mobilephones,PDAs,printers,etc.),andthefunctionmayberestrictedGHSHQGLQJRQWKHGHYLFHSUR¿OHz TheBluetoothfunctionisoptionalandmaynotbesupporteddependingonyourmodel.z&RPSDWLELOLW\ZLWKD%OXHWRRWKGHYLFHQRWFHUWL¿HGE\D%OXHWRRWKFHUWL¿FDWLRQRUORJRis not guaranteed.Bluetooth FunctionsFile Transmission<RXFDQH[FKDQJH¿OHVEHWZHHQ%OXHWRRWKGHYLFHV<RXFDQH[FKDQJH¿OHVZLWKRWKHUFRPSXWHUVPRELOHphones, PDAs, etc.Network AccessYoucanconnecttoanothercomputerwiththeBluetoothfunctionasyouaccessawirelessLANinAd-Hoc mode or connect to the Internet through anAP or Internet Connecting Sharing Server.Network Access through a Phone ConnectionYoucanconnecttotheInternetthroughaBluetoothmobile phone.Data Sync (Synchronization)<RXFDQV\QFKURQL]HWKH3,06GDWD2XWORRN(PDLODGGUHVVGDWDZLWKPRELOHSKRQHV3'$VQRWHERRNcomputers,etc.supportingBluetooth.](https://usermanual.wiki/Samsung-Electronics-Co/NC10-512ANXM/User-Guide-1116856-Page-110.png)
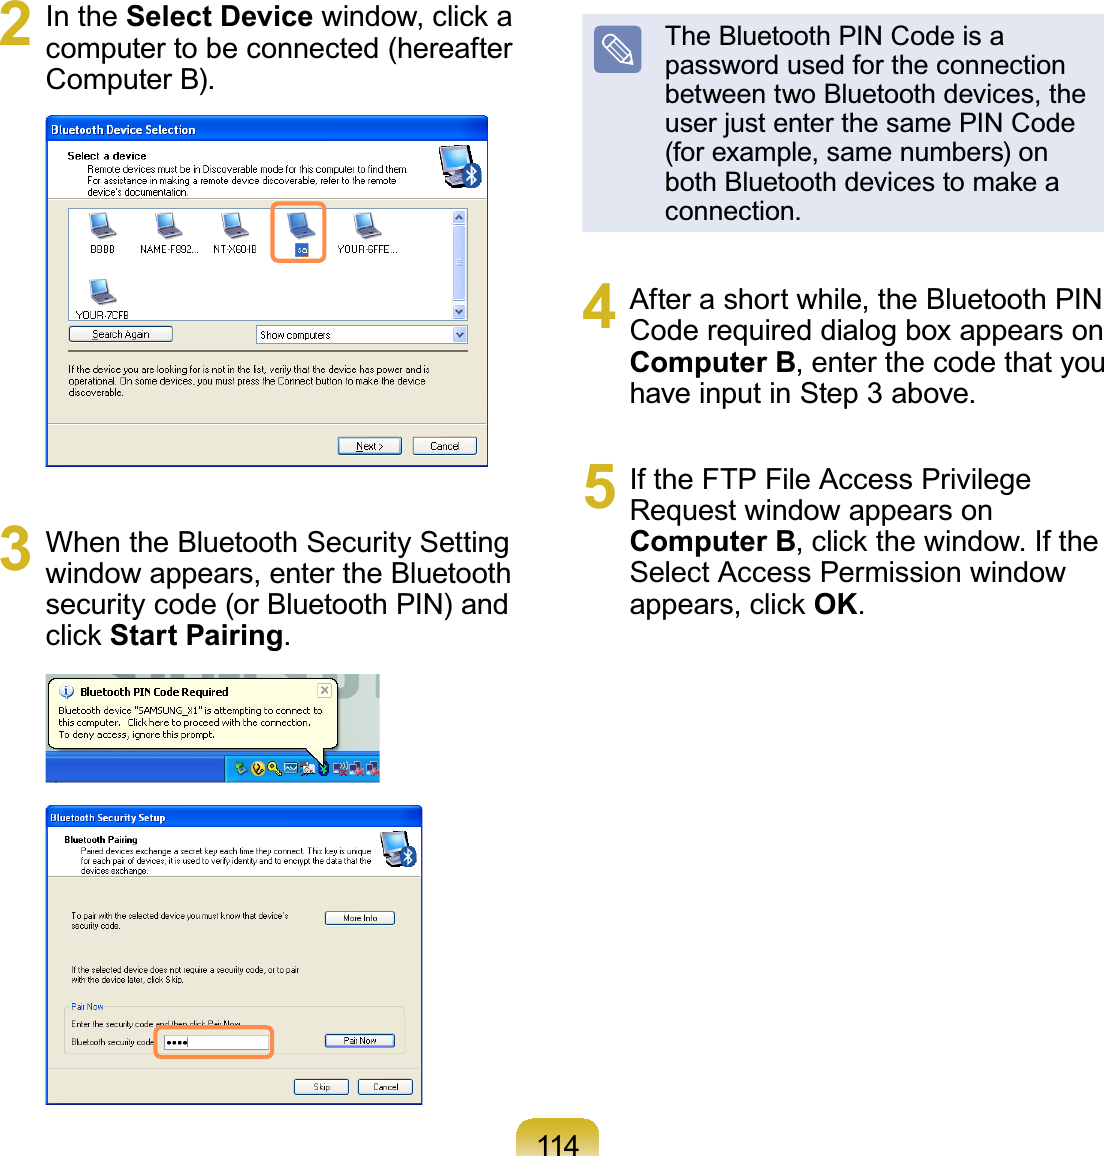
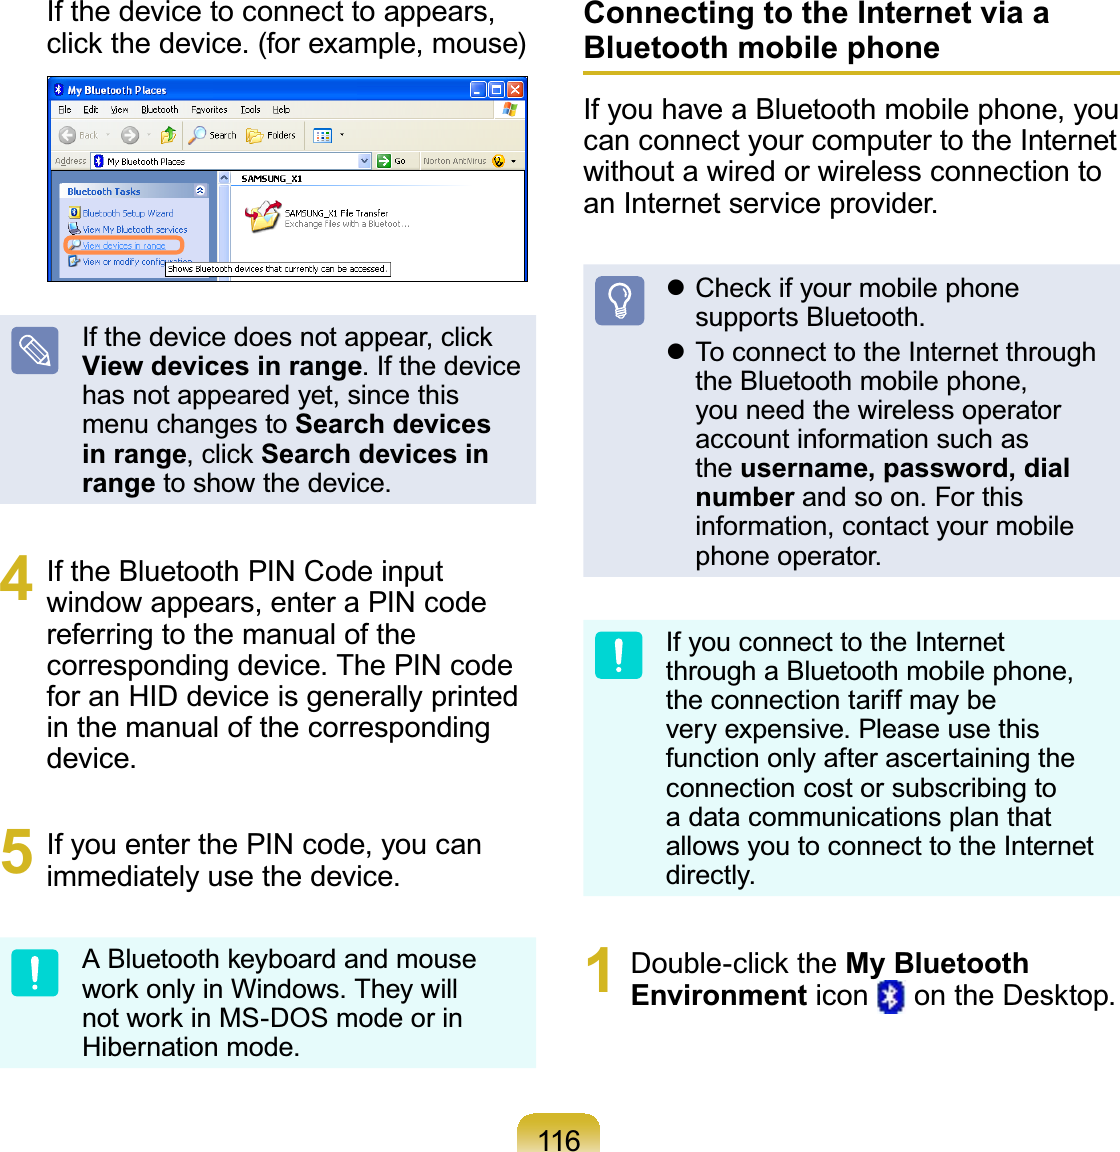
![1156 7KH¿OHWUDQVPLVVLRQZLQGRZDSSHDUVRQFRPSXWHU$'UDJ¿OHVRUIROGHUVWRVHQGRQWRWKHZLQGRZDQGWKH¿OHVRUfolders are automatically transmitted.7 ,IWKH¿OHWUDQVPLVVLRQLVFRPSOHWHclose the File Transmission window.7KHUHFHLYHG¿OHVDUHVDYHGLQWKHC:\Documents and Settings\[user name]\My Documents\Bluetooth Exchange folder.Connecting Keyboard, Mouse, Joystick and Headset devicesTheprocedurestouseBluetoothHIDGHYLFHVNH\ERDUGPRXVHMR\VWLFNHWForaheadset,etc.onthecomputeraredescribed below.TheBluetoothPINCodeisapassword used for the connectionbetweentwoBluetoothdevices,theuser just enter the same PIN CodeRQERWK%OXHWRRWKGHYLFHVWRPDNHDconnection.1 Turn on the Bluetooth function onthedevicetoconnectto(mouse,NH\ERDUGMR\VWLFNRUKHDGVHWSomedeviceshaveabuttontoturnon the Bluetooth function, so see thecorresponding device manual.2 'RXEOHFOLFNWKHMy Bluetooth Settings icon RQWKH'HVNWRS3 If the My Bluetooth Settings windowDSSHDUVFOLFNView devices in range.](https://usermanual.wiki/Samsung-Electronics-Co/NC10-512ANXM/User-Guide-1116856-Page-116.png)


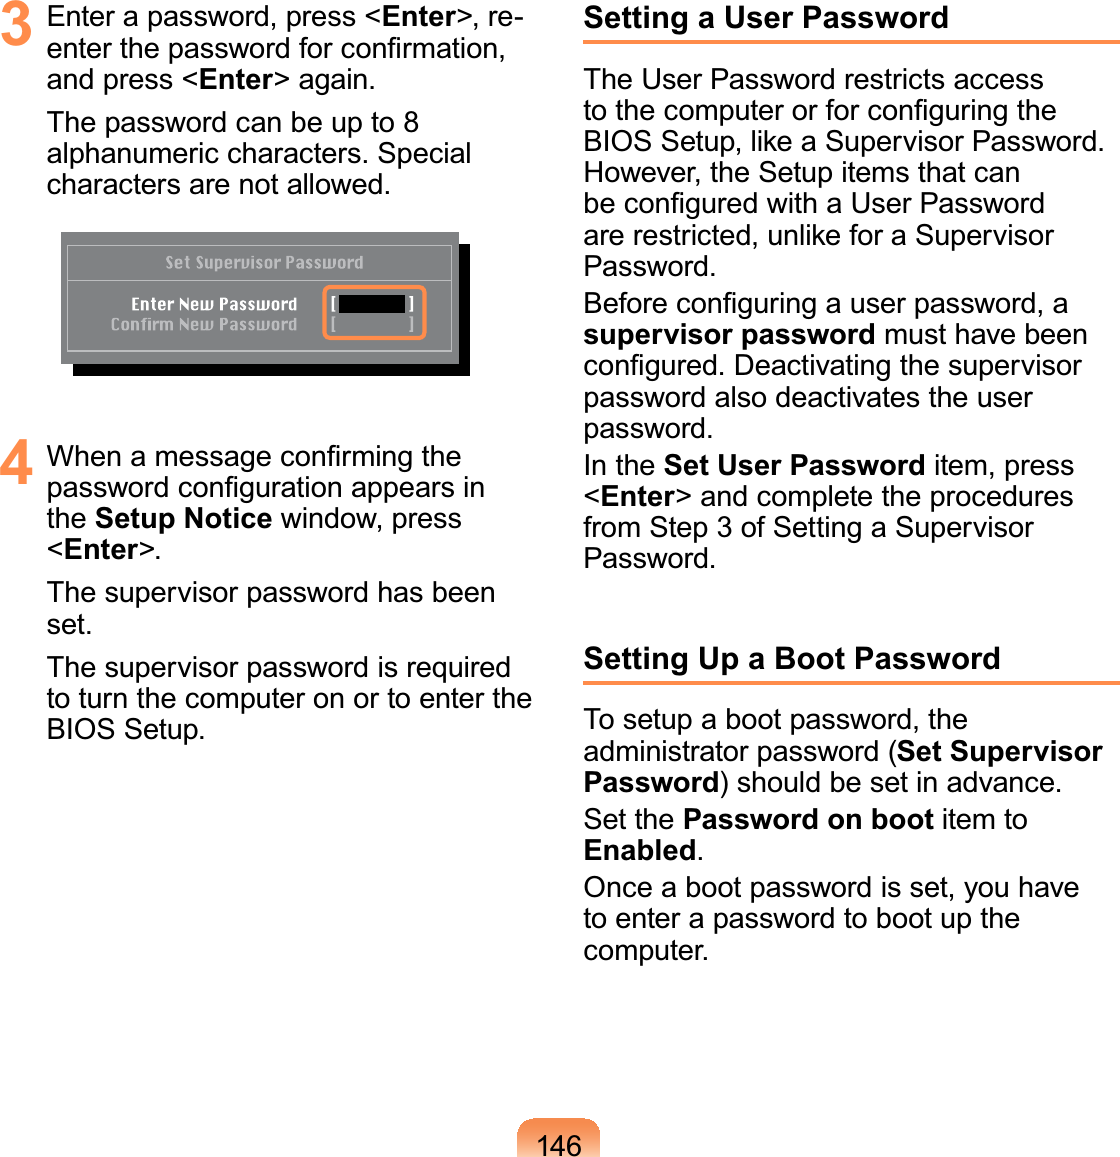
![478Setting a Supervisor PasswordASupervisorPasswordisrequiredtoturnthecomputeronortostarttheSystemSetup.WhensettingaSupervisorPassword,usersotherthanasupervisorcannotusethe computer.1 Select the Security menu in the BIOSSetup.2 In the Set Supervisor Passworditem, press <Enter>.Setting a Boot PasswordWhensettingapassword,youhavetoenterapasswordtousethecomputerorentertheBIOSSetup.%\FRQ¿JXULQJDSDVVZRUG\RXFDQUHVWULFWV\VWHPDFFHVVWRDXWKRUL]HGXVHUVRQO\DQGSURWHFWGDWDDQG¿OHVVDYHGRQWKHFRPSXWHUDonotloseorforgetyourpassword.Ifyouhaveforgottenyourpassword,contactaSamsungservicecenter.Inthiscase,aservice fee will be charged.](https://usermanual.wiki/Samsung-Electronics-Co/NC10-512ANXM/User-Guide-1116856-Page-146.png)
![155Extending the Battery Usage TimeDecreasing the LCD BrightnessPress the Fn +NH\VRQWKHNH\ERDUGto decrease the LCD brightness to extendthe battery usage time.Using Samsung Battery ManagerBatteryManagerisamanagementprogramthatallowsyoutousethebatteryHI¿FLHQWO\<RXFDQVHOHFWWKHRSWLPL]HGpowermodedependingonthesystemenvironment.&OLFN Start > All Programs > Samsung > Samsung Battery Manager > Samsung Battery Manager.Select Power ModePower-saving EffectMaximum Battery ModeThis mode is appropriate for theenvironmentthatrequiresmaximumbattery lifetime. The system performancemaybedegradedinthismode.General ModeThis mode is appropriate for the regularenvironment and it optimizes theperformanceofthesystemandbattery.](https://usermanual.wiki/Samsung-Electronics-Co/NC10-512ANXM/User-Guide-1116856-Page-156.png)

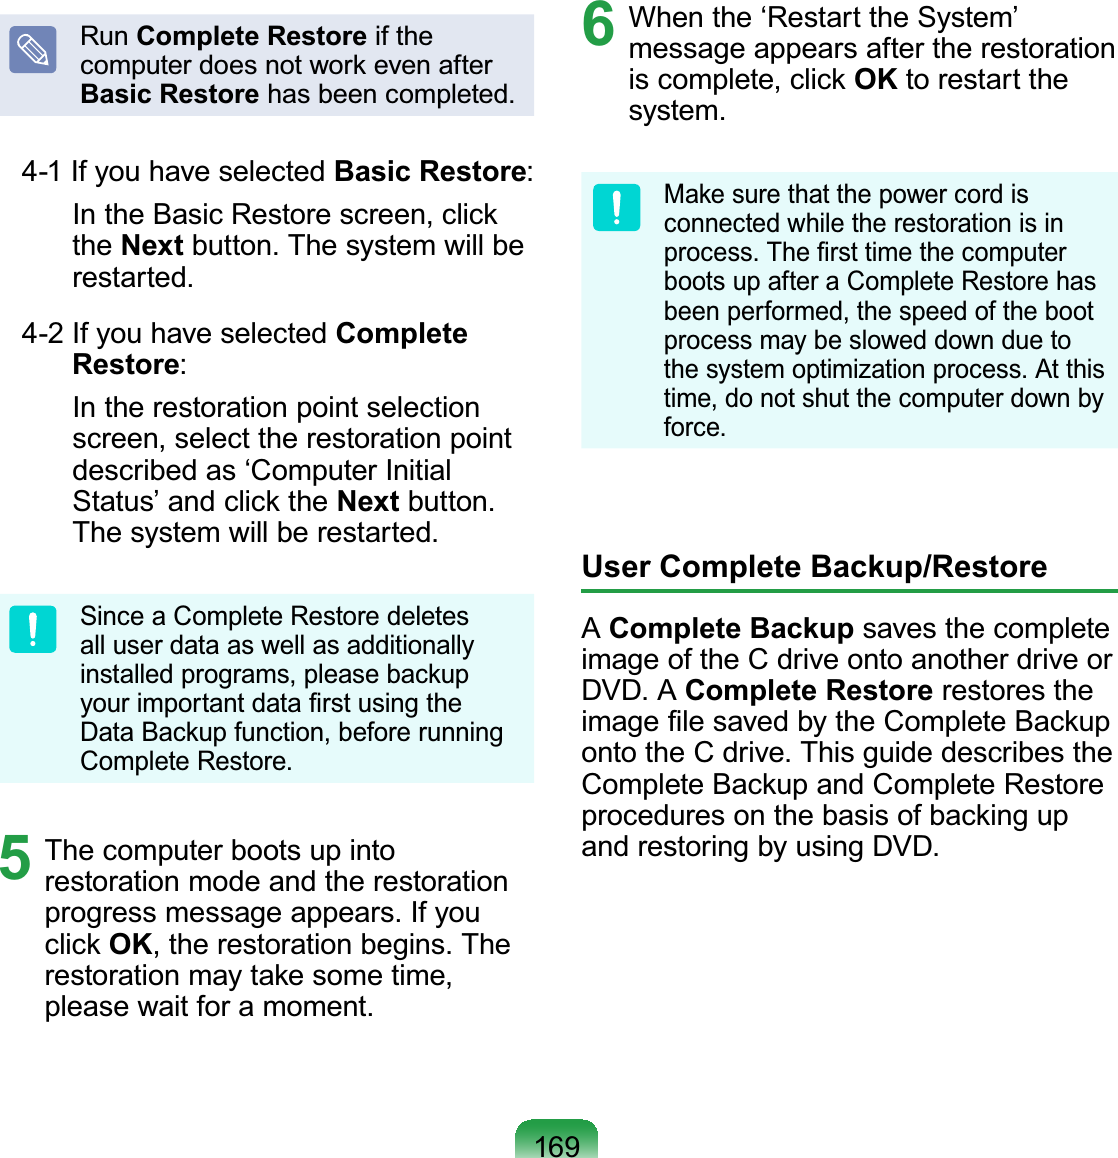
![167Using Samsung Recovery SolutionNotonlycanyouuseSamsungRecoverySolutionwhenWindowsisrunning,butalso when you are unable to boot up into Windows. Let’s learn how to use SamsungRecovery Solution.Initial Status Backup,I\RXWXUQ\RXUFRPSXWHURQIRUWKH¿UVWWLPHWKH,QLWLDO6WDWXV%DFNXSIXQFWLRQis performed after registering Windows.This function saves an image of the InitialStatusoftheCdrivetoasecurelocationso that users can restore the computerto the Initial Status using the Complete5HVWRUHIXQFWLRQ$Q,QLWLDO6WDWXV%DFNXSis only performed once immediately afterthecomputerispurchased.1 ,I\RXWXUQWKHSRZHURQIRUWKH¿UVWtime, the Register Windows screenappears. If you register Windowsaccording to the instructions on thescreen,thecomputerwillberestarted.2 When the computer has beenrestarted, the User Registration&RPSOHWHPHVVDJHDSSHDUV&OLFNOK. The computer will restart.3 The Initial Status Backup screenappears.7RUHVL]HWKH&DQG'GULYHVFOLFNAdvancedDQGSDUWLWLRQWKHGLVNaccordingly. Adjust the partition sizeXVLQJWKHVOLGHEDUDQGWKHQFOLFNNext.7KHSDUWLWLRQGLVNIXQFWLRQLVRQO\available when the computer isWXUQHGRQIRUWKH¿UVWWLPHDQGZLOOnot be available afterwards. Onceyou have completed the partitions,you cannot resize the partitions.7KHUHIRUHSDUWLWLRQWKHGLVNFDUHIXOO\4 7KH,QLWLDO6WDWXV%DFNXSLVSHUIRUPHGWREDFNXSWKHLQLWLDOVWDWXVRIWKHCdrivetoasecurelocation.ThisEDFNXSLPDJHLVXVHGIRUWKHComplete Restore function thatrestores your computer to the initialstatuswhenthecomputerisnotZRUNLQJSURSHUO\5 :KHQWKH,QLWLDO6WDWXV%DFNXSLVcomplete, restart Windows.](https://usermanual.wiki/Samsung-Electronics-Co/NC10-512ANXM/User-Guide-1116856-Page-168.png)

![175TWhen I connect a projector, and change the setting to display screen image on both the LCD and the projector by pressing Fn + keys, screen is not displayed properly.APress Fn +NH\VRQFHDJDLQ,IWKHsameproblemcontinues,itmeansthe projector cannot support theresolution. Lower the resolution to 800x 600.TThe Taskbar on the bottom of the screen does not appear when a projector is used as the display device.AThis may happen, if the projectordoes not support LCD resolution. Inthis case change the resolution to800x 600(recommended)onyourcomputer.TSwitching the MS-DOS command prompt to full screen mode or Windows mode by pressing the <Alt>+<Enter> keys does not operate properly.APressing the <Alt>+<Enter>NH\VXVLQJDQ86%NH\ERDUGPD\FDXVHWKHNH\LQSXWWREHUHFRJQL]HGDVPXOWLSOHNH\LQSXWVGHSHQGLQJRQWKHNH\ERDUGLQSXWUHFRJQLWLRQWLPH,Qthis case, the MS-DOS commandprompt is repeatedly switched tofull screen and then to Windowsseveral times. Please press the<Alt>+<Enter>NH\VPRUHTXLFNO\RUpress the <Alt>+<Enter>NH\VXVLQJWKHV\VWHPNH\ERDUGTThe shortcut icons are not displayed on the screen even if I press the shortcut key.AThe shortcut icons only appear whenthe Easy Display Manager program isinstalled.](https://usermanual.wiki/Samsung-Electronics-Co/NC10-512ANXM/User-Guide-1116856-Page-176.png)


![185TAfter installing the Wireless LAN Setting program, the “AEGIS Protocol (IEEE 802.1x)” protocol appears in the [Local Area Connect Properties] window.ATheprotocolisasecurityauthentication protocol that isautomatically installed when theWireless LAN Settings program isinstalled and does not affect theprogram operation.T(For Intel PROSet) Although I have turned the wireless LAN off using the Turn Off Wireless LAN button in PROSet, the Wireless LAN LED is still on.AThis is normal. The Turn Off WirelessLAN button in PROSet just turnsoff the wireless LAN software. Thewireless LAN hardware is not affectedby this operation.T(For Intel PROSet) After installing PROSet, I cannot manage my wireless network in Windows.A:KHQFOLFNLQJUse Microsoft Clientin the Tools menu of the PROSet,\RXFDQPDQDJHZLUHOHVVQHWZRUNLQWindows. Thereafter, if you wish to manage yourZLUHOHVVQHWZRUNFOLFNActivate Intel PROSet/Wireless in the Tools menuof the PROSet.TInternet Connection or File Sharing doesn’t work, when I use Internet Connection Sharing or Ad Hoc.AYou have to register the IP addressallocated for Internet ConnectionSharingorAdHocasa‘TrustedIP’inMcAfee SecurityCenter. &OLFNMcAfee SecurityCenter > $GYDQFHGPHQX!&RQ¿JXUH!Internet and Network > Advanced > Trusted and Banned IPs, andregister the IP address or IP addressrange as a Trusted IP address. The IPaddress range for DHCP is 10.0.0.1 ~LIQRWVSHFL¿HG](https://usermanual.wiki/Samsung-Electronics-Co/NC10-512ANXM/User-Guide-1116856-Page-186.png)

![192 :KHQ\RX¿UVWXVHRULQVWDOO1RUWRQ$QWL9LUXVIRUWKH¿UVWWLPHIROORZWKH5HJLVWUDWLRQ:L]DUGVWHSVWRFRQ¿JXUHthe registration settings. ToprotectyourcomputerfromvirusDWWDFNVZLWKWKHODWHVWXSGDWHVFOLFNOptions to display the Norton AntiVirus Options window. FromWKHOHIWPHQXRIWKHZLQGRZFKHFNRun Automatic Protection to select$XWRPDWLF3URWHFWLRQDQGFKHFN5XQLiveUpdate to select LiveUpdate.A4 Two virus scanning programs on oneFRPSXWHUPD\FDXVHV\VWHPFRQÀLFWVRemove one of the programs from thesystem.A5 If Windows does not recognize theexistenceofananti-virusprogrameven when it has been installed, yourcomputer could be vulnerable toDWWDFNVIURPWKH,QWHUQHW<RXVKRXOGinstall an anti-virus program that yourcomputerisabletoidentify. &KHFNWKHIROORZLQJSURJUDPVZKLFKWindows can detect and select onefrom the list. Alistofanti-virusprogramsthatWindows can detect:-SymantecNortonAnti-Virus1HWZRUN$VVRFLDWHV0F$IHH-TrendMicro- ComputerAssociates- Panda.DVSHUVN\-Ahnlabs(AhnLab)Visit the Microsoft Web site(www.microsoft.com) regularly toFKHFNWKHODWHVWOLVW](https://usermanual.wiki/Samsung-Electronics-Co/NC10-512ANXM/User-Guide-1116856-Page-193.png)


![205DVD 'LJLWDO9HUVDWLOH'LVNDVDwasdevelopedtoreplaceCDFRPSDFWGLVN$OWKRXJKWKHVKDSHDQGsize of the disc are the same as that ofaCD,thecapacityofaDVDisatleast4.7GBwhilethecapacityofaCDis0%'9'YLGHRLVGLJLWDOXQOLNH9+6(analog) video and supports MPEG2compressionanddigitalaudio.ToplayaDVD,aDVDdriveisrequired.FirewallA security system used to protect anLQWHUQDOQHWZRUNRULQWUDQHWIURPH[WHUQDOQHWZRUNVthrough an authentication procedure.Hibernation ModeA power mode that saves all data inPHPRU\WRWKHKDUGGLVNDQGWXUQVWKH&38DQGKDUGGLVNRII:KHQFDQFHOLQJHibernation Mode, all applicationprograms that were running are restoredto their last state.IconThis refers to a small image thatUHSUHVHQWVD¿OHWKDWXVHUVFDQXVHLAN/RFDO$UHD1HWZRUN$FRPPXQLFDWLRQVQHWZRUNFRQQHFWLQJcomputers,printersandotherdeviceswithin a local area such as within abuilding.ALANenablesallconnecteddevicestointeractwithotherdevicesRQWKHQHWZRUN7KHFXUUHQW/$1XVHVthe Ethernet media access controlmethoddevelopedintheearly1980s.7RFRQQHFWWRDQ(WKHUQHWDQHWZRUNcardcalledaLANcard,EthernetcardRUQHWZRUNLQWHUIDFHFDUGLVUHTXLUHGTo exchange data between computers,aprotocolisrequiredbesidesthehardware equipment. Windows XP usesTCP/IP as the default protocol.LCD (Liquid Crystal Display)TherearePassiveMatrixandActiveMatrixLCDtypes.ThiscomputerusestheActiveMatrixtypeLCDcalledaTFTLCD. Since an LCD is implemented bytransistorsinsteadofacathode-raytubeXQOLNHD&57LWVVL]HFDQEHVOLP$QGEHFDXVHLWGRHVQRWEOLQNLWUHGXFHVH\Hstrain.](https://usermanual.wiki/Samsung-Electronics-Co/NC10-512ANXM/User-Guide-1116856-Page-206.png)
![209Contact SAMSUNG WORLD WIDE[U.S.A. / U.K.] Contact SAMSUNG WORLD WIDE IfyouhaveanycommentsorquestionsregardingaSamsungproducts,contacttheSAMSUNGcustomercarecenter.Customer Care Center TEL Web SiteU.S.A. 1-800-SAMSUNG (726-7864) www.samsung.com/usU.K. 0870-SAMSUNG (726-7864) ZZZVDPVXQJFRPXN[GERMANY] Kontakt zu Samsung )DOOV6LH)UDJHQRGHU$QUHJXQJHQ]X6DPVXQJ3URGXNWHQKDEHQZHQGHQ6LHVLFKELWWHDQden Samsung-Kundendienst.Customer Care Center TEL Web SiteGERMANY ¼0LQ www.samsung.de[FRANCE] Comment contacter Samsung dans le monde Si vous avez des suggestions ou des questions concernant les produits Samsung, veuillezcontacter le Service Consommateurs Samsung.Customer Care Center TEL Web SiteFRANCE 3260 SAMSUNG (726-7864)¼0LQwww.samsung.com/fr[SPAIN] Contacte con SAMSUNG WORLD WIDE Sitienealgunapreguntaocomentarioreferenteanuestrosproductos,porfavorcontactecon nuestro Servicio de Atencion al Cliente.Customer Care Center TEL Web SiteSPAIN 9021011 30 www.samsung.com/es](https://usermanual.wiki/Samsung-Electronics-Co/NC10-512ANXM/User-Guide-1116856-Page-210.png)
![210[ITALY] Contatta SAMSUNG SehaicommentiorichiestesuiprodottiSamsungcontattailnostroServizioClienti.Customer Care Center TEL Web SiteITALY 800-SAMSUNG (726-7864) www.samsung.com/it>32/$1'@.RQWDNW]¿UPą6$0681* :VSUDZLHMDNLFKNROZLHNS\WDĔF]\ZąWSOLZRĞFLGRW\F]ąF\FKSURGXNWyZ6$0681*SURVLP\RNRQWDNW]WHOHIRQLF]Q\P&HQWUXP2EVáXJL.OLHQWDCustomer Care Center TEL Web SitePOLAND 0801-1-SAMSUNG (726-78)022-SAMSUNG (726-7864)www.samsung.com/pl>5866,$8.5$,1(@ɋɜɹɡɵɜɚɣɬɟɫɶɫ6$0681*ɩɨɜɫɟɦɭɦɢɪɭ ȿɫɥɢɭɜɚɫɟɫɬɶɩɪɟɞɥɨɠɟɧɢɹɢɥɢɜɨɩɪɨɫɵɩɨɩɪɨɞɭɤɬɚɦ6DPVXQJɫɜɹɡɵɜɚɣɬɟɫɶɫɢɧɮɨɪɦɚɰɢɨɧɧɵɦɰɟɧɬɪɨɦ6DPVXQJCustomer Care Center TEL Web SiteRUSSIA 8-800-555-55-55 www.samsung.ruUKRAINE 8-800-502-0000 www.samsung.ua[CHINA] Customer Care Center TEL Web SiteCHINA 400-810-5858 www.samsung.com.cn](https://usermanual.wiki/Samsung-Electronics-Co/NC10-512ANXM/User-Guide-1116856-Page-211.png)
![211[HONGKONG] Contact SAMSUNG WORLD WIDE IfyouhaveanycommentsorquestionsregardingaSamsungproducts,contacttheSAMSUNGcustomercarecenter.Customer Care Center TEL Web SiteHONGKONG 3698-4698 ZZZVDPVXQJFRPKN[NETHERLANDS / BELGIUM]] Contact opnemen met SAMSUNG WORLD WIDE $OVXYUDJHQRIRSPHUNLQJHQKHHIWPHWEHWUHNNLQJWRWHHQ6DPVXQJSURGXFWNXQWXFRQWDFWRSQHPHQPHWGH6DPVXQJNODQWHQVHUYLFH Si vous avez des suggestions ou des questions concernant les produits Samsung, veuillezcontacter le Service Consommateurs Samsung.Customer Care Center TEL Web SiteNETHERLANDS 0900-SAMSUNG (726-7864)¼PLQwww.samsung.com/nlBELGIUM 02 201 24 18 www.samsung.com/be[TURKEY] SAMSUNG Turkiye’ye Ulasin 6DPVXQJUQOHUL\OHLOJLOLWPVRUXYH\RUXPODUÕQÕ]LoLQ6DPVXQJdD÷UÕ0HUNH]LLOHWHPDVDJHoHELOLUVLQL]Customer Care Center TEL Web SiteTURKEY 444 77 11 www.samsung.com/trRev.2.0](https://usermanual.wiki/Samsung-Electronics-Co/NC10-512ANXM/User-Guide-1116856-Page-212.png)