Samsung Electronics Co NC10-512ANXM Notebook Computer User Manual 0908 Winchester NC10 XP Eng
Samsung Electronics Co Ltd Notebook Computer 0908 Winchester NC10 XP Eng
User Manual
User Guide

Chapter 1.
Getting Started
Product Features 2
Before You Start 3
Contents 7
Safety Precautions 8
Proper Posture During Computer Use 24
Important Safety Information 27
Replacement Parts and Accessories 30
Regulatory Compliance Statements 33
WEEE SYMBOL INFORMATION 48
Overview 50
Turning the Computer On and Off 56
2
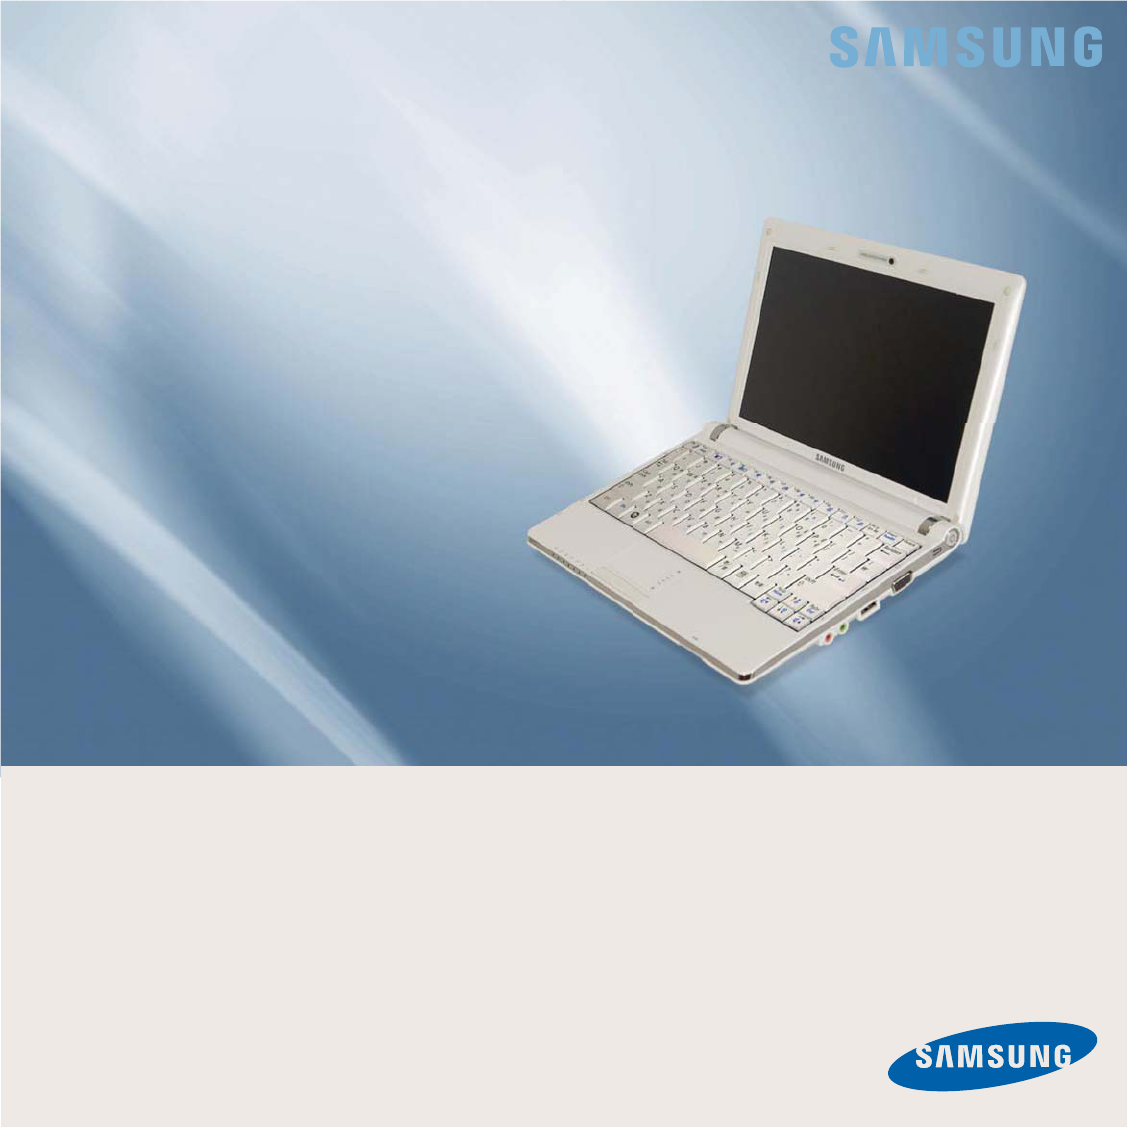
PC in Hand
z Improvedportabilitythroughitscompactsizeand
light-weight design
z Slim, Polished Design
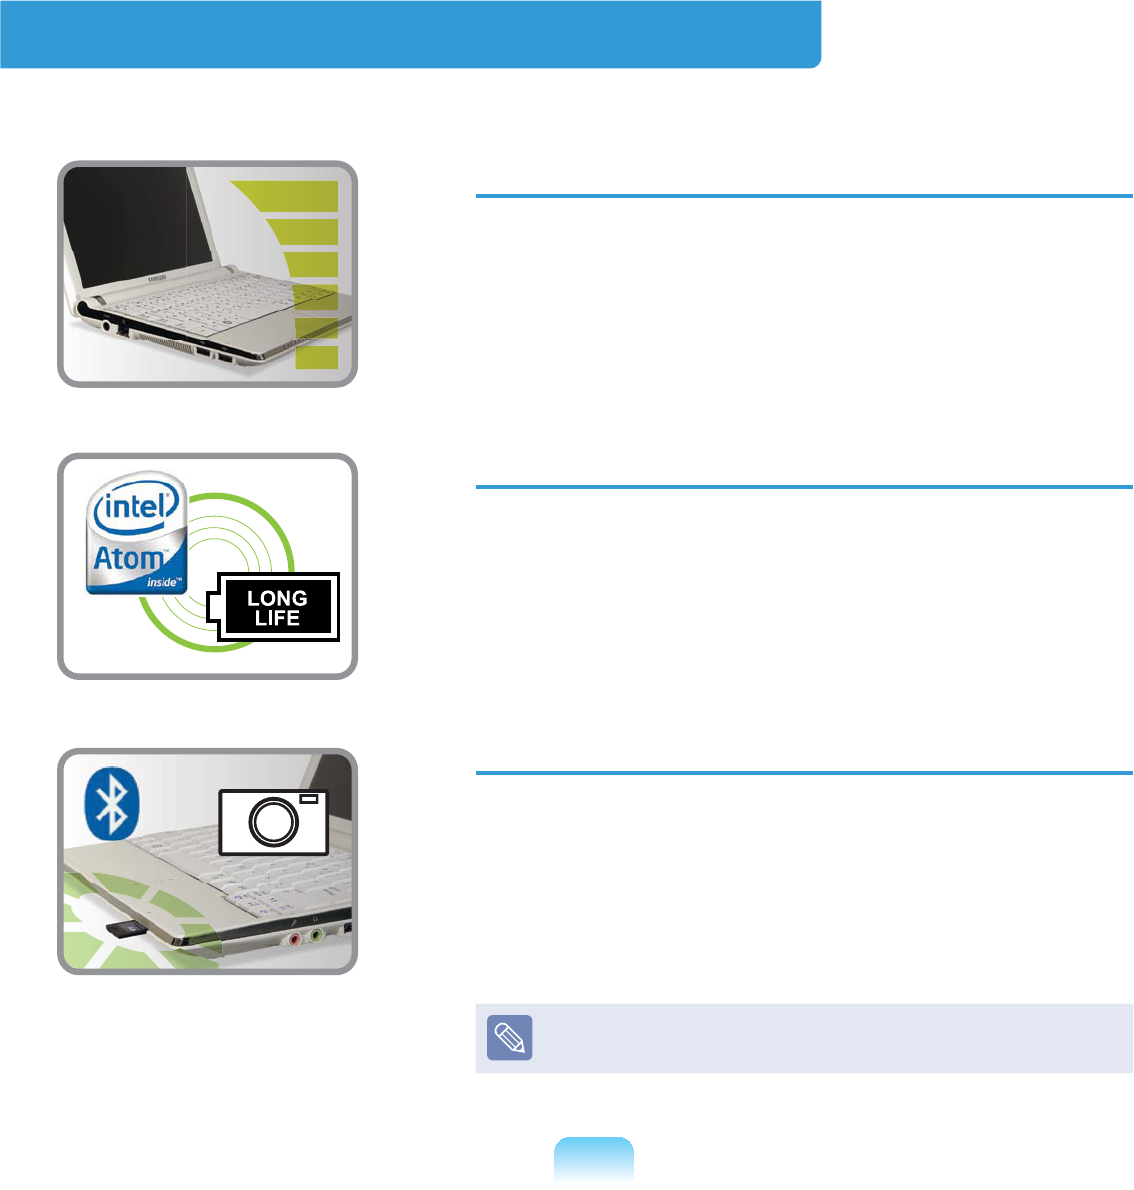
Small but Powerful PC
z AnIntel“Atom”ProcessorwithLowPower
Consumption and Low Heat
z ExtendedUseTimethroughtheuseofPower-
(I¿FLHQW3DUWV
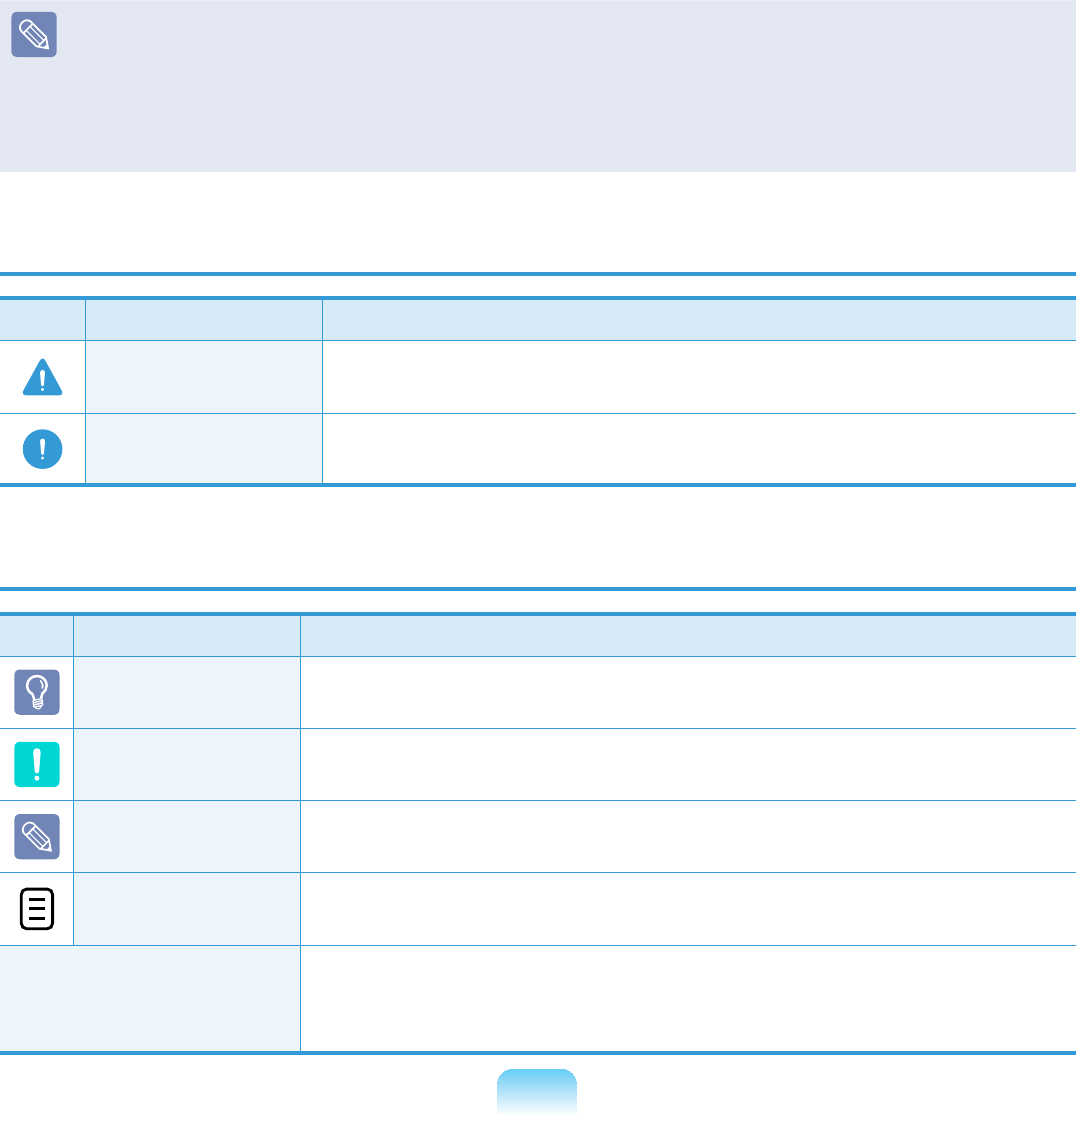
Versatile and Convenient Use
z ACameraModuleforVideoChattingor
Conferencing (Optional)
z WirelessLANandBluetoothFunction(Optional)
z MultiCardSlotSupport
z Easy-to-Use Keyboard
Optionalitemsmaybechangedormaynotbe
provideddependingonthecomputermodel.
Product Features

3
Before You Start
%HIRUHUHDGLQJWKH8VHU*XLGH¿UVWFKHFNWKHIROORZLQJLQIRUPDWLRQ
User Guide Information
Thisproductissuppliedwithan
Installation Guide,andaUser Guide.
You can even more easily and
conveniently use the computer by using
anyoftheguidesdependingonyour
needs.
Installation Guide
Thisguideisprovidedsothatyoucan
conveniently refer to this guide when
XVLQJWKHFRPSXWHUIRUWKH¿UVWWLPHDIWHU
purchasing it.
This document includes the computer
components and the connection
procedures.
User Guide
YouarecurrentlyreadingtheUserGuide.
7RRSHQWKH¿OHDWDQ\WLPHGRXEOHFOLFN
WKHLFRQRQWKH'HVNWRS$OWHUQDWLYHO\
select Start > All Programs > Samsung
> User Guide > User Guide.
This document includes the computer
functions,howtousethefunctions,and
howtousetheprogram.
Utilizing the User Guide
nBe sure to read the Safety
Precautions before using the
computer.
lRefer to the separately supplied
Installation Guide when installing
your computer.
WRefer to the User Guide for the
procedures to use the computer.
jUsing the Index oftheUserGuide,
\RXFDQHDVLO\¿QGDQ\LQIRUPDWLRQ
\RXDUHORRNLQJIRU
VUsing the Glossary of the User
*XLGH\RXFDQHDVLO\¿QGPHDQLQJV
fortechnicalterms.
bIfaproblemoccurs,refertotheQ & A
included in the User Guide.
z Optional items, some devices and
software referred to in the User
Guidemaynotbeprovidedand/or
changedbyupgrade.
Note that the computer
environment referred in the User
Guidemaynotbethesameas
your own environment.
4
z Images used in this User Guide may differ from actual product.
z This guide decribes procedures for using both the mouse and the touchpad.
z The illustrations provided in this guide assume that your operating system is
Windows XP. These illustrations are subject to change.
z TheUserguidesuppliedwiththiscomputermayvarydependingonyourmodel.
Safety Precaution Notations
Icon Notation Description
Warning )DLOLQJWRIROORZLQVWUXFWLRQVPDUNHGZLWKWKLVV\PEROPD\
causepersonalinjuryandorfatality.
Caution )DLOLQJWRIROORZLQVWUXFWLRQVPDUNHGZLWKWKLVV\PEROPD\
causeslightinjurytoyourselfordamageyourproperty.
Text Notations
Icon Notation Description
Before You Start Contentincludedinthissectionincludesinformationrequired
before using a function.
Caution Contentincludedinthissectionincludesinformationrequired
about the function.
Note Contentincludedinthissectionincludeshelpfulinformationto
use the function.
XX This notation represents the page number you can refer to for
informationaboutrelatedfunctionsorasareference.
Start > All Programs
> Samsung > User
Guide > User Guide
Thisrepresentsamenupathtorunaprogram.
&OLFNWKH6WDUWEXWWRQDQGWKHQVHOHFWAll Programs > Samsung
> User Guide > User Guide inthisorderfromthemenu.

5
Copyright
© 2008 Samsung Electronics Co., Ltd.
SamsungElectronicsCo.,Ltd.ownsthecopyrightofthismanual.
Nopartofthismanualmaybereproducedortransmittedinanyformorbyanymeans,
electronic or mechanical, without the consent of Samsung Electronics Co., Ltd.
The information in this document is subject to change without notice due to improving
the performance of the product.
6DPVXQJ(OHFWURQLFVVKDOOQRWEHOLDEOHIRUDQ\GDWDORVV3OHDVHWDNHFDUHWRDYRLG
ORVLQJDQ\LPSRUWDQWGDWDDQGEDFNXS\RXUGDWDWRSUHYHQWDQ\VXFKGDWDORVV
Precautions for Operating System Support
If a problem occurs because of the reinstallation of other operating systems(OS) or a
previousversionofaOSpre-installedonthiscomputer,orasoftwarethatdoesnot
supporttheOS,thecompanywillnotprovidetechnicalsupport,areplacementor
refund, and if our service engineer visits you due to this problem, a service charge will
be applied.

6
About the Product Capacity Representation Standard
About HDD Capacity Representation
Thecapacityofthestoragedevice(HDD,SSD)ofthemanufactureriscalculated
assuming that 1KB=1,000 Bytes.
However,theoperatingsystem(Windows)calculatesthestoragedevicecapacity
assumingthat1KB=1,024 Bytes,andthereforethecapacityrepresentationofthe
HDDinWindowsissmallerthantheactualcapacityduetothedifferenceincapacity
calculation.
(E.g.Fora80GBHDD,Windowsrepresentsthecapacityas74.5GB,
80x1,000x1,000x1,000 byte/(1,024x1,024x1,024)byte = 74.505GB)
Inaddition,thecapacityrepresentationinWindowsmaybeevensmallerbecausesome
programssuchasRecoverySolutionmayresideinahiddenareaoftheHDD.
About Memory Capacity Representation
ThememorycapacityreportedinWindowsislesserthantheactualcapacityof
memory.
ThisisbecauseBIOSoravideoadapterusesaportionofmemoryorclaimsitfor
further use.
(E.g.For1GB(=1,024MB)memoryinstalled,Windowsmayreportthecapacityas
1,022MBorless)
7KHDFWXDOFDSDFLW\RIVWRUDJHGHYLFHFDQEHFKHFNHGLQWKH0DLQPHQXRIWKH%,26
Setup, accessible by pressing F2NH\GXULQJERRW)RUIXUWKHULQVWUXFWLRQVRQKRZWR
entertheBIOSSetup,referto"SettingsandUpgrade"intheUserGuide.

7
Contents
Chapter 1. Getting Started
Product Features 2
Before You Start 3
Contents 7
Safety Precautions 8
Proper Posture During Computer Use 24
Important Safety Information 27
Replacement Parts and Accessories 30
Regulatory Compliance Statements 33
WEEE SYMBOL INFORMATION 48
Overview 50
Turning the Computer On and Off 56
Chapter 2. Using the Computer
Keyboard 59
Touchpad 62
External-type CD drive
(To be purchased) 65
Multi Card Slot 67
Connecting a monitor / TV 70
Adjusting the Volume 74
Chapter 3. Using Microsoft
Windows XP
About Microsoft Windows XP 78
Windows XP Screen Layout 80
Control Panel 84
Chapter 4. Using the Network
Wired Network 90
Wireless Network 93
Using Samsung Network Manager
(Optional) 99
Bluetooth (Optional) 109
Chapter 5. Using Applications
Introducing Programs 123
Play Camera (Optional) 126
Samsung Update Plus (Optional) 128
McAfee SecurityCenter (Optional) 130
Using Samsung Magic Doctor
(Optional) 135
Reinstalling Software 136
Chapter 6. Settings and Upgrade
LCD Brightness Control 139
BIOS Setup 141
Setting a Boot Password 145
Changing the Boot Priority 148
Upgrading Memory 149
Battery 151
Using the Security Lock Port 158
Chapter 7. Appendix
Reinstalling Windows XP 160
Using Samsung Recovery Solution
(Optional) 165
Questions and Answers 174
3URGXFW6SHFL¿FDWLRQV 3
Glossary 204
Index 208
Contact SAMSUNG WORLD WIDE 209
8
Safety Precautions
For your security and to prevent damage, please read the following safety instructions
FDUHIXOO\6LQFHWKLVLVFRPPRQO\DSSOLHGWR6DPVXQJ&RPSXWHUVVRPH¿JXUHVPD\
differ from actual product.
Warning
)DLOLQJWRIROORZLQVWUXFWLRQVPDUNHGZLWKWKLVV\PEROPD\FDXVHSHUVRQDOLQMXU\DQG
even fatality.
Installation Related
Do not install the
product in places
exposed to humidity
such as a bathrooms.
There is a danger of
HOHFWULFVKRFN8VH
the product within the
operating conditions
VSHFL¿HGLQWKH
Manufacturers User
Guide.
Keep the plastic bags
out of the reach of
children.
There is a danger of
suffocation.
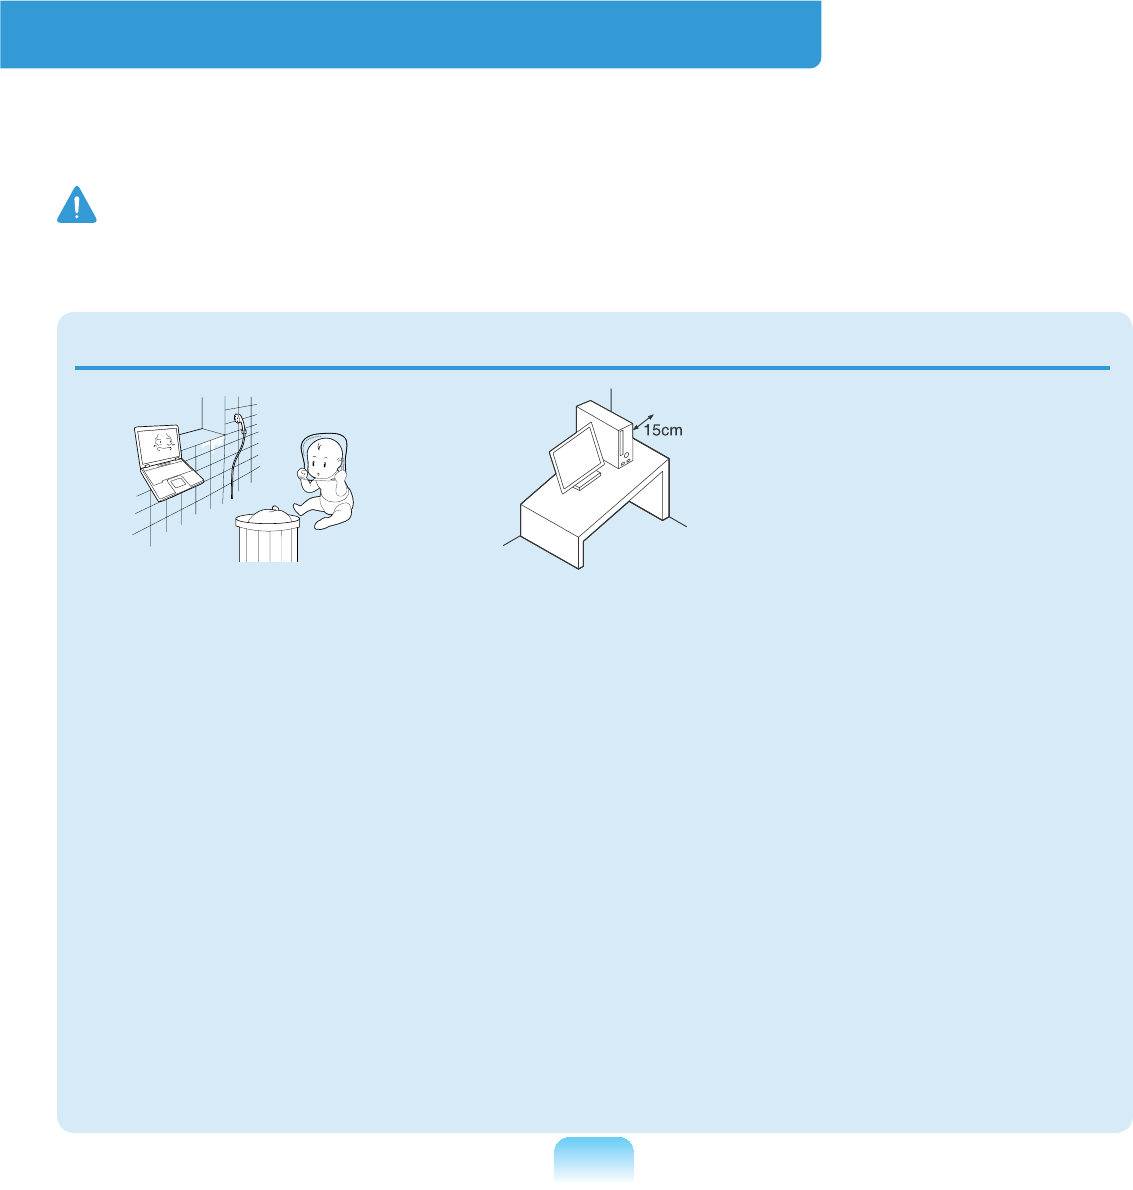
Keep a distance of 15cm
or more between the
computer and the wall
and do not place any
objects between them.
This may increase the
internal temperature of the
computer and may cause
an injury.
Do not install the
computer on a slant
or a place prone to
vibrations, or avoid
using the computer in
that location for a long
time.
7KLVLQFUHDVHVWKHULVNWKDW
a malfunction or damage
to the product will occur.
Q2S#Yhu#417
9
The power plug and
ZDOORXWOHW¿JXUHVPD\
differ depending on the
FRXQWU\VSHFL¿FDWLRQV
and the product model.
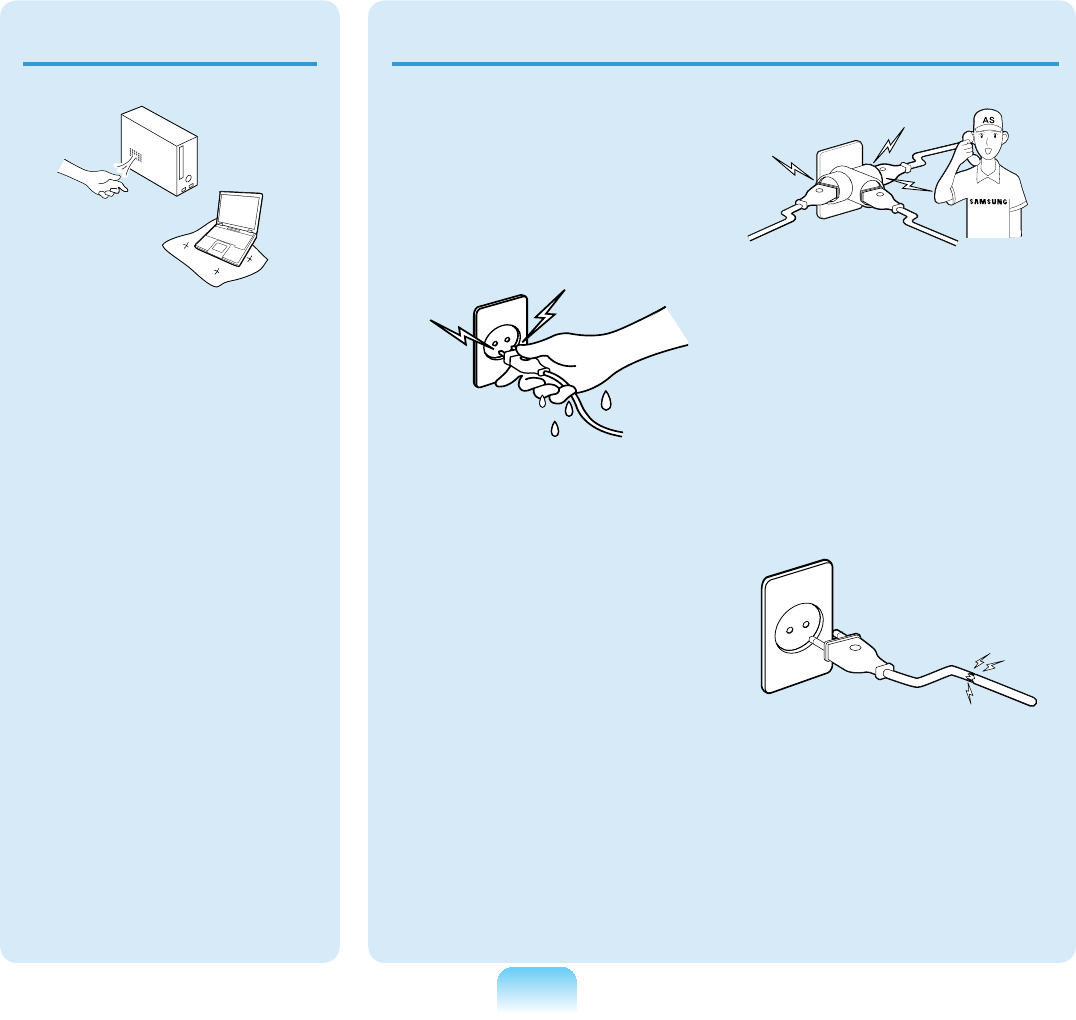
Do not touch the mains
plug or power cord with
wet hands.
There is a danger of
HOHFWULFVKRFN
Do not exceed the
standard capacity
(voltage/current) of a
multi-plug or power
outlet extension when
using it for the product.
There is a danger of
HOHFWULFVKRFNRU¿UH
hazard.
G
If the power cord or
power outlet makes a
noise, disconnect the
power cord from the
wall outlet and contact
a service center.
There is a danger of
HOHFWULFVKRFNRU¿UH
hazard.
Do not use a damaged
or loose mains plug or
power cord or power
outlet.
There is a danger of
HOHFWULFVKRFNRU¿UH
hazard.
Power Related
Avoid exposing any
part of your body
to the heat from the
computer vent for a
long time when it is on.
Exposingapartofyour
bodytotheheatfromthe
ventforlongperiodsof
timemaycauseaburn.
Avoid blocking the
vent at the bottom or
side of the computer
when using it on a bed
or cushion.
,IWKHYHQWLVEORFNHG
there is a danger of
damaging the computer
or overheating the inside
of the computer.
10
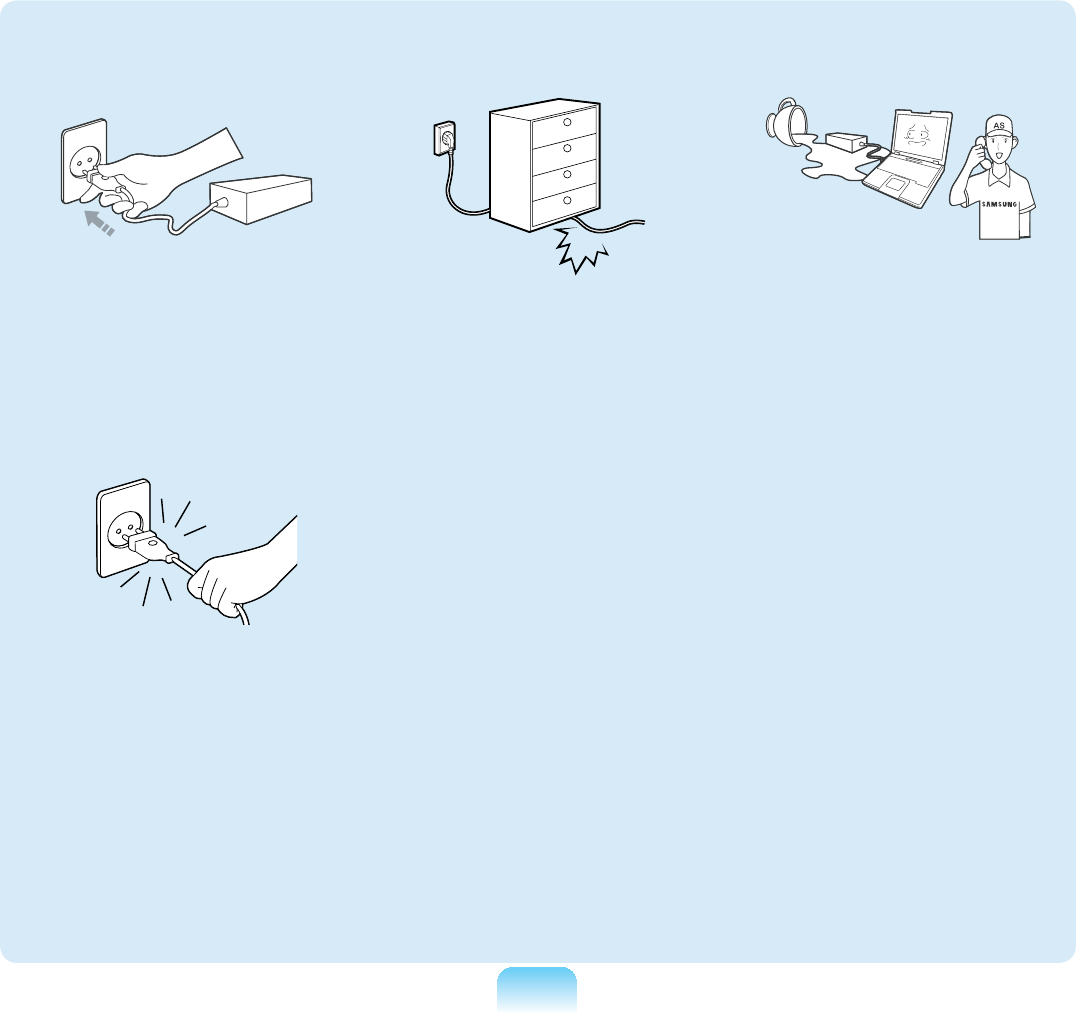
Plug the power cord
¿UPO\LQWRWKHSRZHU
outlet and AC adapter.
Failingtodosomaycause
¿UHKD]DUG
Do not unplug the power
cord out by pulling the
cable only.
Ifthecordisdamaged,it
PD\FDXVHHOHFWULFVKRFN
Do not bend the power
cord excessively or do
not place a heavy object
over the power cord. It is
especially important to
keep the power cord out
of reach of infants and
pets.
Ifthecordisdamaged,it
PD\FDXVHHOHFWULFVKRFN
RU¿UH
If water or another
substance enters the
power input jack, AC
adapter or the computer,
disconnect the power
cord and contact the
service center.
Damage to the device
within the computer may
FDXVHHOHFWULFVKRFNRU¿UH
hazard.

11
Do not place heavy
objects or step onto
the power cord or
AC adapter to avoid
damaging the power
cord or AC adapter.
Ifthecordisdamaged,
there is a danger of
HOHFWULFVKRFNRU¿UH
Use only the AC adapter
supplied with the
product.
Using another adapter
maycausethescreento
ÀLFNHU
Connect the power cord
WRWKH$&DGDSWHU¿UPO\
Otherwise, there is a
GDQJHURI¿UHGXHWRDQ
incomplete contact.
AC Adapter Usage Precautions
12
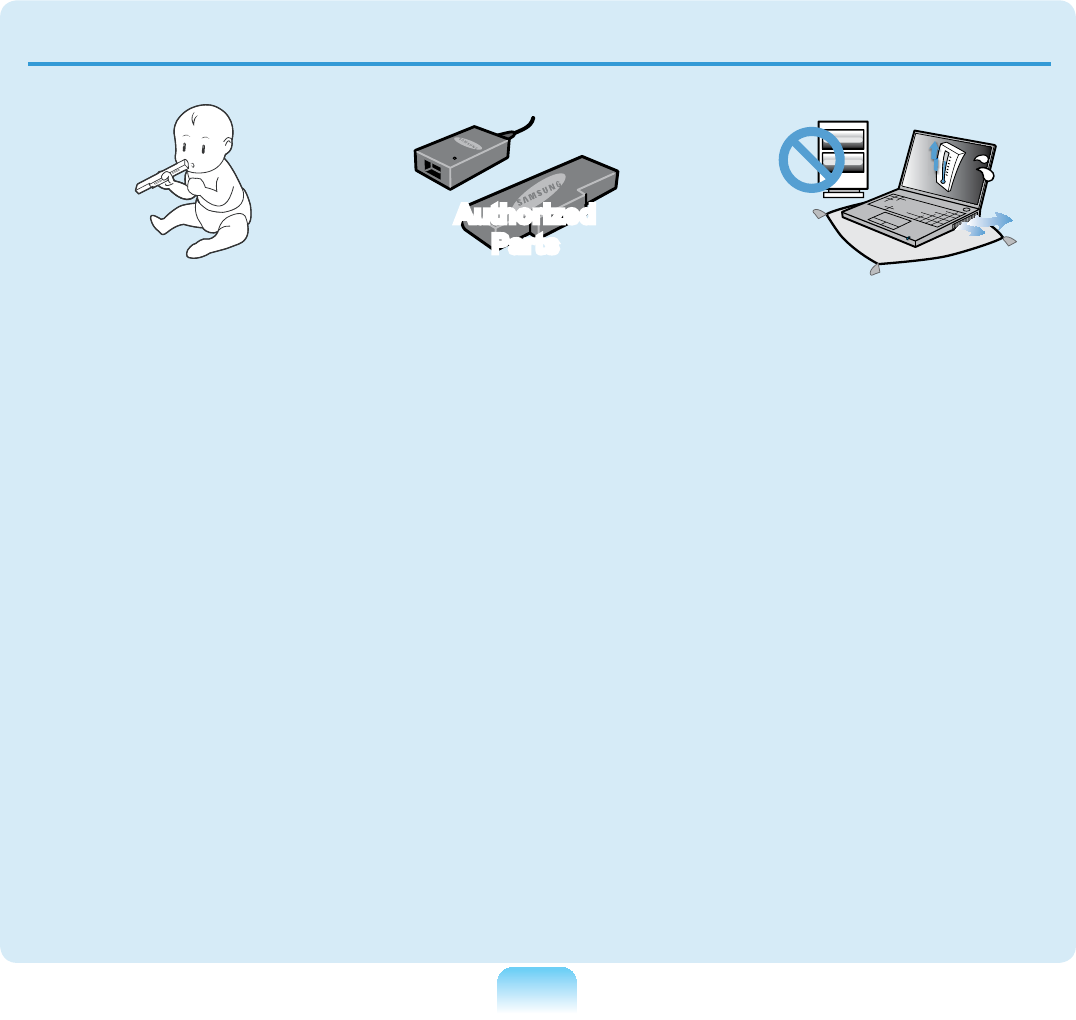
Keep the battery out of
the reach of infants and
pets, as they could put
the battery into their
mouths.
There is a danger of
HOHFWULFVKRFNRUFKRNLQJ
Authorized
Parts
Use an authorized
battery and AC adapter
only.
Please use an authorized
battery and adapter
approved by Samsung
Electronics.
Unauthorized batteries
and adapters may not
meet the proper safety
requirements and may
cause problems or
malfunctions and result in
DQH[SORVLRQRU¿UH
Do not use the computer
in a badly ventilated
location such as on
bedding, on a pillow or
cushion, etc, and do
not use it in a location
such as room with
ÀRRUKHDWLQJDVLWPD\
cause the computer to
overheat.
7DNHFDUHWKDWWKH
computervents(onthe
side or the bottom) are
QRWEORFNHGHVSHFLDOO\LQ
these environments. If
WKHYHQWVDUHEORFNHGWKH
computer may overheat
anditmaycausea
computer problem, or even
explosion.
Battery Usage Related
13
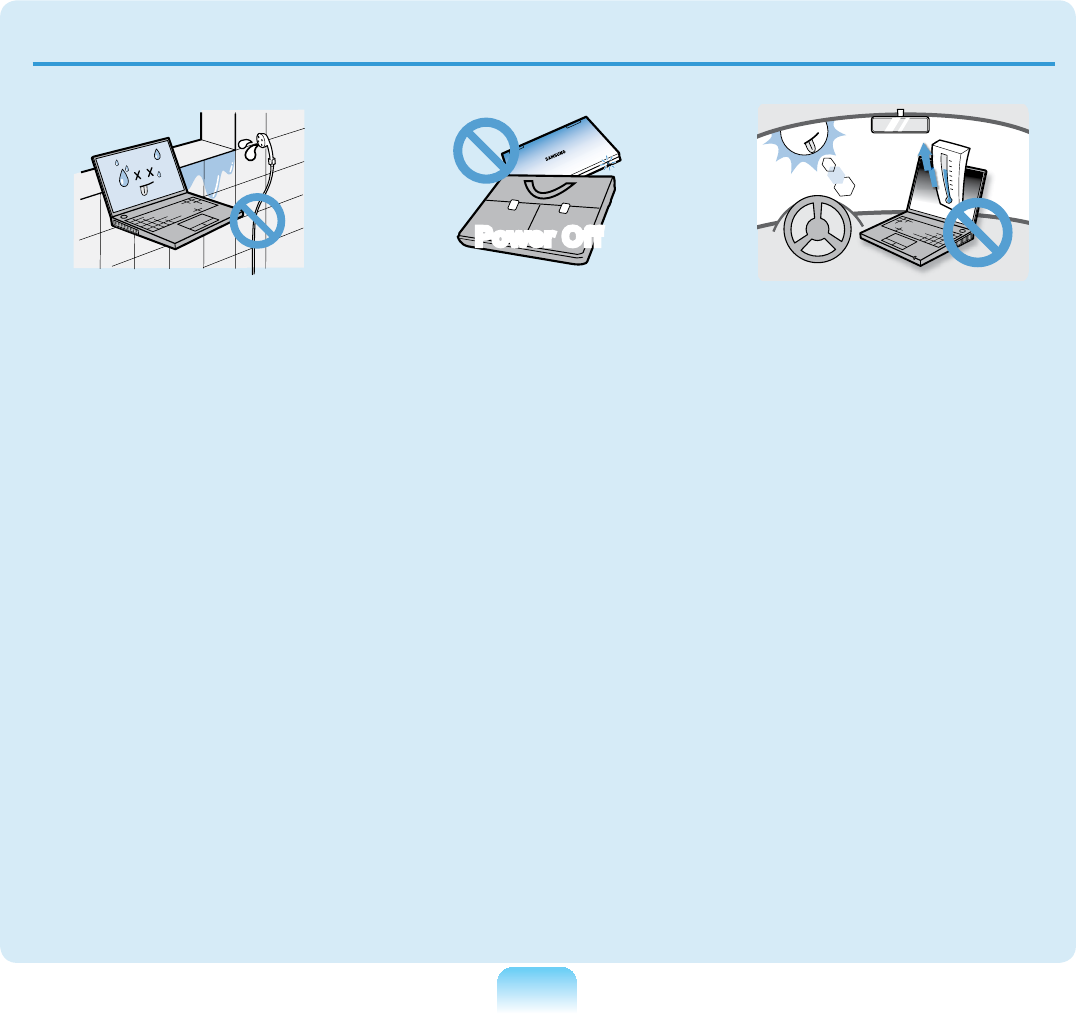
Do not use the computer
in a humid location such
as a bathroom or sauna.
Please use the computer
within the recommended
temperature and humidity
range (10~32ºC, 20~80%
RH).
Power Off
Do not close the LCD
panel and put the
computer into your bag
to move it when it is still
turned on.
If you put the computer
into your bag without
turningitoff,thecomputer
mayoverheatandthereis
DGDQJHURI¿UH6KXWWKH
computerdownproperly
before moving it.
Never heat the battery
or put the battery into
D¿UH'RQRWSXWRU
use the battery in a
hot location such as a
sauna, inside a vehicle
exposed to the heat, and
so on.
Thereisadangerofan
H[SORVLRQRU¿UH
14
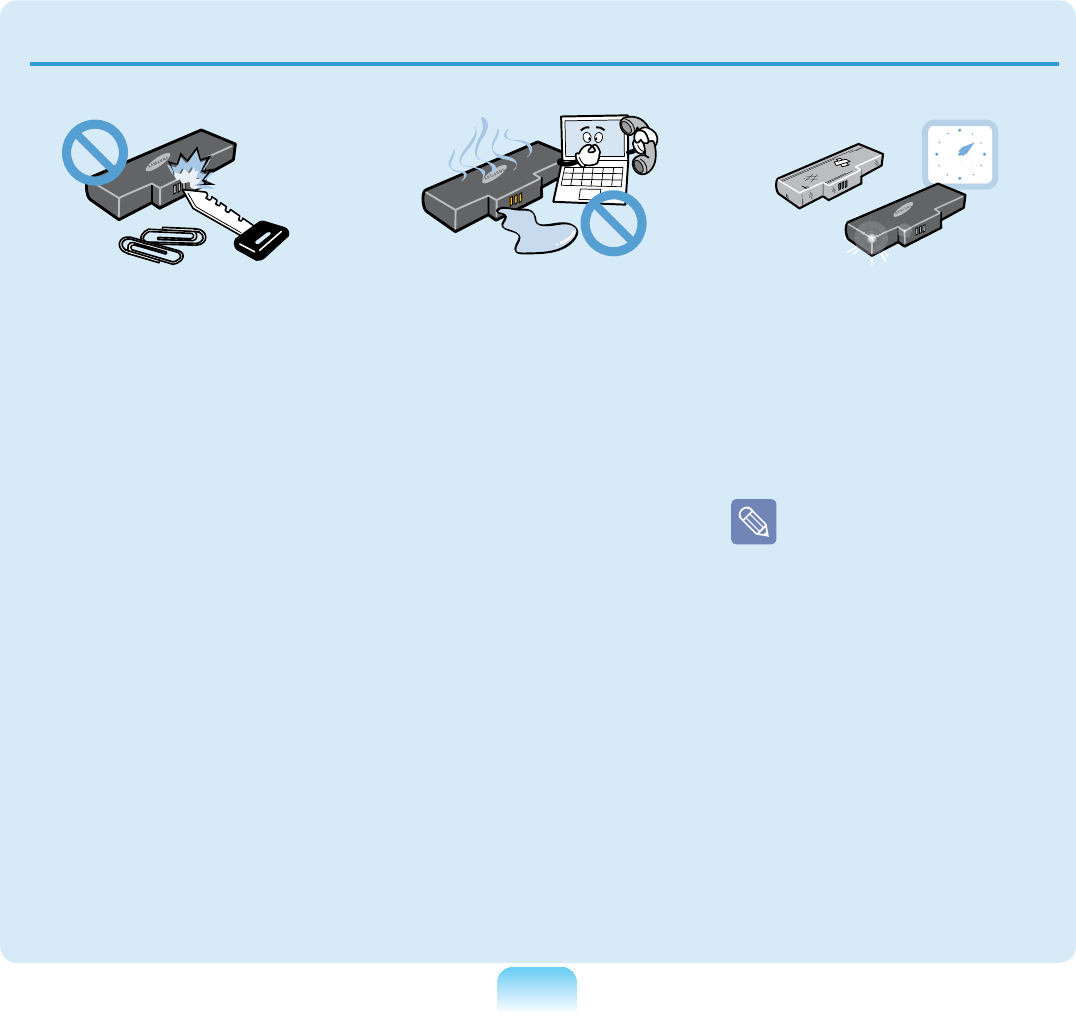
Take care not to allow
metal objects such as a
key or clip to touch the
battery terminal (metal
parts).
If a metal object touches
the battery terminals, it
may cause excessive
FXUUHQWÀRZDQGLWPD\
damage the battery, or
UHVXOWLQD¿UH
If liquid leaks out of
the battery or there is
a funny smell coming
from the battery, remove
the battery from the
computer and contact a
service center.
Thereisadangerofan
H[SORVLRQRU¿UH
To use the computer
safely, replace a dead
battery with a new,
authorized battery.
Please charge the
battery fully before
using the computer
IRUWKH¿UVWWLPH
15
Disconnect all cables
connected to the
computer before
cleaning it. If you are
using a notebook
computer, remove the
battery.
There is a danger of
HOHFWULFVKRFNRUGDPDJH
to the product.
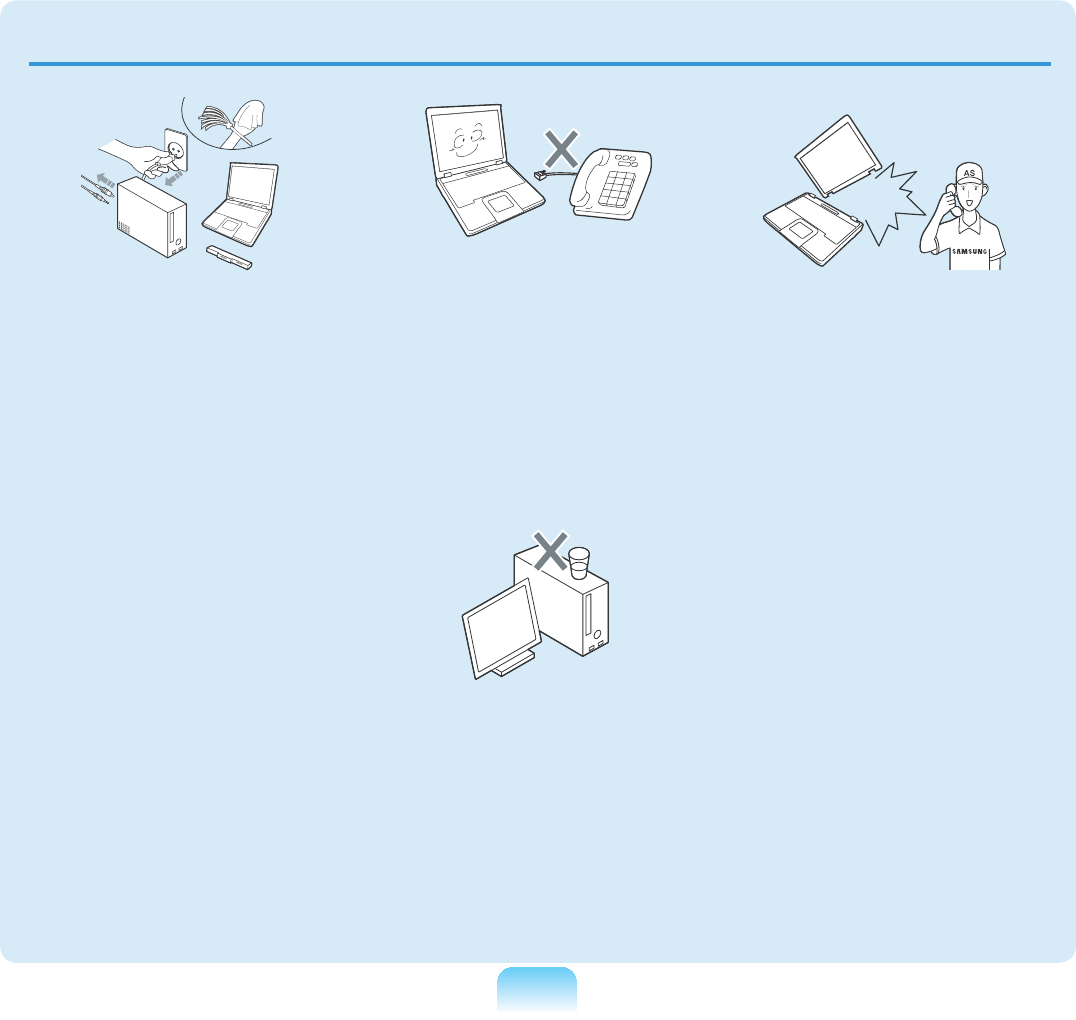
Do not connect a phone
line connected to a
digital phone to the
modem.
Thereisadangerofa
HOHFWULFVKRFN¿UHRU
damage to the product.
Do not place any
FRQWDLQHU¿OOHGZLWK
water or chemicals over
or near the computer.
If water or chemicals
enter the computer, this
PD\FDXVH¿UHRUHOHFWULF
VKRFN
If the computer is
broken or dropped,
disconnect the power
cord and contact a
service center for a
safety check.
8VLQJDEURNHQFRPSXWHU
PD\FDXVHHOHFWULFVKRFN
RU¿UHKD]DUG
Avoid direct sunlight
when the computer is
in an air-tight location
such as inside a vehicle.
7KHUHLVDGDQJHURID¿UH
hazard.Thecomputermay
overheat and also present
opportunitytothieves.
Usage Related
16
Upgrade Related
Never disassemble the
power supply or AC
adapter.
There is a danger of
HOHFWULFVKRFN
When removing the
RTC (Real Time Clock)
battery, keep it out of
the reach of children as
they could touch and/or
swallow it.
There is a danger of
FKRNLQJ,IDFKLOGKDV
swallowedit,contacta
doctor immediately.
Use only authorized
parts (multi-plug,
battery and memory)
and never disassemble
parts.
There is a danger of
damaging the product,
HOHFWULFVKRFNRU¿UH
hazard.
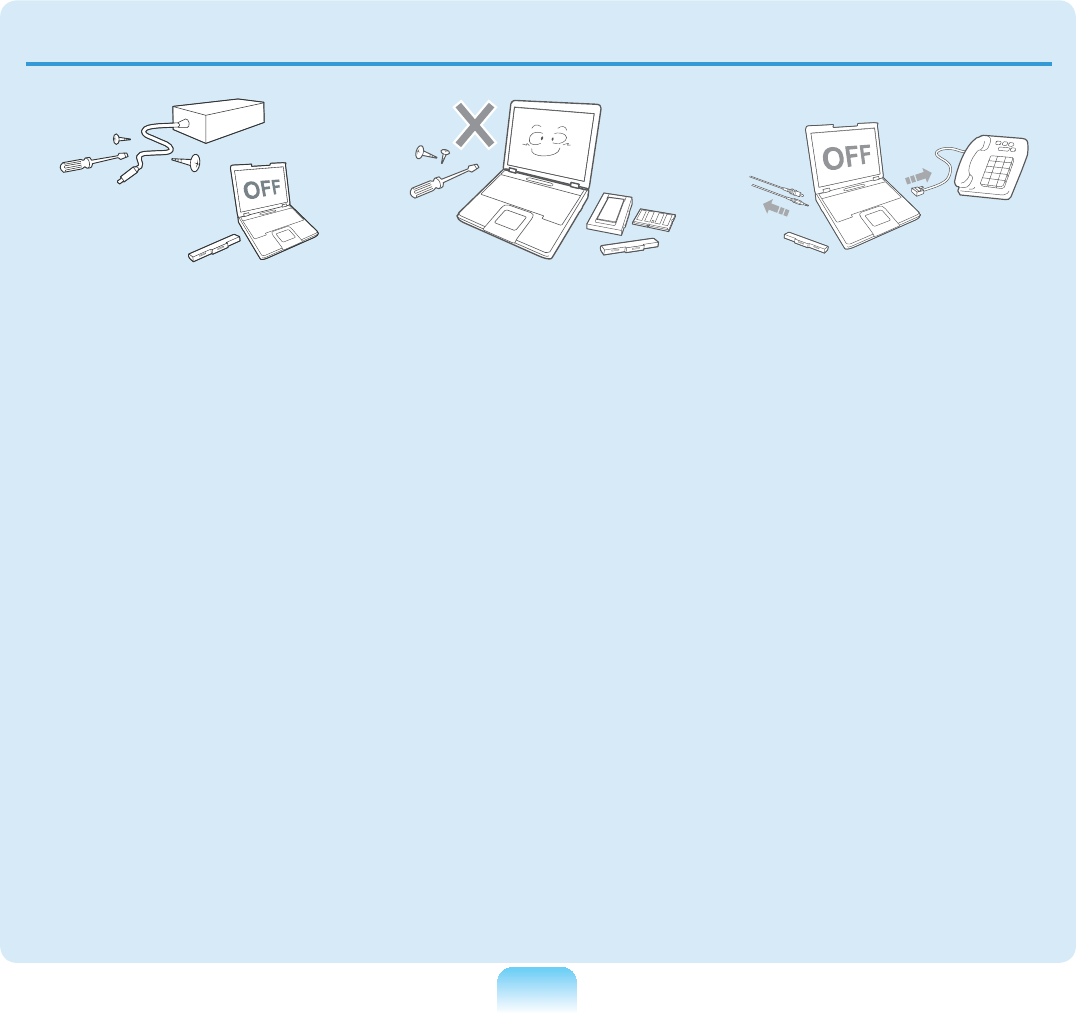
Shut down the computer
and disconnect
all cables before
disassembling the
computer. If there is
a modem, disconnect
the phone line. If you
are using a notebook
computer, make sure to
remove the battery.
Failingtodoso,may
FDXVHHOHFWULFVKRFN

17
Custody and Movement Related
Follow the instructions
for the relevant
location (e.g. airplane,
hospital, etc.) when
using a wireless
communication
device (wireless LAN,
Bluetooth, etc.).
When carrying the
notebook computer
with other items, such
as the adapter, mouse,
books etc, take care
not to press anything
against the notebook
computer.
If a heavy object is
pressed against the
QRWHERRNFRPSXWHUD
whitestoporstainmay
appear on the LCD.
7KHUHIRUHWDNHFDUHQRW
to apply any pressure to
WKHQRWHERRN
In this case, place the
QRWHERRNFRPSXWHULQD
separate compartment
away from the other
objects.

18
Caution
)DLOLQJWRIROORZLQVWUXFWLRQVPDUNHGZLWKWKLVV\PEROPD\FDXVHVOLJKWLQMXU\RUGDPDJH
to the product.
Installation Related Battery Usage
Related
Do not block the ports
(holes), vents, etc. of
the product and do not
insert objects.
Damage to a component
within the computer may
FDXVHHOHFWULFVKRFNRU
¿UH
When using the
computer with it lying
on its side, place it
so that the vents face
upwards.
Failingtodoso,may
cause the internal
temperature of the
computertoriseandthe
computertomalfunctionor
halt.
Do not place a heavy
object over the product.
Thismaycauseaproblem
with the computer. In
addition,theobjectmay
fall and cause injury, or
damage the computer.
Dispose of worn-out
batteries properly.
Ŷ7KHUHLVDGDQJHURI
¿UHRUH[SORVLRQ
Ŷ7KHEDWWHU\GLVSRVDO
method may differ
depending on your
country and region.
Disposeofthe
used battery in an
appropriate way.
Do not throw or
disassemble the
battery and do not put
it into water.
This may cause an
LQMXU\¿UHRUH[SORVLRQ

19
Use only a battery
authorized by Samsung
Electronics.
Failingtodosomay
causeanexplosion.
Avoid contact with
metal objects such as
car keys or clips when
keeping or carrying a
battery.
Contactwithametalmay
cause excessive current
andahightemperature
and may damage the
EDWWHU\RUFDXVHD¿UH
Charge the battery
according to the
instructions in the
manual.
Failingtodoso,may
causeanexplosionor
¿UHIURPGDPDJHWRWKH
product.
Do not heat the battery
or expose it to heat (e.g.
inside a vehicle during
the summer).
There is a danger of
H[SORVLRQRU¿UH
Usage Related
Do not place a candle,
lighted cigar, etc. over
or on the product.
7KHUHLVDGDQJHURI¿UH
Use a wall outlet or
multi-plug with a
grounding part.
Failingtodosomay
FDXVHDQHOHFWULFVKRFN
hazard.
Make sure to have the
product tested by a
safety service engineer
after repairing the
product.
Authorized Samsung
Repair Centers will carry
RXWVDIHW\FKHFNVDIWHUD
repair. Using a repaired
product without testing it
forsafetymaycausean
HOHFWULFVKRFNRU¿UH

20
In case of lightning,
immediately turn the
system off, disconnect
the power cord from
the wall outlet and line
do not use a modem or
phone.
There is a danger of
HOHFWULFVKRFNRU¿UH
Do not use your
computer and AC-
Adapter on your lap or
soft surfaces.
If the computer
temperature increases,
there is a danger of
burning yourself.
Connect only permitted
devices to the
connectors or ports of
the computer.
Failingtodoso,may
FDXVHHOHFWULFVKRFNDQG
¿UH
Close the LCD panel
only after checking if the
notebook computer is
turned off.
The temperature may
riseanditmaycause
overheating and
deformation of the product.
Do not press the Eject
Button while the Floppy
Disk/CD-ROM drive is in
operation.
You might lose data and
WKHGLVNPLJKWEHVXGGHQO\
ejectedandcouldcause
an injury.
Take care not to drop the
product while using it.
This may cause personal
injury or loss of data.
Do not contact the
antenna with electricity
facility such as the
power outlet.
There is a danger of
HOHFWULFVKRFN
When handling
computer parts, follow
the instructions on the
manual supplied with the
parts.
Failingtodoso,may
causedamagetothe
product.
If the computer emits
smoke, or there is
a burning smell,
disconnect the power
plug from the wall outlet
and contact a service
center. If your computer
is a notebook computer,
make sure to remove the
battery.
7KHUHLVDGDQJHURI¿UH

21
Upgrade Related
Do not use a damaged
RUPRGL¿HG&')ORSS\
Disk.
There is a danger of
damaging the product or
personal injury.
Do not insert your
¿QJHUVLQWRWKH3&&DUG
Slot.
Thereisadangerofinjury
RUHOHFWULFVKRFN
Use recommended
computer cleansing
solution when cleaning
the product and only use
the computer when it is
completely dried.
Failingtodosomaycause
HOHFWULFVKRFNRU¿UH
Emergency disk eject
method using paperclip
should not be used
while the disk is in
motion. Make sure to
use the emergency disk
eject method only when
the Optical Disk Drive is
stopped.
Thereisadangerofinjury.
Do not place your face
close to the Optical Disk
Drive tray when it is
operating.
Thereisadangerofinjury
duetoanabruptejection.
Check CDs for cracks
and damage prior to use.
It may damage the disc
and cause disorder of
deviceandinjuryofuser.
Take care when
touching the product
or parts.
Thedevicemaybe
damaged or you may be
injured.
Take care not to throw
or drop a computer
part or device.
This may cause injury or
damage to the product.
Make sure to close the
computer cover before
connecting the power
after a reassembly.
There is a danger of
HOHFWULFVKRFNLI\RXU
body touches an internal
part.

22
Use parts authorized
by Samsung
Electronics only.
Failingtodoso,may
FDXVH¿UHRUGDPDJH
the product.
Never disassemble or
repair the product by
yourself.
There is a danger of
HOHFWULFVKRFNRU¿UH
To connect a
device that is not
manufactured
or authorized by
Samsung Electronics,
enquire at your
service center before
connecting the
device.
There is a danger of
damaging the product.
Custody and Movement Related
When moving the
product, turn the power
off and separate all
FRQQHFWHGFDEOHV¿UVW
Theproductmightbe
damaged or users may
trip over the cables.
For long periods
of not using the
notebook computer,
discharge the battery
and preserve as it is
detached.
The battery will be
preserved at its best
condition.
Do not operate or watch
the computer while
driving a vehicle.
Thereisadangerofa
WUDI¿FDFFLGHQW3OHDVH
concentrate on driving.

23
Cautions on Preventing Data Loss (Hard Disk Management)
Take care not to damage the data on
a hard disk drive.
Ŷ $KDUGGLVNGULYHLVVRVHQVLWLYHWR
external impact that an external
impact may cause loss of data on the
VXUIDFHRIWKHGLVN
Ŷ 7DNHH[WUDFDUHEHFDXVHPRYLQJ
thecomputeroranimpactonthe
computer when it is turned on may
GDPDJHWKHGDWDRIWKHKDUGGLVN
drive.
Ŷ 7KHFRPSDQ\LVQRWOLDEOHIRUDQ\ORVV
ofanydatacausedbyacustomer’s
careless usage or bad environmental
conditions.
Causes that may damage the data of
a hard disk drive and the hard disk
drive itself.
Ŷ 7KHGDWDPD\EHORVWZKHQDQ
H[WHUQDOLPSDFWLVDSSOLHGWRWKHGLVN
while disassembling or assembling the
computer.
Ŷ 7KHGDWDPD\EHORVWZKHQWKH
computeristurnedofforresetbya
SRZHUIDLOXUHZKLOHWKHKDUGGLVNGULYH
is operating.
Ŷ 7KHGDWDPD\EHORVWDQG
irrecoverableduetoacomputervirus
infection.
Ŷ 7KHGDWDPD\EHORVWLIWKHSRZHULV
turned off while running a program.
Ŷ 0RYLQJRUFDXVLQJDQLPSDFWWRWKH
FRPSXWHUZKLOHWKHKDUGGLVNGULYH
LVRSHUDWLQJPD\FDXVH¿OHVWREH
corrupted or bad sectors on the hard
GLVN
To prevent data loss due to damage to the hard disk drive, please backup your
data frequently.
24
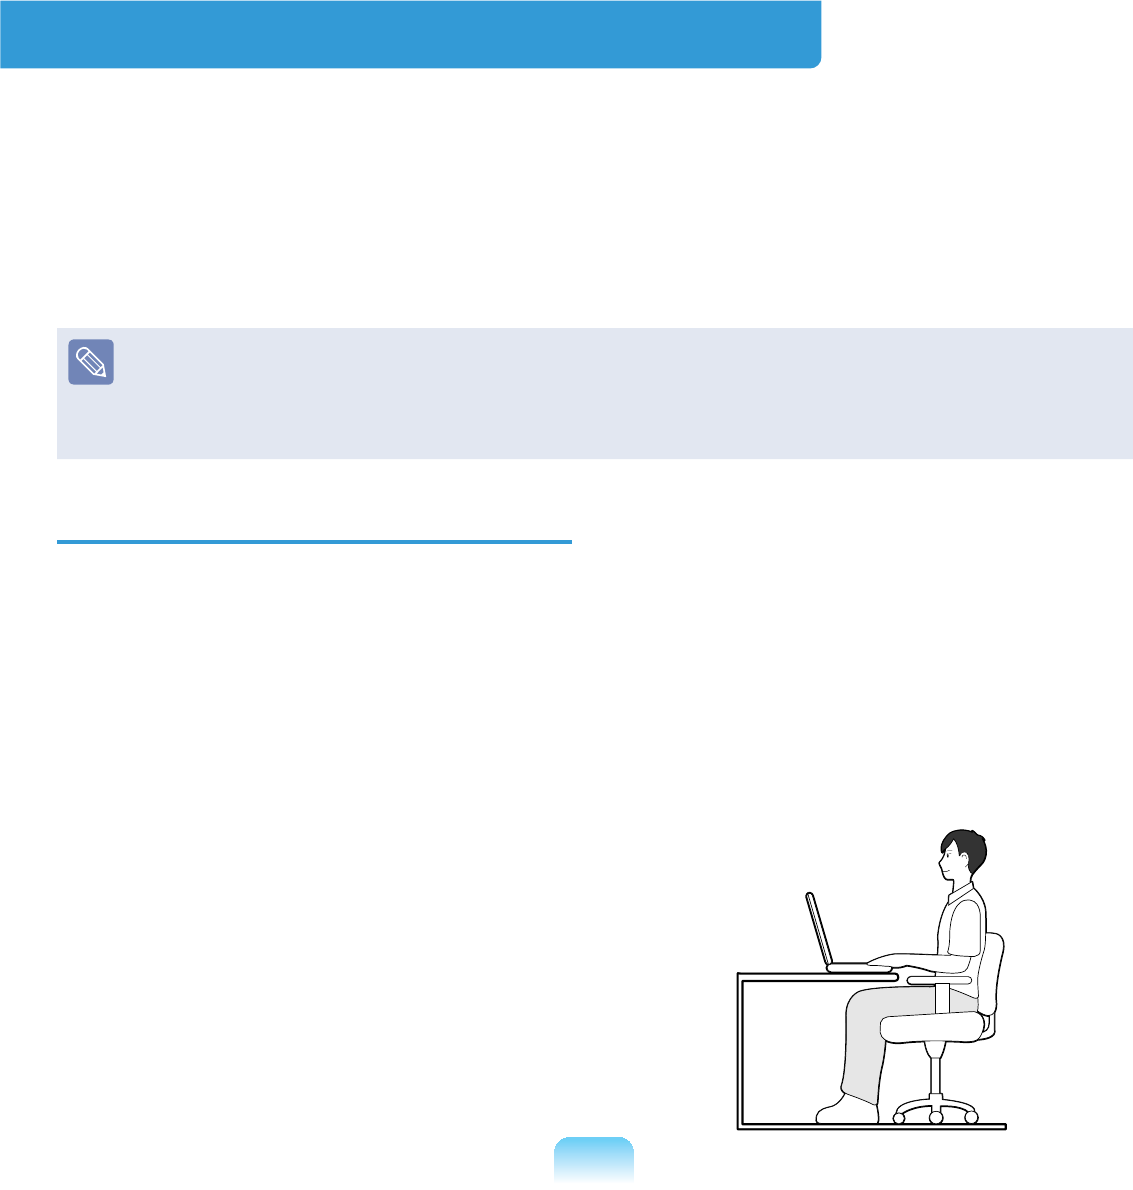
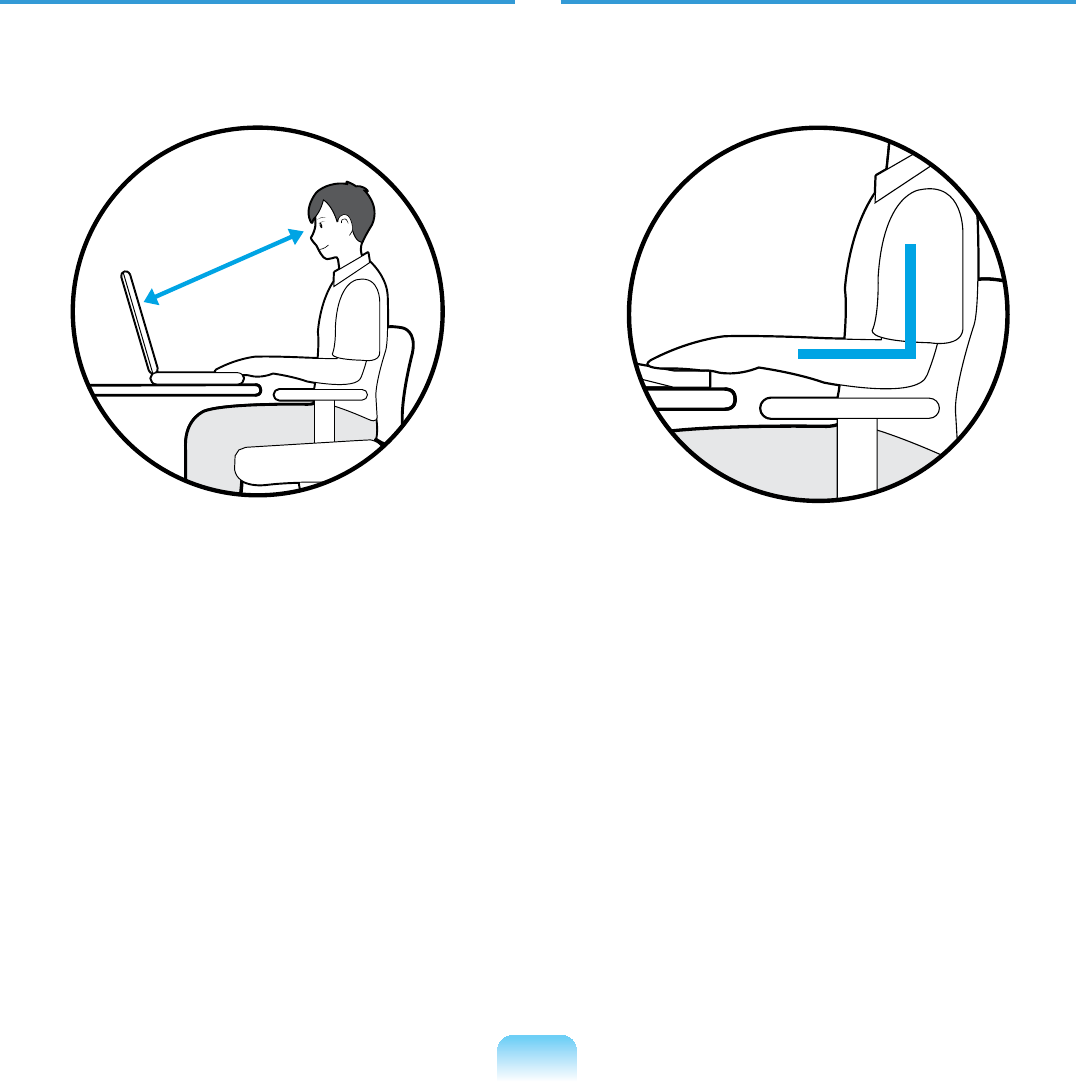
Proper Posture
Adjust the heights of desks and chairs
appropriate to your height.
Theheightsaretobeadjustedsothat
yourarmformsarightanglewhenyou
SODFH\RXUKDQGRYHUWKHNH\ERDUGZKLOH
sittingdownonachair.
Adjust the height of chair so that your heel
LVFRPIRUWDEO\SODFHGRQWKHÀRRU
z Do not use the computer while you
arelyingdown,butonlywhileyouare
sitting down.
z Donotusethecomputeronyourlap.
If the computer temperature increases,
there is a danger of burning yourself.
z:RUNZKLOHNHHSLQJ\RXUZULVWVWUDLJKW
z8VHDFKDLUZLWKDFRPIRUWDEOHEDFN
z Keepthecenterofyourlegweightnot
on the chair but on your feet when you
are sitting on a chair.
z7RXVHWKHFRPSXWHUZKLOHWDONLQJRYHU
thetelephone,useaheadset.Using
thecomputerwiththephoneonyour
shoulder is bad for posture.
z Keep frequently used items within a
FRPIRUWDEOHZRUNUDQJHZKHUH\RX
can reach them with your hands).
Proper Posture During Computer Use
Maintaining a proper posture during computer use is very important to prevent physical
harm.
The following instructions are about maintaining a proper posture during computer use
developedthroughhumanengineering.Pleasereadandfollowthemcarefullywhen
using the computer.
Otherwise,theprobabilityof(RSI:RepetitiveStrainInjury)fromrepeatedoperations
mayincreaseandseriousphysicalharmmaybecaused.
Theinstructionsinthismanualhavebeenpreparedsothattheycanbeappliedwithin
the coverage of general users.
If the user is not included in the coverage, the recommendation is to be applied
according to the user’s needs.
25
Eye Position
Keep the monitor or LCD away from
your eyes by at least 50cm.
50cm
z Adjusttheheightofthemonitorand
the LCD screen so that its top height is
equaltoorlowerthanyoureyes.
z Avoid setting the monitor and LCD
excessively bright.
z Keep the monitor and LCD screen
clean.
z Ifyouwearglasses,cleanthembefore
using the computer.
z When entering contents printed on a
paperintothecomputer,useastatic
paperholdersothattheheightofthe
paperisalmostequaltothatofthe
monitor.
Hand Position
Keep your arm at a right angle as
VKRZQE\WKH¿JXUH
z Keepthelinefromyourelbowtoyour
hand straight.
z Do not place your palm over the
NH\ERDUGZKLOHW\SLQJ
z Donotholdthemousewithexcessive
force.
z'RQRWSUHVVWKHNH\ERDUGWRXFKSDGRU
mouse with excessive force.
z It is recommended connecting an
H[WHUQDONH\ERDUGDQGPRXVHZKHQ
using the computer for long periods of
time.
26
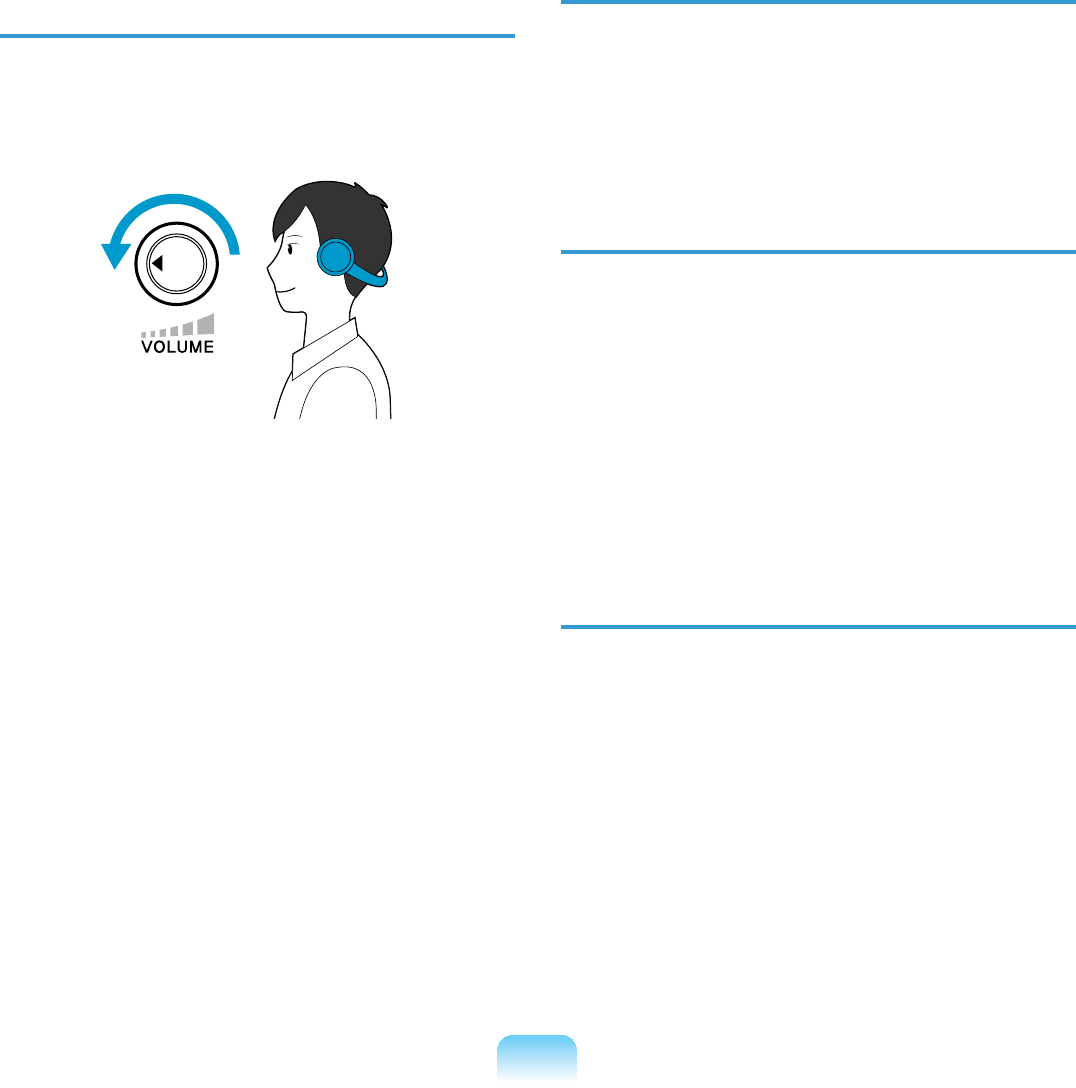
Volume Control
(Headphones and Speakers)
&KHFN\RXUYROXPH¿UVWWROLVWHQWR
music.
Check your
volume!!
z&KHFNLIWKHYROXPHLVWRRORXGEHIRUH
using headphones.
z It is not recommended using
headphones for long periods of time.
z Any deviation from the equalizer
default setting could cause hearing
impairment.
z The default setting can be changed
through software and driver updates
ZLWKRXW\RXULQWHUYHQWLRQ3OHDVHFKHFN
WKHHTXDOL]HUGHIDXOWVHWWLQJEHIRUH¿UVW
usage.
Use Time (Break Time)
z7DNHDEUHDNIRUPLQXWHVRUPRUH
DIWHUDPLQXWHSHULRGZKHQZRUNLQJ
formorethanonehour.
Illumination
z'RQRWXVHWKHFRPSXWHULQGDUN
locations. The illumination level for
computerusemustbeasbrightsofor
UHDGLQJDERRN
z Indirect illumination is recommended.
8VHDFXUWDLQWRSUHYHQWUHÀHFWLRQRQ
the LCD screen.
Operation Condition
z Donotusethecomputerinhotand
humid locations.
z Usethecomputerwithintheallowed
temperature and humidity range
VSHFL¿HGLQWKH8VHU*XLGH

27
Safety Instructions
Your system is designed and tested
to meet the latest standards for safety
of information technology equipment.
However, to ensure safe use of this
product, it is important that the safety
LQVWUXFWLRQVPDUNHGRQWKHSURGXFWDQGLQ
the documentation are followed.
Always follow these instructions to
help guard against personal injury
anddamagetoyoursystem.
Setting Up your System
z Read and follow all instructions
PDUNHGRQWKHSURGXFWDQGLQWKH
documentation before you operate your
system. Retain all safety and operating
instructions for future use.
z Do not use this product near water or a
heat source such as a radiator.
z6HWXSWKHV\VWHPRQDVWDEOHZRUN
surface.
z The product should be operated only
with the type of power source indicated
ontheratinglabel.
z Ensure that the electrical outlet you
are using to power your equipment is
HDVLO\DFFHVVLEOHLQFDVHRI¿UHRUVKRUW
circuit.
z If your computer has a voltage selector
VZLWFKPDNHVXUHWKDWWKHVZLWFKLVLQ
the proper position for your area.
z Openingsinthecomputercaseare
SURYLGHGIRUYHQWLODWLRQ'RQRWEORFN
RUFRYHUWKHVHRSHQLQJV0DNHVXUH
youprovideadequatespace,atleast 6
inches (15 cm), around the system for
YHQWLODWLRQZKHQ\RXVHWXS\RXUZRUN
DUHD1HYHULQVHUWREMHFWVRIDQ\NLQG
into the computer ventilation openings.
z Ensurethatthefanventsonthebottom
of the casing are clear at all times.
Donotplacethecomputeronasoft
VXUIDFHGRLQJVRZLOOEORFNWKHERWWRP
vents.
z Ifyouuseanextensioncordwiththis
V\VWHPPDNHVXUHWKDWWKHWRWDOSRZHU
rating on the products plugged into the
extensioncorddoesnotexceedthe
extension cord power rating.
Important Safety Information

28
Care During Use
z'RQRWZDONRQWKHSRZHUFRUGRUDOORZDQ\WKLQJWRUHVWRQLW
z'RQRWVSLOODQ\WKLQJRQWKHV\VWHP7KHEHVWZD\WRDYRLGVSLOOVLVWRQRWHDWRUGULQN
near your system.
z Some products have a replaceable CMOS battery on the system board. There is a
dangerofexplosioniftheCMOSbatteryisreplacedincorrectly.Replacethebattery
with the same or equivalent type recommended by the manufacturer.
Disposeofbatteriesaccordingtothemanufacturersinstructions.IftheCMOSbattery
UHTXLUHVUHSODFHPHQWLQVXUHWKDWDTXDOL¿HGWHFKQLFLDQSHUIRUPVWKHWDVN
z:KHQWKHFRPSXWHULVWXUQHGRIIDVPDOODPRXQWRIHOHFWULFDOFXUUHQWVWLOOÀRZV
through the computer.
7RDYRLGHOHFWULFDOVKRFNDOZD\VXQSOXJDOOSRZHUFDEOHVUHPRYHWKHEDWWHU\DQG
modem cables from the wall outlets before cleaning the system.
z8QSOXJWKHV\VWHPIURPWKHZDOORXWOHWDQGUHIHUVHUYLFLQJWRTXDOL¿HGSHUVRQQHOLI
–Thepowercordorplugisdamaged.
–Liquidhasbeenspilledintothesystem.
– The system does not operate properly when the operating instructions are followed.
– The system was dropped or the casing is damaged.
– The system performance changes.

29
The Instruction On Safety Operation of NotePC
n When installing and operating devices please refer to safety requirements in the
user guide.
l'HYLFHVFDQEHXVHGRQO\ZLWKWKHHTXLSPHQWVSHFL¿HGLQWKHWHFKQLFDO
VSHFL¿FDWLRQVRIWKHGHYLFHV
W,IDQ\VPHOORIEXUQLQJRUVPRNHIURPWKHFRPSXWHUWKHXQLWVKRXOGEHVZLWFKHGRII
DQGEDWWHU\UHPRYHG7KHXQLWVKRXOGEHFKHFNHGE\DTXDOL¿HGWHFKQLFLDQEHIRUH
reuse.
j Service and repair of devices should be carried out by authorized service centers.
V Donotallowyourportablecomputertooperatewiththebaserestingdirectlyon
H[SRVHGVNLQIRUH[WHQGHGSHULRGVRIWLPH7KHVXUIDFHWHPSHUDWXUHRIWKHEDVH
will rise during normal operation (particularly when AC Power is present). Allowing
VXVWDLQHGFRQWDFWZLWKH[SRVHGVNLQFDQFDXVHGLVFRPIRUWRUHYHQWXDOO\DEXUQ

30
Battery Disposal
Do not put rechargeable batteries or products powered by non-removable
rechargeable batteries in the garbage.
ContacttheSamsungHelplineforinformationonhowtodisposeofbatteriesthatyou
cannotuseorrechargeanylonger.
Follow all local regulations when disposing of old batteries.
THEREISARISKOFEXPLOSIONIFBATTERYISREPLACEDBYAN
INCORRECT TYPE.
DISPOSE OF USED BATTERIES ACCORDING TO THE INSTRUCTIONS.
Replacement Parts and Accessories
Useonlyreplacementpartsandaccessoriesrecommendedbymanufacturer.
7RUHGXFHWKHULVNRI¿UHXVHRQO\1R$:*RUODUJHUWHOHFRPPXQLFDWLRQVOLQHFRUG
'RQRWXVHWKLVSURGXFWLQDUHDVFODVVL¿HGDVKD]DUGRXV6XFKDUHDVLQFOXGHSDWLHQW
care areas of medical and dental facilities, oxygen rich environments, or industrial
areas.

31
Laser Safety
AllsystemsequippedwithCDorDVDdrivescomplywiththeappropriatesafety
VWDQGDUGVLQFOXGLQJ,(&7KHODVHUGHYLFHVLQWKHVHFRPSRQHQWVDUHFODVVL¿HG
as“Class1LaserProducts”underaUSDepartmentofHealthandHumanServices
(DHHS) Radiation Performance Standard. Should the unit ever need servicing, contact
an authorized service location.
zLaser Safety Note:
Useofcontrolsoradjustmentsorperformanceofproceduresotherthanthose
VSHFL¿HGLQWKLVPDQXDOPD\UHVXOWLQKD]DUGRXVUDGLDWLRQH[SRVXUH7RSUHYHQW
exposuretolaserbeams,donottrytoopentheenclosureofaCDorDVDdrive.
z Class1Mlaserradiationwhenoperatingpartisopen.
Donotviewdirectlywithopticalinstruments.
z Class 3B invisible laser radiation when open.
Avoidexposuretothebeam.
Connect and Disconnect the AC adapter
7KHVRFNHWRXWOHWVKDOOEHLQVWDOOHGQHDUWKHHTXLSPHQWDQGVKDOOEHHDVLO\DFFHVVLEOH
Do not unplug the power cord out by pulling the cable only.

32
Power Cord Requirements
Thepowercordset(wallplug,cableandACadapterplug)youreceivedwithyour
computer meets the requirements for use in the country where you purchased your
equipment.
Power cord sets for use in other countries must meet the requirements of the country
where you use the computer. For more information on power cord set requirements,
contactyourauthorizeddealer,reseller,orserviceprovider.
General Requirements
The requirements listed below are applicable to all countries:
z Thelengthofthepowercordsetmustbeatleast 6.00feet(1.8m)andamaximumof
9.75 feet (3.0m).
z All power cord sets must be approved by an acceptable accredited agency
responsibleforevaluationinthecountrywherethepowercordsetwillbeused.
z Thepowercordsetmusthaveaminimumcurrentcapacityof7Aandanominal
voltageratingof125 or 250voltsAC,asrequiredbyeachcountry’spowersystem.
z7KHDSSOLDQFHFRXSOHUPXVWPHHWWKHPHFKDQLFDOFRQ¿JXUDWLRQRIDQ(1,(&
320StandardSheetC7connector,formatingwithapplianceinletonthecomputer.

33
Regulatory Compliance Statements
Wireless Guidance
Low power, Radio LAN type devices (radio frequency (RF) wireless communication
devices), operating in the 2.4GHz/5GHz Band, may be present (embedded) in your
QRWHERRNV\VWHP7KHIROORZLQJVHFWLRQLVDJHQHUDORYHUYLHZRIFRQVLGHUDWLRQVZKLOH
operating a wireless device.
$GGLWLRQDOOLPLWDWLRQVFDXWLRQVDQGFRQFHUQVIRUVSHFL¿FFRXQWULHVDUHOLVWHGLQWKH
VSHFL¿FFRXQWU\VHFWLRQVRUFRXQWU\JURXSVHFWLRQV7KHZLUHOHVVGHYLFHVLQ\RXU
V\VWHPDUHRQO\TXDOL¿HGIRUXVHLQWKHFRXQWULHVLGHQWL¿HGE\WKH5DGLR$SSURYDO0DUNV
onthesystemratinglabel.Ifthecountryyouwillbeusingthewirelessdevicein,isnot
listed,pleasecontactyourlocalRadioApprovalagencyforrequirements.Wireless
devicesarecloselyregulatedandusemaynotbeallowed.
7KH5)¿HOGVWUHQJWKRIWKHZLUHOHVVGHYLFHRUGHYLFHVWKDWPD\EHHPEHGGHGLQ\RXU
QRWHERRNDUHZHOOEHORZDOOLQWHUQDWLRQDO5)H[SRVXUHOLPLWVDVNQRZQDWWKLVWLPH
%HFDXVHWKHZLUHOHVVGHYLFHVZKLFKPD\EHHPEHGGHGLQWR\RXUQRWHERRNHPLWOHVV
energy than is allowed in radio frequency safety standards and recommendations,
manufacturer believes these devices are safe for use. Regardless of the power levels,
FDUHVKRXOGEHWDNHQWRPLQLPL]HKXPDQFRQWDFWGXULQJQRUPDORSHUDWLRQ
Asageneralguideline,aseparationof 20cm(8inches)betweenthewirelessdevice
andthebody,foruseofawirelessdevicenearthebody(thisdoesnotinclude
extremities) is typical. This device should be used more than 20 cm (8 inches) from the
body when wireless devices are on and transmitting.
This transmitter must not be collocated or operate in conjunction with any other antenna
or transmitter except the installed Bluetooth transmitter.
Some circumstances require restrictions on wireless devices. Examples of common
restrictions are listed on the next page:

34
z Radio frequency wireless communication can interfere with equipment on
commercial aircraft. Current aviation regulations require wireless devices to be
turnedoffwhiletravelinginanairplane.
$%*1DOVRNQRZQDVZLUHOHVV(WKHUQHWRU:L¿DQG%OXHWRRWK
communication devices are examples of devices that provide wireless
communication.
z,QHQYLURQPHQWVZKHUHWKHULVNRILQWHUIHUHQFHWRRWKHUGHYLFHVRUVHUYLFHVLV
harmful or perceived as harmful, the option to use a wireless device may be
UHVWULFWHGRUHOLPLQDWHG$LUSRUWV+RVSLWDOVDQG2[\JHQRUÀDPPDEOHJDVODGHQ
atmospheresarelimitedexampleswhereuseofwirelessdevicesmayberestricted
or eliminated. When in environments where you are uncertain of the sanction to use
ZLUHOHVVGHYLFHVDVNWKHDSSOLFDEOHDXWKRULW\IRUDXWKRUL]DWLRQSULRUWRXVHRUWXUQLQJ
on the wireless device.
z Everycountryhasdifferentrestrictionson the use of wireless devices. Since your
system is equipped with a wireless device, when traveling between countries with
\RXUV\VWHPFKHFNZLWKWKHORFDO5DGLR$SSURYDODXWKRULWLHVSULRUWRDQ\PRYHRU
trip for any restrictions on the use of a wireless device in the destination country.
z If your system came equipped with an internal embedded wireless device, do not
operate the wireless device unless all covers and shields are in place and the
system is fully assembled.
z Wireless devices are not user serviceable. Do not modify them in any way.
0RGL¿FDWLRQWRDZLUHOHVVGHYLFHZLOOYRLGWKHDXWKRUL]DWLRQWRXVHLW3OHDVHFRQWDFW
manufacturer for service.
z Onlyusedriversapprovedforthecountryinwhichthedevicewillbeused.Seethe
manufacturer System Restoration Kit, or contact manufacturer Technical Support for
additional information.

35
USA and Canada Safety
Requirements and Notices
Do not touch or move antenna while the
unit is transmitting or receiving.
Donotholdanycomponentcontaining
the radio such that the antenna is very
closeortouchinganyexposedpartsof
thebody,especiallythefaceoreyes,
while transmitting.
Do not operate the radio or attempt
to transmit data unless the antenna
is connected; if not, the radio may be
damaged.
8VHLQVSHFL¿FHQYLURQPHQWV
Theuseofwirelessdevicesinhazardous
locations is limited by the constraints
posedbythesafetydirectorsofsuch
environments.
Theuseofwirelessdevicesonairplanes
is governed by the Federal Aviation
Administration (FAA).
Theuseofwirelessdevicesinhospitals
isrestrictedtothelimitssetforthbyeach
hospital.
Explosive Device Proximity
Warning
Donotoperateaportabletransmitter
VXFKDVDZLUHOHVVQHWZRUNGHYLFH
near unshielded blasting caps or in
an explosive environment unless
WKHGHYLFHKDVEHHQPRGL¿HGWREH
TXDOL¿HGIRUVXFKXVH
Use On Aircraft Caution
RegulationsoftheFCCandFAA
prohibit airborne operation of radio-
frequency wireless devices because
their signals could interfere with
critical aircraft instruments.
Other Wireless Devices
Safety Notices for Other Devices in
the Wireless Network: Refertothe
documentation supplied with wireless
Ethernet adapters or other devices in the
ZLUHOHVVQHWZRUN
ThePart15radiodeviceoperateson
a non-interference basis with other
devices operating at this frequency.
$Q\FKDQJHVRUPRGL¿FDWLRQWRVDLG
product not expressly approved by
Intelcouldvoidtheuser’sauthorityto
operate this device.
United States of America

36
Unintentional Emitter per FCC Part
15
This device complies with Part 15 of the
FCC Rules. Operation is subject to the
following two conditions:(1) this device
may not cause harmful interference,
and (2) this device must accept any
interference received, including
interferencethatmaycauseundesired
operation.
This equipment has been tested
and found to comply with the limits
for a Class B digital device pursuant
to Part 15 of the FCC Rules. These
limitsaredesignedtoprovide
reasonable protection against
harmful interference in a residential
installation.Thisequipmentgenerate
uses and can radiate radio frequency
energyandifnotinstalledandused
in accordance with the instructions
may cause harmful interference will
notoccurinaparticularinstallation.
If this equipment does cause harmful
interference to radio or television
reception, which can be determined
by turning the equipment off and
on, the user is encouraged to try to
correct the interference by one or
more of the following measures:
z Reorient or relocate the receiving
antenna.
z Increase the separation between
the equipment and receiver.
z Connecttheequipmentintoan
outletonacircuitdifferentfrom
that to which the receiver is
connected.
z Consult the dealer or an
experienced radio/TV technician
for help.
Ifnecessary,theusershouldconsultthe
dealer or an experienced radio/television
technician for additional suggestions.
7KHXVHUPD\¿QGWKHIROORZLQJERRNOHW
helpful: “Something About Interference.”
This is available at FCC local regional
RI¿FHV2XUFRPSDQ\LVQRWUHVSRQVLEOH
for any radio or television interference
FDXVHGE\XQDXWKRUL]HGPRGL¿FDWLRQV
of this equipment or the substitution or
attachment of connecting cables and
HTXLSPHQWRWKHUWKDQWKRVHVSHFL¿HG
byourcompany.Thecorrectionwillbe
theresponsibilityoftheuser.Useonly
shieldeddatacableswiththissystem.

37
Intentional emitter per FCC Part 15
Lowpower,RadioLANtypedevices
(radio frequency (RF) wireless
communication devices), operating in
the 2.4GHz/5GHz Band, may be present
HPEHGGHGLQ\RXUQRWHERRNV\VWHP
Thissectionisonlyapplicableifthese
devices are present. Refer to the system
labeltoverifythepresenceofwireless
devices.
Wireless devices that may be in your
V\VWHPDUHRQO\TXDOL¿HGIRUXVHLQWKH
UnitedStatesofAmericaifanFCCID
numberisonthesystemlabel.
This device is restricted to indoor use
duetoitsoperationinthe 5.15to 5.25
GHz frequency range. FCC requires
thisproducttobeusedindoorsfor
the frequency range 5.15 to 5.25 GHz
to reduce the potential for harmful
interference to co-channel Mobile Satellite
systems. High power radars are allocated
as primary users of the 5.25 to 5.35 GHz
and 5.65 to 5.85 GHz bands. These radar
stationscancauseinterferencewithand
/ordamagethisdevice.
TheFCChassetageneralguidelineof
20 cm (8 inches) separation between the
deviceandthebody,foruseofawireless
device near the body (this does not
include extremities). This device should
be used more than 20 cm (8 inches) from
thebodywhenwirelessdevicesareon.
The power output of the wireless device
(or devices), which may be embedded
LQ\RXUQRWHERRNLVZHOOEHORZWKH5)
exposure limits as set by the FCC.
This transmitter must not be collocated
or operate in conjunction with any other
antennaortransmitterexcepttheinstalled
Bluetooth transmitter.
Operationofthisdeviceissubjecttothe
following two conditions: (1) This device
may not cause harmful interference,
and (2) this device must accept any
interference received, including
interferencethatmaycauseundesired
operationofthedevice.
Wireless devices are not user
serviceable. Do not modify them in
any way.
0RGL¿FDWLRQWRDZLUHOHVVGHYLFH
will void the authorization to use it.
Contact manufacturer for service.

38
FCC Statement for Wireless LAN
use:
“While installing and operating this
transmitter and antenna combination
the radio frequency exposure limit
of 1mW/cm2 may be exceeded
atdistancesclosetotheantenna
installed. Therefore, the user must
maintain a minimum distance of
20cm from the antenna at all times.
This device can not be colocated
with another transmitter and
transmitting antenna.”
FCC Part 68
,I¿WWHGZLWKDPRGHPGHYLFH
This equipment compiles with part
RIWKH)&&UXOHV2QWKHEDFNRIWKLV
equipmentisalabelthatcontains,among
otherinformation,theFCCregistration
number and ringer equivalence number
(REN) for this equipment. If requested,
thisinformationmustbeprovidedtothe
telephone company.
This equipment uses the following USOC
MDFNV5-&
An FCC compliant telephone cord
and modular plug is provided with this
equipment. This equipment is designed
WREHFRQQHFWHGWRWKHWHOHSKRQHQHWZRUN
or promises wiring using a compatible
PRGXODUMDFNZKLFKLV3DUWFRPSOLDQW
See Installation Instructions for details.
The REN is used to determine the
quantity of devices which may be
connected to telephone line. Excessive
RENsonthetelephonelinemayresultin
the devices not ringing in response to an
incomingcall.Inmost,butnotallareas,
thesumofRENsshouldnotexceed
¿YH7REHFHUWDLQRIWKHQXPEHURI
devicesthatmaybeconnectedtoaline,
as determined by total RENs, contact the
localtelephonecompanytodeterminethe
maximum REN for the calling area.

39
Iftheterminalequipmentcausesharm
WRWKHWHOHSKRQHQHWZRUNWKH7HOHSKRQH
Companywillnotifyyouinadvancethat
temporary discontinuance of service may
berequired.Butifadvancenoticeisnot
practical, the telephone company will
notify the customer as soon as possible.
Also,youwillbeadvisedofyourright
WR¿OHDFRPSODLQWZLWKWKH)&&LI\RX
believeitisnecessary.
7KHWHOHSKRQHFRPSDQ\PD\PDNH
changesinitsfacilities,equipment,
operations,orproceduresthatcould
affect the operation of the equipment. If
this happens, the telephone company
willprovideadvancednoticeinorderfor
\RXWRPDNHQHFHVVDU\PRGL¿FDWLRQVWR
maintain uninterrupted service.
If trouble is experienced with this
equipment (Modem) for repair or warranty
information, please contact your local
distributor. If the equipment is causing
KDUPWRWKHWHOHSKRQHQHWZRUNWKH
telephone company may request that
youdisconnecttheequipmentuntilthe
problem is resolved.
Theusermustusetheaccessoriesand
cablessuppliedbythemanufacturer
togetoptimumperformancefromthe
product.
No repairs may be done by the customer.
This equipment cannot be used on public
coin phone service provided by the
telephonecompany.Connectiontoparty
lineserviceissubjecttostatetariffs.
TheTelephoneConsumerProtectionAct
RIPDNHVLWXQODZIXOIRUDQ\SHUVRQ
to use a computer or other electronic
device, including fax machines, to send
any message unless such message
clearlycontainsinamarginatthetopor
bottom of each transmitted page or on
WKH¿UVWSDJHRIWKHWUDQVPLVVLRQWKHGDWH
DQGWLPHLWLVVHQWDQGDQLGHQWL¿FDWLRQ
of the business or other entity, or other
individual sending the message and
thetelephonenumberofthesending
machineorsuchbusiness,otherentity,
orindividual.(Thetelephonenumber
provided may not be any number for
whichchargesexceedlocalorlong-
distance transmission charges.)
In order to program this information
into your fax machine, refer to your
communications software user manual.

40
Unintentional Emitter per ICES-003
Thisdigitalapparatusdoesnotexceed
theClassBlimitsforradionoise
emissions from digital apparatus as set
outintheradiointerferenceregulationsof
Industry Canada.
Le présent appareil numérique n’émet
pas de bruits radioélectriques dépassant
les limitesapplicables aux appareils
numériquesdeClasseBprescrites
dans le règlement sur le brouillage
radioélectrique édicté par Industrie
Canada.
Intentional Emitter per RSS 210
Lowpower,RadioLANtypedevices
(radio frequency (RF) wireless
communication devices), operating in
the 2.4GHz/5GHzBand,maybepresent
HPEHGGHGLQ\RXUQRWHERRNV\VWHP
Thissectionisonlyapplicableifthese
devices are present. Refer to the system
labeltoverifythepresenceofwireless
devices.
Wireless devices that may be in your
V\VWHPDUHRQO\TXDOL¿HGIRUXVHLQ
Canada if an Industry Canada ID number
is on the system label.
When using IEEE 802.11a wireless LAN,
thisproductisrestrictedtoindooruse
duetoitsoperationinthe 5.15-to 5.25-
GHz frequency range. Industry Canada
requires this product to be used indoors
for the frequency range of 5.15 GHz to
5.25 GHztoreducethepotentialfor
harmful interference to co-channel mobile
satellite systems. High power radar is
allocatedastheprimaryuserofthe
5.25- to 5.35-GHz and 5.65 to 5.85-GHz
bands. These radar stations can cause
interferencewithand/ordamagetothis
device.
Canada

41
The maximum allowed antenna gain for
usewiththisdeviceis 6dBiinorderto
comply with the E.I.R.P limit for the 5.25-
to 5.35 and 5.725 to 5.85 GHz frequency
range in point-to-point operation.
Asageneralguideline,aseparationof
20cm(8inches)betweenthewireless
deviceandthebody,foruseofa
wireless device near the body (this does
not include extremities) is typical. This
device should be used more than 20 cm
(8 inches) from the body when wireless
devices are on.
The power output of the wireless device
(or devices), which may be embedded
LQ\RXUQRWHERRNLVZHOOEHORZWKH
RF exposure limits as set by Industry
Canada.
This transmitter must not be collocated
or operate in conjunction with any other
antennaortransmitterexcepttheinstalled
Bluetooth transmitter.
Operationofthisdeviceissubjecttothe
following two conditions: (1) This device
may not cause harmful interference,
and (2) this device must accept any
interference received, including
interferencethatmaycauseundesired
operationofthedevice.
To prevent radio interference to
licensed service, this device is
intended to be operated indoors
and away from windows to provide
maximum shielding. Equipment (or
its transmit antenna) that is installed
outdoors is subject to licensing.
Wireless devices are not user
serviceable. Do not modify them in
DQ\ZD\0RGL¿FDWLRQWRDZLUHOHVV
device will void the authorization
to use it. Contact manufacturer for
service.

42
Telecommunications per DOC
QRWLFHIRUSURGXFWV¿WWHGZLWKDQ
IC-compliant modem)
7KH,QGXVWU\&DQDGDODEHOLGHQWL¿HV
FHUWL¿HGHTXLSPHQW7KLVFHUWL¿FDWLRQ
meansthattheequipmentmeetscertain
WHOHFRPPXQLFDWLRQVQHWZRUNSURWHFWLYH
operation, and safety requirements.
The Department does not guarantee
the equipment will operate to the users’
satisfaction.
Before installing this equipment, users
VKRXOGPDNHVXUHWKDWLWLVSHUPLVVLEOH
to be connected to the facilities of the
local telecommunications company. The
equipment must also be installed using
an acceptable method of connection. In
some cases, the inside wiring associated
with a single-line individual service may
EHH[WHQGHGE\PHDQVRIDFHUWL¿HG
connector assembly. The customer
shouldbeawarethatcompliancewith
the above conditions may not prevent
degradation of service in some situations.
5HSDLUVWRFHUWL¿HGHTXLSPHQWVKRXOG
be made by an authorized Canadian
maintenance facility designated by
the supplier. Any repairs or alterations
made by the user to this equipment, or
equipment malfunctions, may give the
telecommunications company cause
to request the user to disconnect the
equipment.
8VHUVVKRXOGPDNHVXUHIRUWKHLURZQ
protection,thattheelectricalground
connectionsofthepowerutility,telephone
lines, and internal metallic water pipe
system,ifpresent,areconnected
together.Thisprecautionmaybe
particularly important in rural areas.
7RDYRLGHOHFWULFDOVKRFNRU
equipment malfunction do not
DWWHPSWWRPDNHHOHFWULFDOJURXQG
connections by yourself. Contact the
appropriate inspection authority or an
electrician, as appropriate.
The Ringer Equivalence Number (REN)
assigned to each terminal device provides
an indication of the maximum number
of terminals allowed to be connected to
atelephoneinterface.Thetermination
on an interface may consist of any
combination of devices subject only to the
requirementthatthesumoftheRinger
Equivalence Numbers of all the devices
does not exceed 5.

43
European Union CE Marking and
Compliance Notices
Products intended for sale within the
(XURSHDQ8QLRQDUHPDUNHGZLWKWKH
&RQIRUPLWp(XURSpHQH&(0DUNLQJ
which indicates compliance with the
applicable Directives and European
VWDQGDUGVDQGDPHQGPHQWVLGHQWL¿HG
below. This equipment also carries the
&ODVVLGHQWL¿HU
Thefollowinginformationisonly
applicable to systems labeled with the CE
PDUN .
European Directives
This Information Technology Equipment
hasbeentestedandfoundtocomplywith
the following European directives:
zEMC Directive 89/336/EEC with
amending directives 92/31/EEC &
93/68/EEC as per
– EN 55022 Class B
– EN 61000-3-2
– EN 61000-3-3
– EN 55024
zLow Voltage Directive (Safety) 73/23/
EEC as per EN 60950(A1/A2/A3/A4/
A11)
zRadio and Telecom Terminal
Equipment Directive 199/5/EC as per
±&75LI¿WWHGZLWKDPRGHP
device)
±(1LI¿WWHGZLWKD*+]
band embedded wireless device)
±(1LI¿WWHGZLWKD
GHzbandembeddedwireless
device)
±(1LI¿WWHGZLWKD
GHzbandembeddedwireless
device)
±(1LI¿WWHGZLWKD*+]
band embedded wireless device)
European Union

44
European Radio Approval
,QIRUPDWLRQIRUSURGXFWV¿WWHGZLWK
EU-approved radio devices)
7KLV3URGXFWLVD1RWHERRNFRPSXWHU
lowpower,RadioLANtypedevices(radio
frequency (RF) wireless communication
devices), operating in the 2.4GHz/5GHz
band,maybepresent(embedded)inyour
QRWHERRNV\VWHPZKLFKLVLQWHQGHGIRU
KRPHRURI¿FHXVH7KLVVHFWLRQLVRQO\
applicable if these devices are present.
Refertothesystemlabeltoverifythe
presence of wireless devices.
Wireless devices that may be in your
V\VWHPDUHRQO\TXDOL¿HGIRUXVHLQWKH
EuropeanUnionorassociatedareas
LID&(PDUN ZLWKD1RWL¿HG%RG\
Registration Number and the Alert
Symbol is on the system label.
The power output of the wireless device
ordevicesthatmaybeembeddedinyou
QRWHERRNLVZHOOEHORZWKH5)H[SRVXUH
limits as set by the European Commission
through the R&TTE directive.
Thelowband 5.15- 5.35 GHzisfor
indoor use only.
See 802.11b and 802.11g restrictions
IRUVSHFL¿FFRXQWULHVRUUHJLRQV
within countries under the heading
“European Economic Area
Restrictions” below.
Translated Statements of Compliance
[English]
Thisproductfollowstheprovisionsofthe
European Directive 1999/5/EC.
[Danish]
'HWWHSURGXNWHULRYHUHQVVWHPPHOVHPHG
GHWHXURSLVNHGLUHNWLY(&
[Dutch]
Dit product is in navolging van de
bepalingen van Europees Directief
1999/5/EC.
[Finnish]
7lPlWXRWHQRXGDWWDD(8GLUHNWLLYLQ
(&PllUl\NVLl
[French]
Ce produit est conforme aux exigences
de la Directive Européenne 1999/5/EC.
[German]
'LHVHV3URGXNWHQWVSULFKWGHQ
Bestimmungen der Europäischen
Richtlinie 1999/5/EC
[Greek]
ȉȠʌȡȠȧȩȞĮȣIJȩʌȜȘȡȠȓIJȚȢʌȡȠȕȜȑȥİȚȢ
IJȘȢǼȣȡȦʌĮȧțȒȢȅįȘȖȓĮȢǼ&
[Icelandic]
ëHVVLYDUDVWHQVWUHJOXJHUè(YUySVND
Efnahags Bandalagsins númer 1999/5/EC
[Italian]
QuestoprodottoèconformeallaDirettiva
Europea 1999/5/EC.

45
[Norwegian]
'HWWHSURGXNWHWHULKHQKROGWLO
EHVWHPPHOVHQHLGHWHXURSHLVNHGLUHNWLYHW
1999/5/EC.
[Portuguese]
Esteprodutocumprecomasnormasda
Diretiva Européia 1999/5/EC.
[Spanish]
Esteproductocumpleconlasnormasdel
Directivo Europeo 1999/5/EC.
[Swedish]
'HQQDSURGXNWKDUWLOOYHUNDWVLHQOLJKHW
PHG(*GLUHNWLY(&
European Economic Area Restrictions
Local Restriction of 802.11b/802.11g
Radio Usage
[Notetointegrator:Thefollowing
statements on local restrictions must be
published in all end-user documentation
provided with the system or product
incorporating the wireless product.]
Duetothefactthatthefrequencies
used by 802.11b/802.11g wireless
LAN devices may not yet be
harmonized in all countries,
802.11b/802.11g products are
GHVLJQHGIRUXVHRQO\LQVSHFL¿F
countriesorregions,andarenot
allowedtobeoperatedincountries
or regions other than those of
designated use.
Asauseroftheseproducts,you
are responsible for ensuring that
the products are used only in the
countriesorregionsforwhichthey
were intended and for verifying
WKDWWKH\DUHFRQ¿JXUHGZLWKWKH
correctselectionoffrequencyand
channelforthecountryorregionof
use. Any deviation from permissible
settingsandrestrictionsinthe
countryorregionofusecouldbean
infringement of local law and may be
punished as such.

46
The European variant is intended for
use throughout the European Economic
Area.However,authorizationforuseis
furtherrestrictedinparticularcountriesor
regionswithincountries,asfollows:
General
European standards dictate maximum
radiatedtransmitpowerof100mW
effective isotropic radiated power (EIRP)
and the frequency range 2400 – 2483.5
MHz.
Thelowband 5.15- 5.35 GHzisfor
indoor use only.
Belgium
Theproductmaybeusedoutdoors,but
for outdoor transmissions over a distance
of 300m or more, a license from the BIPT
is required.
This restriction should be indicated in the
manual as follows:
Dans le cas d’une utilisation privée, à
l’extérieur d’un bâtiment, au-dessus d’un
espace public, aucun enregistrement n’est
nécessairepourunedistancedemoins
de 300m. Pour une distance supérieure
à 300m un enregistrement auprès de
l’IBPT est requise. Pour une utilisation
publique à l’extérieur de bâtiments, une
licencedel’IBPTestrequise.Pourles
enregistrements et licences, veuillez
contacter l’IBPT.
France
ForMetropolitandepartments:
2.400 - 2.4835 GHz for indoor use.
2.400- 2.454 GHz(channels1to7)for
outdoor use.
ForGuadeloupe,Martinique,StPierreet
Miquelon, Mayotte:
2.400 - 2.4835 GHz for indoor and
outdoor use.
ForReunion,Guyane:
2.400 - 2.4835 GHz for indoor use.
2.420 - 2.4835 GHz for outdoor use
(channels 5 to 13)
Thelowband 5.15- 5.35 GHzisfor
indoor use only.

47
European Telecommunication
,QIRUPDWLRQIRUSURGXFWV¿WWHGZLWK
EU-approved modems)
0DUNLQJE\WKHV\PERO indicates
compliance of this equipment to the
Radio and Telecom Terminal Equipment
'LUHFWLYH(&6XFKPDUNLQJLV
indicative that this equipment meets or
exceeds the following technical standards:
CTR 21 - Attachment requirements for
pan-European approval for connection to
theanaloguePublicSwitchedTelephone
1HWZRUNV3671VRI7(H[FOXGLQJ7(
supporting voice telephony services) in
ZKLFKQHWZRUNDGGUHVVLQJLISURYLGHGLV
by means of Dual Tone Multi-Frequency
(DTMF) signaling.
Although this equipment can use
either loop disconnect (pulse) or
DTMF (tone) signaling, only the
performance of the DTMF signaling
is subject to regulatory requirements
for correct operation.
It is therefore strongly recommended
that the equipment is set to use
DTMF signaling for access to public
or private emergency services.
DTMF signaling also provides faster
call setup.
This equipment has been approved to
Council Decision 98/482/EEC - “CTR
21” for Pan-European single terminal
connection to the Public Switched
7HOHSKRQH1HWZRUN3671
However, due to differences between
the individual PSTNs provided in
different countries, the approval does
not, of itself, give an unconditional
assurance of successful operation on
every PSTN termination point. In the
event of problems, you should contact
manufacturer Technical Support.

48
WEEE SYMBOL INFORMATION
Correct disposal of this product
(Waste Electrical & Electronic Equipment)
(Applicable in the European Union and other European countries with separate
collection systems.)
7KLVPDUNLQJVKRZQRQWKHSURGXFWRULWVOLWHUDWXUHLQGLFDWHVWKDWLWVKRXOGQRWEH
GLVSRVHGZLWKRWKHUKRXVHKROGZDVWHVDWWKHHQGRILWVZRUNLQJOLIH7RSUHYHQWSRVVLEOH
harmtotheenvironmentorhumanhealthfromuncontrolledwastedisposal,please
separate this from other types of wastes and recycle it responsibly to promote the
sustainable reuse of material resources.
Household users should contact either the retailer where they purchased this product,
RUWKHLUORFDOJRYHUQPHQWRI¿FHIRUGHWDLOVRIZKHUHDQGKRZWKH\FDQWDNHWKLVLWHPIRU
environmentally safe recycling.
%XVLQHVVXVHUVVKRXOGFRQWDFWWKHLUVXSSOLHUDQGFKHFNWKHWHUPVDQGFRQGLWLRQVRIWKH
purchase contract.
Thisproductshouldnotbemixedwithothercommercialwastesfordisposal.

49
Correct disposal of batteries in this product
Pb
(Applicable in the European Union and other European countries with separate
battery return systems.)
7KLVPDUNLQJRQWKHEDWWHU\PDQXDORUSDFNDJLQJLQGLFDWHVWKDWWKHEDWWHULHVLQWKLV
productshouldnotbedisposedofwithotherhouseholdwasteattheendoftheir
ZRUNLQJOLIH:KHUHPDUNHGWKHFKHPLFDOV\PEROV+J&GRU3ELQGLFDWHWKDWWKH
batterycontainsmercury,cadmiumorleadabovethereferencelevelsinECDirective
2006/66.Ifbatteriesarenotproperlydisposedof,thesesubstancescancauseharmto
humanhealthortheenvironment.
To protect natural resources and to promote material reuse, please separate batteries
fromothertypesofwasteandrecyclethemthroughyourlocal,freebatteryreturn
system.
USA ONLY
This Perchlorate warning applies only to primary CR (Maganese Dioxide) Lithium coin
cellsintheproductsoldordistributedONLYinCaliforniaUSA.
“Perchlorate Material- special handling may apply, See www.dtsc.ca.gov/
hazardouswaste/perchlorate.”
Contains Mercury, Dispose According to Local, State or Federal Laws.
Fordetailsseelamprecycle.org,eise.org,orcall1-800-Samsung.

50
Overview
Front View
1Camera Lens (Optional) 8VLQJWKLVOHQV\RXFDQWDNHVWLOOSLFWXUHVDQGUHFRUGYLGHR
2Microphone You can use the built-in microphone.
3Keyboard $GHYLFHWRHQWHUGDWDE\SUHVVLQJWKHNH\V 59
4Touchpad/Touchpad
Buttons
The touchpad and touchpad buttons provide functions
similar to the mouse ball and buttons. 62
5Multi Card Slot AcardslotthatsupportsSDCard,SDHCandMMC. 67
6Status Indicators Showstheoperatingstatusofthecomputer.
The corresponding operating LED is lit when the
corresponding function operates. 51
7LCD Thescreenimagesaredisplayedhere.
1
7
3
2
4
65
z Optional items may be changed
or may not be provided depending
onthecomputermodel.
z The actual color and appearance
of the computer may differ from
thepicturesusedinthisguide.
51
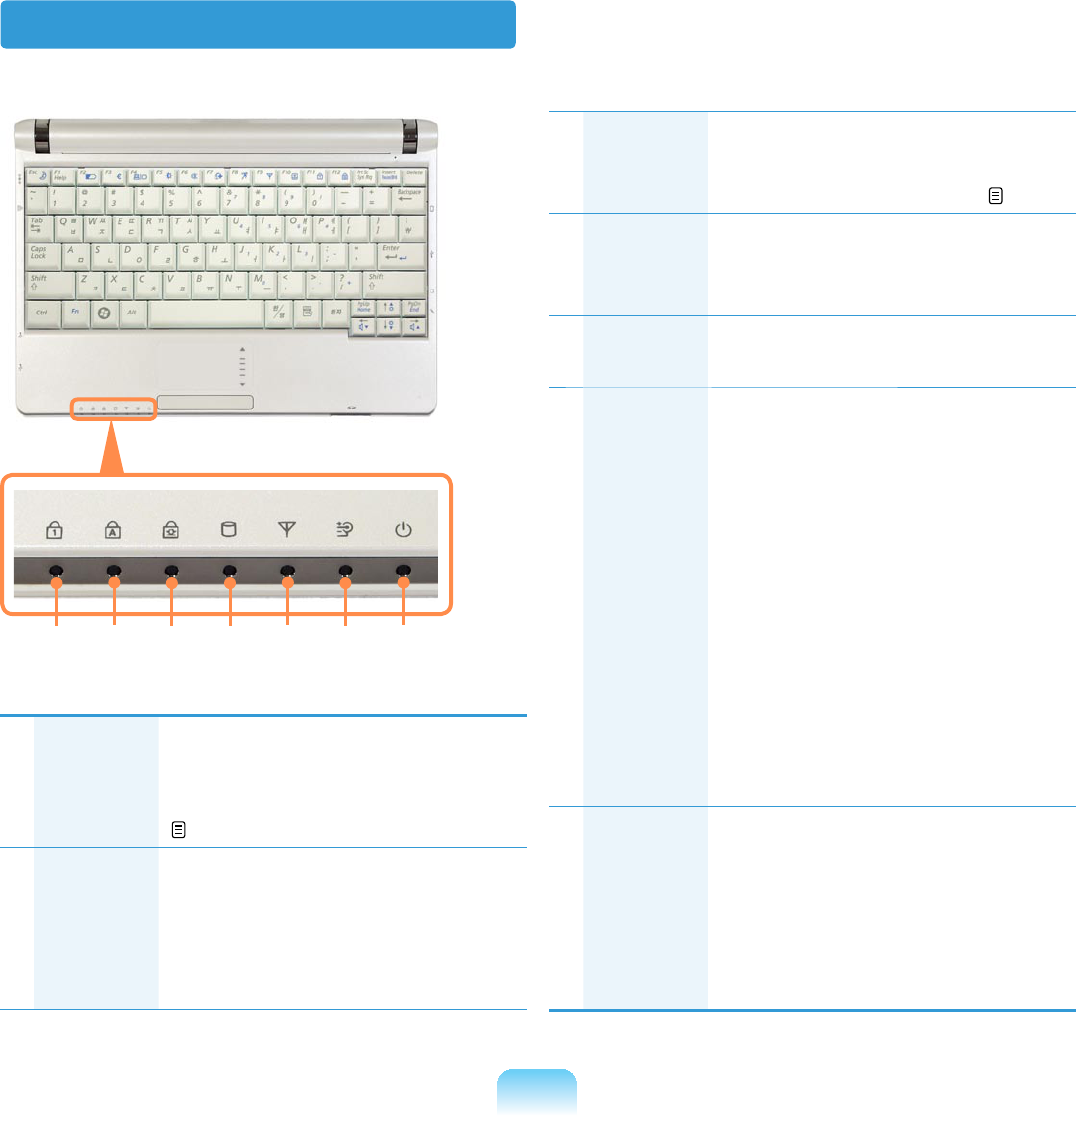
Status Indicators
3Scroll
Lock
ThisturnsonwhentheScroll
/RFNNH\LVSUHVVHGDQG
VFUHHQVFUROOLVORFNHG 61
4HDD/
SSD
Thisturnsonwhenthehard
GLVNRU66'6ROLG6WDWH'LVN
is being accessed.
5Wireless
LAN
Thisturnsonwhenthe
wireless LAN is operating.
6Charge
Status
This shows the power source
and the battery charge status.
Green: When the battery
is fully charged or
the battery is not
installed.
Amber: When the battery is
being charged.
Off: When the computer
is running on battery
power without being
connectedtoAC
adapter.
7Power This shows the computer
operating status.
On: When the computer
is operating.
Blinks: Whenthecomputeris
in Sleep mode.
1Num
Lock
ThisturnsonwhentheNum
/RFNNH\LVSUHVVHGDQG
QXPHULFNH\SDGLVDFWLYDWHG
61
2Caps
Lock
ThisturnsonwhentheCaps
/RFNNH\LVSUHVVHGDOORZLQJ
capital letters to be typed
without holding the Shift
button down.
476
51 3
2
52
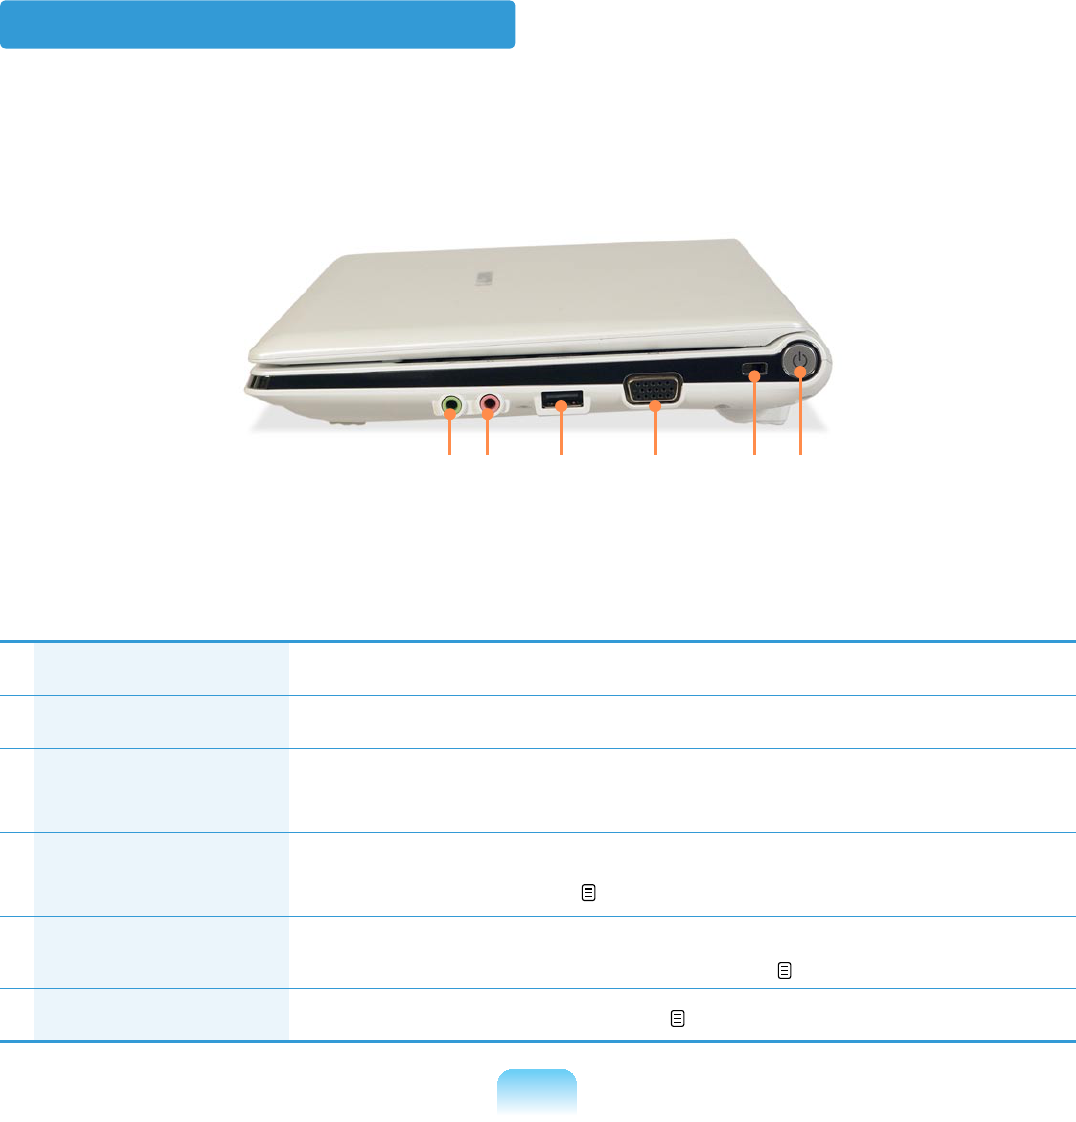
Right View
1Headphone Jack $MDFNXVHGWRFRQQHFWWKHKHDGSKRQHV
2Microphone Jack $MDFNXVHGWRFRQQHFWWKHPLFURSKRQH
3USB Port YoucanconnectUSBdevicestotheUSBportsuchasa
NH\ERDUGPRXVHGLJLWDOFDPHUDHWF
4Monitor Port Aportusedtoconnectamonitor,TVorprojectorsupportinga
15pin D-SUB interface. 70
5Security Lock
Port
<RXFDQFRQQHFWD.HQVLQJWRQORFNWRWKH6HFXULW\/RFN3RUWWR
preventthecomputerfrombeingstolen. 56
6Power Button Turnsthecomputeronandoff. 56
142 5 63
53
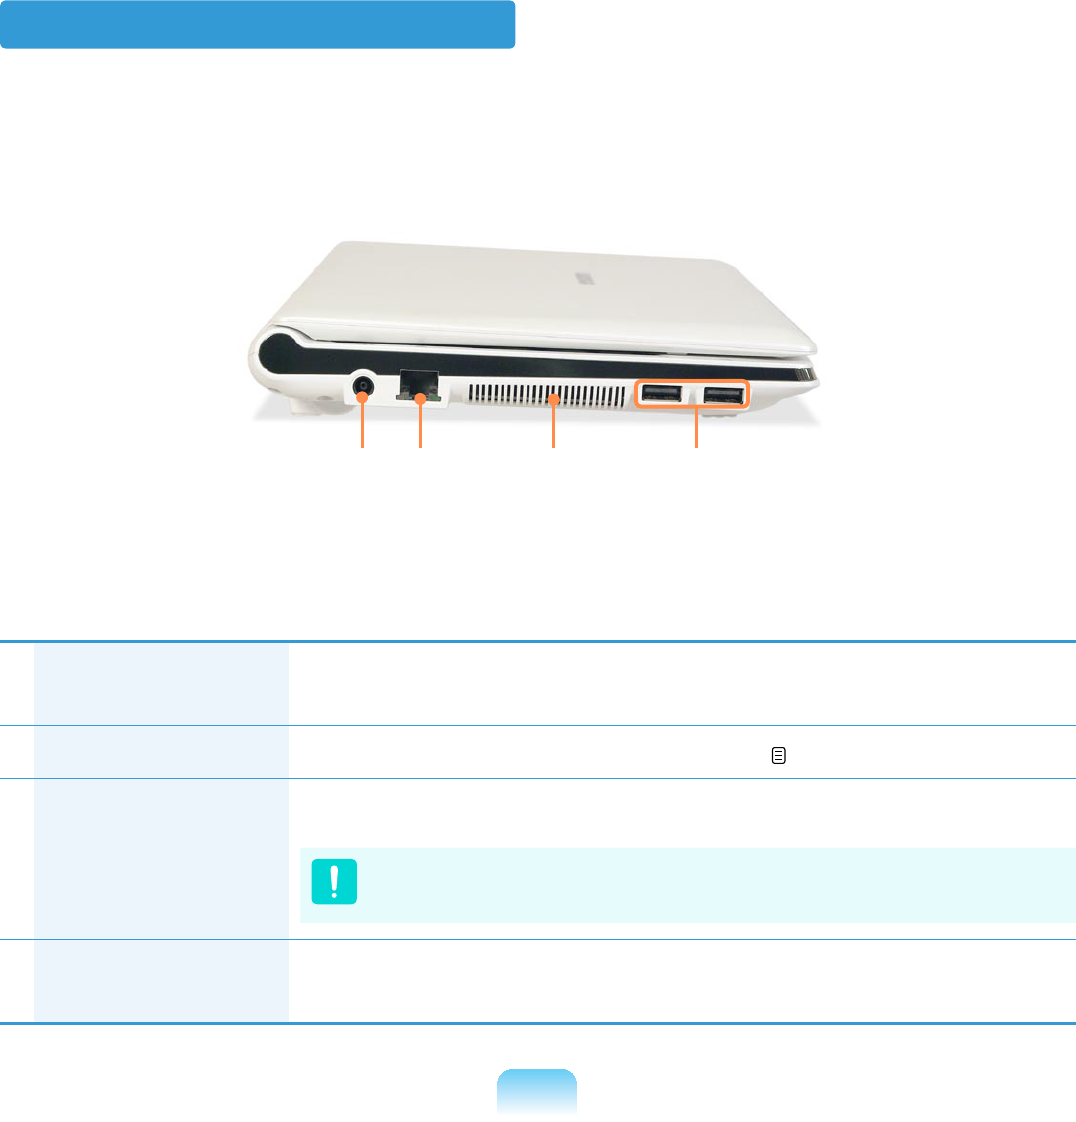
Left View
1DC Jack $MDFNWRFRQQHFWWKH$&DGDSWHUWKDWVXSSOLHVSRZHUWRWKH
computer.
2Wired LAN Port Connect the Ethernet cable to this port. 90
3Fan Vents Theinternalheatofthecomputerisemittedthroughtheseholes.
,IWKHYHQWVDUHEORFNHGWKHFRPSXWHUPD\RYHUKHDW
$YRLGEORFNLQJWKHYHQWVDVWKLVPD\EHGDQJHURXV
4USB Port YoucanconnectUSBdevicestotheUSBportsuchasa
NH\ERDUGPRXVHGLJLWDOFDPHUDHWF
2134
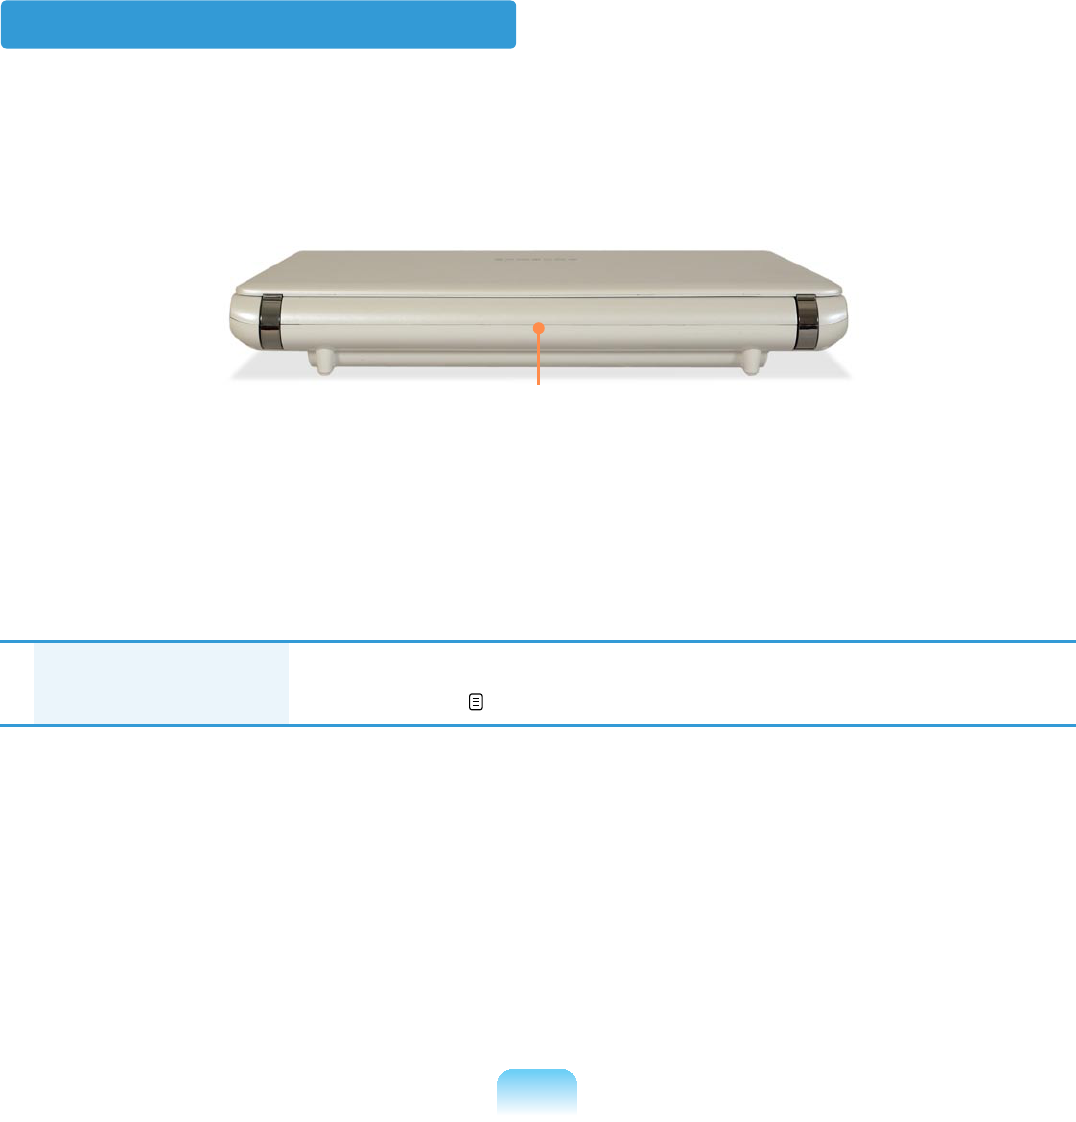
54
Back View
1Battery This is a Lithium-Ion rechargeable battery that supplies power to
the computer. 151
1
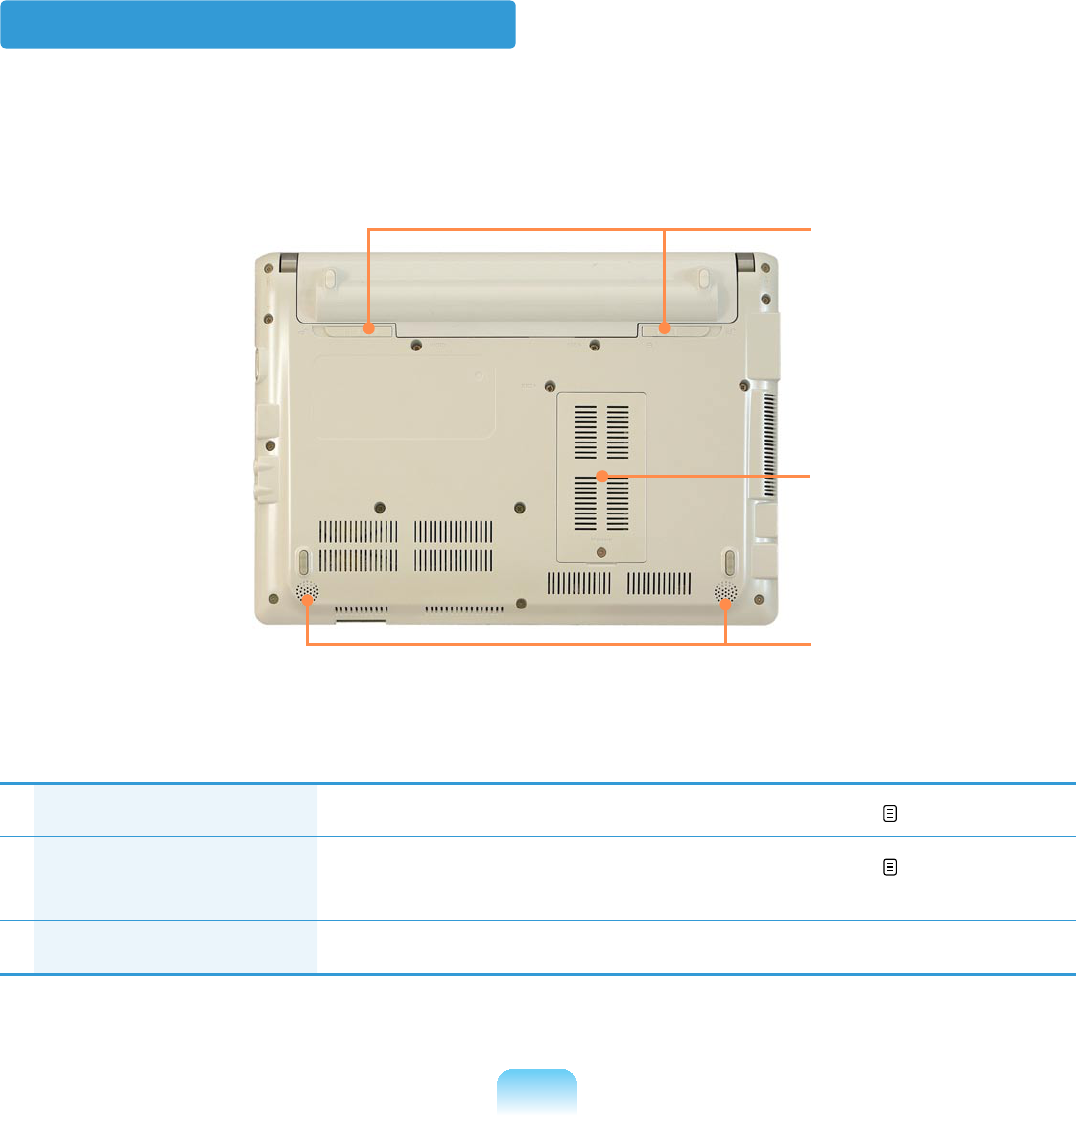
55
Bottom View
1Battery Latches Thelatchusedtoremoveorinstallthebattery. 152
2Memory
Compartment Cover
Themainmemoryisinstalledinsidethecover. 149
3Speaker Adeviceusedtogeneratesound.
1
2
3
56
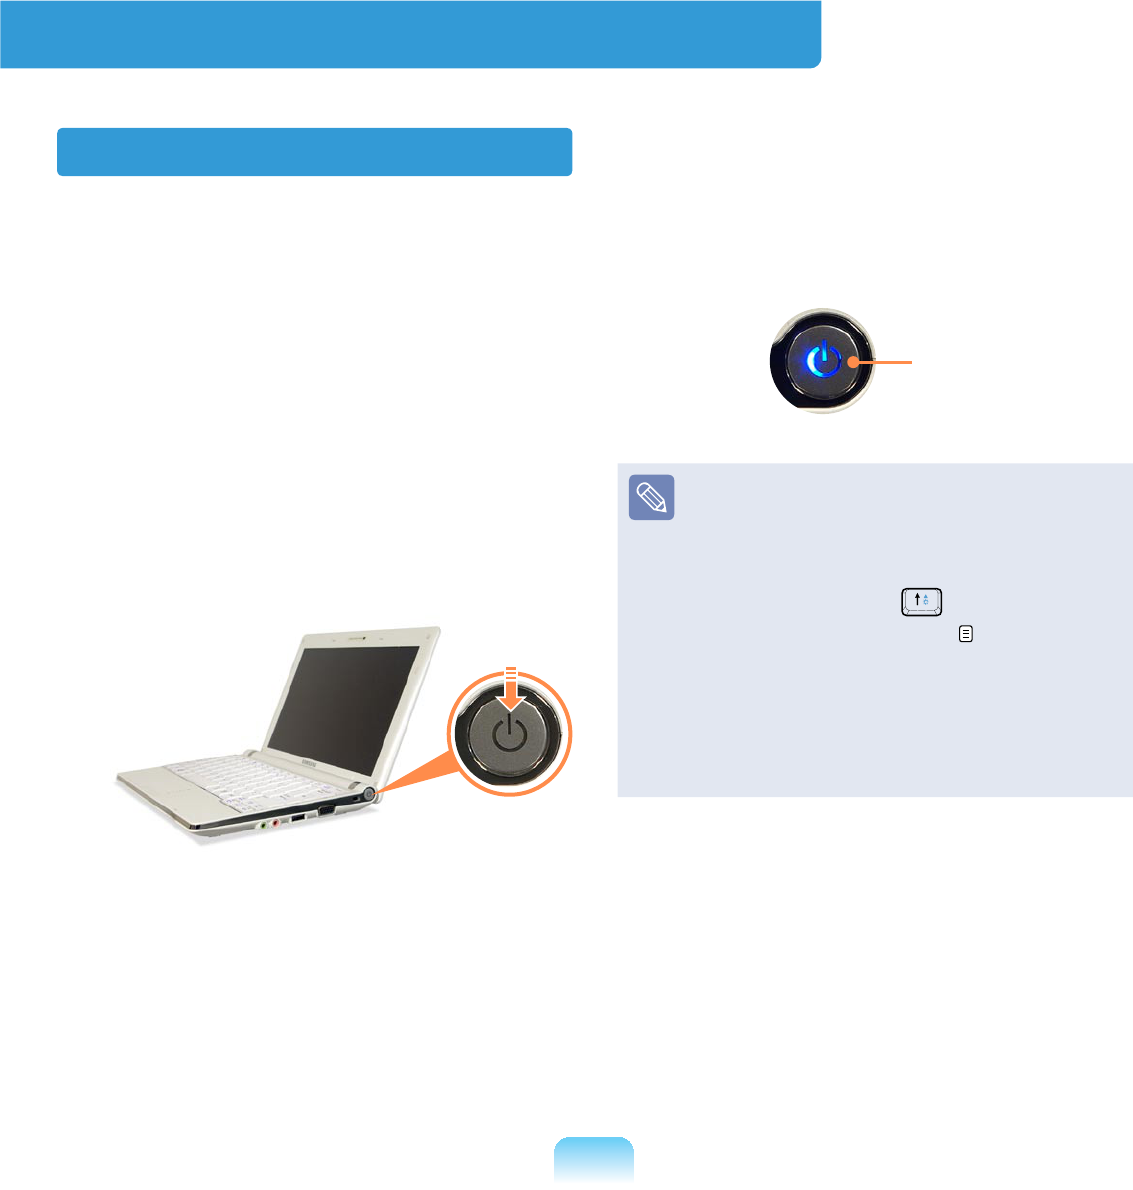
Turning the Computer On and Off
Turning the computer on
1 Install the battery and connect the
AC adapter.
(Refer to the Installation Guide.)
2 Lift the LCD panel up.
3 Press the Power button to turn the
computer on.
4Power button LED is lit while the
computeristurnedon.
LED
z Whenrunningthecomputeron
battery power, the LCD brightness
is dimmed automatically to save
battery power.
Press the Fn +NH\WRLQFUHDVH
the LCD brightness. 61
z When turning the computer on
IRUWKH¿UVWWLPHWKH5HJLVWHU
Windows screen appears. You can
use the computer after registering
your user information.
57
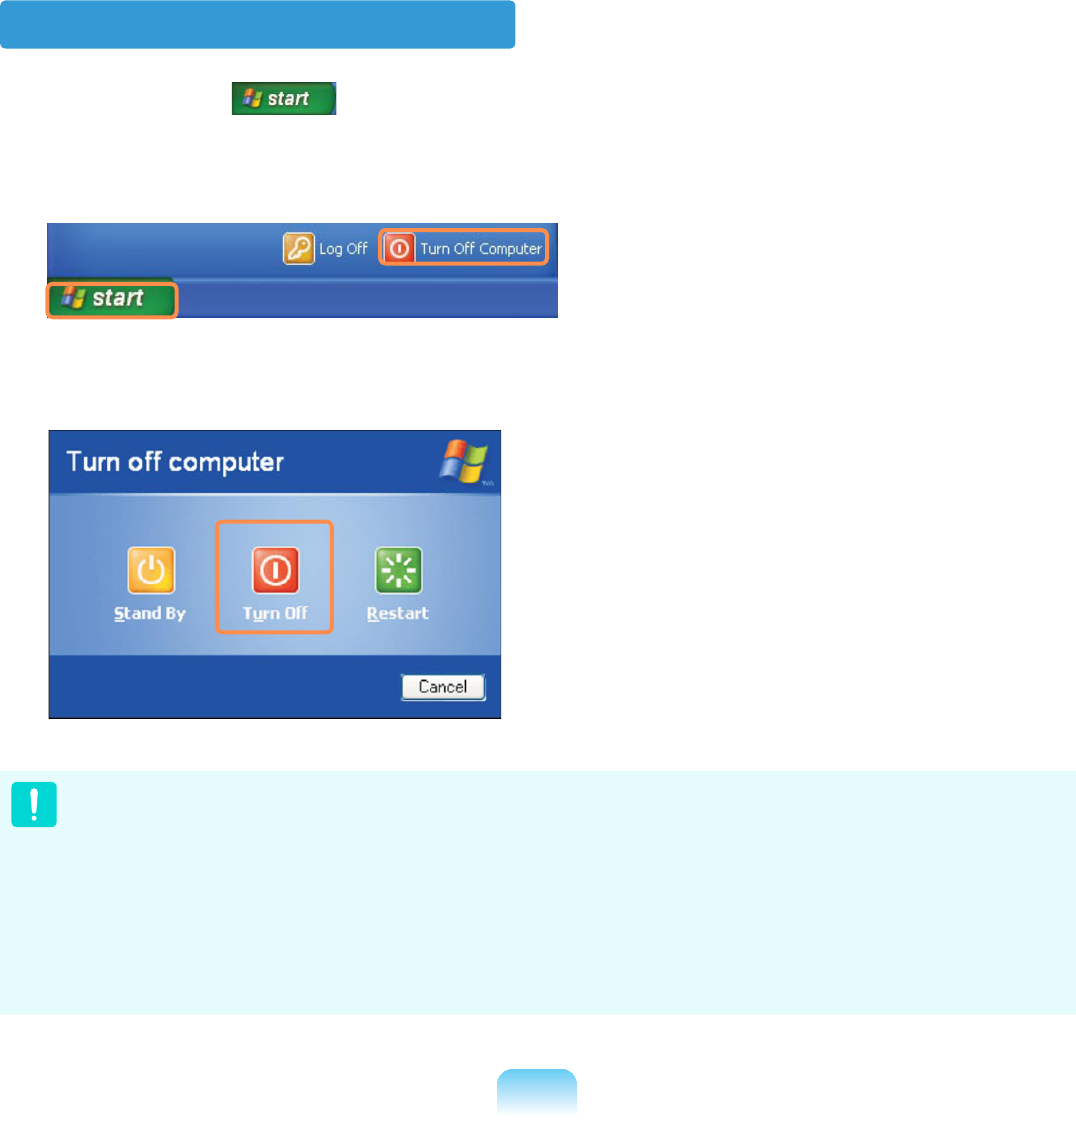
Turning the computer off
1 &OLFNWKHStart EXWWRQRQWKHWDVNEDU
2 &OLFNTurn Off Computer.
3 &OLFNTurn Off.
z Ifthecomputerhasnotturnedoffproperlyduetoasystemerror,press
<Ctrl>+<Alt>+<Delete>:KHQ>:LQGRZV7DVN0DQDJHU@GLDORJER[DSSHDUVFOLFN
Shut Down >Turn Of fWRWXUQRIIWKHFRPSXWHU<RXUXQVDYHGZRUNPD\EHORVW
damaged.
z If <Ctrl>+<Alt>+<Delete>NH\VGRQRWRSHUDWHHLWKHUSUHVVWKHSRZHUEXWWRQIRU
PRUHWKDQVHFRQGVWRWXUQRIIWKHFRPSXWHU<RXUXQVDYHGZRUNPD\EHORVW
GDPDJHG7KHQH[WWLPH\RXWXUQRQ\RXUFRPSXWHUDKDUGGLVNFKHFNZLOOEH
performed, before Windows starts.

Chapter 2.
Using the computer
Keyboard 59
Touchpad 62
External-type CD drive
(To be purchased) 65
Multi Card Slot 67
Connecting a monitor / TV 70
Adjusting the Volume 74
59
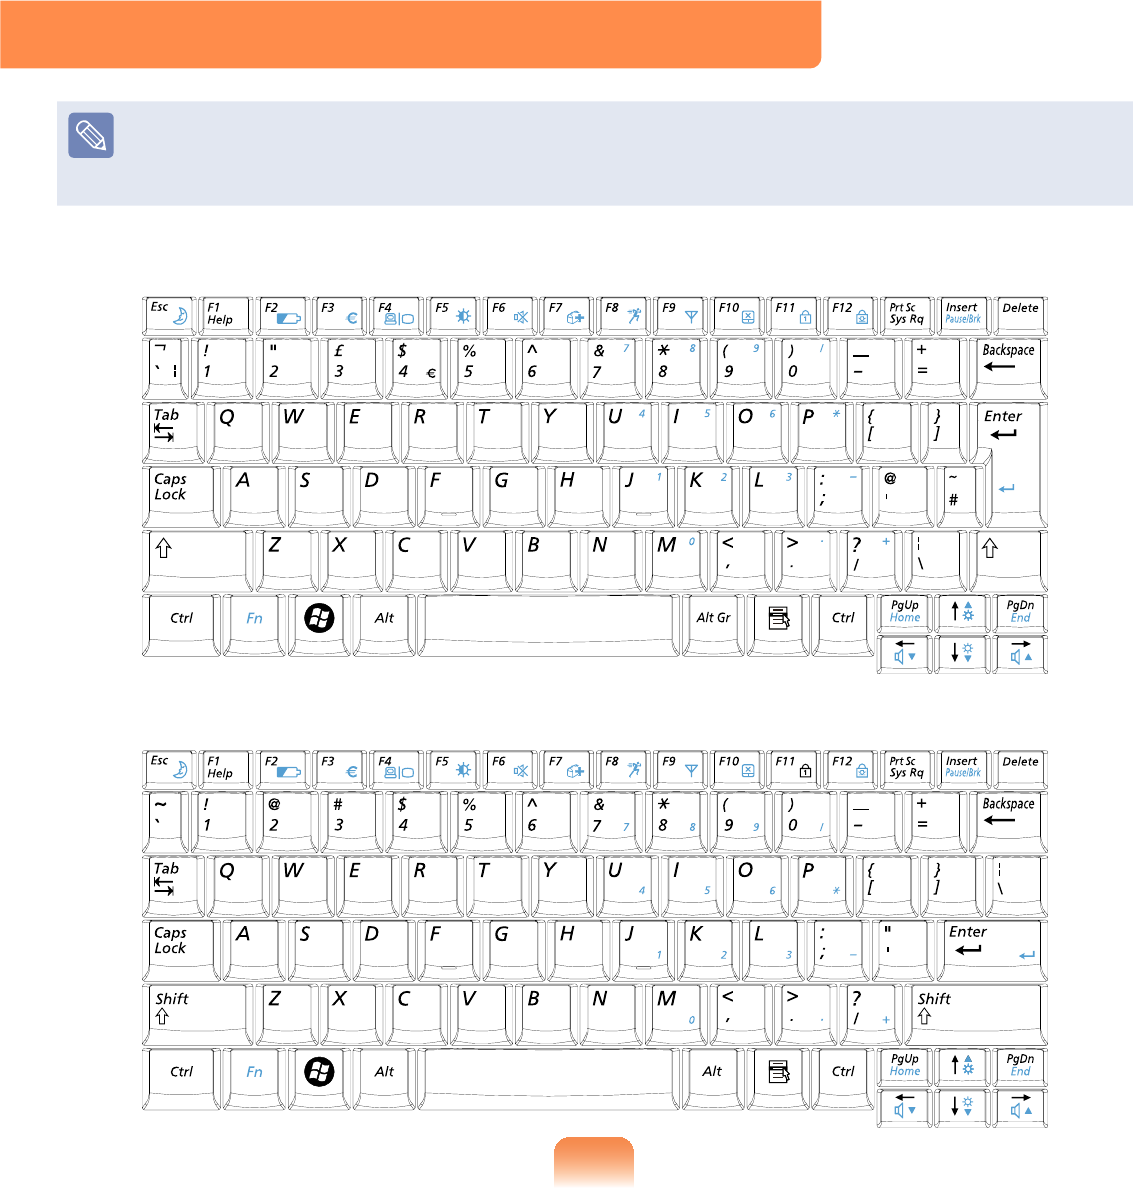
Keyboard
z7KHNH\ERDUGLVVXSSOLHGDFFRUGLQJWRWKHFRUUHVSRQGLQJFRXQWU\5HIHUWRWKH
NH\ERDUG¿JXUHIRUWKHFRUUHVSRQGLQJFRXQWU\
z7KHNH\ERDUGLPDJHDQGFRORUPD\GLIIHUIURPWKHDFWXDONH\ERDUG
United Kingdom
United States
60
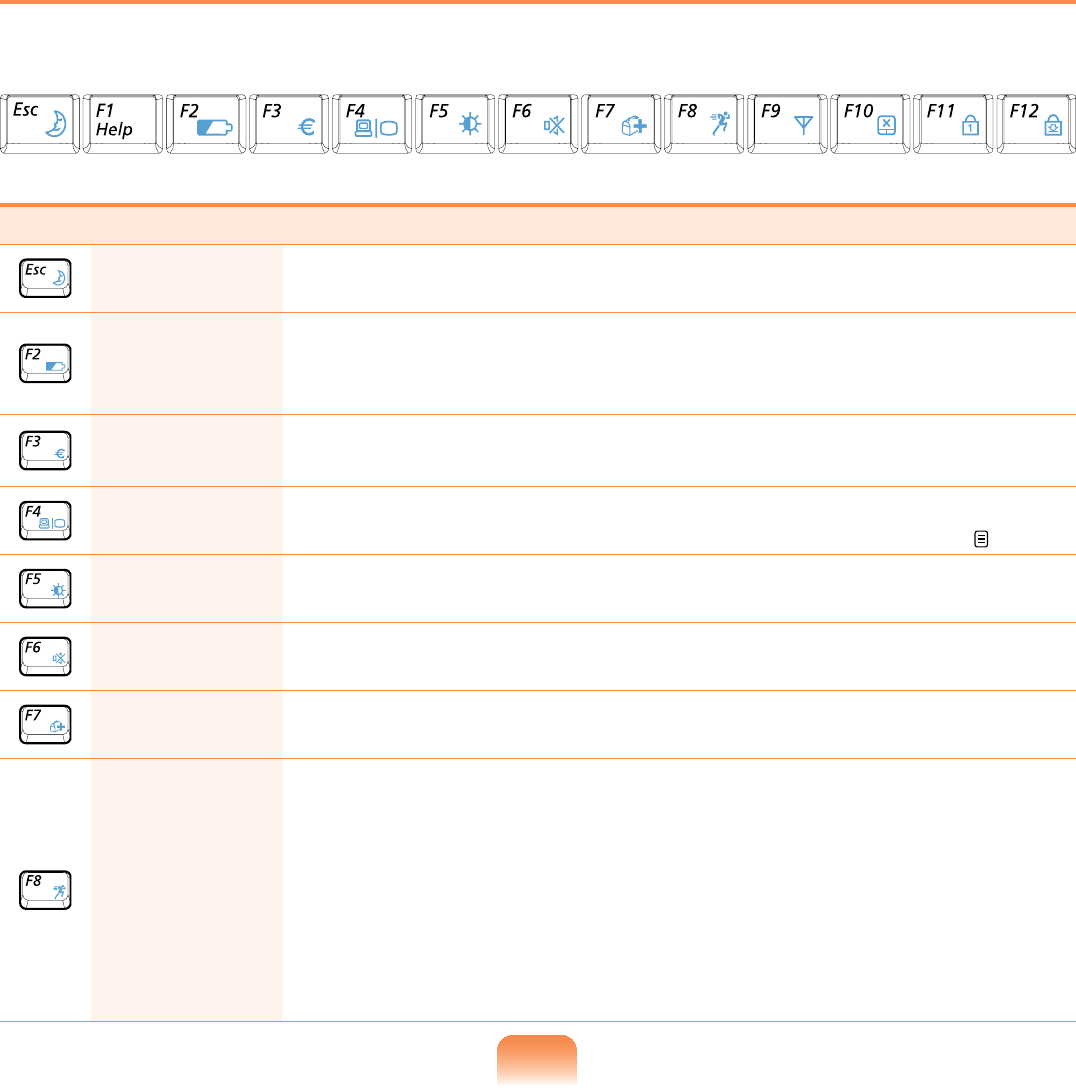
Shortcut Keys
<RXFDQXVHWKHIROORZLQJIXQFWLRQVE\SUHVVLQJWKHNH\VEHORZZLWKWKHFnNH\
Fn+ Name Function
REST
(Sleep Mode)
6ZLWFKHVWR6OHHSPRGH7RZDNHWKHFRPSXWHUXSSUHVVWKH
Power button.
Gauge
Shows the remaining battery charge.
YoucanonlyusethisfunctionwhentheEasyDisplayManager
programisinstalled.
Euro EnterstheEuromonetaryunitsymbol.
7KLVNH\PD\QRWEHSURYLGHGGHSHQGLQJRQWKHNH\ERDUGW\SH
CRT/LCD SwitchesthescreenoutputtotheLCDorexternalmonitorwhen
anexternalmonitor(orTV)isconnectedtothecomputer. 71
Backlit 7XUQVWKH/&'EDFNOLJKWRQRURII
Mute Mutesorcancelsmute.
Samsung
Magic Doctor
System diagnosis, recovery and Internet consultation program,
Samsung Magic Doctor, will be launched.
Easy
SpeedUp
Manager
You can select operation mode when you need maximum system
SHUIRUPDQFHRUORZQRLVHORZSRZHUFRQVXPSWLRQZLWKRQHFOLFN
zSilent: Low-noise and low power consumption mode
zNormal: Normal Mode
zSpeed: Maximum performance mode. The system operates
in its maximum performance, and system resources are
allocated to the currently active program with priority for
maximum performance.

61
Fn+ Name Function
Wireless LAN TurnsthewirelessLANfunctiononoroffinmodelswithwireless
LAN capability.
Touchpad
Turns the Touchpad function on or off.
When using an external mouse only, you can turn the Touchpad
off.
Num Lock 7XUQVWKHQXPHULFNH\ERDUGRQRURII
Scroll Lock ,I\RXWXUQWKH6FUROO/RFNRQ\RXFDQVFUROOWKHVFUHHQXSRU
down without changing the cursor location in some applications.
Screen Brightness Control
To adjust the LCD brightness press the
Fn +NH\FRPELQDWLRQRUWKHFn +
NH\FRPELQDWLRQ
Thechangedscreenbrightnessis
displayedatthecenterofthescreenfora
moment.
Volume Control
To control the volume, press the Fn +
NH\FRPELQDWLRQRUWKHFn +NH\
combination.
Youcanmutethesoundorcancelthe
PXWHIXQFWLRQE\FOLFNLQJWKHFn +
NH\FRPELQDWLRQ
Numeric Key
The numbers are printed in blue on the
QXPHULFNH\V
,I1XP/RFNLVWXUQHGRQE\SUHVVLQJWKH
Fn +NH\FRPELQDWLRQ\RXFDQXVH
WKHQXPHULFNH\VWRHQWHUGLJLWV
Other Function Keys
Application Key
3HUIRUPVWKHULJKWFOLFNPRXVHIXQFWLRQ
(touchpad).
62
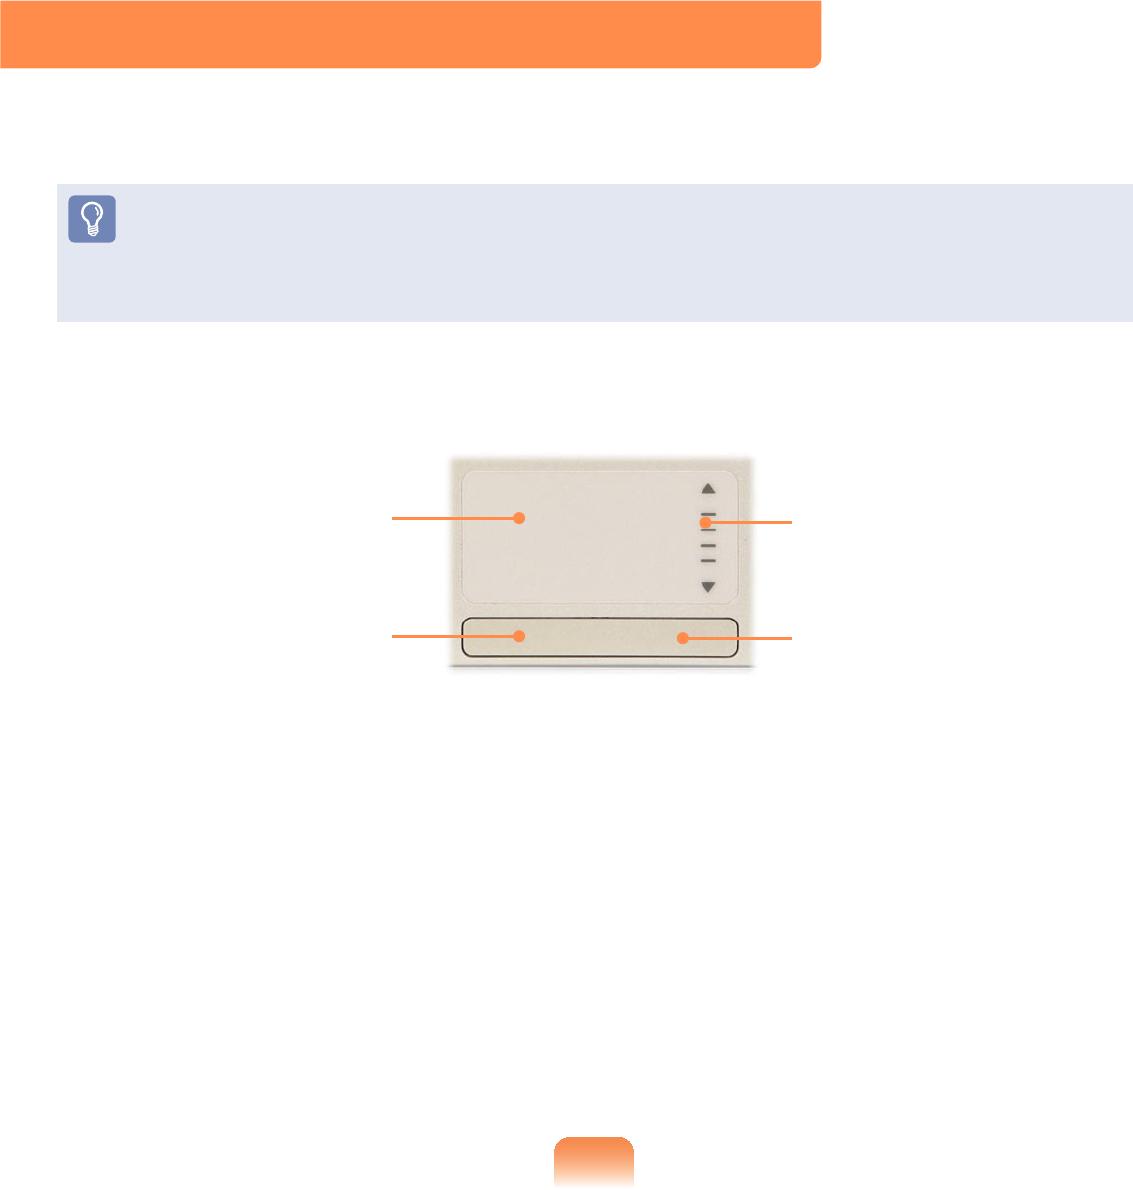
Touchpad
Thetouchpadprovidesthesamefunctionasamouseandtheleftandrightbuttonsof
thetouchpadplaystheroleoftheleftandrightbuttonsofamouse.
z8VHWKH7RXFKSDGZLWK\RXU¿QJHUV8VLQJDVKDUSREMHFWPD\GDPDJHWKH
Touchpad.
z If you touch the Touchpad or press the Touchpad buttons while booting up, the
Windowsboottimemaybeextended.
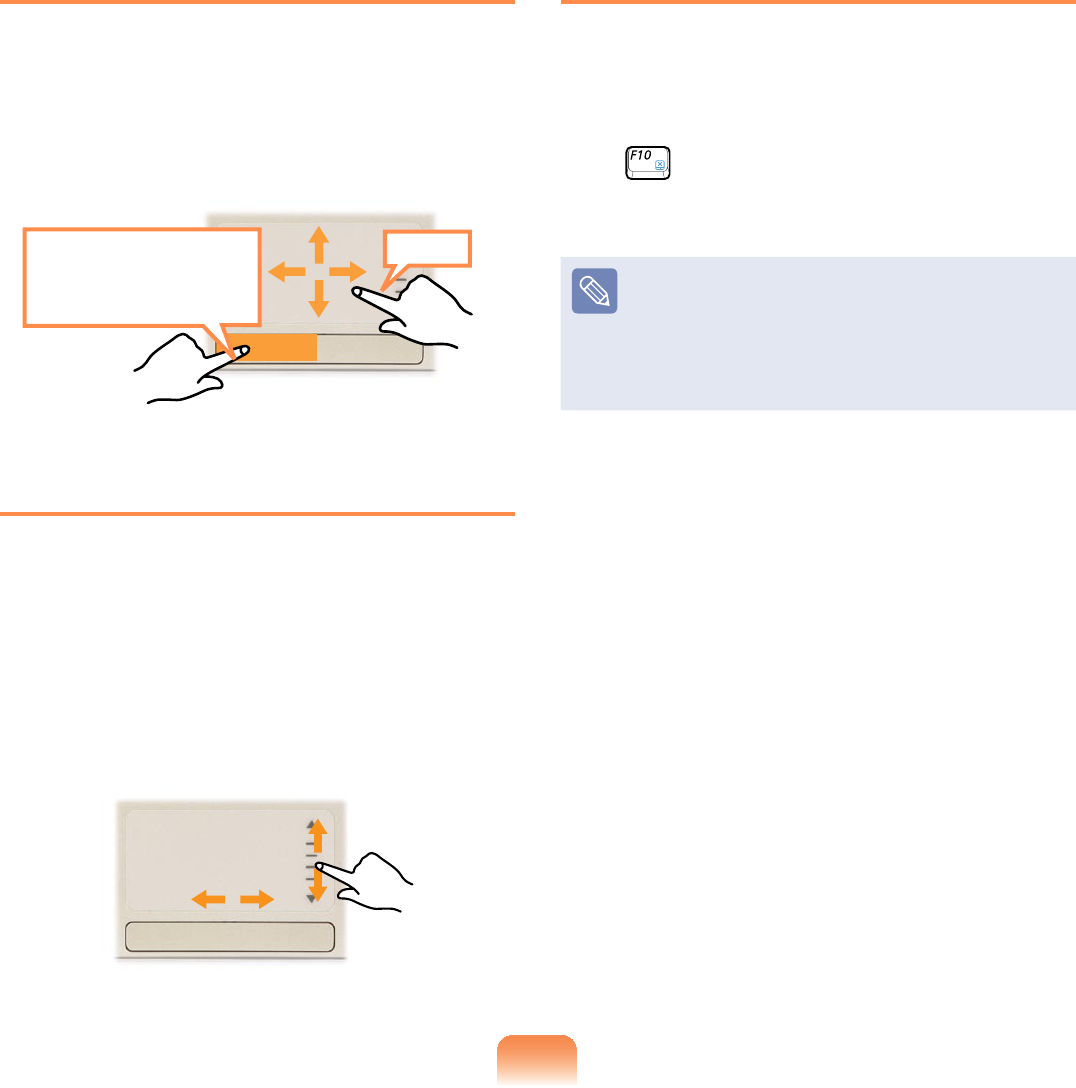
Touchpad
Usetomovethe
cursor.
Scroll Area
Plays the role of the
mouse wheel. You can
scroll up and down using
theScrollArea.
Touchpad Left Button
You can select or run a
program using this button.
Touchpad Right Button
Plays the role of the right
mouse button.

63
Moving the cursor on the screen
3ODFH\RXU¿QJHURQWKHWRXFKSDGVOLJKWO\
DQGPRYH\RXU¿QJHU
The mouse cursor will move accordingly.
0RYH\RXU¿QJHULQWKHGLUHFWLRQ\RXZLVK
to move the cursor.
Click Function
3ODFH\RXU¿QJHURQWKHWRXFKSDGDQGWDS
\RXU¿QJHURQFHRYHUDQLWHP\RXZDQW
Alternatively, press the left touchpad
button once.
Tap
Click
or
Double-Click Function
3XW\RXU¿QJHURQWKHWRXFKSDGDQG
TXLFNO\WDSWZLFHZLWK\RXU¿QJHURQDQ
item you want.
Alternatively, press the left touchpad
EXWWRQWZLFHTXLFNO\
ClickClick
TapTap
or
Right Button Function
7KLVFRUUHVSRQGVWRFOLFNLQJWKHULJKW
mouse button.
Press the right touchpad button once. The
correspondingpop-upmenuappears.
Click
64
Drag Function
Draggingreferstomovinganitemto
anotherplaceafterselectingit.
Pressandholddownthelefttouchpad
buttonoveranitemyouwanttodragand
movetheitemtothenewlocation.
Holding down
the left touchpad
button
Move
Touchpad Scroll Function
Thetouchpadscrollareaprovidesthe
mouse wheel function (scroll function).
3ODFH\RXU¿QJHURQWKHWRXFKSDG¶VULJKW
edge for vertical scrolling or the bottom
edge for horizontal scrolling and then
PRYH\RXU¿QJHUDORQJWKHHGJHWRVFUROO
thescreenverticallyorhorizontally.
Touchpad On/Off Function
Ifyouwanttousethemouseonlywithout
usingthetouchpad,youcanturnthe
touchpad off.
7RORFNWKHWRXFKSDGIXQFWLRQSUHVVWKH
Fn +NH\V
Youcansetthetouchpadand
touchpad button settings in the tabs
WKDWDSSHDUZKHQFOLFNLQJStart >
Control Panel > Hardware and
Sound > Mouse.
65
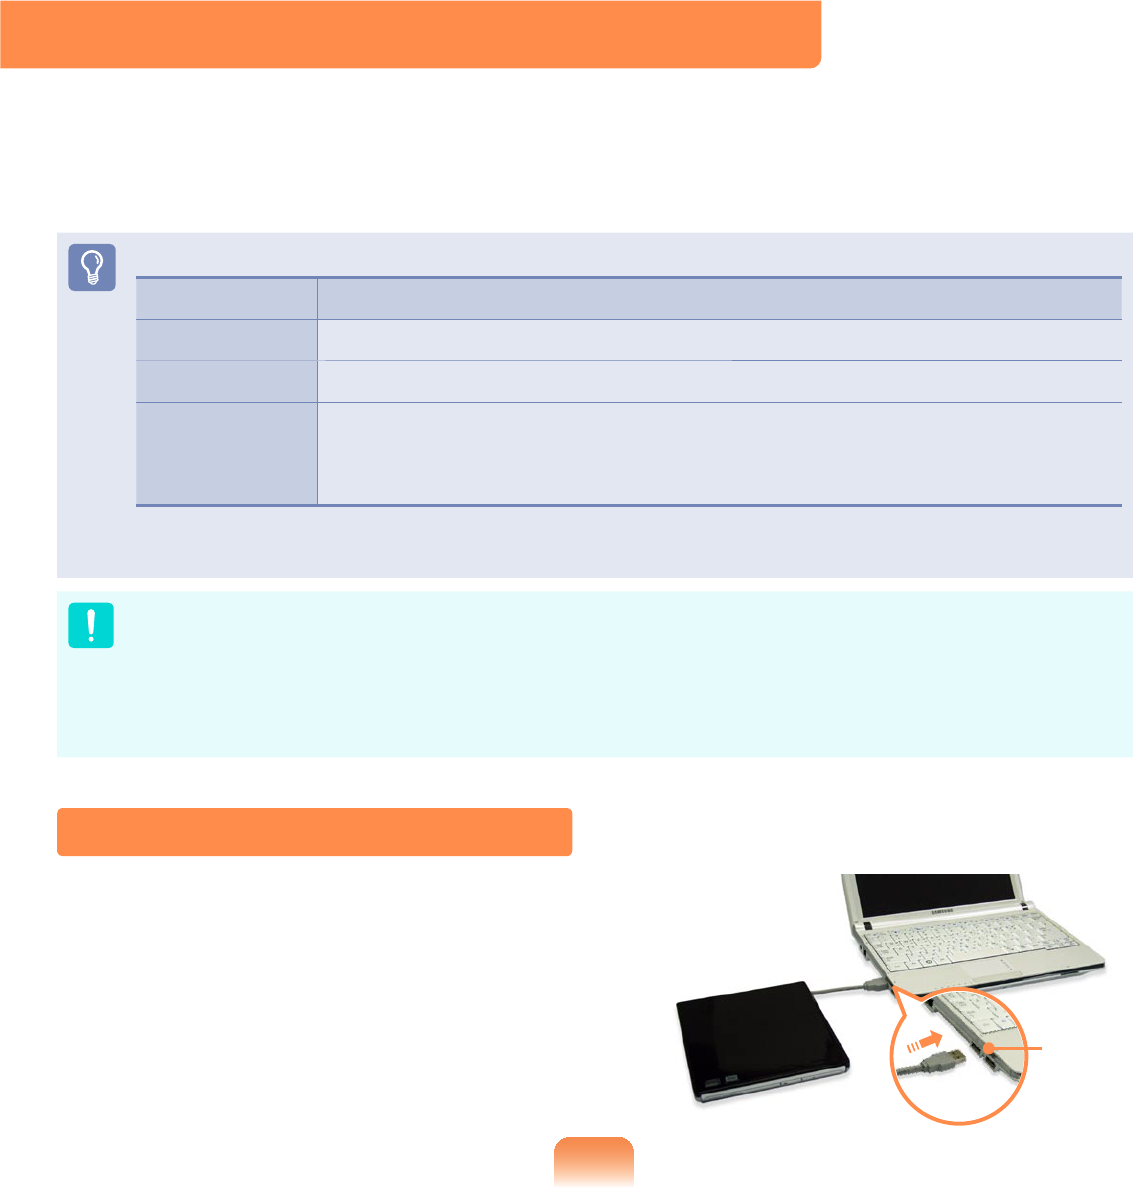
External-type CD drive (To be purchased)
ThiscomputersupportsanexternalUSBCD-ROMdrive(canbeadditionally
purchased).
&KHFNLIWKHLQWHUIDFHW\SHRIWKHH[WHUQDO&'520GULYHLVD86%W\SH)RUGHWDLOHG
VSHFL¿FDWLRQVUHIHUWRWKHFDWDORJ
ThefollowingtypesofexternalCDdrivesexist.
Drive Type Function
DVD-ROM Reads CD/DVD.
DVD-Combo YoucanreadCDsandDVDs,andburnaCD.
DVD Super
Multi
YoucanreadCDsandDVDs,andburnCDsandDVDs.
Supported DVD recording types include DVD±R, DVD±RW, DVD-
RAM.
Theappearanceandcoloroftheexternal-typeCDdrivemaydifferfromtheactual
appearanceandcolordependingontheCDdrivemodel.
z'RQRWLQVHUWDFUDFNHGRUVFUDWFKHG&'
2WKHUZLVHWKH&'PD\EUHDNDQGGDPDJHWKHRSWLFDOGLVNGULYHZKHQWKH&'
rotatesatahighspeed.
z WhenyoucleanaCDorDVDtitle,wipewithasoftclothfrominsidetooutside.
z DonotejectaCDwhentheCDoperatingLEDison.
Connecting the CD Drive
ConnecttheCDdrivetotheUSB port.
USB
port
66
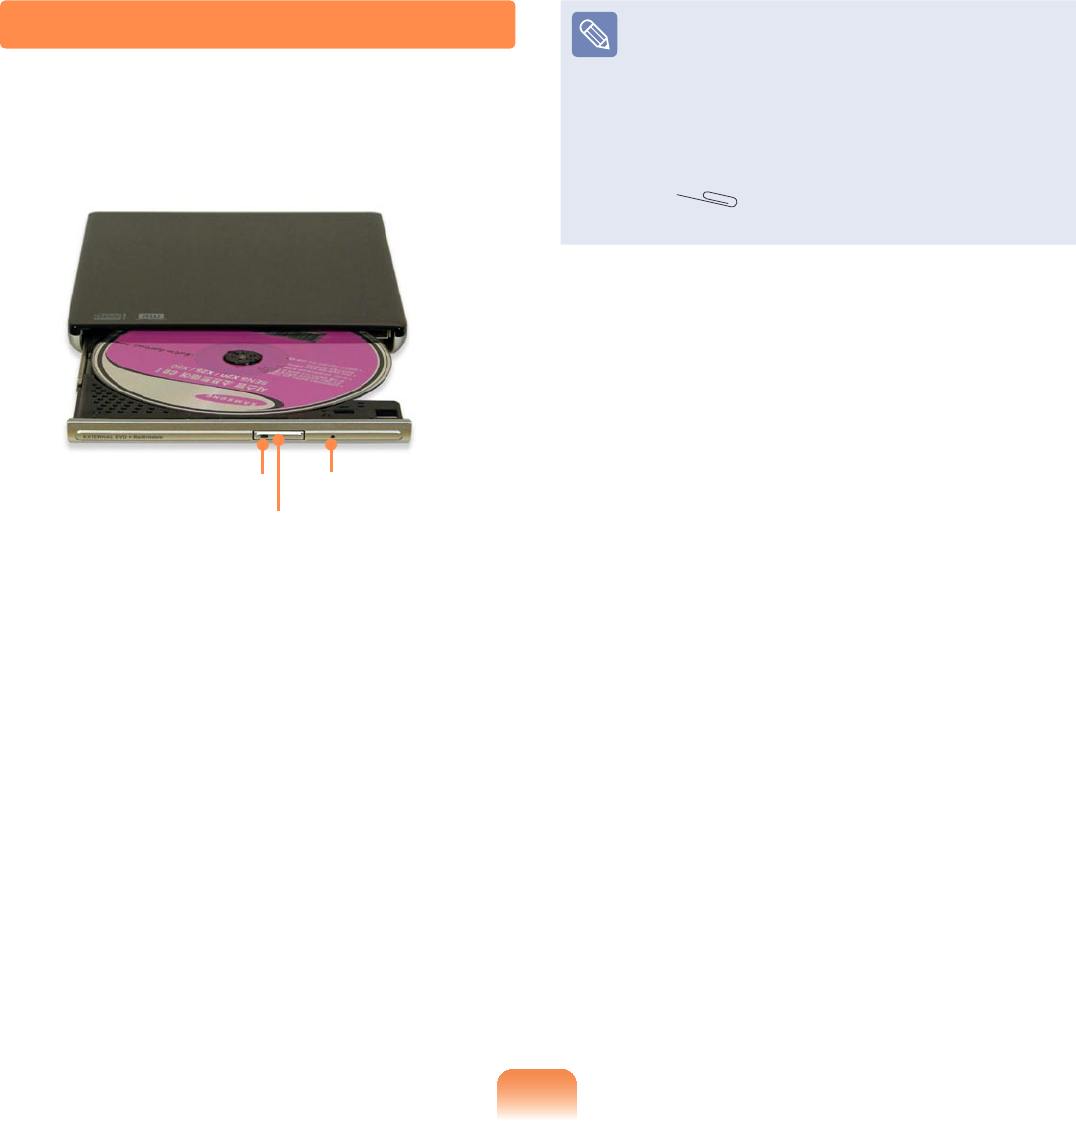
Inserting and Ejecting a CD
1 Press the Eject button of the CD
drive.
Status Indicator
Eject Button
Emergency Hole
2 WhentheCDtrayopens,insertaCD
orDVDandpushthetrayinuntilit
FOLFNV
3 3XVKWKH&'WUD\LQZDUGXQWLOLWFOLFNV
TheCDdrivestatusindicatoristurned
on.
z ACDdrive’sreadingandwriting
speedmaydifferdependingonthe
condition and type of the media.
z ToejectaCDwhentheCDdrive
GRHVQRWZRUNRUWKHFRPSXWHULV
off,placetheendofapaperclip
()intotheEmergencyHole
until the CD tray is ejected.
67
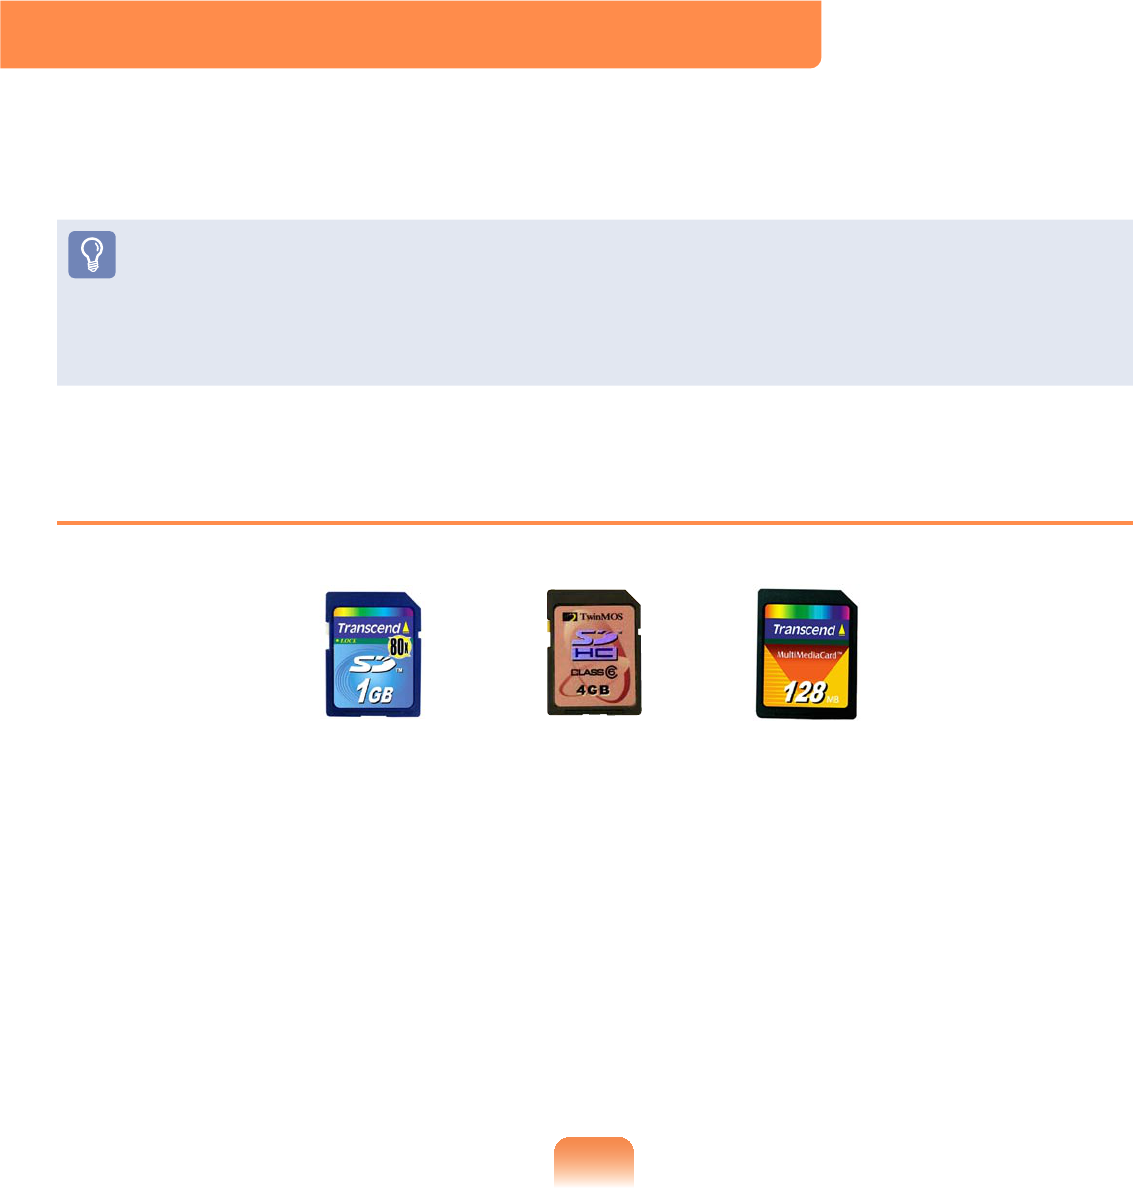
Multi Card Slot
Usingthemulticardslot,youcanreadandwritedatatoaSDcard,SDHCcard,MMC.
<RXFDQXVHDFDUGDVDUHPRYDEOHGLVNDQGFRQYHQLHQWO\H[FKDQJHGDWDZLWKGLJLWDO
devicessuchasadigitalcamera,digitalcamcorder,MP3,etc.
z Youhavetoadditionallypurchaseamulticardwiththenecessarycapacity
dependingonyourrequirements.
z<RXFDQXVHDPXOWLFDUGMXVWOLNHDQ\GDWDVWRUDJHGHYLFH$FRS\ULJKWSURWHFWLRQ
function is not supported.
z6LQFH\RXFDQORVHDFDUGZKHQPRYLQJWKHFRPSXWHUNHHSWKHFDUGVHSDUDWHO\
Supported Cards
SD Card MMC
SDHC Card
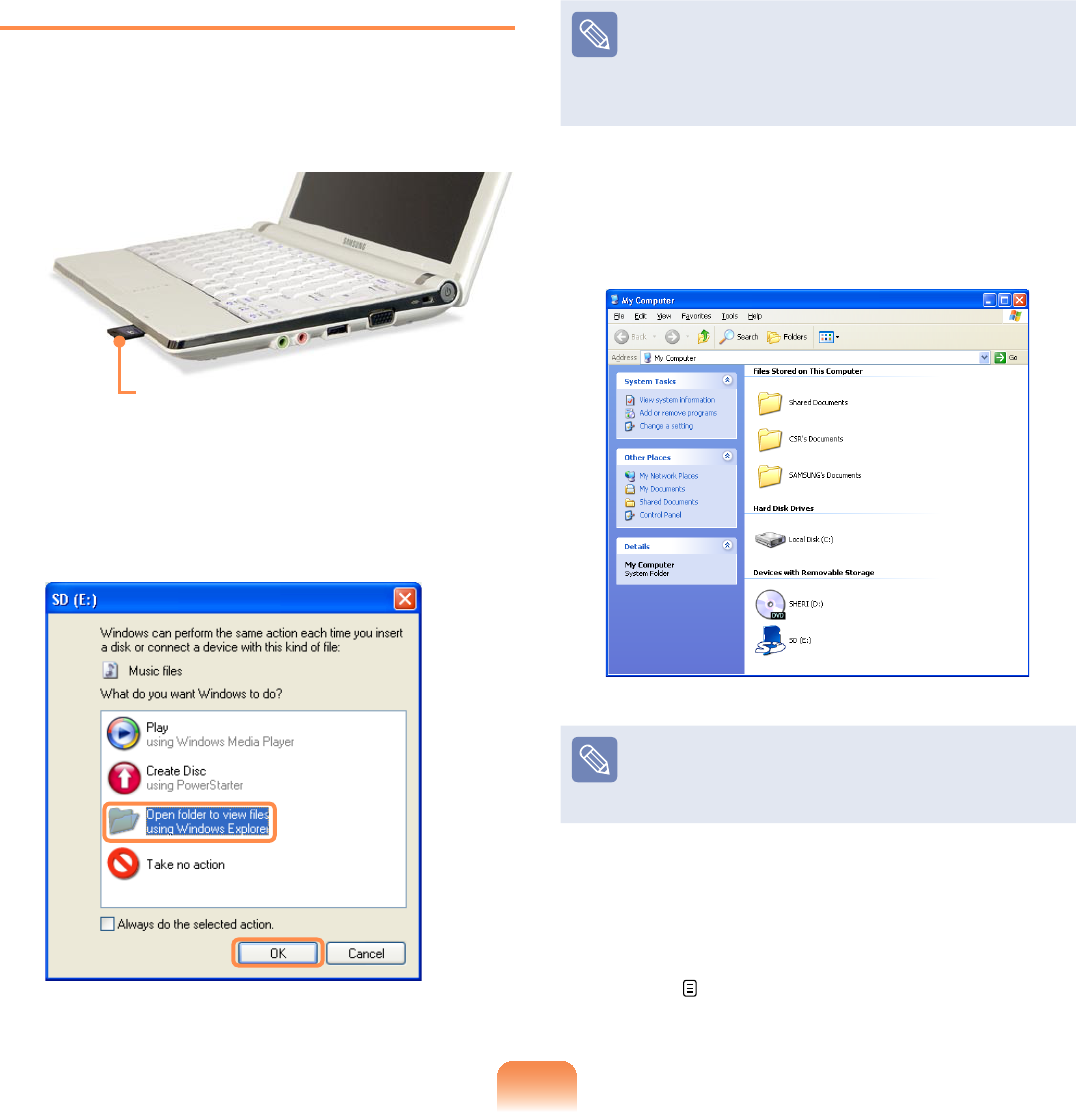
68
To Insert and Use a Memory Card
1 Insertacardintotheslotaccordingto
the directions printed on the slot.
Example) SD Card
2 &OLFNStart > My Computer.The
insertedmemorycardisdisplayed.
,IDZLQGRZDVNLQJWRVFDQDQG
FKDQJHDSSHDUVFOLFNContinue
Without Scanning.Thiswill
proceed to Step 2 above.
3 You can save, move and delete data
E\GRXEOHFOLFNLQJWKHFRUUHVSRQGLQJ
drive.
Thedevicenameofthecarddrive
maydifferdependingonyour
computer model.
Sinceyoucanonlyusethecardafter
formattingit,ifitisnotformatted,
format the card referring to the
descriptionsof“Toformatamemory
card”. 69

69
Using a Mini SD snd RS-MMC
Since the above cards are too small,
youcannotinsertthecardsintothe
slot directly.
Insert the card into the dedicated
adapter(availablefrommost
electronic retailers) and then insert
the adapter into the multi card slot.
However, depending on the adapter’s
body material, some RS-MMC cards
may not be recognized properly.
6DPVXQJUHFRPPHQGWKDW\RXFKHFN
thecardisrecognizedcorrectlyprior
to purchasing.
To remove a memory card
1 7DNHKROGRIWKHHQGRIWKHFDUGDQG
remove the card.
To format a memory card
:KHQXVLQJWKHPHPRU\FDUGIRUWKH¿UVW
time,youmustformatthecardbefore
using it.
Formattingacarddeletesalldata
savedonthecard.Ifthecard
LQFOXGHVGDWDEDFNXSWKHGDWD
before formatting it.
1 &OLFNStart > My computer.
2 5LJKWFOLFNRYHUDFDUGGULYHZLWKWKH
touchpad and select Format.
3 &OLFNStart to the formatting.
z Touseacardtoexchangedata
with a digital device such as a
digital camera, formatting the
data using the digital device is
recommended.
z When you try to use a card, which
is formatted in the computer, in
another digital device, you may
have to format the card again in
the device.
z You cannot format, write or delete
data from a SD, or SDHC card
with a write protection tab when it
LVLQWKH/RFNSRVLWLRQ
z Inserting and removing a memory
card repeatedly may damage the
memory card.
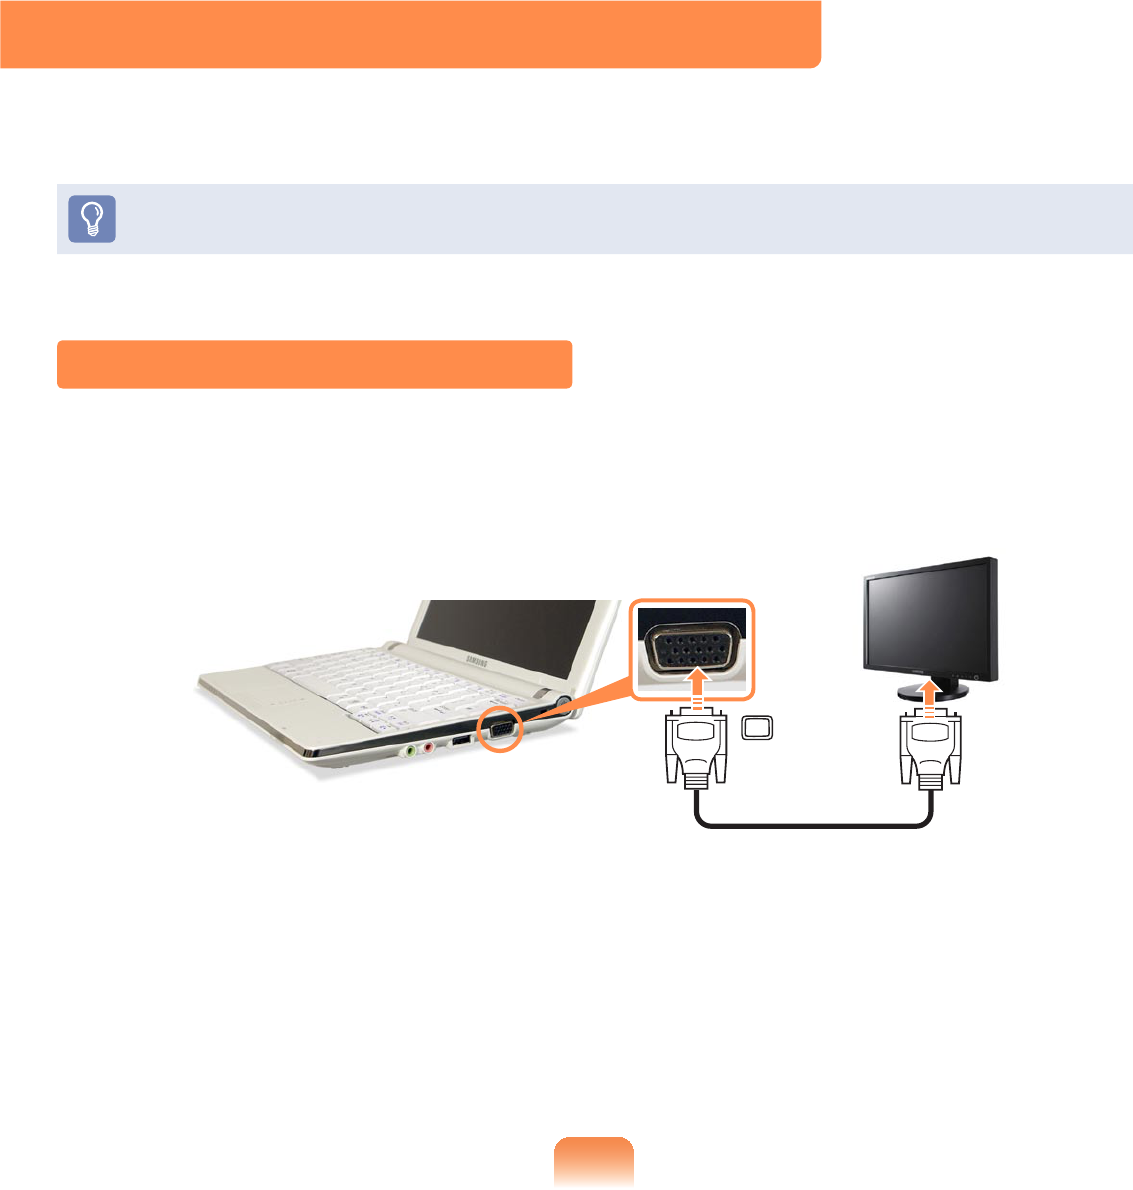
70
Connecting a monitor / TV
Usinganexternaldisplaydeviceisusefulwhenyouaregivingapresentationor
watchingavideoormoviethroughyourmonitor.
Youhavetobuyaconnectioncableadditionally.
Connecting to the Monitor / TV
ConnectthecomputertotheRGBportofthemonitororTVusingamonitorcable(15-
pin).

71
Switching the Display Device using
the Shortcut Key
Press the Fn +NH\FRPELQDWLRQ
once. Then the Easy Display Manager
screenappearsinwhichyoucanselecta
display device.
Whenever you press the NH\ZKLOH
holdingdowntheFnNH\WKHVHOHFWHG
option is changed.
Example) Selecting LCD+CRT
Dual View
zLCD1RWHERRN6FUHHQ
zCRT: External Monitor Screen
zLCD+CRT Clone :1RWHERRN
External Monitor Screen
zLCD+CRT DualView:1RWHERRN
ExternalMonitorScreeninDual
View
zWhat is Dual View?
DualViewisafunctionthat
enables you to view a computer
screen over two display devices.
It is convenient when you need a
wide screen.
ExternalMonitor/TVisnot
supportedintheDOSCommand
Prompt window.
Viewing Through a Monitor / TV
<RXFDQVZLWFKWKHGLVSOD\GHYLFHXVLQJWKHVKRUWFXWNH\
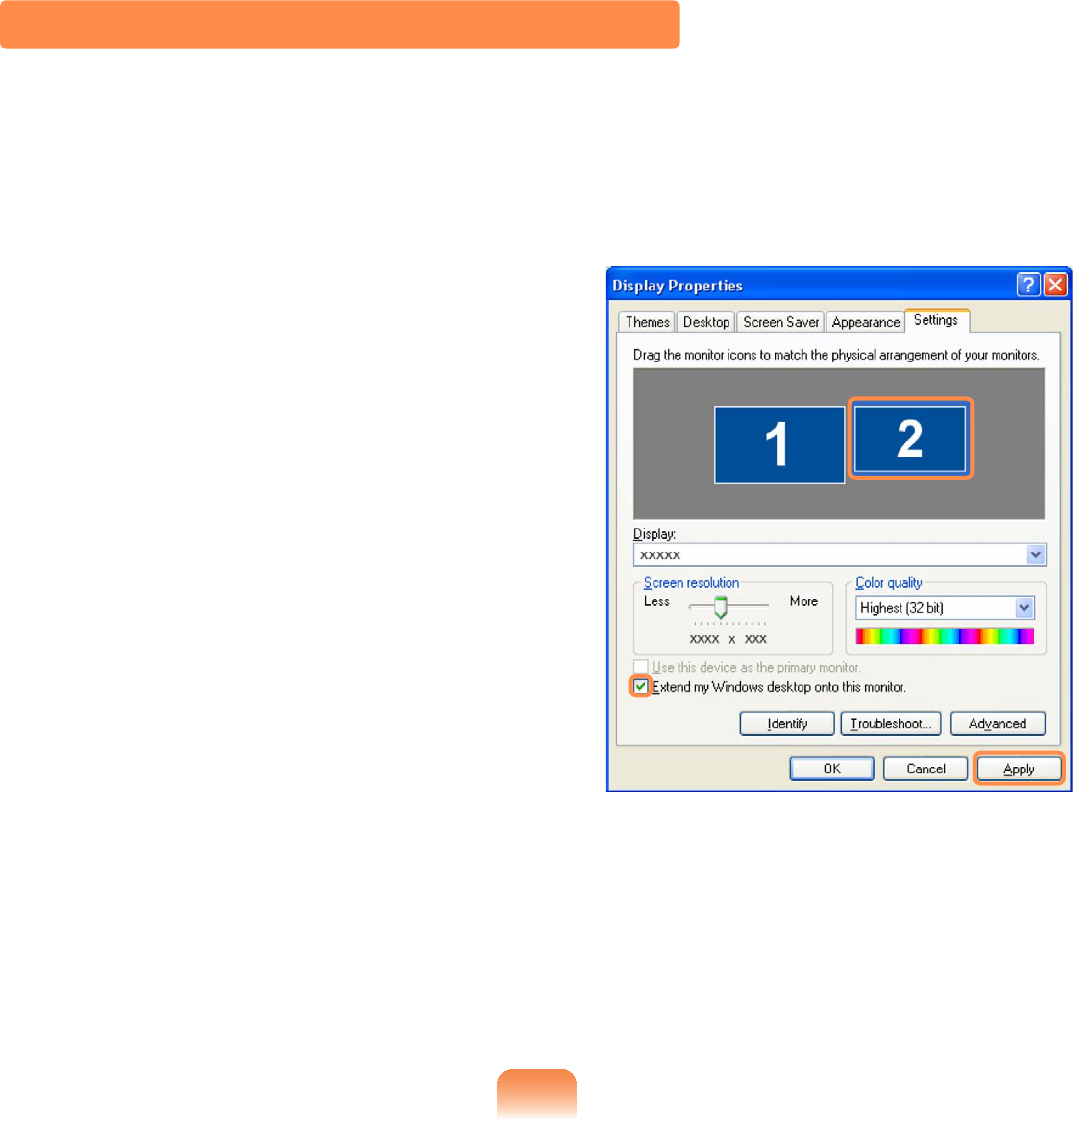
72
Using Dual View to View Extended Screen
Dual View is a function that enables you to view a computer screen over two display
GHYLFHV7KLVLVFRQYHQLHQWZKHQQHHGLQJDZLGHVFUHHQIRUZRUN
In Dual View mode, you can select the screen resolution and colour quality for each
display device, as if there were two separate graphics cards.
1 Connect the external display device
(e.g.amonitororaprojector)tothe
correspondingportofthesystem.To
connectaTV,connecttheTVtothe
TV output port of the system.
2 Presstouchpadrightbuttononthe
GHVNWRSFOLFNProperties, and then
FOLFNWKH6HWWLQJVWDE
3 &OLFNWKHPRQLWRU2icon, select the
Extend my Windows desktop onto
this monitorFKHFNER[DQGWKHQ
FOLFNApply.
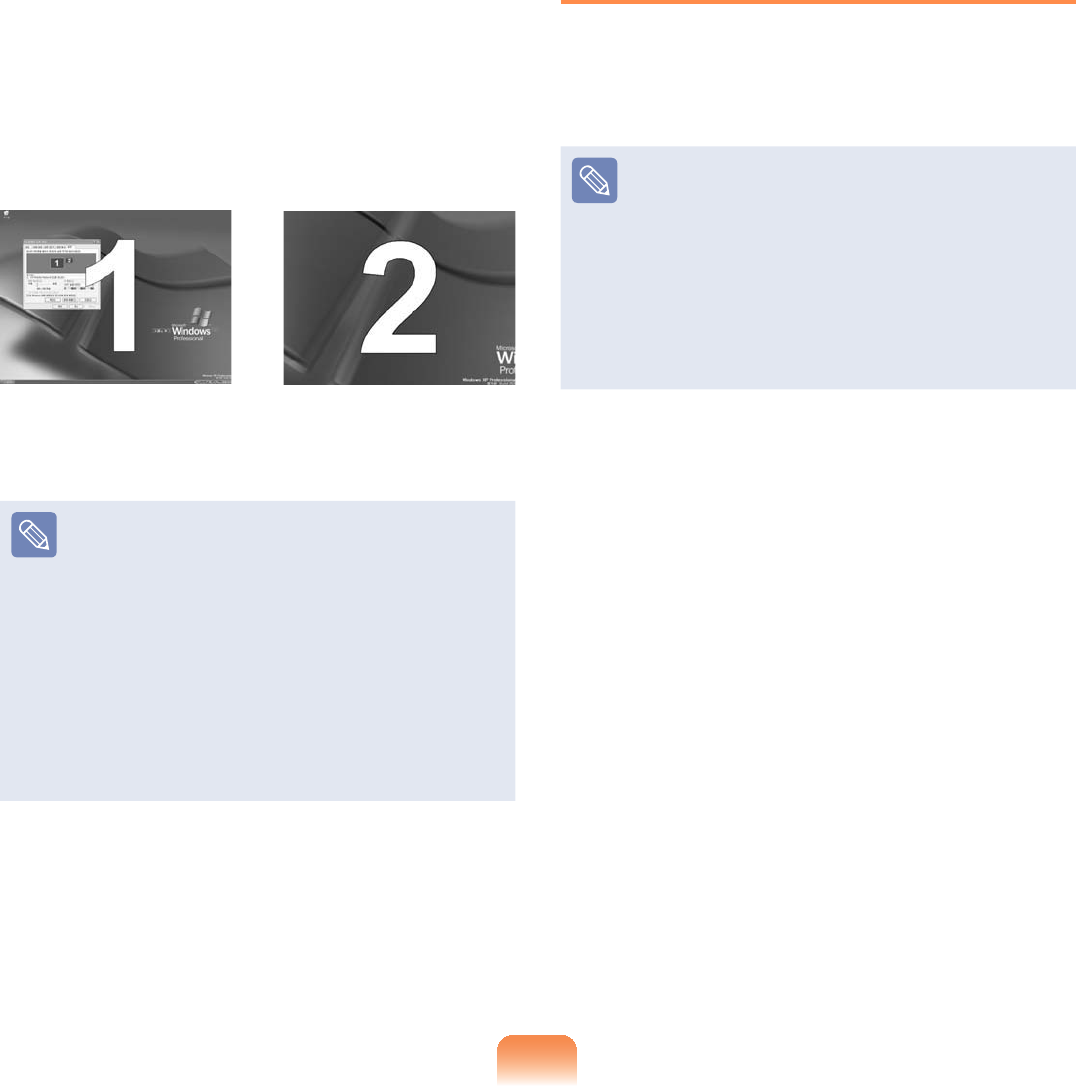
73
4 :KHQWKHFRQ¿JXUDWLRQLVFRPSOHWH
FOLFNIdentify ontheleftsideof
Troubleshoot. The primary display
device(the LCD) is indicated as 1,
and the secondary display device is
indicated as 2.Nowyoucanviewthe
screen through two monitors.
1 : Primary 2 : Secondary
z When you use Dual View,
FRQ¿JXULQJWKH/&'DVWKH
'Primary' monitor is recommended.
z Ifthescreenofthesecondary
displaydeviceisdisplayedat
1024x768 pixels, with 32bit
colours, change the settings to
the desired screen resolution
andcolourqualityinthe[Display
Properties] dialog box.
Deactivating Dual View Mode
&OLFNWKHPRQLWRU2icon, clear the
Extend my Windows desktop onto this
monitorFKHFNER[DQGWKHQFOLFNApply.
To move a window between
display devices in Dual View
mode
&OLFNWKHWLWOHEDURIWKHZLQGRZLQWKH
primary display device (1, the LCD),
anddragittothesecondarydisplay
device(2).Thewindowismovedto
the secondary display device.
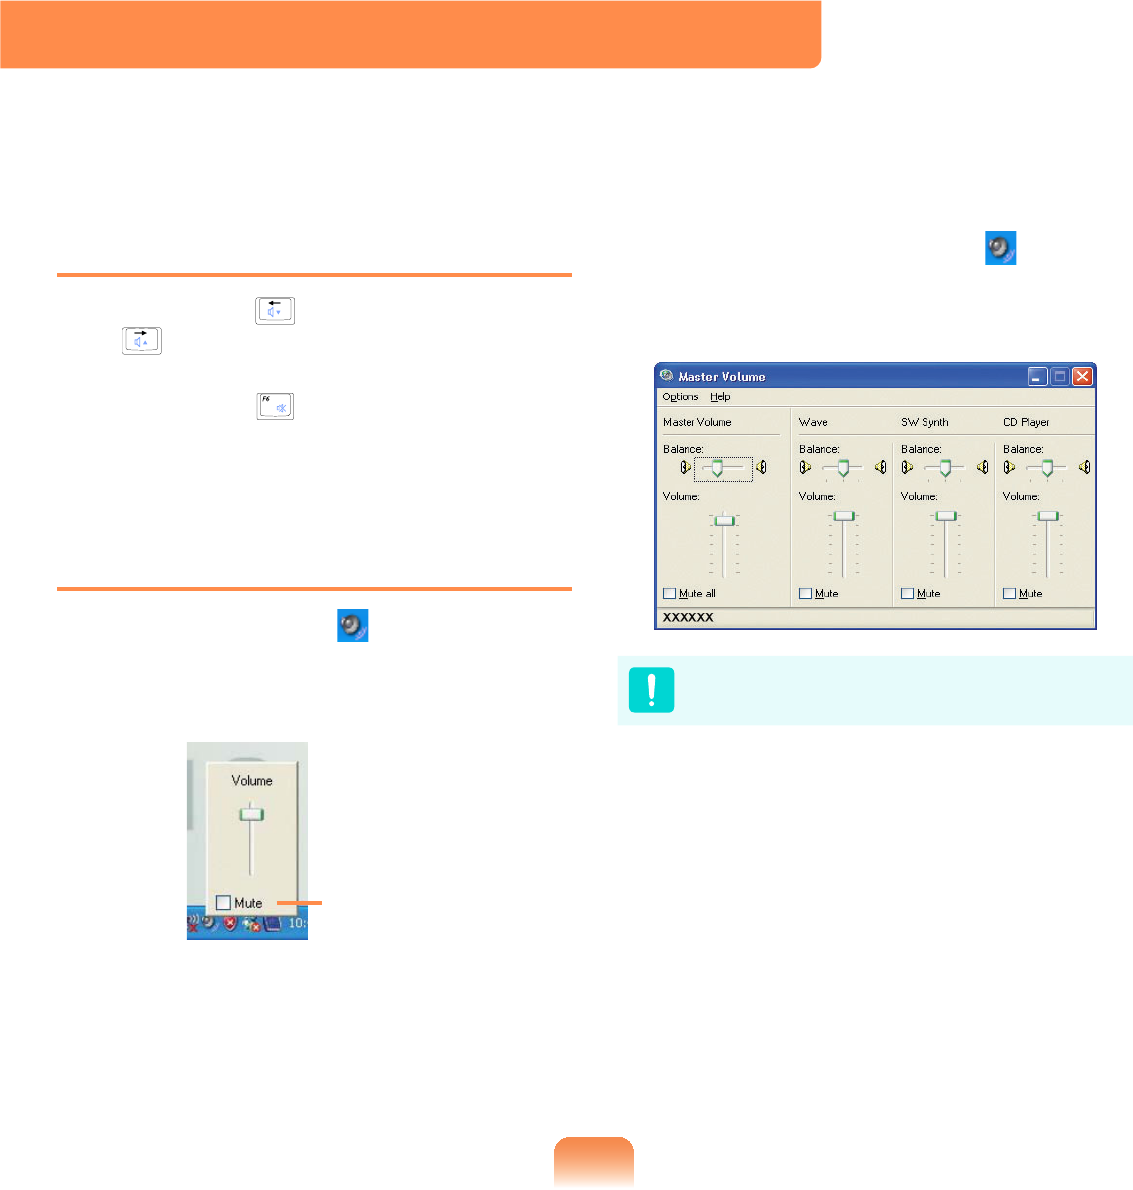
74
Adjusting the Volume using the
Keyboard
Press the Fn +NH\FRPELQDWLRQRU
Fn +NH\FRPELQDWLRQWRDGMXVWWKH
volume.
Press the Fn +NH\FRPELQDWLRQWR
turnthevolumeonoroff.
Adjusting the Volume using the
Volume Adjustment Program
&OLFNWKHVolume icon RQWKHWDVNEDU
andslidethevolumecontrolbartoadjust
the volume.
Mute
For advanced volume control options,
GRXEOHFOLFNWKHVolume icon ,and
adjustthevolumelevelinthevolume
control program.
Whenyouturnthesystemon,a
booting noise may occur.
Adjusting the Volume
<RXFDQDGMXVWWKHYROXPHXVLQJWKHNH\ERDUGDQGWKHYROXPHFRQWUROSURJUDP

75
Using EDS
Enables listening to surround sound using
VWHUHRVSHDNHUV
To listen to more stereophonic sound,
FOLFNStart >All Programs >Samsung
>Samsung EDS >Samsung EDS or
GRXEOHFOLFNWKHEDS icon on the
7DVNEDUDQGVHOHFWDVXUURXQGPRGH
from the pop-up menu.
To disable EDS, select Enhanced Digital
SoundOFFfromthepop-upmenu.
What is Auto Volume Control?
z Auto Volume Control is a function
that maintains the same volume
levelforalldigitalsources.
The volume level of playing music
FKDQJHVIRUHDFK¿OHHYHQLIWKH
SOD\HUYROXPHLV¿[HG,I\RXXVH
theAutoVolumeControlfunction,
the volume level will remain the
same.
However,iftheAutoVolume
Control function is activated,
the volume control function of
amultimediaplayersuchas
Windows Media Player may
DSSHDUWRQRWZRUN,QWKLVFDVH
FOLFNRYHUWKHYROXPHLFRQ in
WKHQRWL¿FDWLRQDUHDRIWKH7DVNEDU
and adjust the volume by sliding
thevolumebar.
z To disable EDS, select Enhanced
Digital Sound OFF from the pop-
up menu.
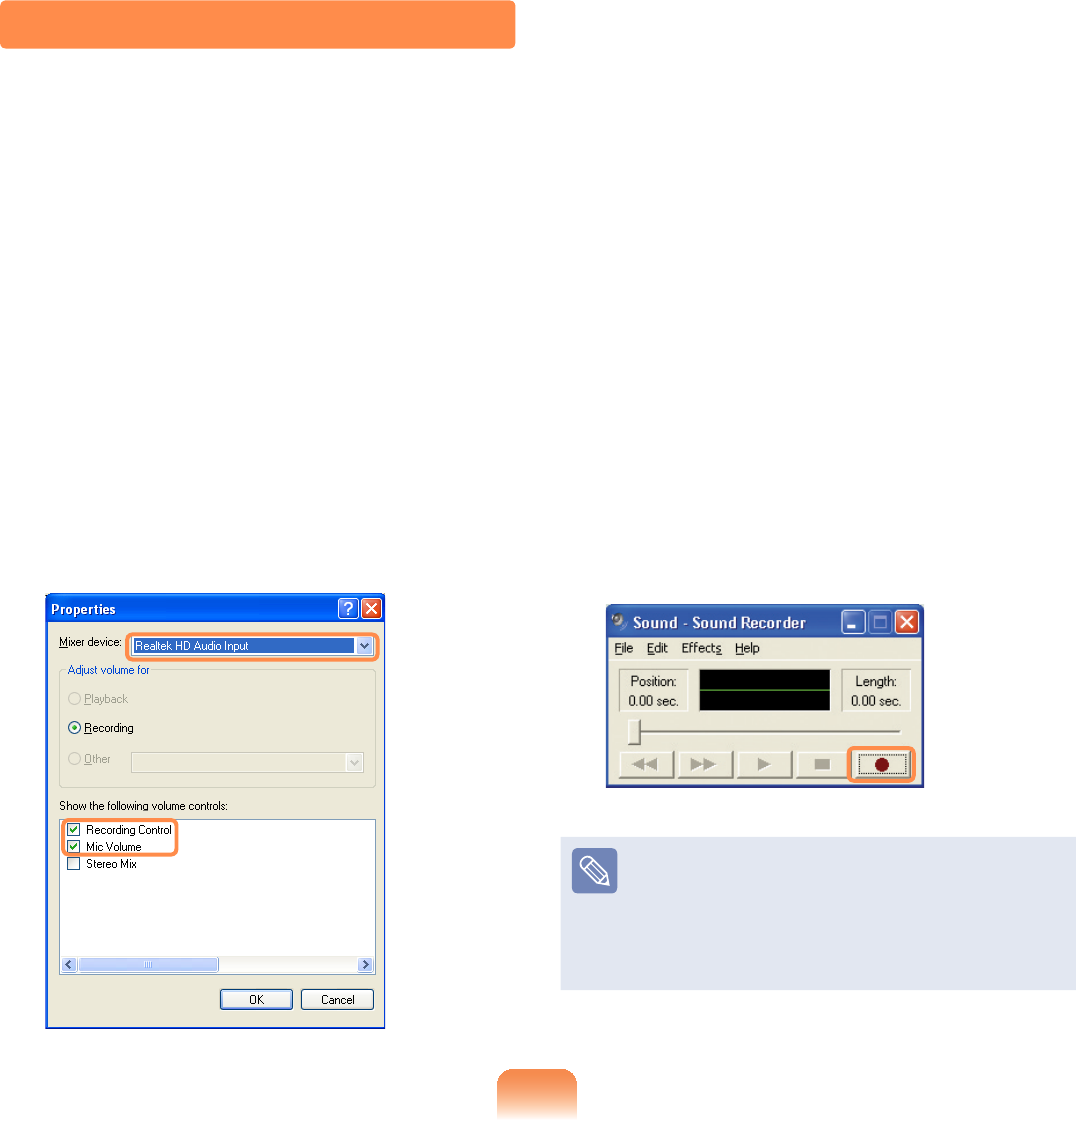
76
Using Recorders
This section describes how to perform
recording on a computer by using
Windows Recorder.
1 Connectamicrophonetothe
PLFURSKRQHMDFN
2 &OLFNStart > Control Panel >
Sounds, Speech, and Audio
Devices > Sounds and Audio
Devices.
3 &OLFNAdvanced from Volume and
WKHQFOLFNOptions >Properties.
4 Select Realtek HD Audio input from
the mixer device to select Recording
from Adjust Volume for.
5 Select Mic in Volume from Show the
following volume controlsDQGFOLFN
OK.
6 When Recording Control window
DSSHDUVPDNHVXUHDOOWKH0XWH
ER[HVDUHXQFKHFNHG,QFUHDVHWKH
recording volume to increase the
recording sensitivity and close the
window.
7 &OLFNStart > All Programs >
Accessories > Entertainment >
Sound Recorder.
8 &OLFNWKHRecord button to perform
recording.
Thedefaultrecordingdurationof
Windows is 60 seconds. Download
a dedicated recording program from
theInternettorecordaudiodatafora
long time.

Chapter 3.
The screen shots used in this chapter may differ from actual
screens depending on the Windows XP version and model.
Using Microsoft
Windows XP
About Microsoft Windows XP 78
Windows XP Screen Layout 80
Control Panel 84
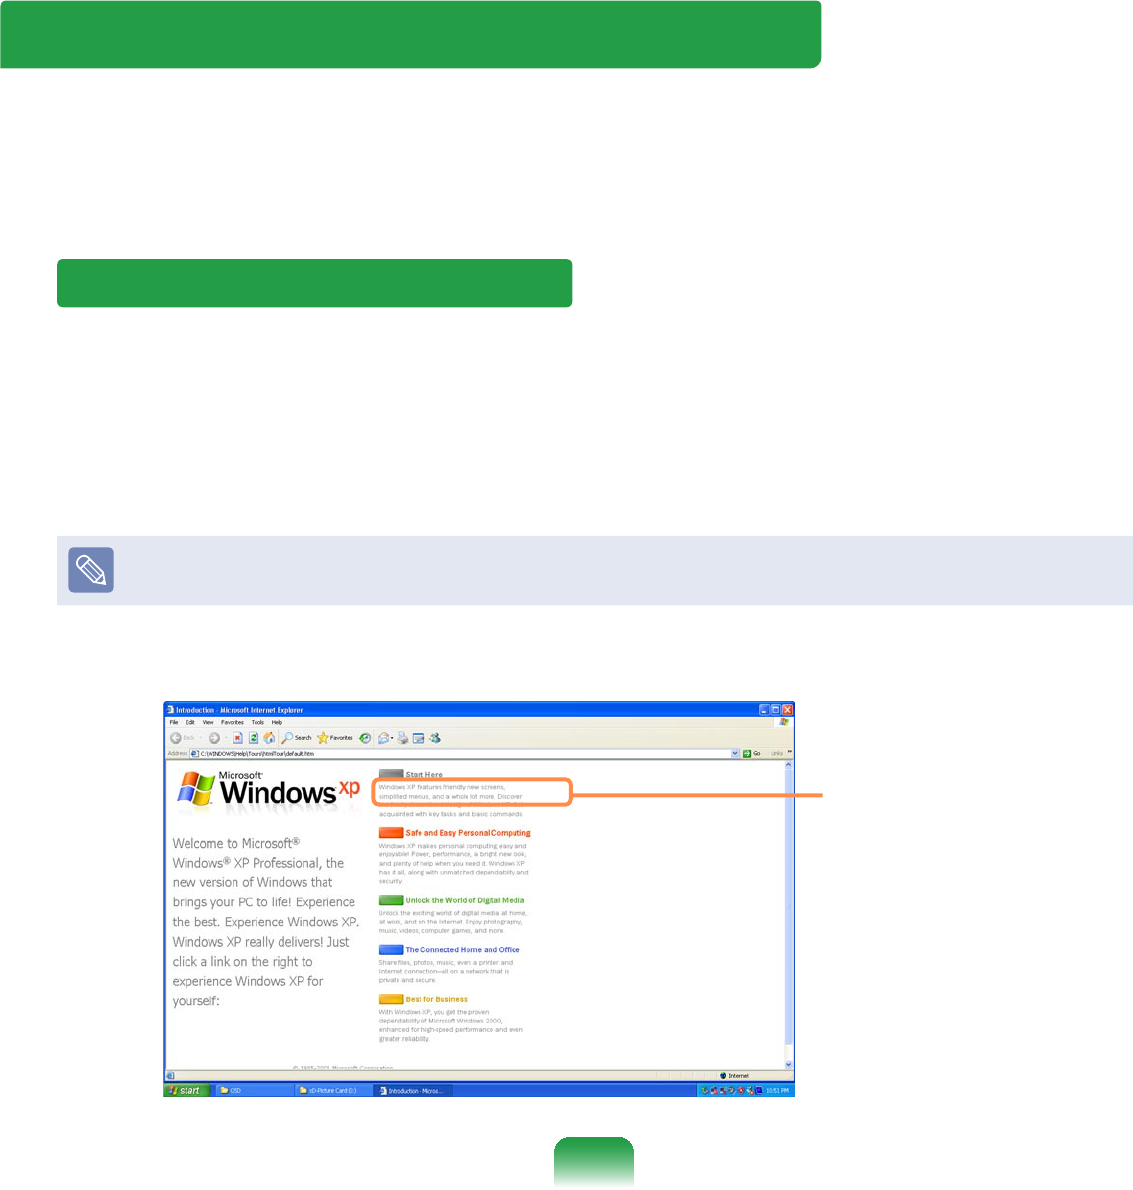
78
About Microsoft Windows XP
Microsoft Windows XP (hereinafter referred to as Windows) is the basic operating
system for computers.
<RXVKRXOGNQRZKRZWRXVH:LQGRZVLQRUGHUWRXVH\RXUFRPSXWHUSURSHUO\8VH
Tour Windows XP as well as Help and Support tolearnabouthowtouseWindows.
Tour Windows XP
Tour Windows XP introduces the basic features and characteristics of Windows.
&OLFNStart > Tour Windows XP.
2UFOLFNStart > All Programs > Accessories > Tour Windows XP.
&OLFNWKHWLWOHDWWKHULJKWWRYLHZWKHGHVFULSWLRQRIWKH:LQGRZVIHDWXUHV
Thescreenlayoutmaydifferdependingonthecomputermodelandtheoperating
system.
Click the title.

79
Help and Support
HelpandSupportallowsyoutoviewthefeaturesandusageofWindows.Also,itallows
\RXWRVHDUFKWKHLQIRUPDWLRQ\RXZDQWE\HQWHULQJDVHDUFKNH\ZRUG
&OLFNStart > Help and Support.
Search(QWHUDVHDUFKNH\ZRUGWRYLHZWKH+HOS
Fixing a problem:Ifaproblemoccurs,youcangethelp.
How to Change Desktop (Background Picture)
What's new in Windows XP > Windows XP articles : Walkthrough ways to use
your PC$IWHUFOLFNLQJWalkthrough : Personalize your PC,youcanviewthewayto
FKDQJHWKHEDFNJURXQGSLFWXUHRQCustomize Desktop.
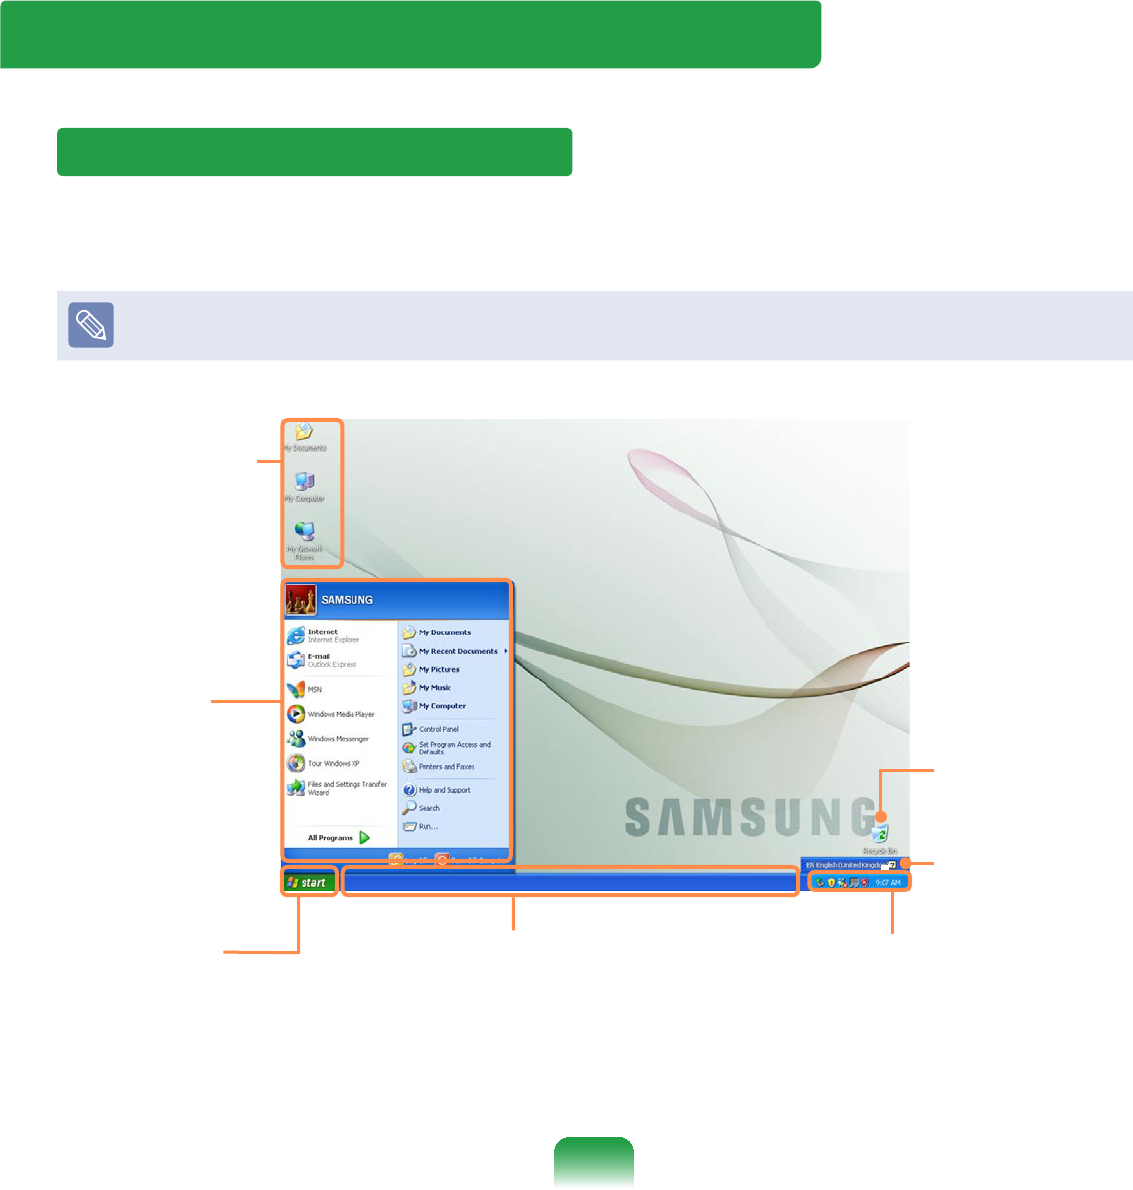
80
Windows XP Screen Layout
Desktop
,I\RXWXUQRQWKHFRPSXWHUWKH'HVNWRSZLOODSSHDU7KH'HVNWRSLVWKHZRUNVSDFH
VFUHHQRIDFRPSXWHUDQGLVFRQ¿JXUHGDVIROORZV
Thescreenlayoutmaydifferdependingonthecomputermodelandtheoperating
system.
Start button
Press the start button.
The Start menu appears.
Taskbar
Currently running
programs are
displayed here.
Shortcut Icons
You can launch
programs by
FOLFNLQJWKH
shortcut icons
RQWKH'HVNWRS
Recycle Bin
You can drop
XVHOHVV¿OHVDQG
folders here.
System Tray with Clock
Shows some running program
icons. Icons not being used are
KLGGHQ,I\RXFOLFNWKHDUURZ
PDUNRQWKHOHIW\RXFDQYLHZ
hidden icons.
Start Menu
The menu
from which
you can launch
programs. Language Bar
Switches text
input language.
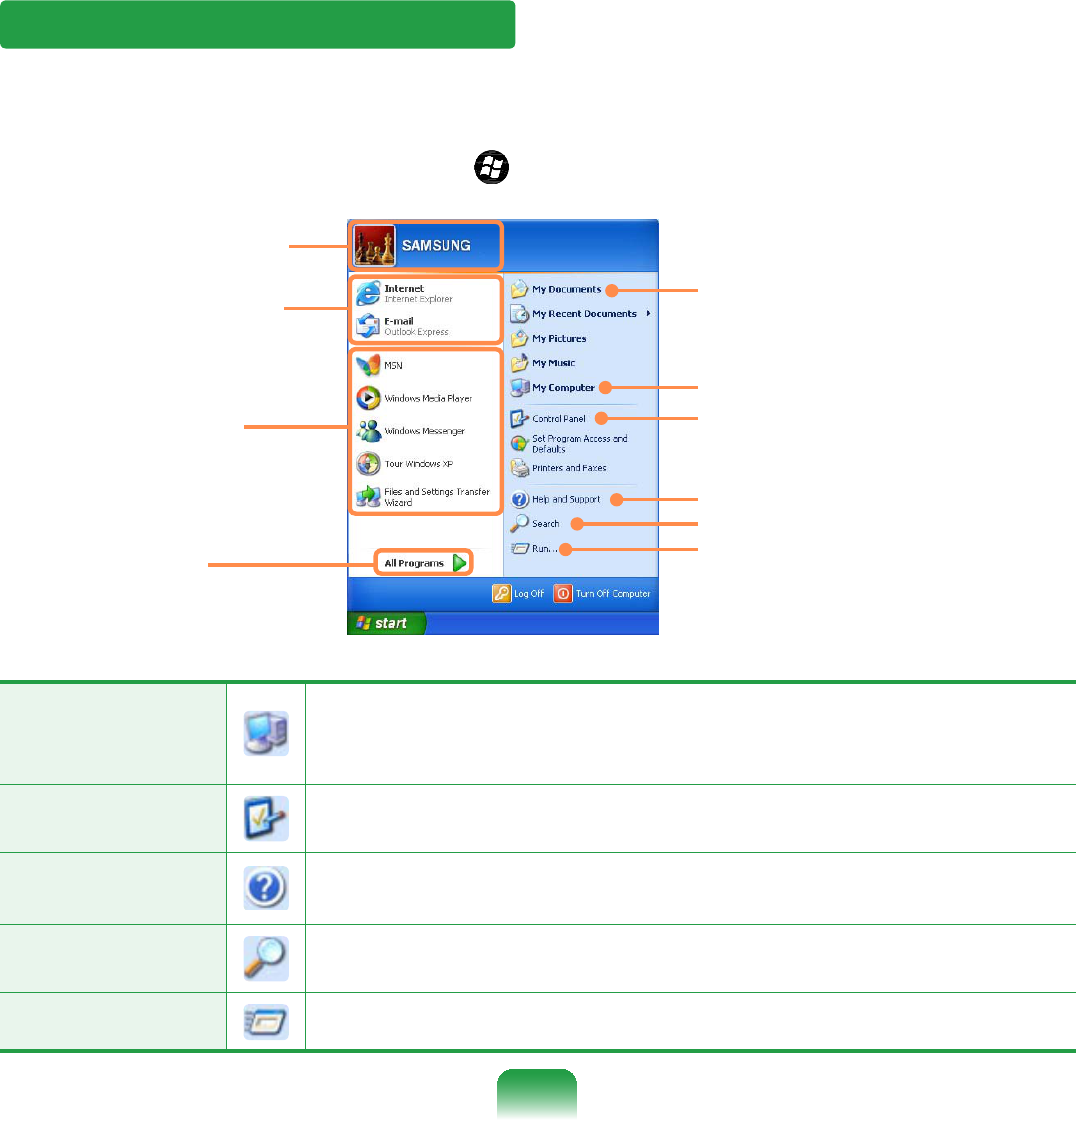
81
Start Menu
Themenufromwhichyoucanlaunchprograms.
&OLFNStart.TheStartmenuappears.
Alternatively, press the WindowsNH\ RQWKHNH\ERDUG
Frequently used
programs
All Programs
My Computer
Control Panel
Help and Support
My Documents folder
Search
Run
Items that are pined
to the Start menu.
User account name
My Computer
'LVSOD\VWKHFRQWHQWVRIWKHKDUGGLVNWKH&'520GULYHWKH
QHWZRUNGULYHVDQGÀRSS\GLVNV
,WFDQDOVREHXVHGWRVHDUFKDQGRSHQ¿OHVDQGIROGHUV
Control Panel (QDEOHVXVHUVWRFRQ¿JXUHVHWWLQJVRQWKHFRPSXWHU
Help and
Support
Provideson-linehelp,informationonWindowsand
troubleshooting.
Search (QDEOHVXVHUVWRVHDUFKIRULQIRUPDWLRQLQ¿OHVRUWKH,QWHUQHW
Run Runprogramsordocuments.
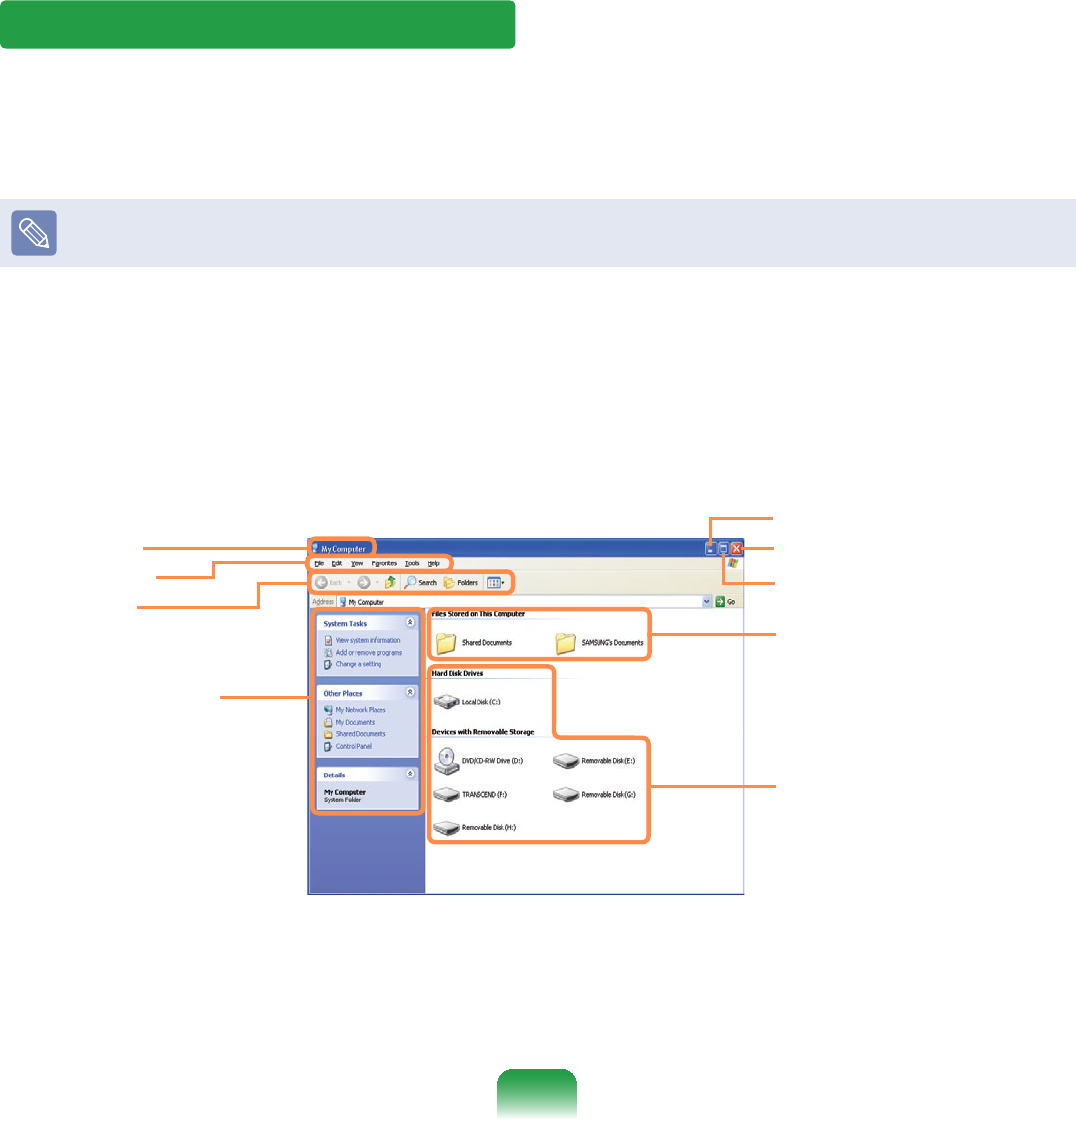
82
Window
A window is a basic foundation for operating your computer. For instance, a window of
\RXUFRPSXWHULVFRQ¿JXUHGDVIROORZV
&OLFNStart > My Computer.
Displayedmenusandnamesmaybevaried.
'RXEOHFOLFNWKH Local DiskZKLFKLVDKDUGGLVNGULYHWRYLHZWKHIROGHUVDQG¿OHV
savedinyourcomputer.
,IDQ\IROGHURU¿OHLVQRWVKRZQFOLFNShow Folder Contents.
Title Bar
Menu Bar
Toolbar
Fast Operation
Window
Folder Icon
Drive Icon (Memory)
Minimize button
Maximize button
Close button

83
What is a Drive?
$GULYHLVDVWRUDJHGHYLFHWKDWFDQUHDGRUZULWHGDWDVXFKDVIROGHUVDQG¿OHV
What is a Folder?
$IROGHULVMXVWOLNHDFDELQHWWKDWNHHSV¿OHVRUIROGHUV<RXFDQNHHS¿OHVRUIROGHUVRI
VLPLODUNLQGVLQDIROGHU
What is a File?
$¿OHLVWKHPLQLPXPXQLWRIPDWHULDOVFUHDWHGE\XVLQJDSURJUDPDQGLVDOVRFDOOHG
data.
How to View the Entire Drive Structure
&OLFNWKHIROGHULFRQIURPWKH7RROEDUWRYLHZWKHGULYHVWUXFWXUH
&OLFNWKHLFRQDJDLQWRUHWXUQWRWKH)DVW2SHUDWLRQZLQGRZ
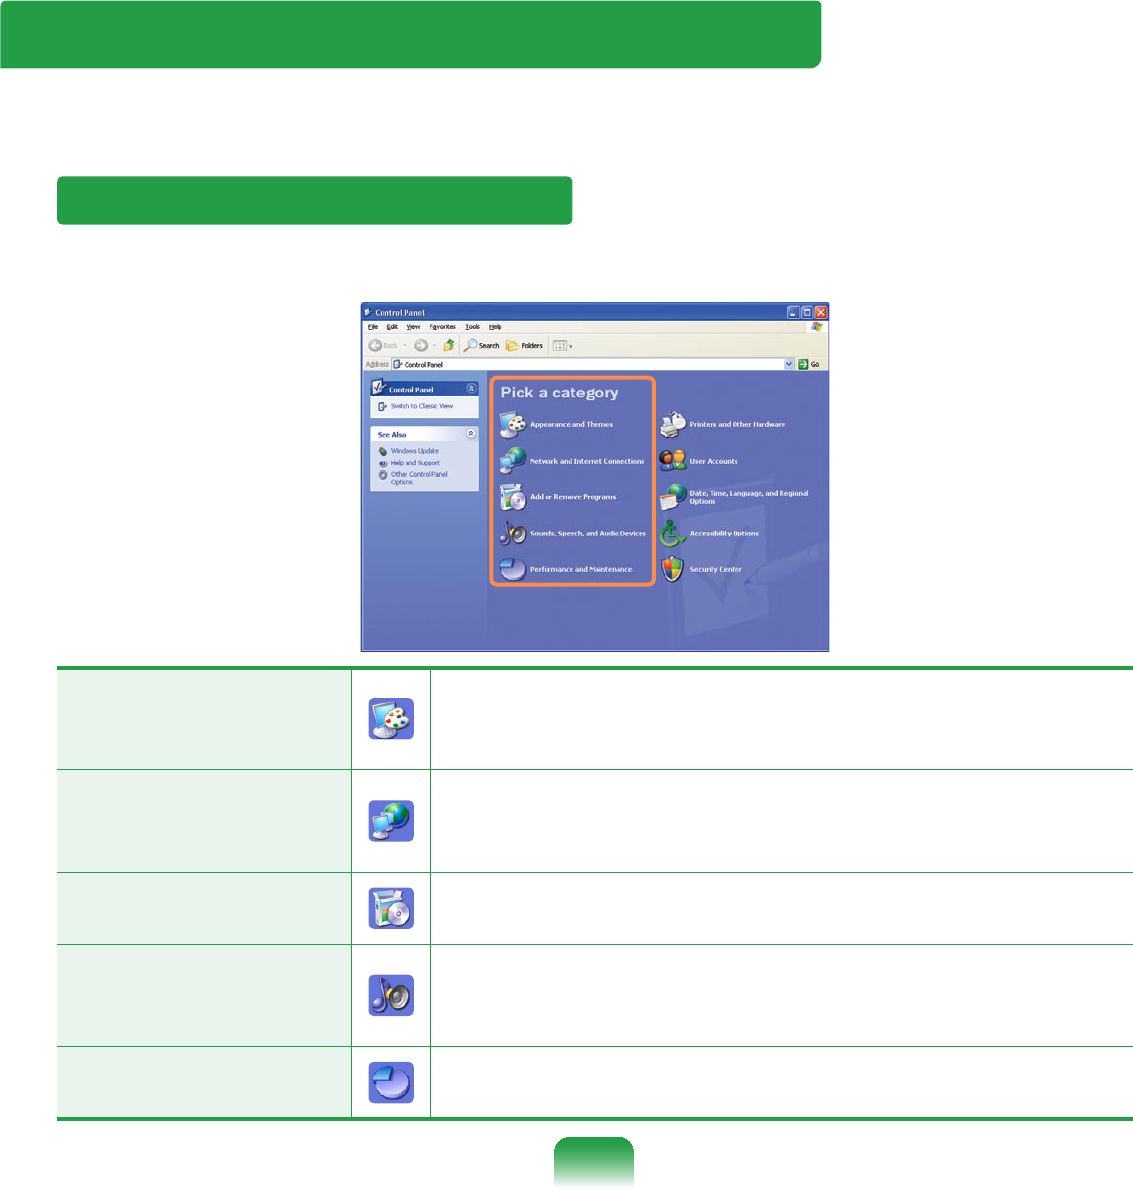
84
Control Panel
7KH&RQWURO3DQHOKDVDJURXSRIWRROVWKDWHQDEOHWRFRQ¿JXUHWKH:LQGRZVUHODWHG
settings.
Running Control Panel
&OLFNStart > Control Panel.
Appearance and
Themes
&KDQJHWKHDSSHDUDQFHRIGHVNWRSLWHPVDSSO\DWKHPH
orscreensavertoyourcomputer,orcustomizetheStart
PHQXDQG7DVNEDU
Network and Internet
Connections
&RQQHFWWRWKH,QWHUQHWFUHDWHDKRPHRUVPDOORI¿FH
QHWZRUNFRQ¿JXUHQHWZRUNVHWWLQJVWRZRUNIURPKRPH
or change modem, phone, and Internet settings.
Add or Remove
Programs InstallorremoveprogramsandWindowscomponents.
Sounds, Speech, and
Audio Devices
Change the entire sound scheme or individual sounds
PDGHE\\RXUFRPSXWHURUFRQ¿JXUHVWKHVHWWLQJVIRU
\RXUVSHDNHUVDQGUHFRUGLQJGHYLFHV
Performance and
Maintenance
6FKHGXOHUHJXODUPDLQWHQDQFHFKHFNVLQFUHDVHVSDFHRQ
\RXUKDUGGLVNRUFRQ¿JXUHHQHUJ\VDYLQJVHWWLQJV
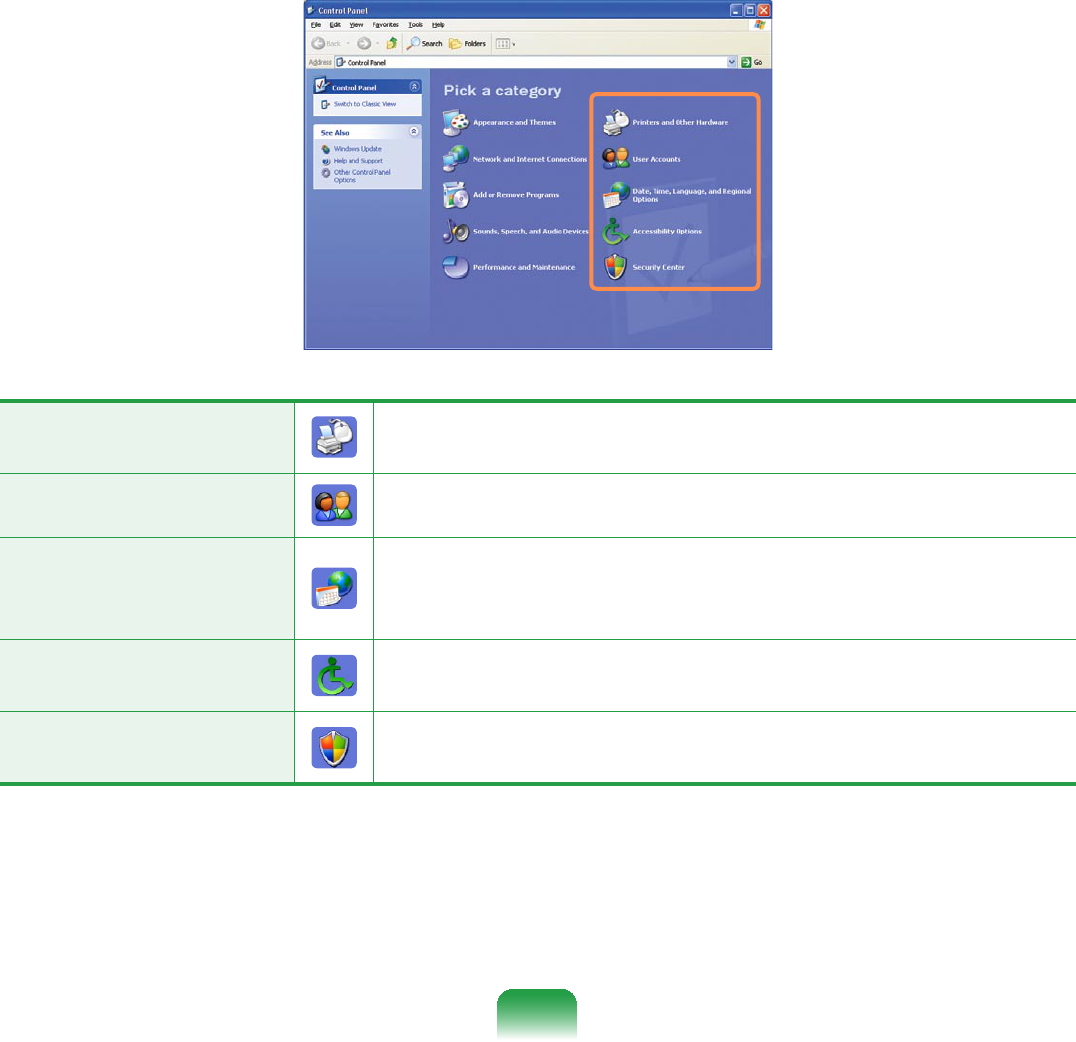
85
&OLFNStart > Control Panel.
Printers and Other
Hardware
&KDQJHWKHVHWWLQJVIRU\RXUSULQWHUNH\ERDUGPRXVH
camera,andotherhardware.
User Accounts Change user account settings, passwords, and pictures.
Date, Time,
Language, and
Regional Options
Changethedate,time,andtimezoneforyourcomputer,
the language to use, and the way numbers, currencies,
dates, and times are displayed.
Accessibility Options Adjust your computer settings for vision, hearing, and
mobility.
Security Center Viewyourcurrentsecuritystatusandaccessimportant
settings to help protect your PC.
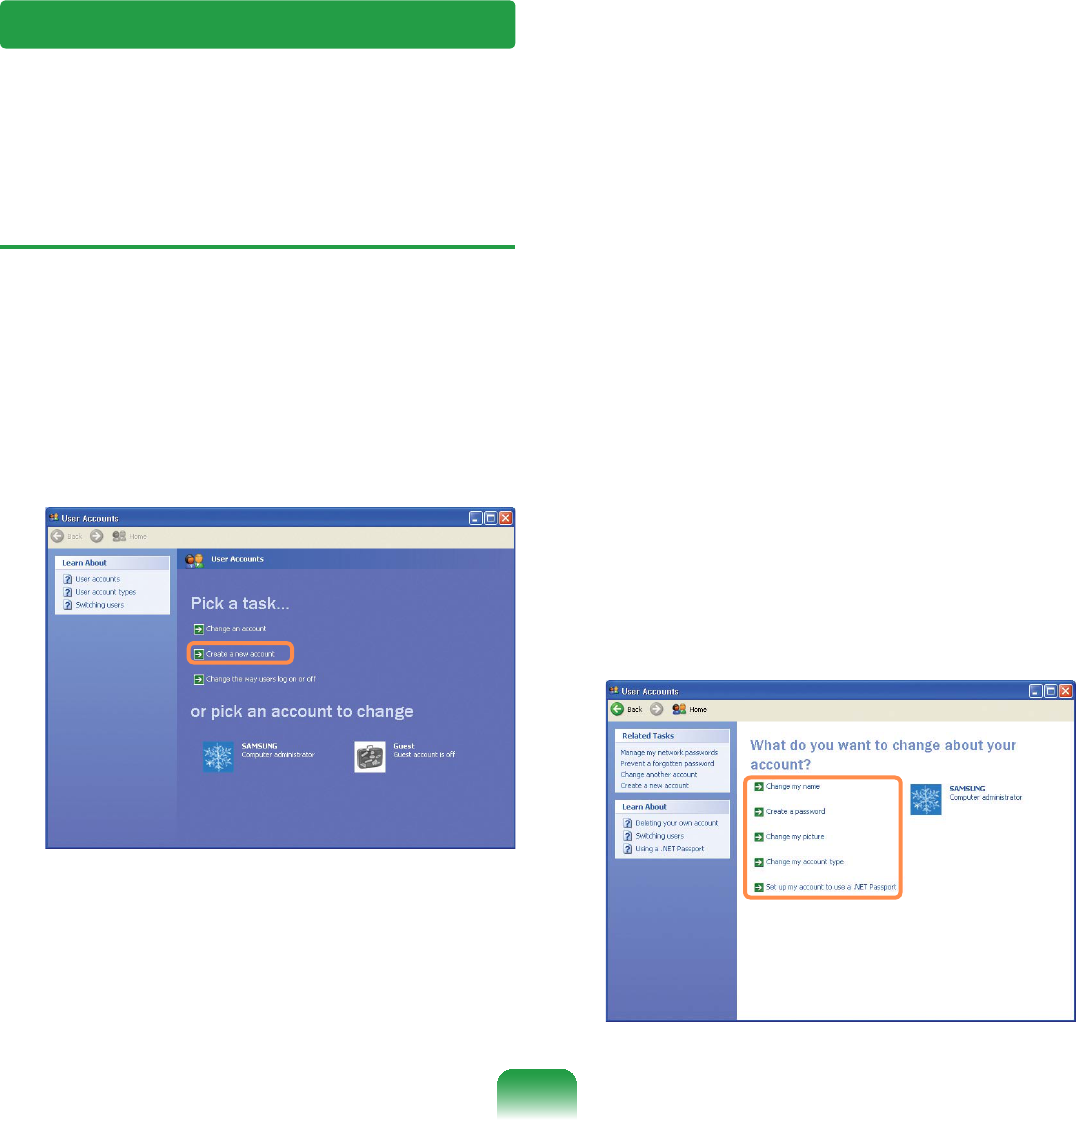
86
User Account
WindowsXPallowstosetmultipleuserswithaccounts.
Thissectiondescribeshowtoaddauseraccountandtoswitchait.
How to Add a User Account
1 &OLFNStart > Control Panel.
2 &OLFNUser Account and Create a
new Account in sequence.
3 (QWHU\RXUQDPHDQGFOLFNNext.
4 6HOHFWDQDFFRXQWW\SHDQGFOLFNWKH
Create AccountEXWWRQ7KHQFKHFN
the created account from the User
Account window.
5 &OLFNWKHWDUJHWDFFRXQWDQGFKDQJH
the user account information.
You can change the account name,
password, account type, and picture.
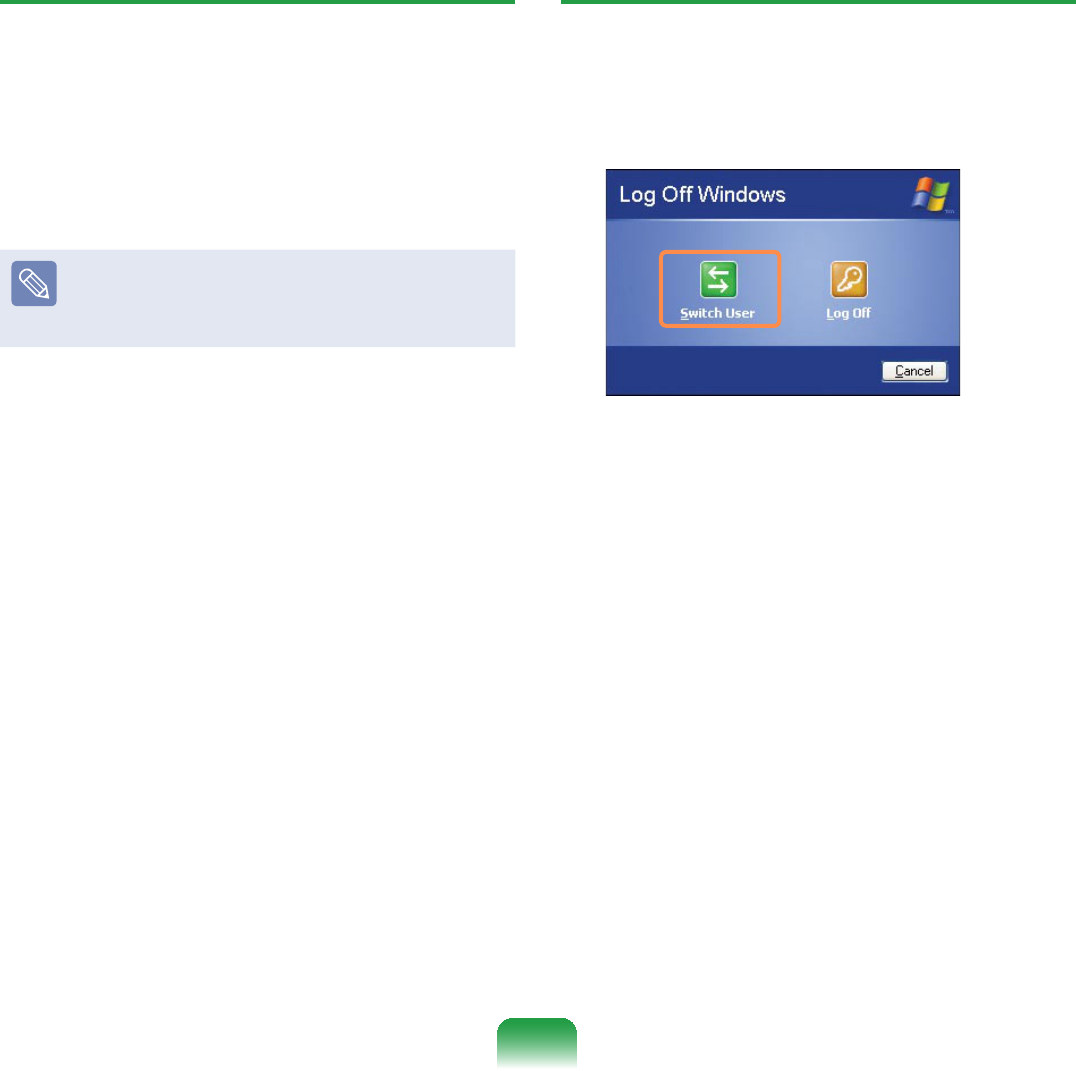
87
To Delete User Account
1 &OLFNStart > Control Panel > User
Account.
2 Select the user account to be deleted
DQGFOLFNDelete Account.
The administrator account cannot be
deleted. It can only be renamed or
disabled.
How to Switch a User
1 &OLFNStart > Logoff.
2 &OLFNSwitch User.
3 &OLFNWKHXVHUQDPHWREHVZLWFKHG
from the Welcome screen. Then you
canlogonwithanewusername.
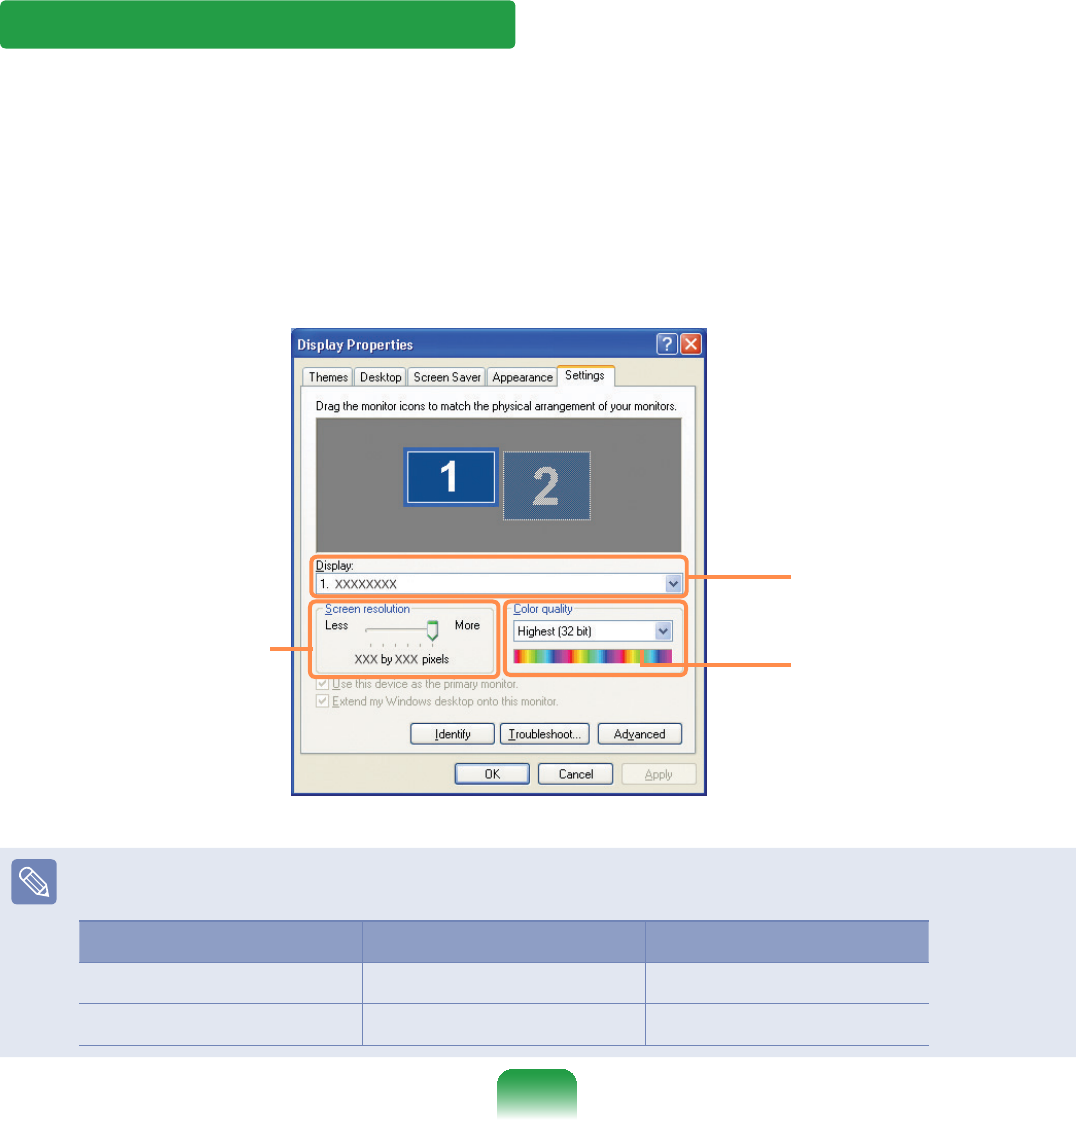
88
1 &OLFNStart > Control Panel >
Appearance and Themes > Change
the screen resolution.
2 &OLFNSettings and change the
resolution and color quality. Then,
FOLFNOK.
You can select a
graphic chip set.
Click the pull-down
menu button to
select the number of
colors you want.
Move the slider bar
to set the resolution.
Itisrecommendedtosettheresolutionand color quality depending on the LCD type
of your computer as the following:
LCD Type Resolution Color Quality
WSVGA 1024 x 600 Strongest (32-bit)
WSVGA 1024 x 576 Strongest (32-bit)
Changing Resolution and Color
A resolution is the number of pixels displayed on the screen. If you set the resolution to
DKLJKHUYDOXHLWHPVRQWKHVFUHHQZLOOEHGLVSOD\HGVPDOOHUDQGWKHVFUHHQORRNVZLGHU
thanthepervious.Ascolorqualitygetshigher,morecolorscanberepresented.

Chapter 4.
Using the Network
Wired Network 90
Wireless Network 93
Using Samsung Network Manager
(Optional) 99
Bluetooth (Optional) 109
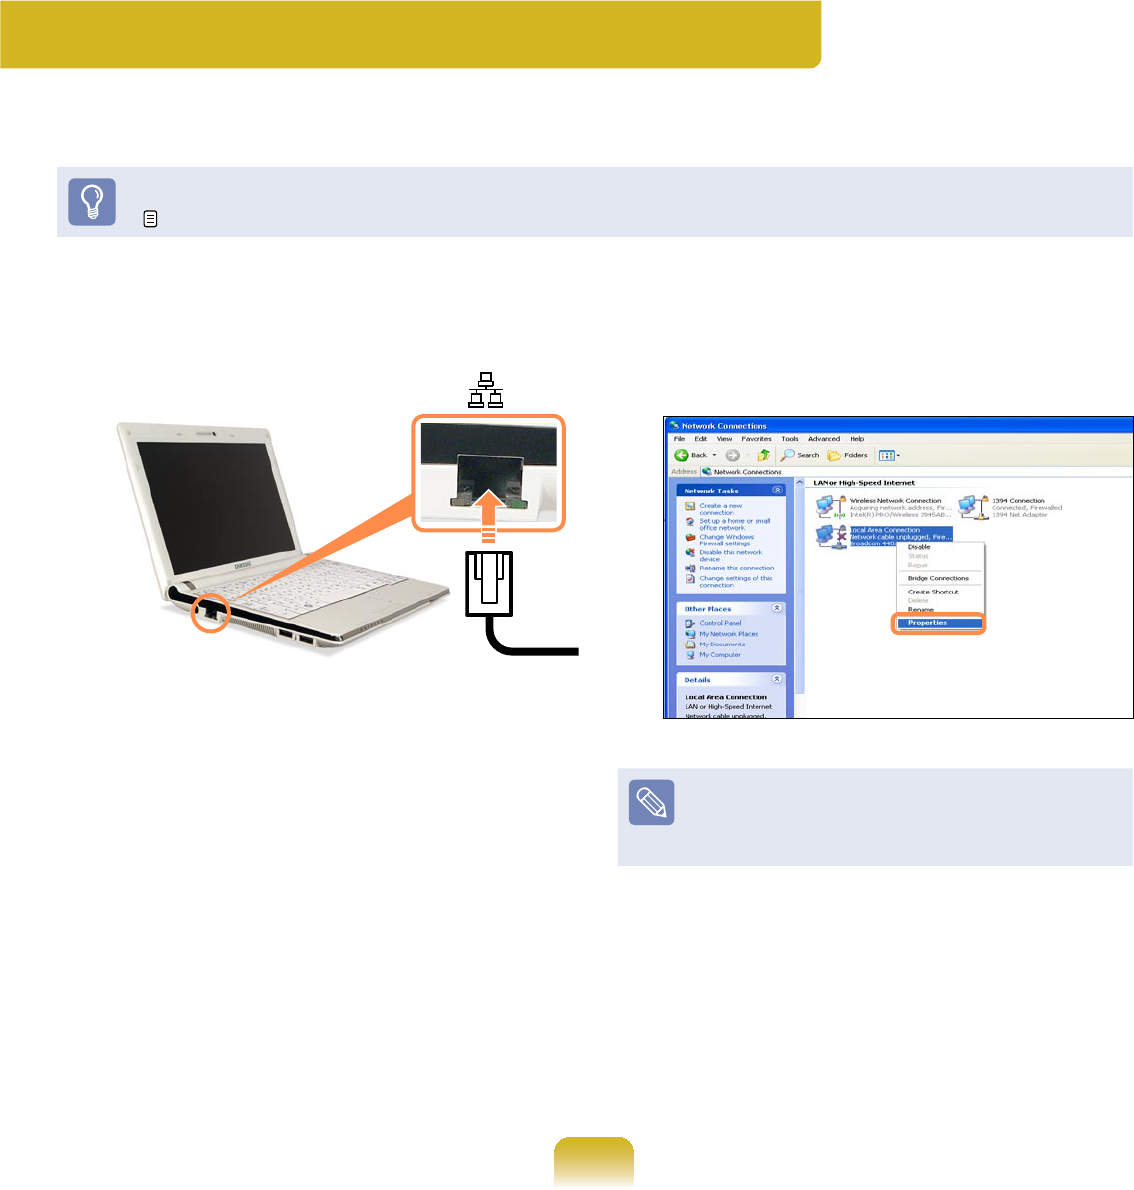
90
1 ConnectaLANcabletothe
computer’s LAN port.
2 &OLFNStart > Control Panel >
Network and Internet Connections
> Network Connection.
3 &OLFNManage Network Connections
fromtheleftpane.
4 Select Local Area Connection and
FOLFNWKHULJKWEXWWRQRIWKHWRXFKSDG
and select Properties.
The LAN Device name may differ
dependingonyourcomputer’s
1HWZRUN'HYLFH
Wired Network
$ZLUHGQHWZRUNLVDQHWZRUNHQYLURQPHQWXVHGIRUDFRPSDQ\QHWZRUNRUEURDGEDQG
internet connection at home.
<RXFDQDOVRFRQ¿JXUHWKHQHWZRUNVHWWLQJVXVLQJWKH6DPVXQJ1HWZRUN0DQDJHU
99

91
5 &OLFNGeneral tab and select a LAN
driver from Connect using:. Select
Internet Protocol(TCP/IP)DQGFOLFN
Properties.
ThedisplayedLANdrivermayvary
dependingontheLANdevicetype.
&OLFNInstallWRDGGDQHWZRUN
FRPSRQHQWDVVKRZQLQWKH¿JXUH
below: You can add a client, a
service, or a protocol.
6 &RQ¿JXUH,3VHWWLQJV
Select Obtain an IP address
automatically when using DHCP. If
you use a static IP, select Use the
following IP address and enter the
values.
IftheIPofyourcomputerisnot
automaticallyassigned,contactthe
QHWZRUNDGPLQLVWUDWRU
7 ,IDOOVHWWLQJVDUHPDGHFOLFNOK.Now
WKHQHWZRUNFRQ¿JXUDWLRQLV¿QLVKHG

92
8VLQJERWK'+&3DQGD¿[HG,3
simultaneously
Using the $OWHUQDWH&RQ¿JXUDWLRQ
providing by Windows XP, you can set
ERWKDXWRPDWLFDQG¿[HG,3DGGUHVVHV
andthenyoucanselecttouseeitherof
themtoconnecttotheInternet.
1 &OLFNStart > Control Panel >
Network and Internet Connections
> Network Connection > Local
Area Connection by using the right
EXWWRQRIWKHWRXFKSDGDQGFOLFN
Properties.
2 Select Internet Protocol (TCP/IP)
DQGFOLFNProperties.
3 Select the $OWHUQDWH&RQ¿JXUDWLRQ
tab, select 8VHUFRQ¿JXUHGDQG¿OOLQ
WKH¿HOGV
4 :KHQWKHVHWWLQJFRPSOHWHVFOLFNOK.

93
Wireless Network
$ZLUHOHVVQHWZRUNDOORZVFRPSXWHUVWRVKDUHUHVRXUFHVRUDQLQWHUQHWFRQQHFWLRQ
without using LAN cables between them.
z This description is applied only to the models equipped with wireless LAN cards or
GHYLFHV<RXFDQVHWDZLUHOHVVQHWZRUNE\XVLQJSamsung Network Manager as
well. 99
$ZLUHOHVV/$1GHYLFHLVRSWLRQDOZKHQSXUFKDVLQJ&OLFNDV\PEROIURPStart
> Control Panel > Performance and Maintenance > System > Hardware Tab >
Device Manager > Network AdapterWRFKHFNWKHGHYLFHW\SH
Some of the pictures shown in this description may vary depending on the wireless
LAN device.
z Press the Fn + NH\DQGHQDEOHWKHZLUHOHVV/$1IHDWXUHVWRXVHZLUHOHVV/$1
Once the wireless LAN is enabled, the wirelss LED turns on.
Types of Wireless LAN Connections
The types of wireless LAN connections
areasfollows.Thefollowingdescribes
howtousethewirelessLANbasedon
AP connections.
zAP Connections
YoucanconnecttotheInternetora
FRPSXWHURQWKHQHWZRUNE\FRQQHFWLQJ
WR$3RQDQ$3HQDEOHGQHWZRUN
What is Access Point (AP)?
$3LVDQHWZRUNGHYLFHWKDWFRQQHFWV
wired LAN to wireless LAN and
corresponds to the wireless hub of a
ZLUHGQHWZRUN$OVR$3DOORZV\RX
to connect more than one computer
where wireless LAN is enabled.
z6PDOO2I¿FH1HWZRUN
7KHVPDOORI¿FHQHWZRUNLQWHUFRQQHFWV
computers where wireless LAN is
enabled wirelessly and is called Peer-
to-Peer(orAdHOC).Thismethod
HQDEOHVWKHFRQ¿JXUDWLRQRIDVPDOO
RI¿FHQHWZRUNLQRQHFRPSXWHU
Then, another computer is connected
to the computer wirelessly for
communications.
For more information on how to
establish connections, see the
information from Start > Help and
Support > Networking and Web.
WhenyouuseAd-Hoc,youhaveto
change the McAfee Firewall settings.
185
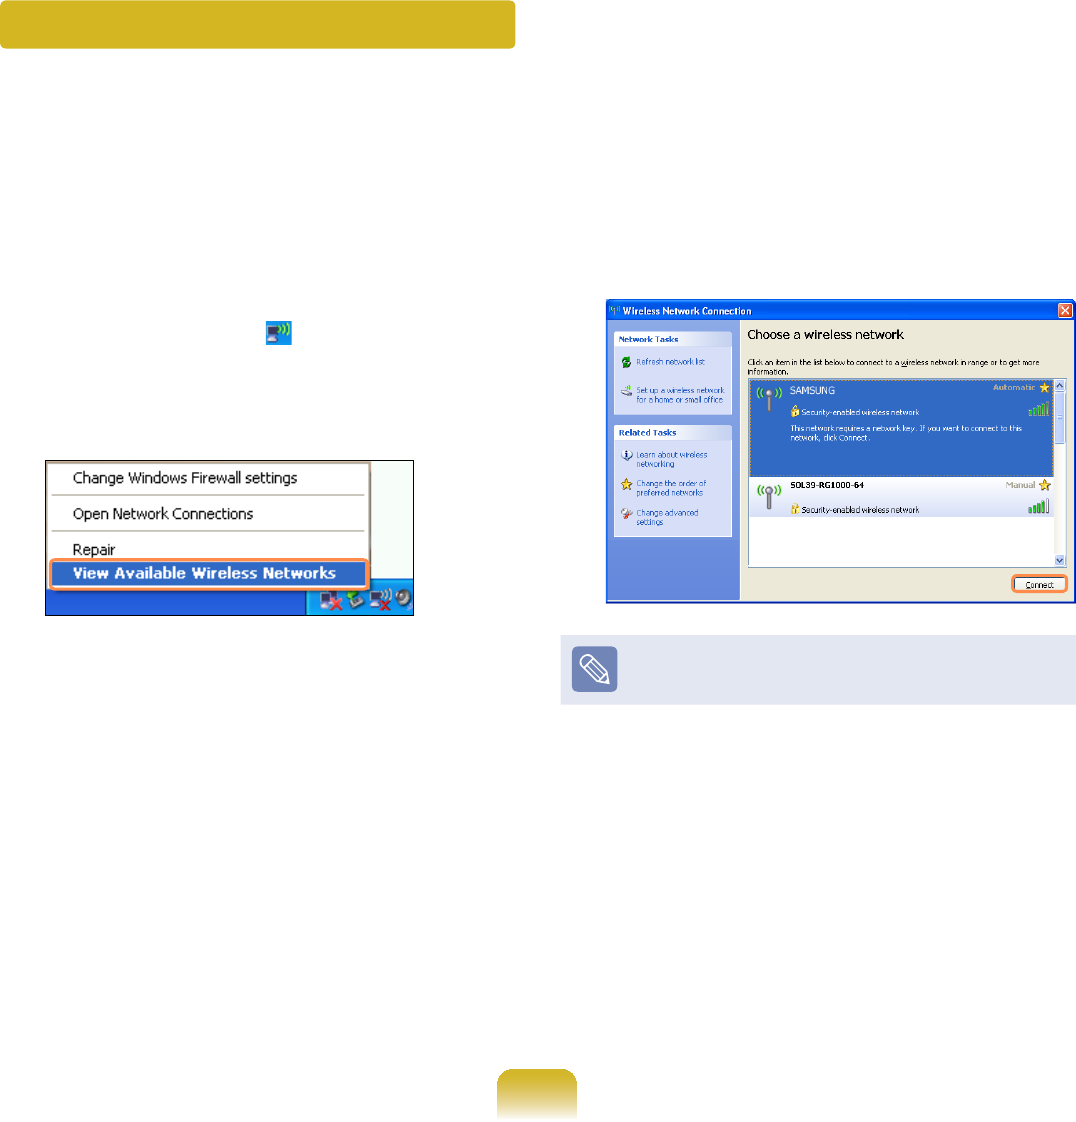
94
Connecting to Wireless LAN
If an AP exists near your location, you can easily connect to wireless LAN in the
method provided by Windows XP.
7KHIROORZLQJGHVFULSWLRQLVEDVHGRQ:LQGRZV;36HUYLFH3DFNWKXVWKHSLFWXUHV
may vary.
1 &OLFNWKHWireless Network
Connection icon IURPWKH7DVNEDU
using the right button of the touch
SDG7KHQFOLFNView Available
Wireless Networks.
2 Select an AP to be connected and
FOLFNConnect.
,IDQHWZRUNNH\LVVHWLQWKH$3WKH
QHWZRUNNH\LQSXWZLQGRZZLOODSSHDU
(QWHUWKHQHWZRUNNH\LQWKHLQSXW
ZLQGRZDQGFOLFNOK.
)RUDQHWZRUNNH\FRQWDFWWKH
QHWZRUNDGPLQLVWUDWRU
3 Once Connected to AP is displayed,
\RXFDQXVHDZLUHOHVVQHWZRUN

95
To check the network connections
PlacethemouseontheWireless
Network Connection icon from the
7DVNEDU7KHQWKHVWDWXVZLOODSSHDU
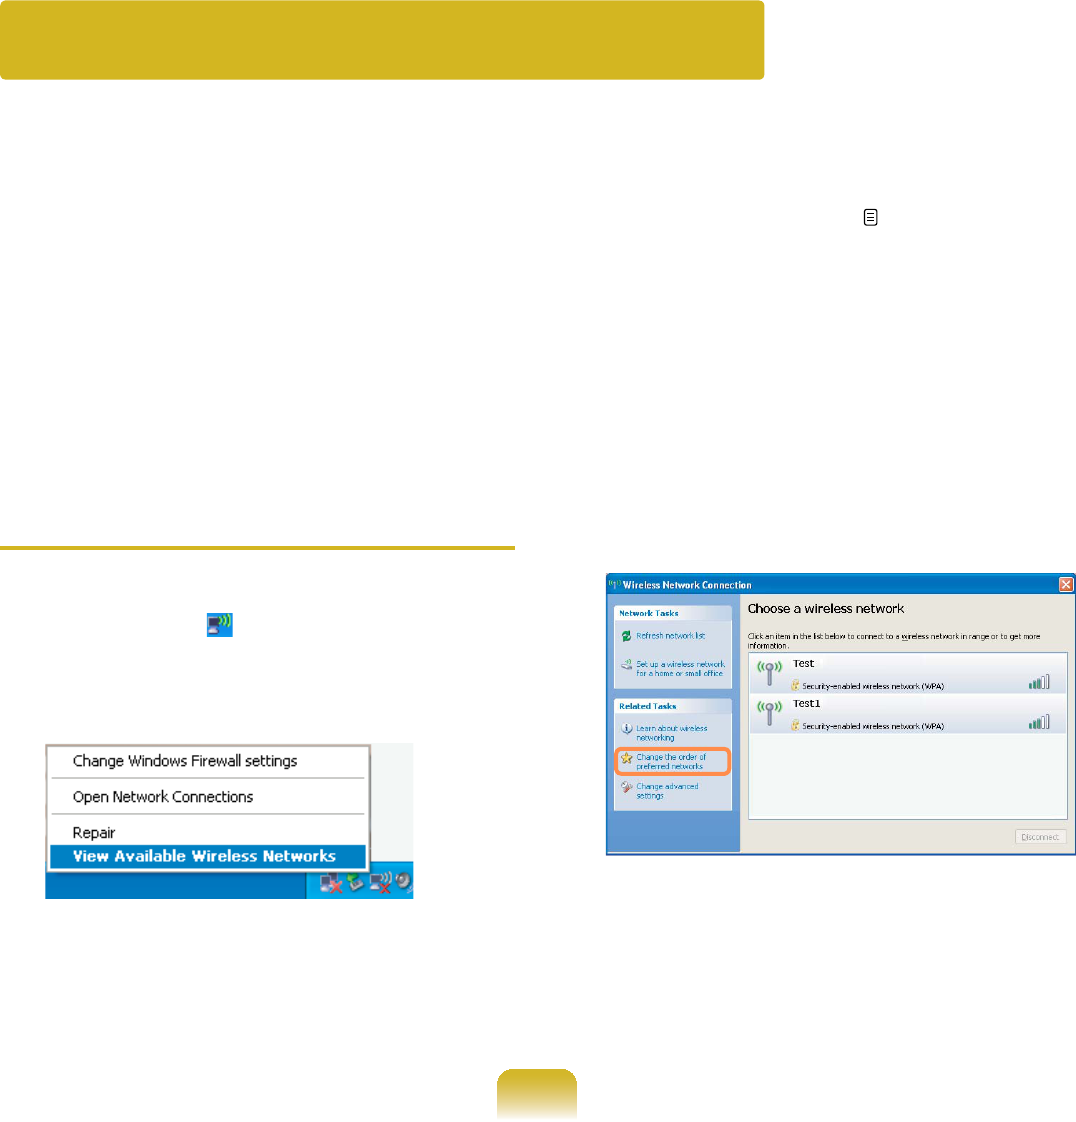
96
Connecting to computer-to-computer networks
(peer-to-peer or ad hoc)
,QFRPSXWHUWRFRPSXWHUZLUHOHVVQHWZRUNV\RXFDQZLUHOHVVO\FRQQHFWRUPRUH
computersthathavewirelessLANmodules.Usingthismethod,acomputerthatis
notconnectedtotheInternetcansharetheInternetbyaccessinganothercomputer
connectedtotheInternet.(Referto“SharingInternetAccess”onpage 103.)
Youcanconnectbycompletingthefollowingsteps:
z 6WHS6HWXSDFRPSXWHUWRFRPSXWHUQHWZRUNRQDFRPSXWHU
z 6WHS&RQQHFWWRWKHFRQ¿JXUHGFRPSXWHUIURPRWKHUFRPSXWHUV
Step 1. Setting up a computer-to-
computer network
1 5LJKWFOLFNRQWKHWireless Network
Connection LFRQRQWKHWDVNEDU
and select View Available Wireless
Networks.
2 &OLFN&KDQJHWKHRUGHURI3UHIHUUHG
1HWZRUNV
3 2QWKH:LUHOHVV1HWZRUNWDEFOLFN
Advanced.
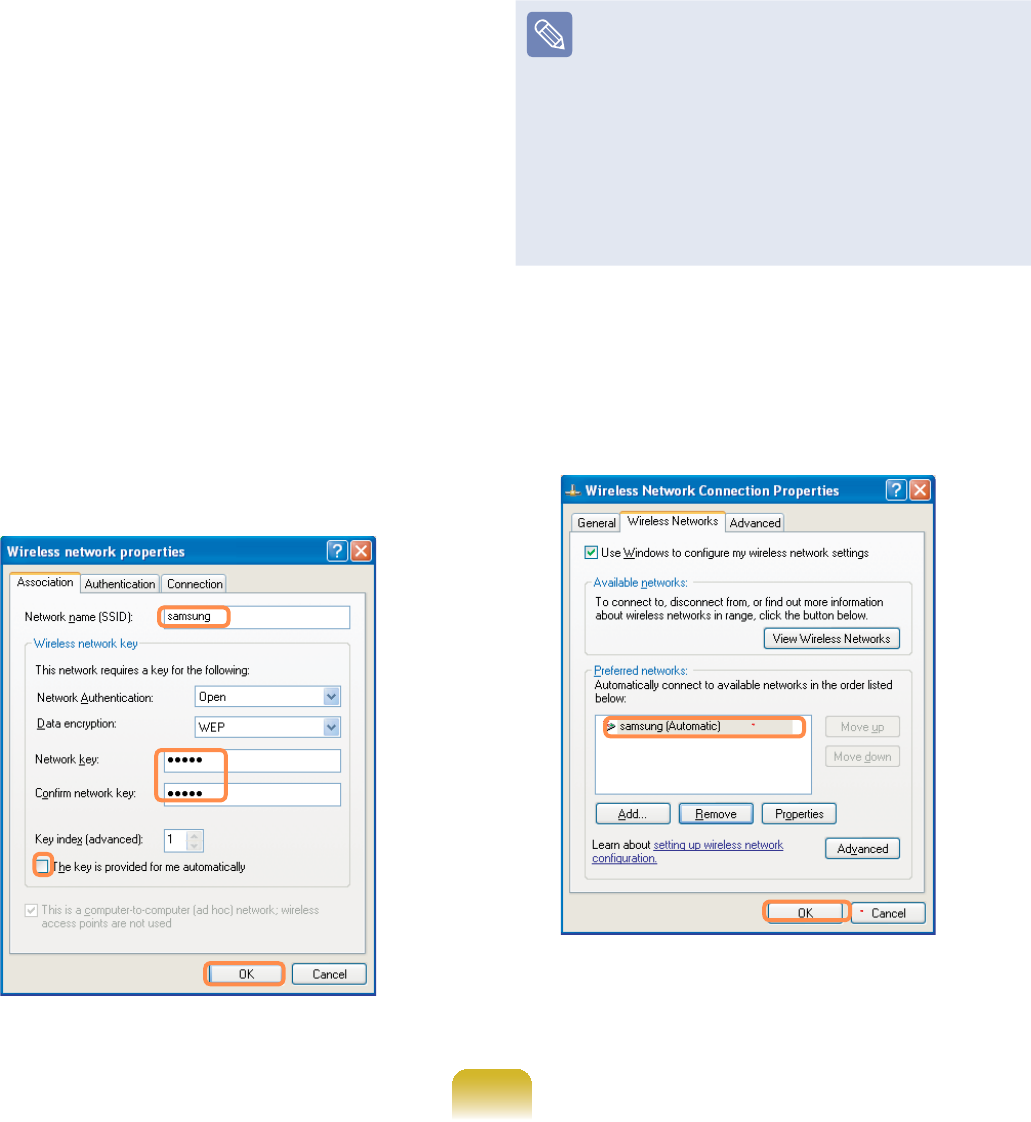
97
4 Clear ‘Automatically connect to
QRQGHIDXOWQHWZRUN¶FKHFNER[LI
it is selected.Select ‘Computer-to-
FRPSXWHUDGKRFQHWZRUNVRQO\¶DQG
FOLFN&ORVH
5 ,QWKH:LUHOHVV1HWZRUNVWDEFOLFN
Add.
6 (QWHUWKHQHWZRUNQDPHHJ
VDPVXQJDQGXQVHOHFWµ7KHNH\LV
provided for meautomatically’. Enter
WKHHQFU\SWLRQNH\LQWKH1HWZRUNNH\
¿HOGDQGFOLFN2.
7RSUHYHQWDQHWZRUNFRQQHFWLRQ
from an unauthorized user, it would
EHEHWWHUWRFRQ¿JXUHDQHWZRUN
NH\HQFU\SWLRQNH\$QHWZRUNNH\
consistsof 5 ~13alphanumeric
characters(e.g.magic),orof10~ 26
hexadecimal numbers (ahexadecimal
number is represented by numbers
‘0’to‘9’orletters‘a’to‘f’).
7 &KHFNWKDWWKHFRQ¿JXUHGQHWZRUN
name(e.g.samsung)isinthe
¶3UHIHUUHGQHWZRUNV¶LWHPDQGFOLFN
OK.
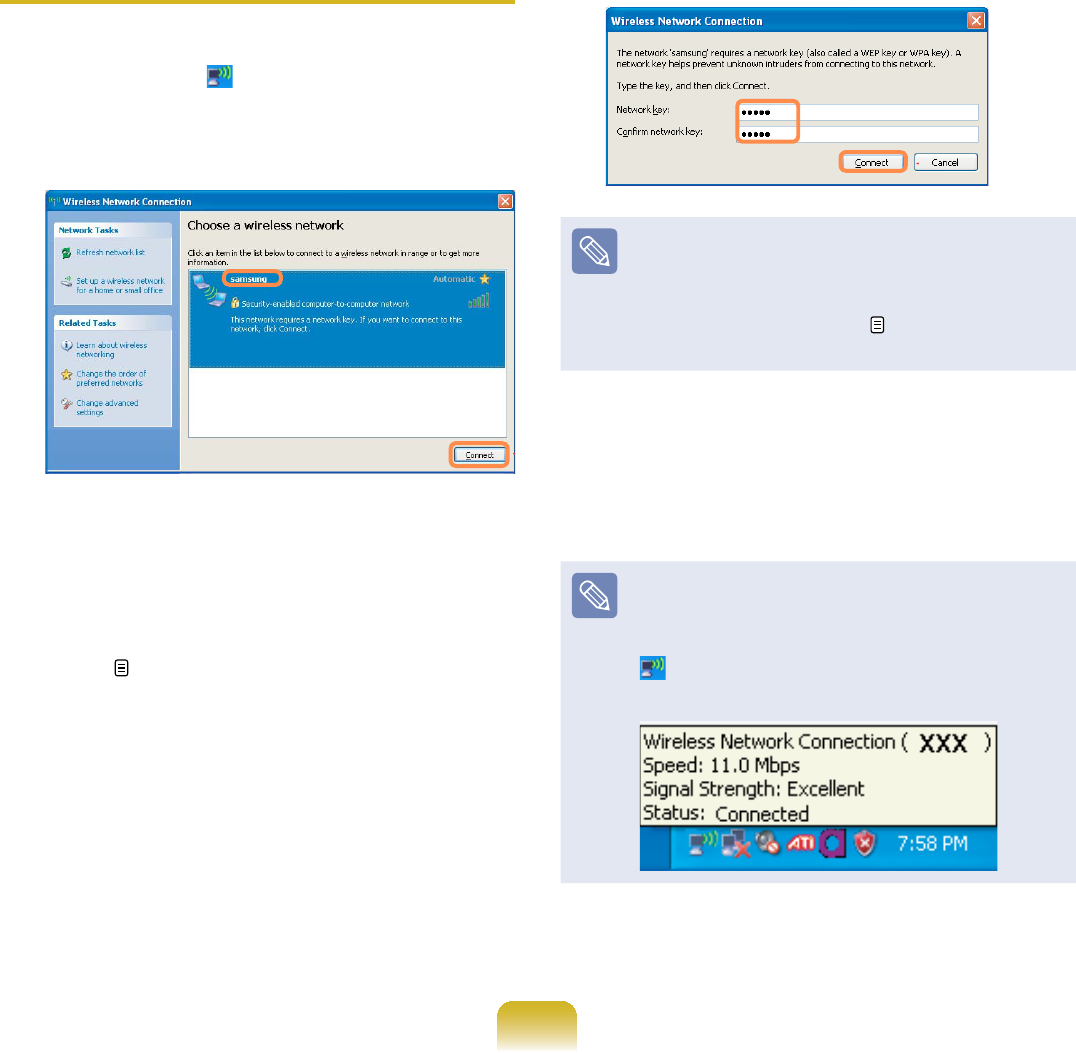
98
Step 2. Connecting to the
FRQ¿JXUHGFRPSXWHU
1 5LJKWFOLFNRQWKHWireless Network
Connection LFRQRQWKHWDVNEDU
and select View Available Wireless
Networks.
2 6HOHFWWKHZLUHOHVVQHWZRUN
QDPHHJVDPVXQJVSHFL¿HGLQ
”Connecting to computer-to-computer
QHWZRUNVSHHUWRSHHURUDGKRF´RQ
page 80DQGFOLFNConnect.
3 (QWHUDFU\SWRJUDSKLFNH\LQWKH
QHWZRUNNH\ER[DQGFOLFN&RQQHFW
,IWKHQHWZRUNNH\LVQRWFRQ¿JXUHG
in ”Connecting to computer-to-
FRPSXWHUQHWZRUNVSHHUWRSHHU
or ad hoc)” on page 96MXVWFOLFN
ConnectZLWKRXWDQ\NH\VWURNHV
When connected to the wireless
QHWZRUNWKHV\VWHPGLVSOD\V
ConnectedLQWKHVHOHFWHGQHWZRUNRI
WKH1HWZRUN&RQQHFWLRQZLQGRZ
Checking the connection status
Move the mouse pointer over the
:LUHOHVV1HWZRUN&RQQHFWLRQ
LFRQRQWKHWDVNEDUDQGWKH
connection status is displayed.

99
Using Samsung Network Manager (Optional)
6DPVXQJ1HWZRUN0DQDJHUJXLGHV\RXWRFRQ¿JXULQJWKHQHWZRUNUHODWHGVHWWLQJV
6DPVXQJ1HWZRUN0DQDJHUSHUIRUPVWKHIHDWXUHVDVVKRZQEHORZ
z(DV\FRQ¿JXUDWLRQIRU\RXUQHWZRUNDQGSULQWHU 99~102
zEnabling the movement-free feature. 103
,I\RXXVHDFRPSXWHULQGLIIHUHQWSODFHVVXFKDV\RXURI¿FHDQGKRPH&RQ¿JXUH
QHWZRUNVHWWLQJVLQHDFKSODFH
Then, you can select a location and use the computer without giving extra effort for
QHWZRUNVHWWLQJVHDFKWLPH
z(DV\,QWHUQHWFRQ¿JXUDWLRQ 103
EnablesthefeaturethatallowstwocomputerstoshareanInternetusingoneInternet
line.
Setsonecomputerasthesharingserverandtheothercomputerastheclienttouse
theInternetinbothcomputers.
zEasy check-up for the network connection status. 108
Perform Network Settings
<RXFDQVHWXSDZLUHGQHWZRUNRUZLUHOHVVQHWZRUN:KHQGLIIHUHQWQHWZRUNVDUH
XVHGLQGLIIHUHQWSODFHV\RXPXVWVHWXSWKHQHWZRUNHQYLURQPHQWIRUHDFKSODFH7KH
SURJUHVVRIFRQ¿JXUDWLRQLVGLVSOD\HGZKLOHWKHQHWZRUNLVEHLQJVHWXS
1 IfyouuseawiredLAN,connectthe
LANcabletothewiredLANport.
Press the Fn + NH\DQGHQDEOH
the wireless LAN features to use
wireless LAN. Once the wireless LAN
is enabled, the wireless LAN LED
turns on.
2 &OLFNStart > All Programs >
Samsung > Samsung Network
Manager > Samsung Network
Manager.
3 &OLFNAdd.
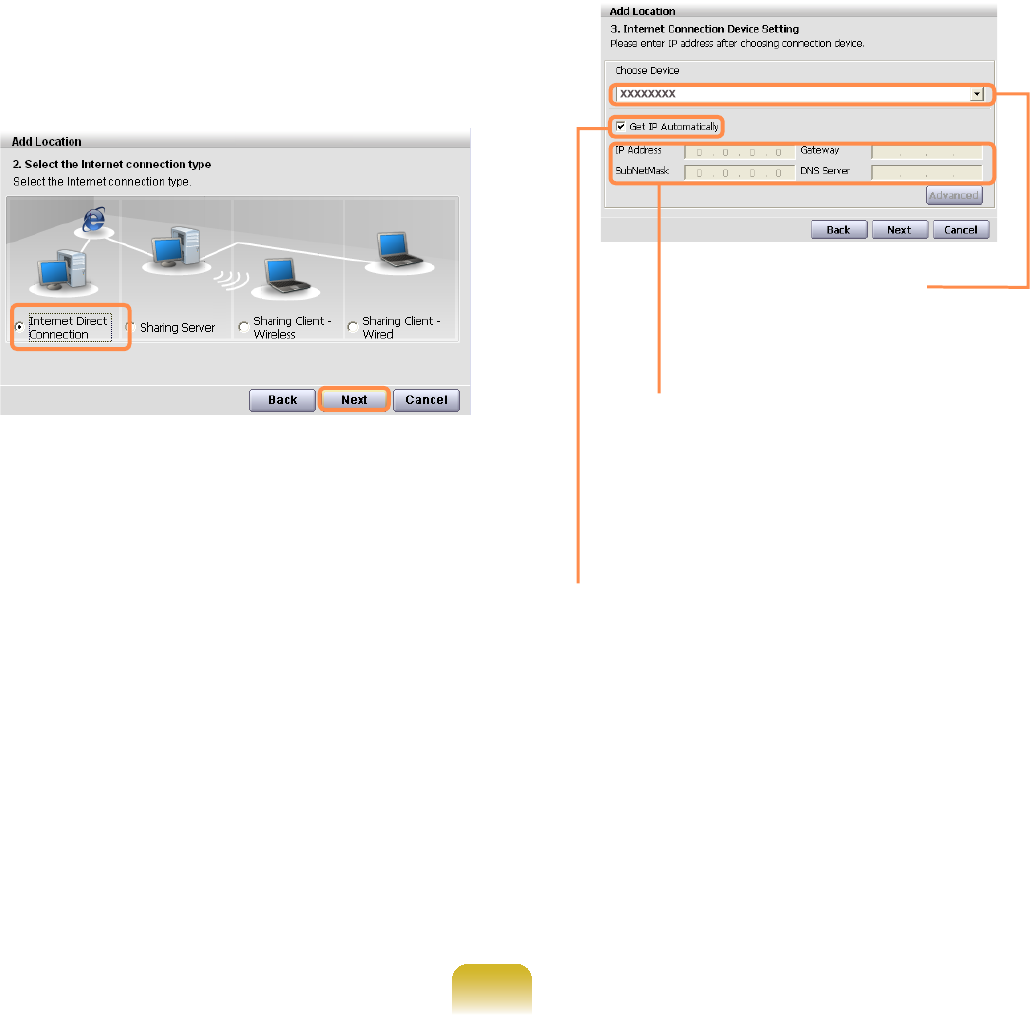
100
4 6HOHFWDQLFRQWRFKRRVHWKHQHWZRUN
locationandenterthelocationname
IRUH[DPSOH³+RPH´DQGFOLFNNext.
5 Select Internet Direct Connection
DQGFOLFNNext.
6 6HOHFWDGHYLFHDQGFRQ¿JXUH,3
VHWWLQJV7KHQFOLFNNext.
Choose Device
Select between wired
LAN and wireless LAN.
IP Settings
&RQWDFWWKHQHWZRUN
administrator and enter the IP
information if the IP is not an
automatic IP.
Get IP Automatically
Select this option and perform
automaticIPsettingsifyouuseDHCP.

101
7 When the Printer Setting window
DSSHDUVFOLFNFinish.Toadda
SULQWHUFOLFNAdd Printer. The Add
PrinterWizardappears.Setup
theprinter according to the instructions
displayed on the screen. When the
SULQWHUKDVEHHQDGGHGFOLFNWKH
Show printer button, select the
QHZO\DGGHGSULQWHUDQGWKHQFOLFNWKH
Finish button.
Tonotaddaprinter,selectNo
Default PrinterDQGWKHQFOLFNWKH
Finish button:KHQWKHQHWZRUN
settingiscomplete,the’Do you
want to move to newly added
location now?’ messageappears.If
you select ’Yes’WKHQHWZRUNVHWWLQJV
fortheaddedlocationareapplied.
:KHQWKHQHWZRUNVHWWLQJVIRUWKH
addedlocationareapplied,the
added place and the corresponding
QHWZRUNFRQQHFWLRQLQIRUPDWLRQ
is displayed in The detailed
Information for window.
:KHQWKHQHWZRUNVHWWLQJLVFRPSOHWH
an icon for the added location is created
within
the Saved Locations window. Now
youcanusetheInternetoraddanew
QHWZRUNORFDWLRQ
Menu
Current Place
Information
Saved Locations
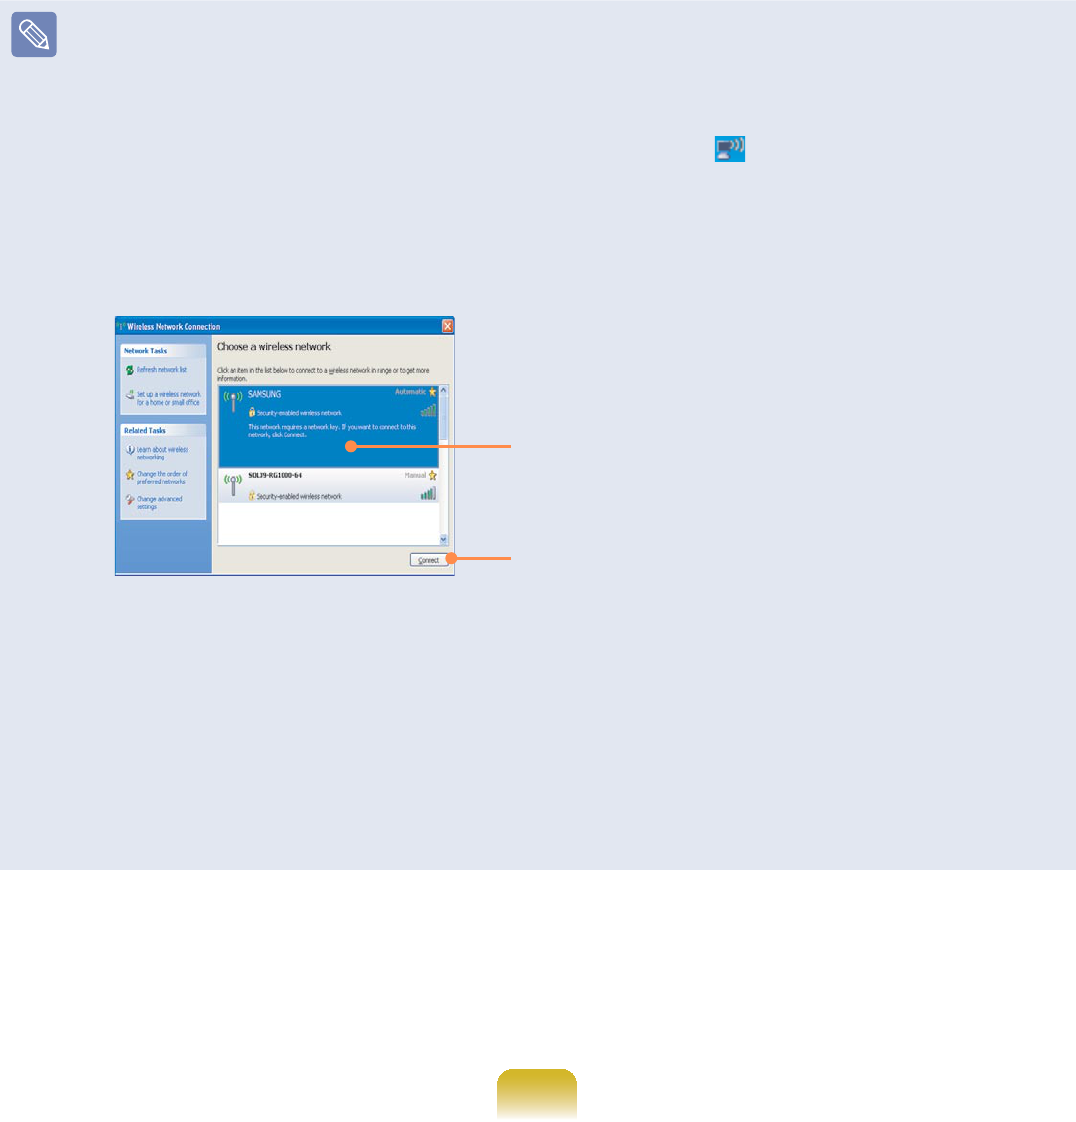
102
Wireless LAN AP Connection Procedures7RXVHDZLUHOHVV/$1¿UVWFRQQHFWWR
DZLUHOHVV/$1$3DQGWKHQ\RXFDQDFFHVVWKHQHWZRUNHYHQZKHQPRYLQJORFDWLRQ
PRYLQJORFDWLRQDQGWKHQ\RXFDQDFFHVVWKHQHWZRUNHYHQZKHQFRQQHFWLQJWRD
wireless LAN AP
n5LJKWFOLFNRYHUWKHWireless Network Connection LFRQRQWKH7DVNEDUDQG
FOLFNView Available Wireless Networks.
l&OLFNSearch AP from the Wireless menu to search for wireless LAN APs. Select
DQDYDLODEOHZLUHOHVVQHWZRUNHJ6$0681*DQGFOLFNWKHConnect button. For
LQIRUPDWLRQRQDYDLODEOHZLUHOHVV/$1$3VDVN\RXUQHWZRUNDGPLQLVWUDWRU
Available AP
Connect
W7KHQHWZRUNNH\VHFXULW\NH\LQSXWZLQGRZDSSHDUV
,IDQHWZRUNNH\KDVEHHQVHWIRUWKHZLUHOHVV/$1$3HQWHUWKHQHWZRUNNH\
DQGFOLFNWKH&RQQHFWEXWWRQ)RUWKHQHWZRUNNH\LQIRUPDWLRQDVN\RXUQHWZRUN
administrator.
,IQRQHWZRUNNH\KDVEHHQVHWIRUWKHZLUHOHVV/$1$3FOLFNWKH&RQQHFWEXWWRQ
ZLWKRXWHQWHULQJWKHQHWZRUNNH\
jWhenthecomputerisconnectedtothewirelessLANAP,theConnectedmessage
ZLOODSSHDURQWKH:LUHOHVV1HWZRUNLFRQLQWKH7DVNEDU

103
Using the network after moving
location
%\VHWWLQJWKHQHWZRUNVHWWLQJV,3
address, printer setting, etc.) for each
location, you can immediately access the
QHWZRUNZLWKRXWSHUIRUPLQJWKHQHWZRUN
settingproceduresregardlessofyour
location.
1 5XQ6DPVXQJ1HWZRUN0DQDJHU
when connected to the Internet.
2 Select an icon that represents the
correspondinglocationfromthe
SavedLocationswindowandthen
FOLFN0RYH
3 :KHQWKHQHWZRUNVHWWLQJVRIWKH
selected location are applied, the new
ORFDWLRQDQGWKHQHWZRUNFRQQHFWLRQ
informationaredisplayedinThe
detailed Information for window.
Sharing Internet Access
Setonecomputerasthesharingserver
andanothercomputerastheclientfor
twocomputerstoshareanInternetusing
RQH,QWHUQHWOLQH2QFHWKHFRQ¿JXUDWLRQ
is complete, you can use the Internet
immediately.
If you perform Internet sharing
setup by using Samsung Network
Manager, the program must be
installedintobothcomputers.
There are three methods for setting each
computerasasharingserverandaclient
asshowninthetable.Thisdocument
describes how to do so by giving an
exampletothetypicalconnectionmethod
1(Wire+Wireless).
Sharing Server (Hereinafter
referred to as server)
Computerthatisequippedwithtwo
LANSandisdirectlyconnectedtoan
Internet.
Sharing Client (Hereinafter
referred to as client)
Computerthatisnotdirectly
connectedtotheInternetandis
able to use the Internet through the
sharing server.

104
How to Connect the Client to the Server
Connection
Type
Network Device of the
Server Network
Device of
the Client
Check the connections
before connecting to the
Internet.
Connection
Device to
the Internet
Connects
to the
client.
Method1 Wired LAN Wireless
LAN
Wireless
LAN
It is wireless-to-wireless
connection. First turn on the
wireless LAN.
Method2 Wireless
LAN Wired LAN Wired LAN It is wire-to-wire connection.
FirstusetheLANcableto
connecttwodevicesbefore
setting the computer.
InMethod 3,youhaveto
install the wired LAN card for
connection.
Method3 Wired LAN Wired LAN Wired LAN
How to Set up Sharing Server
&KHFNLIWKH/$1FDEOHLVSURSHUO\
connectedbeforesettingupthesharing
server.
1 Run Samsung Network Manager on
thecomputerthatwillbeusedasthe
sharing server.
2 &OLFNAdd.
3 Select the icon that shows the
QHWZRUNORFDWLRQDQGHQWHUWKH
locationname(forexample,Home-
6KDULQJ6HUYHUDQGFOLFNNext.
4 6HOHFWWKHVKDULQJVHUYHUDQGFOLFN
Next.
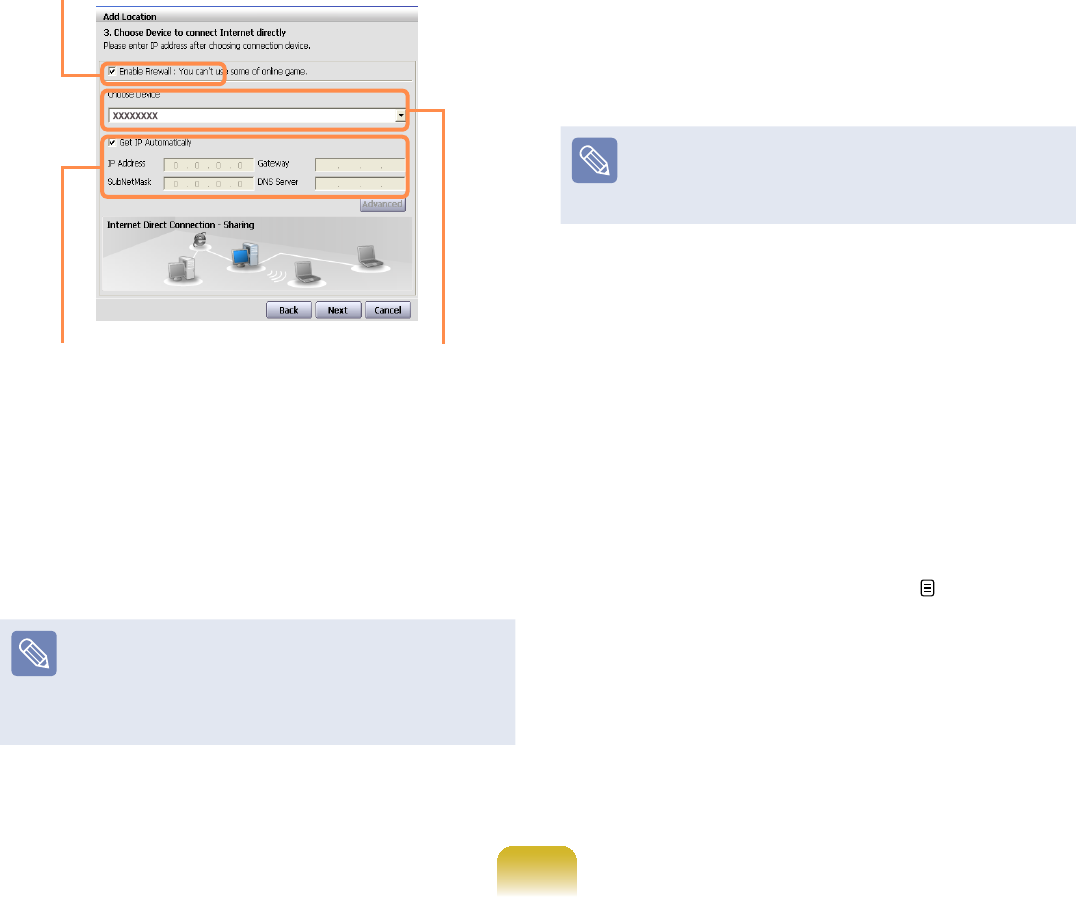
105
5 6HWXSWKHQHWZRUNGHYLFHWREH
connected to the external Internet as
VKRZQLQWKH¿JXUHEHORZDQGFOLFN
Next.
Determining whether
WRXVHD¿UHZDOO
Select a network device
(for example, wired LAN)
IP address
setting
6 Setupthedevicetobeconnectedto
WKHFOLHQWDVVKRZQLQWKH¿JXUHEHORZ
DQGFOLFNNext.
Because the wireless connection
QDPHDQGQHWZRUNNH\HQWHUHGLQWKH
sharingservermustbeenteredin
theclientaswell,rememberthem.
7 &KHFNWKHVHWWLQJVDQGFOLFNNext.
8 &OLFNAdd Printer and set up a
printer following the instructions in the
wizard.
Onceprinteradditioniscomplete,
FOLFNRefresh. Select the added
SULQWHUDQGFOLFNComplete.
Ifyoudon’twanttoaddaprinter,just
FOLFNComplete without following the
instructions in the wizard.
9 If the “Do you want to move to
newly added location now?”
ZLQGRZDSSHDUVFOLFNNo.
The added location icon is created
and sharing server setup is complete.
Setupthesharingclientnext.
When you use Internet Connection
Sharing,youhavetochangethe
McAfee Firewall settings. 185

106
How to Set up the Sharing Client
This description is discussed based on
the wireless connection to the sharing
server.Thesharingserverhastobe
turned on and the wireless LANs in both
computers have to be active.
1 Run Samsung Network Manager on
acomputerthatwillfunctionasthe
sharing client.
2 &OLFNAdd.
3 Select the icon that shows the
QHWZRUNORFDWLRQDQGHQWHUWKH
ORFDWLRQQDPH&OLFNNext.
4 Select Sharing Client (Wireless) and
FOLFNNext.
5 Enter the values in the Wireless
Connection Name and Network Key
¿HOGVLQWKH6HOHFW'HYLFHZLQGRZ
DQGFOLFNNext.
6 &KHFNWKHVHWWLQJVDQGFOLFNNext.
7 &OLFNAdd Printer and set up a
printer following the instructions in the
wizard.Oncetheprinteradditionis
FRPSOHWHFOLFNRefresh.
6HOHFWDSULQWHUDQGFOLFNFinish.
Ifyoudon’twanttoaddaprinter,just
FOLFNComplete without following the
instructions in the wizard.
8 If the “Do you want to move to
the added location now?”window
DSSHDUVFOLFNNo.
If the icon for the added location
appear, it means that the client
FRQ¿JXUDWLRQLVFRPSOHWH
,I\RXFOLFNYes, the computer
connects to the sharing server and
you can immediately use the Internet.

107
To connect to the Internet from the
Sharing Client
1 &KHFNLIWKHVKDULQJVHUYHUWXUQVRQ
becausethisismandatory.Ifyou
connecttothesharingserverthrough
a wireless LAN, the wireless LAN of
theservermustbeturnedon.
2 Run Samsung Network Manager on
the sharing client computer.
3 &OLFNWKHLFRQIRUWKHORFDWLRQWKDWKDV
beensetasthesharingclientinthe
6KDUHG/RFDWLRQZLQGRZDQGFOLFN*R
Onceamessageappearstoinform
youthatmovingiscomplete,you
canusetheInternet.IftheInternet
LVGLVFRQQHFWHGGXULQJXVHFOLFN
Wireless menus > Reconnect
Sharing in Samsung Network
Manager7KHQWKHQHWZRUNZLOOEH
connected again.
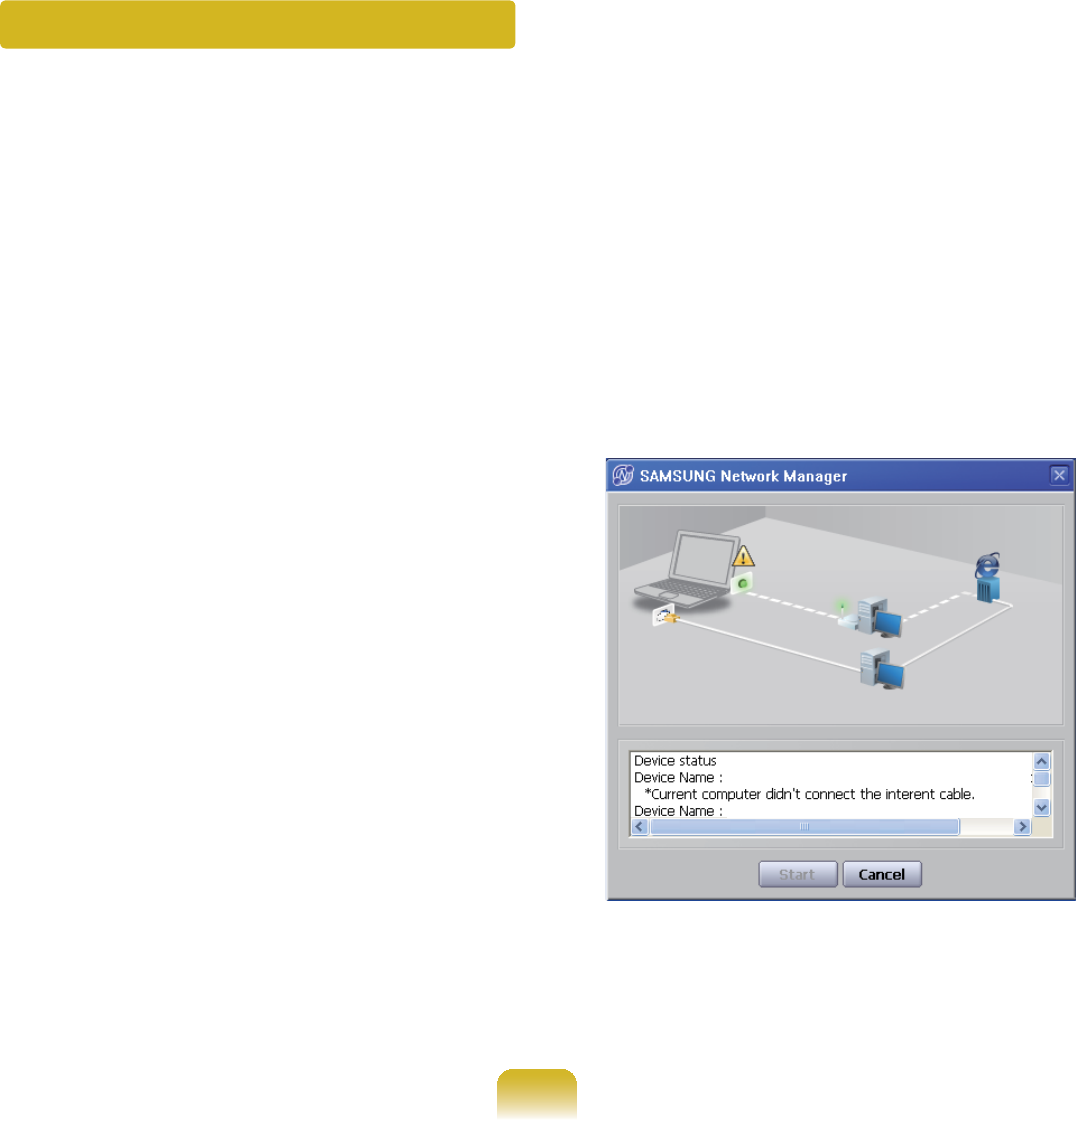
108
Checking Network Status
,IWKHQHWZRUNFRQQHFWLRQLVQRWDYDLODEOH\RXFDQHDVLO\¿QGWKHFDXVHVE\FKHFNLQJ
WKHQHWZRUNVWDWXV
1 Run Samsung Network Manager.
2 &OLFNDiagnose Status on the
Mngmnt menu.
3 7KH1HWZRUN&RQQHFWLRQ3LFWXUH
window appears.
,I\RXFOLFNStartFKHFNLQJWKH
QHWZRUNZLOOVWDUW
4 When the diagnosis is complete, out
RIRUGHUGHYLFHVDUHPDUNHGE\WKH
H[FODPDWLRQPDUNLFRQ)RUGHWDLOHG
device status, read the description in
the lower part of the window.
Reconnect and set up the device
according to the diagnosis result.
XXXXXXXX
XXXXXXXX
109
Bluetooth (Optional)
Bluetoothisawirelesscommunicationtechnologythatallowsaccesstodevices
QHDUE\VXFKDVDFRPSXWHUPRELOHSKRQHSULQWHUNH\ERDUGRUPRXVHZLWKRXWDFDEOH
connection.
%OXHWRRWKHQDEOHV¿OHWUDQVPLVVLRQV,QWHUQHWDFFHVVDSULYDWHDUHDQHWZRUNIXQFWLRQ
DQGDFFHVVWRDNH\ERDUGPRXVHDQGSULQWHUEHWZHHQGHYLFHVVXSSRUWLQJWKH%OXHWRRWK
function without a cable connection.
z TheBluetoothfunctionisonlyavailablebetweendevicessupportingBluetooth
(computers,mobilephones,PDAs,printers,etc.),andthefunctionmayberestricted
GHSHQGLQJRQWKHGHYLFHSUR¿OH
z TheBluetoothfunctionisoptionalandmaynotbesupporteddependingonyour
model.
z&RPSDWLELOLW\ZLWKD%OXHWRRWKGHYLFHQRWFHUWL¿HGE\D%OXHWRRWKFHUWL¿FDWLRQRUORJR
is not guaranteed.
Bluetooth Functions
File Transmission
<RXFDQH[FKDQJH¿OHVEHWZHHQ%OXHWRRWKGHYLFHV
<RXFDQH[FKDQJH¿OHVZLWKRWKHUFRPSXWHUVPRELOH
phones, PDAs, etc.
Network Access
Youcanconnecttoanothercomputerwiththe
BluetoothfunctionasyouaccessawirelessLANin
Ad-Hoc mode or connect to the Internet through an
AP or Internet Connecting Sharing Server.
Network Access through
a Phone Connection
YoucanconnecttotheInternetthroughaBluetooth
mobile phone.
Data Sync
(Synchronization)
<RXFDQV\QFKURQL]HWKH3,06GDWD2XWORRN(PDLO
DGGUHVVGDWDZLWKPRELOHSKRQHV3'$VQRWHERRN
computers,etc.supportingBluetooth.
110
Electronic Business
Card (Vcard)
You can exchange electronic business cards with
PRELOHSKRQHV3'$VQRWHERRNFRPSXWHUVHWF
supporting Bluetooth.
Sound Output
You can listen to audio from the computer through
another Bluetooth device or listen to audio of another
Bluetooth device through the computer.
HID Connections
<RXFDQFRQQHFWDNH\ERDUGPRXVHMR\VWLFNHWF
supporting Bluetooth.
FormoreinformationaboutusingtheBluetooth
function, see the online help of the Bluetooth Device.
FormoreinformationaboutusingtheBluetoothfunction,refertotheonlinehelpofthe
Bluetooth Device.
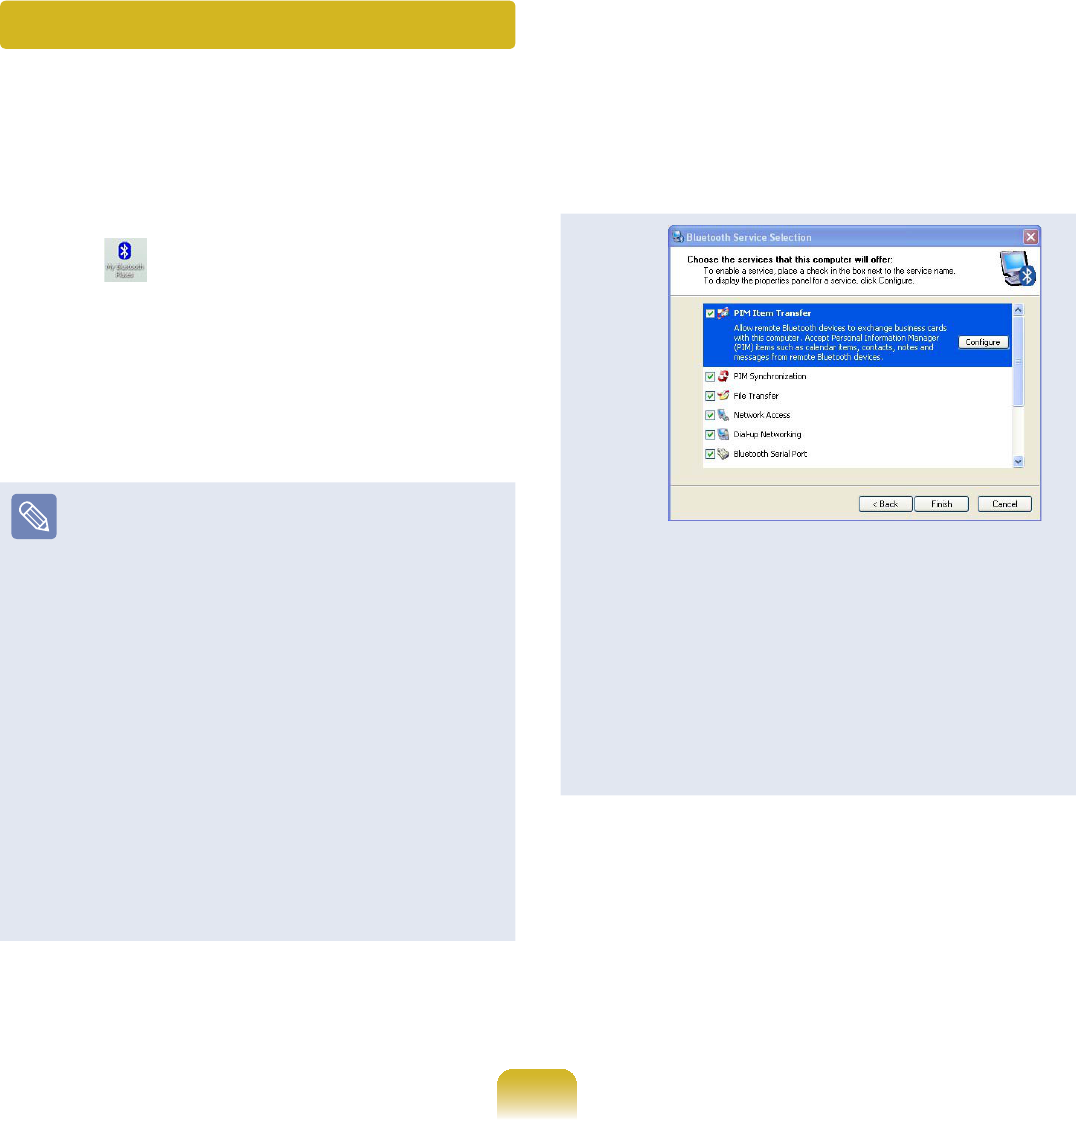
111
Bluetooth Software Setup
BluetoothsoftwareisinstalledoncomputerssupportingBluetooth.
)RU¿UVWWLPHXVHVHWXSWKH%OXHWRRWKVRIWZDUHDVIROORZV
1 'RXEOHFOLFNMy Bluetooth Places
icon RQWKHGHVNWRS
2 &OLFNWKHNext buttontostartsetting
up.
z In the setting up steps, enter a
device name to be displayed in t
he Bluetooth Manager program.
EnteranameintheComputer
Name¿HOGDQGVHOHFWLaptop for
the Computer Type¿HOG
z Also, a step appears for selecting
theservicestobeprovided
by your Bluetooth device for
other Bluetooth devices. At this
point, the program automatically
detects available services and
displays them as selected. It is
recommended not to change the
default selection.
If you change the service settings,
the driver necessary for the
additionally selected services are
installed.
At this point, a warning message
may appear informing you that
there is no Microsoft logo. Since
it does not affect the operation,
continue the installation.
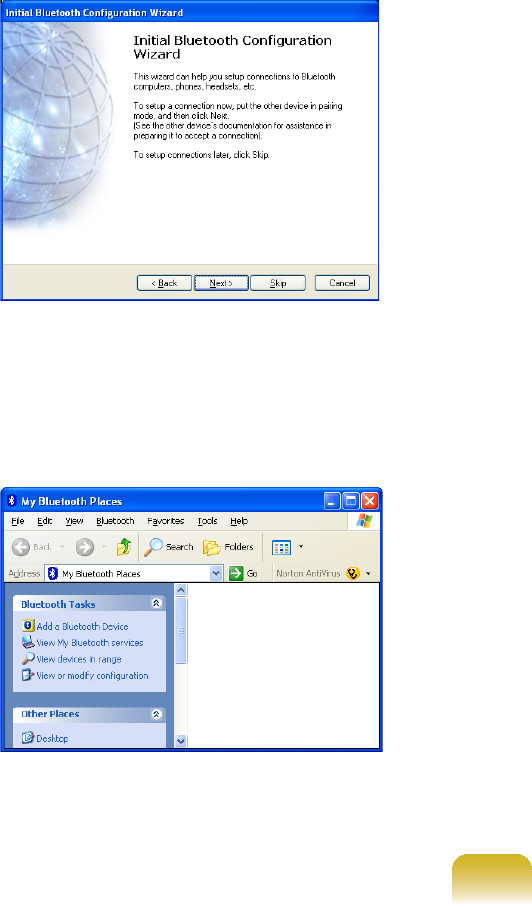
112
3 Ifthedriverinstallationiscomplete,
thenextstepproceedswhich
searches for nearby Bluetooth
devices.Sinceyoudonothaveto
VHDUFKZKLOHVHWWLQJXSFOLFNSkip
DQG¿QLVKWKHVHWWLQJV
4 If the settings are complete, the
My Bluetooth Environment window
appears.
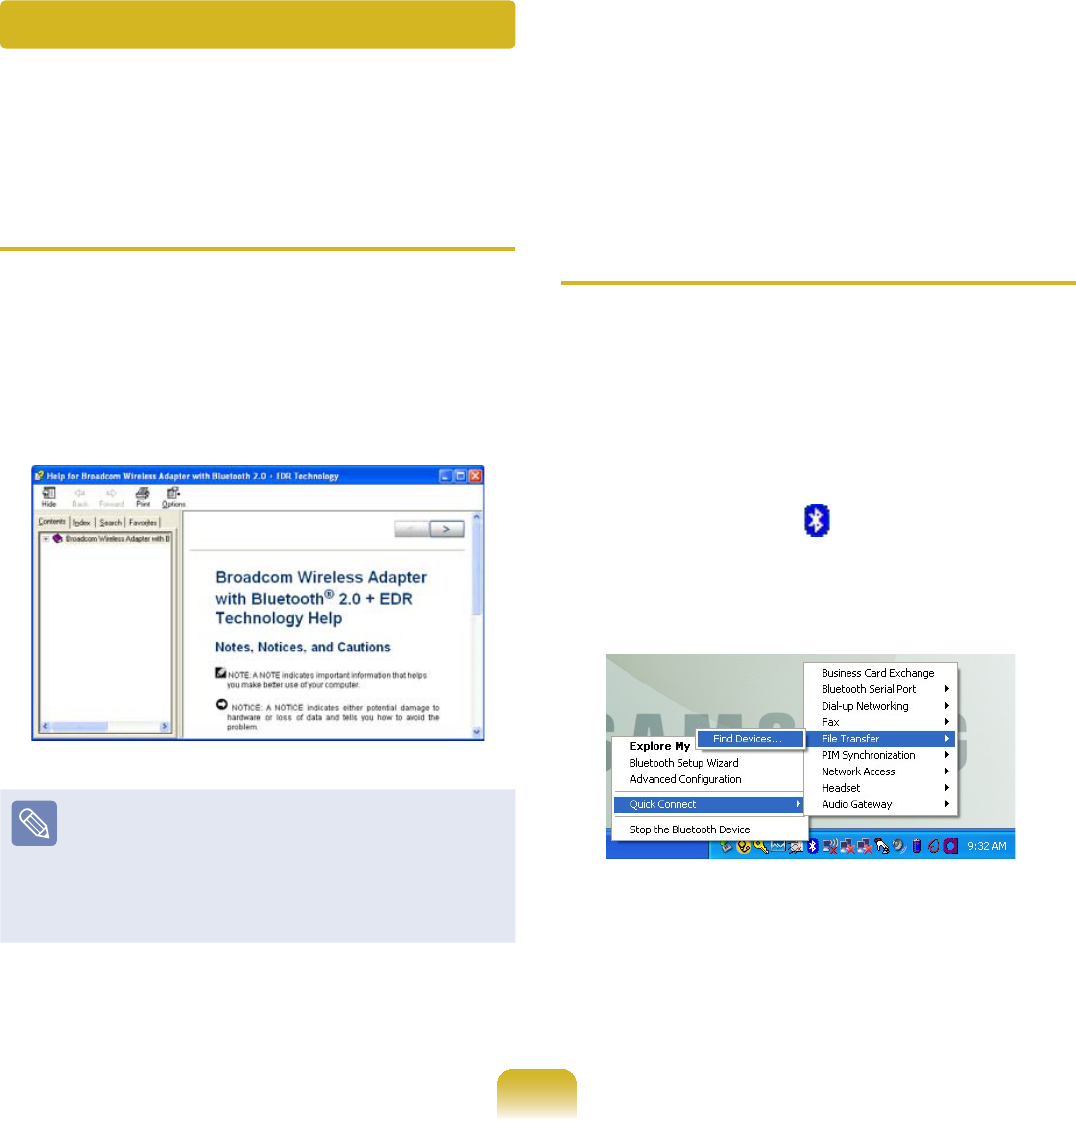
113
Bluetooth Help
BluetoothHelpprovidesdetailed
procedures on using Bluetooth functions.
'RXEOHFOLFNMy Bluetooth Settings
on the Desktop and press the <F1>NH\
(Help).
Select Start > Help and Support
> Networking and the Web >
Networking > Wireless networking
> Bluetooth devices (wireless) to
view Windows Help.
Exchanging Files between
Bluetooth computers
7KHSURFHGXUHVWRH[FKDQJH¿OHVDQG
folders between Bluetooth computers are
described below.
1 2QWKHFRPSXWHUWKDWLVVHQGLQJD¿OH
KHUHDIWHU&RPSXWHU$ULJKWFOLFNWKH
Bluetooth icon LQWKHQRWL¿FDWLRQ
area and select Quick Connection
> File Transmission > Search for
Device.
Using Bluetooth
'HVFULEHVKRZWRH[FKDQJH¿OHVEHWZHHQFRPSXWHUVVXSSRUWLQJ%OXHWRRWKDQGKRZWR
useotherBluetoothdevices.
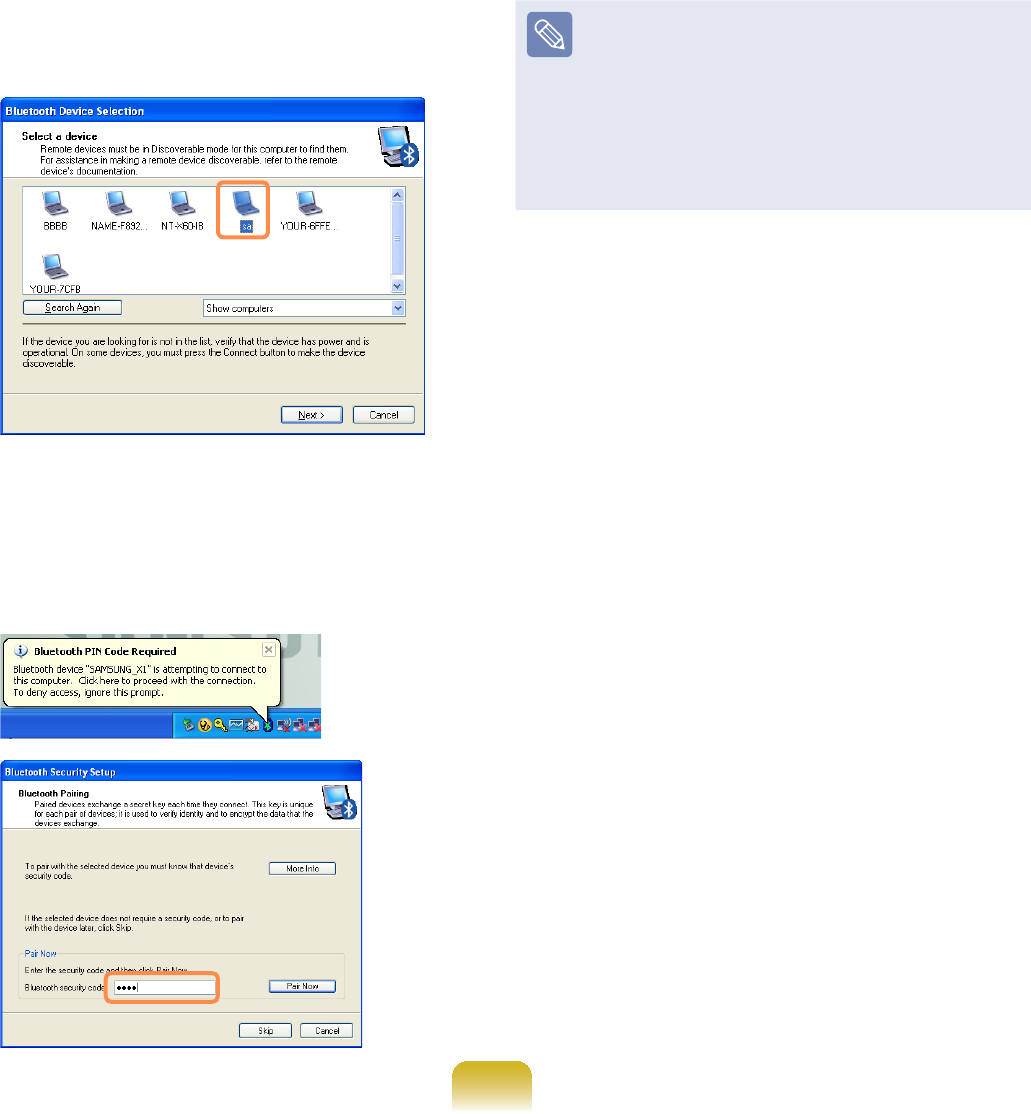
114
2 In the Select DeviceZLQGRZFOLFND
computertobeconnected(hereafter
Computer B).
3 When the Bluetooth Security Setting
window appears, enter the Bluetooth
security code (or Bluetooth PIN) and
FOLFNStart Pairing.
The Bluetooth PIN Code is a
password used for the connection
betweentwoBluetoothdevices,the
user just enter the same PIN Code
(for example, same numbers) on
ERWK%OXHWRRWKGHYLFHVWRPDNHD
connection.
4 Afterashortwhile,theBluetoothPIN
Code required dialog box appears on
Computer B,enterthecodethatyou
have input in Step 3 above.
5 If the FTP File Access Privilege
Request window appears on
Computer BFOLFNWKHZLQGRZ,IWKH
Select Access Permission window
DSSHDUVFOLFNOK.
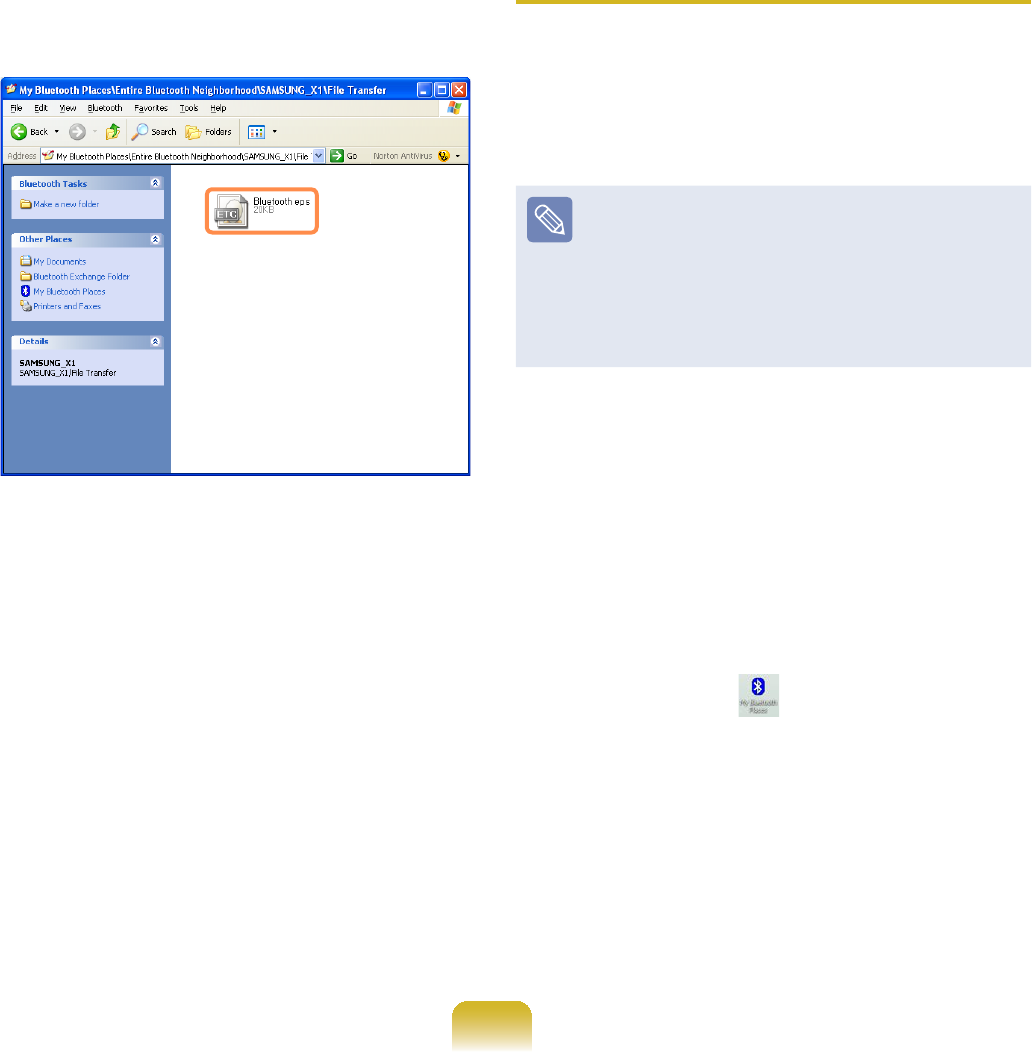
115
6 7KH¿OHWUDQVPLVVLRQZLQGRZDSSHDUV
RQFRPSXWHU$'UDJ¿OHVRUIROGHUVWR
VHQGRQWRWKHZLQGRZDQGWKH¿OHVRU
folders are automatically transmitted.
7 ,IWKH¿OHWUDQVPLVVLRQLVFRPSOHWH
close the File Transmission window.
7KHUHFHLYHG¿OHVDUHVDYHGLQWKH
C:\Documents and Settings\[user
name]\My Documents\Bluetooth
Exchange folder.
Connecting Keyboard, Mouse,
Joystick and Headset devices
TheprocedurestouseBluetoothHID
GHYLFHVNH\ERDUGPRXVHMR\VWLFNHWF
oraheadset,etc.onthecomputerare
described below.
TheBluetoothPINCodeisa
password used for the connection
betweentwoBluetoothdevices,the
user just enter the same PIN Code
RQERWK%OXHWRRWKGHYLFHVWRPDNHD
connection.
1 Turn on the Bluetooth function on
thedevicetoconnectto(mouse,
NH\ERDUGMR\VWLFNRUKHDGVHW
Somedeviceshaveabuttontoturn
on the Bluetooth function, so see the
corresponding device manual.
2 'RXEOHFOLFNWKHMy Bluetooth
Settings icon RQWKH'HVNWRS
3 If the My Bluetooth Settings window
DSSHDUVFOLFNView devices in
range.
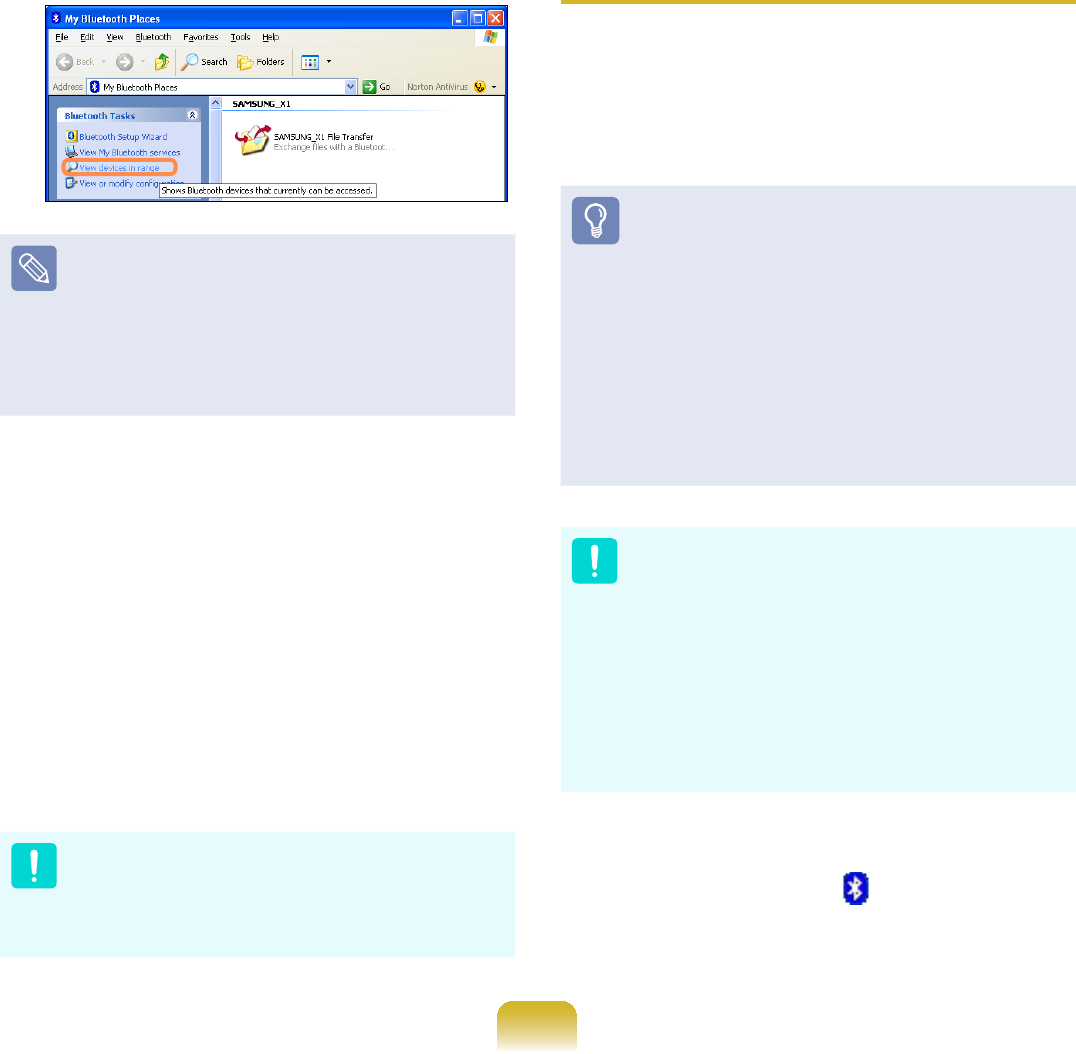
116
Ifthedevicetoconnecttoappears,
FOLFNWKHGHYLFHIRUH[DPSOHPRXVH
,IWKHGHYLFHGRHVQRWDSSHDUFOLFN
View devices in range.Ifthedevice
has not appeared yet, since this
menu changes to Search devices
in rangeFOLFNSearch devices in
range to show the device.
4 IftheBluetoothPINCodeinput
window appears, enter a PIN code
referringtothemanualofthe
corresponding device. The PIN code
foranHIDdeviceisgenerallyprinted
inthemanualofthecorresponding
device.
5 IfyouenterthePINcode,youcan
immediately use the device.
$%OXHWRRWKNH\ERDUGDQGPRXVH
ZRUNRQO\LQ:LQGRZV7KH\ZLOO
QRWZRUNLQ06'26PRGHRULQ
Hibernation mode.
Connecting to the Internet via a
Bluetooth mobile phone
IfyouhaveaBluetoothmobilephone,you
canconnectyourcomputertotheInternet
without a wired or wireless connection to
an Internet service provider.
z&KHFNLI\RXUPRELOHSKRQH
supports Bluetooth.
z ToconnecttotheInternetthrough
the Bluetooth mobile phone,
you need the wireless operator
account information such as
the username, password, dial
number andsoon.Forthis
information,contactyourmobile
phone operator.
If you connect to the Internet
through a Bluetooth mobile phone,
theconnectiontariffmaybe
very expensive. Please use this
function only after ascertaining the
connection cost or subscribing to
adatacommunicationsplanthat
allowsyoutoconnecttotheInternet
directly.
1 'RXEOHFOLFNWKHMy Bluetooth
Environment icon RQWKH'HVNWRS
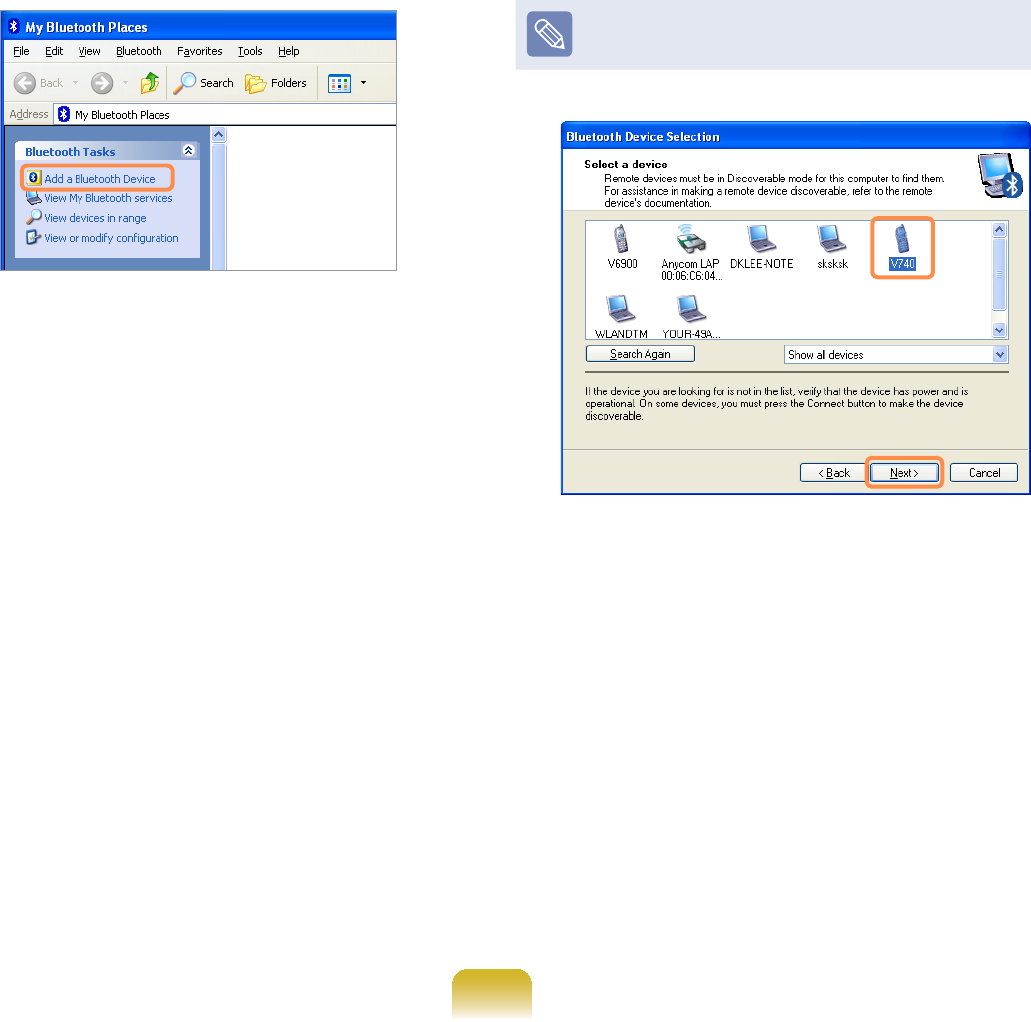
117
2 When the My Bluetooth
EnvironmentZLQGRZDSSHDUVFOLFN
Add Bluetooth device.
3 If the Bluetooth Setup Wizard
VFUHHQDSSHDUVFOLFNNext to start the
device search.
4 Select your mobile phone from the
6HOHFW'HYLFHZLQGRZDQGFOLFNNext.
The following descriptions use a
mobile phone called ‘V740’.
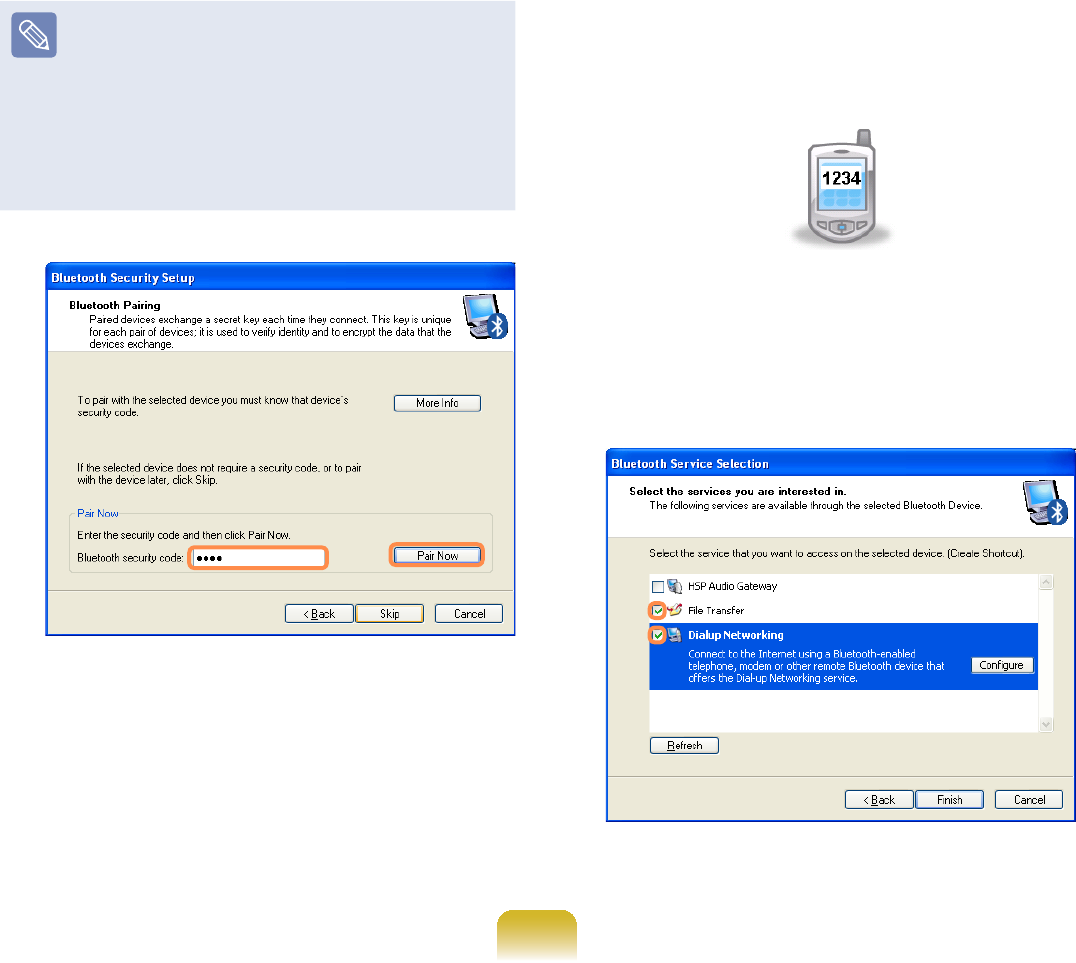
118
5 If the Bluetooth Security Setup
window appears, enter a Bluetooth
security code (Bluetooth PIN) and
WKHQFOLFNStart Pairing.
The Bluetooth security code
(Bluetooth PIN) isapasswordused
between two devices connected
throughBluetooth.Youcanenter
any number between 4 to 6
alphanumeric characters on the two
devices.
6 If the Pairing signal is delivered to
the mobile phone, the Bluetooth
security code input window appears
in the mobile phone screen. Enter the
samesecuritycodeintothemobile
phonethatyouenteredinStep 4.For
example,ifyouentered‘1234’onyour
computer, you must also enter ‘1234’
on the mobile phone.
7 In the Select Bluetooth Service
window, select the File Transfer and
Dialup Networking services and
WKHQFOLFNFinish.
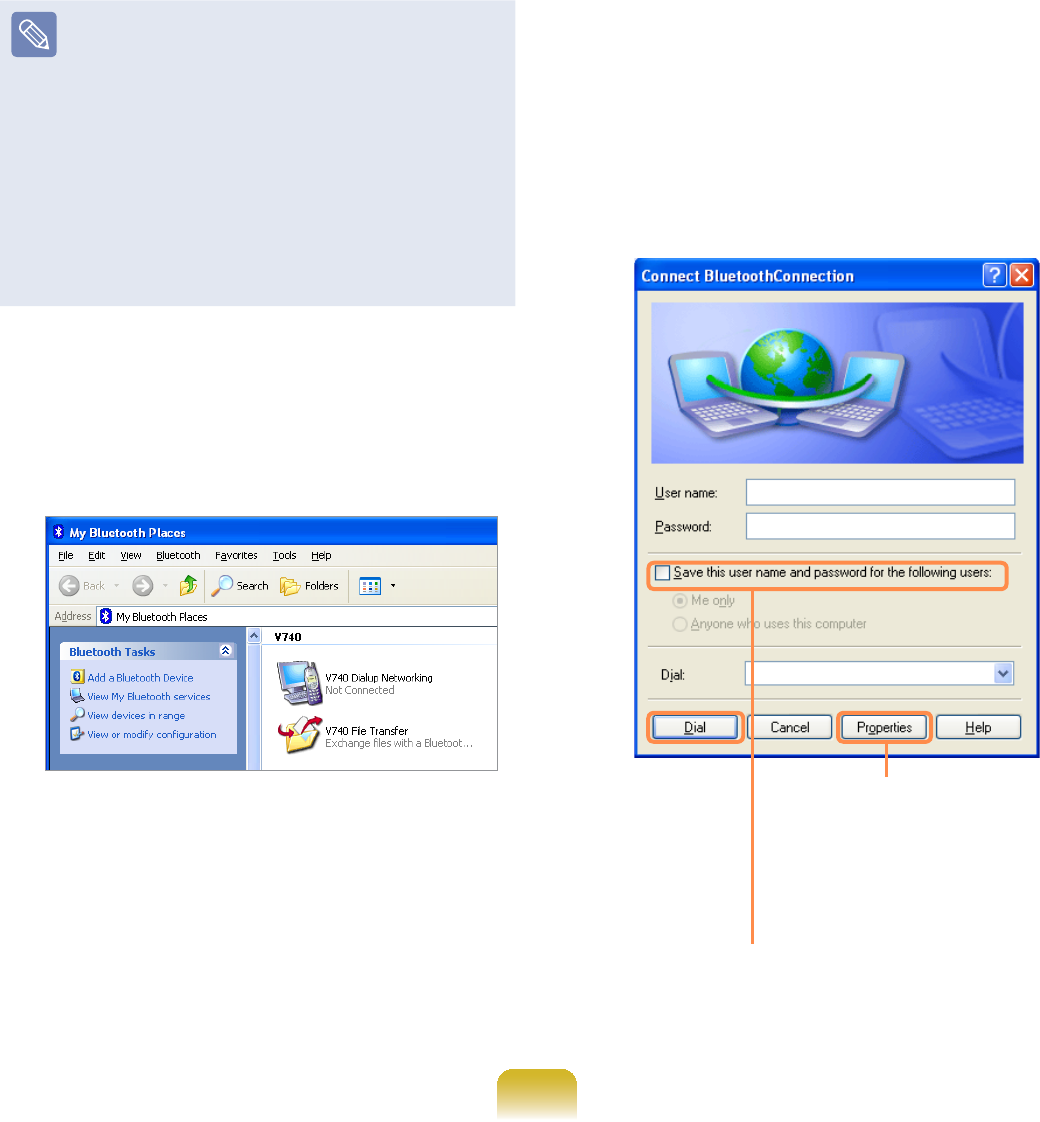
119
z Depending on the mobile phone
model, the service names and
supported service types may
differ.
z Ifyouselectonlyoneservice,one
more Setup Wizard step appears.
z,I\RXVHOHFW'LDOXS1HWZRUNLQJ
Serviceonly,aBluetooth
&RQQHFWLRQZLQGRZDSSHDUV&OLFN
cancel and close the window.
8 The Dialup Networking and File
Transfer service icons are added
to the My Bluetooth Environment
window.
9 'RXEOHFOLFNV740 Dialup
Networking in the My Bluetooth
Environment window.
10 If the Connect to Bluetooth
windowappearsafterawhile,enter
the Username, Password,and
Dial (Dial Number)¿HOGVDQGFOLFN
the Dial button. Then, when the
Internet connection is established,
youcanusetheInternetusing
Internet Explorer.
,I\RXFKHFNWKLVRSWLRQWKH
currentlyenteredusername
and password are saved.
,I\RXFOLFNWKLVEXWWRQ
enter the phone number
in the Dial Number¿HOG
DQGFOLFNOK to save
the phone number.
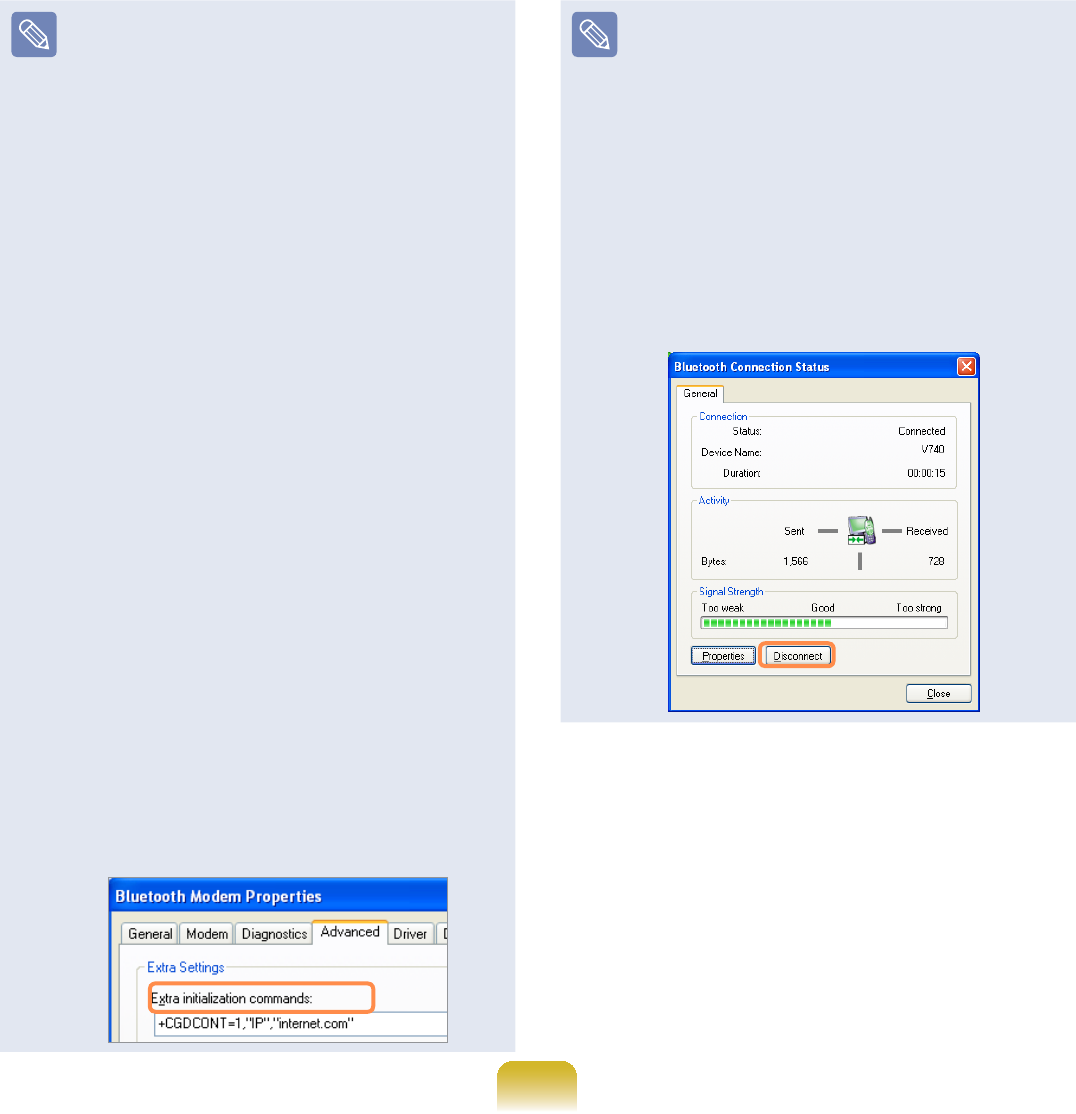
120
z About the Username, Password,
and Dial Number
Theusername,passwordand
dialnumberusedheredonot
refer to the ones used by the
mobile phone user. They refer to
theuniqueusername,password
and phone number of the mobile
phone operator that are required
WRPDNHWKHFRQQHFWLRQ$VN\RXU
mobile phone operator about
them.
zWhen an AP name is required
to connect to the Internet
An APN (AP Name) may be
required depending on the
mobile phone or mobile phone
RSHUDWRU,QWKLVFDVHFOLFNStart
> Control Panel > Performance
and Maintenance > System
> Device Manager > Modem,
GRXEOHFOLFNBluetooth Modem,
select the Advanced tab and
thenenteranAPNintheformat
of +CGDCONT=1,”IP”,”APN” in
the Miscellaneous Initialization
Command¿HOGHJZKHQWKH
APNis‘internet.com’).Fordetailed
LQIRUPDWLRQDVN\RXUPRELOH
phone operator about this.
zDisconnecting the Internet
connection
n'RXEOHFOLFNV740 Dialup
Networking in the My Bluetooth
Environment window.
l&OLFNWKH'LVFRQQHFWEXWWRQLQWKH
Bluetooth Connection Status
window. Alternatively, press the
Disconnect button on the mobile
phonetodisconnecttheInternet
connection.
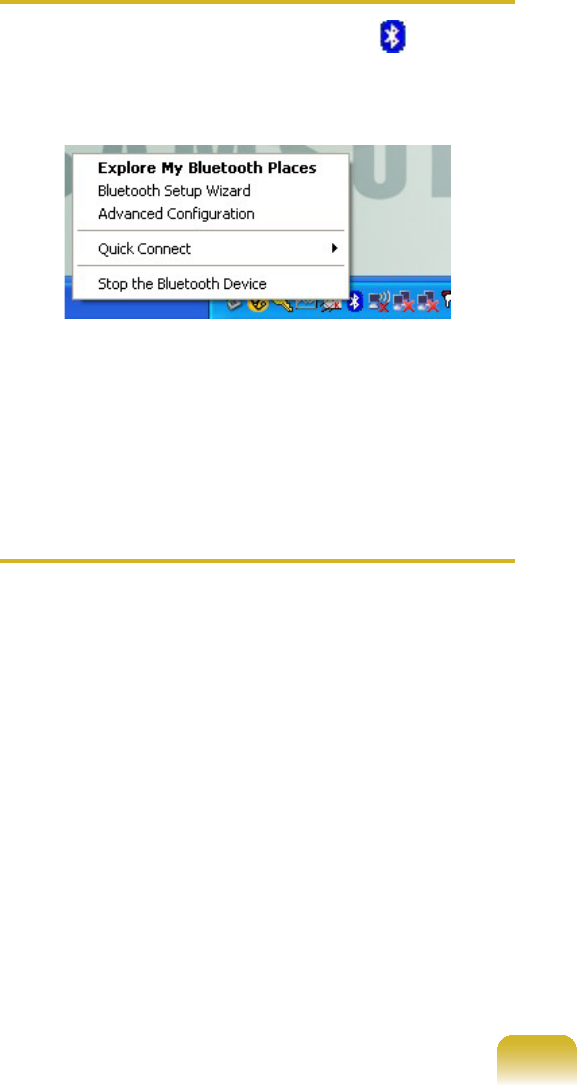
121
Stopping a Bluetooth device
5LJKWFOLFNWKHBluetooth icon on the
7DVNEDUDQGVHOHFWStop the Bluetooth
device.
TouseaBluetoothdeviceafterstopping
it, select Start Bluetooth deviceOLNH
above.
Usage Instructions
z Generally, Bluetooth devices deliever
stable performance while connected
within a 3m(10 ft.) distance.
z For Bluetooth to operate smoothly, use
thecomputerinanopenenvironment
with no walls or obstacles in the way
andhavinglowradiointerference.
z Youcanconnecttoonlyone
Bluetoothdeviceatatimeforaphone
connection, data syncing, electronic
business card exchange, FAX
transmission/reception, sound related
functions, and serial port functions.
z It is recommended using only
oneBluetoothdeviceatatimeas
connecting multiple Bluetooth or other
wirelessdevicesatthesametime
mayslowordestabilizetheBluetooth
connection.
z Data communications via Bluetooth
maybepoorwhentheCPUloadisat
IXOOFDSDFLW\RUWKHUHDUHLQVXI¿FLHQW
system resources.
z The Bluetooth function of a Bluetooth
PDA, mobile phone, mouse or
NH\ERDUGPD\EHWXUQHGRII7RXVH
them in connection with a Samsung
computersupportingBluetooth,you
PXVWFKHFNLIWKH%OXHWRRWKIXQFWLRQRI
thedevicetoconnecttoisturnedon.
Fortheproceduresonturningonthe
Bluetoothfunctionofadevice,referto
the relevant device manual.
z TheservicesprovidedbyBluetooth
devicesmayvarydependingontheir
capabilities. For the services provided
by the Bluetooth device, refer to the
device manual.

Chapter 5.
Using Applications
Introducing Programs 123
Play Camera (Optional) 126
Samsung Update Plus (Optional) 128
McAfee SecurityCenter (Optional) 130
Using Samsung Magic Doctor
(Optional) 135
Reinstalling Software 136
123
Introducing Programs
Using the software supplied with the Samsung computer, you can easily use functions
and troubleshoot problems.
Try to use the software after learning about the basic use of the software. For detailed
information,refertothehelpsectionofthecorrespondingsoftware.
Everysoftwareprogrammaynotbeprovideddependingonyourcomputermodel.
Inaddition,somepicturesmaydifferfromactualproductdependingonthecomputer
model and software version.
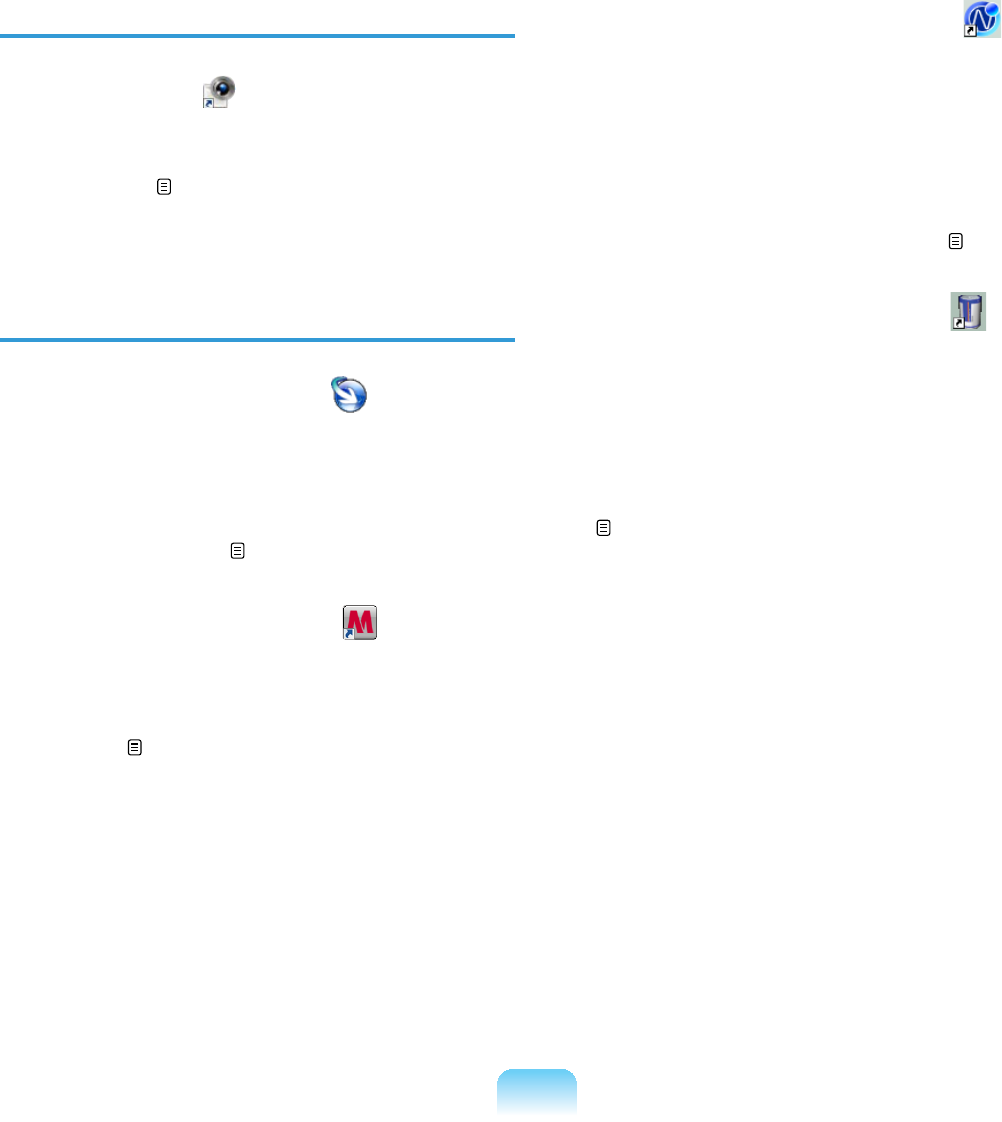
124
Multi Media Functions
zPlay Camera (Optional)
Usingthisprogram,youcandirectly
WDNHSLFWXUHVDQGUHFRUGYLGHRRQWKH
computer. 126
Management Functions
zSamsung Update Plus (Optional)
Samsung Update Plus is a software
function that examines and updates the
Samsung software and drivers installed
on your Samsung computer to the most
recent versions. 128
zMcAfee SecurityCenter (Optional)
Thisisasecuritysolutionthatdetects
and removes computer viruses and
protects the computer from Internet
threats. 130
zSamsung Network Manager
(Optional)
6DPVXQJ1HWZRUN0DQDJHULVD
program that enables you to easily
FRQ¿JXUHWKHQHWZRUNVHWWLQJV
<RXFDQFRQ¿JXUHWKHQHWZRUNVHWWLQJV
foreachlocationandyoucanalso
GLDJQRVHWKHQHWZRUNVWDWXV 99
z Samsung Battery ManagerSamsung Battery Manager
(Optional)
SamsungBatteryManagerisapowerSamsungBatteryManagerisapower
managementprogramthatprovides
easy-to-use power management and
power saving settings so that the
battery usage time can be extended.
155
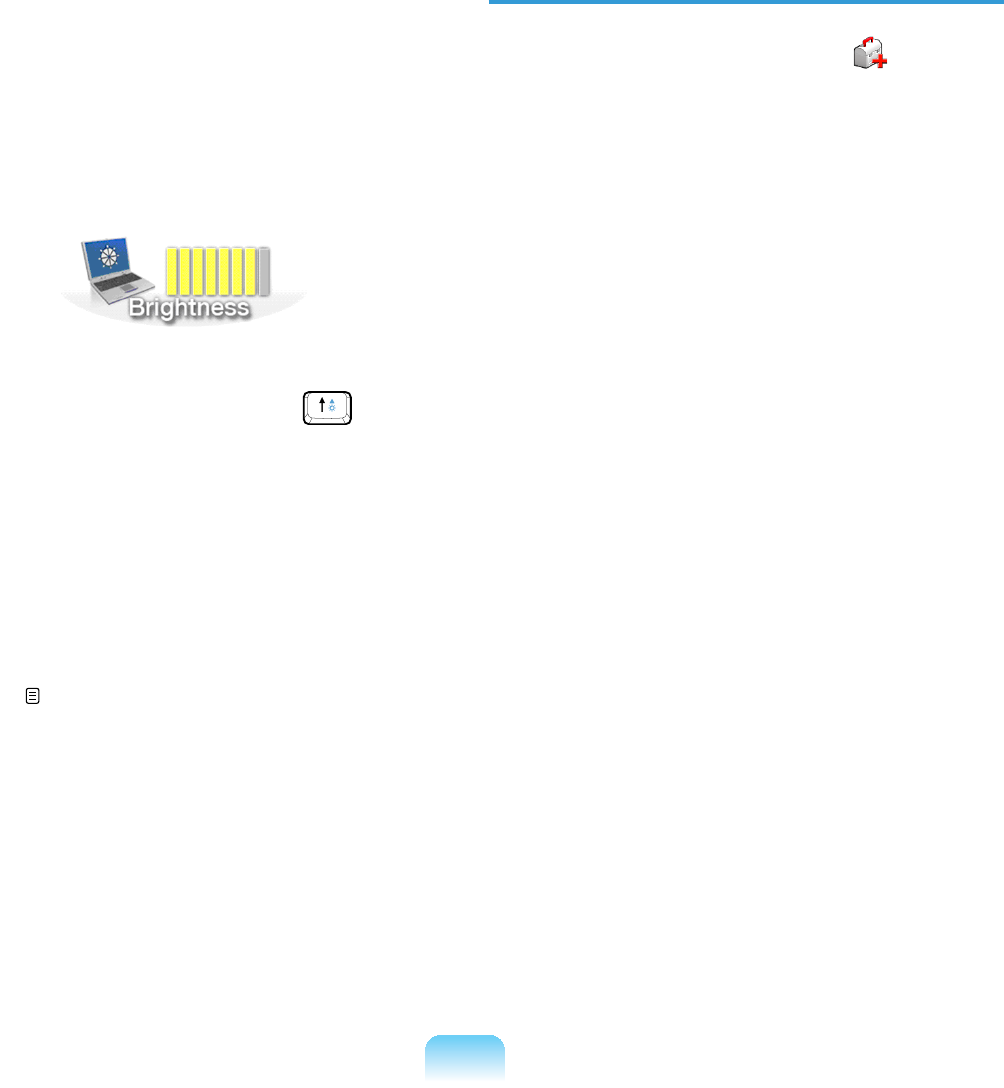
125
zEasy Display Manager (Optional)
EasyDisplayManagerisaprogram
that displays the changed setting on the
screen when a setting is changed by
SUHVVLQJWKHVKRUWFXWNH\VDQGHQDEOHV
changingthedisplaymodethroughthe
Display Settings window.
Example) The icon that appears when
pressing the Fn +
NH\VWRFKDQJHWKHVFUHHQ
brightness.
zEasy SpeedUP Manager (Optional)
This program enables you to select
operationmodewhenyouneed
maximum system performance or low-
noise/low power consumption with one-
FOLFN 60
Troubleshooting Functions
zSAMSUNG Magic Doctor
(Optional)
SAMSUNG Magic Doctor is
troubleshooting software provided
by Samsung Computer for system
diagnosis, and restoring the system.
The system diagnosis function enables
users to diagnose system problems
without assistance from others.

126
Play Camera (Optional)
3OD\&DPHUDLVDSURJUDPWKDWHQDEOHVXVHUVWRWDNHVWLOOSLFWXUHVRUUHFRUGYLGHRV
using the camera installed on the computer.
z Theprogramversionsdescribedinthismanualaresubjecttochangeandthe
screen images and terms in this manual may differ from actual product.
z Formoreinformationonhowtousetheprogram,refertotheonlinehelp.
z'RQRWWDNHSLFWXUHVRUUHFRUGYLGHRRIVRPHRQHZLWKRXWWKHLUSHUPLVVLRQ
z'RQRWWDNHSLFWXUHVRUUHFRUGYLGHRLQORFDWLRQVZKHUHSKRWRJUDSK\LVSURKLELWHG
z'RQRWWDNHSLFWXUHVRUUHFRUGYLGHRLQORFDWLRQVZKHUH\RXFRXOGYLRODWHDQRWKHU
person’s privacy.
1 &OLFNStart >All Programs >
Samsung >Play Camera >Play
Camera.
Window Control
and Exit Buttons
Preview
Window
Open Folder
Snapshot
Help
Rec

127
,I\RXULJKWFOLFNRYHUWKH3UHYLHZ
window using the Touchpad, you can
set up the camera, resolution, device
andsavefolder.
2 Placeanobjectinfrontofthecamera
RYHUWKH/&'DQGFOLFNWKHSnapshot
or Start Recording button. A
VWLOOSLFWXUHLVWDNHQRUYLGHRVWDUWV
recording.
7RVWRSDYLGHRUHFRUGLQJFOLFNWKH
Stop Recording button. The
recordingisstopped.
3 ,I\RXFOLFNWKHOpen Save Folder
button, you can view your stored
pictures and videos.
zYou can view a picture by double-
FOLFNLQJLW
zSince you cannot watch recorded
videos using the Play Camera,
use a video playing program such
asWindowsMediaPlayer,etc.to
watch videos.
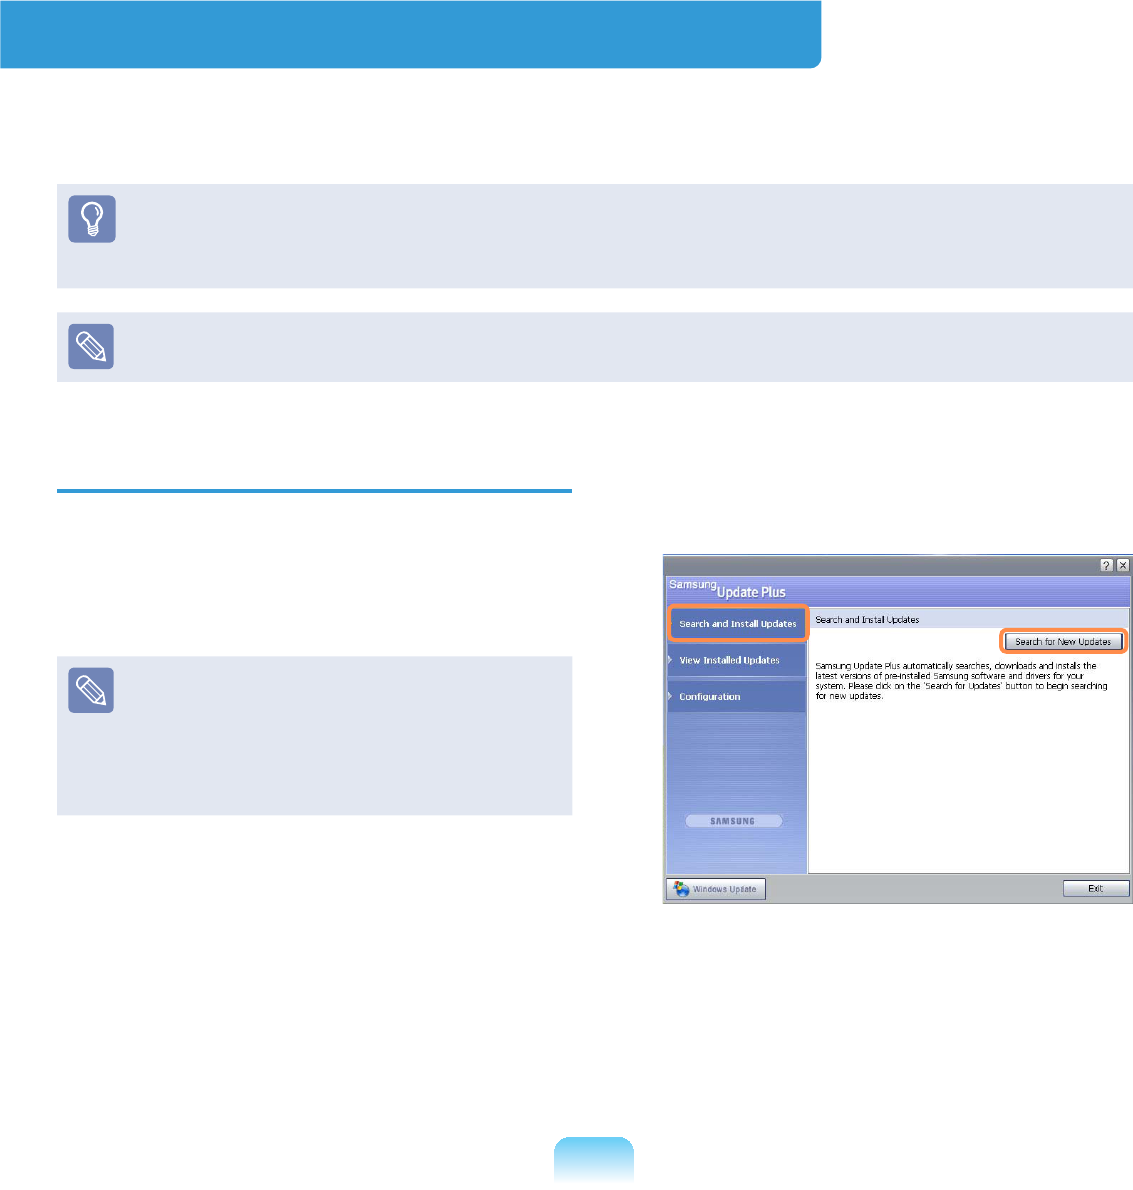
128
Samsung Update Plus (Optional)
Samsung Update Plus is software that examines and updates the Samsung software
anddriversinstalledonyourSamsungcomputertothelatestversion.
z To search for updates and update your computer using Samsung Update Plus, your
computermustbeconnectedtotheInternet.
z Theupdatesearchresultmaydifferdependingonyourcomputermodel.
Samsung Update Plus does not provide updates for applications installed after
purchasing the computer.
To update the software and drivers
1 Select Start > All Programs >
Samsung > Samsung Update Plus
> Samsung Update Plus.
,IWKLVLVWKH¿UVWWLPH\RXDUHUXQQLQJ
theprogram,awindowwillappear
DVNLQJ\RXLI\RXDJUHHWRWKH
agreement in the window.
&OLFNAgree tousethissoftware.
2 &OLFNSearch for and Install Updates
DQGFOLFNSearch for New Updates.
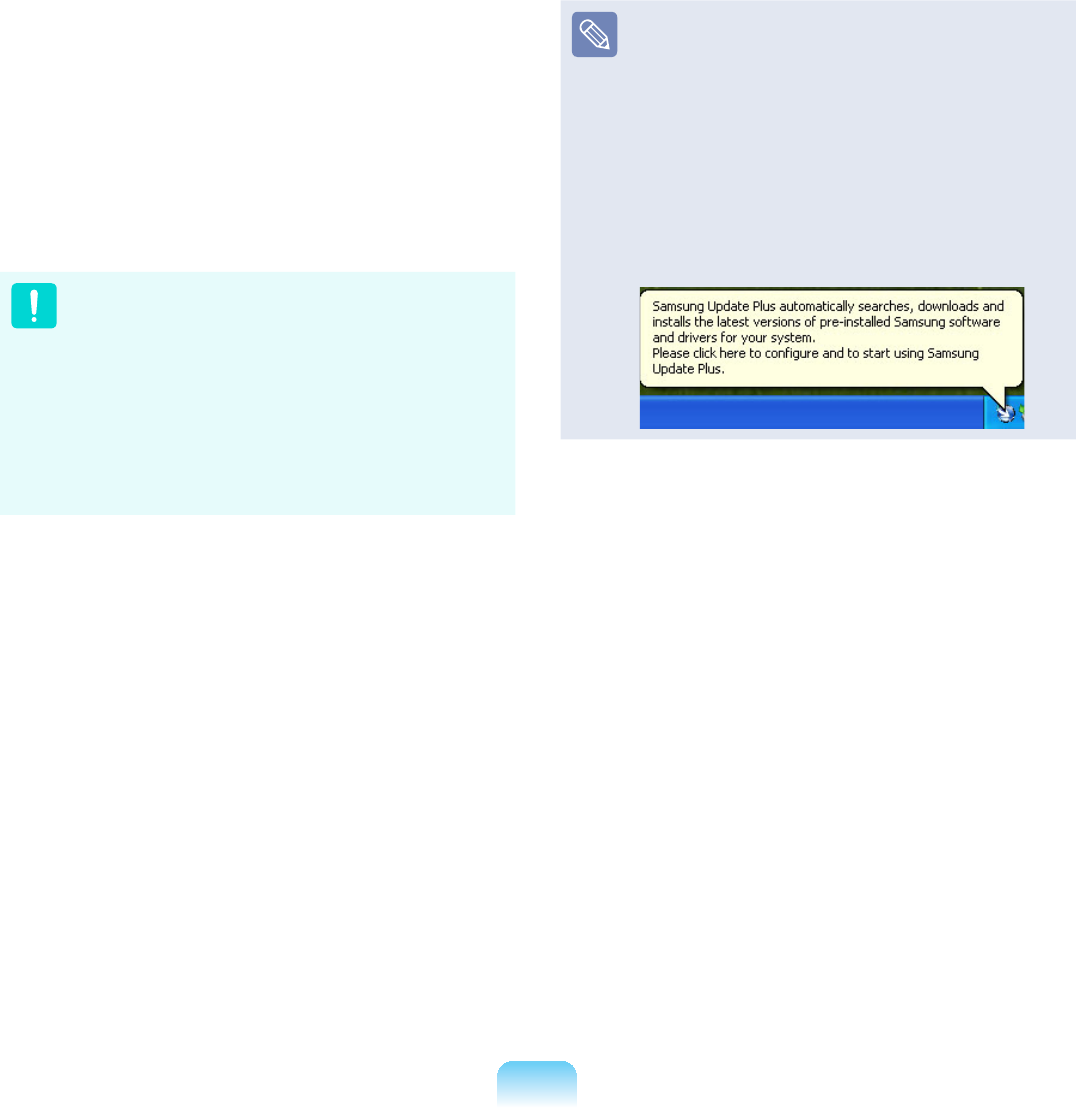
129
3 If there are available software or
driver updates for your computer, the
available updates will be listed. Select
therequiredupdatesfromthelist
DQGFOLFNInstall Update to start the
update. (The update list on the screen
maydifferdependingonthecomputer
model.)
Updates that must be installed
separately.
If you select Install as an update
item that must be installed
separately, a message appears
informingyouofthis.Followthe
instruction message to correctly
install it.
Automatic update items display
By default, your computer is
FRQ¿JXUHGWRDXWRPDWLFDOO\VHDUFK
for updates. If there is a new update
DYDLODEOHWKLVLVQRWL¿HGLQWKH
QRWL¿FDWLRQDUHD&OLFNWKHEDOORRQ
KHOSLFRQLQWKHQRWL¿FDWLRQDUHD
+HUH\RXZLOOEHDEOHWR¿QGWKH
latest available updates.
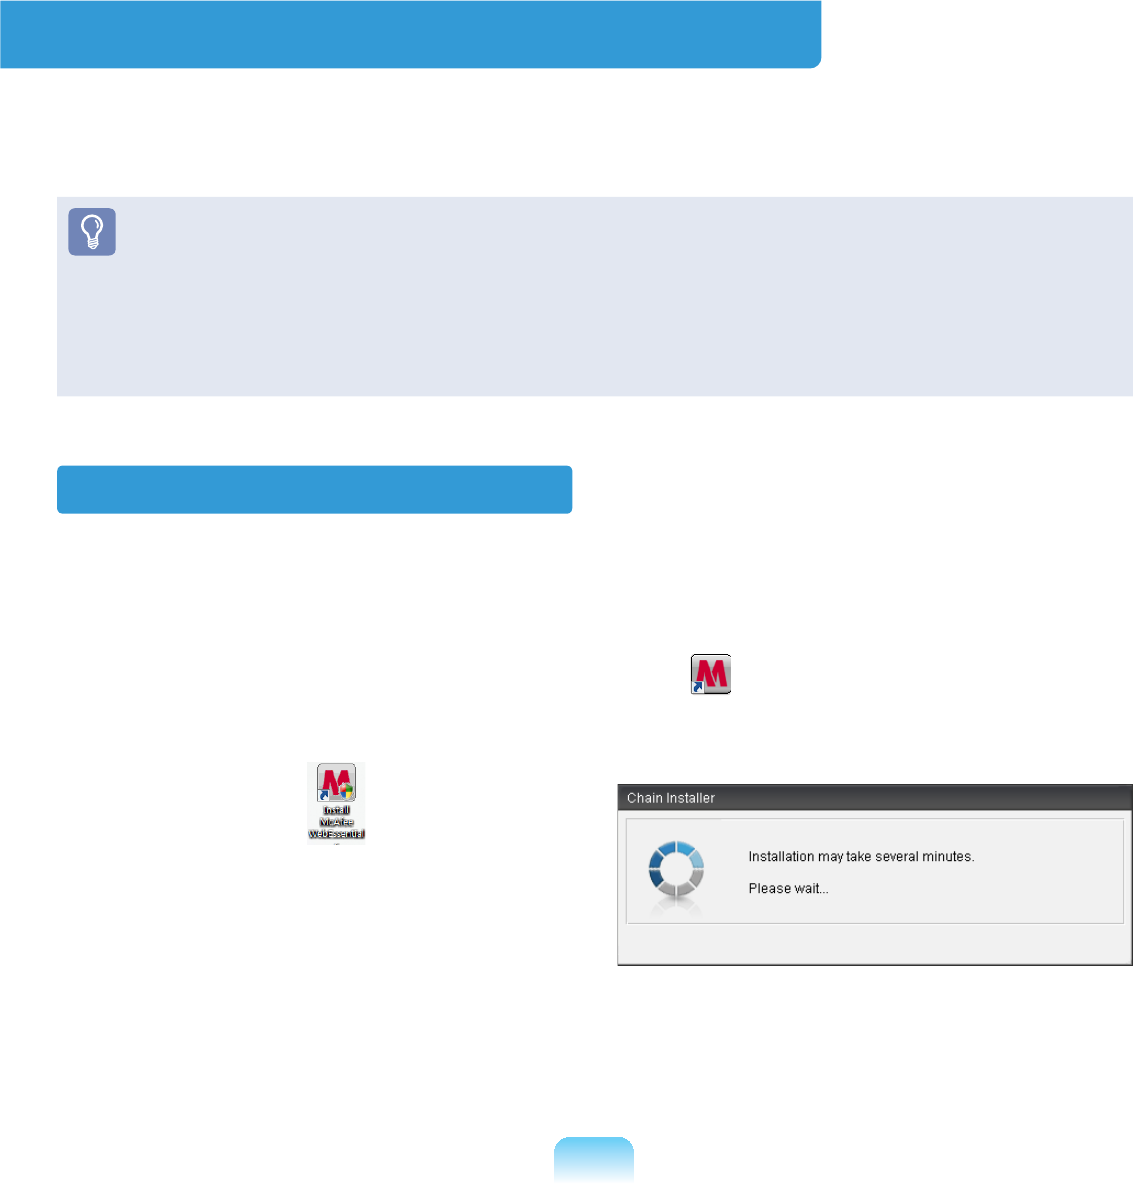
130
McAfee SecurityCenter (Optional)
McAfeeSecurityCenter(avirus/spywaredetectionandprotectionsoftwarethatincludes
D¿UHZDOOIXQFWLRQ+HUHDIWHUUHIHUUHGWRDV³0F$IHH´LVVRIWZDUHWKDWSURWHFWV\RXU3&
from various Internet threats as well as detecting and removing viruses.
z Formoredetailedinformationontheprogram,refertotheMcAfeehelp.
z YoucanregisterMcAfeewhenconnectedtotheInternet.
z McAfeesoftwareisoptional.Itmaynotbesuppliedforsomemodelsoritmaybe
suppliedthroughtheMcAfeeinstallationicon.Whentheinstallationiconisprovided,
youhavetoinstalltheprogramreferringtotheInstallingMcAfeesection.
z A different anti-virus program may be provided depending on the computer model.
Installing McAfee
Forsomemodels,anInstall McAfee Web EssentialsLFRQLVORFDWHGRQWKH'HVNWRS
Inthiscase,youcaninstalltheMcAfeesoftwareaccordingtothefollowingprocedures
and then use the McAfee software.
Forsomemodels,aMcAfee Security Center icon LVORFDWHGRQWKH'HVNWRSVLQFH
the software is already installed, the installation step is not required.
n 'RXEOHFOLFNWKHInstall McAfee Web
Essentials icon RQWKH'HVNWRS
l The Chain Installer window
opens and the installation begins
automatically. Please wait for a
moment.
W When the installation is complete, the
Chain Installer window disappears.
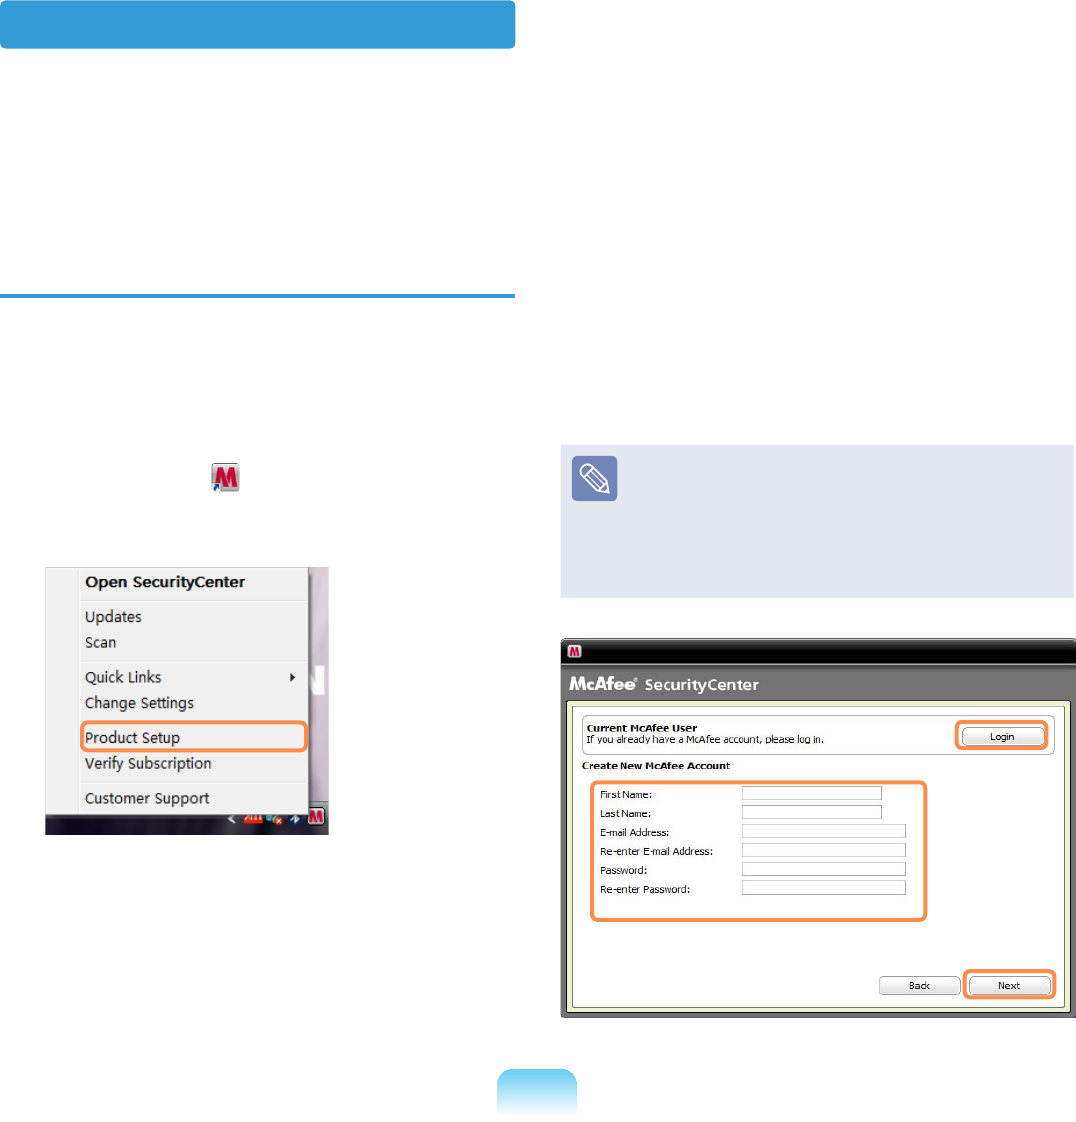
131
User Registration
1 The Program Setup screen appears
ZKLOHERRWLQJ&OLFNNext.
If the Program Setup screen does
QRWDSSHDUULJKWFOLFNRYHUWKH
McAfee icon LQWKH7DVNEDUDQG
then select Product Setup from the
pop-up menu.
2 The End User License Agreement
appears.
&KHFNLIWKHFRXQWU\KDVEHHQ
FRUUHFWO\VHOHFWHGDQGWKHQFOLFN
Accept.
3 The Create New McAfee Account
item appears.
%HVXUHWR¿OOLQDOOWKH¿HOGVDQG
FOLFNNext.TheProgram Setup
Completed window appears.
Ifyouhavealreadyregisteredwith
0F$IHHFOLFNLogin and enter
the registered email address and
password to login. The Program
Setup Completed window appears.
Using McAfee
To use McAfee, user registration is required. If a user is not registered, even though
virusinspectionissupported,yourPCwillnotbecompletelyprotectedbecausethe
virusinformationwillnotbeupdatedwiththelatestinformation.Theproceduresto
inspect and heal viruses after the user registration will be described below.
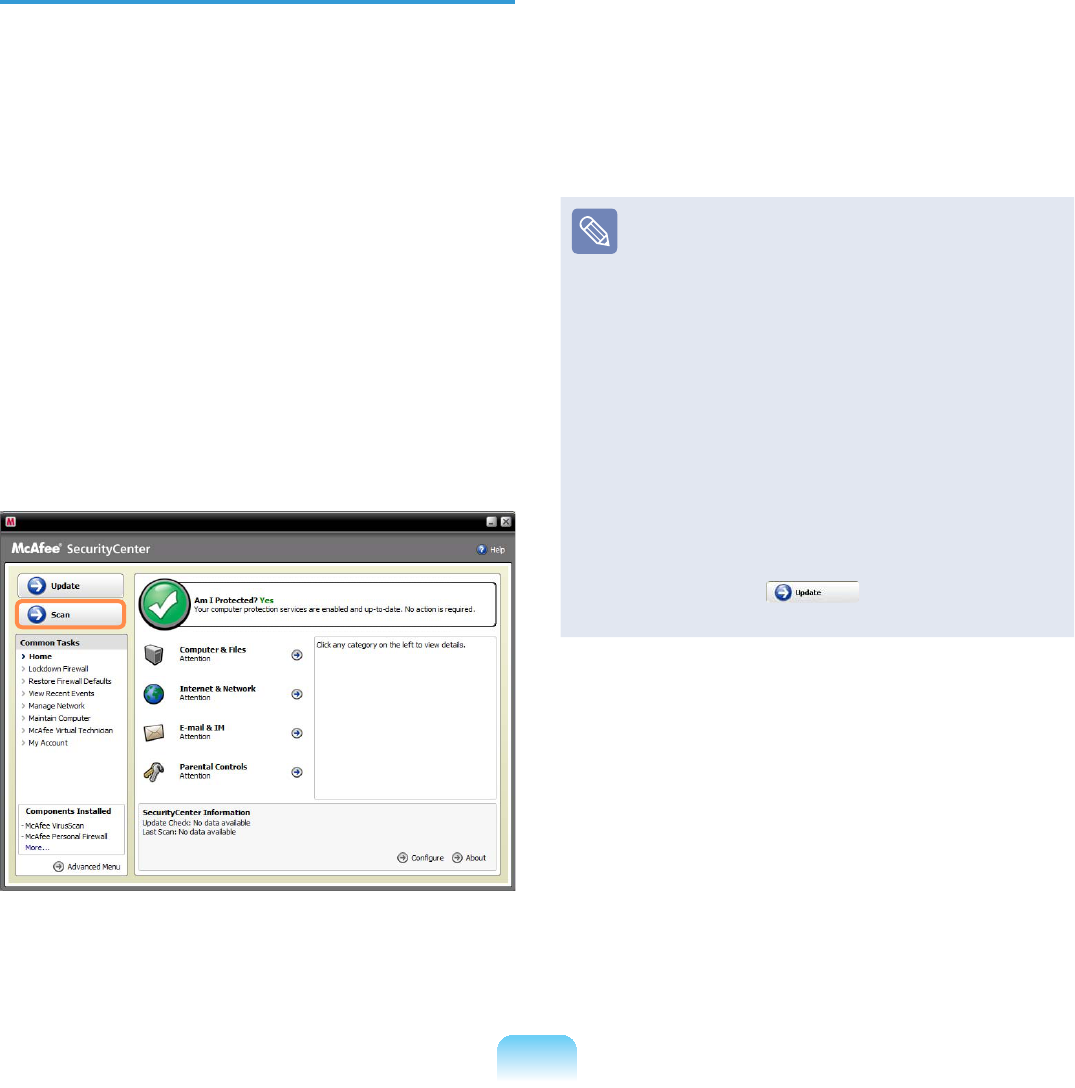
132
Inspecting and Healing Viruses
7KHSURFHGXUHVWRFKHFNLIWKHFRPSXWHU¶V
¿OHVRULQIRUPDWLRQKDYHEHHQLQIHFWHG
byavirusandtohealvirusesfoundby
McAfee are described below.
1 &OLFNStart > All Programs > McAfee
> McAfeeSecurityCenter.
2 &OLFNWKHScan button on the left side
of the program. The Scan begins.
At this time, if a virus is found, it
is immediately healed during the
inspection.
3 ,IDYLUXVKDVEHHQIRXQGFOLFNView
Results.
The viruses are listed. Since the
corresponding viruses have already
beenremoved,youcanuseyour
computer without any concern.
z For possible virus infections
(where it is not completely certain),
the Detected message appears.
In this case, the items will be
maintained or deleted depending
on your decision.
z To deal with new viruses,
SOHDVHDOZD\VNHHS
McAfeeSecurityCenter up to date.
In general, it is automatically
updatedwhenconnectedtothe
Internet. Alternatively, you can
XSGDWHLWPDQXDOO\E\FOLFNLQJ
Update after connecting
to the Internet.

133
&RQ¿JXULQJWKH0F$IHH)LUHZDOO
7KH0F$IHH)LUHZDOOLVFRQ¿JXUHG
for the product when purchasing the
product in order to protect the computer
IURPYLUXVHV+RZHYHULIWKH¿UHZDOOLV
activated,youmaynotconnecttothe
QHWZRUNRUWKH,QWHUQHWSURSHUO\,QWKLV
case, you have to change the settings as
follows.
Method 1) When you need to select
Allow Access in the Server
or Internet Access Request
window.
:KHQ\RXFRQQHFWWRDEDQNVWRFN
PDUNHWRUJDPLQJZHEVLWHDQDFFHVV
requestwindowappears.Inthiscase,
select Allow Access in the window
DQGFOLFNOK. Then you can install the
programnormallyoropenthepage.

134
Method 2) When you need to
deactivate the Firewall
If you cannot connect to the Internet when
using a broadband Internet service, you
canconnecttotheInternalnormallyifyou
disable the McAfee Firewall. However,
sinceitmaycauseasecurityproblem,be
careful when doing so.
n'RXEOHFOLFNWKHMcAfee Security
CenterLFRQIURPWKH'HVNWRS
l&OLFNWKHAdvanced menu at the
ERWWRPOHIWDQGFOLFN&RQ¿JXUH!
Internet&Network.
W Turn the Internet&Network at the
right to Off,settheSelect when to
UHHQDEOH¿UHZDOO to Never and then
FOLFNOK.
j&OLFNHome intheleftmenupane
DQGFOLFNIgnore next to the ‘Firewall
protection is disabled’ message.
It is recommended activating
the Windows Firewall for your
computer'ssafetywhenyouhave
disabled the McAfee Firewall. To
DFWLYDWHWKH:LQGRZV)LUHZDOOFOLFN
Start > Control Panel > Windows
Firewall > Change Settings >
On(recommended).
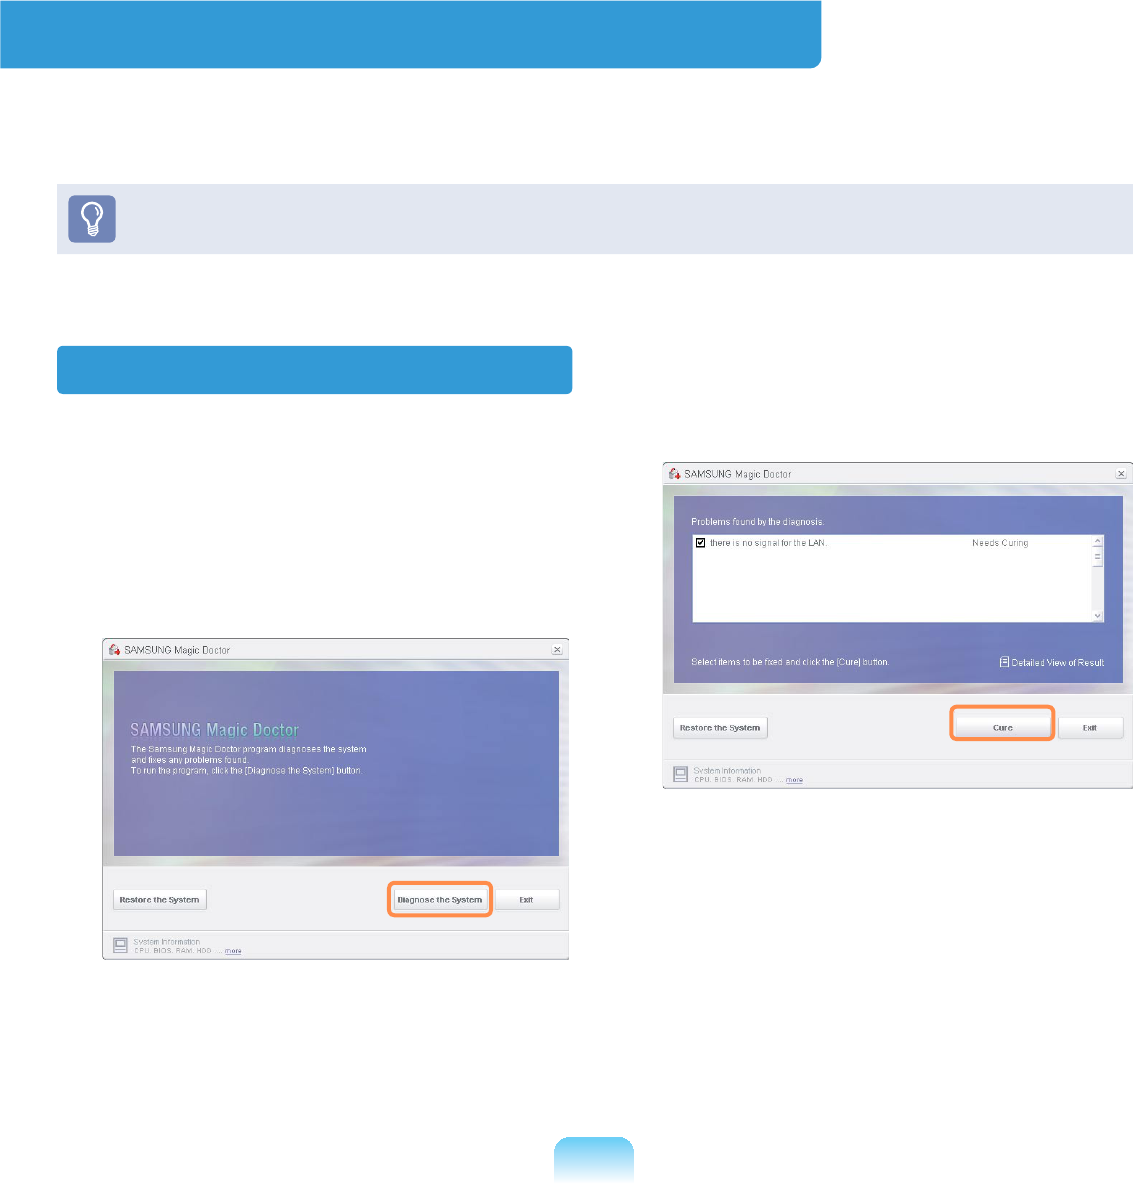
135
Using Samsung Magic Doctor (Optional)
MagicDoctoristroubleshootingsoftwareprovidedbySamsungComputer.Ausercan
GLDJQRVHV\VWHPSUREOHPVYLDRQHFOLFNRUE\VHOHFWLQJGLDJQRVWLFLWHPV
Thescreensusedinthismanualmaydifferfromactualscreensaccordingtothe
program version.
Diagnosing the System
1 Select Start > All Programs >
Samsung > Samsung Magic Doctor
> Samsung Magic Doctor.
2 &OLFNWKH'LDJQRVHWKH6\VWHPLFRQ
The system status diagnostics start.
3 When the system status diagnostics
are complete, the diagnostics result
appears.
,IDSUREOHPKDVEHHQIRXQGFOLFNRQ
Cure for Samsung Magic Doctor to
cure the problem.

136
Reinstalling Software
IfyouhavereinstalledtheWindowsoperatingsystem,orthesystemandprogram
do not operate properly, you can re-install the driver and program using the system
software Media.
z:KHQVRIWZDUHLVQRWZRUNLQJSURSHUO\LWLVUHFRPPHQGHGUHPRYLQJWKHVRIWZDUH
using the Add or Remove Programs of the Control Panel and reinstalling the
software using the System Software Media.
TheSystemSoftwareMediaissuppliedasaCDorDVDdependingonyour
computer model.
z TousetheSystemSoftwareMedia,theexternalUSBODDmustbeconnectedto
thecomputer.Thefollowingdescriptions presuppose that the external USB ODD is
connected.
Running the system software
Media
Standard
Installation
Thisdisplaysalistof
driversorprogramsthat
are not currently installed
onyourcomputerfromthe
system software Media
provided.All necessary
components are installed
using the factory defaults.
Minimum
Installation
This displays the
components (driver,
Windows programs,etc)
that,ifnotinstalled,may
cause problems with the
system performance.You
can install only required
components.
Custom
Installation
Youcancustomizethe
installation of drivers and
programs.

137
Installing drivers and programs
1 Select Standard Installation in
the System Software Media main
screen.
2 If the Start Standard Installation
ZLQGRZDSSHDUVFOLFNWKHYes button.
Thedriversandprograms,whichwere
installed in the computer when you
purchased the computer, are installed
again.
3 The Software installations was
completed window appears.
,I\RXFOLFNYes,thecomputeris
restarted.
4 When done, restart the system.

Chapter 6.
Settings and Upgrade
LCD Brightness Control 139
BIOS Setup 141
Setting a Boot Password 145
Changing the Boot Priority 148
Upgrading Memory 149
Battery 151
Using the Security Lock Port 158
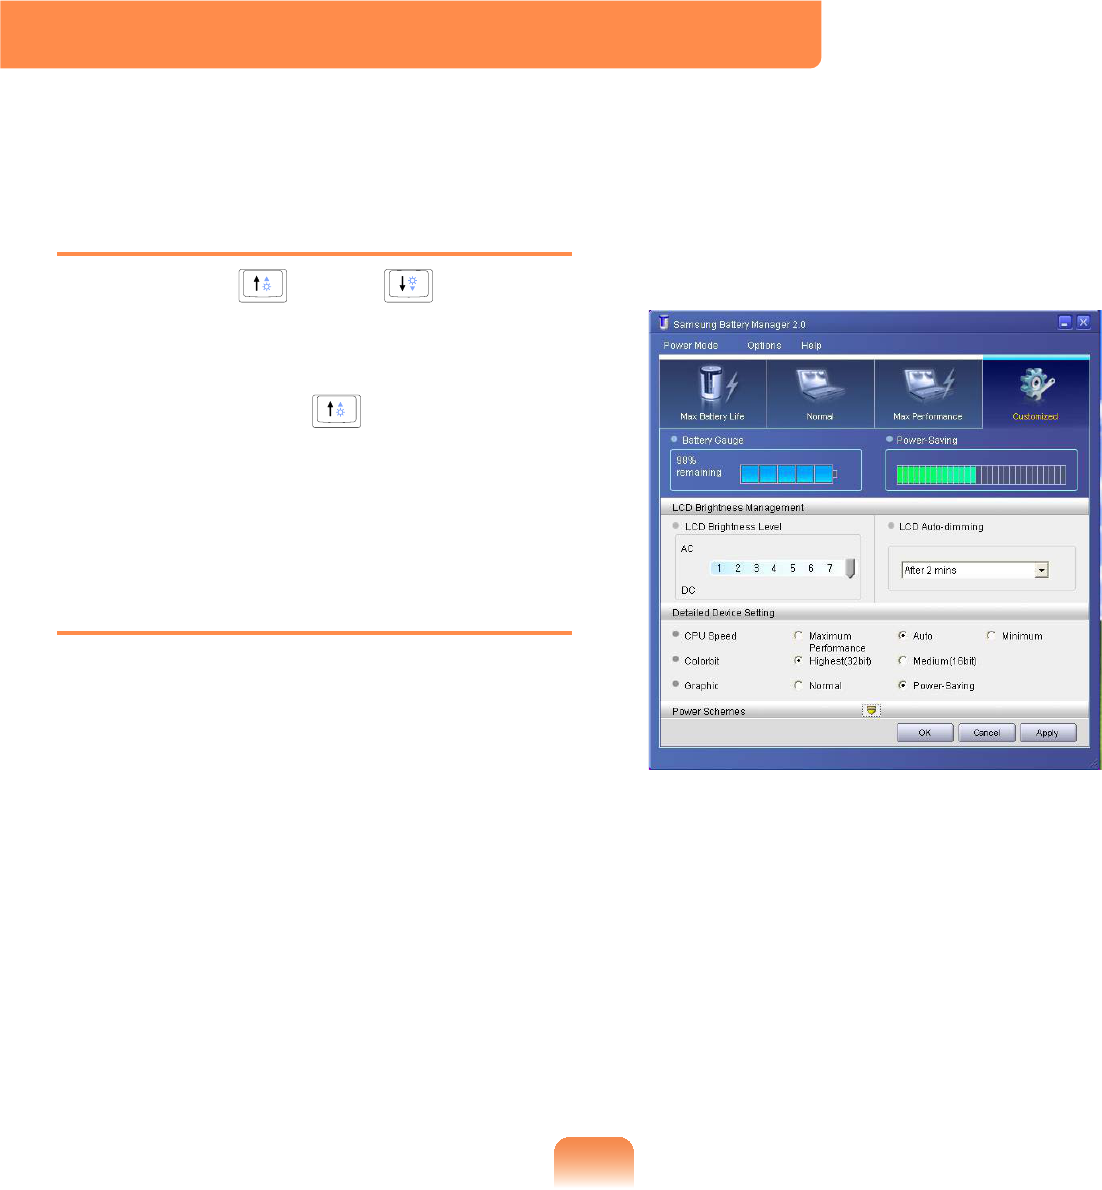
46<
LCD Brightness Control
YoucanadjusttheLCDbrightnessin8levels.
Adjusting LCD Brightness Using
Keyboard
Press the Fn+or Fn+to adjust
thebrightnessofLCD.
TheLCDbrightnesshaseightlevelsof
degree.
By pressing the Fn+,theLCDgets
brighter by one level of degree.
Adjusting LCD Brightness Using
Samsung Battery Manager
Appropriate LCD brightness is set
foreachmodeinSamsung Battery
Manager.Inusersettingsmode,youcan
select the brightness level.
&OLFN Start > All Programs > Samsung
> Samsung Battery Manager >
Samsung Battery Manager.
(for example, in Customized mode)
In this mode, you can change the
brightnessanddevicesettingdetails.

140
LCD Brightness
The LCD brightness settings for
maximum battery mode, general
mode, and maximum performance
mode in Samsung Battery Manager
are not maintained when your
computer reboots.
Only the LCD brightness setting in
the user settings mode is maintained
once you reboot the computer.
For information on the other features
of Samsung Battery Manager, see
the description on batteries. 147
To Maintain the Changed LCD
Brightness After Reboot
&RQ¿JXUHWKHIROORZLQJVHWWLQJVWR
maintain the LCD brightness set
XVLQJWKHVFUHHQDGMXVWPHQWNH\RU
Samsung Battery Manager.
nTurn on the computer. If the
SAMSUNG logo appears, press
the F2NH\7KHQVHWXSZLOOVWDUW
lChange the value of Brightness
Mode Control on the Boot menu
to User Control.
WPress the F10NH\WRVDYHWKH
changeandcompletesetup.
How to Reduce Battery
Consumption
Adjust the screen brightness to a
GDUNHUYDOXHRUVHOHFWWKHPD[LPXP
batterymodeinSamsung Battery
Manager to reduce battery
consumption.
Bad pixels of an LCD
TheLCDmayhavelessthan 4
badpixelsbutitdoesnotaffectthe
computer performance. This product
mayhavebadpixelsofthesame
level as the products made by other
companies.
Caution for Cleaning up LCD
WipetheLCDfromthecentertothe
RXWVLGHZLWKDVRIWFORWKVRDNHGLQ
acomputer-dedicateddetergent.If
\RXZLSHWKH/&'¿UPO\LWPD\KDYH
damage.

474
BIOS Setup
7KH%,266HWXSHQDEOHV\RXWRFRQ¿JXUH\RXUFRPSXWHUKDUGZDUHDFFRUGLQJWR\RXU
needs.
z8VHWKH%,26VHWXSWRGH¿QHDERRWSDVVZRUGFKDQJHWKHERRWLQJSULRULW\RUDGGD
new device.
6LQFHLQFRUUHFWVHWWLQJVPD\FDXVH\RXUV\VWHPWRPDOIXQFWLRQRUFUDVKWDNHFDUH
ZKHQFRQ¿JXULQJWKH%,26
z ThefunctionsoftheBIOSsetuparesubjecttochangeforproductfunction
enhancement purposes.
TheBIOSSetupmenusanditemsmaydifferdependingonyourcomputermodel.
Entering the BIOS Setup
1 Turnthecomputeron.
2 When the booting screen (SAMSUNG
logo) appears, press the F2NH\WR
enter the BIOS Setup.
3UHVVWKH)NH\ZKLOHWKHERRWLQJ
screen(SAMSUNG logo) appears,
thesystemwilltrytobootfromthe
QHWZRUN
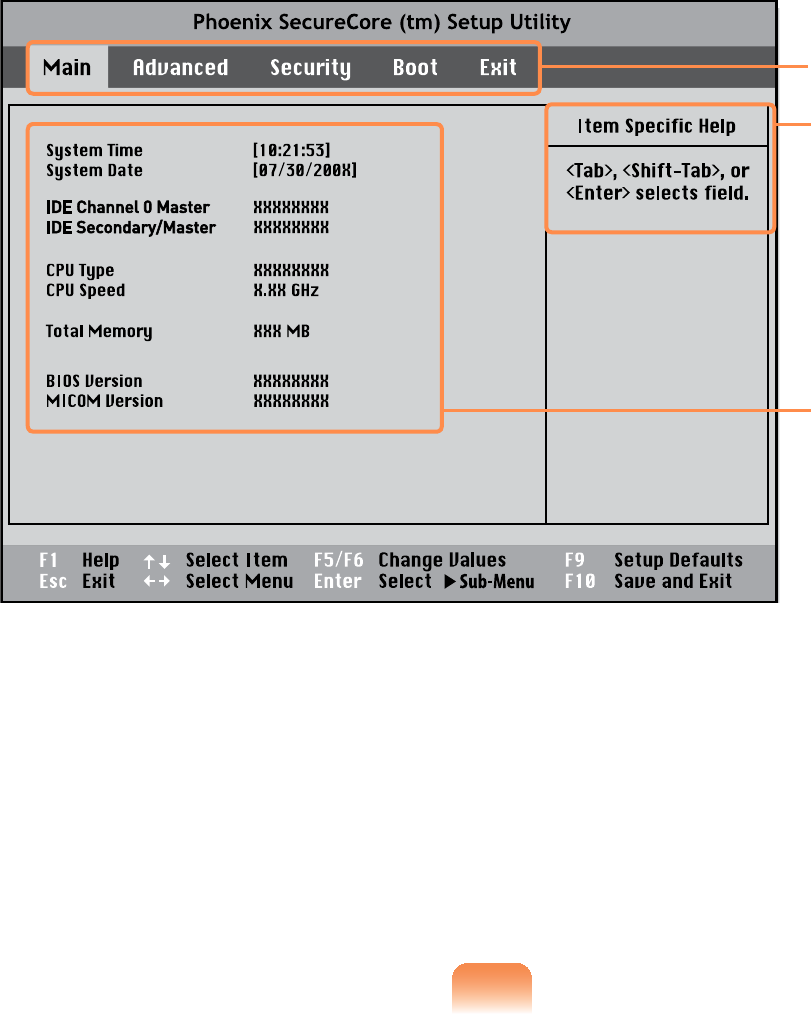
142
3 Afteramoment,theBIOSsetupscreenappears.
TheitemsintheBIOSsetupmaydifferdependingontheproduct.
Setup Menu
Setup Items
Help
Help for the
selected
item appears
automatically.
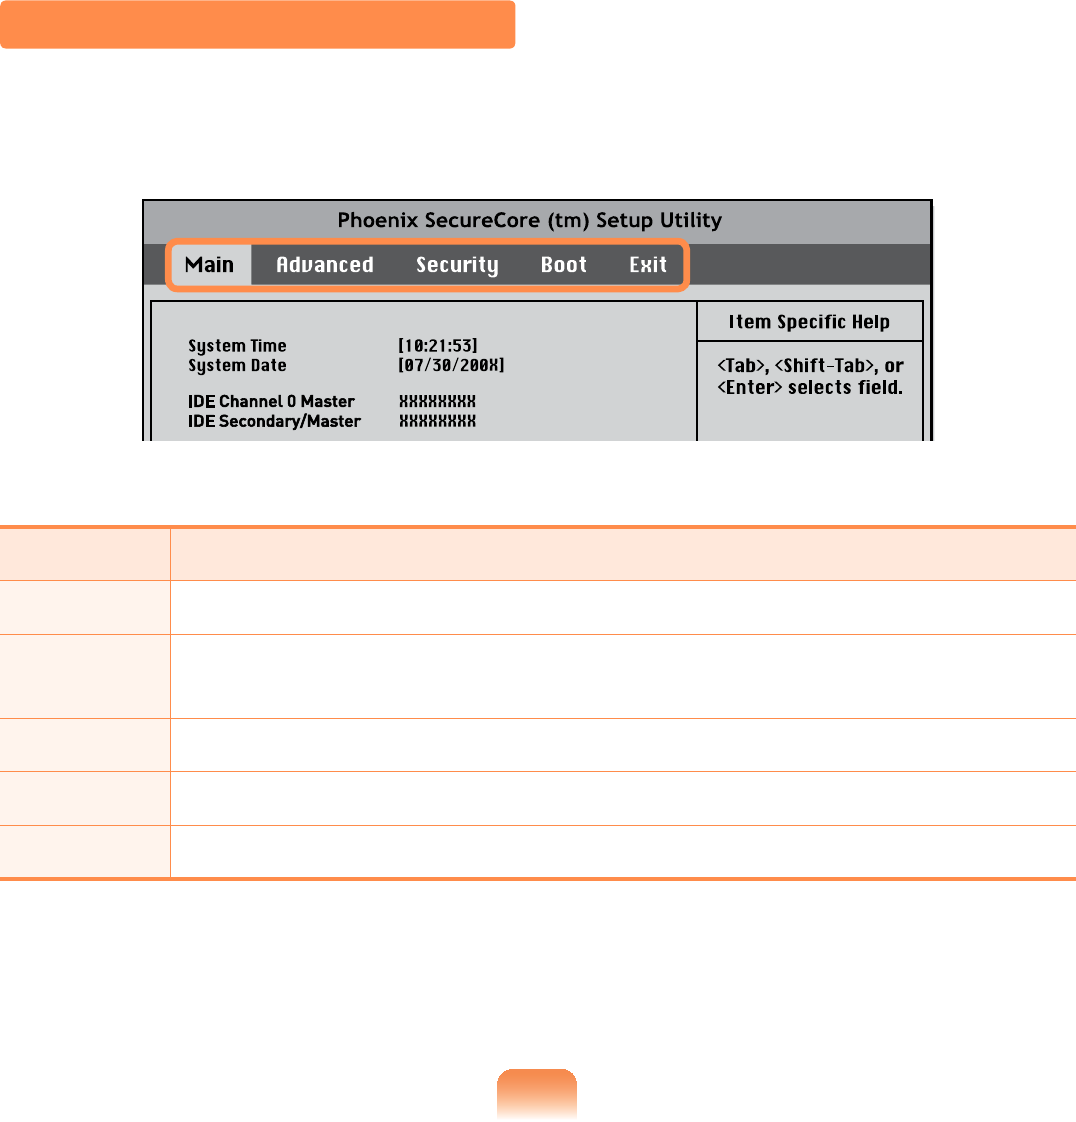
143
The BIOS Setup Screen
Menu Description
Main Used to change the basic system and environment settings.
Advanced 8VHGWRFRQ¿JXUHDGYDQFHGIXQFWLRQVRQ\RXUFRPSXWHUDURXQGGHYLFHV
and chipsets.
Security 8VHGWRFRQ¿JXUHVHFXULW\IXQFWLRQVLQFOXGLQJSDVVZRUGV
Boot Used to set the boot priority and other boot options
Exit Used to exit the Setup either saving the changes or not.
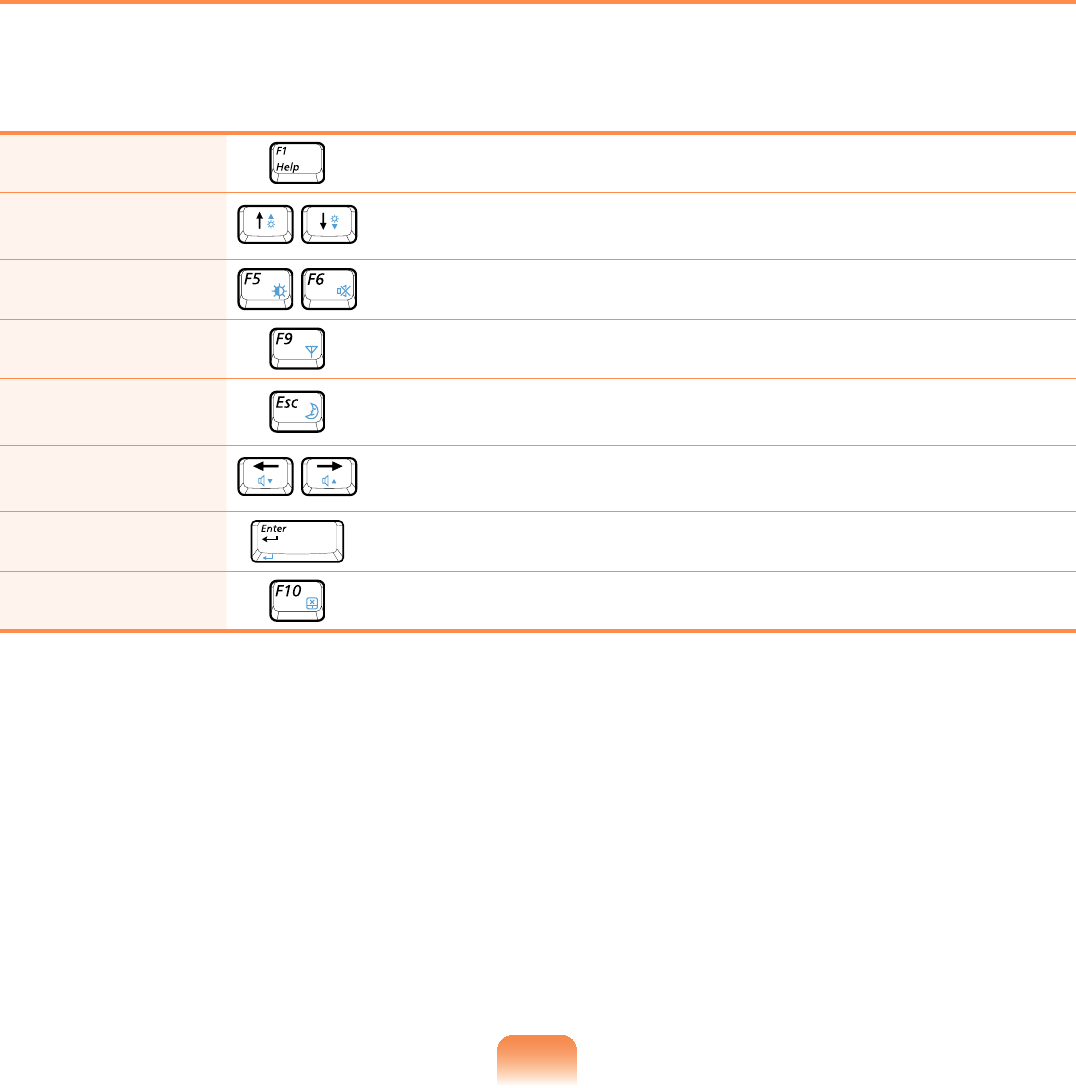
144
System Setup Keys
,QWKH6HWXS\RXKDYHWRXVHWKHNH\ERDUG
F1 PresstoviewtheSetupHelp.
Up & Down
Keys Presstomoveupanddown.
F5/F6 Presstochangetheitemvalue.
F9 PresstoloadthedefaultSetupsettings.
ESC Presstoreturntoahigherlevelmenuortomovetothe
Exit menu.
Left & Right
Keys Presstomovetoanothermenu.
Enter Presstoselectanitemortoenterasubmenu.
F10 PresstosavethechangesandexitSetup.
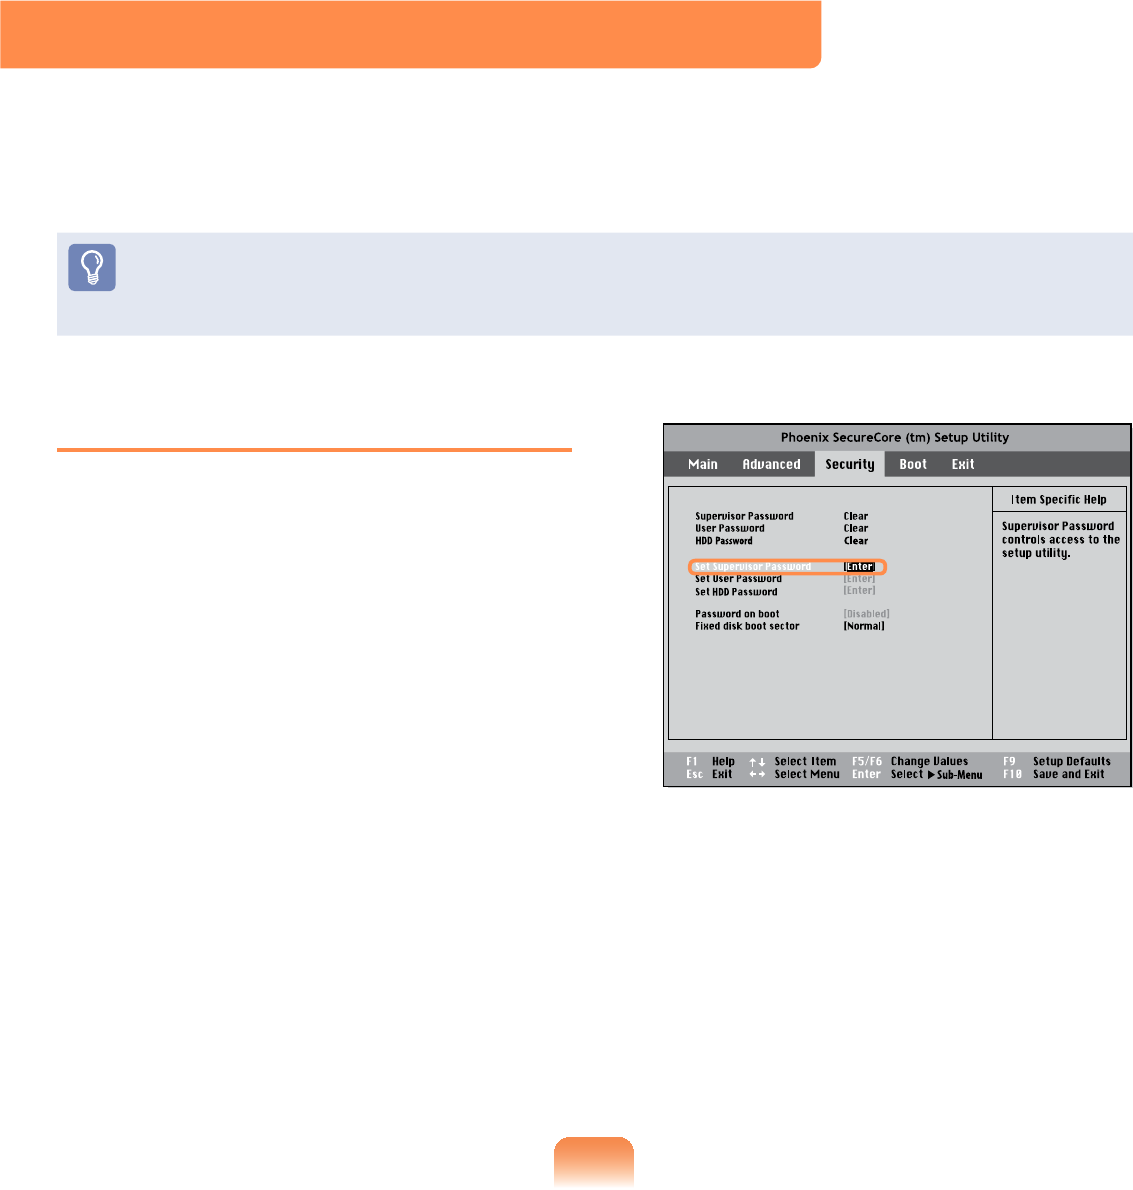
478
Setting a Supervisor Password
ASupervisorPasswordisrequiredtoturn
thecomputeronortostarttheSystem
Setup.
WhensettingaSupervisorPassword,
usersotherthanasupervisorcannotuse
the computer.
1 Select the Security menu in the BIOS
Setup.
2 In the Set Supervisor Password
item, press <Enter>.
Setting a Boot Password
Whensettingapassword,youhavetoenterapasswordtousethecomputerorenter
theBIOSSetup.
%\FRQ¿JXULQJDSDVVZRUG\RXFDQUHVWULFWV\VWHPDFFHVVWRDXWKRUL]HGXVHUVRQO\DQG
SURWHFWGDWDDQG¿OHVVDYHGRQWKHFRPSXWHU
Donotloseorforgetyourpassword.
Ifyouhaveforgottenyourpassword,contactaSamsungservicecenter.Inthiscase,a
service fee will be charged.
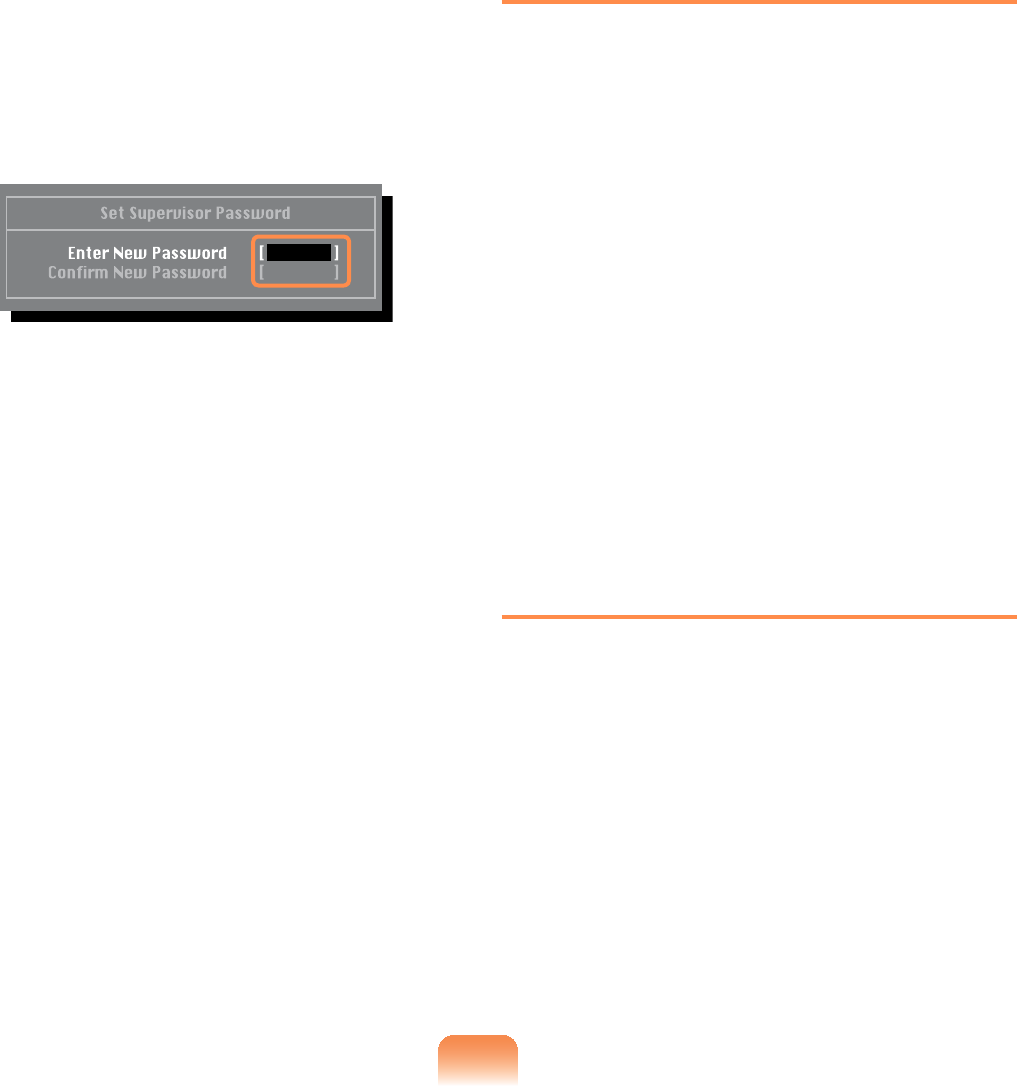
146
3 Enter a password, press <Enter>, re-
HQWHUWKHSDVVZRUGIRUFRQ¿UPDWLRQ
and press <Enter> again.
The password can be up to 8
alphanumeric characters. Special
characters are not allowed.
4 :KHQDPHVVDJHFRQ¿UPLQJWKH
SDVVZRUGFRQ¿JXUDWLRQDSSHDUVLQ
the Setup Notice window, press
<Enter>.
The supervisor password has been
set.
Thesupervisorpasswordisrequired
toturnthecomputeronortoenterthe
BIOS Setup.
Setting a User Password
TheUserPasswordrestrictsaccess
WRWKHFRPSXWHURUIRUFRQ¿JXULQJWKH
%,266HWXSOLNHD6XSHUYLVRU3DVVZRUG
However,theSetupitemsthatcan
EHFRQ¿JXUHGZLWKD8VHU3DVVZRUG
DUHUHVWULFWHGXQOLNHIRUD6XSHUYLVRU
Password.
%HIRUHFRQ¿JXULQJDXVHUSDVVZRUGD
supervisor password must have been
FRQ¿JXUHG'HDFWLYDWLQJWKHVXSHUYLVRU
password also deactivates the user
password.
In the Set User Password item, press
<Enter> and complete the procedures
from Step 3 of Setting a Supervisor
Password.
Setting Up a Boot Password
Tosetupabootpassword,the
administrator password (Set Supervisor
Password)shouldbesetinadvance.
Set the Password on boot item to
Enabled.
Onceabootpasswordisset,youhave
toenterapasswordtobootupthe
computer.

147
Setting up a Hard Disk Drive
Password (Optional)
Asupervisorpasswordmustbesetusing
the Set Supervisor Password menu.
,I\RXVHWDSDVVZRUGIRUDKDUGGLVN
drive, it cannot be accessed from another
computer.
Press <Enter>intheSet HDD
PasswordLWHPDQGGH¿QHDSDVVZRUGDV
describedinStep 3 oftheSettingupthe
Supervisor Password.
7KHKDUGGLVNGULYHSDVVZRUGVHWWLQJ
function is not provided for some
models.
Changing the hard disk drive
password
For security purposes, you can only
FKDQJHDKDUGGLVNGULYHSDVVZRUG
afterrestartingthecomputerby
pressing the computer Power button.
If you cannot change the hard
GLVNGULYHSDVVZRUGRUWKHHDD
Password Frozen message appears
when entering the BIOS Setup and
then selecting Security > HDD
Password, press the Power button
toturnthecomputeronagain.
Deactivating the Password
1 Press <Enter>onthepassword
to be deactivated. For example, to
deactivateasupervisorpasswordin
the Set Supervisor Password item,
press <Enter>.
2 In the Enter Current Password
LWHPHQWHUWKHFXUUHQWO\FRQ¿JXUHG
password and press <Enter>.
3 Leave the Enter New Password item
¿HOGHPSW\DQGSUHVVEnter>.
4 Leave the &RQ¿UP1HZ3DVVZRUG
¿HOGHPSW\DQGSUHVVEnter>.
5 In the Setup Notice window, press
<Enter>.
Thepasswordisdeactivated.
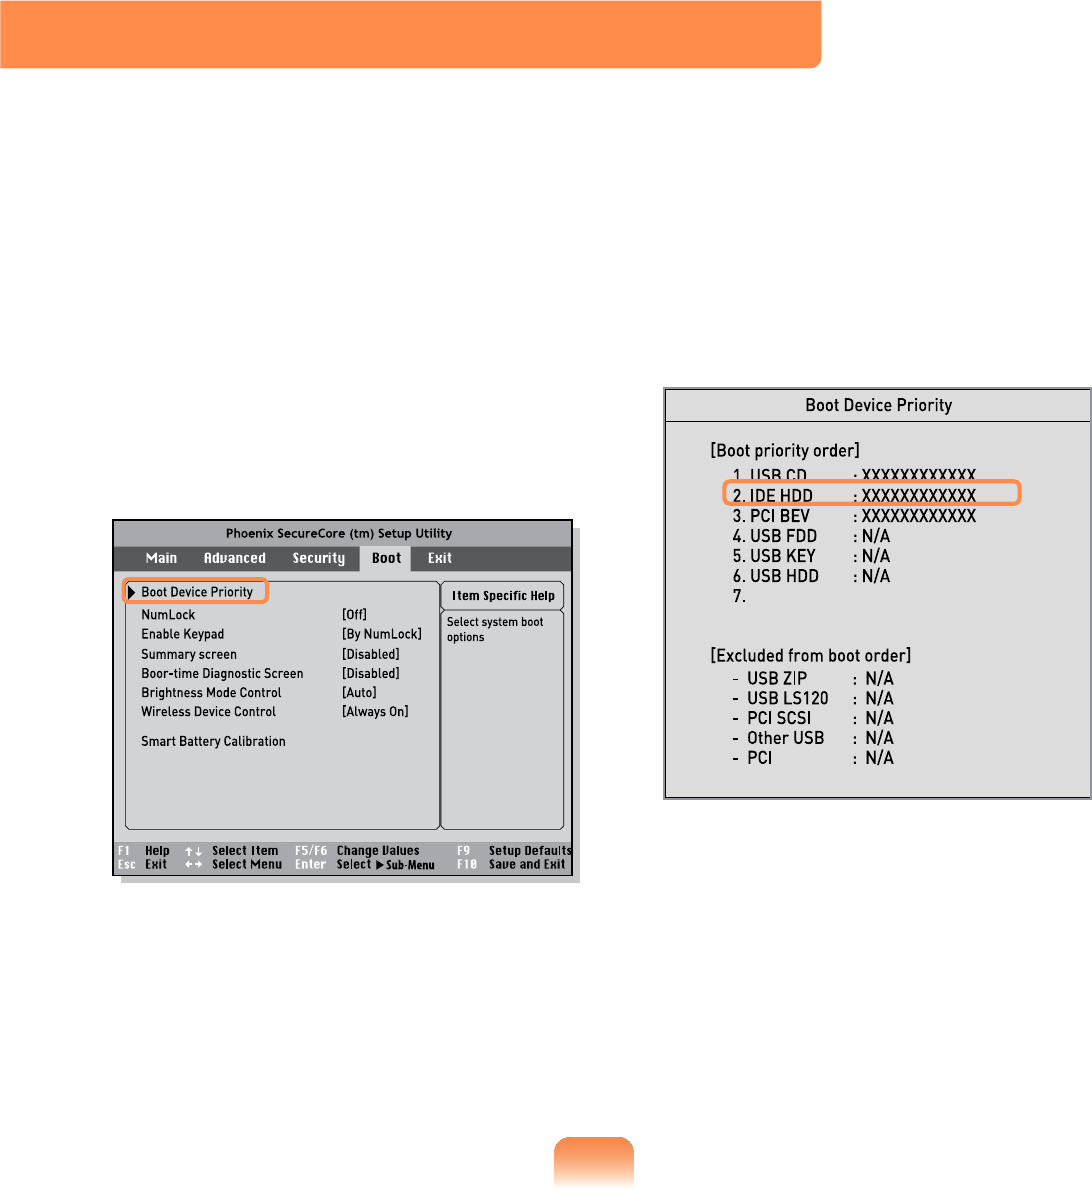
47;
1 Select the Boot menu in the BIOS
Setup.
2 Press <Enter>ontheBoot Device
Priority item.
3 3UHVVWKHGRZQNH\ĻWRPRYHWRWKH
IDE HDD itemand press the F6NH\WR
move up to the top item.
4 Press the F10NH\WRVDYHWKHVHWWLQJV
andexitSetup.
The highest boot priority device is
nowsettotheHardDrive.
Changing the Boot Priority
7KLVFRPSXWHULVFRQ¿JXUHGWRERRWIURPDQH[WHUQDOW\SH2''¿UVW
Thischapterdescribeshowtochangethebootprioritysothatthecomputerbootsfrom
WKHKDUGGLVNGULYH¿UVW
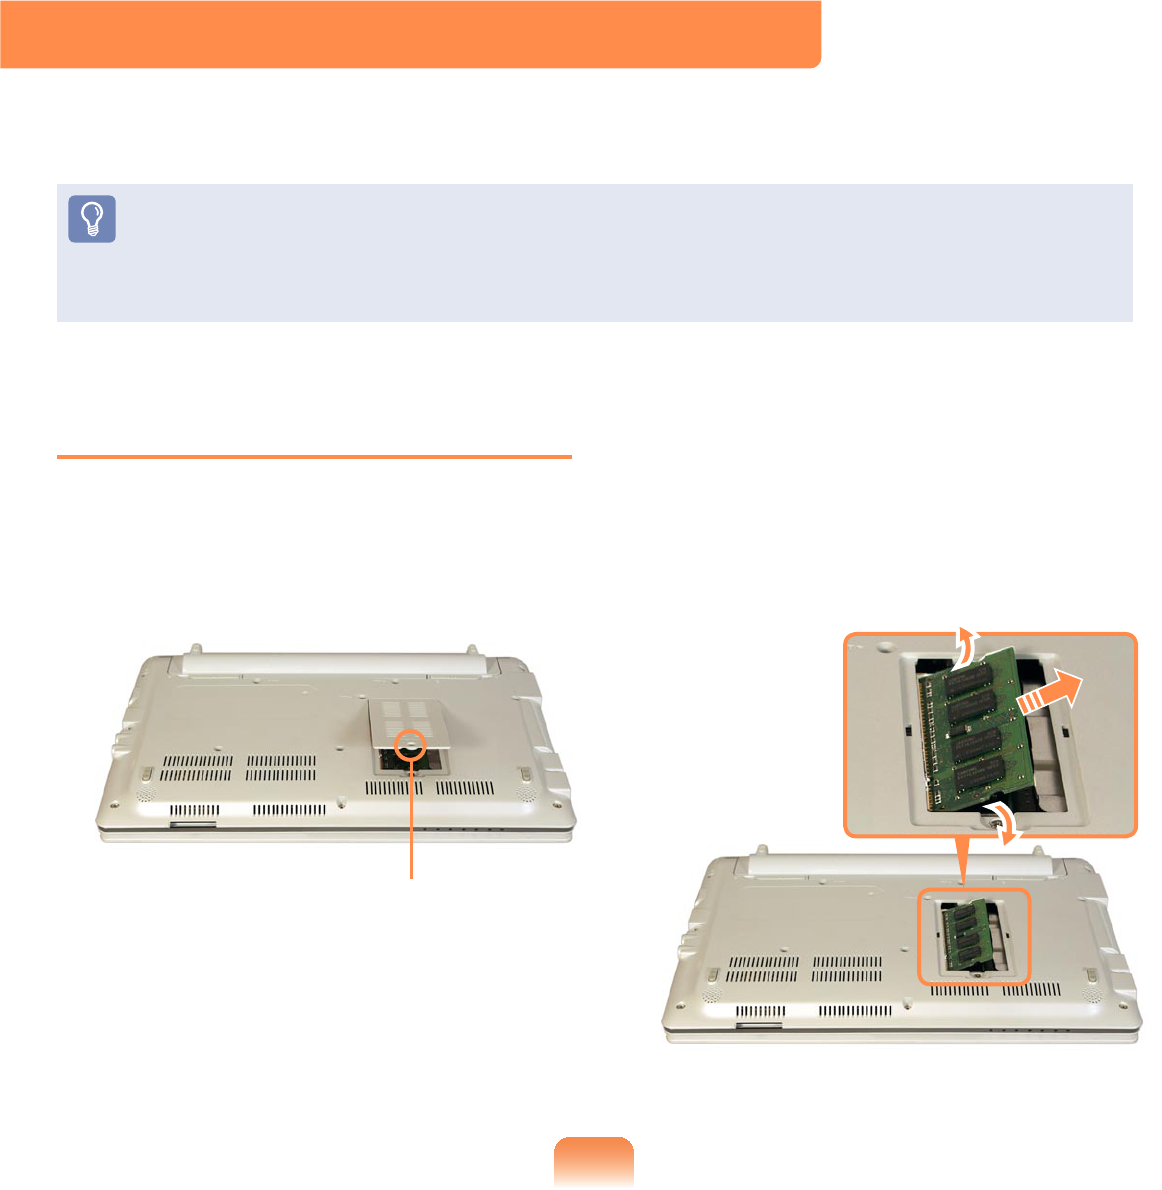
47<
Upgrading Memory
Amemoryisinstalledinthememoryslotatthebottomofthiscomputer.The
procedures to replace the memory are described below.
z Replacenewmemoryonlyaftershuttingthecomputerdowncompletely.Donot
replace memorywhenthecomputerisinSleepmode.
z Disconnect mains power and remove the battery before continuing.
z2QO\XVHWKHVDPHW\SHRIPHPRU\DVVSHFL¿HGLQWKH3URGXFW6SHFL¿FDWLRQ
Replacing the Memory
1 Remove the screw on the memory
compartmentcoveratthebottomof
thecomputerusingascrewdriver.
Fixing Screw
2 Pullthememorymodulelatches
outward.Thememorymodulewillpop
up.
Removethememorymoduleoutat
an angle of 30 degrees.
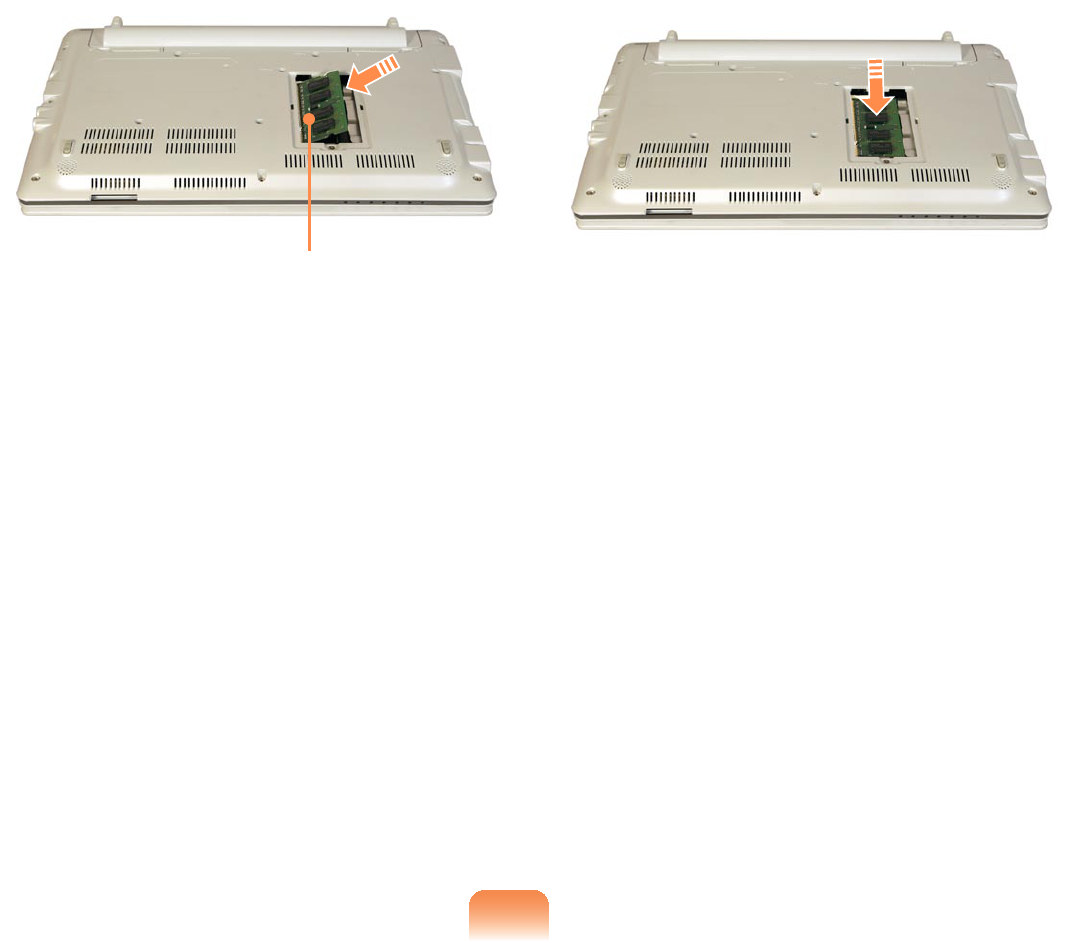
150
3 Insert a new memory module into
thememoryslotatanangleof
approximately 30 degrees aligning it
totheangleofthememoryslot.
Memory Slot
4 Pushthememorymoduledown
VRWKDWLWLVFRPSOHWHO\¿[HG,IWKH
PHPRU\GRHVQRW¿WHDVLO\SXVKWKH
memory module down while pulling
thememorymodulelatchesoutward.
5 Close the memory compartment
cover and fasten the screw.

484
Battery
Pleaserefertothefollowinginstructionswhenrunningthecomputeronbatterypower
withoutconnectingtheACpower.
ALithium-Ionsmartbatteryissuppliedwiththiscomputer.
Carefullyreadandfollowtheprecautionsprintedonthebatterybeforeusingthe
battery.
Precautions
8VHRQO\FKDUJHUVVSHFL¿HGLQWKH8VHU0DQXDO
1HYHUKHDWWKHEDWWHU\SDFNSXWLWQHDURULQD¿UHRUXVHDWDWHPSHUDWXUHKLJKHUWKDQ
&DVWKLVPD\FDXVH¿UH
1HYHUFDXVHDVKRUWFLUFXLWEHWZHHQWKHEDWWHU\SDFNWHUPLQDOVRUGLVDVVHPEOHWKH
EDWWHU\SDFN
Carefullyreadandfollowtheprecautionsprintedonthebatteryandthesafety
instructions in the User Manual before using the battery.
Please refer to the system operation environment ( 193) of this manual and operate
and store the battery at room temperature.
Installing/Removing the Battery
1 Shutdownthesystem,closetheLCDpanelandplacethecomputerupsidedownon
DÀDWVXUIDFH
152
2 Slidetherightbatterylatchtothe
OPEN position and remove the
battery while holding the left battery
latchtotheOPEN position.
l
n
W
3 To install the battery again, slide the
battery into the system.
6OLGHDQG¿[WKHULJKWEDWWHU\ODWFKWR
the CLOSE (inside) position so that
WKHEDWWHU\LV¿[HG
n
l
Iftherightbatterylatchisnotinthe
CLOSE (inside) position, there is
adangerofdatalossbecausethe
battery may become separated.
6OLGHDQG¿[WKHODWFKWRWKH&/26(
SRVLWLRQVRWKDWWKHUHGFLUFOHPDUNLV
hidden.
&KHFNLIWKHEDWWHU\ODWFKKDVEHHQ
moved inwards.

153
Charging the Battery
1 Attach the battery and connect the
$&DGDSWHUWRWKH'&LQMDFNRIWKH
computer.
The battery will then start charging.
2 When charging is complete, the
Charge LED turns green.
Status Charge LED
Charging Amber
Charging complete Green
AC adapter not
connected Off

154
Measuring the Remaining Battery Charge
You can view the battery charge status by completing the following procedures.
To use the shortcut key to view
Press the Fn +NH\VRQWKHNH\ERDUG
The remaining battery charge (%) will
displayedforamoment.
Youcanonlyviewthechargestatusin
thiswaywhenEasyDisplayManageris
installed on your computer.
Battery Warning
z Youwillhearanalarmwhenthe
remaining battery charge reaches
below 10%.
In this case, connect the AC
adapterorturnoffthecomputer
andinstallafullychargedbattery.
z If the battery residual amount is
3~5%, the computer automatically
shutsdownaftersavingthedata.
The battery residual amount may
vary depending on the computer
model.
Battery Usage Time Information
A battery is an expendable supply,
sowhenusingitoveralongtime,the
capacity/battery life is shortened. If the
batterylifeisreducedtounderhalfofits
initial time, we recommend purchasing a
new battery.
Forlongperiodsofnotusingthebattery,
NHHSWKHEDWWHU\DIWHUGLVFKDUJLQJLW7KLV
extendsthebatterylifetime.

155
Extending the Battery Usage
Time
Decreasing the LCD Brightness
Press the Fn +NH\VRQWKHNH\ERDUG
to decrease the LCD brightness to extend
the battery usage time.
Using Samsung Battery Manager
BatteryManagerisamanagement
programthatallowsyoutousethebattery
HI¿FLHQWO\<RXFDQVHOHFWWKHRSWLPL]HG
powermodedependingonthesystem
environment.
&OLFN Start > All Programs > Samsung
> Samsung Battery Manager >
Samsung Battery Manager.
Select Power
Mode
Power-saving
Effect
Maximum Battery Mode
This mode is appropriate for the
environmentthatrequiresmaximum
battery lifetime. The system performance
maybedegradedinthismode.
General Mode
This mode is appropriate for the regular
environment and it optimizes the
performanceofthesystemandbattery.

156
Maximum Performance Mode
This mode is appropriate for the
environmentthatrequiresmaximum
system performance. The battery life may
get shorter in this mode.
User Settings Mode
7KLVPRGHDOORZV\RXWRFRQ¿JXUHWKH
detailed settings. You can set LCD
brightness, power status, and color
quality.
What is the Power-saving Effect?
This product displays the battery life
ineachpowermode.Thehigherthe
powersavingeffectincreases,the
longerthegraphbarisdisplayed.
When Using Games or Multimedia
The system may not operate properly
inmaximumbatterymode.Itis
recommendedtoconnecttheAC
adapter to the system or to use the
system in general mode.
Usage Mode of Samsung Battery
Manager
z The maximum battery mode
optimizes the system operation
speed to increase the battery run
time,sotheprogramexecution
time may get longer.
z If you change the power settings,
the properties in Power Options
window will also be changed.
z Complete, install Samsung Battery
Manager using the System
Software Media in order to use
the general mode.
Disabling Unused Devices
Ifyouturnoffunuseddevices,battery
lifetime will improve.
1 &OLFN'HYLFH0DQDJHUIURPStart
> Control Panel > Performance
and Maintenance > Systems >
Hardware tab.
2 5LJKWFOLFNWKHGHYLFHVWKDW\RXDUH
not using and select Disable.
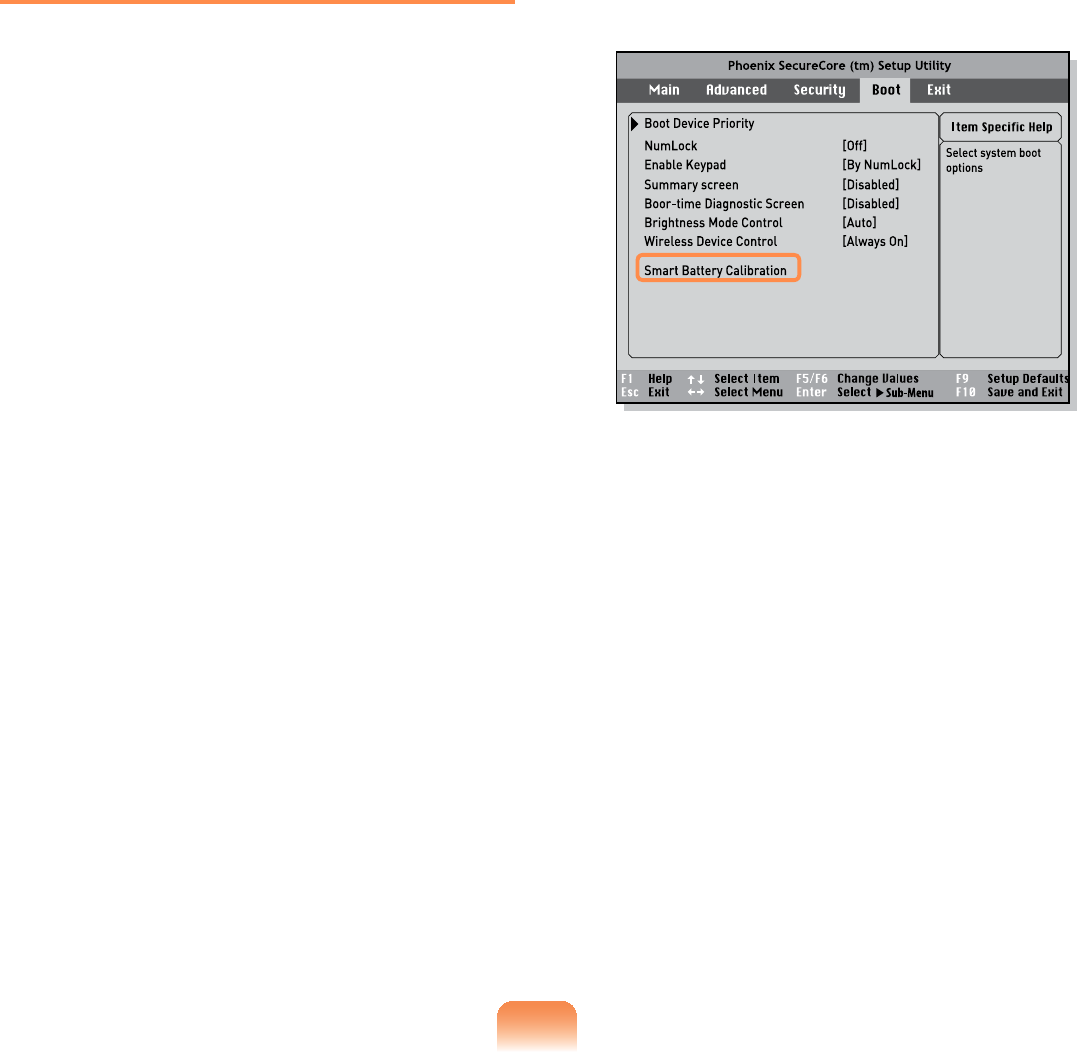
157
Using the Battery Calibration
Function
When charging/discharging the battery
repeatedlyforashorttimeonly,the
battery usage time may be reduced by
thedifferencebetweentheactualbattery
charge and the remaining charge display.
In this case, the actual battery charge
and the remaining charge display will
be the same by discharging the battery
completely using the Battery Calibration
function, and then recharging it again.
1 Disconnect the AC power adapter
afterturningoffthecomputer.
2 Restartyourcomputerandpressthe
F2 button when the Samsung logo
appears, to start the BIOS Setup.
3 Move to the Boot > Smart Battery
Calibration item using the direction
NH\VDQGSUHVVEnter>.
4 Highlight Yes in the Battery
&DOLEUDWLRQ&RQ¿UPDWLRQ window
and press <Enter>.
The Battery Calibration function is
activated and the battery is forcefully
discharged. To stop the operation,
press the <Esc> button.
This operation requires 3~5 hours
depending on the battery capacity
and the remaining battery charge.
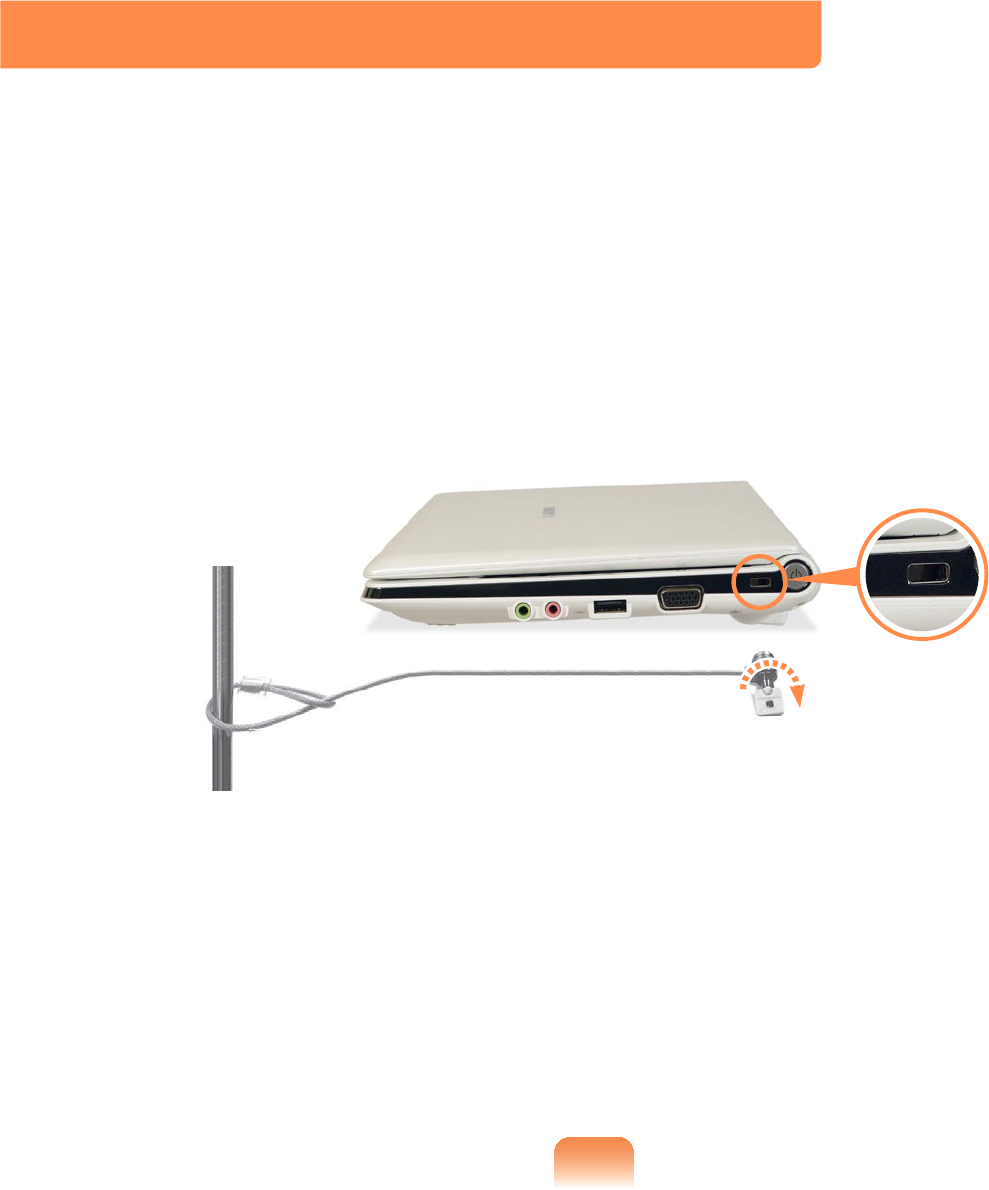
48;
Using the Security Lock Port
<RXFDQFRQQHFWD.HQVLQJWRQORFNWRWKH6HFXULW\/RFNSRUWWRSUHYHQW\RXUFRPSXWHU
beingstolenwhenyouhavetousethecomputerinapublicplace.
7RXVHWKLVIHDWXUH\RXKDYHWRSXUFKDVHWKH.HQVLQJWRQORFNDGGLWLRQDOO\7RXVHWKH
.HQVLQJWRQORFNUHIHUWRWKHSURGXFWPDQXDO
7LHWKH.HQVLQJWRQORFNFDEOHWRD¿[HGREMHFWDQGLQVWDOOWKHRWKHUHQGRIWKHFDEOHWR
WKH6HFXULW\/RFNSRUW

Chapter 7.
Appendix
Reinstalling Windows XP 160
Using Samsung Recovery Solution
(Optional) 165
Questions and Answers 174
3URGXFW6SHFL¿FDWLRQV 3
Glossary 204
Index 208
Contact SAMSUNG WORLD WIDE 209

160
Reinstalling Windows XP
You can reinstall Windows using the System Recovery CD when Windows does not
ZRUNSURSHUO\
z ASystemRecoveryCDmaynotbesupplieddependingonyourcomputermodel.
z To reinstall Windows when Windows does not boot, refer to page 163.
z To reinstall Windows using System Recovery Media, an external-type ODD must be
connectedbeforeturningthecomputeron.Thefollowingdescriptionsassumethat
anexternalODDisconnected.
5HLQVWDOOLQJ:LQGRZVPD\GHOHWHGDWD¿OHVDQGSURJUDPVVDYHGRQWKHKDUGGLVN
GULYH0DNHVXUHWREDFNXSDOOLPSRUWDQWGDWD6DPVXQJ(OHFWURQLFVVKDOOQRWEHKHOG
liable for any loss of data.
Reinstalling Windows
Explain Standard installation option as a
standard.
1 Insert the system recovery CD into
theCD-ROMdrive.
2 ,QWKHLQLWLDOVFUHHQFOLFNStandard
Installation.
zStandard installation
You can change the settings for
partitioning, the installation folder,
etc. during the Windows installation.
However, reinstalling Windows may
GHOHWHWKHGDWDRQWKHKDUGGLVNGULYH
VXFKDV¿OHVSURJUDPVHWF,QRUGHU
to minimize damage from data loss,
SOHDVHUHPHPEHUWRDOZD\VEDFNXS
data.
zQuick Installation
This re-installs Windows with the user
GDWDDQGWKHV\VWHPFRQ¿JXUDWLRQ
intact. The user data in the already
existing Windows folders may be
preserved as the existing Windows
folders are overwritten.

161
3 The description for the standard
LQVWDOODWLRQDSSHDUV&OLFNYes.The
installation starts, and the system will
berestartedafterawhile.
:KHQ4XLFN,QVWDOODWLRQLVVHOHFWHG
Setup proceeds with Step 3 before
automatically installing Windows.
4XLFN,QVWDOODWLRQRYHUZULWHVWKH
existing Windows version, so that
drivers or applications do not need to
be reinstalled.
4 Afterthesystemhasrestarted,the
PHVVDJH¶3UHVVDQ\NH\WRERRWIURP
&'¶DSSHDUV'RQRWSUHVVDQ\NH\
at this time. After a while the partition
FRQ¿JXUDWLRQVFUHHQDSSHDUV7RQRW
change the partition, press Enter.
:KDWLVSDUWLWLRQFRQ¿JXUDWLRQ"
3DUWLWLRQFRQ¿JXUDWLRQLVDIXQFWLRQ
WKDWGHYLGHVWKHKDUGGLVNGULYHLQWR
one or several partitions. Note that
changing the partition deletes all of
WKHGDWDRQWKHKDUGGLVNGULYH
5 Select the folder to install the
Windows operating system. To delete
the previous version of Windows and
install in the current folder, press Lon
WKHNH\ERDUG
If you press ESC to select another
folder for the installation, new
Windows folders are created causing
DULVNRIGXDOERRWLQJ
6 After the installation process copies
the necessary folders for the
Windows installation, restart the
system, and the message “Press any
NH\WRERRWIURP&'´LVGLVSOD\HG<RX
donotneedtoenteranything.Ina
moment,theWindowsXPinstallation
screen will appear to proceed with the
installation.
7 When the Regional and Language
OptionsZLQGRZDSSHDUVFOLFNNext.
8 Whenawindowthatrequiresyour
name and organization pops up, enter
your name and the organization and
FOLFNNext.
9 When the Date and Time Settings
ZLQGRZDSSHDUVFOLFNNext.Setup
will continue.

162
10 When the system restarts to display
3UHVVDQ\NH\WRERRWIURP&'GR
QRWSUHVVDQ\NH\
:KHQ\RXVHHWKH:LQGRZVGHVNWRS
thismeansthattheinstallationprocessis
completed.
Remove the system recovery CD
and install the device drivers and
applications from the system software
Media.

163
1 Insert the system recovery CD into
theCD-ROMdriveandstartthe
computer.
2 If the following message appears on
WKHVFUHHQSUHVVDQ\NH\IURPWKH
NH\ERDUG
Press any key to boot from CD.....
3 'RQRWSUHVVDQ\NH\DWWKLV
time. After a while the partition
FRQ¿JXUDWLRQVFUHHQDSSHDUV7RQRW
change the partition, press Enter.
4 6HOHFWWKHGHVLUHG¿OHV\VWHPIRUPDW
7RPDLQWDLQWKHFXUUHQW¿OHV\VWHP
press Enter.
5 Select the folder to install the
Windows operating system. To delete
the previous version of Windows and
install in the current folder, press Lon
WKHNH\ERDU
6 After the installation process copies
the necessary folders for the
Windows installation, restart the
system, and the message “Press any
NH\WRERRWIURP&'´LVGLVSOD\HG<RX
donotneedtoenteranything.Ina
moment,theWindowsXPinstallation
screen will appear to proceed with the
installation.
7 Follow the instructions of the Windows
XP installation wizard to continue with
the installation.
Reinstalling when Windows does not start
WhenWindowsdoesnotstart,bootupwiththeSystemRecoveryCDandfromthere
you can reinstall Windows.

164
8 When the installation is complete,
thecomputerwillrestart.Whenthe
systemhasrestarted,thePress
DQ\NH\WRERRWIURP&'PHVVDJH
appears.
Ignore the message.
ThesystembootsandtheWindows
and Windows Registration screen
appears. Register Windows, following
WKHLQVWUXFWLRQVWR¿QLVKWKH:LQGRZV
installation. Remove the System
Recovery CD and install the device
drivers and application programs using
Standard Installation from the System
Software Media.

165
Using Samsung Recovery Solution (Optional)
SamsungRecoverySolutionprovidesaRestore Function that enables you to
easily restore your computer to a previous, normal state when a problem occurs with
your computer, as well as a Backup Function that enables you to easily save your
computer’scurrentstatusandyourdata.
z Samsung Recovery Solution may not be provided or the version may differ
dependingonyourcomputermodelandtheusageproceduresmaydifferdepending
ontheversion.Thescreenimagesinthisdocumentmaydifferfromactualones.
z)RUPRGHOVZLWKDQ66'6ROLG6WDWH'LVN6DPVXQJ5HFRYHU\6ROXWLRQLVQRW
provided.
z7RXVHWKHEDFNXSDQGUHVWRUHIXQFWLRQWR'9'DQH[WHUQDO2''PXVWEH
connected. The following descriptions assume that an external ODD is connected.
Samsung Recovery Solution Functions
}Restore Function
Using this function, you can easily restore your computer to a previous, normal state
withoutusingtheSystemRecoveryMediaortheWindowsInstallationCD,whenyour
FRPSXWHULVQRORQJHUZRUNLQJSURSHUO\RUIDLOVWRERRWXSGXHWRDSUREOHP,I\RX
KDYHEDFNHGXSGDWD\RXFDQUHVWRUHWKHEDFNXSGDWD

166
Basic Restore Complete Restore Data Restore
7KLVIXQFWLRQTXLFNO\
restores major
:LQGRZV¿OHV&?
Windows) without
touching the user
FRQ¿JXUDWLRQDQG
dataontheCdrive.
This function deletes the entire C
driveandthenrestoresthecontents
of the C drive completely.
This function
restores the user
data if the user
SUHYLRXVO\EDFNHGXS
data.
z Initial Status Restore This function
restoresthecomputertotheinitial
status saved when the computer
ZDVUXQIRUWKH¿UVWWLPHDIWHULWZDV
purchased.
z&RPSOHWH%DFNXS5HVWRUH7KLV
function restores the computer to
the point where the user performed
aComplete Backup.
Restore Functions
}Backup Function
<RXFDQEDFNXSWKHHQWLUH&GULYHRUDOO\RXUGDWDWRanother hard disk drive or
DVD<RXFDQUHVWRUHWKHEDFNHGXSGULYHRUGDWDXVLQJWKH5HVWRUHIXQFWLRQ
Backup Functions
7KLVIXQFWLRQEDFNVXS
the initial status of the
computer.
Initial Status Backup
7KLVIXQFWLRQEDFNVXS
VSHFL¿FIROGHUVRU¿OHV
Data Backup
7KLVIXQFWLRQEDFNVXS
theentiredriveC.
Complete Backup

167
Using Samsung Recovery Solution
NotonlycanyouuseSamsungRecoverySolutionwhenWindowsisrunning,but
also when you are unable to boot up into Windows. Let’s learn how to use Samsung
Recovery Solution.
Initial Status Backup
,I\RXWXUQ\RXUFRPSXWHURQIRUWKH¿UVW
WLPHWKH,QLWLDO6WDWXV%DFNXSIXQFWLRQ
is performed after registering Windows.
This function saves an image of the Initial
StatusoftheCdrivetoasecurelocation
so that users can restore the computer
to the Initial Status using the Complete
5HVWRUHIXQFWLRQ$Q,QLWLDO6WDWXV%DFNXS
is only performed once immediately after
thecomputerispurchased.
1 ,I\RXWXUQWKHSRZHURQIRUWKH¿UVW
time, the Register Windows screen
appears. If you register Windows
according to the instructions on the
screen,thecomputerwillberestarted.
2 When the computer has been
restarted, the User Registration
&RPSOHWHPHVVDJHDSSHDUV&OLFN
OK. The computer will restart.
3 The Initial Status Backup screen
appears.
7RUHVL]HWKH&DQG'GULYHVFOLFN
AdvancedDQGSDUWLWLRQWKHGLVN
accordingly. Adjust the partition size
XVLQJWKHVOLGHEDUDQGWKHQFOLFN
Next.
7KHSDUWLWLRQGLVNIXQFWLRQLVRQO\
available when the computer is
WXUQHGRQIRUWKH¿UVWWLPHDQGZLOO
not be available afterwards. Once
you have completed the partitions,
you cannot resize the partitions.
7KHUHIRUHSDUWLWLRQWKHGLVNFDUHIXOO\
4 7KH,QLWLDO6WDWXV%DFNXSLVSHUIRUPHG
WREDFNXSWKHLQLWLDOVWDWXVRIWKH
Cdrivetoasecurelocation.This
EDFNXSLPDJHLVXVHGIRUWKH
Complete Restore function that
restores your computer to the initial
statuswhenthecomputerisnot
ZRUNLQJSURSHUO\
5 :KHQWKH,QLWLDO6WDWXV%DFNXSLV
complete, restart Windows.

168
Quick Restore
4XLFN5HVWRUHHQDEOHV\RXWRHDVLO\
restoreyourcomputertoaprevious,
normalstatewhenaproblemoccurswith
\RXUFRPSXWHU4XLFN5HVWRUHSURYLGHV
BasicRestoreandCompleteRestore
(Computer Initial Status Restore) options.
1– When Windows is running:
&OLFNStart > All Programs >
Samsung > Samsung Recovery
Solution > Samsung Recovery
Solution.
– When Windows does not start:
Turnthecomputeronandpress
the F4NH\ZKHQWKHERRWVFUHHQ
(SAMSUNG logo) appears. After a
moment,thecomputerbootsupin
RestorationmodeandtheSamsung
Recovery Solution screen appears.
The touch screen function is not
supportedinthismodeevenifyour
modelsupportsatouchscreen.In
this mode, please use the touchpad
or mouse instead of the touch
screen.
2 If the Samsung Recovery Solution
SURJUDPLVODXQFKHGIRUWKH¿UVWWLPH
after purchasing the computer, the
license agreement screen appears
before the restoration is started. Read
WKHDJUHHPHQWDQGFOLFNAgree to
continue.
3 If the initial menu screen appears,
FOLFNRestore.
,I\RXFOLFNSelect by Symptom,
theSelectbySymptommenu
appears.Ifyouselectasymptom,a
recommended restoration option will
EOLQN&OLFNWKHUHVWRUDWLRQRSWLRQWR
continue.
4 Select either Basic Restore or
Complete Restore from the Restore
menu.
zABasic Restore restores the major
:LQGRZV¿OHVRQO\ZKLOHPDLQWDLQLQJ
WKHXVHUFRQ¿JXUDWLRQDQGGDWDRQWKH
Cdriveinashorttime.
zAComplete Restore deletes the
entireCdriveandthenrestoresthe
contentsoftheCdrive.

169
Run Complete Restore if the
FRPSXWHUGRHVQRWZRUNHYHQDIWHU
Basic Restore has been completed.
4-1 If you have selected Basic Restore:
,QWKH%DVLF5HVWRUHVFUHHQFOLFN
the Next button. The system will be
restarted.
4-2 If you have selected Complete
Restore:
In the restoration point selection
screen, select the restoration point
describedas‘ComputerInitial
6WDWXV¶DQGFOLFNWKHNext button.
The system will be restarted.
SinceaCompleteRestoredeletes
alluserdataaswellasadditionally
LQVWDOOHGSURJUDPVSOHDVHEDFNXS
\RXULPSRUWDQWGDWD¿UVWXVLQJWKH
'DWD%DFNXSIXQFWLRQEHIRUHUXQQLQJ
Complete Restore.
5 Thecomputerbootsupinto
restorationmodeandtherestoration
progressmessageappears.Ifyou
FOLFNOK, the restoration begins. The
UHVWRUDWLRQPD\WDNHVRPHWLPH
please wait for a moment.
6 When the ‘Restart the System’
message appears after the restoration
LVFRPSOHWHFOLFNOK to restart the
system.
0DNHVXUHWKDWWKHSRZHUFRUGLV
connected while the restoration is in
SURFHVV7KH¿UVWWLPHWKHFRPSXWHU
bootsupafteraCompleteRestorehas
beenperformed,thespeedoftheboot
process may be slowed down due to
the system optimization process. At this
time,donotshutthecomputerdownby
force.
User Complete Backup/Restore
AComplete Backup saves the complete
imageoftheCdriveontoanotherdriveor
DVD. A Complete Restore restores the
LPDJH¿OHVDYHGE\WKH&RPSOHWH%DFNXS
onto the C drive. This guide describes the
&RPSOHWH%DFNXSDQG&RPSOHWH5HVWRUH
SURFHGXUHVRQWKHEDVLVRIEDFNLQJXS
and restoring by using DVD.

170
}Complete Backup
z,I\RXUXQ&RPSOHWH%DFNXS
usingaDVD,youcanrestorethe
computerevenwhenaproblem
RFFXUVZLWKWKHKDUGGLVNRUZKHQ
the restoration area is removed.
z7RSHUIRUPDFRPSOHWHEDFNXS
onto DVD, an external ODD that
supports DVD burning must be
connected.
1 &OLFNStart > All Programs >
Samsung > Samsung Recovery
Solution > Samsung Recovery
Solution.
When you cannot start Windows,
turnthecomputeronandpressthe
)NH\LQWKHERRWVFUHHQWRHQWHU
restoration mode.
2 When the initial menu screen
DSSHDUVFOLFNBackup.
3 &OLFNComplete Backup in the
EDFNXSPHQX
4 (QWHUDGHVFULSWLRQIRUWKHEDFNXS
regarding the current computer status
LQWKH'HVFULSWLRQ¿HOGVRWKDW\RXFDQ
easily recognize it later, and specify
the Save Path. If your computer has a
DVD-Writer, you can specify the DVD
drive as the Save Path.
Select Drive D.
Select the DVD drive.
5 ,I\RXFOLFNWKHNext button, the
system restarts in restoration mode
and the Complete Backup begins.
IfyouhaveselectedtheDVDdrive
DVWKH6DYH3DWKWKH³(QWHUDEODQN
DVD”messageappears.Inserta
EODQN'9'DQGFOLFNWKHOK button.
Samsung Recovery Solution
supports DVD+R, DVD-R, DVD+RW,
andDVD-RW,butdoesnotsupport
CD-R,CD-RW,DVD-RAM,DVD-DL
(Dual Layer), HD-DVD, and Blu-Ray.

171
6 7KH&RPSOHWH%DFNXSEHJLQV
If multiple DVDs are required,
theexpectednumberofDVDsis
displayed in the progress screen.
Whenever burning a DVD is
completed,the“InsertthenextDVD”
messagewillappear.Continuethe
EDFNXSDFFRUGLQJWRWKHLQVWUXFWLRQV
7
When the ‘Restart the System’ message
DSSHDUVDIWHUWKHEDFNXSLVFRPSOHWH
FOLFNOK to restart the system.
}Complete Restore
1– When backing up onto DVD
Turnthecomputeronandinsertthe
EDFNXS'9'LQWRWKH'9'GULYH
,IWKHUHDUHPXOWLSOHEDFNXS'9'V
LQVHUWWKH¿UVW'9'
– When backing up to another
drive
ProceedtoStep 2.
2 &OLFNStart > All Programs >
Samsung > Samsung Recovery
Solution > Samsung Recovery
Solution.
When you cannot start Windows,
turnthecomputeronandpressthe
)NH\LQWKHERRWVFUHHQWRHQWHU
restoration mode.
3 When the initial menu screen
DSSHDUVFOLFNRestoreDQGWKHQFOLFN
Complete Restore.
4 Select a Complete Backup
restoration point in the restoration
SRLQWVHOHFWLRQVFUHHQDQGFOLFNWKH
Next button. The system is restarted.
5 The restoration progress message
appears after the computer boots up
LQUHVWRUDWLRQPRGH,I\RXFOLFNOK,
the restoration begins.
If multiple DVDs have been used
IRUD&RPSOHWH%DFNXSZKHQHYHU
burning a DVD is completed, the
“Insert the next DVD” message will
appear.
6 When the ‘Restart the System’
message appears after the restoration
LVFRPSOHWHFOLFNOK to restart the
system. The Complete Restore has
been completed.

172
User Data Backup/Restore
Data Backup enables you to save
VSHFL¿F¿OHVRUIROGHUVRQWRDQRWKHUGULYH
or DVD. Data Restore enables you to
restoredatausingthedatasavedby
D'DWD%DFNXSZKHQGDWDLVORVW7KLV
JXLGHGHVFULEHVWKH%DFNXSDQG5HVWRUH
SURFHGXUHVRQWKHEDVLVRIEDFNLQJXS
and restoring by using DVD.
}Data Backup
1 &OLFNStart > All Programs >
Samsung > Samsung Recovery
Solution > Samsung Recovery
Solution.
When you cannot start Windows,
turnthecomputeronandpressthe
)NH\LQWKHERRWVFUHHQWRHQWHU
restoration mode.
2 When the initial menu screen
DSSHDUVFOLFNBackupDQGWKHQFOLFN
Data Backup.
3 In the data selection screen, select
either Basic Selection or Select
from allVHOHFWDIROGHURU¿OHWREH
EDFNHGXSDQGWKHQFOLFNWKHNext
button.
4 (QWHUDGHVFULSWLRQIRUWKHEDFNXSLQ
the Description¿HOGVRWKDW\RXFDQ
easily recognize it later and specify
the Save Path.Ifyourcomputerhasa
DVD-Writer, you can specify the DVD
drive as the Save Path.
,I\RXKDYHVSHFL¿HGDKDUGGLVN
GULYHRUDUHPRYDEOHGLVNDVWKH
Save Path, the SamsungRecovery\
SamsungData folder is created on
WKHFRUUHVSRQGLQJGULYHHJ'?
andthedataissavedtothefolder.
7DNHFDUHWRQRWGHOHWHWKHIROGHUE\
PLVWDNHRURQSXUSRVH
5 ,I\RXFOLFNWKHNext button, the Data
%DFNXSEHJLQV,I\RXKDYHVHOHFWHG
theDVDdriveastheSavePath,
WKH³(QWHUDEODQN'9'´PHVVDJH
DSSHDUV,QVHUWDEODQN'9'DQGFOLFN
the OK button.
6 7KH³%DFNXSLVFRPSOHWHG´PHVVDJH
appears.

173
}Data Restore
1– When backing up onto DVD
Turnthecomputeronandinsertthe
EDFNXS'9'LQWRWKH'9'GULYH
– When backing up to another
drive
ProceedtoStep 2.
2 &OLFNStart > All Programs >
Samsung > Samsung Recovery
Solution > Samsung Recovery
Solution.
When you cannot start Windows,
turnthecomputeronandpressthe
)NH\LQWKHERRWVFUHHQWRHQWHU
restoration mode.
3 When the initial menu screen
DSSHDUVFOLFNRestoreDQGWKHQFOLFN
Data Restore.
4 6HOHFWDEDFNXSLWHPWREHUHVWRUHG
LQWKHEDFNXSOLVWDQGFOLFNWKHNext
button.
5 Select a folder for the restoration and
FOLFNWKHNext button. Data Restore
begins.
6 When Data Restore is completed,
FKHFNLIWKHGDWDKDVEHHQUHVWRUHGWR
WKHVSHFL¿HGIROGHU

174
Questions and Answers
This section provides information on possible problems, solutions and other references
for system use.
TThe system does not shutdown
properly.
AWhen the system does not shutdown
normally, press and hold the Power
button until the system manually
shutsoff.IfthePower-SavingMode
LVFRQ¿JXUHGLQWRWKHPower button,
pressandholdformorethan 4
secondstoshutthesystemoff.When
the system is turned on after such
PDQXDOVKXWGRZQ6FDQGLVNZLOOUXQWR
FKHFNHUURUVLQWKHV\VWHP
TThe system freezes during
program operation.
A1 Thereisanerrorwiththeprogram
currently being used. Press the
<Ctrl>,<Alt>,and<Delete> NH\V
VLPXOWDQHRXVO\DQGFOLFNEnd Task in
the Windows Task Manager window.
A2 ThereisanerrorwiththeWindows
OS.Rebootthesystembyusingthe
Power button.
Windows Related
TThe LCD screen is too dark or too
bright.
A7XUQRQWKH/&'EDFNOLJKWRUDGMXVW
the screen brightness. Press Fn +
WRWXUQRQWKH/&'EDFNOLJKWRU
press Fn +,Fn +to adjust the
screen brightness.
TThe screen saver disturbs screen
viewing during Media Player or
YLGHR¿OHRSHUDWLRQ
A&OLFNTools >Options >Player and
then clear the Allow screen saver
during playback in the Media
CenterFKHFNER[
Display Related

175
TWhen I connect a projector, and
change the setting to display
screen image on both the LCD
and the projector by pressing Fn
+ keys, screen is not displayed
properly.
APress Fn +NH\VRQFHDJDLQ,IWKH
sameproblemcontinues,itmeans
the projector cannot support the
resolution. Lower the resolution to 800
x 600.
TThe Taskbar on the bottom of the
screen does not appear when a
projector is used as the display
device.
AThis may happen, if the projector
does not support LCD resolution. In
this case change the resolution to
800x 600(recommended)onyour
computer.
TSwitching the MS-DOS command
prompt to full screen mode or
Windows mode by pressing the
<Alt>+<Enter> keys does not
operate properly.
APressing the <Alt>+<Enter>NH\V
XVLQJDQ86%NH\ERDUGPD\FDXVH
WKHNH\LQSXWWREHUHFRJQL]HGDV
PXOWLSOHNH\LQSXWVGHSHQGLQJRQWKH
NH\ERDUGLQSXWUHFRJQLWLRQWLPH,Q
this case, the MS-DOS command
prompt is repeatedly switched to
full screen and then to Windows
several times. Please press the
<Alt>+<Enter>NH\VPRUHTXLFNO\RU
press the <Alt>+<Enter>NH\VXVLQJ
WKHV\VWHPNH\ERDUG
TThe shortcut icons are not
displayed on the screen even if I
press the shortcut key.
AThe shortcut icons only appear when
the Easy Display Manager program is
installed.

176
TThe color is strange when the
picture is displayed on the
connected monitor (or projector).
A&KHFNWKHPRQLWRUVLJQDOFDEOH
connection and reconnect the cable.
THow to install and uninstall the
sound driver.
ATo install or uninstall the sound driver
fromthissystem,pleasefollowthe
procedures below.
zSound Driver Components
The sound driver consists of the
following 3 components and the
3 components are automatically
installed during the installation.
–+LJK'H¿QLWLRQ$XGLR.%:
MicrosoftUAABusDriverforHigh
'H¿QLWLRQ$XGLR
–5HDOWHN+LJK'H¿QLWLRQ$XGLR
Driver5HDOWHN+LJK'H¿QLWLRQ$XGLR
–Samsung EDS
zUninstalling the Sound Driver
Toremovethesounddriverduetoa
problemorforanupdate,followthe
procedures below.
If you do not follow the sequence
below, the sound driver may not be
removed or the reinstalled driver, or
PD\QRWZRUNSURSHUO\
n Select Start > Control Panel > Add
or Remove Programs.
Sound Related

177
l Remove Samsung EDS¿UVW
W Remove 5HDOWHN+LJK'H¿QLWLRQ
Audio Driver and restart the
computer.
Do not remove the+LJK'H¿QLWLRQ
Audio item.Removingthisitemalso
removesthemodemdevicedriver.
Ifyouhaveremovedthisitem,you
need to install the modem device
driver again.
zReinstalling the Sound Driver
If there is an already installed sound
driver,uninstallthedriveraccordingto
theproceduresabove.
The sound driver is included on the
System Software Media.
n Insert the System Software CD-
ROM intotheCD-ROMdrive.
l Select Sound Driver on either
Standard Installation or Custom
Installation, then the 3 components
of the sound driver are automatically
installed.
zInstalling the Sound Driver after a
Windows XP Reinstallation
Ifyouinstallthesounddriverafter
reinstalling Windows XP, the Add
Hardware Wizard (Modem Device)
windowmayappearduringthesound
driver installation.
This happens because the High
'H¿QLWLRQ$XGLR—.%+RW¿[
whichhasbeeninstalledonyour
system, has changed the settings to
search for both sound and modem
devices. If you install the modem
device, this message will not appear.
If necessary, install the modem device
together.
7KHQXPEHURIWKH+LJK'H¿QLWLRQ
$XGLR².%+RW¿[PD\GLIIHULI
\RXKDYHXSGDWHGWKH+RW¿[IURPWKH
Microsoft web site.

178
T+RZFDQ,FRQ¿JXUHWKH5HFRUGLQJ
0L[HUZKLOH,DPYLGHRRUDXGLR
FKDWWLQJ"
$ 3OD\EDFN0L[HU6HWWLQJV
n Double-click the YROXPH icon from
the Taskbar and select 2SWLRQV!
3URSHUWLHV from the menu.
l,QWKH0L[HUGHYLFH¿HOGVHOHFW
5HDOWHN+'$XGLR,QSXW.
W Select 0LF9ROXPH.
$5HDOWHN+'6RXQG(IIHFW0DQDJHU
6HWWLQJV
n Click 6WDUW!&RQWUDO3DQHO!
6RXQGV6SHHFKDQG$XGLR
'HYLFHV!5HDOWHN+'6RXQG(IIHFW
0DQDJHU.
l Click 0LFURSKRQH tab.
W Select 1RLVH6XSSUHVVLRQ and
$FRXVWLF(FKR&DQFHOODWLRQ and
Click OK.
Using $FRXVWLF(FKR&DQFHOODWLRQ
option keeps Microphone Volume
muted in the Playback Mixer.
T+RZFDQ,FRQ¿JXUHWKH5HFRUGLQJ
0L[HUZKLOHEURDGFDVWLQJPXVLFLQ
:LQ$03"
$ 3OD\EDFN0L[HU6HWWLQJV
nDouble-click the 9ROXPH icon in the
Taskbar and click on 2SWLRQV.
l,QWKH0L[HUGHYLFH¿HOGVHOHFW
5HDOWHN+'$XGLR,QSXW.
W Select 6WHUHR0L[.
$5HDOWHN+'6RXQG(IIHFW0DQDJHU
6HWWLQJV
n Click 6WDUW!&RQWUDO3DQHO!
6RXQGV6SHHFKDQG$XGLR
'HYLFHV!5HDOWHN+'6RXQG(IIHFW
0DQDJHU.
l Click 0LFURSKRQH tab.
W Unselect 1RLVH6XSSUHVVLRQ and
$FRXVWLF(FKR&DQFHOODWLRQ and
Click OK.

179
TI cannot hear my voice through the
built-in microphone.
A This is because the setting is
FRQ¿JXUHGVRWKDWVRXQGIURPWKH
EXLOWLQPLFURSKRQHWRWKHVSHDNHULV
muted to reduce the howling sound
effect.Youcanusethemicrophone
recording function normally, even in
this state.
When using an external microphone,
if you disable the microphone channel
mutefunctionoftheplaymixer,you
canhearthesoundinputintothe
external microphone through the
VSHDNHU
TI have a trouble with recording
after selecting ‘Acoustic Echo
Cancellation’ and unselecting Mute
in the Microphone volume of the
Playback Mixer.
A Thisisbecausethesoundfrom
external microphone is muted by
the Acoustic Echo Cancellation
Algorithm considering the sound as a
Acoustic Echo while the recording and
SOD\LQJEDFNLVSURFHVVHGDWWKHVDPH
time.Inthiscase,selectMuteinthe
0LFURSKRQH9ROXPHRIWKH3OD\EDFN
Mixer after selecting Acoustic Echo
Cancellation item.

180
T<Wake On LAN> function
A:DNH2Q/$1!LVDIXQFWLRQWKDW
activates the system from Sleep mode
whenasignal(suchasapingor
PDJLFSDFNHWFRPPDQGDUULYHVRYHU
WKHQHWZRUNZLUHG/$1
zS3 WOL (Wake On LAN)
n Select Start > Control Panel >
Performance and Maintenance
> System > Hardware > Device
Manager > Network Adapters.
l'RXEOHFOLFNWKHGeneric Marvell
Yukon 88E8040 PCI-E Fast
Ethernet Controller item.
Theabovedrivernamemaybe
different.
W From Power management tab, select
“Allow this device to bring the
computer out of standby´WKHQFOLFN
OK. Restart the system.
,IWKHV\VWHPZDNHXSIURP6OHHS
mode even though there is no
received signal, use the system
DIWHUGLVDEOLQJWKH:DNH2Q/$1!
function.
- TheLANLEDmaynotbeturnedoffif
System is shutdown without disabling
WKH:2/:DNHRQ/$1!RSWLRQ
- Connecting a wired LAN while using
a wireless LAN may not activate the
:DNH2Q/$1!IXQFWLRQ6HWWKH
Wireless LAN to Disable to use the
:DNH2Q/$1!IXQFWLRQ
- Whenthecomputerexitsstandby/
hibernate mode a message informing
10Mbps wired LAN connection may
appear.Itisbecauserestoringthe
QHWZRUNWDNHVDERXWVHFRQGV:KHQ
WKHQHWZRUNLVUHVWRUHGLWRSHUDWHVLQ
100Mbps.
Wired LAN Related

181
T,FDQQRW¿QGDQ$3
zCheck the Wireless LAN LED.
A&KHFNLIWKH:LUHOHVV/$1/('LVRQ
If off, press the Wireless LAN On/Off
button <Fn>+<F9> to turn it on.
zReinstall the driver.
AReinstall the driver using the software
media.
zCheck the Wireless Zero
&RQ¿JXUDWLRQ:=&VHUYLFH
A,IWKH³:LQGRZVFDQQRWPDNHWKLV
wireless connection” message
appears while searching for wireless
QHWZRUNVLWLQGLFDWHVWKDWDSURJUDP
otherthanWindowsissettomanage
the wireless LAN settings.
zTo use the wireless LAN settings
using Windows:
An&OLFNStart > Control Panel
> Network and Internet
Connections > Network
Connections > Wireless LAN
ConnectionULJKWFOLFNDQGFKHFN
if the “Windows manages wireless
QHWZRUNVHWWLQJV:´RSWLRQLV
selected in the Wireless Network
taboftheProperties window.Ifnot,
select the option.
l&OLFNStart > Control Panel >
Performance and Maintenance >
Administrative Tools > Computer
ManagementDQGFOLFNServices
and Applications > Services.
,QWKHULJKWSDQHGRXEOHFOLFN
:LUHOHVV=HUR&RQ¿JXUDWLRQ
DQGFKHFNLIWKH6WDUWXS7\SHLV
AutomaticandtheStatusisStarted.
Wireless LAN Related

182
TI cannot connect to an AP.
(The wireless connection is
disconnected frequently.)
zCheck the Network Key.
A5LJKWFOLFNWKHWireless Network
Connections icon from the Taskbar
DQGFOLFNView available wireless
networks,IZLUHOHVVQHWZRUNVDUH
found, it indicates that the device is
RSHUDWLQJSURSHUO\EXWWKHQHWZRUN
settings may have a problem. Please
FKHFNWKHNetwork Key (Encryption
Key) and the AP settings.
zCheck if there is a device nearby
using the same frequency band.
A1 Ifthereisadevicenearbyusingthe
same frequency band such as another
wireless LAN device, wireless video
transceiver, microwave oven, plasma
bulb, etc., channel interference
mayoccur.Ifyouexperience
interferencefromanotherdevice,it
is recommended changing the AP
channel.
A2 WhenoperatinginEEE802.11gmode,
ifthereisaIEEE802.11bdevice
operating nearby, you may experience
lowdataratesorevendisconnection
asitoperatesinHybridmode.
zCheck the authentication type.
AAconnectionmaybedisconnected
after a period of time if the “Use
,((([QHWZRUNDXWKHQWLFDWLRQ´
option is selected when IEEE 802.1x
authentication is not being used.
Viewthepropertiesofthe
corresponding AP in the Wireless
1HWZRUN3URSHUWLHV,QWKH
Authentication tab, unselect the “Use
IEEE 802.1x authentication in this
QHWZRUN´RSWLRQ
For detailed information on the
DXWKHQWLFDWLRQVHUYHUDVN\RXU
QHWZRUNDGPLQLVWUDWRU
zCheck the AP settings.
A1 &KHFNLIWKHVXUURXQGLQJVDUH
appropriate for a wireless LAN.
AwirelessLANconnectionmay
belimitedbythesurrounding
environment and distance. Obstacles
such as walls and door mats affect
the quality of the wireless LAN signal.
You have to install an AP in a high,
open position far away from any other
radio signal sources.

183
IftheAPisexcessivelyfaraway,or
isinstalledattheendofabuilding
and you are attempting to use the
wireless LAN from the other end, you
may not be able to use the wireless
communication normally because
WKHVLJQDOLVEORFNHGE\REVWDFOHV
betweenyouandtheAP(suchasa
wall).
A2 &KHFNLIWKH$3RSHUDWHVSURSHUO\,I
theAPisnotoperatingproperly,turn
it off and on again and try again.
A3 &KHFNLIWKH$3¿UPZDUHLVWKHODWHVW
version. (For more information on the
$3¿UPZDUHDVNWKH$3PDQXIDFWXUHU
or your product provider.)
A4 &KHFNLIWKH$3LVSURSHUO\FRQQHFWHG
WRWKHQHWZRUN&RQQHFWWKH/$1
cablefromtheAPtoacomputerand
FKHFNLIWKHQHWZRUNLVFRQQHFWHG
properly.
A5 &KHFNWKHNetwork Key (Encryption
Key)settingsagain.Iftheautomatic
password converting function
(passphrase function) is enabled and
the wireless connection is normal
but you cannot send data over the
connection, please enter the Network
Key (Encryption Key) manually.
A6 &KHFNWKH$3VHWWLQJVDVIROORZV
If there are multiple APs running at
WKHVDPHWLPHFKHFNWKHFKDQQHO
settingofeachAP.Iftheinterval
between the channels of the APs
is narrow, you may experience
electromagnetic interference. Set the
channel numbers of the APs so that
the internals between the channels
aremaximized.(forexample,Ch1,
Ch5, Ch9, Ch13) computer.
It is recommended unselecting the
Hide option of the AP. SSID (Service
SetID)isanameusedtodistinguish
a wireless LAN from other wireless
LANs.
It is recommended using Long
Preamble. Preamble is a signal for
data transmission synchronization.
Although some APs support
Short Preamble, there might be a
compatibility problem.
Because “Fixed” channel selection
is more stable then ‘Auto’ channel
selection, “Fixed” channel selection
is recommended. It is recommended
QRWXVLQJWKH³%ORFN$Q\´DQG³$Q\
&RQQHFWLRQ%ORFN´IXQFWLRQV$OWKRXJK
WKHVHIXQFWLRQVEORFNFRQQHFWLRQV
DWWKHFOLHQWVLGHZKHQWKHQHWZRUN
name is Any or Blank,itmaycausea
compatibility problem.

184
For more information on the AP
settings,seetheowner’smanual
supplied with the AP.
TAlthough a connection has been
established, I cannot connect to
the Internet.
zCheck the TCP/IP settings.
AIfyoucannotconnecttotheInternet
butyouareconnectedtoanAP,
FKHFNLIWKH7&3,3VHWWLQJVDUH
FRQ¿JXUHGSURSHUO\
When you are not connected to an
$3DQ;PDUNDSSHDUVRYHUWKH
µ:LUHOHVV1HWZRUN&RQQHFWLRQV¶LFRQ
LQWKH7DVNEDU,I\RXGRXEOHFOLFN
theicon,theSearchforWireless
Connections window appears.
5HFRQQHFWWRDZLUHOHVVQHWZRUN
referringtothedescriptionsof
Connecting to a Wireless LAN in
WKH8VLQJWKH1HWZRUNVHFWLRQ
WhenyouareconnectedtoanAP,an
;PDUNDSSHDUVRYHUWKH³:LUHOHVV
1HWZRUN&RQQHFWLRQV´LFRQ in the
7DVNEDU'RXEOHFOLFNWKHLFRQDQG
FKHFNLIWKH,3DGGUHVVLVSURSHUO\
allocatedontheSupporttab.Ifthe
IP address is not properly allocated,
the IP address will be displayed as
follows; (for example, 169.254.xxx.
xxx).
,I\RXUQHWZRUNGRHVQRWVXSSRUW
DHCP, you have to manually
FRQ¿JXUHDQ,3DGGUHVVE\DVNLQJ
\RXUQHWZRUNDGPLQLVWUDWRU
,QDGGLWLRQHYHQLI\RXUQHWZRUN
supports DHCP, the Internet
connection may not be available if the
DHCP server fails to allocate an IP
address to your computer.
T,KDYHFRQ¿JXUHGERWKZLUHGDQG
wireless connections with the
same IP address, but the network
connections do not work properly.
AYou cannot use the same IP address
for wired and wireless connections.
To use only one IP address for both
wired and wireless connections, you
mustdisableoneofthemaccording
WR\RXUUHTXLUHPHQWVLQ1HWZRUN
Connections in the Control Panel.

185
TAfter installing the Wireless LAN
Setting program, the “AEGIS
Protocol (IEEE 802.1x)” protocol
appears in the [Local Area Connect
Properties] window.
ATheprotocolisasecurity
authentication protocol that is
automatically installed when the
Wireless LAN Settings program is
installed and does not affect the
program operation.
T(For Intel PROSet) Although I have
turned the wireless LAN off using
the Turn Off Wireless LAN button
in PROSet, the Wireless LAN LED
is still on.
AThis is normal. The Turn Off Wireless
LAN button in PROSet just turns
off the wireless LAN software. The
wireless LAN hardware is not affected
by this operation.
T(For Intel PROSet) After installing
PROSet, I cannot manage my
wireless network in Windows.
A:KHQFOLFNLQJUse Microsoft Client
in the Tools menu of the PROSet,
\RXFDQPDQDJHZLUHOHVVQHWZRUNLQ
Windows.
Thereafter, if you wish to manage your
ZLUHOHVVQHWZRUNFOLFNActivate Intel
PROSet/Wireless in the Tools menu
of the PROSet.
TInternet Connection or File Sharing
doesn’t work, when I use Internet
Connection Sharing or Ad Hoc.
AYou have to register the IP address
allocated for Internet Connection
SharingorAdHocasa‘TrustedIP’in
McAfee SecurityCenter.
&OLFNMcAfee SecurityCenter >
$GYDQFHGPHQX!&RQ¿JXUH!
Internet and Network > Advanced
> Trusted and Banned IPs, and
register the IP address or IP address
range as a Trusted IP address. The IP
address range for DHCP is 10.0.0.1 ~
LIQRWVSHFL¿HG

186
T3D game is not executed, or some
functions are not working.
AChangethegraphicsettingofthe
game to “2D” or “Software Renderer,”
then execute the program again.
TI launched a game right after
installing it, and the game is not
executed.
AThis problem may occur when the
game is not compatible with Windows
XP.Launchthegameagain,anditwill
be executed properly.
TFn + Key combination does not
work.
AWhiledisplayingvideoofVCDor
MPEG,orthedisplaysettingisDual
View, you cannot toggle display
devices. Also the installation of
NetWare Client 32 program disables
thefunctionofFn +.
TWhile playing a game, pressing the
Fn + keys does not work or the
screen is not properly displayed.
ASome games and 3D application
programs may change the display
device control. Therefore, pressing
the Fn +NH\VPD\WHUPLQDWHWKH
running program or may display an
abnormal screen.
Press the Fn +NH\VEHIRUH
launching a program and do not press
them while running the program.
TRunning speed of a game is too
slow or fast.
AChange the setting of Power
Schemes to “Always On.”
&OLFNStart > Control Panel >
Performance and Maintenance >
Power Options > Power Schemes
WDEWKHQFRQ¿JXUHWKH3RZHU
VFKHPHV¿HOGWR³$OZD\V2Q´
Games and Programs Related

187
T Somepartofagameimageisnot
displayedorisdisplayedinblack.
AThis may happen when running a
game designed for DirecX 8.1 or
which has 1024 x 768 as the default
resolution, such as NHL 2003, MVP
Baseball 2003, Special Forces,
Hangame, Pmang etc.
T The picture is not displayed
properly for some games.
ASome games may not display the
picture properly when the screen
resolution is set to 1024 × 600 and the
color quality is set to 32 bit.
For these games, set the screen
resolution to 1024 x 600 or 800 x 600,
and the color quality to 16bit.
T Game play is not displayed
smoothly on the screen.
AFor 3D games, the texture data
for the 3D screen display is saved
to the system memory. If there is
LQVXI¿FLHQWV\VWHPPHPRU\WKHGDWD
is saved to the hard disk drive and
loaded to memory when required.
This operation may temporarily stop
displaying the picture on the screen.
In this case, lower the game
resolution or the screen settings.
In addition, some 3D games, such as
Dungeon and Fighter, RollerCoaster
Tycoon 3, Special Forces, Universe
at War, Transformer the Game etc,
take up lots of hardware resources so
upgrading system memory to 2G and
above is recommneded.

188
T,FDQQRW¿QGRUFRQQHFWWKH
headset.
A1 Iftheheadsetisconnectedtoanother
deviceandiscurrentlybeingused,
youwillnotbeabletolocateit.Inthis
case,evenifyoulocatetheheadset,
youwillnotbeabletoconnectit.
Disconnect the headset from the
device and then try again.
A2 Iftheheadsetisconnectedto
the power adapter, the Bluetooth
wireless connection is not available.
Disconnect the headset from the
poweradapterandtryagain.
A3 A Bluetooth headset generally
provides On/Off and Pairing modes.
Toconnecttheheadsettoanother
Bluetoothdevicesuchasacomputer
or cellphone, it must be in Pairing
mode.SwitchtheheadsettoPairing
mode and try again.
In general, a Bluetooth headset
in Pairing mode is automatically
switchedtoOn/Offmodeafterapre-
determined period of time.
TI have connected the headset, but I
cannot hear sound normally.
A1 IftheBluetoothheadsetisproperly
connected to a computer, the Control
Pane Sound Playback Device
changes to Bluetooth Audio (for
a mono headset) or High Quality
Bluetooth Audio (forastereo
headset). If the Sound Playback
Device in the Control Panel is not
changedproperly,youmaynothear
DQ\VRXQG&KHFNWKHDXGLRVHWWLQJV
in the Control Panel according to the
procedures below.
z&RQ¿JXULQJ6RXQGVDQG$XGLR
Devices in the Control Panel
n'RXEOH&OLFNStart > Control Panel >
Sounds and Audio Devices.
l Select the Audio tabintheSounds
andAudioDevicesProperties
window.
W&KHFNLIWKH6RXQGSOD\EDFNDQG
Sound recording device is set to
Bluetooth audio (for a mono headset)
or High Quality Bluetooth audio (for a
stereo headset).
A2 &KHFNLIWKHKHDGVHWLVSURSHUO\
connected and is operating normally.
A3 &KHFNWKHYROXPHVHWWLQJVRIWKH
headset and the computer.
Bluetooth

189
A4 Ifamultimediaapplicationsuchas
Windows Media Player is running
when connecting the headset, the
headset may not be connected or
recognized properly. Connect the
KHDGVHW¿UVWDQGWKHQODXQFKD
multimedia application.
TTo change the popup window
display settings when connected
to the Internet. In the Windows
XP SP2 environment, you can
decide whether to display a popup
window when connected to the
Internet, for user convenience and
security.
A1 Todisplaymostofthepopupwindows
when connected to the Internet:
n&OLFN,QWHUQHW2SWLRQVLQStart >
Control Panel > Security Center >
Manage security settings for.
l InthePrivacytabofInternet
3URSHUWLHVFOHDU%ORFNSRSXSV
A2 Todisplaypopupwindowsonlyfrom
the current site when connected to the
Internet:
3ODFHWKHFXUVRURQWKHQRWL¿FDWLRQ
areaatthebottomoftheInternet
DGGUHVVEDUDQGULJKWFOLFNWRGLVSOD\
a menu, from which you can select
TemporarilyAllowPop-upsorAlways
Allow Pop-ups from This Site.
Security Center

190
A3 To display popup windows from a
particular site:
n&OLFN,QWHUQHW2SWLRQVLQStart >
Control Panel > Security Center >
Manage security settings for.
l InthePrivacytabofInternet
3URSHUWLHVFOLFN6HWWLQJVIURP%ORFN
pop-ups.
W EnteraURLtowanttoallowpop-ups
intoAddressofWebsitetoallowand
FOLFN$GG
j<RXZLOO¿QGWKDWWKHHQWHUHGDGGUHVV
is added to the allowed sites list. The
next time you connect to the Web site,
youwillseepop-upsappearing.
:KHQ\RXQHHGWRUHEORFND
permitted site, select the Web site
DGGUHVVWKDW\RXZDQWWREORFNIURP
WKH$OORZHG6LWHVDQGFOLFN5HPRYH
TWhen you connect to a Web site,
you see the message, “To help
protect your security, Internet
Explorer stopped this site from
installing an ActiveX control on
your computer” or “This site might
require the following ActiveX
control” below the address bar.
A:LQGRZV;363EORFNVXQVLJQHG
ActiveX controls from being installed
whenconnectedtocertainWebsites
forsecurityreasons.OnsomeWeb
sitesthathavenoActiveXcontrols
installed, applications are not started
or do not display properly.
In this case, to install ActiveX controls,
ULJKWFOLFNWKHQRWL¿FDWLRQDUHDWR
display a menu from which you can
select Install ActiveX control.

191
TWhen you see a Windows Security
Alert icon appear on the right
part of the Taskbar. With the
Security Center feature added,
Windows XP SP2 checks the
Firewall, the automatic updates
FRQ¿JXUDWLRQDQGLQVWDOODWLRQ
of virus-checking programs
to display a Windows Security
Alert icon on the right part of the
Taskbar when it judges that the
computer is vulnerable to attacks
from the Internet. In this case,
check the following to install the
necessary components.
A1 SetuptheWindowsFirewall.
WhenyousetuptheWindows
Firewall, you will be protected from
unauthorized access through the
,QWHUQHWRUWKHQHWZRUN
n&OLFN:LQGRZV)LUHZDOOLQStart >
Control Panel > Security Center >
Manage security settings for.
l FromtheGeneraltabofWindows
Firewall, select ON (recommended).
W If you want to allow a certain program
or service to gain access to your
computer using the Firewall, select
DQGFKHFNWKHSURJUDPRUVHUYLFH
that you want to allow access from,
in the Exceptions tab of the Windows
Firewall. If you want to add a program
WR3URJUDPVDQG6HUYLFHVFOLFN$GG
Program and select it.
A2 SetupWindowsAutomaticUpdates.
This automatically downloads and
installs critical updates via the Internet
WRNHHS\RXUFRPSXWHUXSWRGDWH
n&OLFN$XWRPDWLF8SGDWHVLQStart >
Control Panel > Security Center >
Manage security settings for.
l From general tab of Automatic
Updates window, select Automatic
(recommended).
A3 Keep your computer current with
the latest virus updates. (ex: Norton
Antivirus) Even when you have
installed Norton AntiVirus on your
computer, Windows cannot recognize
WKHSURJUDPXQWLO\RXFRQ¿JXUHWKH
settings, displaying a Security Alert
icon.

192
:KHQ\RX¿UVWXVHRULQVWDOO1RUWRQ
$QWL9LUXVIRUWKH¿UVWWLPHIROORZWKH
5HJLVWUDWLRQ:L]DUGVWHSVWRFRQ¿JXUH
the registration settings.
Toprotectyourcomputerfromvirus
DWWDFNVZLWKWKHODWHVWXSGDWHVFOLFN
Options to display the Norton
AntiVirus Options window. From
WKHOHIWPHQXRIWKHZLQGRZFKHFN
Run Automatic Protection to select
$XWRPDWLF3URWHFWLRQDQGFKHFN5XQ
LiveUpdate to select LiveUpdate.
A4 Two virus scanning programs on one
FRPSXWHUPD\FDXVHV\VWHPFRQÀLFWV
Remove one of the programs from the
system.
A5 If Windows does not recognize the
existenceofananti-virusprogram
even when it has been installed, your
computer could be vulnerable to
DWWDFNVIURPWKH,QWHUQHW<RXVKRXOG
install an anti-virus program that your
computerisabletoidentify.
&KHFNWKHIROORZLQJSURJUDPVZKLFK
Windows can detect and select one
from the list.
Alistofanti-virusprogramsthat
Windows can detect:
-SymantecNortonAnti-Virus
1HWZRUN$VVRFLDWHV0F$IHH
-TrendMicro
- ComputerAssociates
- Panda
.DVSHUVN\
-Ahnlabs(AhnLab)
Visit the Microsoft Web site
(www.microsoft.com) regularly to
FKHFNWKHODWHVWOLVW

193
3URGXFW6SHFL¿FDWLRQV
7KHV\VWHPVSHFL¿FDWLRQVPD\GLIIHUGHSHQGLQJRQWKHGHULYHGPRGHOV)RUGHWDLOHGV\VWHP
VSHFL¿FDWLRQVUHIHUWRWKHSURGXFWFDWDORJXH
CPU (Optional) Intel ATOM™ Processor (1.6GHz)
Cache Memory (Optional) 512KB
Main Memory (Optional) 1GB,MAX1GB,Memorytype:DDR2SODIMM
Main Chipset (Optional) Intel 945GSE + ICH7M
Hard Disk Drive (Optional) 9.5mmH SATA HDD (80G~160G) or 9.5mmH SATA SSD (8G
/16G)
Optical Disk Drive (Optional) External ODD: USB 2.0/9.5mm Super-multi (Optional)
Graphics (Optional) Intel 945GSE (Internal)
Sound Chipset ALC272-GR
Network (Optional)
WiredLAN:Marvell88E8040
Wireless LAN: 802.11BG (Optional)
Bluetooth 2.0+EDR (Optional)
Multi Card Slot SDCard/SDHCCard/MMC
Ports (Optional)
USB 2.0Portx 3,Video(Monitor)Port,Headphone
-DFN0LFURSKRQH-DFN:LUHG/$13RUW3RZHU,1-DFN
.HQVLQJWRQ/RFN
Dimensions 261 x 185.5 x 30.3mm
LCD (Optional) 10.2”/8.9” WSVGA (1024 x 600), 10.1” WSVGA (1024 x 576)
(Optional)
Weight (Optional) 1.18Kg (With 3 Cell Standard Batteries)
Battery (Optional) Lithium-Ion Smart Battery: 3Cell or 6Cell
Operating Environment Temperature:-5~40°Cforstorage,10~32°Cwhenoperating
Humidity: 5~90%forstorage, 20~80%whenoperating
Operating Voltage 100 - 240VAC
Frequency 50/60Hz
Output Power (Optional) 40W (Optional)
Output Voltage 19VDC 2.1A(40W) (Optional)

194
z Theweightanddimensionlistedareapproximatevaluesandmayvaryabitfrom
theactualproduct.
z Optional components may not be provided or different components may be provided
depending on the computer model.
z7KHV\VWHPVSHFL¿FDWLRQVDUHVXEMHFWWRFKDQJHZLWKRXWQRWLFH
z7KHKDUGGLVNGULYHFDSDFLW\RIDFRPSXWHULQZKLFK6DPVXQJ5HFRYHU\6ROXWLRQLV
LQVWDOOHGLVUHSUHVHQWHGDVVPDOOHUWKDQWKHSURGXFWVSHFL¿FDWLRQ

195
:LUHOHVV/$16SHFL¿FDWLRQVDEJQ&DUG
Intel 802.11ABG WLAN
zThe Name of the Registered Equipment :SpecialLowPowerWirelessDevicefor
Wireless Data Communication Systems.
Item 'HWDLOHG6SHFL¿FDWLRQV
Physical
6SHFL¿FDWLRQV
Dimensions 30.0 × 50.95mm (Width X Height)
Operating
Temperature And
Humidity
Same as System Operations
Temperature: Bet. 0°C and 70°C,
Humidity:Lessthan85%
Power
6SHFL¿FDWLRQV Power 3.3V
Network
6SHFL¿FDWLRQV
Compatibility IEEE 802.11a, IEEE 802.11b, IEEE 802.11g
Operating System Microsoft Windows XP/Vista
Media Access
Protocol (MAC)
CSMA/CA (Collision Avoidance) with
$FNQRZOHGJHPHQW$&.
Security Wired Equivalent Privacy support (WEP)
64bit/128bit WPA*
*7KLVGHYLFHVXSSRUWVWKH:LUHOHVV/$16HFXULW\6SHFL¿FDWLRQV:3$:L)L3URWHFWHG
Access) for Wi-Fi.
7RFRQQHFWWRD:3$ZLUHOHVVQHWZRUN\RXKDYHWRFRQ¿JXUHWKHVHWWLQJVDFFRUGLQJWR
WKHQHWZRUNFRQQHFWLRQHQYLURQPHQW)RUGHWDLOHGVHWWLQJLQIRUPDWLRQDVN\RXUQHWZRUN
administrator.

196
z5DGLR6SHFL¿FDWLRQV
RF Band 2.4GHz, 5GHz
Supported Channels Channels allowed per country.
Device Transceiver
Standard Output Power MAX 10mW
Modulation Scheme
11a mode : OFDM
11bmode:DSSS
11gmode:OFDM
Data Rate (Mbps)*
11a mode** : MAX 54Mbps
11bmode:MAX11Mbps
11g mode*** : MAX 54Mbps
Antenna Type Built-in Antenna
* Thedataratemaydifferfromtherealdatatransmissionrate.
** 11amodeisonlysupportedwhenthedeviceisconnectedtoanIEEE802.11adevice.
(e.g.AccessPointsupportingIEEE802.11a)
***11gmodeisonlysupportedwhenthedeviceisconnectedtoanIEEE802.11gdevice.
(e.g.AccessPointsupportingIEEE802.11g)

197
Intel 802.11AGN WLAN
zThe Name of the Registered Equipment :SpecialLowPowerWirelessDevicefor
Wireless Data Communication Systems.
Item 'HWDLOHG6SHFL¿FDWLRQV
Physical
6SHFL¿FDWLRQV
Dimensions 30.0 × 50.95mm (Width X Height)
Operating
Temperature And
Humidity
Same as System Operations
Temperature: Bet. 0°C and 70°C,
Humidity:Lessthan85%
Power
6SHFL¿FDWLRQV Power 3.3V
Network
6SHFL¿FDWLRQV
Compatibility IEEE 802.11a, IEEE 802.11b, IEEE 802.11g,
IEEE 802.11n
Operating System Microsoft Windows XP/Vista
Media Access
Protocol (MAC)
CSMA/CA (Collision Avoidance) with
$FNQRZOHGJHPHQW$&.
Security Wired Equivalent Privacy support (WEP)
64bit/128bit WPA*
*7KLVGHYLFHVXSSRUWVWKH:LUHOHVV/$16HFXULW\6SHFL¿FDWLRQV:3$:L)L3URWHFWHG
Access) for Wi-Fi.
7RFRQQHFWWRD:3$ZLUHOHVVQHWZRUN\RXKDYHWRFRQ¿JXUHWKHVHWWLQJVDFFRUGLQJWR
WKHQHWZRUNFRQQHFWLRQHQYLURQPHQW)RUGHWDLOHGVHWWLQJLQIRUPDWLRQDVN\RXUQHWZRUN
administrator.

198
z5DGLR6SHFL¿FDWLRQV
RF Band 2.4GHz, 5GHz
Supported Channels Channels allowed per country.
Device Transceiver
Standard Output Power MAX 10mW
Modulation Scheme
11a mode : OFDM
11bmode:DSSS
11gmode:OFDM
11nmode:MIMO
Data Rate (Mbps)*
11a mode** : MAX 54Mbps
11bmode :MAX11Mbps
11g mode*** : MAX 54Mbps
11n mode**** : MAX 450Mbps, MAX 300Mbps
Antenna Type Built-in Antenna
* Thedataratemaydifferfromtherealdatatransmissionrate.
** 11amodeisonlysupportedwhenthedeviceisconnectedtoanIEEE802.11adevice.
(e.g.AccessPointsupportingIEEE802.11a)
***11gmodeisonlysupportedwhenthedeviceisconnectedtoanIEEE802.11gdevice.
(e.g.AccessPointsupportingIEEE802.11g)
****11n mode is only supported when it is connected to an IEEE802.11n device (e.g.
Access Point supporting IEEE802.11n).

199
:LUHOHVV/$16SHFL¿FDWLRQV%*&DUG
Intel 802.11BG WLAN
zThe Name of the Registered Equipment :SpecialLowPowerWirelessDevicefor
Wireless Data Communication Systems.
Item 'HWDLOHG6SHFL¿FDWLRQV
Physical
6SHFL¿FDWLRQV
Dimensions 30.0 × 50.95mm (Width X Height)
Operating
Temperature And
Humidity
Same as System Operations
Temperature: Bet. 0°C and 70°C,
Humidity:Lessthan85%
Power
6SHFL¿FDWLRQV Power 3.3V
Network
6SHFL¿FDWLRQV
Compatibility IEEE 802.11b, IEEE 802.11g
Operating System Microsoft Windows XP/Vista
Media Access
Protocol (MAC)
CSMA/CA (Collision Avoidance) with
$FNQRZOHGJHPHQW$&.
Security WiredEquivalentPrivacysupport(WEP)
64bit/128bit WPA*
*7KLVGHYLFHVXSSRUWVWKH:LUHOHVV/$16HFXULW\6SHFL¿FDWLRQV:3$:L)L3URWHFWHG
Access) for Wi-Fi.
7RFRQQHFWWRD:3$ZLUHOHVVQHWZRUN\RXKDYHWRFRQ¿JXUHWKHVHWWLQJVDFFRUGLQJWR
WKHQHWZRUNFRQQHFWLRQHQYLURQPHQW)RUGHWDLOHGVHWWLQJLQIRUPDWLRQDVN\RXUQHWZRUN
administrator.

200
z5DGLR6SHFL¿FDWLRQV
RF Band 2.4GHz
Supported Channels Channels allowed per country.
Device Transceiver
Standard Output Power MAX 10mW
Modulation Scheme 11bmode:DSSS
11gmode:OFDM
Data Rate (Mbps)*11bmode:MAX11Mbps
11g mode** : MAX 54Mbps
Antenna Type Built-in Antenna
* Thedataratemaydifferfromtherealdatatransmissionrate.
** 11gmodeisonlysupportedwhenthedeviceisconnectedtoanIEEE802.11gdevice.
(e.g.AccessPointsupportingIEEE802.11g)

201
Atheros 802.11BG WLAN
zThe Name of the Registered Equipment :SpecialLowPowerWirelessDevicefor
Wireless Data Communication Systems.
Item 'HWDLOHG6SHFL¿FDWLRQV
Physical
6SHFL¿FDWLRQV
Dimensions 30.0 × 50.95mm (Width X Height)
Operating
Temperature And
Humidity
Temperature: Between 0°C and 70°C,
Maximum Humidity: 85%
Power
6SHFL¿FDWLRQV Power 3.3V
Network
6SHFL¿FDWLRQV
Compatibility IEEE 802.11b, IEEE 802.11g
Operating System Microsoft Windows XP/Vista
Media Access
Protocol (MAC)
CSMA/CA (Collision Avoidance) with
$FNQRZOHGJHPHQW$&.
Security Wired Equivalent Privacy support (WEP)
64bit/128bit WPA*
*7KLVGHYLFHVXSSRUWVWKH:LUHOHVV/$16HFXULW\6SHFL¿FDWLRQV:3$:L)L3URWHFWHG
Access) for Wi-Fi.
7RFRQQHFWWRD:3$ZLUHOHVVQHWZRUN\RXKDYHWRFRQ¿JXUHWKHVHWWLQJVDFFRUGLQJWR
WKHQHWZRUNFRQQHFWLRQHQYLURQPHQW)RUGHWDLOHGVHWWLQJLQIRUPDWLRQDVN\RXUQHWZRUN
administrator.

202
z5DGLR6SHFL¿FDWLRQV
RF Band 2.4GHz
Supported Channels Channels allowed per country.
Device Transceiver
Standard Output Power MAX 10mW
Modulation Scheme 11bmode:DSSS
11gmode:OFDM
Data Rate (Mbps)*11bmode:MAX11Mbps
11g mode** : MAX 54Mbps
Antenna Type Built-in Antenna
* Thedataratemaydifferfromtherealdatatransmissionrate.
** 11gmodeissupportedonlywhenyouareconnectedtoanIEEE802.11gdevice(e.g.An
Access Point supporting IEEE 802.11g).

203
Registered Trademarks
6DPVXQJLVDUHJLVWHUHGWUDGHPDUNRI
SamsungCo.,Ltd.
6(16LVDUHJLVWHUHGWUDGHPDUNRI
Samsung Electronics Co., Ltd.
Intel, ATOM/ Pentium/Celeron are
UHJLVWHUHGWUDGHPDUNVRIWKH,QWHO
Corporation.
Microsoft, MS-DOS, and Windows are
UHJLVWHUHGWUDGHPDUNVRIWKH0LFURVRIW
Corporation.
³0HPRU\6WLFN´DQG DUHWUDGHPDUNV
of the Sony Corporation.
Allotherproductorcompanynames
mentioned herein are registered
WUDGHPDUNVRIWKHLUUHVSHFWLYHFRPSDQLHV
ENERGY STAR® Partner
As an ENERGY STAR® Partner,
SAMSUNG has determined that
this product meets the ENERGY
STAR® guidelines for energy
HI¿FLHQF\

204
Glossary
TheGlossaryliststheterminologiesusedinthisUserGuide.
)RUWHUPLQRORJLHVRWKHUWKDQWKHVHORRNLQ:LQGRZV+HOS
Backup
A way to save the current data to restore
LWODWHULIQHFHVVDU\$EDFNXSLVDZD\
torestorecomputerdatawhenthedata
orcomputerisdamaged.
Client
Thisreferstoacomputerthatusesa
VKDUHGQHWZRUNUHVRXUFHSURYLGHGE\D
server.
DDR SDRAM (Double Data Rate
Synchronous Dynamic Random Access
Memory)
DRAMisamemorytypewhosecells
consistofacapacitorandtransistor
manufactured at a low price. SDRAM
isamemorytypewhoseperformance
hasbeenimprovedbysynchronizing
WKHFORFNZLWKWKHH[WHUQDO&38FORFN
DDRSDRAMisamemorytypewhose
performancehasbeenimprovedby
doubling the operating speed of the
SDRAM and is widely used nowadays.
ThiscomputerusesDDRSDRAM.
Device Manager
An administrative tool used to manage
computer devices. You can add or
removehardwareorupdateadevice
driver using the Device Manager.
Direct X
An application interface developed to
enable Windows application programs
toaccesshardwaredevicesatavery
high speed. Since the operating speed
ofgraphics,memoryandsoundcards
mustbeveryfasttoprovidehigh
quality video and sound for games,
DirectXenablesfastercontroland
interaction between applications and
hardware devices. By using Direct X,
the multimedia performance of Windows
has been hugely improved.
Driver
Software that interacts between the
hardware and the operating system. An
RSHUDWLQJV\VWHPNQRZVWKHKDUGZDUH
information and controls the hardware.
Ingeneral,adriverissuppliedwiththe
corresponding hardware device.

205
DVD 'LJLWDO9HUVDWLOH'LVN
DVDwasdevelopedtoreplaceCD
FRPSDFWGLVN$OWKRXJKWKHVKDSHDQG
size of the disc are the same as that of
aCD,thecapacityofaDVDisatleast
4.7GBwhilethecapacityofaCDis
0%'9'YLGHRLVGLJLWDOXQOLNH9+6
(analog) video and supports MPEG2
compressionanddigitalaudio.Toplaya
DVD,aDVDdriveisrequired.
Firewall
A security system used to protect an
LQWHUQDOQHWZRUNRULQWUDQHWIURPH[WHUQDO
QHWZRUNV
through an authentication procedure.
Hibernation Mode
A power mode that saves all data in
PHPRU\WRWKHKDUGGLVNDQGWXUQVWKH
&38DQGKDUGGLVNRII:KHQFDQFHOLQJ
Hibernation Mode, all application
programs that were running are restored
to their last state.
Icon
This refers to a small image that
UHSUHVHQWVD¿OHWKDWXVHUVFDQXVH
LAN/RFDO$UHD1HWZRUN
$FRPPXQLFDWLRQVQHWZRUNFRQQHFWLQJ
computers,printersandotherdevices
within a local area such as within a
building.ALANenablesallconnected
devicestointeractwithotherdevices
RQWKHQHWZRUN7KHFXUUHQW/$1XVHV
the Ethernet media access control
methoddevelopedintheearly1980s.
7RFRQQHFWWRDQ(WKHUQHWDQHWZRUN
cardcalledaLANcard,Ethernetcard
RUQHWZRUNLQWHUIDFHFDUGLVUHTXLUHG
To exchange data between computers,
aprotocolisrequiredbesidesthe
hardware equipment. Windows XP uses
TCP/IP as the default protocol.
LCD (Liquid Crystal Display)
TherearePassiveMatrixandActive
MatrixLCDtypes.Thiscomputeruses
theActiveMatrixtypeLCDcalledaTFT
LCD. Since an LCD is implemented by
transistorsinsteadofacathode-raytube
XQOLNHD&57LWVVL]HFDQEHVOLP$QG
EHFDXVHLWGRHVQRWEOLQNLWUHGXFHVH\H
strain.

206
Network
Agroupofcomputersanddevices,such
as printers and scanners, connected
E\DFRPPXQLFDWLRQVOLQN$QHWZRUN
canbeeithersmallorlargeandcanbe
connected permanently through cables
or temporarily through telephone lines
RUZLUHOHVVOLQNV7KHELJJHVWQHWZRUNLV
WKH,QWHUQHWDZRUOGZLGHQHWZRUN
1RWL¿FDWLRQ$UHD
This refers to the right area of the
7DVNEDULQFOXGLQJSURJUDPLFRQVVXFK
asthevolumecontrol,thepoweroptions
and the time.
Power Schemes
This refers to a pre-determined power
management option group. For example,
youcansetthetimethecomputerwaits
before entering Standby Mode, or before
the monitor or hard drive turns off. The
settingsaresavedasapowerscheme.
Quick Launch
Thisreferstoatoolbarthatcanbe
FRQ¿JXUHGVRWKDW\RXFDQODXQFKD
programsuchasInternetExploreror
GLVSOD\WKH:LQGRZV'HVNWRSZLWKRQH
FOLFN<RXFDQDGGDQ\LFRQWRWKHTXLFN
ODXQFKDUHDRIWKH7DVNEDUDQGODXQFK
IUHTXHQWO\XVHGSURJUDPE\FOLFNLQJWKDW
icon.
Server
Ingeneral,aserverreferstoacomputer
that provides shared resources for
QHWZRUNXVHUV
Share
Thisreferstosettingaresourceofa
computersuchasafolderorprinterso
that other users can also use it.
Shared Folder
Afolderthatcanbeusedbyotherusers
RQWKHQHWZRUN

207
SSD6ROLG6WDWH'LVN
Thisreferstoadevicethatsaves
LQIRUPDWLRQWRVHPLFRQGXFWRUVXQOLNHD
QRUPDOKDUGGLVNGULYH+''7KHUHDUH
two types of SSD. One saves data to
theDRAMandtheothersavesdatato
the Flash Memory. Since there are no
mechanical parts, an SSD provides a
much better performance than an HDD.
Especially, a Flash Memory-Type SSD
provides high reliability and durability.
Network Administrator
$XVHUZKRSODQVFRQ¿JXUHVDQG
PDQDJHVQHWZRUNRSHUDWLRQV
6RPHWLPHVDQHWZRUNDGPLQLVWUDWRULV
called a system administrator.
Sleep Mode
A power mode that enables computers
to save power consumption when they
arenotbeingused.Whenacomputer
isinSleepMode,thedataonthe
computermemoryisnotsavedtothe
KDUGGLVN,IWKHSRZHULVWXQHGRIIWKH
data in memory will be lost.
System File
6\VWHP)LOHVUHIHUWR¿OHVWKDWDUHUHDG
andusedbytheWindowsoperating
V\VWHP,QJHQHUDOV\VWHP¿OHVPXVWQRW
bedeletedormoved.
USB (Universal Serial Bus)
This refers to a serial interface standard
developedtoreplacetheconventional
interface standards such as Serial and
PS/2. While USB 1.1 supports 12Mbps
(12 million bits per second), USB 2.0
supports a data rate that is 40 times
(480Mpbs)fasterthanthatofUSB1.1.
ThedatarateofUSB 2.0isequivalentto
that of IEEE1394. Therefore USB 2.0 is
used for A/V devices supported by IEEE
1394 anda 2ndHDDandCDRWthat
requireahighdatarate.
Windows Media Player
A multimedia program included with
Windows. Using this program, you can
SOD\DPHGLD¿OHFUHDWHDQDXGLR&'
listen to a radio broadcast, search and
PDQDJHPHGLD¿OHVDQGFRS\¿OHVWRD
portable device, etc.

208
Index
B
Battery 177
Battery Calibration 182
BIOS Setup 167
Bluetooth 109
Booting Priority 173
C
CD Drive / Recording 59
Charge 178
&OLFN 55
Connect / Output Monitor
65
Connecting AP / AP 103
Control Panel 87
D
'HVNWRS&KDQJH 77
Dual View 70
E
Easy Battery Manager
180
(DV\1HWZRUN0DQDJHU
105
ExpressCard Slot 64
H
Help 76
L
LCD Brightness 166
M
Memory 174
Multi Card Slot 61
Multimedia 116
N
1HWZRUN 105
1HWZRUN6WDWXV'LDJQRVLV
108
P
Password 171
Product Name 42
3URGXFW6SHFL¿FDWLRQV
219
Program 115
R
Recorder 72
Charge 179
Resolution / Color 91
S
Safety Precautions 8
Samsung Update Plus
135
6HFXULW\/RFN3RUW 183
Shortcut Keys 52
Status Indicators 43
T
Touchpad 54
U
User Accounts / Switch
User 89
V
Volume Control 72
W
Windows XP 75
:LUHG1HWZRUN 100
:LUHOHVV1HWZRUN 103

209
Contact SAMSUNG WORLD WIDE
[U.S.A. / U.K.] Contact SAMSUNG WORLD WIDE
IfyouhaveanycommentsorquestionsregardingaSamsungproducts,contactthe
SAMSUNGcustomercarecenter.
Customer Care Center TEL Web Site
U.S.A. 1-800-SAMSUNG (726-7864) www.samsung.com/us
U.K. 0870-SAMSUNG (726-7864) ZZZVDPVXQJFRPXN
[GERMANY] Kontakt zu Samsung
)DOOV6LH)UDJHQRGHU$QUHJXQJHQ]X6DPVXQJ3URGXNWHQKDEHQZHQGHQ6LHVLFKELWWHDQ
den Samsung-Kundendienst.
Customer Care Center TEL Web Site
GERMANY ¼0LQ www.samsung.de
[FRANCE] Comment contacter Samsung dans le monde
Si vous avez des suggestions ou des questions concernant les produits Samsung, veuillez
contacter le Service Consommateurs Samsung.
Customer Care Center TEL Web Site
FRANCE 3260 SAMSUNG (726-7864)
¼0LQ
www.samsung.com/fr
[SPAIN] Contacte con SAMSUNG WORLD WIDE
Sitienealgunapreguntaocomentarioreferenteanuestrosproductos,porfavorcontacte
con nuestro Servicio de Atencion al Cliente.
Customer Care Center TEL Web Site
SPAIN 9021011 30 www.samsung.com/es
210
[ITALY] Contatta SAMSUNG
SehaicommentiorichiestesuiprodottiSamsungcontattailnostroServizioClienti.
Customer Care Center TEL Web Site
ITALY 800-SAMSUNG (726-7864) www.samsung.com/it
>32/$1'@.RQWDNW]¿UPą6$0681*
:VSUDZLHMDNLFKNROZLHNS\WDĔF]\ZąWSOLZRĞFLGRW\F]ąF\FKSURGXNWyZ6$0681*
SURVLP\RNRQWDNW]WHOHIRQLF]Q\P&HQWUXP2EVáXJL.OLHQWD
Customer Care Center TEL Web Site
POLAND 0801-1-SAMSUNG (726-78)
022-SAMSUNG (726-7864)
www.samsung.com/pl
>5866,$8.5$,1(@ɋɜɹɡɵɜɚɣɬɟɫɶɫ6$0681*ɩɨɜɫɟɦɭɦɢɪɭ
ȿɫɥɢɭɜɚɫɟɫɬɶɩɪɟɞɥɨɠɟɧɢɹɢɥɢɜɨɩɪɨɫɵɩɨɩɪɨɞɭɤɬɚɦ6DPVXQJɫɜɹɡɵɜɚɣɬɟɫɶɫ
ɢɧɮɨɪɦɚɰɢɨɧɧɵɦɰɟɧɬɪɨɦ6DPVXQJ
Customer Care Center TEL Web Site
RUSSIA 8-800-555-55-55 www.samsung.ru
UKRAINE 8-800-502-0000 www.samsung.ua
[CHINA]
Customer Care Center TEL Web Site
CHINA 400-810-5858 www.samsung.com.cn

211
[HONGKONG] Contact SAMSUNG WORLD WIDE
IfyouhaveanycommentsorquestionsregardingaSamsungproducts,contactthe
SAMSUNGcustomercarecenter.
Customer Care Center TEL Web Site
HONGKONG 3698-4698 ZZZVDPVXQJFRPKN
[NETHERLANDS / BELGIUM]] Contact opnemen met SAMSUNG WORLD WIDE
$OVXYUDJHQRIRSPHUNLQJHQKHHIWPHWEHWUHNNLQJWRWHHQ6DPVXQJSURGXFWNXQWXFRQWDFW
RSQHPHQPHWGH6DPVXQJNODQWHQVHUYLFH
Si vous avez des suggestions ou des questions concernant les produits Samsung, veuillez
contacter le Service Consommateurs Samsung.
Customer Care Center TEL Web Site
NETHERLANDS 0900-SAMSUNG (726-7864)
¼PLQ
www.samsung.com/nl
BELGIUM 02 201 24 18 www.samsung.com/be
[TURKEY] SAMSUNG Turkiye’ye Ulasin
6DPVXQJUQOHUL\OHLOJLOLWPVRUXYH\RUXPODUÕQÕ]LoLQ6DPVXQJdD÷UÕ0HUNH]LLOHWHPDVD
JHoHELOLUVLQL]
Customer Care Center TEL Web Site
TURKEY 444 77 11 www.samsung.com/tr
Rev.2.0