Samsung Electronics Co NP900X3F Notebook PC User Manual user guide 03
Samsung Electronics Co Ltd Notebook PC user guide 03
Contents
- 1. user guide_01
- 2. user guide_02
- 3. user guide_03
- 4. user guide_04
user guide_03

40
41
Chapter 2
Using Windows 8
Windows Hot Key Function
You can use the following convenient hot keys in Windows 8.
Function Hot Keys Function Description
Displaying the
Start Screen Windows Key Switches to Start mode.
Displaying the
Desktop Windows Key + D Switches to Desktop
mode.
Running the
Charms Windows Key + C Activates the Charms.
Locking the
Screen Windows Key + L Locks the screen.
Opening the
Ease of Access
Center
Windows Key + U Opens the Ease of Access
Center conguration.
Opening the
Second Screen
Settings
Windows Key + P Opens the External
Monitor Settings menu.
Opening the
Advanced
Management
Tool
Windows Key + X Opens the Advanced
Management Tool.
Exit App Alt + F4 Exits the currently
running App.

Keyboard 43
Touchpad 46
External-type CD drive (ODD, To be purchased) 50
Multi Card Slot (Optional) 52
Connecting an External Display Device 55
Adjusting the Volume 59
LCD Brightness Control 61
Wired Network 62
Wireless Network (Optional) 66
Mobile broadband (Wireless WAN, Optional) 68
Using the TPM Security Device (Optional) 69
Using the Multimedia App (Optional) 78
Samsung Software Update 82
Diagnosing the Computer Status
and Troubleshooting 83
Chapter 3.
Using the computer
43
Chapter 3.
Using the computer
Keyboard
Shortcut key functions and procedures are discussed in the following sections.
The keyboard image may dier from the actual keyboard.•
The keyboard may dier depending on your country. The following mainly describes the shortcut keys.•
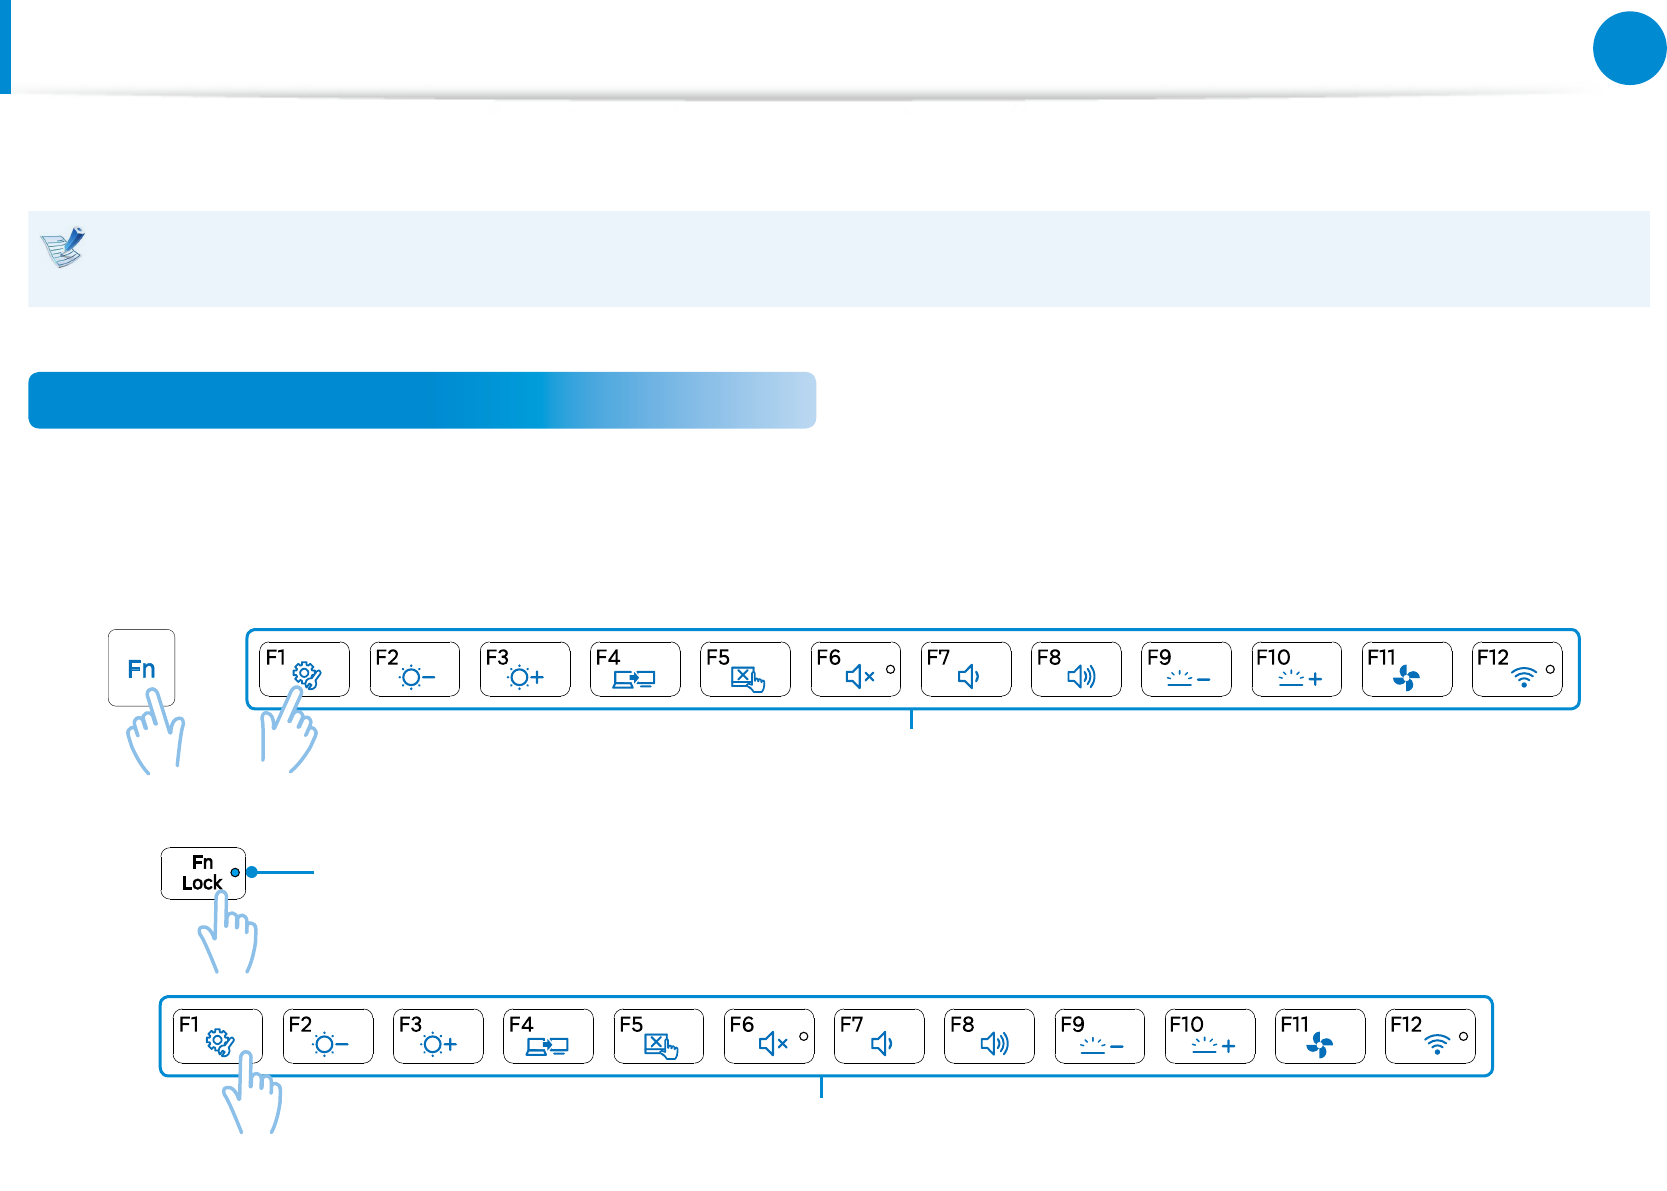
Shortcut Keys
Press both the Fn key and hot key at the same time.
Alternatively, press the Fn Lock key as well as a hot key to use the hot key functions more easily.
► Method 1
+
Shortcut Keys
► Method 2
1 Fn Lock On: The Blue LED is turned On
2
Shortcut Keys
44
Chapter 3.
Using the computer
Keyboard
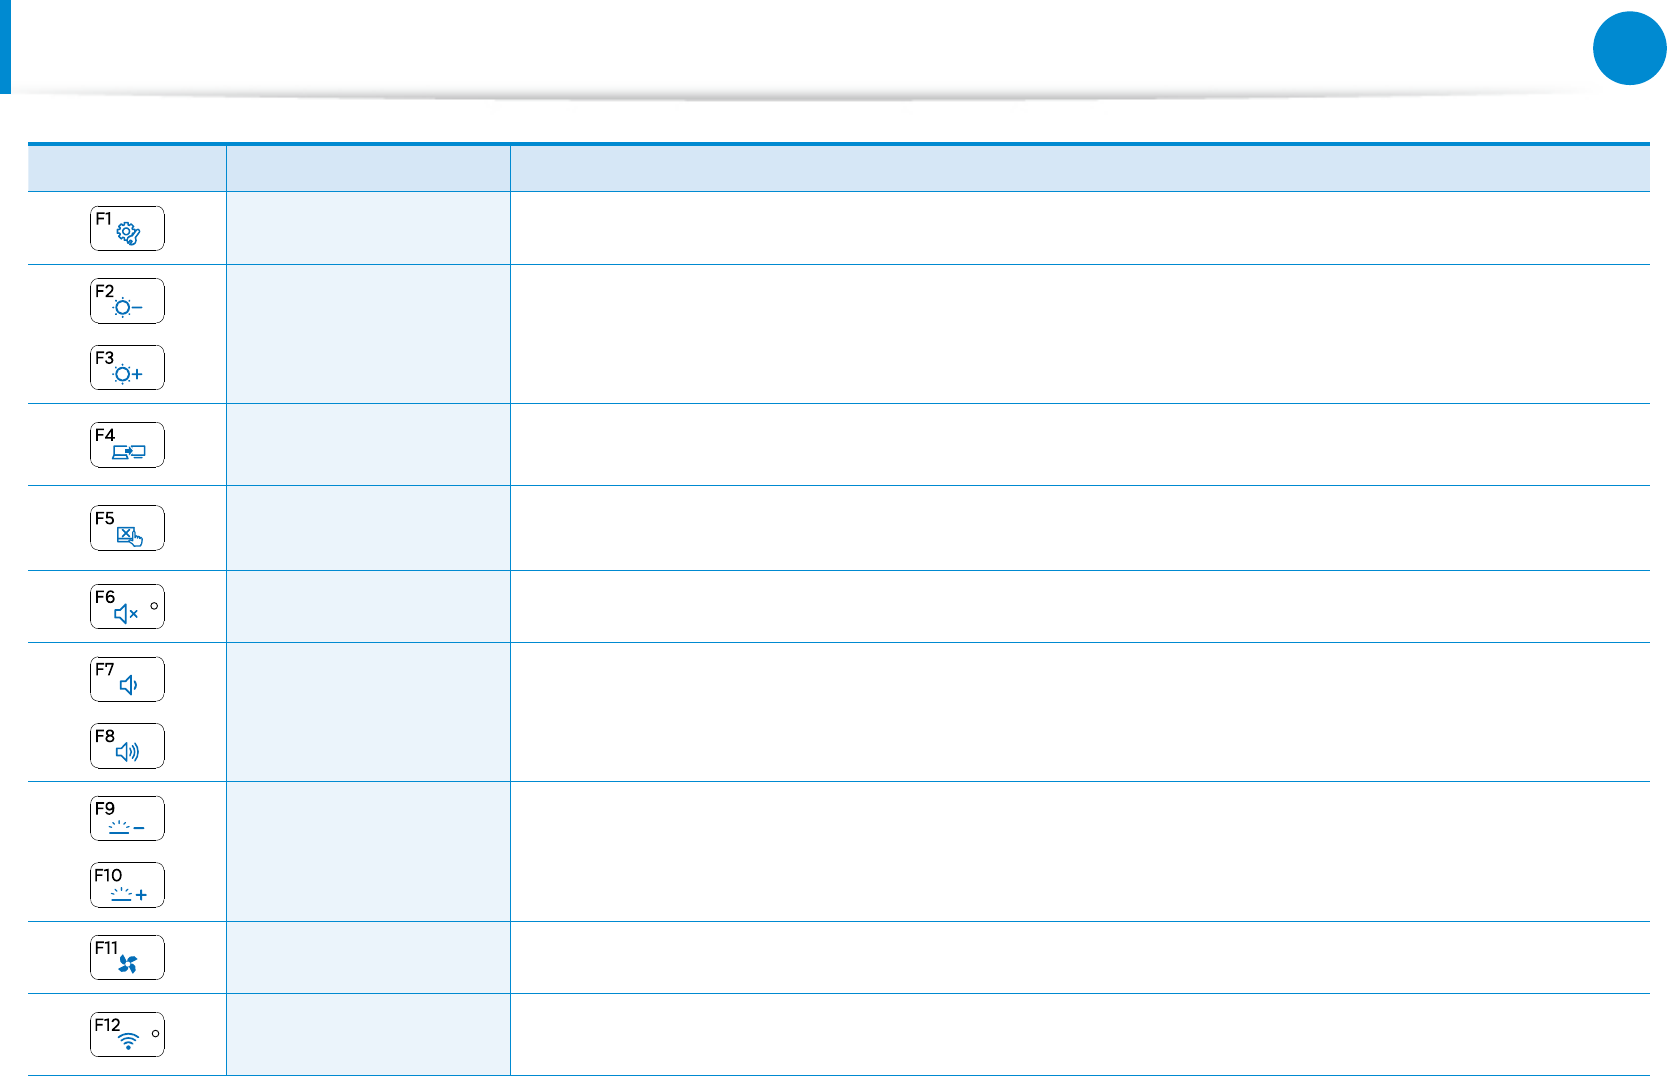
Shortcut Keys Name Function
Settings The Samsung software control program, the Settings, is launched.
Screen Brightness
Control Controls the screen brightness.
LCD/External Monitor Switches the screen output to the LCD or external monitor when an external monitor (or TV) is
connected to the computer.
Touchpad Turns the Touchpad function on or o.
When using an external mouse only, you can turn the Touchpad o.
Mute Press this button to turn the audio on or o.
Volume Control Controls the volume.
Keyboard Backlight
Brightness Control
(Optional)
When it is dark or when the illumination sensor is turned o, you can manually control the
brightness of the keyboard backlight.
Silent Mode Reduces the Fan noise so that users can use the computer without hearing noise.
Airplane Mode Turns all wireless network devices on or o.
(Only for models with a wireless network device.)
44
45
Chapter 3.
Using the computer
Keyboard
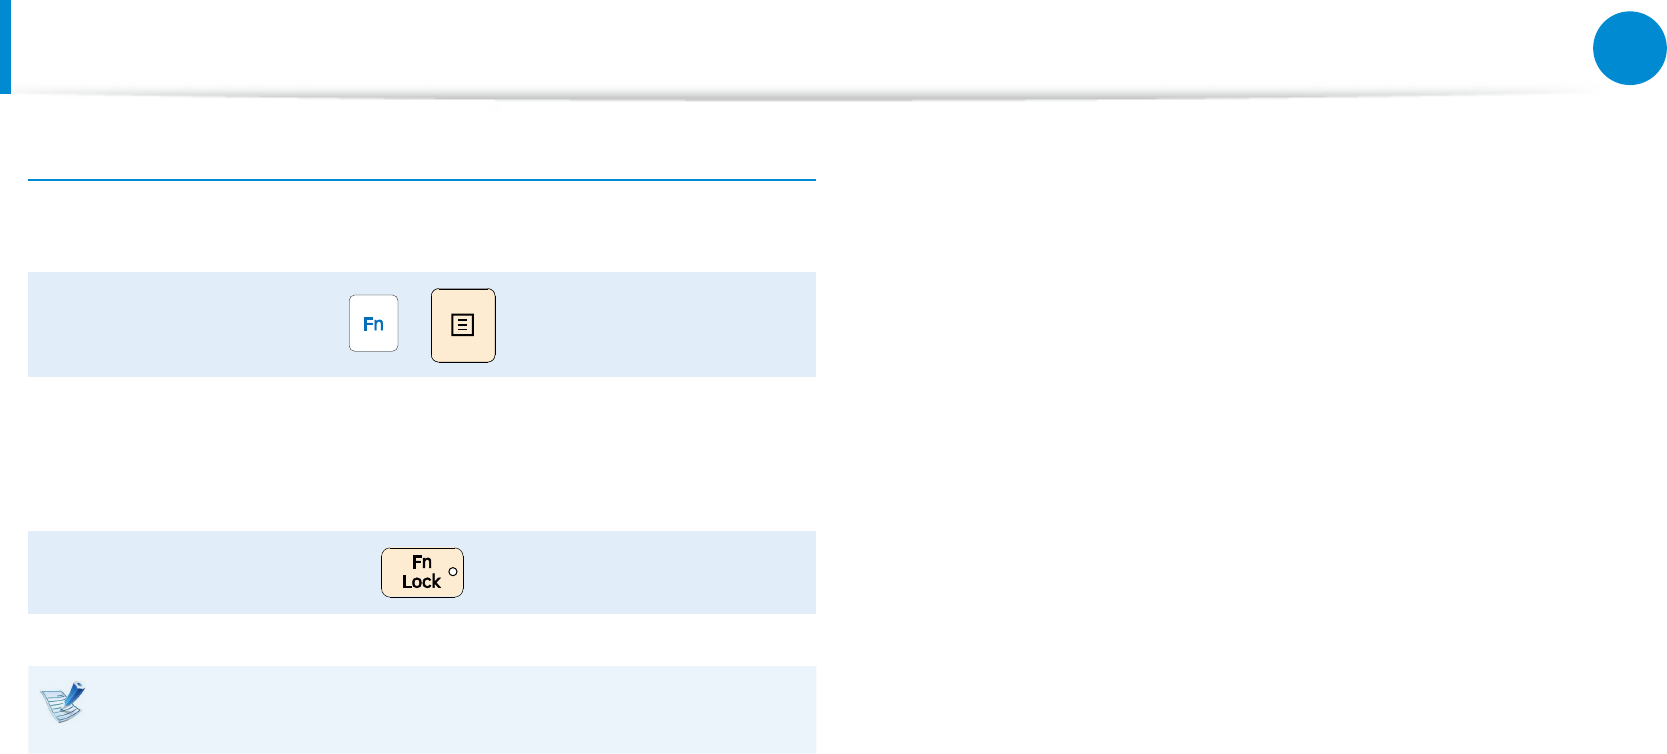
Other Function Keys (Optional)
Performs the right-click mouse function (touchpad).•
+
If you press the • Fn Lock key, you can use the hot key functions
without pressing the Fn key.
If the hot keys do not work properly, you have to install the
Settings.
46
Chapter 3.
Using the computer
Touchpad
The touchpad provides the same function as a mouse and the left
and right buttons of the touchpad plays the role of the left and
right buttons of a mouse.
Touch the touchpad with your ngers only. •
Anything other than your ngers, such as a ball-point pen,
will not be recognized by the touchpad.
If you touch the Touchpad or press the Touchpad buttons •
while booting up, the Windows boot time may be
extended.
Basic Touchpad Functions
Moving the cursor on the screen
Place your nger on the touchpad slightly and move your nger.
The mouse cursor will move accordingly. Move your nger in the
direction you wish to move the cursor.
Click Function
Place a nger on the touchpad and click on an item once.
Alternatively, press the left button once quickly and release it.
Tap
Click
or
Double-Click Function
Put your nger on the touchpad and quickly tap twice with your
nger on an item you want.
Alternatively, press the left touchpad button twice quickly.
ClickClick
TapTap
or
46
47
Chapter 3.
Using the computer
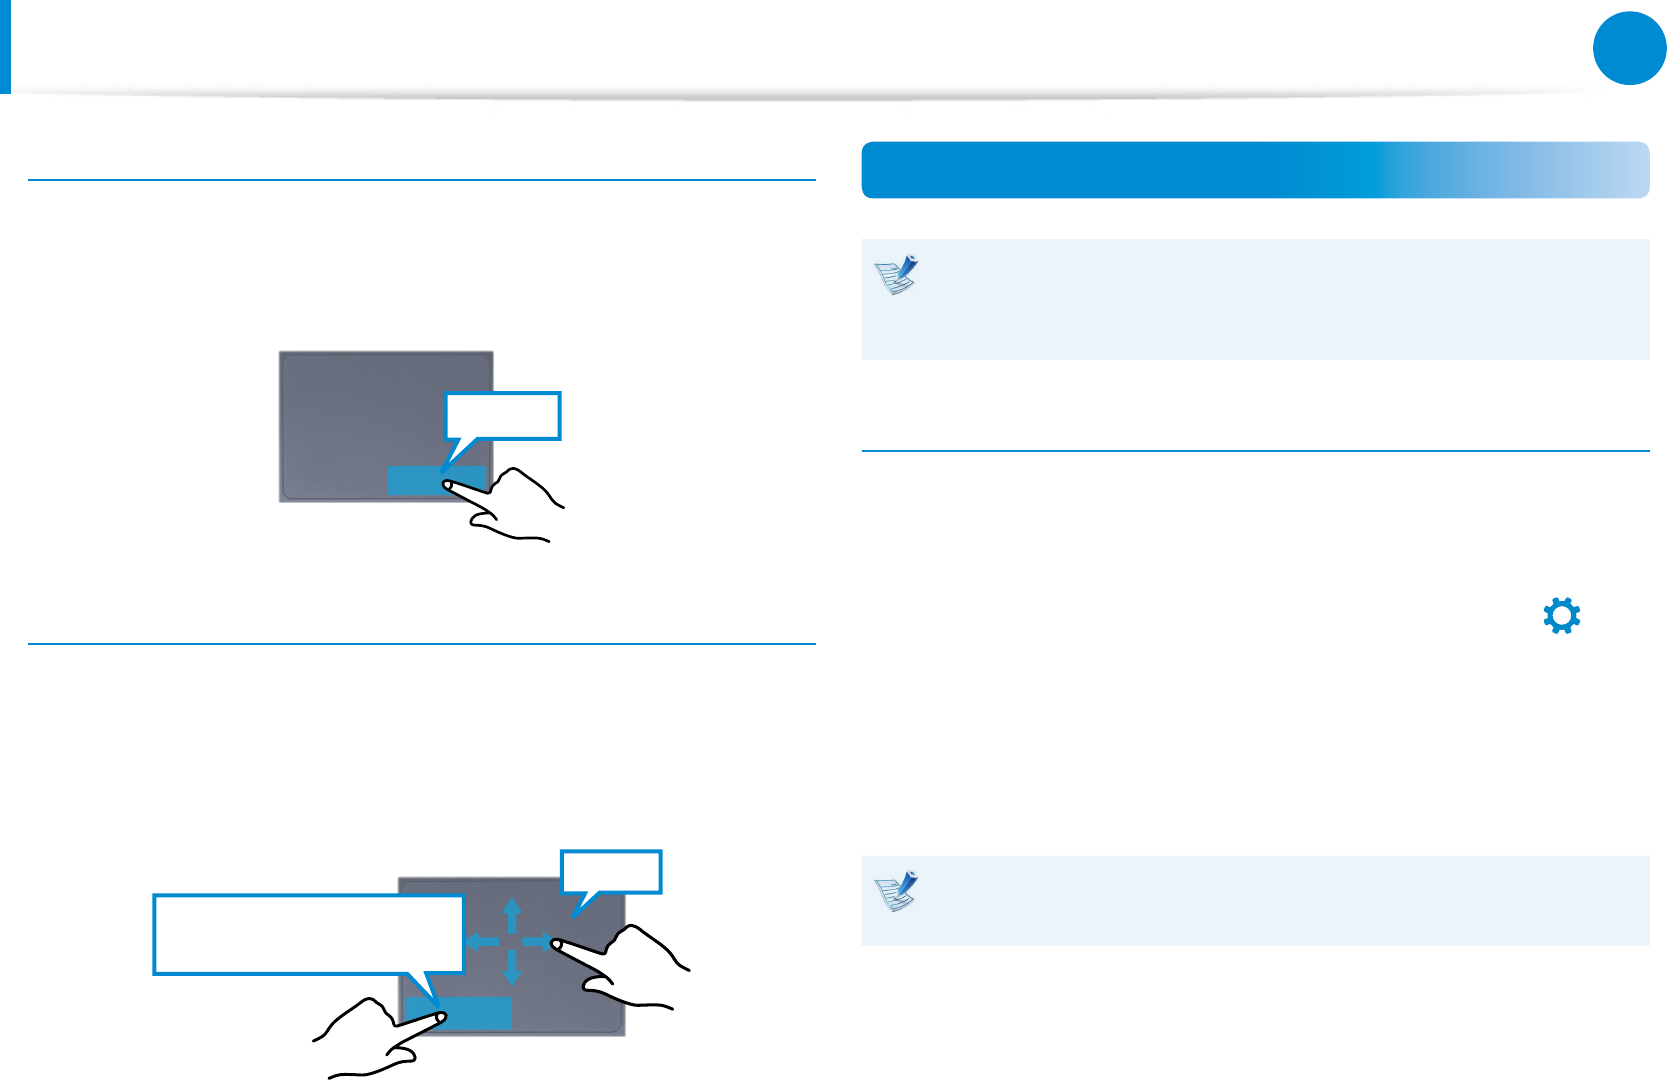
Right Button Function
This corresponds to clicking the right mouse button.
Press the right touchpad button once. The corresponding pop-up
menu appears.
Click
Drag Function
Dragging refers to moving an item to another place after selecting
it.
Press and hold down the left touchpad button over an item you
want to drag and move the item to the new location.
Holding down the left
touchpad button
Move
The Gesture Function of the Touchpad (Optional)
The Touchpad Gesture function may not be provided and the
version of the function may dier depending on the model.
Some usage procedures may dier depending on the version.
Conguring the Gesture Function
Some gesture functions may not be congured.
In this case, you can congure them using the following path.
1 On the Desktop, click the Charms menu > Settings
áᔪ
Ŗᮁ
᯲
ᰆ⊹
ᖅᱶ
>
Control Panel > Hardware and Sound > Touchpad icon.
2 When the Touchpad Settings window appears, click the
corresponding item in the Select an Item to Congure
setting to select the checkbox for the corresponding item.
To cancel the Gesture function, deselect the checkbox for the
corresponding item in the Touchpad Settings window.
Touchpad
48
Chapter 3.
Using the computer
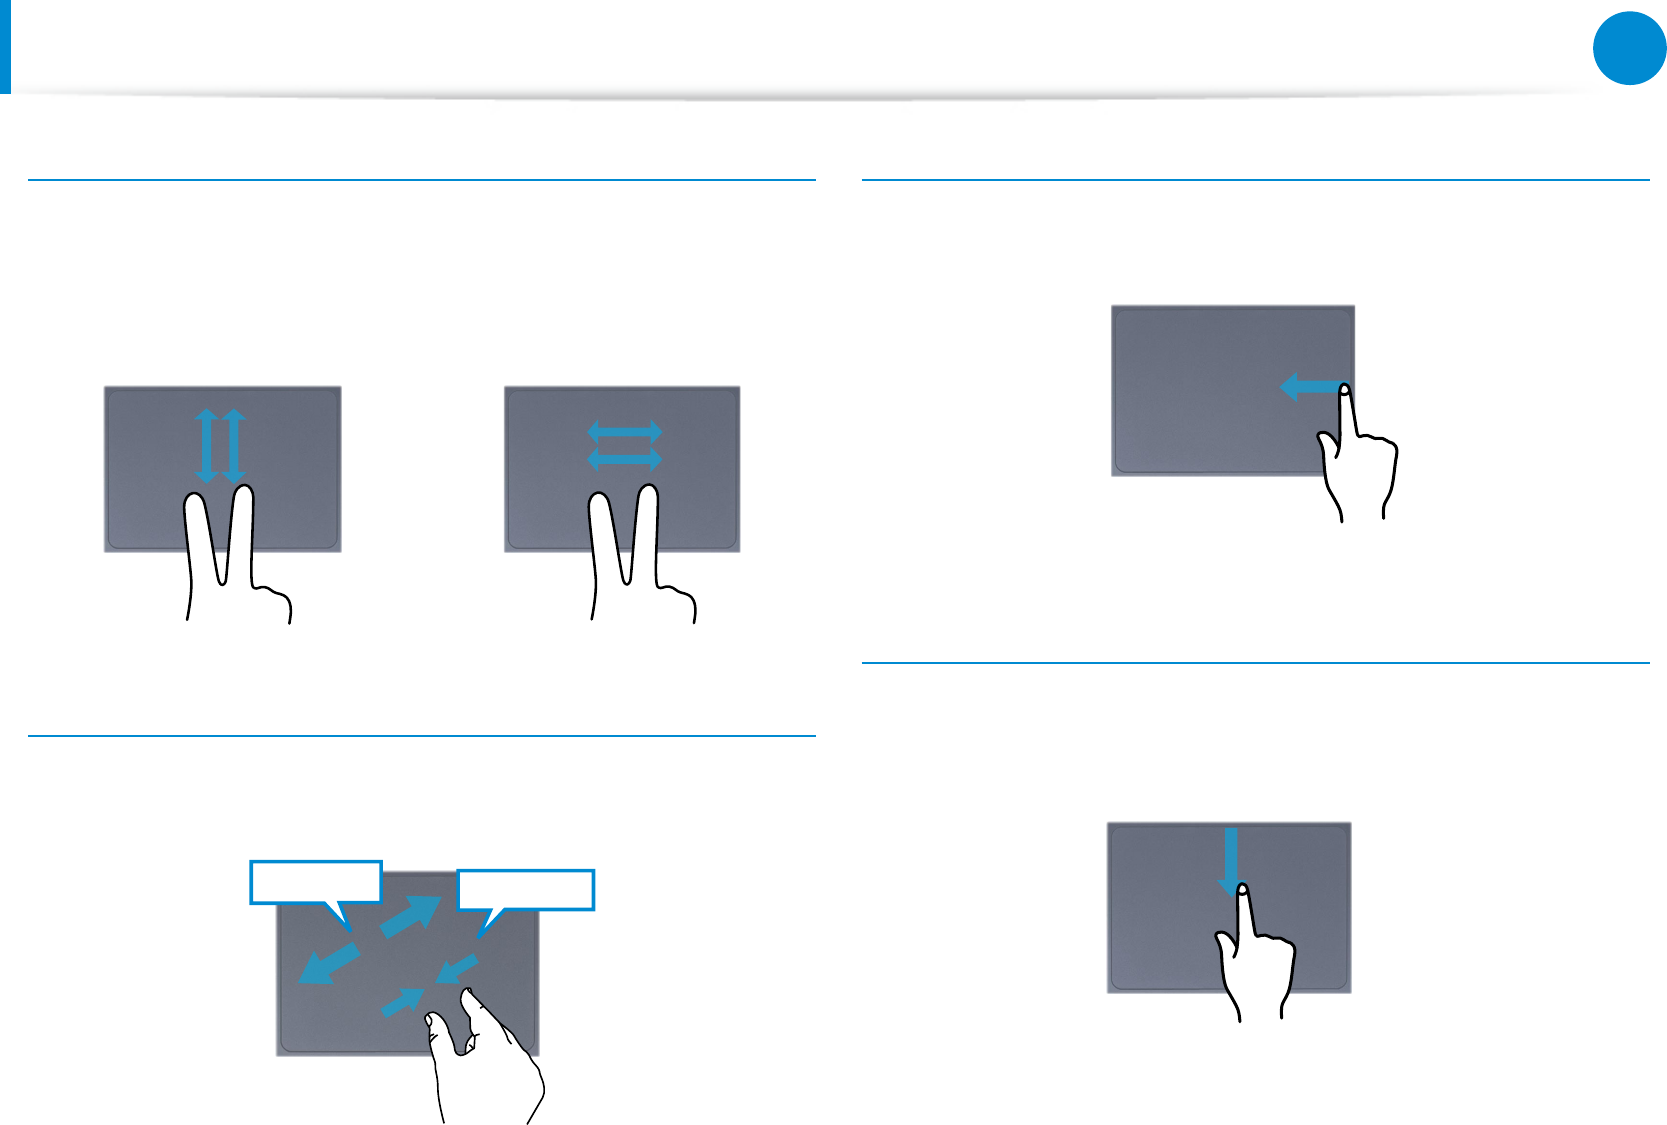
The Scroll Function
This function is the same as the scroll area of the Touchpad.
If you place two ngers over the Touchpad and move them up,
down, left or right, the screen is scrolled up, down, left or right
accordingly.
or
Zoom Functions
If you place two ngers over the Touchpad together or apart, the
current image or text is zoomed in or out.
Zoom-out
Zoom-in
or
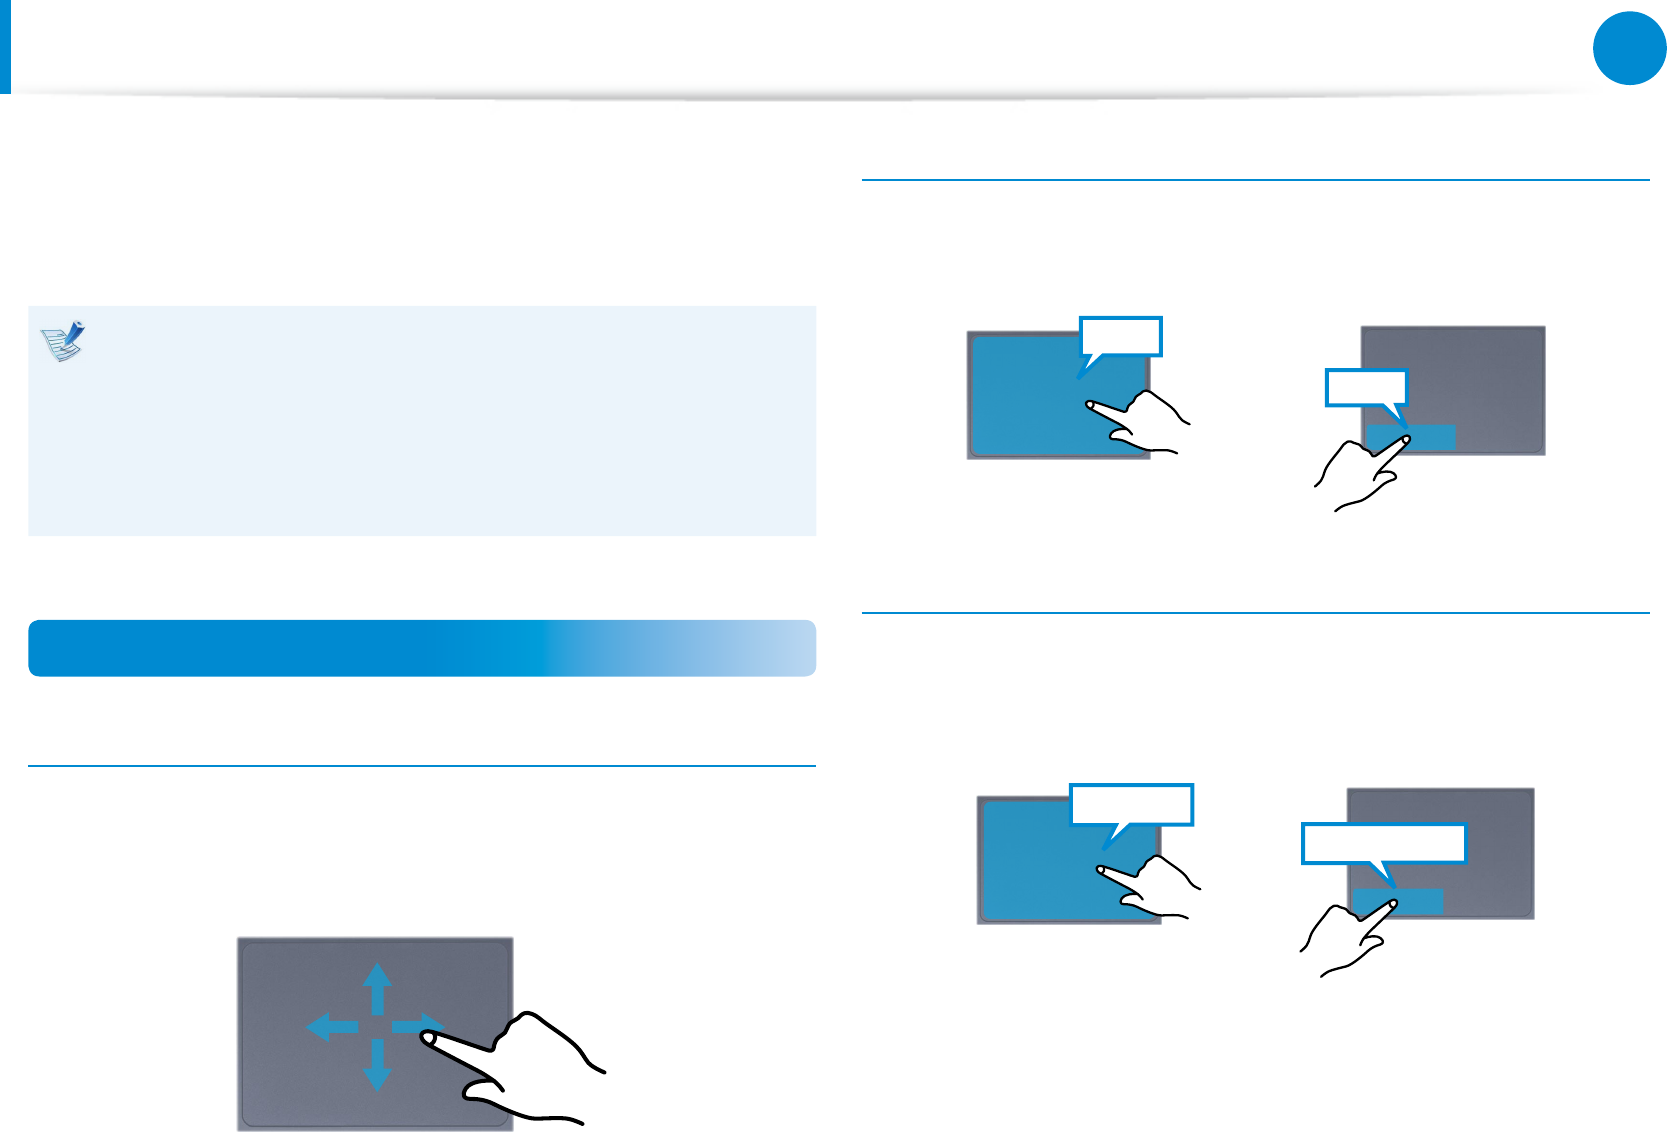
Charms Menu Activating Function
If you place your nger on the right edge of the touch pad and
drag your nger toward the center, the Charms menu appears.
Displaying Additional Menu(s) of a Currently Running
App
Place your nger at the edge of the top area on the touch pad and
drag your nger toward the center, and the menu of the currently
running App appears.
Touchpad
48
49
Chapter 3.
Using the computer
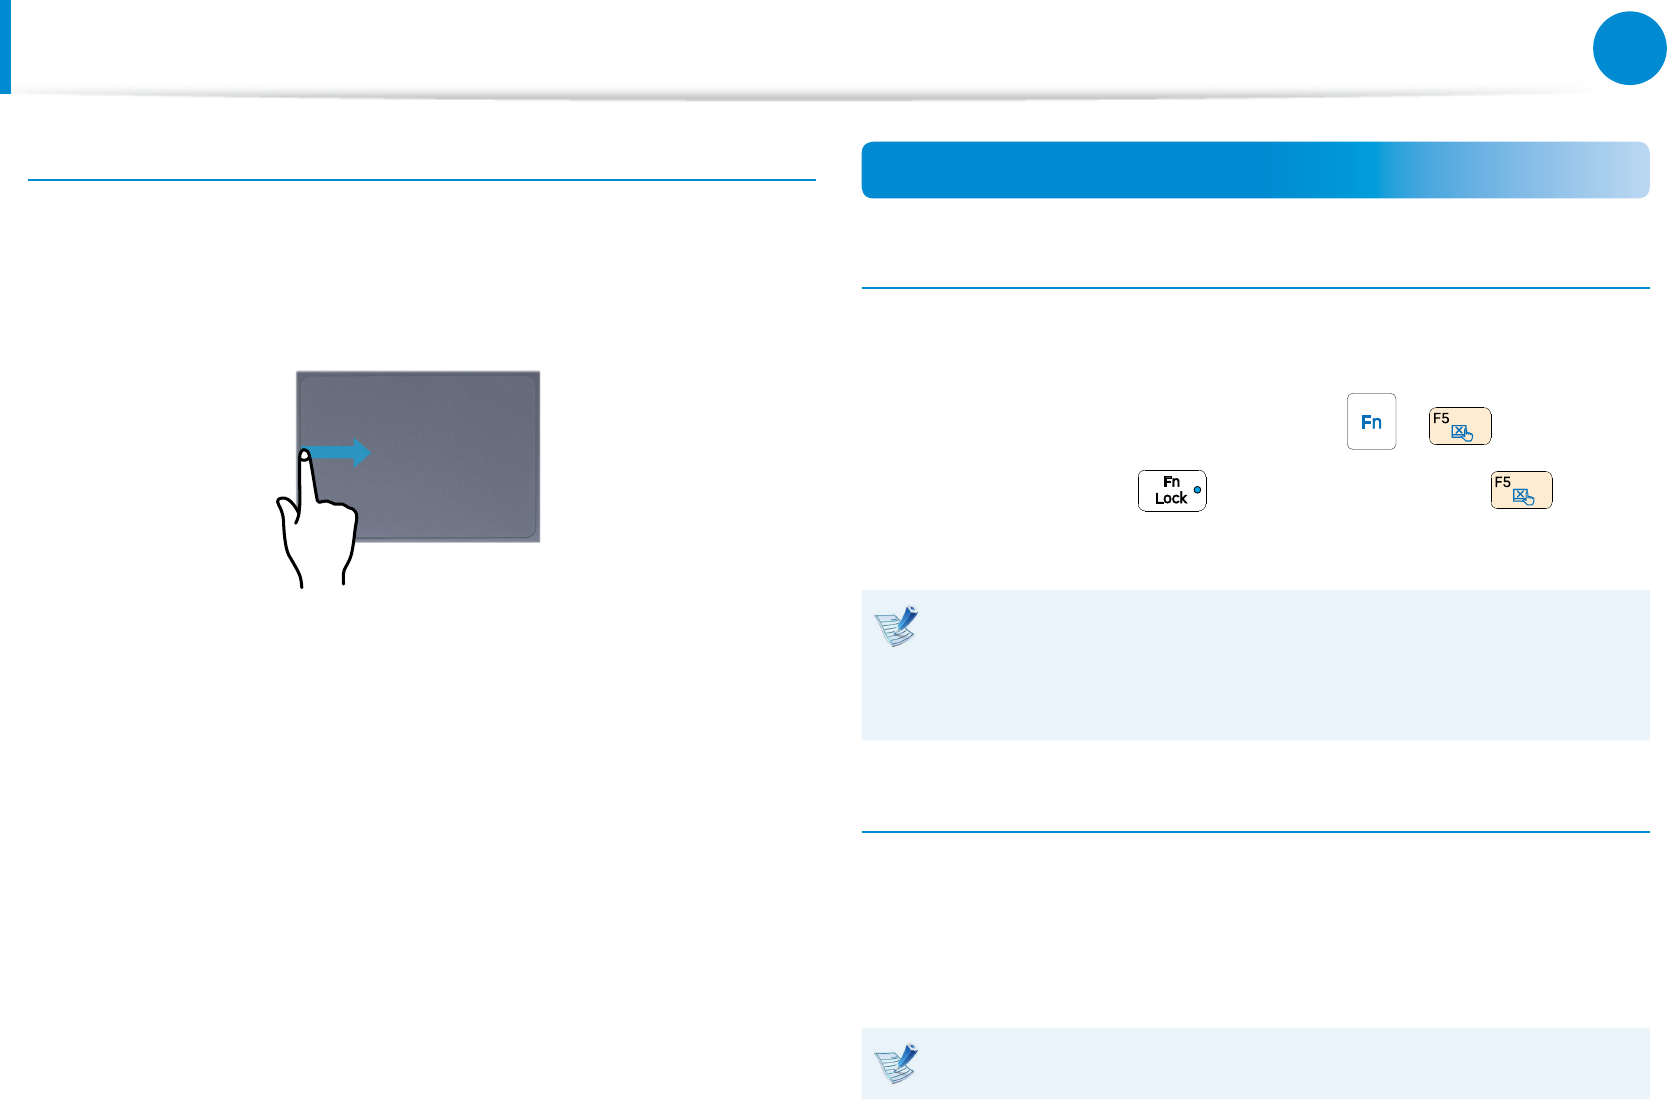
Last Run Window Opening Function
Place your nger on the left edge of the touch pad and drag
your nger towards the center to activate a previously operating
program from among the currently running programs.
Touchpad On/O Function
Locking with shortcut keys
If you want to use the mouse only without using the touchpad,
you can turn the touchpad o.
To lock the touchpad function, press the + keys.
Alternatively, press the key and then press the key to
turn the touchpad function o.
You can set the touchpad and touchpad button settings in
the tabs that appear when clicking Charms menu on the
Desktop > Settings > Control Panel > Hardware and
Sound > Touchpad.
Auto-locking when connecting USB mouse
If an external USB pointing device is connected in the Charms
menu in Desktop > Settings > Control Panel > Hardware and
Sound > Touchpad, check Disabled to disable the touchpad
feature when connecting to the USB mouse.
This auto-locking function is not provided for some models.
Touchpad

50
Chapter 3.
Using the computer
This computer supports an external USB CD-ROM drive (can be
additionally purchased).
Check if the interface type of the external CD-ROM drive is a USB
type. For detailed specications, refer to the catalog.
Do not insert a cracked or scratched CD. •
Otherwise, the CD may break and damage the optical disk
drive when the CD rotates at a high speed.
When you clean a CD or DVD title, wipe with a soft cloth •
from inside to outside.
Do not eject a CD when the CD operating LED is on.•
The gures used for the description are of a representative •
model. Therefore the gures may dier from the real ones.
Using a CD that is not in the shape of a circle is not •
recommended.
Connecting the CD Drive
Connect the CD drive to the USB port.
USB port
External-type CD drive (ODD, To be purchased)

50
51
Chapter 3.
Using the computer
Inserting and Ejecting a CD
1 Press the Eject button of the CD drive.
Status Indicator
Eject Button
Emergency Hole
2 When the CD tray opens, insert a CD or DVD and push the
tray in until it clicks.
3 Push the CD tray inward until it clicks.
The CD drive status indicator is turned on.
A CD drive’s reading and writing speed may dier •
depending on the condition and type of the media.
To eject a CD when the CD drive does not work or the •
computer is o, place the end of a paper clip ( ) into
the Emergency Hole until the CD tray is ejected.
External-type CD drive (ODD, To be purchased)
52
Chapter 3.
Using the computer
Multi Card Slot (Optional)
Using the multi-card slot, you can read and write data on various
types of memory cards.
When you insert a memory card, make sure to insert the memory
card in the correct direction. Pushing an incorrectly inserted
memory card may damage the card itself or the slot.
You can use memory cards as a removable disk and •
conveniently exchange data with digital devices such as a
digital camera, etc.
Separately purchase memory cards of your desired •
capacity.
The color of the multi-card slot may dier from the picture •
in this manual.
Before using the slot, remove the dummy card from inside •
the slot. (Only for models providing dummy cards.)
Insert the memory card into the multi-card slot in the •
direction printed on the slot.
For memory cards marked with ‘*’, you must insert them •
into a specied adapter and then insert the adapter into
the multi-card slot.
Inserting such memory cards directly into the multi-card
slot without using a specied adapter may damage the
computer.
The computer may not recognize the device depending on •
the status of the specied adapter.
Micro SD / SD slot,
*micro SD (T-Flash), *micro SDHC,
*micro SDXC, *micro SDXC UHS-I,
SD, *mini SD, SDHC, *mini SDHC,
SDHC UHS-I, SDXC, SDXC UHS-I
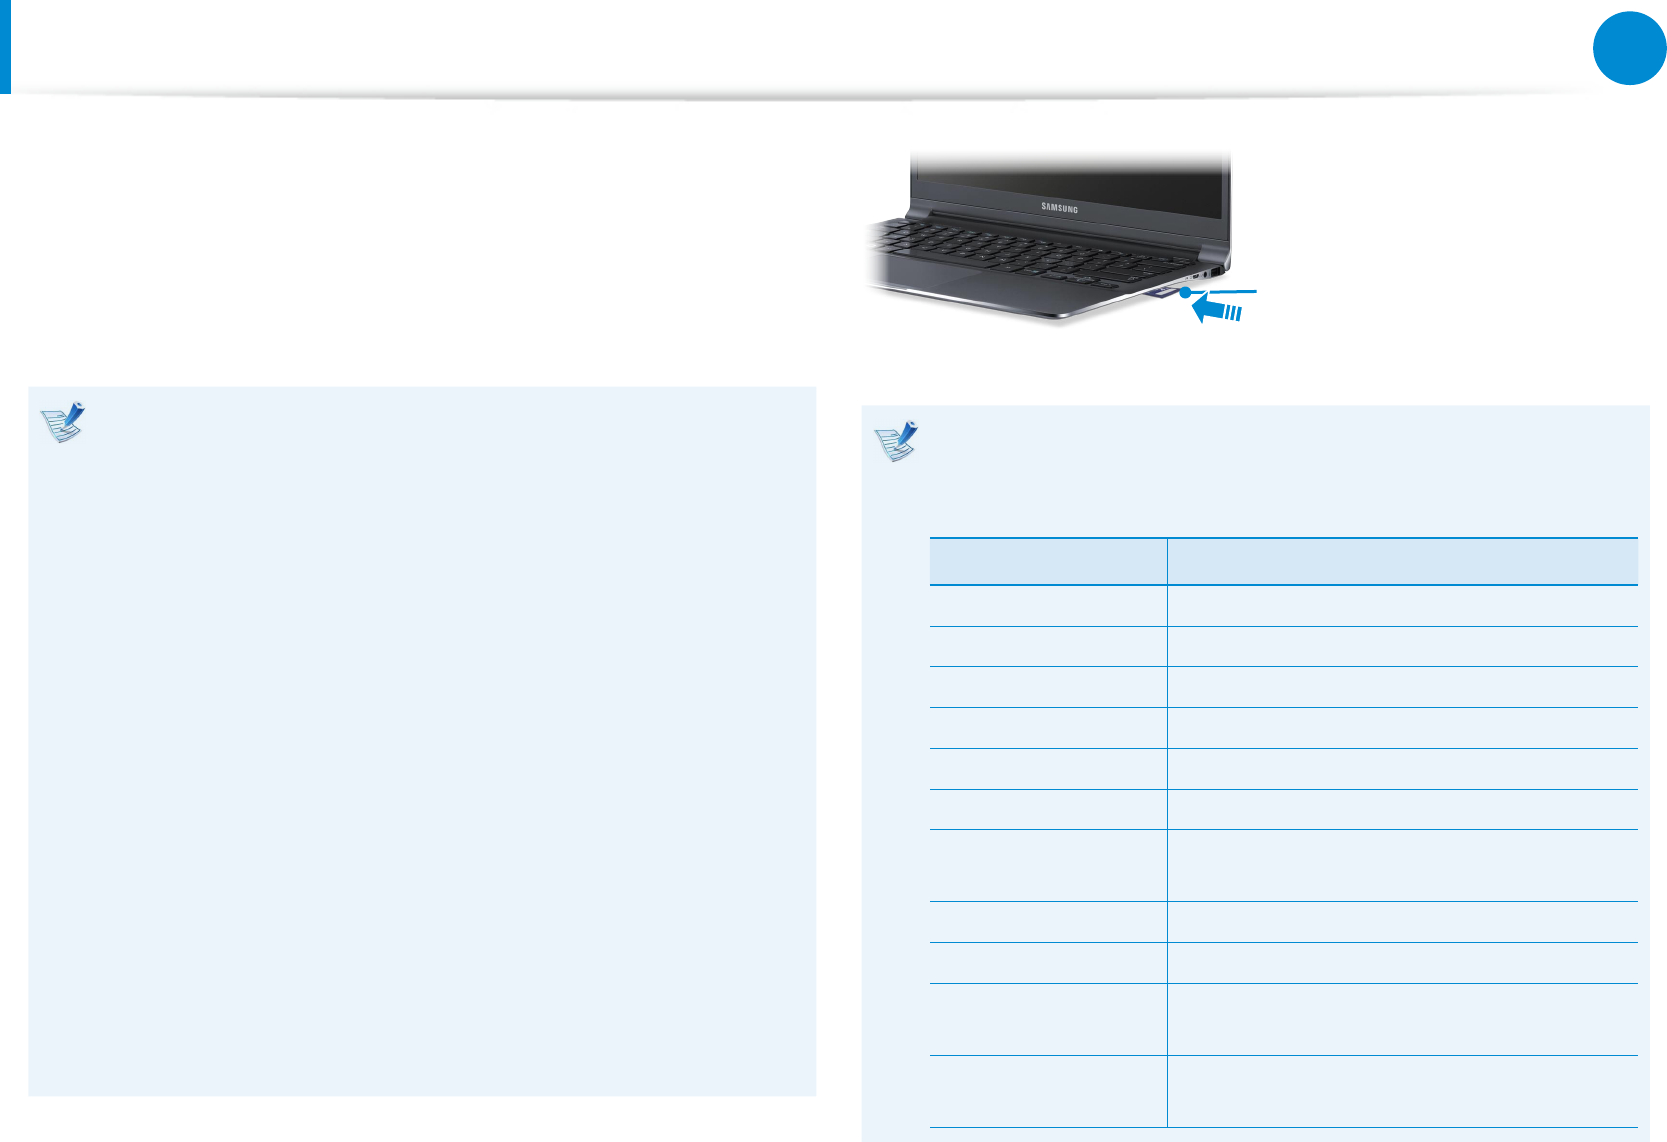
Memory Card Naming
The following table shows the full names of memory cards
for each abbreviation.
Abbreviation Memory Card’s Name
SD Secure Digital
*mini SD mini Secure Digital
*micro SD micro Secure Digital
SDHC Secure Digital High Capacity
*mini SDHC mini Secure Digital High Capacity
*micro SDHC micro Secure Digital High Capacity
SDHC UHS-I Secure Digital High Capacity Ultra High
Speed Phase I
SDXC Secure Digital eXtended Capacity
*micro SDXC micro Secure Digital eXtended Capacity
SDXC UHS-I Secure Digital eXtended Capacity Ultra
High Speed Phase I
*micro SDXC UHS-I micro Secure Digital eXtended Capacity
Ultra High Speed Phase I
52
53
Chapter 3.
Using the computer
Multi Card Slot (Optional)
1 Insert a memory card into the multi-card slot in the correct
direction.
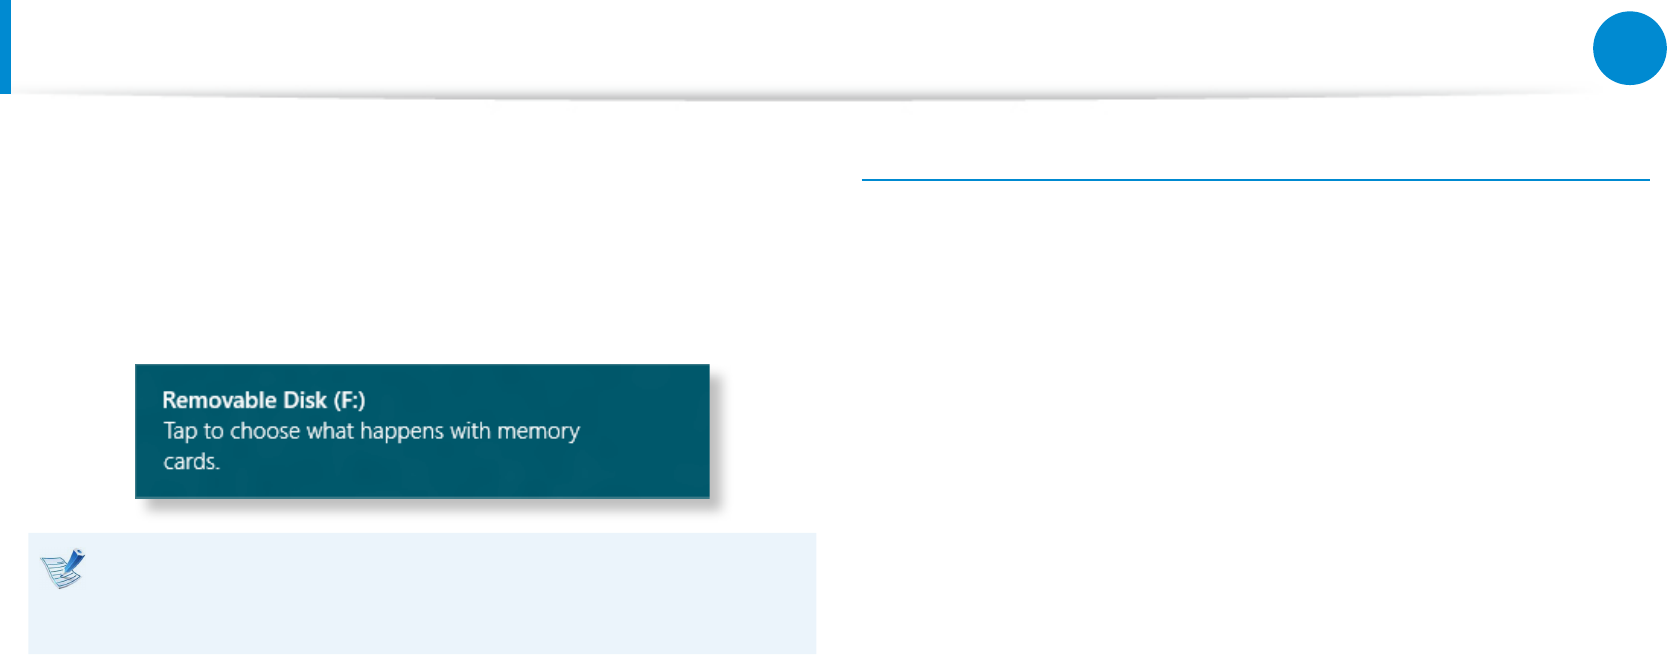
2 The following message appears on the top right.
Click to open the folder and click View Files.
If a message appears to notify you of any problem, click the
corresponding window > Continue without Scanning. You
can perform the following process described in No. 3.
3 Windows Explorer runs on the Desktop. You can save, move
and delete data on the corresponding drive.
To remove a memory card
Remove the card while holding the tip of the card.
Alternatively, push the tip of the card in and then remove it once it
pops up.
54
Chapter 3.
Using the computer
Multi Card Slot (Optional)
To format a memory card
When using the memory card for the rst time, you must format
the card before using it.
Formatting a card deletes all data saved on the card. If the
card includes data, backup the data before formatting it.
1 Click the Windows Explorer icon in the taskbar on the
Desktop.
2 Right-click over a card drive with the touchpad and select
Format.
3 Click Start to the formatting.
To share a memory card with a digital device such as digital •
camera, it is recommended to format the memory card
in the digital device before use. If you format a memory
card on the computer and then insert the memory into the
digital device, you may need to format the memory card
again in the digital device.
If there is a write-protection device in the memory card •
and the device is set to the lock position, you cannot
format, write data, nor erase data from the card.
Repeatedly inserting and removing a memory card may •
damage the memory card.
The SD slot does not support SDIO (Secure Digital Input •
Output).
You cannot read or write copyright-protected data.•
54
55
Chapter 3.
Using the computer
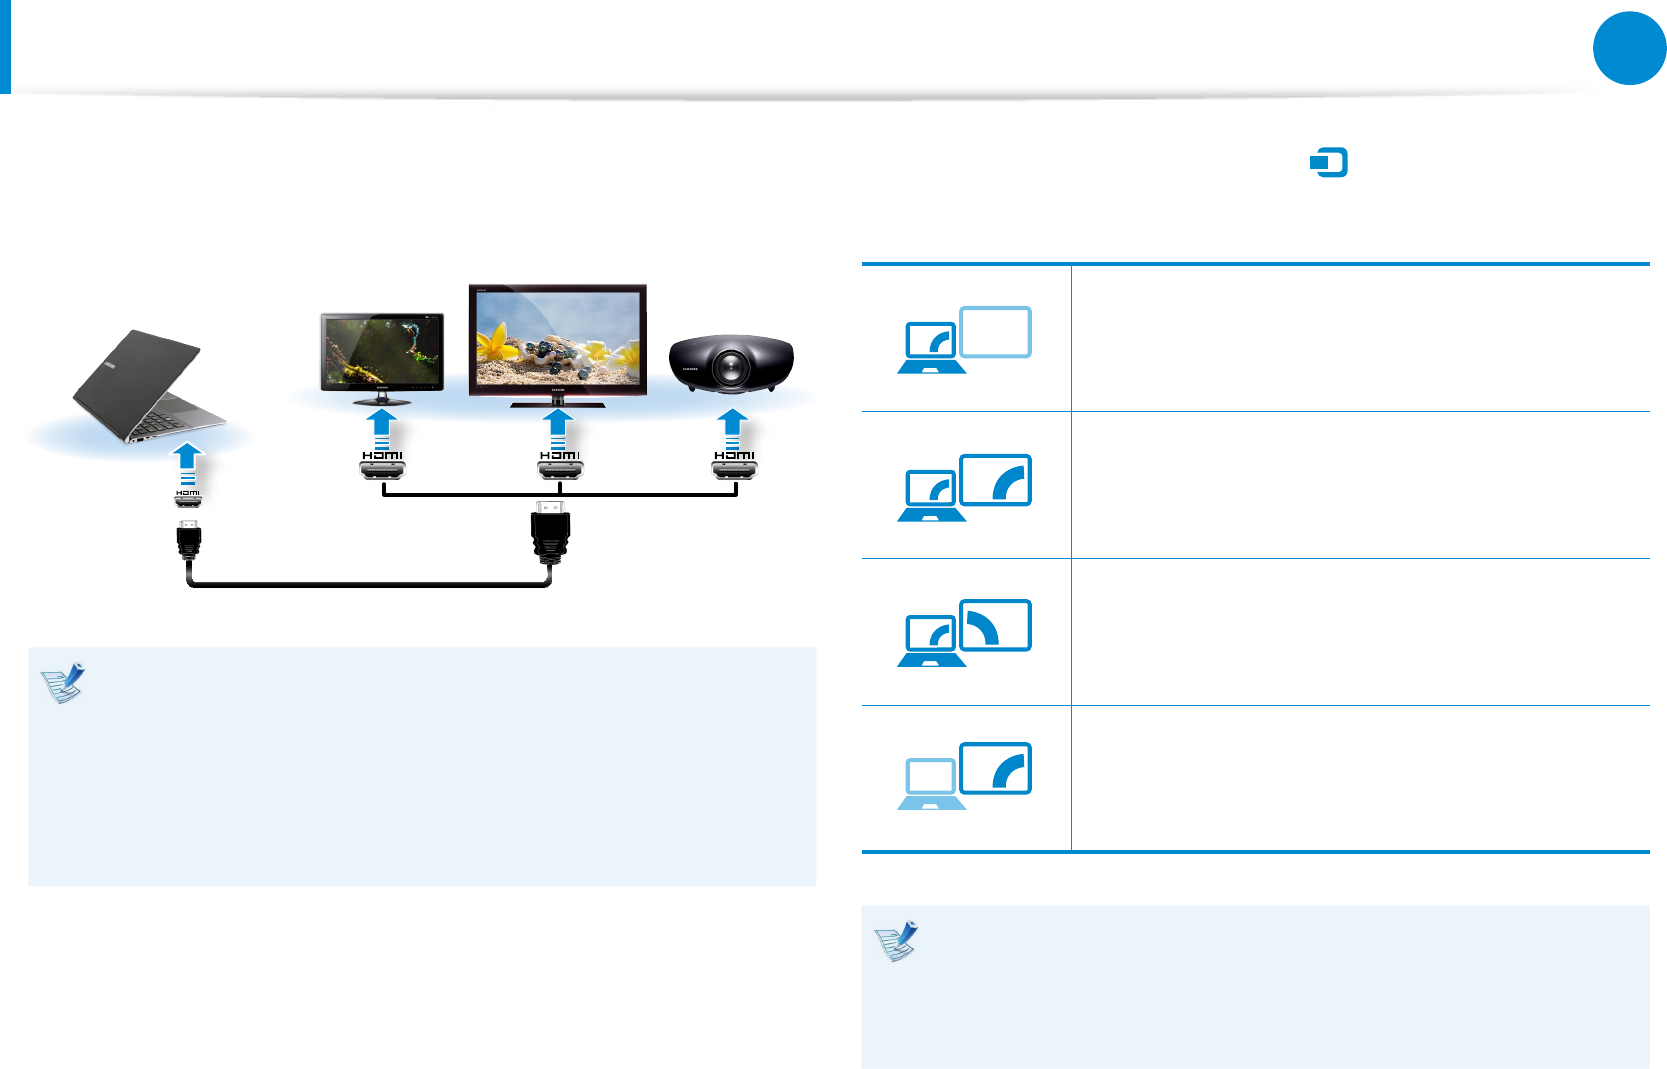
Connecting an External Display Device
If you connect an external display device such as a monitor, TV,
projector, etc., you can view the picture on the wider screen of the
external device when you give a presentation or watch a video or
movie.
There is an analog monitor port (D-SUB) and a micro digital video
and audio port (Micro HDMI).
Since the visual quality is higher for Micro HDMI than D-SUB, if
more than one port is available, connect the port that provides
the higher visual quality.
Before you start, check the port and cable of the external
display device and then connect the display device to the
computer.
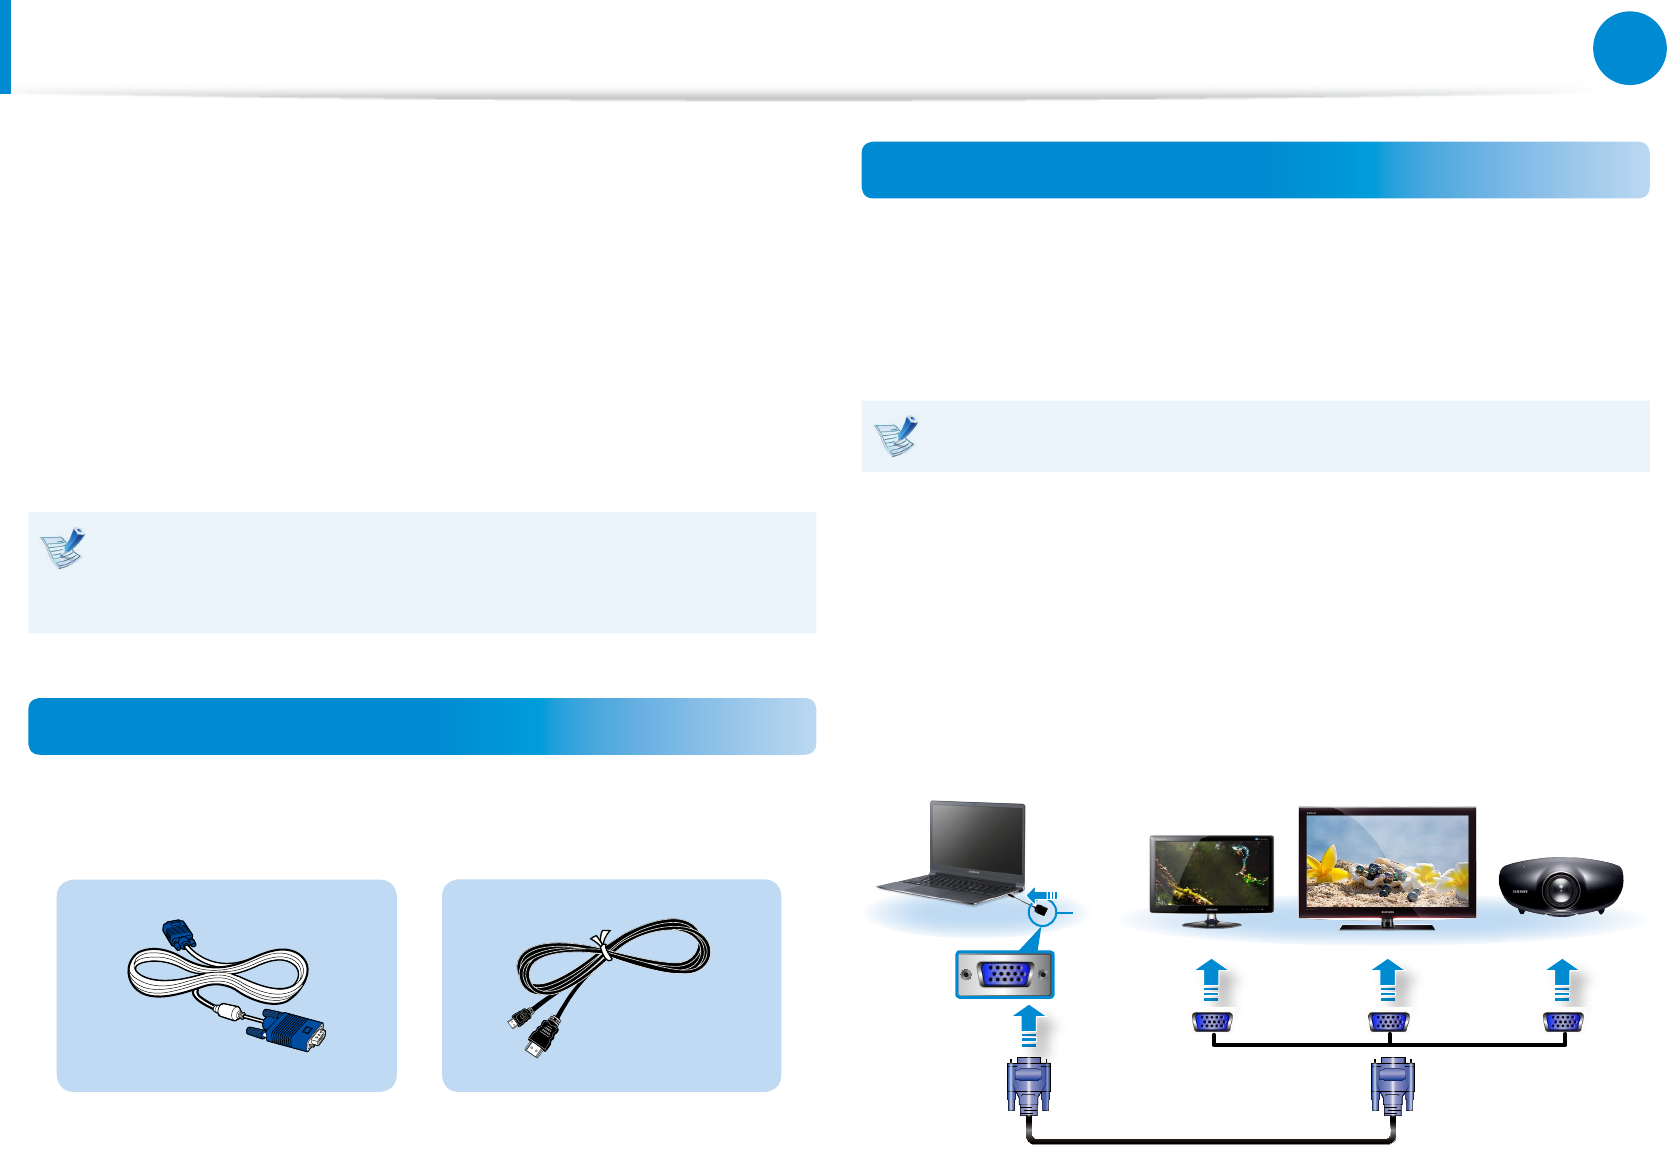
About the connection cable
Users should additionally purchase the necessary connection
cables.
Analog Monitor (D-SUB) Cable
HDMI to micro HDMI Cable
Connecting to the monitor port (Optional)
You can experience a wider screen by connecting the computer to
a monitor, TV or projector with a monitor port.
You can give better presentations by connecting the computer to
a projector.
The VGA adapter is optional and to be be purchased.
1 Connect the VGA adapter to the monitor port of the
computer.
Connect the VGA cable (15-pin) to the connected VGA
adapter and then connect the other end of the VGA cable to
the D-SUB port of the monitor or the TV.
x
External
Monitor TV
Projector
z
VGA
Adapter
56
Chapter 3.
Using the computer
2 Connect the power cord of the connected monitor, TV or
projector and turn the power on.
Change your TV to external device mode when connecting to
the TV.
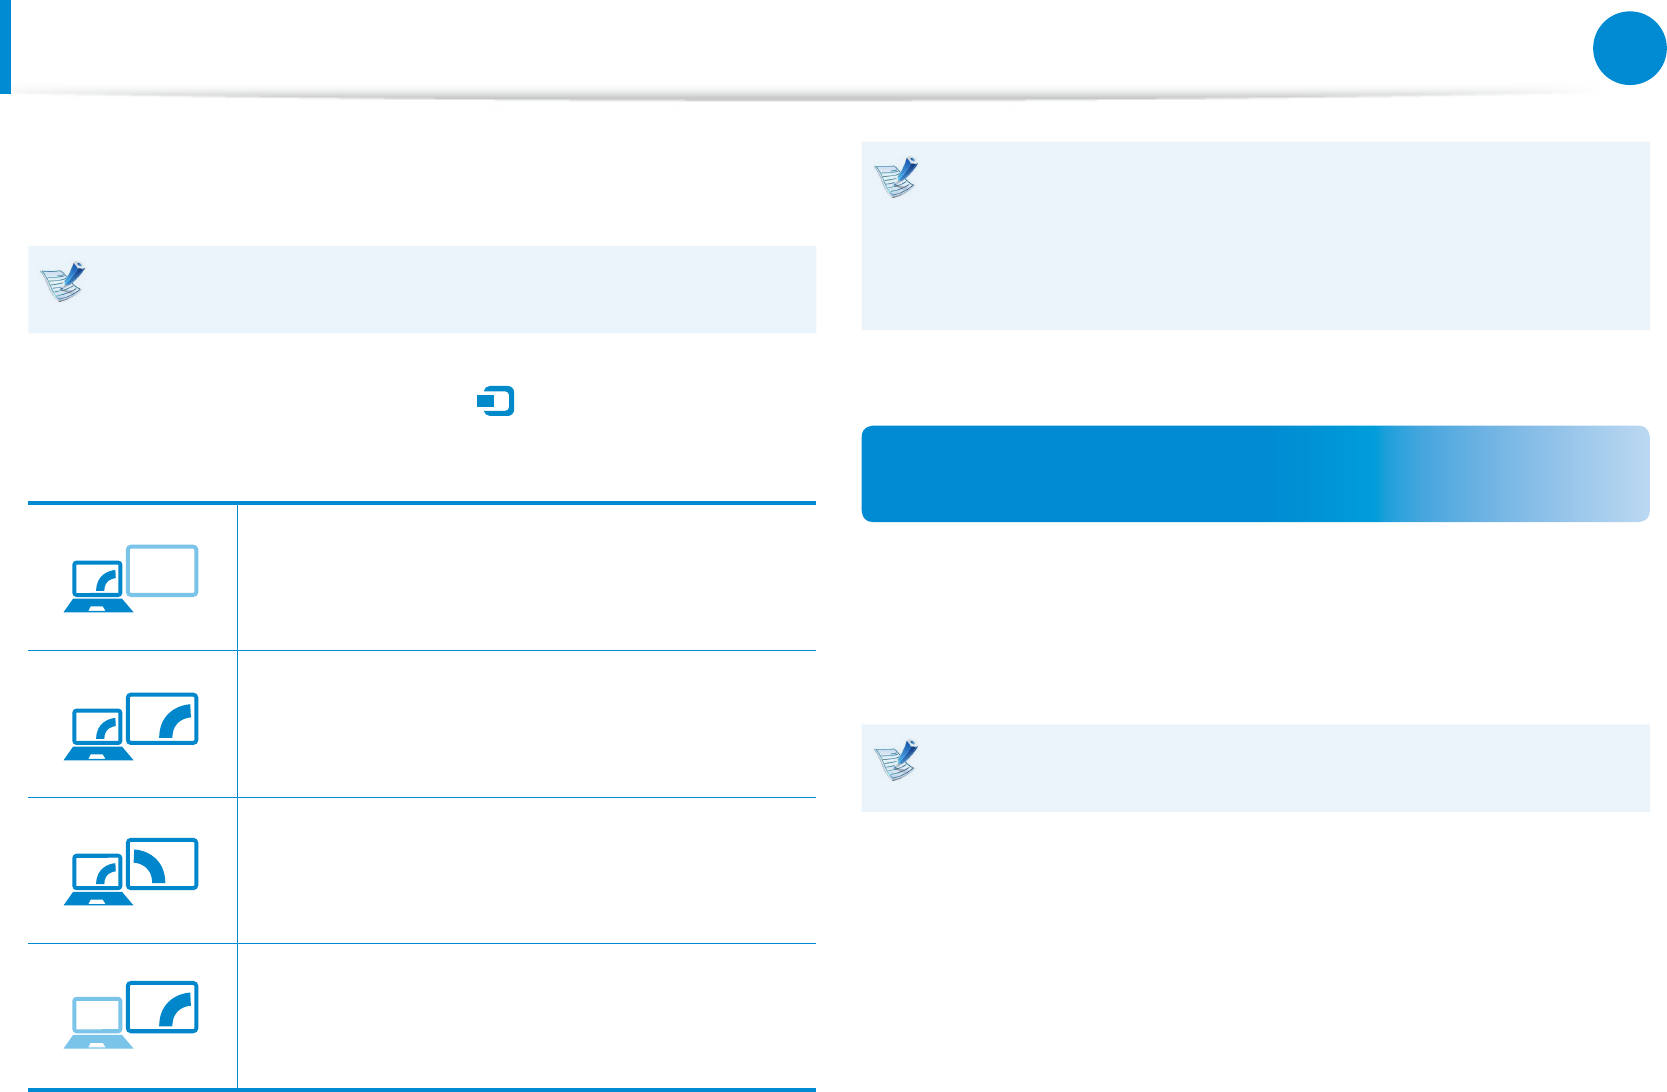
3 Select Charms menu > Devices
áᔪ
Ŗᮁ
᯲
ᰆ⊹
ᖅᱶ
> Second Screen.
Select a desired monitor mode.
3&ִփ
ـࢿ
ࢠ
ѿءधִփ
PC screen only
The contents are only displayed on the PC
monitor (current device).
3&ִփ
ـࢿ
ࢠ
ѿءधִփ
Duplicate
The contents of the current device are displayed
on the external device as well.
3&ִփ
ـࢿ
ࢠ
ѿءधִփ
Extend
The screen of the current device is expanded to
the external device.
3&ִփ
ـࢿ
ࢠ
ѿءधִփ
Second screen only
The contents are displayed only on the screen of
the external device.
Alternatively, to set up dual view:
Open the Display Settings window in the Control Panel,
select Monitor 2 and select the Expand to t to this
monitor checkbox to set dual view. For more detailed
information, refer to the Windows online help.
Connecting through the Micro HDMI port
(Optional)
By connecting the computer to a TV with a HDMI port, you can
enjoy both a high visual quality and a high sound quality.
After connecting a TV through HDMI, you have to congure the
screen and sound.
You have to additionally purchase the HDMI to micro HDMI
cable.
Connecting an External Display Device
56
57
Chapter 3.
Using the computer
1 Connect the HDMI to micro HDMI cable to the HDMI port of
the TV.
External
Monitor TV
Projector
HDMI to
micro HDMI
This is only supported for models that support a TV output •
port (HDMI).
When a TV provides more than one HDMI port, connect •
the computer to the DVI IN port.
When connecting the computer to a TV, switch the •
external input mode of the TV to HDMI.
2 Select Charms menu > Devices
áᔪ
Ŗᮁ
᯲
ᰆ⊹
ᖅᱶ
> Second Screen.
Select a desired monitor mode.
3&ִփ
ـࢿ
ࢠ
ѿءधִփ
PC screen only
The contents are only displayed on the PC
monitor (current device).
3&ִփ
ـࢿ
ࢠ
ѿءधִփ
Duplicate
The contents of the current device are displayed
on the external device as well.
3&ִփ
ـࢿ
ࢠ
ѿءधִփ
Extend
The screen of the current device is expanded to
the external device.
3&ִփ
ـࢿ
ࢠ
ѿءधִփ
Second screen only
The contents are displayed only on the screen of
the external device.
External Monitor / TV is not supported in the DOS •
Command Prompt window.
Simultaneous output to all 3 (LCD + CRT + HDMI) is not •
supported.
Connecting an External Display Device
58
Chapter 3.
Using the computer
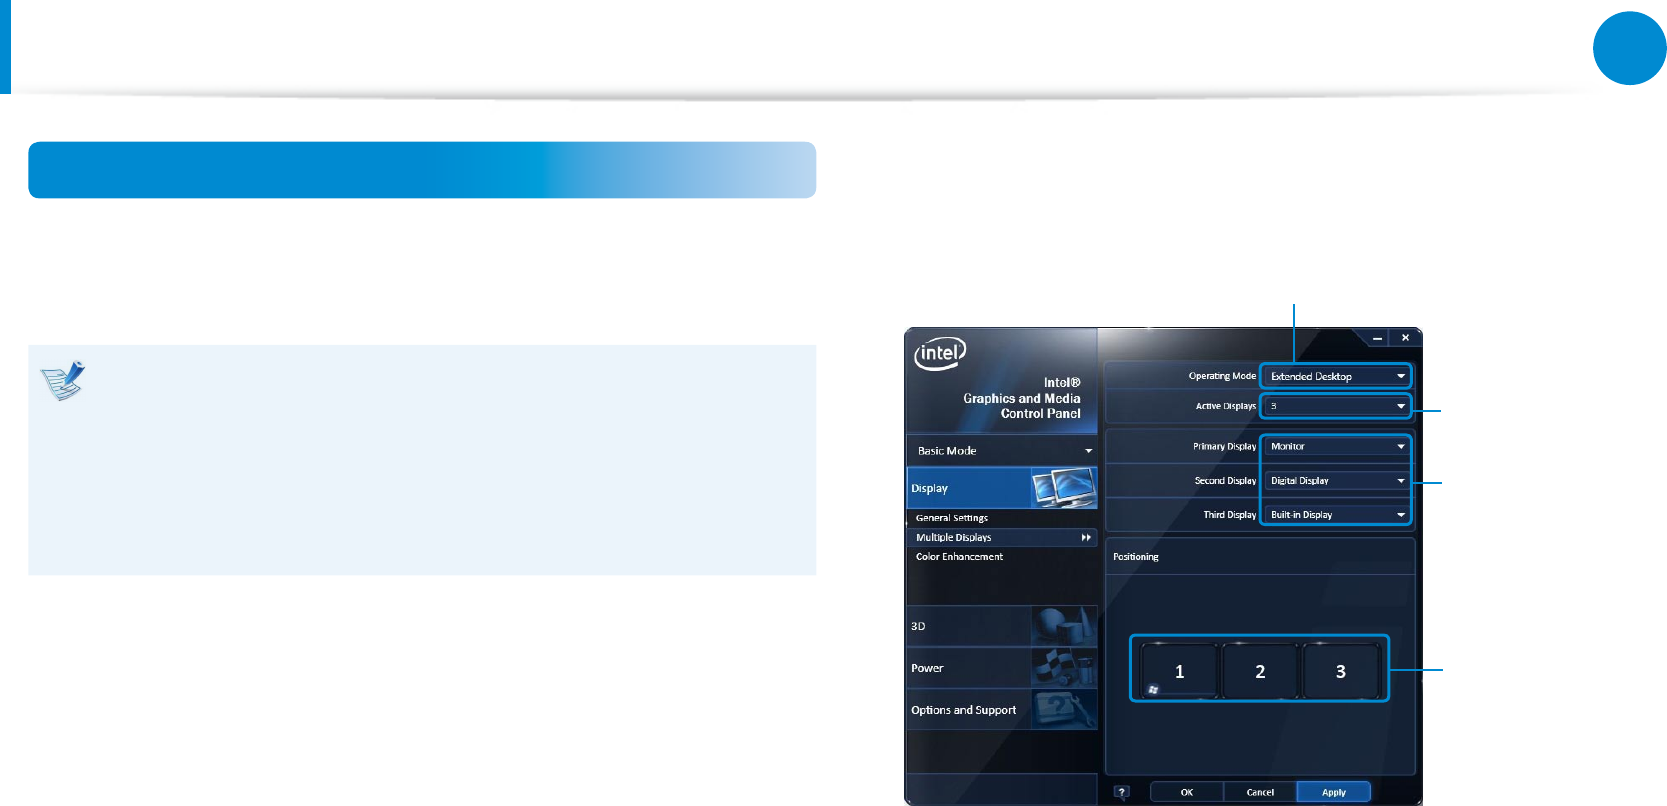
Using multiple displays (Optional)
You can connect and use two displays devices by connecting
them to the monitor and the Micro HDMI ports respectively.
This function is supported for 13.3 inch Intel® HD Graphics
4000 models.
You can check if this feature is available by selecting
Computer > System Properties > Device Manager >
Display adapters and conrming that the display adapter is
an Intel® HD Graphics 4000.
1 Connect the display devices to the monitor and the Micro
HDMI ports.
2 Right-click on the Desktop and select Graphics Properties >
Display > Multiple Displays from the popup menu.
3 Congure the settings and click Apply.
Select either Clone or Extended
Desktop.
Select the
number of
displays (3)
Congure display
devices 1 to 3.
Specify the
locations of the
devices.
Connecting an External Display Device
58
59
Chapter 3.
Using the computer
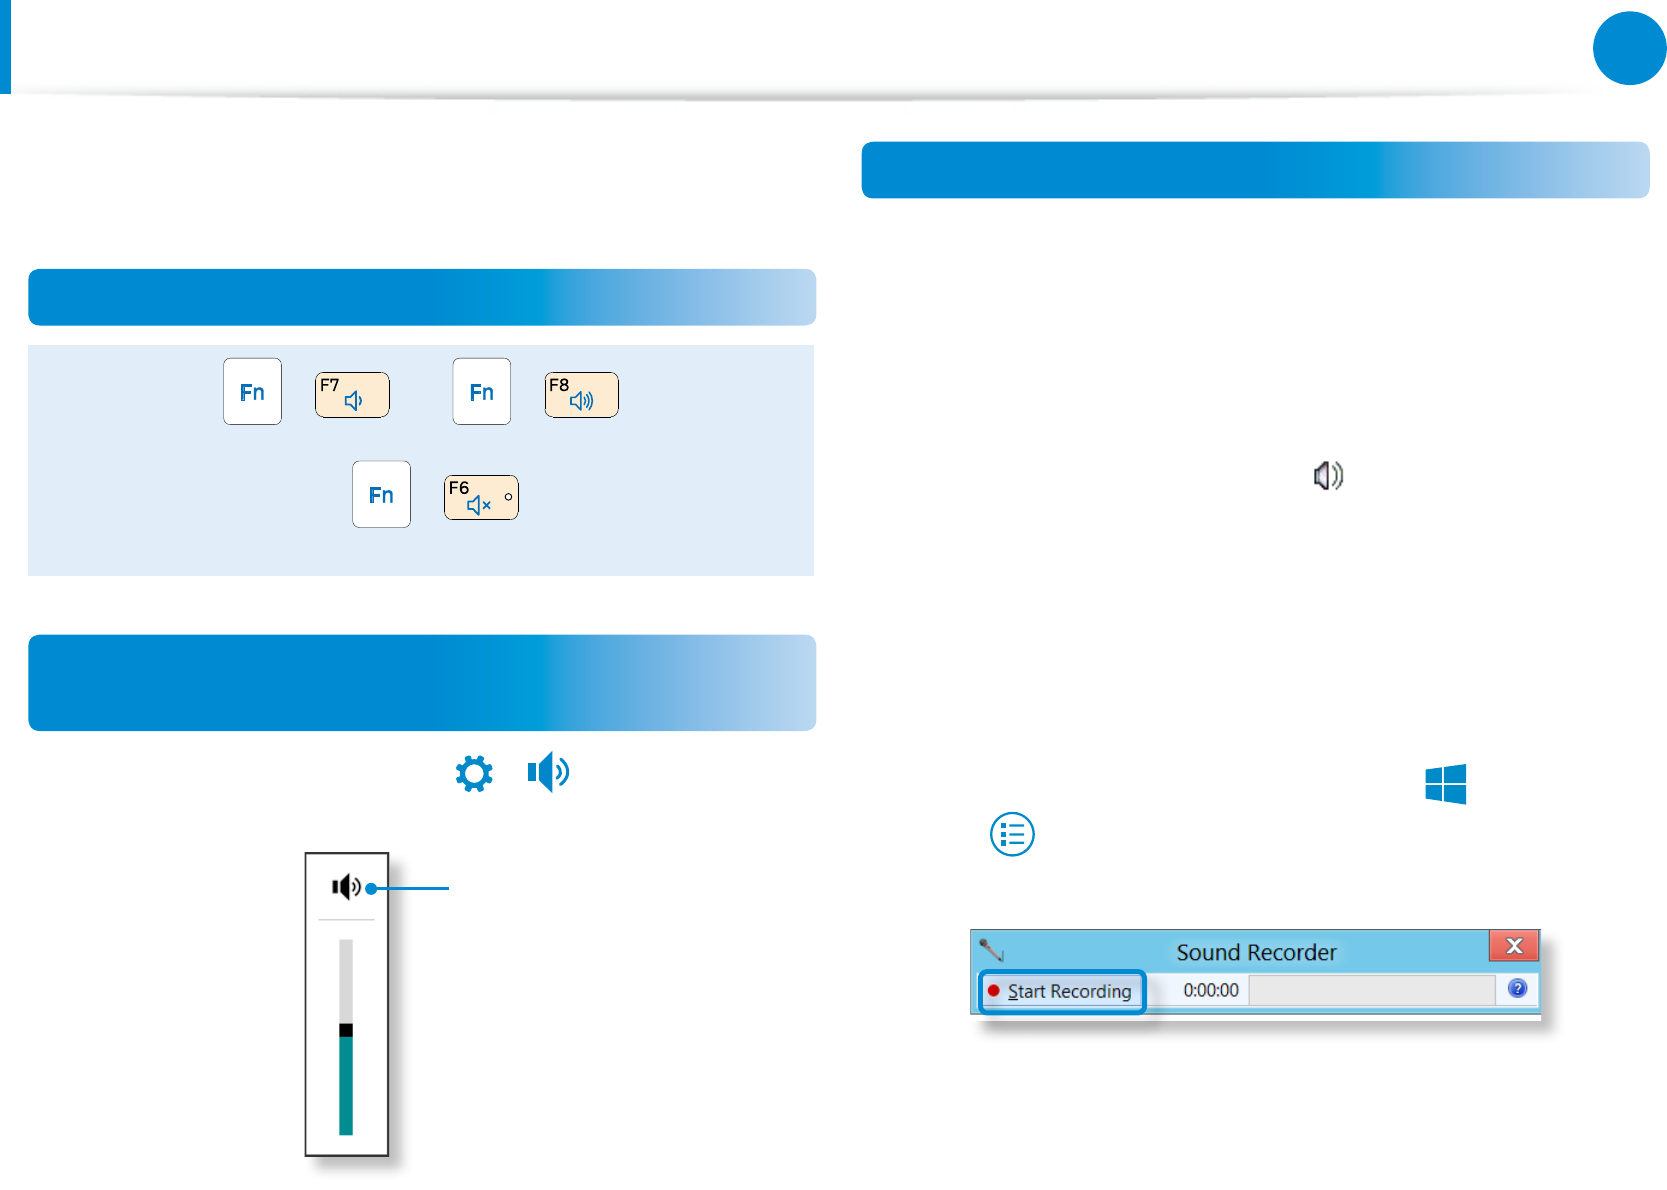
Adjusting the Volume
You can adjust the volume using the keyboard and the volume
control program.
Adjusting the Volume using the Keyboard
+ or +
Alternatively, press the + key combination to
turn the volume on or o.
Adjusting the Volume using the Volume
Adjustment Program
Click the Charms menu > Settings
áᔪ
Ŗᮁ
᯲
ᰆ⊹
ᖅᱶ
>
⦽
to adjust the control
bar.
Mute
Using the Sound Recorder
The procedures to record sound using the Windows Recorder are
described below.
1 Connect a microphone to the microphone jack.
You can also use the internal MIC.
2 Right-click over the Volume icon on the taskbar and select
Recording Device.
3 Check if the microphone is set as the default recording
device.
If this is the case, it is already set as the default device. If not,
right-click over the microphone and select Set default.
4 Right-click over the Charms menu > Start
áᔪ
Ŗᮁ
᯲
ᰆ⊹
ᖅᱶ
to click All
Apps > Sound Recorder. Then press Start Recording to
record.

60
Chapter 3.
Using the computer
Using SoundAlive (Optional)
The SoundAlive function enables you to experience more
stereophonic sound using stereo speakers.
SoundAlive is only supported in Windows 8.•
The software programs provider may vary, depending on •
your computer model.
In addition, some pictures may dier from actual product •
depending on the computer model and software version.
1 Right-click over the Volume in the taskbar on the Desktop
and click Play Device.
(Alternatively, click the Charms menu on the Desktop >
Settings
áᔪ
Ŗᮁ
᯲
ᰆ⊹
ᖅᱶ
> Control Panel > Hardware and Sound >
Sound.)
2 Right-click over the Speakers and select Properties.
3 Select the SoundAlive tab and select one of the modes.
Adjusting the Volume