Samsung Electronics Co NX1 Digital camera User Manual 2 of 3
Samsung Electronics Co Ltd Digital camera 2 of 3
Contents
- 1. User manual 1 of 3
- 2. User manual 2 of 3
- 3. User manual 3 of 3
User manual 2 of 3

My Camera > Display icons
51
Icon Description
White Balance micro adjustment
Optical Image Stabilization (OIS) (p. 101)
intelli-zoom on
intelli-zoom ratio
Dynamic Range (p. 117)
OLED Color (p. 86)
Wi-Fi on
Bluetooth on
Firmware update notication*
* This icon appears only when the camera is connected to a
Wi-Fi network.
3. Shooting options (Touch)
Icon Description
Change Smart mode*
Save a custom mode**
Quick Transfer (p. 148)
Touch AF options
Shooting options
Smart panel
* This icon appears only when you select Smart mode.
** This icon appears when you select Custom1 or Custom2
mode.
The icons displayed will change according to the
mode you select or the options you set.
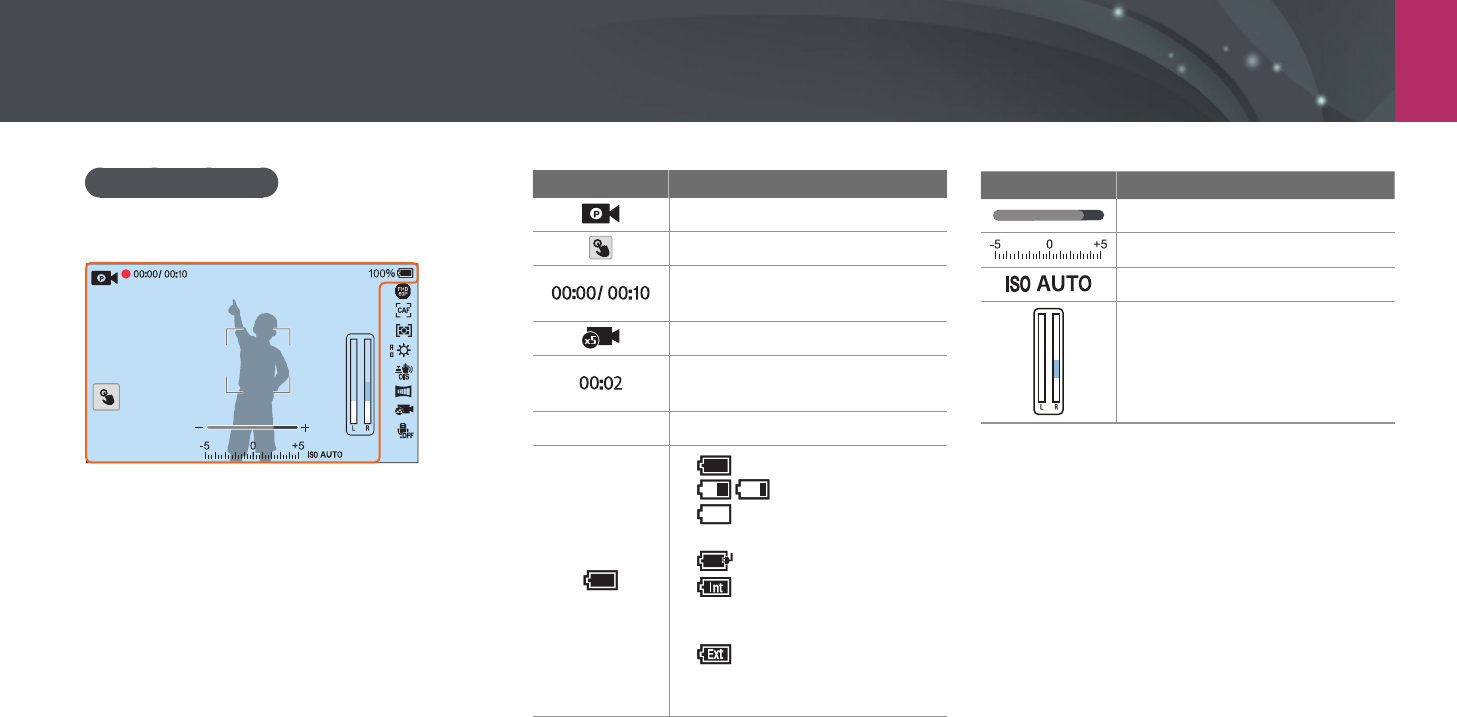
2. Shooting options
Icon Description
Photo size
RAW le
Drive mode
Flash (p. 108)
Flash intensity adjustment
Metering (p. 114)
AF mode (p. 91)
Focus area
Face detection
White Balance (p. 87)
My Camera > Display icons
52
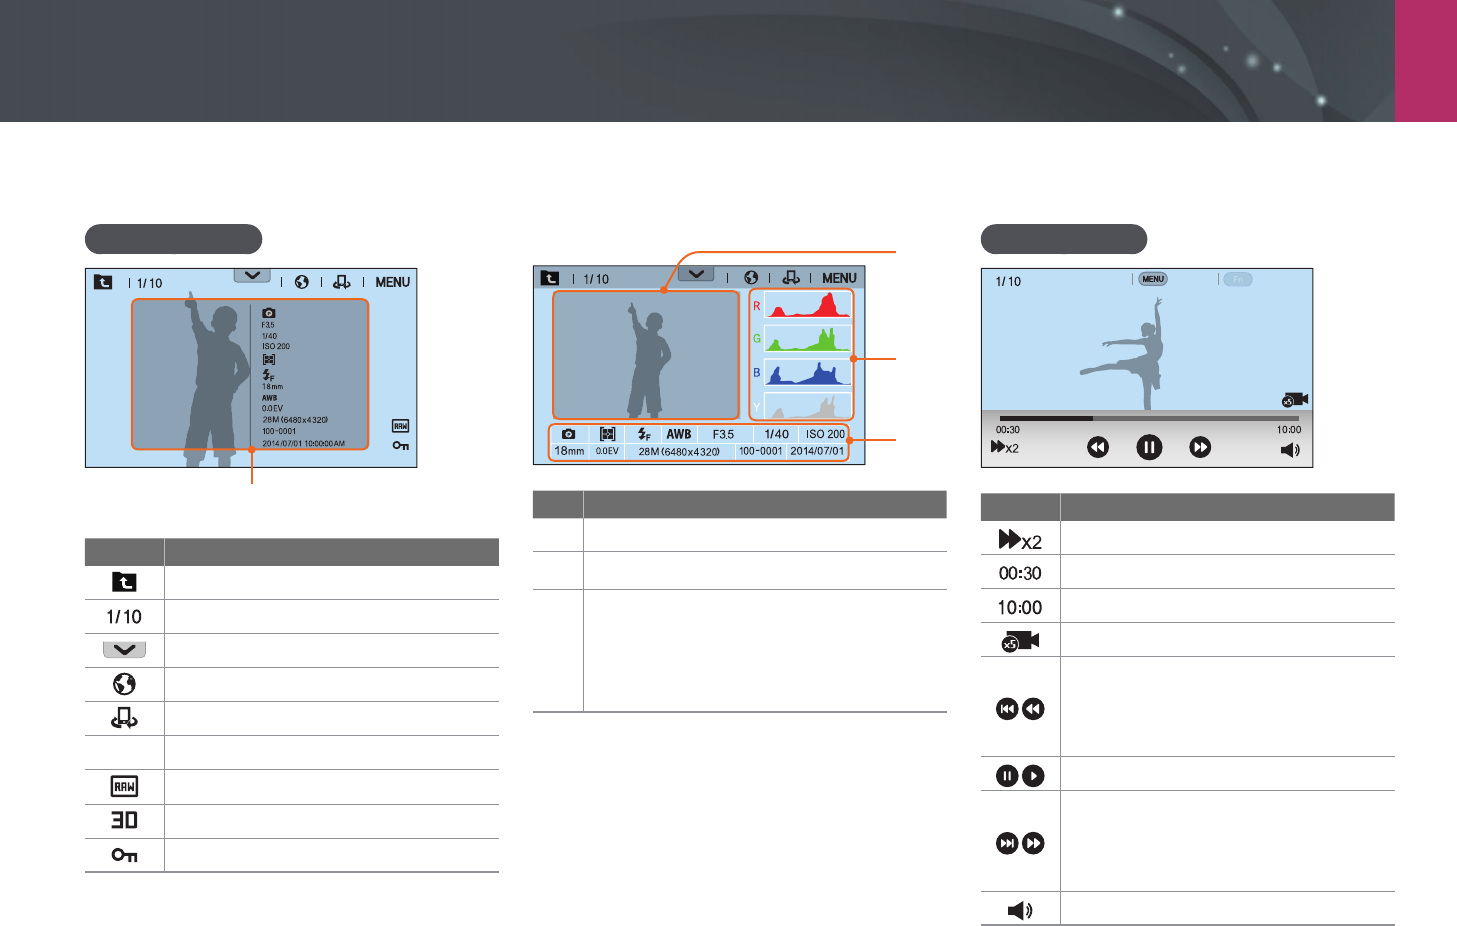
Icon Description
Shooting mode
Touch AF option (Touch)
Current recording time/
Available recording time
Multi Motion (p. 123)
Playback time after applying the
Multi Motion feature
100%
Battery percentage
• : Fully charged
• : Partially charged
• (Red): Empty (recharge
the battery)
• : Charging
• : Internal battery in use
(when the vertical grip is
connected)
• : External battery in use
(when the vertical grip is
connected)
Icon Description
Zoom indicator*
Exposure value
ISO sensitivity (p. 85)
Video sound level
Recording videos
1. Shooting information

My Camera > Display icons
53
Icon Description
Fader (p. 124)
Multi Motion (p. 123)
Voice recording o (p. 125)
Zoom button*
OLED Color (p. 86)
* This icon appears when you attach the Power Zoom lens.
The icons displayed will change according to the
mode you select or the options you set.
About the level gauge
The level gauge helps you align the camera with
the horizontal and vertical lines on the display.
If the level gauge is not level, calibrate the level
gauge using the Horizontal Calibration function.
(p. 177)
Vertical
Horizontal
▲
Level
▲
Unlevel
You cannot use the level gauge when you shoot
in portrait orientation.
2. Shooting options
Icon Description
Video size
AF mode (p. 91)
Metering (p. 114)
White Balance (p. 87)
White Balance micro adjustment
Optical Image Stabilization (OIS) (p. 101)
Digital Image Stabilization (DIS) (p. 124)
My Camera > Display icons
54
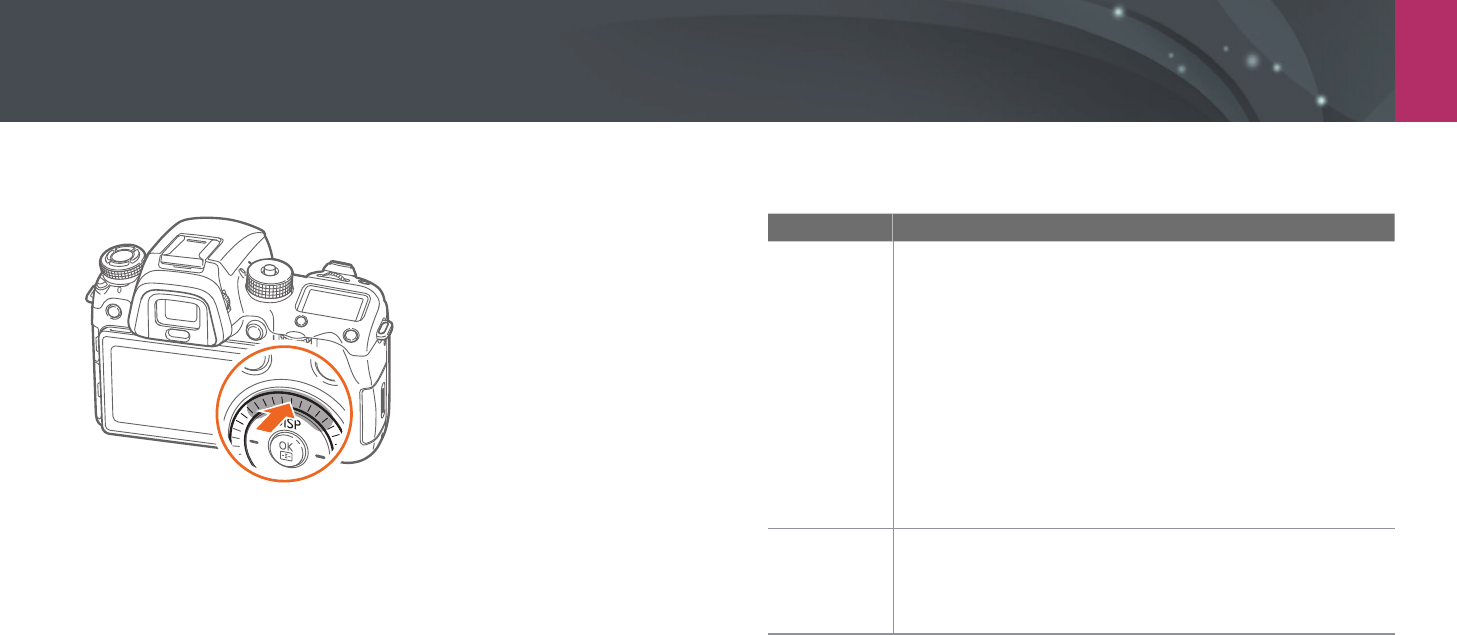
In Playback mode
Viewing photos
Information
Mode
F No
Shutter
ISO
Metering
Flash
Focal Length
White Balance
EV
Photo Size
Folder No.-File No.
Date & Time
Icon Description
View image thumbnails. (Touch)
Current le/The total number of les
Notication panel bar (Touch)
Share les via Wi-Fi network. (Touch)
Share les with other devices. (Touch)
m
Playback/Editing/Setting menu (Touch)
RAW le
3D le
Protected le
1
2
3
No. Description
1
Captured photo
2
RGB histogram (p. 173)
3
Shooting mode, Metering, Flash,
White Balance, Aperture value,
Shutter speed, ISO, Focal length,
Exposure value, Photo size,
Folder number-File number, Date
Playing videos
Stop Capture
Icon Description
Playback speed
Current playback time
Video length
Multi Motion
View previous le/Scan backward.
(Each time you touch the scan
backward icon, you change the scan
speed in this order: 2X, 4X, 8X.)
Pause or resume playback.
View next le/Scan forward. (Each time
you touch the scan forward icon, you
change the scan speed in this order:
2X, 4X, 8X.)
Adjust the volume or mute the sound.
My Camera > Display icons
55
Changing the information displayed
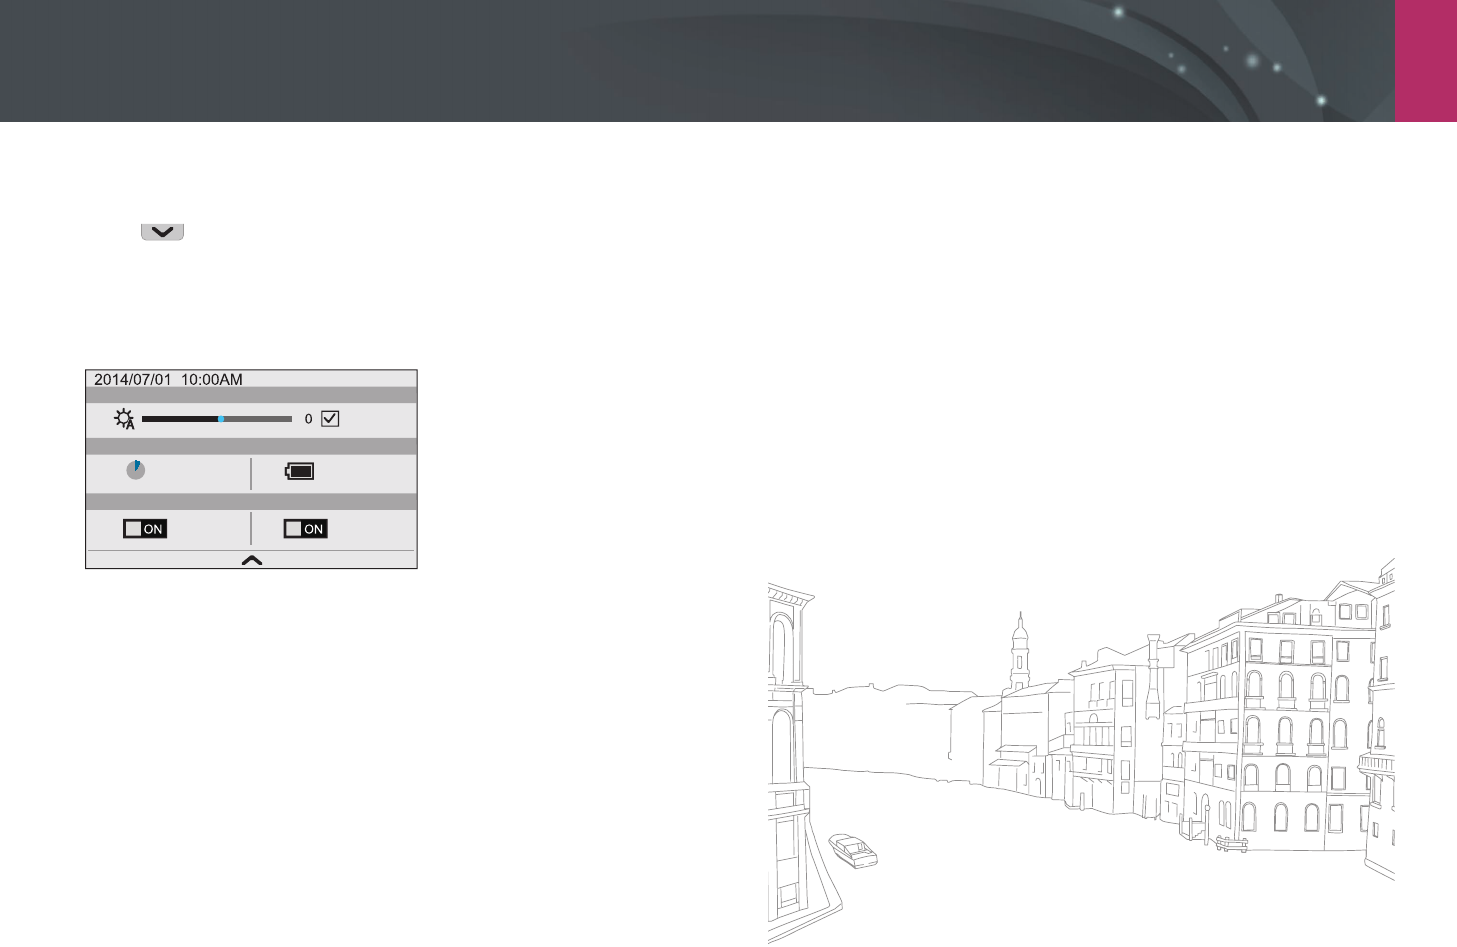
Press [D] repeatedly to change the display type.
Mode Display type
Shooting
• Basic shooting information (Shooting mode, Shutter
speed, Aperture value, Exposure value, ISO sensitivity, etc.)
• Basic shooting information + Shooting option buttons
(MENU, Fn, Quick Transfer, Touch AF) + Current shooting
options information (Photo size, Drive mode, Flash,
Metering, AF mode, etc.) + Histogram
• Basic shooting information + Shooting option buttons +
Current shooting options information + Level gauge
• Basic shooting information + Shooting option buttons +
Current shooting options information
• No information (when connected to an HDTV or an HDMI-
enabled monitor)
Playback
• Basic information
• Display all information about the current le.
• Display all information about the current le including
RGB histogram.

My Camera > Display icons
56
Viewing the status display panel
View basic shooting information, such as AF mode, metering option, and
battery life on the status display panel without having to view the display.
Press [O] to illuminate the status display panel.
Icon Description
AF mode (p. 91)
Metering (p. 114)
RAW le
Battery life
White Balance (p. 87)
ISO sensitivity (p. 85)
Available number of photos
Shutter speed
Aperture value
Exposure adjustment value
Connect the camera to your computer with the USB
cable.
Enter Power Save mode when the camera is connected
to a power adapter.
My Camera > Display icons
57
Viewing the notication panel
Touch at the top of the display to open the notication panel. You
can adjust the display brightness or view the current date and time,
battery life, and data storage information. You can also view the status of a
Bluetooth or Wi-Fi connection and enable or disable it. Touch the bottom
of the notication panel or press [m] or [f] to close it.
Auto
Storage
10 shot(s)
Battery
Level
Bluetooth Wi-Fi
Networks
100 %
Connection Status
Storage & Battery Level
Display Brightness

My Camera
58
Lenses
You can purchase optional lenses made exclusively for your NX series
camera.
Learn about the functions of each lens and select one that suits your needs
and preferences.
Lens layout
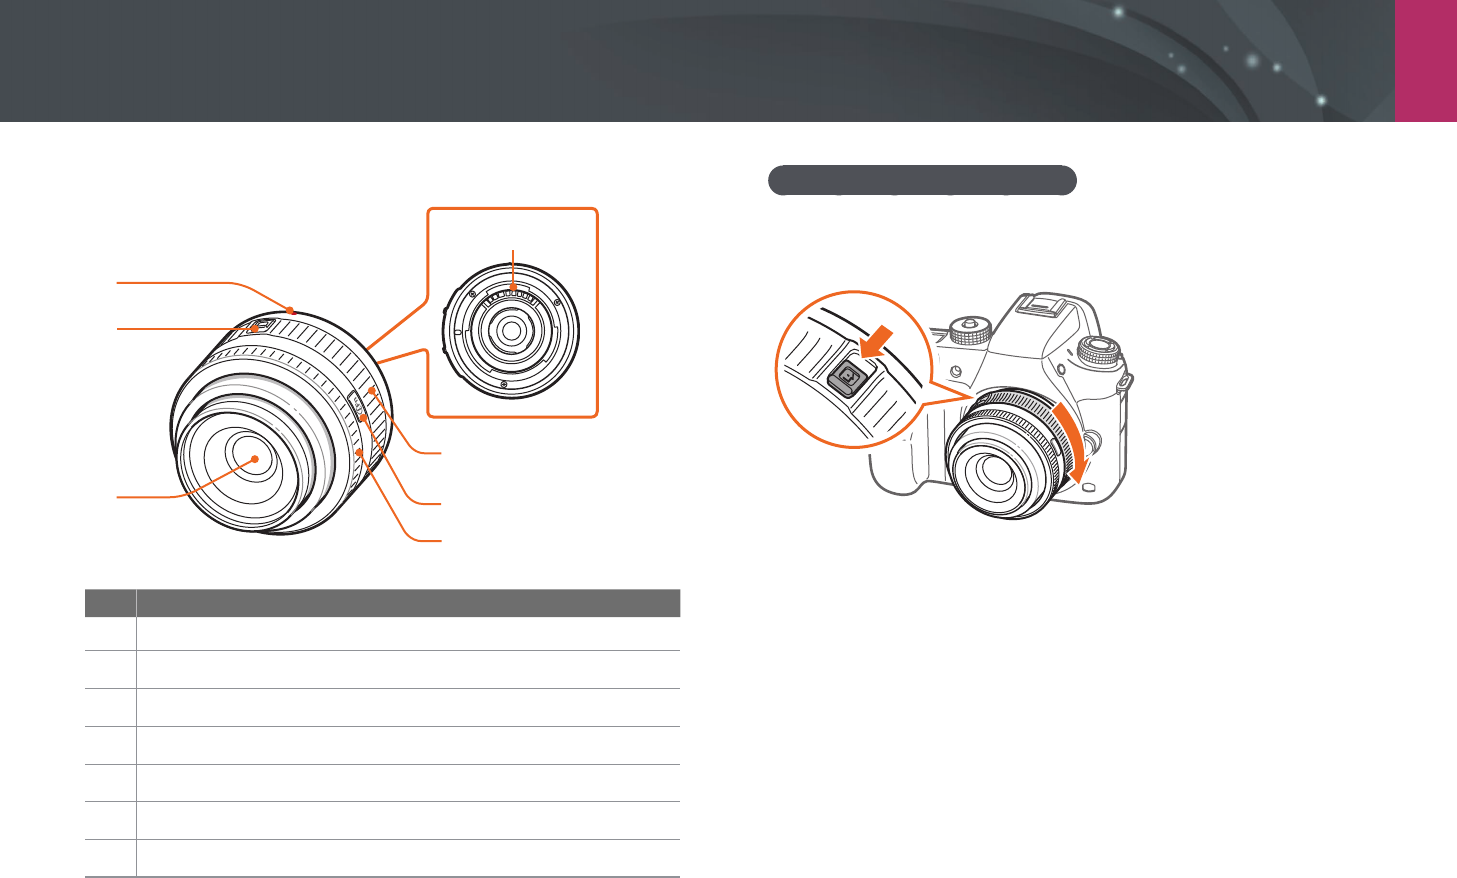
SAMSUNG 18-55 mm F3.5-5.6 OIS III lens (example)
8
1
2
3
5
4
6 7
No. Description
1
Lens mount index
2
Zoom ring
3
Focus ring (p. 99)
4
Lens hood mount index
5
Lens
6
i-Function button (p. 47)
7
AF/MF switch (p. 91)
8
Lens contacts
When not using the lens, attach the lens cap and lens mount cover to protect
the lens from dust and scratches.
My Camera > Lenses
59
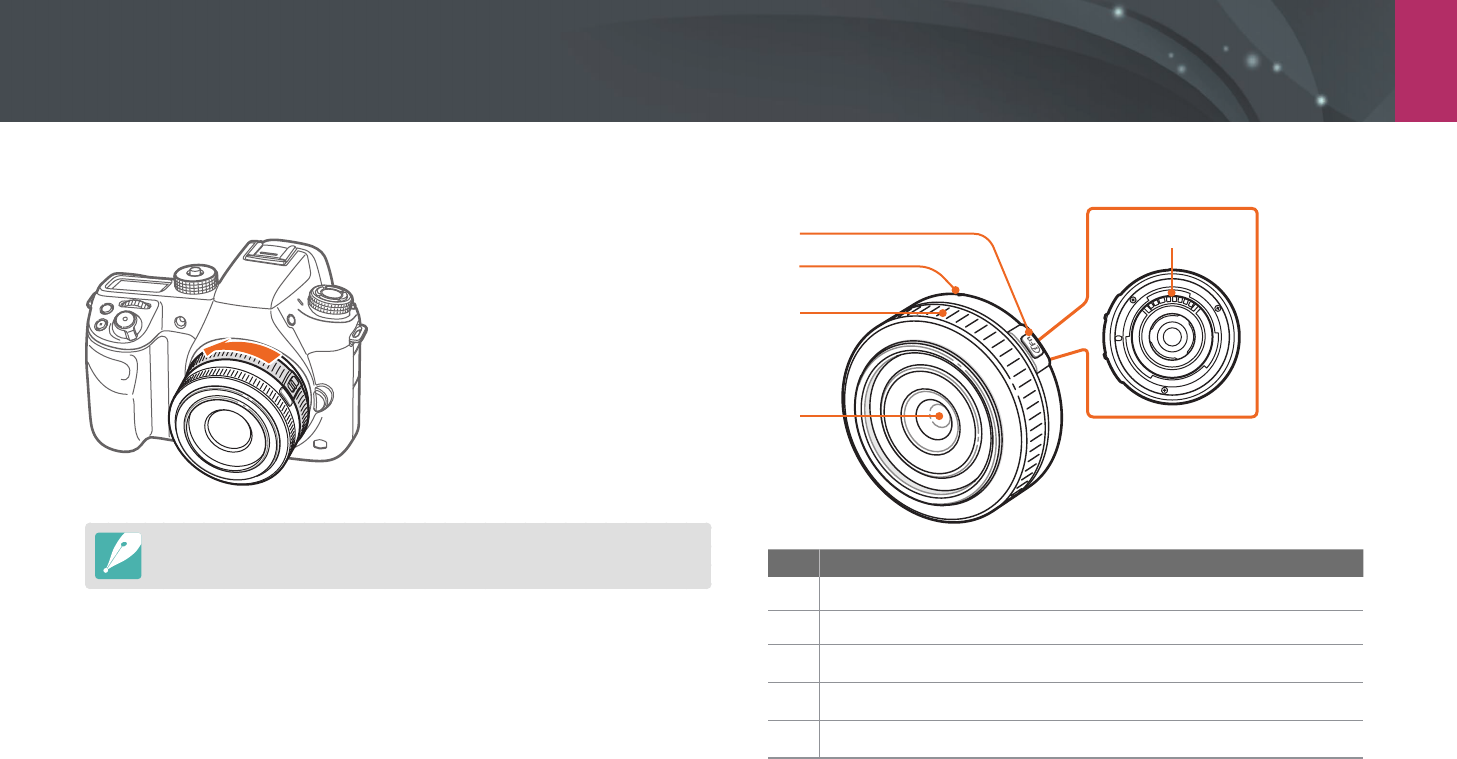
SAMSUNG 20-50 mm F3.5-5.6 ED II lens (example)
7
1
2
35
6
4
No. Description
1
Lens mount index
2
Zoom lock switch
3
Lens
4
Focus ring (p. 99)
5
i-Function button (p. 47)
6
Zoom ring
7
Lens contacts
Locking or unlocking the lens
To lock the lens, pull and hold the zoom lock switch away from the camera
body and rotate the zoom ring as shown in the illustration.
My Camera > Lenses
60
To unlock the lens, rotate the zoom ring as shown in the illustration until
you hear the click.
You cannot capture a photo when the lens is locked.
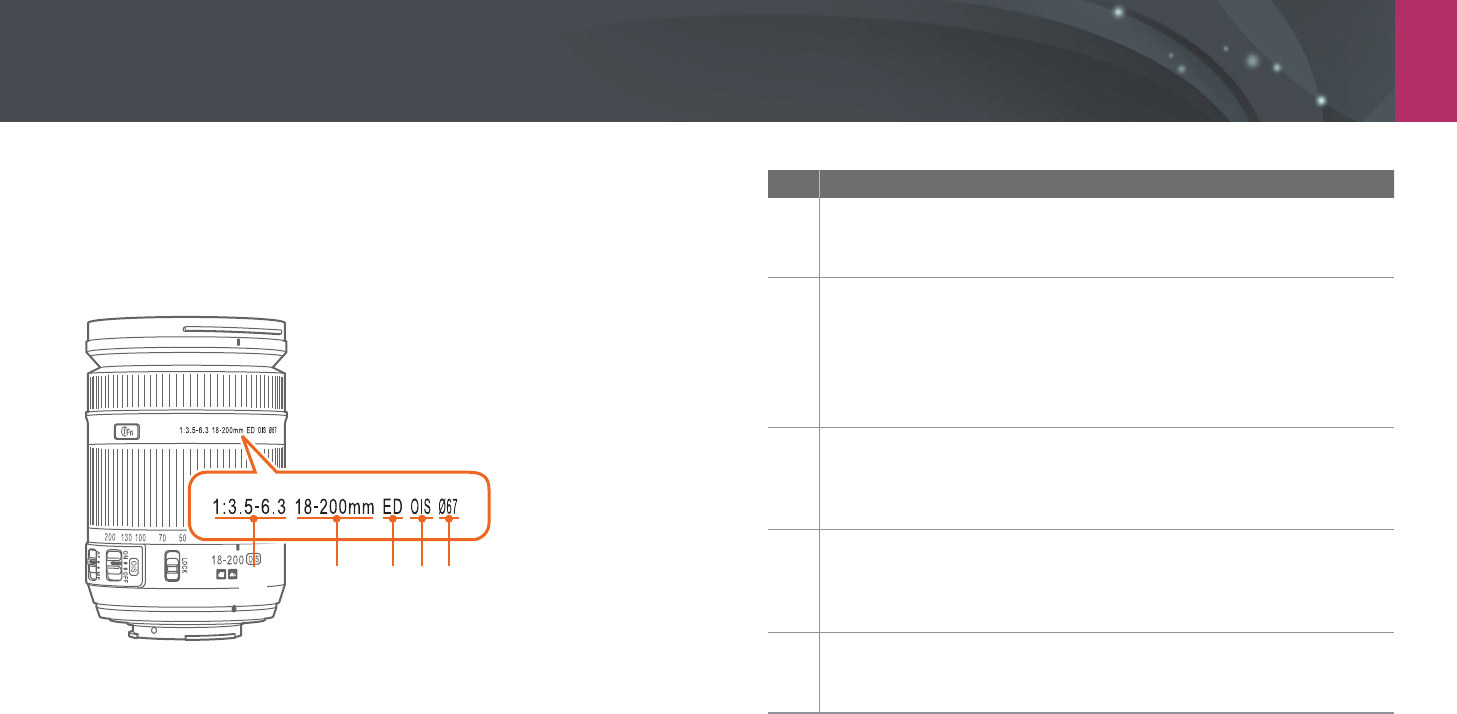
SAMSUNG 16 mm F2.4 lens (example)
5
2
1
4
3
No. Description
1
i-Function button (p. 47)
2
Lens mount index
3
Focus ring (p. 99)
4
Lens
5
Lens contacts
My Camera > Lenses
61
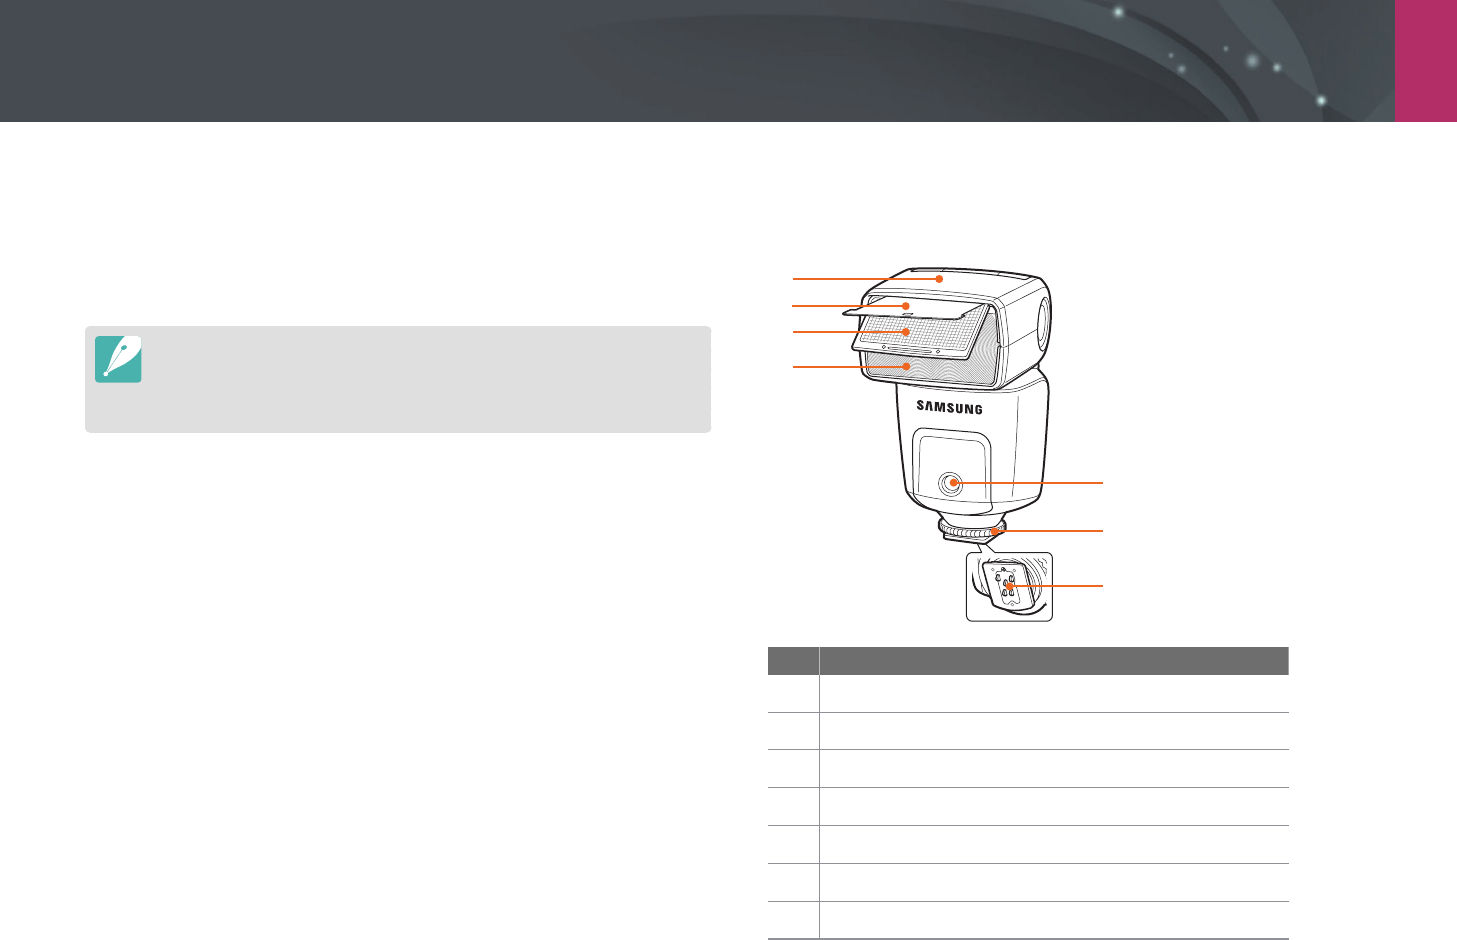
Lens markings
Find out what the numbers on the lens signify.
SAMSUNG 18-200 mm F3.5-6.3 ED OIS lens (example)
12 3 4 5
No. Description
1
Aperture value
A range of supported aperture values. For example, 1:3.5–6.3 means
the maximum aperture value range from 3.5 to 6.3.
2
Focal length
The distance from the middle of the lens to its focal point (in
millimeters). This gure is expressed in a range: minimum focal length
to maximum focal length of the lens.
Longer focal lengths result in narrower angles of view and the subject
is magnied. Shorter focal lengths result in wider angles of view.
3
ED
ED stands for Extra-low Dispersion. Extra-low dispersion glass is
eective in minimizing chromatic aberration (a distortion that occurs
when a lens fails to focus all colors to the same convergence point).
4
OIS (p. 101)
Optical Image Stabilization. Lenses with this feature can detect
camera shake and eectively cancel out the movement inside the
camera.
5
Ø
The lens diameter. When you attach a lter to the lens, make sure that
the diameters of the lens and the lter are the same.
My Camera
62
Accessories
You can use accessories such as external ash that can help you capture
better and more convenient photos.
For more information about optional accessories, refer to the manual for
each accessory.
•
The illustrations may dier from the actual items.
•
You can purchase Samsung-approved accessories at a retailer or a Samsung
service center. Samsung is not responsible for damage caused by using
another manufacturer’s accessories.
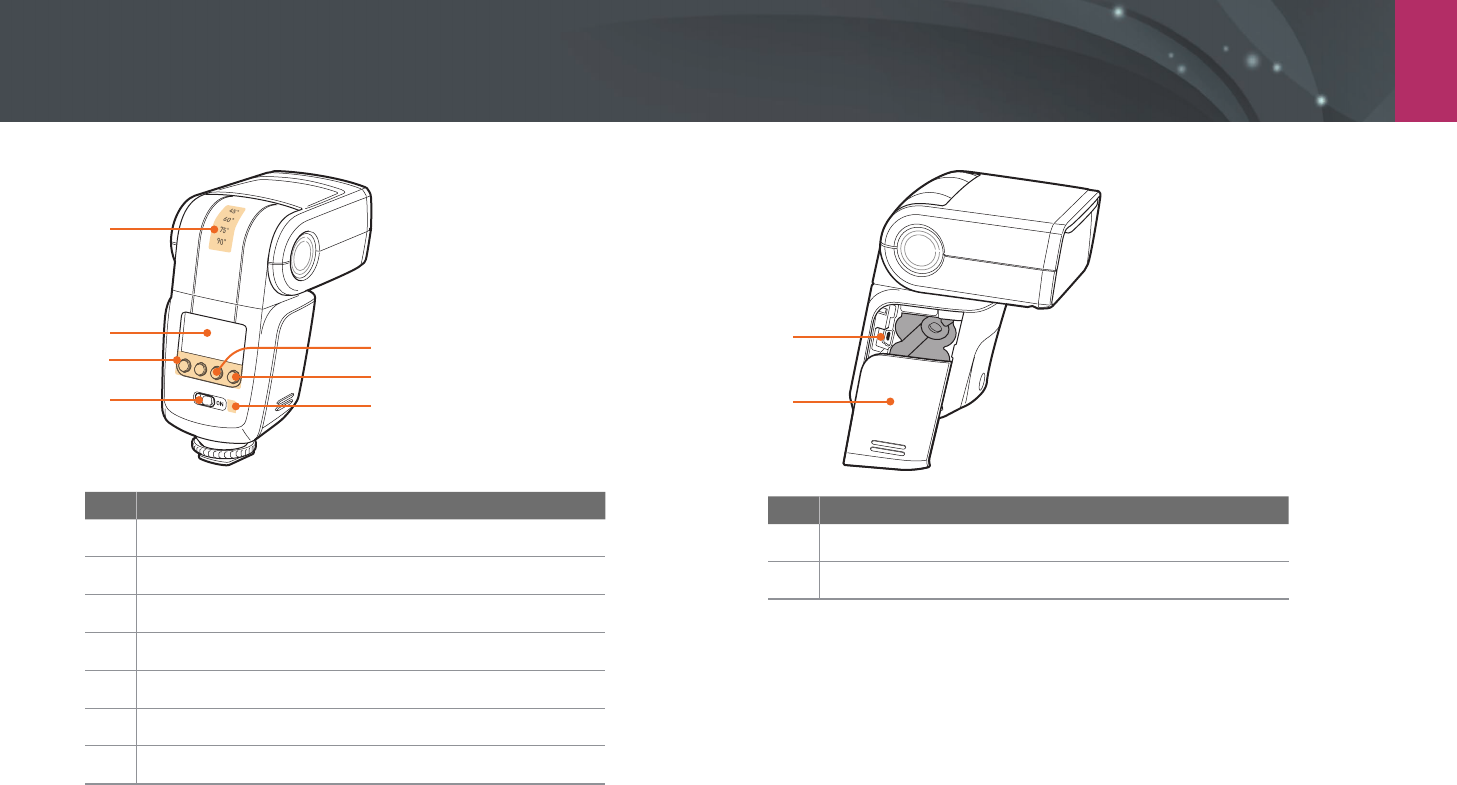
External ash layout
SEF-580A (example) (optional)
2
1
3
4
6
7
5
No. Description
1
Flash head
2
Reector card
3
Wide-angle panel
4
Lamp
5
AF-assist light
6
Hot-shoe fastening dial
7
Hot-shoe connection
My Camera > Accessories
63
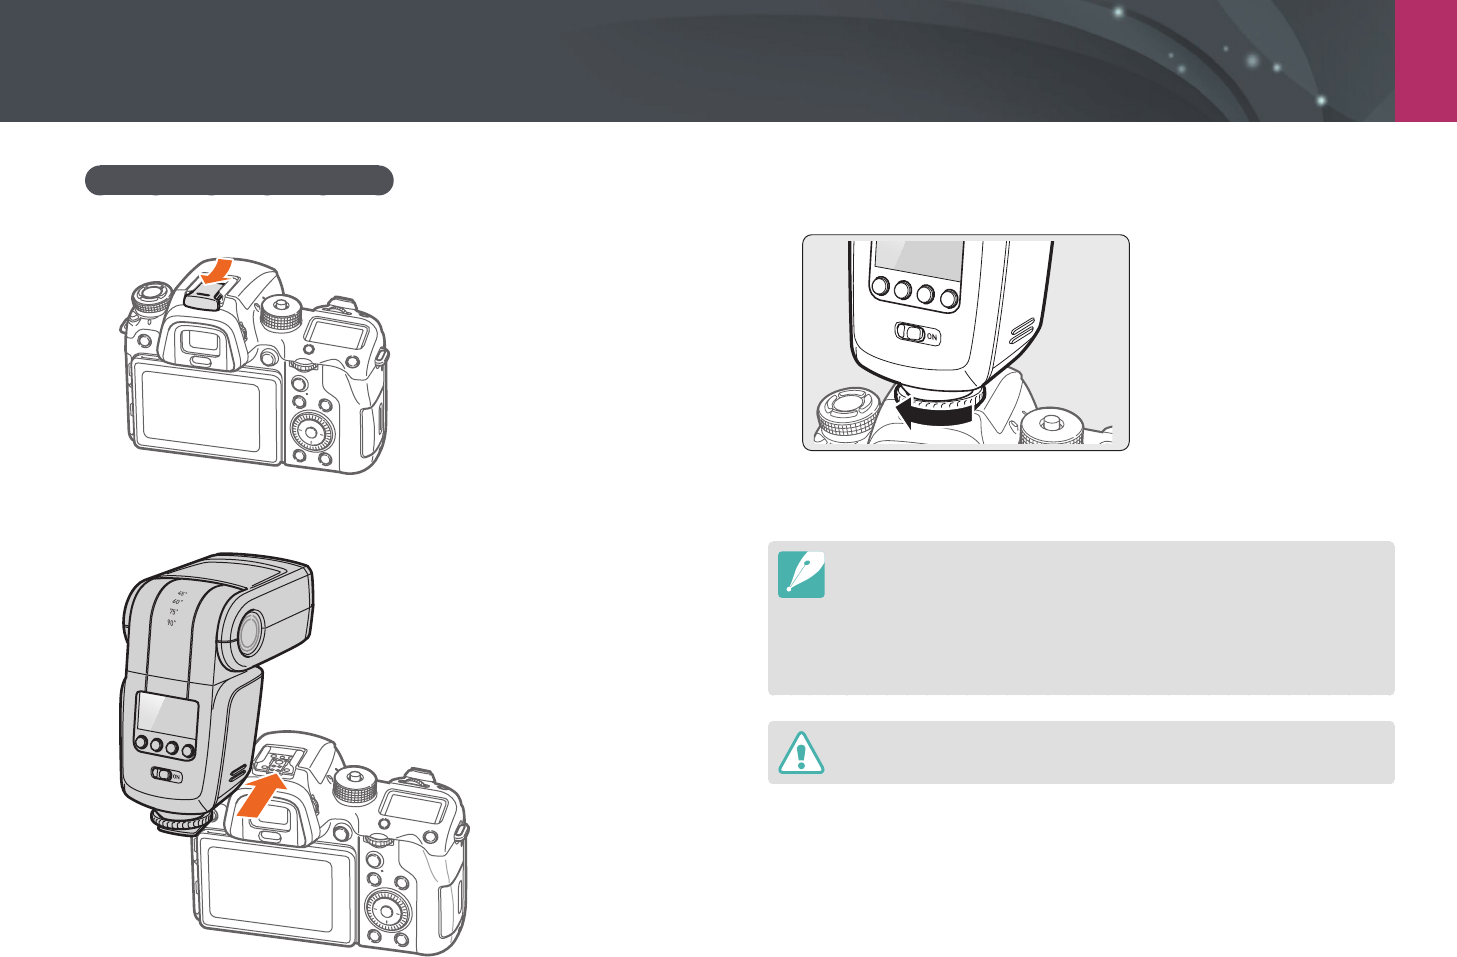
3
2
47
6
5
1
No. Description
1
Flash head angles
2
Flash screen
3
Flash buttons
4
Power switch
5
Correct exposure indicator
6
Manual ring button/Flash-ready indicator
7
Light sensor for wireless remote ash
2
1
No. Description
1
USB port
2
Battery chamber cover
My Camera > Accessories
64
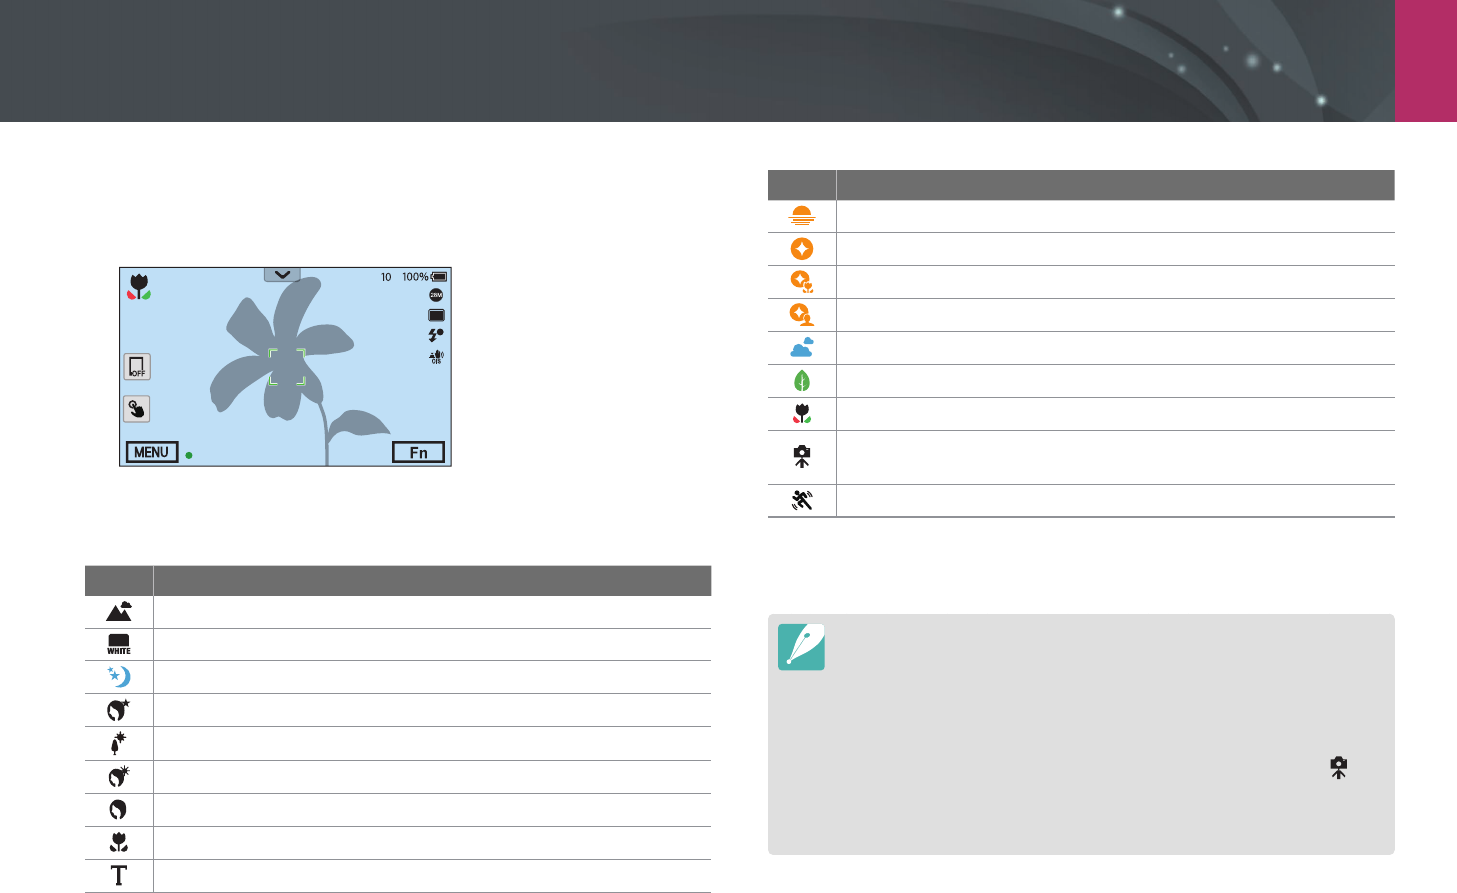
3 Rotate the hot-shoe fastening dial as shown in the illustration
to lock the ash into place.
4 Slide the power switch towards ON to turn on the ash.
•
You can capture a photo with a ash that is not fully charged, but it is
recommended to use a fully charged ash.
•
The available options may dier depending on the shooting mode.
•
There is an interval between two bursts of the ash. Do not move until the
ash res a second time.
•
For more details about optional ashes, refer to the user manual for the ash.
Use only Samsung-approved ashes. Using incompatible ashes may damage
your camera.
Connecting the external ash
1 Remove the hot-shoe cover from the camera.
2 Mount the ash by sliding it into the hot-shoe.

My Camera
65
Shooting modes
Two simple shooting modes—Smart Auto and Smart mode—help you
capture photos with numerous automatic settings. Additional modes
allow for greater customization of settings.
Icon Description
t
Smart Auto mode (p. 65)
P
Program mode (p. 67)
A
Aperture Priority mode (p. 69)
S
Shutter Priority mode (p. 70)
M
Manual mode (p. 71)
T
Custom1 mode (p. 72)
U
Custom2 mode (p. 72)
s
Smart mode (p. 74)
t Smart Auto mode
In Smart Auto mode, the camera recognizes surrounding conditions
and automatically adjusts factors that contribute to exposure, including
shutter speed, aperture value, metering, White Balance, and exposure
compensation. As the camera controls most of the functions, some
shooting functions are limited. This mode is useful for capturing quick
snapshots with the least amount of adjustment.
1 Rotate the mode dial to t.
2 Align your subject in the frame.
My Camera > Shooting modes
66
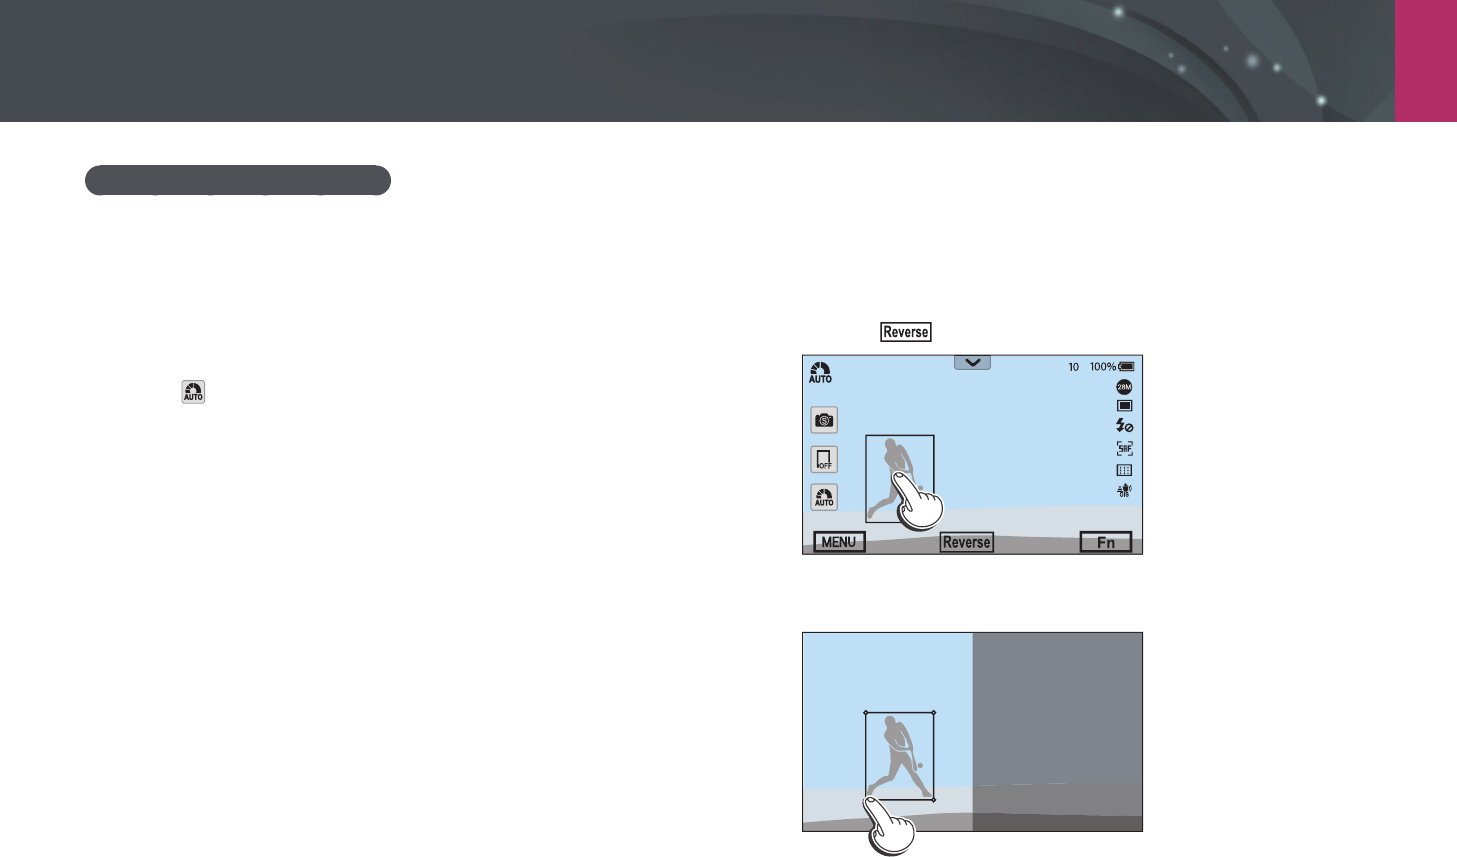
3 Half-press [Shutter] to focus.
•
The camera selects a scene. An appropriate scene icon appears at
the screen.
A
S
Recognizable scenes
Icon Description
Landscapes
Scenes with bright white backgrounds
Landscapes at night
Portraits at night
Landscapes with backlighting
Portraits with backlighting
Portraits
Close-up photos of objects
Close-up photos of text
Icon Description
Sunsets
Partially lit
Close-up with spot lighting
Portraits with spot lighting
Blue skies
Forested areas typically consist of green-colored subjects
Close-up photos of colorful subjects
Camera is stabilized on a tripod and the subject is not moving for a
certain period of time. (when shooting in the dark)
Actively moving subjects
4 Press [Shutter] to capture the photo.
•
The camera may detect dierent scenes, even the same subjects, depending
on external factors such as camera shake, lighting, or distance to the subject.
•
If the camera does not recognize an appropriate scene mode, it uses the
default settings for the Smart Auto mode.
•
Even if it detects a face, the camera may not select a portrait mode
depending on the subject’s position or lighting.
•
Even if you use a tripod, the camera may not detect the tripod mode ( ) if
the subject is moving.
•
The camera consumes more battery power, because it changes settings often
to select appropriate scenes.

My Camera > Shooting modes
67
P Program mode
The camera automatically adjusts shutter speed and aperture value so that
an optimal exposure value can be achieved.
This mode is useful when you want to capture shots of constant exposure
while being able to adjust other settings.
1 Rotate the mode dial to P.
2 Set the desired options.
3 Half-press [Shutter] to focus, and then press [Shutter] to
capture the photo.

My Camera > Shooting modes
68
Program Shift
Program Shift function lets you adjust the shutter speed and aperture
value while the camera maintains the same exposure. When you scroll the
command dial 1 or command dial 2 to the left, the shutter speed decreases
and the aperture value increases. When you scroll the command dial 1 or
command dial 2 to the right, the shutter speed increases and the aperture
value decreases.
Direction Adjustable item
Shutter speed decreases and aperture value increases.
Shutter speed increases and aperture value decreases.
Minimum shutter speed
Set the shutter speed not to be slower than the selected speed. However, if
an optimal exposure value cannot be achieved because the ISO sensitivity
reached the maximum ISO value that is set by Auto ISO Range, shutter
speed may be slower than the selected minimum shutter speed.
To set the minimum
shutter speed,
In Shooting mode, press [m]
→
b
→
Minimum
Shutter Speed
→
an option.
•
This feature is available only when the ISO sensitivity is set to Auto.
•
This feature is available only in Program or Aperture Priority mode.

My Camera > Shooting modes
69
A Aperture Priority mode
In Aperture Priority mode, the camera automatically calculates shutter
speed according to the aperture value you choose.
You can adjust the depth of eld (DOF) by changing the aperture value.
This mode is useful for taking portraits, owers, or landscape shots.
Large Depth of Field Small Depth of Field
1 Rotate the mode dial to A.
2 Scroll the command dial 1 or command dial 2 to adjust the
aperture value.
•
You can also adjust the aperture value by pressing [f], moving
to the aperture value, and then scrolling the command dial 1 or
dragging your nger on the screen.
3 Set the desired options.
4 Half-press [Shutter] to focus, and then press [Shutter] to
capture the photo.
•
In low-light settings, you may need to increase the ISO sensitivity to prevent
blurred photos.
•
To set the minimum shutter speed, in Shooting mode, press [m]
→
b
→
Minimum Shutter Speed
→
an option.

My Camera > Shooting modes
70
S Shutter Priority mode
In Shutter Priority mode, the camera automatically adjusts the aperture
value according to the shutter speed you choose. This mode is useful for
capturing photos of fast-moving subjects or for creating tracer eects in a
photo.
For example, set the shutter speed to over 1/500 s to freeze the subject. To
make the subject appear blurred set the shutter speed to below 1/30 s.
Slow shutter speed Fast shutter speed
1 Rotate the mode dial to S.
2 Scroll the command dial 1 or command dial 2 to adjust the
shutter speed.
•
You can also adjust the shutter speed by pressing [f], moving
to the shutter speed, and then scrolling the command dial 1 or
dragging your nger on the screen.
3 Set the desired options.
4 Half-press [Shutter] to focus, and then press [Shutter] to
capture the photo.
In order to compensate for the reduced amount of light allowed by fast shutter
speeds, open the aperture and let in more light. If your photos are still too dark,
increase the ISO value.

My Camera > Shooting modes
71
M Manual mode
Manual mode lets you adjust the shutter speed and aperture value
manually. In this mode, you can fully control the exposure of your photos.
This mode is useful in controlled shooting environments, such as a studio,
or when it is necessary to ne-tune camera settings. The Manual mode is
also recommended for shooting night scenes or reworks.
1 Rotate the mode dial to M.
2 Scroll command dials 1 and 2 to adjust the shutter speed and
aperture value, respectively.
•
Press [m]
→
d
→
Command Dial, and then you can select an
item to adjust when scrolling each dial. (p.174)
•
You can also adjust the shutter speed or the aperture value by
pressing [f], moving to the shutter speed or the aperture value,
and then scrolling the command dial 1 or dragging your nger on
the screen.
3 Set the desired options.
4 Half-press [Shutter] to focus, and then press [Shutter] to
capture the photo.
Using the Bulb function
Use the Bulb function to shoot night scenes or the night sky. While you are
pressing [Shutter], the shutter is left open so you can create moving light
eects.
To use a bulb, Completely scroll command dial 1 or 2 to the left to Bulb
→
Press and hold [Shutter] for the desired time.
•
If you set a high ISO value or open the shutter for a long time, image noise
may increase.
•
Drive options, ash, and One touch shot cannot be used with the Bulb
function.
•
The Bulb function is available only in Manual mode.
•
Use a tripod and shutter release to prevent your camera from shaking.
•
The longer you open the shutter, the longer it takes to save a photo. Do not
turn the camera o while the camera saves a photo.
•
If you use this function for a long time, use a fully charged battery.

My Camera > Shooting modes
72
T U Custom mode
Custom mode lets you create your own shooting modes by customizing
options and saving them. Save frequently used option settings and
then open it as your own shooting mode customized for the shooting
environment. Use custom mode when you capture photos in various
environments, you have preferred shooting settings, or you frequently use
preset options in certain conditions.
Saving custom modes
1 Rotate the mode dial to P, A, S, M, T, or U.
2 Set shooting options.
3 Press [m], and then select d
→
Manage Custom Mode
→
Save.
•
You can also save a custom mode by touching on the screen.
•
You can also save a custom mode by pressing [f], and then
touching .
4 Verify the shooting options, and then select Save or Save as.
5 Use the on-screen keyboard to enter a name for the mode.
(p. 154)
6 Press [o] to save the mode name.
7 Capture a representative photo for the mode to save.
8 Select Save.
You can save up to 40 custom modes.

My Camera > Shooting modes
73
Downloading custom modes
You can download various shooting settings (lm) on a smart phone and
share with the camera.
1 Connect the camera and a smart phone via Bluetooth.
2 On the smart phone, turn on Samsung Camera Manager.
3 Select Pro Suggest Market.
4 Download a desired lm.
•
The custom mode saved on the camera is automatically shared to a smart
phone when the camera and a smart phone are connected.
•
Some of the shooting settings (lm) may not be supported on the camera.
Selecting custom modes
1 Rotate the mode dial to T or U.
2 On a pop-up window, select Yes
→
a mode.
•
You can also press [m], and then select d
→
Manage Custom
Mode
→
Open
→
a mode.
•
If there is no custom mode saved, you can select a shooting mode
from a pop-up window on the camera, set shooting options, and
save new custom modes.
3 Verify the shooting options, and then select OK.
Deleting custom modes
1 Rotate the mode dial to P, A, S, M, T, or U.
2 Press [m], and then select d
→
Manage Custom Mode
→
Delete.
3 Select a mode to delete, and then press [n].

My Camera > Shooting modes
74
s Smart mode
In Smart mode, you can capture photos with options that are preset for a
specic scene.
1 Rotate the mode dial to s.
2 Select a scene.
Drag to navigate options.
Switch to the grid view.
Portrait
Switch to the list view.
Option Description
Beauty Face
Capture a portrait with options to hide facial
imperfections.
Landscape
Capture still-life scenes and landscapes.
Action Freeze
Capture subjects moving at high speed.
Rich Tones
Capture a photo with vibrant colors.
Panorama
Capture a wide panoramic scene in a single photo.
Waterfall
Capture scenes with waterfalls.
Multi Exposure
Capture multiple photos and overlap them to create
one photo.
Auto Shutter
Set an area to automatically capture a subject when
movement is detected.
Silhouette
Capture subjects as dark shapes against a light
background.
Sunset
Capture scenes at sunset, with natural-looking reds
and yellows.

My Camera > Shooting modes
75
Option Description
Night
Capture multiple photos in low light conditions
without a ash. The camera combines them to create a
single image that is brighter and has less blurring.
Fireworks
Capture scenes with reworks.
Light Trace
Capture scenes with the light trailing in low-light
conditions.
Some options are not available when you use the viewnder.
3 Half-press [Shutter] to focus, and then press [Shutter] to
capture.

My Camera > Shooting modes
76
4 When you are nished, release [Shutter].
•
The camera will automatically save the shots into one photo.
•
If you release [Shutter] while shooting, the panoramic shooting
stops and photos that have been captured are saved.
•
The resolution varies depending on the panoramic photo you captured.
•
In Panorama mode, some shooting options are not available.
•
The camera may stop shooting due to the shooting composition or the
subject’s movement.
•
In Panorama mode, your camera may not capture the entire last scene if you
stop moving the camera to improve the photo quality. To capture the entire
scene, move your camera slightly beyond the point where you want the
scene to end.
•
For best results when capturing panoramic photos, avoid the following:
-
moving the camera too quickly or too slowly
-
moving the camera too little to capture the next image
-
moving the camera at irregular speeds
-
shaking the camera
-
shooting in dark places
-
capturing moving subjects nearby
-
shooting conditions where the brightness or color of light is changing
•
Photos taken are automatically saved, and shooting is stopped under the
following conditions:
-
if you change the shooting direction while shooting
-
if you move the camera too rapidly
-
if you do not move the camera
Capturing panoramic photos
In Panorama mode, you can capture a wide panoramic scene in a single
photo. Panorama mode captures and combines a series of photos to create
a panoramic image.
1 Rotate the mode dial to s, and then select Panorama.
2 Press and hold [Shutter] to start shooting.
3 With [Shutter] pressed, slowly move the camera in the
direction you selected.
•
An arrow toward the direction of motion is displayed, and the entire
shooting image is displayed in the preview box.
•
When the scenes are aligned, the camera captures the next photo
automatically.
My Camera > Shooting modes
77
Using the Auto Shutter mode
In Auto Shutter mode, the camera will automatically capture a photo when
movement is detected. This mode is useful when capturing movements,
such as batters hitting a ball or jumping.
1 Rotate the mode dial to s, and then select Auto Shutter.
2 Touch , and then select Baseball or Jump Shot.
3 Press [Shutter] to capture a photo.
•
If you select Jump Shot, the photo is automatically taken when
jumping is detected.
•
If you selected Baseball, the photo is automatically taken when
the camera detects someone swinging a bat. To set an area for
detecting movement, please refer to the following.
Setting a movement detection area
1 Tap the person-shaped icon on the screen, and then drag it to
the desired location.
•
You cannot drag the box to the opaque area on the screen.
•
Touch to move the box to the other half of the screen.
2 Drag the corners of the box to adjust its size to t the subject.

My Camera > Shooting modes
78
Recording a video
In Shooting mode, you can record UHD videos (4096X2160) by pressing
(Video recording). The camera lets you record a video up to 29 minutes
and 59 seconds long, or until the size of the movie le reaches 4 GB in
length at 60, 30, 24, or 15 fps, and then saves the le in HEVC format. (For
3840X2160 (30 fps), you can record up to 14 minutes and 12 seconds. For
4096X2160 (30 fps), you can record up to 15 minutes and 50 seconds.) 15
fps is available only with some Smart Filter options. The sound is recorded
via the camera’s microphone. (If you attach an external microphone, the
sound will be recorded via the external microphone.)
You can set the exposure by adjusting the aperture value and shutter
speed for the mode you selected. When you use a lens that does not have
an AF/MF switch while recording a video, press [F] to deactivate or
activate the AF function. When you use the lens that has an AF/MF switch,
the AF function works according to the switch’s setting.
Select Fader to fade in or out a scene. You can also select Voice, Wind Cut,
or other options to set recording options. (p. 124)
While recording a video, touch to select a touch AF option. If Touch AF
is selected, the focus holds on the focus area by touching a subject on the
screen and if Tracking AF is selected, the focus tracks and automatically
focuses on your subject, even when the subject is moving or when you
change the picture composition.
•
Use a tripod to prevent your camera from shaking.
•
In dark environments the movement of a subject may not be taken properly.
•
If you select Jump Shot, the photo may be taken using the person jumping
highest as a reference when a lot of people jump.
•
If you select Baseball, a subject’s movement is clearly detected under the
following situation:
-
maintaining a ± 20° angle of view from a batter's side (in the direction of a
ball’s path)
-
maintaining distance of 3-3.5 m between the camera and a batter
-
there is no net between the camera and a batter

My Camera > Shooting modes
79
1 Set the desired options.
•
If [e/h/e] is set to Movie STBY, press [e/h/e] to enter the Video
recording standby mode.
2 Press (Video recording) to start recording.
•
Video recording may not be supported depending on the selected
shooting options.
3 Press (Video recording) again to stop.
•
High-eciency Video Coding (HEVC) is the latest video encoding format
established in 2013 collaboratively by ISO-IEC and ITU-T. Because this format
uses a high compression rate, more data can be saved in less memory space.
Depending on your computer’s specications, les may not play at full
resolution due to the high compression on some computers.
•
If you have the image stabilizer option on when shooting a movie, the
camera may record the image stabilizer sound.
•
The zoom sound or other lens sounds may be recorded if you adjust the lens
while recording a video.
•
When using an optional video lens, the autofocus noise is not recorded.
•
If you remove the camera lens while recording a movie, the recording will be
interrupted. Do not change the lens while recording.
•
If you attach or remove an external microphone while recording a movie,
sound will be recorded via the camera’s microphone.
•
If you change the shooting angle of the camera suddenly while shooting a
movie, the camera may not be able to record images accurately. Use a tripod
to minimize camera shake.
•
When the size of a movie le exceeds 4 GB, the camera automatically stops
recording even if the maximum recording time (29 minutes and 59 seconds)
has not been reached.
•
If you use a slow writing memory card, the recording of your movie can
be interrupted because the card cannot process data at the rate the video
is being shot. If this occurs, replace the card with a faster memory card or
reduce the video size (for example, from 1280X720 to 640X480).
•
When recording a UHD video, it is recommended to use a memory card with
a writing speed of faster than 30 MB/sec.
•
When formatting a memory card, always format using the camera. If you
format on another camera or a PC, you can lose les on the card or cause a
change in the capacity of the card.
•
When you press the video recording button, intelli-zoom turns o.
•
While recording a video in the same ISO sensitivity, the screen may be darker
than taking a photo. Adjust the ISO sensitivity.
•
When you record a video in P, A, or S mode, ISO is automatically set to Auto.

My Camera > Shooting modes
80
3D mode
You can capture 3D photos or videos with an optional 3D lens.
SAMSUNG 45 mm F1.8 [T6] 2D/3D lens (example)
Set the 2D/3D switch on the lens to 3D, and then capture a photo or video
1.5–5 m away from the subject.
•
3D mode is always on, regardless of the mode dial of the camera.
•
To use auto 3D options that enable the camera to set shooting options
automatically depending on shooting conditions in 3D mode, press
[m]
→
b
→
3D Auto Mode
→
On.
•
Available shooting options dier compared to other shooting modes.
•
You can select either 5.9M (3232X1824) or 2.1M (1920X1080) photo size.
•
The video resolution is set to 1920X1080.
•
Videos recorded in 3D may be dark or playback may be jittery.
•
Shooting in low temperatures may result in color distortion in images and
may consume more battery power.
•
You may not be able to shoot properly in conditions below 8.5 LV/900 lux. For
best results, capture photos in places with sucient light.
•
When you photograph objects that contain polarizing material, such as a
display, sunglasses, or a polarizing lter, or use the polarizing material with
your lens, the images may appear dark or the 3D eect may not be applied
properly.
•
Use a tripod to prevent your camera from shaking.
•
If you rotate or tilt the camera vertically while shooting, the 3D eect may not
be applied properly. Capture images with the camera in the normal position.
•
If you shoot in uorescent lighting or capture images displayed by projectors
or TVs, the images may appear black due to the icker eect.
•
In 3D mode, the Enlarge x8 option of MF Assist may not be available.
•
The camera’s display shows 3D videos only in 2D.
•
Photos captured with the 3D function are saved in JPEG (2D) and MPO (3D)
formats. On your camera’s display, you can view only JPEG les.
•
To view 3D les, connect your camera to a 3D TV or 3D monitor with an
optional HDMI cable. While viewing, wear proper 3D glasses.
•
You cannot use the ash in 3D mode.

My Camera > Shooting modes
81
Available functions by shooting mode
For details about shooting functions, see Chapter 2.
Press a shortcut for each function.
Function Available in Shortcut
Framing Mode
(p. 119)
P/A/S/M-
Photo Size (p. 83)
P/A/S/M/s*/t*/3D* -
Quality (p. 84)
P/A/S/M/s*/t*/3D* -
ISO (p. 85)
P/A/S/M f/I
OLED Color (p. 86)
P/A/S/M/s/t-
White Balance (p. 87)
P/A/S/M/3D f/C
Picture Wizard (p. 89)
P/A/S/M/3D f
Smart Filter (p. 90)
P/A/S/M-
AF Mode (p. 91)
P/A/S/M/s*/t*/3D*f
AF Area (p. 94)
P/A/S/M/s*f/F
Touch AF (p. 97)
P/A/S/M/s*/t/3D* -
Function Available in Shortcut
MF Assist (p. 99)
P/A/S/M/s/t/3D* -
Focus Peaking (p. 100)
P/A/S/M/s/t-
OIS (Anti-Shake)
(p. 101)
P/A/S/M/s*/t-
Drive (Single/
Continuous/Timer/
Bracketing) (p. 102)
P/A/S/M/s*/t*/3D*f
Interval Capture
(p. 107)
P/A/S/M-
Flash (p. 108)
P*/A*/S*/M*/s*/t*f
Metering (p. 114)
P/A/S/M f/N
Link AE to AF Point
(p. 116)
P/A/S/M-
Dynamic Range
(p. 117)
P/A/S/M-
Exposure
compensation (p. 118)
P/A/S/M/3D f
Exposure/Focus lock
(p. 120)
P/A/S/M a
* Some functions are limited in these modes.

Chapter 2
Shooting Functions
Learn about the functions you can set in Shooting mode.
You can enjoy more customized photos and videos by using the shooting functions.

83
Shooting Functions > Size and Resolution
83
Shooting Functions >
Size and Resolution
Shooting Functions
Photo size
As you increase the resolution, your photo or video will include more
pixels, so it can be printed on larger paper or displayed on a larger screen.
When you use a high resolution, the le size will also increase. Select a low
resolution for photos that will be displayed in a digital picture frame or
uploaded to the web.
To set the size,
In Shooting mode, press [m]
→
b
→
Photo Size
→
an option.
* Default
Icon Size Recommended for
(3:2) 6480X4320* Printing on A0 paper.
(3:2) 4560X3040 Printing on A2 paper.
(3:2) 3264X2176 Printing on A3 paper.
(3:2) 2112X1408 Printing on A5 paper.
(16:9) 6480X3648 Printing on A0 paper or viewing on an
HDTV.
(16:9) 4608X2592 Printing on A2 paper or viewing on an
HDTV.
(16:9) 3328X1872 Printing on A4 paper or viewing on an
HDTV.
(16:9) 2048X1152 Printing on A5 paper or viewing on an
HDTV.
(1:1) 4320X4320 Printing a square photo on A1 paper.
(1:1) 3088X3088 Printing a square photo on A2 paper.
(1:1) 2160X2160 Printing a square photo on A4 paper.
(1:1) 1408X1408 Printing a square photo on A5 paper.
Available options may dier depending on shooting conditions.
Size and Resolution

84
Shooting Functions > Size and Resolution
Quality
The camera saves photos in either the JPEG or RAW format.
Photos captured by a camera are often transformed to the JPEG format
and stored in the memory according to the settings of the camera at the
time of shooting. RAW les are not transformed to the JPEG format and are
stored in the memory without any changes.
RAW les have the le extension “SRW“. To adjust and calibrate exposures,
White Balances, tones, contrasts, and colors of the RAW les, or to convert
them into JPEG or TIFF format, use the supplied Samsung RAW Converter
program.
Ensure you have enough space on the memory card to save photos in the
RAW format.
To set the quality,
In Shooting mode, press [m]
→
b
→
Quality
→
an option.
* Default
Icon Format Description
JPEG
Super Fine*:
• Compressed for the best quality.
• Recommended for printing in large size.
* Default
Icon Format Description
JPEG
Fine:
• Compressed for better quality.
• Recommended for printing in normal size.
JPEG
Normal:
• Compressed for normal quality.
• Recommended for printing in small size or
uploading to the web.
RAW
RAW:
• Save a photo without data loss.
• Recommended for editing after shooting.
RAW+JPEG RAW + S.Fine: Save a photo in both the JPEG
(S.Fine quality) and RAW format.
RAW+JPEG RAW + Fine: Save a photo in both the JPEG (Fine
quality) and RAW format.
RAW+JPEG RAW + Normal: Save a photo in both the JPEG
(Normal quality) and RAW format.
Available options may dier depending on shooting conditions.

85
Shooting Functions > ISO sensitivity
85
Shooting Functions >
ISO sensitivity
Shooting Functions
The ISO sensitivity value represents the sensitivity of camera to light.
The larger the ISO value, the more sensitive the camera is to light.
Consequently, by selecting a higher ISO sensitivity value, you can capture
photos in dim or dark places at faster shutter speeds. However, this may
increase electronic noise and result in a grainy photo.
To set ISO sensitivity,
In Shooting mode, press [I]
→
an option.
Examples
ISO 100 ISO 400
ISO 800 ISO 3200
•
You can also set the option by pressing [m]
→
b
→
ISO
→
an option in
Shooting mode.
•
Increase the ISO value in places where ash use is prohibited. You can capture
a clear photo by setting a high ISO value without having to secure more light.
•
Use the Noise Reduction function in order to reduce the visual noise that can
appear on photos of a high ISO value. (p. 170)
•
Available options may dier depending on the shooting conditions.
ISO sensitivity
86
Shooting Functions > OLED Color
86
Shooting Functions >
OLED Color
Shooting Functions
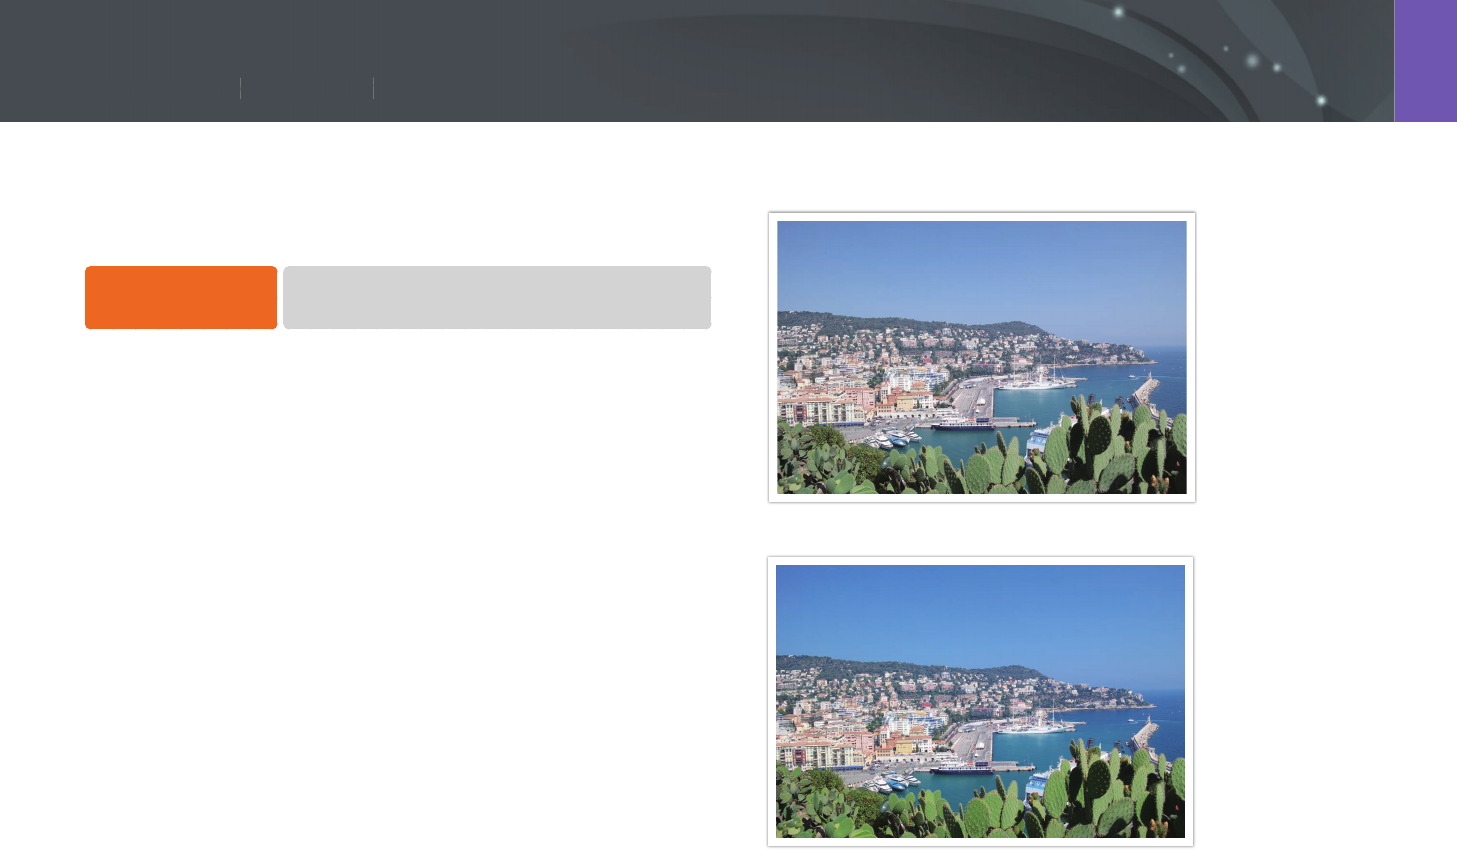
Set the camera to optimize colors for an OLED display when you capture
or play back photos. An OLED display has a wider color reproduction range
than a crystal liquid display and produces brighter, natural colors.
To set OLED Color,
In Shooting mode, press [m]
→
b
→
OLED Color
→
an option.
Examples
Without OLED Color eect
With OLED Color eect
OLED Color
87
Shooting Functions > White Balance
87
Shooting Functions >
White Balance
Shooting Functions
White Balance represents the light source that inuences on the color of a
photo.
The color of a photo depends on the type and quality of the light source.
If you want the color of your photo to be realistic, select an appropriate
lighting condition to calibrate the White Balance, such as Auto WB,
Daylight, Cloudy, Tungsten, or adjust color temperature manually.
You can also adjust color for the preset light sources so that the colors of
the photo match the actual scene under mixed lighting conditions.
To set the White
Balance,
In Shooting mode, press [C]
→
an option.
* Default
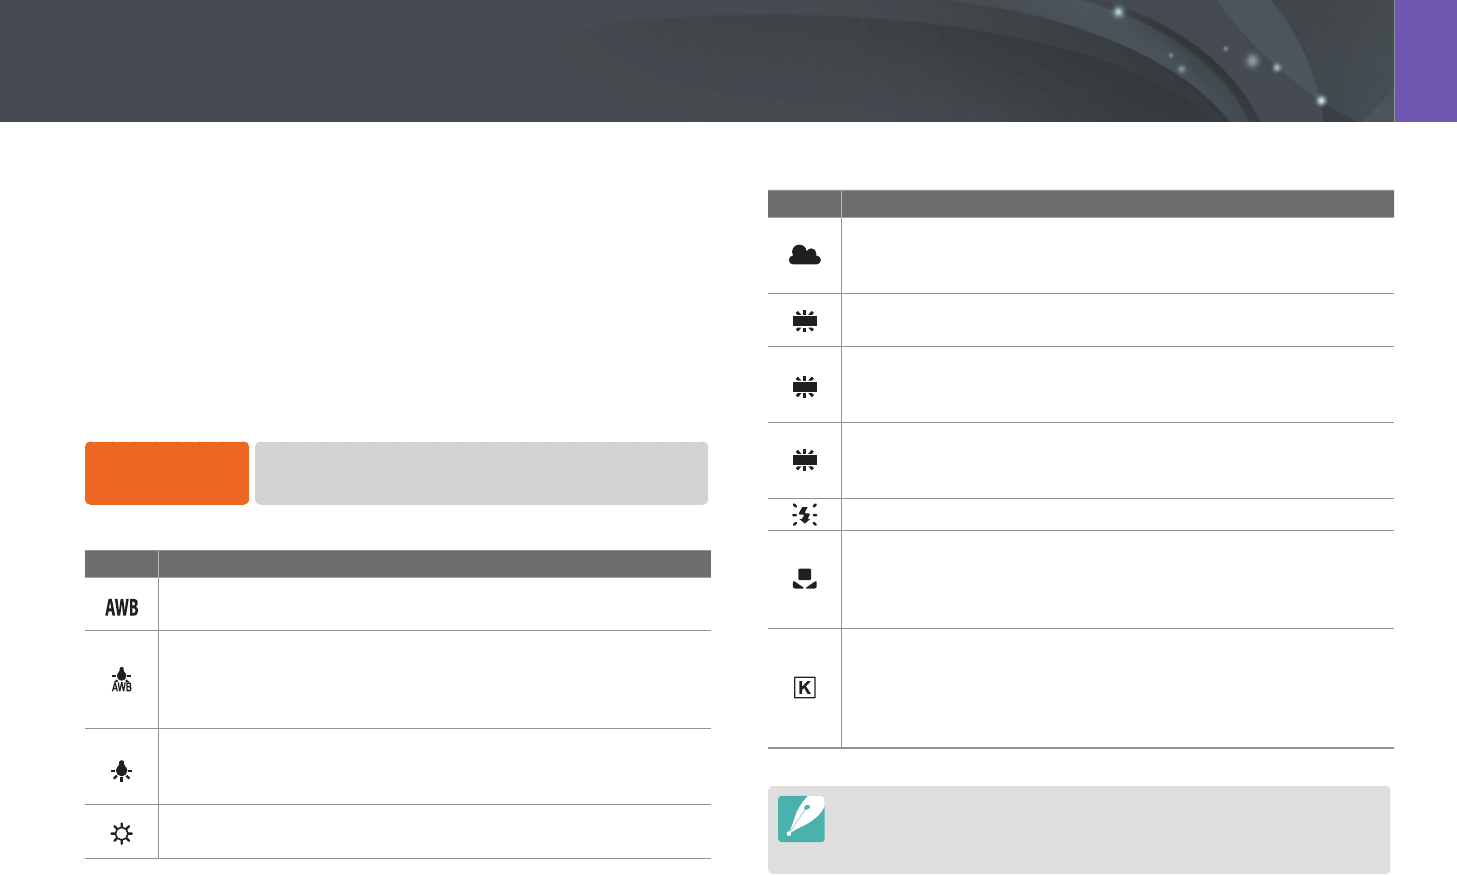
Icon Description
Auto WB*: Use automatic settings depending on the lighting
conditions.
Auto WB+Tungsten: Select when shooting under incandescent
bulbs. This option osets a reddish hue that incandescent tungsten
bulbs tend to have. In other situations, use automatic settings
depending on the lighting conditions.
Tungsten: Select when taking indoor photos under incandescent
bulbs or halogen lamps. Incandescent tungsten bulbs tend to have
a reddish hue. This option osets that eect.
Daylight: Select when taking outdoor photos on a sunny day. This
option results in photos closest to the natural colors of the scene.
* Default
Icon Description
Cloudy: Select when taking outdoor photos on a cloudy day or in
shadows. Photos captured on cloudy days tend to be more bluish
than on sunny days. This option osets that eect.
WFluorescent White: Select when shooting under a daylight
uorescent lamp, especially for white uorescent light.
N
Fluorescent NW: Select when shooting under a daylight
uorescent lamp, especially for white uorescent light of very
white hues.
D
Fluorescent Daylight: Select when shooting under a daylight
uorescent lamp, especially for white uorescent light of slightly
bluish hue.
Flash WB: Select when using a ash.
Custom Set: Use your pre-dened settings. You can manually set
the White Balance by pressing [D], and then shooting a white
sheet of paper. Fill the spot metering circle with the paper and set
the White Balance.
Color Temperature: Manually adjust the color temperature of
the light source. Color temperature is a measurement in degrees
Kelvin that indicates the specic type of light source. You can get a
warmer photo with a higher value, and a cooler photo with a lower
value. Press [D], and then adjust the color temperature.
•
You can also set the option by pressing [m]
→
b
→
White Balance
→
an option in Shooting mode.
•
Available options may dier depending on shooting conditions.
White Balance
88
Shooting Functions > White Balance
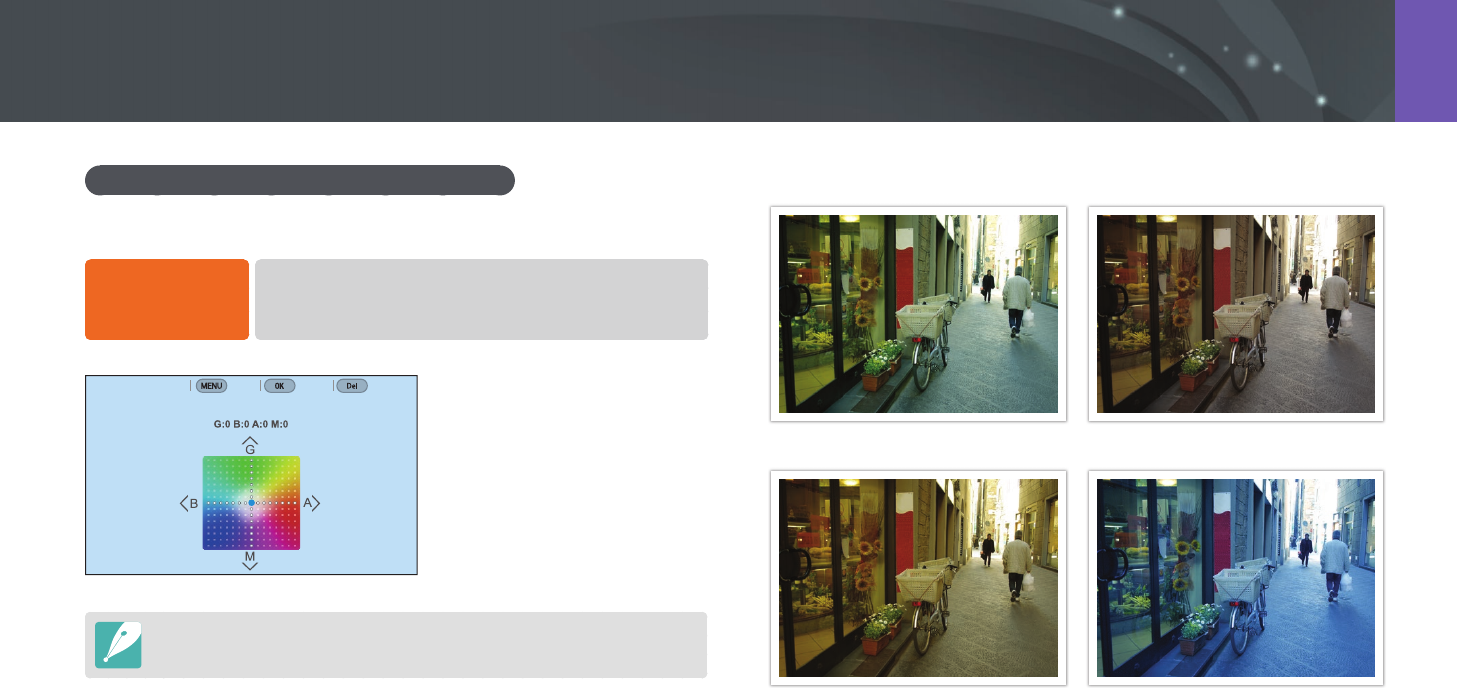
Customizing preset White Balance options
You can also customize preset White Balance options.
To customize
preset options,
In Shooting mode, press [C]
→
an option
→
[D]
→
scroll
the command dial 1 or rotate the navigation button or press
[D/h/e/e].
White Balance : Daylight
Back Set Reset
You can also touch an area on the screen.
Examples
Auto WB Daylight
Fluorescent Daylight Tungsten
89
Shooting Functions > Picture Wizard (photo styles)
89
Shooting Functions >
Picture Wizard (photo styles)
Shooting Functions
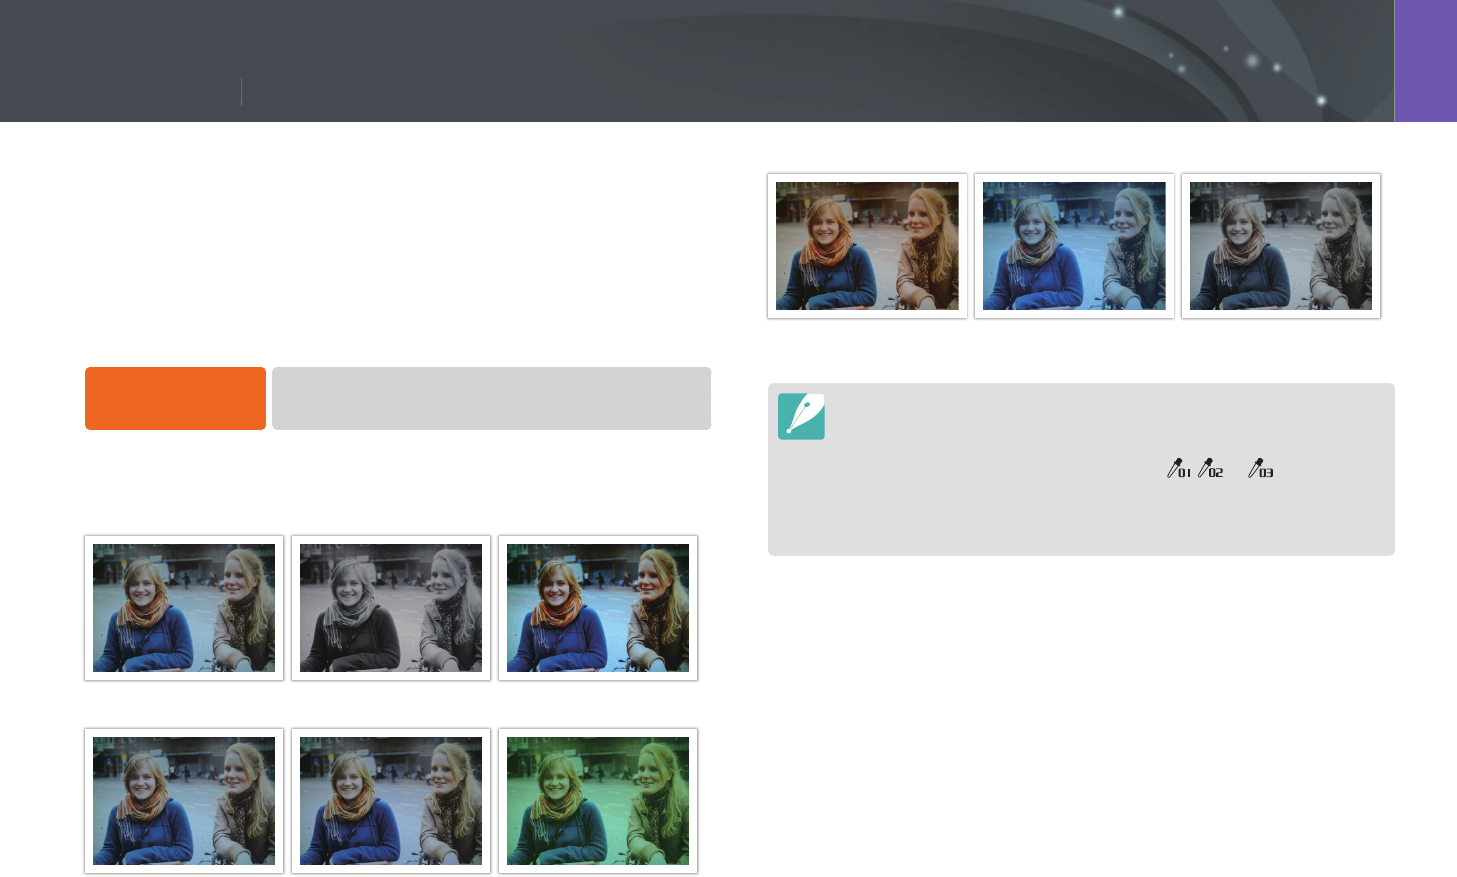
Picture Wizard lets you apply dierent photo styles to your photo to create
various looks and emotional moods. You can also create and save your
own photo styles by adjusting color, saturation, sharpness, contrast, and
hue for each style.
There is no rule for which style is suitable in which conditions. Experiment
with dierent styles and nd your own settings.
To set a photo style,
In Shooting mode, press [m]
→
b
→
Picture Wizard
→
an option.
Examples
Standard Classic Vivid
Portrait Landscape Forest
Retro Cool Calm
•
You can also adjust the value of the preset style settings. Select a Picture
Wizard option, press [D], and then adjust color, saturation, sharpness,
contrast, or hue.
•
To customize your own picture wizard, select , , or , and then
adjust the color, saturation, sharpness, contrast, and hue.
•
Picture Wizard options cannot be set with Smart Filter options at the same
time.
Picture Wizard (photo styles)

90
Shooting Functions > Smart Filter
90
Shooting Functions >
Smart Filter
Shooting Functions
Smart Filter lets you apply special eects to your photos. You can select
various lter options to create special eects that are dicult to be
achieved with normal lenses.
To set Smart Filter
options,
In Shooting mode, press [m]
→
b
→
Smart Filter
→
an option.
* Default
Option Description
O*
No eect
Vignetting
Apply the retro-looking colors, high contrast, and strong
vignette eect of Lomo cameras.
Miniature (H)
Apply a tilt-shift eect to make the subject appear in
miniature. The top and bottom of the photo will be
blurred.
Miniature (V)
Apply a tilt-shift eect to make the subject appear in
miniature. The left and right of the photo will be blurred.
Watercolor
Apply a watercolor painting eect.
Red
Desaturate all colors but red.
Green
Desaturate all colors but green.
* Default
Option Description
Blue
Desaturate all colors but blue.
Yellow
Desaturate all colors but yellow.
•
Smart Filter options cannot be set with Picture Wizard options at the same
time.
•
Available options may dier depending on the shooting conditions.
Smart Filter

91
Shooting Functions > AF mode
91
Shooting Functions >
AF mode
Shooting Functions
AF mode
Learn how to adjust the camera’s focus according to the subjects.
You can select the appropriate focus mode for the subject: Single Auto
Focus, Continuous Auto Focus, Action Auto Focus, or Manual Focus. The AF
function is activated when you press [Shutter] halfway. In the MF mode,
you have to rotate the focus ring on the lens to focus manually.
In most cases, you can have a focus by selecting Single AF. Fast moving
subjects or subjects with small shading dierences to the background are
dicult to focus. Select an appropriate focusing mode for such instances.
If your lens has an AF/MF switch, you must set the switch according to
the selected mode. Set the switch to AF when you select Single AF or
Continuous AF. Set the switch to MF when you select Manual Focus.
When your lens has no AF/MF switch, press [F] to select a desired AF
mode.
To set the auto
focus mode,
In Shooting mode, press [F]
→
an option.
•
You can also set the option by pressing [m]
→
b
→
AF Mode
→
an option in Shooting mode.
•
The available options may dier depending on the lens in use.
92
Shooting Functions > AF mode
Single AF
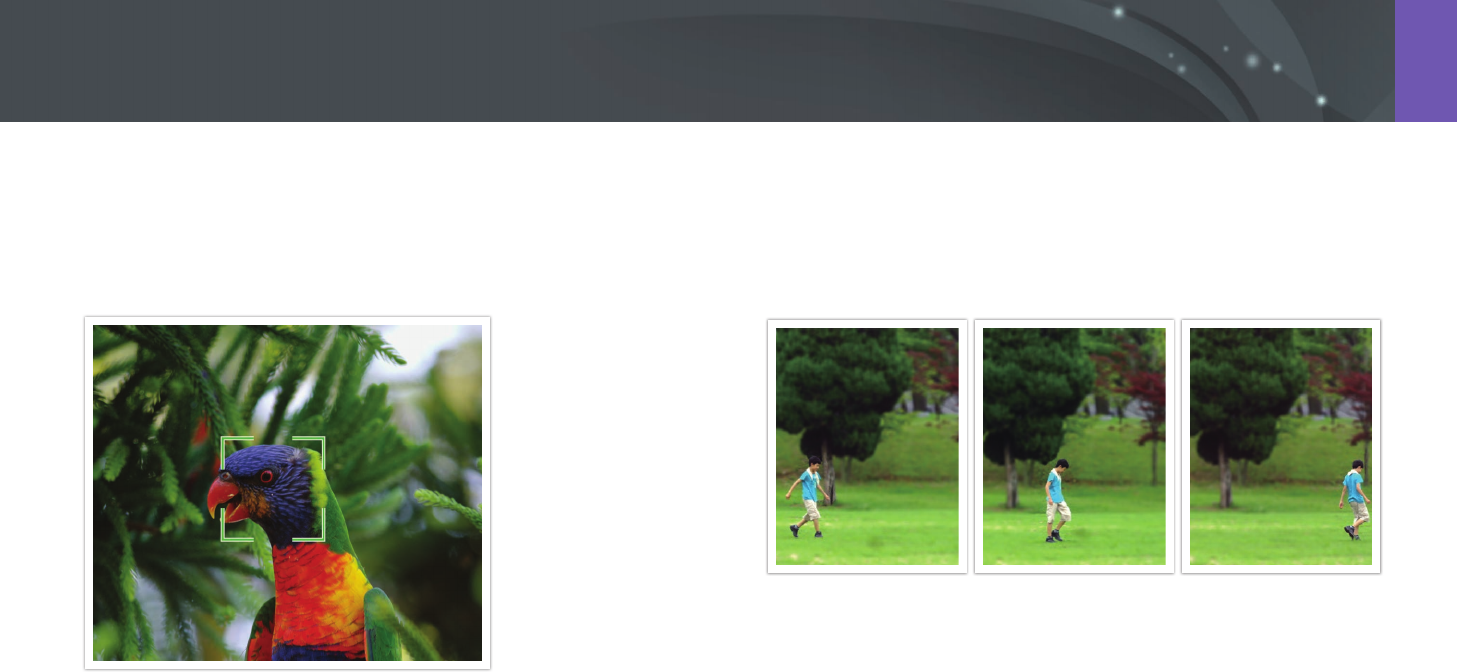
Single AF is appropriate for shooting a still subject. When you press
[Shutter] halfway, the focus xes in the focus area. The area turns green
when the focus is achieved.
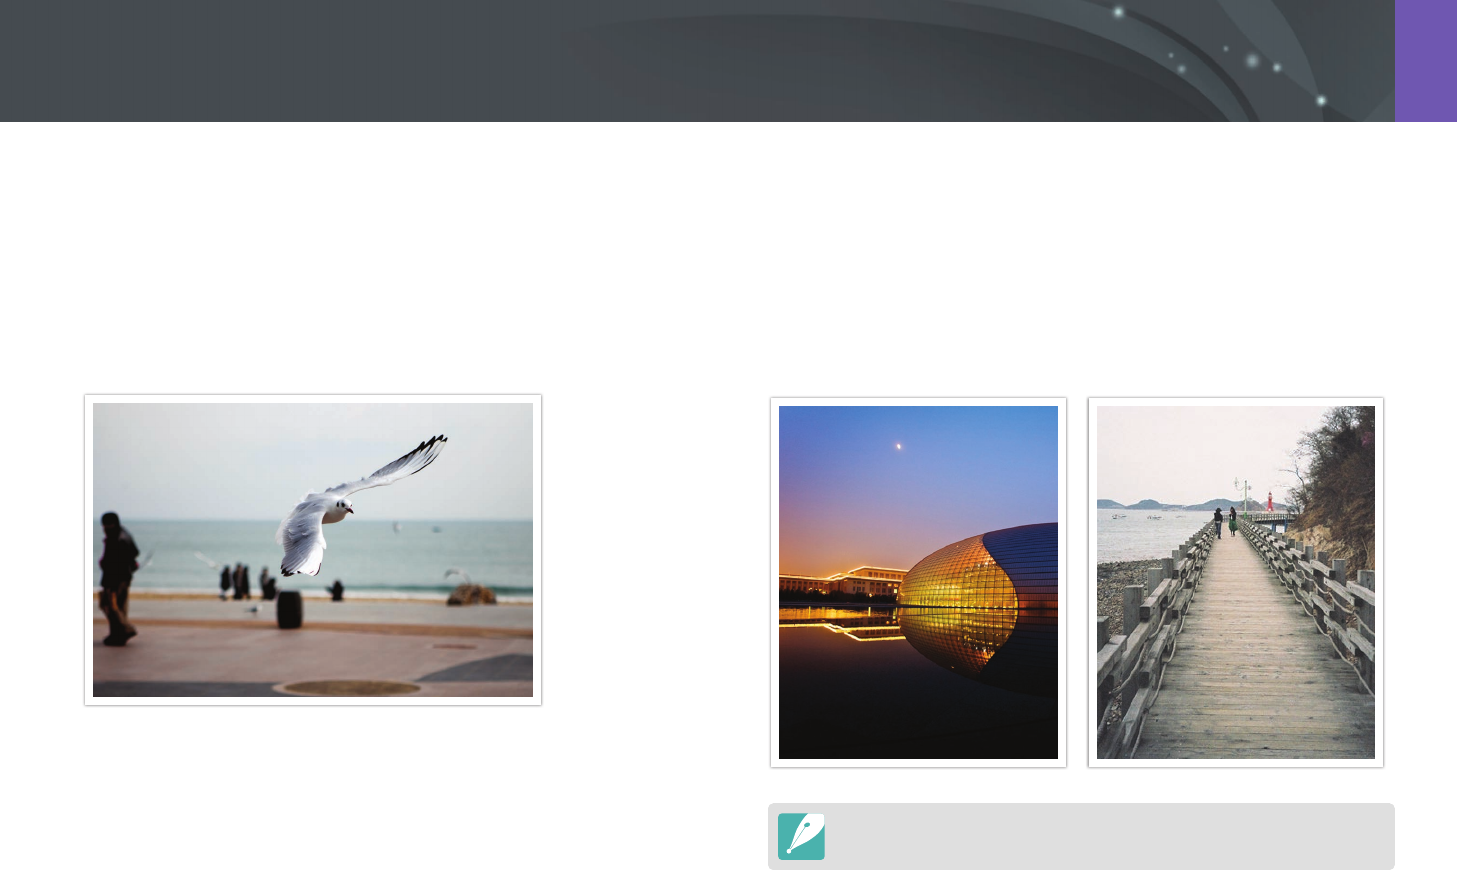
Continuous AF
While you are pressing [Shutter] halfway, the camera continues to focus
automatically. This mode is recommended for shooting action, such as a
person on a bicycle, a running dog, or a car racing scene.
93
Shooting Functions > AF mode
Action AF
While you are pressing [Shutter] halfway, the camera automatically
detects the subject’s movement. It xes the focus on the subject when
the subject gets far from the camera (Single AF). It continues to focus
automatically when the subject gets closer to the camera (Continuous
AF). This mode is recommended for shooting subjects that are moving
unpredictably.
Manual focus
You can manually focus on a subject by rotating the focus ring on the
lens. The MF Assist function lets you easily achieve a focus. While you are
rotating the focus ring, the focus area is magnied. When you use the
Focus Peaking function, the color you selected appears on the focused
subject. This mode is recommended for shooting an object similar in color
to the background, a night scene, or reworks.
If you use this function, you cannot set Touch AF, AF Area, and Link AE to AF
Point options.

94
Shooting Functions > AF area
94
Shooting Functions >
AF area
Shooting Functions
The AF area function changes the positions of the focus area.
Generally, cameras focus on the nearest subject. When there are a lot of
subjects, however, unwanted subjects can be in focus. In order to prevent
unwanted subjects from being in focus, change the focus area so that
a desired subject is in focus. You can get a clearer and sharper photo by
selecting an appropriate focus area.
To set the auto
focus area,
In Shooting mode, press [m]
→
b
→
AF Area
→
an option.
•
Available options may dier depending on shooting conditions.
•
When the AF/MF switch is set to MF, you cannot change the AF area from the
shooting menu.
•
When you use the Face Detection AF option, the camera focuses on the area
with the white frame automatically.
•
Depending on the Picture Wizard options, Face Detection may not be
eective.
•
When you set manual focus, Face Detection may not be available.
•
Face Detection may not be eective when:
-
the subject is far from the camera
-
it is too bright or too dark
-
the subject is not facing the camera
-
the subject is wearing sunglasses or a mask
-
the subject’s facial expression changes drastically
-
the subject is backlit or the lighting conditions are unstable
Selection AF
You can set the focus on an area you want. Apply an out-of-focus eect to
make the subject more distinguishable.
The focus on the photo below was repositioned and resized so that it ts
the subject’s face.
To resize or move the focus area, in Shooting mode, press [o]. Use the
navigation button or the command dial 2 to move the focus area. Scroll the
command dial 1 to resize the focus area.
AF area

95
Shooting Functions > AF area
Multi AF
The camera displays a green rectangle in places where focus is set
correctly. The photo is divided into two or more areas, and the camera
obtains focus points of each area. It is recommended for scenery photos.
When you press [Shutter] halfway, the camera displays the focus areas as
shown in the photo below.
To resize or move the focus area, in Shooting mode, press [o]. Use the
navigation button or the command dial 2 to move the focus area. Scroll the
command dial 1 to resize the focus area.
Face Detection AF
The camera focuses on human faces preferentially. Faces of up to
10 people can be detected. This setting is recommended for shooting a
group of people.
When you press [Shutter] halfway, the camera focuses on faces as shown
in the photo below. When shooting a group of people, the camera focuses
on the nearest person’s face or on the face in the center of the screen. It
will display the focus subject’s face in white and the other peoples’ faces in
gray.

96
Shooting Functions > AF area
Self-Portrait AF
It can be dicult to check whether your face is in focus when you are
taking a self-portrait. When this function is on, the beep from the camera
gets faster when your face is located at the center of the composition.
97
Shooting Functions > Touch AF
97
Shooting Functions >
Touch AF
Shooting Functions
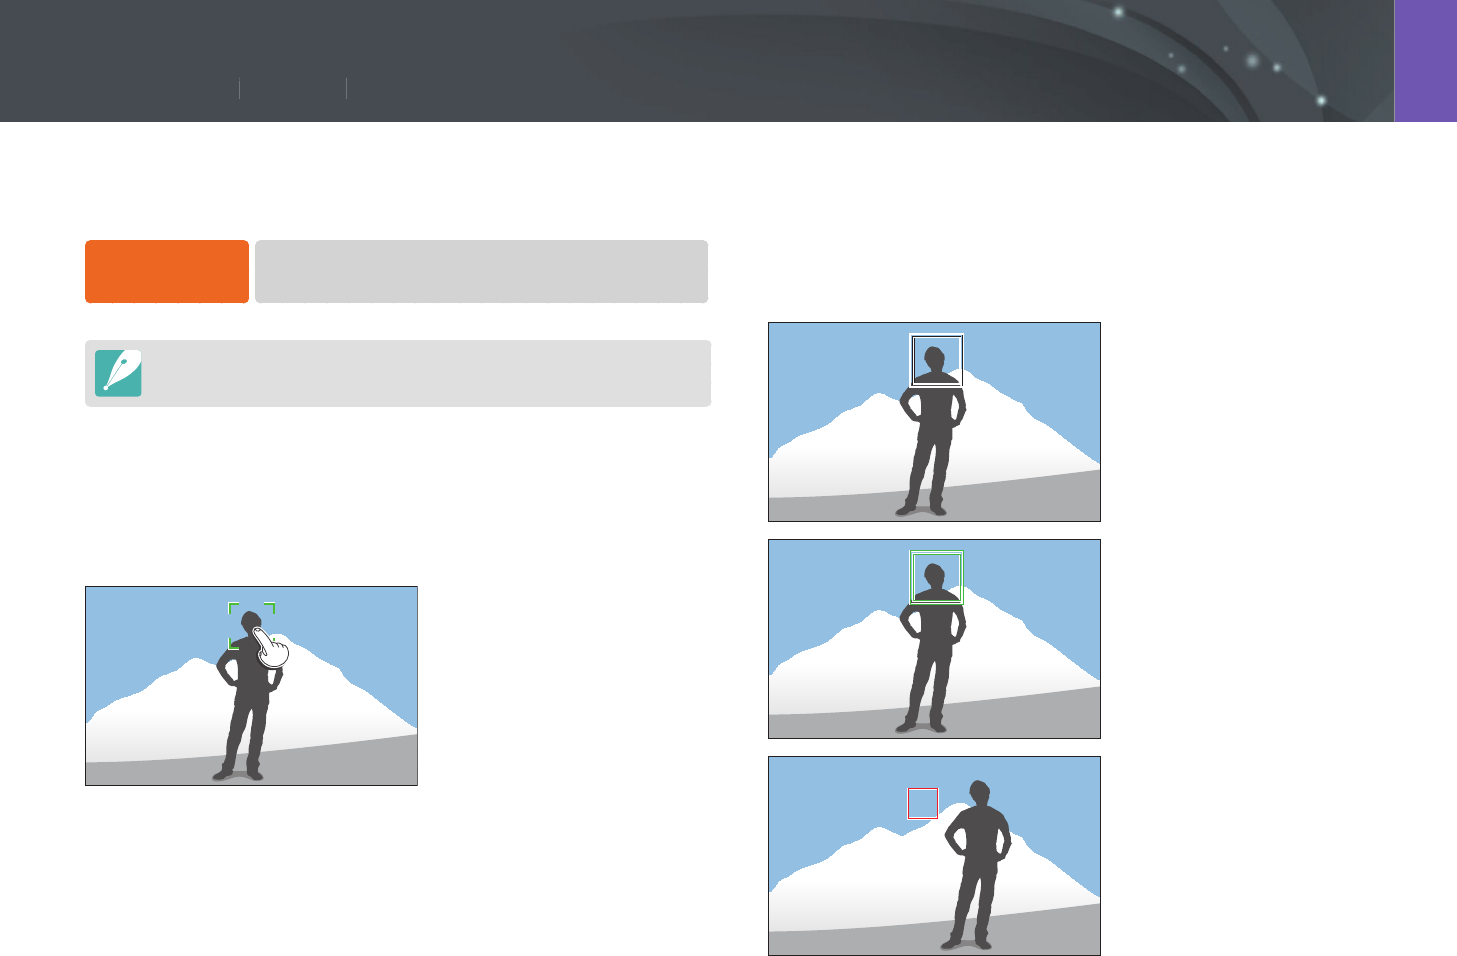
Tracking AF
Tracking AF allows you to track and automatically focus on your subject,
even when the subject is moving or when you change the shooting
composition.
White frame: Your camera is
tracking the subject.
Green frame: Your subject is
in focus when you half-press
[Shutter].
Red frame: Your camera failed to
focus.
Select or focus on an area that you touch on the screen. Additionally, focus
on the subject and capture a photo by touching on the screen.
To set Touch AF,
In Shooting mode, press [m]
→
b
→
Touch AF
→
an option.
Available options may dier depending on the shooting conditions.
Touch AF
Touch AF allows you to select and focus on the focus area that you touch
on the screen.
AF Point
The focus area will correspond to the area you touch on the screen and the
focus will not be achieved.
Touch AF

98
Shooting Functions > Touch AF
One touch shot
You can capture a photo with the touch of your nger. As you touch a
subject, the camera focuses on the subject automatically and captures a
photo.
•
If you do not select a focus area, the Auto Focus function does not work.
•
Tracking a subject may fail when:
-
the subject is too small
-
the subject moves irregularly
-
the subject is backlit or you are shooting in a dark place
-
colors or patterns on the subject and the background are the same
-
the subject includes horizontal patterns, such as blinds
-
the camera shakes excessively
-
you capture photos continuously
•
When tracking fails, the feature will be reset.
•
If the camera fails to track the subject, the focus area will be reset.
•
If the camera fails to focus, the focus frame will change to red and the focus
will be reset.

99
Shooting Functions > Focus assist
99
Shooting Functions >
Focus assist
Shooting Functions
In the manual focus mode, you have to rotate the focus ring on the lens to
focus. When you use the MF Assist function or the Focus Peaking function,
you can achieve a clearer focus. This function is only available on a lens
that supports manual focus.
You can also use the Direct Manual Focus (DMF) function to adjust the
focus manually. After focusing with the Auto Focus function, adjust the
focus by rotating the focus ring.
MF Assist
In the manual focus mode, you can enlarge the scene and easily adjust the
focus while rotating the focus ring.
To set the manual
focus assist,
In Shooting mode, press [m]
→
b
→
MF Assist
→
an option.
* Default
Option Description
O
Do not use the MF Assist function.
Enlarge x5*
The focus area is magnied by 5 times when you rotate the
focus ring.
Enlarge x8
The focus area is magnied by 8 times when you rotate the
focus ring.
Focus assist

100
Shooting Functions > Focus assist
Focus Peaking
In the manual focus mode, the color you selected appears on the focused
subject to help you focus while rotating the focus ring.
To set Focus
Peaking options,
In Shooting mode, press [m]
→
b
→
Focus Peaking
→
an option.
* Default
Option Description
Level
Set a sensitivity for detecting the focused subject.
(O, High, Normal*, Low)
Color
Set a color to appear on the focused subject.
(White*, Red, Green)
DMF (Direct Manual Focus)
You can adjust the focus manually by rotating the focus ring after
achieving the focus by half-pressing [Shutter].
To set the DMF
function,
In Shooting mode, press [m]
→
d
→
DMF
→
an option.
Setting DMF responsiveness
Set the focus ring’s response when you use the DMF function. If you select
High, slight rotations of the focus ring are made to adjust the focus. If you
select Low, longer rotations of the focus ring are made to adjust the focus.
To set DMF
Responsiveness
options,
In Shooting mode, press [m]
→
d
→
DMF
Responsiveness
→
an option.
101
Shooting Functions > Optical Image Stabilization (OIS)
101
Shooting Functions >
Optical Image Stabilization (OIS)
Shooting Functions
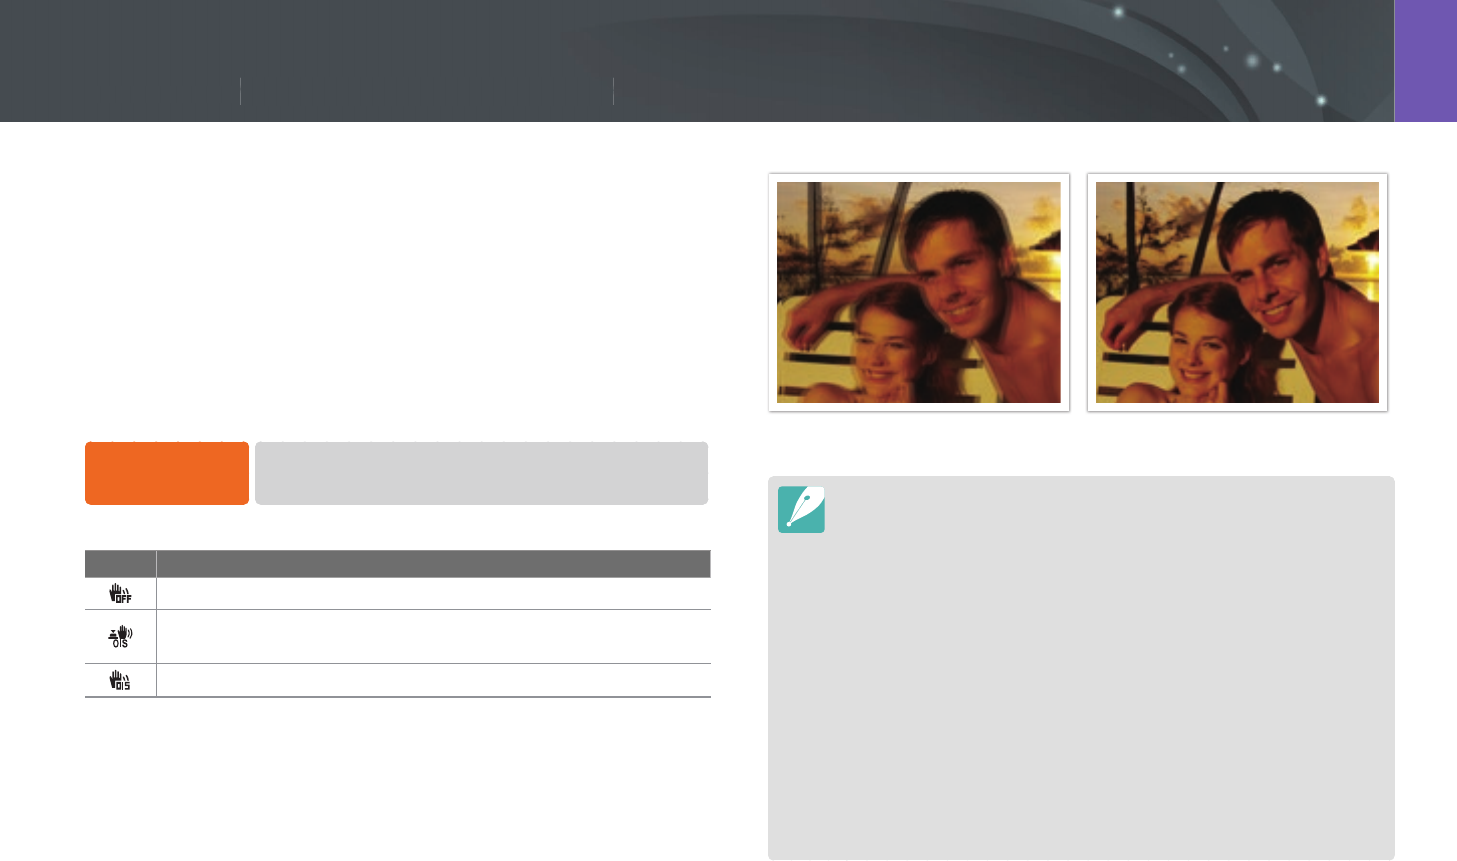
Use the Optical Image Stabilization (OIS) function to minimize camera
shake. OIS may not be available with some lenses.
Camera shake tends to occur in dark places or when shooting indoors.
In such cases, the camera uses slower shutter speeds in order to increase
the amount of light taken in, which can result in a blurry photo. You can
prevent this situation by using the OIS function.
If your lens has an OIS switch, you have set the switch to ON to use the OIS
function.
To set OIS options,
In Shooting mode, press [m]
→
b
→
OIS (Anti-Shake)
→
an option.
* Default
Icon Description
O: The OIS function is o.
Mode 1*: The OIS function is applied only when you press
[Shutter] in full or half.
Mode 2: The OIS function is on.
Optical Image Stabilization (OIS)
Without OIS correction With OIS correction
•
OIS may not function properly when:
-
you move your camera to follow a moving subject
-
there is too much camera shake
-
the shutter speed is slow (for example, when you select Night in
s mode)
-
the battery is low
-
you capture a close-up shot
•
If you use the OIS function with a tripod, your images may be blurred by
the vibration of the OIS sensor. Deactivate the OIS function when you use a
tripod.
•
If the camera is hit or dropped, the display will be blurry. If this occurs, turn o
the camera, and then turn it on again.
•
Use the OIS function only when needed because the function consumes
more battery power.
•
To set an OIS option on the menu, set the OIS switch on your lens to ON.
•
This option may not be available with some lenses.

102
Shooting Functions > Drive (shooting method)
102
Shooting Functions >
Drive (shooting method)
Shooting Functions
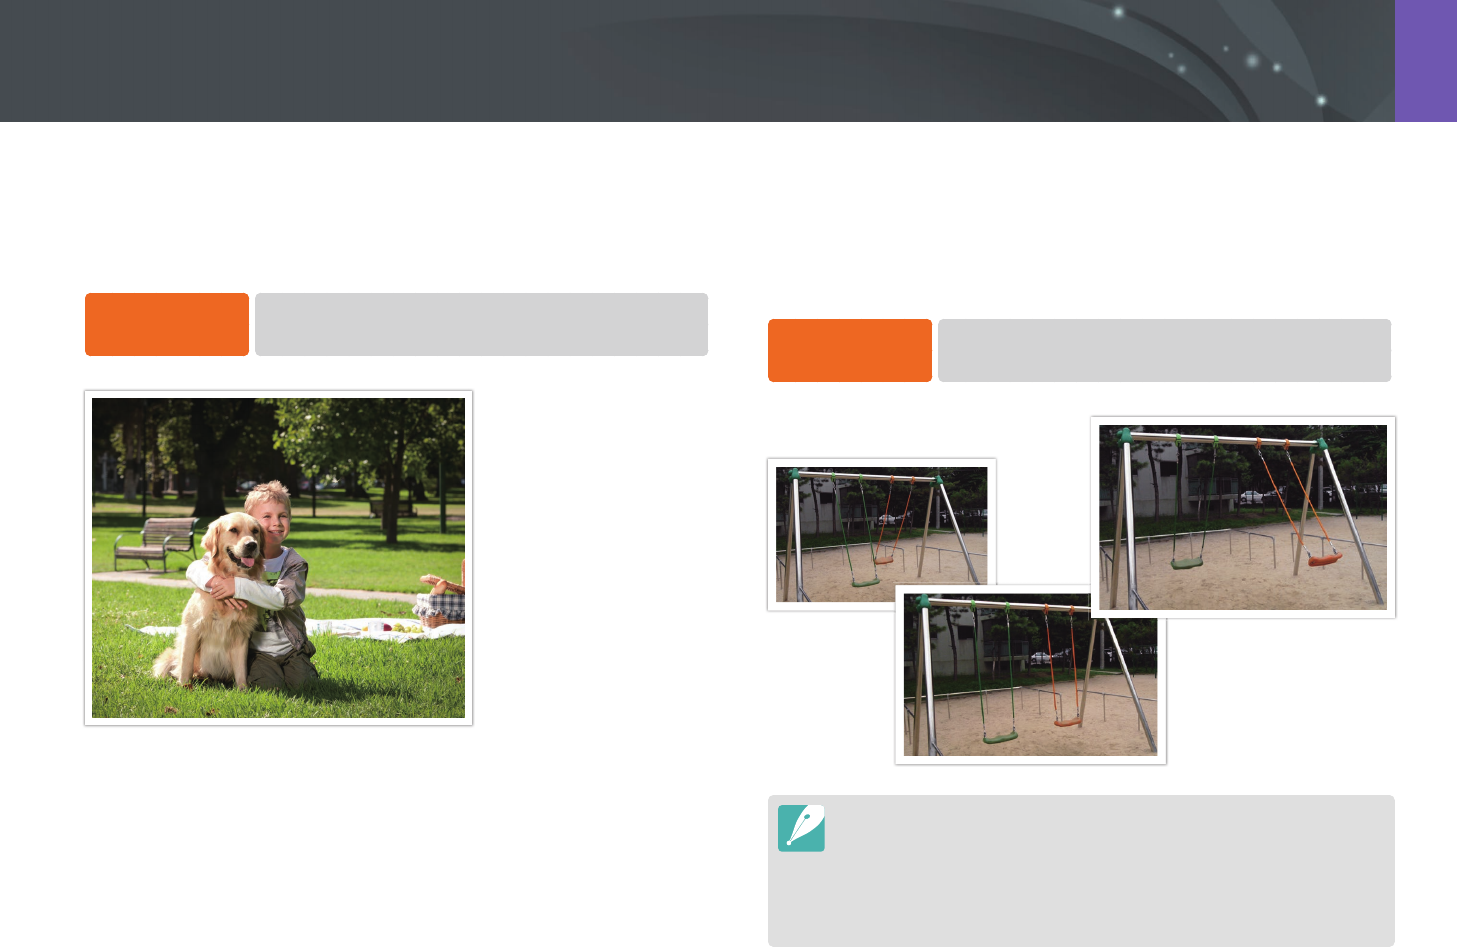
You can set the shooting method, such as Continuous, Timer, or Bracketing.
Select Single to capture one photo at a time. Select Continuous Normal
or Continuous High to shoot fast moving subjects. Select AE Bracket,
WB Bracket, P Wiz Bracket, or Depth Bracket to adjust exposure, White
Balance, apply picture Wizard eects, or capture photos with dierent
depths of eld. You can also select Timer to capture a photo automatically
after a specied time.
Available options may dier depending on shooting conditions.
When Continuous High is selected (example)
Icon Description
H
Single (p. 103)
i
Continuous Normal (p. 103)
W
Continuous High (p. 103)
K
Timer (p. 104)
L
Bracketing (p. 104)
Do not rotate the drive dial without pressing the drive dial lock button. Doing so
may damage the camera.
Drive (shooting method)
103
Shooting Functions > Drive (shooting method)
Single
Capture one photo whenever you press [Shutter]. Recommended for
general conditions.
To set the shooting
method,
Rotate the drive dial to H.
Continuous
Continuously capture photos while you are pressing [Shutter]. You can
capture up to 4, 6, or 8 photos (Continuous Normal) or 10, 12, or 15
photos (Continuous High) per second.
To set the shooting
method,
Rotate the drive dial to i (Continuous Normal) or
W (Continuous High).
•
To set the number of shots, rotate the drive dial to i (Continuous Normal)
or W (Continuous High), and then press [m]
→
b
→
Drive Settings
→
Continuous Settings
→
Continuous Normal or Continuous High
→
set the number of shots.
•
The noise reduction function is not available with this option.
•
The Tracking AF function is available with this option.

104
Shooting Functions > Drive (shooting method)
Timer
Capture a photo after a specied time. You can also set the shooting
interval, number of shots, and shooting time.
To set the shooting
method,
Rotate the drive dial to K.
•
Press [Shutter] to stop capturing.
•
To set the timer details, rotate the drive dial to K, and then press [m]
→
b
→
Drive Settings
→
Timer Settings
→
set the shooting interval,
number of shots, and shooting time.
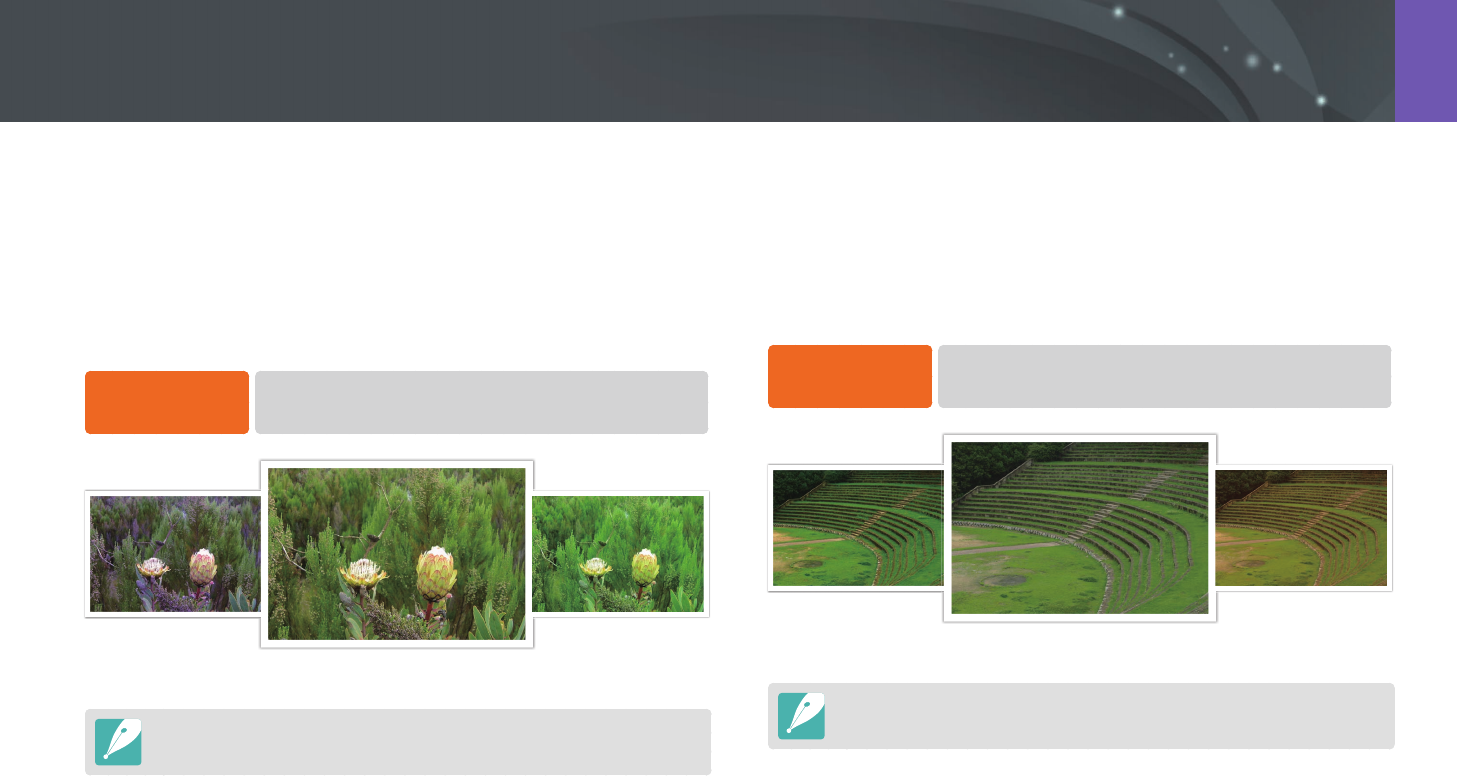
Auto Exposure Bracketing (AE Bracket)
When you press [Shutter], the camera captures 3 consecutive photos: the
original, one a step darker, and one a step lighter. Use a tripod to prevent
blurry photos as the camera captures three photos continuously. You can
adjust the settings in Bracket Settings menu.
To set the shooting
method,
Rotate the drive dial to L, and then press [m]
→
b
→
Drive Settings
→
Bracket Settings
→
AE Bracket.
Exposure -2
Original
Exposure +2
105
Shooting Functions > Drive (shooting method)
White Balance Bracketing (WB Bracket)
When you press [Shutter], the camera captures 3 consecutive photos:
the original and two more with dierent White Balance settings. The
original photo is captured when you press [Shutter]. The other two are
automatically adjusted according to the White Balance you have set. You
can adjust the settings in Bracket Settings menu.
To set the shooting
method,
Rotate the drive dial to L, and then press [m]
→
b
→
Drive Settings
→
Bracket Settings
→
WB Bracket.
WB-2
Original
WB+2
This option cannot be used with the RAW le format. Selecting this option will
change the photo quality from RAW to JPEG.
Picture Wizard Bracketing (P Wiz Bracket)
When you press [Shutter], the camera captures three consecutive photos,
each with a dierent Picture Wizard setting. The camera captures a photo
and applies the three Picture Wizard options you have set to the image
captured. You can select three dierent settings in Bracket Settings menu.
To set the shooting
method,
Rotate the drive dial to L, and then press [m]
→
b
→
Drive Settings
→
Bracket Settings
→
P Wiz Bracket.
Vivid
Standard
Retro
This option cannot be used with the RAW le format. Selecting this option will
change the photo quality from RAW to JPEG.

106
Shooting Functions > Drive (shooting method)
Depth Bracketing
When you press [Shutter], the camera captures three consecutive photos,
each with a dierent depth of eld by adjusting the aperture value. Use
a tripod to prevent blurry photos as the camera captures three photos
continuously. You can adjust the settings in Bracket Settings menu.
To set the shooting
method,
Rotate the drive dial to L, and then press [m]
→
b
→
Drive Settings
→
Bracket Settings
→
Depth Bracket.
This feature is available only in Program or Aperture priority mode.
Bracket Settings
You can set up the options for each bracketing.
To set a bracketing
option,
In Shooting mode, press [m]
→
b
→
Drive Settings
→
Bracket Settings
→
an option.
* Default
Option Description
AE Bracketing
Settings
Set the exposure interval. Use the command dial 1
or the navigation button to select an option. You can
also drag the slider or touch the arrows. (-/+0.3 EV*,
-/+0.7 EV, -/+1.0 EV, -/+1.3 EV, -/+1.7 EV,
-/+2.0 EV, -/+2.3 EV, -/+2.7 EV, -/+3.0 EV)
WB Bracketing
Settings
Adjust the White Balance interval range of the
3 bracketed photos. Use the command dial 1 or the
navigation button to select an option. (AB-/+3*, AB-
/+2, AB-/+1, MG-/+3, MG-/+2, MG-/+1)
For example, AB-/+3 adjusts the Amber value plus
or minus three steps. MG-/+3 adjusts the Magenta
value the same amount.
P Wiz Bracket Set
Select 3 Picture Wizard settings the camera uses to
capture the 3 bracketed photos.
Depth Bracket Set
Set the depth interval. Use the command dial 1 or
the navigation button to select an option. You can
also drag the slider or touch the arrows to select
an option. (-/+0.3, -/+0.7, -/+1.0*, -/+1.3, -/+1.7,
-/+2.0, -/+2.3, -/+2.7, -/+3.0)

107
Shooting Functions > Interval Capture
107
Shooting Functions >
Interval Capture
Shooting Functions
Set the shooting interval, the number of shots, and shooting start time.
Use this function to capture photos at regular intervals during an event
such as a lunar eclipse or a sunrise.
To capture an
interval shot,
In Shooting mode, press [m]
→
b
→
Interval Capture
→
set a shooting interval, the number of shots, and shooting start
time
→
Start Interval Capture
→
press [Shutter] to capture
the photo.
•
To save interval shots as a video, select Time Lapse
→
On.
A video is recorded up to 1 minute in UHD and at a rate of 10 fps.
•
Touch to pause while capturing photos.
•
Touch to resume.
•
Touch or press [Shutter] to stop capturing.
•
Use a shutter release cable with a tripod to minimize camera movement
when capturing interval shots.
•
Connect the power cable if the shooting interval is long or the number of
shots to be taken is high.
•
If the shooting interval is set to between one minute and 10 minutes, the
camera will enter Display save mode after it starts to capture a photo. If a
shooting interval exceeds 10 minutes, the camera will enter Power save mode
and turn on and capture a photo automatically at the next interval. Press
[Shutter] to cancel Power save mode.
Interval Capture
108
Shooting Functions > Flash
108
Shooting Functions >
Flash
Shooting Functions
In order to capture a realistic photo of a subject, the amount of light
should be constant. When the light source varies, you can use a ash and
supply a constant amount of light. Select appropriate settings according to
a light source and a subject.
To set ash options,
In Shooting mode, press [m]
→
b
→
Flash
→
an option.
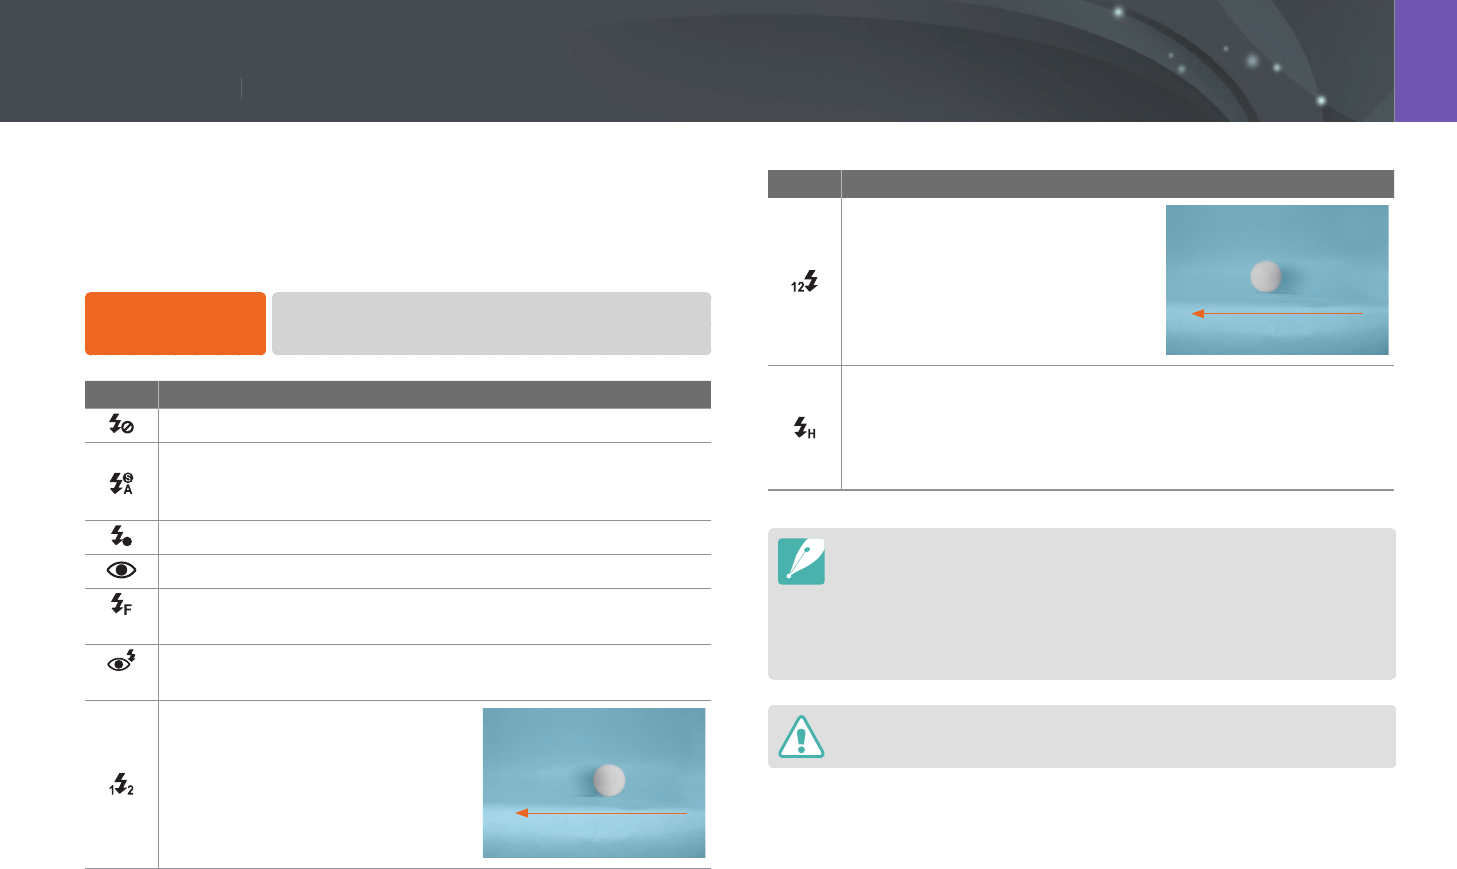
Icon Description
O: Do not use the ash.
Smart Flash: The camera automatically adjusts the brightness
of the ash according to the amount of light in the surrounding
environment.
A
Auto: The ash automatically res in dark places.
Auto Red-eye: The ash automatically res and reduces red-eyes.
Fill in: The ash res whenever you capture a photo. (Brightness is
automatically adjusted.)
Fill-in Red: The ash res whenever you capture a photo and
reduces red-eyes.
1st Curtain: The ash res
immediately after the shutter opens.
The camera captures a photo of a
subject earlier in an action sequence
clearly. Ball moving direction
Icon Description
2nd Curtain: The ash res just
before the shutter closes. The
camera captures a photo of a
subject later in an action sequence
clearly. Ball moving direction
Hi-speed: If the shutter speed is faster than the camera’s sync
speed (the quickest time taken to open and close the shutter), the
ash will re multiple times at high speed. The ash starts to re
while the shutter opens. This option can be set only when you
attach a compatible, optional external ash. (SEF-580A)
•
The available options may dier depending on shooting conditions.
•
There is an interval between two bursts of the ash. Do not move until the
ash res a second time.
•
If you select O, the ash does not re even when an external ash is
attached. If you adjust the ash intensity manually, the ash will re once
without a pre-ash.
Use only Samsung-approved ashes. Using incompatible ashes may damage
your camera.
Flash
109
Shooting Functions > Flash
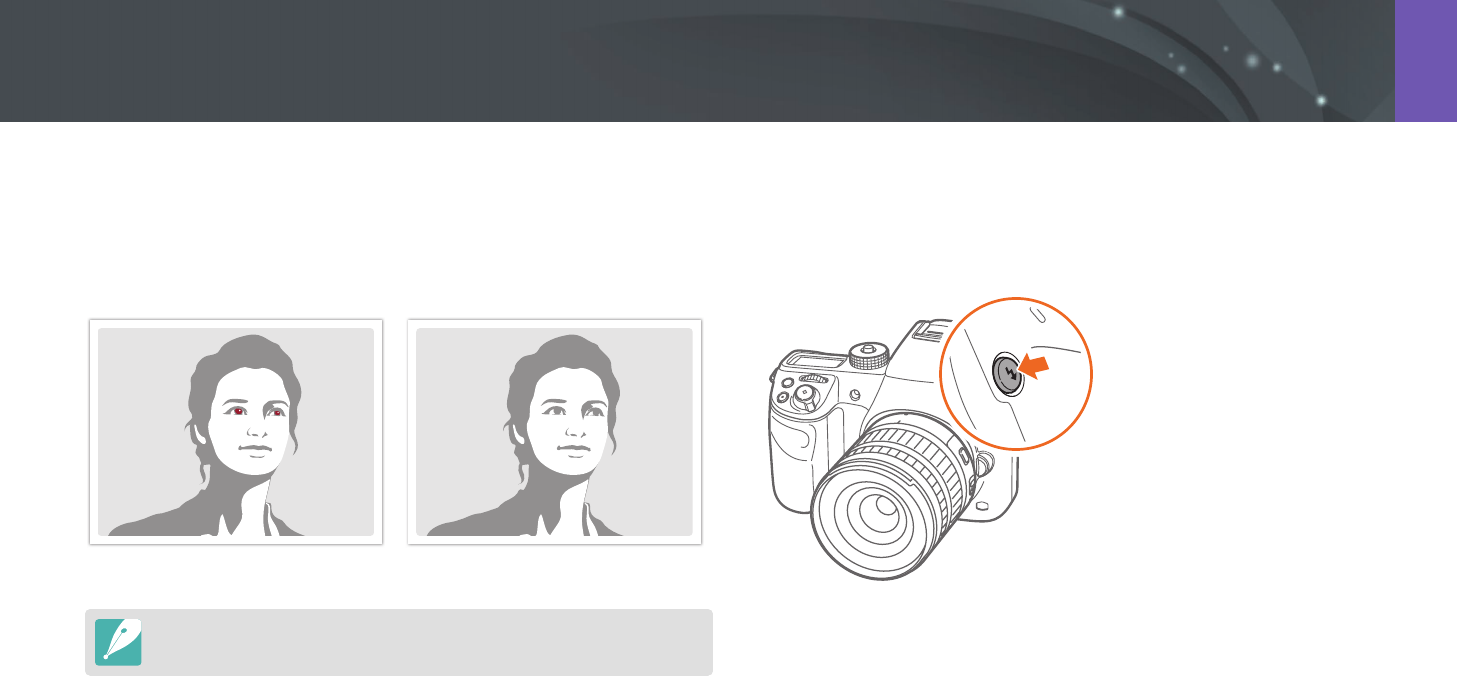
Reducing the red-eye eect
If the ash res when you capture a photo of a person in the dark, a red
glow may appear in the eyes. To reduce the red-eye eect, select Auto
Red-eye, or Fill-in Red.
Without red-eye reduction With red-eye reduction
If the subject is too far from the camera or moves when the rst ash res, red-
eyes may not be reduced.
Using the built-in ash
To open the built-in ash, press the ash pop-up button. The ash does
not re when the built-in ash is closed.

110
Shooting Functions > Flash
Adjusting the ash intensity
When the ash is on, adjust the ash intensity +/-2 levels.
To set the ash
intensity,
In Shooting mode, select [m]
→
b
→
Flash
→
an option
→
[D]
→
scroll the command dial 1 or the command dial
2 or rotate the navigation button or press [e/e] to adjust the
ash intensity.
Back Set Cancel
Flash : Fill in
•
You can also drag the slider or touch / to adjust the intensity.
•
Adjusting the flash intensity may not be eective when:
-
the subject is too close to the camera
-
you set a high ISO sensitivity
-
the exposure value is too big or too small
-
it is too bright or too dark
•
In some shooting modes, you cannot use this function.
•
If you attach an intensity-adjustable external ash to the camera, the intensity
settings of the ash will be applied.
•
If the subject is too close when you use the ash, some light may be blocked,
resulting in a dark photo. Ensure that the subject is within the recommended
range, which varies by lens.
•
When a lens hood is attached, the light from the ash can be blocked by the
hood. Remove the hood to use the ash.