Samsung Electronics Co NX1 Digital camera User Manual 3 of 3
Samsung Electronics Co Ltd Digital camera 3 of 3
UserManual.wiki
>
Samsung Electronics Co
>
NX1 User Manual
>
User manual 3 of 3
Contents
1.
User manual 1 of 3
2.
User manual 2 of 3
3.
User manual 3 of 3
User manual 3 of 3
Navigation menu
Upload a User Manual
Namespaces
Wiki Guide
HTML
PDF
Info
Views
User Manual
Discussion / Help
Navigation
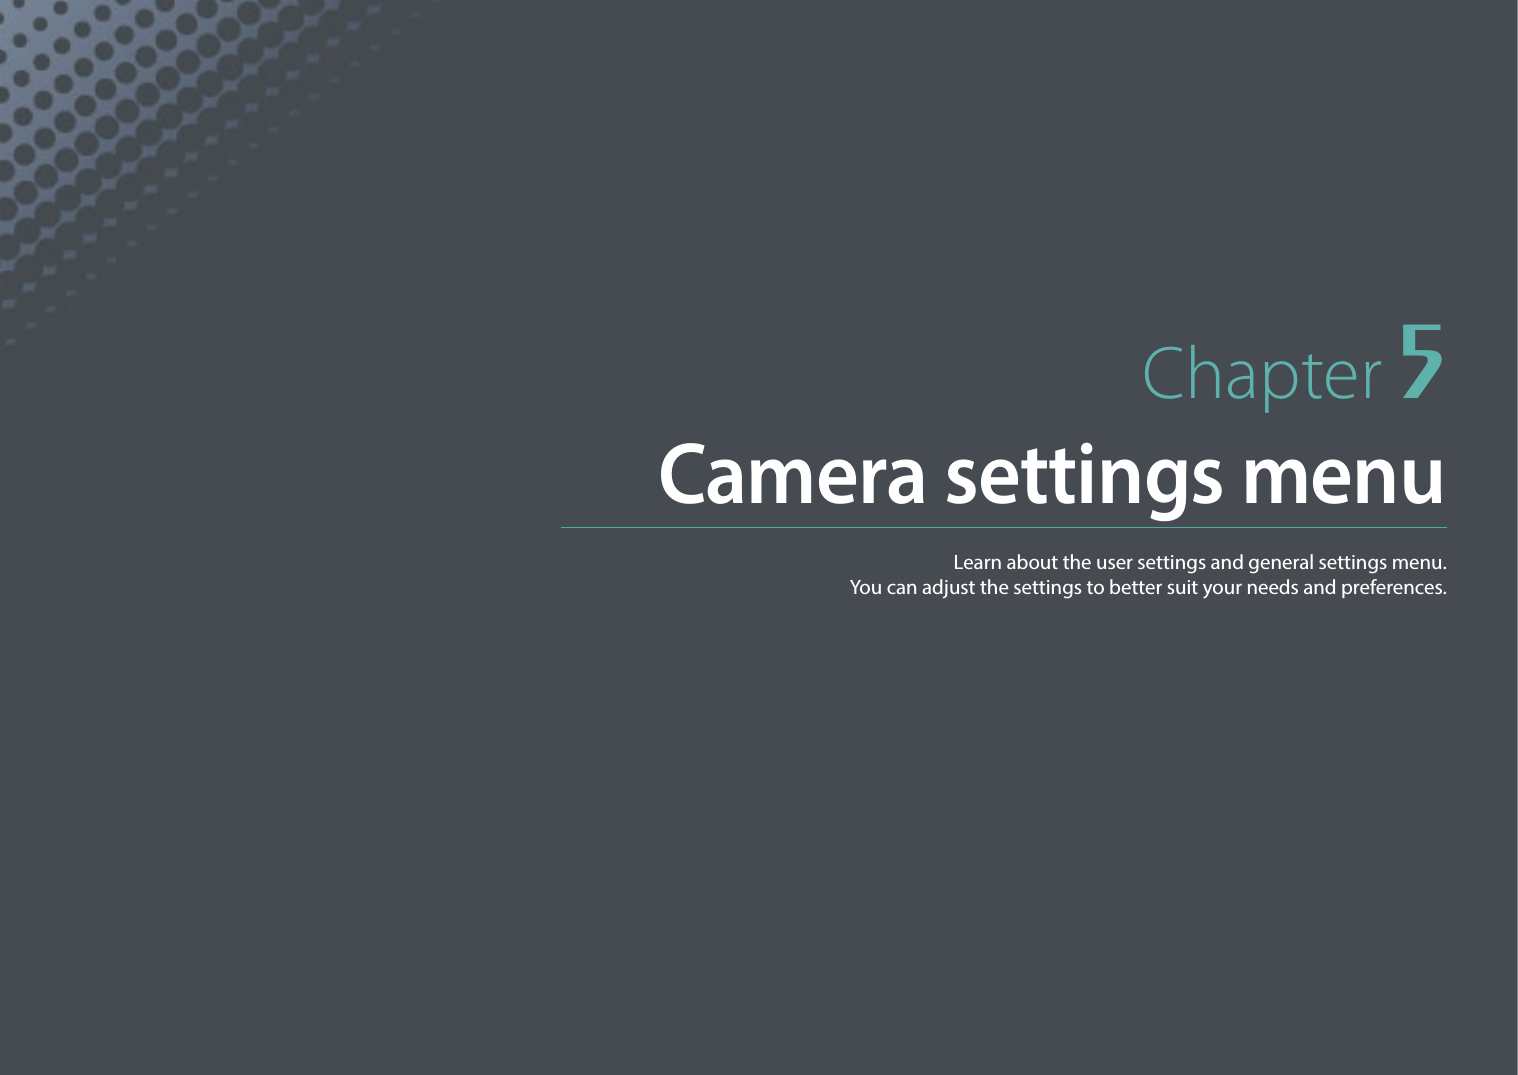
![111Shooting Functions > FlashFlash settingsSet the ash mode, exposure value, ash brightness, or multi ash when you attach an external ash to the camera. You can also set wireless sync to control internal or external ash. The ash settings are supported only when you attach a compatible, optional external ash (SEF-580A).Setting external ashTo set external ash,In Shooting mode, press [m] → b → External Flash Settings → an option.Option DescriptionFlash Mode•A-TTL: In the A-TTL (Advanced Through The Lens) mode,the camera measures the light reected by the subjectthrough the lens. Then, it calculates the optimumexposure based on the exposure value and shutterspeed.•Manual Flash: The ash emits the full amount of light orthe ash intensity can be adjusted manually.•Multi Flash: When you press [Shutter], the ash resmultiple times based on the number you have set.Flash EVSet the exposure of the ash when the ash mode is A-TTL.Flash Output Set the brightness of the ash when the ash mode is Manual Flash.Multi Flash SettingsSet the count, brightness, or frequency of the ash when the ash mode is Multi Flash.If data can be exchanged between the camera and the ash, the settings for the external ash can be adjusted on the camera or the ash. Your previous options will be applied.](https://usermanual.wiki/Samsung-Electronics-Co/NX1.User-manual-3-of-3/User-Guide-2394048-Page-1.png)
![112Shooting Functions > FlashSetting wireless sync for internal or external ashSet wireless sync to control internal and external ash units remotely via wireless signals. The remote system consists of a master ash that is mounted on the camera and one or more slave ash units. A slave ash is assigned to one of three groups: A, B, or C.To set wireless sync,In Shooting mode, press [m] → b → Internal Wireless Flash or External Wireless Flash → an option. * DefaultOption DescriptionUse Wireless FlashSet to use wireless sync. (O*, On)ChannelSelect channels for wireless sync. There are four remote channels available to allow multiple remote systems to operate at the same time. Master and slave ash units, in the same remote system, must be set to the same channel. (Ch. 1, Ch. 2, Ch. 3, Ch. 4)Group Flash ModeSet the ash mode for group A, B, or C. Changes to the ash mode must be made on the master ash. The changes are then applied to slave group A, B, or C, and the slave groups operate as a remote system of the ash mode (TTL or manual) according to the settings for the master ash.• A-TTL: Set the exposure of the ash when the ash mode is A-TTL.• Manual Flash: Set the brightness of the ash when the ash mode is Manual Flash.• O: Do not re the ash.•You cannot select External Flash Settings when you use the External Wireless Flash function.•For information about using the wireless sync feature with an external ash, refer to the optional external ash’s (SEF-580A) user manual.](https://usermanual.wiki/Samsung-Electronics-Co/NX1.User-manual-3-of-3/User-Guide-2394048-Page-2.png)
![113Shooting Functions > FlashLocking the ash intensityWhen the ash mode is set to A-TTL, the camera automatically calculates the optimum exposure through pre-ash. If the exposure is not calculated correctly, use the FEL function. The pre-ash res on the area that you set and the ash intensity is locked.To lock the ash intensity,Set the function of [a] to FEL → focus on the exposure area → press [a].](https://usermanual.wiki/Samsung-Electronics-Co/NX1.User-manual-3-of-3/User-Guide-2394048-Page-3.png)
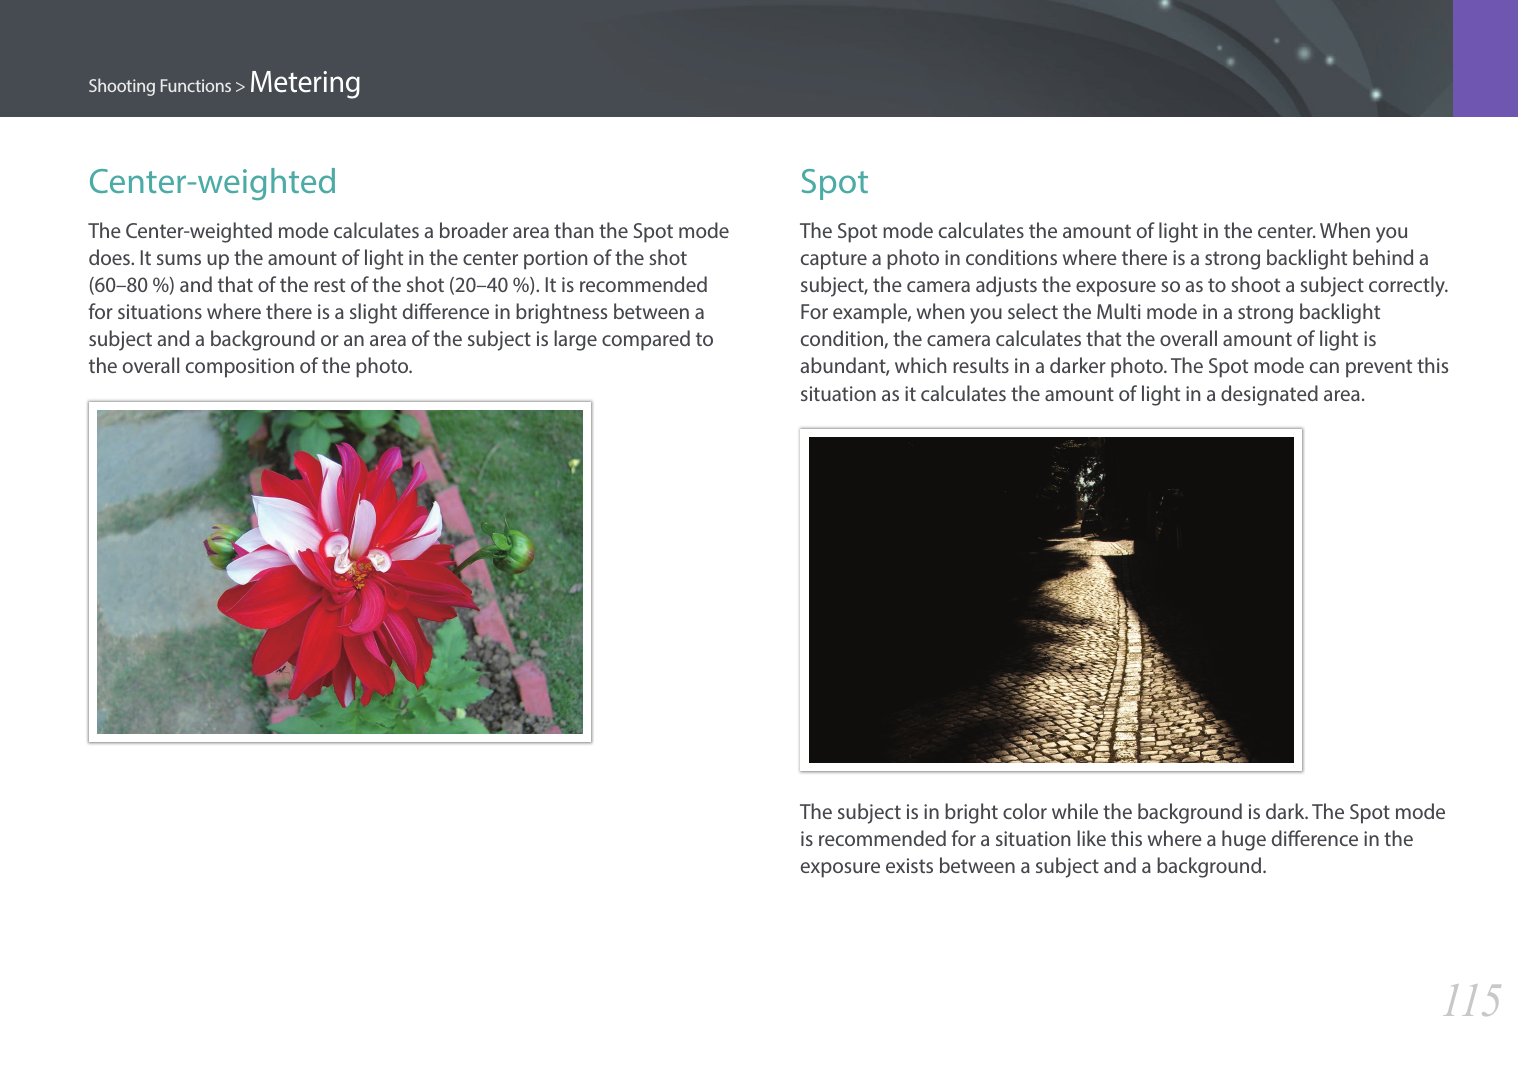
![114Shooting Functions > Metering114Shooting Functions > MeteringShooting FunctionsThe metering mode refers to the way in which a camera measures the quantity of light.The camera measures the amount of light in a scene, and in many of its modes, uses the measurement to adjust various settings. For example, if a subject looks darker than its actual color, the camera captures an overexposed photo of it. If a subject looks lighter than its actual color, the camera captures an underexposed photo of it.The brightness and overall mood of the photo can also be aected by how the camera measures the amount of light. Select an appropriate setting for a shooting condition.To set a metering option, In Shooting mode, press [N] → an option.MultiThe Multi mode calculates the amount of light in multiple areas. When light is sucient or insucient, the camera adjusts the exposure by averaging the overall brightness of the scene. This mode is suitable for general photos.Metering](https://usermanual.wiki/Samsung-Electronics-Co/NX1.User-manual-3-of-3/User-Guide-2394048-Page-4.png)
![116Shooting Functions > MeteringMeasuring the exposure value of the focus area When this function is turned on, the camera automatically sets an optimal exposure by calculating the brightness of the focus area. This function is only available when you select Spot metering or Multi metering, and Selection AF.To set this function, In Shooting mode, press [m] → b → Link AE to AF Point → an option.](https://usermanual.wiki/Samsung-Electronics-Co/NX1.User-manual-3-of-3/User-Guide-2394048-Page-6.png)
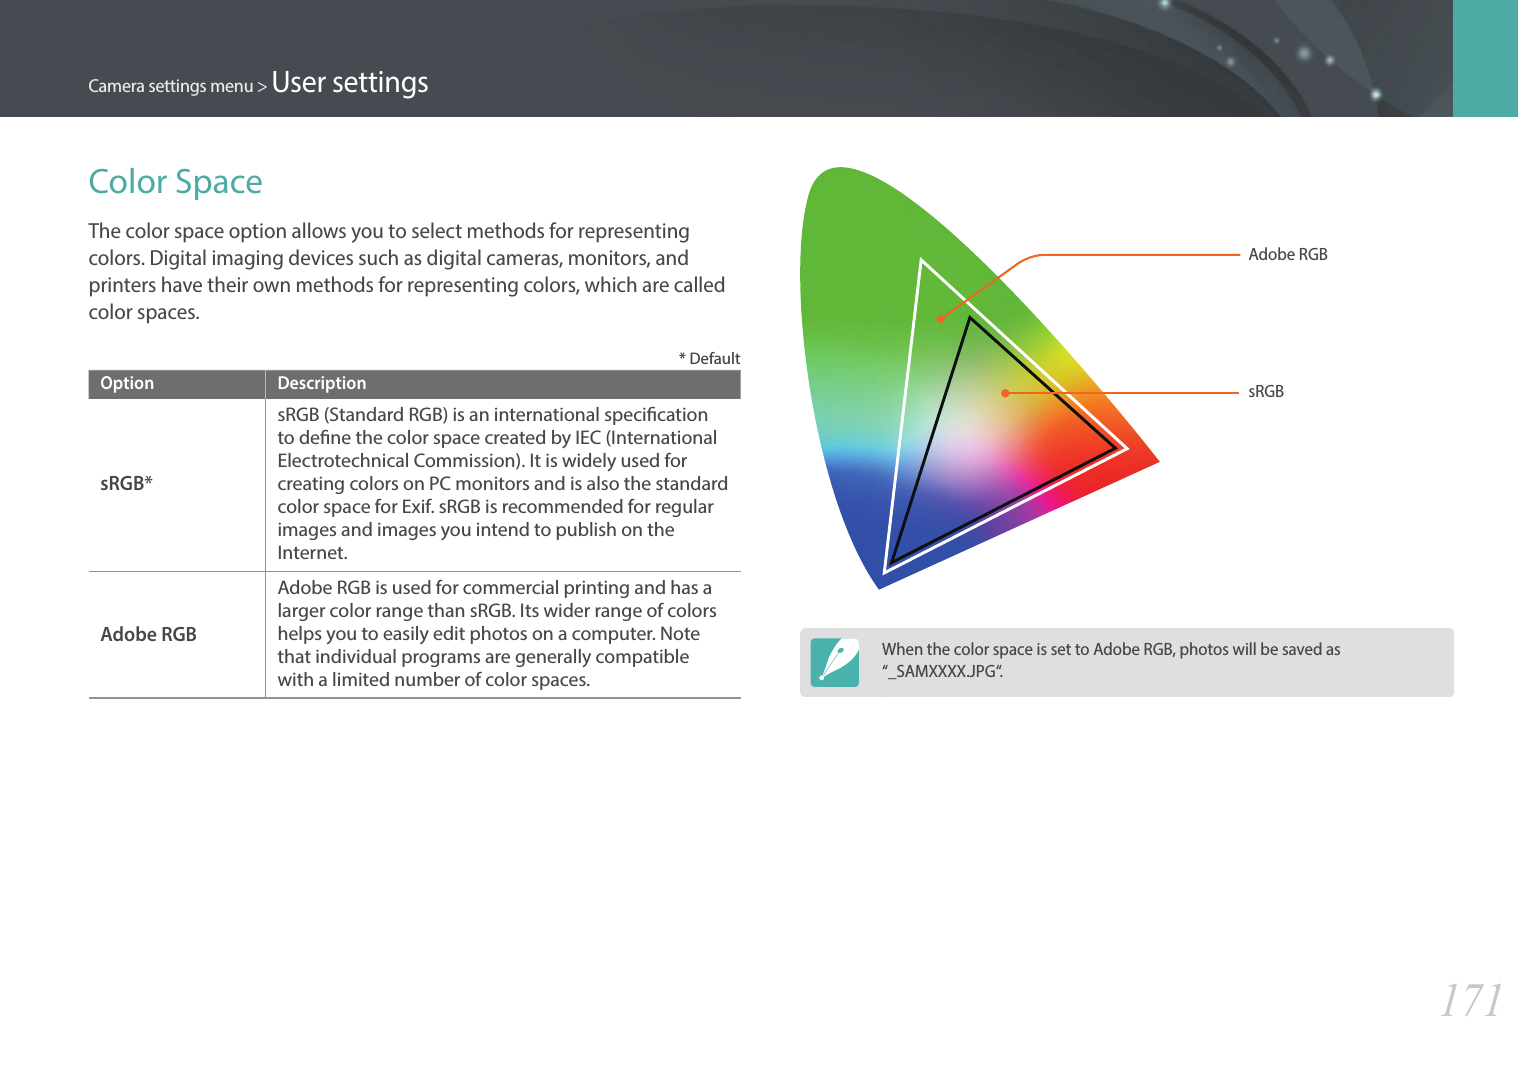
![117Shooting Functions > Dynamic Range117Shooting Functions > Dynamic RangeShooting FunctionsThis function automatically corrects the loss of bright detail that can occur due to shading dierences in the photo.To set Dynamic Range options, In Shooting mode, press [m] → b → Dynamic Range → an option.Without Dynamic Range eect With Dynamic Range eect* DefaultIcon DescriptionO*: Do not use Dynamic Range.Smart Range+: Correct the loss of bright detail.You cannot set ISO 100. HDR: Capture several photos with dierent exposures, and then combine them to automatically create a single image.•To set the exposure adjustment value press [e](right), and then select Low, Medium, or High.•You cannot set an ISO option higher than ISO 3200.•Dynamic Range options cannot be set with Picture Wizard options at the same time.Dynamic Range](https://usermanual.wiki/Samsung-Electronics-Co/NX1.User-manual-3-of-3/User-Guide-2394048-Page-7.png)
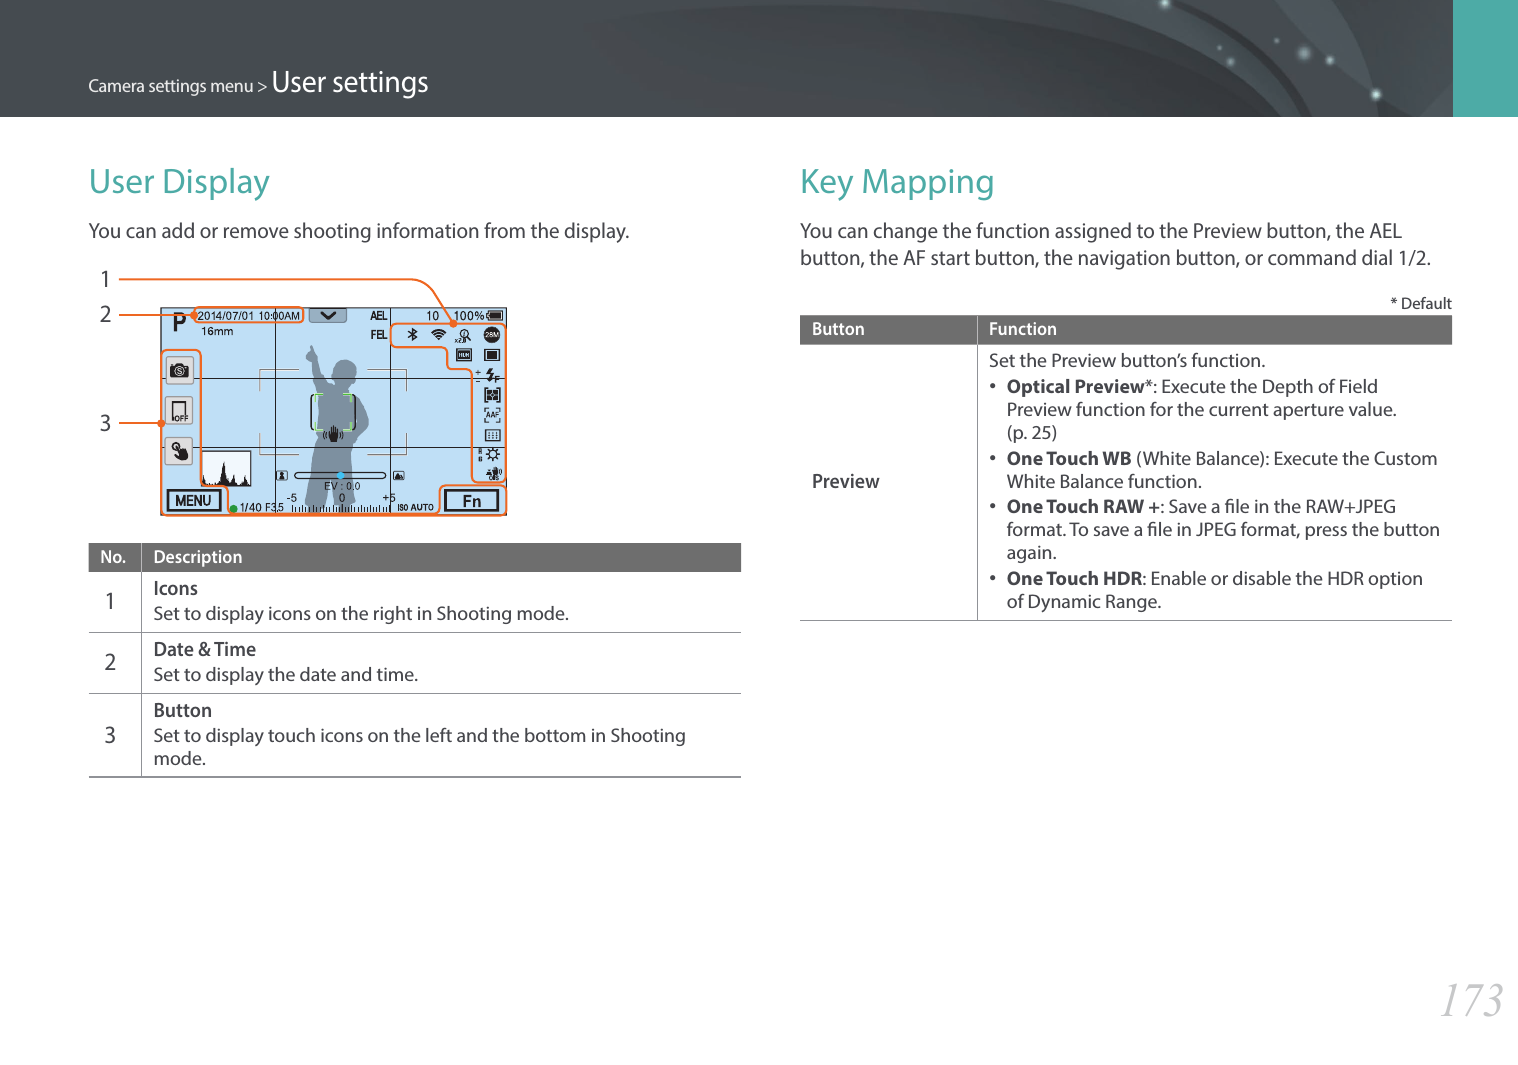
![118Shooting Functions > Exposure compensation118Shooting Functions > Exposure compensationShooting FunctionsThe camera automatically sets the exposure by measuring the levels of light from the photo’s composition and the position of a subject. If the exposure set by the camera is higher or lower than you expected, you can adjust the exposure value manually. The exposure value is adjustable in ±5 increments. The camera displays the exposure warning in red for each step beyond ±5 range.To adjust the exposure value, while holding down [B], scroll command dial 1 or 2. You can also adjust the exposure value by pressing [f], and then selecting EV.Exposure level indicatorStandard exposure indexIncreased exposure (brighter)Decreased exposure (darker) Exposure warningExposure adjustment value-2Original+2Exposure compensation](https://usermanual.wiki/Samsung-Electronics-Co/NX1.User-manual-3-of-3/User-Guide-2394048-Page-8.png)
![119Shooting Functions > Exposure compensationUsing Framing ModeWhen you adjust the aperture value or shutter speed, the exposure changes according to the settings, so the display may darken. With this function on, the brightness of the display is constant regardless of the settings, so you can better frame your shot.To use Framing Mode,In Shooting mode, press [m] → b → Framing Mode → an option.Viewing the overexposure guideView overexposed areas on a photo in Shooting mode before capturing a photo. Setting this feature will allow the overexposed areas of a photo to blink.To view the overexposure guide,In Shooting mode, press [m] → b → Overexposure Guide → an option.Using the brightness adjustment guideAdjust the brightness using the selected area as a reference.To adjust the brightness,In Shooting mode, press [m] → b → Brightness Adjust Guide → On → select the reference area → adjust the brightness.•This feature is available only in Program, Aperture priority, or Shutter priority mode.•This feature cannot be set with the overexposure guide at the same time.•This feature cannot be set with the Dynamic Range HDR option at the same time.•This feature cannot be set with ash options at the same time.](https://usermanual.wiki/Samsung-Electronics-Co/NX1.User-manual-3-of-3/User-Guide-2394048-Page-9.png)
![120Shooting Functions > Exposure/Focus lock120Shooting Functions > Exposure/Focus lockShooting FunctionsWhen you cannot achieve an appropriate exposure because of a strong brightness contrast or you want to capture a photo on which the subject is out of the auto focus area, lock the focus or exposure and then capture a photo.For example, to take a photo with the focus locked, set the focus frame to where you want to and press the [Shutter] halfway to focus. Then, press [a] to lock the focus.After locking the focus and changing to a desired composition, measure the exposure by pressing [Shutter] halfway, and then press [Shutter] to take a photo.To take a photo with the exposure locked, set the focus frame to where you want to and press the [Shutter] halfway to measure the exposure. After locking the exposure by pressing [a] and changing to a desired composition, press the [Shutter] halfway to focus.You can change the function assigned to the button to focus lock, exposure lock, or both of them. (p. 174)Exposure/Focus lock](https://usermanual.wiki/Samsung-Electronics-Co/NX1.User-manual-3-of-3/User-Guide-2394048-Page-10.png)
![121Shooting Functions > Exposure/Focus separation121Shooting Functions > Exposure/Focus separationShooting FunctionsSeparate the exposure area and the focus area or merge them again. This feature is available only when Touch AF is set to Touch AF.1 On the screen, touch an area to focus on it.•The exposure separation icon will appear on the focus frame.2 Drag to the exposure area.•The focus area and the exposure area will be separated.•Touch and hold each area to lock the focus or exposure setting.•Drag the areas together to merge the focus area and the exposure area.ExposureFocus3 Press [Shutter] to capture the photo.•The focus area and the exposure area will return to their pre-shooting position.If you press [a] while its function is set to AEL Hold, the exposure/focus will not be separated.Exposure/Focus separation](https://usermanual.wiki/Samsung-Electronics-Co/NX1.User-manual-3-of-3/User-Guide-2394048-Page-11.png)
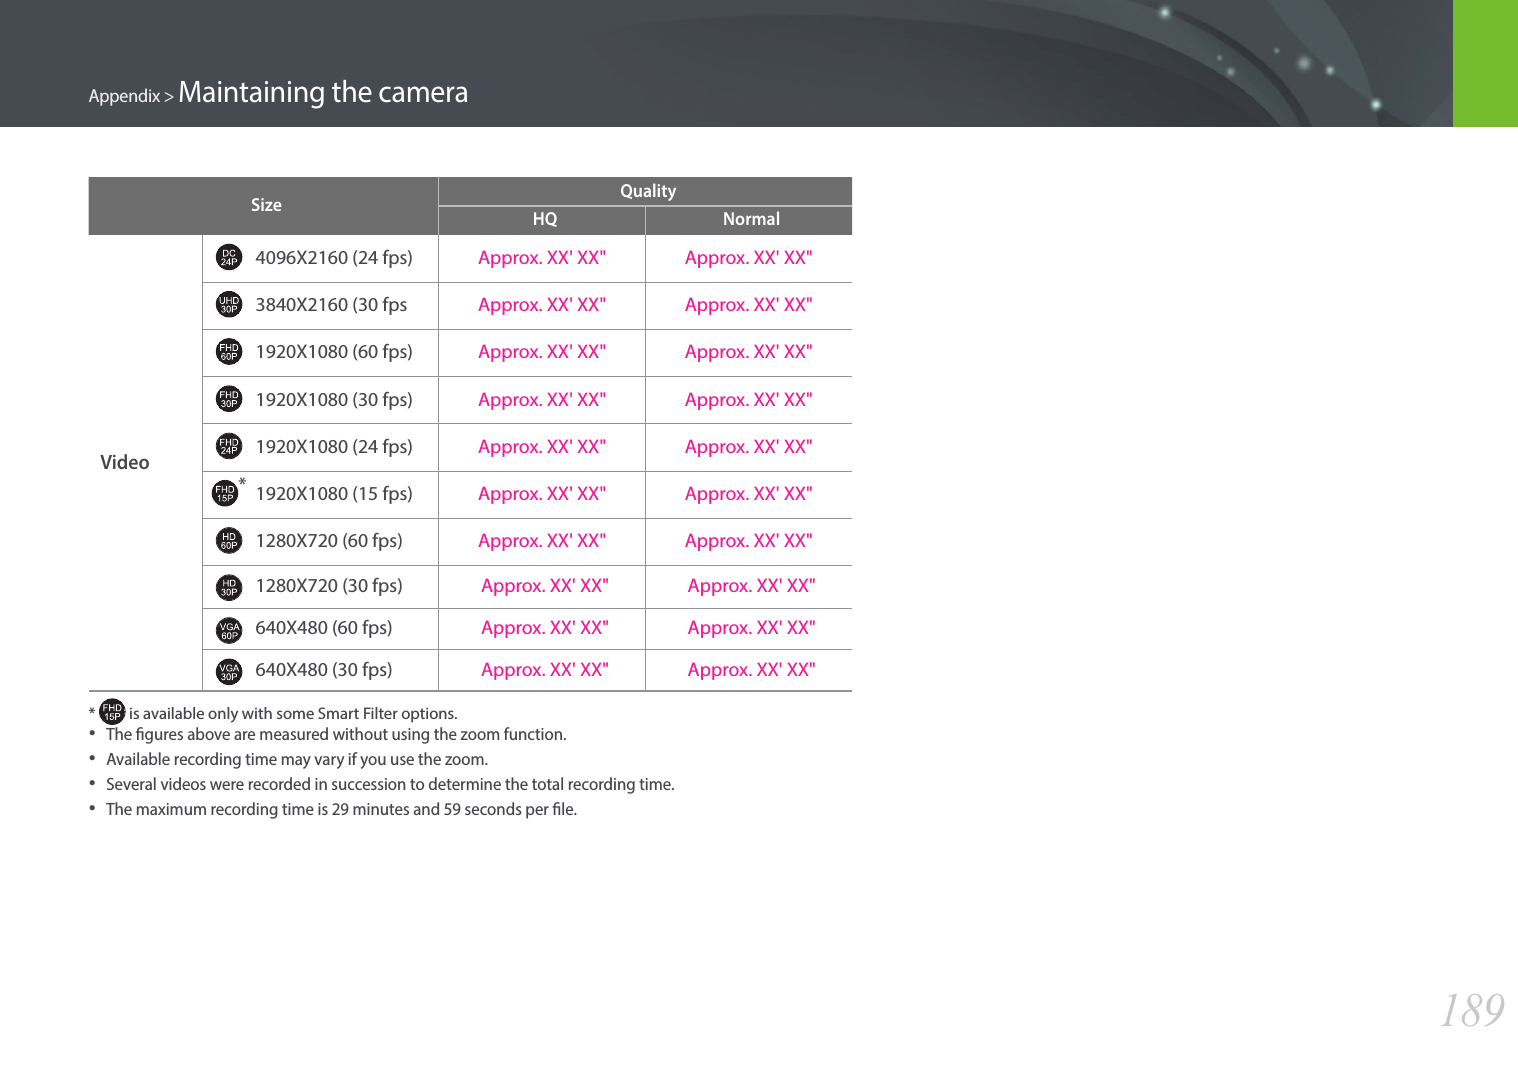
![122Shooting Functions > Video functions122Shooting Functions > Video functionsShooting FunctionsThe functions available for video are explained below.Movie sizeSet the movie size.To set movie size options, In Shooting mode, press [m] → g → Movie Size → an option.* DefaultIcon Size Recommended for4096X2160 (24 fps) (1.9:1) View on a 4K UHDTV.3840X2160 (30 fps) (16:9 ) View on a 4K UHDTV.*1920X1080 (60 fps) (16:9)View on a Full HDTV. (Videos recorded with this option may not play on some HDTVs or smart phones that do not support 60 fps.)1920X1080 (30 fps) (16:9) View on a Full HDTV. 1920X1080 (24 fps) (16:9) View on a Full HDTV. 1920X1080 (15 fps) (16:9) View on a Full HDTV. (Available only with some Smart Filter options.)1280X720 (60 fps) (16:9) View on an HDTV.1280X720 (30 fps) (16:9) View on an HDTV.640X480 (60 fps) (4:3) View on a TV.640X480 (30 fps) (4:3) View on a TV.Video functions](https://usermanual.wiki/Samsung-Electronics-Co/NX1.User-manual-3-of-3/User-Guide-2394048-Page-12.png)
![123Shooting Functions > Video functionsMovie qualitySet the Movie quality.To set movie quality options, In Shooting mode, press [m] → g → Movie Quality → an option.* DefaultIcon Extension DescriptionHEVC Normal: Record videos in normal quality.HEVC HQ*: Record videos in high quality.Multi MotionSet the playing speed of a video.To set playing speed options,In Shooting mode, press [m] →g →Multi Motion → an option.* DefaultIcon Descriptionx0.25: Record a video to view it at 1/4 normal speed during playback. Available only with 1920X1080 (30 fps), 1280X720 (30 fps), 640X480 (30 fps).x0.5: Record a video to view it at 1/2 normal speed during playback. Available only with 1920X1080 (60 fps), 1920X1080 (30 fps), 1280X720 (60 fps), 1280X720 (30 fps), 640X480 (60 fps), 640X480 (30 fps).x1*: Record a video to view it at normal speed during playback.x5: Record a video to view it at 5X normal speed during playback.x10: Record a video to view it at 10X normal speed during playback.x20: Record a video to view it at 20X normal speed during playback.•If you select an option other than x1, the sound recording function and the Distortion Correct function will not be supported.•The available options may dier depending on shooting conditions.](https://usermanual.wiki/Samsung-Electronics-Co/NX1.User-manual-3-of-3/User-Guide-2394048-Page-13.png)
![124Shooting Functions > Video functionsFaderYou can fade in or fade out a scene using the fader function on the camera without having to do it on a PC. Set the fade in option to gradually fade in at the start of the scene. Set the fade out option to gradually fade out the scene. Use the function appropriately and add dramatic eects on your videos.To set fader options, In Shooting mode, press [m] → g →Fader → an option.* DefaultIcon DescriptionO*: Fader function not used.In: Scene gradually fades in.Out: Scene gradually fades out.In-Out: The fader function is applied at the start and end of the scene.When you use the fader function, it may take longer to save a le.DIS (Anti-Shake)Set the Digital Image Stabilization function.To set the DIS function,In Shooting mode, press [m] →g →DIS (Anti-Shake) →an option.* DefaultOption DescriptionO*Do not use the DIS function.OnUse the DIS function.•If you record a video with the DIS function, the video will be recorded at a narrower angle than the lens’ angle.•The DIS function is not supported when you attach a sh-eye lens.](https://usermanual.wiki/Samsung-Electronics-Co/NX1.User-manual-3-of-3/User-Guide-2394048-Page-14.png)
![125Shooting Functions > Video functionsVoiceSometimes, a muted video is more appealing than the one with sound. Turn the voice o to record a muted video.To set voice options, In Shooting mode, press [m] → g → Voice → an option.Wind CutWhen you record videos in noisy environments, unintended sounds can be recorded in videos. In particular, severe wind noise recorded in videos distracts you from enjoying your videos. Use the Wind Cut function to remove some surrounding noise in addition to wind noise.To reduce wind sound, In Shooting mode, press [m] → g → Wind Cut → an option.Mic LevelSet the mic level for the shooting conditions.To set the mic level, In Shooting mode, press [m] → g → Mic Level → rotate the navigation button or press [e/e] to adjust the mic level → touch Set.Smart RangeCorrect the loss of bright detail.To set Smart Range options, In Shooting mode, press [m] → g → Smart Range → an option.](https://usermanual.wiki/Samsung-Electronics-Co/NX1.User-manual-3-of-3/User-Guide-2394048-Page-15.png)

![127Playback/EditingLearn how to view photo and video thumbnails and how to protect or delete les.If you perform no operations for a while, information and icons on the screen disappear. When you press a button or touch the screen, they will reappear.Viewing photos1 Press [y].•The most recent le you captured will be displayed.2 Scroll the command dial 2 or rotate the navigation button or press [e/e] to scroll through les.•You can also drag the image left or right to move to another le.You may not be able to edit or play back les that were captured with other cameras, due to unsupported sizes or codecs. Use a computer or another device to edit or play back these les.Viewing image thumbnailsIn order to search for photos and videos you want, convert to the thumbnail view. The thumbnail view displays multiple images at a time so that you can easily look through items you wish to nd. You can also classify and display les by category, such as date or le type.AllScroll the command dial 1 to the left to select the thumbnail view mode.(Scroll the command dial 1 to the right to return to the previous mode.)Searching and managing files](https://usermanual.wiki/Samsung-Electronics-Co/NX1.User-manual-3-of-3/User-Guide-2394048-Page-17.png)
![128Playback/Editing > Searching and managing lesViewing les by category1 In the thumbnail view, press [m] → z → Filter →a category.•You can also touch the current category name to open the option list.* DefaultOption DescriptionAll*View les normally.DateView les by the date they were saved.TypeView les by the le type.2 Select a list to open it.3 Select a le to view it.4 Touch to return to the previous view.](https://usermanual.wiki/Samsung-Electronics-Co/NX1.User-manual-3-of-3/User-Guide-2394048-Page-18.png)
![129Playback/Editing > Searching and managing lesViewing les as a folderContinuous shots appear as a folder. Selecting a folder will play back all photos automatically. Deleting a folder will delete all photos in the folder.1 In Playback mode, scroll the command dial 2 or rotate the navigation button or press [e/e] to move to a desired folder.•You can also drag the image left or right to move to a desired folder.•The camera will automatically play back photos in the folder.2 Scroll the command dial 1 to the right to open the folder.•You can also touch the folder on the screen or press [o] to open the folder.3 Scroll the command dial 2 or rotate the navigation button or press [e/e] to move to another le.•You can also drag the image left or right to move to another le.4 Scroll the command dial 1 to the left or press [o] to return to Playback mode.•You can also touch to return to Playback mode.](https://usermanual.wiki/Samsung-Electronics-Co/NX1.User-manual-3-of-3/User-Guide-2394048-Page-19.png)
![130Playback/Editing > Searching and managing lesProtecting lesProtect your les from accidental deletion.1 In Playback mode, press [m] → z → Protect → Multiple Protect.2 Scroll the command dial 2 or rotate the navigation button or press [e/e] to move to a le, and then select the le by pressing [o].3 Press .•You cannot delete or rotate a protected le.•You can directly protect a le in Playback mode by selecting a le, and then pressing [ ]. To unprotect the le, press [ ] again.•For photos that are saved as a folder, press [ ] while the folder is selected to protect all les.Lock/Unlock all lesLock or unlock all les.1 In Playback mode, press [m] → z → Protect → Protect All.2 Select an option.Option DescriptionCancelReturn to the previous menu.UnlockUnlock all les.LockLock all les.](https://usermanual.wiki/Samsung-Electronics-Co/NX1.User-manual-3-of-3/User-Guide-2394048-Page-20.png)
![131Playback/Editing > Searching and managing lesDeleting lesDelete les in Playback mode and secure more space on your memory card. Protected les are not deleted.Deleting a single leYou can select a single le and delete it.1 In Playback mode, select a le, and then press [n].2 When the pop-up message appears, select Ye s.Deleting multiple lesYou can select multiple les and delete them.1 In Playback mode, press [m] → z → Delete → Multiple Delete.•In thumbnails view, press [m] → z → Select Item.•Alternatively, in thumbnails view, press [n], and then select les to delete.2 Scroll the command dial 2 or rotate the navigation button or press [e/e] to move to a le, and then select the le by pressing [o].•Press [o] again to cancel your selection.3 Press [n].4 When the pop-up message appears, select Ye s.Deleting all lesYou can delete all les on the memory card at once.1 In Playback mode, press [m].2 Select z → Delete → Delete All.3 When the pop-up message appears, select Ye s.](https://usermanual.wiki/Samsung-Electronics-Co/NX1.User-manual-3-of-3/User-Guide-2394048-Page-21.png)
![132Playback/EditingEnlarging a photoYou can enlarge photos when viewing them in Playback mode. You can also use the Trim function to extract the portion of the image displayed on the screen and save it as a new le.Magnied areaMagnication (The maximum magnication may dier by resolution.) Full Image CropScroll the command dial 1 to the right to enlarge a photo. (Scroll the command dial 1 to the left to reduce a photo.)To Do thisMove magnied areaPress [D/h/e/e].Crop the enlarged imagePress [f]. (saved as a new le)Return to the original imagePress [o].•You can also pinch your ngers together or spread them apart on the screen to reduce or enlarge a photo. You can also double-tap an area to enlarge it quickly.•You can scroll through les by rotating the navigation button, even when a photo is enlarged.Viewing photos](https://usermanual.wiki/Samsung-Electronics-Co/NX1.User-manual-3-of-3/User-Guide-2394048-Page-22.png)
![133Playback/Editing > Viewing photosViewing a slide showYou can view photos in a slide show and apply various eects.1 In Playback mode, press [m].2 Select z → Slide Show Options.3 Select a slide show eect option.•Skip to step 4 to start a slide show with no eects.* DefaultOption DescriptionPlay ModeSet whether or not to repeat the slide show. (One Play*, Repeat)IntervalSet the interval between photos. (1 sec*, 3 sec, 5 sec, 10 sec)Eect• Set a scene change eect between photos.• Select O to cancel eects.4 Press [m].5 Select Start Slide Show.6 View the slide show.•Press [o] to pause.•Press [o] again to resume.•Press [m] to stop the slide show and return to Playback mode.](https://usermanual.wiki/Samsung-Electronics-Co/NX1.User-manual-3-of-3/User-Guide-2394048-Page-23.png)
![134Playback/Editing > Viewing photosViewing the overexposure guideSet the overexposed areas of a photo to blink.To view the overexposure guide, In Playback mode, press [m] → z → Overexposure Guide → an option.Viewing interval shotsView photos that are captured with the Interval Capture function.To view interval shots, In Playback mode, press [m] → z → Play Interval Shots.Auto rotatingWith Auto Rotate on, the camera automatically rotates photos you have captured vertically so they t the screen horizontally.To set auto rotate options, In Playback mode, press [m] → z → Auto Rotate → an option.Converting to JPEGConvert RAW les to JPG les.To convert les, In Playback mode, press [m] → z → Convert to JPG.](https://usermanual.wiki/Samsung-Electronics-Co/NX1.User-manual-3-of-3/User-Guide-2394048-Page-24.png)
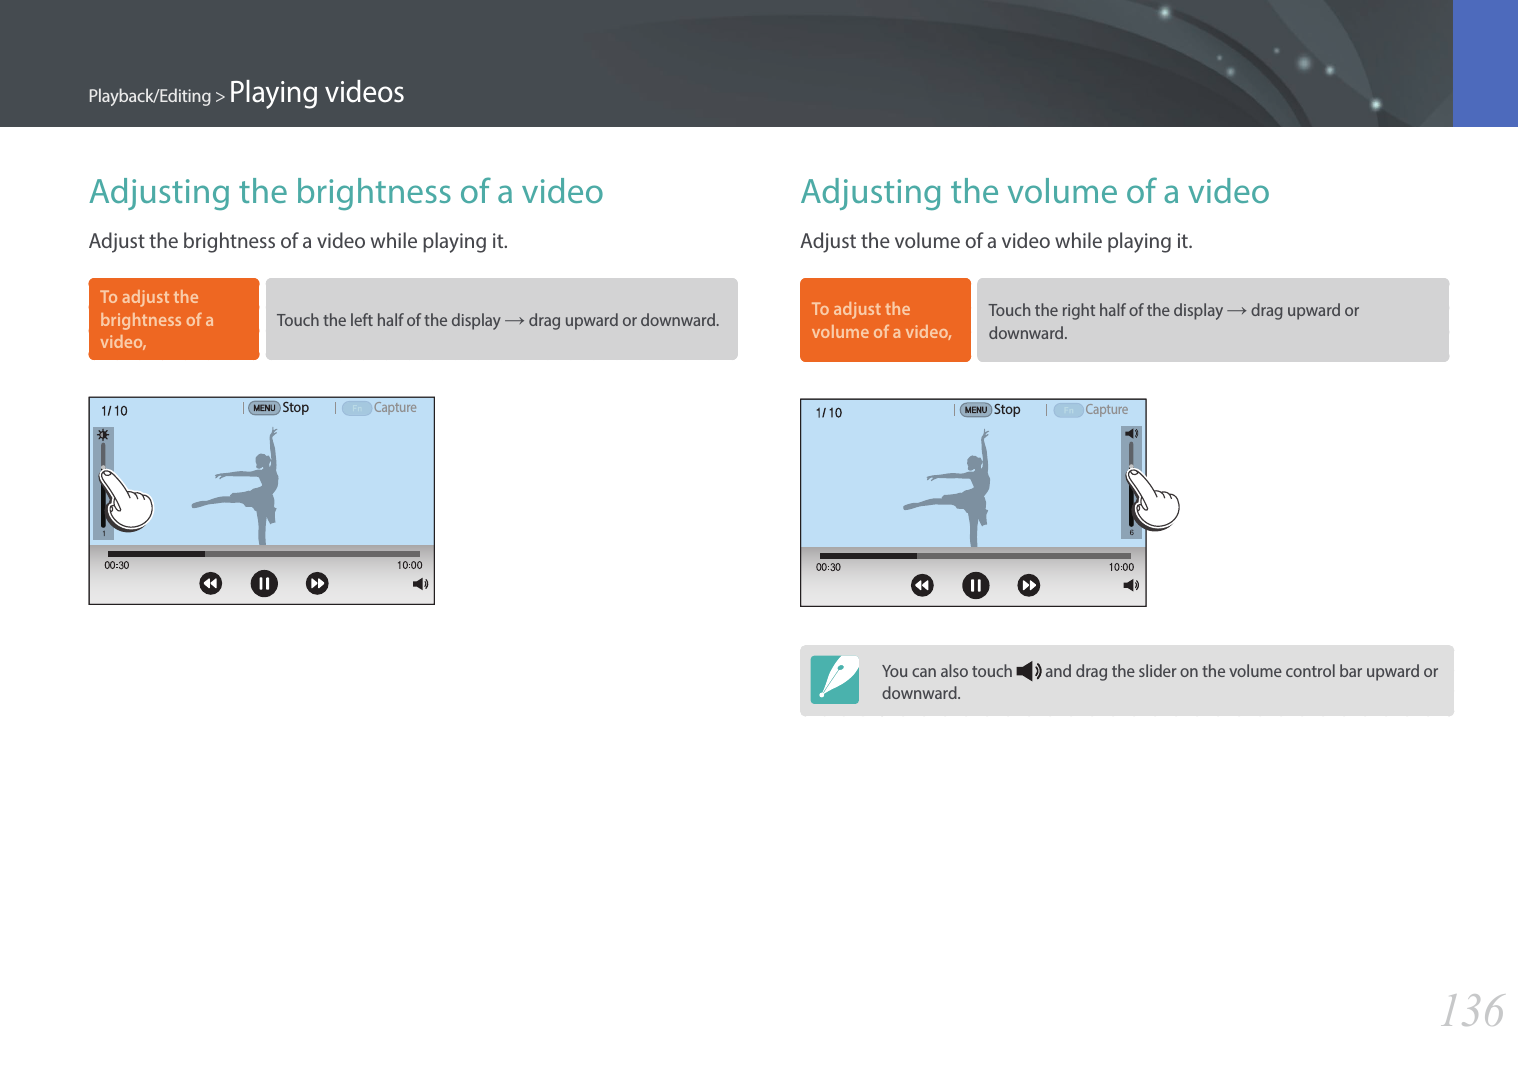
![135Playback/EditingIn Playback mode, you can play a video, capture an image from a video, or crop a video to save as another le.StopCaptureIcon Description View previous le/Scan backward. (Each time you touch the icon while playing the video, you change the scan speed in this order: 2X, 4X, 8X.) Pause or resume playback. View next le/Scan forward. (Each time you touch the icon while playing the video, you change the scan speed in this order: 2X, 4X, 8X.)Adjust the volume or mute the sound. Scanning backward or forwardTo scan backwards or forwards through a video le while it is playing, use one of the following methods.•Touch . Each time you touch the icon, you change the scan speed in this order: 2X, 4X, 8X.•Press [e/e]. Each time you press the button, you change the scan speed in this order: 2X, 4X, 8X.•Scroll the command dial 1 to the left or right. Each time you scroll the command dial 1, you change the scan speed in this order: 2X, 4X, 8X.•Drag the handles that appear on the progress bar to the left or right. You can change the playback position in the video.Playing videos](https://usermanual.wiki/Samsung-Electronics-Co/NX1.User-manual-3-of-3/User-Guide-2394048-Page-25.png)
![137Playback/Editing > Playing videos10 When the pop-up message appears, select Ye s.•You cannot trim a video recorded in 3D mode.•The original video should be at least 10 seconds long.•The camera will save the edited video as a new le and leave the original video intact.Capturing an image during playback1 While viewing a video, press [o] or touch at the point where you want to capture an image.2 Press [f] or touch Capture.•You cannot capture an image from a video recorded in 3D mode.•The resolution of the captured image will be the same as the original video.•The captured image is saved as a new le.Trimming a video during playback1 In Playback mode, scroll to a video, and then press [m].2 Select Trim Movie.3 Press [o] or touch to start playing the video.4 Press [o] or touch at the point where you want the trimming to begin.5 Press [f] or touch Start Point.6 Press [o] or touch to resume playing the video.7 Press [o] or touch at the point where you want the trimming to end.8 Press [f] or touch End Point.9 Press [f] or touch Trim to trim a video.•You can adjust the scene to be cropped by dragging the handles that appear on the progress bar.](https://usermanual.wiki/Samsung-Electronics-Co/NX1.User-manual-3-of-3/User-Guide-2394048-Page-27.png)
![138Playback/EditingPerform photo editing tasks, such as resizing or rotating. Edited photos are saved as new les under dierent le names. Photos captured in some modes cannot be edited with the Image Edit function.To edit images, In Playback mode, scroll to a photo, and then press [f] →an option.•You can also edit images in Playback mode by selecting a photo, and then pressing [m] → z → Edit Image.•Some images may not be edited with the Edit Image function. In this case, use the supplied image editing software.•The camera will save edited photos as new les.•When you edit photos, the camera will automatically convert them to a lower resolution. Photos that you rotate or resize manually are not automatically converted to a lower resolution.•You cannot edit photos while viewing les as a folder. Open the folder and select a photo to edit each photo.Cropping a photo1 Touch → .2 Drag the sides of the box to adjust the size of the area.3 Drag the box to move the location of the area.4 Press [o] or touch Done.5 Touch to save.Editing photos](https://usermanual.wiki/Samsung-Electronics-Co/NX1.User-manual-3-of-3/User-Guide-2394048-Page-28.png)
![139Playback/Editing > Editing photosRotating a photo1 Touch → .2 Touch an option.Rotate : Right 90˚Cancel Done3 Press [o] or touch Done.4 Touch to save.•You can also rotate a photo in Playback mode by pressing [m], and then selecting z → Rotate → a desired option.•The camera will overwrite the original le.Resizing photosChange the size of a photo and save it as a new le.1 Touch → .2 Touch an option.Resize : 13.9M 3:2Cancel Done3 Press [o] or touch Done.4 Touch to save.Available resize options dier depending on the original size of the photo.](https://usermanual.wiki/Samsung-Electronics-Co/NX1.User-manual-3-of-3/User-Guide-2394048-Page-29.png)
![140Playback/Editing > Editing photosAdjusting your photosYou can correct captured photos by adjusting the brightness, contrast, or color.1 Touch .2 Touch an adjusting option.•If you selected (Auto adjustment), skip to step 4.Icon DescriptionOriginal (Reset to the original image.)Auto adjustmentBrightnessContrastSaturationRGB adjustmentColor TemperatureExposureHue3 Scroll the command dial 1 or rotate the navigation button or press [e/e] to adjust the option.•You can also drag the slider or touch +/- to adjust the option.4 Press [o] or touch Done.5 Touch to save.Retouching faces1 Touch → .2 Scroll the command dial 1 or rotate the navigation button or press [e/e] to adjust the option.•You can also drag the slider or touch +/- to adjust the option.•As the number increases, the skin tone becomes brighter and smoother.3 Press [o] or touch Done.•To cancel correction, touch .4 Touch to save.](https://usermanual.wiki/Samsung-Electronics-Co/NX1.User-manual-3-of-3/User-Guide-2394048-Page-30.png)
![141Playback/Editing > Editing photosApplying Smart Filter eectsApply special eects to your photos.1 Touch , and then touch an option.Smart Filter : VignettingCancel DoneOption DescriptionOriginalNo eectVignettingApply the retro-looking colors, high contrast, and strong vignette eect of Lomo cameras.Miniature (H)Apply a tilt-shift eect to make the subject appear in miniature. The top and bottom of the photo will be blurred.Option DescriptionMiniature (V)Apply a tilt-shift eect to make the subject appear in miniature. The left and right of the photo will be blurred.WatercolorApply a watercolor painting eect.RedDesaturate all colors but red.GreenDesaturate all colors but green.BlueDesaturate all colors but blue.YellowDesaturate all colors but yellow. 2 Press [o] or touch Done.3 Touch to save.](https://usermanual.wiki/Samsung-Electronics-Co/NX1.User-manual-3-of-3/User-Guide-2394048-Page-31.png)
![143Connecting & TransferringConnecting to a smart phoneUsing NFC features in Playback mode (Photo Beam)In Playback mode, the camera transfers the current les to the smart phone automatically by placing the two devices close to each other while they are connected via Bluetooth.•To transfer multiple les, select les from the thumbnail view, and then read a tag from an NFC-enabled device.Using the NFC FeaturePlace a smart phone’s NFC antenna near the camera’s NFC tag to connect the camera to the smart phone. You can also transfer les to an NFC-enabled device in Playback mode.•This feature is supported by NFC-enabled smart phones running Android OS. It is recommended that you use the latest version. This feature is not available for iOS devices.•You should install Samsung Camera Manager on your phone or device before using this feature. You can download the application from GALAXY Apps or the Google Play Store. Samsung Camera Manager is compatible with Samsung camera NX1 or later and is supported by Android OS 4.1 or higher.•To read an NFC tag, place the NFC-enabled device near the camera’s NFC tag for more than 2 seconds.•You can set the size for transferred photos by pressing [m], and then selecting d → MobileLink/NFC Image Size → an option.•Do not modify the NFC tag in any way.Using NFC features in Shooting modeLaunch MobileLink, Remote Viewnder or Quick Transfer by reading a tag from an NFC-enabled device to connect the camera and a smart phone, and then pressing [R]. (p. 144, 146, 148)](https://usermanual.wiki/Samsung-Electronics-Co/NX1.User-manual-3-of-3/User-Guide-2394048-Page-33.png)
![144Connecting & Transferring > Connecting to a smart phoneSending les to a smart phoneThe camera connects to a smart phone that supports the MobileLink feature via Bluetooth or Wi-Fi. You can easily send photos or videos to your smart phone.•The MobileLink feature is supported by smart phones or tablets running Android OS or iOS. (Some features may not be supported by some models.) Before using this feature, update the device’s rmware to the latest version. If the rmware version is not the most recent, this function may not perform properly.•You should install Samsung Camera Manager on your phone or device before using this feature. You can download the application from GALAXY Apps or the Google Play Store. Samsung Camera Manager is compatible with Samsung camera NX1 or later and is supported by Android OS 4.1 or higher.•When there are no les in the camera memory, you cannot use this feature.•You can view up to 1,000 recent les and send up to 1,000 les at a time.•When you send Full HD or UHD videos using the MobileLink feature, you may not be able to play back les on some devices that are not supported by HEVC codecs.•When using this feature on an iOS device, the device may lose its Wi-Fi connection.•You cannot send RAW les.•You can set the size for transferred photos by pressing [m], and then selecting d → MobileLink/NFC Image Size → an option.•You can only connect to Android OS devices that support the Bluetooth feature. You cannot connect to Bluetooth speakers, headsets, or other accessories.•The screen turns o if you perform no operations on the camera for 30 seconds.1 In Shooting mode, press [R].•You can also press and hold [R] to launch the MobileLink feature directly.2 Touch .•If the pop-up message that prompts you to download the application appears, select Next.•To require PIN verication when connecting the smart phone to the camera, select Security Settings. (p. 180)•If the pop-up message that prompts you to set the auto time setting appears, select Yes to sync the camera’s date and time to the smart phone’s. (p. 180)3 On the smart phone, turn on Samsung Camera Manager.•Ensure that Bluetooth and Wi-Fi are enabled on the camera and the smart phone before turning on the application.•To start the application automatically on an NFC-enabled smart phone, turn on the function and place the smart phone near the NFC tag (p. 34) on the camera. Verify that the smart phone is connected to your camera, and then skip to step 7.](https://usermanual.wiki/Samsung-Electronics-Co/NX1.User-manual-3-of-3/User-Guide-2394048-Page-34.png)
![146Connecting & Transferring > Connecting to a smart phoneUsing a smart phone as a remote shutter releaseThe camera connects to a smart phone that supports the Remote Viewnder feature via Bluetooth or Wi-Fi. Use the smart phone as a remote shutter release with the Remote Viewnder feature.•The Remote Viewnder feature is supported by smart phones or tablets running Android OS or iOS. (Some features may not be supported by some models.) Before using this feature, update the device’s rmware to the latest version. If the rmware version is not the most recent, this function may not perform properly.•You should install Samsung Camera Manager on your phone or device before using this feature. You can download the application from GALAXY Apps or the Google Play Store. Samsung Camera Manager is compatible with Samsung camera NX1 or later and is supported by Android OS 4.1 or higher.•This function is not available when you attach a 3D lens in 3D mode.•You can only connect to Android OS devices that support the Bluetooth feature. You cannot connect to Bluetooth speakers, headsets, or other accessories.1 In Shooting mode, press [R].•If the pop-up message that prompts you to select the device to connect appears, select the type of your smart phone.2 Touch .•If the pop-up message that prompts you to download the application appears, select Next.•To require PIN verication when connecting the smart phone to the camera, select Security Settings. (p. 180)•If the pop-up message that prompts you to set the auto time setting appears, select Yes to sync the camera’s date and time to the smart phone’s. (p. 180)3 On the smart phone, turn on Samsung Camera Manager.•Ensure that Bluetooth and Wi-Fi are enabled on the camera and the smart phone before turning on the application.•To start the application automatically on an NFC-enabled smart phone, turn on the function and place the smart phone near the NFC tag (p. 34) on the camera. Verify that the smart phone is connected to your camera, and then skip to step 6.](https://usermanual.wiki/Samsung-Electronics-Co/NX1.User-manual-3-of-3/User-Guide-2394048-Page-36.png)
![148Connecting & Transferring > Connecting to a smart phoneSaving les to a smart phone automaticallyThe camera connects to a smart phone that supports the Quick Transfer feature via Bluetooth. When you capture a photo with your camera, the photo is saved to a smart phone automatically.•The Quick Transfer feature is supported by smart phones or tablets running Android OS or iOS. (Some features may not be supported by some models.) Before using this feature, update the device’s rmware to the latest version. If the rmware version is not the most recent, this function may not perform properly.•You should install Samsung Camera Manager on your phone or device before using this feature. You can download the application from GALAXY Apps or the Google Play Store. Samsung Camera Manager is compatible with Samsung camera NX1 or later and is supported by Android OS 4.1 or higher.•If you set this function, the setting is maintained even when you change the Shooting mode.•This feature may not be supported in some modes or may not be available with some shooting options.•You can only connect to Android OS devices that support the Bluetooth feature. You cannot connect to Bluetooth speakers, headsets, or other accessories.1 In Shooting mode, touch .•You can also press [R], and then select .•If the pop-up message that prompts you to download the application appears, select Next.•To require PIN verication when connecting the smart phone to the camera, select Security Settings. (p. 180)•If the pop-up message that prompts you to set the auto time setting appears, select Yes to sync the camera’s date and time to the smart phone’s. (p. 180)2 On the smart phone, turn on Samsung Camera Manager.•Ensure that Bluetooth and Wi-Fi are enabled on the camera and the smart phone before turning on the application.•To start the application automatically on an NFC-enabled smart phone, turn on the function and place the smart phone near the NFC tag (p. 34) on the camera. Verify that the smart phone is connected to your camera, and then skip to step 5.3 Select the camera from the smart phone and connect.•The smart phone can connect to only one camera at a time.•If the Wi-Fi Privacy lock is enabled and Wi-Fi is connected, enter the PIN displayed on the camera to the smart phone.](https://usermanual.wiki/Samsung-Electronics-Co/NX1.User-manual-3-of-3/User-Guide-2394048-Page-38.png)
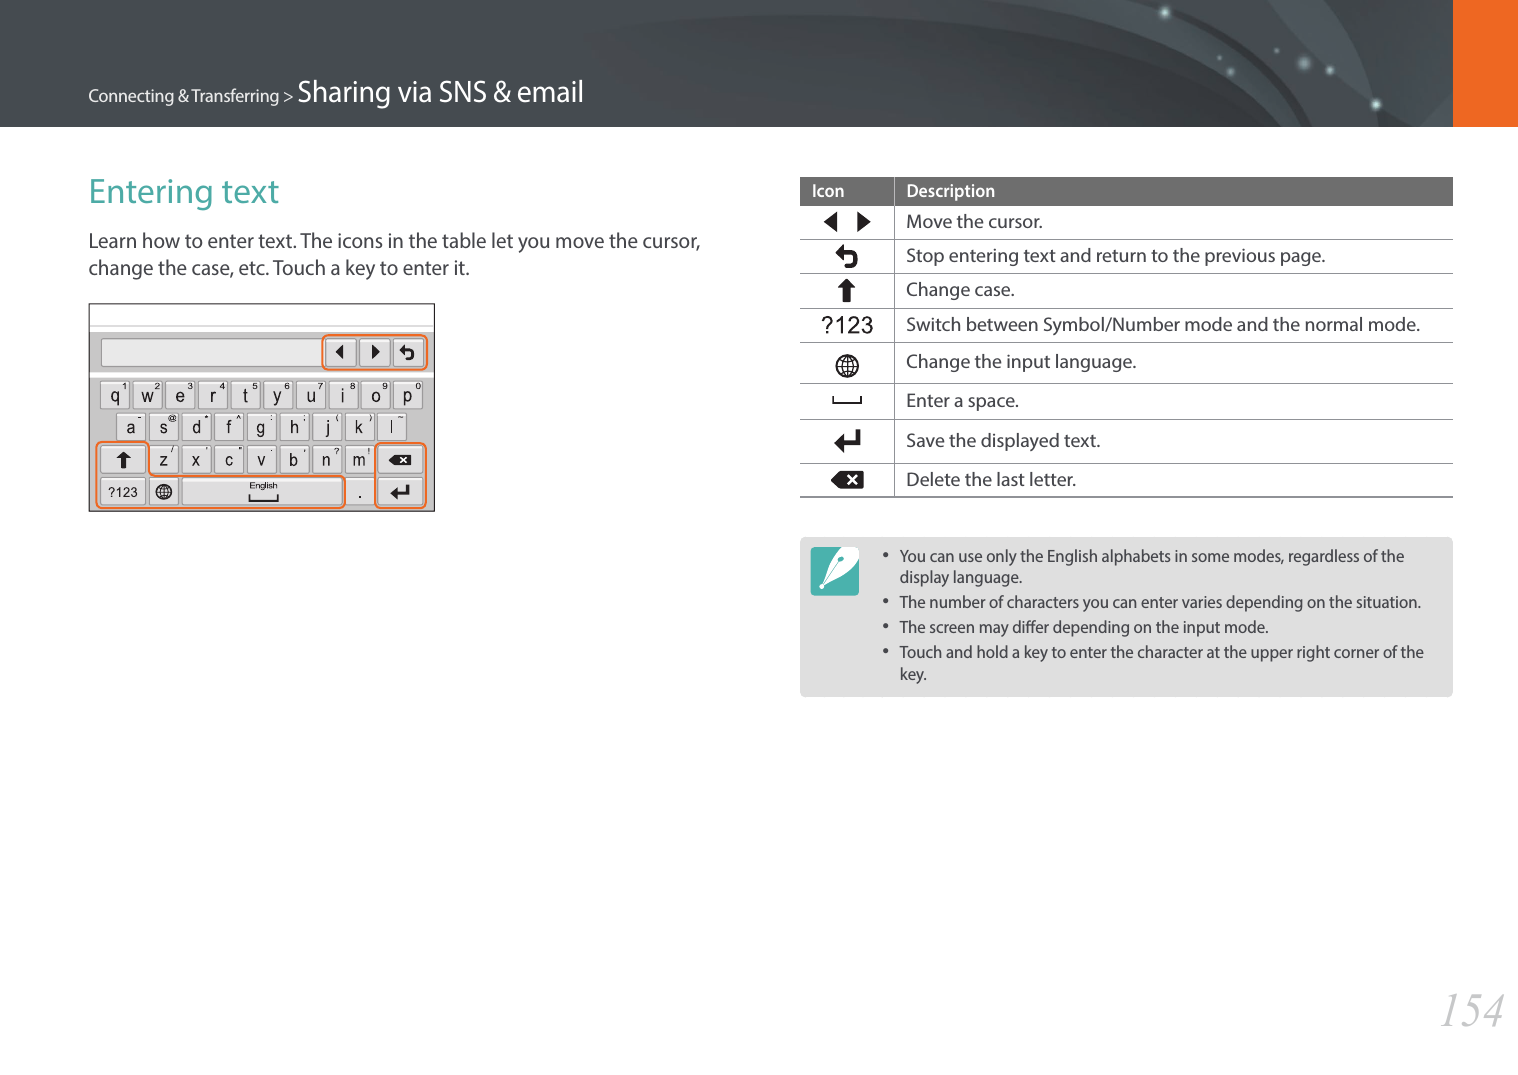
![150Connecting & TransferringSharing via SNS & emailUpload photos or videos to SNS or send them to other people via email.Connecting to a WLANLearn to connect via an access point (AP) when you are in a range of a WLAN. You can also congure network settings.1 In Shooting mode, touch .2 Select a service from the list.•The camera automatically searches for available AP devices.•Available services will be displayed on your camera.•If a pop-up message about data collection regulations appears, read and agree to it.3 Select an AP.Samsung1Samsung2Samsung3Samsung4Wi-Fi SettingRefreshBack•Select Refresh to refresh the list of connectable APs.•Select Add wireless network to add an AP manually. The AP name must be in English to add the AP manually.Icon DescriptionAd hoc APSecured APWPS APSignal strengthPress [F] or touch to open network setting options.•When you select a secured AP, a pop-up window appears. Enter the required passwords to connect to the WLAN. For information about entering text, refer to “Entering text“. (p. 154)](https://usermanual.wiki/Samsung-Electronics-Co/NX1.User-manual-3-of-3/User-Guide-2394048-Page-40.png)
![151Connecting & Transferring > Sharing via SNS & email•When a login page appears, refer to “Using the web browser“. (p. 152)•When you select an unsecured AP, the camera will connect to the WLAN.•If you select a WPS prole supported AP, select → WPS PIN connection, and then enter a PIN on the AP device. You can also connect to a WPS prole supported AP by selecting → WPS button connection on the camera, and then pushing the WPS button on the AP device.•The same AP may be listed twice, with dierent frequencies, because your camera supports the dual band function.Setting network options1 In the Wi-Fi Setting screen, move to an AP, and then press [e] or touch .2 Select each option, and then enter the required information.Option DescriptionNetwork PasswordEnter the network password.IP SettingSet the IP address automatically or manually.Manually setting the IP address1 In the Wi-Fi Setting screen, move to an AP, and then press [e] or touch .2 Select IP Setting → Manual.3 Select each option, and then enter the required information.Option DescriptionIPEnter the static IP address.Subnet MaskEnter the subnet mask.GatewayEnter the gateway.DNS ServerEnter the DNS address.](https://usermanual.wiki/Samsung-Electronics-Co/NX1.User-manual-3-of-3/User-Guide-2394048-Page-41.png)

![156Connecting & Transferring > Sharing via SNS & email•You cannot upload les if the le size exceeds the limit. The maximum resolution of photos you can upload is 2M. The maximum resolution of videos you can upload is XX. If the selected photo has a resolution higher than 2M, it will be automatically resized to a lower resolution. (On some SNS, the maximum photo resolution may vary.)•The method of uploading photos or videos may dier depending on the selected SNS.•If you cannot access a sharing service because of rewall or user authentication settings, contact your network administrator or network service provider.•Uploaded photos or videos may be automatically titled with the date they were captured.•The speed of your internet connection may aect how quickly photos upload or web pages open.•When there are no les in the camera memory, you cannot use this feature.•You cannot upload videos to some SNS.•When you upload photos to SNS, the photo may be resized to 2M or 1M depending on their policy.Sending photos via emailYou can send photos stored on the camera via email. For information about entering text, refer to “Entering text“. (p. 154)1 In Playback mode, touch .2 Select .•In thumbnails view, select → a le, and then press [f]. You can select up to 20 les. The total size must be 7 MB or less.3 Connect to a WLAN. (p. 150)4 Select the Sender box, enter your email address, and then touch .•If you have previously saved your information, it will be inserted automatically. (p. 158)•To use an address from the list of previous senders, select → an address.](https://usermanual.wiki/Samsung-Electronics-Co/NX1.User-manual-3-of-3/User-Guide-2394048-Page-46.png)

![158Connecting & Transferring > Sharing via SNS & emailStoring a sender’s informationIn the email menu, you can change settings for storing a sender’s information. For information about entering text, refer to “Entering text“. (p. 154)1 In Playback mode, touch .2 Select .•The camera will automatically attempt to connect to a WLAN via the most recently connected AP device.•If the camera has not previously been connected to a WLAN, it will search for available AP devices. (p. 150)3 Press [f].4 Select Sender Setting.5 Select the Name box, enter your name, and then touch .Sender Setting BackNameSaveEmailReset6 Select the Email box, enter your email address, and then touch .7 Select Save to save your changes.•To delete your information, select Reset.](https://usermanual.wiki/Samsung-Electronics-Co/NX1.User-manual-3-of-3/User-Guide-2394048-Page-48.png)
![159Connecting & TransferringViewing photos or videos on a TVUse the TV Link feature or USB cable to play back les from the camera on a TV.Connecting wirelessly1 In Playback mode, touch .•You can also select a le, and then select in thumbnails view.2 Select .•If the guide message appears, select OK.•The camera will automatically attempt to connect to a WLAN via the most recently connected AP device.•If the camera has not previously been connected to a WLAN, it will search for available AP devices. (p. 150)3 Connect the TV Link-enabled TV to a network, and then turn on the TV Link feature.•Refer to the TV’s user manual for more information.4 Select a TV to connect to from the list.•To refresh the list of the TV device, select Refresh.5 Browse the shared photos or videos.•Press [f] to connect to another TV.•Press [m] to switch to the thumbnails view.•For information about searching for the camera and browsing the photos or videos on the TV Link-enabled TV, refer to the TV’s user manual.•Videos may not play smoothly depending on the type of TV Link-enabled TV or the network condition. For smooth playback, use a 5 GHz dual-band AP device.AP The camera is connected to a TV that supports TV Link via WLAN.](https://usermanual.wiki/Samsung-Electronics-Co/NX1.User-manual-3-of-3/User-Guide-2394048-Page-49.png)
![161Connecting & Transferring > Viewing photos or videos on a TVConnecting via cablePlay back photos or videos by connecting your camera to an HDTV (3D TV) using an optional HDMI cable.Viewing les on an HDTV1 In Shooting or Playback mode, press [m] → q → HDMI Output → an option. (p. 179)2 Turn o your camera and HDTV.3 Connect your camera to your HDTV with the optional HDMI cable.4 Turn on your HDTV, and then select the HDMI video source.5 Turn on the camera.6 View photos or play videos using the camera buttons.•When using the HDMI cable, you can connect the camera to an HDTV using the Anynet+(CEC) method.•The Anynet+(CEC) functions allow you to control connected devices using the TV remote control.•If the HDTV supports Anynet+(CEC), the TV turns on automatically when used in conjunction with the camera. This feature may not be available on some HDTVs.•You can capture a photo or video when the camera is connected to an HDTV, but some functions are limited. Shooting functions are supported only when HDMI Output is set to 1080p or Auto on the camera and the TV’s HDMI output option is set to 1080p.•When connected to an HDTV, some of the camera’s playback functions may not be available.•The length of time after which the camera and an HDTV are connected may vary depending on the memory card that you are using. As the main feature of a memory card is to increase the transfer speed, it is not necessarily true to say that a memory card with a faster transfer speed is also fast in using the HDMI function.•1920X1080 (60 fps) videos can be played only on Full HDTVs capable of playback at 60 fps.•To view 3D photos on a TV that does not support the 3D function, press the ▼ button and switch to Anaglyph mode.•You can also play back or capture photos or videos when connected to an HDMI-enabled monitor. Connections may vary depending on the monitor. Refer to the monitor’s manual for more details.](https://usermanual.wiki/Samsung-Electronics-Co/NX1.User-manual-3-of-3/User-Guide-2394048-Page-51.png)
![162Connecting & Transferring > Viewing photos or videos on a TVViewing les on a 3D TVYou can view photos or videos captured in 3D mode on a 3D TV.1 In Shooting or Playback mode, press [m] → q → HDMI Output → an option. (p. 179)2 Turn o your camera and 3D TV.3 Connect your camera to your 3D TV with the optional HDMI cable.4 Turn on your 3D TV, and then select the HDMI video source.5 Turn on your camera.6 Move to a 3D le, and then press [h] to switch to 3D mode.•Press [h] again to switch to 2D Mode.7 Turn on your TV’s 3D function.•Refer to your TV’s user manual for more details.8 View 3D photos or play 3D videos using the camera buttons.•You cannot view an MPO le in 3D eect on TVs that do not support the le format.•Use proper 3D glasses when you view an MPO le or a 3D video le on a 3D TV.Do not view the 3D photos or videos captured by your camera on a 3D TV or 3D monitor for an extended period of time. It may cause unpleasant symptoms, such as eyestrain, fatigue, nausea, and more.](https://usermanual.wiki/Samsung-Electronics-Co/NX1.User-manual-3-of-3/User-Guide-2394048-Page-52.png)
![169Camera settings menuYou can set the user environment with these settings.To set user options, In Shooting mode, press [m] → d → an option.Available items and the order of them may dier depending on shooting conditions.Manage Custom ModeCreate your own shooting modes by adjusting options and saving them. Open saved custom modes or delete them.ISO CustomizingISO StepYou can set the size for the ISO sensitivity by either 1/3 or 1 step.Auto ISO RangeYou can set the maximum ISO value under which each EV step is chosen when you set the ISO to Auto.* DefaultOption Value1/3 StepISO 125, ISO 160, ISO 200, ISO 250, ISO 320, ISO 400, ISO 500, ISO 640, ISO 800, ISO 1000, ISO 1250, ISO 1600, ISO 2000, ISO 2500, ISO 3200*1 StepISO 200, ISO 400, ISO 800, ISO 1600, ISO 3200*ISO ExpansionYou can select ISO 51200.User settings](https://usermanual.wiki/Samsung-Electronics-Co/NX1.User-manual-3-of-3/User-Guide-2394048-Page-59.png)
![170Camera settings menu > User settingsNoise ReductionUse the Noise Reduction to reduce the visual noise in photos.* DefaultOption DescriptionHigh ISO NRThis function reduces noise that may occur when you set a high ISO sensitivity. (O, High, Normal*, Low)Long Term NRThis function reduces noise when you set the camera for a long exposure. (O, On*)DMF (Direct Manual Focus)You can adjust the focus manually by rotating the focus ring after achieving the focus by half-pressing [Shutter].DMF ResponsivenessSet the focus ring response when you use the DMF function. If you select High, slight rotations of the focus ring are made to adjust the focus. If you select Low, longer rotations of the focus ring focus are made to adjust the focus. (High, Medium*, Low)](https://usermanual.wiki/Samsung-Electronics-Co/NX1.User-manual-3-of-3/User-Guide-2394048-Page-60.png)
![172Camera settings menu > User settingsDistortion CorrectYou can correct lens distortion that might occur from lenses.Touch OperationSet to enable touch operation in Shooting mode.* DefaultOption DescriptionODo not use touch operations in Shooting mode. (You can use touch operations in other situations.)On*Use touch operations in Shooting mode.iFn SettingYou can select options that can be adjusted when you press [i-Function] on an i-Function lens.Option DescriptionApertureSet to adjust the aperture value.Shutter speedSet to adjust the shutter speed.EVSet to adjust the exposure value.ISOSet to adjust ISO sensitivity.White BalanceSet to adjust the White Balance.intelli-ZoomSet to adjust the zoom scale.](https://usermanual.wiki/Samsung-Electronics-Co/NX1.User-manual-3-of-3/User-Guide-2394048-Page-62.png)
![174Camera settings menu > User settings* DefaultButton FunctionAELSet the functions for the AEL button or the AF start button. You can change the function assigned to each button to exposure and focus setting, focus lock, or exposure lock. The AEL and AFL functions save the exposure value or focus area respectively when you press [a]. The function executed by half-pressing [Shutter] varies according to the function assigned to [a].• Metering & AF start*: Set an optimum exposure by calculating the brightness of the focus area and execute the auto focus function at the same time.• AEL*: Execute the auto exposure lock function. (Half-pressing [Shutter] executes the auto focus lock function.)• AEL Hold: Keep executing the auto exposure lock function after shooting. (The exposure remains locked even after you capture a photo.)• AFL: Execute the auto focus lock function. (Half-pressing [Shutter] executes the auto exposure lock function.)• AFL Hold: Keep executing the auto focus lock function after shooting. (The focus remains locked even after you capture a photo.)AF-ON* DefaultButton FunctionAEL• AEL + AFL: Execute the auto exposure and focus lock functions together. (Half-pressing [Shutter] executes no function.)• AEL + AFL Hold: Keep executing the auto exposure and focus lock functions together after shooting. (The exposure and focus remain locked even after you capture a photo.)• FEL: Execute the ash intensity lock function. (p. 113)• FEL Hold: Keep executing the ash intensity lock function after shooting. (The intensity remains locked even after you capture a photo.) (p. 113)AF-ONCustom ◄ KeySet the function of the left, right, or down navigation button. (None, AF Mode, AF Area*, White Balance, ISO, Metering, Touch Operation, Dynamic Range, Minimum Shutter Speed, Auto ISO Range, Smart Filter, Picture Wizard*, Continuous Settings, Timer Settings, Bracket Settings, Flash, i-Zoom, Focus Peaking, MF Assist, Framing Mode, Grid Line, Movie STBY*)Custom ► KeyCustom ▼ KeyCustom WheelSelect an item to adjust when rotating the navigation button. (No, Shutter Speed, Aperture, ISO*, AF Size)Command DialSelect an item to adjust when scrolling the command dial 1 or command dial 2. (Shutter Speed/Aperture*, Aperture/Shutter Speed)](https://usermanual.wiki/Samsung-Electronics-Co/NX1.User-manual-3-of-3/User-Guide-2394048-Page-64.png)
![175Camera settings menu > User settingsEVF button InteractionSet to use the viewnder or display when you press [E].* DefaultOption DescriptionAuto - EVF Only*Pressing [E] will allow you to view the viewnder or display in this order:• Set the proximity sensor to automatically select the display or viewnder.• Use the viewnder. Main Display - EVF OnlyPressing [E] will allow you to view the viewnder or display in this order:• Use the display.• Use the viewnder.•Wi-Fi functions, slideshow functions, interval shots playback, and Manage Custom Mode, Edit Image functions are not available when you use the viewnder.•The camera does not automatically select the display or viewnder when you record or play videos. For example, if you start recording or playing a video while seeing through the viewnder, the main display will not be available during recording or playing back.AF Release PrioritySet to capture a photo when the focus is achieved.* DefaultOption DescriptionFocus*Capture a photo only when the focus is achieved.ReleaseCapture a photo when you press [Shutter] even when the focus is not achieved.MobileLink/NFC Image SizeSet the size of photos to transfer to a smart phone using the MobileLink or NFC functions.* DefaultOption DescriptionResize to 2M or lowerIf a photo’s size is larger than 3M, it will be transferred after resizing it to 2M or lower.Original*The photo will be transferred in its original size.](https://usermanual.wiki/Samsung-Electronics-Co/NX1.User-manual-3-of-3/User-Guide-2394048-Page-65.png)
![177Camera settings menuLearn to congure your camera’s settings.To set Setting options, In Shooting or Playback mode, press [m] → q → an option.* DefaultItem DescriptionSound• System Volume: Set the sound volume or turn all sound o entirely. (O, Low, Medium*, High)Even if the system volume is turned o, the camera emits the sound while playing a video.• AF Sound: Set the sound the camera emits when you half-press the shutter button on or o. (O, On*)• Button Sound: Set the sound the camera emits when you press the buttons or touch the screen on or o. (O, On*)• E-Shutter Sound: Set to emit a sound when you use the electronic shutter. (O*, On)•The camera emits a sound only when the shutter speed is longer than 0.5 second.•This option may not be available in Smart mode.* DefaultItem DescriptionQuick ViewSet the Quick View time length–the amount of time the camera displays a photo immediately after you capture it. Select Hold + Focus Zoom to display the image and enlarge the focus area after shooting.(O, 1 sec*, 3 sec, 5 sec, Hold, Hold + Focus Zoom)Display AdjustAdjust the display brightness, auto brightness setting, display color, or level gauge.• Display Brightness: You can adjust the display brightness manually.• Auto Brightness: Turn auto brightness on or o. (O, On*)• Display Color: You can adjust the display color manually.• Horizontal Calibration: Calibrate the level gauge. If the level gauge is not level, position the camera on the level surface, and then follow the on-screen instructions.•You cannot access the Horizontal Calibration option in Playback mode.•You cannot calibrate the level gauge in portrait orientation.Setting](https://usermanual.wiki/Samsung-Electronics-Co/NX1.User-manual-3-of-3/User-Guide-2394048-Page-67.png)
![178Camera settings menu > Setting* DefaultItem DescriptionAuto Display OSet the display o time. The display turns o if you do not use the camera for the time you set. (O, 30 sec*, 1 min, 3 min, 5 min, 10 min)Power SaveSet power shut o time. The camera shuts o if you do not use it for the time you set. (30 sec, 1 min*, 3 min, 5 min, 10 min, 30 min)•The camera retains the power-o time setting even if you replace the battery.•Power Save may not work if the camera is connected to a computer or a TV or playing a slide show or a movie.•Power Save may not work when the camera is connected to a smart phone and Pro Suggest Market is in use.Help Guide Display• Mode Help Guide: Set to display help text about the selected mode when changing shooting modes. (O*, On)• Function Help Guide: Set to display help text about menus and functions. (O, On*)Press [n] to hide the help text.* DefaultItem DescriptionLanguageSet a language the camera shows on the display.Date and TimeSet date, time, date format, and time zone. (Time Zone, Date Settings, Time Settings, Date Type, Time Type)Video OutSet the video signal output appropriate for your country when connecting the camera to an external video device such as a monitor or HDTV.• NTSC: USA, Canada, Japan, Korea, Taiwan, Mexico, etc.• PAL (Supports only PAL B, D, G, H, or I): Australia, Austria, Belgium, China, Denmark, Finland, France, Germany, England, Italy, Kuwait, Malaysia, New Zealand, Singapore, Spain, Sweden, Switzerland, Thailand, Norway, etc.Anynet+ (HDMI-CEC)When you connect the camera to an HDTV that supports Anynet+ (HDMI-CEC), you can control the play function of the camera with the TV remote control.• O: You cannot control the play function of camera with the TV remote control.• On*: You can control the play function of camera with the TV remote control.](https://usermanual.wiki/Samsung-Electronics-Co/NX1.User-manual-3-of-3/User-Guide-2394048-Page-68.png)


![198AppendixUpdating the firmwareConnect the camera to the computer and update the rmware of the camera of the lens.•You cannot run a rmware upgrade without a fully charged battery. Recharge the battery fully before running a rmware upgrade.•If you update the rmware, user settings and values will be reset. (Date, time, language, and video out will not change.)•Do not turn the camera o while the update is in progress. 1 Turn o the camera.2 Connect your camera to the computer with the USB cable.•You must plug the small end of the USB cable into your camera. If the cable is reversed, it may damage your les. The manufacturer is not responsible for any loss of data.•If you try to plug the USB cable into the HDMI port, the camera may not work properly.3 Turn on the camera.4 On the computer, select i-Launcher → Software Update.5 Follow the on-screen instructions to download the rmware to the camera.•You can download the rmware of the camera or the lens.6 Turn o the camera when the download completes.7 Remove the USB cable.8 Turn on the camera.9 Press [m] → q →Device Information →Software Update→Body FirmwareorLens Firmware.10 Select Ye s from a pop-up window on the camera to update the rmware.](https://usermanual.wiki/Samsung-Electronics-Co/NX1.User-manual-3-of-3/User-Guide-2394048-Page-88.png)
![201Appendix > Before contacting a service centerSituation Suggested remediesPlayback screen does not appear on the connected external device• Ensure that HDMI cable is properly connected to the external monitor.• Ensure that the memory card is properly recorded.Your computer does not recognize your camera• Ensure that the USB cable is connected correctly.• Ensure that the camera is switched on.• Ensure that you are using a supported operating system.Your computer disconnects the camera while transferring lesThe le transfer may be interrupted by static electricity. Disconnect the USB cable and connect it again. i-Launcher is not functioning properly• End i-Launcher and restart the program.• Depending on your computer’s specications and environment, the program may not launch automatically. In this case, click Start → All Programs → Samsung → i-Launcher → Samsung i-Launcher on your Windows computer. (For Windows 8, open Start screen, and then select All apps → Samsung i-Launcher.) Or, click Applications → Samsung → i-Launcher on your Mac OS computer.Situation Suggested remediesAuto Focus does not work• Subject is not in focus. When the subject is outside the AF area, shoot by moving the subject inside the AF area and half-pressing [Shutter].• Subject is too close. Step back from the subject and shoot.• The focus mode is set to MF. Switch the mode to AF.AEL feature does not workAEL feature does not work in t, M, and s modes. Select another mode to use this feature.Lens does not work• Ensure that the lens is properly mounted.• Remove the lens from the camera and remount it.External ash does not workEnsure that the external device is properly mounted and turned on.The date & time settings screen appears when you power on the camera• Set the date and time again.• This screen appears when the camera’s internal power source is completely discharged. Insert a fully charged battery and wait at least 72 hours in power o status for the internal power source to be recharged.](https://usermanual.wiki/Samsung-Electronics-Co/NX1.User-manual-3-of-3/User-Guide-2394048-Page-91.png)