Samsung Electronics Co NX300 Digital Camera User Manual rev 1
Samsung Electronics Co Ltd Digital Camera rev 1
UserManual.wiki
>
Samsung Electronics Co
>
NX300 User Manual
>
user manual rev 1
Contents
1.
user manual rev 1
2.
user manual
user manual rev 1
Navigation menu
Upload a User Manual
Namespaces
Wiki Guide
HTML
PDF
Info
Views
User Manual
Discussion / Help
Navigation
![Shooting Functions102102Shooting FunctionsShooting FunctionsThe camera automatically sets the exposure by measuring the levels of light from the photo’s composition and the position of a subject. If the exposure set by the camera is higher or lower than you expected, you can adjust the exposure value manually. The exposure value is adjustable in ±3 increments. The camera displays the exposure warning in red for each step beyond ±3 range.To adjust the exposure value, while holding down [W], scroll the jog dial. You can also adjust the exposure value by pressing [f], and then selecting EV.You can check the exposure value by the position of the exposure level indicator.Exposure level indicatorIncreased exposure (brighter)Decreased exposure (darker) Exposure warning Standard exposure index-2Original+2 Exposure compensation](https://usermanual.wiki/Samsung-Electronics-Co/NX300.user-manual-rev-1/User-Guide-1897607-Page-1.png)
![Shooting Functions103103Shooting FunctionsShooting FunctionsWhen you cannot achieve an appropriate exposure because of a strong color contrast, lock the exposure, and then capture a photo.To lock the exposure value, adjust the photo’s exposure, and then press the custom button.After locking the exposure, aim the lens where you desire, and then press [Shutter].• Set a function of the custom button to AEL to lock the current exposure value. (p. 150)• This feature is not available in Manual mode.Exposure lock](https://usermanual.wiki/Samsung-Electronics-Co/NX300.user-manual-rev-1/User-Guide-1897607-Page-2.png)
![Shooting Functions104104Shooting FunctionsShooting FunctionsThe functions available for video are explained below.Movie sizeSet the movie size.To set movie size options, In Shooting mode, press [m] → 6 → Movie Size → an option.Icon Size Recommended for1920X1080 (60 fps) (16:9) View on a Full HDTV.1920X1080 (30 fps) (16:9) View on a Full HDTV. 1920X1080 (15 fps) (16:9) View on a Full HDTV. (Available only with some Smart Filter options.)1920X810 (24 fps) (Approx. 2.35:1) View on an HDTV.1280X720 (60 fps) (16:9) View on an HDTV.1280X720 (30 fps) (16:9) View on an HDTV.640X480 (30 fps) (4:3) View on a TV.320X240 (30 fps) (4:3) Post on a website using the wireless network (30 seconds maximum).Movie qualitySet the Movie quality.To set movie quality options, In Shooting mode, press [m] → 6 → Movie Quality → an option.Icon Extension DescriptionMP4 (H.264) Normal: Record videos in normal quality.MP4 (H.264) HQ: Record videos in high quality.Video functions](https://usermanual.wiki/Samsung-Electronics-Co/NX300.user-manual-rev-1/User-Guide-1897607-Page-3.png)
![105Shooting Functions > Video functionsMulti MotionSet the playing speed of a video.To set playing speed options,In Shooting mode, press [m] → 6 → Multi Motion → an option.Icon Descriptionx0.25: Record a video and play it at 1/4 normal speed. (Available only with 640x480 or 320x240)x0.5: Record a video and play it at 1/2 normal speed. (Available only with 1280x720 (30 fps), 640x480, or 320x240)x1: Record a video and play it at normal speed.x5: Record a video and play it at 5X normal speed.x10: Record a video and play it at 10X normal speed.x20: Record a video and play it at 20X normal speed.• If you select an option other than x1, sound will not be recorded.• The available options may dier depending on shooting conditions.FaderYou can fade in or fade out a scene using the fader function on the camera without having to do it on a PC. Set the fade in option to gradually fade in at the start of the scene. Set the fade out option to gradually fade out the scene. Use the function appropriately and add dramatic eects on your videos.To set fader options, In Shooting mode, press [m] → 6 → Fader → an option.Icon DescriptionO: Fader function not used.In: Scene gradually fades in.Out: Scene gradually fades out.In-out: The fader function is applied at the start and end of the scene.When you use the fader function, it may take longer to save a le.](https://usermanual.wiki/Samsung-Electronics-Co/NX300.user-manual-rev-1/User-Guide-1897607-Page-4.png)
![106Shooting Functions > Video functionsVoiceSometimes, a muted video is more appealing than the one with sound. Turn the voice o to record a muted video. To set voice options, In Shooting mode, press [m] → 6 → Voice → an option.Wind cutWhen you record videos in noisy environments, unintended sounds can be recorded in videos. In particular, severe wind noise recorded in videos distracts you from enjoying your videos. Use the Wind Cut function to remove some surrounding noise in addition to wind noise.To reduce wind sound, In Shooting mode, press [m] → 6 → Wind Cut → an option.](https://usermanual.wiki/Samsung-Electronics-Co/NX300.user-manual-rev-1/User-Guide-1897607-Page-5.png)

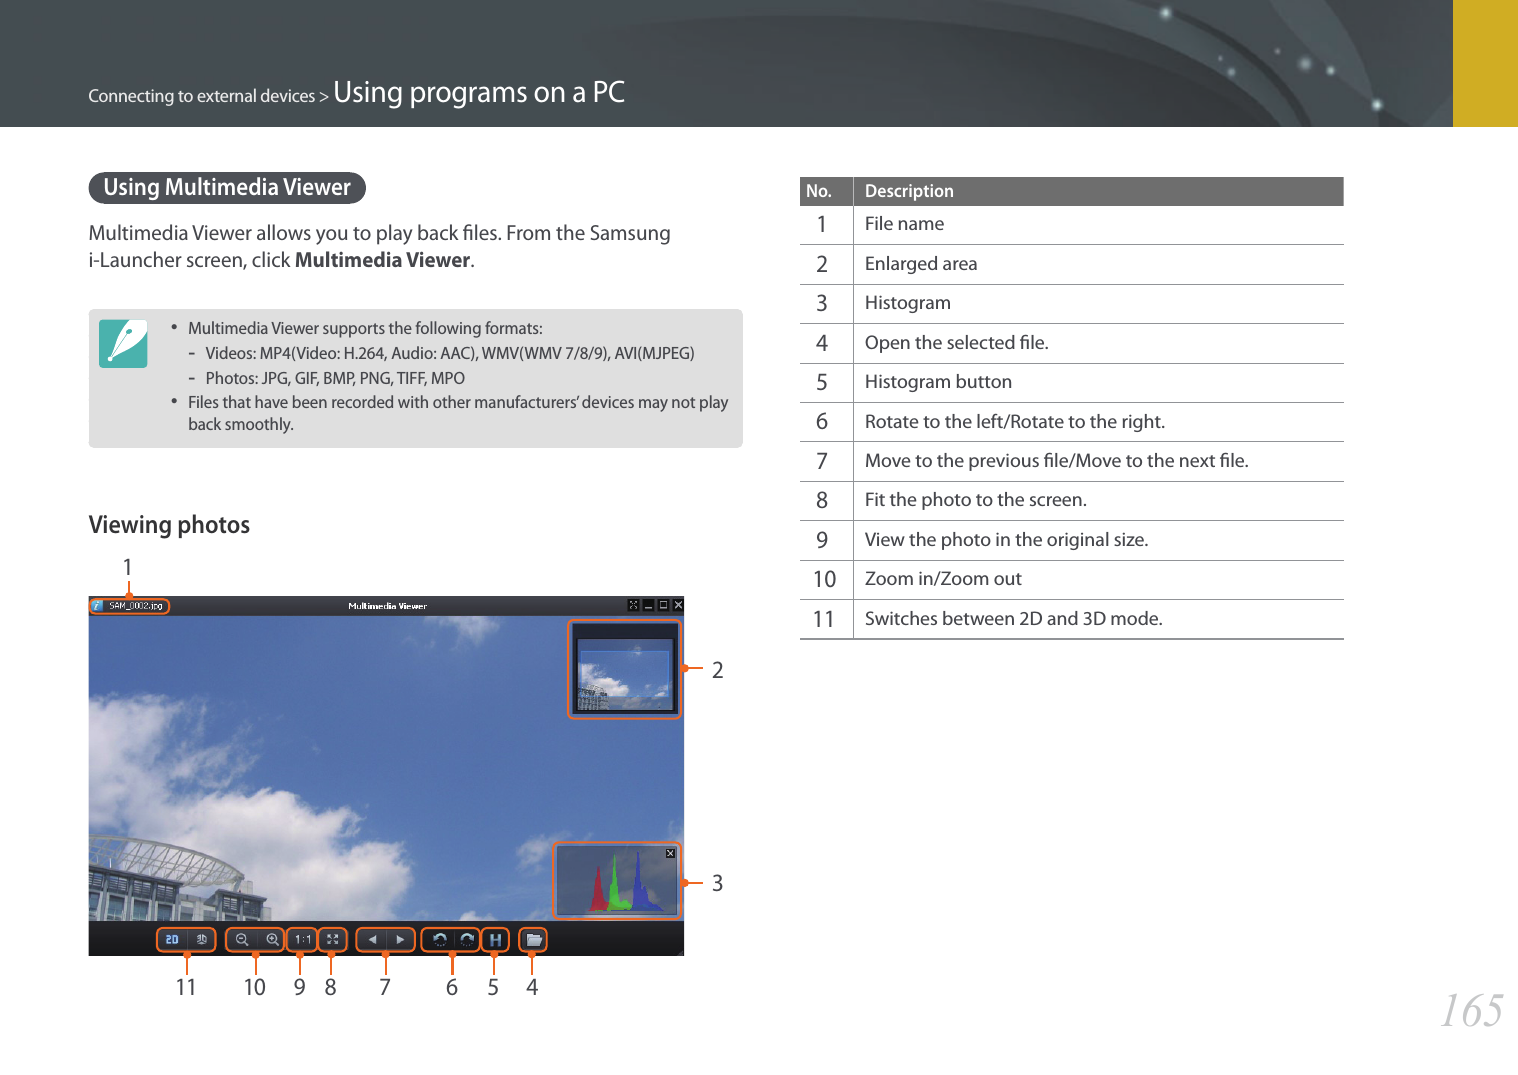
![108Playback/EditingLearn how to view photo and video thumbnails and how to protect or delete les.If you perform no operations for a while, information and icons on the screen disappear. When you operate the camera again, they will reappear.Viewing photos1 Press [y].• The most recent le you captured will be displayed.2 Press [C/F] to scroll through les.• You can also drag the image left or right to move to another le.You may not be able to edit or play back les that were captured with other cameras, due to unsupported sizes or codecs. Use a computer or another device to edit or play back these les.Viewing image thumbnailsIn order to search for photos and videos you want, convert to the thumbnail view. The thumbnail view displays multiple images at a time so that you can easily look through items you wish to nd. You can also classify and display les by category, such as date or le type.Scroll the jog dial to the left to select the thumbnail view mode.(Scroll the jog dial to the right to return to the previous mode.)Searching and managing les](https://usermanual.wiki/Samsung-Electronics-Co/NX300.user-manual-rev-1/User-Guide-1897607-Page-7.png)
![109Playback/Editing > Searching and managing lesViewing les by category1 In the thumbnail view, press [m] → z → Filter → a category.• You can also touch FILTER to select a category.* DefaultOption DescriptionAllView les normally.Date*View les by the date they were saved.TypeView les by the le type.LocationView les by the place they were saved. (Only the photos captured with a GPS module have the location information.)2 Select a list to open it.3 Select a le to view it.4 Touch to return to the previous view.Viewing les as a folderContinuous and burst shots appear as a folder. Selecting a folder will play back all photos automatically. Deleting a folder will delete all photos in the folder.1 In Playback mode, press [C/F] or drag the image left or right to move to a desired folder.• The camera will automatically play back photos in the folder.2 Scroll the jog dial to the right to open the folder.• You can also touch the folder on the screen to open the folder.3 Press [C/F] or drag the image left or right to move to another le.4 Scroll the jog dial to the left to return to Playback mode.](https://usermanual.wiki/Samsung-Electronics-Co/NX300.user-manual-rev-1/User-Guide-1897607-Page-8.png)
![110Playback/Editing > Searching and managing lesProtecting lesProtect your les from accidental deletion.1 In Playback mode, press [m] → z → Protect → Select.2 Press [C/F] to select a le, and then press [o].3 Press [f].You cannot delete or rotate a protected le.Lock/Unlock all lesLock or unlock all les.1 In Playback mode, press [m] → z → Protect → All.2 Select an option.Option DescriptionLockLock all les.UnlockUnlock all les.CancelReturn to the previous menu.](https://usermanual.wiki/Samsung-Electronics-Co/NX300.user-manual-rev-1/User-Guide-1897607-Page-9.png)
![111Playback/Editing > Searching and managing lesDeleting lesDelete les in Playback mode and secure more space on your memory card. Protected les are not deleted.Deleting a single leYou can select a single le and delete it.1 In Playback mode, select a le, and then press [n].2 When the pop-up message appears, select Ye s.Deleting multiple lesYou can select multiple les and delete them.1 In Playback mode, press [m] → z → Delete → Select.• Alternatively, in thumbnails view, press [n], and then select les to delete.2 Select les you want to delete by pressing [C/F], and then press [o].• Press [o] again to cancel your selection.3 Press [n].4 When the pop-up message appears, select Ye s.](https://usermanual.wiki/Samsung-Electronics-Co/NX300.user-manual-rev-1/User-Guide-1897607-Page-10.png)
![112Playback/Editing > Searching and managing lesDeleting all lesYou can delete all les on the memory card at once.1 In Playback mode, press [m].2 Select z → Delete → All.3 When the pop-up message appears, select Yes .](https://usermanual.wiki/Samsung-Electronics-Co/NX300.user-manual-rev-1/User-Guide-1897607-Page-11.png)
![113Playback/EditingEnlarging a photoYou can enlarge photos when viewing them in Playback mode. You can also use the Trim function to extract the portion of the image displayed on the screen and save it as a new le.Magnied areaMagnication (the maximum magnication may dier by resolution) Full Image CropScroll the jog dial to the right to enlarge a photo. (Scroll the jog dial to the left to reduce a photo.)To Do thisMove magnied areaPress [D/I/C/F].Crop the enlarged imagePress [f]. (saved as a new le)Return to the original imagePress [o].Viewing a slide showYou can view photos in a slide show, apply various eects to the slide show, and play background music.1 In Playback mode, press [m].2 Select z → Slide Show Options.3 Select a slide show eect option.• Skip to step 4 to start a slide show with no eects.* DefaultOption DescriptionPlay ModeSet whether or not to repeat the slide show. (One Play*, Repeat)Interval• Set the interval between photos. (1 sec*, 3 sec, 5 sec, 10 sec)• You must set the Eect option to O to set the interval.MusicSet background audio.Eect• Set a scene change eect between photos.• Select O to cancel eects.• When you use the Eect option, the interval between photos will be set to 1 second.Viewing photos](https://usermanual.wiki/Samsung-Electronics-Co/NX300.user-manual-rev-1/User-Guide-1897607-Page-12.png)
![114Playback/Editing > Viewing photos4 Press [m].5 Select Start Slide Show.6 View the slide show.• Press [o] to pause.• Press [o] again to resume. • Press [m] to stop the slide show and return to Playback mode.• Press [D/I] to adjust the volume level.Auto rotatingWith Auto Rotate on, the camera automatically rotates photos you have captured vertically so they t the screen horizontally.To set auto rotate options, In Playback mode, press [m] → z → Auto Rotate → an option.Creating a print order (DPOF)DPOF (Digital Print Order Format) lets you set the print size of a photo and the number of copies to be printed. The camera saves the DPOF information in the MISC folder of your memory card. If you have set DPOF information for your images, you can take the memory card to a digital printing shop for printing. You cannot set the print order of RAW format les.Photos with dimensions that are wider than the paper may be cut o on the left and right edges. Ensure that your photo dimensions are compatible with the paper you select.1 In Playback mode, select a photo, and then press [m]. 2 Select z → DPOF. 3 Press [D/I] to set the number of copies. • To select another photo, press [C/F]. 4 Press [o] to save.](https://usermanual.wiki/Samsung-Electronics-Co/NX300.user-manual-rev-1/User-Guide-1897607-Page-13.png)
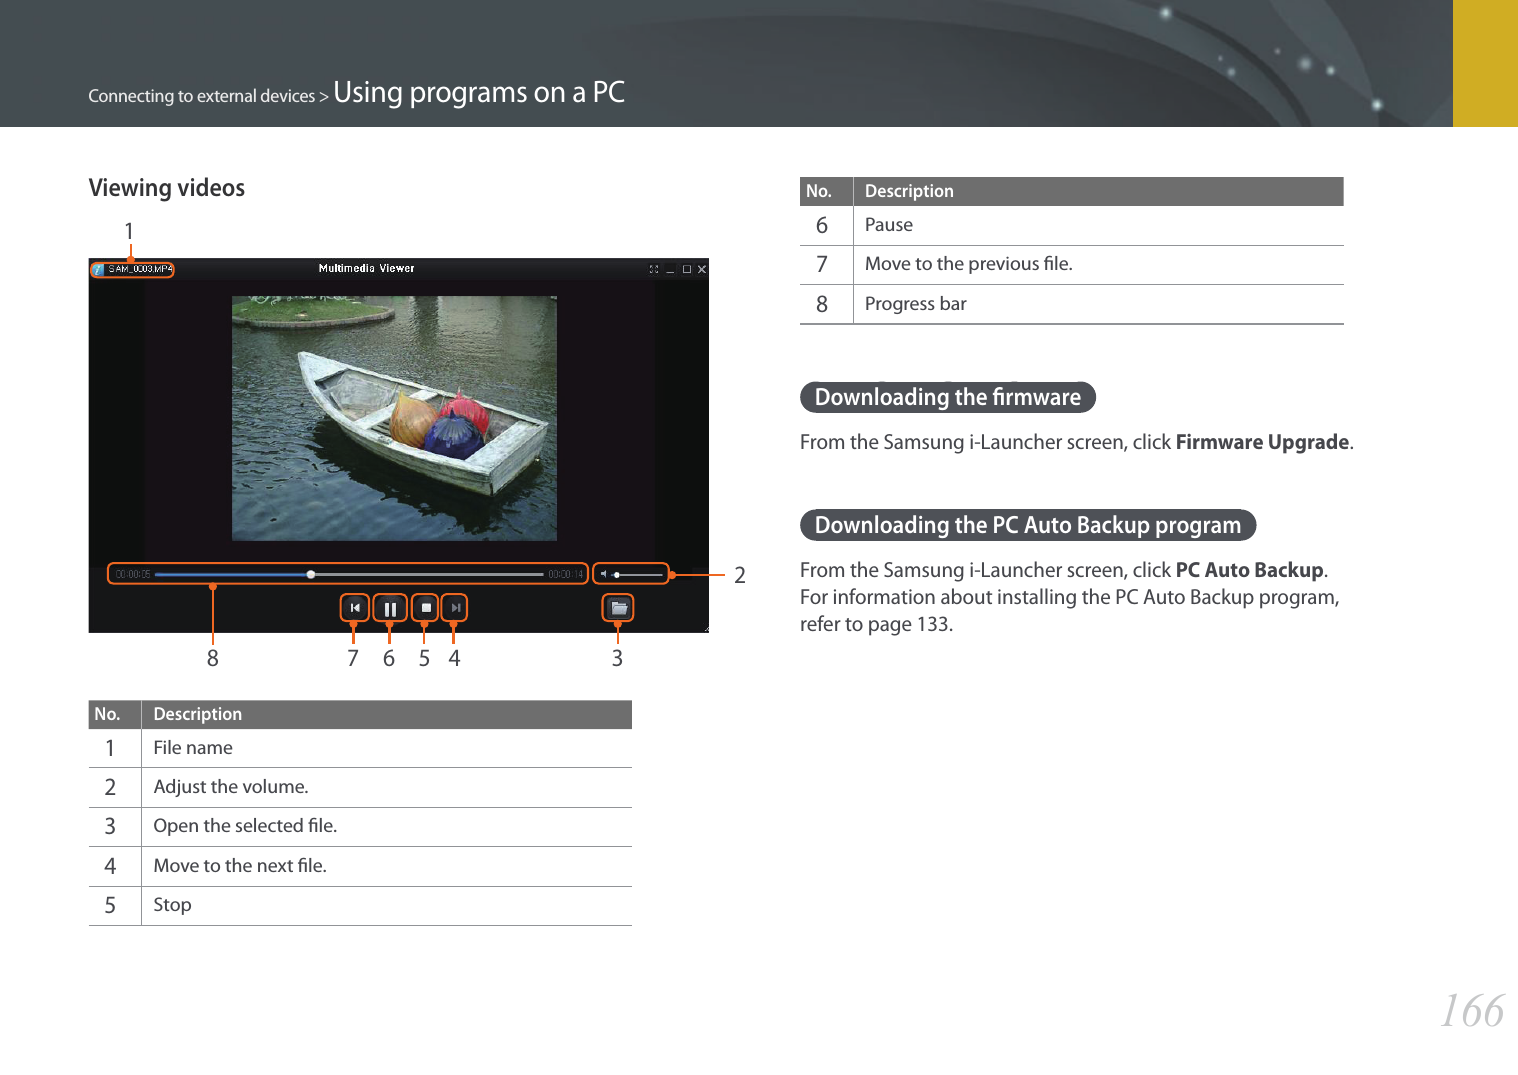
![115Playback/EditingIn Playback mode, you can play a video, capture an image from a video, or crop a video to save as another le.StopVideo viewing controlsIcon/Button Description//[C]View previous le/Scan backward. (Each time you touch the icon or press the button while playing the video, you change the scan speed in this order: 2X, 4X, 8X.)//[o]Pause or resume playback.//[F]View next le/Scan forward. (Each time you touch the icon or press the button while playing the video, you change the scan speed in this order: 2X, 4X, 8X.)/[D/I]Adjust the volume or mute the sound. Trimming a video during playback1 In Playback mode, scroll to a video, and then touch .2 Press [o] or touch to start playing the video.3 Press [o] or touch at the point where you want the trimming to begin.4 Press [f] or touch Start Point.5 Press [o] or touch to resume playing the video.6 Press [o] or touch at the point where you want the trimming to end.Playing videos](https://usermanual.wiki/Samsung-Electronics-Co/NX300.user-manual-rev-1/User-Guide-1897607-Page-14.png)
![116Playback/Editing > Playing videos7 Press [f] or touch End Point.8 Press [f] or touch Trim to trim a video.• You can adjust the scene to be cropped by dragging the handles that appear on the progress bar.9 When the pop-up message appears, select Yes .• You cannot trim a video recorded in 3D mode.• The original video should be at least 10 seconds long.• The camera will save the edited video as a new le and leave the original video intact.Capturing an image during playback1 While viewing a video, press [o] or touch at the point where you want to capture an image.2 Press [f] or touch Capture.• You cannot capture an image from a video recorded in 3D mode.• The resolution of the captured image will be the same as the original video.• The captured image is saved as a new le.](https://usermanual.wiki/Samsung-Electronics-Co/NX300.user-manual-rev-1/User-Guide-1897607-Page-15.png)
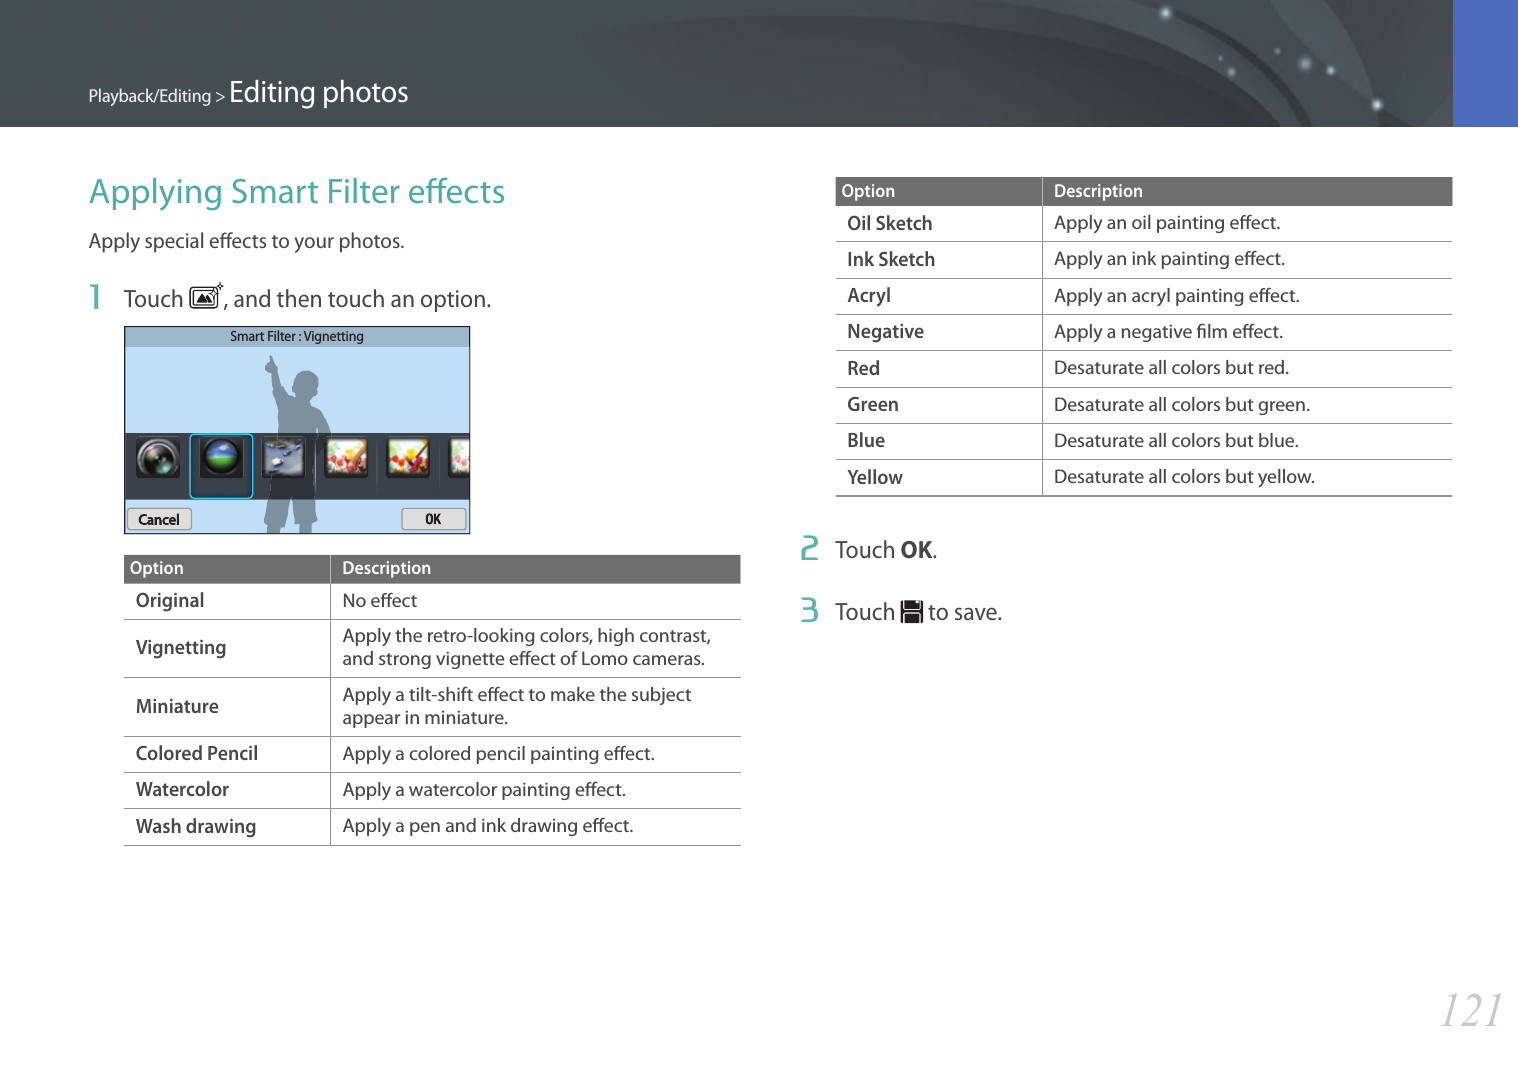
![117Playback/EditingPerform photo editing tasks, such as resizing, rotating, or reducing red-eye eects. Edited photos are saved as new les under dierent le names. Photos captured in some modes cannot be edited with the Image Edit function.To edit images, In Playback mode, scroll to a photo, and then touch → an option.• You can also edit images in Playback mode by selecting a photo, and then pressing [f] or [m] → Edit Image. • Some images may not be edited with the Image Edit function. In this case, use a supplied image editing software.• The camera will save edited photos as new les.• When you edit photos, the camera will automatically convert them to a lower resolution. Photos that you rotate or resize manually are not automatically converted to a lower resolution.• You cannot edit photos while viewing les as a folder. Open the folder and select a photo to edit each photo.Cropping a photo1 Touch → .2 Drag the corners of the box to adjust the size of the area.3 Drag the box to move the location of the area.4 Touch OK.5 Touch to save.Editing photos](https://usermanual.wiki/Samsung-Electronics-Co/NX300.user-manual-rev-1/User-Guide-1897607-Page-16.png)
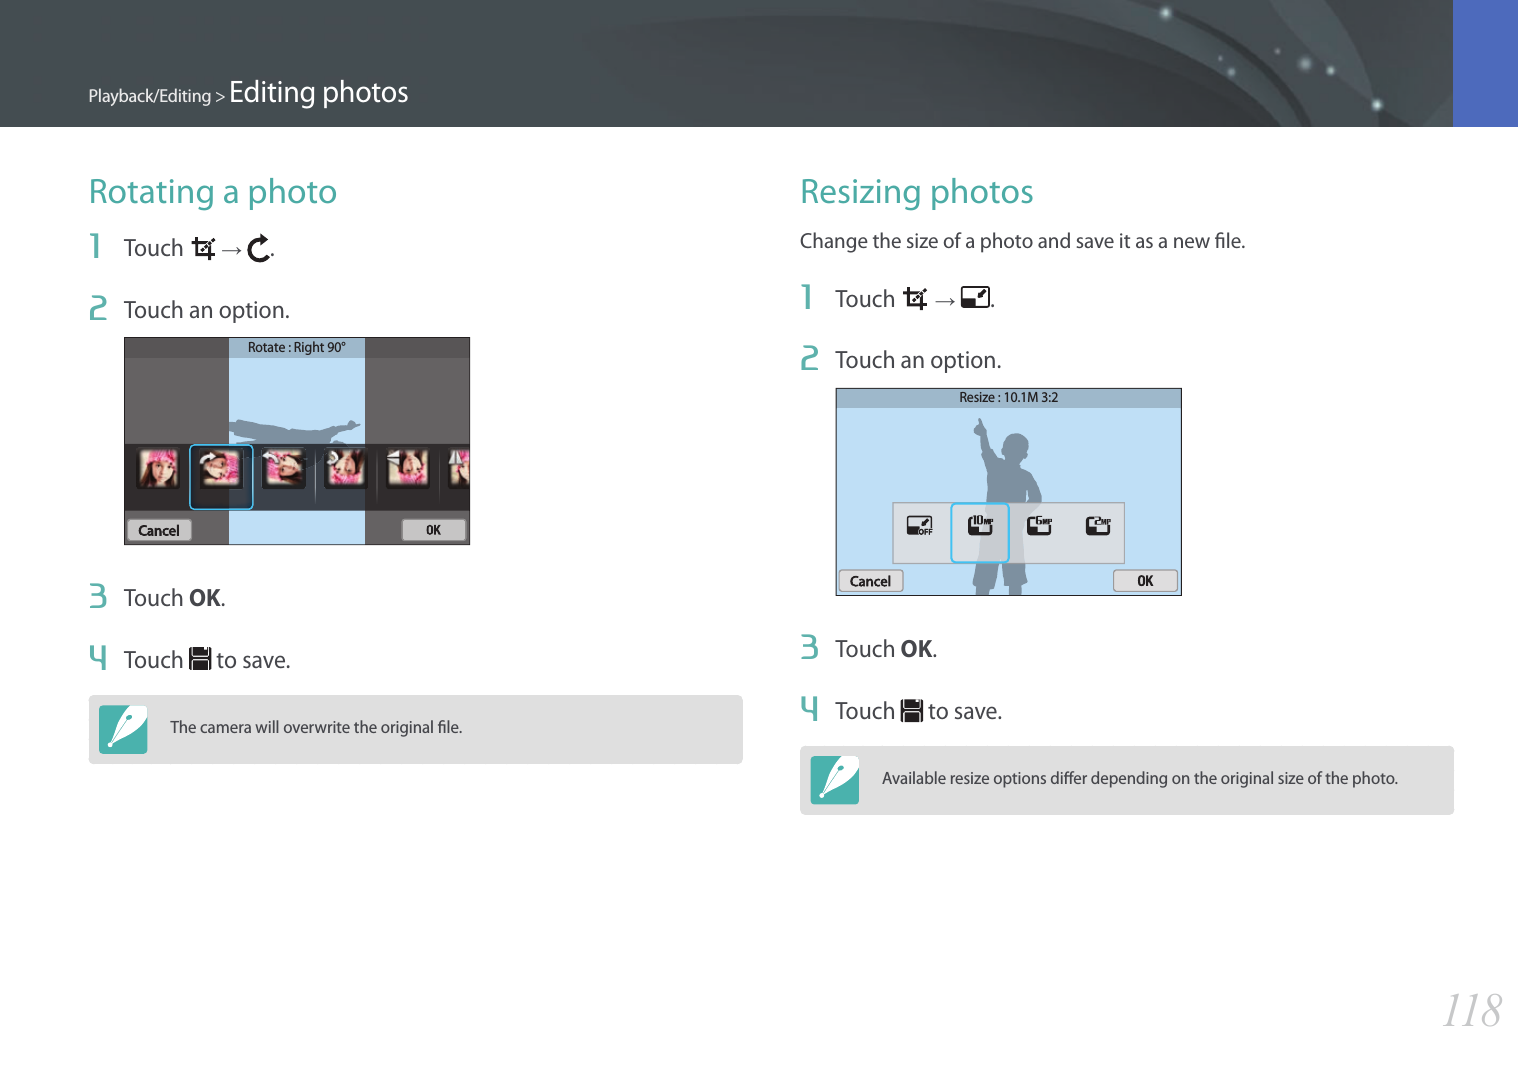
![119Playback/Editing > Editing photosAdjusting your photosYou can correct captured photos by adjusting the brightness, contrast, or saturation.1 Touch .2 Touch an adjusting option.Icon DescriptionOriginal (Reset to the original image)Auto adjustmentBrightnessContrastSaturationRGBColor TemperatureExposureHue3 Press [C/F] to adjust the option.• You can also drag the slider or touch +/- to adjust the option.4 Touch OK.5 Touch to save.](https://usermanual.wiki/Samsung-Electronics-Co/NX300.user-manual-rev-1/User-Guide-1897607-Page-18.png)
![120Playback/Editing > Editing photosRetouching faces1 Touch → .2 Press [C/F] to adjust the option.• You can also drag the slider or touch +/- to adjust the option.• As the number increases, the skin tone becomes brighter and smoother.3 Touch OK.• To cancel correction, touch .4 Touch to save.Reducing red-eye1 Touch → . 2 Touch OK.• To cancel correction, touch .3 Touch to save.](https://usermanual.wiki/Samsung-Electronics-Co/NX300.user-manual-rev-1/User-Guide-1897607-Page-19.png)
![123Wireless networkConnecting to a WLAN and conguring network settingsLearn to connect via an access point (AP) when you are in a range of a WLAN. You can also congure network settings.Connecting to a WLAN1 Rotate the mode dial to B.2 Select , , , or .3 Press [m], and then select Wi-Fi Setting.• In some modes, follow the on-screen instructions until the Wi-Fi Setting screen appears.• The camera automatically searches for available AP devices.4 Select an AP.BackRefreshSamsung1Samsung2Samsung3Samsung4• Select Refresh to refresh connectable APs.• Select Add wireless network to add an AP manually. Your AP name must be in English to add the AP manually.Icon/Option DescriptionAd hoc APSecured APWPS APSignal strengthPress [C] or touch to open network setting options.• When you select a secured AP, a pop-up window appears. Enter the required passwords to connect to the WLAN. For information about entering text, refer to "Entering text". (p. 127)• When a login page appears, refer to "Using the login browser". (p. 125)• When you select an unsecured AP, the camera will connect to the WLAN.• If you select a WPS prole supported AP, select → WPS PIN connection, and then enter a PIN on the AP device. You can also connect to a WPS prole supported AP by selecting → WPS button connection on the camera, and then pushing the WPS button on the AP device.• The same AP may be listed twice, with dierent frequencies, because your camera supports the dual band function.](https://usermanual.wiki/Samsung-Electronics-Co/NX300.user-manual-rev-1/User-Guide-1897607-Page-22.png)
![124Wireless network > Connecting to a WLAN and conguring network settingsSetting network options1 In the Wi-Fi Setting screen, move to an AP, and then press [F] or touch .2 Select each option, and then enter the required information.Option DescriptionNetwork PasswordEnter the network password.IP SettingSet the IP address automatically or manually.Manually setting the IP address1 In the Wi-Fi Setting screen, move to an AP, and then press [F] or touch .2 Select IP Setting → Manual.3 Select each option, and then enter the required information.Option DescriptionIPEnter the static IP address.Subnet MaskEnter the subnet mask.GatewayEnter the gateway.DNS ServerEnter the DNS address.](https://usermanual.wiki/Samsung-Electronics-Co/NX300.user-manual-rev-1/User-Guide-1897607-Page-23.png)
![128Wireless networkSaving les to a smart phone automaticallyThe camera connects to a smart phone that supports the AutoShare feature via a WLAN. When you capture a photo with your camera, the photo is saved to the smart phone automatically.• The AutoShare feature is supported by Galaxy series smart phones or Galaxy Tab models with the Android 2.2 OS or higher or iOS devices with the iOS 4.3 or higher. Before using this feature, check the device’s rmware and update it if needed.• You should install Samsung SMART CAMERA App on your phone or device before using this feature. You can download the application from Samsung Apps, the Google Play Store, or the Apple App Store. Samsung SMART CAMERA App is compatible with Samsung camera models manufactured in 2013 or later.• This feature is not available with the internal memory in some Shooting modes.• If you set this function, the setting is maintained even when you change the Shooting mode.• This feature may not be supported in some modes or may not be available with some shooting options.1 On the camera, in Shooting mode, press [m].2 On the camera, select 1 → AutoShare → On.• If the pop-up message that prompts you to download the application appears, select Next.3 On the smart phone, turn on Samsung SMART CAMERA App.• For iOS devices, turn on the Wi-Fi feature before turning on the application.4 Select the camera from the list and connect the smart phone to the camera.• The smart phone can connect to only one camera at a time.5 On the camera, allow the smart phone to connect to your camera.• If the smart phone has been connected to your camera before, it is connected automatically.• An icon that shows the connection status ( ) will appear on the camera’s screen.6 On the camera, capture a photo.• The captured photo is saved to the camera, and then transferred to the smart phone.• If you recorded a video, it is saved only to the camera.](https://usermanual.wiki/Samsung-Electronics-Co/NX300.user-manual-rev-1/User-Guide-1897607-Page-27.png)
![135Wireless network5 Select the Name box, enter your name, and then select .Sender SettingNameSaveEmailReset6 Select the Email box, enter your email address, and then select .7 Select Save to save your changes.• To delete your information, select Reset.You can change settings in the email menu and send photos or videos stored on the camera via email.Changing email settingsIn the email menu, you can change settings for storing your information. You can also set or change the email password. For information about entering text, refer to "Entering text". (p. 127)Storing your information1 Rotate the mode dial to B.2 Select .• The camera will automatically attempt to connect to a WLAN via the most recently connected AP device.• If the camera has not previously been connected to a WLAN, it will search for available AP devices. (p. 123)3 Press [m].4 Select Sender Setting.Sending photos or videos via email](https://usermanual.wiki/Samsung-Electronics-Co/NX300.user-manual-rev-1/User-Guide-1897607-Page-34.png)
![136Wireless network > Sending photos or videos via emailSetting an email password1 Rotate the mode dial to B.2 Select .• The camera will automatically attempt to connect to a WLAN via the most recently connected AP device.• If the camera has not previously been connected to a WLAN, it will search for available AP devices. (p. 123)3 Press [m].4 Select Setting Password → On.• To deactivate the password, select O.5 When the pop-up appears, select OK.• The pop-up disappears automatically even if you do not select OK.6 Enter a 4-digit password.7 Enter the password again.8 When the pop-up appears, select OK.If you lost your password, you can reset it by selecting Reset on the password setting screen. When you reset the information, the previously saved user’s setting information, email address, and recently sent email list will be deleted.](https://usermanual.wiki/Samsung-Electronics-Co/NX300.user-manual-rev-1/User-Guide-1897607-Page-35.png)
![137Wireless network > Sending photos or videos via emailChanging the email password1 Rotate the mode dial to B.2 Select .• The camera will automatically attempt to connect to a WLAN via the most recently connected AP device.• If the camera has not previously been connected to a WLAN, it will search for available AP devices. (p. 123)3 Press [m].4 Select Change Password.5 Enter your current 4-digit password.6 Enter a new 4-digit password.7 Enter the new password again.8 When the pop-up appears, select OK.Sending photos or videos via emailYou can send photos or videos stored on the camera via email. For information about entering text, refer to "Entering text". (p. 127)1 Rotate the mode dial to B.2 Select .• The camera will automatically attempt to connect to a WLAN via the most recently connected AP device.• If the camera has not previously been connected to a WLAN, it will search for available AP devices. (p. 123)3 Select the Sender box, enter your email address, and then select .• If you have previously saved your information, it will be inserted automatically. (p. 135)• To use an address from the list of previous senders, select → an address.](https://usermanual.wiki/Samsung-Electronics-Co/NX300.user-manual-rev-1/User-Guide-1897607-Page-36.png)
![138Wireless network > Sending photos or videos via email4 Select the Receiver box, enter an email address, and then select .• To use an address from the list of previous recipients, select → an address.• Select to add additional recipients. You can input up to 30 recipients.• Select to delete an address from the list.5 Select Next.6 Select les to send.• You can select up to 20 les. The total size must be 7 MB or less.7 Select Next.8 Select the comment box, enter your comments, and then select .9 Select Send.• The camera will send the email.• Even if a photo appears to have transferred successfully, errors with the recipient’s email account may cause the photo to be rejected or recognized as spam.• You may not be able to send an email if no network connection is available or if your email account settings are incorrect.• You cannot send an email if the le size exceeds the limit. The maximum photo resolution you can send is 2M and the longest video you can upload is a video recorded using . If the selected photo resolution is higher than 2M, it will be automatically resized to a lower resolution.• If you cannot send an email because of rewall or user authentication settings, contact your network administrator or network service provider.• When there are no les in the camera memory, you cannot use this feature.• You can also send an email in Playback mode by pressing [m], and then selecting Share(Wi-Fi) → Email.](https://usermanual.wiki/Samsung-Electronics-Co/NX300.user-manual-rev-1/User-Guide-1897607-Page-37.png)
![140Wireless network > Using photo or video sharing websitesUploading photos or videos1 Access the website with your camera.2 Select les to upload.• You can select up to 20 les. The total size must be 10 MB or less. (On some websites, the total size or number of les may vary.)3 Select Upload.• On some websites, you can enter your comments by selecting the comment box. For information about entering text, refer to "Entering text". (p. 127)• You can set an upload folder for Facebook by pressing [m], and then selecting Upload Folder (Facebook) on the website's list screen.• You cannot upload les if the le size exceeds the limit. The maximum photo resolution you can upload is 2M, and the longest video you can upload is a video recorded using . If the selected photo resolution is higher than 2M, it will be automatically resized to a lower resolution. (On some websites, the maximum photo resolution may vary.)• The method of uploading photos or videos may dier depending on the selected website.• If you cannot access a website because of rewall or user authentication settings, contact your network administrator or network service provider.• Uploaded photos or videos may be automatically titled with the date they were captured.• The speed of your internet connection may aect how quickly photos upload or web pages open.• When there are no les in the camera memory, you cannot use this feature.• You can also upload photos or videos to le sharing websites in Playback mode by pressing [m], and then selecting Share(Wi-Fi) → a desired website.• You cannot upload videos to some websites.• When you upload photos to SkyDrive, they will be resized to 2M while maintaining their aspect ratios.](https://usermanual.wiki/Samsung-Electronics-Co/NX300.user-manual-rev-1/User-Guide-1897607-Page-39.png)
![141Wireless networkUsing AllShare Play to send lesYou can upload les from your camera to AllShare Play online storage or view les on an AllShare Play device connected to the same AP.Uploading photos to online storage1 Rotate the mode dial to B.2 Select → Web storage.• If the guide message appears, select OK.• The camera will automatically attempt to connect to a WLAN via the most recently connected AP device.• If the camera has not previously been connected to a WLAN, it will search for available AP devices. (p. 123)• To change the size for uploaded photos, press [m], and then select Upload Image Size.• If you have registered more than one web storage, you can select from the list by pressing [m], and then selecting Change Web storage.3 Enter your ID and password, and then select Login → OK.• For information about entering text, refer to "Entering text". (p. 127)• To select an ID from the list, select → an ID.• If you have previously logged in to the website, you may be logged in automatically.To use this feature, you must create an AllShare Play account and an account with an aliated online storage service using your PC. After nishing creating accounts, add your online storage account to AllShare Play.4 Select les you want to upload, and then select Upload.• If you have registered more than one web storage, select a web storage rst.• You cannot upload video les to AllShare Play online storage.• When there are no les in the camera memory, you cannot use this feature.• You can upload up to 20 les.• You can also upload photos in Playback mode by pressing [m], and then selecting Share(Wi-Fi) → AllShare Play.](https://usermanual.wiki/Samsung-Electronics-Co/NX300.user-manual-rev-1/User-Guide-1897607-Page-40.png)
![142Wireless network > Using AllShare Play to send lesViewing photos or videos on devices that support AllShare Play1 Rotate the mode dial to B.2 Select → Nearby devices.• If the guide message appears, select Ye s .• The camera will automatically attempt to connect to a WLAN via the most recently connected AP device. • If the camera has not previously been connected to a WLAN, it will search for available AP devices. (p. 123)• You can set to allow only selected devices or all devices to connect by pressing [m], and then selecting DLNA Access Control on the screen.• A sharing le list is created. Wait until other devices can nd your camera.3 Connect the AllShare Play device to a network, and then turn on the AllShare Play feature.• Refer to your device's user manual for more information.4 On the camera, allow the AllShare Play device to connect to your camera.5 On the AllShare Play device, select a camera to connect.6 On the AllShare Play device, browse the shared photos or videos.• For information about searching for the camera and browsing the photos or videos on the AllShare Play device, refer to the device's user manual.• Videos may not play smoothly depending on the type of AllShare Play device or the network condition. For smooth playback, use a 5Ghz dual-band AP device.APS A camera is connected to a TV that supports AllShare Play via WLAN.](https://usermanual.wiki/Samsung-Electronics-Co/NX300.user-manual-rev-1/User-Guide-1897607-Page-41.png)

![144Wireless networkSending photos using Wi-Fi DirectWhen the camera connects via a WLAN to a device that supports the Wi-Fi Direct function, you can send photos to the device. This feature may not be supported on some devices.1 On the device, turn on the Wi-Fi Direct option.2 On the camera, in Playback mode, scroll to a photo.3 Press [m], and then select Share(Wi-Fi) → Wi-Fi Direct.• When in the single image view, you can send only one photo at a time.• When in thumbnails view, you can select multiple photos. Select Upload when you are nished selecting photos.4 Select the device from the camera’s list of Wi-Fi Direct devices.• Ensure that the device's Wi-Fi Direct option is turned on.• You can also select your camera from the device's list of Wi-Fi Direct devices.5 On the device, allow the camera to connect to the device.• The photo will be sent to the device.• You can send up to 20 les at a time.• When there are no photos in the camera memory, you cannot use this feature.• If you cannot connect to a Wi-Fi Direct device, update the device with the latest rmware. This feature may not be supported on some devices.](https://usermanual.wiki/Samsung-Electronics-Co/NX300.user-manual-rev-1/User-Guide-1897607-Page-43.png)
![146Camera settings menuYou can set the user environment with these settings.To set user options, In Shooting mode, press [m] → 5 → an option.Available items and the order of them may dier depending on shooting conditions.ISO CustomizingISO StepYou can set the size for the ISO sensitivity by either 1/3 or 1 step.Auto ISO RangeYou can set the maximum ISO value under which each EV step is chosen when you set the ISO to Auto.* DefaultOption Value1/3 StepISO 125, ISO 160, ISO 200, ISO 250, ISO 320, ISO 400, ISO 500, ISO 640, ISO 800*, ISO 1000, ISO 1250, ISO 1600, ISO 2000, ISO 2500, ISO 32001 StepISO 200, ISO 400, ISO 800*, ISO 1600, ISO 3200Noise ReductionUse the Noise Reduction to reduce the visual noise in photos.* DefaultOption DescriptionHigh ISO NRThis function reduces noise that may occur when you set a high ISO sensitivity. (O, High, Normal*, Low)Long Term NRThis function reduces noise when you set the camera for a long exposure. (O, On*)User settings](https://usermanual.wiki/Samsung-Electronics-Co/NX300.user-manual-rev-1/User-Guide-1897607-Page-45.png)
![147Camera settings menu > User settingsBracket SetYou can set up the options for AE Bracket, WB Bracket, and P Wiz Bracket.Option DescriptionAE Bracket SetSet the exposure interval. (-/+0.3 EV*, -/+0.7 EV, -/+1 EV, -/+1.3 EV, -/+1.7 EV, -/+2 EV, -/+2.3 EV, -/+2.7 EV, -/+3 EV)WB Bracket SetAdjust the White Balance interval range of the 3 bracketed photos. (AB-/+3*, AB-/+2, AB-/+1, MG-/+3, MG-/+2, MG-/+1)For example, AB-/+3 adjusts the Amber value plus or minus three steps. MG-/+3 adjusts the Magenta value the same amount.P Wiz Bracket SetSelect 3 Picture Wizard settings the camera uses to capture the 3 bracketed photos.DMF (Direct Manual Focus)You can adjust the focus manually by rotating the focus ring after achieving the focus by half-pressing [Shutter]. This feature may not be available with some lenses.](https://usermanual.wiki/Samsung-Electronics-Co/NX300.user-manual-rev-1/User-Guide-1897607-Page-46.png)
![149Camera settings menu > User settingsDistortion CorrectYou can correct lens distortion that might occur from lenses. This feature may not be available with some lenses.iFn CustomizingYou can select options that can be adjusted when you press [i-Function] on an i-Function lens.Option DescriptionApertureSet to adjust the aperture value.Shutter SpeedSet to adjust the shutter speed.EVSet to adjust the exposure value.ISOSet to adjust ISO sensitivity.White BalanceSet to adjust the White Balance.ZSet to adjust the zoom ratio.User DisplayYou can add or remove shooting information from the display.123LondonNo. Description1 Date & TimeSet to display the date and time.2 IconsSet to display icons on the right in Shooting mode.](https://usermanual.wiki/Samsung-Electronics-Co/NX300.user-manual-rev-1/User-Guide-1897607-Page-48.png)
![152Camera settings menuLearn to congure your camera's settings.To set Setting options, In Shooting or Playback mode, press [m] → q → an option.* DefaultItem DescriptionSound• System Volume: Set the sound volume or turn all sound o entirely. (O, Low, Medium*, High)Even if the system volume is turned o, the camera emits the sound while playing a video or a slide show.• AF Sound: Set the sound the camera emits when you half-press the shutter button on or o. (O, On*)• Button Sound: Set the sound the camera emits when you press the buttons or touch the screen on or o. (O, On*)Quick ViewSet the Quick View time length – the amount of time the camera displays a photo immediately after you capture it. (O, 1 sec*, 3 sec, 5 sec, Hold)* DefaultItem DescriptionDisplay AdjustAdjust the display brightness, auto brightness setting, display color, or level gauge.• Display Brightness: You can adjust the display brightness manually.• Auto Brightness: Turn auto brightness on or o. (O, On*)• Display Color: You can adjust the display color manually.• Horizontal Calibration: Calibrate the level gauge. If the level gauge is not level, position the camera on the level surface, and then follow the on-screen instructions.• You cannot access the Horizontal Calibration option in Playback mode.• You cannot calibrate the level gauge in portrait orientation.Auto Display OSet the display o time. The display turns o if you do not use the camera for the time you set. (O, 30 sec*, 1 min, 3 min, 5 min, 10 min)Setting](https://usermanual.wiki/Samsung-Electronics-Co/NX300.user-manual-rev-1/User-Guide-1897607-Page-51.png)
![153Camera settings menu > Setting* DefaultItem DescriptionPower SaveSet power shut o time. The camera shuts o if you do not use it for the time you set. (30 sec, 1 min*, 3 min, 5 min, 10 min, 30 min)• The camera retains the power-o time setting even if you replace the battery.• Power Save may not work if the camera is connected to a computer or a TV or playing a slide show or a movie.Help Guide DisplaySet to display help text about menus and functions. (O, On*)Press [n] to hide the help text.LanguageSet a language the camera shows on the display.Date & TimeSet date, time, date format, time zone and whether to imprint the date on photos. (Time Zone, Date & Time, Date Type, Time Type, Imprint)• The date appears on the lower right side of the photo.• When you print a photo, some printers may not print the date appropriately. * DefaultItem DescriptionVideo OutSet the video signal output appropriate for your country when connecting the camera to an external video device such as a monitor or HDTV.• NTSC: USA, Canada, Japan, Korea, Taiwan, Mexico, etc• PAL (Supports only PAL B, D, G, H, or I): Australia, Austria, Belgium, China, Denmark, Finland, France, Germany, England, Italy, Kuwait, Malaysia, New Zealand, Singapore, Spain, Sweden, Switzerland, Thailand, Norway, etcAnynet+ (HDMI-CEC)When you connect the camera to an HDTV that supports Anynet+ (HDMI-CEC), you can control the play function of the camera with the TV remote control.• O: You cannot control the play function of camera with the TV remote control.• On*: You can control the play function of camera with the TV remote control.HDMI OutputWhen you connect the camera to an HDTV with an HDMI cable, you can change the resolution of the image.• NTSC: Auto*, 1080p, 720p, 480p, 576p (activates only when PAL is selected)If the connected HDTV does not support the resolution you select, the camera sets the resolution one level lower.](https://usermanual.wiki/Samsung-Electronics-Co/NX300.user-manual-rev-1/User-Guide-1897607-Page-52.png)
![158Connecting to external devicesPlay back photos or videos by connecting your camera to an HDTV (3D TV) using an optional HDMI cable.Viewing les on an HDTV1 In Shooting or Playback mode, press [m] → q → HDMI Output → an option. (p. 153)2 Turn o your camera and HDTV.3 Connect your camera to your HDTV with the optional HDMI cable.4 Turn on your HDTV, and then select the HDMI video source.5 Turn on the camera.• The camera automatically enters into Playback mode when you connect it to an HDTV.6 View photos or play videos using the camera buttons.• When using the HDMI cable, you can connect the camera to an HDTV using the Anynet+(CEC) method. • The Anynet+(CEC) functions allow you to control connected devices using the TV remote control.• If the HDTV supports Anynet+(CEC), the TV turns on automatically when used in conjunction with the camera. This feature may not be available on some HDTVs.• When connected to an HDTV by an HDMI cable, the camera cannot capture a photo or video.• When connected to an HDTV, some of the camera’s playback functions may not be available.• The length of time after which the camera and an HDTV are connected may vary depending on the memory card that you are using. As the main feature of a memory card is to increase the transfer speed, it is not necessarily true to say that a memory card with a faster transfer speed is also fast in using the HDMI function.Viewing les on an HDTV or 3D TV](https://usermanual.wiki/Samsung-Electronics-Co/NX300.user-manual-rev-1/User-Guide-1897607-Page-57.png)
![159Connecting to external devices > Viewing les on an HDTV or 3D TVViewing les on a 3D TVYou can view photos or videos captured in 3D mode or with the 3D Panorama option in Smart mode on a 3D TV.1 In Shooting or Playback mode, press [m] → q → HDMI Output → an option. (p. 153)2 Select 3D HDMI Output → an option. (p. 154)3 Turn o your camera and 3D TV.4 Connect your camera to your 3D TV with the optional HDMI cable.5 Turn on your 3D TV, and then select the HDMI video source.6 Turn on your camera.• The camera automatically enters into Playback mode when you connect it to a 3D TV.7 Move to a 3D le, and then press [I] to switch to 3D mode.• Press [I] again to switch to 2D Mode.8 Turn on your TV's 3D function.• Refer to your TV's user manual for more details.9 View 3D photos or play 3D videos using the camera buttons.• You cannot view an MPO le in 3D eect on TVs that do not support the le format.• Use proper 3D glasses when you view an MPO or le or a 3D video le on a 3D TV.• Capturing photos in 3D Panorama mode may result in a less pronounced 3D eect than those captured in 3D mode with a 3D lens.Do not view the 3D photos or videos captured by your camera on a 3D TV or 3D monitor for an extended period of time. It may cause unpleasant symptoms, such as eyestrain, fatigue, nausea, and more.](https://usermanual.wiki/Samsung-Electronics-Co/NX300.user-manual-rev-1/User-Guide-1897607-Page-58.png)


![187Appendix > Before contacting a service centerSituation Suggested remediesYour computer cannot play videosVideos may not play on some video player programs. To play video les captured with your camera, use the Multimedia Viewer program that you can install with the i-Launcher program on your computer.i-Launcher is not functioning properly• End i-Launcher and restart the program.• Depending on your computer's specications and environment, the program may not launch automatically. In this case, click Start → All Programs → Samsung → i-Launcher → Samsung i-Launcher on your Windows computer. (For Windows 8, open Start screen, and then select All apps → Samsung i-Launcher.) Or, click Applications → Samsung → i-Launcher on your Mac OS computer.Cannot set the DPOF for RAW lesYou cannot set the DPOF for RAW les.Auto Focus does not work• Subject is not in focus. When the subject is outside the AF area, shoot by moving the subject inside the AF area and half-pressing [Shutter].• Subject is too close. Step back from the subject and shoot.• The focus mode is set to MF. Switch the mode to AF.Situation Suggested remediesAEL feature does not workAEL feature does not work in t, M, i, and s modes. Select another mode to use this feature.Lens does not work• Ensure that the lens is properly mounted. • Remove the lens from the camera and re-mount it.External ash or GPS does not workEnsure that the external device is properly mounted and turned on.The date & time settings screen appears when you power on the camera• Set the date and time again.• This screen appears when the camera’s internal power source is completely discharged. Insert a fully charged battery and wait at least 72 hours in power o status for the internal power source to be recharged.](https://usermanual.wiki/Samsung-Electronics-Co/NX300.user-manual-rev-1/User-Guide-1897607-Page-86.png)
![199AppendixOptional accessoriesLensSAMSUNG 18-55 mm F3.5-5.6 OIS IIISAMSUNG 20-50 mm F3.5-5.6 ED IISAMSUNG 16 mm F2.4 SAMSUNG 20 mm F2.8SAMSUNG 30 mm F2 SAMSUNG 50-200 mm F4-5.6 ED OIS IISAMSUNG 60 mm F2.8 Macro ED OIS SSASAMSUNG 18-200 mm F3.5-6.3 ED OISLensSAMSUNG 85 mm F1.4 ED SSA SAMSUNG 45 mm F1.8SAMSUNG 45 mm F1.8 [T6] 2D/3DExternal ashSEF42A SEF220AGPSGPS10](https://usermanual.wiki/Samsung-Electronics-Co/NX300.user-manual-rev-1/User-Guide-1897607-Page-98.png)