Samsung Electronics Co NX500 Digital Camera User Manual 1 of 2
Samsung Electronics Co Ltd Digital Camera 1 of 2
UserManual.wiki
>
Samsung Electronics Co
>
NX500 User Manual
>
User manual 1 of 2
Contents
1.
User manual 1 of 2
2.
User manual 2 of 2
User manual 1 of 2
Navigation menu
Upload a User Manual
Namespaces
Wiki Guide
HTML
PDF
Info
Views
User Manual
Discussion / Help
Navigation
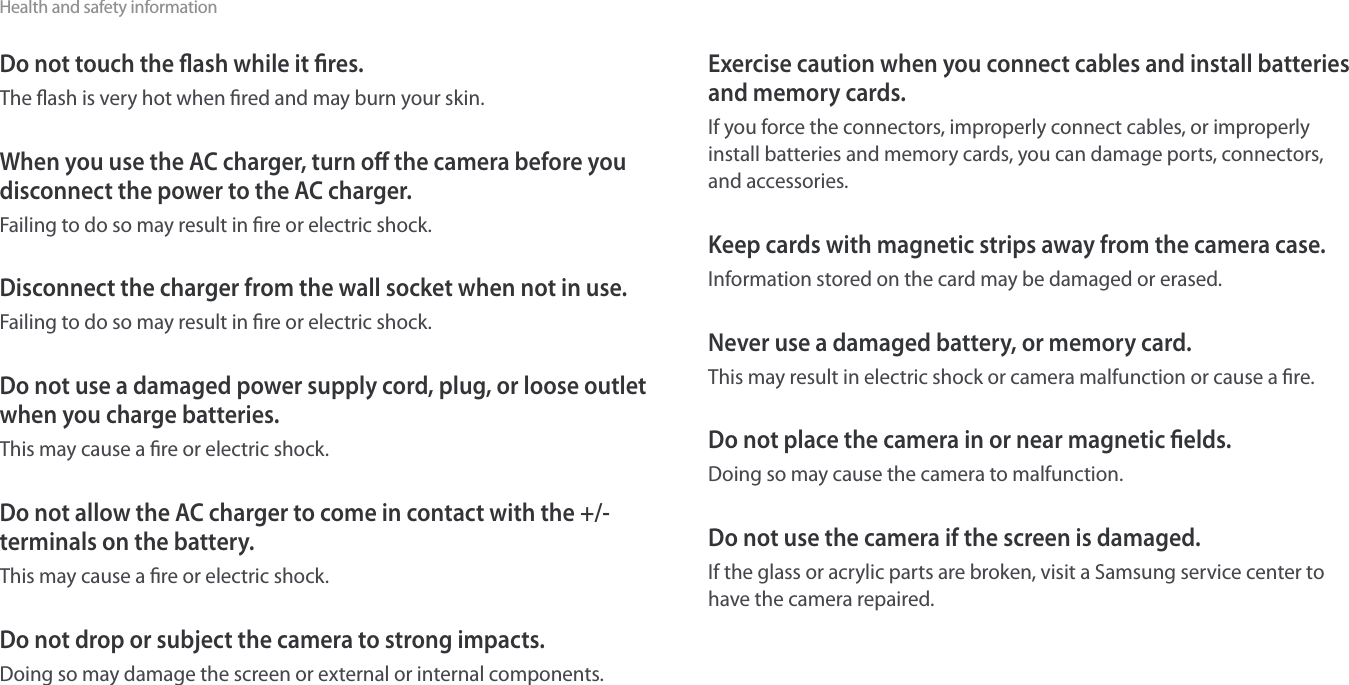
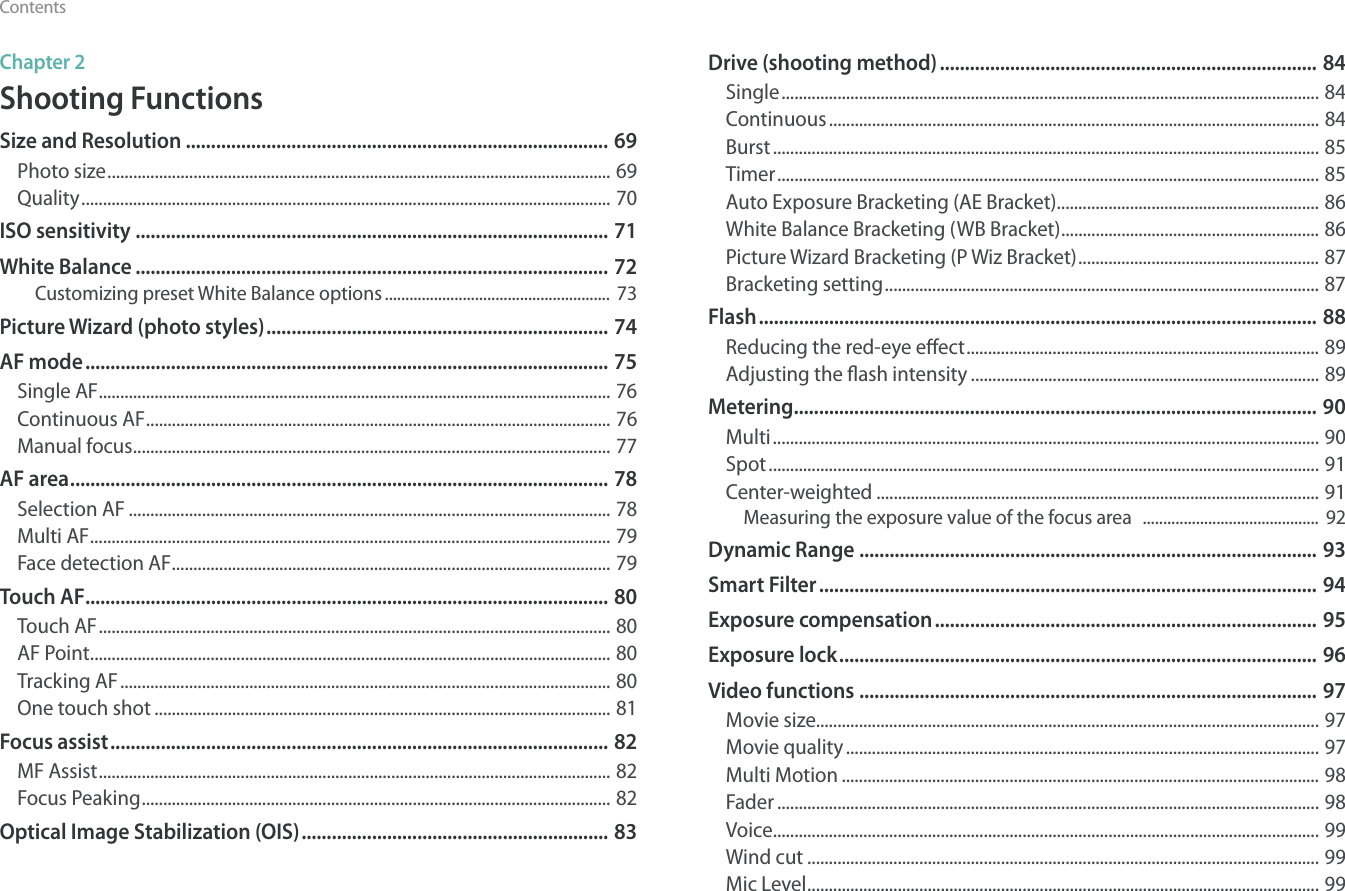
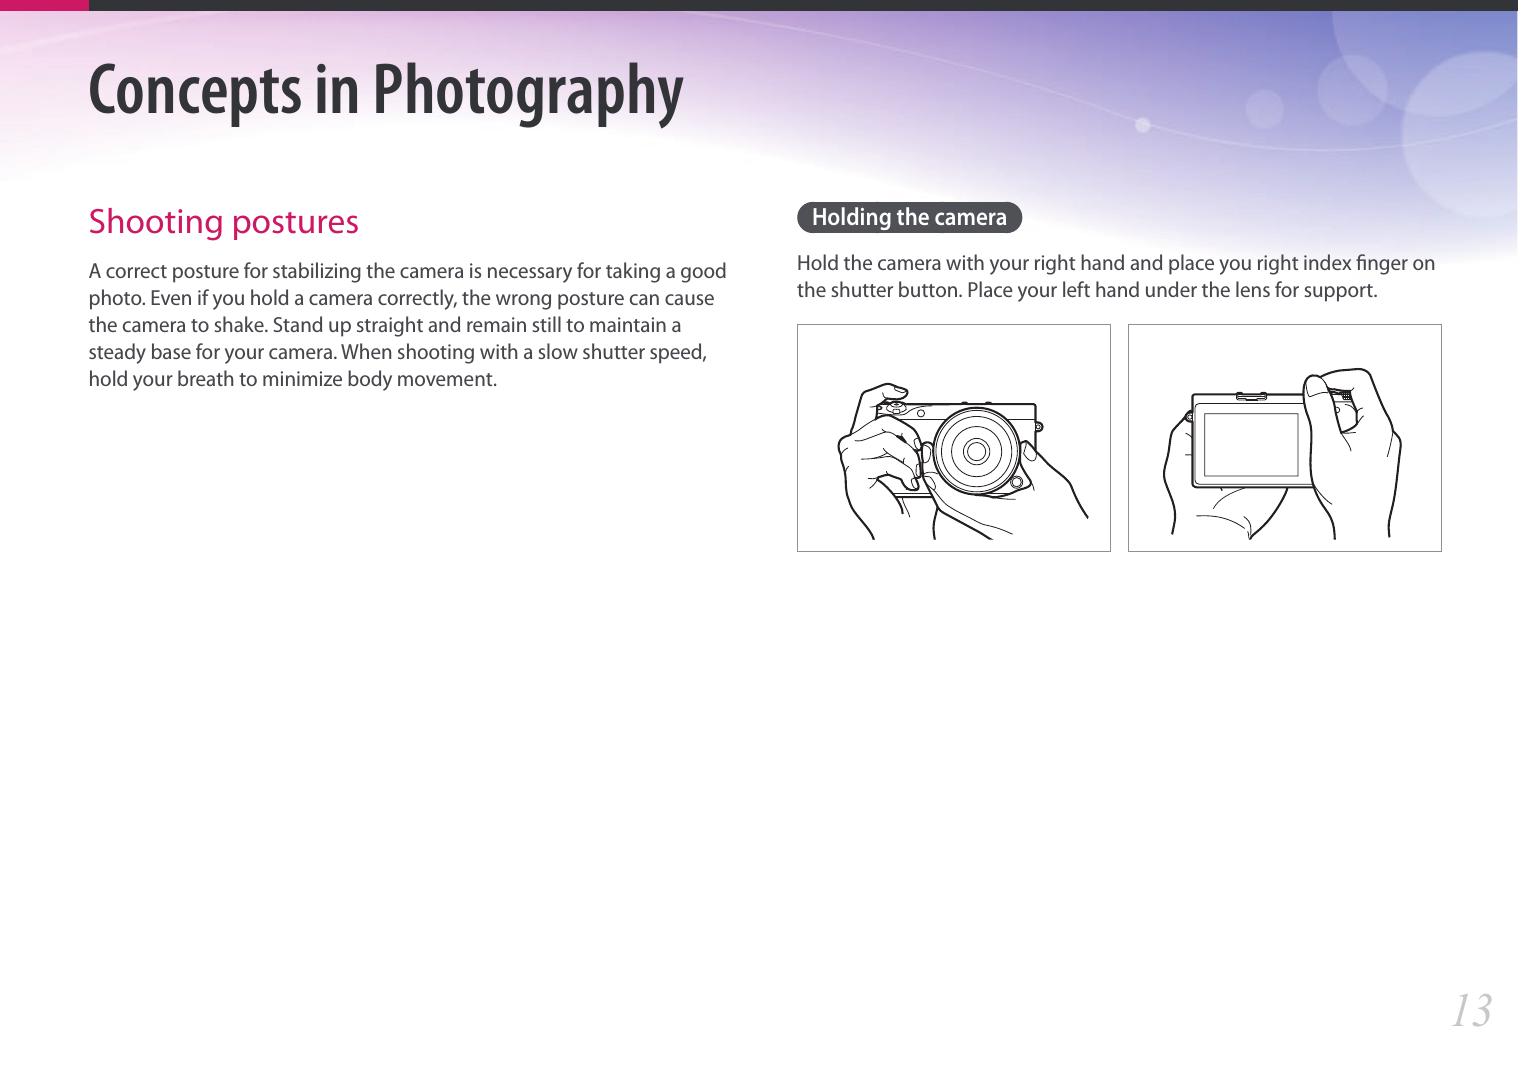
![6Indications used in this manualMode indicationsMode IndicationSmart AutotProgramPAperture PriorityAShutter PrioritySManualMLens PriorityiSmartsWi-FiBIcons used in this manualIcon FunctionAdditional informationSafety warnings and precautions[ ]Camera buttons. For example, [Shutter] represents the shutter button.( )Page number of related informationĺThe order of options or menus you must select to perform a step; for example: Select 1 ĺ Quality (represents select 1, and then Quality). *Annotation](https://usermanual.wiki/Samsung-Electronics-Co/NX500.User-manual-1-of-2/User-Guide-2507705-Page-7.png)

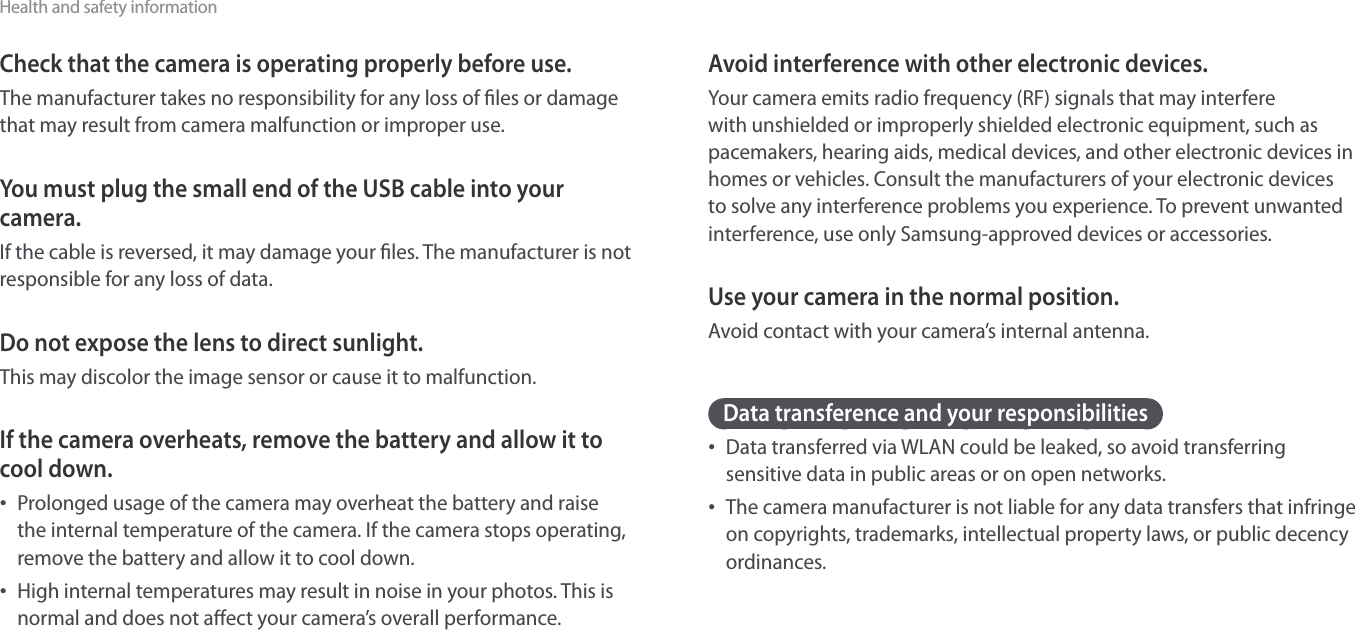
![My Camera36Performing the initial setupWhen you turn on your camera for the rst time, the initial setup screen appears. The language is preset for the country or region where the camera is sold. You can change the language as desired. You can also select an item by touching it on the screen.1 Press [I] to select Time Zone, and then press [F] or [o].2 Press [D/I] to select a time zone, and then press [o].Back SetTime Zone[GMT +00:00] London[GMT -01:00] Cape Verde[GMT -02:00] Mid-Atlantic[GMT -03:00] Buenos Aires, Sao Paulo[GMT -03:30] Newfoundland3 Press [I] to select Date & Time, and then press [F] or [o].Back SetDate & TimeYear Month Day Hr Min DST• The screen may dier depending on the language you selected.4 Press [C/F] to select an item (Year/Month/Day/Hr/Min/DST).5 Press [D/I] to set the option, and then press [o].6 Press [I] to select Date Type, and then press [F] or [o].7 Press [D/I] to select a date type, and then press [o].8 Press [I] to select Time Type, and then press [F] or [o].9 Press [D/I] to select a time type, and then press [o].10 Press [m] to nish the initial setup.](https://usermanual.wiki/Samsung-Electronics-Co/NX500.User-manual-1-of-2/User-Guide-2507705-Page-37.png)
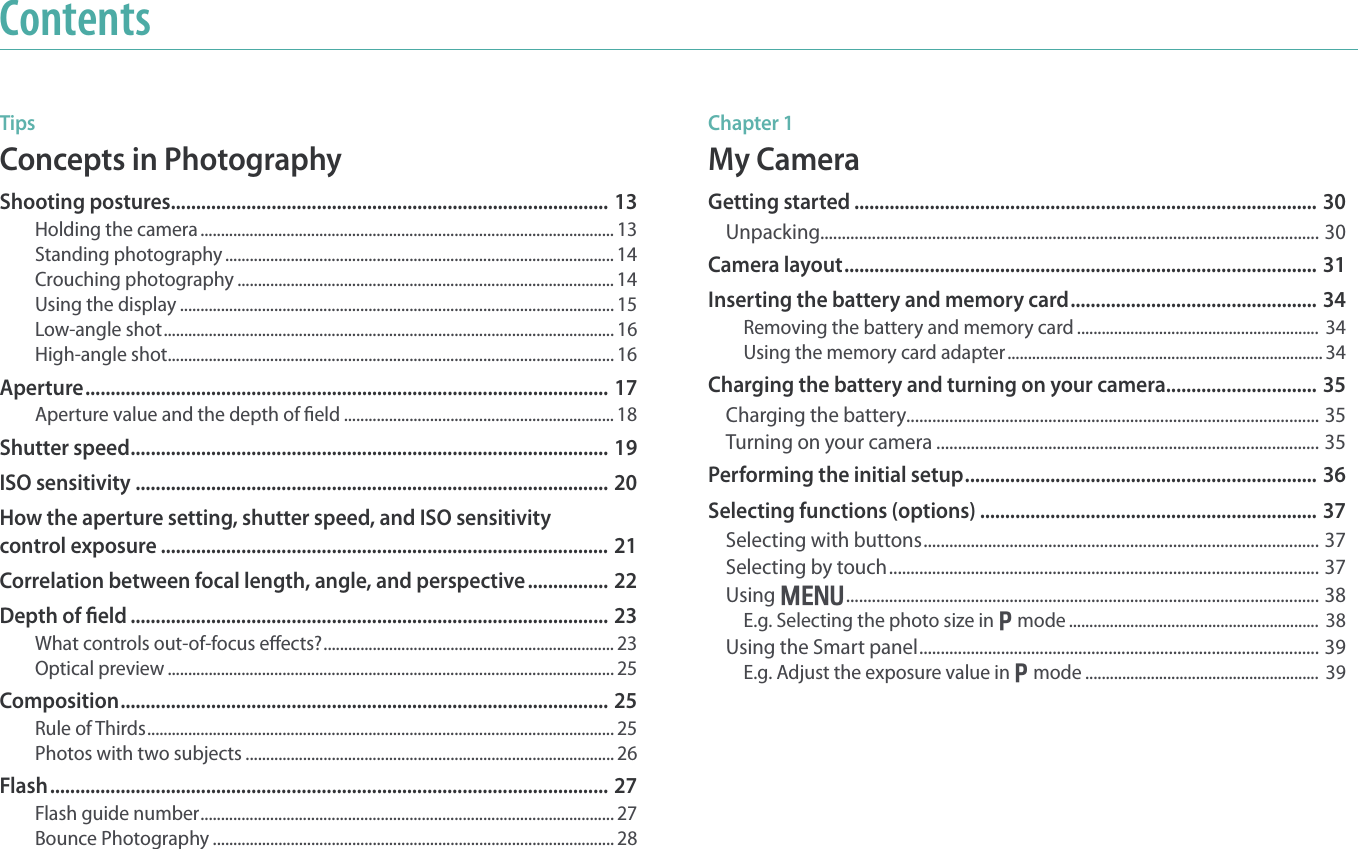
![My Camera37Selecting functions (options)Selecting with buttonsScroll the jog dial or press [D/I/C/F] to move, and then press [o] to select an option.Selecting by touchDo not use sharp objects, such as pens or pencils, to touch the screen. You can damage the screen.Touching: Touch an icon to select a menu or an option.Samsung LinkMobileLink Remote ViewnderAuto BackupEmailSNS & CloudDragging: Touch and hold an area on the screen, and then drag your nger.AutoSharePhoto SizeQualityISOWhite BalanceBack Select](https://usermanual.wiki/Samsung-Electronics-Co/NX500.User-manual-1-of-2/User-Guide-2507705-Page-38.png)
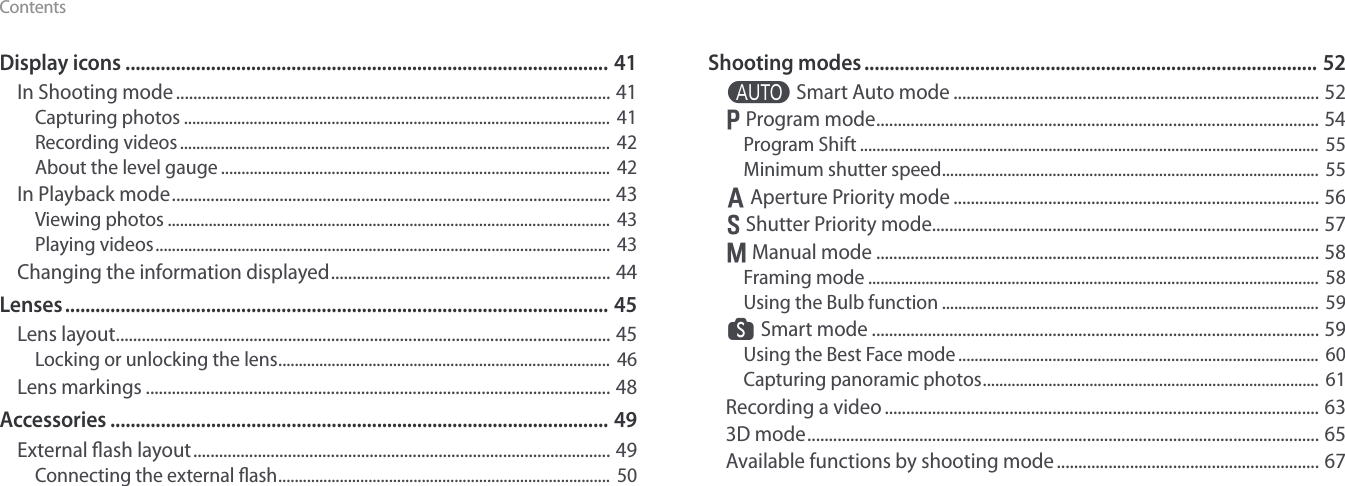
![My Camera > Selecting functions (options)38Flicking: Gently ick your nger across the screen.• The touch screen may not recognize your inputs if you touch multiple items at the same time.• When you touch or drag the screen, discolorations may occur. This is not a malfunction, but a characteristic of the touch screen. Touch or drag lightly to minimize the discolorations.• The touch screen may not work properly if you use the camera in extremely humid environments.• The touch screen may not work properly if you apply screen protection lm or other accessories to the screen.• Depending on the viewing angle of the camera or the display, the screen may appear dim. Adjust the viewing angle or brightness to improve the resolution.Using mPress [m] or touch on the screen, and then change shooting options or settings.E.g. Selecting the photo size in P mode1 Rotate the mode dial to P.2 Press [m] or touch .3 Press [C] ĺ [D/I] to move to 1, and then press [o].• You can also touch 1 on the screen.4 Scroll the jog dial or press [D/I] to move to Photo Size, and then press [o].• You can also drag the option list, and then touch an option.Back SelectAutoSharePhoto SizeQualityISOWhite Balance](https://usermanual.wiki/Samsung-Electronics-Co/NX500.User-manual-1-of-2/User-Guide-2507705-Page-39.png)
![My Camera > Selecting functions (options)395 Scroll the jog dial or press [D/I] to move to an option, and then press [o].• You can also drag the option list, and then touch an option.• Press [m] or touch Back to go back to the previous menu.Back SetAutoSharePhoto SizeQualityISOWhite Balance5472x3648 (3:2)3888x2592 (3:2)2976x1984 (3:2)1728x1152 (3:2)5472x3080 (16:9)6 Press [m] or touch Back to switch to Shooting mode.Using the Smart panelPress [f] or touch on the screen to access some functions such as Exposure, ISO, and White Balance.E.g. Adjust the exposure value in P mode1 Rotate the mode dial to P.2 Press [f] or touch .](https://usermanual.wiki/Samsung-Electronics-Co/NX500.User-manual-1-of-2/User-Guide-2507705-Page-40.png)
![My Camera > Selecting functions (options)403 Press [D/I/C/F] to move to EV, and then press [o]. • You can select an option directly by scrolling the jog dial without having to press [o].• You can also select an option by touching it.EV : 0.0AdjustYou can adjust some options by dragging them. Back4 Scroll the jog dial or press [C/F] to adjust the exposure value, and then press [o].• You can also drag the dial on the screen, and then select Set to adjust the option.EV : 0.0Back Set](https://usermanual.wiki/Samsung-Electronics-Co/NX500.User-manual-1-of-2/User-Guide-2507705-Page-41.png)
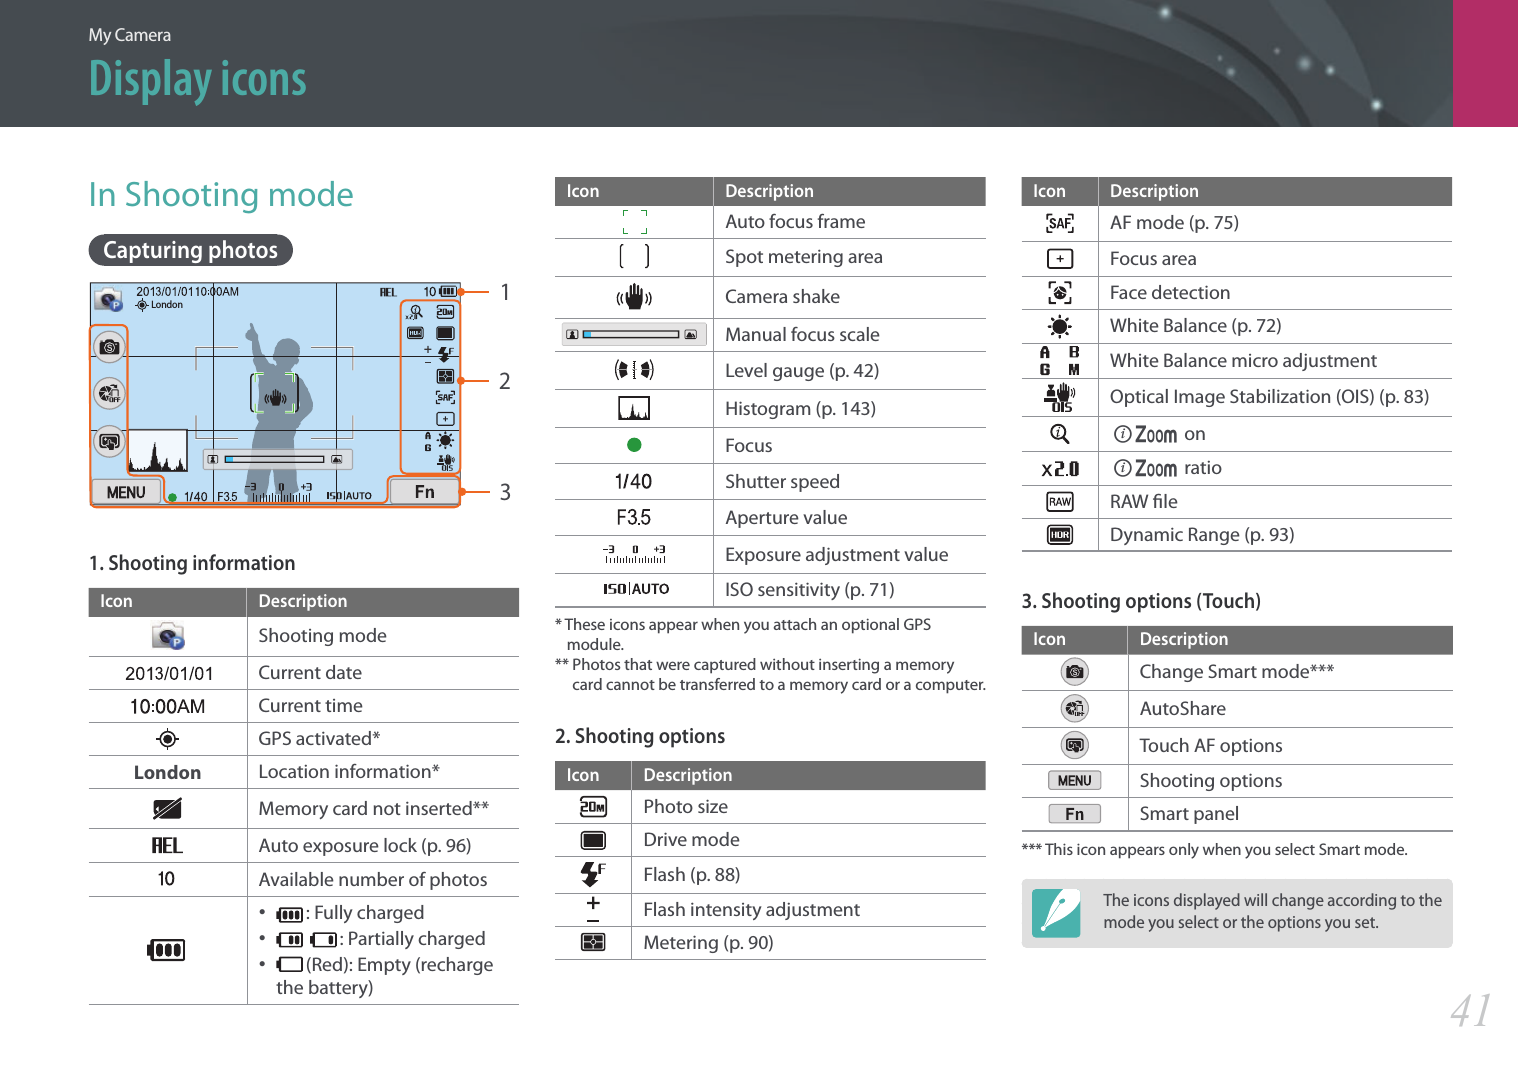
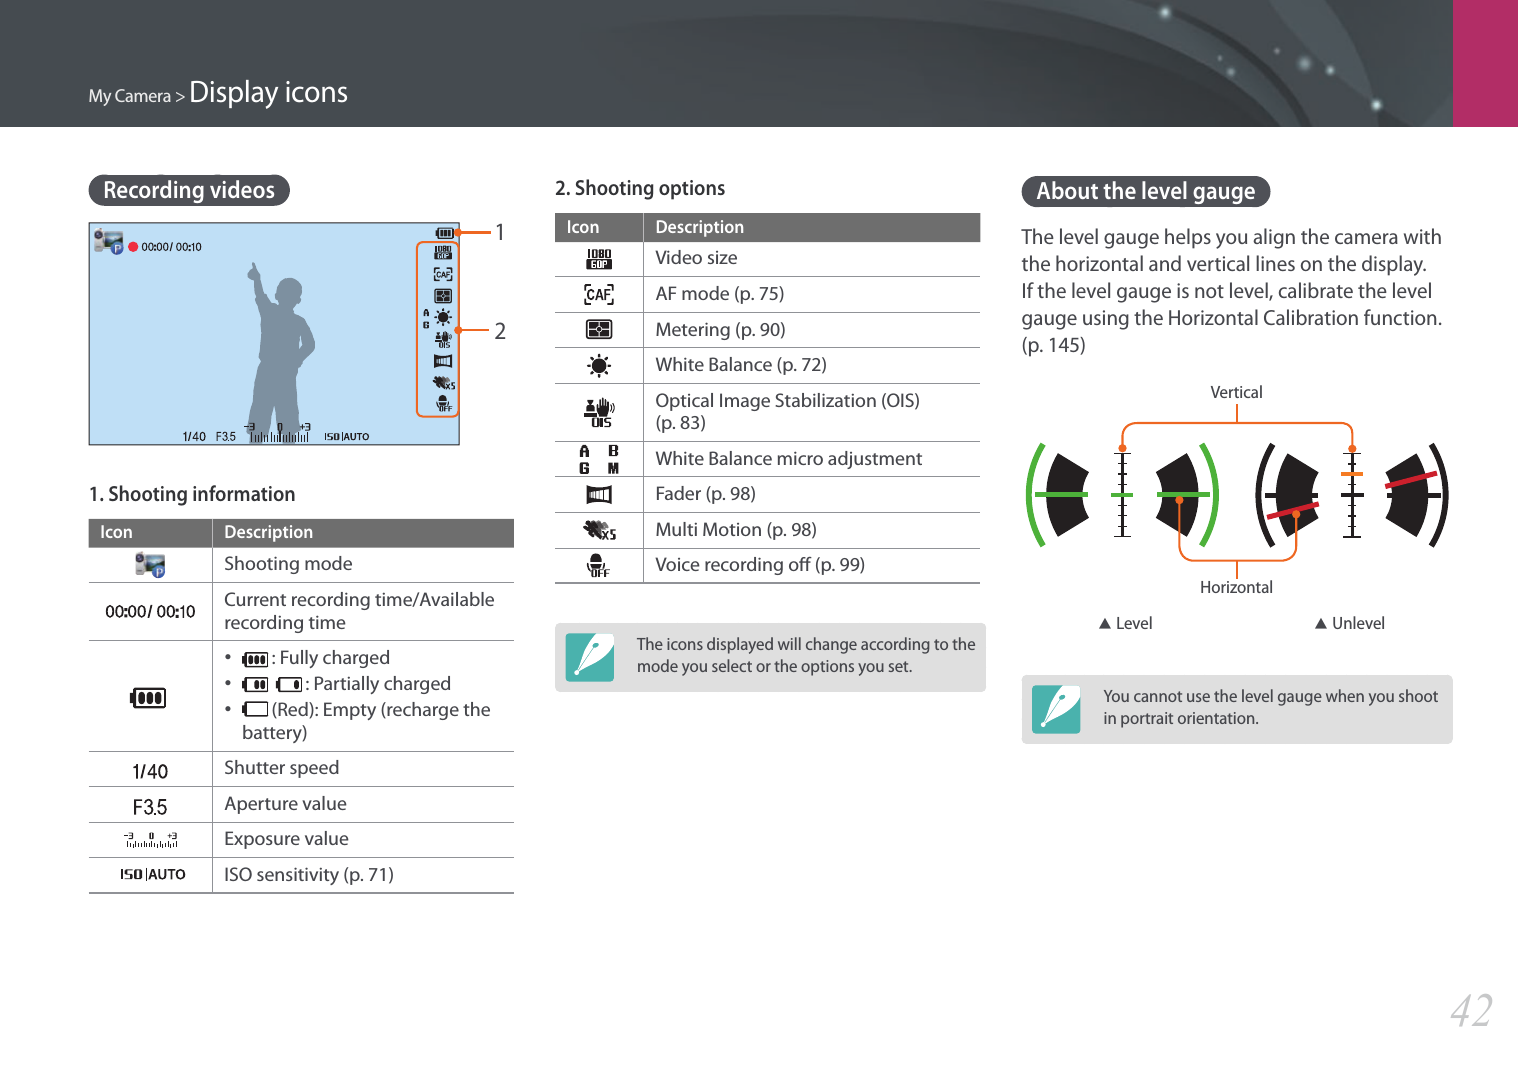
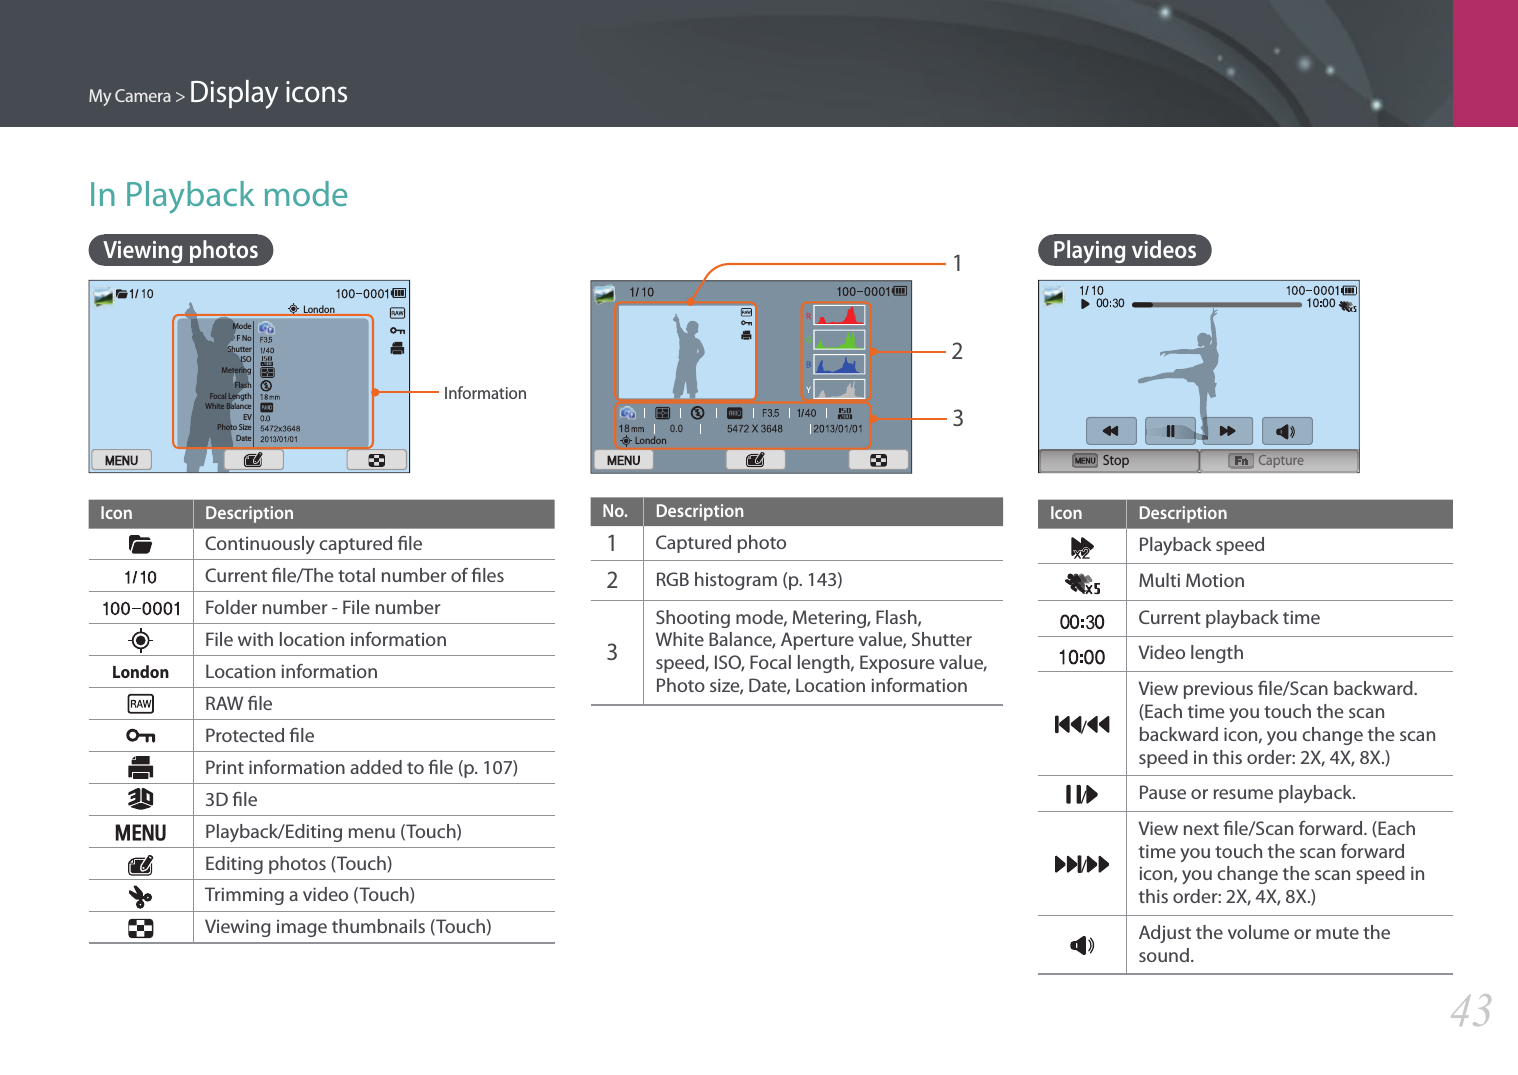
![My Camera > Display icons44Changing the information displayedPress [D] repeatedly to change the display type.Mode Display typeShooting• Basic shooting information (Shooting mode, Shutter speed, Aperture value, Exposure value, ISO sensitivity, etc.)• Basic shooting information + Shooting option buttons (MENU, Fn, AutoShare, Touch AF) + Level gauge• Basic shooting information + Shooting option buttons + Current shooting options information (Photo size, Drive mode, Flash, Metering, AF mode, etc.)• Basic shooting information + Shooting option buttons + Current shooting options information + Histogram + Date and timePlayback• Basic information• Display all information about the current le.• Display all information about the current le including RGB histogram.](https://usermanual.wiki/Samsung-Electronics-Co/NX500.User-manual-1-of-2/User-Guide-2507705-Page-45.png)
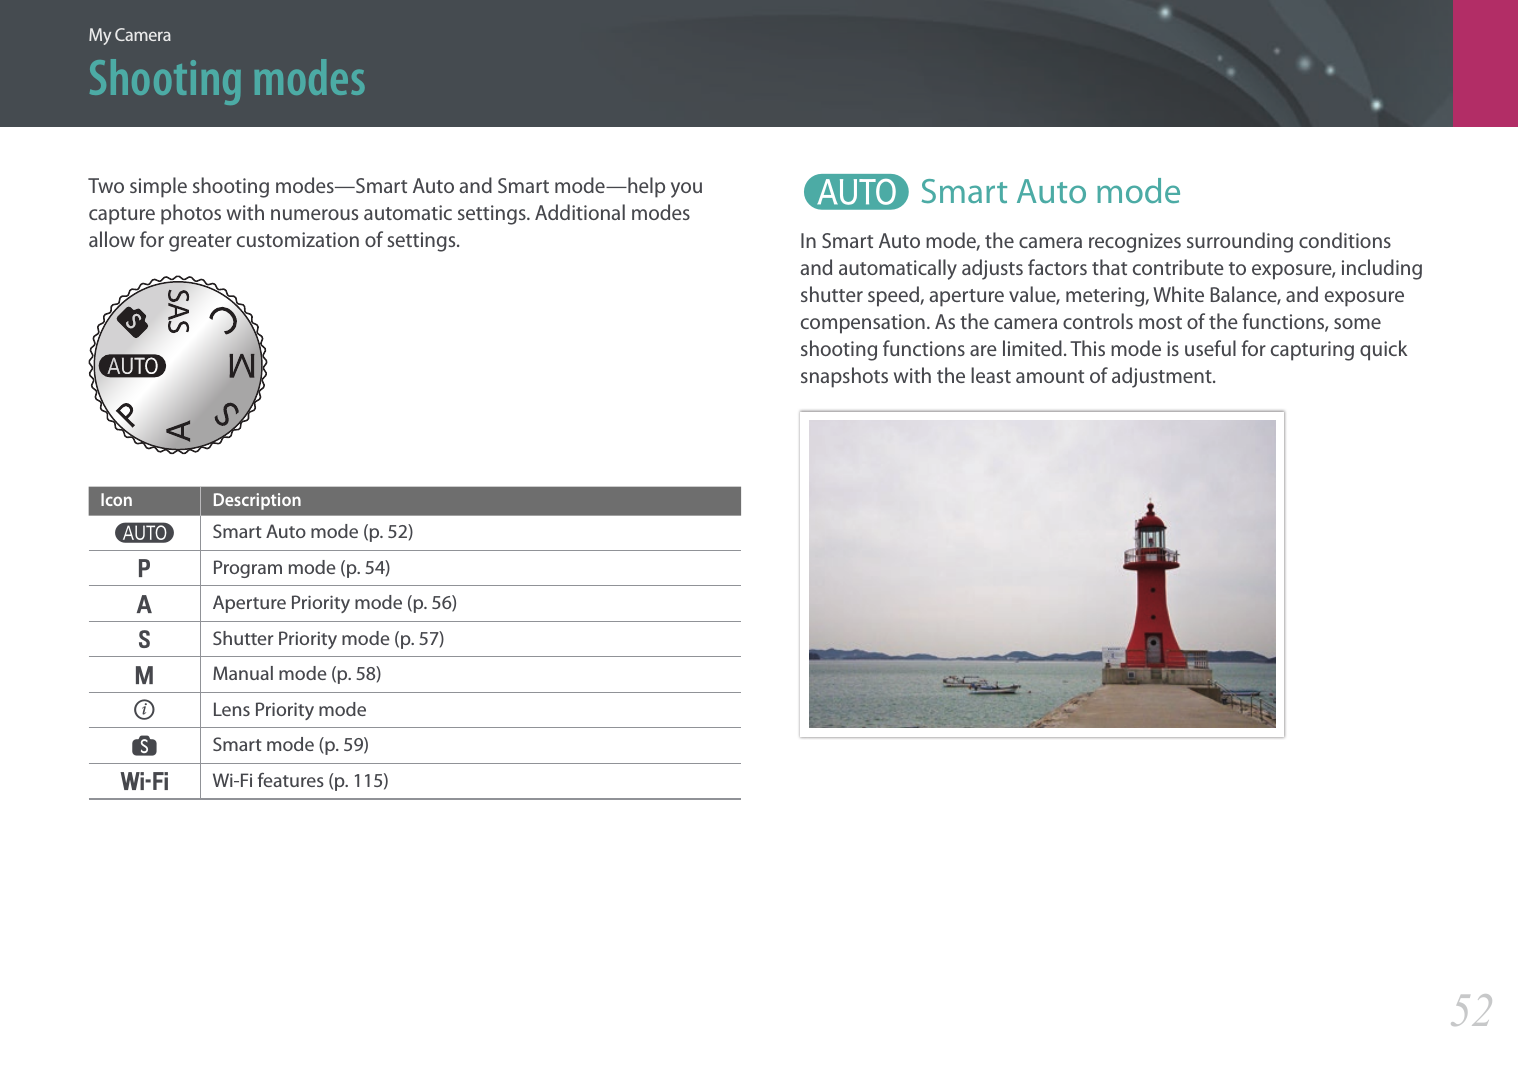
![My Camera > Shooting modes531 Rotate the mode dial to t.2 Align your subject in the frame.3 Half-press [Shutter] to focus.• The camera selects a scene. An appropriate scene icon appears at the screen.Recognizable scenesIcon DescriptionLandscapesScenes with bright white backgroundsLandscapes at nightIcon DescriptionPortraits at nightLandscapes with backlightingPortraits with backlightingPortraitsClose-up photos of objectsClose-up photos of textSunsetsIndoors, darkPartially litClose-up with spot lightingPortraits with spot lightingBlue skiesForested areas typically consist of green-colored subjectsClose-up photos of colorful subjectsCamera is stabilized on a tripod and the subject is not moving for a certain period of time. (when shooting in the dark)Actively moving subjectsFireworks (when using a tripod)4 Press [Shutter] to capture the photo.](https://usermanual.wiki/Samsung-Electronics-Co/NX500.User-manual-1-of-2/User-Guide-2507705-Page-54.png)
![My Camera > Shooting modes54• The camera may detect dierent scenes, even the same subjects, depending on external factors such as camera shake, lighting, and distance to the subject.• If the camera does not recognize an appropriate scene mode, it uses the default settings for the Smart Auto mode.• Even if it detects a face, the camera may not select a portrait mode depending on the subject's position or lighting.• Even if you use a tripod, the camera may not detect the tripod mode ( ) if the subject is moving.• The camera consumes more battery power, because it changes settings often to select appropriate scenes.P Program modeThe camera automatically adjusts shutter speed and aperture value so that an optimal exposure value can be achieved.This mode is useful when you want to capture shots of constant exposure while being able to adjust other settings.1 Rotate the mode dial to P.2 Set the desired options. 3 Half-press [Shutter] to focus, and then press [Shutter] to capture the photo.](https://usermanual.wiki/Samsung-Electronics-Co/NX500.User-manual-1-of-2/User-Guide-2507705-Page-55.png)
![My Camera > Shooting modes55Program ShiftProgram Shift function lets you adjust the shutter speed and aperture value while the camera maintains the same exposure. When you scroll the jog dial to the left, the shutter speed decreases and the aperture value increases. When you scroll the jog dial to the right, the shutter speed increases and the aperture value decreases.Minimum shutter speedSet the shutter speed not to be slower than the selected speed. However, if an optimal exposure value cannot be achieved because the ISO sensitivity reached the maximum ISO value that is set by Auto ISO Range, shutter speed may be slower than the selected minimum shutter speed.To set the minimum shutter speed, In Shooting mode, press [m] ĺ 1 ĺ Minimum Shutter Speed ĺ an option.• This feature is available only when the ISO sensitivity is set to Auto.• This feature is available only in Program or Aperture priority mode.](https://usermanual.wiki/Samsung-Electronics-Co/NX500.User-manual-1-of-2/User-Guide-2507705-Page-56.png)
![My Camera > Shooting modes56A Aperture Priority modeIn Aperture Priority mode, the camera automatically calculates shutter speed according to the aperture value you choose. You can adjust the depth of eld (DOF) by changing the aperture value. This mode is useful for taking portraits, owers, or landscape shots. Large Depth of Field Small Depth of Field1 Rotate the mode dial to A.2 Scroll the jog dial to adjust the aperture value. • You can also adjust the aperture value by pressing [f], moving to the aperture value, and then scrolling the jog dial or dragging the screen. 3 Set the desired options. 4 Half-press [Shutter] to focus, and then press [Shutter] to capture the photo.• In low-light settings, you may need to increase the ISO sensitivity to prevent blurred photos.• To set the minimum shutter speed, in Shooting mode, press [m] ĺ 1 ĺ Minimum Shutter Speed ĺ an option.](https://usermanual.wiki/Samsung-Electronics-Co/NX500.User-manual-1-of-2/User-Guide-2507705-Page-57.png)
![My Camera > Shooting modes57S Shutter Priority modeIn Shutter Priority mode, the camera automatically adjusts the aperture value according to the shutter speed you choose. This mode is useful for capturing photos of fast-moving subjects or for creating tracer eects in a photo.For example, set the shutter speed to over 1/500 s to freeze the subject. To make the subject appear blurred set the shutter speed to below 1/30 s.Slow shutter speed Fast shutter speed1 Rotate the mode dial to S.2 Scroll the jog dial to adjust the shutter speed.• You can also adjust the shutter speed by pressing [f], moving to the shutter speed, and then scrolling the jog dial or dragging the screen.3 Set the desired options. 4 Half-press [Shutter] to focus, and then press [Shutter] to capture the photo.In order to compensate for the reduced amount of light allowed by fast shutter speeds, open the aperture and let in more light. If your photos are still too dark, increase the ISO value.](https://usermanual.wiki/Samsung-Electronics-Co/NX500.User-manual-1-of-2/User-Guide-2507705-Page-58.png)
![My Camera > Shooting modes58M Manual modeManual mode lets you adjust the shutter speed and aperture value manually. In this mode, you can fully control the exposure of your photos.This mode is useful in controlled shooting environments, such as a studio, or when it is necessary to ne-tune camera settings. The Manual mode is also recommended for shooting night scenes or reworks.1 Rotate the mode dial to M.2 Scroll the jog dial to adjust the shutter speed.3 Press and hold [W], and then rotate the mode dial to adjust the aperture value.• You can also adjust the shutter speed or the aperture value by pressing [f], moving to the shutter speed or the aperture value, and then scrolling the jog dial or dragging the screen.4 Set the desired options.5 Half-press [Shutter] to focus, and then press [Shutter] to capture the photo.Framing modeWhen you adjust the aperture value or shutter speed, the exposure changes according to the settings, so the display may darken. With this function on, the brightness of the display is constant regardless of the settings, so you can better frame your shot.To use Framing Mode,In Shooting mode, press [m] ĺ 1 ĺ Framing Mode ĺ an option.](https://usermanual.wiki/Samsung-Electronics-Co/NX500.User-manual-1-of-2/User-Guide-2507705-Page-59.png)
![My Camera > Shooting modes59Using the Bulb functionUse the Bulb function to shoot night scenes or the night sky. While you are pressing [Shutter], the shutter is left open so you can create moving light eects.To use a bulb, Completely scroll the jog dial to the left to Bulb ĺ Press and hold [Shutter] for the desired time.• If you set a high ISO value or open the shutter for a long time, image noise may increase.• Drive options, ash, and One touch shot cannot be used with the Bulb function.• The Bulb function is available only in Manual mode.• Use a tripod and shutter release to prevent your camera from shaking.• The longer you open the shutter, the longer it takes to save a photo. Do not turn the camera o while the camera saves a photo. • If you use this function for a long time, use a fully charged battery. s Smart modeIn Smart mode, you can capture photos with options that are preset for a specic scene.1 Rotate the mode dial to s.2 Select a scene. • To select a shooting mode when the mode dial is set to s, press [f] or touch , and then select a desired mode. Smart : Beauty FaceSetOption DescriptionBeauty FaceCapture a portrait with options to hide facial imperfections.Best FaceCapture multiple photos and replace faces to create the best possible image.LandscapeCapture still-life scenes and landscapes.](https://usermanual.wiki/Samsung-Electronics-Co/NX500.User-manual-1-of-2/User-Guide-2507705-Page-60.png)
![My Camera > Shooting modes60Option DescriptionMacroCapture small or close-up subjects.Action FreezeCapture subjects moving at high speed.Rich TonesCapture a photo with vibrant colors.PanoramaCapture a wide panoramic scene in a single photo.WaterfallCapture scenes with waterfalls.SilhouetteCapture subjects as dark shapes against a light background.SunsetCapture scenes at sunset, with natural-looking reds and yellows.NightCapture multiple photos in low light conditions without a ash. The camera combines them to create a single image that is brighter and has less blurring.FireworksCapture scenes with reworks.Light TraceCapture scenes with the light trailing in low-light conditions.Creative ShotCapture photos with eects applied automatically.3 Half-press [Shutter] to focus, and then press [Shutter] to capture.Using the Best Face modeIn Best Face mode, you can capture multiple photos and replace faces to create the best possible image. Use this mode to select the best image for each individual when capturing group photos.1 Rotate the mode dial to s, and then select Best Face.2 Align your subject in the frame, and then half-press [Shutter] to focus.3 Press [Shutter] to capture the photo.• The camera captures 5 photos consecutively.• The rst photo is set as the background image.• The camera automatically detects faces after shooting.4 Touch a face to replace.](https://usermanual.wiki/Samsung-Electronics-Co/NX500.User-manual-1-of-2/User-Guide-2507705-Page-61.png)
![My Camera > Shooting modes615 Touch the best image from the 5 faces that were captured.• Repeat steps 4 and 5 to replace the rest of the faces in the photo.• The icon will appear on the image that the camera recommends.6 Touch to save the photo.• Use a tripod to prevent your camera from shaking.• The resolution is set to 5.9M or less.Capturing panoramic photosCapture a 2D or 3D panoramic photo. Captured 3D panoramic photos can be viewed only on a 3D TV or 3D monitor.1 Rotate the mode dial to s, and then select Panorama.2 Press [m] ĺ 1 ĺ Panorama ĺ Live Panorama or 3D.3 Press [m] to return to Shooting mode.4 Press and hold [Shutter] to start shooting.](https://usermanual.wiki/Samsung-Electronics-Co/NX500.User-manual-1-of-2/User-Guide-2507705-Page-62.png)
![My Camera > Shooting modes625 With [Shutter] pressed, slowly move the camera in the direction you selected.• In 3D Panorama mode, you can capture a scene only in horizontal directions.• Arrows pointing in the direction of motion are displayed, and the entire shooting image is displayed in the preview box.• When the scenes are aligned, the camera captures the next photo automatically.6 When you are nished, release [Shutter].• The camera will automatically save the shots into one photo.• If you release [Shutter] while shooting, the panoramic shooting stops and photos that have been captured are saved.• The resolution varies depending on the panoramic photo you captured.• In Panorama mode, some shooting options are not available.• The camera may stop shooting due to the shooting composition or the subject's movement.• In Panorama mode, your camera may not capture the entire last scene if you stop moving the camera to improve the photo quality. To capture the entire scene, move your camera slightly beyond the point where you want the scene to end.• In 3D Panorama mode, your camera may not capture the very beginning or end of a scene due to the nature of the 3D eect. To capture the entire scene, move slightly beyond the beginning and end points you want to capture.• Photos captured with the 3D function are saved in JPEG (2D) and MPO (3D) formats. On your camera's display, you can view only JPEG les.• To view 3D les, connect your camera to a 3D TV or 3D monitor with an optional HDMI cable. While viewing, wear proper 3D glasses. • Capturing photos in 3D Panorama mode may result in a less pronounced 3D eect than those captured with a 3D lens. To increase the 3D eect, attach the optional 3D lens and use 3D mode. (p. 65)](https://usermanual.wiki/Samsung-Electronics-Co/NX500.User-manual-1-of-2/User-Guide-2507705-Page-63.png)
![My Camera > Shooting modes63• For best results when capturing panoramic photos, avoid the following: -moving the camera too quickly or too slowly -moving the camera too little to capture the next image -moving the camera at irregular speeds -shaking the camera -shooting in dark places -capturing moving subjects nearby -shooting conditions where the brightness or color of light is changing• Photos taken are automatically saved, and shooting is stopped under the following conditions: -if you change the shooting direction while shooting -if you move the camera too rapidly -if you do not move the cameraRecording a videoIn Shooting mode, you can record Full HD videos (1920X1080) by pressing (Video recording). The camera lets you record a video up to 29 minutes and 59 seconds in length at 60, 30, 24, or 15 fps, and saves the les in MP4 (H.264) format. 60 fps is available only with 1920X1080 and 1280X720 and 24 fps is available only with 1920X810. 15 fps is available only with some Smart Filter options. The sound is recorded via the camera's microphone.You can set the exposure by adjusting the aperture value and shutter speed for the mode you selected. When you use a lens that does not have an AF/MF switch while recording a video, press [F] to deactivate or activate the AF function. When you use the lens that has an AF/MF switch, the AF function works according to the switch’s setting.Select Fader to fade in or out a scene. You can also select Voice, Wind Cut, or other options to set recording options. (p. 99)](https://usermanual.wiki/Samsung-Electronics-Co/NX500.User-manual-1-of-2/User-Guide-2507705-Page-64.png)

![My Camera > Shooting modes653D modeYou can capture 3D photos or videos with an optional 3D lens.SAMSUNG 45 mm F1.8 [T6] 2D/3D lens (example)Set the 2D/3D switch on the lens to 3D, and then capture a photo or video 1.5-5 m away from the subject.• 3D mode is always on, regardless of the mode dial of the camera, except B.• To use auto 3D options that enable the camera to set shooting options automatically depending on shooting conditions in 3D mode, press [m] ĺ 1 ĺ 3D Auto Mode ĺ On.• To change the 3D recording option, press [m] ĺ 6 ĺ 3D REC Mode ĺ a desired option.* DefaultIcon DescriptionSide by Side*: Displays two images next to each other.Frame Packing: Displays the images for the left and right eye alternately in frames.](https://usermanual.wiki/Samsung-Electronics-Co/NX500.User-manual-1-of-2/User-Guide-2507705-Page-66.png)
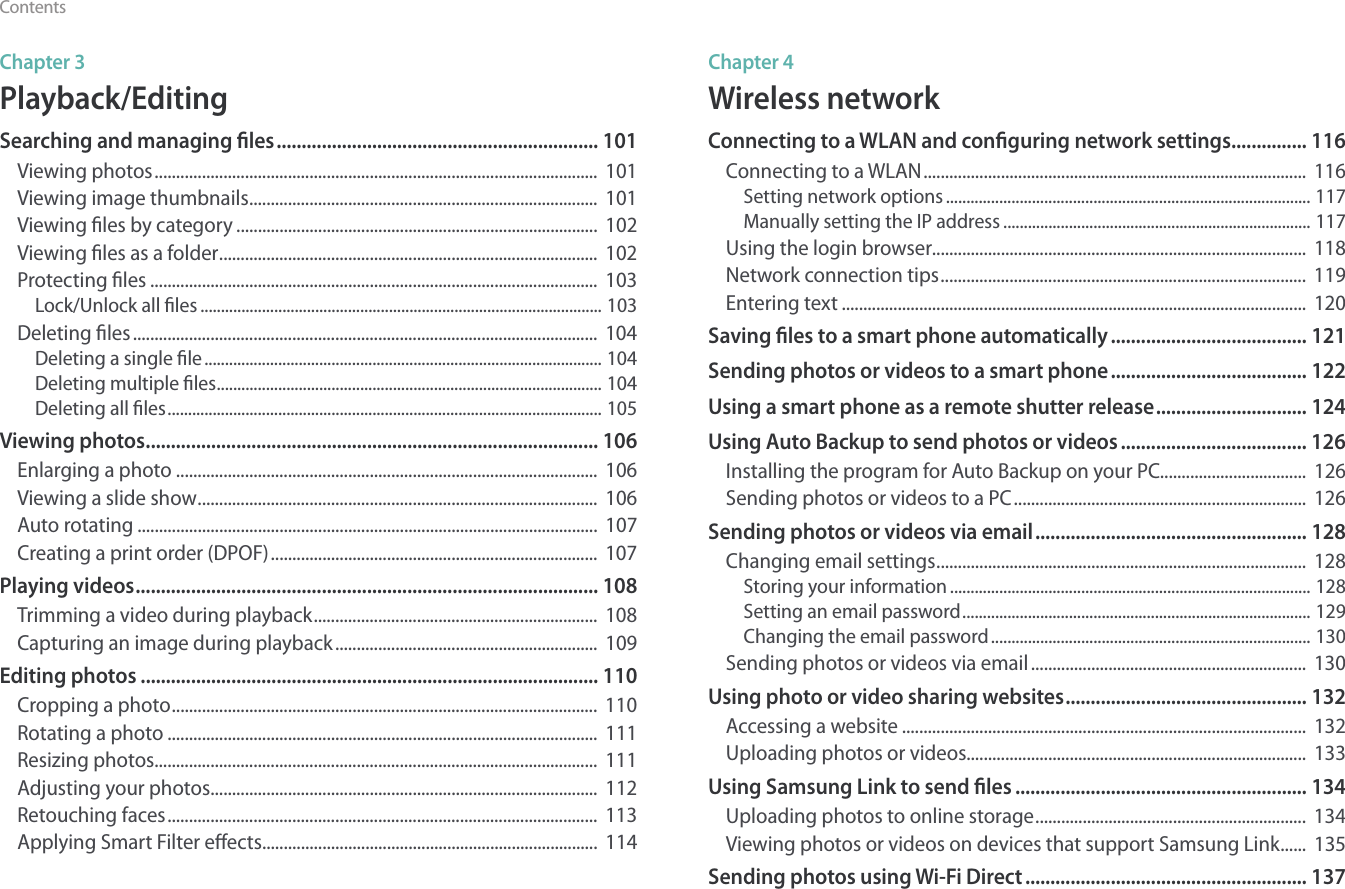
![Shooting Functions6969Shooting FunctionsShooting FunctionsPhoto sizeAs you increase the resolution, your photo or video will include more pixels, so it can be printed on larger paper or displayed on a larger screen. When you use a high resolution, the le size will also increase. Select a low resolution for photos that will be displayed in a digital picture frame or uploaded to the web.To set the size, In Shooting mode, press [m] ĺ 1 ĺ Photo Size ĺ an option.Icon Size Recommended for5472x3648 (3:2) Printing on A1 paper.3888x2592 (3:2) Printing on A2 paper.2976x1984 (3:2) Printing on A3 paper.1728x1152 (3:2) Printing on A5 paper.5472x3080 (16:9) Printing on A1 paper or viewing on an HDTV.3712x2088 (16:9) Printing on A3 paper or viewing on an HDTV.2944x1656 (16:9) Printing on A4 paper or viewing on an HDTV.1920x1080 (16:9) Printing on A5 paper or viewing on an HDTV.3648x3648 (1:1) Printing a square photo on A1 paper.2640x2640 (1:1) Printing a square photo on A3 paper.2000x2000 (1:1) Printing a square photo on A4 paper.1024x1024 (1:1) Printing a square photo on A5 paper.Available options may dier depending on shooting conditions.Size and Resolution](https://usermanual.wiki/Samsung-Electronics-Co/NX500.User-manual-1-of-2/User-Guide-2507705-Page-70.png)
![70Shooting Functions > Size and ResolutionQualityThe camera saves photos in either the JPEG or RAW format.Photos captured by a camera are often transformed to the JPEG format and stored in the memory according to the settings of the camera at the time of shooting. RAW les are not transformed to the JPEG format and are stored in the memory without any changes. RAW les have the le extension “SRW”. To adjust and calibrate exposures, White Balances, tones, contrasts, and colors of the RAW les, or to convert them into JPEG or TIFF format, use the Adobe Photoshop Lightroom program found on the supplied DVD-ROM.Ensure you have enough space on the memory card to save photos in the RAW format.To set the quality, In Shooting mode, press [m] ĺ 1 ĺ Quality ĺ an option.Icon Format DescriptionJPEGSuper Fine:• Compressed for the best quality.• Recommended for printing in large size.JPEGFine:• Compressed for better quality.• Recommended for printing in normal size.Icon Format DescriptionJPEGNormal:• Compressed for normal quality.• Recommended for printing in small size or uploading to the web.RAWRAW:• Save a photo without data loss.• Recommended for editing after shooting.RAW+JPEG RAW + S.Fine: Save a photo in both the JPEG (S.Fine quality) and RAW format.RAW+JPEG RAW + Fine: Save a photo in both the JPEG (Fine quality) and RAW format.RAW+JPEG RAW + Normal: Save a photo in both the JPEG (Normal quality) and RAW format.Available options may dier depending on shooting conditions.](https://usermanual.wiki/Samsung-Electronics-Co/NX500.User-manual-1-of-2/User-Guide-2507705-Page-71.png)
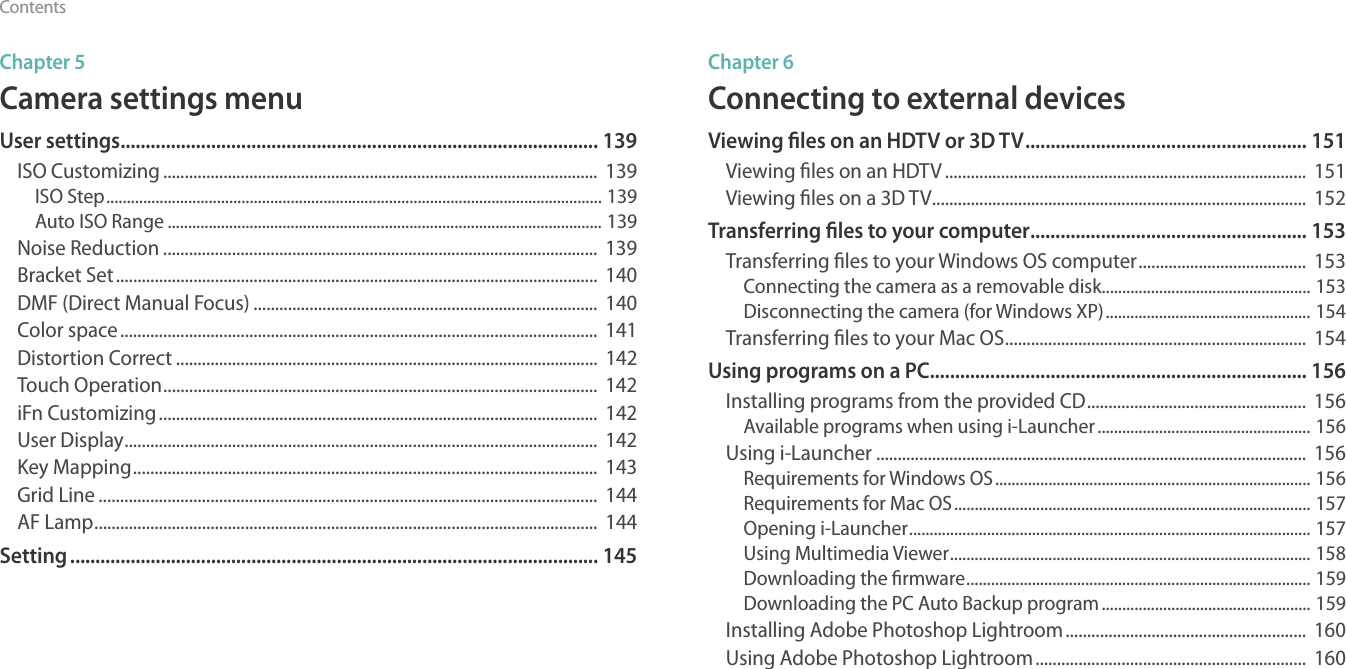
![Shooting Functions7171Shooting FunctionsShooting FunctionsThe ISO sensitivity value represents the sensitivity of camera to light. The larger the ISO value, the more sensitive the camera is to light. Consequently, by selecting a higher ISO sensitivity value, you can capture photos in dim or dark places at faster shutter speeds. However, this may increase electronic noise and result in a grainy photo.To set ISO sensitivity, In Shooting mode, press [I] ĺ an option.ExamplesISO 100 ISO 400ISO 800 ISO 3200• You can also set the option by pressing [m] ĺ 1 ĺ ISO ĺ an option in Shooting mode.• Increase the ISO value in places where ash use is prohibited. You can capture a clear photo by setting a high ISO value without having to secure more light.• Use the Noise Reduction function in order to reduce the visual noise that can appear on photos of a high ISO value. (p. 139)• Available options may dier depending on the shooting conditions.ISO sensitivity](https://usermanual.wiki/Samsung-Electronics-Co/NX500.User-manual-1-of-2/User-Guide-2507705-Page-72.png)
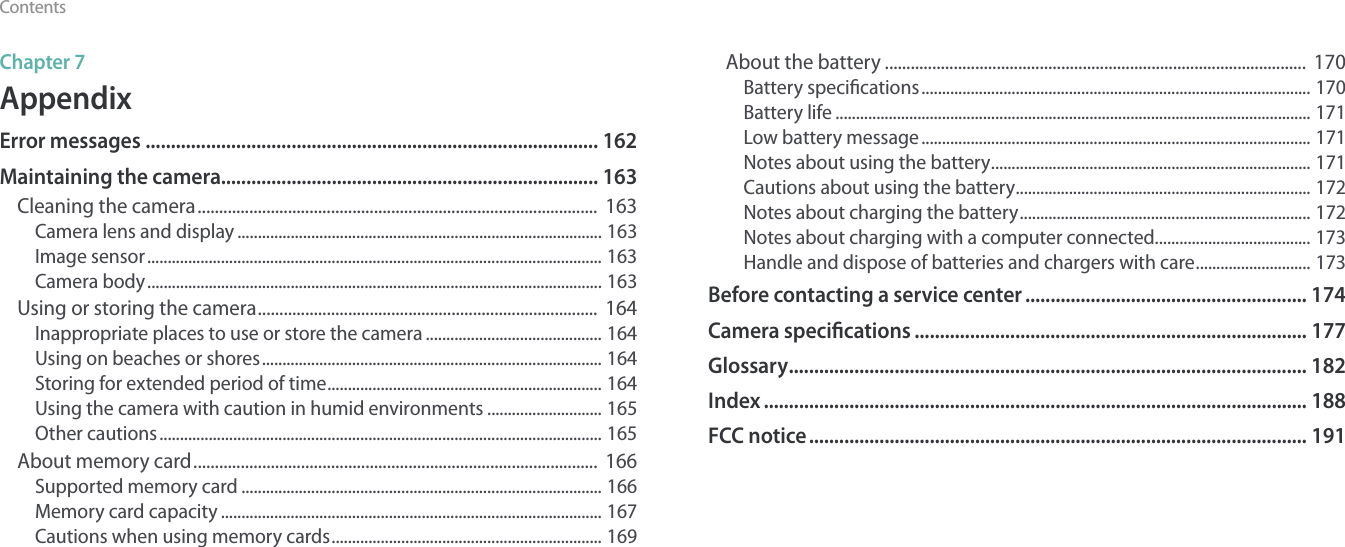
![Shooting Functions7272Shooting FunctionsShooting FunctionsWhite Balance represents the light source that inuences on the color of a photo. The color of a photo depends on the type and quality of the light source. If you want the color of your photo to be realistic, select an appropriate lighting condition to calibrate the White Balance, such as Auto WB, Daylight, Cloudy, Tungsten, or adjust color temperature manually.You can also adjust color for the preset light sources so that the colors of the photo match the actual scene under mixed lighting conditions.To set the White Balance, In Shooting mode, press [m] ĺ 1 ĺ White Balance ĺ an option.Icon DescriptionAuto WB: Use automatic settings depending on the lighting conditions.Daylight: Select when taking outdoor photos on a sunny day. This option results in photos closest to the natural colors of the scene.Cloudy: Select when taking outdoor photos on a cloudy day or in shadows. Photos captured on cloudy days tend to be more bluish than on sunny days. This option osets that eect.Fluorescent White: Select when shooting under a daylight uorescent lamp, especially for white uorescent light.Icon DescriptionFluorescent NW: Select when shooting under a daylight uorescent lamp, especially for white uorescent light of very white hues.Fluorescent Daylight: Select when shooting under a daylight uorescent lamp, especially for white uorescent light of slightly bluish hue.Tungsten: Select when taking indoor photos under incandescent bulbs or halogen lamps. Incandescent tungsten bulbs tend to have a reddish hue. This option osets that eect.Flash WB: Select when using a ash.Custom Set: Use your pre-dened settings. You can manually set the White Balance by pressing [D], and then shooting a white sheet of paper. Fill the spot metering circle with the paper and set the White Balance.Color Temperature: Manually adjust the color temperature of the light source. Color temperature is a measurement in degrees Kelvin that indicates the specic type of light source. You can get a warmer photo with a higher value, and a cooler photo with a lower value. Press [D], and then adjust the value.Available options may dier depending on shooting conditions.White Balance](https://usermanual.wiki/Samsung-Electronics-Co/NX500.User-manual-1-of-2/User-Guide-2507705-Page-73.png)
![73Shooting Functions > White BalanceCustomizing preset White Balance optionsYou can also customize preset White Balance options.To customize preset options,In Shooting mode, press [m] ĺ 1 ĺ White Balance ĺ an option ĺ [D] ĺ scroll the jog dial, or press [D/I/C/F]. White Balance : DaylightBack Set ResetYou can also touch an area on the screen.ExamplesAuto WB DaylightFluorescent Daylight Tungsten](https://usermanual.wiki/Samsung-Electronics-Co/NX500.User-manual-1-of-2/User-Guide-2507705-Page-74.png)
![Shooting Functions7474Shooting FunctionsShooting FunctionsPicture Wizard lets you apply dierent photo styles to your photo to create various looks and emotional moods. You can also create and save your own photo styles by adjusting color, saturation, sharpness, and contrast for each style.There is no rule for which style is suitable in which conditions. Experiment with dierent styles and nd your own settings.To set a photo style, In Shooting mode, press [m] ĺ 1 ĺ Picture Wizard ĺ an option.ExamplesStandard Vivid PortraitLandscape Forest RetroCool Calm Classic• You can also adjust the value of the preset style settings. Select a Picture Wizard option, press [D], and then adjust color, saturation, sharpness, or contrast.• To customize your own picture wizard, select , , or , and then adjust the color, saturation, sharpness, and contrast.• Picture Wizard options cannot be set with Smart Filter options at the same time.Picture Wizard (photo styles)](https://usermanual.wiki/Samsung-Electronics-Co/NX500.User-manual-1-of-2/User-Guide-2507705-Page-75.png)
![Shooting Functions7575Shooting FunctionsShooting FunctionsAF modeLearn how to adjust the camera’s focus according to the subjects.You can select a focusing mode appropriate to the subject among Single Auto Focus, Continuous Auto Focus, and Manual Focus. The AF function is activated when you press [Shutter] halfway. In the MF mode, you have to rotate the focus ring on the lens to focus manually.In most cases, you can have a focus by selecting Single AF. Fast moving subjects or subjects of a color similar to the background are dicult to focus. Select an appropriate focusing mode for such instances.If your lens has an AF/MF switch, you must set the switch according to the selected mode. Set the switch to AF when you select Single AF or Continuous AF. Set the switch to MF when you select Manual Focus.When your lens has no AF/MF switch, press [F] to select a desired AF mode.To set the auto focus mode, In Shooting mode, press [F] ĺ an option.• You can also set the option by pressing [m] ĺ 1 ĺ AF Mode ĺ an option in Shooting mode.• The available options may dier depending on the lens in use.](https://usermanual.wiki/Samsung-Electronics-Co/NX500.User-manual-1-of-2/User-Guide-2507705-Page-76.png)
![76Shooting Functions > AF modeSingle AFSingle AF is appropriate for shooting a still subject. When you press [Shutter] halfway, the focus xes in the focus area. The area turns green when the focus is achieved.Continuous AFWhile you are pressing [Shutter] halfway, the camera continues to automatic focusing. Once the focus area is xed on the subject, the subject is always in focus even when moving. This mode is recommended for shooting a person on a bicycle, a running dog, or a car racing scene.](https://usermanual.wiki/Samsung-Electronics-Co/NX500.User-manual-1-of-2/User-Guide-2507705-Page-77.png)
![Shooting Functions7878Shooting FunctionsShooting FunctionsThe AF area function changes the positions of the focus area.Generally, cameras focus on the nearest subject. When there are a lot of subjects, however, unwanted subjects can be in focus. In order to prevent unwanted subjects from being in focus, change the focus area so that a desired subject is in focus. You can get a clearer and sharper photo by selecting an appropriate focus area.To set the auto focus area, In Shooting mode, press [m] ĺ1 ĺ AF Area ĺ an option.• Available options may dier depending on shooting conditions.• When the AF/MF switch is set to MF, you cannot change the AF area from the shooting menu.• When you use the Face Detection AF option, the camera focuses on the area with the white frame automatically.• Depending on the Picture Wizard options, Face Detection may not be eective.• When you set manual focus, Face Detection may not be available.• Face Detection may not be eective when: -the subject is far from the camera -it is too bright or too dark -the subject is not facing the camera -the subject is wearing sunglasses or a mask -the subject’s facial expression changes drastically -the subject is backlit or the lighting conditions are unstableSelection AFYou can set the focus on an area you want. Apply an out-of-focus eect to make the subject more distinguishable.The focus on the photo below was repositioned and resized so that it ts the subject’s face. To resize or move the focus area, in Shooting mode, press [o]. Use the navigation button to move the focus area. Scroll the jog dial to resize the focus area.AF area](https://usermanual.wiki/Samsung-Electronics-Co/NX500.User-manual-1-of-2/User-Guide-2507705-Page-79.png)
![79Shooting Functions > AF areaMulti AFThe camera displays a green rectangle in places where focus is set correctly. The photo is divided into two or more areas, and the camera obtains focus points of each area. It is recommended for scenery photos.When you press [Shutter] halfway, the camera displays the focus areas as shown in the photo below.Face detection AFThe camera focuses on human faces preferentially. Faces of up to 10 people can be detected. This setting is recommended for shooting a group of people.When you press [Shutter] halfway, the camera focuses on faces as shown in the photo below. In cases of shooting a group of people, the camera displays the focus on the nearest person’s face in white and the rest of the people’s faces in gray.](https://usermanual.wiki/Samsung-Electronics-Co/NX500.User-manual-1-of-2/User-Guide-2507705-Page-80.png)
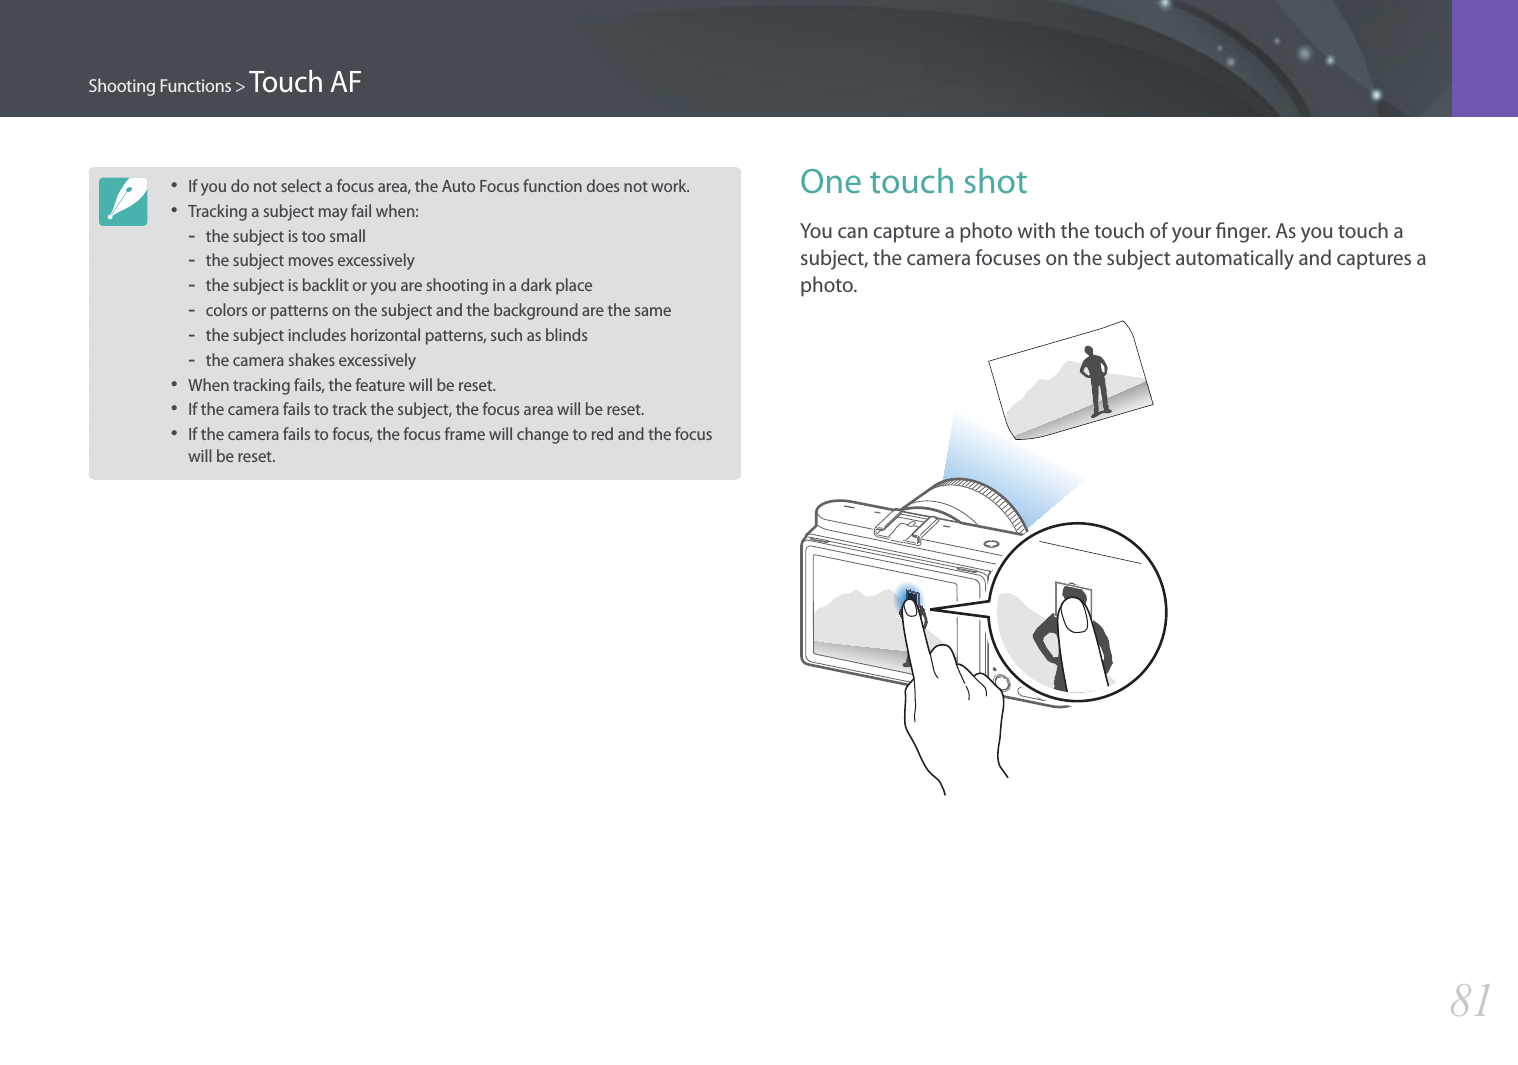
![Shooting Functions8080Shooting FunctionsShooting FunctionsTracking AFTracking AF allows you to track and automatically focus on your subject, even when the subject is moving or when you change the shooting composition. White frame: Your camera is tracking the subject.Green frame: Your subject is in focus when you half-press [Shutter].Red frame: Your camera failed to focus. Select or focus on an area that you touch on the screen. Additionally, focus on the subject and capture a photo by touching the screen.To set Touch AF, In Shooting mode, press [m] ĺ1 ĺTouch AF ĺ an option.Available options may dier depending on the shooting conditions.Touch AFTouch AF allows you to select and focus on the focus area that you touch on the screen.AF PointThe focus area will correspond to the area you touch on the screen and the focus will not be achieved. Touch AF](https://usermanual.wiki/Samsung-Electronics-Co/NX500.User-manual-1-of-2/User-Guide-2507705-Page-81.png)
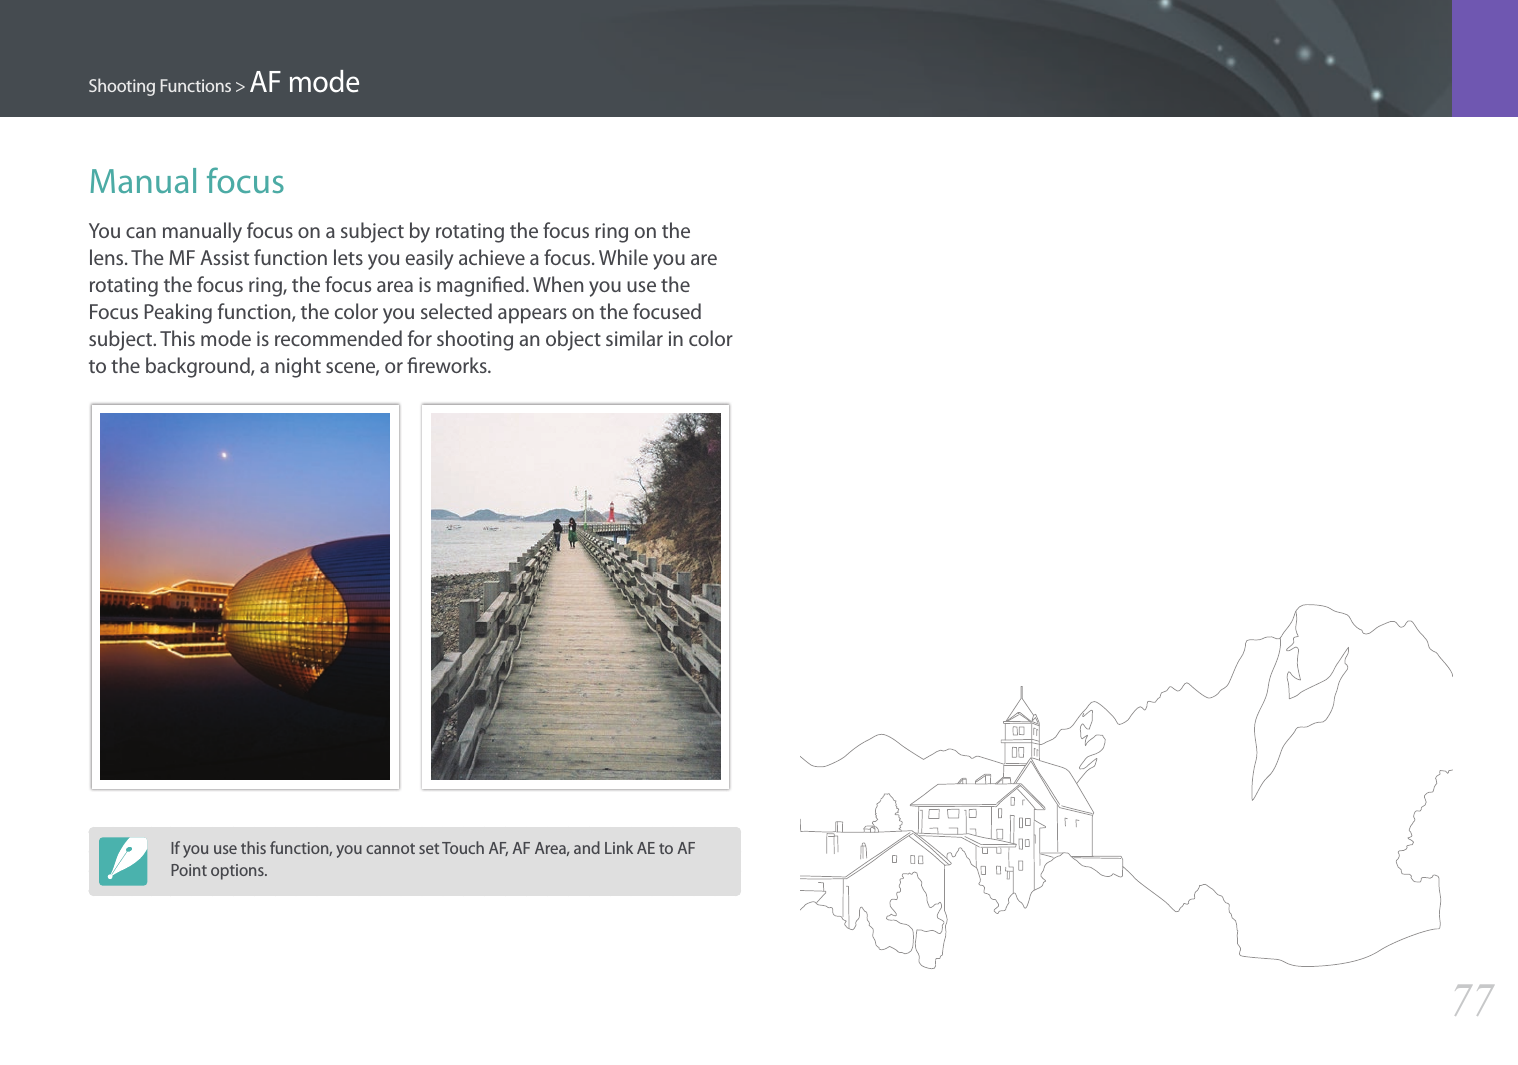
![Shooting Functions8282Shooting FunctionsShooting FunctionsIn the manual focus mode, you have to rotate the focus ring on the lens to focus. When you use the MF Assist function or the Focus Peaking function, you can achieve a clearer focus. This function is only available on a lens that supports manual focus.MF AssistIn the manual focus mode, you can enlarge the scene and easily adjust the focus while rotating the focus ring.To set the manual focus assist, In Shooting mode, press [m] ĺ 1 ĺ MF Assist ĺ an option.* DefaultOption DescriptionODo not use the MF Assist function.Enlarge x5*The focus area is magnied by 5 times when you rotate the focus ring.* DefaultOption DescriptionEnlarge x8The focus area is magnied by 8 times when you rotate the focus ring.Focus PeakingIn the manual focus mode, the color you selected appears on the focused subject to help you focus while rotating the focus ring.To set Focus Peaking options, In Shooting mode, press [m] ĺ 1 ĺ Focus Peaking ĺ an option.* DefaultOption DescriptionLevelSet a sensitivity for detecting the focused subject. (O, High, Normal*, Low)ColorSet a color to appear on the focused subject. (White*, Red, Green)Focus assist](https://usermanual.wiki/Samsung-Electronics-Co/NX500.User-manual-1-of-2/User-Guide-2507705-Page-83.png)
![Shooting Functions8383Shooting FunctionsShooting FunctionsUse the Optical Image Stabilization (OIS) function to minimize camera shake. OIS may not be available with some lenses.Camera shake tends to occur in dark places or when shooting indoors. In such cases, the camera uses slower shutter speeds in order to increase the amount of light taken in, which can result in a blurry photo. You can prevent this situation by using the OIS function.If your lens has an OIS switch, you have set the switch to ON to use the OIS function.To set OIS options, In Shooting mode, press [m] ĺ1 ĺ OIS (Anti-Shake) ĺ an option.* DefaultIcon DescriptionO: The OIS function is o. (This option may not be available with some lenses.)Mode 1*: The OIS function is applied only when you press [Shutter] in full or half.Mode 2: The OIS function is on.Optical Image Stabilization (OIS)Without OIS correction With OIS correction• OIS may not function properly when: -you move your camera to follow a moving subject -there is too much camera shake -the shutter speed is slow (for example, when you select Night in s mode) -the battery is low -you capture a close-up shot• If you use the OIS function with a tripod, your images may be blurred by the vibration of the OIS sensor. Deactivate the OIS function when you use a tripod.• If the camera is hit or dropped, the display will be blurry. If this occurs, turn o the camera, and then turn it on again.• Use the OIS function only when needed because the function consumes more battery power.• To set an OIS option on the menu, set the OIS switch on your lens to ON.• This option may not be available with some lenses.• O may not be available with some lenses.](https://usermanual.wiki/Samsung-Electronics-Co/NX500.User-manual-1-of-2/User-Guide-2507705-Page-84.png)
![Shooting Functions8484Shooting FunctionsShooting FunctionsYou can set the shooting method such as Continuous, Burst, Timer and so on.Select Single to capture one photo at a time. Select Continuous or Burst to shoot fast moving subjects. Select AE Bracket, WB Bracket, or P Wiz Bracket to adjust exposure, White Balance, or apply Picture Wizard eects. You can also select Timer to capture a photo of yourself.To set the shooting method, In Shooting mode, press [C] ĺ an option.• You can also set the option by pressing [m] ĺ 1 ĺ Drive ĺ an option in Shooting mode.• Available options may dier depending on shooting conditions.SingleCapture one photo whenever you press [Shutter]. Recommended for general conditions.ContinuousContinuously capture photos while you are pressing [Shutter]. You can capture up to 5 photos (Continuous Normal) or 8.6 photos (Continuous High) per second.If you select Continuous High, the noise reduction function is not available.Drive (shooting method)](https://usermanual.wiki/Samsung-Electronics-Co/NX500.User-manual-1-of-2/User-Guide-2507705-Page-85.png)
![85Shooting Functions > Drive (shooting method)BurstConsecutively capture up to 10 shots per second (3 seconds), 15 shots per second (2 seconds), or 30 shots per second (1 second) when you press [Shutter] once. It is recommended for shooting the rapid motion of fast moving subjects such as racing cars.• To set the number of shots, in Shooting mode, press [C] ĺBurst, and then press [D].• The photo size is set to 5M. • It may take longer to save a photo. • You cannot use the ash with this option.• Shutter speed must be faster than 1/30 second.• Photos captured with this option may be slightly enlarged when saving.• You cannot set an ISO option higher than ISO 3200.• This option cannot be used with the RAW le format and is not available when the photo quality is set to RAW.TimerCapture a photo with a delay of 2 to 30 seconds. The delay is adjustable in increments of 1 second.To set the delay, in Shooting mode, press [C] ĺ Timer, and then press [D].](https://usermanual.wiki/Samsung-Electronics-Co/NX500.User-manual-1-of-2/User-Guide-2507705-Page-86.png)
![86Shooting Functions > Drive (shooting method)Auto Exposure Bracketing (AE Bracket)When you press [Shutter], the camera captures 3 consecutive photos: the original, one a step darker, and one a step lighter. Use a tripod to prevent blurry photos as the camera captures three photos continuously. You can adjust the settings in Bracket Set menu.Exposure -2OriginalExposure +2White Balance Bracketing (WB Bracket)When you press [Shutter], the camera captures 3 consecutive photos: the original and two more with dierent White Balance settings. The original photo is captured when you press [Shutter]. The other two are automatically adjusted according to the White Balance you have set. You can adjust the settings in Bracket Set menu.WB-2OriginalWB+2This option cannot be used with the RAW le format and is not available when the photo quality is set to RAW.](https://usermanual.wiki/Samsung-Electronics-Co/NX500.User-manual-1-of-2/User-Guide-2507705-Page-87.png)
![87Shooting Functions > Drive (shooting method)Picture Wizard Bracketing (P Wiz Bracket)When you press [Shutter], the camera captures three consecutive photos, each with a dierent Picture Wizard setting. The camera captures a photo and applies the three Picture Wizard options you have set to the image captured. You can select three dierent settings in Bracket Set menu.VividStandardRetroThis option cannot be used with the RAW le format and is not available when the photo quality is set to RAW.Bracketing settingYou can set up the options for AE Bracket, WB Bracket, and P Wiz Bracket. (p. 140)To set a bracketing option, In Shooting mode, press [m] ĺ 5 ĺ Bracket Set ĺ an option.](https://usermanual.wiki/Samsung-Electronics-Co/NX500.User-manual-1-of-2/User-Guide-2507705-Page-88.png)
![Shooting Functions8888Shooting FunctionsShooting FunctionsIn order to capture a realistic photo of a subject, the amount of light should be constant. When the light source varies, you can use a ash and supply a constant amount of light. Select appropriate settings according to a light source and a subject.To set ash options, In Shooting mode, press [m] ĺ 1 ĺ Flash ĺ an option.Icon DescriptionO: Do not use the ash.Smart Flash: The camera automatically adjusts the brightness of the ash according to the amount of light in the surrounding environment.Auto: The ash automatically res in dark places.Auto Red-eye: The ash automatically res and reduces red-eyes.Fill in: The ash res whenever you capture a photo. (Brightness is automatically adjusted.)Fill-in Red: The ash res whenever you capture a photo and reduces red-eyes.Icon Description1st Curtain: The ash res immediately after the shutter opens. The camera captures a photo of a subject earlier in an action sequence clearly. Ball moving direction2nd Curtain: The ash res just before the shutter closes. The camera captures a photo of a subject later in an action sequence clearly. Ball moving direction• The available options may dier depending on shooting conditions.• There is an interval between two bursts of the ash. Do not move until the ash res a second time.• If you select O, the ash does not re even when an external ash is attached.Use only Samsung-approved ashes. Using incompatible ashes may damage your camera. Flash](https://usermanual.wiki/Samsung-Electronics-Co/NX500.User-manual-1-of-2/User-Guide-2507705-Page-89.png)
![89Shooting Functions > FlashReducing the red-eye eectIf the ash res when you capture a photo of a person in the dark, a red glow may appear in the eyes. To reduce the red-eye eect, select Auto Red-eye or Fill-in Red.Without red-eye reduction With red-eye reductionIf the subject is too far from the camera or moves when the rst ash res, red-eyes may not be reduced.Adjusting the ash intensityWhen the ash is on, adjust the ash intensity +/-2 levels.To set the ash intensity,In Shooting mode, press [f] ĺ Flash ĺ an option ĺ [D] ĺ scroll the jog dial or press [C/F] to adjust the ash intensity. Back SetFlash : 0.0• You can also drag the slider or touch +/- to adjust the intensity.• Adjusting the flash intensity may not be eective when: -the subject is too close to the camera -you set a high ISO sensitivity -the exposure value is too big or too small• In some shooting modes, you cannot use this function.• If you attach an intensity-adjustable external ash to the camera, the intensity settings of the ash will be applied. • If the subject is too close when you use the ash, some light may be blocked, resulting in a dark photo. Ensure that the subject is within the recommended range, which varies by lens.• When a lens hood is attached, the light from the ash can be blocked by the hood. Remove the hood to use the ash.](https://usermanual.wiki/Samsung-Electronics-Co/NX500.User-manual-1-of-2/User-Guide-2507705-Page-90.png)
![Shooting Functions9090Shooting FunctionsShooting FunctionsThe metering mode refers to the way in which a camera measures the quantity of light.The camera measures the amount of light in a scene, and in many of its modes, uses the measurement to adjust various settings. For example, if a subject looks darker than its actual color, the camera captures an overexposed photo of it. If a subject looks lighter than its actual color, the camera captures an underexposed photo of it.The brightness and overall mood of the photo can also be aected by how the camera measures the amount of light. Select an appropriate setting for a shooting condition.To set a metering option, In Shooting mode, press [m] ĺ 1 ĺ Metering ĺ an option.MultiThe Multi mode calculates the amount of light in multiple areas. When light is sucient or insucient, the camera adjusts the exposure by averaging the overall brightness of the scene. This mode is suitable for general photos.Metering](https://usermanual.wiki/Samsung-Electronics-Co/NX500.User-manual-1-of-2/User-Guide-2507705-Page-91.png)