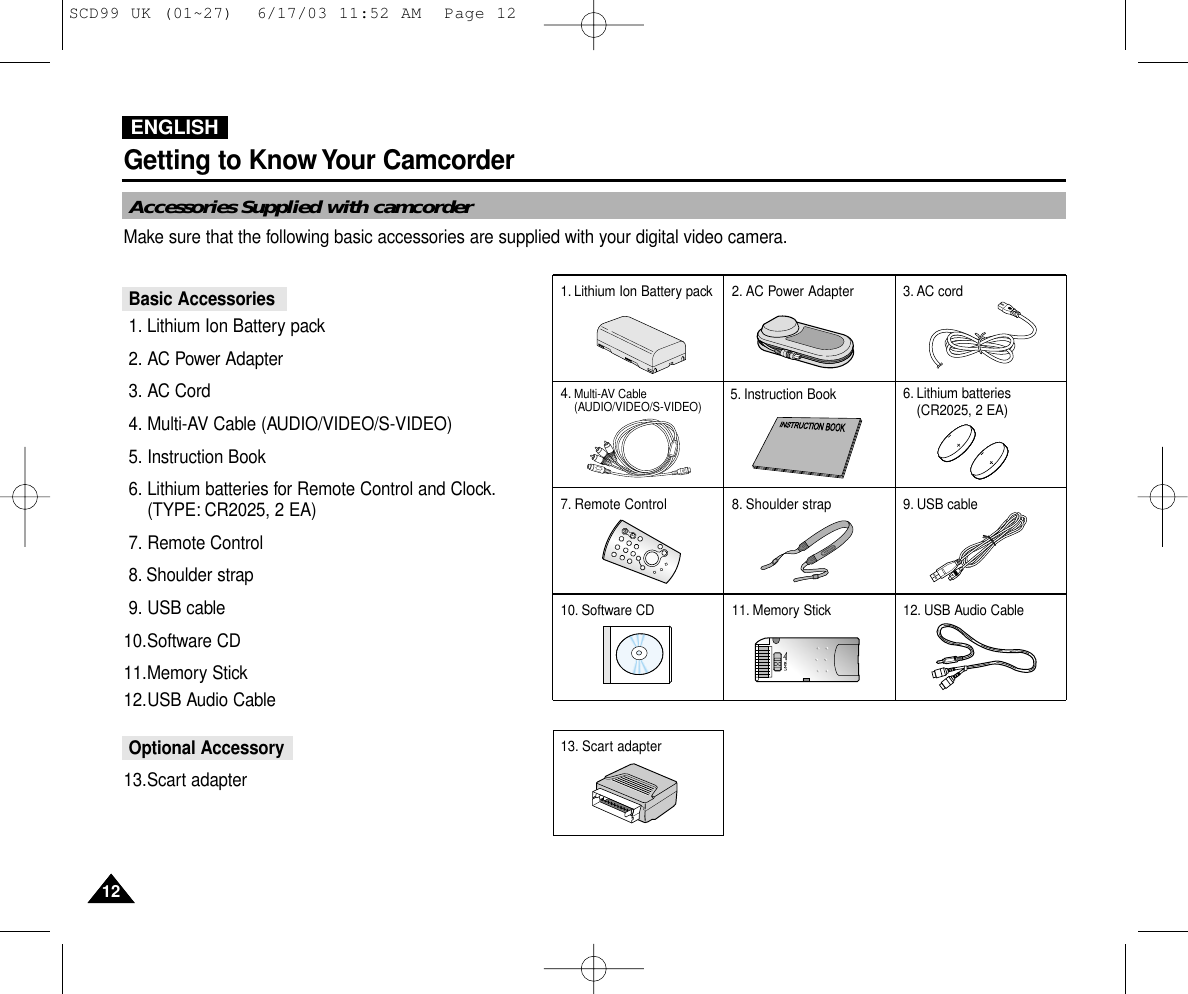
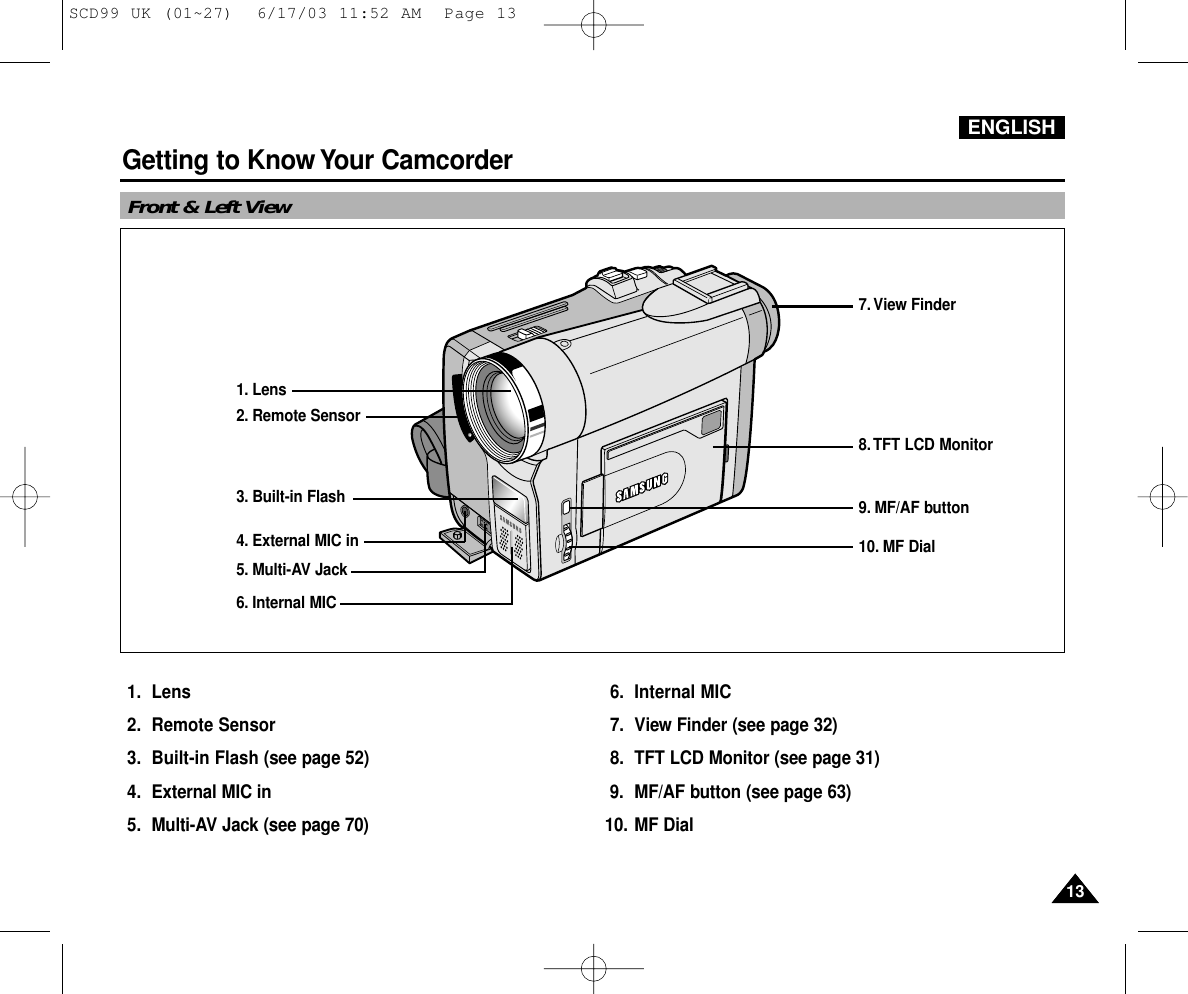
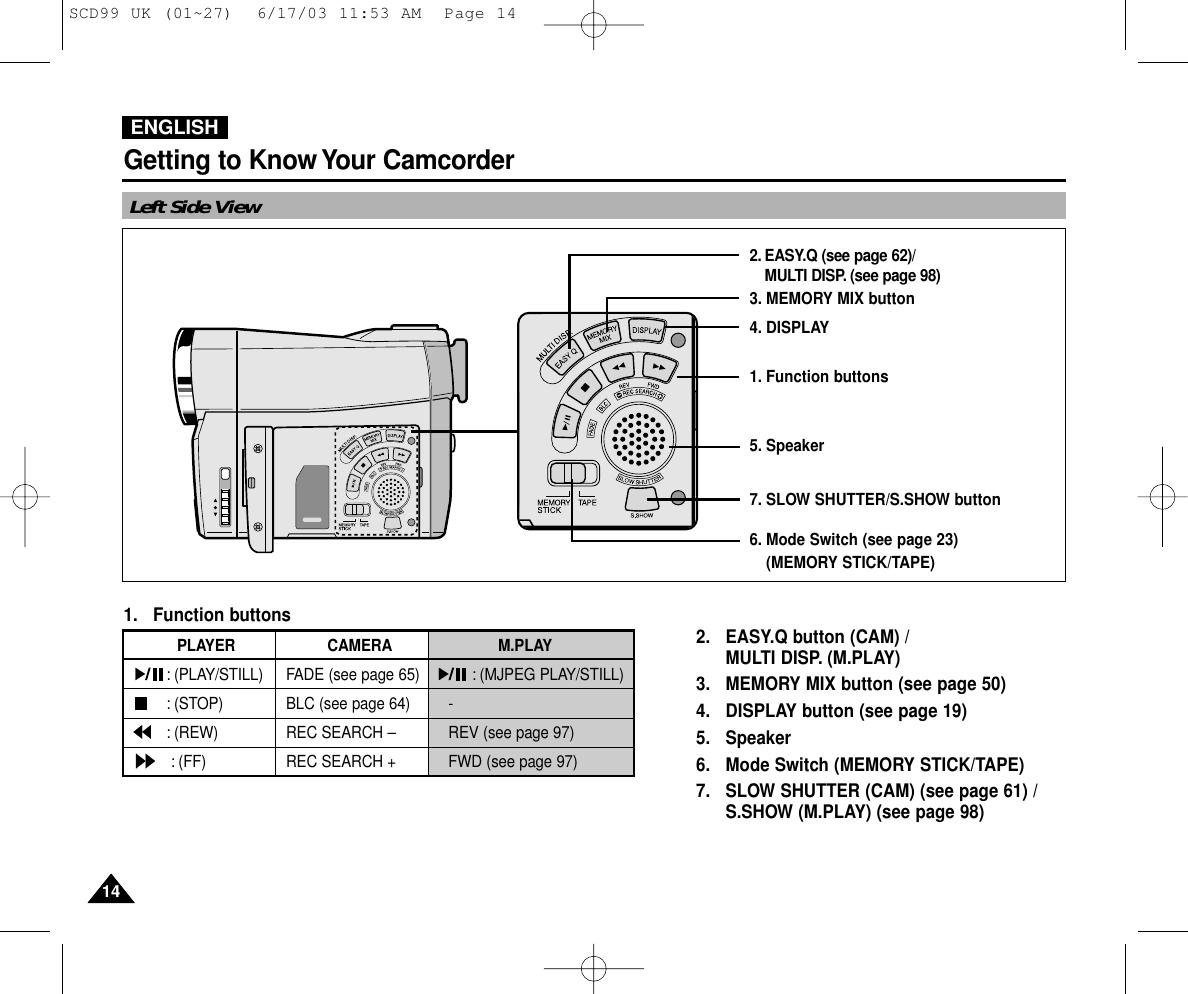
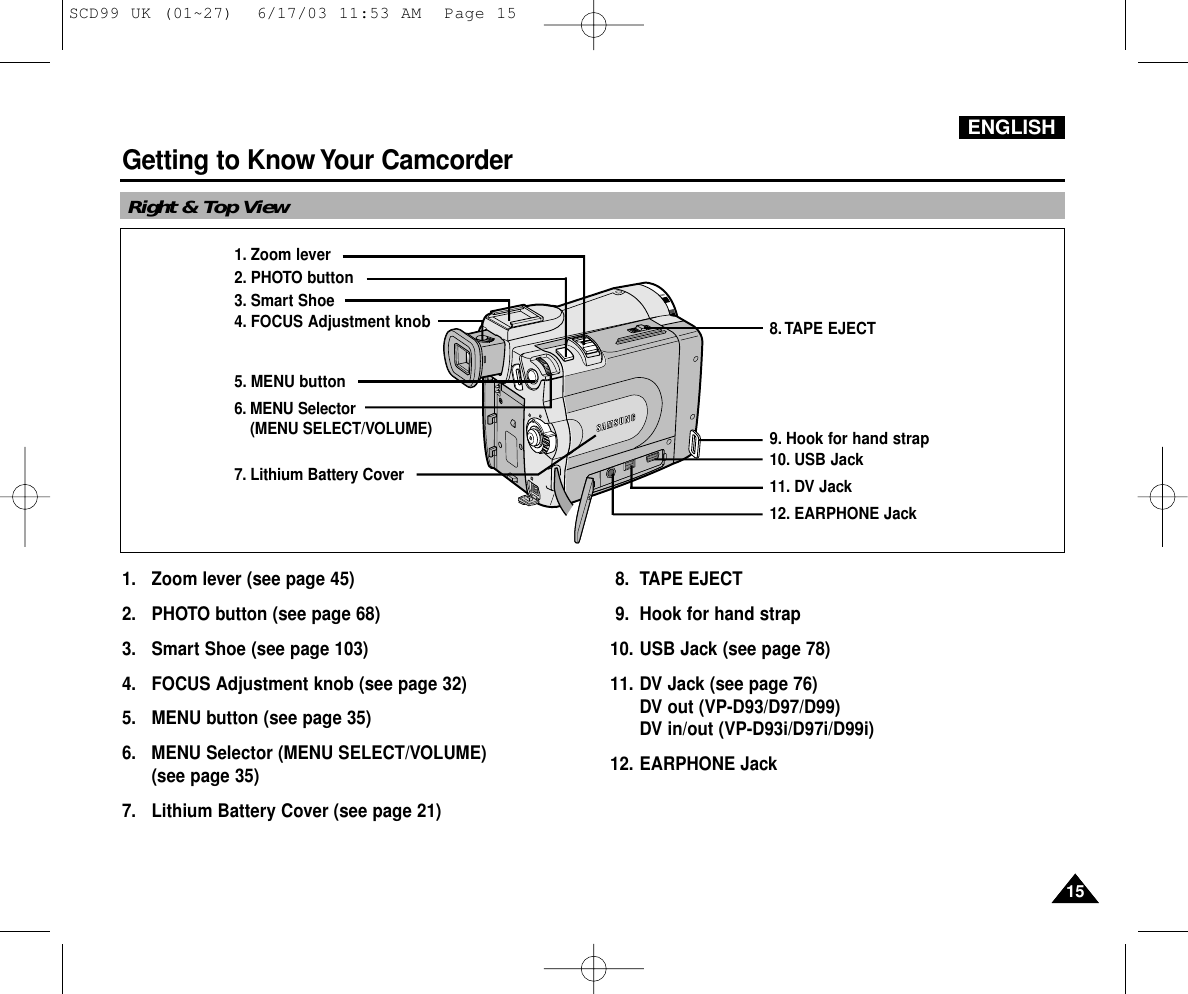
Samsung Electronics Co OMEGA Digital Video Camcorder User Manual SCD99 UK 01 27
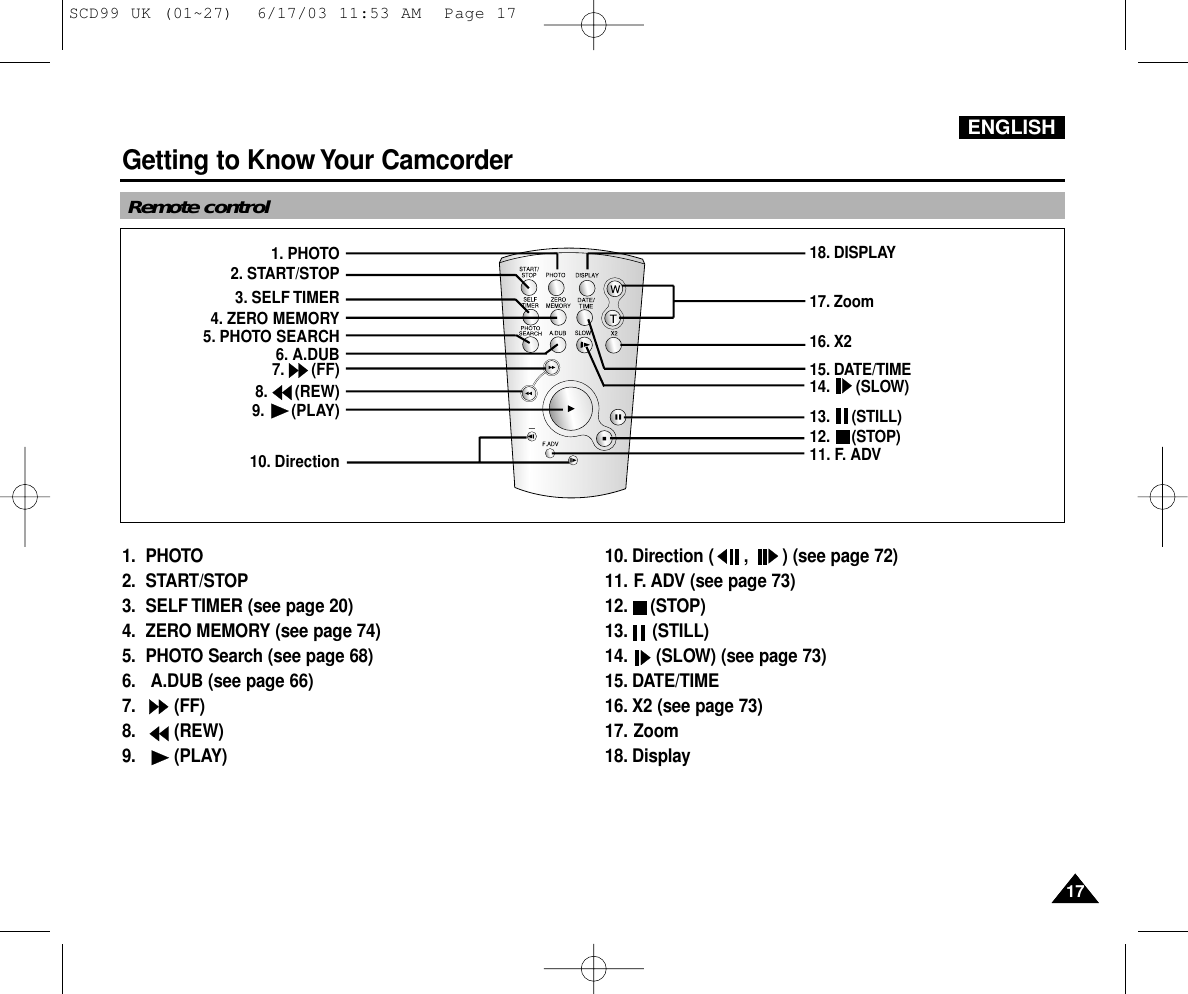
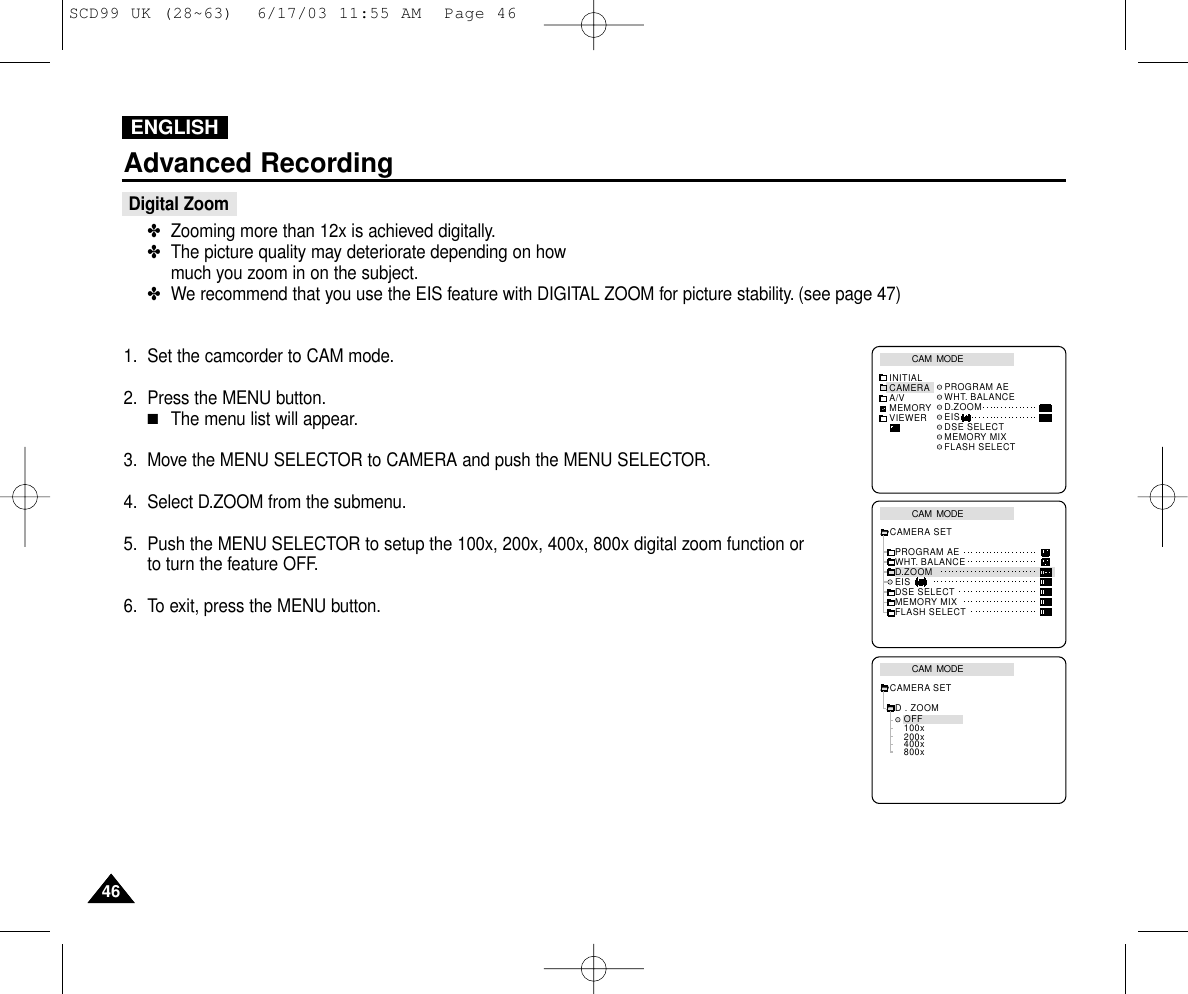
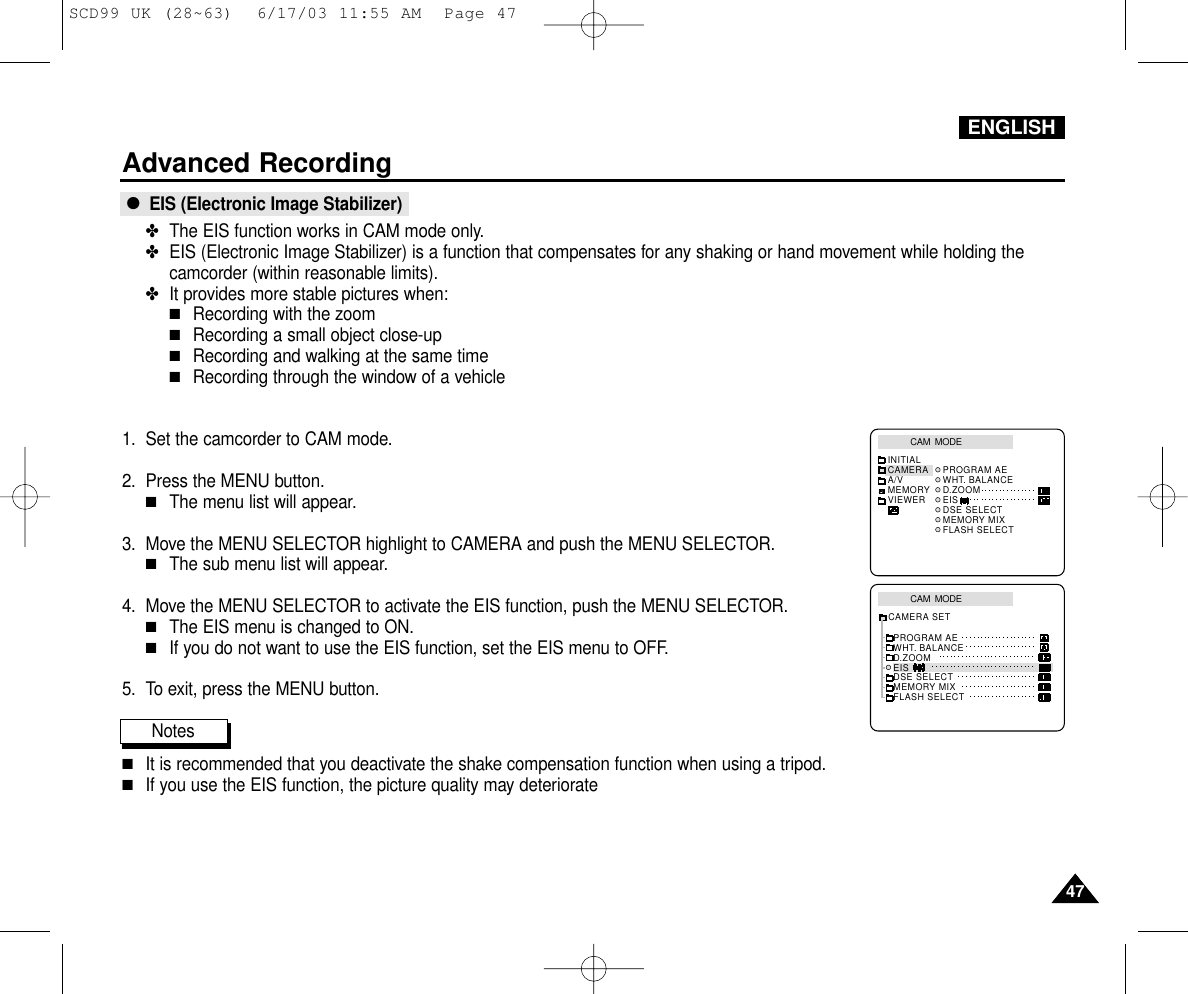
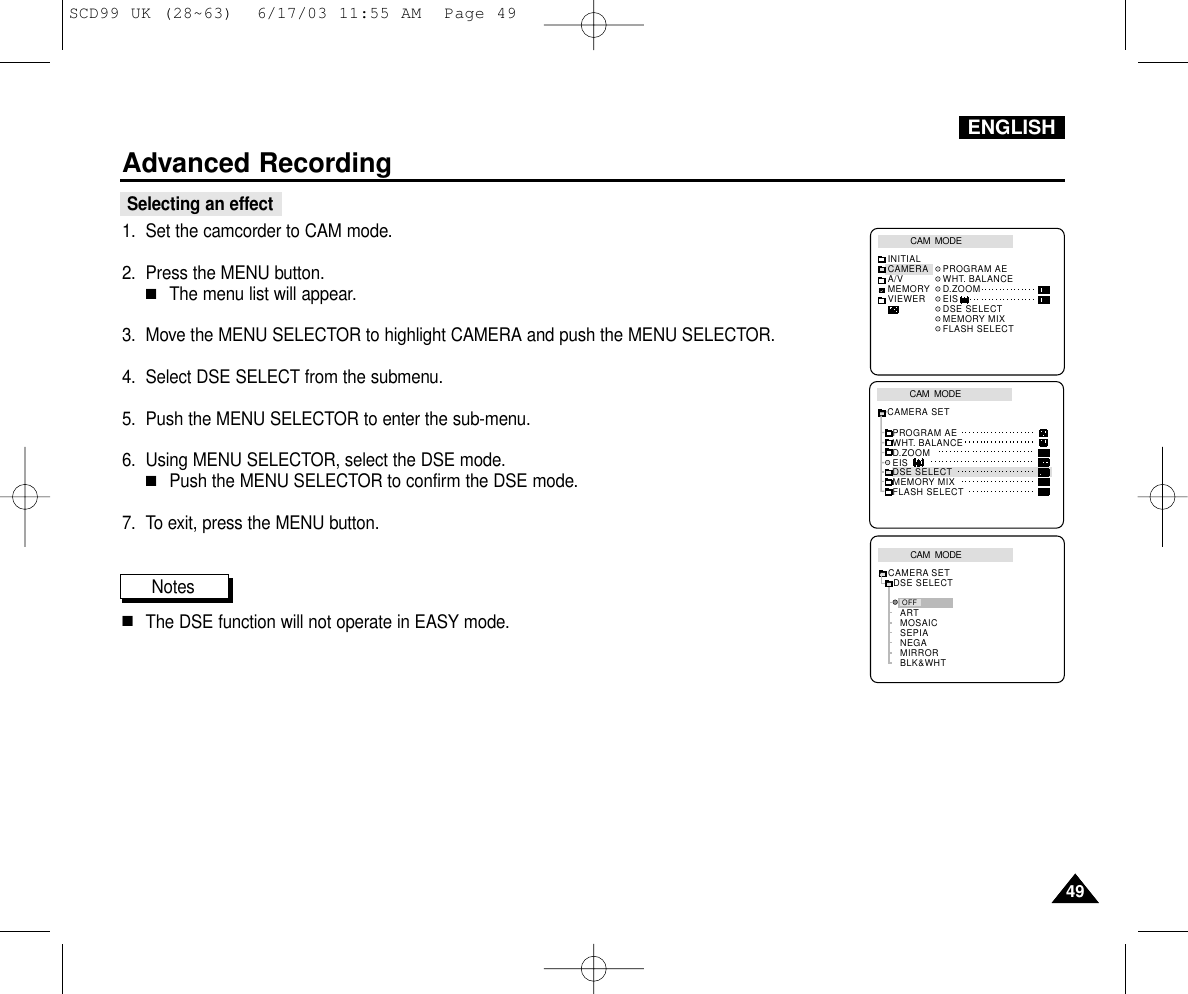
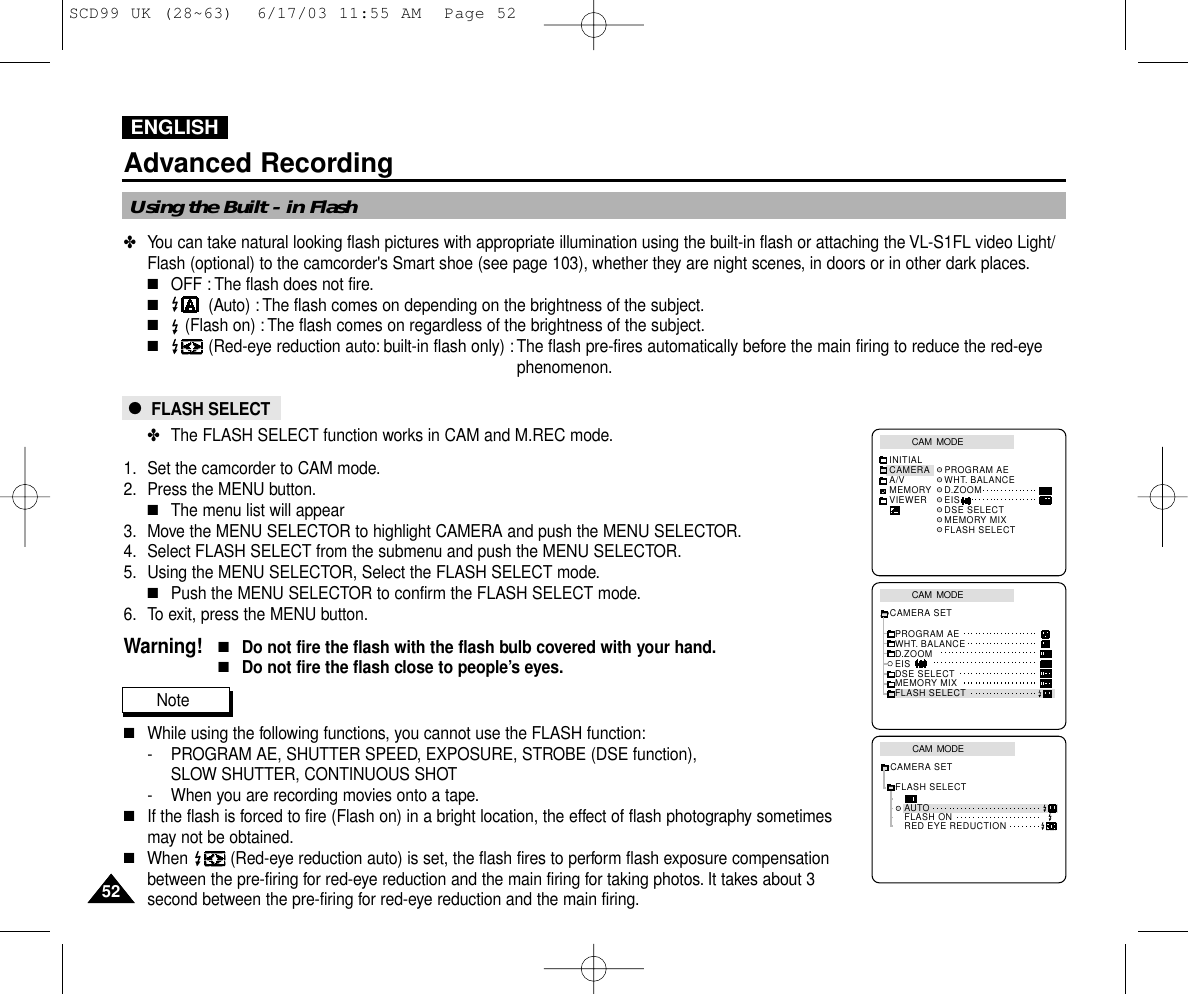
Samsung Electronics Co Ltd Digital Video Camcorder SCD99 UK 01 27
UserManual.wiki
>
Samsung Electronics Co
>
OMEGA User Manual
>
Users Manual 1
Contents
1.
Users Manual 1
2.
Users Manual 2
Users Manual 1
Navigation menu
Upload a User Manual
Namespaces
Wiki Guide
HTML
PDF
Info
Views
User Manual
Discussion / Help
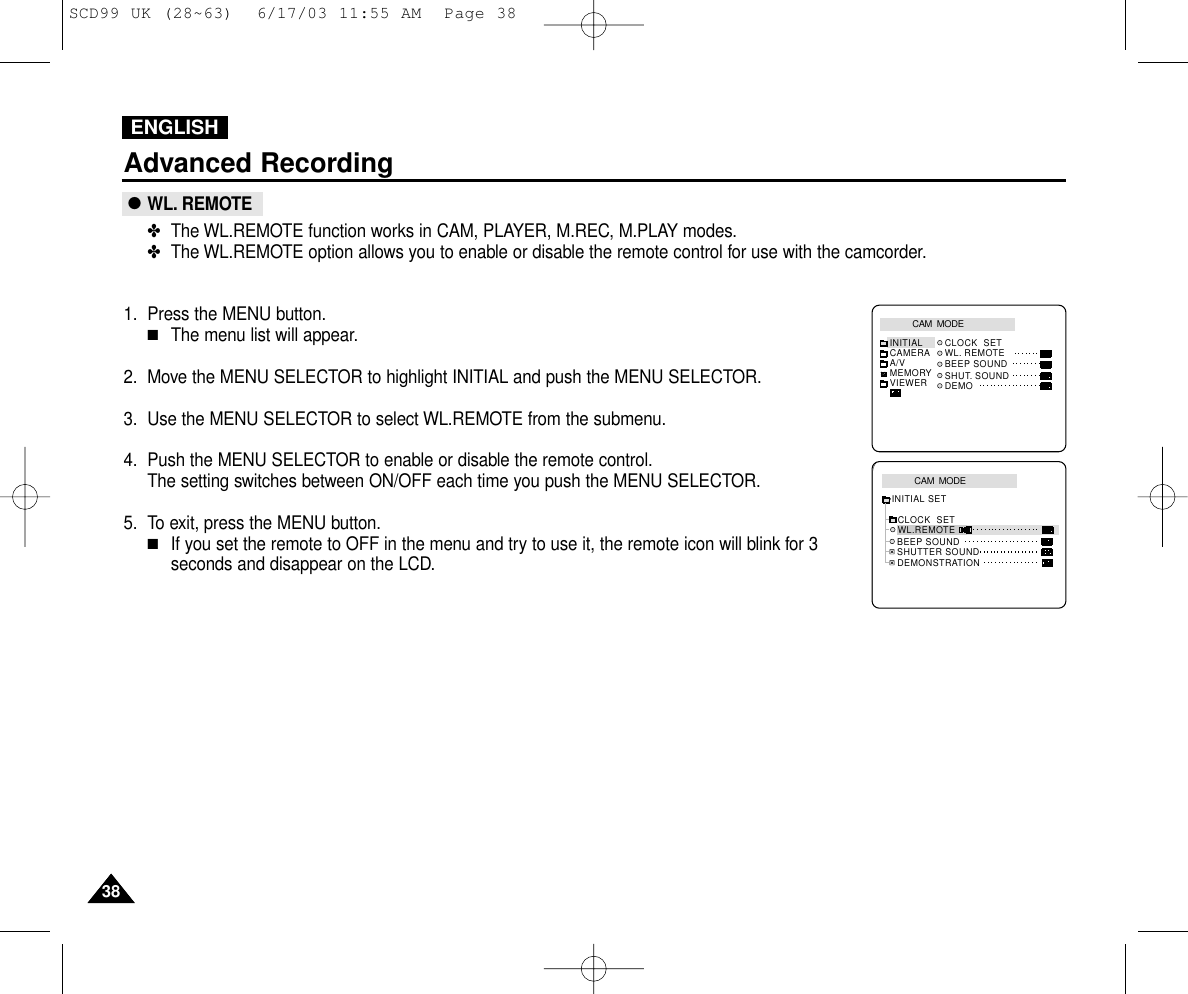
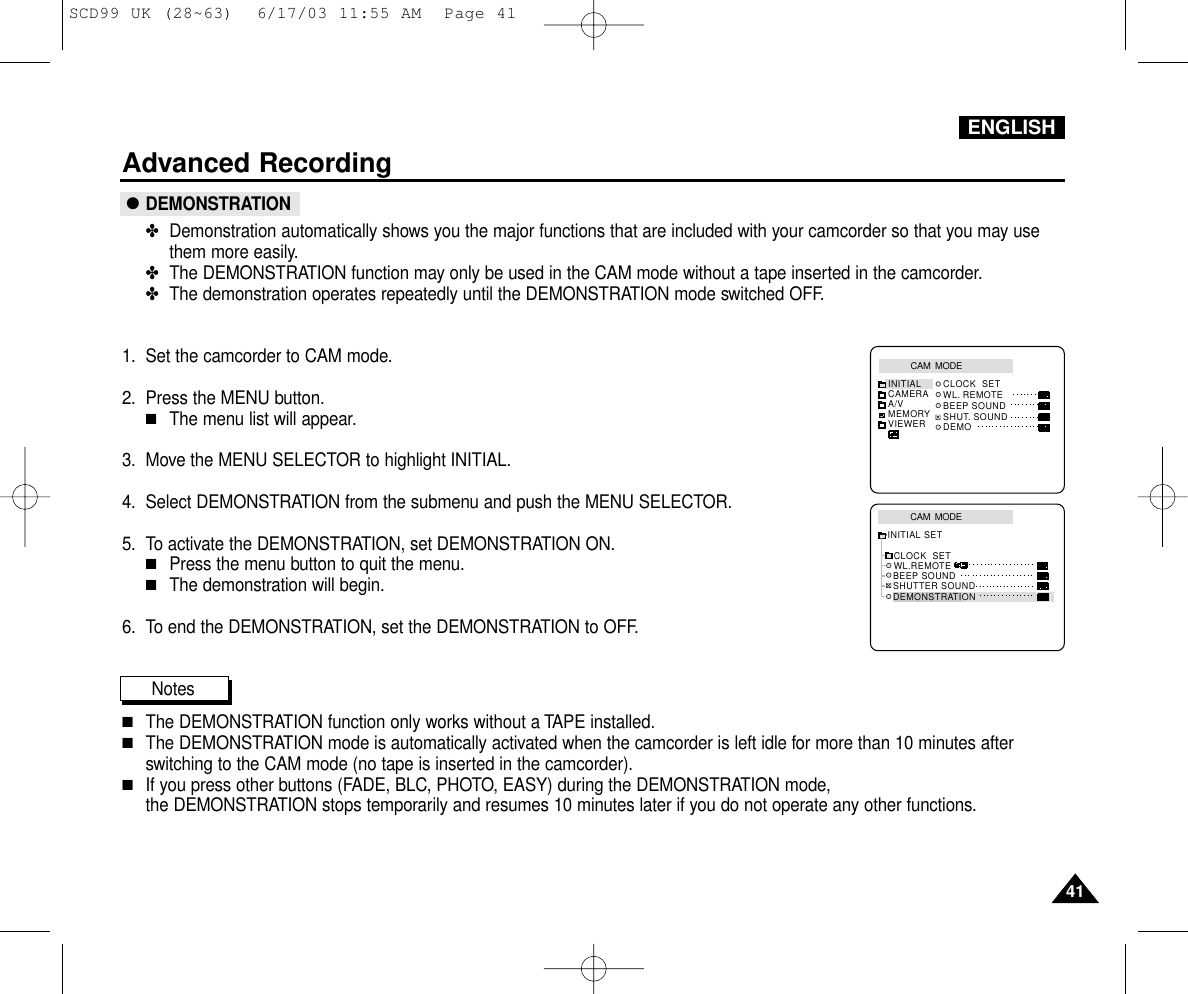
Navigation

![ENGLISHGetting to Know Your Camcorder1818OSD (On Screen Display in CAM and PLAYER modes)1. Battery level (see page 26)2. Easy mode (see pages 62)3. DSE (Digital Special Effects) mode (see page 48)4. Program AE (see page 42)5. White Balance mode (see page 44)6. BLC (Back Light Compensation) (see page 64)7. Manual focus (see page 63) 8. Shutter speed and EXPOSURE (see page 60)9. Zoom position (see page 45)10. Memory Mix (see page 50)11. DATE/TIME (see page 56)12. USB (see page 78)13. WL. REMOTE (see page 38)14. WIND CUT (see page 55)15. Audio recording mode (see page 54)16. Zero memory indicator (see page 74)17. Remaining Tape (measured in minutes) 18. Tape Counter19. Operating mode20. Record speed mode21. PHOTO mode22. Self recording and waiting timer (see page 20)23. EIS (see page 47)24. Volume control (see page 34)25. Audio playback channel (see page 67)26. DV IN(DV data transfer mode) (VP-D93i/D97i/D99i only) (see page 77)27. DEW (see page 7)28. Message Line29. FLASH mode (see page 52)30. SLOW SHUTTER (see page 61)OSD in CAM modeTAPE !MFM.OVERLAPMIRRORSHUTTERZOOMSHUTTEREXPOSURESLOW SHUTTEREASY M - 0 : 0 0 : 0 0 5 5 min1 6 bit1 5 : 0 0 10 . J A N . 2 0 0 3RECEXPOSUREBLC123465107309823 22 21 20 1918171615141312291128OSD in PLAYER mode. . . CSOUND [ 2 ] M - 0 : 0 0 : 0 0 5 5 min1 6 bitVOL. [ 1 1 ]DV1 5 : 0 0 10 . J A N . 2 0 0 325282721 20 192624 11SCD99 UK (01~27) 6/17/03 11:53 AM Page 18](https://usermanual.wiki/Samsung-Electronics-Co/OMEGA.Users-Manual-1/User-Guide-336675-Page-23.png)
![ENGLISHGetting to Know Your Camcorder1919A. Folder number-file number (see page 83)B. Image counter- Current still image/Total number of recordable still images.C. CARD (MEMORY STICK) indicatorD. Image recording and loading indicator E. Photo Quality (see page 84)F. ERASE PROTECTION indicator (see page 100)G. Print Mark (see page 99)H. SLIDE SHOW (see page 98)I. MJPEG SCREEN SIZE (see page 86)J. Image Size (see page 85)K. Continuous Shot (see page 87)L. Remaining Memory (MJPEG)Turning the OSD on/off (On Screen Display)●Turning OSD on/offPress the DISPLAY button on the left side panel.- Each press of the button toggles the OSD function on and off.- When you turn the OSD off, In CAM mode: The STBY, REC, EASY.Q modes are always displayed on the OSD, even when the OSD is turned OFF and the key input is displayed for 3 seconds thenturned off.In PLAYER mode: When you press any Function button, the function is displayed on the OSD for 3 seconds before it turns off.●Turning the DATE/TIME on/off - The DATE/TIME is not affected when the OSD function is switched ON or OFF.- To turn the DATE/TIME on or off, access the menu and change the DATE/TIME mode. (see page 56)- You may also use the Quick Menu to turn the DATE/TIME ON or OFF. (see page 58) (only in CAM/M.REC mode)OSD in M.REC mode [2 2 / 2 0 0 ]3 2 0 2 min1280HSSF1 2 : 0 0 10 . J A N . 2 0 0 3MFOSD in M.PLAY modeMEMORY STICK !SLIDE1 0 0 - 0 0 0 1[2 2 / 2 4 0]0 0 11 0 : 0 0 10 . J A N . 2 0 0 31280 X 960EBLID CFHAJKJGOSD (On Screen Display in M.REC/M.PLAY modes)SCD99 UK (01~27) 6/17/03 11:53 AM Page 19](https://usermanual.wiki/Samsung-Electronics-Co/OMEGA.Users-Manual-1/User-Guide-336675-Page-24.png)
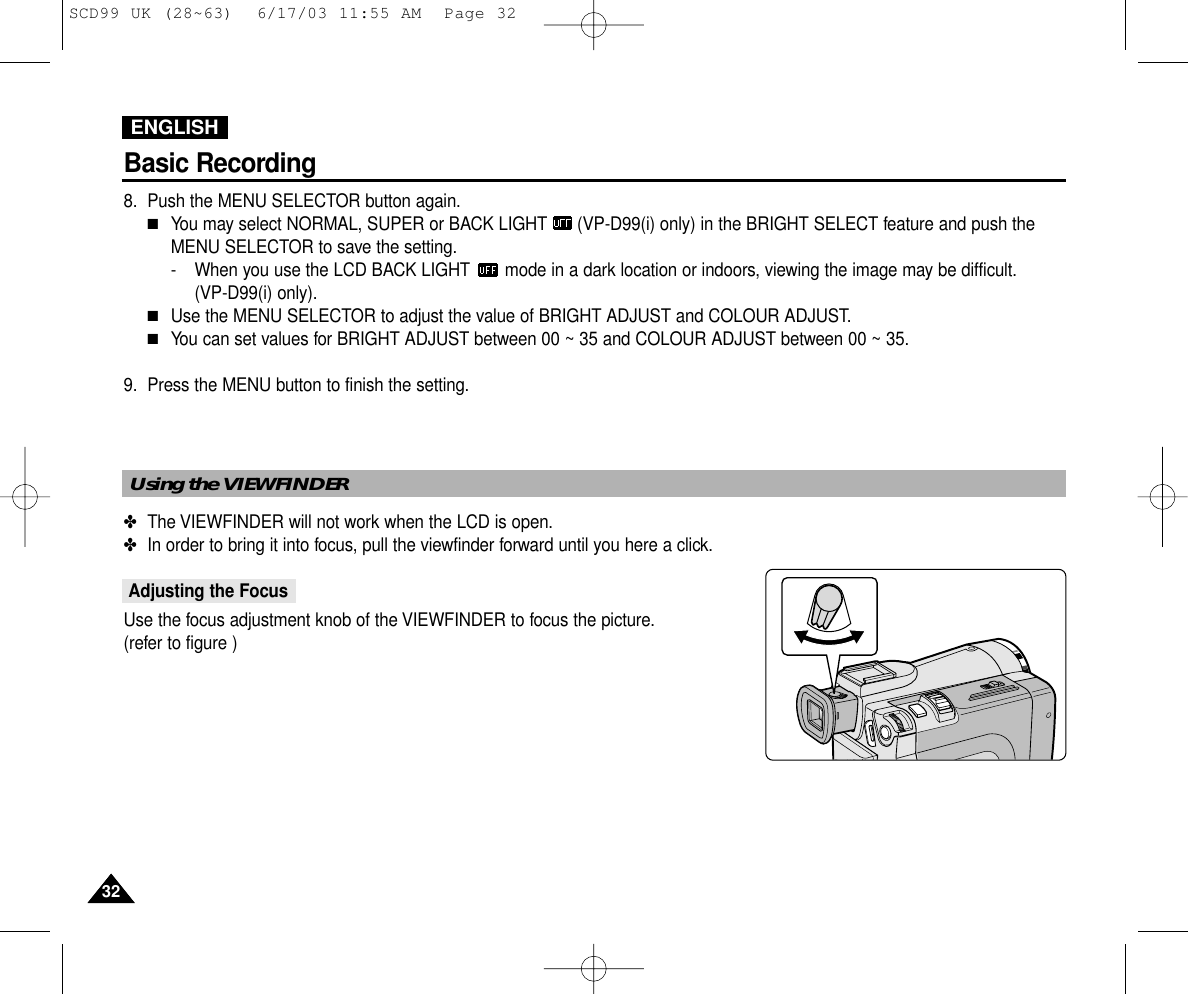
![ENGLISHBasic Recording3131✤Your camcorder is equipped with a 2.5 inch colour Liquid Crystal Display(LCD) screen, which enables youto view what you are recording or playing back directly.✤Depending on the conditions under which you are using the camcorder (indoors or outdoors for example),you can adjust ;■BRIGHT SELECT■BRIGHT ADJUST■COLOUR ADJUST1. Set the POWER switch to CAM position.■In the PLAYER mode, you may only setup the LCD while the tape is playing.2. Open the LCD screen, and the LCD switches on.3. Press the MENU button.4. Move the MENU SELECTOR so that VIEWER is highlighted andthen push the MENU SELECTOR.5. Move the MENU SELECTOR so that LCD ADJUST is highlighted.6. Push the MENU SELECTOR to enter the sub-menu.7. Move the MENU SELECTOR so that it highlights the menu item youwant to adjust (BRIGHT SELECT, BRIGHT ADJUST, COLOUR ADJUST).CAM MODEVIEWER SETLCD ADJUSTDATE / TIMETV DISPLAYCAM MODEINITIALLCD ADJUSTDATE/TIMETV DISPLAYCAMERAA/VMEMORYVIEWERCAM MODELCD ADJUSTVIEWER SETBRIGHT SELECT NORMALBRIGHT ADJUST [ 1 8 ]COLOUR ADJUST [ 1 8 ]CAM MODEBRIGHT SELECTNORMALSUPERBACK LIGHTLCD ADJUSTAdjusting the LCD*VP-D99(i) onlySCD99 UK (28~63) 6/17/03 11:55 AM Page 31](https://usermanual.wiki/Samsung-Electronics-Co/OMEGA.Users-Manual-1/User-Guide-336675-Page-36.png)

![Adjusting the LCD during PLAY✤ You can adjust the LCD during playback.✤ The adjustment method is the same procedure as used in CAM mode. (see page 31) The Speaker works in PLAYER mode only.■When you use the LCD screen for playback, you can hear recorded sound from the built-in Speaker.- Follow the instructions below to decrease or mute speaker volume in the PLAYER mode.- Take the following steps to lower the volume or mute the sound while playing a tape on the camcorder.1. Set the power switch to PLAYER mode.2. Press (PLAY/STILL) to play the tape.3. When you hear sounds once the tape is in play, use the MENU SELECTOR to adjust thevolume.■A volume level display will appear on the LCD.Levels may be adjusted from anywhere between 00 to 19 and you will not hear any sound when the volume is set on 00.■If you close the LCD while playing, you will not hear sound from the speaker.Notes■When the cable is connected to the Multi AV jack, you cannot hear sound from the speakerand cannot adjust the volume.■If a cable is connected to the Multi AV jack, you can hear sound from the speaker when AV IN/OUT MODE on MENU is set to AV IN or S-VIDEO IN. (VP-D93i/D97i/D99i only)■You can hear sound from speaker by removing the connected cable from the Multi AV jack.■The speaker turns off when you use earphones.ENGLISHBasic Recording3434Controlling Sound from the Speaker 0 : 2 3 : 4 7 5 5 min1 0 : 0 0 10 . J A N . 2 0 0 3VOL. [ 1 1 ]<3-2>VOLUME23-1SCD99 UK (28~63) 6/17/03 11:55 AM Page 34](https://usermanual.wiki/Samsung-Electronics-Co/OMEGA.Users-Manual-1/User-Guide-336675-Page-39.png)
![ENGLISHAdvanced Recording4848●DSE(Digital Special Effects) SELECT✤The DSE function works in CAM mode only.✤The digital effects enable you to give a creative look to your recording by adding various special effects.✤Select the appropriate digital effect for the type of picture that you wish to record and the effect you wish to create.✤There are 8 DSE modes.a. ART modeThis mode gives the images a coarse effect.b. MOSAIC modeThis mode gives the images a mosaic effect.c. SEPIA modeThis mode gives the images a reddish-brown pigment.d. NEGA mode This mode reverses the colours of the images, creating a negative image.e. MIRROR modeThis mode cuts the picture in half, using a mirror effect.f. BLK & WHT modeThis mode changes the images to black and white.g. WIDE [16:9] modeProduce images in the WIDE [16:9] format for Playback on wide screen TVs.h. STROBE modeThis effect converts on-screen action to a series of still images, giving an effect similar to slow-motion.bdce fhgaSCD99 UK (28~63) 6/17/03 11:55 AM Page 48](https://usermanual.wiki/Samsung-Electronics-Co/OMEGA.Users-Manual-1/User-Guide-336675-Page-53.png)

![ENGLISHAdvanced Recording5151Recording Superimposed images on a tape✤Insert a tape for recording into your camcorder.✤Insert a Memory Stick is recorded still images into your camcorder.1. Set the camcorder to CAM mode.2. Press the MENU button.■The menu list will appear.3. Move the MENU SELECTOR to highlight CAMERA and push the MENU SELECTOR.4. Select MEMORY MIX from the submenu and push the MENU SELECTOR.5. Move the MENU SELECTOR to select the desired MEMORY MIX mode and push the MENU SELECTOR.■Your currently recording image is combined with the last recorded image.6. Press the (FWD)/ (REV) buttons to select the still image you want to superimpose.7. Move the MENU SELECTOR to adjust the mix level ■Push the MENU SELECTOR to confirm the MEMORY MIX mode.8. To exit, press the MENU button.■Your selected MEMORY MIX mode is flashed in the display.9. Press the MEMORY MIX button.■The still image is superimposed on the moving image.■Each time you press the MEMORY MIX button, your selection is activated (display lightscontinuously) or de activated (display flashes)10.Press the START/STOP button to start recording.■The superimposed images are recorded onto the tape.Note■If you turn the position of the power switch, select your still image for MEMORY MIX again.CAM MODEINITIAL PROGRAM AEWHT. BALANCED.ZOOMEISDSE SELECTMEMORY MIXFLASH SELECTCAMERAA/VMEMORYVIEWERCAM MODEPROGRAM AEWHT. BALANCED.ZOOMEISDSE SELECTMEMORY MIXFLASH SELECTCAMERA SETCAM MODEMEMORY MIXM.CHROMAM.LUMIC.LUMIM.OVERLAPCAMERA SET [07/07]STBYSCD99 UK (28~63) 6/17/03 11:55 AM Page 51](https://usermanual.wiki/Samsung-Electronics-Co/OMEGA.Users-Manual-1/User-Guide-336675-Page-56.png)
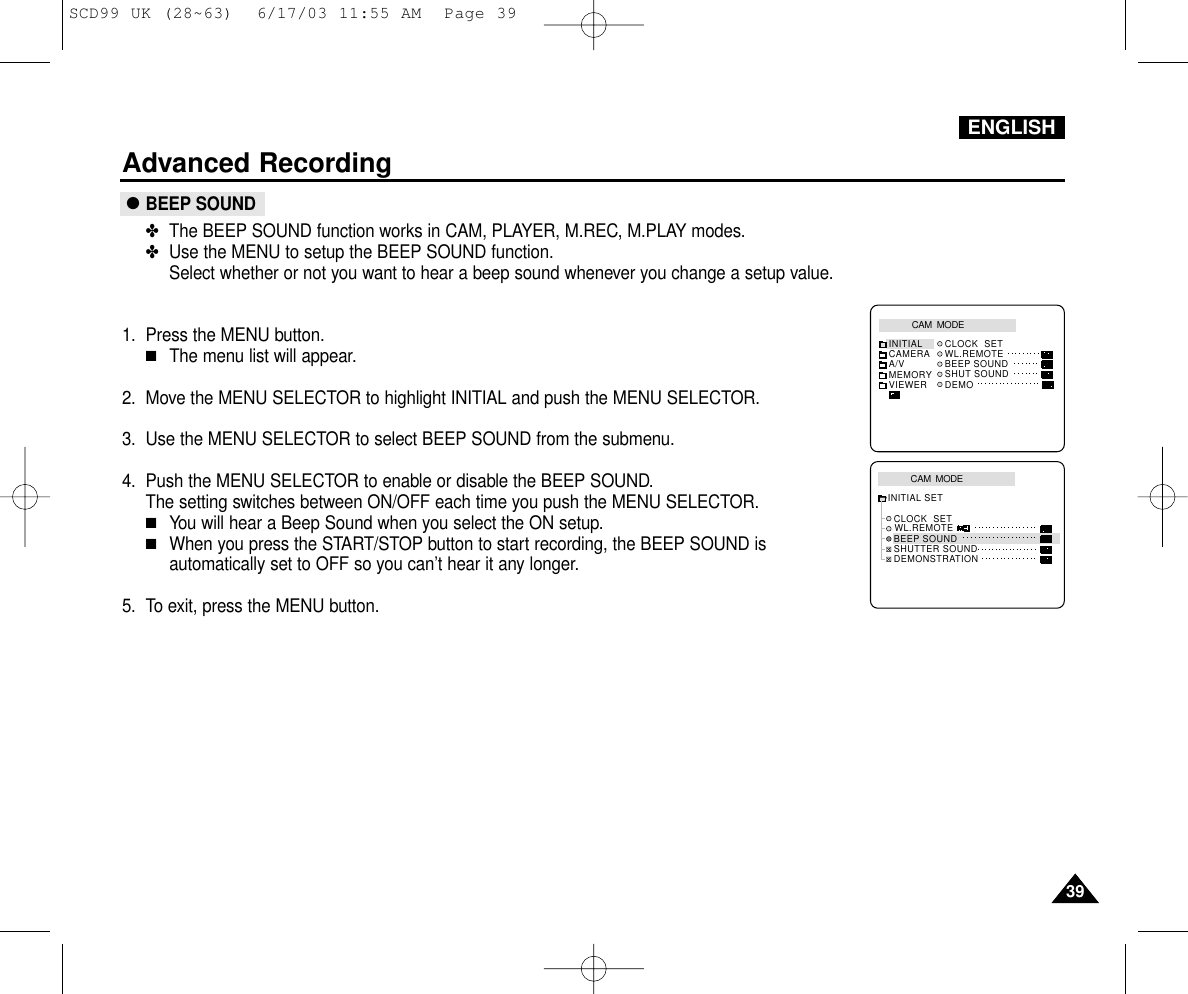
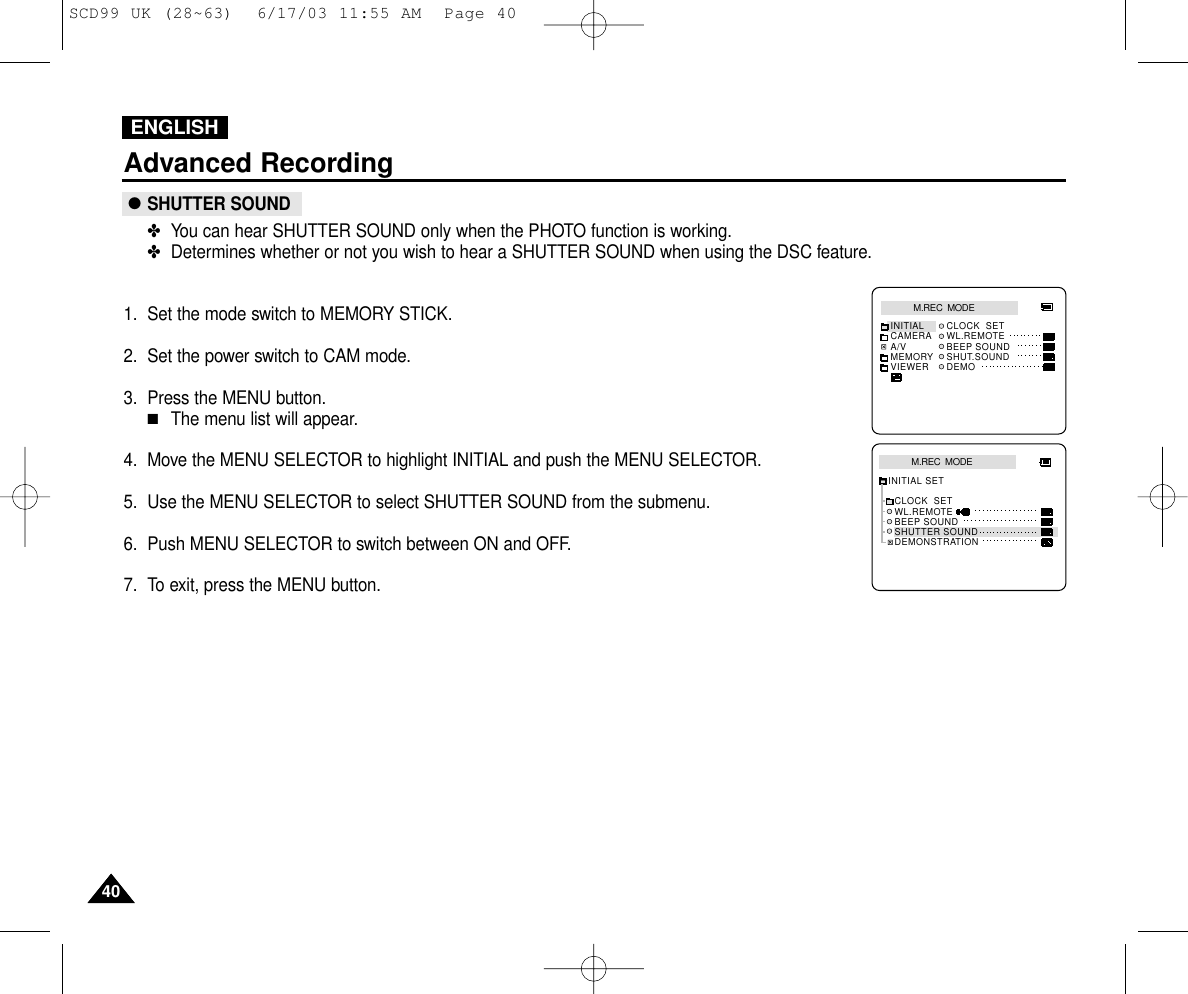
![ENGLISH5353Advanced Recording●REC MODE✤The REC MODE function works in both CAM and PLAYER (VP-D93i/D97i/D99i only) modes.✤This camcorder records and plays back in SP (standard play) mode and in LP (long play) mode.■SP (standard play): This mode permits 60 minutes of recording time with a DVM60 tape.■LP (long play): This mode permits 90 minutes of recording time with a DVM60 tape.■See AV IN/OUT select on page 76.1. Set the camcorder to CAM or PLAYER mode.2. Press the MENU button.■The menu list will appear.3. Move the MENU SELECTOR to highlight A/V and push the MENU SELECTOR.4. Select REC MODE from the submenu and push the MENU SELECTOR.■The REC MODE toggles between SP and LP with each press.5. To exit, press the MENU button.Notes■We recommend that you use this camcorder to play back any tapes recorded on this camcorder.Playing back a tape recorded in other equipment may produce mosaic shaped distortion.■When you record a tape in SP and LP modes, or LP mode only, the playback picture may be distorted or the time code may not be written properly between scenes.■Record using SP mode for best picture and sound quality.CAM MODEINITIALWIND CUTREC MODEPHOTO SEARCHAUDIO MODE 12AV IN/OUT OUTAUDIO SELECTCAMERAA/VMEMORYVIEWER COPYCAM MODEREC MODEPHOTO SEARCHPHOTO COPYAUDIO MODE 12SOUND[1]AUDIO SELECTWIND CUTA / V SETOUTAV IN/OUTSCD99 UK (28~63) 6/17/03 11:55 AM Page 53](https://usermanual.wiki/Samsung-Electronics-Co/OMEGA.Users-Manual-1/User-Guide-336675-Page-58.png)
![ENGLISH5454Advanced Recording●AUDIO MODE✤The AUDIO MODE function works in CAM and PLAYER (VP-D93i/D97i/D99i only) modes.✤This camcorder records sound in two ways. (12bit, 16bit)■12bit : You can record two 12bit stereo sound tracks.The original stereo sound can be recorded onto the MAIN (SOUND1) track.Additional stereo sound can be dubbed onto the SUB (SOUND2) track.■16bit : You can record one high quality stereo sound using the 16bit recording mode.Audio dubbing is not possible when using this mode.1. Set the camcorder to CAM mode.2. Press the MENU button.■The menu list will appear.3. Move the MENU SELECTOR to highlight A/V and push the MENU SELECTOR.4. Select the AUDIO MODE from the menu and push the MENU SELECTOR.■The AUDIO MODE toggles between 12bit-16bit with each push.5. To exit, press the MENU button.CAM MODEREC MODEPHOTO SEARCHPHOTO COPYAUDIO MODE 12SOUND[1]AUDIO SELECTWIND CUTA / V SETOUTAV IN/OUTCAM MODEINITIALWIND CUTREC MODEPHOTO SEARCHAUDIO MODE 12AV IN/OUT OUTAUDIO SELECTCAMERAA/VMEMORYVIEWER COPYSCD99 UK (28~63) 6/17/03 11:55 AM Page 54](https://usermanual.wiki/Samsung-Electronics-Co/OMEGA.Users-Manual-1/User-Guide-336675-Page-59.png)
![ENGLISH5555Advanced Recording●WIND CUT✤The WIND CUT function works in CAM and PLAYER (VP-D93i/D97i/D99i only) modes.✤The WIND CUT function minimizes wind noise or other noise while recording.- When the wind cut is on, some low sounds are eliminated along with the sound of the wind.1. Set the camcorder to CAM mode.2. Press the MENU button.■The menu list will appear.3. Move the MENU SELECTOR to highlight A/V and push the MENU SELECTOR.4. Select WIND CUT from submenu.5. This feature toggles ON/OFF each time you push the MENU SELECTOR.■is shown in the display when you turn the WIND CUT on.6. To exit, press the MENU button.Notes■Make sure WIND CUT is set to off when you want the microphone to be as sensitive as possible.■Use the WIND CUT when recording in windy places such as the beach or near buildings.■The WIND CUT does not operate when an external microphone is connected to the External MIC in or the optional ZM-EC1microphone is connected to the Smart Shoe.CAM MODEREC MODEPHOTO SEARCHPHOTO COPYAUDIO MODE 12SOUND[1]AUDIO SELECTWIND CUTA / V SETOUTAV IN/OUTCAM MODEINITIALWIND CUTREC MODEPHOTO SEARCHAUDIO MODE 12AV IN/OUT OUTAUDIO SELECTCAMERAA/VMEMORYVIEWER COPYSCD99 UK (28~63) 6/17/03 11:55 AM Page 55](https://usermanual.wiki/Samsung-Electronics-Co/OMEGA.Users-Manual-1/User-Guide-336675-Page-60.png)