Samsung Electronics Co OTR19MHC4 Microwave Oven User Manual MHC4 8505 XAA 03805A Instruction manual
Samsung Electronics Co Ltd Microwave Oven MHC4 8505 XAA 03805A Instruction manual
UserManual.wiki
>
Samsung Electronics Co
>
OTR19MHC4 User Manual
Users Manual
Navigation menu
Upload a User Manual
Namespaces
Wiki Guide
HTML
PDF
Info
Views
User Manual
Discussion / Help
Navigation
![3Microwave Hood Combination WarrantyOne Year Limited WarrantyWhen installed, operated and maintained according to all instructions supplied with the product, if this appliance fails due to a defect in material or workmanship within one year from the date of purchase, call 1-800-4-MY-HOME® to arrange for free repair.If this appliance is used for other than private family purposes, this warranty applied for only 90 days from the date of purchase.This warranty covers only defects in material and workmanship. Sears will NOT pay for:1. Expendable items that can wear out from QRUPDOXVHLQFOXGLQJEXWQRWOLPLWHGWRÀOWHUVbelts, light bulb, and bags.2. A service technician to instruct the user in correct product installation, operation or maintenance.3. A service technician to clean or maintain this product.4. Damage to or failure of this product if it is not installed, operated or maintained according to all instructions supplied with the product.5. Damage to or failure of this product resulting from accident, abuse, misuse or use for other than its intended purpose.6. Damage to or failure of this product caused by the use of detergents, cleaners, chemicals or utensils other than those recommended in all instructions supplied with the product.7. Damage to or failure of parts or systems UHVXOWLQJIURPXQDXWKRUL]HGPRGLÀFDWLRQVmade to this product.Disclaimer or implied warranties; limitations of remediesCustomer’s sole and exclusive remedy under this limited warranty shall be product repair as provided herein. Implied warranties, including ZDUUDQWLHVRIPHUFKDQWDELOLW\RUÀWQHVVIRUDparticular purpose, are limited to one year or the shortest period allowed by law. Sears shall not be liable for incidental or consequential damages. Some states and provinces do not allow the exclusion or limitations on the duration of implied warranties of merchantability or ÀWQHVVVRWKHVHH[FOXVLRQVRUOLPLWDWLRQVPD\QRWapply to you.This warranty applied only while this appliance is used in the United States.7KLVZDUUDQW\JLYHV\RXVSHFLÀFOHJDOULJKWVand you may also have other rights which vary from state to state.Sears Brands Management Corporation, Hoffman Estates, IL 601798505_XAA_03805A-EN+MES.indb 3 2010-07-08 6:45:46](https://usermanual.wiki/Samsung-Electronics-Co/OTR19MHC4/User-Guide-1314498-Page-3.png)
![IMPORTANT SAFETY INSTRUCTIONSSAVE THESE INSTRUCTIONS5 WARNINGImproper use of the grounding plug can result in a risk of electric shock.GROUNDING INSTRUCTIONSThis appliance must be grounded. In the event of an electrical short circuit, grounding reduces the risk of electric shock by providing an escape wire for the electrical current. This appliance is equipped with a cord that includes a grounding wire and a grounding plug. The plug must be plugged into an outlet that is properly installed and grounded. See Installation Instructions.This appliance must be connected to a grounded, metallic, permanent wiring system or an equipment grounding conductor should be run with the circuit conductors and connected to the equipment grounding terminal or lead on the appliance.&RQVXOWDTXDOLÀHGHOHFWULFLDQRUVHUYLFHULIgrounding instructions are not completely understood, or if doubt exists as to whether the oven is properly grounded.Do not use an extension cord. If the product power FRUGLVWRRVKRUWKDYHDTXDOLÀHGHOHFWULFLDQinstall a three-slot receptacle. This oven should be plugged into a separate 60 Hertz circuit with WKHHOHFWULFDOUDWLQJDVVKRZQLQVSHFLÀFDWLRQVtable. When the oven is on a circuit with other equipment, an increase in cooking times may be required and fuses can be blown.Microwave operates on standard household current, 110- 120V.FEDERALCOMMUNICATIONS COMMISSION RADIO FREQUENCY INTERFERENCE STATEMENT (U.S.A. ONLY)This equipment generates and uses ISM frequency energy and if not installed and used properly, that is in strict accordance with the manufacturer’s instructions, may cause interference to radio and television reception. It has been type tested and found to comply with limits for ISM Equipment pursuant to part 18 of FCC Rules, which are designed to provide reasonable protection against such interference in a residential installation.However, there is no guarantee that interference will not occur in a particular installation. If this equipment does cause interference to radio or television reception, which can be determined by turning the equipment off and on, the user is encouraged to try to correct the interference by one or more of the following:Reorient the receiving antenna of the radio or television.Relocate the microwave oven with respect to the receiver.Move the microwave oven away from the receiver.Plug the microwave oven into a different outlet so that the microwave oven and the receiver are on different branch circuits.The manufacturer is not responsible for any radio or television interference caused by XQDXWKRUL]HGPRGLÀFDWLRQWRWKLVPLFURZDYHoven. It is the responsibility of the user to correct such interference.8505_XAA_03805A-EN+MES.indb 5 2010-07-08 6:45:47](https://usermanual.wiki/Samsung-Electronics-Co/OTR19MHC4/User-Guide-1314498-Page-5.png)


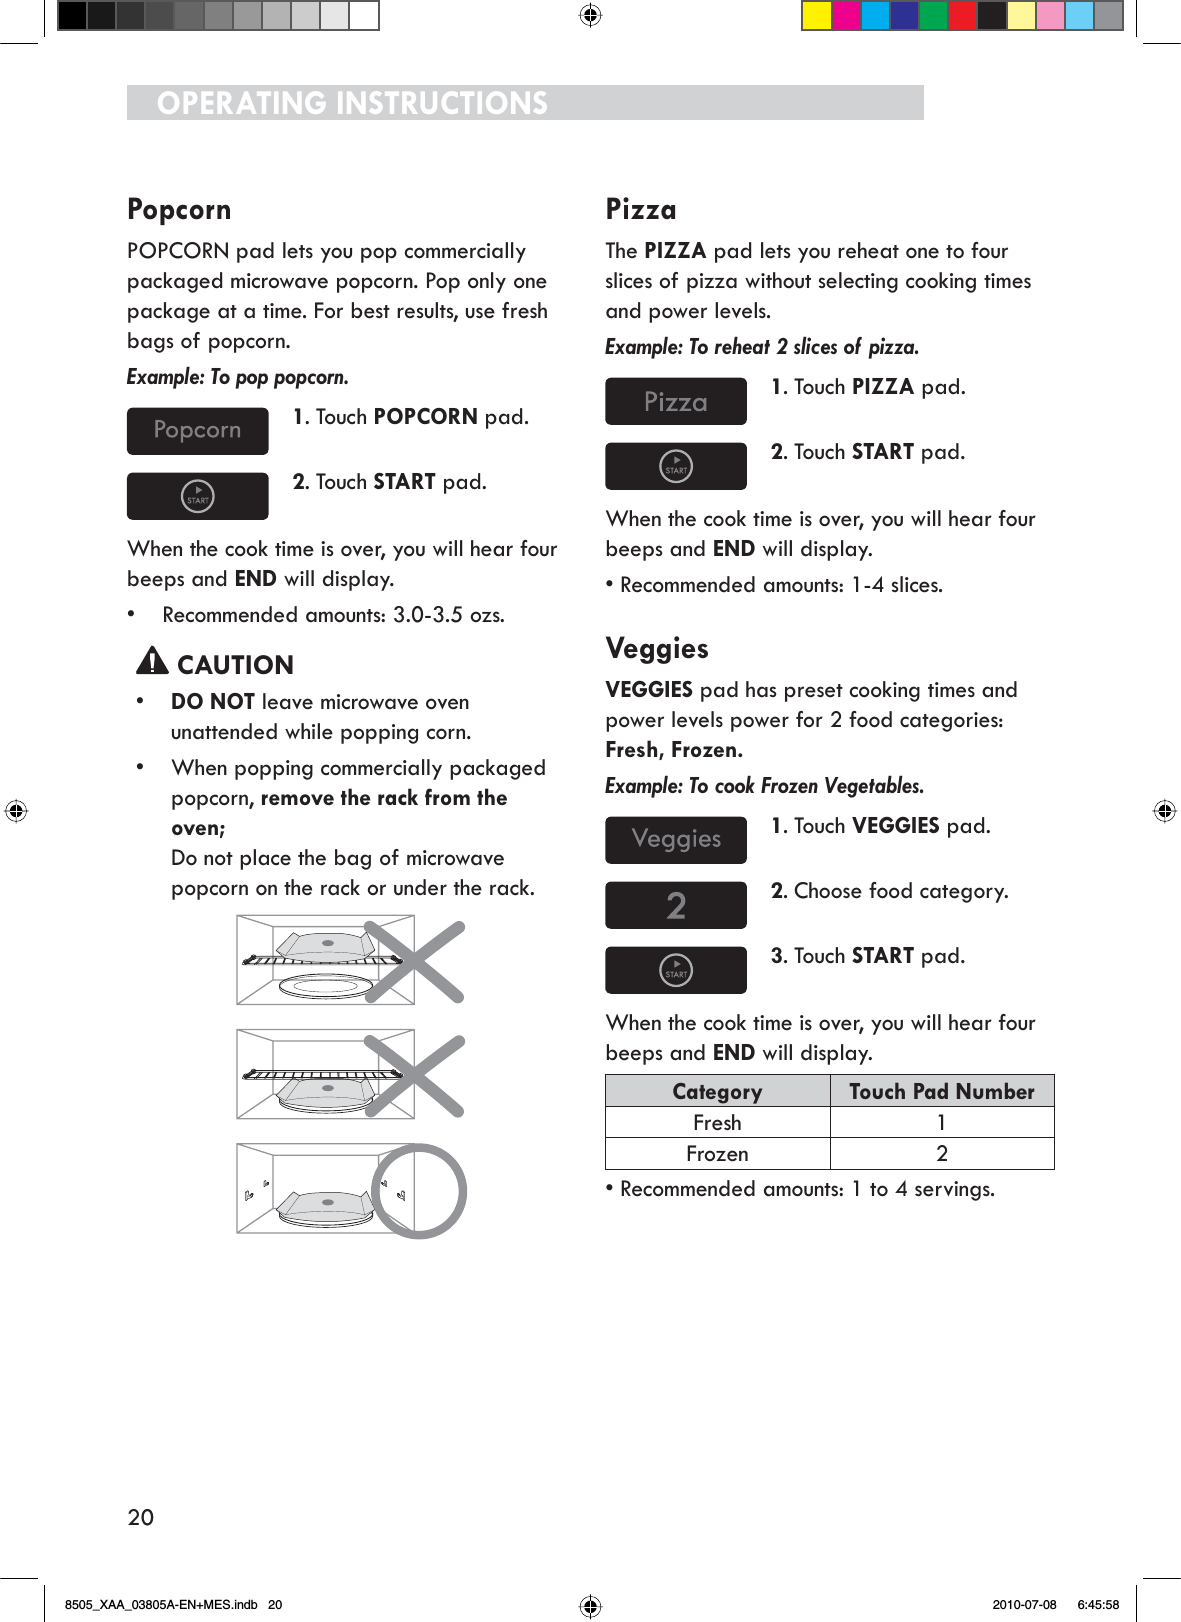
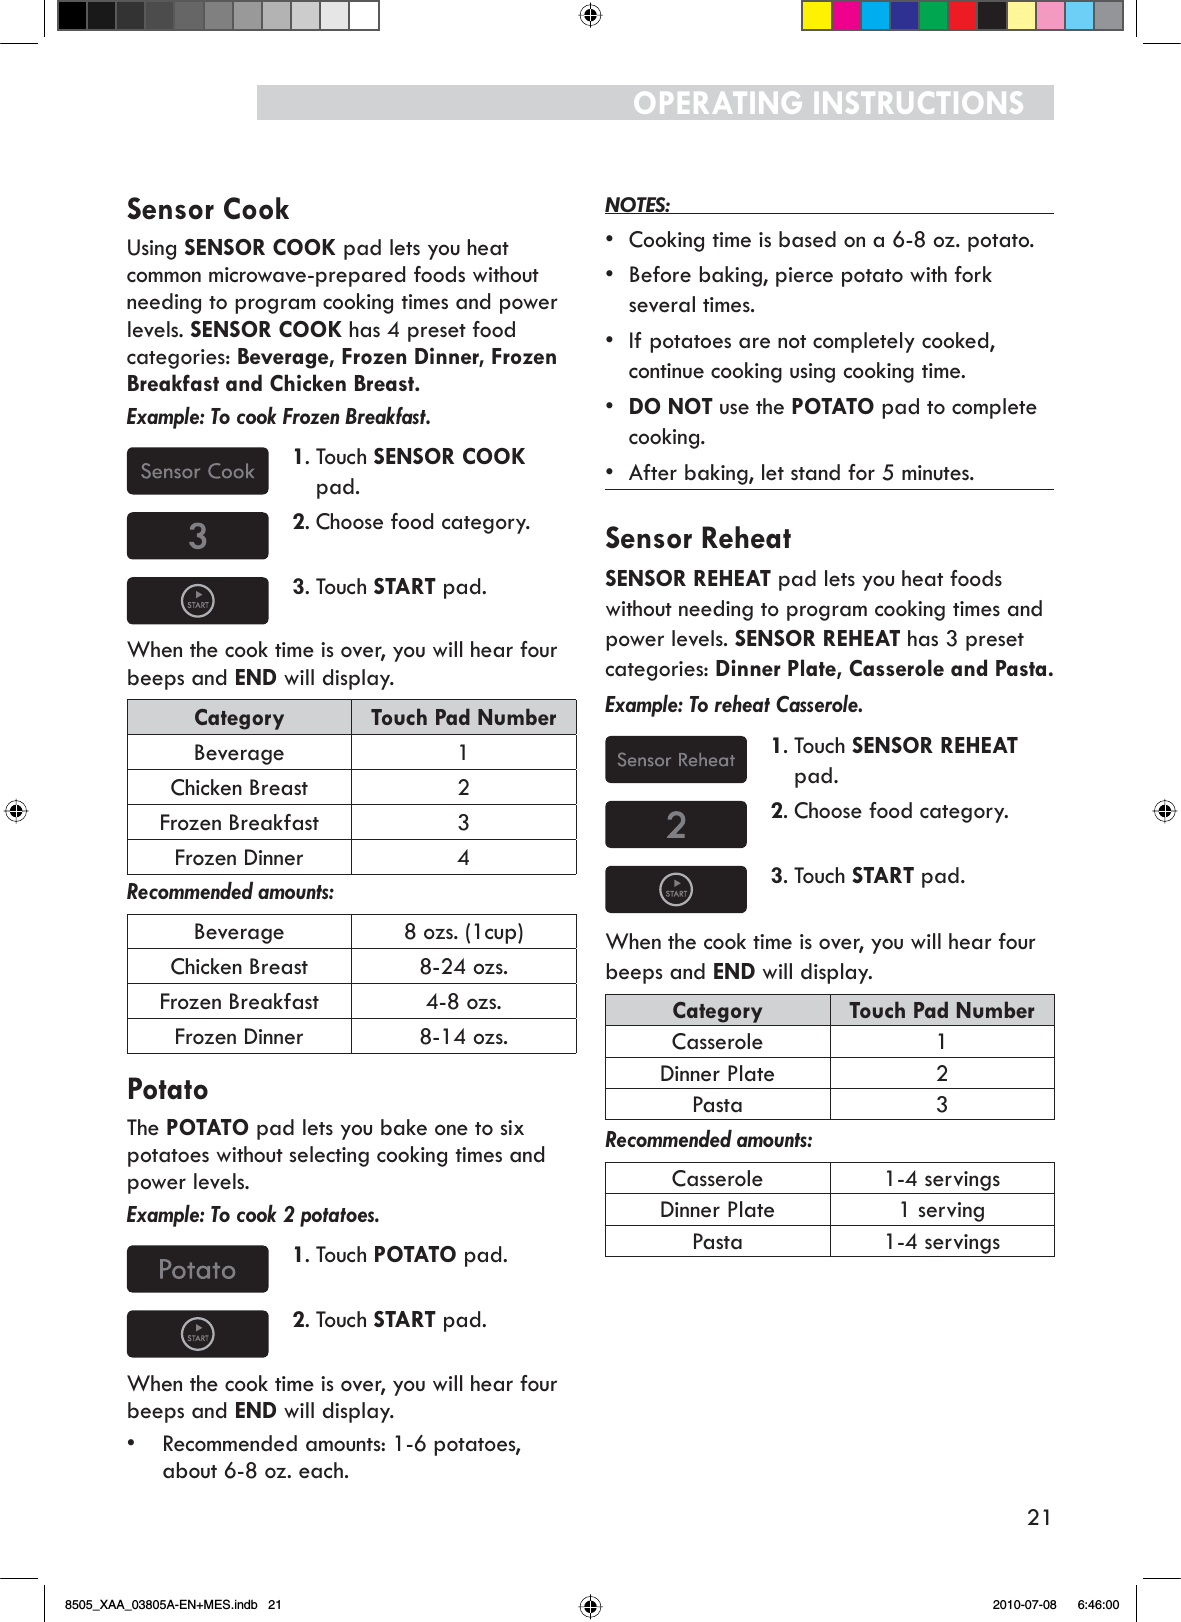
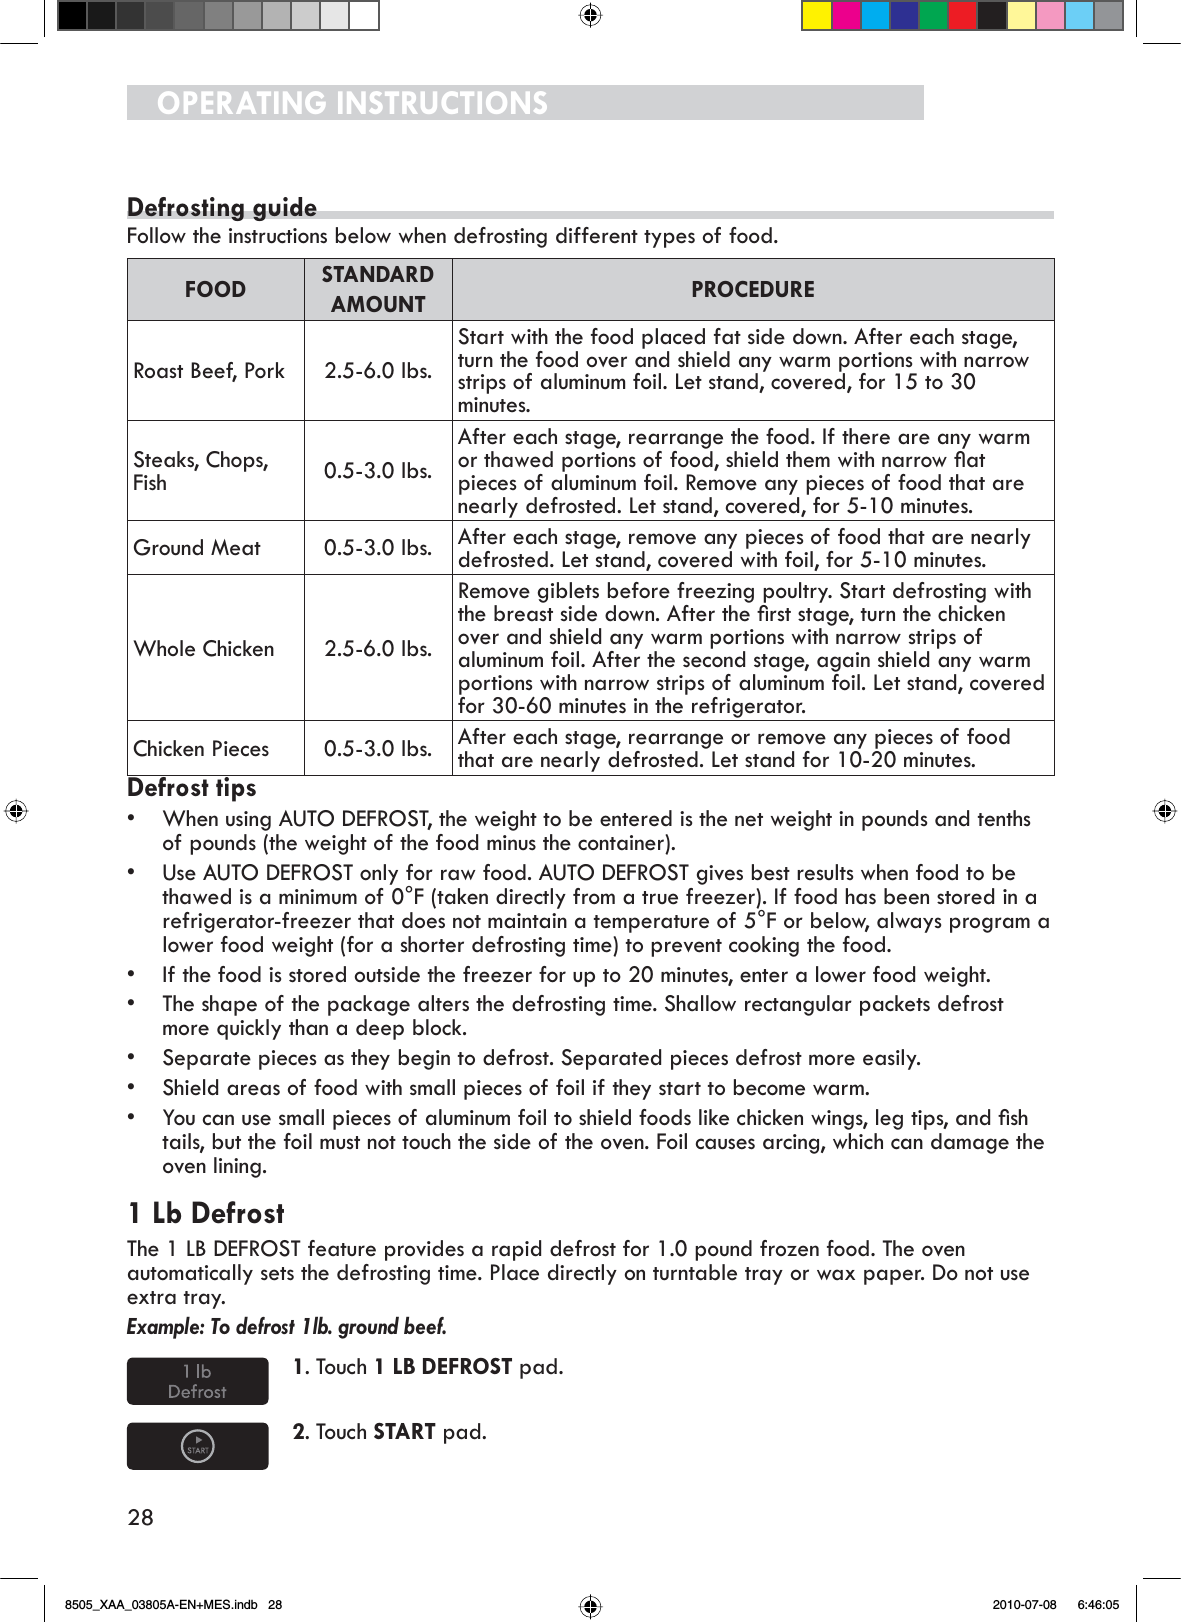
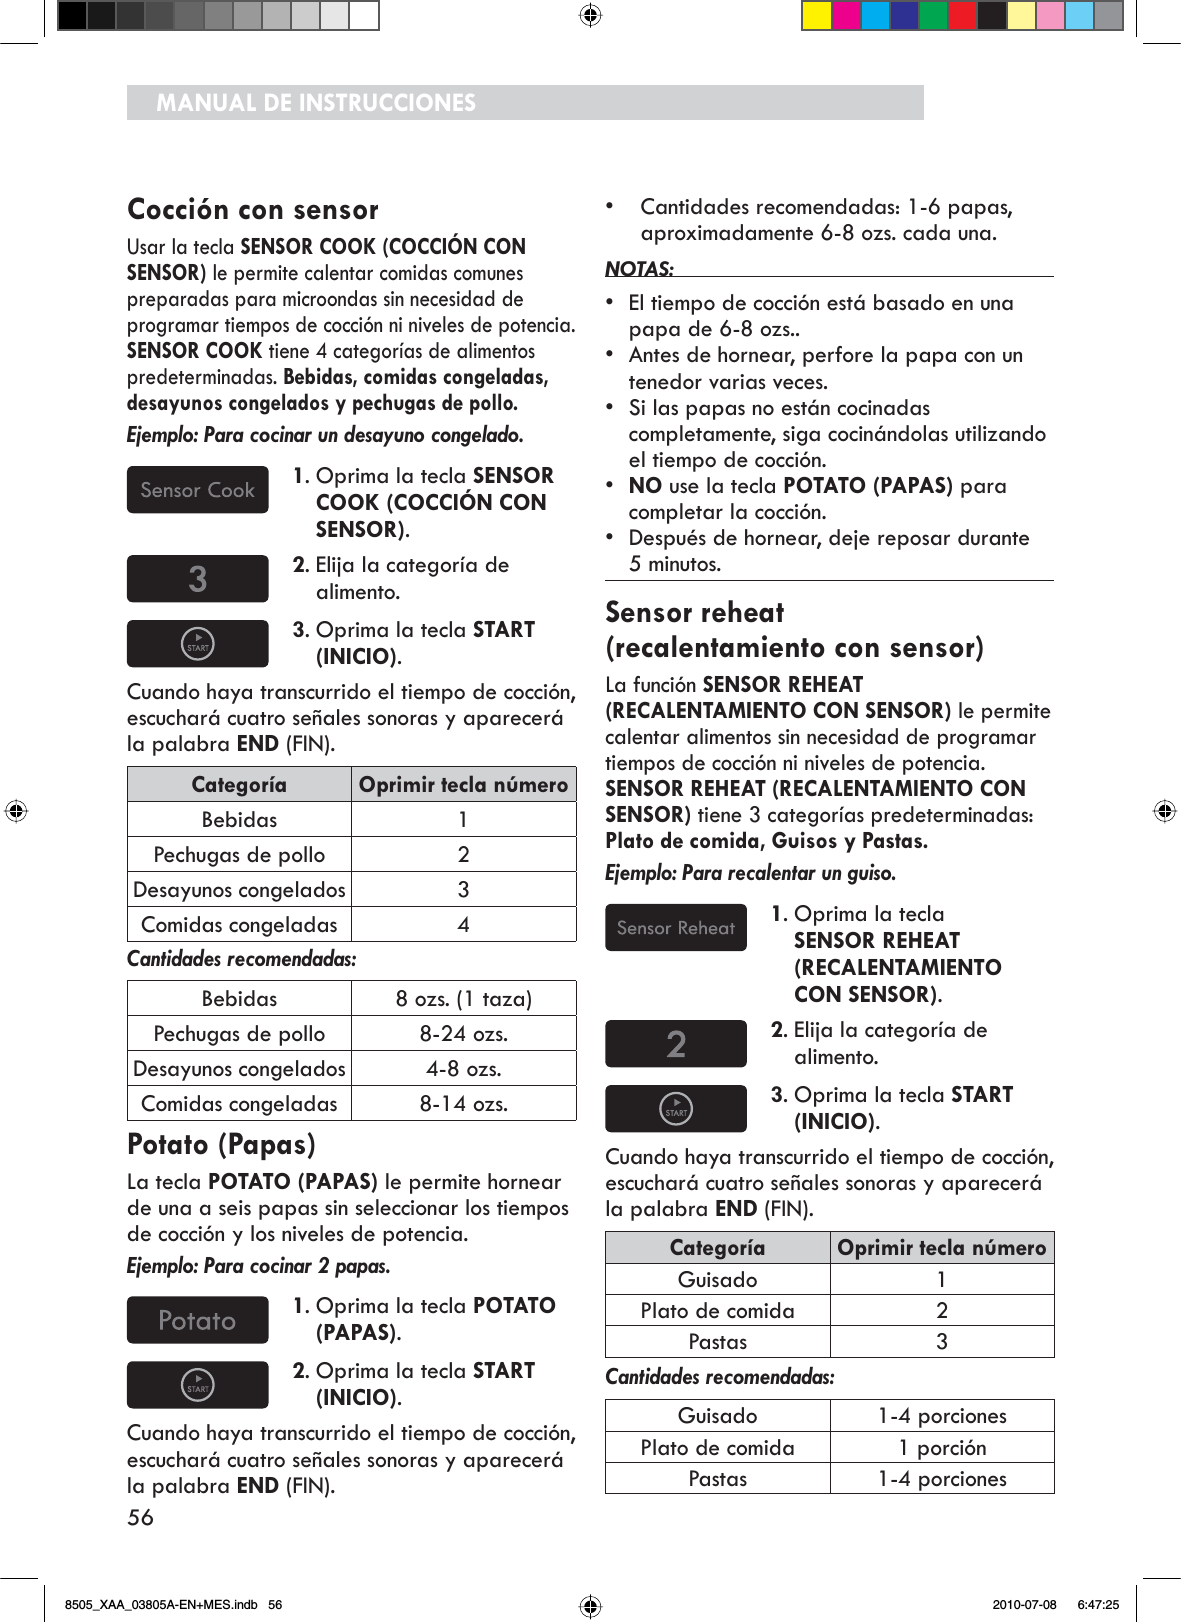
![22OPERATING INSTRUCTIONSSensor cook tableCATEGORY DIRECTIONS AMOUNTPopcorn Use only one microwave-only bag of popcorn at a time. Use caution when removing and opening the hot bag from oven. Let oven cool for at least 5 minutes before using again.3.0 to 3.5oz.1 packagePotato Prick each potato several times with fork. Place on turntable in spoke-like fashion. Let stand 3-5 minutes. Let oven cool for at least 5 minutes before using again.1 to 6 potatoesVEGGIESFresh VegetablesPlace fresh vegetables in microwave-safe ceramic, glass or plastic dish and add 2-4 Tbs. water. Cover with lid or vented plastic wrap during cooking and stir before standing. Let oven cool for at least 5 minutes before using again.1 to 4 servingsFrozen VegetablesPlace frozen vegetables in microwave-safe ceramic, glass or plastic dish and add 2-4 Tbs. water. Cover with lid or vented plastic wrap during cooking and stir before standing. Let oven cool for at least 5 minutes before using again.1 to 4 servingsPizzaPut 1-4 slices of pizza on a microwave-safe plate with wide end of slice toward the outside edge of the plate. Do not let slices overlap. Do not cover. Let oven cool for at least 5 minutes before using again.1 to 4 SlicesBeverageUse measuring cup or mug ; do not cover. Place the beverage in the oven. After heating, stir well. Let oven cool for at least 5 minutes before using again.Note:Reheat times based on an 8 ounce cup. (1 cup.)Beverage heated with the beverage feature may be very hot.Remove container with care.8 oz.(1 cup.)Chicken BreastPlace chicken breasts on a microwave-safe plate and cover with plastic wrap. Cook to an internal temperature of 170 degrees F.Turn over during countdown time. Let stand 5 minutes. Let oven cool for at least 5 minutes before using again.8 to 24 oz.Frozen BreakfastFollow package instructions for covering and standing. Use this pad for frozen sandwich, breakfast entree, etc. Let oven cool for at least 5 minutes before using again. 4 to 8 oz.Frozen Dinner Remove food from outer wrapping and follow box instructions for covering and standing. Let oven cool for at least 5 minutes before using again. 8 to 14 oz.Sensor reheat tableCATEGORY DIRECTIONS AMOUNTDinner PlateUse only pre-cooked, refrigerated foods. Cover plate with vented plastic wrap or waxed paper, tucked under plate. If food is not as hot as you prefer after heating with REHEAT, continue heating using cooking time and power level. Do not continue cooking using the Reheat pad.Contents:R]PHDWSRXOWU\RUÀVKXSWRR]ZLWKERQH1/2 cup starch (potatoes, pasta, rice, etc.)1/2 cup vegetables (about 3-4 oz.)1 serving(1 plate)Casserole Cover plate with lid or vented plastic wrap. If food is not as hot as you prefer after heating with REHEAT, continue heating using time and power level. Do not continue cooking using the Reheat pad.Stir foods once before serving.Contents:Casserole-refrigerated foods. (Examples: Lasagna and beef stew.)Pasta-Canned spaghetti and ravioli, refrigerated foods.1 to 4 servings.Pasta8505_XAA_03805A-EN+MES.indb 22 2010-07-08 6:46:00](https://usermanual.wiki/Samsung-Electronics-Co/OTR19MHC4/User-Guide-1314498-Page-22.png)
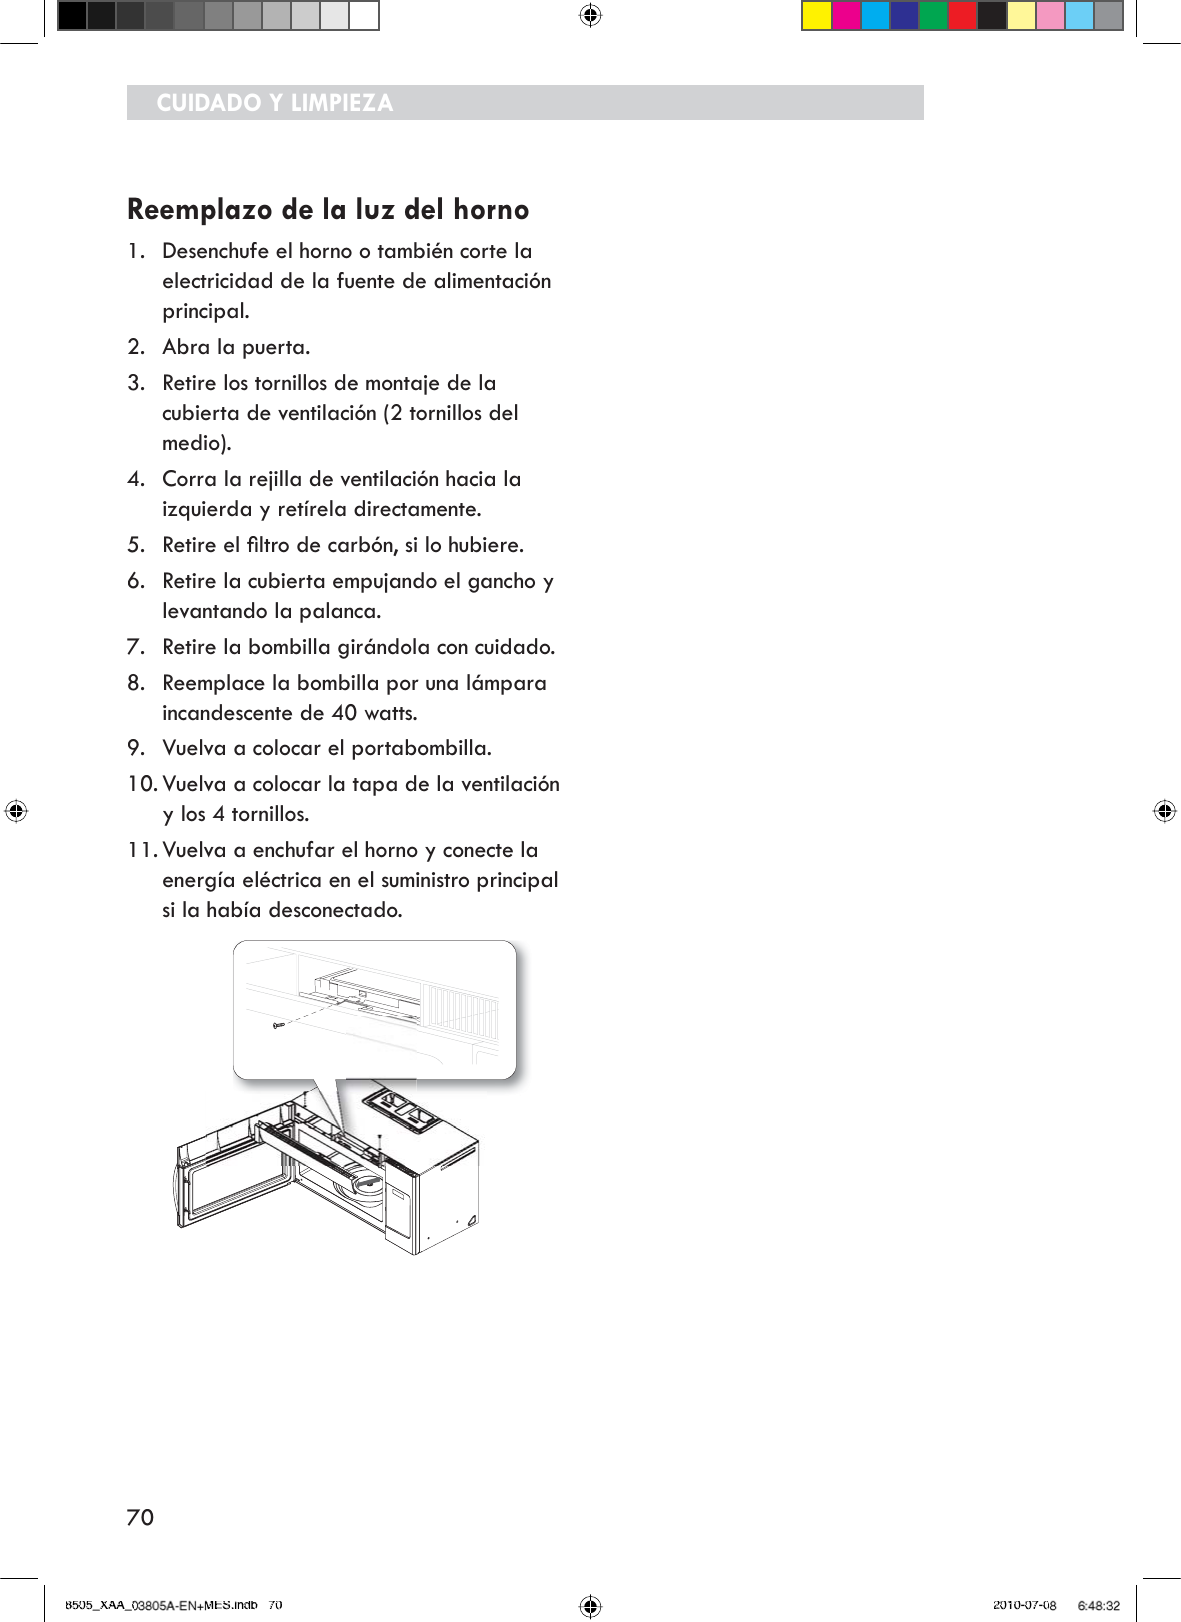
![37ÍndiceGarantía de Combinación Microondas Campana ......................... 38Servicio técnico de Sears ............. 39Contratos maestros de protección .......39INSTRUCCIONES DE SEGURIDAD IMPORTANTES ..................... 41PRECAUCIONES PARA EVITAR LA POSIBLE EXPOSICIÓN A ENERGÍA DE MICROONDAS EXCESIVA......................... 42Obtener los mejores resultados de cocción45Prueba de la vajilla o los utensilios......45Características ..................... 46(VSHFLÀFDFLRQHVGHOKRUQR .............46Características......................48Manual de instrucciones ............. 49Conozca su horno de microondas .......49Reloj (Clock)........................49Temporizador de cocina ..............49Opciones ..........................49Turntable on/off (plato giratorio activado/desactivado) .......................50Ventilador .........................50Retardo apagado ...................50Control lock (Bloquear controles)........50Agregar 30 seg ....................51Light Set Timer (Temporizador de FRQÀJXUDFLyQGHODOX] ...............51Light Hi/Nite/Off (Luz alta/noche/apagada) .........................51Cocción con altos niveles de potencia. . . .52Cocción con bajos niveles de potencia . . .52Cocción multietapas..................52Guía de cocción de los niveles de potencia ........................53Guía de cocción con sensor ............54Popcorn (Palomitas) ..................55Pizza .............................55Veggies (Verduras) ..................55Cocción con sensor...................56Potato (Papas) ......................56Sensor reheat(recalentamiento con sensor) ...........56Tiempo de cocción (Time Cook).........58Favorite (Favoritos) ..................58Warm & hold(Calentar y mantener caliente) .........58Botanas ...........................59Comidas para niños..................60Ablandar/derretir...................61Auto Descongelado (Auto Defrost) ......621 Lb defrost (Descongelamiento 1 Lb)....63Guía de cocción.....................64Utensilios para cocinar .............. 67Guía de utensilios para microondas .....67Cuidado y limpieza ................. 68Cuidado y limpieza..................68/LPSLH]DGHORVÀOWURVGHJUDVD ........685HHPSOD]RGHOÀOWURGHFDUEyQ ........69Reemplazo de la luz de la cubierta/luz nocturna...........................69Reemplazo de la luz del horno .........70Guía de solución de problemas ........ 71Guía de solución de problemas ........718505_XAA_03805A-EN+MES.indb 37 2010-07-08 6:47:09](https://usermanual.wiki/Samsung-Electronics-Co/OTR19MHC4/User-Guide-1314498-Page-37.png)
![38Garantía de Combinación Microondas CampanaGarantía limitada de un añoUna vez instalado, en funcionamiento y mantenido de acuerdo con todas las instrucciones proporcionadas con el producto, si este aparato no funciona debido a un defecto en los materiales o la mano de obra durante un período de un año desde la fecha de adquisición, llame a 1-800-4-MY-HOME® para obtener una reparación gratuita.Si este electrodoméstico se utiliza con SURSyVLWRVGLVWLQWRVDORVÀQHVSULYDGRVGHuna familia, esta garantía sólo será aplicable durante 90 días desde la fecha de la compra.Esta garantía sólo cubre defectos de fabricación de los materiales y la mano de obra. Sears no pagará por:1. Elementos consumibles que se pueden desgastar con el uso normal, incluidos, aunque no taxativamente enumerados, ÀOWURVFLQWDVERPELOODVGHOX]\EROVDV2. Un técnico de servicio para instruir al usuario sobre la instalación, el funcionamiento o el mantenimiento correctos del producto.3. Un técnico de servicio para limpiar o efectuar el mantenimiento de este producto.4. Los daños o las fallas de este producto si no se instala, se utiliza o se mantiene de acuerdo con todas las instrucciones suministradas con el producto.5. Los daños o las fallas de este producto causados por accidentes, abuso, uso incorrecto o un uso distinto al que fue destinado.6. Los daños o las fallas causados por el uso de detergentes, limpiadores, productos químicos o utensilios que no sean los recomendados en todas las instrucciones suministradas con el producto.7. Los daños o las fallas de las piezas o VLVWHPDVFDXVDGRVSRUPRGLÀFDFLRQHVQRautorizadas realizadas en este producto.Desconocimiento de garantías tácitas; limitación de reparaciones.La única y exclusiva reparación para el cliente bajo esta garantía limitada será la reparación del producto como aquí se estipula.Garantías tácitas, incluyendo las garantías de comerciabilidad o aptitud para un propósito especial, poseen un término limitado de un año o el período más corto permitido por la ley. Sears no se hará responsable por daños derivados o imprevistos. Algunos estados y provincias no permiten la exclusión o las limitaciones en cuanto a la duración de las garantías tácitas de comerciabilidad o aptitud, por lo tanto las limitaciones o exclusiones antedichas pueden no aplicarse a usted.Esta garantía sólo se aplica si este aparato se usa en los Estados Unidos.Esta garantía le otorga derechos legales HVSHFtÀFRV\DGHPiVSXHGHWHQHURWURVderechos que varían según el Estado en el que se encuentre.Sears Brands Management Corporation, Hoffman Estates, IL 601798505_XAA_03805A-EN+MES.indb 38 2010-07-08 6:47:09](https://usermanual.wiki/Samsung-Electronics-Co/OTR19MHC4/User-Guide-1314498-Page-38.png)
![40CONSERVE ESTAS INSTRUCCIONESINSTRUCCIONES DE SEGURIDAD IMPORTANTES ADVERTENCIAEl uso inadecuado del enchufe de conexión a tierra puede conducir a un riesgo de descarga eléctrica.INSTRUCCIONES DE CONEXIÓN A TIERRAEste electrodoméstico debe conectarse a tierra. En caso de cortocircuito, la conexión a tierra reduce el riesgo de descarga eléctrica ya que ofrece un cable de escape para la corriente eléctrica.Este electrodoméstico está equipado con un cable que incluye un cable y un enchufe de conexión a tierra. El enchufe debe conectarse a un tomacorriente que esté correctamente instalado y conectado a tierra. Consulte las instrucciones de instalación.Consulte a un electricista o servicio técnico FDOLÀFDGRVLQRFRPSUHQGHELHQODVinstrucciones de conexión a tierra, o si tiene alguna duda respecto de si el horno está conectado a tierra correctamente.No utilice un cable prolongador. Si el cable de alimentación del producto es demasiado corto, KDJDTXHXQHOHFWULFLVWDFDOLÀFDGRLQVWDOHXQtomacorriente de tres ranuras. Este horno debe enchufarse en un circuito de 60 Hz separado con los valores eléctricos nominales mostrados HQODWDEODGHHVSHFLÀFDFLRQHV&XDQGRHOhorno comparte el circuito con otros equipos, quizás sea necesario un aumento en los tiempos de cocción y pueden saltar los fusibles.El microondas funciona con la corriente normal doméstica, 110-120 V.DECLARACIÓN DE INTERFERENCIA DE RADIOFRECUENCIA DE LA COMISIÓN FEDERAL DE COMUNICACIONES (ESTADOS UNIDOS SOLAMENTE)Este equipo genera y utiliza energía de frecuencia ISM, y si no se instala y se utiliza correctamente, es decir, en estricto cumplimiento con las instrucciones del fabricante, puede causar interferencia con la recepción de radio y televisión. Se ha FRPSUREDGR\FRQÀUPDGRTXHFXPSOHFRQlos límites estipulados para Equipos ISM ,QGXVWULDOHV&LHQWtÀFRV0pGLFRVHQYLUWXGde la sección 18 de los reglamentos de la FCC, que han sido diseñados para proveer protección razonable contra tal interferencia en una instalación residencial.Sin embargo, no se garantiza que no habrá interferencia en alguna instalación determinada. Si este equipo causa interferencia con la recepción de radio o televisión, lo que puede determinarse apagando y encendiendo el equipo, se recomienda que el usuario intente corregir la interferencia de una de las siguientes maneras:Cambie la orientación de la antena de recepción de radio o televisión.Ubique en otro lugar el horno de microondas con respecto al receptor.Aleje el horno de microondas del receptor.Enchufe el horno de microondas en un tomacorriente distinto para que el horno de microondas y el receptor estén en circuitos diferentes.El fabricante no es responsable de ninguna interferencia de radio o televisión causada por ODPRGLÀFDFLyQQRDXWRUL]DGDGHHVWHKRUQRde microondas. Es responsabilidad del usuario corregir tal interferencia.8505_XAA_03805A-EN+MES.indb 40 2010-07-08 6:47:10](https://usermanual.wiki/Samsung-Electronics-Co/OTR19MHC4/User-Guide-1314498-Page-40.png)
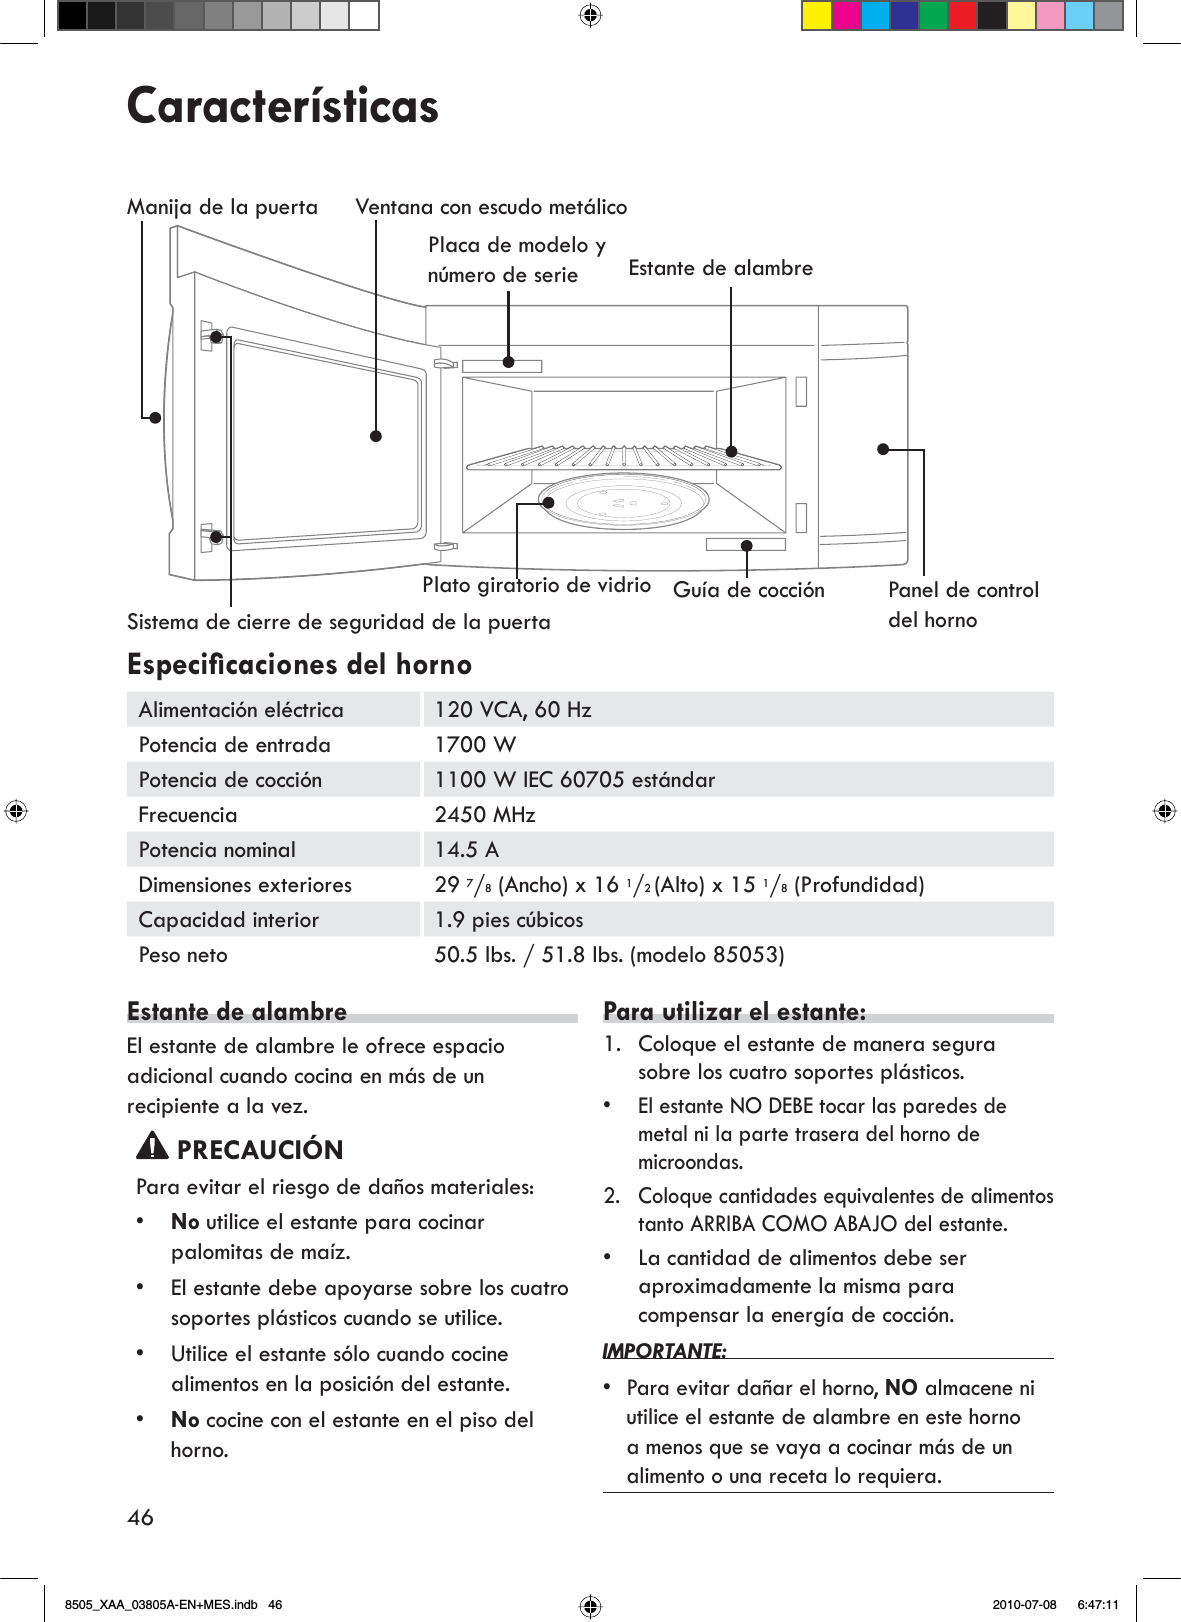
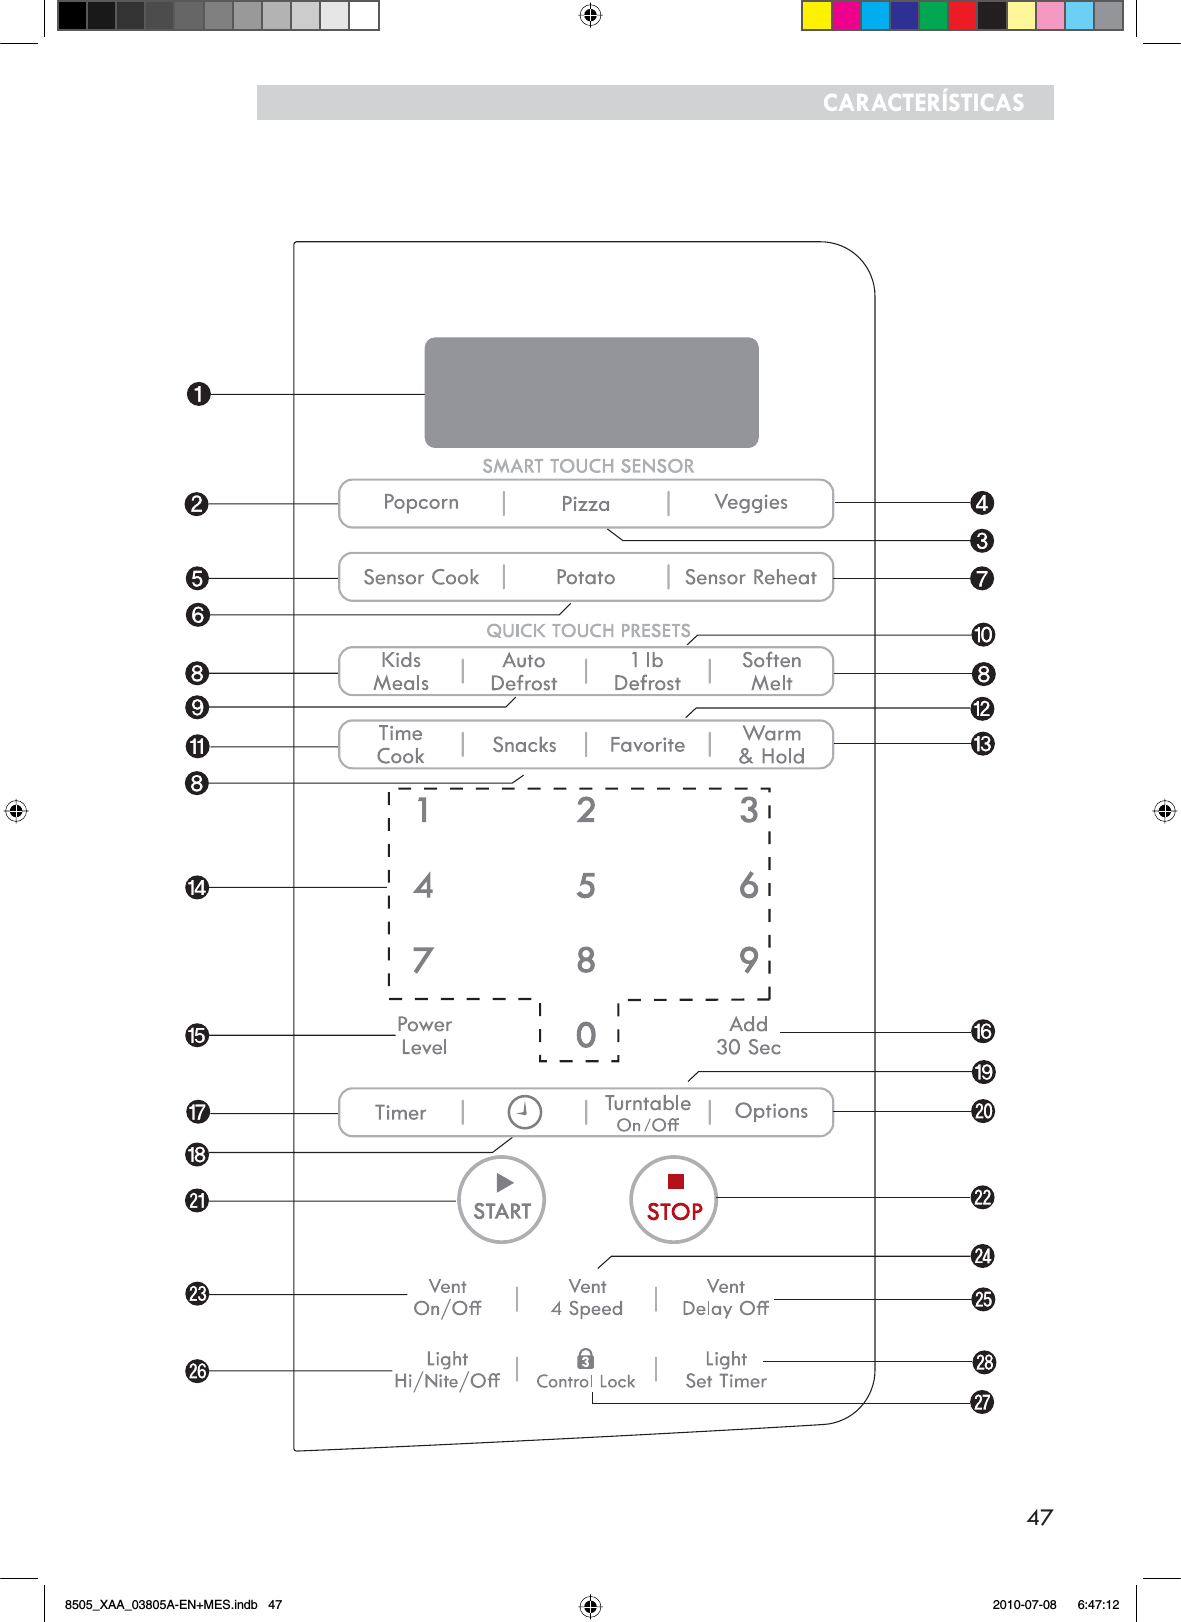
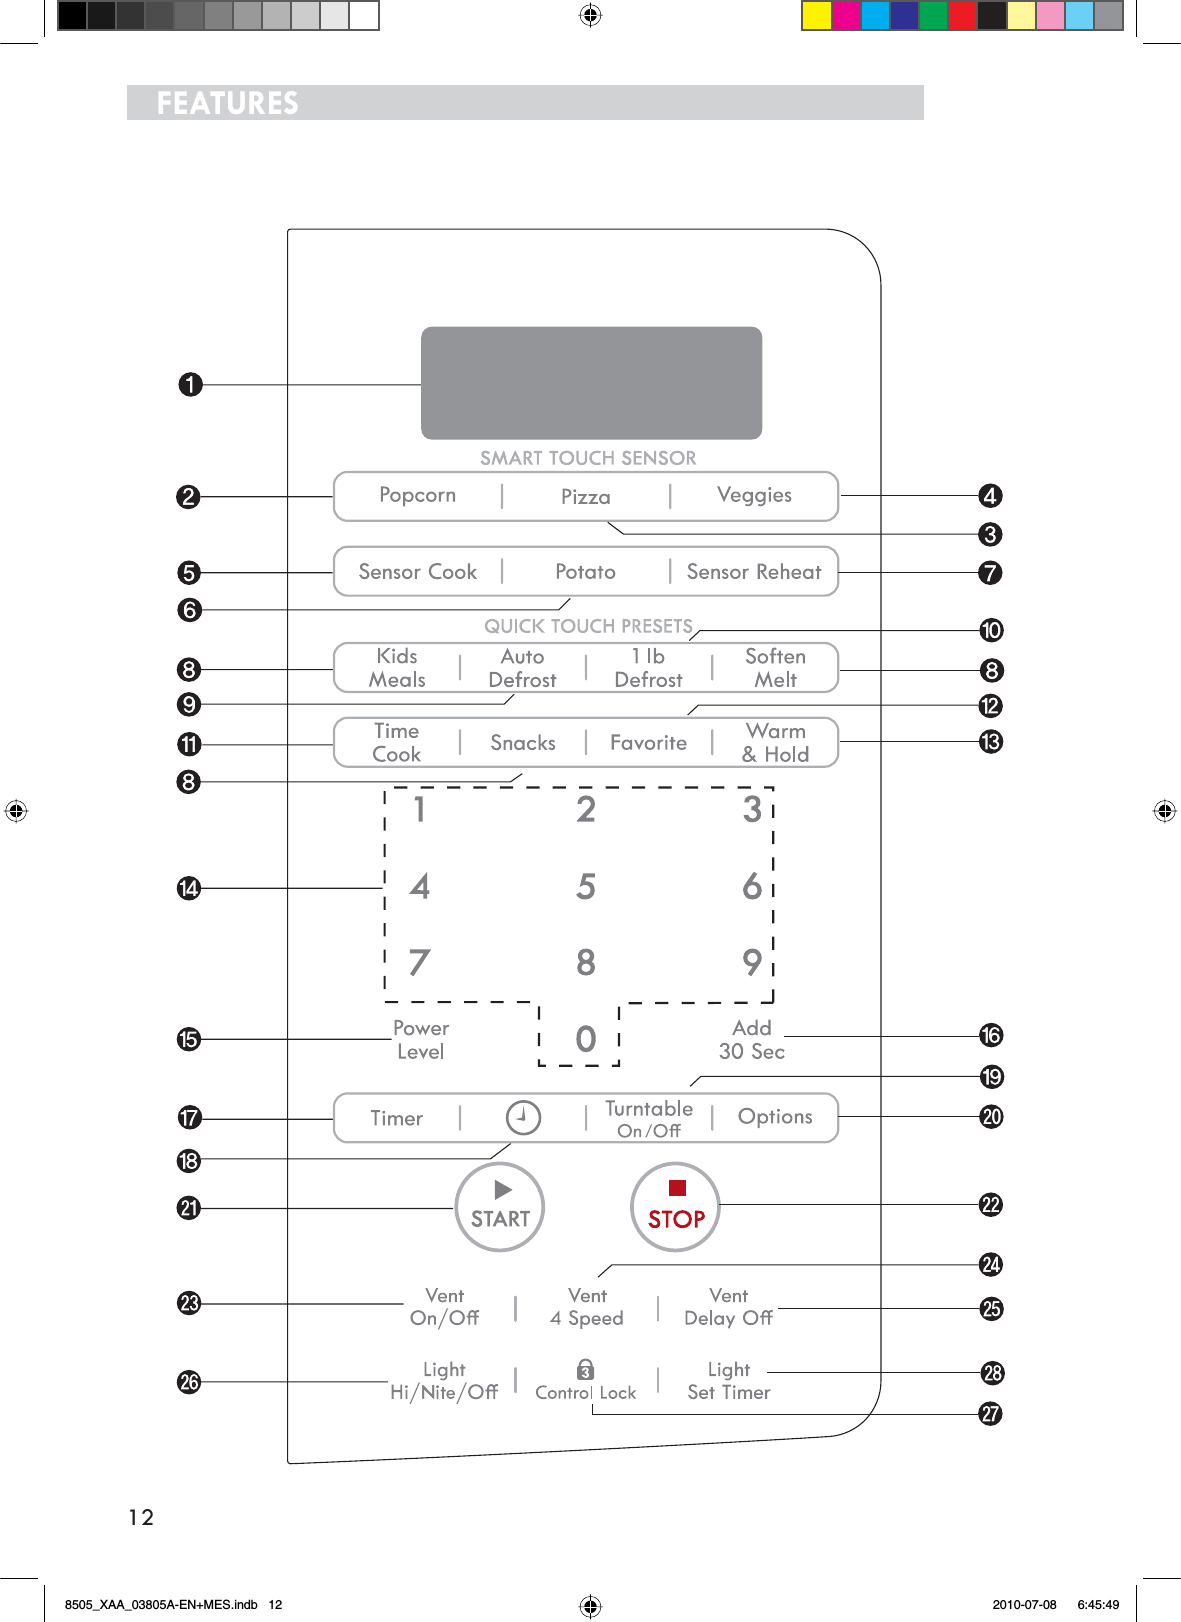
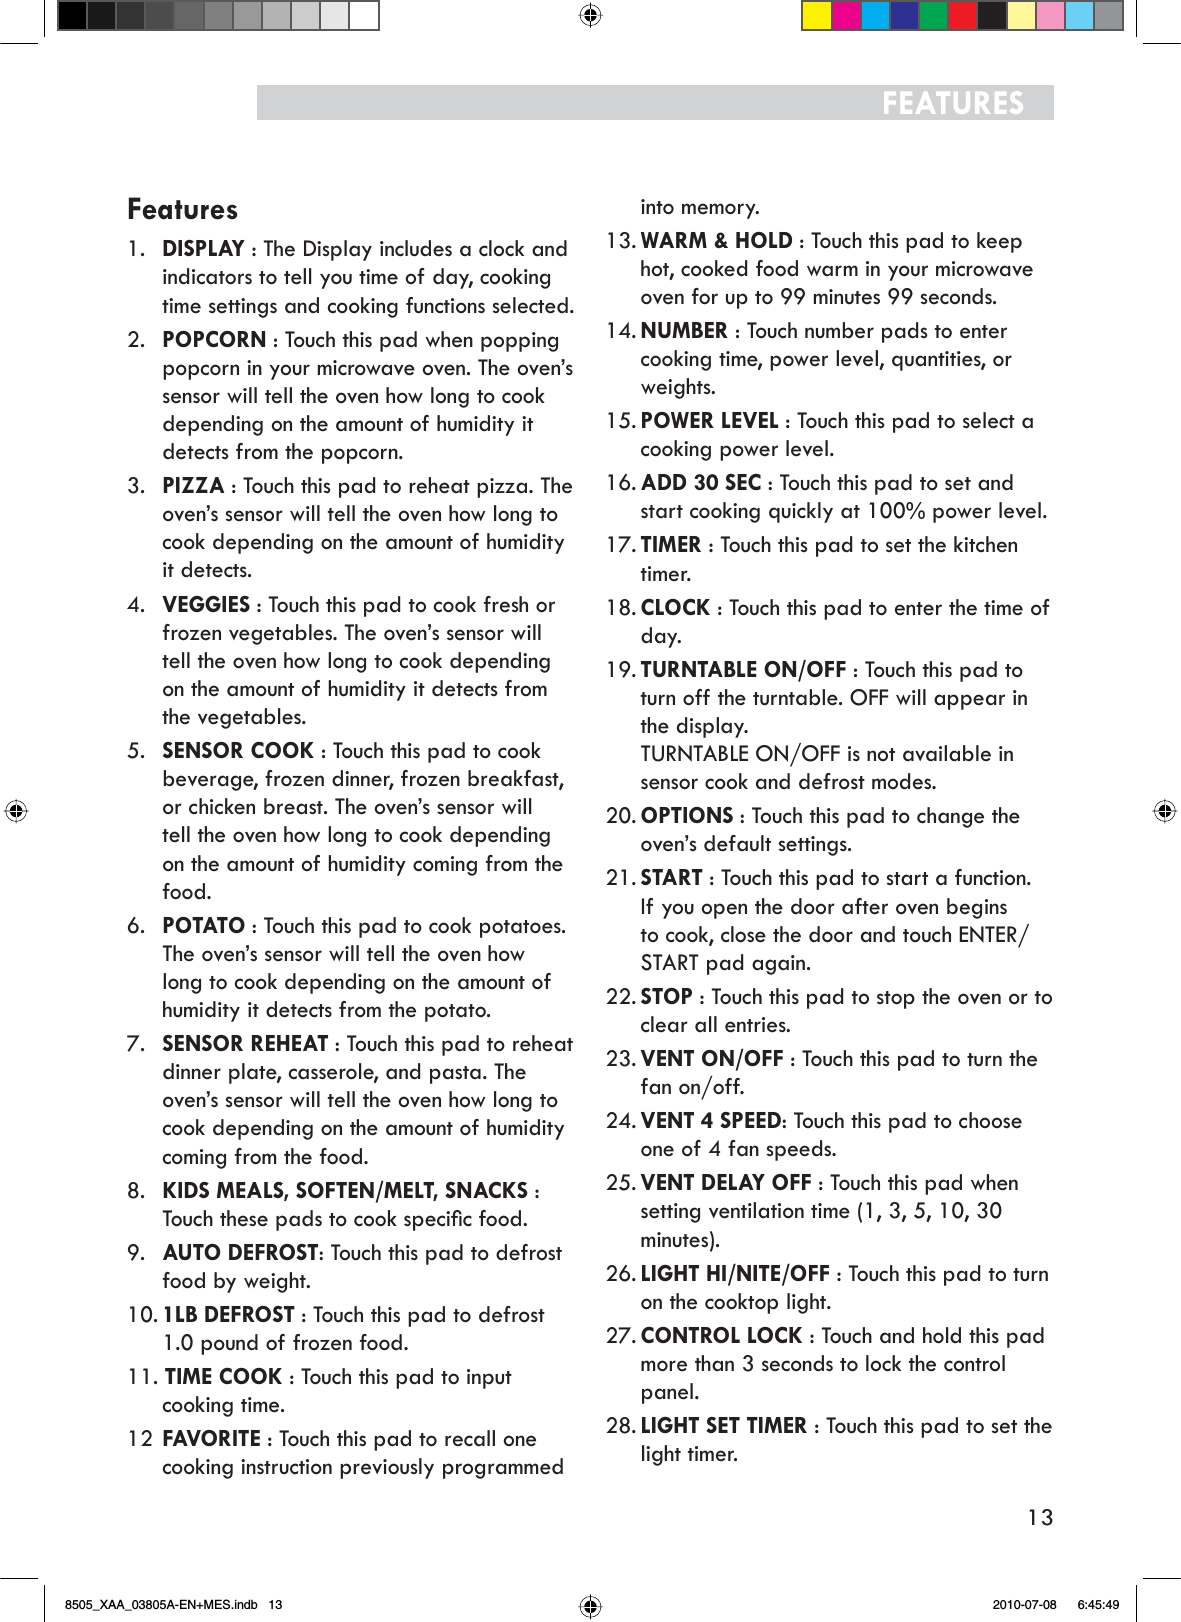
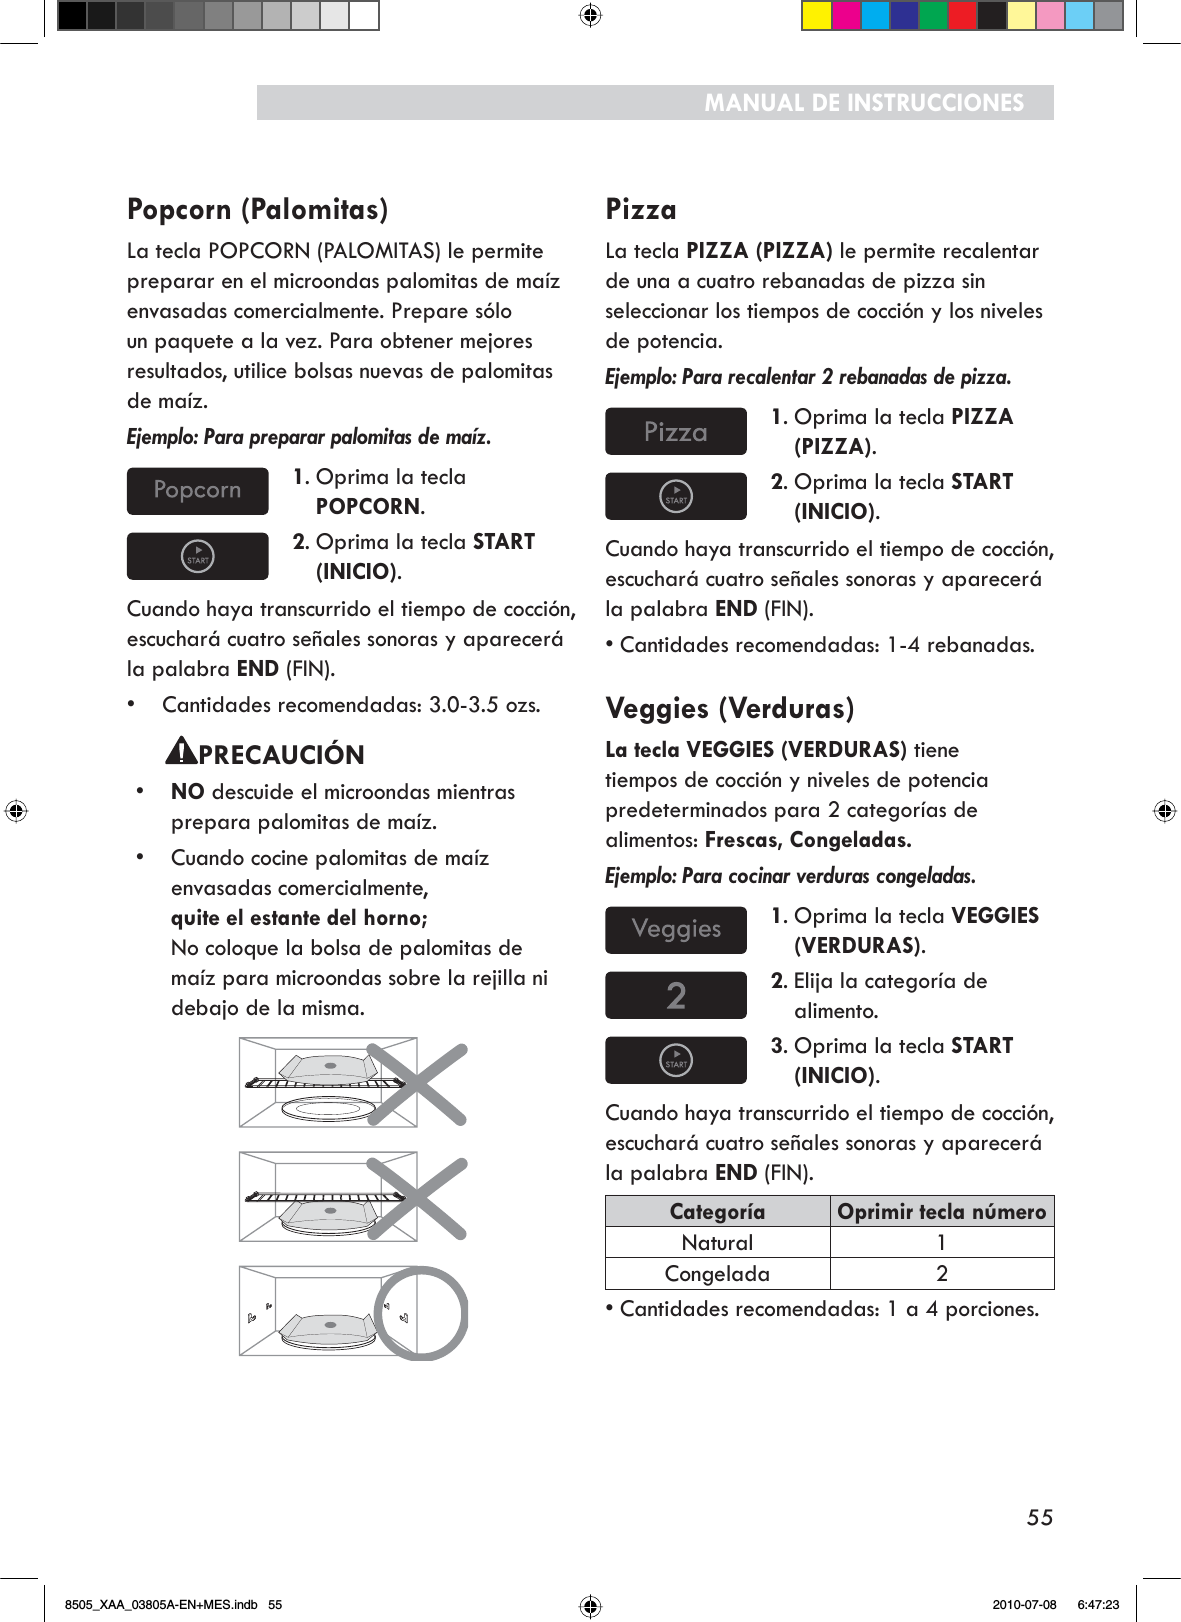
![48CARACTERÍSTICASCaracterísticas1. PANTALLA: La Pantalla incluye un reloj e indicadores SDUDFRPXQLFDUOHODKRUDGHOGtDODVFRQÀJXUDFLRQHVdel tiempo de cocción y las funciones seleccionadas.2. POPCORN (PALOMITAS DE MAÍZ): Oprima esta tecla cuando prepare palomitas de maíz en su horno de microondas. El sensor le indicará al horno cuánto tiempo cocinar dependiendo de la cantidad de humedad que detecte en las palomitas de maíz.3. PIZZA (PIZZA): Oprima esta tecla para recalentar la pizza. El sensor le indicará al horno cuánto tiempo cocinar dependiendo de la cantidad de humedad que detecte.4. VEGGIES (VERDURAS) : Oprima esta tecla para cocinar verduras frescas o congeladas. El sensor le indicará al horno cuánto tiempo cocinar dependiendo de la cantidad de humedad que detecte en las verduras.5. SENSOR COOK (COCCIÓN CON SENSOR): Oprima esta tecla para cocinar bebidas, comidas congeladas, desayunos congelados o pechugas de pollo. El sensor le indicará al horno cuánto tiempo cocinar dependiendo de la cantidad de humedad proveniente de la comida.6. POTATO (PAPAS): Oprima esta tecla para cocinar papas. El sensor le indicará al horno cuánto tiempo cocinar dependiendo de la cantidad de humedad que detecte en las papas.7. SENSOR REHEAT (RECALENTAMIENTO CON SENSOR): Oprima esta tecla para recalentar un plato de comida, guisos y pastas. El sensor le indicará al horno cuánto tiempo cocinar dependiendo de la cantidad de humedad proveniente de la comida.8. KIDS MEALS, SOFTEN/MELT, SNACKS (COMIDAS PARA NIÑOS, ABLANDAR/DERRETIR, BOTANAS):2SULPDHVWDVWHFODVSDUDFRFLQDUFRPLGDVHVSHFtÀFDV9. AUTO DEFROST (DESCONGELAMIENTO AUTOMÁTICO): Oprima esta tecla para descongelar alimentos según el peso.10. 1 LB DEFROST (DESCONGELAMIENTO 1 LB):Oprima esta tecla para descongelar 1 libra de alimentos congelados.11. TIME COOK (TIEMPO DE COCCIÓN): Oprima esta tecla para agregar más tiempo de cocción.12 FAVORITE (FAVORITOS): Oprima esta tecla para recuperar una instrucción de cocción previamente programada en la memoria.13. WARM & HOLD (CALENTAR Y MANTENER CALIENTE): Oprima esta tecla para mantener calientes los alimentos cocinados en el horno microondas hasta 99 minutos y 99 segundos.14. TECLAS NUMÉRICAS: Oprima las teclas numéricas para ingresar el tiempo de cocción, el nivel de potencia, las cantidades o los pesos.15. POWER LEVEL (NIVEL DE POTENCIA): Oprima esta tecla para seleccionar un nivel de potencia de cocción.16. ADD 30 SEC (AGREGAR 30 SEG): Oprima esta tecla para ajustar y comenzar rápidamente la cocción en el nivel de potencia del 100 %.17. TIMER (TEMPORIZADOR): Oprima esta tecla para FRQÀJXUDUHOWHPSRUL]DGRUGHODFRFLQD18. CLOCK (RELOJ): Oprima esta tecla para ingresar la hora del día.19. TURNTABLE ON/OFF (PLATO GIRATORIO ACTIVADO/DESACTIVADO): Oprima esta tecla para desactivar el plato giratorio. En la pantalla, aparecerá OFF (DESACTIVADO).La función ACTIVAR/DESACTIVAR PLATO GIRATORIO no está disponible en los modos cocción con sensor ni descongelamiento.20. OPTIONS (OPCIONES): Oprima esta tecla para PRGLÀFDUODVFRQÀJXUDFLRQHVSUHGHWHUPLQDGDVGHOhorno.21. START (INICIO): Oprima esta tecla para iniciar una función. Si abre la puerta después de que el horno comienza a cocinar, cierre la puerta y oprima la tecla ENTER/START (INGRESAR/INICIO) nuevamente.22. STOP (DETENER): Oprima esta tecla para apagar el horno o anular todas las entradas.23. VENT ON/OFF (VENTILACIÓN ACTIVADA/DESACTIVADA): Oprima esta tecla para encender o apagar el ventilador.24. VENT 4 SPEED (VENTILACIÓN CON 4 VELOCIDADES):Oprima esta tecla para elegir una de las 4 velocidades del ventilador.25. VENT DELAY ON/OFF (VENTILACIÓN RETARDADA ACTIVADA/DESACTIVADA)2SULPDHVWDWHFODFXDQGRFRQÀJXUHHOtiempo de ventilación (1, 3, 5, 10, 30 minutos).26. LIGHT HI/NITE/OFF (LUZ ALTA/NOCHE/APAGADA):Oprima esta tecla para encender la luz de la cubierta.27. CONTROL LOCK (BLOQUEAR CONTROLES):Mantenga presionada esta tecla más de 3 segundos para bloquear el panel de control.28. LIGHT TIMER (TEMPORIZADOR DE CONFIGURACIÓN DE LA LUZ)2SULPDHVWDWHFODSDUDFRQÀJXUDUHOtemporizador de la luz.8505_XAA_03805A-EN+MES.indb 48 2010-07-08 6:47:12](https://usermanual.wiki/Samsung-Electronics-Co/OTR19MHC4/User-Guide-1314498-Page-48.png)
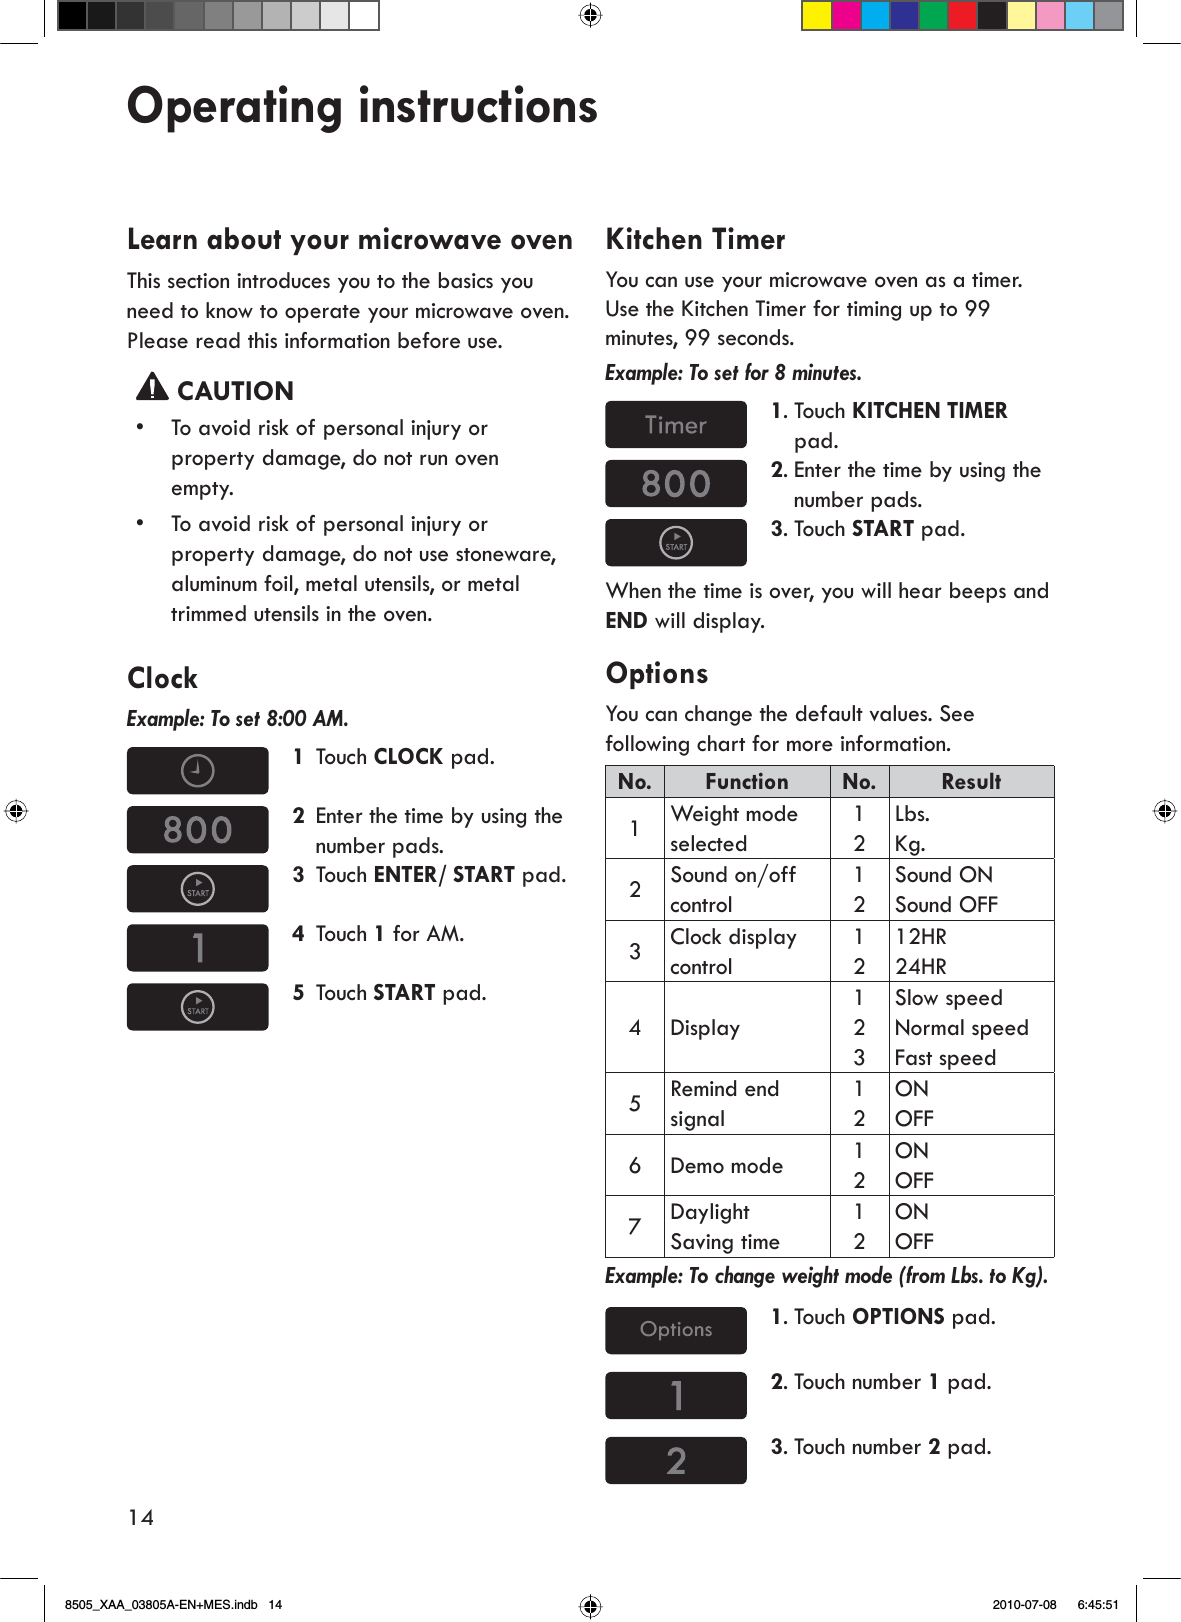
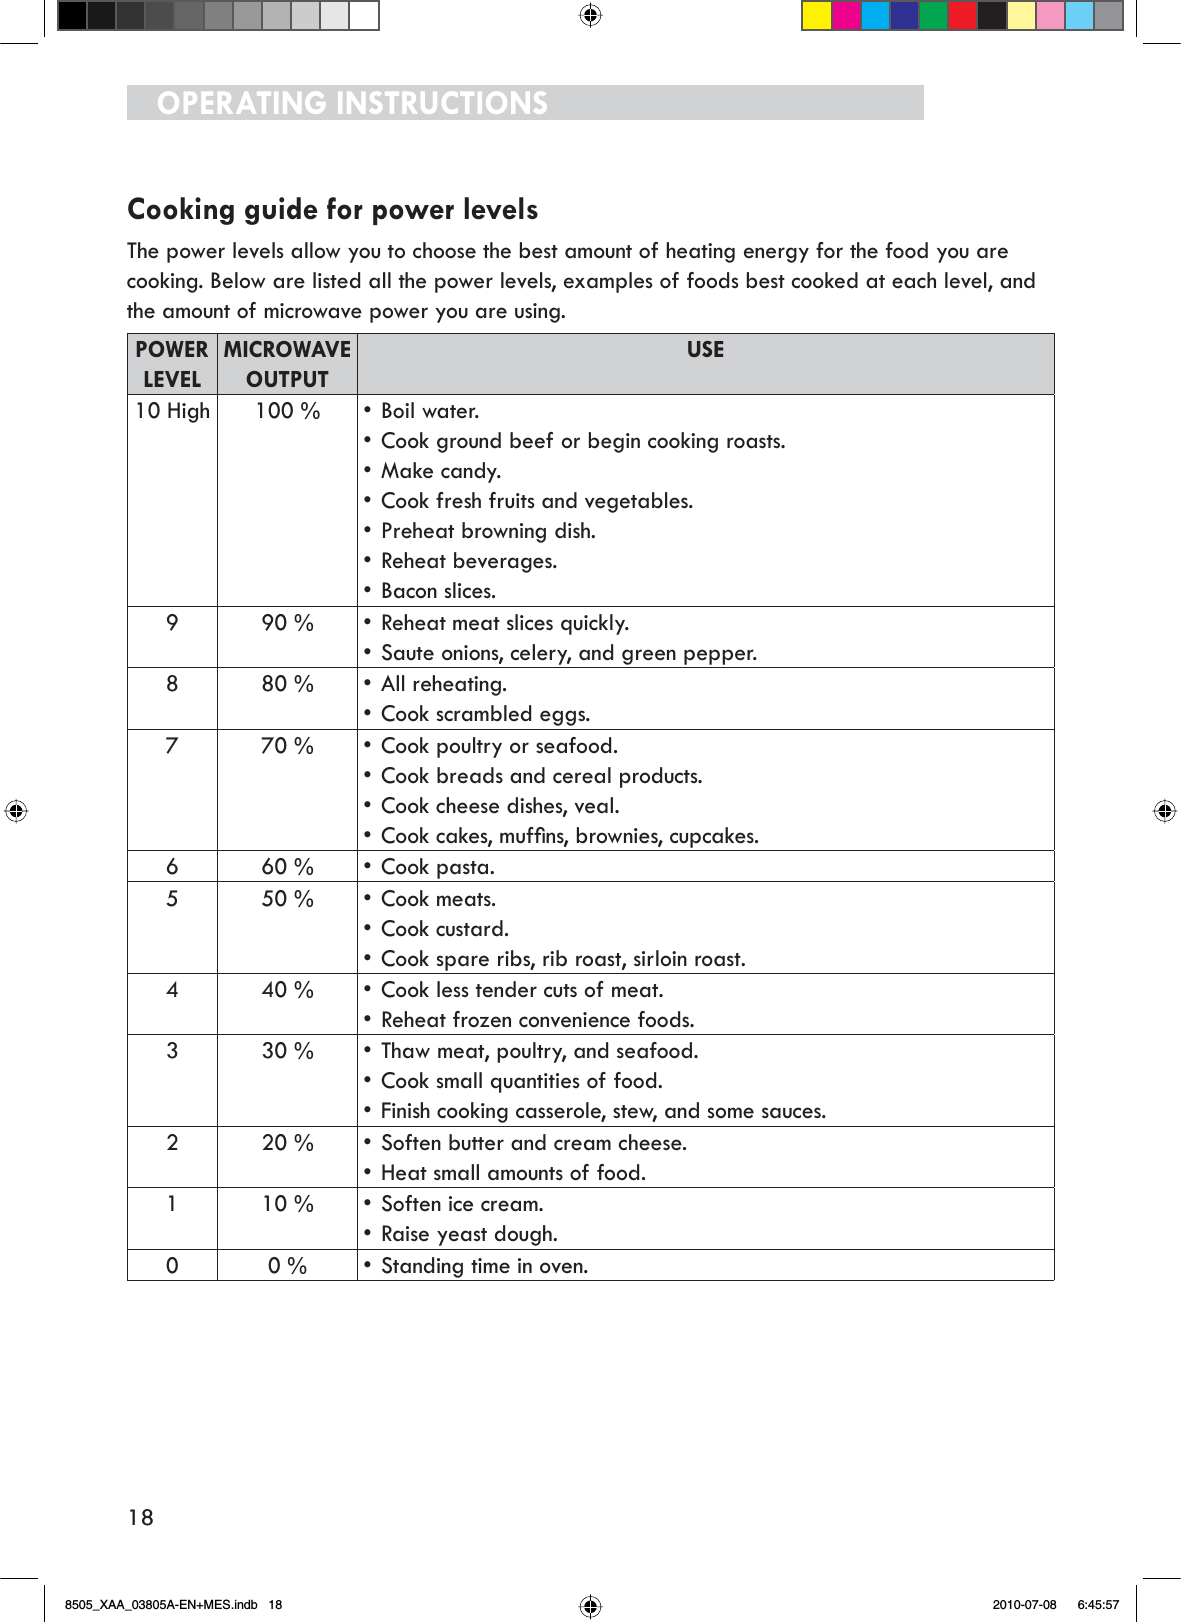
![49Manual de instruccionesConozca su horno de microondasEsta sección describe los elementos básicos que debe conocer para manejar su horno de microondas. Por favor lea esta información antes de utilizarlo. PRECAUCIÓNPara evitar el riesgo de lesiones físicas o daños materiales, no ponga en funcionamiento el horno vacío.Para evitar el riesgo de lesiones físicas o daños materiales no utilice recipientes de barro cocido, papel de aluminio, utensilios de metal ni con adornos de metal en el horno.Reloj (Clock)Ejemplo: Para poner el reloj a las 8:00 AM.1Oprima la tecla CLOCK.2Ingrese la hora utilizando el teclado numérico.3Oprima la tecla ENTER/START (INGRESAR/INICIO).4Oprima 1 para AM.5Oprima la tecla START (INICIO).Temporizador de cocinaPuede utilizar su horno de microondas como temporizador. Utilice el temporizador de la cocina para programar hasta 99 minutos, 99 segundos.Ejemplo: Para programar 8 minutos.1. Oprima la tecla KITCHEN TIMER (TEMPORIZADOR DE LA COCINA).2. Ingrese la hora utilizando el teclado numérico.3. Oprima la tecla START (INICIO).Cuando haya transcurrido el tiempo, escuchará señales sonoras y aparecerá la palabra END(FIN).Opciones3XHGHPRGLÀFDUORVYDORUHVSUHGHWHUPLQDGRVConsulte la siguiente tabla para obtener más información.No. Función No. Resultado1Selección de unidad de peso12Lbs.Kg.2Control de sonido12Sonido ON (activado)Sonido OFF (desactivado)3 Control del reloj 1212HR24HR4 Pantalla123Velocidad lentaVelocidad normalVelocidad rápida5Señal de ÀQDOL]DFLyQ12ON (activado)OFF (desactivado)6Mododemostración12ON (activado)OFF (desactivado)7 Hora de verano 12ON (activado)OFF (desactivado)Ejemplo: Para cambiar el modo de peso (de Lbs. a Kg.).1. Oprima la tecla OPTIONS(OPCIONES).2. Oprima la tecla numérica 1.3. Oprima la tecla numérica 2.8505_XAA_03805A-EN+MES.indb 49 2010-07-08 6:47:14](https://usermanual.wiki/Samsung-Electronics-Co/OTR19MHC4/User-Guide-1314498-Page-49.png)
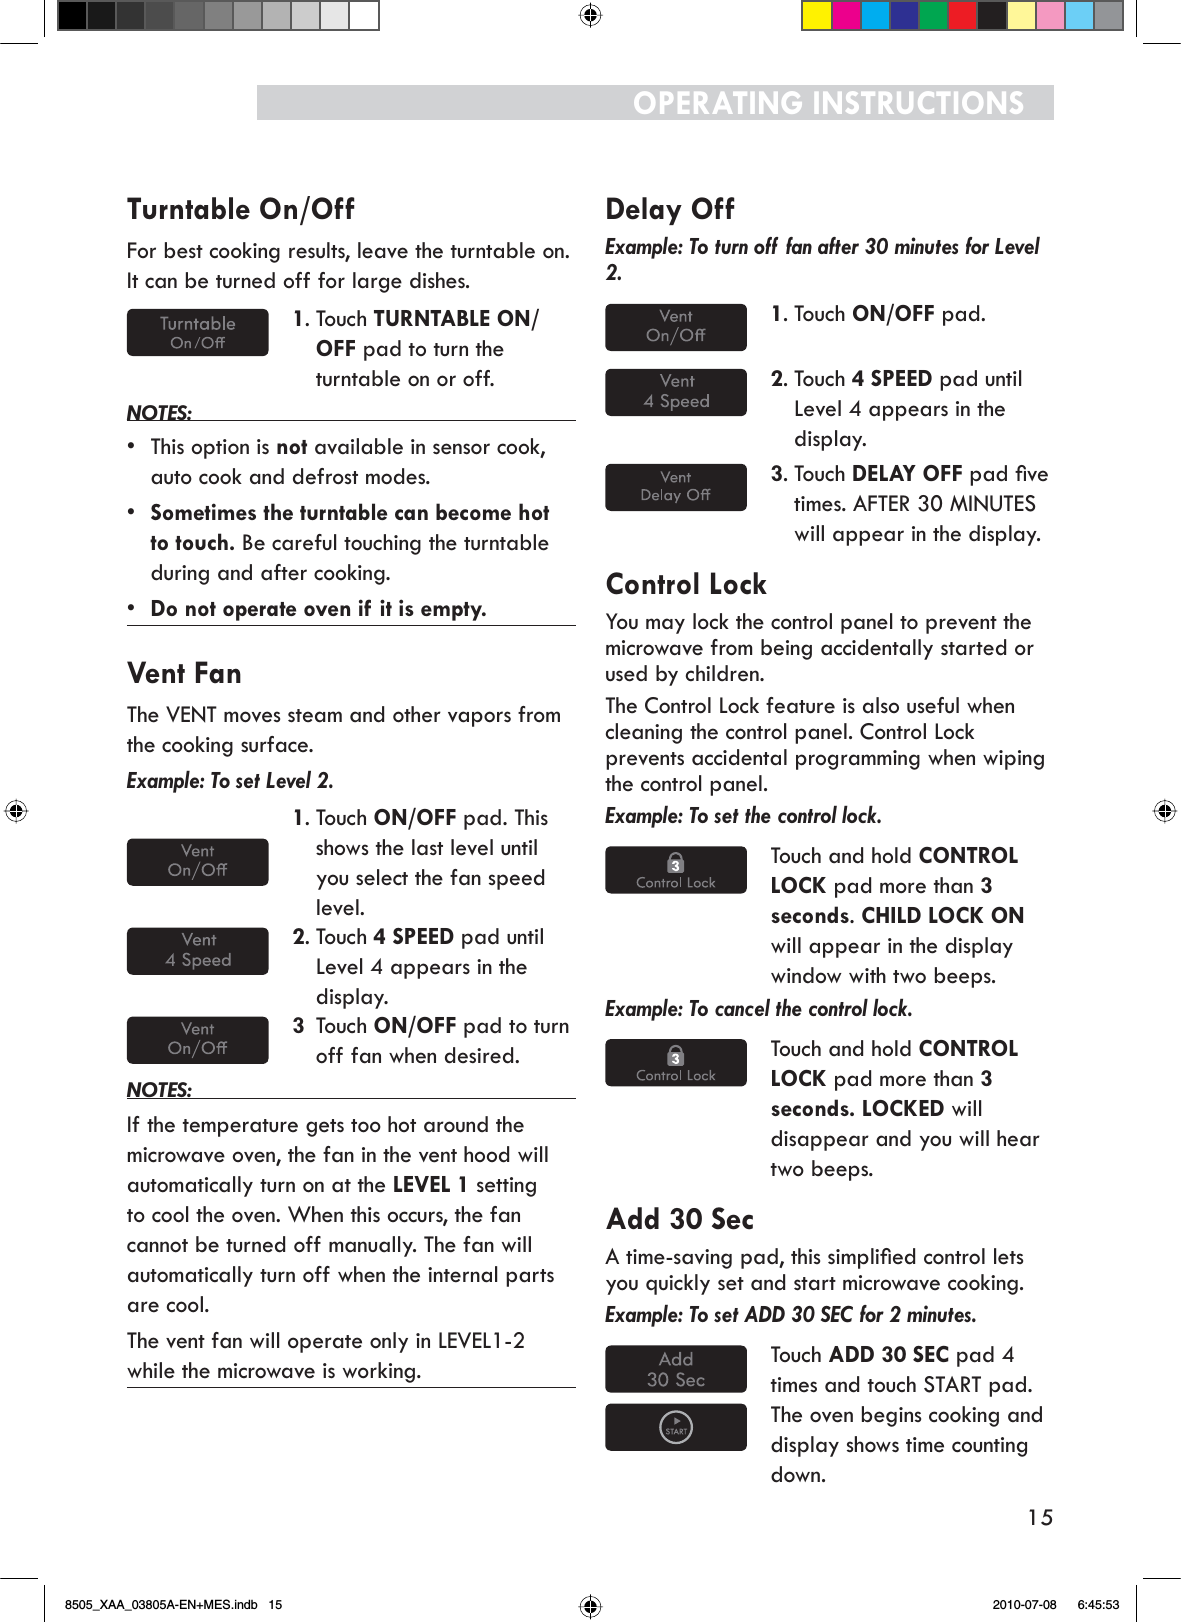
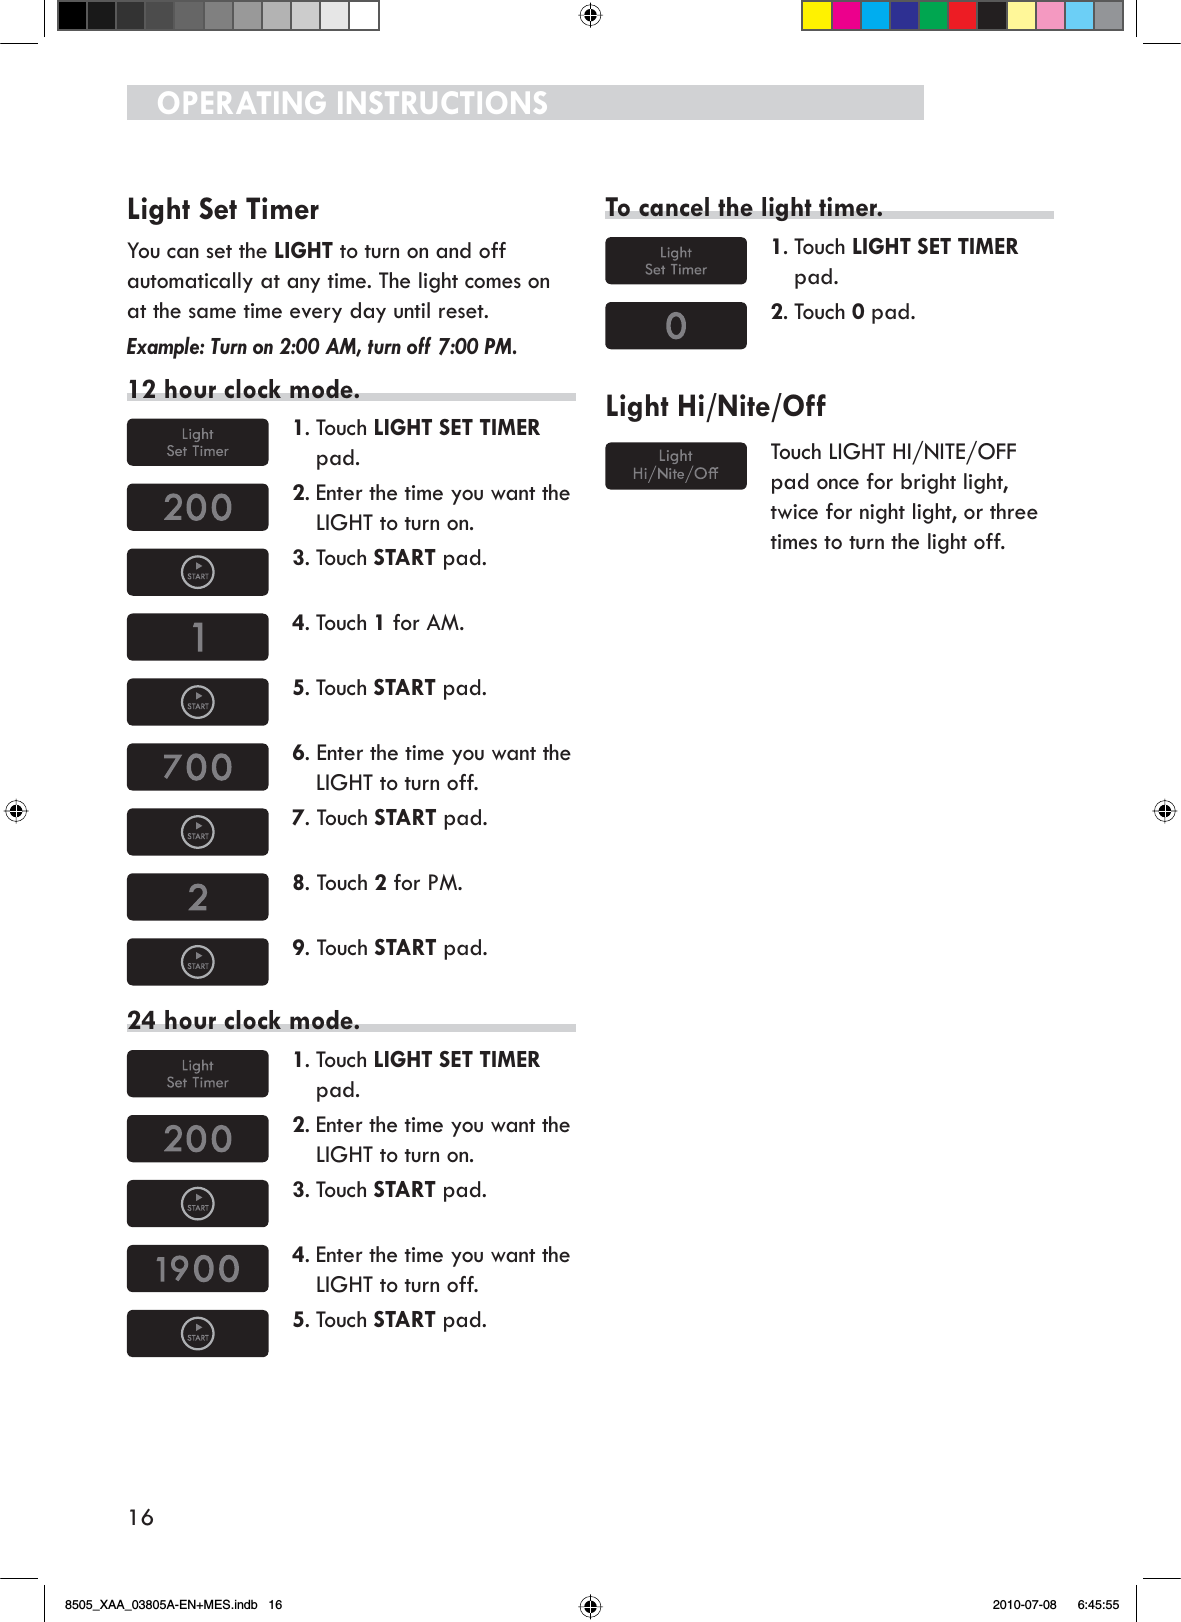
![MANUAL DE INSTRUCCIONES51Agregar 30 seg(VWDWHFODVLPSOLÀFDGDDKRUUDWLHPSR\OHSHUPLWHFRQÀJXUDUUiSLGDPHQWH\FRPHQ]DUODcocción en el microondas.(MHPSOR3DUDFRQÀJXUDU$''6(&(AGREGAR 30 SEG) en 2 minutos.Oprima la tecla ADD 30 SEC (AGREGAR 30 SEG) 4 veces y oprima la tecla START (INICIO). El horno comienza la cocción y la pantalla muestra la cuenta regresiva del tiempo.Light Set Timer (Temporizador de FRQÀJXUDFLyQGHODOX]Puede programar la LIGHT (LUZ) para que se encienda y se apague automáticamente en cualquier momento. La luz se enciende a la misma hora todos los días hasta que se reinicie el horno.Ejemplo: Se enciende a las 2:00 AM, se apaga a las 7:00 AM.Modo de reloj de 12 horas.1. Oprima la tecla LIGHT SETTIMER (TEMPORIZADOR DE CONFIGURACIÓN DE LA LUZ).2. Ingrese la hora a la que desea que se encienda la LUZ.3. Oprima la tecla START (INICIO).4. Oprima 1 para AM.5. Oprima la tecla START (INICIO).6. Ingrese la hora a la que desea que se apague la LUZ.7. Oprima la tecla START (INICIO).8. Oprima 2 para PM.9. Oprima la tecla START (INICIO).Modo de reloj de 24 horas.1. Oprima la tecla LIGHT SETTIMER (TEMPORIZADOR DE CONFIGURACIÓN DE LA LUZ).2. Ingrese la hora a la que desea que se encienda la LUZ.3. Oprima la tecla START (INICIO).4. Ingrese la hora a la que desea que se apague la LUZ.5. Oprima la tecla START (INICIO).Para cancelar el temporizador de luz.1. Oprima la tecla LIGHT SET TIMER (TEMPORIZADOR DE CONFIGURACIÓN DE LA LUZ).2. Oprima la tecla 0.Light Hi/Nite/Off (Luz alta/noche/apagada)Oprima la tecla LIGHT HI/NITE/OFF (LUZ ALTA/NOCHE/APAGADA) una vez para luz brillante, dos veces para luz nocturna, o tres veces para apagar la luz.8505_XAA_03805A-EN+MES.indb 51 2010-07-08 6:47:19](https://usermanual.wiki/Samsung-Electronics-Co/OTR19MHC4/User-Guide-1314498-Page-51.png)
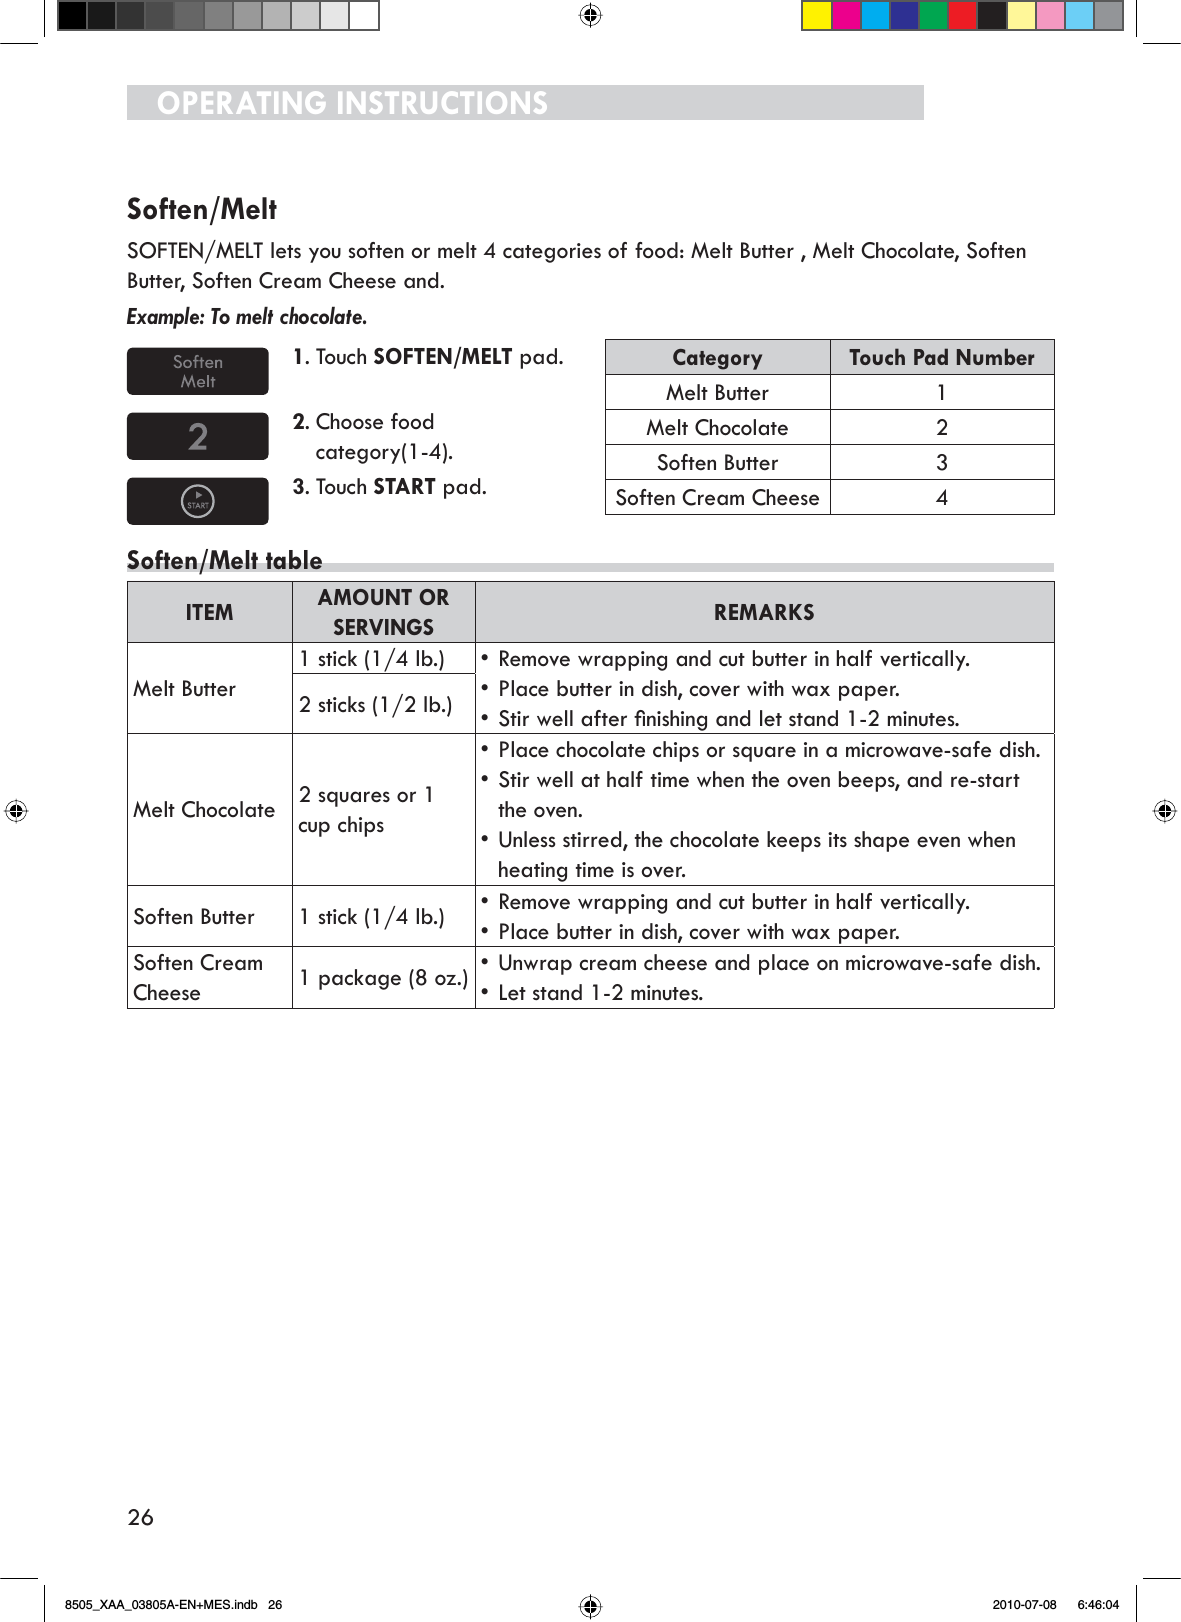
![MANUAL DE INSTRUCCIONES61Ablandar/derretirSOFTEN/MELT (ABLANDAR/DERRETIR) le permite ablandar o derretir 4 categorías de alimentos: Derretir manteca, derretir chocolate, ablandar manteca, ablandar queso crema.Ejemplo: Para derretir chocolate.1. Oprima la tecla SOFTEN/MELT (ABLANDAR/DERRETIR).Categoría Oprimir tecla númeroDerretir manteca 1Derretir chocolate 2Ablandar manteca 3Ablandar queso crema42. Elija la categoría de alimento (1-4).3. Oprima la tecla START (INICIO).Tabla de Ablandar / DerretirALIMENTO CANTIDAD O PORCIÓN COMENTARIOSDerretirmanteca1 barra (1/4 lb.) Quite el envoltorio y corte la manteca a la mitad en forma vertical.Coloque la manteca en el recipiente, cúbralo con papel encerado.5HYXHOYDELHQGHVSXpVGHÀQDOL]DU\GHMHUHSRVDU1-2 minutos.2 barras (1/2 lb.)Derretirchocolate2 cuadrados o 1 taza de pepitasColoque los cuadrados o las pepitas de chocolate en un recipiente apto para microondas.Revuelva bien en la mitad del tiempo cuando el horno emita una señal sonora, y vuelva a iniciar el horno.A menos que se revuelva, el chocolate mantiene su forma incluso cuando termina el tiempo de calentamiento.Ablandarmanteca 1 barra (1/4 lb.)Quite el envoltorio y corte la manteca a la mitad en forma vertical.Coloque la manteca en el recipiente, cúbralo con papel encerado.Ablandarqueso crema 1 paquete (8 oz.)Desenvuelva el queso crema y colóquelo en un recipiente apto para microondas.Deje reposar 1-2 minutos.8505_XAA_03805A-EN+MES.indb 61 2010-07-08 6:47:29](https://usermanual.wiki/Samsung-Electronics-Co/OTR19MHC4/User-Guide-1314498-Page-61.png)
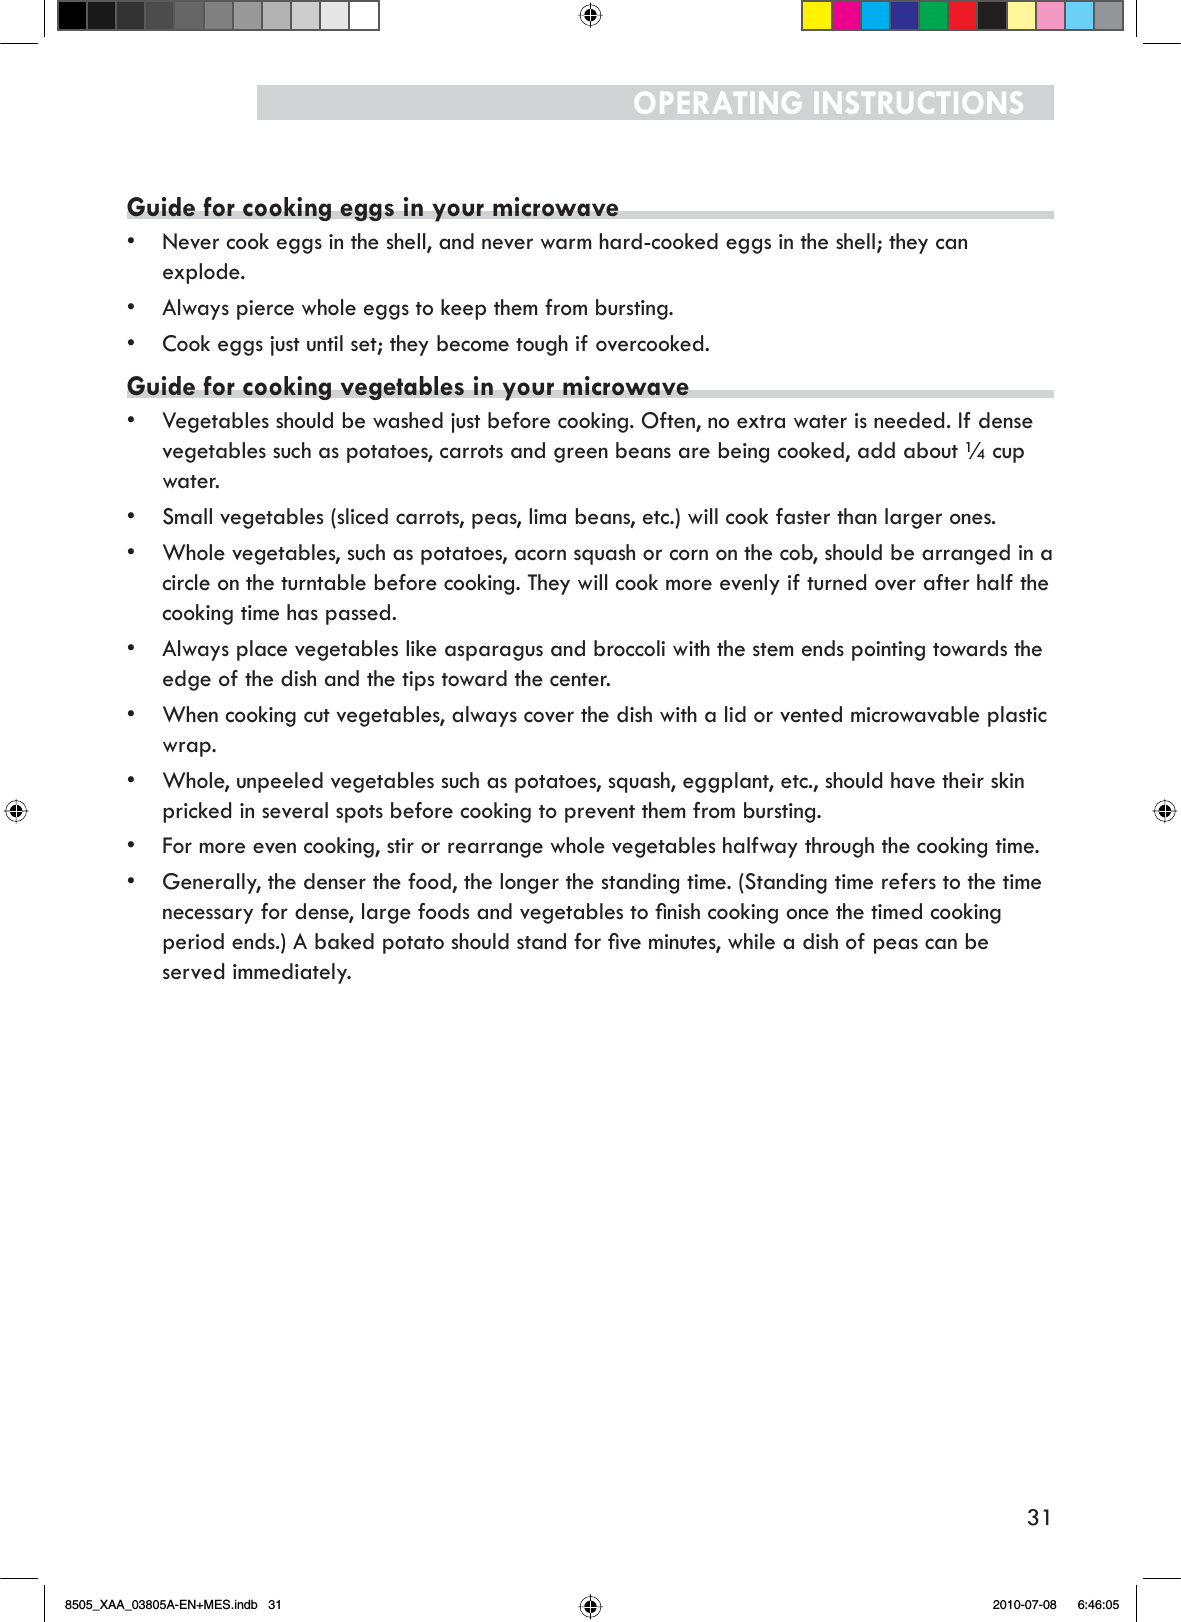
![MANUAL DE INSTRUCCIONES65Guía para cocinar ave en el microondasColoque la carne de ave sobre una asadera para microondas en una fuente para microondas.Cubra la carne de ave con papel encerado para evitar salpicaduras.Utilice papel de aluminio para cubrir las puntas de los huesos, las áreas de carne delgada o las áreas que comienzan a cocinarse demasiado.Controle la temperatura en varios lugares antes de dejar reposar la carne de ave el tiempo recomendado.Tipo de alimentoTiempo de cocción/Nivel de potencia InstruccionesPollo enteroHasta 4 lb.Tiempo de cocción: 9-13 min./lb.180 °F para carne oscura170 °F para carne blancaNivel de potencia: Mediana alta (7).Coloque el lado de la pechuga del pollo hacia abajo en la asadera. Cubra con papel encerado. Dé vuelta a la mitad del ciclo de cocción. Cocine hasta que los jugos sean claros y la carne cerca del hueso ya no sea rosada. Deje reposar 5-10 minutos.Presas de polloHasta 2 lb.Tiempo de cocción: 8-11 min./lb.180 °F para carne oscura170 °F para carne blancaNivel de potencia: Mediana alta (7).Coloque el lado del hueso del pollo hacia abajo en la fuente, con las porciones más gruesas hacia la parte externa del plato. Cubra con papel encerado. Dé vuelta a la mitad del ciclo de cocción. Cocine hasta que los jugos sean claros y la carne cerca del hueso ya no sea rosada. Deje reposar 5-10 minutos.Guía para cocinar mariscos en el microondasCocine el pescado hasta que se pueda desmenuzar fácilmente con un tenedor.Coloque el pescado sobre una asadera para microondas en una fuente para microondas.Utilice una cubierta ceñida para cocinar el pescado al vapor. Una cubierta más liviana de papel encerado o toalla de papel genera menos vapor.No deje que el pescado se pase, contrólelo en el tiempo de cocción mínimo.Tipo de alimentoTiempo de cocción/Nivel de potencia InstruccionesFiletesHasta1.5 lb.Tiempo de cocción: 6-10 min./lb.Nivel de potencia: Mediana alta (7).Acomode los bistecs en la asadera con las porciones más carnosas hacia la parte exterior de la asadera.Cubra con papel encerado. Dé vuelta y reacomode el pescado cuando haya transcurrido la mitad del tiempo de cocción. Cocine el pescado hasta que se pueda desmenuzar fácilmente con un tenedor. Deje reposar 3-5 minutos.FiletesHasta1.5 lb.Tiempo de cocción: 4-8 min./lb.Nivel de potencia: Mediana alta (7).$FRPRGHORVÀOHWHVHQXQDIXHQWHSDUDKRUQRGDQGRYXHOWDFXDOTXLHUSHGD]RÀQLWR&XEUDFRQSDSHOencerado. Si tiene más de 1/2 pulgada de grosor, dé vuelta y reacomode el pescado cuando haya transcurrido la mitad del tiempo de cocción. Cocine el pescado hasta que se pueda desmenuzar fácilmente con un tenedor. Deje reposar 2-3 minutos.CamaronesHasta1.5 lb.Tiempo de cocción: 4-6 min./lb.Nivel de potencia: Mediana alta (7).Acomode los camarones en una fuente para horno sin superponerlos ni formar capas. Cubra con papel HQFHUDGR&RFLQHKDVWDTXHHVWpQÀUPHV\RSDFRVrevolviendo 2 ó 3 veces. Deje reposar 5 minutos.8505_XAA_03805A-EN+MES.indb 65 2010-07-08 6:47:31](https://usermanual.wiki/Samsung-Electronics-Co/OTR19MHC4/User-Guide-1314498-Page-65.png)
![66MANUAL DE INSTRUCCIONESGuía para cocinar huevos en el microondasNunca cocine huevos con cáscara y nunca caliente los huevos duros con la cáscara; pueden explotar.Siempre perfore los huevos enteros para evitar que estallen.Cocine los huevos hasta que apenas se endurezcan; quedan duros si se pasan.Guía para cocinar verduras en el microondasLas vegetales deben lavarse antes de cocinarlos. Por lo general, no se necesita agua adicional. Si se cocinan verduras densas como, por ejemplo, papas, zanahorias y judías verdes, agregue 1/4 de taza de agua aproximadamente.Los vegetales pequeños (zanahorias rebanadas, chícharos, frijoles, etc.) se cocinarán más rápido que los vegetales de mayor tamaño.Los vegetales enteros, tales como las patatas, calabazas o mazorca, deben acomodarse en círculo sobre el plato giratorio antes de cocinarlos. Se cocinarán en forma más pareja si se dan vuelta una vez transcurrida la mitad del tiempo de cocción.Siempre coloque los vegetales como espárragos y brócoli con los extremos de los tallos apuntando hacia el borde de la fuente y las puntas hacia el centro.Cuando cocine vegetales cortados, siempre cubra la fuente con una tapa o envoltorio plástico para microondas con ventilación.Las vegetales enteros sin pelar, tales como las papas, calabaza, berenjenas, etc., deben pincharse en varios lugares antes de cocinarlas para evitar que estallen.Para una cocción más pareja, revuelva o reacomode los vegetales enteros a la mitad del tiempo de cocción.Por lo general, cuanto más denso es el alimento, mayor será el tiempo de reposo. (El tiempo GHUHSRVRVHUHÀHUHDOWLHPSRQHFHVDULRSDUDTXHORVDOLPHQWRV\YHUGXUDVGHQVRV\JUDQGHVWHUPLQHQGHFRFLQDUVHXQDYH]ÀQDOL]DGRHOWLHPSRGHFRFFLyQ8QDSDSDDOKRUQRdebe reposar durante cinco minutos, mientras que una fuente de arvejas puede servirse de inmediato.8505_XAA_03805A-EN+MES.indb 66 2010-07-08 6:47:31](https://usermanual.wiki/Samsung-Electronics-Co/OTR19MHC4/User-Guide-1314498-Page-66.png)
![68Cuidado y limpiezaCuidado y limpiezaPara un mejor desempeño y mayor seguridad, mantenga el horno limpio por dentro y por fuera.Preste especial cuidado para que el panel interior de la puerta y el marco delantero del horno se mantengan limpios y sin acumulación de restos de alimentos o grasa. Nunca utilice polvos abrasivos o esponjas duras. Limpie el interior y el exterior del horno de microondas, incluyendo la cubierta inferior de la campana, con un paño suave y una solución con detergente suave tibio (no caliente). Luego enjuague y seque. Utilice un limpiador de cromo y OLPSLHODVVXSHUÀFLHVGHFURPRPHWDO\DOXPLQLRLimpie de inmediato las salpicaduras con una toalla de papel húmeda, especialmente después de cocinar pollo o tocino. Limpie su horno semanalmente o más a menudo si es necesario.Siga estas instrucciones para limpiar y cuidar su horno.Mantenga limpia la parte interna del horno. Las partículas de alimentos y los líquidos derramados pueden adherirse a las paredes del horno, haciendo que el horno funcione menos HÀFLHQWHPHQWHLimpie los derrames de inmediato. Utilice un paño húmedo y detergente suave. No use detergentes fuertes ni abrasivos.Para ayudar a ablandar las partículas de alimentos o líquidos, caliente dos tazas de agua (agregue el jugo de un limón si desea mantener el horno fresco) en un medidor de cuatro tazas a potencia Alta durante cinco minutos o hasta que hierva. Déjelo en el horno durante uno o dos minutos.Saque la charola de vidrio del horno cuando limpie el horno o la charola. Para evitar que la charola se rompa, manipúlela con cuidado y no la ponga en agua inmediatamente después de cocinar. Lave la charola con cuidado en agua jabonosa tibia o el en lavavajillas./LPSLHODVXSHUÀFLHH[WHUQDGHOKRUQRFRQ detergente y un paño húmedo. Séquelo con un paño suave. Para evitar causar daños a las partes operativas del horno, no deje que entre agua en las aberturas.Limpie la ventana de la puerta con un detergente muy suave y agua. Asegúrese de utilizar un paño suave para evitar rayarla.Si se acumula vapor dentro o fuera de la puerta del horno, límpielo con un paño suave. Se puede acumular vapor cuando el horno funciona con mucha humedad y esto de ninguna manera indica una fuga del microondas.Nunca ponga en funcionamiento el horno sin alimentos dentro; esto puede dañar el tubo de magnetrón o la charola de vidrio. Puede dejar un vaso de agua en el horno cuando no se use para evitar daños en caso de que el horno se encienda accidentalmente./LPSLH]DGHORVÀOWURVGHJUDVD(OÀOWURGHJUDVDGHEHTXLWDUVH\OLPSLDUVHFRQfrecuencia, al menos una vez al mes. PRECAUCIÓNPara evitar el riesgo de lesiones físicas o daños materiales, no ponga en funcionamiento la campana del horno sin WHQHUFRORFDGRVORVÀOWURV 3DUDVDFDUHOÀOWURGHJUDVDGHVOLFHHOÀOWURKDFLDXQODGR7LUHGHOÀOWURKDFLDDEDMR\HPSXMHKDFLDHORWURODGR(OÀOWURcaerá. 6XPHUMDHOÀOWURGHJUDVDHQDJXDFDOLHQWHy detergente suave. Enjuáguelo bien y sacúdalo hasta que se seque. No utilice amoníaco ni lo coloque en un lavavajillas. El aluminio se oscurecerá. 3DUDYROYHUDLQVWDODUHOÀOWURFROyTXHORen la ranura lateral, luego empuje hacia arriba y hacia el centro del horno para trabarlo.8505_XAA_03805A-EN+MES.indb 68 2010-07-08 6:47:32](https://usermanual.wiki/Samsung-Electronics-Co/OTR19MHC4/User-Guide-1314498-Page-68.png)
![CUIDADO Y LIMPIEZA695HHPSOD]RGHOÀOWURGHFDUEyQSi su horno tiene ventilación hacia el interior, elÀOWURGHFDUEyQGHEHUHHPSOD]DUVHFDGDD12 meses, y más a menudo si es necesario. ElÀOWURGHFDUEyQQRSXHGHOLPSLDUVH(OÀOWURGHcarbón está disponible en Sears si llama al1-800-4-MY-HOME®o visita sears.com.1.Desenchufe el horno o corte la electricidadde la fuente de alimentación principal.2.Abra la puerta.3.Retire los tornillos de montaje de la rejillade ventilación (2 tornillos del medio).4.Corra la rejilla de ventilación hacia la izquierda y retírela directamente.2SULPDHOJDQFKR\H[WUDLJDHOÀOWURYLHMRÁnguloÁnguloÁnguloÁnguolo,QVHUWHXQQXHYRÀOWURGHFDUEyQHQVXOXJDU(OÀOWURGHEHTXHGDULQVWDODGRHQHOángulo que se muestra.7.Vuelva a colocar la rejilla de ventilación y los 4 tornillos y cierre la puerta. Vuelva a FRQHFWDUODFRUULHQWH\FRQÀJXUHHOUHORMÁnguloÁnguloÁnguoÁnguoloN.° DE PIEZA DEL FILTRO DE CARBÓNN.º de pieza: DE63-00367DReemplazo de la luz de lacubierta/luz nocturnaPRECAUCIÓNPara evitar lesiones físicas o dañosmateriales, use guantes cuando reemplace la bombilla de luz.1.Desenchufe el horno o corte la energíaeléctrica del suministro principal.2.Retire los tornillos de montaje de la cubierta de la bombilla.3.Reemplace la bombilla con una bombillahalógena de 20 watts; utilice guantes o un pañuelo.La grasa de los dedos puedeacortar la vida de la bombilla.4.Vuelva a colocar la cubierta de la bombillay los tornillos de montaje.5.Vuelva a conectar la energía eléctrica enel suministro principal.8505_XAXAAAA_0992010-07-02010-07-0](https://usermanual.wiki/Samsung-Electronics-Co/OTR19MHC4/User-Guide-1314498-Page-69.png)