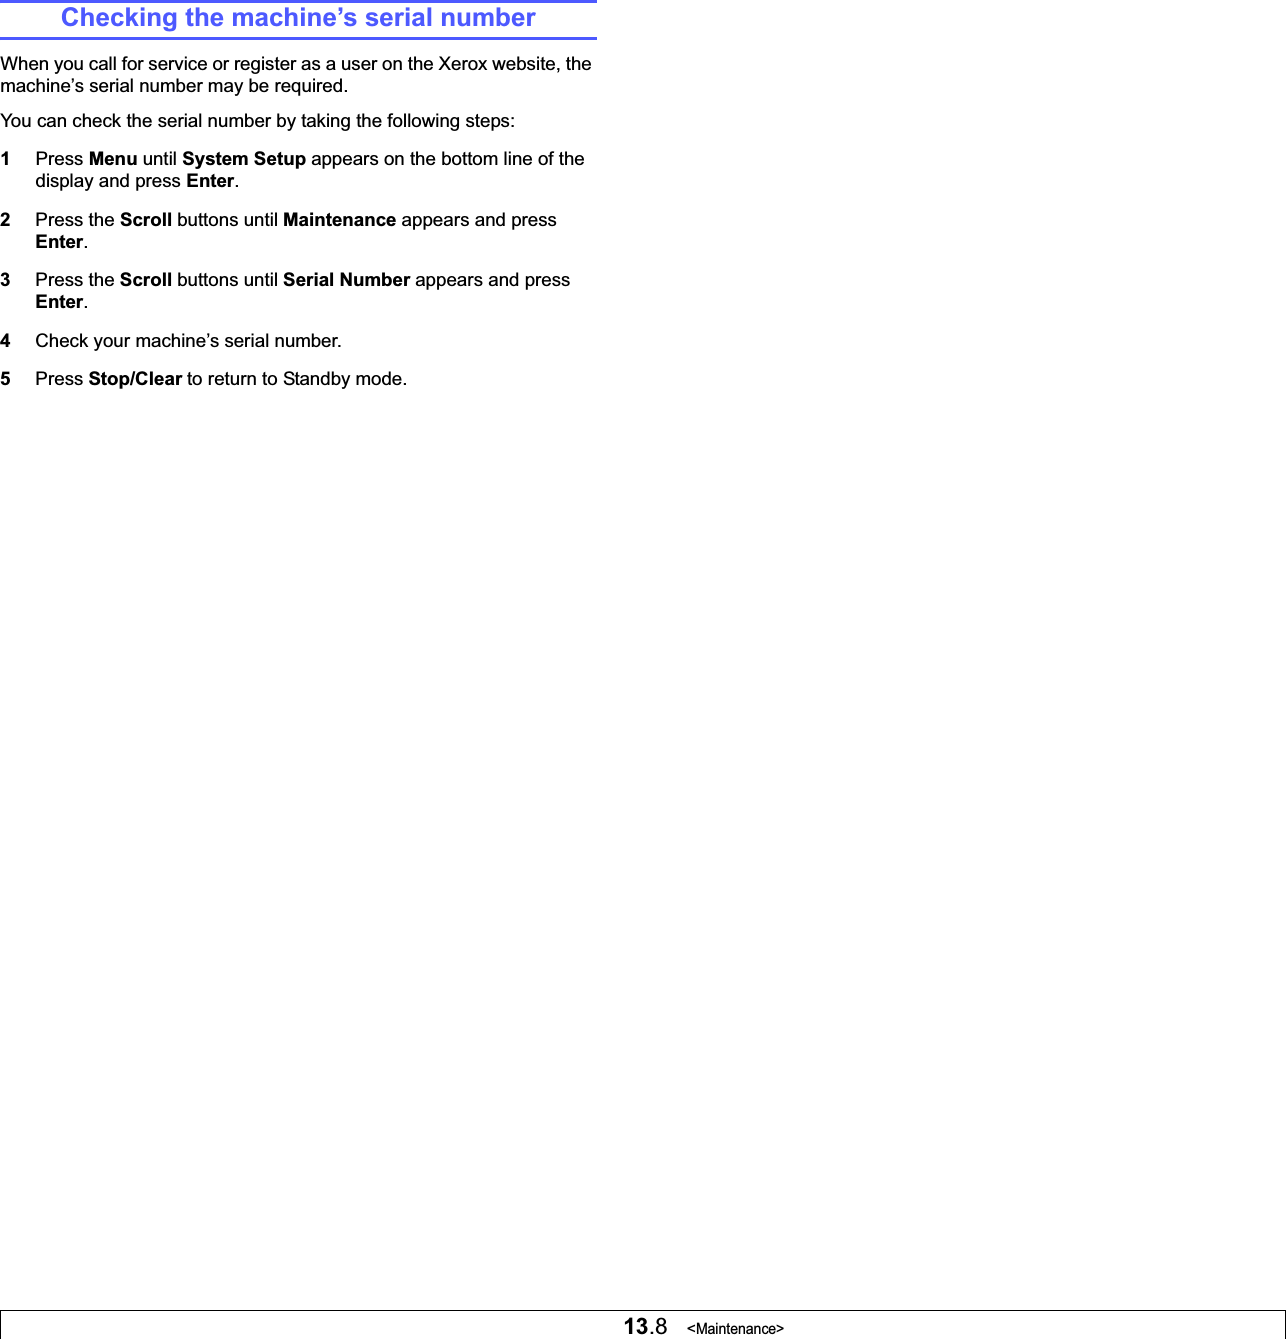
Samsung Electronics Co P3300MFP Laser Printer User Manual P3300MFP UserGuide
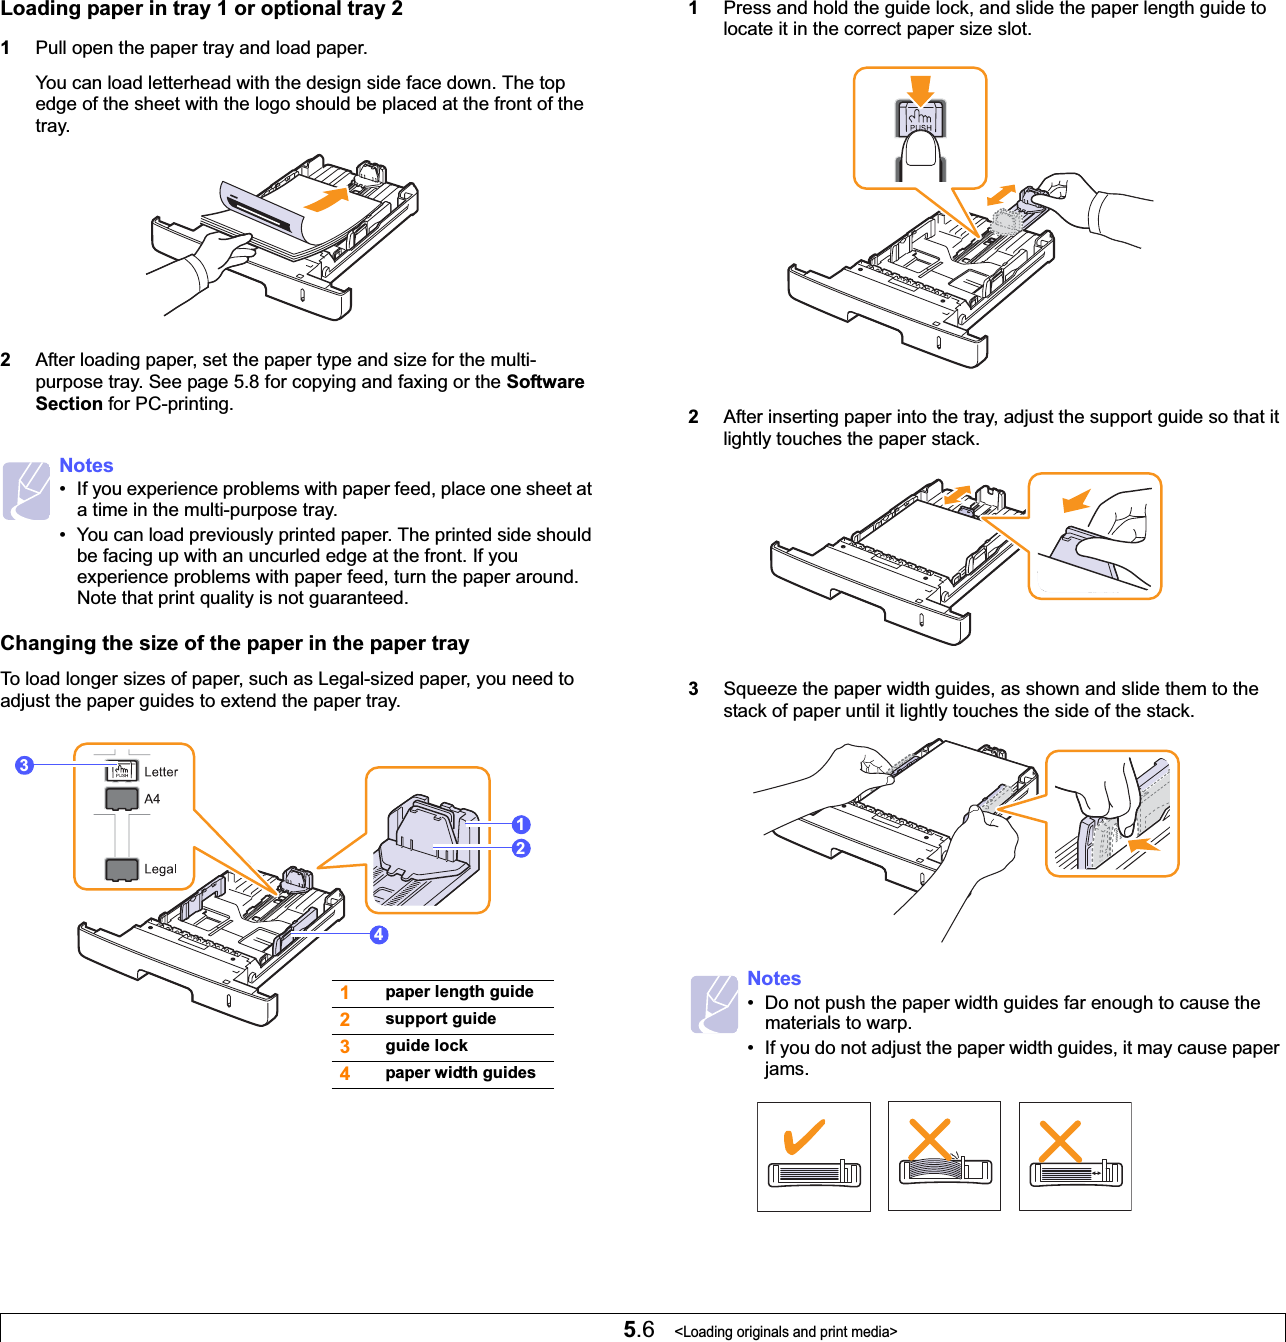
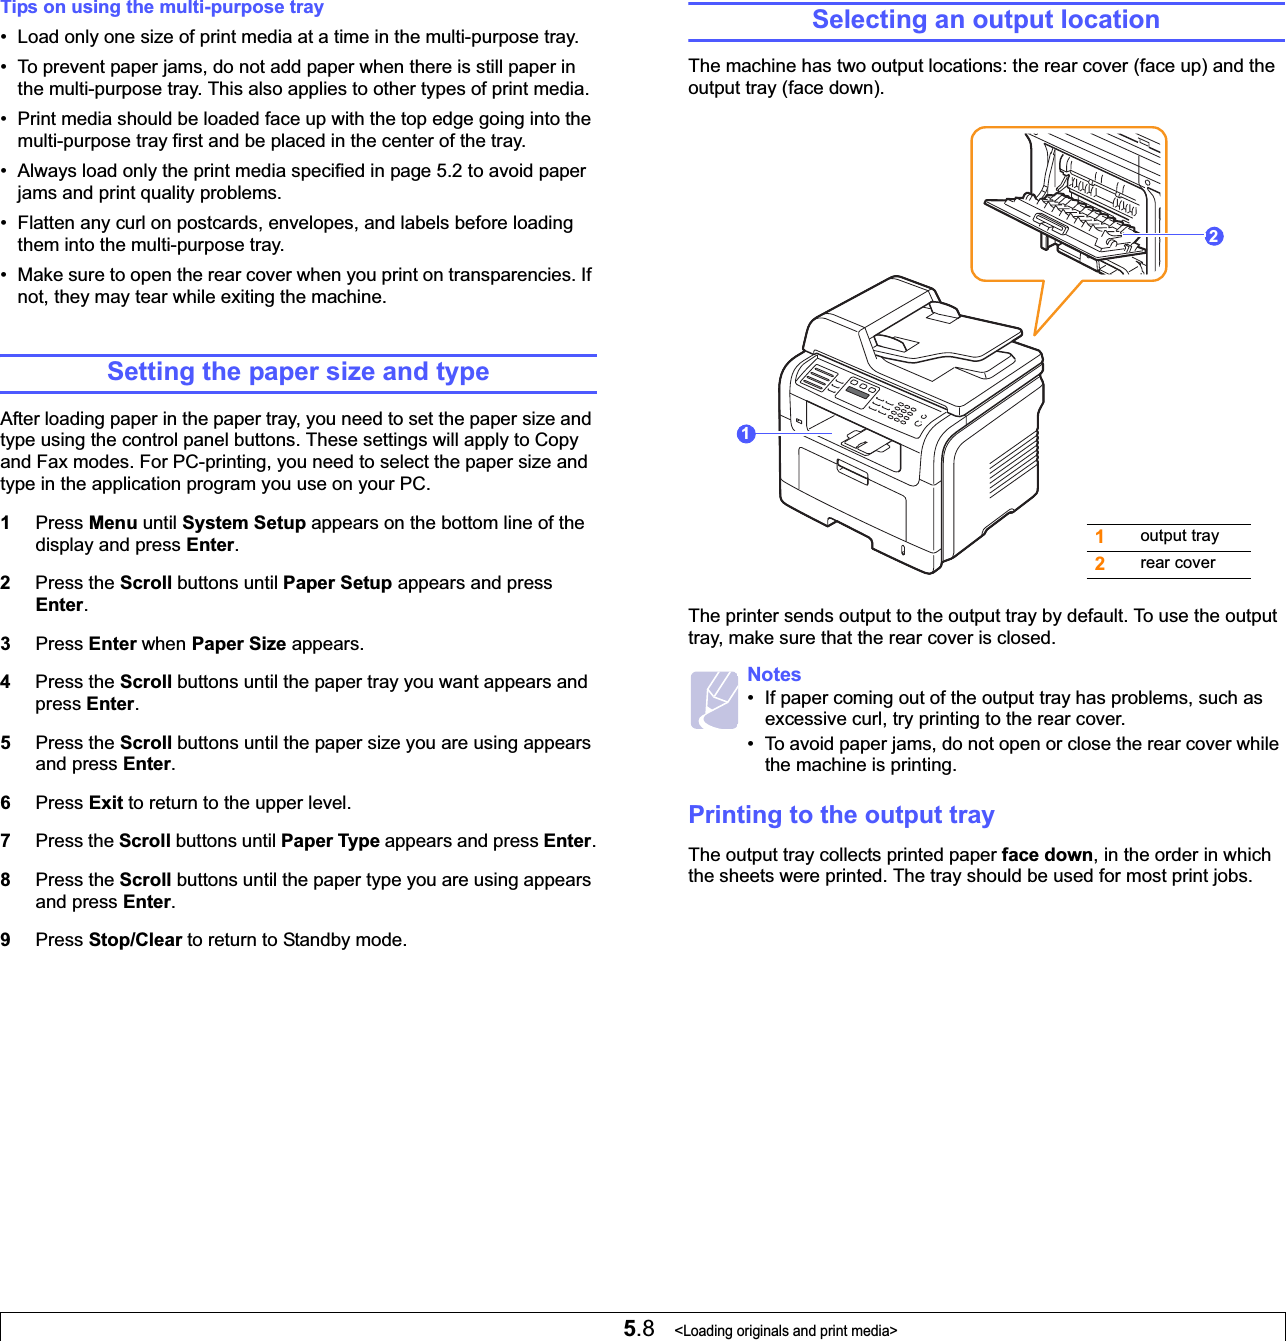
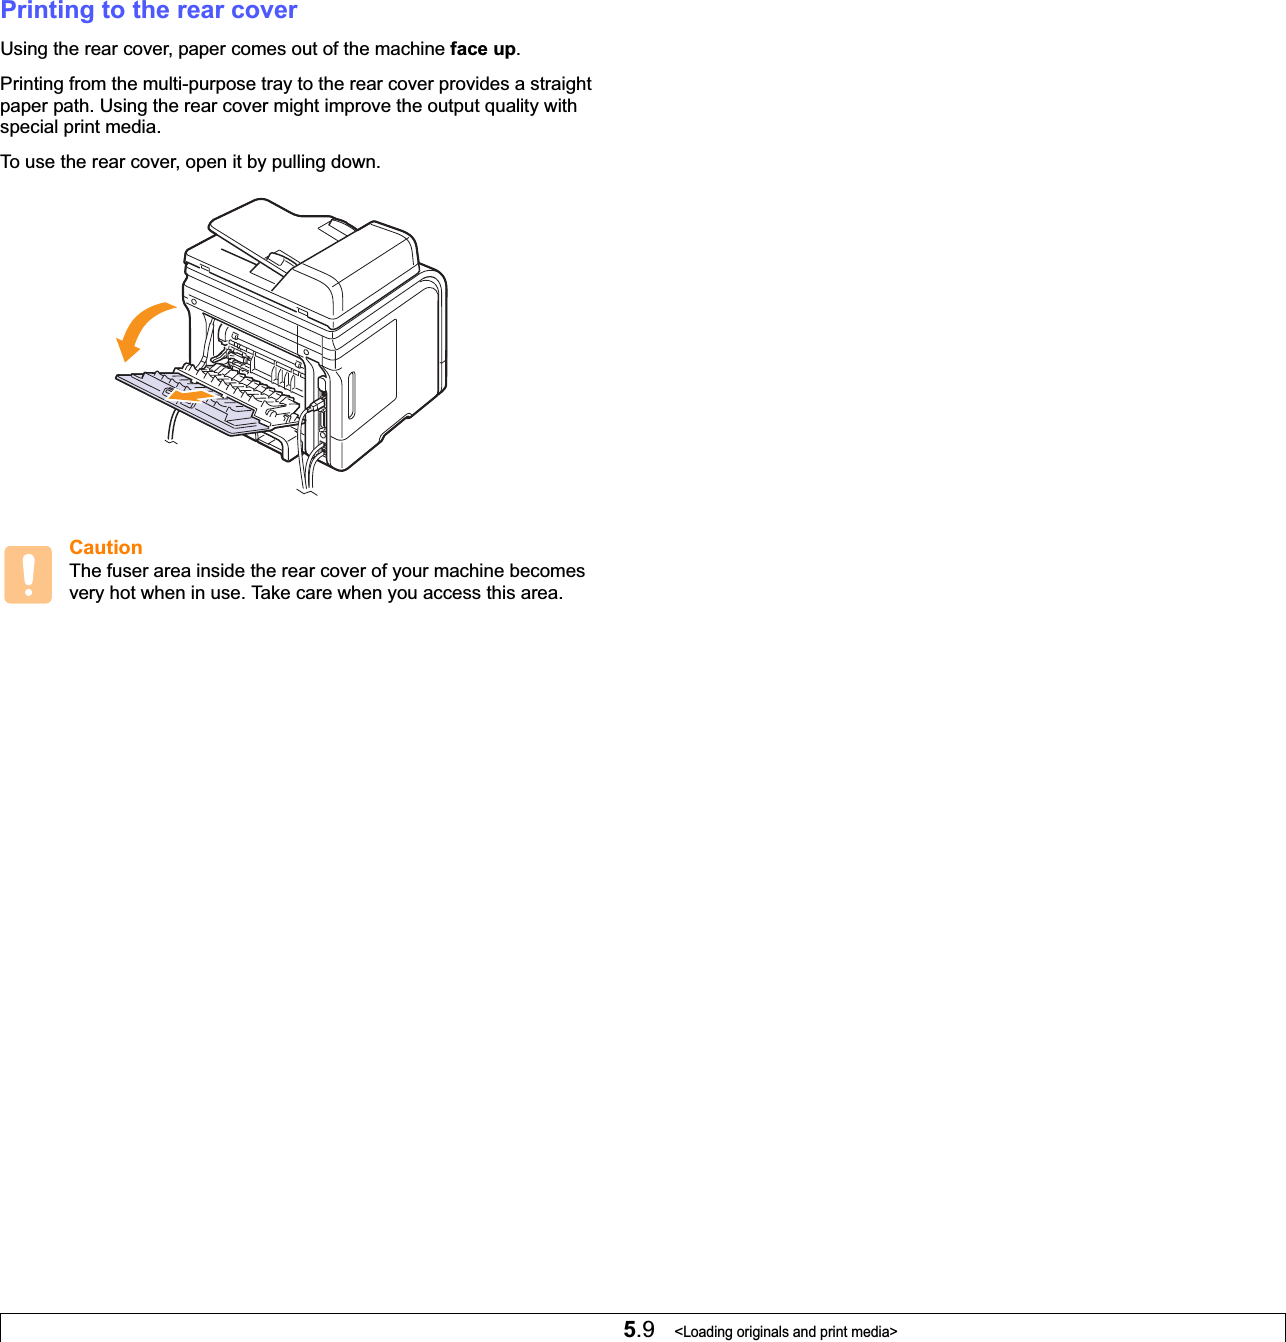
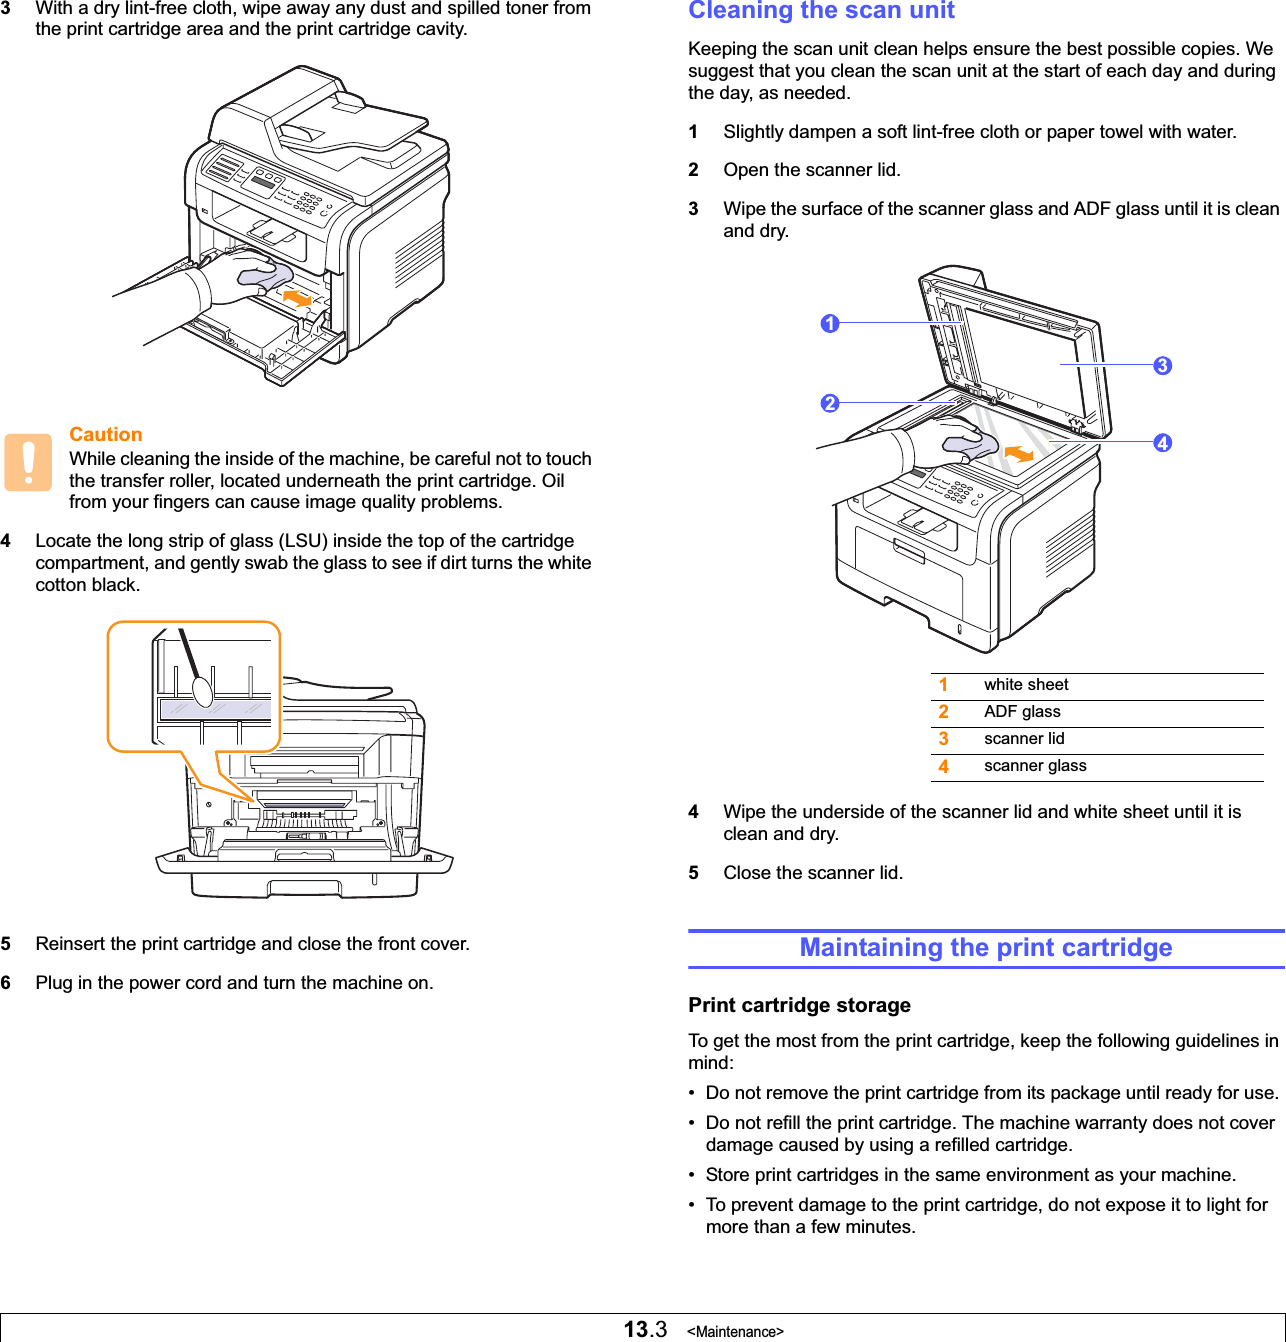
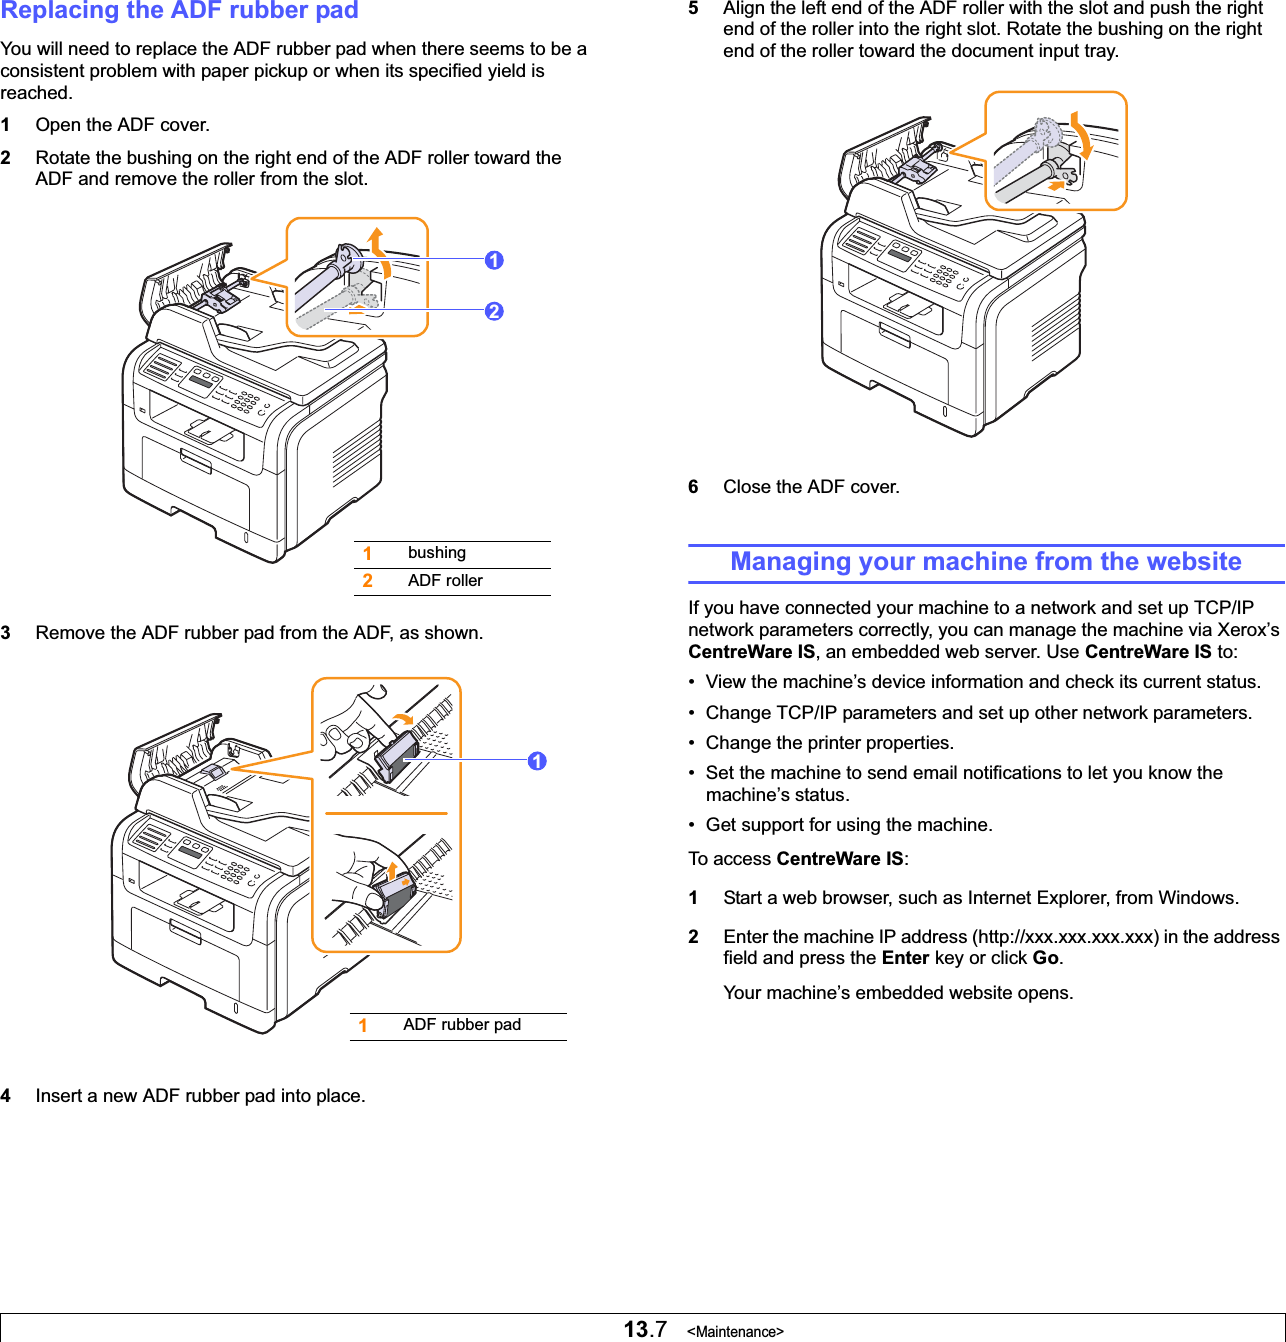
Samsung Electronics Co Ltd Laser Printer P3300MFP UserGuide
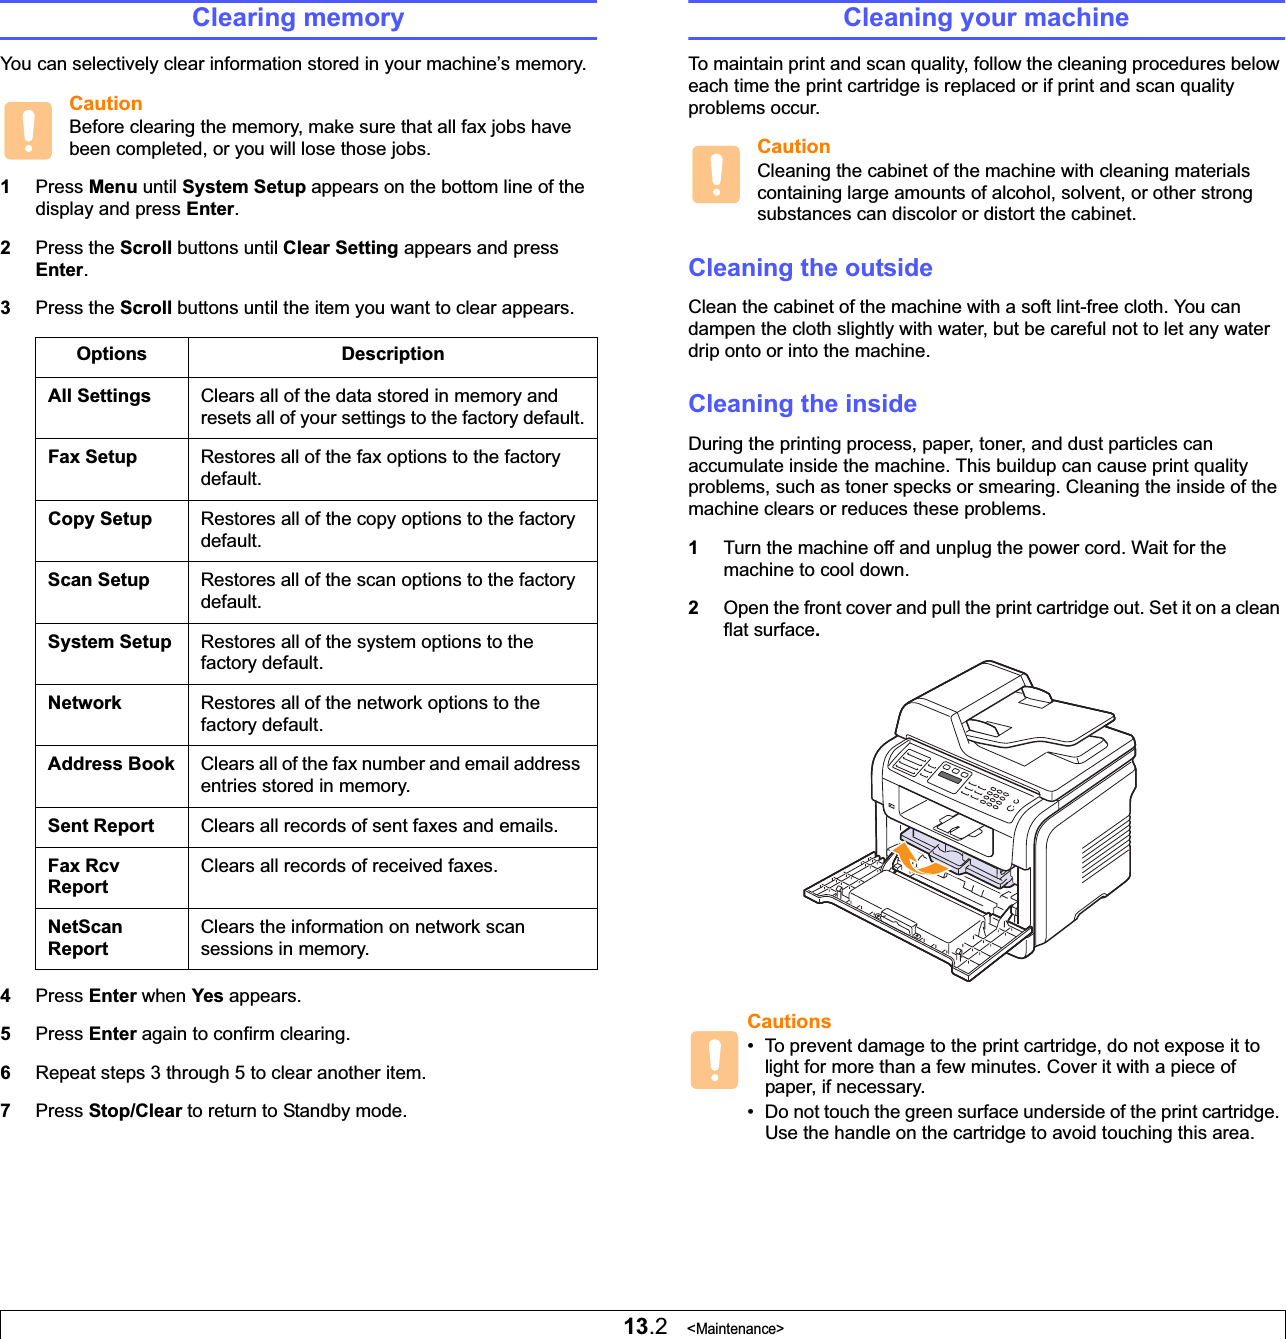
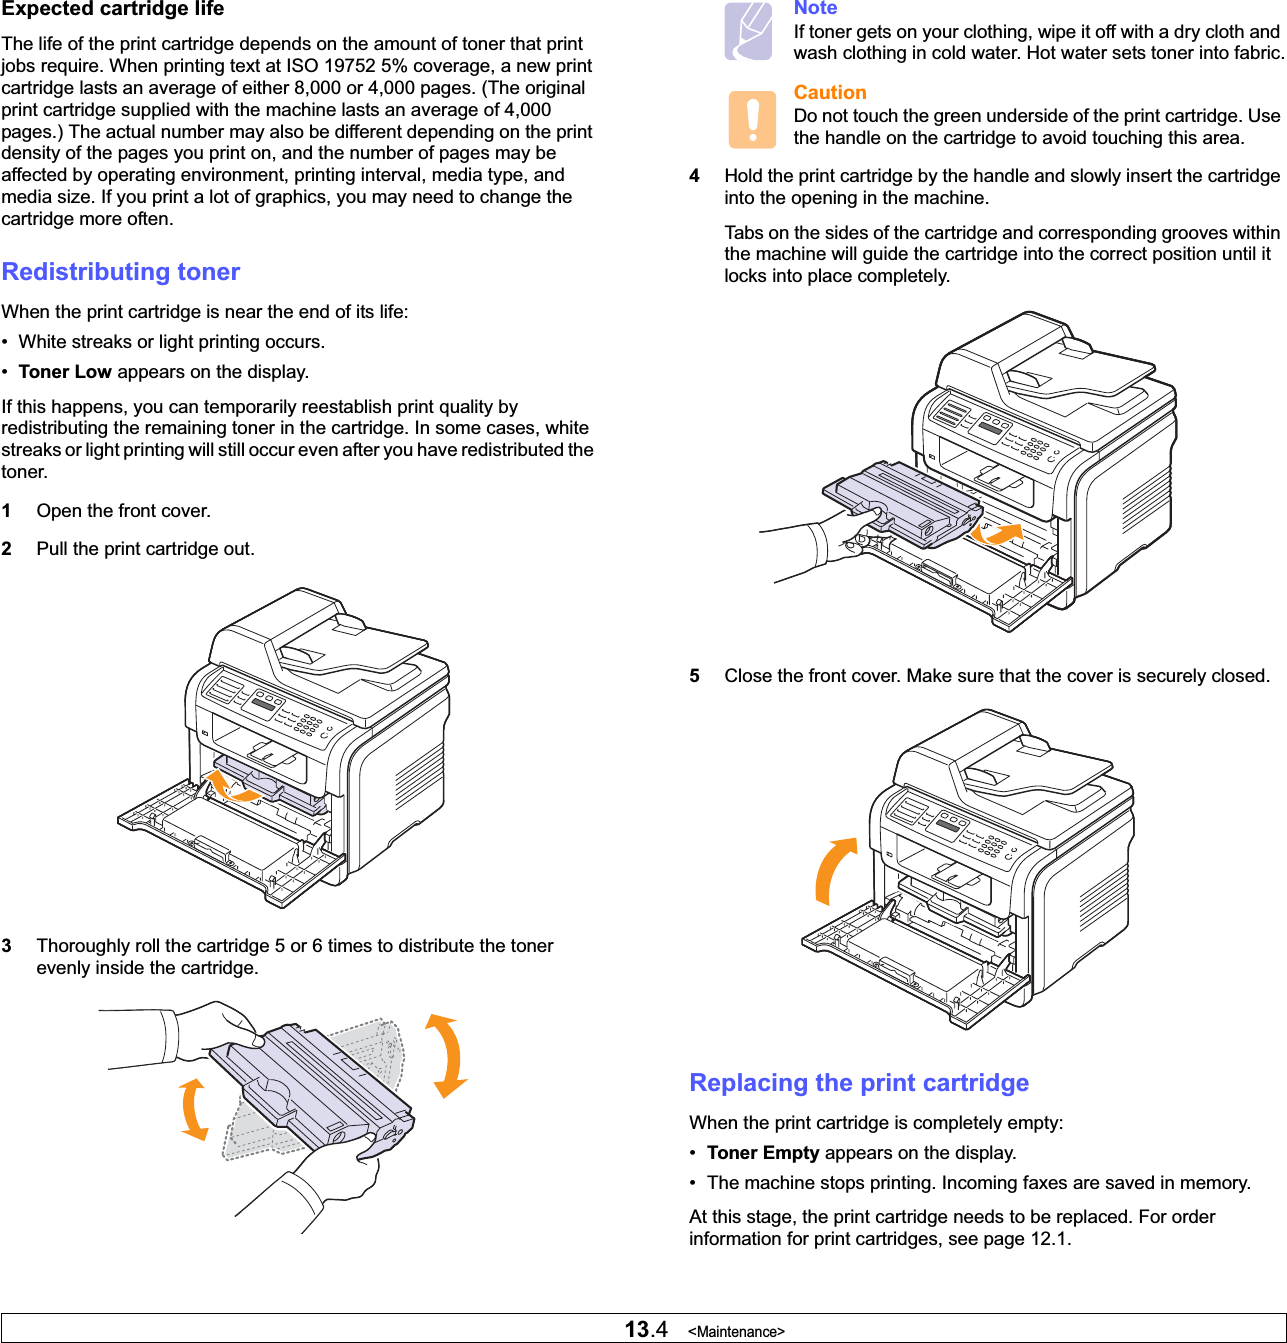
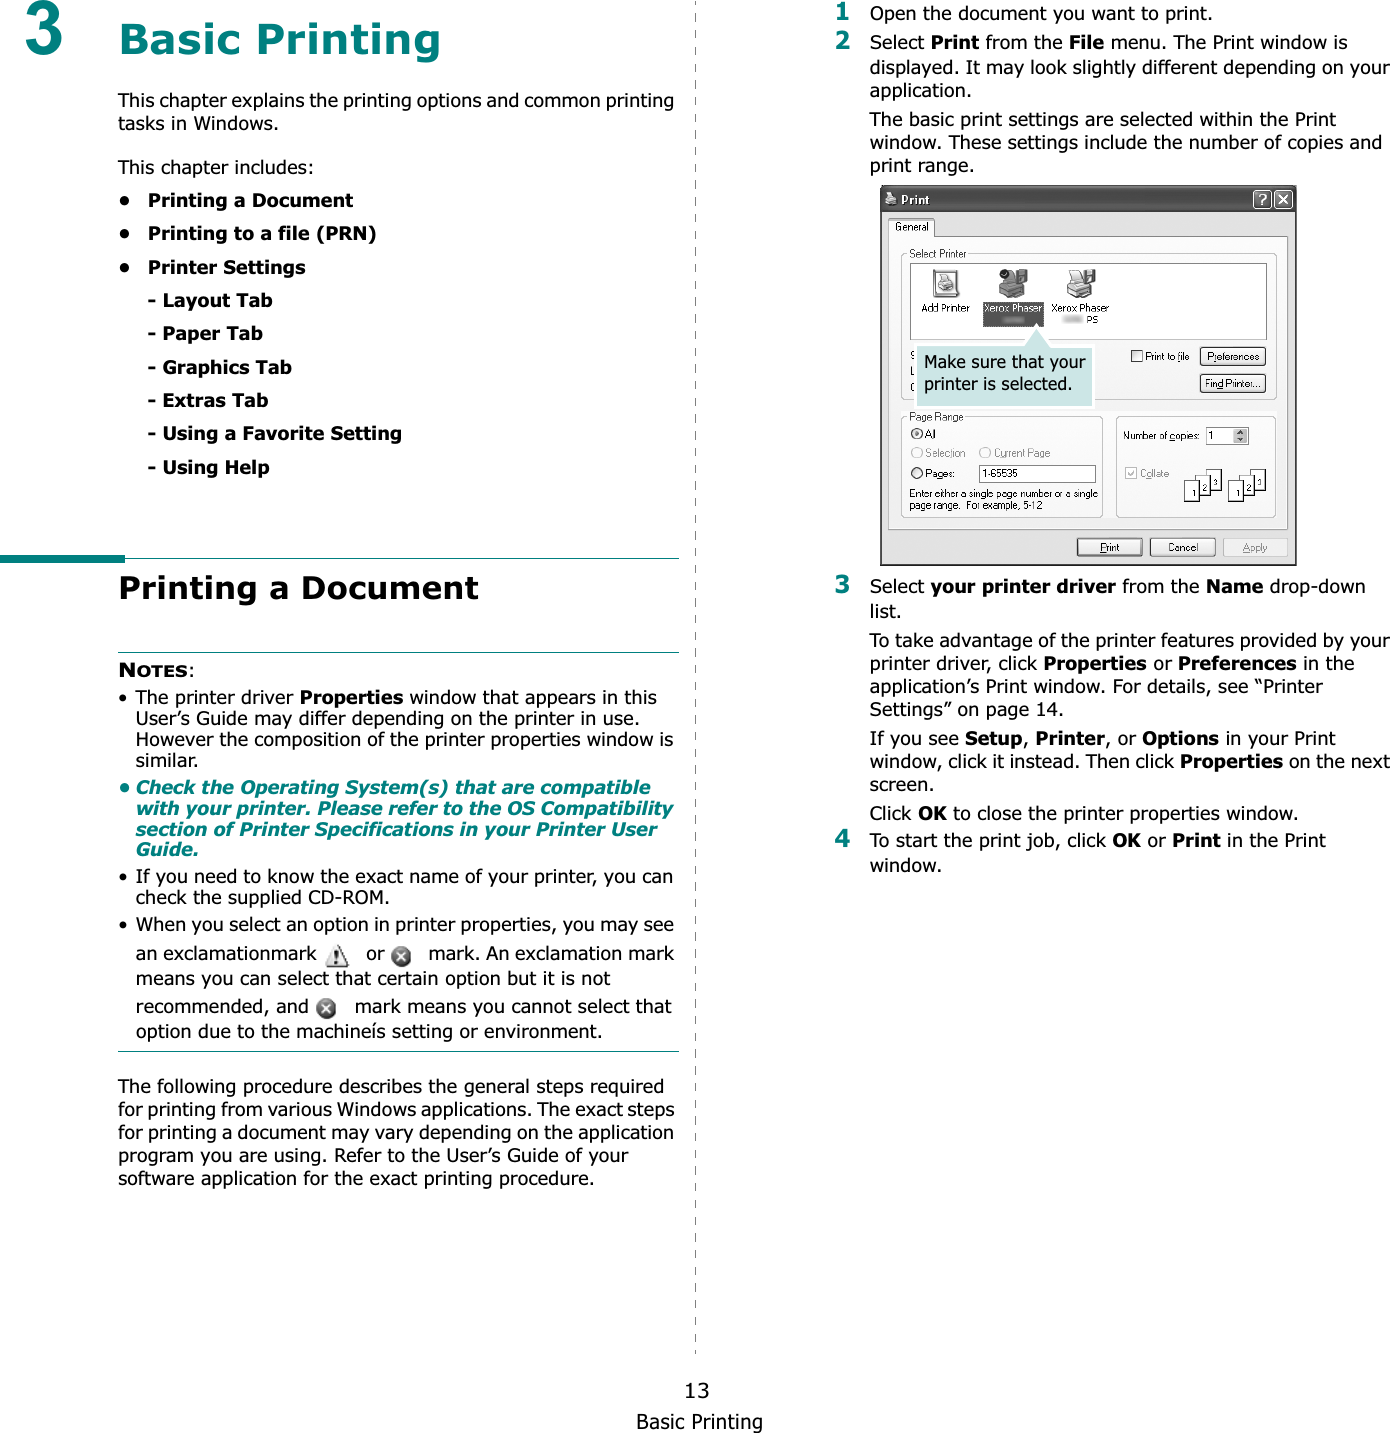
UserManual.wiki
>
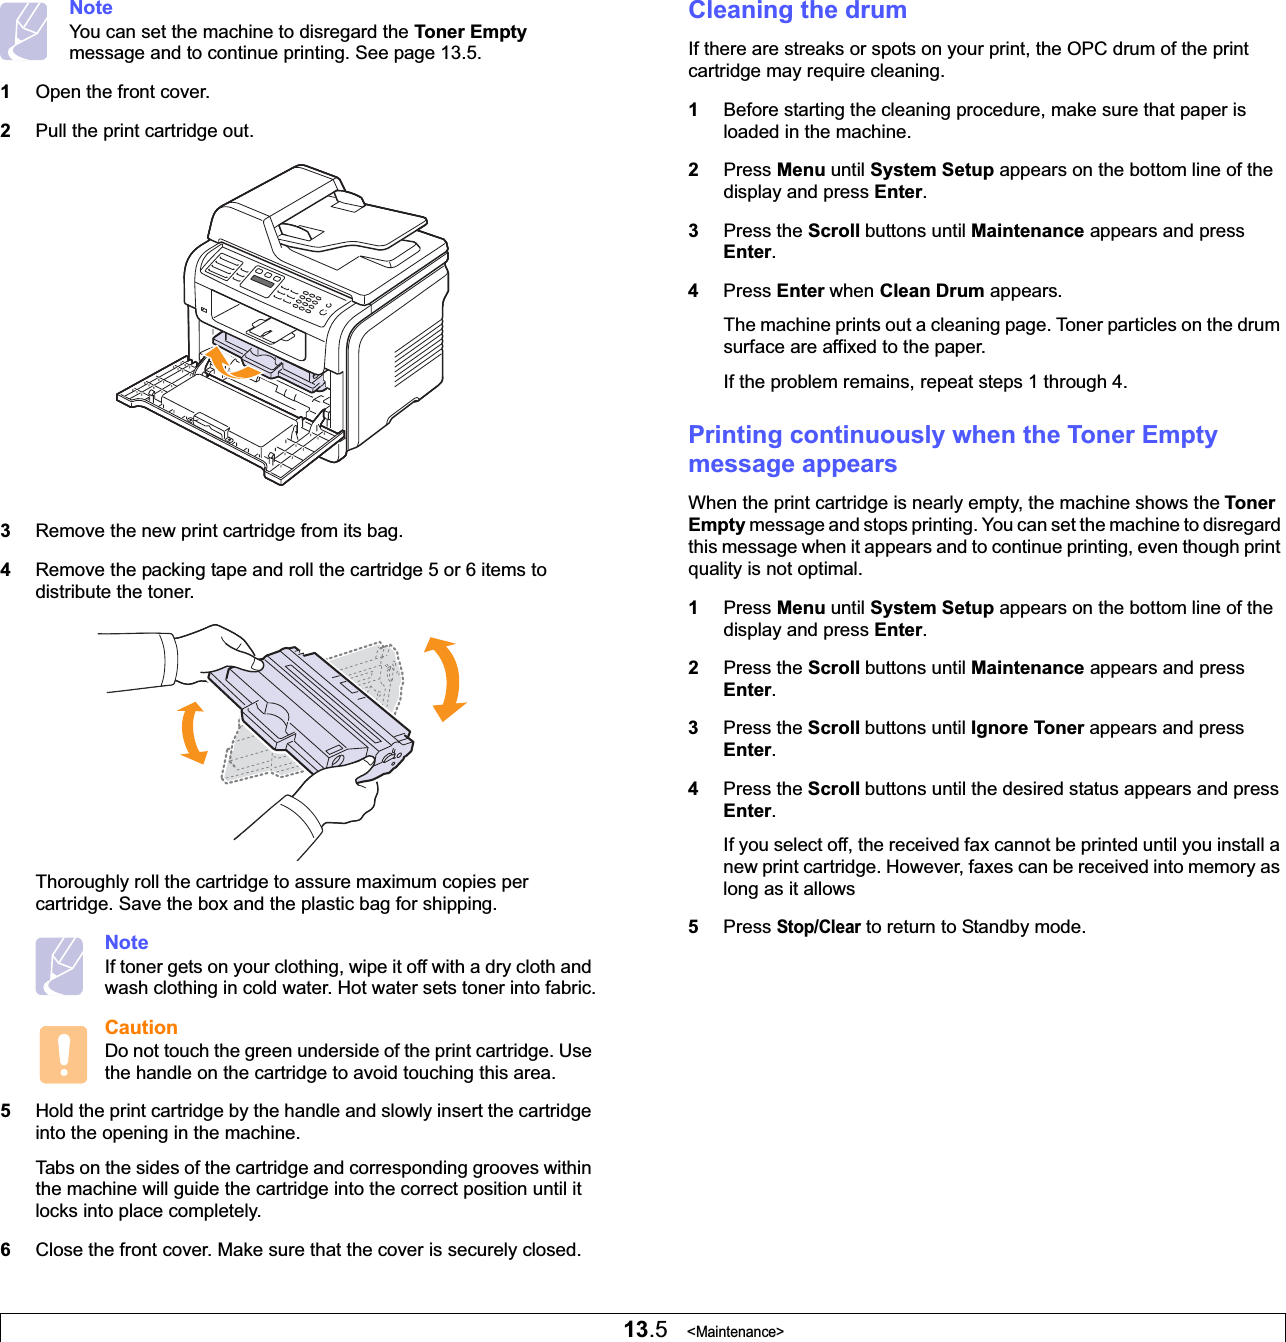
Samsung Electronics Co
>
P3300MFP User Manual
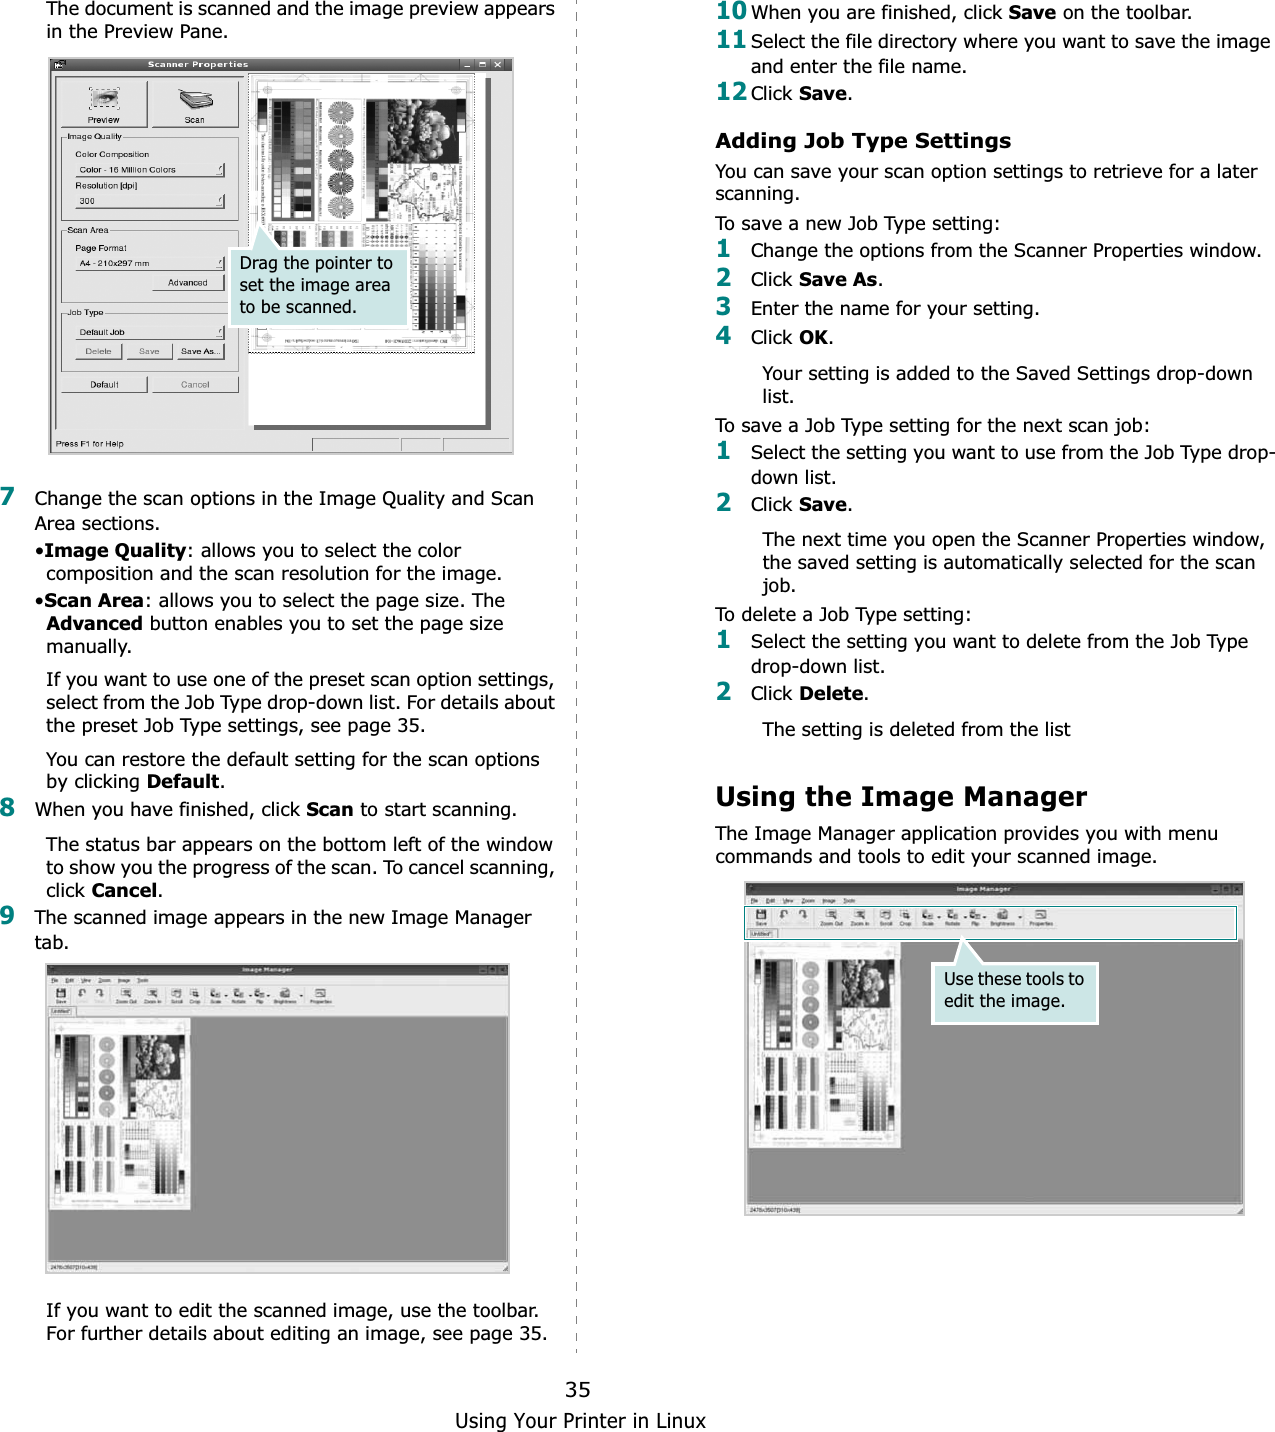
Users Manual
Navigation menu
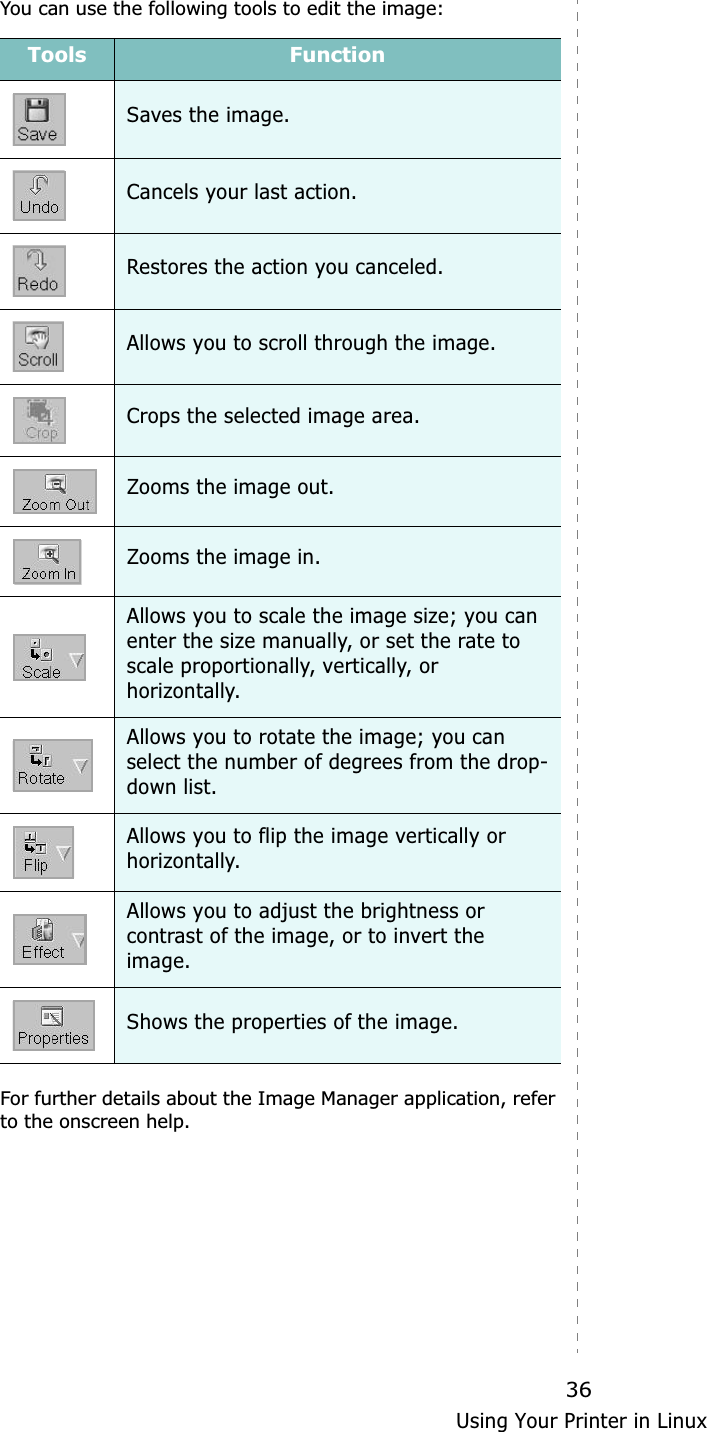
Upload a User Manual
Namespaces
Wiki Guide
HTML
PDF
Info
Views
User Manual
Discussion / Help
Navigation
![viiiThis product includes cryptographic software written by Eric Young(eay@cryptsoft.com). This product includes software written by Tim Hudson (tjh@cryptsoft.com).Original SSLeay LicenseCopyright (C) 1995-1998 Eric Young (eay@cryptsoft.com) All rights reserved.This package is an SSL implementation written by Eric Young (eay@cryptsoft.com). The implementation was written so as to conform with Netscapes SSL.This library is free for commercial and non-commercial use as long as the following conditions are aheared to. The following conditions apply to all code found in this distribution, be it the RC4, RSA, lhash, DES, etc., code; not just the SSL code. The SSL documentation included with this distribution is covered by the same copyright terms except that the holder is Tim Hudson (tjh@cryptsoft.com). Copyright remains Eric Young's, and as such any Copyright notices in the code are not to be removed. If this package is used in a product, Eric Young should be given attribution as the author of the parts of the library used. This can be in the form of a textual message at program startup or in documentation (online or textual) provided with the package.Redistribution and use in source and binary forms, with or without modification, are permitted provided that the following conditions are met:1. Redistributions of source code must retain the copyright notice, this list of conditions and the following disclaimer.2. Redistributions in binary form must reproduce the above copyright notice, this list of conditions and the following disclaimer in the documentation and/or other materials provided with the distribution.3. All advertising materials mentioning features or use of this software must display the following acknowledgement: "This product includes cryptographic software written by Eric Young (eay@cryptsoft.com)" The word 'cryptographic' can be left out if the rouines from the library being used are not cryptographic related.4. If you include any Windows specific code (or a derivative thereof) from the apps directory (application code) you must include an acknowledgement: "This product includes software written by Tim Hudson (tjh@cryptsoft.com)"THIS SOFTWARE IS PROVIDED BY ERIC YOUNG ``AS IS'' AND ANY EXPRESS OR IMPLIED WARRANTIES, INCLUDING, BUT NOT LIMITED TO, THE IMPLIED WARRANTIES OF MERCHANTABILITY AND FITNESS FOR A PARTICULAR PURPOSE ARE DISCLAIMED. IN NO EVENT SHALL THE AUTHOR OR CONTRIBUTORS BE LIABLE FOR ANY DIRECT, INDIRECT, INCIDENTAL, SPECIAL, EXEMPLARY, OR CONSEQUENTIAL DAMAGES (INCLUDING, BUT NOT LIMITED TO, PROCUREMENT OF SUBSTITUTE GOODS OR SERVICES; LOSS OF USE, DATA, OR PROFITS; OR BUSINESS INTERRUPTION) HOWEVER CAUSED AND ON ANY THEORY OF LIABILITY, WHETHER IN CONTRACT, STRICT LIABILITY, OR TORT (INCLUDING NEGLIGENCE OR OTHERWISE) ARISING IN ANY WAY OUT OF THE USE OF THIS SOFTWARE, EVEN IF ADVISED OF THE POSSIBILITY OF SUCH DAMAGE.The licence and distribution terms for any publically available version or derivative of this code cannot be changed. i.e. this code cannot simply be copied and put under another distribution licence [including the GNU Public Licence.]](https://usermanual.wiki/Samsung-Electronics-Co/P3300MFP/User-Guide-957465-Page-13.png)
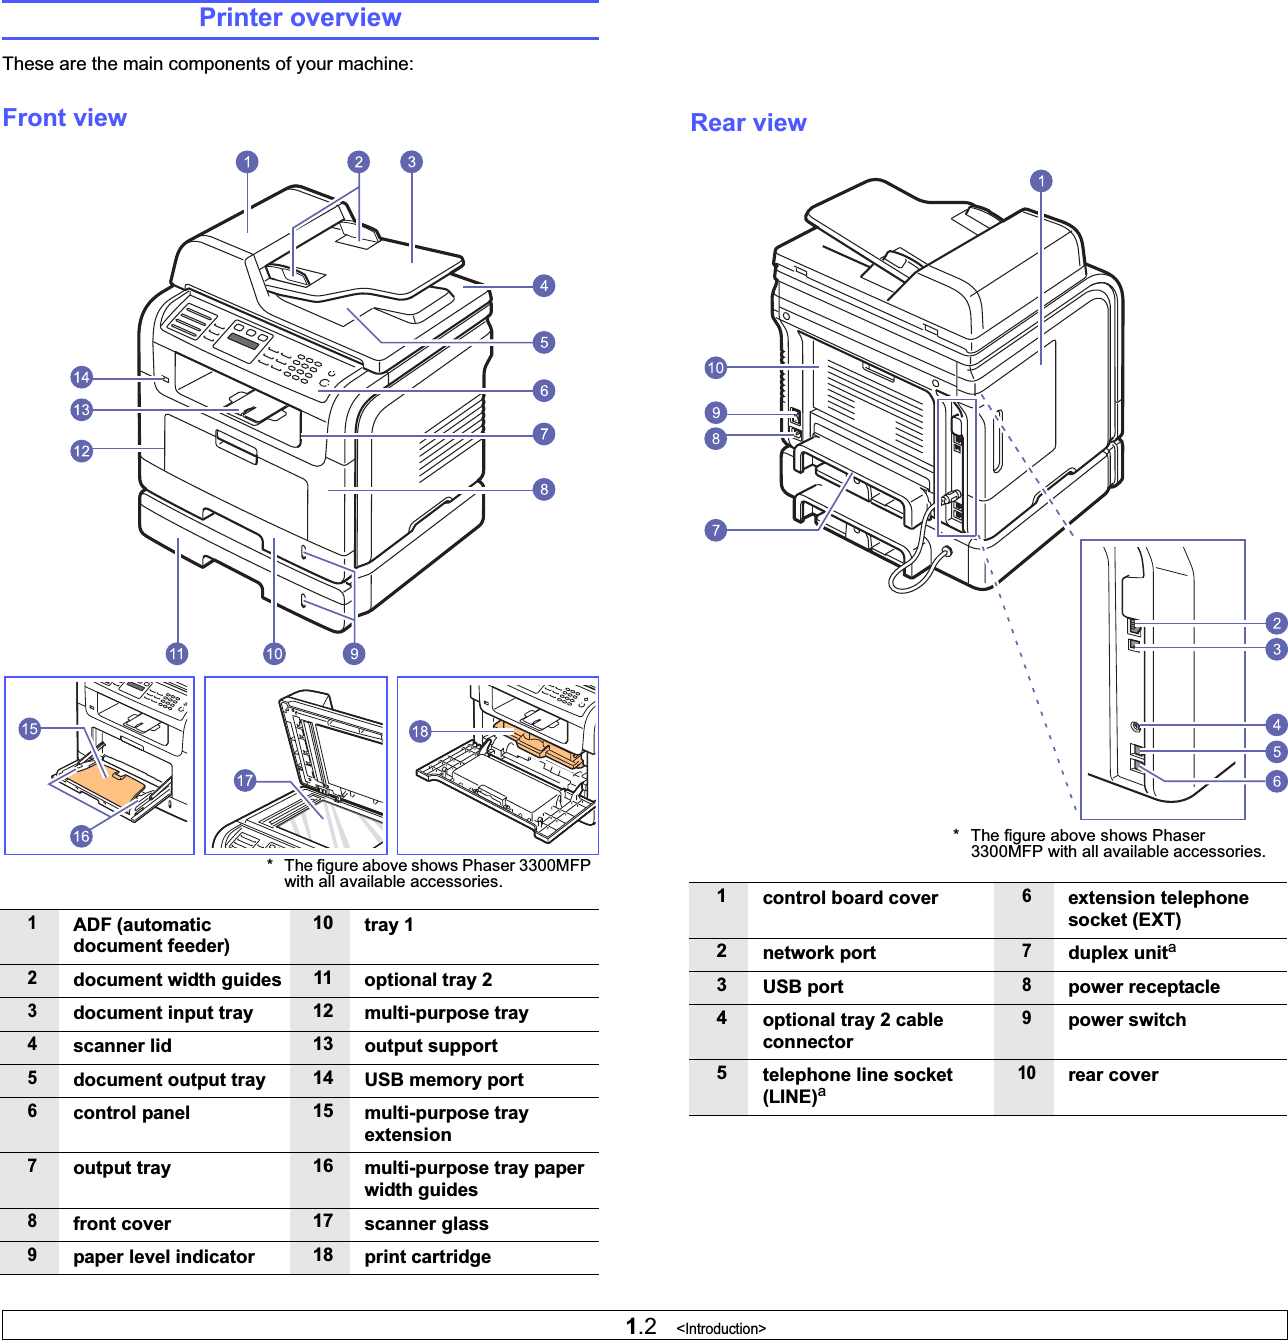
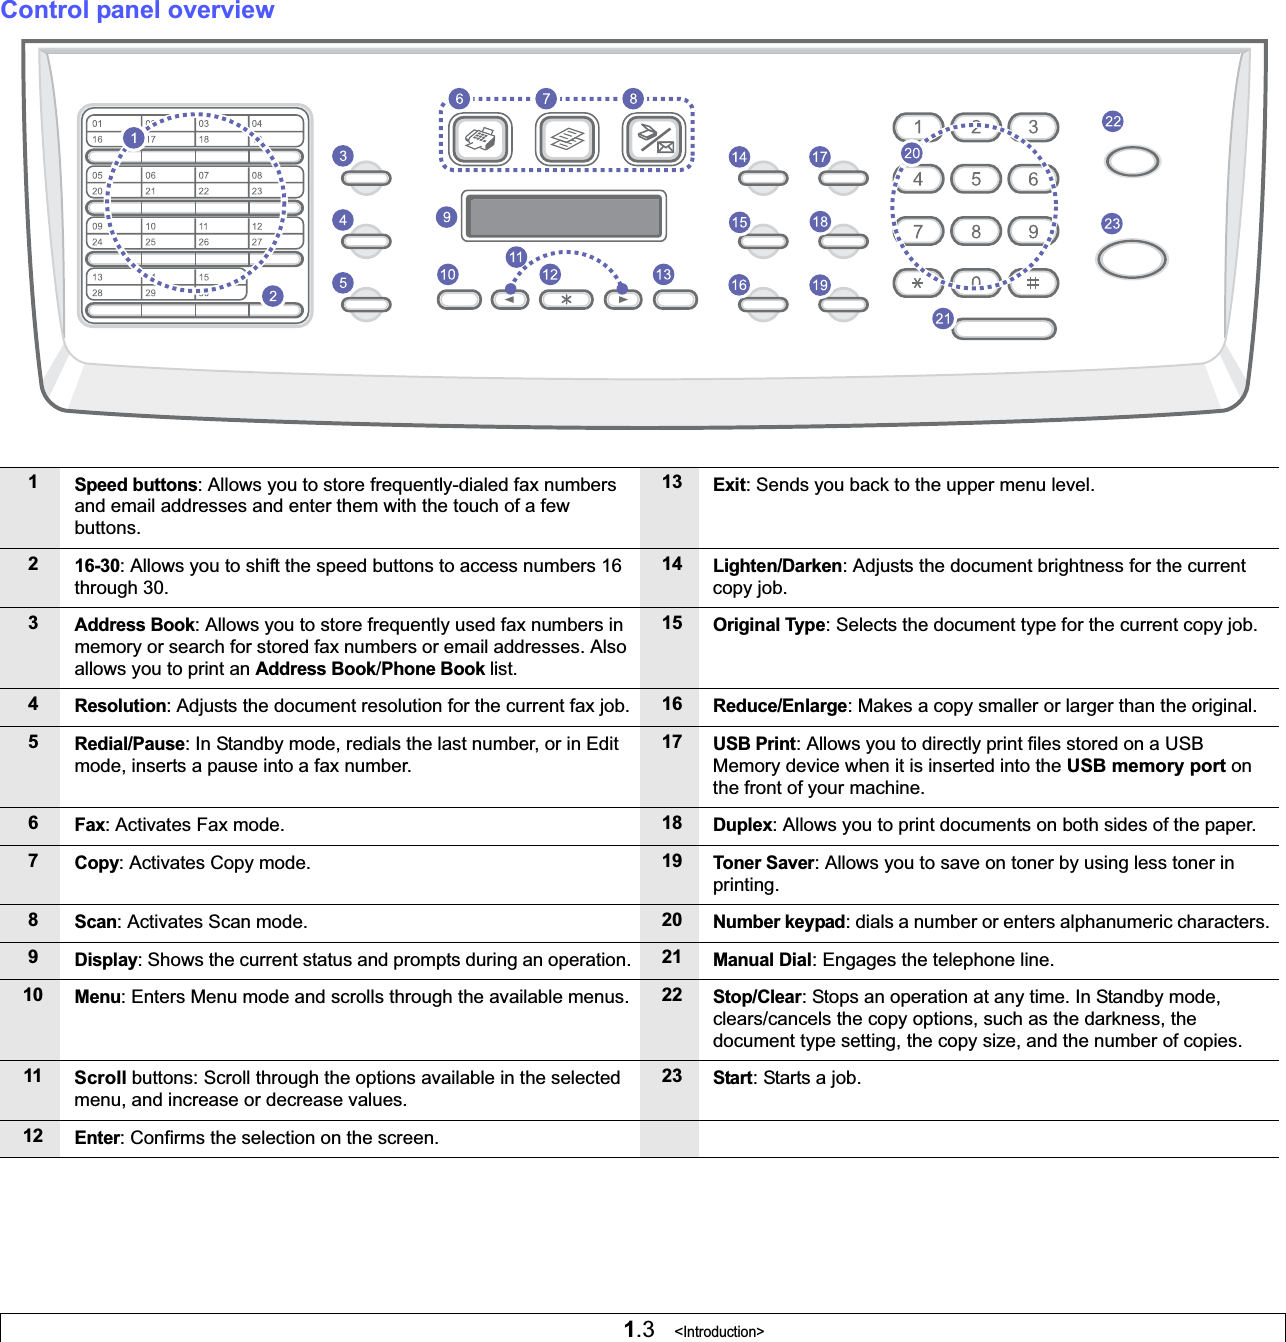
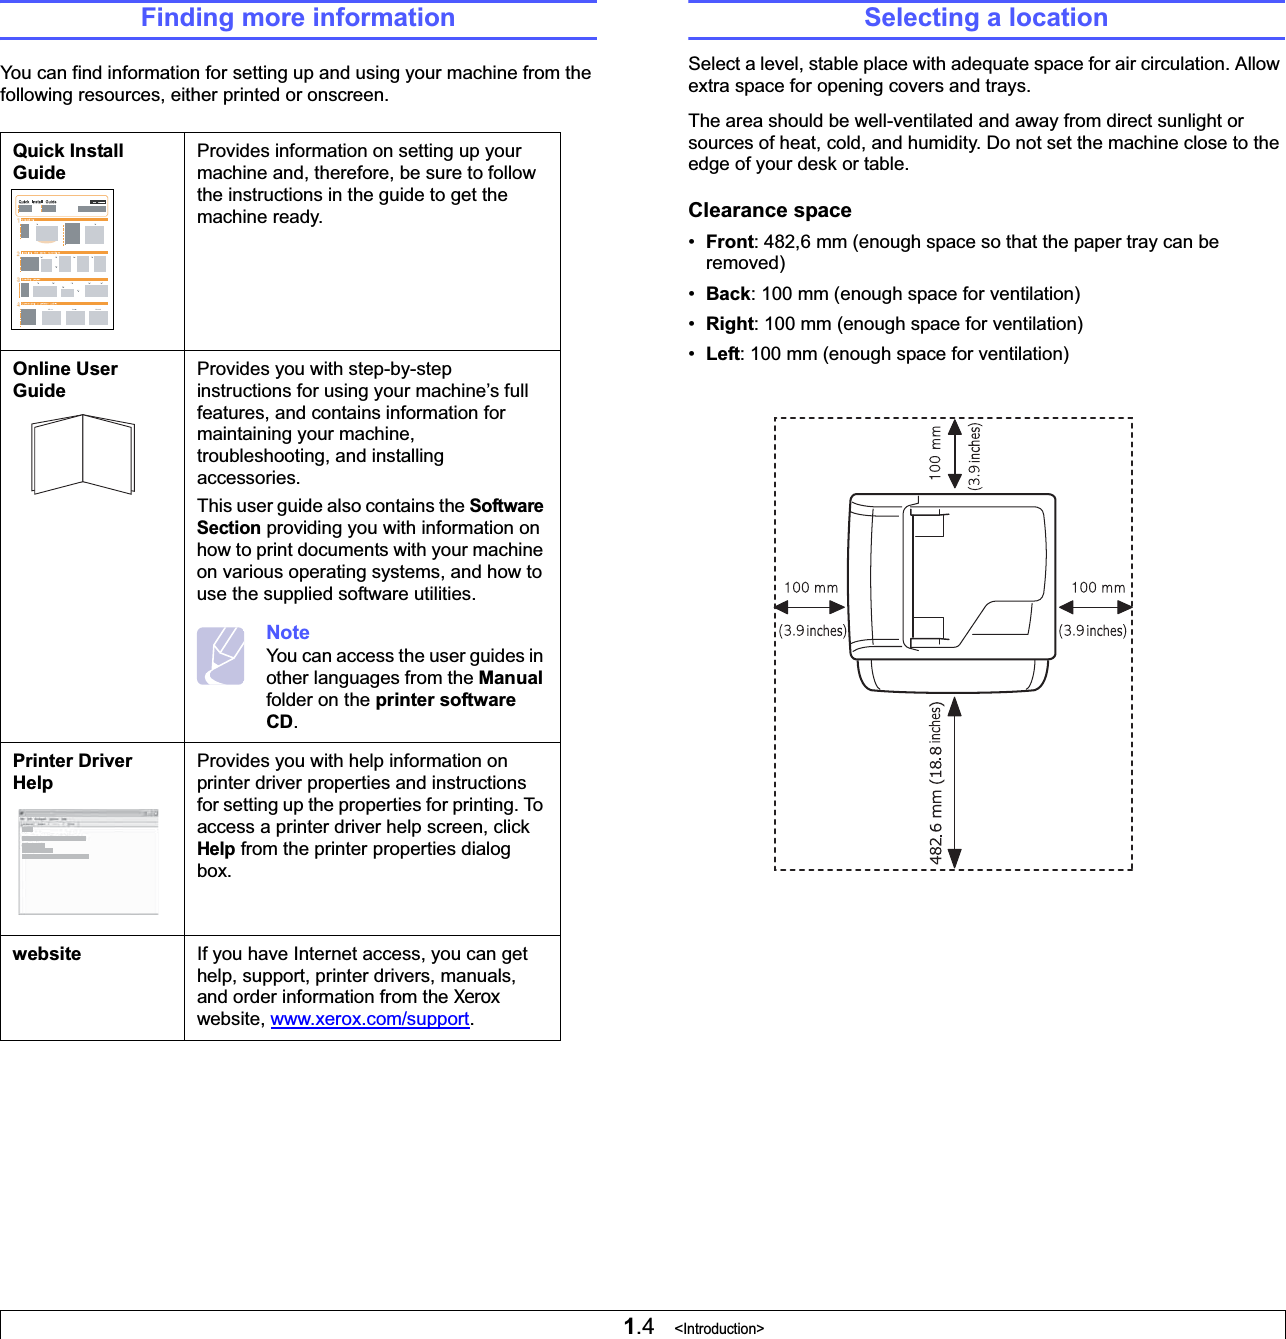
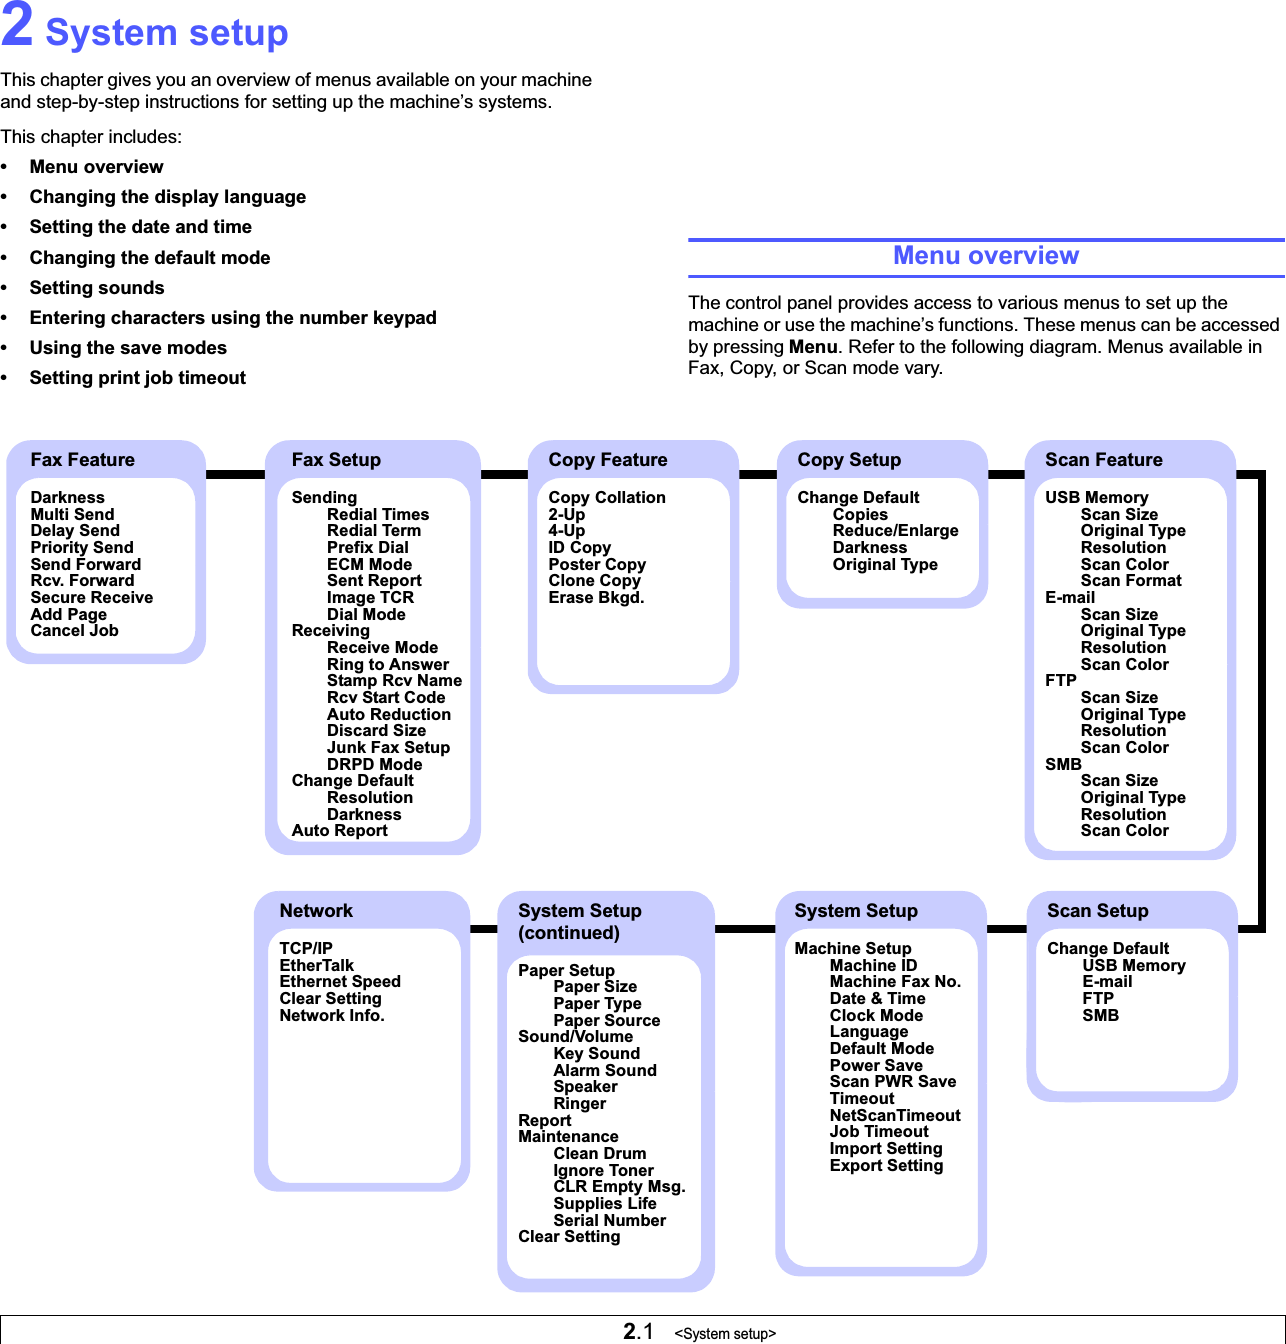
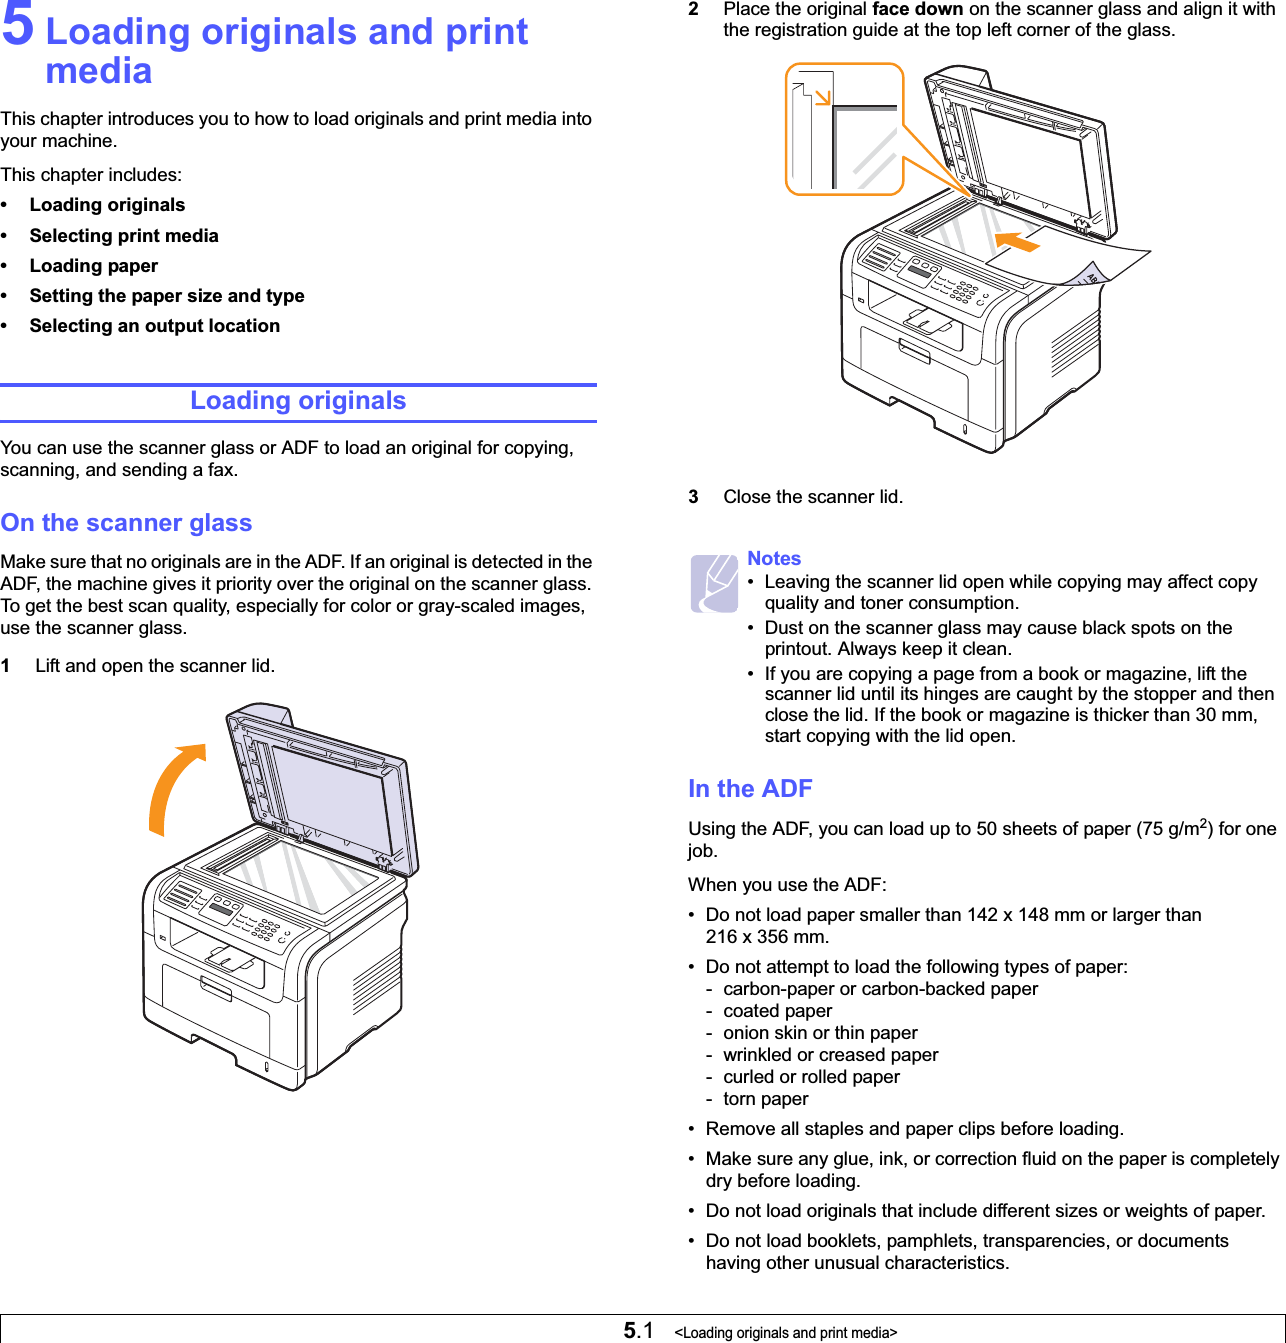
![1.1 <Introduction>1 IntroductionThank you for purchasing this Xerox multifunctional product. Your machine provides printing, copying, scanning, and faxing functions.This chapter includes:• Special features• Printer overview• Finding more information• Selecting a locationSpecial featuresYour new machine is equipped with special features that improve print quality. You can:Print with excellent quality and speed• You can print with a resolution of up to 1200 dpi [Best].See the Software Section.• Your machine prints A4-sized paper at up to 28 ppmaand letter-sized paper at up to 30 ppm.• For duplex printing, your machine prints A4-sized paper at up to 19 ipmb and letter-sized paper at up to 21 ipm.Handle paper flexibly•The multi-purpose tray supports letterhead, envelopes, labels, transparencies, custom-sized media, postcards, and heavy paper. The multi-purpose tray holds up to 50 sheets of plain paper.•The 250-sheet tray 1 and 250-sheet optional tray 2support plain paper in various sizes. Create professional documents•Print Watermarks. You can customize your documents with words, such as “Confidential”. See the Software Section.•Print Posters. The text and pictures of each page of your document are magnified and printed across the sheet of paper and can then be taped together to form a poster. See the Software Section.Save time and money • You can print multiple pages on one single sheet of paper to save paper.• You can use preprinted forms and letterhead with plain paper. See the Software Section.• This machine automatically conserves electricity by substantially reducing power consumption when not in use.250250Expand your machine’s capacity* Zoran IPS Emulation compatible with PostScript 3 • © Copyright 1995-2005, Zoran Corporation. All rights reserved. Zoran, the Zoran logo, IPS/PS3, and OneImage are trademarks of Zoran Corporation.* 136 PS3 fontsContains UFST and MicroType from Monotype Imaging Inc.Print in various environments• You can print with Windows 2000/XP/2003/Vista.• Your machine is compatible with a variety of Linux systems.• Your machine is compatible with a variety of Macintosh systems.• Your machine comes with both USB and ethernet interfaces.Use USB flash memory devicesIf you have a USB memory device, you can use it in various ways with your machine.• You can scan documents and save them to the device.• You can directly print data stored to the device.• You can back up data and restore backup files to the machine’s memory.Machine featuresThe table below lists a general overview of features supported by your machine.(I: Installed, O: Option, NA: Not Available)• The Phaser 3300MFP has 96 MB of memory which can be expanded to 320 MB.• You can add a 250-sheet optional tray 2 to your machine. This tray lets you add paper to the machine less often. • Zoran IPS Emulation* compatible with PostScript 3 (PS) enables PS printing. Features Phaser 3300MFPUSB 2.0 IUSB Memory IPostScript Emulation INetwork Interface(Ethernet 10/100 Base TX)IDuplex printing11. Printing on both sides of paper.Ia. pages per minuteb. images per minute](https://usermanual.wiki/Samsung-Electronics-Co/P3300MFP/User-Guide-957465-Page-16.png)


![6.3 <Copying>ID card copyingYour machine can print 2-sided originals on one sheet of A4-, Letter-, Legal-, Folio-, Executive-, B5-, A5-, or A6-sized paper. When you copy using this feature, the machine prints one side of the original on the upper half of the paper and the other side on the lower half without reducing the size of the original. This feature is helpful for copying a small-sized item, such as a name card. This copy feature is available only when you place originals on the scanner glass.1Press Copy.2Place a single original face down on the scanner glass. For details about loading an original, see page 5.1.3Press Menu until Copy Feature appears on the bottom line of the display and press Enter.4Press the Scroll buttons until ID Copy appears and press Enter.Place Front Side and Press[Start] appears on the display.5Press Enter or Start.Your machine begins scanning the front side and shows Place Back Side and Press[Start].6Open the scanner lid and turn the original over.NoteIf you press Stop/Clear or if no buttons are pressed for approximately 30 seconds, the machine cancels the copy job and returns to Standby mode.7Press Start to begin copying.NoteIf the original is larger than the printable area, some portions may not be printed.Poster copyingYour machine can print an image onto 9 sheets of paper (3x3). You can paste the printed pages together to make one poster-sized document.This copy feature is available only when you place originals on the scanner glass.1Press Copy.2Place a single original face down on the scanner glass.For details about loading an original, see page 5.1.3Press Menu until Copy Feature appears on the bottom line of the display and press Enter.4Press the Scroll buttons until Poster Copyappears and press Enter.5Press the Scroll buttons to select Yes.6Press Enter or Start to begin copying.Note You cannot adjust the copy size using the Reduce/Enlarge button when making a poster.Your original is divided into 9 portions. Each portion is scanned and printed one by one in the following order:](https://usermanual.wiki/Samsung-Electronics-Co/P3300MFP/User-Guide-957465-Page-41.png)


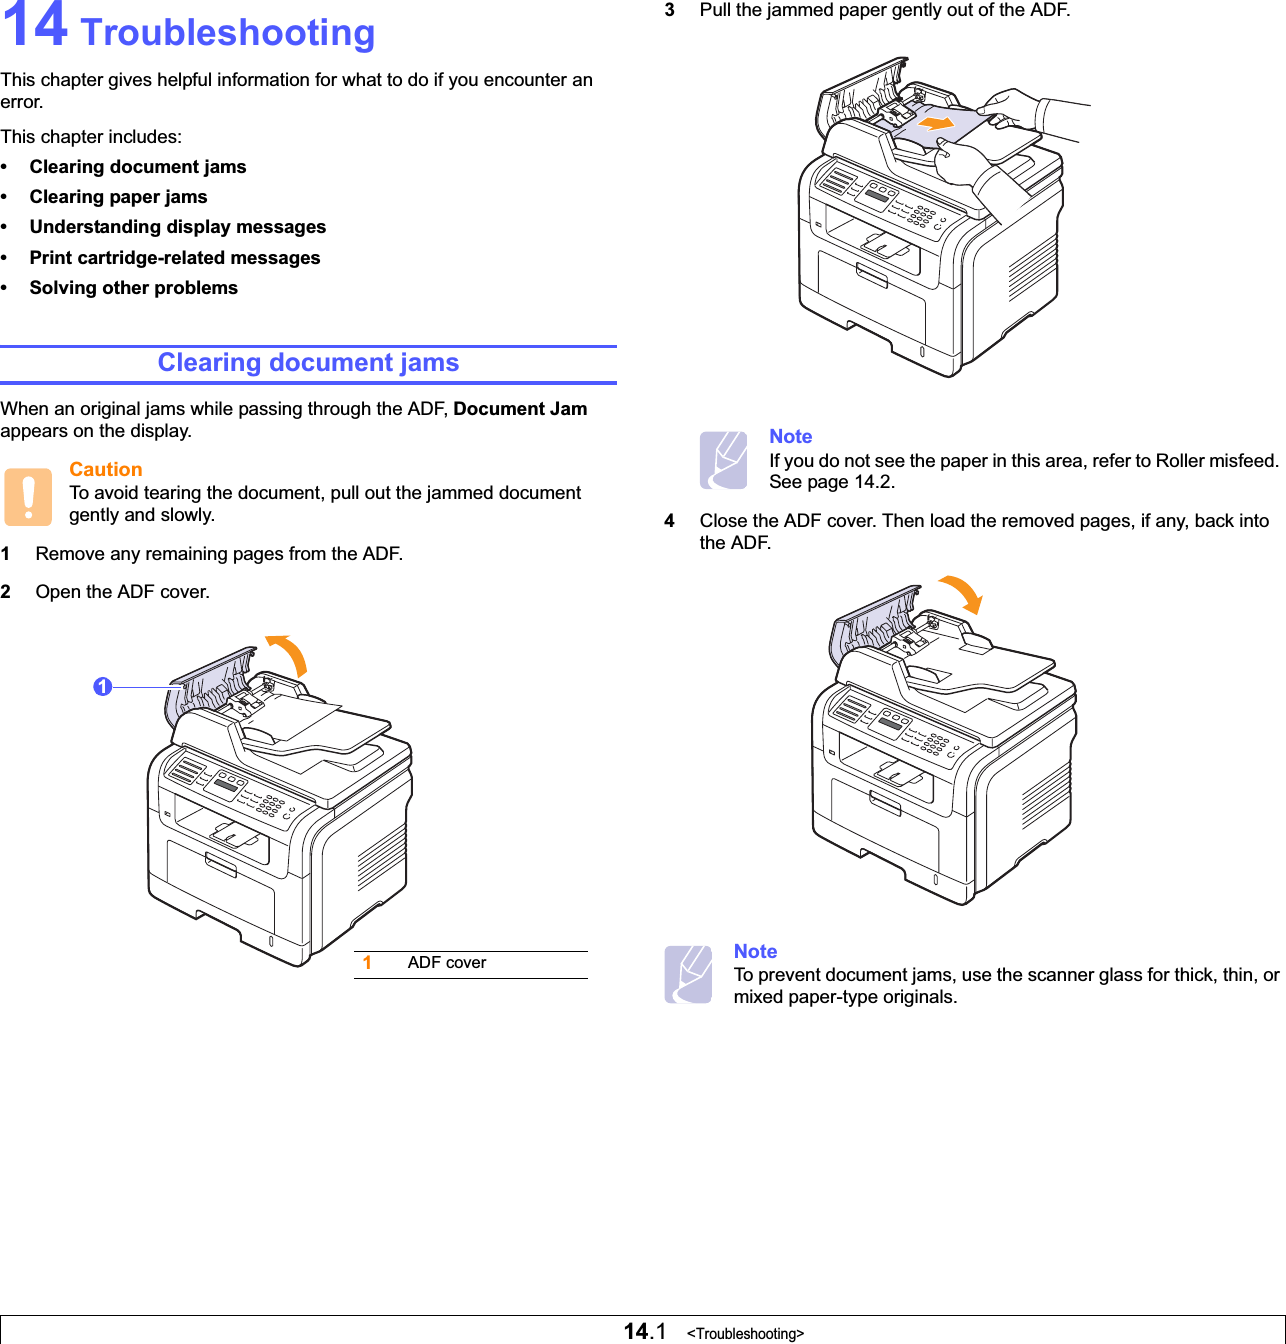
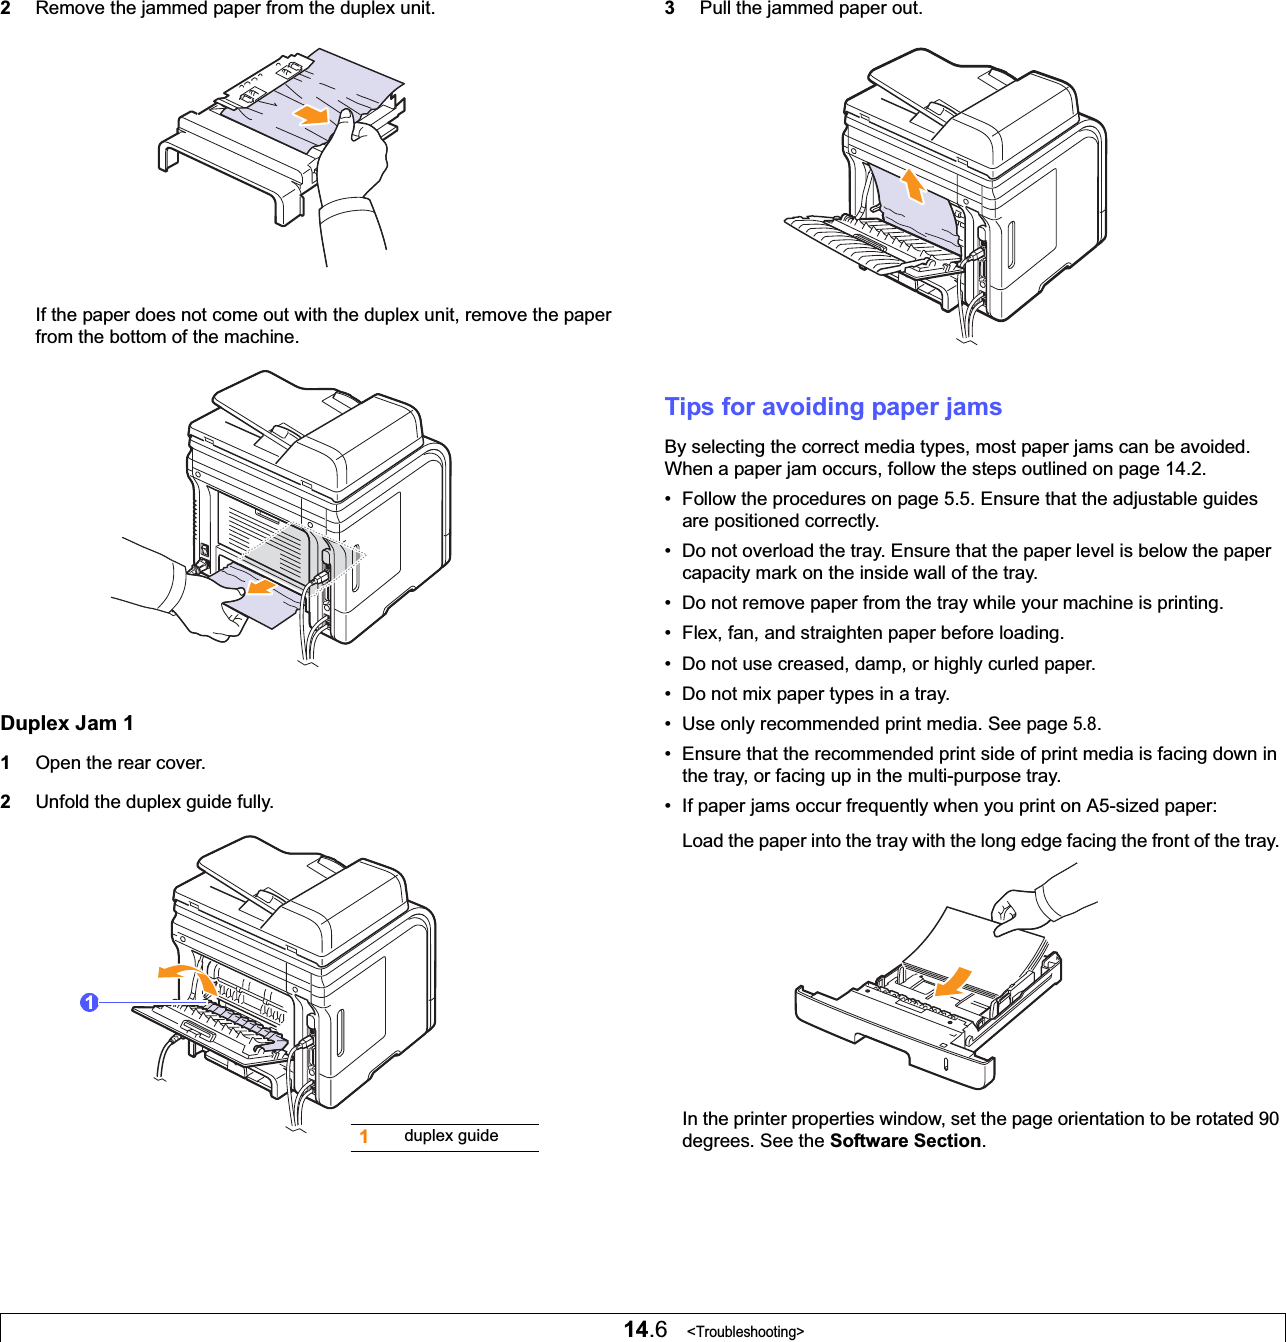
![14.2 <Troubleshooting>Roller misfeed1Open the scanner lid.2Grasp the misfed paper, and remove the paper from the feed area by carefully pulling it to the right using both hands.3Close the scanner lid. Then load the removed pages back into the ADF.Clearing paper jamsWhen a paper jam occurs, Paper Jam appears on the display. Refer to the table below to locate and clear the paper jam.CautionTo avoid tearing the paper, pull out the jammed paper gently and slowly. Follow the instructions in the following sections to clear the jam. Message Location of jam Go to[Paper Jam 0] Open/Close DoorIn the paper feed area (tray 1, optional tray 2, or multi-purpose tray)below and page 14.3[Paper Jam 1]Open/Close DoorIn the fuser area or around the print cartridgepage 14.3[Paper Jam 2]Check InsideIn the paper exit area page 14.4[Duplex Jam 0]Check InsideIn the duplex unit page 14.5[Duplex Jam 1]Check InsideBetween the duplex unit and fuser areapage 14.61scanner lid1In tray 11Open and close the front cover. The jammed paper is automatically ejected from the machine.If the paper does not exit, go to the next step.2Pull tray 1 open. 3Remove the jammed paper by gently pulling it straight out.If the paper does not move when you pull, or if you do not see the paper in this area, check the fuser area around the print cartridge. See page 14.3. 4Insert tray 1 into the machine until it snaps into place. Printing automatically resumes.](https://usermanual.wiki/Samsung-Electronics-Co/P3300MFP/User-Guide-957465-Page-79.png)

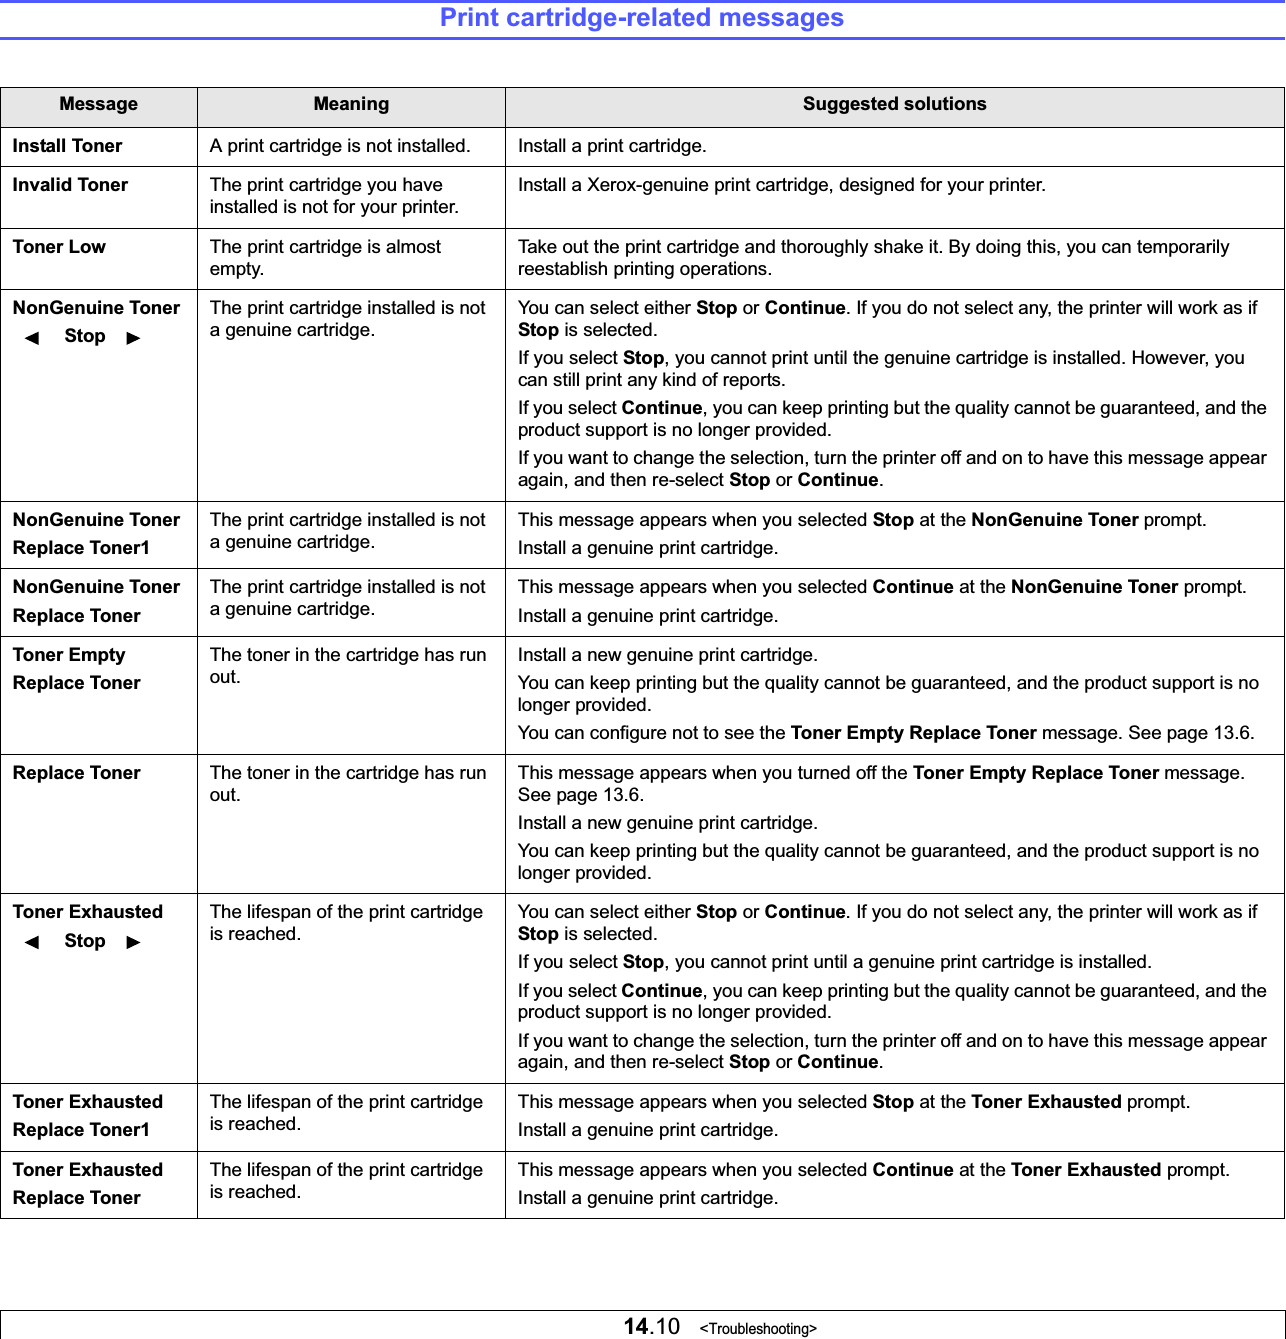
![14.7 <Troubleshooting>Understanding display messagesMessages appear on the Status Monitor program window or the control panel display to indicate the machine’s status or errors. Refer to the tables below to understand the messages’ meaning and correct the problem if necessary. Messages and their meanings are listed in alphabetical order.NoteWhen you call for service, it is very convenient to tell the service representative the display message.Message Meaning Suggested solutionsAuthentication FailureThe ID or password you entered is incorrect.Enter the correct ID or password.Cancel? YesYour machine’s memory has become full while trying to store an original into memory.To cancel the fax job, press the Enter button to accept Yes.If you want to send those pages that have been successfully stored, press the Enter button to accept No. You should send the remaining pages later, when memory is available.[COMM. Error] The machine has a communication problem.Ask the sender to try again.Connection Error Connection with the SMTP server failed.Check the server settings and the network cable.Connection Failed The protocol you have entered is not supported or server port is wrong.Check the protocol or server port.Data Read FailCheck USB Mem.Time expired while reading data.Try again.Data Write FailCheck USB Mem.Storing to the USB memory failed.Check the available USB memory space.Document Jam The loaded original has jammed in the ADF.Clear the jam. See page 14.1.Door Open The front cover or rear cover is not securely latched.Close the cover until it locks into place.Duplex Jam 0Check InsidePaper has jammed during duplex printing.Clear the jam. See page 14.5.Duplex Jam 1Open/Close DoorPaper has jammed during duplex printing.Clear the jam. See page 14.6.Enter Again You entered an unavailable item.Enter the correct item again.File Access DeniedLogin to the network server was successful. However, access to the file on the network server was denied.Change the server settings.File Name Exist The file name you have entered already exists.Enter a different file name.File Name Over LimitThe file names you can use are from doc001 to doc999. However, all file names are used already.Delete unnecessary files.File FormatNot SupportedThe selected file format is not supported.Use the correct file format.Fuser Door Open The fuser door is not securely latched.Open the rear cover and close the fuser door until it locks into place. For the location of the fuser door, see page 14.5.Global Address Not FoundWhen the device is unable to locate the given address of the Global server.Check the search ID.Global Query Size ExceededThis is an error message and displays when the global query size has been exceeded.• There are too many search results. Refine your search by entering more letters.• Contact a LDAP Server administrator.Message Meaning Suggested solutions](https://usermanual.wiki/Samsung-Electronics-Co/P3300MFP/User-Guide-957465-Page-84.png)
![14.8 <Troubleshooting>Global Server Auth FailedWhen there is an authentication fail while connecting to the global server this message displays.Check the authentication account and password.Global Server Comm. ErrorThis error message displays when there is a communication error between the global server and the device.• Try again.• Contact a LDAP Server administrator.Global Server Not ConfiguredWhen no global server is configured, this message displays.Check the LDAP server configuration settings.Global Server Not FoundWhen the device is unable to find the Global server.Check the LDAP server address, The LDAP server address is incorrect, or the server has failed.Group Not AvailableYou have tried to select a group location number where only a single location number can be used, such as when adding locations for a Multiple Send operation.Use a speed dial number or dial a number manually using the number keypad.[Incompatible] The machine has received a fax from which is registered as a junk fax.The received fax data will be deleted.Reconfirm junk fax setup, see page 10.2.Invalid Server AddressThe server address you have entered is invalid.Enter the correct server address.Line Busy The receiving fax machine did not answer or the line is already engaged.Try again after a few minutes.[Line Error] Your machine cannot connect with the receiving fax machine or has lost contact because of a problem with the phone line.Try again. If the problem persists, wait an hour or so for the line to clear and try again.Or, turn the ECM mode on. See page 10.1.Message Meaning Suggested solutionsLow Heat ErrorCycle PowerThere is a problem in the fuser unit.Unplug the power cord and plug it back in. If the problem persists, please call for service.LSU Motor ErrorCycle PowerA problem has occurred in the LSU (Laser Scanning Unit).Unplug the power cord and plug it back in. If the problem persists, please call for service.LSU Hsync ErrorCycle PowerA problem has occurred in the LSU (Laser Scanning Unit).Unplug the power cord and plug it back in. If the problem persists, please call for service.Main Motor LockedThere is a problem in the main motor.Open and then close the front cover.Mail ExceedsServer SupportThe mail size is larger than the supported size by SMTP server.Divide your mail or reduce the resolution.Memory Full The memory is full. Delete unnecessary fax jobs and retransmit after more memory becomes available. Alternatively, split the transmission into more than one operation.MP TrayPaper EmptyThere is no paper in the multi-purpose tray.Load paper in the multi-purpose tray. See page 5.7.Network Error There is a problem with the network.Contact your network administrator.[No Answer] The receiving fax machine has not answered after several redial attempts.Try again. Make sure that the receiving machine is operational.Not Assigned The speed button or speed dial number you tried to use has no number or email address assigned to it.Enter the number or email address manually using the number keypad or store the number or address.[No Paper]Add PaperThe paper in the tray has run out.Load paper in the tray. See page 5.5.One Page isToo LargeSingle page data exceeds the configured mail size.Reduce the resolution and try again.Message Meaning Suggested solutions](https://usermanual.wiki/Samsung-Electronics-Co/P3300MFP/User-Guide-957465-Page-85.png)
![14.9 <Troubleshooting>Open Heat ErrorCycle PowerThere is a problem in the fuser unit.Unplug the power cord and plug it back in. If the problem persists, please call for service.Operation Not AssignedYou are in the AddPage/Cancel Joboperation, but there are no jobs stored.Check the display to see if there are any scheduled jobs.Over Heat ErrorCycle PowerThere is a problem in the fuser unit.Unplug the power cord and plug it back in. If the problem persists, please call for service.Paper Jam 0Open/Close DoorPaper has jammed in the feeding area of the tray.Clear the jam. See page 14.2 and page 14.3.Paper Jam 1Open/Close DoorPaper has jammed in the fuser area.Clear the jam. See page 14.3.Paper Jam 2Check InsidePaper has jammed in the paper exit area.Clear the jam. See page 14.4.Power Failure Power has turned off then on and the machine’s memory has not been back up.The job which you were trying to do before the power failure must be completely re-done.Retry Redial? The machine is waiting for a specified time interval to redial a previously busy station.You can press Enter to immediately redial, or Stop/Clear to cancel the redial operation.Scanner locked The scanner module is lockedUnlock the scanner and press Stop/Clear.Self DiagnosticLSUThe LSU (Laser Scanning Unit) in your printer is checking some problems detected.Please wait a few minutes.Self DiagnosticTemperatureThe engine in your machine is checking some problems detected.Please wait a few minutes.Send Error(AUTH)There is a problem in SMTP authentication.Configure the authentication setting.Message Meaning Suggested solutionsSend Error(DNS)There is a problem in DNS.Configure the DNS setting. Send Error(POP3)There is a problem in POP3.Configure the POP3 setting. Send Error(SMTP)There is a problem in SMTP.Change to the available server.Send Error(Wrong Config)There is a problem on the network interface card.Configure your network interface card correctly.[Stop Pressed] Stop/Clear has been pressed during a fax transmission.Try again.Tray 1Paper EmptyThere is no paper in the tray 1.Load paper in tray 1. See page 5.5.Tray 2Paper EmptyThere is no paper in the optional tray 2.Load paper in the optional tray 2. See page 5.5.Message Meaning Suggested solutions](https://usermanual.wiki/Samsung-Electronics-Co/P3300MFP/User-Guide-957465-Page-86.png)


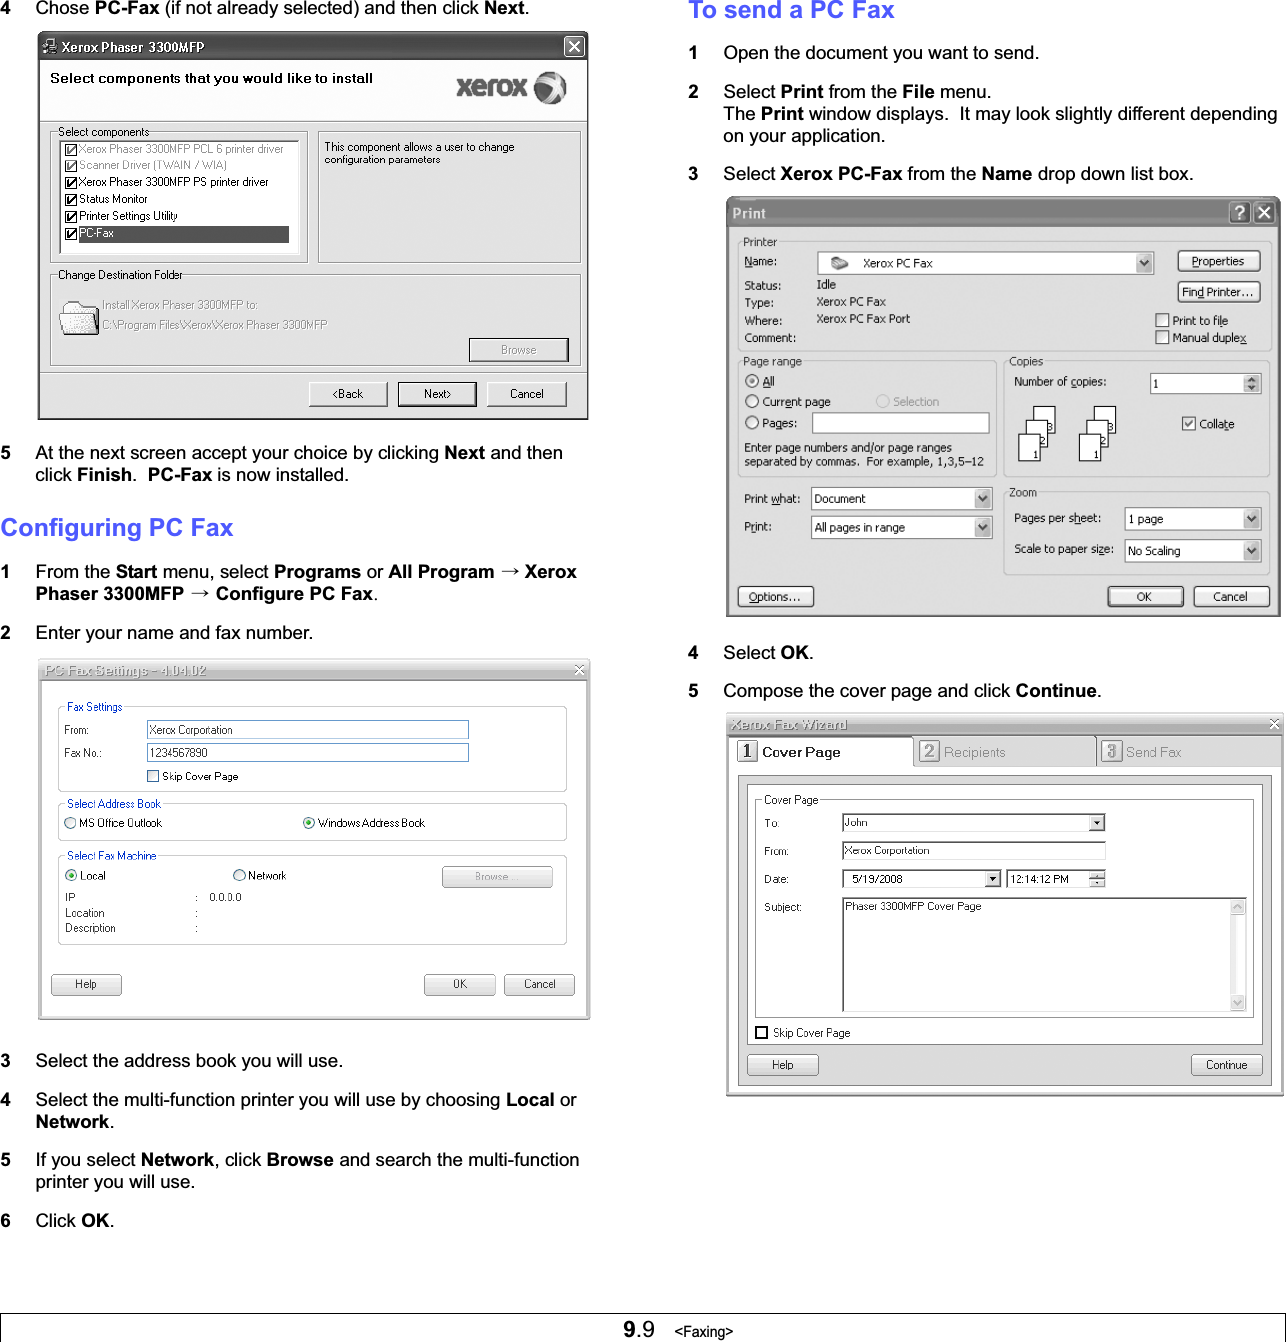
![Installing Printer Software in Windows65Select your printer and click Next.NOTE: If your printer is not already connected to the computer, the following window will appear.• After connecting the printer, click Next.• If you don’t want to connect the printer at this time, click Next, and No on the following screen. Then the installation will start and a test page will not be printed at the end of the installation.• The installation window that appears in this User Guide may differ depending on the printer and interface in use.6Select the components to be installed and click Next.NOTE: You can change the desired installation folder by clicking [Browse].7After the installation is finished, a window asking you to print a test page appears. If you choose to print a test page, select the checkbox and click Next.Otherwise, just click Next and skip to step 9.8If the test page prints out correctly, click Yes.If not, click No to reprint it.9Click Finish.Installing Software for Network PrintingBefore you beginBefore turning on the machine:• Confirm that an existing operational network utilizing TCP/IP is available.• Confirm that the Ethernet cable is plugged into the machine and is connected to an operational Ethernet port on the network.When you connect your printer to a network, you must first configure the TCP/IP settings for the printer. After you have assigned and verified the TCP/IP settings, you are ready to install the software on each computer on the network.You can install the printer software using the typical or custom method.Typical InstallationThis is recommended for most users. All components necessary for printer operations will be installed.1Make sure that the printer is connected to your network and powered on. For details about connecting to the network, see the supplied printer’s User Guide.2Insert the supplied CD-ROM into your CD-ROM drive.The CD-ROM should automatically run, and an installation window appears.If the installation window does not appear, click Start and then Run. Type X:\Setup.exe, replacing “X” with the letter which represents your drive and click OK.If you use Windows Vista, click Start oAll programs oAccessories oRun, and type X:\Setup.exe.If the AutoPlay window appears in Windows Vista, click RunSetup.exe in Install or run program field, and click Continuein the User Account Control window.](https://usermanual.wiki/Samsung-Electronics-Co/P3300MFP/User-Guide-957465-Page-110.png)
![Installing Printer Software in Windows73Click Install Software.4Select Typical installation for a network printer. Click Next.5The list of printers available on the network appears. Select the printer you want to install from the list and then click Next.• If you do not see your printer on the list, click Update to refresh the list, or select Add TCP/IP Port to add your printer to the network. To add the printer to the network, enter the port name and the IP address for the printer.To verify your printer’s IP address or the MAC address, print a Network Configuration page.• To find a shared network printer (UNC Path), select Shared Printer [UNC] and enter the shared name manually or find a shared printer by clicking the Browse button.NOTE: To search the network printer, the firewall should be disabled. For Windows operating system, click Start ->Control Panel and start windows firewall, and set this option unactivated. For other operating system, refer to its on-line guide.6After the installation is finished, click Finish. If you choose to print a test page, select the checkbox.7If the test page prints out correctly, click Yes.If not, click No to reprint it.8Click Finish.NOTE: After setup is complete, if your printer driver does not work properly, reinstall the printer driver. See “Reinstalling Printer Software” on page 9.Custom InstallationYou can choose individual components to install and set a specific IP address.1Make sure that the printer is connected to your network and powered on. For details about connecting to the network, see the supplied printer’s User Guide.2Insert the supplied CD-ROM into your CD-ROM drive.The CD-ROM should automatically run, and an installation window appears.If the installation window does not appear, click Start and then Run. Type X:\Setup.exe, replacing “X” with the letter which represents your drive and click OK.If you use Windows Vista, click Start oAll programs oAccessories oRun, and type X:\Setup.exe.If the AutoPlay window appears in Windows Vista, click RunSetup.exe in Install or run program field, and click Continuein the User Account Control window.](https://usermanual.wiki/Samsung-Electronics-Co/P3300MFP/User-Guide-957465-Page-111.png)
![Installing Printer Software in Windows83Click Install Software.4Select Custom installation. Click Next.5The list of printers available on the network appears. Select the printer you want to install from the list and then click Next.• If you do not see your printer on the list, click Update to refresh the list, or select Add TCP/IP Port to add your printer to the network. To add the printer to the network, enter the port name and the IP address for the printer.To verify your printer’s IP address or the MAC address, print a Network Configuration page.• To find a shared network printer (UNC Path), select Shared Printer [UNC] and enter the shared name manually or find a shared printer by clicking the Browse button.NOTE: To search the network printer, the firewall should be disabled. For Windows operating system, click Start ->Control Panel and start windows firewall, and set this option unactivated. For other operating system, refer to its on-line guide.TIP: If you want to set a specific IP address on a specific network printer, click the Set IP Address button. The Set IP Address window appears. Do as follows:a. Select a printer to be set with a specific IP address from the list. To verify your printer’s IP address or MAC address, print a Network Configuration page.b. Configure an IP address, subnet mask, and gateway for the printer manually and click Configure to set the specific IP address for the network printer.c. Click Next.6Select the components to be installed and click Next.](https://usermanual.wiki/Samsung-Electronics-Co/P3300MFP/User-Guide-957465-Page-112.png)
![Installing Printer Software in Windows97You can also change the printer name, set the printer to be shared on the network, set the printer as the default printer, and change the port name of each printer. Click Next.To install this software on a server, select the Setting up this printer on a server checkbox.8After the installation is finished, click Finish. If you choose to print a test page, select the checkbox.9If the test page prints out correctly, click Yes.If not, click No to reprint it.10 Click Finish.NOTE: After setup is complete, if your printer driver does not work properly, reinstall the printer driver. See “Reinstalling Printer Software” on page 9.Reinstalling Printer SoftwareYou can reinstall the software if installation fails.1Start Windows.2From the Start menu select Programs or All Programs oyour printer driver name oMaintenance.3Select Repair and click Next.4The list of printers available on the network appears. Select the printer you want to install from the list and then click Next.• If you do not see your printer on the list, click Update to refresh the list, or select Add TCP/IP Port to add your printer to the network. To add the printer to the network, enter the port name and the IP address for the printer.• To find a shared network printer (UNC Path), select Shared Printer [UNC] and enter the shared name manually or find a shared printer by clicking the Browse button.You will see a component list so that you can reinstall any item individually.NOTE: If your printer is not already connected to the computer, the following window will appear.• After connecting the printer, click Next.• If you don’t want to connect the printer at this time, click Next, and No on the following screen. Then the installation will start and a test page will not be printed at the end of the installation.• The reinstallation window that appears in this User Guide may differ depending on the printer and interface in use.](https://usermanual.wiki/Samsung-Electronics-Co/P3300MFP/User-Guide-957465-Page-113.png)

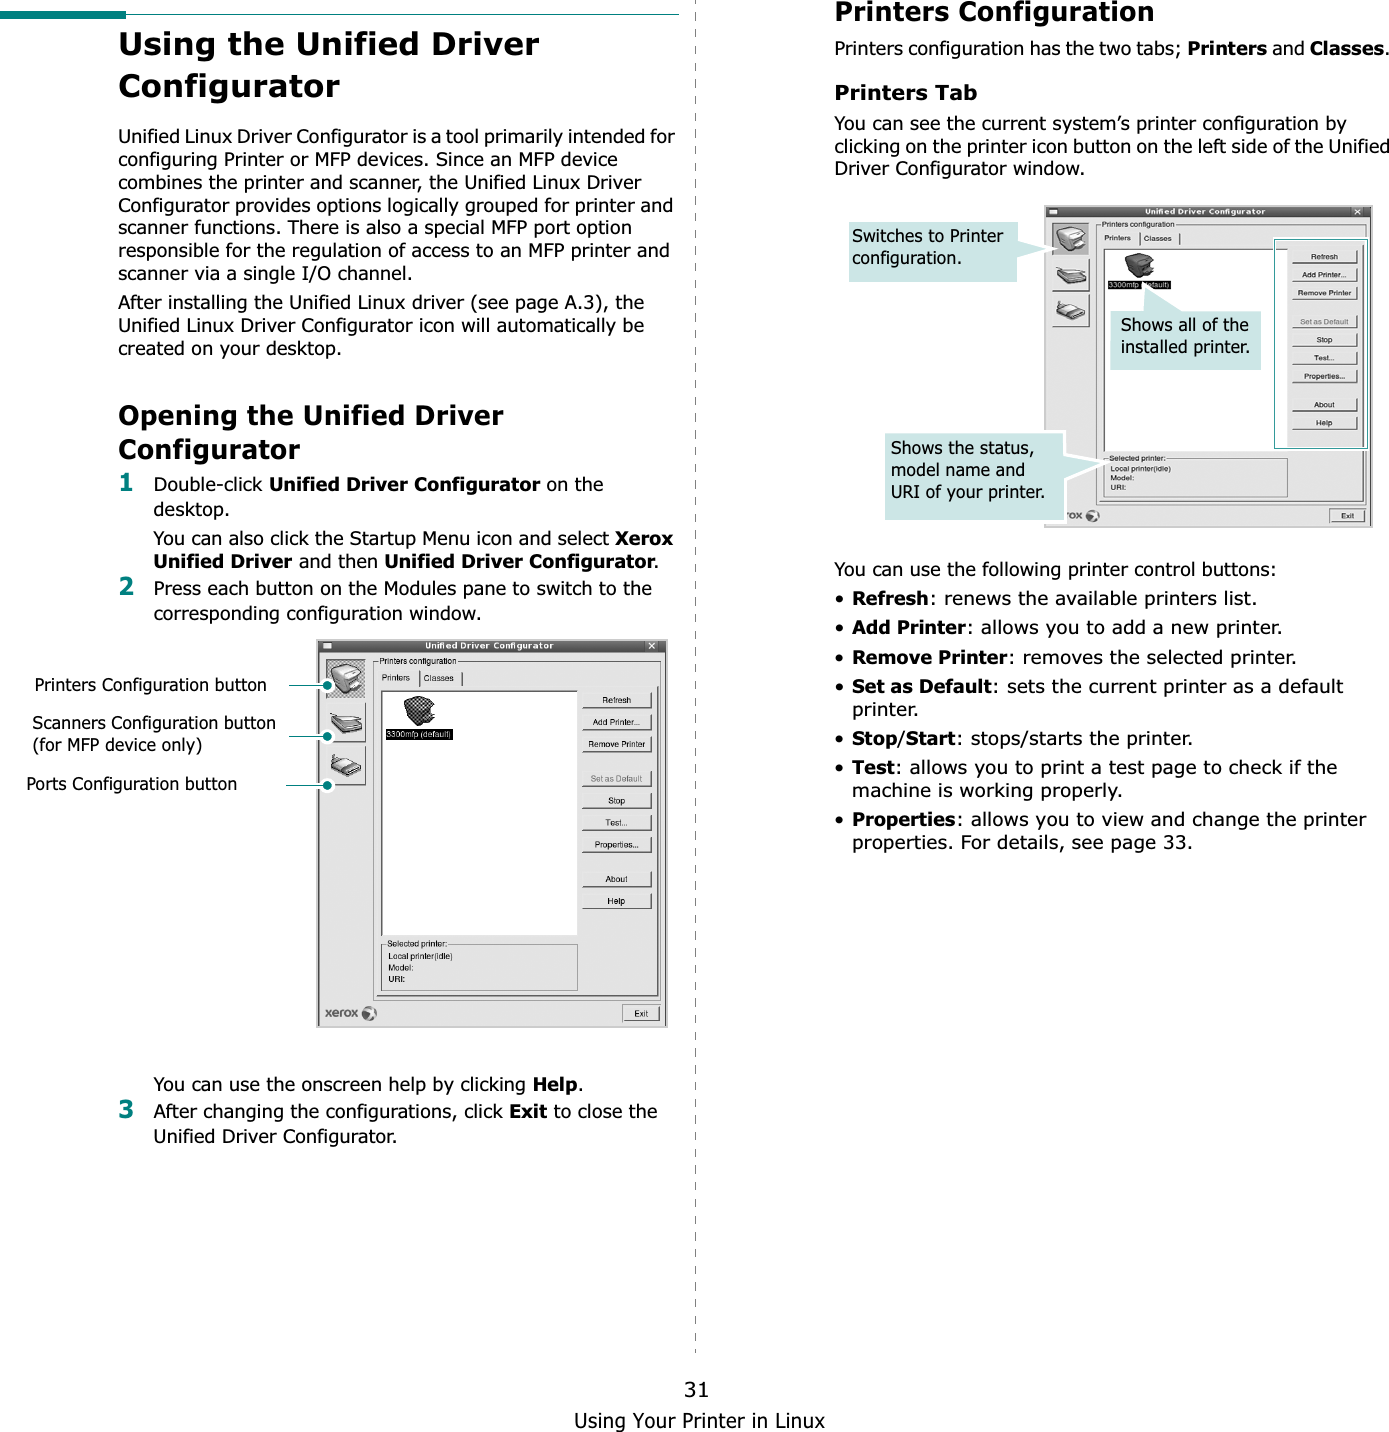
![Using Your Printer in Linux299Using Your Printer in LinuxYou can use your machine in a Linux environment. This chapter includes:• Getting Started• Installing the Unified Linux Driver• Using the Unified Driver Configurator• Configuring Printer Properties• Printing a Document• Scanning a DocumentGetting StartedThe supplied CD-ROM provides you with Xerox’s Unified Linux Driver package for using your machine with a Linux computer.Xerox’s Unified Linux Driver package contains printer and scanner drivers, providing the ability to print documents and scan images. The package also delivers powerful applications for configuring your machine and further processing of the scanned documents.After the driver is installed on your Linux system, the driver package allows you to monitor a number of machine devices via the USB. The acquired documents can then be edited, printed on the same local or network machine devices, sent by e-mail, uploaded to an FTP site, or transferred to an external OCR system.The Unified Linux Driver package is supplied with a smart and flexible installation program. You don't need to search for additional components that might be necessary for the Unified Linux Driver software: all required packages will be carried onto your system and installed automatically; this is possible on a wide set of the most popular Linux clones.Installing the Unified Linux DriverInstalling the Unified Linux Driver1Make sure that you connect your machine to your computer. Turn both the computer and the machine on.2When the Administrator Login window appears, type in root in the Login field and enter the system password.NOTE: You must log in as a super user (root) to install the printer software. If you are not a super user, ask your system administrator.3Insert the printer software CD-ROM. The CD-ROM will automatically run.If the CD-ROM does not automatically run, click the icon at the bottom of the desktop. When the Terminal screen appears, type in:If the CD-ROM is secondary master and the location to mount is /mnt/cdrom,[root@localhost root]#mount -t iso9660 /dev/hdc /mnt/cdrom[root@localhost root]#cd /mnt/cdrom/Linux[root@localhost root]#./install.sh If you still failed to run the CD-ROM, type the followings in sequence:[root@localhost root]#umount/dev/hdc[root@localhost root]#mount -t iso9660 /dev/hdc /mnt/cdromNOTE: The installation program runs automatically if you have an autorun software package installed and configured.](https://usermanual.wiki/Samsung-Electronics-Co/P3300MFP/User-Guide-957465-Page-133.png)
![Using Your Printer in Linux304When the welcome screen appears, click Next.5When the installation is complete, click Finish.The installation program has added the Unified Driver Configurator desktop icon and Xerox Unified Driver group to the system menu for your convenience. If you have any difficulties, consult the onscreen help that is available through your system menu or can otherwise be called from the driver package windows applications, such as Unified Driver Configurator or Image Manager.NOTE: Installing the driver in the text mode:• If you do not use the graphical interface or have failed the driver installation, you have to use the driver in the text mode.• Follow the step 1 to 3, then type [root@localhost Linux]# ./install.sh, than follow the instruction on the terminal screen. Then the installation completes.• When you wan to uninstall the driver, follow the installation instruction above, but type [root@localhost Linux]# ./uninstall.sh on the terminal screen.Uninstalling the Unified Linux Driver1When the Administrator Login window appears, type in root in the Login field and enter the system password.NOTE: You must log in as a super user (root) to install the printer software. If you are not a super user, ask your system administrator.2Insert the printer software CD-ROM. The CD-ROM will automatically run.If the CD-ROM does not automatically run, click the icon at the bottom of the desktop. When the Terminal screen appears, type in:If the CD-ROM is secondary master and the location to mount is /mnt/cdrom,[root@localhost root]#mount -t iso9660 /dev/hdc /mnt/cdrom[root@localhost root]#cd /mnt/cdrom/Linux[root@localhost root]#./uninstall.sh NOTE: The installation program runs automatically if you have an autorun software package installed and configured.3Click Uninstall.4Click Next.5Click Finish.](https://usermanual.wiki/Samsung-Electronics-Co/P3300MFP/User-Guide-957465-Page-134.png)