Samsung Electronics Co PRSE0609 RFID Multifunction Printer User Manual SCX6345N EN
Samsung Electronics Co Ltd RFID Multifunction Printer SCX6345N EN
UserManual.wiki
>
Samsung Electronics Co
>
PRSE0609 User Manual
>
Users Manual 1
Contents
1.
Users Manual 1
2.
Users Manual 2
Users Manual 1
Navigation menu
Upload a User Manual
Namespaces
Wiki Guide
HTML
PDF
Info
Views
User Manual
Discussion / Help
Navigation

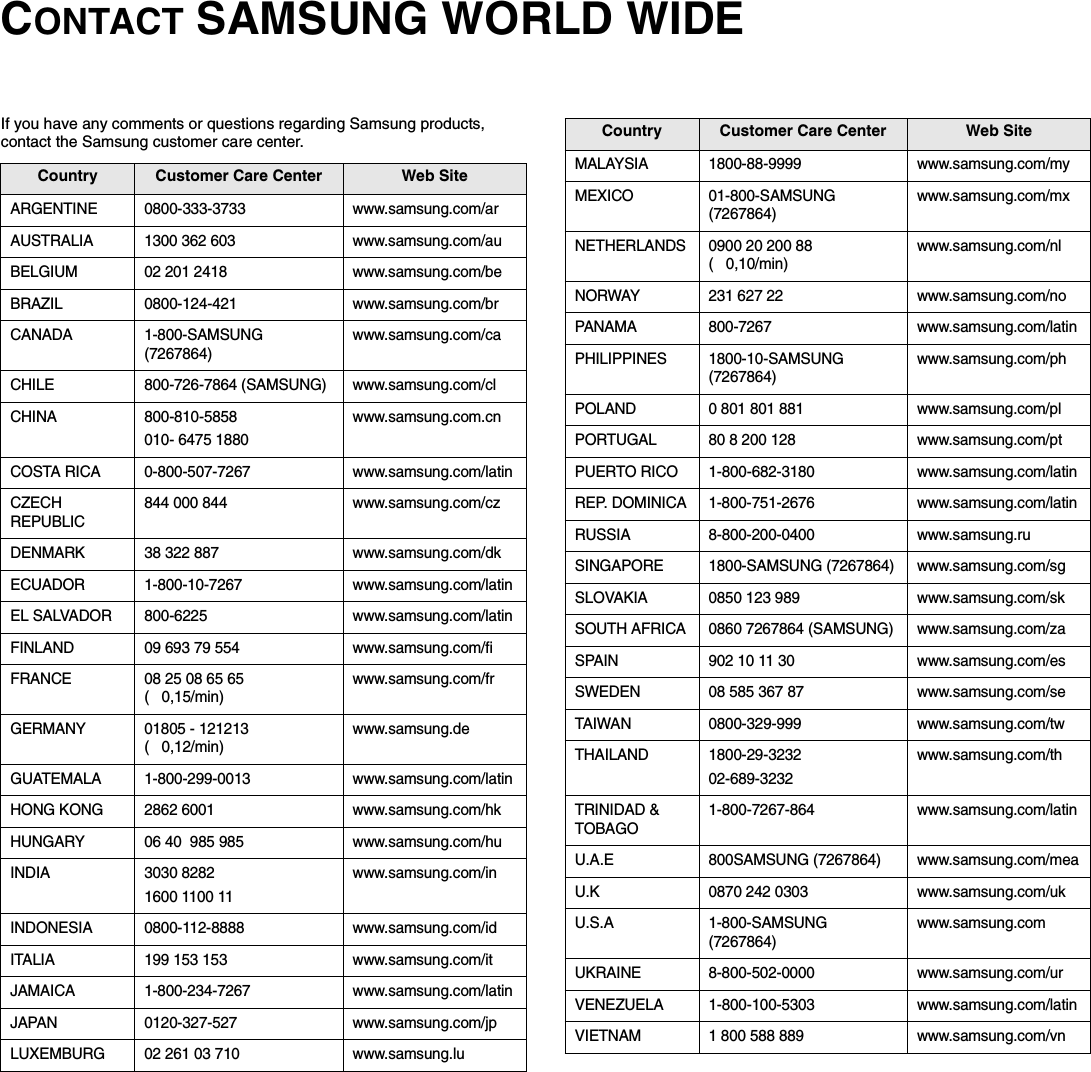

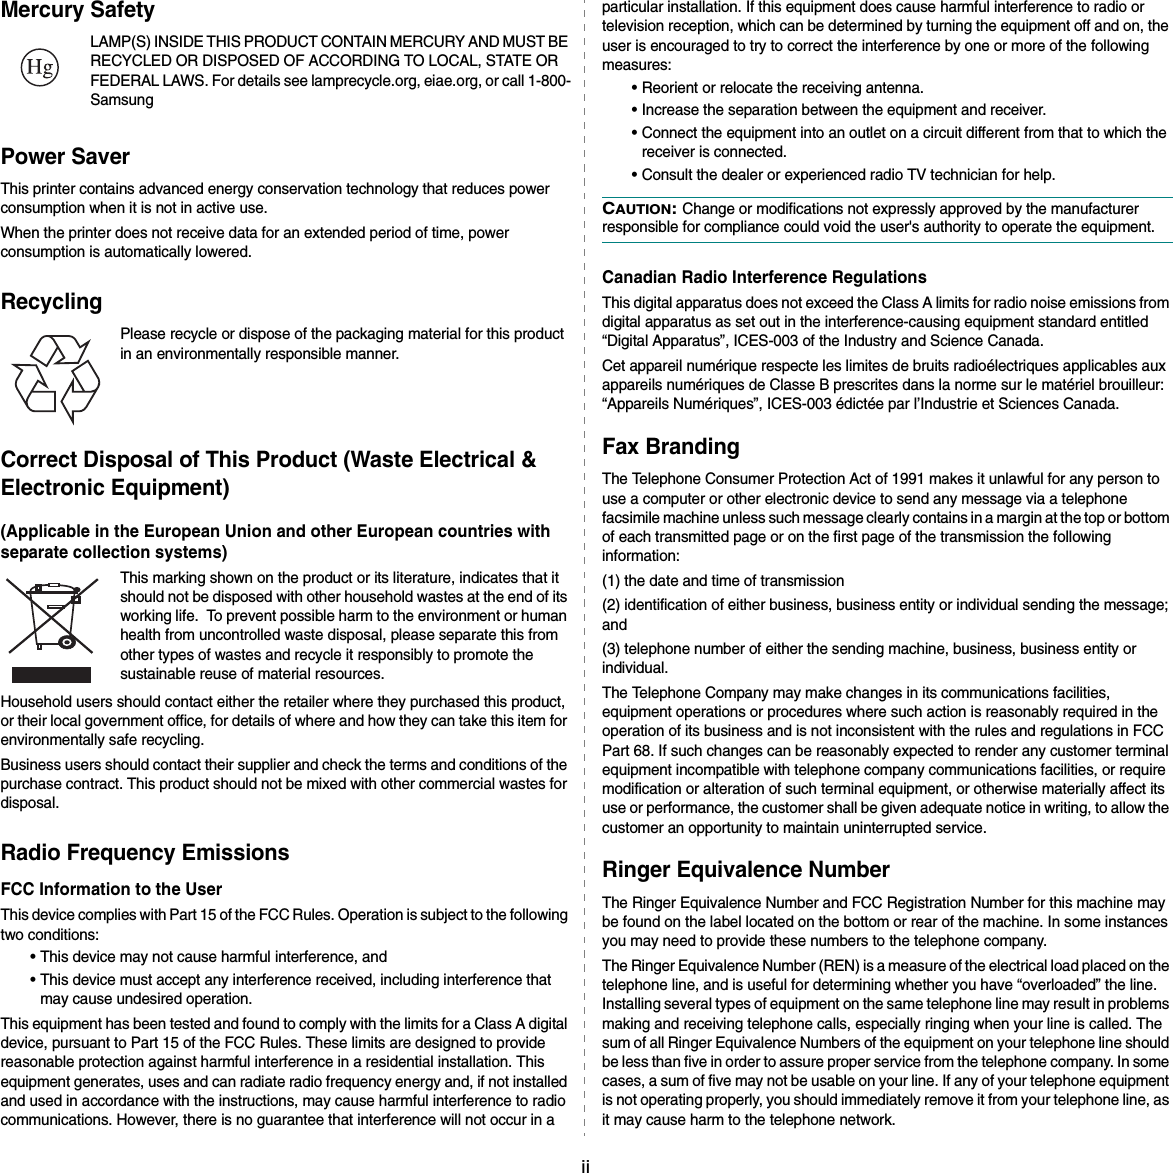
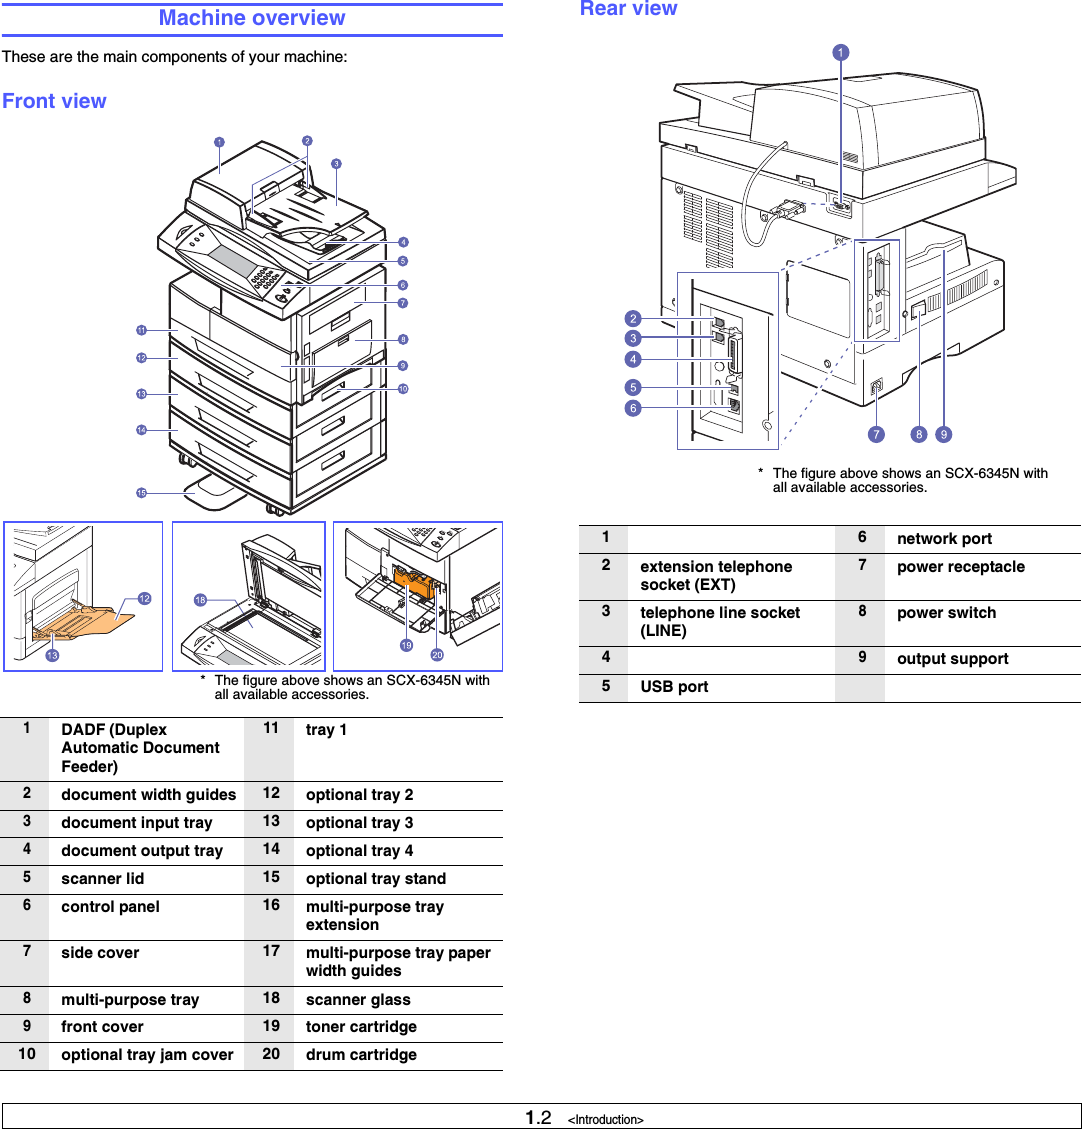
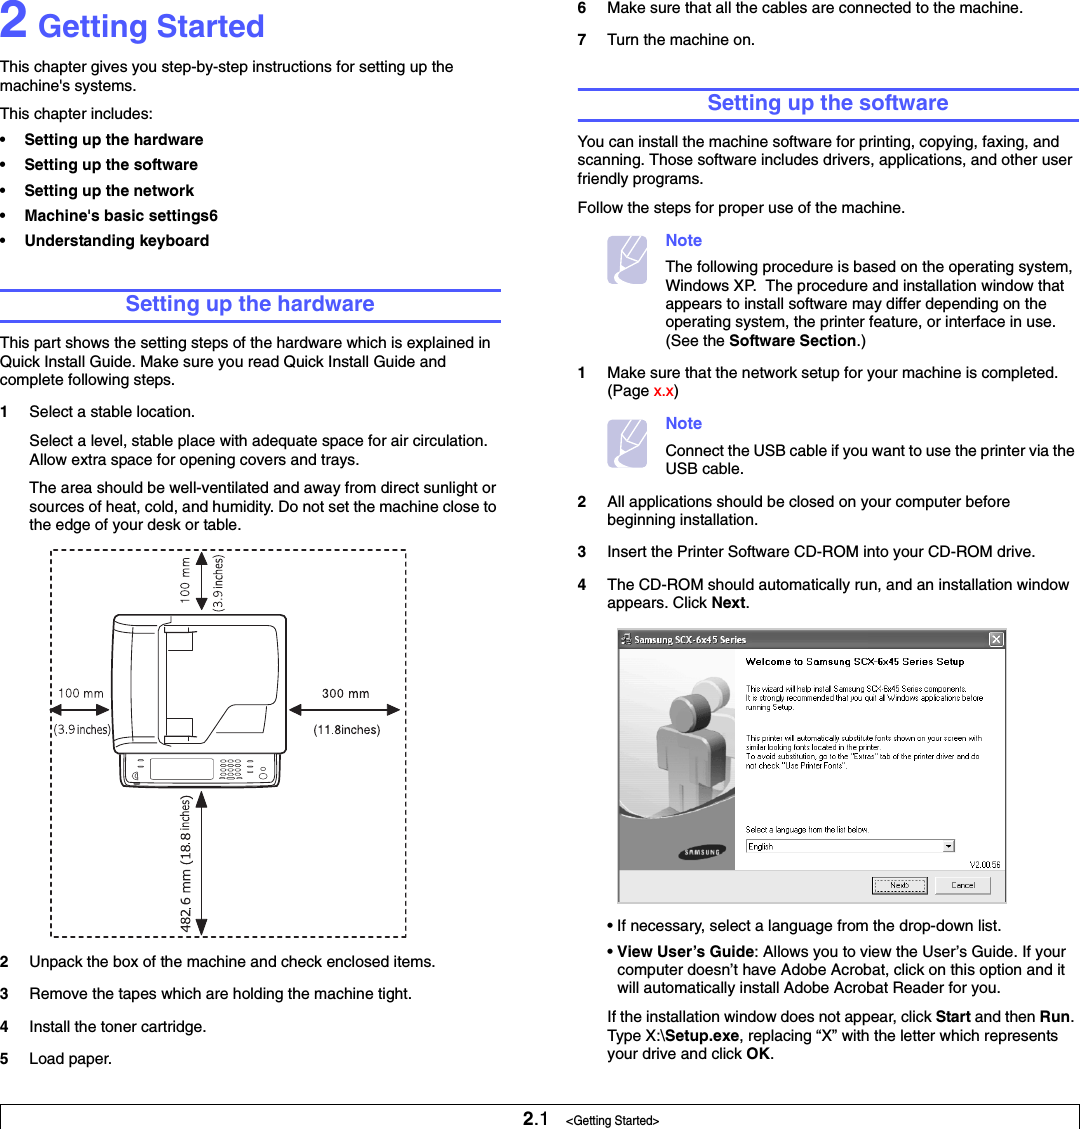
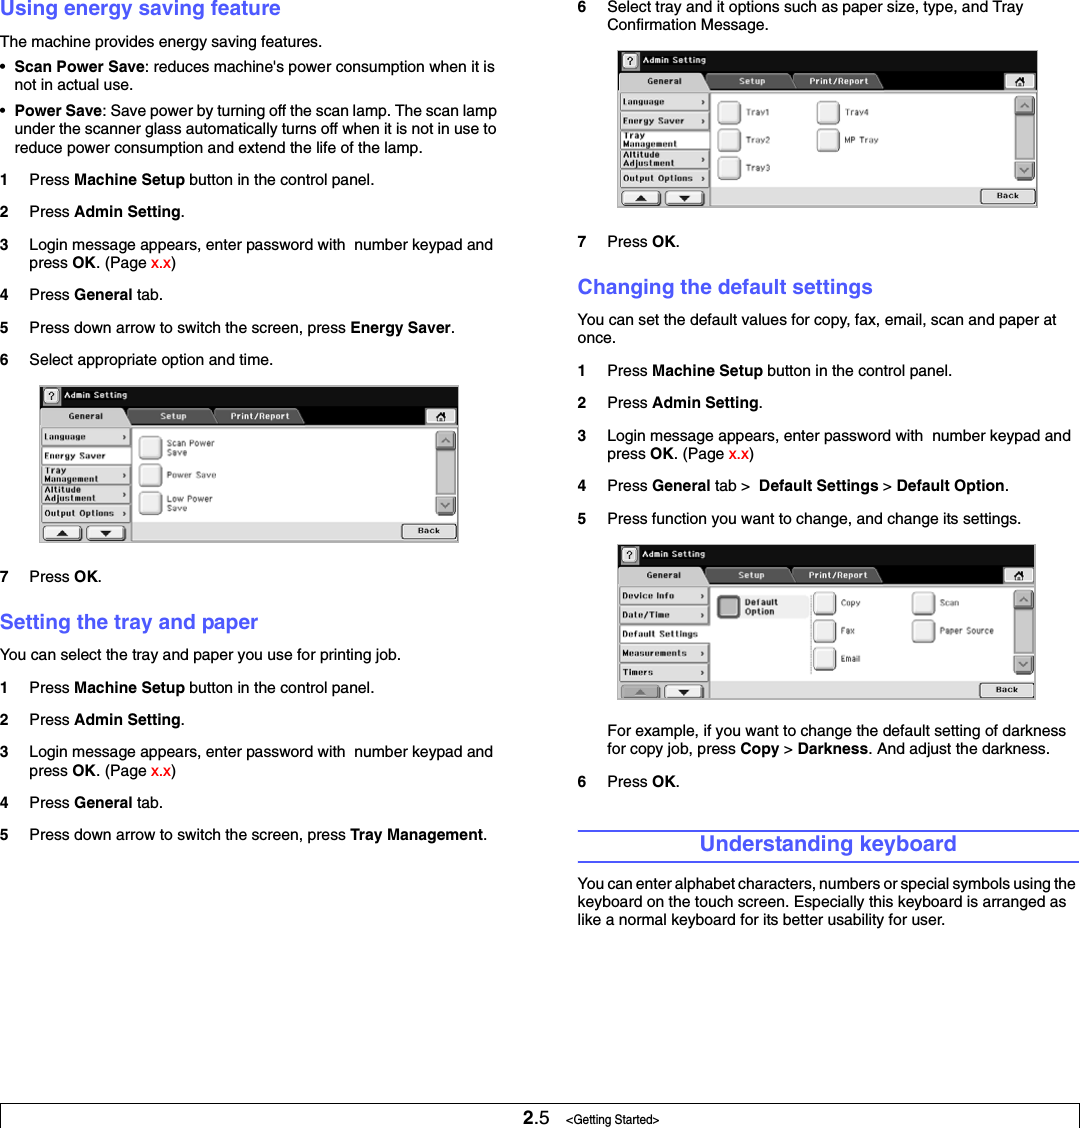
![1.1 <Introduction>1 IntroductionThank you for purchasing this Samsung multifunctional product. Your machine provides printing, copying, scanning, and faxing functions.This chapter includes:• Special features• Machine overview• Control panel overviewNoteYour machine does not support some of these features, please check the specifications (Page 13.1)Special featuresYour new machine is equipped with special features that improve print quality. You can:Print with excellent quality and speed• You can print with a resolution of up to 1200 dpi [Best].See the Software Section.• Your machine prints A4-sized paper at up to 45 ppmaand letter-sized paper at up to 43 ppm.• For duplex printing, your machine prints A4-sized paper at up to 42 ipmb and letter-sized paper at up to 43 ipm.Handle paper flexibly•The multi-purpose tray supports letterhead, envelopes, labels, transparencies, custom-sized media, postcards, and heavy paper. The multi-purpose tray holds up to 100 sheets of plain paper.•The 550-sheet tray 1 and 550-sheet optional tray 2support plain paper in various sizes. Create professional documents•Print Watermarks. You can customize your documents with words, such as “Confidential”. See the Software Section.•Print Posters. The text and pictures of each page of your document are magnified and printed across the sheet of paper and can then be taped together to form a poster. See the Software Section.Save time and money • You can print multiple pages on one single sheet of paper to save paper.• You can use preprinted forms and letterhead with plain paper. See the Software Section.• This machine automatically conserves electricity by substantially reducing power consumption when not in use.Expand your machine’s capacity* Zoran IPS Emulation compatible with PostScript 3 • © Copyright 1995-2005, Zoran Corporation. All rights reserved. Zoran, the Zoran logo, IPS/PS3, and OneImage are trademarks of Zoran Corporation.* 136 PS3 fontsContains UFST and MicroType from Monotype Imaging Inc.Print in various environmentsCopy originals in several formsScan originals and send it right away Reserving the time to transmit a Fax • Your printer has 128 MB of memory which can be expanded to 512 MB. Page 12.1.•A Network interface enables network printing. Your machine is come with a built-in network interface, 10/100 Base TX.• Zoran IPS Emulation* compatible with PostScript 3 Emulation* (PS) enables PS printing. • You can print with Windows 98/Me/NT 4.0/2000/XP/2003 as well as Linux systems and Macintoshsystems.• Your machine come with USB interface and a network interface.• Producing a sequential 2-sided document allows you to create a booklet. • At the same time, the quality and the size of output image can be adjusted and enhanced.• Erase punch holes or staple marks of originals, and containing color in the background like a newspaper.• By Email, SMB, FTP, or network scanning program, you can send the scanned file to several destinations. • The keyboard on the touch screen of the machine’s control panel makes you to simply type the email address to send it immediately.• You can scan originals in color mode and save them in JPEG, JIF format which has more precise compression format for color bitmaps.• You can specify the certain time to transmit the fax and also send the fax to several stored destinations. • After the transmission, the machine may print out the fax reports according to the setting.a. pages per minuteb. images per minute](https://usermanual.wiki/Samsung-Electronics-Co/PRSE0609.Users-Manual-1/User-Guide-700394-Page-11.png)
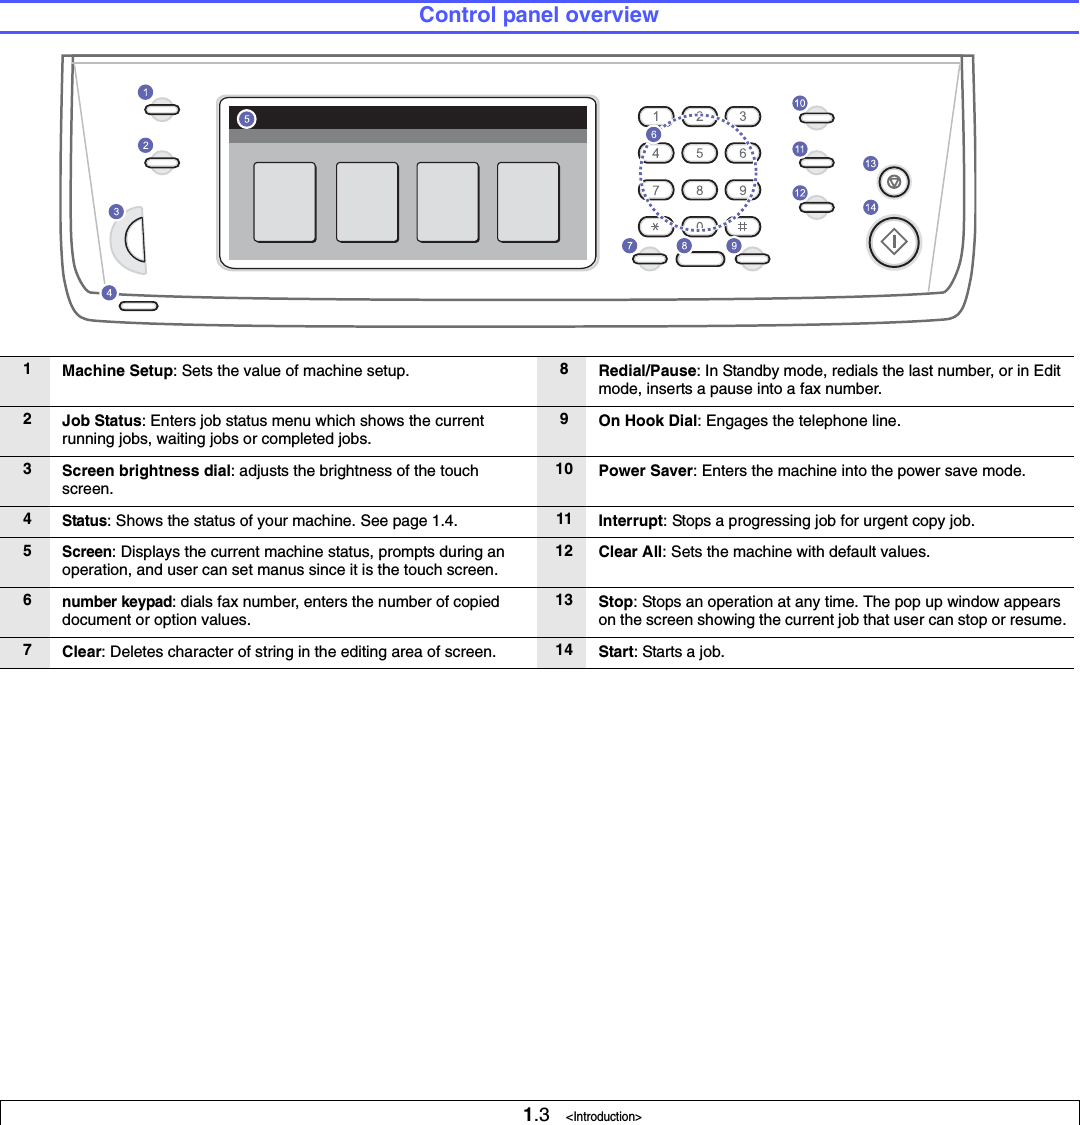
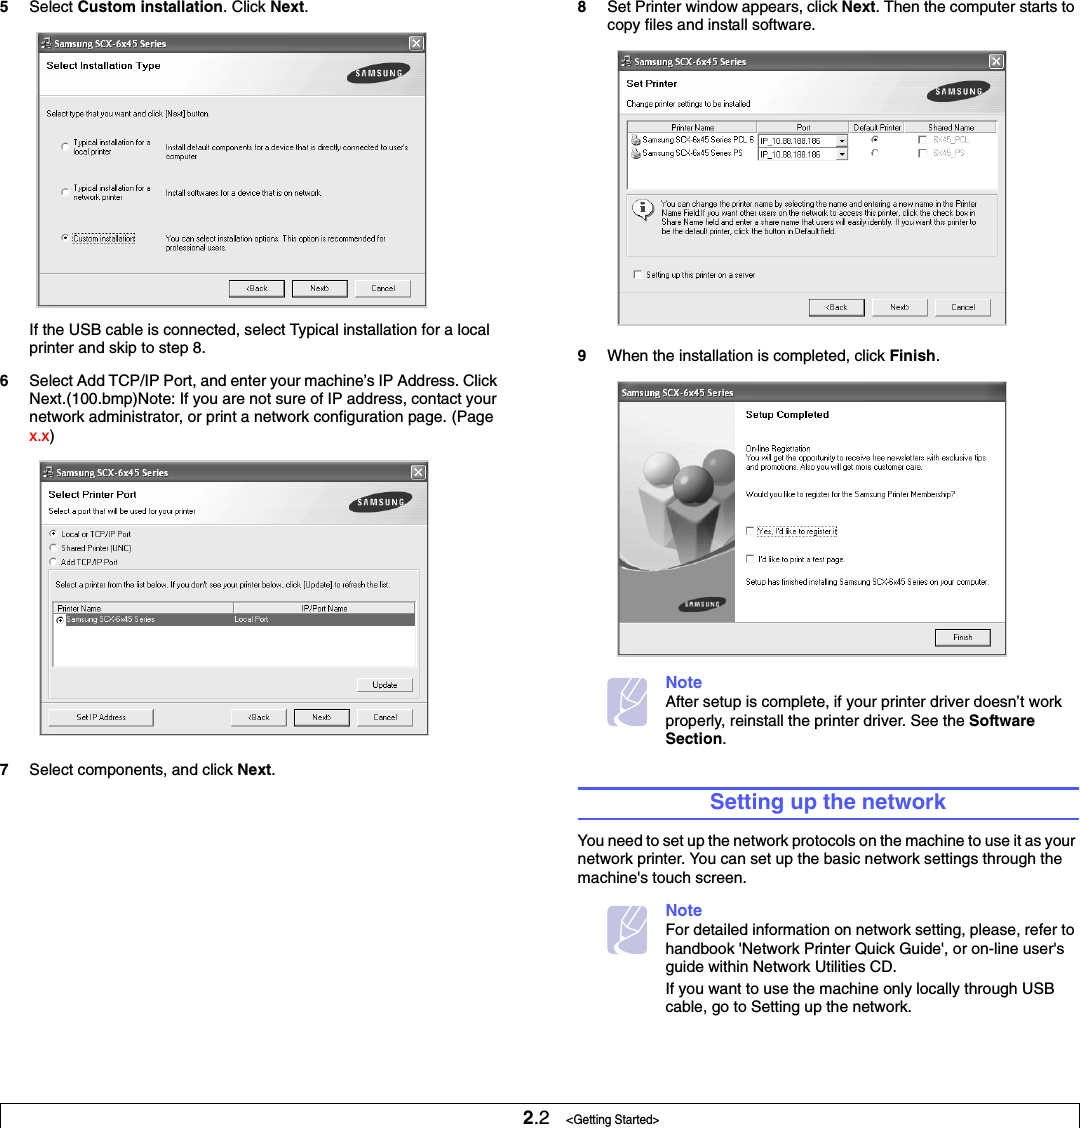
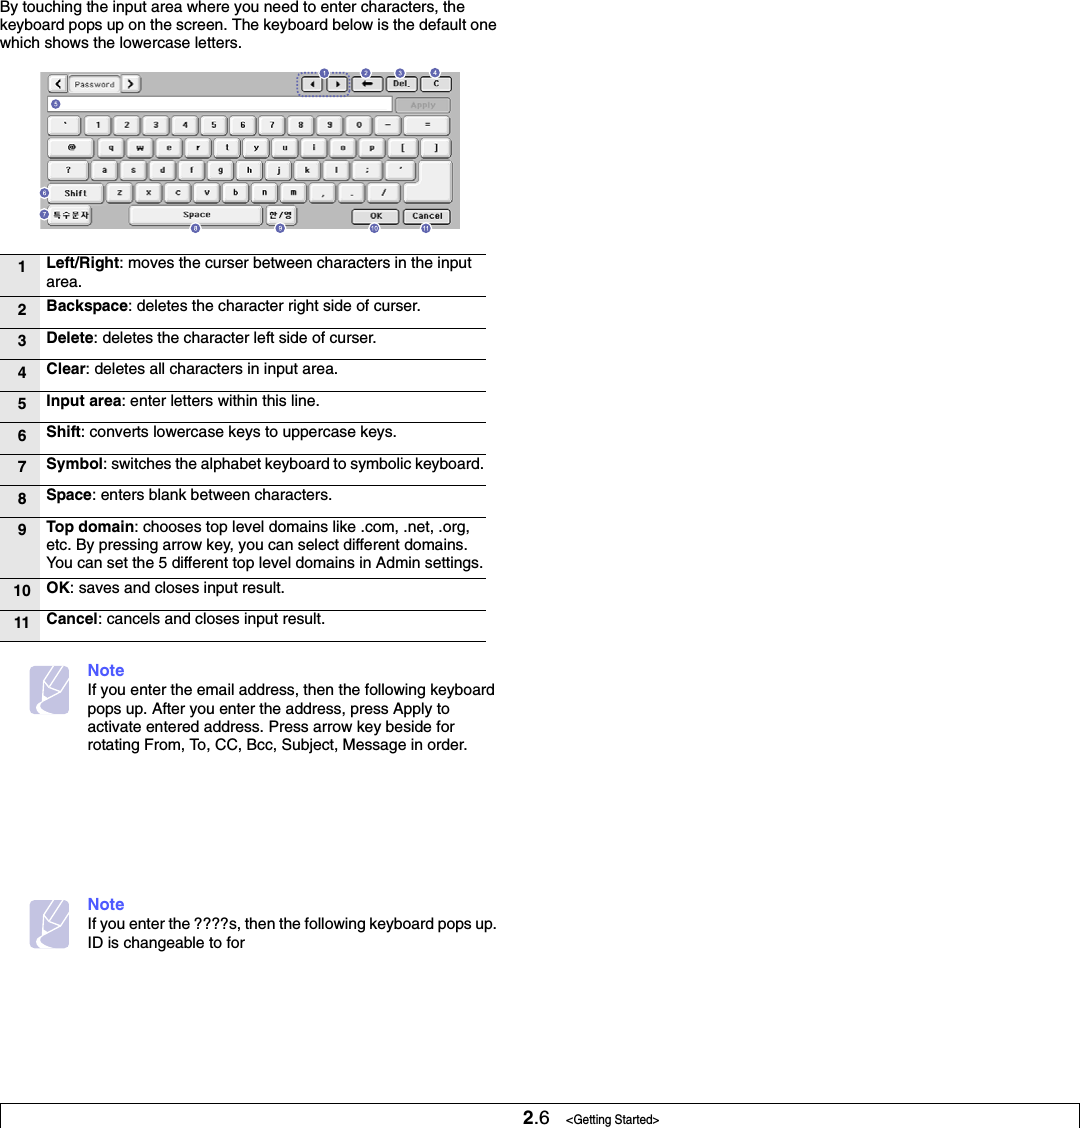


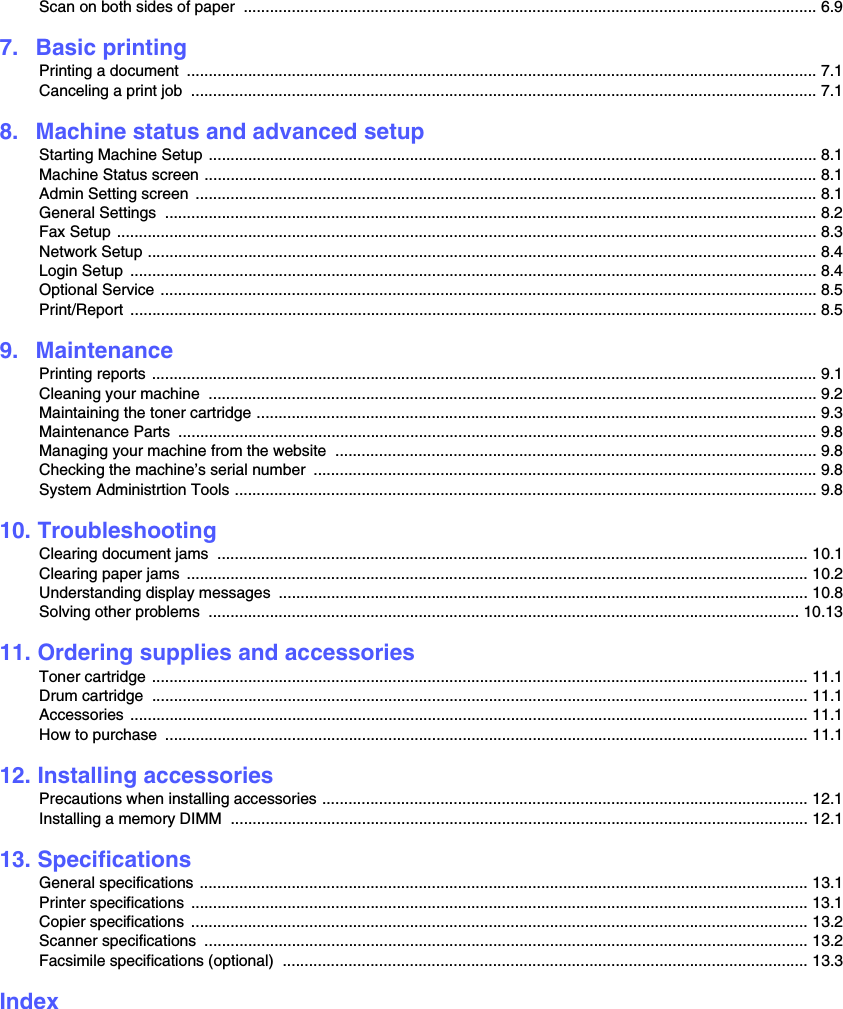
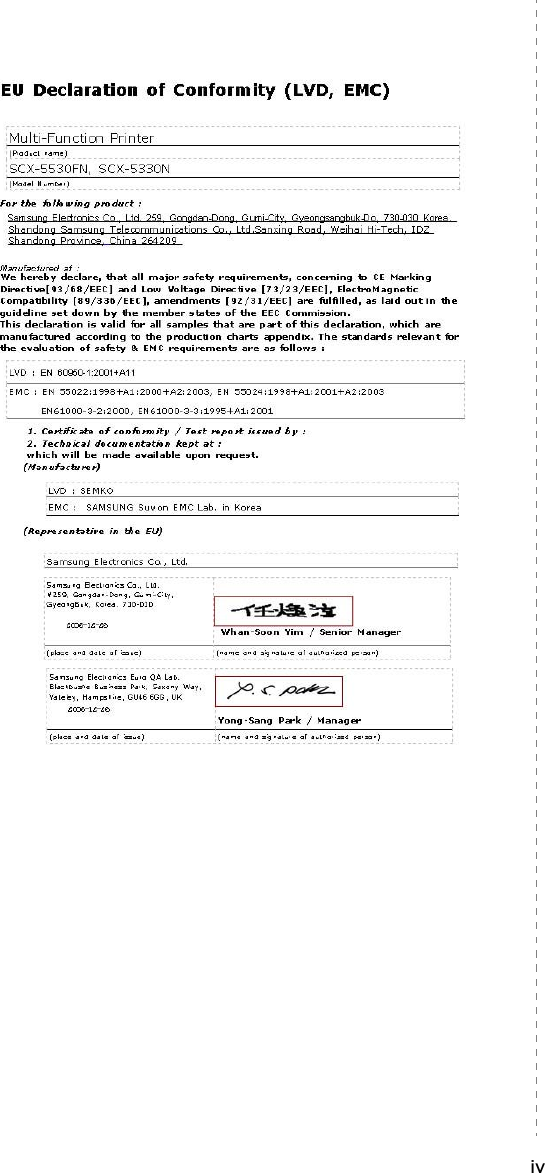
![10.1 <Troubleshooting>10 TroubleshootingThis chapter gives helpful information for what to do if you encounter an error.This chapter includes:• Clearing document jams• Clearing paper jams• Understanding display messages• Solving other problemsClearing document jamsWhen an original jams while passing through the DADF, [Document Jam] appears on the display.1Remove any remaining pages from the DADF.2Open the DADF cover.3Pull the jammed paper gently out of the DADF.NoteIf you do not see the paper in this area, refer to Roller misfeed. See page 10.2.4Close the DADF cover. Then load the removed pages, if any, back into the DADF.NoteTo prevent document jams, use the scanner glass for thick, thin, or mixed paper-type originals.](https://usermanual.wiki/Samsung-Electronics-Co/PRSE0609.Users-Manual-1/User-Guide-700394-Page-70.png)