Samsung Electronics Co PS10PS Photo Player with Bluetooth User Manual 2
Samsung Electronics Co Ltd Photo Player with Bluetooth Users Manual 2
Contents
- 1. Users Manual 1
- 2. Users Manual 2
- 3. Users Manual 3
Users Manual 2

Play multimedia
24
From the Main menu screen, select a memory location
1
(
Frame Memory
,
SD Card
, or
USB
).
Scroll to
2
Videos
and touch
e
.
Scroll to a file and touch
3
e
to play a video.
Control playback using the following buttons:
4
Touch button Description
h
Access the Main menu
m
Access the video menu
d
/
u
Adjust the volume
l
/
r
Skip backward or forward; Scan backward or forward in a
file (touch and hold)
e
Pause or resume the playback
b
Return to the previous level
If the frame is not in use for some time while pausing a video, the
screensaver will appear. To return to the video player screen, touch
any button except for
p
.
Play videos
Pause Volume Prev/Next
Optimal video resolution or codec
Video
Bit rate 1000 ~ 1500 Kbps
Resolution 800P• : 640 X 384
1000P• : 640 X 375
Audio
AVI MP3, 48 KHz (sampling
rate), 2 channel, 128 Kbps
MP4
mp4a (AAC-LC), 48 KHz
(sampling rate), 2 channel,
128 Kbps

Play multimedia
25
Use video menus
Touch
1
m
during playback.
Scroll to one of the following options and touch
2
e
.
Option Description
Play Mode
All videos• : Play all videos in the order of file names
Videos in folder• : Play all videos in the selected folder in
the order of file names
One video• : Repeat the selected video
Play Order Normal• : Play videos in the order of file names
Shuffle• : Play videos in a random order
Repeat Set to play repeatedly
Settings Access the Settings menu
When you are finished, touch
3
b
.
When you touch •
b
in the Settings menu, the Main menu
appears. To play the video, refer to steps 1~3 in “Play videos.”
Play videos (continued)
Play Mode
Play Order
Repeat
Settings
: All videos
: Normal
: On

Play multimedia
26
From the Main menu screen, select a memory location
1
(
Frame Memory
,
SD Card
, or
USB
).
Scroll to
2
Music
and touch
e
.
Scroll to a file and touch
3
e
to play music.
Control playback using the following buttons:
4
Touch button Description
h
Access the Main menu
m
Access the music menu
d
/
u
Adjust the volume
l
/
r
Skip backward or forward; Scan backward or forward in a
file (touch and hold)
e
Pause or resume the playback
b
Return to the previous level
If the frame is not in use for some time while not playing music, the
screensaver will appear. To return to the music player screen, touch any
button except for
p
.
Play music
Pause Volume Prev/Next

Play multimedia
27
Use music menus
Touch
1
m
during playback.
Scroll to one of the following options and touch
2
e
.
Option Description
Play Mode
All music• : Play all music files in the order of file names
Music in folder• : Play all music files in the selected folder
in the order of file names
One music• : Repeat the selected music file
Repeat Set to play repeatedly
Play Order Normal• : Play music files in the order of file names
Shuffle• : Play music files in a random order
Settings Access the Settings menu
When you are finished, touch
3
b
.
When you touch •
b
in the Settings menu, the Main menu
appears. To play the music, refer to steps 1~3 in “Play music.”
Play music (continued)
Play Mode
Repeat
Play Order
Settings
: All music
: On
: Normal
Pause Volume Prev/Next

28
From the Main menu screen, select a memory location
1
(
Frame Memory
,
SD Card
, or
USB
).
Scroll to
2
Photos
,
Videos
, or
Music
and touch
e
.
Touch
3
d
,
u
,
l
, or
r
to browse files.
To view files in a folder, scroll to the folder and touch •
e
.
If the frame is not in use for some time, the screensaver will appear.
Touch
b
to access the currently used screen.
Browse and manage multimedia
Browse les
Access the Photos, Videos, or Music menus and browse files.
Memory location/
Folder name/File name
Current file number/
total number of files
Photos
Frame Memory • 2009 • Music
Music
Title Artist
Frame Memory • 2009 • IMG1

Browse and manage multimedia
29
While browsing files, touch
1
m
.
Scroll to one of the following options and touch
2
e
.
Option Description
Copy Copy the selected folder or file to another memory
location (p. 30)
Delete Delete the selected folder or file (p. 31)
Select Multiple
Files
Select multiple files to view as a slideshow, copy, or
delete
Select Storage
Device Change the memory location (p. 15)
Settings Access the Settings menu (p. 36)
Manage les
Copy or delete files stored in internal memory or external memory devices.
Copy
Delete
Select Multiple Files
Select Storage Device
Settings
Photo Size
File Size
Date
Photos

Browse and manage multimedia
30
Copy files
Connect an external memory device (SD memory card or USB
memory device) to the frame and copy files from the external memory
device to the frame or vice versa.
From the Main menu screen, select a memory location
1
(
Frame Memory
,
SD Card
, or
USB
).
Scroll to
2
Photos
,
Videos
, or
Music
and touch
e
.
Scroll to the file you want to copy and touch
3
m
.
To copy all files in the selected folder, select the folder.•
Scroll to
4
Copy
and touch
e
.
To copy multiple files, select • Select Multiple Files.
Select a destination for the files.
5
The selected files will be copied.•
Manage les (continued)
Photos copied to the frame will be automatically •
resized to be optimal for the screen. To copy the
photos in their original sizes, from the Main menu
screen, select Settings → General → Frame
Memory Copy → Original Size (p. 39).
The resized photos will have lower resolution •
compared to the original photos, but with smaller
file sizes, you can store more photos.
Copy
Choose a device to copy a photo to.
SD Card
USB
Photos

Browse and manage multimedia
31
Delete files
From the Main menu screen, select a memory location
1
(
Frame Memory
,
SD Card
, or
USB
).
Scroll to
2
Photos
,
Videos
, or
Music
and touch
e
.
Scroll to the file you want to delete and touch
3
m
.
To delete all files in the selected folder, select the folder.•
Scroll to
4
Delete
and touch
e
.
To delete multiple files, select • Select Multiple Files.
Select
5
Yes
to confirm.
The selected file will be deleted.•
Manage les (continued)
Delete
Do you want to delete the
photo?
Yes No
Photos
32
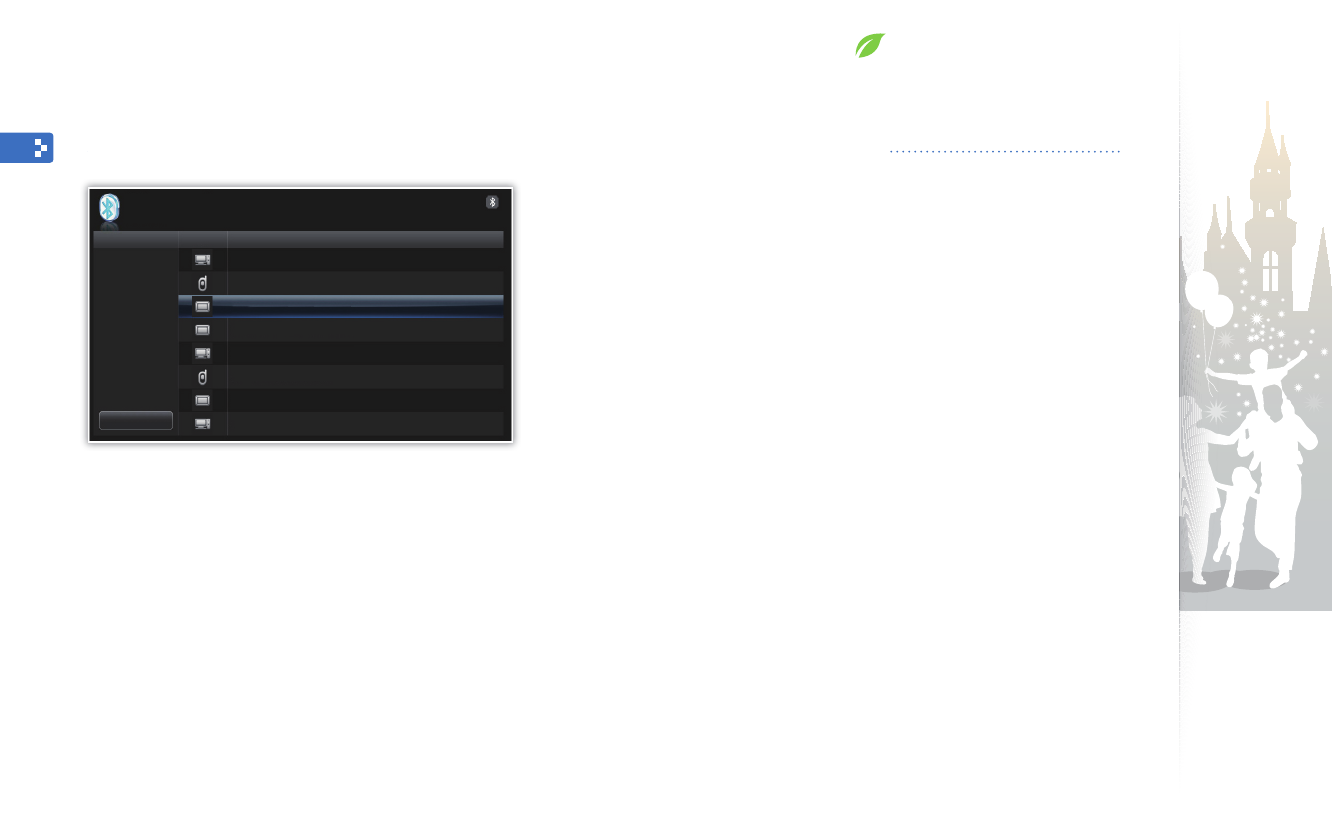
From the Main menu screen, scroll to
1
Bluetooth
and touch
e
.
The Bluetooth wireless feature turns on by default. •
To turn off the Bluetooth wireless feature, from the Main menu •
screen, select Settings → Bluetooth → Bluetooth Mode →
Off.
Select
2
Search
to find other Bluetooth-enabled devices.
Scroll to a device and touch
3
e
.
When the owner of the other device enters the same PIN or •
accepts the connection, pairing is complete.
The frame’s default PIN is 0000.
To end the Bluetooth connection, move to any other screens and •
the connection will terminate automatically.
To end the Bluetooth connection when connected to A2DP •
devcies, such as headsets, scroll to the connected device and
touch
e
.
Use the Bluetooth wireless feature
Connect to other wireless devices for exchanging data.
Find and pair with other Bluetooth-enabled devices
Bluetooth
Type Device Name
Search
Com 01 (000F:CC:AC842)
Phone 01 (0015:00:158E2)
Bluetooth (001F:60:15842)
Bluetooth 000F:00:15CG4D)
Com 02 (000F:B9:153264)
Phone 02 (001F:00:354832)
CSR (0010:00:1S5D42)
Com 03 (000F:00:038317)

Use the Bluetooth wireless feature
33
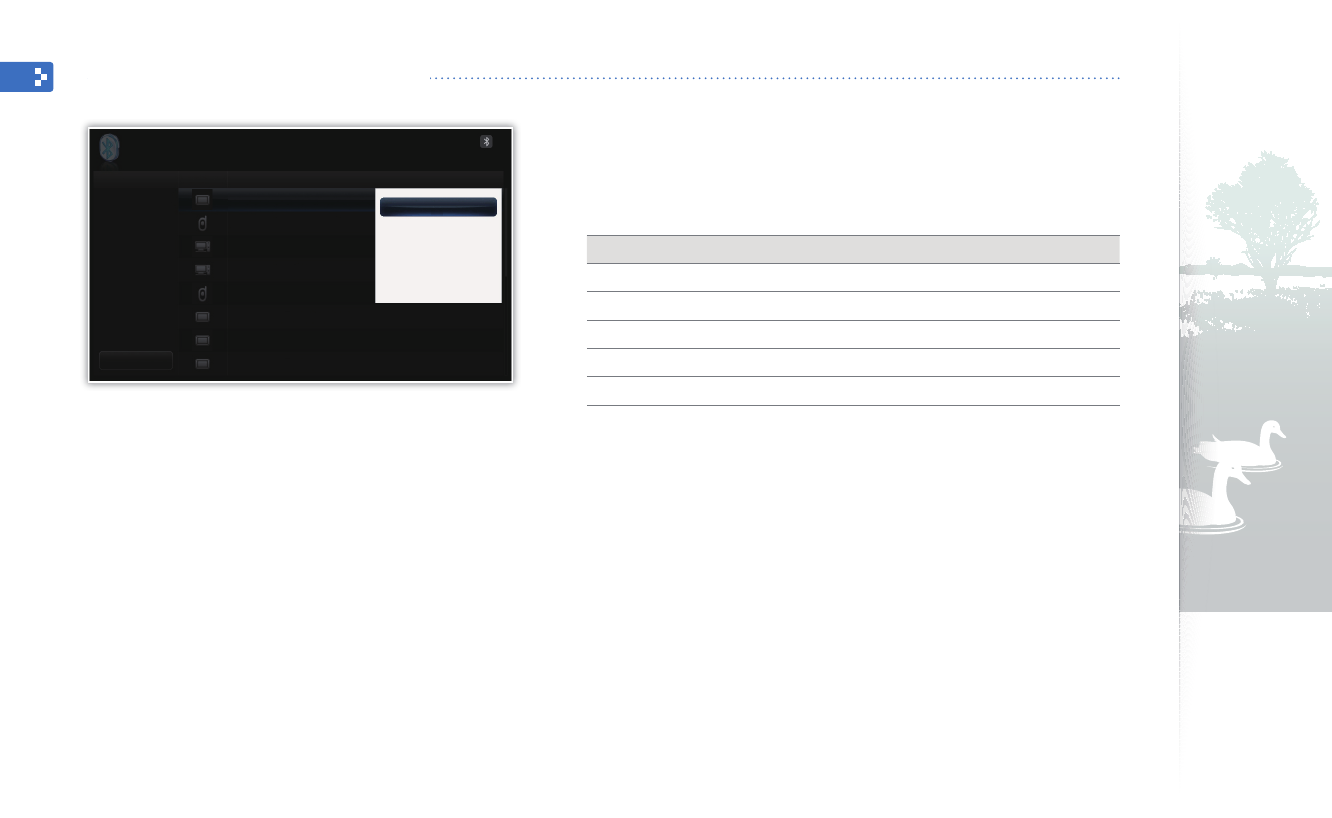
In the device list, scroll to one of the paired devices and
1
touch
m
.
Scroll to
2
Photo List
and touch
e
.
The photo list of the connected device will display.•
Photo List is deactivated when you connect to a headset or
speaker.
Select the files you want to copy and select
3
Copy
.
The selected files will be copied to the frame’s memory.•
Receiving files is available in any screens except for the Bluetooth
screen.
Get data using the Bluetooth wireless feature
Copy
Select BACK Select All
Reset
[xx] photos selected.
Copy : Copy to selected photos to Frame Memory.
Reset : Cancel all selections.
Bluetooth
File Name
All
Upper Folder
Folder(12)
Sky.jpg
Hi.jpg
Hello.jpg
Use the Bluetooth wireless feature
34
In the device list, scroll to one of the paired devices and
1
touch
m
.
Scroll to one of the following menus and touch
2
e
.
Menu Description
Photo List* Access the photo list of the paired device (p. 33)
Rename Rename the paired device
Delete Delete one of the paired devices
Delete All Delete all of the paired devices
Settings Access the Settings menu (p. 40)
* Photo List is deactivated when you select a device that is not connected to the
frame.
Use Bluetooth menus
Photo List
Rename
Delete
Delete All
Settings
Bluetooth
Device Name
Search
Com 01 (000F:CC:AC842)
Phone 01 (0015:00:158E2)
Bluetooth (001F:60:15842)
Bluetooth 000F:00:15CG4D)
Com 02 (000F:B9:153264)
Phone 02 (001F:00:354832)
CSR (0010:00:1S5D42)
Com 03 (000F:00:038317)

Use the Bluetooth wireless feature
35
The Bluetooth wireless feature can transmit data to a maximum of 10 meters (30 feet). This distance may be reduced •
by obstacles, such as walls or people, or other devices that use or produce radio waves, such as WLAN devices or
other mobile phones on the 2.4GHz band. Obstacles or other wireless devices can interfere with the Bluetooth wireless
connection and reduce the effective range.
The frame’s wireless antenna is located in front of • p. For best results, ensure that you are within the maximum
distance for a Bluetooth connection and that there are no obstacles between the devices. Interference from other
devices may cause the frame to emit unusual noises or function improperly.
The Bluetooth wireless feature may cause interference with medical devices. Do not use the frame or other Bluetooth-•
enabled devices in hospitals, airplanes, and trains or near automatic doors, alarms, or flammable gases.
Your frame supports security settings for safe connections with other Bluetooth-enabled devices. However, you should •
always take precautions to secure your data when connecting to other Bluetooth-enabled devices. Samsung is not
responsible for any loss of private information over a Bluetooth wireless connection.
The Bluetooth wireless feature in your frame may not be compatible with all Bluetooth-enabled devices. For best •
results, pair and connect your frame only with devices certified by the Bluetooth SIG and ensure that the Bluetooth
profiles of the devices are compatible. Even when a device is certified by the Bluetooth SIG, some incompatibilities may
occur and some features or functions may be unavailable.
When playing music over a Bluetooth wireless connection, you may experience interference from other devices, •
temporary interruptions in your music, or limited functionality of your frame, depending on wireless devices present in
the area or the physical environment.
Information for using Bluetooth

36
From the Main menu screen, scroll to
1
Settings
and touch
e
.
Scroll to
2
Photos
and touch
e
.
Select and adjust slideshow effects (p.
3 22).
From the Main menu screen, scroll to
1
Settings
and touch
e
.
Scroll to
2
Clock
and touch
e
.
Set the time and date and customize the clock settings
3
(p. 13).
Customize settings
Define frame settings according to your preferences.
Adjust slideshow eects
Set the time and date
Option
Slideshow Transition
Slideshow Speed
Slideshow Mode
Slideshow Order
View Mode
Aspect Ratio
Display Photo Info
: Fade
: Fast
: All photos
: Normal
: Photo Only
: Auto Fit
: On
Settings
Category
Photos
Clock
Alarm
General24 Hours
Bluetooth
Support
Option
Clock Set
Date Format
Time Format
Clock Type
: DD.MM.YYYY
: 24 Hours
: Clock & Calendar
Settings
Category
Photos
Clock
Alarm
General
Bluetooth
Support

Customize settings
37
Set a new alarm
From the Main menu screen, scroll to
1
Settings
and touch
e
.
Scroll to
2
Alarm
and touch
e
.
Scroll to an empty alarm and touch
3
e
.
Touch
4
d
,
u
,
l
, or
r
to set alarm details.
OK Cancel
Activation
On
AM/PM
AM
Set time
Manual
Repeat
Once
Hour
12
Sound
Sound 1
Minute
00
Volume
70
When you are finished, select
5
OK
.
• will appear at the top right corner of the screen.
You can only have an alarm for a specified time. Duplicate alarms will
be ignored.
Set and use alarms
Set and control alarms for important events.
Category
Photos
Clock
Alarm
General
Bluetooth
Support
Option
Alarm1
Alarm2
Alarm3
Alarm4
Alarm5
: Off
: Off
: Off
: Off
: Off
Settings
Customize settings
38
Stop an alarm
When the alarm sounds, touch any button except for p to stop the
alarm. If you do not stop the alarm, it will sound for 1 minute.
Deactivate an alarm
From the Main menu screen, scroll to
1
Settings
and touch
e
.
Scroll to
2
Alarm
and touch
e
.
Scroll to the alarm you want to deactivated and touch
3
e
.
Scroll to
4
Off
and select
OK
.
Set and use alarms (continued)
Alarm1
Current
PM
PM
PM
Settings
Category
Photos
Clock
Alarm
General
Bluetooth
Support
Option
Alarm1
OK
Alarm