Samsung Electronics Co S200 Web Pad User Manual Ver 4 iZZi CE
Samsung Electronics Co Ltd Web Pad Ver 4 iZZi CE
User Manual

1
Part I. System User’s Guide
Ver 4 - iZZi+CE.fm Page 1 Monday, November 13, 2000 11:58 AM
2 User’s Guide
Using Your Documentation
Congratulations on your purchase of the IZZI web with Microsoft
Windows CE operating system.
Documentation Conventions
Information Icons
Three icons and their associated messages appear in this manual:
A note informs you of special circumstances.
A caution warns you of possible damage to equipment or
data.
A warning indicates the possibility of personal injury.
Keyboard Conventions
Keys that you need to press to perform certain functions are shown in the
manual enclosed in angle brackets. For example,
<Ctrl>
indicates the control key (Ctrl on the keyboard).
If you need to press two keys at the same time, the key names are shown
joined by a plus sign. For example,
<Alt+Pg Up>
means that you should press the Alt key and hold it and then press the
Pg Up key.
Ver 4 - iZZi+CE.fm Page 2 Monday, November 13, 2000 11:58 AM
Introducing theIZZI web3
Introducing the IZZI web
The IZZI web is a lightweight handheld appliance that includes features
to meet your computing needs at home, business or on the road.
Item check list:
–IZZIweb
– AC adapter (IZZI web & Access Point)
– Power cord
– Docking Station
– Access Point
– User’s Guide
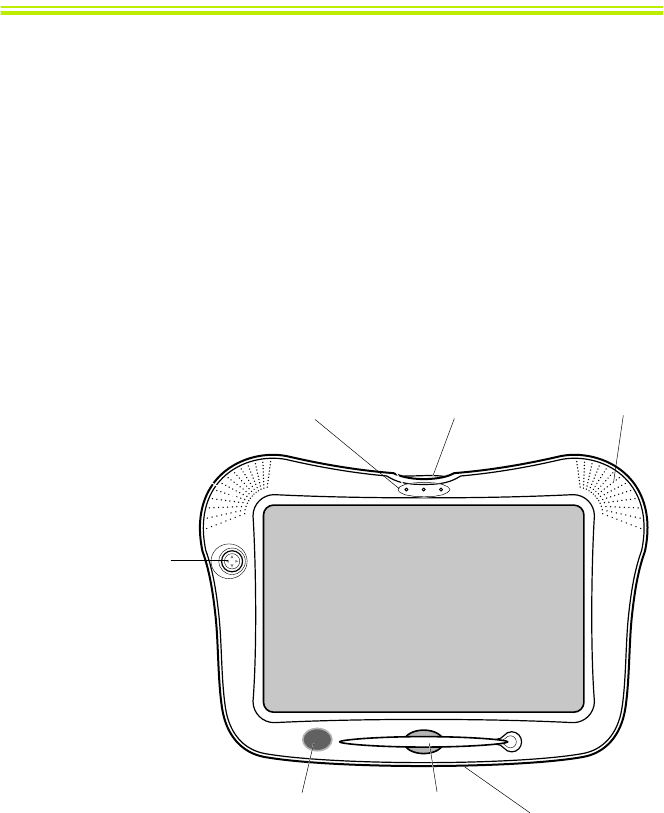
Figures 1 and 2 show you the features of the IZZI web.
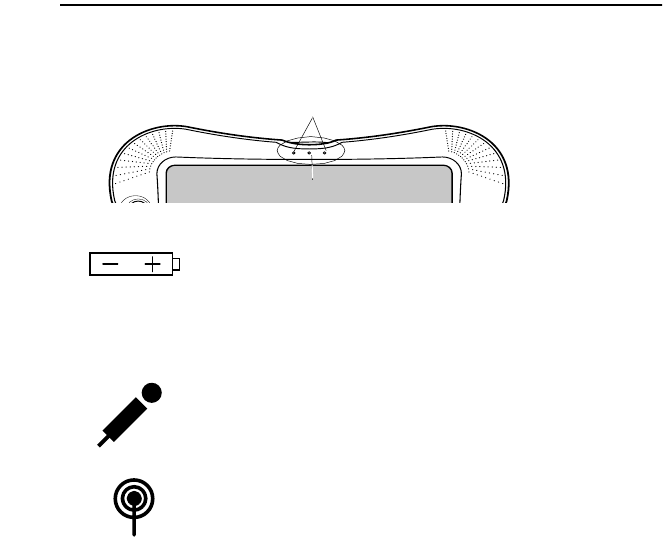
Figure 1.Front ViewofIZZIweb
Power button
LCD Display
Stylus
Indicator lights and
internal microphone
Scroll
button
Speaker
Infrared Port
(Wireless Keyboard) Docking Window
on Bottom
Ver 4 - iZZi+CE.fm Page 3 Monday, November 13, 2000 11:58 AM
4User’s Guide
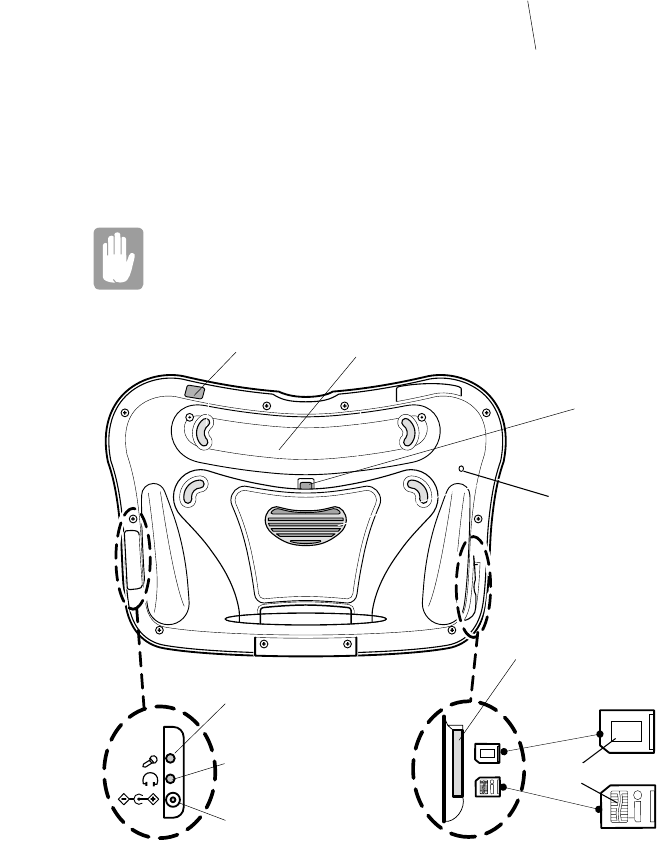
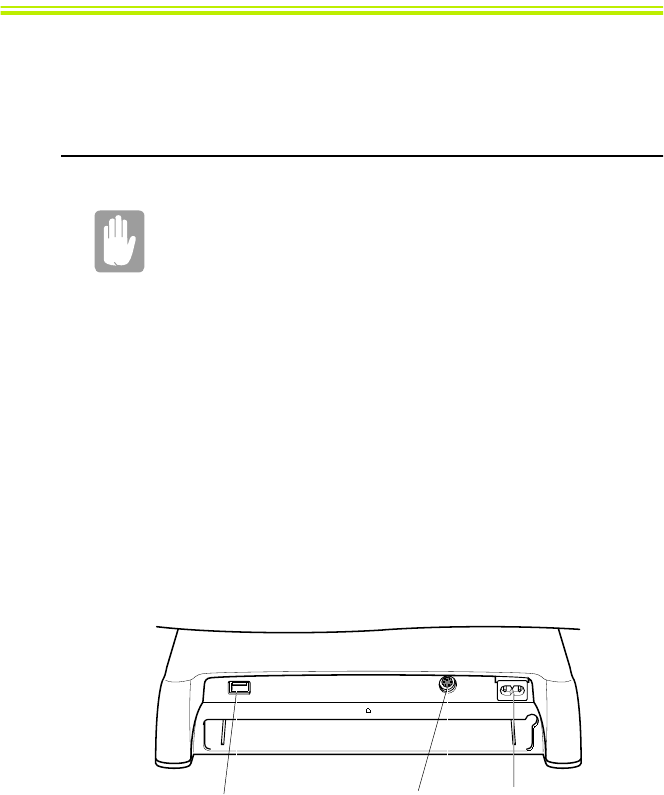
Figure 2. Bottom View of IZZI web
Data Loss may be caused by:
Disassembling the battery compartment.
Touching any key or button while you are pushing the reset
button.
Figure 3. Back ViewofIZZIweb
Docking Window
Smart Media
card slot
Battery
compartment
Microphone jack
Headphone jack
Stand latch
Reset button
Smart Media Card
Back
Front
AC Adapter jack
Infrared port
(SIR)
Ver 4 - iZZi+CE.fm Page 4 Monday, November 13, 2000 11:58 AM

Setting UptheIZZI web5
Setting Up the IZZI web
This section gives you detailed information on usingthe IZZI web for the
first time.
IZZI web Setup
The methods used for turning on the IZZI web for the first time are
explained here.
1. Placing the IZZI web on its stand.
a. Unlock the Stand Latch.
b. Release the Stand leg.
c. Support the system with the prop.
Figure 4. Standing theIZZI web
2. Installing the power cord.
a. Connect the power cord to the AC adapter.
b. Plug in the IZZI web into the AC adapter.
c. Connect the power cord to the electrical outlet.
a
bc
Stand Latch
Stand leg
Prop
Ver 4 - iZZi+CE.fm Page 5 Monday, November 13, 2000 11:58 AM
6User’s Guide
3. When the power cord is installed properly, the left indicator
light turns amber. This means that the battery is charging.
Leave the IZZI web plugged in for several hours until the
indicator light turns green, meaning that the battery is fully
charged.
The battery will fully recharge in about three hours with the
system is turned off and three and half hours with the system on.
All batteries eventually wear out and lose the ability to
hold a charge. If you notice your normal operating time on
the battery significantly decrease you should replace the
battery.
4. Installing the Access Point’s power is completed using the
instructions provided in the Access Point manual provided with
your IZZI web.
For Installation of Access Point, Please see the enclosed
manual.
5. Press the IZZI web power button. In approximately 1-3 seconds
Microsoft Windows CE starts.
6. Next the [Ethernet Driver Settings] window appears. There are
two options described below.
a.YoumayallowtheIZZIwebtofinditsownIPaddressby
selecting the “Obtain an IP address via DHCP” radio
button.
b. Or you may assign your own network IP address by clicking
on the “Specify an IP address” radio button. To get the
correct IP address for your area, ask your network
administrator.
Now your IZZI web setup is complete. If you want to make
changes, click Start > Setting > Control Panel and use the
Network
icon
.
Ver 4 - iZZi+CE.fm Page 6 Monday, November 13, 2000 11:58 AM

Setting UptheIZZI web7
Adjusting the LCD Display
You may wish to adjust the LCD display when you start using your
system. To adjust the LCD you may do one of the following:
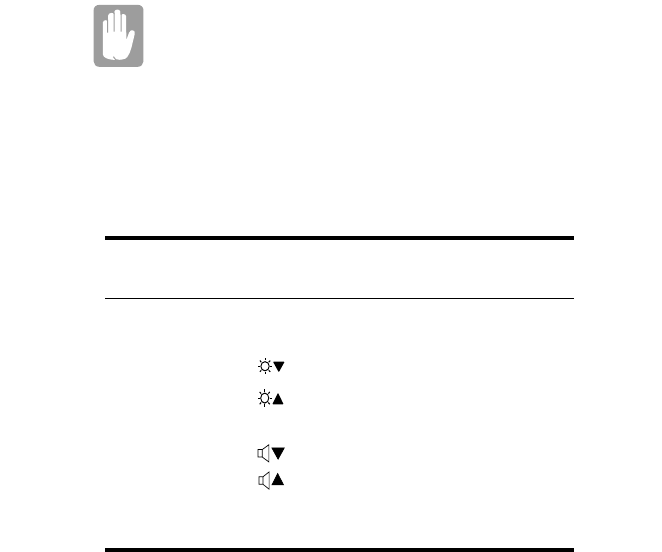
•Using the Keyboard.
– Press <Fn + F3> to decrease the brightness.
– Press <Fn + F4> to increase the brightness.
•Tap Start >Settings >Control Panel
– Double tap IZZI web.
–Tapthe
brightness tab to see the brightness slider bar.
Slide the bar to suit your requirements.
Turning Off the System
To turn off the system you may do one of the following:
•Press the power button.
•Complete the following steps,
a. Tap Start on the task bar
b. Tap Suspend.
•Press <Fn + F8> rest.
Ver 4 - iZZi+CE.fm Page 7 Monday, November 13, 2000 11:58 AM

8User’s Guide
Tips for Using the IZZI web
The following information helps you avoid potential problems as you use
the IZZI web:
Do not try to disassemble the IZZI web. Opening the
system chassis voids your warranty. Only an authorized
manufacturer’s service center can replace or add any
parts inside the chassis.
•Follow all the instructions and cautions in the user
documentation.
•The LCD has a polarized surface and can be damaged easily.
Use only the Stylus for tapping the screen.
•Because this system is small and has restricted air flow around
its components, it is more likely to overheat than a desktop
computer. Keep the system in an area that has good air
circulation. Do not cover equipment with clothing or other
items that may restrict air circulation.
•Avoid using or storing the IZZI web in extremely hot or cold
areas, such as a car on a hot day. Keep the IZZI web away from
heaters and out of direct sunlight. Exposure to excessive heat
or cold may damage your IZZI web components.
If you have left your IZZI web in a hot or cold place, let it cool
down or warm up slowly to room temperature before using it.
•Do not remove the battery compartment door, or try to install a
battery when the IZZI web is on.
•Set up your work area to avoid physical strain. Sit with your
back straight and supported by your chair. Adjust your chair or
work table so that your arms and wrists can remain in a relaxed
position, parallel with the floor. Avoid bending or twisting
your wrists as you work. Your hands should “float” slightly
above the keyboard. Refer to a book on office ergonomics for
more information on setting up your work area.
•Take frequent breaks from working at the IZZI web to rest
your eyes and stretch your muscles.
Ver 4 - iZZi+CE.fm Page 8 Monday, November 13, 2000 11:58 AM

Setting UptheIZZI web9
•Remember to save your data files frequently and to make
backup copies of your files.
•If you will not be using the IZZI web for a long period of time
(two days or more), you should backup the data to the “Smart
Media Card(s)” or to your desktop PC.
Handling Spills
Do not spill anything on your IZZI web. The best way to avoid
spills is not to eat or drink around your IZZI web. If you do spill
something on the IZZI web, turn it off, unplug it immediately, and
do the following.
•Be careful not to let the liquid drip onto the LCD panel. Allow
the system to dry for several days before trying to use it.
•If you spill liquid on an external keyboard, unplug it and drain
as much of the liquid as possible. Allow the keyboard to sit at
room temperature for a full day before trying to use it.
Sweet liquids (i.e. Coke or Pepsi)may leave a sticky
residue that may cause the keys to stick despite your
efforts to remove and dry the liquid.
•If you spill liquid on the LCD panel, clean it immediately with
a soft cloth and denatured alcohol. Do not use water, window
cleaner, acetone, aromatic solvent, or dry, rough towels to
clean it.
Some liquids damage the polarized LCD screen. If your
screen is damaged, contact your authorized
manufacturer’s service center for a replacement.
Storing the IZZI web for Long Periods
If you will not be using your IZZI web for an extended period of time (2
or 3 days), you should back up your data to the “Smart Media Card(s)”,
which are available in 16Mb/32Mb/64Mb sizes or to your desktop PC.
Ver 4 - iZZi+CE.fm Page 9 Monday, November 13, 2000 11:58 AM
10User’s Guide
Operating Notes
This section provides you with the basic understanding of the IZZI web.
Docking Station
If you bump or jar the docking station the connection bay
become broken. To insure a proper connection verify the
docking indicator light is on and green.
You can place the IZZI web into the Docking Station for more functions
and a more stable working platform.
To set the IZZI web into the Docking Station;
1. Remove the power cord from the IZZI web. Separate the power
cord from the AC adapter.
2. Plug the power cord into the back of the Docking Station.
When the power cord is installed properly, the indicator light
turns amber. When the power cord is disconnected, the light
goes off.
You can connect USB device and PS/2 keyboard only [no
mouse] to back of the Docking Station, see next figure 4 for
more information.
Figure 5. Portson theDocking Station
Mouse Only USB port PS/2 keyboard port AC-in Port
Ver 4 - iZZi+CE.fm Page 10 Monday, November 13, 2000 11:58 AM
Operating Notes 11
The USBport on the back of the docking station will only
support a mouse
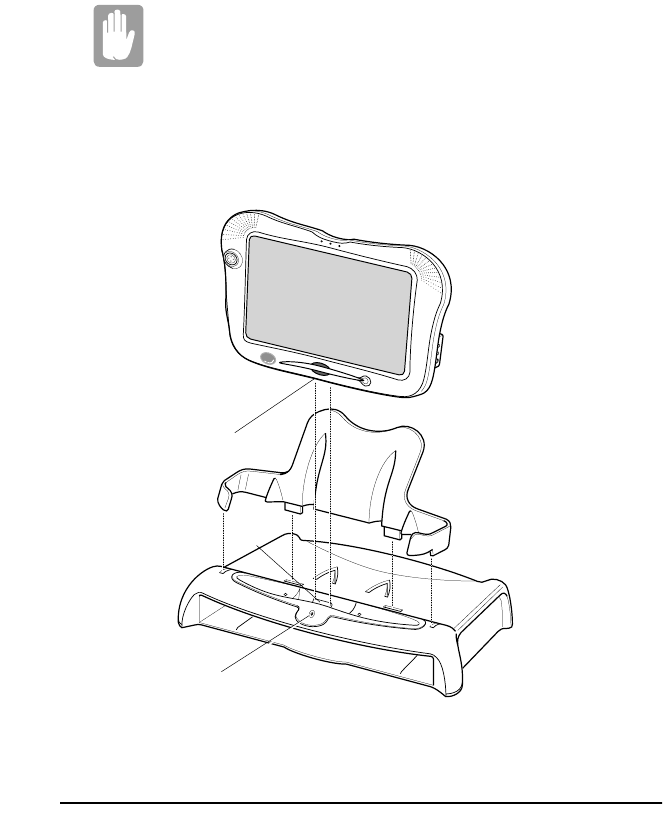
3. Open the docking window, located on the bottom of IZZI web
display.
4. Place the IZZI web into the Docking Station. When the IZZI
web is installed properly, the indicator light turns green.
Figure 6. Setting theIZZI webinto theDocking Station
IR Keyboard
Your IZZI web has an 86-key keyboard. The IR keyboard is within the
Docking Station and it is remotely activated. By pressing designated key
combinations, you can have access to almost all the key functions of a
full-sized keyboard.
Indicator light
Docking window
on bottom
Docking Connector
Ver 4 - iZZi+CE.fm Page 11 Monday, November 13, 2000 11:58 AM
12 User’s Guide
To use the keyboard insure the following is set;
1. The angle between the IZZI web and the keyboard is +/- 40° of
parrallel.
2. The distance from the IZZI web to the keyboard is a minimum
of 10 Cm to maximum of 1 meter.
Changing Keyboard Batteries
To change the batteries, open the compartment on the bottom front of the
keyboard. Replace the 2 AAA size Alkaline batteries and replace the
cover. The batteries will last about 3 months with an average use of 3
hours per day.
To clean the keyboard, use slightly damp cotton swabs. Scrub the keys
and the surface around the keys.
Do not allow liquid to drop into the keyboard. This may
damage the keyboard.
Using the Special Functions Keys
The <Fn> key activates special functions when it is pressed in
combination with another key. Table 2 shows these special key
combinations.
Table1.Description of [Fn +] Special Function Keys
<Fn> Key
Combination Function
<Fn +F1> Prt Sc
:Print Screen
.
<Fn +F2> Sys Rq :System Request
<Fn +F3> :Decrease LCD Brightness
<Fn +F4> :Increase LCD Brightness
<Fn +F5> Mute
:Mute
<Fn +F6> :Decrease Speaker/Headset Volume
<Fn +F7> :Increase Speaker/Headset Volume
<Fn +F8> Rest :Suspend to RAM
<Fn +F12> Scroll :Scroll Lock
Ver 4 - iZZi+CE.fm Page 12 Monday, November 13, 2000 11:58 AM
Operating Notes 13
Stylus
Your IZZI web is equipped with a Stylus and touch screen (LCD panel),
which are used in place of a standard mouse. This is because no cursor is
displayed on the touch screen.
To calibrate the Stylus;
1. Click Start >Settings >Control Panel.
2. Double click Stylus icon, then Stylus Properties window
appears.
3. Select Calibration tab.
4. Follow the instruction on the screen and click Recalibrate.
5. Click OK in the window.
Use of the Stylus is recommended to avoid damage to the
touchscreen, using other items such as pens, pencils or
your fingers may cause damage.
System Buttons
Your system has several important buttons. They are the Power, Reset
and Scroll buttons.
Figure 7. Scroll button
Power Button
The power button, located on top of the LCD display screen, is used to
turntheIZZIwebonanoff.
Scroll button
Reset button
(Back)
Power button
Ver 4 - iZZi+CE.fm Page 13 Monday, November 13, 2000 11:58 AM
14User’s Guide
Scroll Button
Your system includes the scroll button, located on the left side of the
LCD screen, which is four-way button for system cursor positioning.
You can easily move the screen in a internet site with this scroll button.
Reset Button
The reset button, located on the back of the LCD screen, is used to restart
your computer when normal methods will not work.
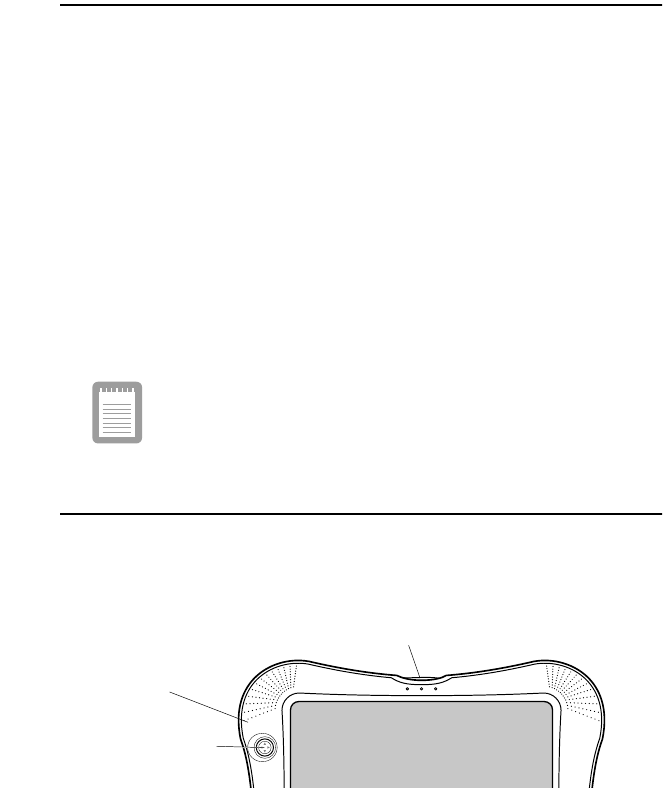
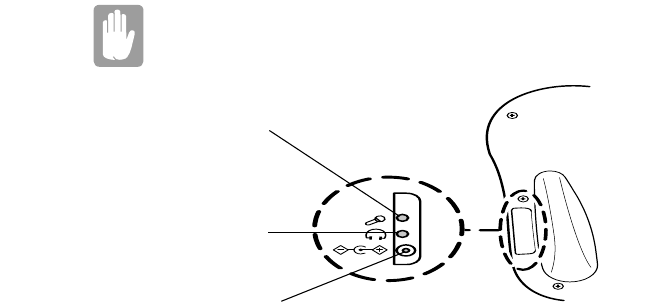
Indicator Lights & Microphone Port
System status lights show the status of the system functions. The lights
appear on the upper side of the IZZI web (Figure 8).
Figure 8. Indicatorlights
Battery charge light: When the power cord is connected,
light gives information about the status of the battery
charge. The light is yellow when the battery is charging
normally and the light is green when the battery is fully
charged.
Microphone port: This small opening will act in the same
manner as an external microphone on a PC.
Networking light: The light turns on when the network you
have connected to is activated, if the site is not activated,
the light blinks.
Indicator lights
Microphone port
Ver 4 - iZZi+CE.fm Page 14 Monday, November 13, 2000 11:58 AM

Operating Notes 15
Infrared Communications
You can use infrared (SIR) beaming for wireless transfer of information
between your IZZI web and any other device [PC, Printer or another IZZI
web] that is IR-ready.
The infrared beaming is SIRwith a transfer rate of 115 K-
bps Maximum.
To use infrared beaming:
•Position the IZZI web IR port and the IR port of the other
device so that they are lined up and within three feet (one
meter) of each other without blocking.
•Some fluorescent lights will interfere with the transmission of
data. If this occurs turn off / reduce the amount of fluorescent
lights in the immediate area or move to a location with
different lighting such as incandescent lights.
Battery Management
The IZZI web has three basic battery states, Normal, Low and Very Low.
The Normal state is from 50% to 100%. When the battery charge is less
than 50% a warning message is displayed and you should follow the steps
below to conserve battery life.
Follow these tips to conserve your battery and extend its life:
•Recharge the batteries while you are on the road by using the
IZZI web with the AC adapter whenever circumstances permit.
•Change the default shut-off time when running on batteries.
The default is three minutes. Choose Start >Settings >
Control Panel > - Double -Click Power and select Power Off
tab, then select a shorter time.
•Reduce LCD display brightness.
•Disable sounds you don’t absolutely need to hear. Choose
Start >Settings >Control Panel - Double -Click the Volume
&Soundsicon, then select the sounds as needed.
Ver 4 - iZZi+CE.fm Page 15 Monday, November 13, 2000 11:58 AM
16User’s Guide
The IZZI web will automacically enter suspend mode when the battery
power is less than 5%. When this happens the data you have will be
retained in memory for about 48 hours if you do not plug in the AC
adapter.
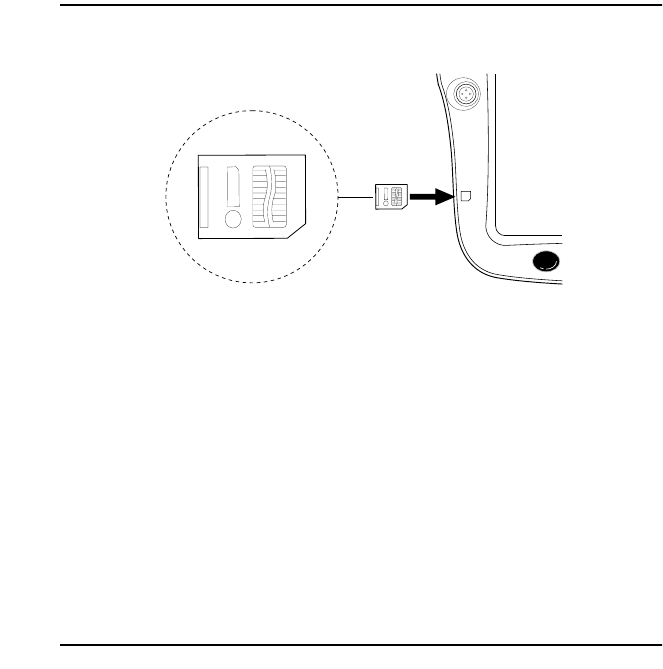
Smart Media Card
To install a Smart Media card in the IZZI web, follow these steps:
Figure 9. Inserting theSmartMediaCard
1. Identify the connecting edge of the card [the one with the
chamfered edge]. Insert the Smart Media card with the metallic
chip toward the front of the IZZI web until you feel it seat itself.
It will feel similar to a television on/off switch.
2. Follow the enclosed documentation included with the card.
To remove the Smart Media card;
1. Press the Smart Media card to pop it out.
2. Remove the card.
Connecting Peripheral Devices
There are several external devices which you may wish to use with your
IZZI web. They are a external microphone and/or a set of headphones.
You may also use an external power supply to reduce the load on the
batteries.
Ver 4 - iZZi+CE.fm Page 16 Monday, November 13, 2000 11:58 AM
Operating Notes 17
Each of these devices is simply plugged into the proper port as shown in
the figure below.
Use the IZZI web AC Adapter only (AD-3612) or you may
cause damage to your system
Figure 10. Peripheral DevicePluginLocation
Microphone Jack
Headphone Jack
Alternate AC Power Jack
Ver 4 - iZZi+CE.fm Page 17 Monday, November 13, 2000 11:58 AM

18User’s Guide
Troubleshooting
If you have difficulty running the IZZI web, follow these steps:
1. Consult the following sections for advice on this system or
program & user’s guide.
2. If step 1 does not help you to resolve the problem, contact your
reseller for assistance.
The IZZI web does nothing when you turn it on.
• Connect AC adapter, if you are using the battery pack.
• Check AC-IN indicator light, when you use the AC adapter.
• Check if the power cable is damaged.
• Check the AC adapter and power cord are correctly connected.
• When the IZZI web is connected to peripheral devices, disconnect
each device for a moment.
• Remove the AC adapter for a few seconds, then reconnect them and
wait for 5 seconds before turning on the power.
• Press the Soft Reset Button with a paper clip.Be careful not to touch
any key when you press the soft reset button, doing so may cause the
loss of all of your data.
• If you cannot turn the computer off or the reset button does not work,
then you will have to push them at the same time. Use this as a last
resort because doing this will cause you to lose all of your unsaved
data.
The Stylus doesn’t work on the screen or in the programs.
• Press the Soft Reset Button with a paper clip.Be careful not to touch
any key when you press the soft reset button, doing so may cause the
loss of all of your data.
Do not touch any keys while you are pushing the reset
button, doing so may cause the loss of all of you data.
Ver 4 - iZZi+CE.fm Page 18 Monday, November 13, 2000 11:58 AM

Troubleshooting 19
• Remove the AC adapter for few seconds, then reconnect it and wait
for 5 seconds before turning on the power.
The battery doesn’t last long enough.
• See ”Battery Management” on page 15 in this user’s Guide.
Possible Data Loss:
If the IZZI web does nothing when you turn it on or try to turn it
off, Press the Soft Reset button and Power button
simultaneously and wait for 1 or 2 seconds. This may cause
you to lose any data not saved up to this point.
Network Doesn’t Work
• Verify the Ethernet driver settings in the control panel.
• Ensure the system and AP are in range (~35 m) in a office
invironment. This may vary dpending on structural materials.
• Contact your system administrator if you cannot resolve the
problem.
Ver 4 - iZZi+CE.fm Page 19 Monday, November 13, 2000 11:58 AM

20User’s Guide
Specifications
Table 2 gives the specifications for your IZZI web.
Table2.SystemSpecifications
Features
CPU X86 Family
LCD TFT LCD, 10.4 inch
RAM 32 MB, SDRAM
ROM 16 MB
Keyboard 86 keys
Connecting ports Infrared, External-Microphone &
Headphone,
Sound Internal microphone, internal speaker
Operating system Windows CE PB 2.12
Dimensions MaxMin
Width 12.34 in (313.5 mm) 10.66 in (2707 mm)
Height 1.47in (39 mm) 1.02 in (26 mm)
Depth 9.07 in (230.4 mm) 8.57 in (217.8 mm)
Weight (with Li-Ion battery) 3 lb. (1378 g)
Environment
Ambient temperature, operating 50o~90
oF(10
o~32
oC)
Ambient temperature, storage 23o~104
oF (-5o~40
oC)
Relative humidity (noncondensing),
operating
20 ~ 80%
Relative humidity (noncondensing),
storage
5~90%
Altitude, operating 0to8,000ft.(0to2,348m)
Altitude, storage 0 to 40,000 ft. (0 to 12,192 m)
Shock, operating 10 G for 11 ms half sine
Shock, nonoperating 60 G for 11 ms half sine
Ver 4 - iZZi+CE.fm Page 20 Monday, November 13, 2000 11:58 AM

Specifications21
Li-Ion Battery
Normal Weight 0.44 lbs (200 g)
Nominal open circuit voltage 7.4 VDC
Capacity, typical 3600 mAhr
Charging time, approximate, with IZZI
web turned on or off
3.0 ~ 3.5 hr. (Li-Ion)
External AC Adapter
Operating voltage 100 - 240 VAC
Line frequency 50/60 Hz
Input current 1.0 A 100 V ~ 0.5 A 240 V
Output current 3.0 A
Output voltage 12 VDC
Ver 4 - iZZi+CE.fm Page 21 Monday, November 13, 2000 11:58 AM
22 User’s Guide
Part II. Program &User’s
Guide
Ver 4 - iZZi+CE.fm Page 22 Monday, November 13, 2000 11:58 AM

Where to FindInformation 23
Where to Find Information
This book describes your device hardware, provides an overview of the
programs included, and describes how to use the Internet. The following
table is a guide to the different types of information available to help you
use your device. Note that although this book introduces the programs on
your device, it does not describe them completely. For more information,
see the comprehensive online Help for each program.
Table3. Getting Information
Information Source
Programs This User's Guide or Online Help on your device.
Select Start and then Help.
Toolbar buttons Tap or click and hold on a toolbar button to see its
name. Drag off the toolbar button before lifting to
avoid activating the button.
Troubleshooting
information on
connections
In the Mobile Devices window, click Help, then
Communications Troubleshooter.
Up-to-date information
on Windows CE-based
devices
http://www.microsoft.com/windowsce/
Ver 4 - iZZi+CE.fm Page 23 Monday, November 13, 2000 11:58 AM

24User’s Guide
Chapter 1: Getting Started
Welcome
Congratulations on purchasing a portable device powered by the
Microsoft® Windows® CE operating system. The size and capabilities
of this device let you keep your most important business and personal
information up-to-date and close at hand.
Before you start using your device, you will need to connect the AC
adapter, turn it on, and adjust the screen brightness.
Setting Up the Device
Use the AC adapter to plug your device into external power whenever
possible, especially when:
•Using the backlight feature of your device display.
•Letting the LED indicator flash for extended time periods.
Ver 4 - iZZi+CE.fm Page 24 Monday, November 13, 2000 11:58 AM
Chapter 2:Basics25
Chapter 2:Basics
Entering Information and Selecting Objects
Your device comes with a keyboard, touch screen, and Stylus, or a
keyboard and a pointing device (scroll button). You use the keyboard and
pointing device just as you do on your desktop computer. The Stylus and
touch screen replace the pointing device; you select and move objects on
the screen by tapping and dragging them with the Stylus. The Stylus also
allows you to write on the screen just as you do with a pen and paper. The
details on how to use the Stylus will be explained later. See ”DioPen -
Handwriting Recognizer” on page 28
If you have difficulty accurately selecting objects with
your Stylus, press CTRL+ALT+ + (= key)to calibrate the
screen.
Programs
The Windows CE programs that come with your device are stored in
ROM (read-only memory) and cannot be removed or lost. You can install
additional programs that will be placed in RAM (random access
memory). Table 5 details the programs on your device.
Table4. Program anditsdescription
Program Description
Inbox Send and receive e-mail.
Microsoft Pocket
Word
Create, view and edit Word documents.
Terminal View and download files from a bulletin board or send
and receive e-mail.
World Clock Set the date, time, and alarm for your home city and the
city you are visiting.
Ver 4 - iZZi+CE.fm Page 25 Monday, November 13, 2000 11:58 AM
26User’s Guide
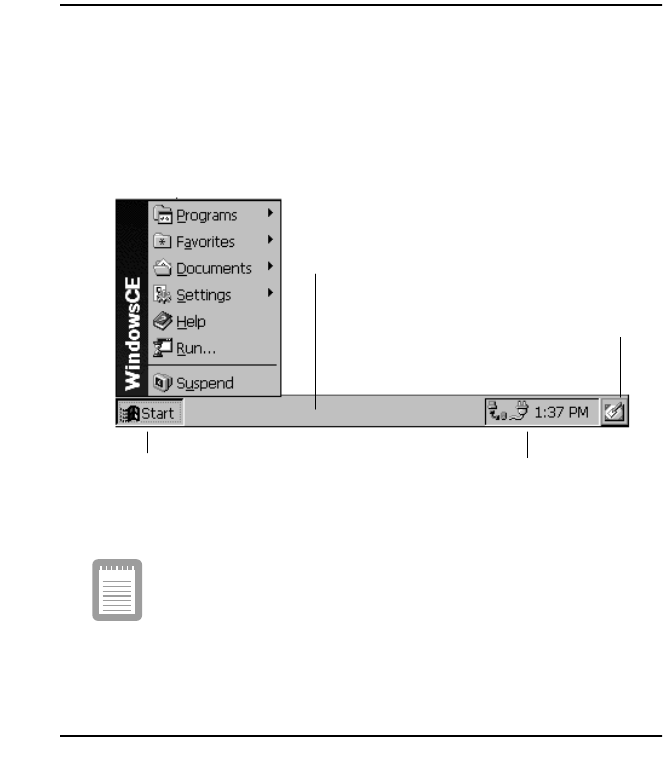
Using the Start Menu and Taskbar
Use the Start menu to open programs, change settings, obtain help, and
open recently used documents. Just select Start, and then select the
program or item you want to open. In addition to the Start menu, the
taskbar contains buttons for the programs you have running, a status area,
and a desktop icon.
Figure 11.WindowsCE StartMenu
If you have a color device, you can change the color of the
windows and menus. On the Start menu, select Settings,
then Control Panel. Double-tap or double-click the Display
icon, and then select the Appearance tab. Select a preset
scheme or create your own.
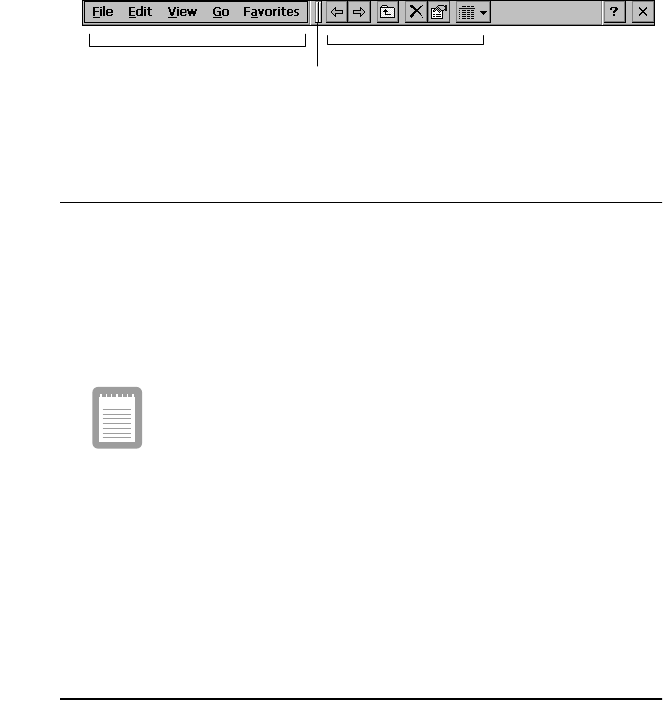
Using the Command Bar
Each program has a command bar located at the top of the program
window. The command bar displays both menu names and toolbar
buttons. Select the slider to switch between displaying toolbar buttons
only or menu names and toolbar buttons. You can drag the slider to
Select any program shown on this bar to
maximize (display) and minimize (hide) the
running program.
Select the desktop icon to
minimize all open programs and
display the device desktop.
Select Start, then select
the item you want. Double-tap or double-click an icon in
the status area for more information.
Ver 4 - iZZi+CE.fm Page 26 Monday, November 13, 2000 11:58 AM
Chapter 2:Basics27
display the buttons and menu names you want. You can also drag the
slider down to move the toolbar buttons under the menus.
Figure 12.WindowsCE CommandBar
Finding Files and Exploring the Web
To find files on your device, select Start, Programs, and then Windows
Explorer. When you create and save a file on your device, it is stored in
a folder called My Documents unless you select another location. You
can copy or move a file from one location to another by selecting the file
and then using the Copy or Cut and Paste commands on the Edit menu.
While using Windows Explorer, you can type a URLinthe
Address boxto access a Web site if you are connected to
the Internet or an intranet.
To view Web pages, select Start, Programs, and then Internet Explorer.
To view Web pages that are stored on your device, select, File, Open, and
then the Browse button and locate the file. To view Web pages on the
Internet or an intranet, type a URL in the Address box. To access Internet
or intranet Web pages, you must first set up a connection between your
device and the Internet or an intranet. For more information, See
”Finding Files and Exploring the Web” on page 27.
Printing
Microsoft Pocket Word, Internet Explorer support printing. Once you
have connected your device to a SIR compatible printer you may print
your documents.
The currently supported printers are the PCL Laser, PCL Inkjet and the
Maxall test color printer.
Toolbar buttons
Menus
Slider
Ver 4 - iZZi+CE.fm Page 27 Monday, November 13, 2000 11:58 AM

28User’s Guide
Customizing Your Device
You can adjust device settings to suit the way you work. Select Start,
Settings, and then Control Panel to see the settings available on your
device.
You might want to adjust the following:
•Power, to maximize battery life.
•System, to adjust memory allocation between storage memory
and program memory.
•Volume & Sounds, to customize or turn off sounds.
•World Clock, to set the date and time for your location and a
second location.
For Security purposes you may wish to enter or change the following:
•Owner, to enter contact information in case your device is
misplaced.
•Password, to limit access to your device.
DioPen - Handwriting Recognizer
DioPen Components
Soft Keyboard On-screen keyboard using Input Panel Window.
Panel Recognizer Hand-writing Input Method using Input Panel
Window.
Screen Recognizer Input Method without any windows. (anywhere
on the screen directly)
DioPen Action
Input Method can be selected using toolbar or tray icon (details are in the
input method description). For alpha/numeric, the letters should be
written in certain suggested ways and symbols can be written in normal
ways. See ”Alpha/Numeric handwriting style” on page 33.
Ver 4 - iZZi+CE.fm Page 28 Monday, November 13, 2000 11:58 AM

Chapter 2:Basics29
DioPen Options
DioPen Options either use Input Panel Windows in control panel in
Setting or Popup menu that appears after tapping on DioPen Tray Icon.
Delay Time Both Panel Recognizer and Screen Recognizer
recognizes the letters written (in the case of
writing symbols) after a given time. In other
words, if the stroke is not completed in this given
time, it recognizes the written strokes as a false
character or null character (null character means
no matching symbols.) If it is Null character,input
can not be processed. Delay time is set in mSec
and the range is between 100-5000(msec).
Ink Width The width of written stroke on the screen. ranges
between 1-10 pixel.
Ink Color The color of the written stroke on the screen.
(changing color by using Change Button)
DioPen Toolbar
In <Figure12>, (a) is the DioPen Toolbar when the Screen Recognizer is
chosen and (b) is for other cases.
Figure 13. DioPenToolbar
Open Toolbar Select Show Toolbar on Popup menu.
Close Toolbar Select Show Toolbar on Popup menu or x button
on the Tool bar.
If for some reason, one of the above two tool bars is not visible or you
have closed it as described above, you will have to click - tap on the red
arrow in the menubar next to the time clock in the lower right corner of
the LED screen. See figure below.
(a) (b)
Ver 4 - iZZi+CE.fm Page 29 Monday, November 13, 2000 11:58 AM
30 User’s Guide
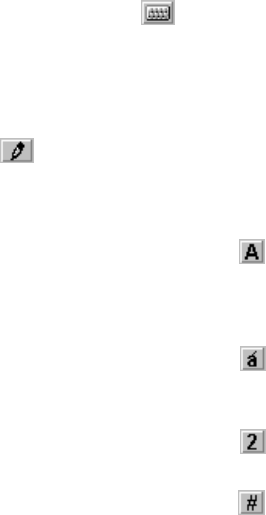
Panel Recognizer
Select Panel Recognizer
Select Panel Recognizer on the Popup menu or xxx button on DioPen
Toolbar if availble.
Figure 14. PanelRecognizer
Figure 15. PanelRecognizer window details
When you select Panel Recognizer, hand-writing input window like
figure 13 appears. Figure 14 is the descriptions of each buttons and
handwriting areas.
Lowercase Alphabet Write on the lowercase area in figure 13 like
window.
Uppercase Alphabet Write in the left side of the character separation
line across the mode discrimination line.
Accent Alphabet After writing alphabets, write Accent Gesture.
Symbol Write in the right side of the character separation
line across the mode discrimination line.
Numeric Write in Numeric area.
upper/lower or symbol/numeric character separation line
alpha/numeric, symbol character separation line
Ver 4 - iZZi+CE.fm Page 30 Monday, November 13, 2000 11:58 AM
Chapter 2:Basics31
Soft Keyboard
Selection of Soft Keyboard
Select Soft Keyboard on Popup menu or button on DioPen Toolbar
if available.
Screen Recognizer
Select Screen Recognizer Select Screen Recognizer on Popup menu or
button on DioPen Toolbar if available.
Lowercase Alphabet If Toolbar is available, Write
without selecting any character mode button. If
not, write below the character mode marks.
Uppercase Alphabet If Toolbar is available, select button. (In this
case, continuous input of Uppercase Alphabets is
possible) If not, write below the character mode
marks after writing the mode change gesture.
Accent Alphabet If Toolbar is available, select button and
write. (It only applies to one character) If not,
write Accent gesture after writing alphabets.
Numeric If Toolbar is available, select button. If not,
write above the character mode marks.
Symbol If Toolbar is available, select button. If not,
write above the character mode marks after
writing the mode change gesture.
Close Screen RecognizerSelect Pointing Mode in Popup Menu.
Ver 4 - iZZi+CE.fm Page 31 Monday, November 13, 2000 11:58 AM

32 User’s Guide
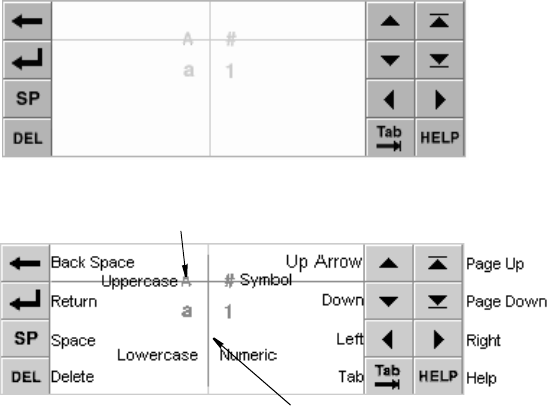
There are two hand writing styles shown in the next two figures. The first
style is the gesture style shown in figure 15 is mainly used for formatting
sentences and basic handwriting non-character commends. The second
style is the alpha/numeric style, shown in figure 16, is used to write the
same characters you find on the keyboard.
Gesture Handwriting Style
Figure 16. Gesture Handwriting Style
Function Handwriting
Style Function Handwriting
Style
Space Back Space
Enter Tab
Upper/Low char,
Number/Special
Char. Convert
Delete
Accent Character
Convert
Ver 4 - iZZi+CE.fm Page 32 Monday, November 13, 2000 11:58 AM
Chapter 2:Basics33
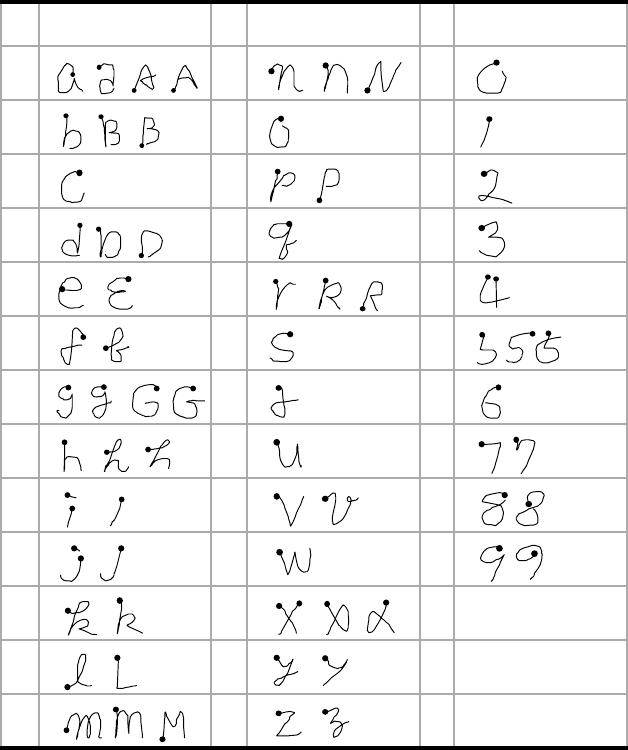
Alpha/Numeric Handwriting Style
Figure 17. Alpha/Numerichandwriting style
Handwriting Style Handwriting Style Handwriting Style
AN0
BO1
CP2
DQ3
ER4
FS5
GT6
HU7
IV8
JW9
KX
LY
MZ
Ver 4 - iZZi+CE.fm Page 33 Monday, November 13, 2000 11:58 AM
34 User’s Guide
Chapter 3:Microsoft Pocket Word
The Microsoft Pocket Word program is a scaled down version of the
Microsoft Word Program on your desktop PC. This program works with
the Windows version of the same program on your desktop computer to
give you easy access to up-to-date copies of your documents. You can
create, view or edit your Word files. Word templates are also available to
help you quickly create documents.
You can access the Pocket Word program by selecting Start, Programs,
then Microsoft Pocket Word.
Online Help:
More information on the procedures described in this chapter,
as well as information on additional procedures, can be found
in online Help on the IZZI web device. Select Start > Help, and
then the program you want information on. Because the
programs work in similar ways to their counterparts on the
desktop computer, online Help covers basic procedures and
the differences between the companion programs and desktop
programs. If you need more information on using an Pocket
Word program, see the documentation that came with the
desktop version of the program.
Pocket Word: Creating & Saving Documents
You can use Pocket Word to create documents, such as letters, meeting
minutes, and trip reports just to mention a few. You can also use Pocket
Word to open and edit documents created in the desktop version of Word.
When you are ready to save a document you created or edited, you can
save it in a variety of formats, including Pocket Word (.pwd) and Word
(.doc). If you plan to send the document through e-mail to someone who
will be using Word, not Pocket Word, be sure to save it in the Word
(.doc) format.
To type text in Pocket Word, tap or click the screen to place the insertion
point and start typing. Use the spelling checker to verify accuracy. You
can quickly format the text, using buttons and menu commands. You
may format as you go or apply formatting later.
Ver 4 - iZZi+CE.fm Page 34 Monday, November 13, 2000 11:58 AM
Chapter 3: Microsoft PocketWord 35
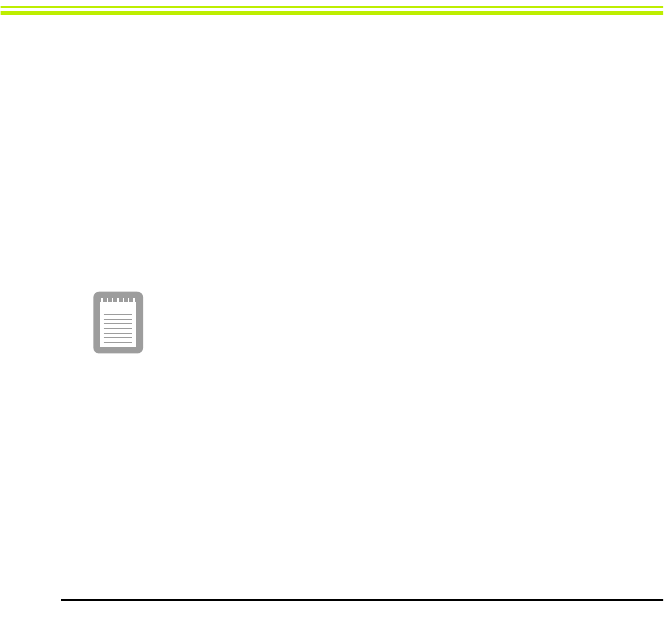
You can type text in either Outline view or Normal view, and you can
easily switch from one view to the other, using the View menu. Work in
Outline view when taking notes in meetings; use headings to highlight
the main points and body text to add details.
Figure 18. Pocketword using themeeting notes template
Take meeting minutes using Pocket Word:
1. Select File, New, and then Document from Template.
2. SelectMeetingNotesandthenOK.
3. Select File and then Save.
4. Enter a name, choose a storage location, and then select OK.
5. Replace the text in the template.
To see more of your document, select Full Screen on the
View menu.
Ver 4 - iZZi+CE.fm Page 35 Monday, November 13, 2000 11:58 AM
36 User’s Guide
Chapter 4: Inbox-E-mail program
The IZZI web has included a simple e-mail program called Inbox.
With Inbox, you can send and receive e-mail messages by connecting
directly to your mail server through an Internet or network account.
Inbox: Sending and Receiving E-mail Messages
Use Inbox to send and receive e-mail messages. You can access your e-
mail by connecting to a mail server through an Internet or network
account.
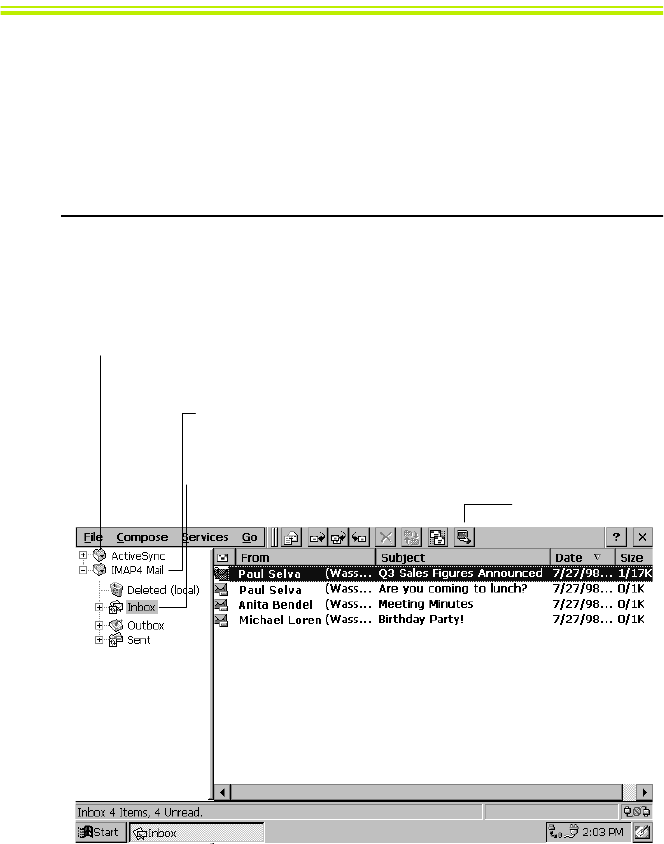
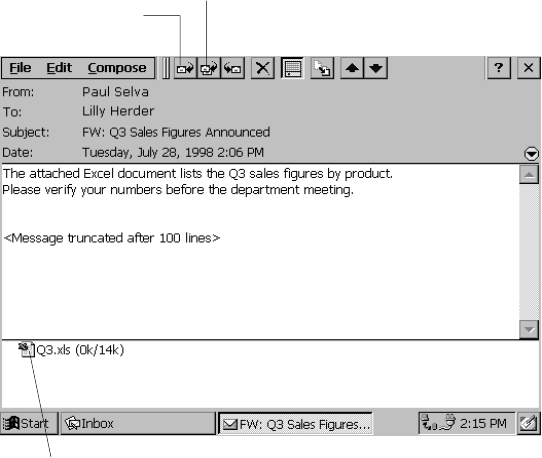
Figure 19. Inbox interface
E-mail messages you send and receive through
synchronization are stored here.
When you set up Inbox, a service is added to the Inbox window.
Mail folders are stored under the service name either IMAPI or
POP3.
The double-arrow icon marks office folders.
Messages in these folders can be viewed
even when you are not connected. Connect button
Ver 4 - iZZi+CE.fm Page 36 Monday, November 13, 2000 11:58 AM

Chapter 4: Inbox - E-mailprogram 37
Connecting to a Mail Server
You can send and receive messages by connecting directly to your mail
server. In addition to creating a connection to your ISP or network, you
must give Inbox the information it needs to communicate with your mail
server.
InboxSupport:
Inbox does not currently support connecting with proprietary
mail protocols such as AOL and MSN™. However, you can still
gain access to the Internet through these services. There may
be third-party programs available that would enable you to
send and receive mail through proprietary protocols. Try
searching the Web on the keyword "Windows CE" to find third-
party programs for your device.
Setting up Inbox forconnecting to a mailserver
1. Get the following information from your ISP or network
administrator: POP3 or IMAP4 server name, SMTP host name,
user name, password, and domain name (for network
connections only).
2. Select Start, Programs, Pocket Outlook, and then Inbox.
3. Select Services and then Options.
4. On the Services tab, select Add.
5. Choose IMAP4 Mail or POP3 Mail, enter a name for the
connection, and then select OK.
6. In the Mail Service Definition dialog box, enter the information
from step 1. In Connection, choose the remote connection you
want to use. (If you are receiving e-mail through a network
connection, Select Network Connection).
7. In the Mail General Preferences dialog box, select desired
options.
Ver 4 - iZZi+CE.fm Page 37 Monday, November 13, 2000 11:58 AM
38 User’s Guide
8. In the Mail Inbox Preferences dialog box, select desired
options.
– In When Getting Messages, choose how you want
messages downloaded by default. Choosing Get full
copy of messages will take up more storage space on
your device. Choosing Only synchronize Inbox folder
hierarchy (IMAP4 only) will speed up the time it takes
to download your messages.
– In When Getting Full Copy, choose whether you want
to download file attachments and meeting requests
when you get full copies of messages. This setting
applies whether you have chosen to download full
copies of messages by default, or if you selectively
download full copies of messages by opening the
message and selecting the Get Full Copy button. In
addition, if you want to receive meeting requests, your
Exchange Server administrator must enable support for
Rich Text Format for your account. Ask your
administrator if this feature is enabled for you.
Downloading Messages
To send and receive e-mail, select the Services menu and make sure that
the service you want to use is selected (the selected service has a bullet
next to it.) Then, select the Connect button. When you connect to the mail
server, the messages on your device and mail server are synchronized:
new messages are downloaded to the device Inbox folder, messages in
the device Outbox folder are sent, and messages that have been deleted
on the serverare removed from the device Inbox. These folders are stored
under the service you created when setting up Inbox. Double-tap or
double-click a message in the message list to open it. If you read a
message and decide that you need the full copy, select the Get Full Copy
button.
Ver 4 - iZZi+CE.fm Page 38 Monday, November 13, 2000 11:58 AM
Chapter 4: Inbox - E-mailprogram 39
Figure 20. PocketOutlook E-mailmessagecenter
Disconnecting from theserver
To disconnect Inbox from your mail server, select the Connect button
again. You also need to disconnect your dial-up connection by double-
tapping or double-clicking the icon in the status bar and selecting
Disconnect.
Select the “Get Full Copy”button to
download the rest of the message
the next time you connect.
Double-tap or double-click an attachment to mark it for downloading
the next time you connect. If it has already been downloaded,
double-tap or double-click it to open it.
Show Attachment
button
Ver 4 - iZZi+CE.fm Page 39 Monday, November 13, 2000 11:58 AM
40 User’s Guide
Managing messages andfolders
By default, messages are displayed in one of four folders in the service
you created: Inbox, Deleted (local), Outbox, and Sent. The Deleted
(local) folder contains messages that have been deleted on the device. If
you are using IMAP4, you may see a Deleted Items folder. This folder is
for deleted messages on the server. The behavior of the Deleted and Sent
folders depends on the Inbox options you have chosen.
If you want to organize messages into additional folders, select File,
Folder, and then New Folder. Then, drag messages into the folder you
created. The behavior of the folders you create depends on whether you
are using POP3 or IMAP4.
If you are using POP3, when you drag messages to a folder you created,
the link is broken between the messages and their copies on the mail
server. The next time you connect, the mail server will see that the
messages are missing from the device Inbox and delete them from the
server. This prevents you from having duplicate copies of a message, but
it also means that you will no longer have access to the messages you
move to the folders you create from anywhere except the device.
If you are using IMAP4, the folders you create and the messages you
move are mirrored onthe server. For example, if you move two messages
from the Inbox folder to a folder called Family, the server will create a
copy of the Family folder and copy the messages into that folder.
Therefore, messages are available to you anytime you connect to your
mail server. This synchronization of folders occurs when you create a
new folder, move messages into a folder, exit the Inbox program, or
select Synchronize Folders on the Services menu. If you want to view the
messages in a folder while disconnected from your mail server, select the
folder and then Offline Folder on the Services menu.
Ver 4 - iZZi+CE.fm Page 40 Monday, November 13, 2000 11:58 AM

Troubleshooting 41
Troubleshooting
If you encounter difficulties while using your IZZI web, first look in this
section. If you need troubleshooting information for Windows CE
Services, click Windows CE Services Help Topics on the Help menu in
the Mobile Devices folder.
Remote Connections
This section covers situations you may encounter when trying to connect
your device to other sources of information. For problems with
communicating with your desktop, see Windows CE Services Help.
Can't dial outwith thedialer
•Verify that the phone line is firmly seated in the telephone
jack.
•Make sure the telephone line is analog. (Analog telephone
lines transmit data in analog instead of digital form. Your
home telephone line is most likely analog, while office
telephone lines are often digital.)
•Ensure you've correctly set dialing properties for this
connection.
•Make sure the modem is waiting for a dial tone. Select Start,
Programs, Communication, and then Remote Networking. Tap
or click your connection once to select it, and then select
Properties on the File menu. In the Dial-Up Connection dialog
box, select the Configure button and then select the Call
Options tab. Select Wait for dial tone before dialing.
•For international calls, allow more time for the call to go
through. On the Call Options tab described in the previous
bullet, clear the Cancel the call if not connected within option
or increase the number of seconds allowed.
Ver 4 - iZZi+CE.fm Page 41 Monday, November 13, 2000 11:58 AM
42 User’s Guide
Can dial outbutcan'tmakeaproper connection
•Make sure the network to which you are trying to connect
supports Point-to-Point Protocol (PPP). PPTP connections are
not currently supported. Your Internet service provider or
network administrator can verify this.
•Verify that the location is correct. Select Start, Settings,
Control Panel, and then double-tap or double-click the Dialing
icon. Make sure that the location settings reflect your current
location, that the location's dialing pattern is appropriate, and
that the local country and area code are correct.
Theconnection is unreliable
•Verify that the phone line is firmly seated in the telephone
jack.
•Disable call waiting. Select Start, Settings, Control Panel, and
then double-tap or double-click the Dialing icon. Select
Disable call waiting by dialing and enter the disable code
specified by your telephone company.
Infrared Transfer -Windows CE-based Devices
If you are unable to use infrared to transfer information between
Windows CE-based devices, try the following.
•Transfer only one file, or no more than 25 contact cards, at a
time.
•Position the infrared ports so that they line up and are less than
one meter (three feet) but more than two inches apart.
•Ensure nothing is between the two infrared ports.
•Adjust the room lighting. Some types of light interfere with
infrared communication. Try moving to a different location or
turning off some lights.
Ver 4 - iZZi+CE.fm Page 42 Monday, November 13, 2000 11:58 AM
Troubleshooting 43
Display
If you're having trouble viewing your data, here are some suggestions.
Screenis blank
If the device doesn't respond when you briefly press the On button, try
holding the button down for a full second. If that doesn't work:
•Make sure your adapter is connected to the system and press
the power button. If the battery is discharged the system will
not operate properly.
•Reset the device.
Screenis Dark
Prolonged exposure to direct sunlight may cause your device screen to
temporarily darken. This is normal for LCD screens and is not
permanent.
System Response
Sometimes the device doesn't respond as quickly or accurately as usual.
Here are some tips to get you back up to speed.
InaccurateResponse to Stylus Taps
Recalibrate the Stylus. Press < CTRL + ALT >+< = > key), or select
Start, Settings, Control Panel, and then double-tap or double-click the
Stylus icon.
Slow orNo Response
Reset the device.
Ver 4 - iZZi+CE.fm Page 43 Monday, November 13, 2000 11:58 AM

44 User’s Guide
Glossary
AC adapter
A connector that provides external power (not battery power) to
your device. See your device manufacturer's documentation for
information about proper installation and use.
Access Point
The electronic device that transfers information between your
IZZI web and the network.
Application Manager
The Windows CE Services feature that enables you to add and
remove software on your device. In the Mobile Devices window,
click Tools and then click Application Manager.
Attachment
A file included with an e-mail message such as documents or
pictures.
Backup file
A duplicate copy of the program data on your device. This file
does not include settings and information stored in ROM, such as
factory-installed software. Use your backup file to return your
device to its previous state if your device data is damaged or
destroyed, or if you have performed a full reset.
Baud rate
The speed at which a modem transmits data. This is set at 19200
by default.
Calibrate
The process that determines how the Stylus and touch screen
interact. You can calibrate both the screen alignment and the
Stylus double-tap settings.
COM port
See communications port.
Ver 4 - iZZi+CE.fm Page 44 Monday, November 13, 2000 11:58 AM
Glossary45
Command bar
The combination toolbar and menu bar used in Windows CE.
Communications port
A serial communications port used to connect equipment, such as
mobile devices, modems, and printers.
Compact flash card
A modem, network, or storage card that you plug into your device.
Connection
The ability to interact with another device, computer, or the
Internet by means of a serial, IR, Ethernet, or dial-up connection.
Data
Information that is stored in any of your Windows CE program
files.
Desktop computer
A computer running Microsoft Windows 95/98/Me or Windows
NT to which you connect your device.
Dial-up connection
A connection between your device and a remote computer by
means of a modem. You connect to your Internet Service Provider
[ISP].
Direct connection
A connection between your device and another computer by
means of an IR port.
DioPen
A handwriting recognition program that allows computer input via
pen like writing device directly on the LED display screen.
Download
The process of transferring data from your desktop computer to
your device.
E-mail
Messages and other items that you send and receive with Inbox.
Ver 4 - iZZi+CE.fm Page 45 Monday, November 13, 2000 11:58 AM
46 User’s Guide
Ethernet Card
A removable card that conforms to the PCMCIA specification.and
allows you to connect to the internet.
Explorer window
The window that appears when you double-click a device icon in
the Mobile Devices window. In the Explorer window, which is
part of Windows CE Services, you can view and copy files
between your device and your desktop computer.
File conversion
The process of converting Windows-compatible files on your
desktop computer to Windows CE-compatible files on your device,
and vice versa.
Full reset
See reset.
IMAP4 (Internet Message Access Protocol)
An e-mail protocol supported by some mail servers. When using
IMAP4, the folders you create on your desktop computer or device
are mirrored on the mail server so that the contents of the folders
are available from any computer with access to your mail server.
Internet connection
A communications method used to establish a link between your
device and a server that provides access to the Internet, typically,
an Internet service provider.
Internet service provider (ISP)
A company that provides access to the Internet.
Intranet
A network designed for information sharing within a company or
organization.
Local folder
A folder that is available only from the location in which it was
created. In POP3, any folder you create on the device is a local
folder, and any messages it contains can only be viewed from the
device.
Ver 4 - iZZi+CE.fm Page 46 Monday, November 13, 2000 11:58 AM
Glossary47
Mobile device
A computer or other device that runs Microsoft Windows CE.
Mobile Devices folder
The folder on the desktop computer that contains the Windows CE
Services components.
Modem card
See compact flash card and PC Card.
My Documents folder
The folder that stores files you create on your device. You can
view the contents of this folder in the Explorer window in
Windows CE Services.
Network connection
A connection between your device and a network by means of an
Ethernet card inserted into your device.
Offline folder
When using IMAP4, a folder that contains messages that are
available when working online or offline.
POP3 (Post Office Protocol)
An e-mail protocol supported by most mail servers.
Port settings
The settings used to configure a communications port on a
computer.
PPP (Point-to-Point Protocol)
The protocol that your device uses to communicate with your
Internet service provider's network server.
RAS (Remote Access Service) account
A network account that enables your device to remotely access
your corporate network.
Remote connection
A connection between your device and a remote computer. You
make a remote connection by using a modem or an Ethernet card.
Ver 4 - iZZi+CE.fm Page 47 Monday, November 13, 2000 11:58 AM
48 User’s Guide
Remote Networking
The Windows CE folder where you establish a dial-up connection
between a mobile device and a remote computer.
Reset
Depending on the state of your device, a process that either causes
the device to reboot or erases all data stored in RAM. For more
information, see your device manufacturer's instructions.
Restore
To return your device to the state it was in when it was backed up.
This involves copying your backup data to your device.
Serial cable
A cable provided by your manufacturer to connect your device to
your desktop computer.
Serial connection
A connection between your device and a desktop computer or
external modem by means of a serial cable.
SIR (infrared) connection
A connection between your device and another computer or device
(such as a printer) by means of the IR port on each device. The
transfer rate is a maximum of 115 K-bps.
Slider
The vertical double bar on the command bar used to switch
between displaying toolbar buttons and menu names.
Smart Media Card
A removable card, capable of storing information in a similar
manner as a floppy disk. They are available in 16Mb/32/Mb/64Mb
sizes.
Stylus
A pen like device that is used along with the DioPen handwriting
recognizer to create text input and provide a means of program
operation.
TCP/IP (Transmission Control Protocol/Internet Protocol)
The protocol that your device uses to communicate remotely.
Ver 4 - iZZi+CE.fm Page 48 Monday, November 13, 2000 11:58 AM
Glossary49
Toolbar
A bar at the top of the screen that contains buttons that perform
specific tasks.
Touch screen
A touch-sensitive screen on your device that can recognize the
location of a touch on its surface (typically done by using the
Stylus) and translate that touch into a desired action (such as
making a selection or moving the cursor).
Wireless Keyboard
A smallbut highly functional keyboard that uses IR to transfer data
to the IZZY web.
Legal Terms and Copyright Information
The following product names are trademarks or registered trademarks of
Microsoft Corporation. Please use the appropriate trademark symbol on
first mention.
ActiveX®
Microsoft®
Microsoft InkWriter®
Microsoft Outlook™
Microsoft PowerPoint®
Microsoft Windows®
Microsoft Windows NT®
MSN™
Visual Basic®
Visual C++®
Ver 4 - iZZi+CE.fm Page 49 Monday, November 13, 2000 11:58 AM

50 User’s Guide
Safety, Regulatory &Legal Information
Important Safety Instructions
Your system is designed and tested to meet the latest standards for safety
of information technology equipment.However, to ensure safe use of this
product, it is important that the safety instructions marked on the product
andinthedocumentationarefollowed.
Always follow these instructions to help guard against
personal injury and damage to your system.
•Read and follow all instructions marked on the product and in
the documentation before you operate your system. Retain all
safety and operating instructions for future use.
•Unplug this product from the wall outlet before cleaning. Only
use a damp cloth for cleaning. Do not use liquid cleaners or
aerosol cleaners.
•Do not use this product near water or a heat source such as a
radiator.
•Set up the system on a stable work surface.
•Openings in the computer case are provided for ventilation. Do
not block or cover these openings. Make sure you provide
adequate space, at least 1 5cm. ( 6in.), around the system for
ventilation when you set up your work area. Never insert
objects of any kind into the computer ventilation openings
because they may touch dangerous voltage points or short out
parts; that could possibly cause a fire or electric shock.
•Before connecting this product to a power source, check the
required voltage and frequency match the available power
source.
•This product is powered by an internal battery pack or by an
external AC power source through an external AC adapter. Use
of another battery pack or external AC adapter may present a
risk of fire or explosion as well as voiding your warranty.
Ver 4 - iZZi+CE.fm Page 50 Monday, November 13, 2000 11:58 AM
Safety, Regulatory&Legal Information 51
•This product is equipped with a 2-wire type plug. If you are
unable to insert the plug into the outlet, contact your electrician
to replace your obsolete outlet.
•Do not walk on the power cord or allow anything to rest on it.
•Do not place this product in a location where someone may trip
over the cord.
•If an extension cord is used with this product, make sure that
the total of the ampere ratings on the products plugged into the
extension cord do not exceed the extension cord ampere rating.
•Except as explained elsewhere in this manual, do not attempt
to service this product yourself.
•Handle battery and other optional products with care. If
dropped, they may be damaged.
•Do not allow the battery to be exposed to direct sunlight for
extended periods of time.
•Do not attempt to disassemble the battery. Do not expose the
battery to moisture or chemicals.
•Charge the battery only as described in this document.
•Do not short circuit the battery terminals as the resulting high
currents may damage the battery.
•The battery should not be used to power other products.
•Disposal of a used battery in a fire or incinerator may result in
an explosion.
•The battery should be recycled.
•Do not subject the battery to temperature less than -20oC
(68oF) or greater than 50oC (122oF).
•Unplug the system from the wall outlet and refer servicing to
qualified personnel if:
- The power cord or plug is damaged.
- Liquid has been spilled into the system.
- The system does not operate properly when the
operating instructions are followed.
- The system was dropped or the cabinet is damaged.
- The system performance changes.
Ver 4 - iZZi+CE.fm Page 51 Monday, November 13, 2000 11:58 AM
52 User’s Guide
Battery Disposal
Contact your customer service representative for
information on how to dispose of batteries that you cannot
use or recharge any longer.
Do not put rechargeable batteries or products powered by non-removable
rechargeable batteries in the garbage.
Contact your customer service representative for information on how to
dispose of batteries that you cannot use or recharge any longer. Follow
all local regulations when old batteries.
Regulatory Compliance Statements
United States Users
Federal CommunicationsCommission (FCC)
This device has been tested and found to comply with the limits for a
Class B digital device, pursuant to Part 15 of the FCC rules. These limits
are designed to provide reasonable protection against harmful
interference in a residential installation. This equipment generates, uses,
and can radiate radio frequency energy and, if not installed and used in
accordance with the instructions, may cause harmful interference to radio
or television reception. However, there is no guarantee that interference
will not occur in a particular installation. If this equipment does cause
interference to radio and television reception, which can be determined
by turning the equipment off and on, the user is encouraged to try to
correct the interference by one or more of the following measures:
•Reorient or relocate the receiving antenna
•Increase the separation between the equipment and receiver
•Connect the equipment into an outlet on a circuit different from
that to which the receiver is connected
•Consult the dealer or an experienced radio/TV technician for
help.
Ver 4 - iZZi+CE.fm Page 52 Monday, November 13, 2000 11:58 AM

Safety, Regulatory&Legal Information 53
This device complies with Part 15 of the FCC Rules. Operation of this
productis subject to the following two conditions: (1) thisdevice may not
cause harmful interference, and (2) this device must accept any
interference received, including interference that may cause undesired
operation.
This device complies with Part 15 of the FCC Rules. Operation is subject
to the following two conditions:(1) this device may not cause harmful
interference, and (2) this device must accept any interference received,
including interference that may cause undesired operation.
Changes or modifications not expressly approved by
manufacturer could void the FCC compliance and negate
your authority to operate the product.
If necessary, the user should consult the dealer or an experienced radio/
television technician for additional suggestions. The user may find the
following booklet helpful: "Something About Interference." This is
available at FCC local regional offices. Our company is not responsible
for any radio or television interference caused by unauthorized
modifications of this equipment or the substitution or attachment of
connecting cables and equipment other than those specified by our
company. The correction will be the responsibility of the user. Use only
shielded data cables with this system.
Canadian Users
RadioInterferenceRegulations(ICES-003)
This digital apparatus does not exceed the Class B limits for radio noise
emissions from digital apparatus as set out in the radio interference
regulations of Industry Canada.
Le présent appareil numérique n’émet pas de bruits radioélectriques
dépassant les limites applicables aux appareils numériques de Class eB
prescrites dans le règlement sur le brouillage radioélectrique édicté par
Industrie Canada.
Ver 4 - iZZi+CE.fm Page 53 Monday, November 13, 2000 11:58 AM

54 User’s Guide
Power Cord Requirement
The power cord set (appliance coupler, flexible cord, and wall plug) you
received with your computer meets the requirements for use in the
country where you purchased your equipment.
Power cord sets for use in other countries must meet the requirements of
the country where you use the computer. For more information on power
cord set requirements, contact your authorized dealer, reseller, or service
provider.
General Requirements
The requirements listed below are applicable to all countries:
•The length of the power cord set must be at least 6.00 feet
(1.8m) and a maximum of 9.75 feet (3.0m).
•All power cord sets must be approved by an acceptable
accredited agency responsible for evaluation in the country
where the power cord set will be used.
•The power cord set must have a minimum current capacity of
3A and a nominal voltage rating of 125 or 250 volts AC, as
required by each country’s power system.
•The appliance coupler must meet the mechanical configuration
of an EN 60 320/IEC 320 Standard Sheet C13 connector, for
mating with appliance inlet on the computer.
Ver 4 - iZZi+CE.fm Page 54 Monday, November 13, 2000 11:58 AM

Safety, Regulatory&Legal Information 55
Country-Specific Power Cord Set Requirements
Notes:
1. Flexible cord must be <HAR> Type HO3VV-F or HO5VV-F,
2-conductor, 0.75 mm² conductor size. Power cord set fittings
(appliance coupler and wall plug) must bear the certification
mark of the agency responsible for evaluation in the country
where it will be used.
2. Flexible cord must be Type SPT-2 or equivalent, No.18 AWG,
2-conductor. Wall plug must be a two-pole type with a NEMA
1-15P (10A, 125V) configuration.
3. Appliance coupler, flexible cord, and wall plug must bear a "T"
mark and registration number in accordance with the Japanese
Dentori Law. Flexible cord must be Type HVFF or HVCTF, 2-
conductor, 0.75 mm² conductor size. Wall plug must be a two-
pole grounding type with a Japanese Industrial Standard C8303
(7 A, 125V) configuration.
Country Accrediting
Agency Applicable Note
Numbers
Australia EANSW 1
Austria OVE 1
Belgium CEBC 1
Canada CSA 2
Denmark DEMKO 1
Finland FIMKO 1
France UTE 1
Germany VDE 1
Italy IMQ 1
Japan JIS 3
Netherlands KEMA 1
Norway NEMKO 1
Sweden SEMKO 1
Switzerland SEV 1
United Kingdom BSI 1
United States UL 2
Ver 4 - iZZi+CE.fm Page 55 Monday, November 13, 2000 11:58 AM