Samsung Electronics Co S900 Notebook PC User Manual English
Samsung Electronics Co Ltd Notebook PC English
Contents
- 1. Users Manual 1
- 2. Users Manual1
- 3. Users Manual2
- 4. Users Manual3
Users Manual2

Using Your Computer for the First Time 11
•Do not remove the memory-module compartment door, or try to install a
memory module when the computer is on.
(For information on installing memory modules, see “Installing a Memory
Module” on page 68.)
•Set up your computer work area to avoid physical strain. Sit with your back
straight and supported by your chair. Adjust your chair or work table so that
your arms and wrists can remain in a relaxed position, parallel with the floor.
Avoid bending or twisting your wrists as you work. Your hands should “float”
slightly above the keyboard. Refer to a book on office ergonomics for more
information on setting up your work area.
•Take frequent breaks from working at the computer to rest your eyes and
stretch your muscles.
•Remember to save your data files frequently and to make backup copies of your
files.
Travelling with Your Computer
If you are travelling by air, follow these tips:
•Take the computer with you as carry-on luggage. Do not check the computer
with your baggage.
•Allow the computer and disks to go through the X-ray security devices. Do not
hand-carry disks through the walk-through metal detectors, which can cause
loss of data.
•Please collect your computer immediately after X-ray scanning, this is a high
theft area for portable computers.
•Make sure that the battery is charged or the power cord is easily accessible.
You may be required to turn on the computer for airport security personnel.
•Be prepared to turn off the computer during take off and landing.
Locking your Computer
As a precaution, when you are travelling or leaving your computer unattended, you
should keep your computer as safe as possible. A way to do this is a Security Lock
System. Follow the Security Lock System manufacturer’s instructions for specific
installation and use. The figures below show generally how to use the security lock.
Matrix II (Windows XP) - English.fm Page 11 Thursday, September 13, 2001 11:42 AM

12 Users Manual
Make sure that the object you lock your computer to cannot be easily
disassembled or broken, such as steel post or a secure part of a desk.
Handling Spills
Do not spill anything on your computer. The best way to avoid spills is to avoid eating
and drinking around your computer. If you do spill something on your computer, turn
off your computer, unplug it immediately, and do the following:
•If you spill liquid on the keyboard, drain as much of the liquid from the
keyboard as possible. Be careful not to let the liquid drip onto the LCD panel.
Allow the system to dry for several days before trying to use it.
•If you spill liquid on an external keyboard or keypad, unplug it and drain as
much of the liquid as possible. Allow the keyboard to sit at room temperature
for a full day before trying to use it.
Sweet liquids leave a sticky residue that may jam the keyboard despite your
efforts to dry it.
•If you spill liquid on the LCD panel, clean it immediately with a soft cloth and
denatured alcohol or a proprietary LCD screen cleaner. Do not use water,
window cleaner, acetone, aromatic solvent, or dry, rough towels to clean it.
13
2
From Lock
To Lock
Matrix II (Windows XP) - English.fm Page 12 Thursday, September 13, 2001 11:42 AM

Using Your Computer for the First Time 13
Some liquids damage the polarized LCD screen. If your screen is damaged,
contact your authorized manufacturer’s service center for a replacement.
Storing the Computer for Long Periods
If possible, leave the power cord connected to the computer and an electrical outlet
when the computer is not in use. This extends the life of the battery and keeps the
battery fully charged.
If you will not be using the computer for a long period of time (a month or more), you
should charge the battery until it is completely full. After you have done so, remove the
battery from the unit.
Matrix II (Windows XP) - English.fm Page 13 Thursday, September 13, 2001 11:42 AM
14 Users Manual
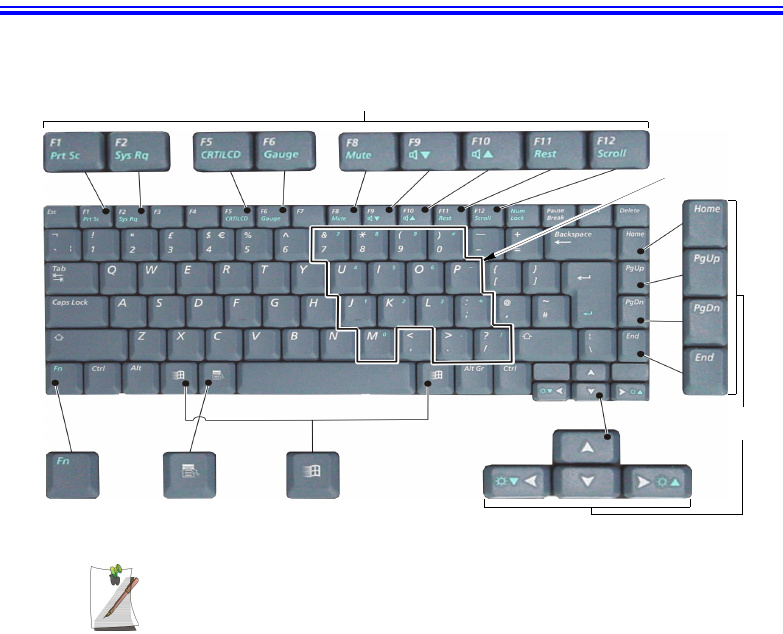
Using the Keyboard
Your computer has an 87/88-key keyboard. By pressing designated key combinations,
you can have access to all the key functions of a full-sized keyboard.
Although the layout of the keys on your computer’s keyboard is different from
that on a desktop computer’s keyboard, the keyboard feels like a full-sized
keyboard when you use it.
The keys on the keyboard can be grouped into the following categories:
•Full-sized Alphanumeric typewriter keys are arranged like a standard
typewriter keyboard and are used for text entry. The Windows keys on either
side of the spacebar open Windows menus and perform other special functions.
•Function keys, when pressed together with the <Fn> key, enable special
functions.
•Cursor and Screen control keys move the cursor. They may perform other
functions, depending on your software.
To clean the computer keyboard, use slightly damp cotton swabs. Scrub the keys and
the surface around the keys.
Function & Special Purpose Keys
Embedded
Numeric Keypad
Application Key
Cursor/Screen
Control Keys
Windows KeyFunction Key
Matrix II (Windows XP) - English.fm Page 14 Thursday, September 13, 2001 11:42 AM
Using the Keyboard 15
Do not allow liquid to drip into the keyboard or you may damage the keyboard.
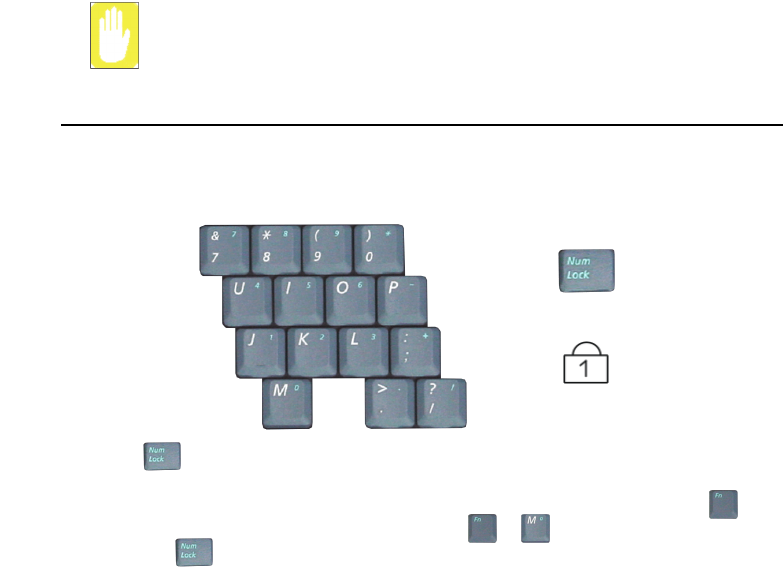
Using the Numeric Keypad
Your keyboard includes a numeric keypad, which is a group of keys that you can set to
type numbers and mathematical symbols, such as the plus sign. A number or symbol
on the right corner of each keypad key shows its numeric function.
Press to turn on the embedded numeric keypad. The numeric functions of the
keypad are enabled and the Num Lock light turns on. While the numeric functions are
enabled, you can temporarily return a key to its normal function by pressing and
the key. For example to type the letter m, press . To turn the numeric keypad
off, press again. The Num Lock light turns off.
Num Lock LED
Num Lock Key
+
Matrix II (Windows XP) - English.fm Page 15 Thursday, September 13, 2001 11:42 AM

16 Users Manual
Using Special Function Keys
The <Fn> key activates special functions when it is pressed in combination with
another key.
Table 2. Description of Special Function Keys
When you press a function key combination, the system sound may be
temporarily muted.
<Fn> Key
Combination Function
<Fn+F1> Print screen: Takes a picture of the open screen, which you can paste into the Paint
program.
<Fn+F2> System request: Reserved for use in software programs.
<Fn+F5> CRT/LCD: Switches the display between the LCD, the external monitor, and
simultaneous display on both the LCD and the external monitor.
<Fn+F6> Gauge: Displays the battery gauge in the upper-right corner of your screen.
The gauge closes in a few seconds, or you can press <Esc> to close the gauge. (See
“Monitoring the Battery Charge” on page 45 for more information on the battery gauge.)
<Fn+F8> Mute: Turns the audio output on and off.
<Fn+F9> Volume down: Decreases the audio volume.
<Fn+F10> Volume up: Increases the audio volume.
<Fn+F11> Rest: Puts the computer into Suspend mode. To resume normal operation from rest,
press the power button. (See “Using Power Management Options” on page 54 for
more information about the rest mode.)
<Fn+F12> Scroll: In some applications, sets the cursor-control keys to scroll the page up or down
while the cursor position does not change. Pressing <Fn+F12> again turns off the
scrolling function.
<Fn+Right Arrow> Brightness up: Increases the LCD brightness.
<Fn+Left Arrow> Brightness down: Decreases the LCD brightness.
Matrix II (Windows XP) - English.fm Page 16 Thursday, September 13, 2001 11:42 AM
Using the Keyboard 17
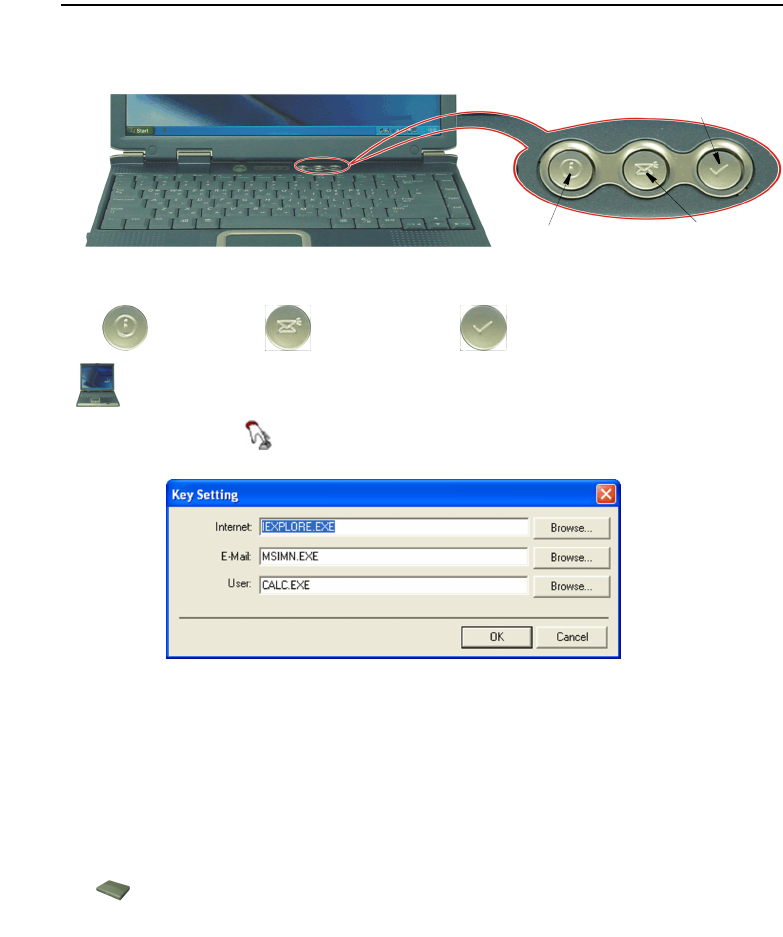
User Defined Buttons (SENS Keyboard)
You may program the three buttons to the left of the power button to start any program
you have installed on your computer.
The default settings for these buttons are:
To reprogram the Sens Keyboard, follow the steps below:
1. Double-Click icon on the Windows taskbar, the Key Setting window is
displayed.
2. Select Button you wish to reprogram from the drop down menus in the Key
Setting window.
3. Use the Browse button to locate the program you wish to assign to the SENS
Keyboard button selected.
4. Click on your program choice to select it.
5. Click Open.
6. Click OK to close window and complete programming the Sens Keyboard.
Internet E-Mail - Outlook Windows Calculator
Internet Explorer Outlook Express
User defined program
Matrix II (Windows XP) - English.fm Page 17 Thursday, September 13, 2001 11:42 AM
18 Users Manual
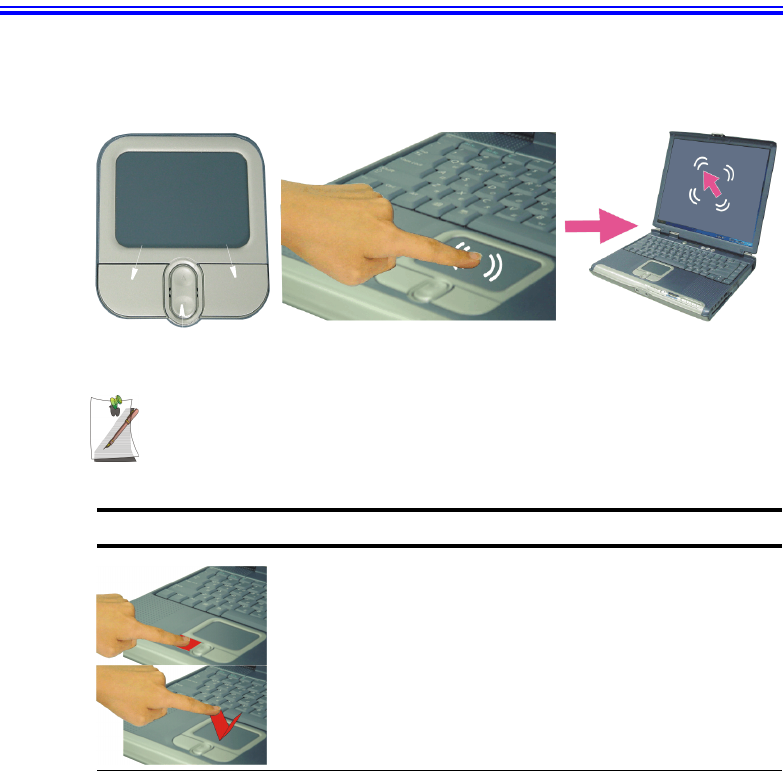
Using the Touchpad
Your computer is equipped with a touchpad, which is an integrated-pointing device
that is used to perform standard mouse functions. The touchpad is an advanced and
reliable pointing device that works with a touch of your finger.
Press on the touchpad gently. The touchpad responds to light pressure.
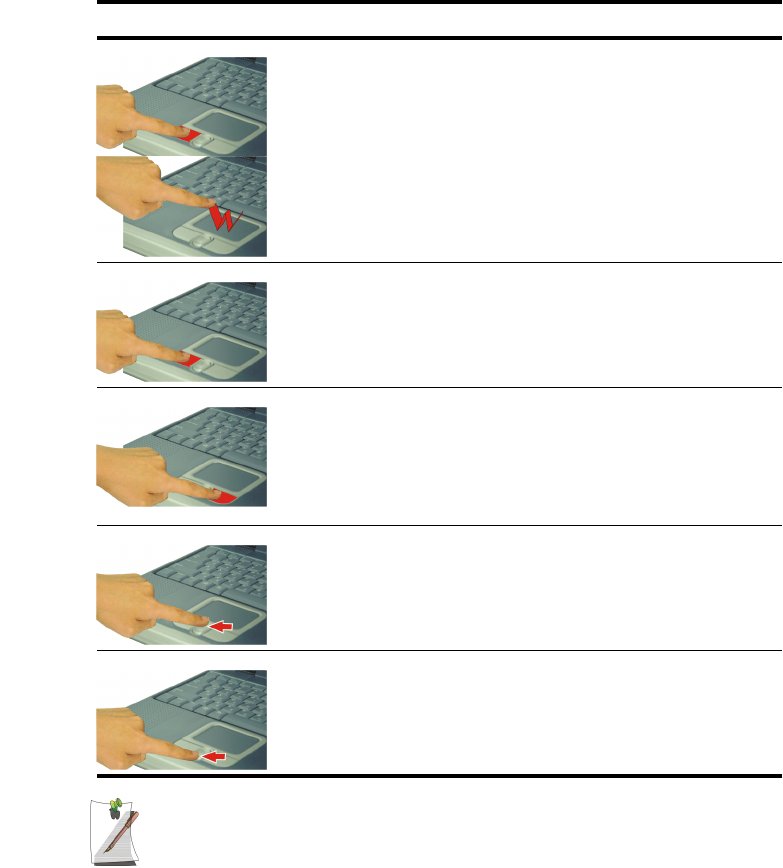
Table 3. Using the Touchpad
Action Process and Comment
Click/Tap Process
Depress the touchpad left button and release or position the pointer
over the object and Quickly tap the touchpad once with your finger.
This action is called clicking.
Comment
This will cause a process to begin or select an object on the screen.
Touchpad
Mouse buttons
Scroll button
Matrix II (Windows XP) - English.fm Page 18 Thursday, September 13, 2001 11:42 AM
Using the Touchpad 19
PS/2 Mouse Menu:
You may change the setup in Setup > Advanced Menu
Disabled : Prevents any installed PS/2 mouse from functioning, but frees
up IRQ12.
Enabled : Forces the PS/2 mouse port to be enabled regardless if there is
a mouse present.
Auto Detect : Enables the PS/2 mouse only if present.
Double-Click/Tap Process
Quickly click the left touchpad button two times or position the pointer
over the object and Quickly tap the touchpad twice with your finger.
This action is called Double-clicking.
Comment
This will cause a process to begin or open a file folder.
Click-Hold Process
Depress the left touchpad button and do not release.
Comment
This is used to move/drag objects to new locations. See “Drag (Move)”
on page 20.
Right-Click Process
Position the pointer over the object. Quickly press and release the right
button once.
This action is called Right-clicking.
Comment
This is usually used to obtain information about an object or access a
short cut menu.
Scroll up Process
Place your finger on the top half of the button to scroll up the current
window.
Comment
Moves the current window down.
Scroll down Process
Place your finger on the bottom half of the button to scroll up the current
window.
Comment
Moves the current window up.
Action Process and Comment
Matrix II (Windows XP) - English.fm Page 19 Thursday, September 13, 2001 11:42 AM
20 Users Manual
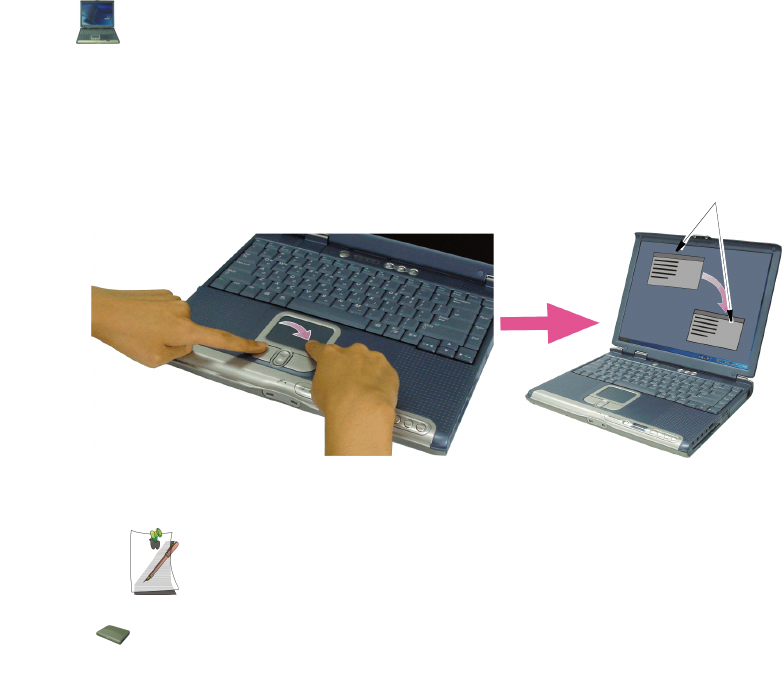
Drag (Move)
To move a window on the desktop, complete the following:
1. Click the window title bar or icon in the bottom of the window which you want
to drag using the touchpad.
2. Press the left touchpad button and hold it.
3. Drag the window using the touchpad.
Area or Multiple item selection:
The drag function may be used to select an area or multiple items in an
area by clicking in one area and then dragging to create a selection
window. The items inside the window will be selected.
Cursor in Windows
Title Bar
11 Click the Window
Title Bar and Hold
1
22 Drag your finger to
move the window
2
Matrix II (Windows XP) - English.fm Page 20 Thursday, September 13, 2001 11:42 AM
System Status Lights and Buttons 21
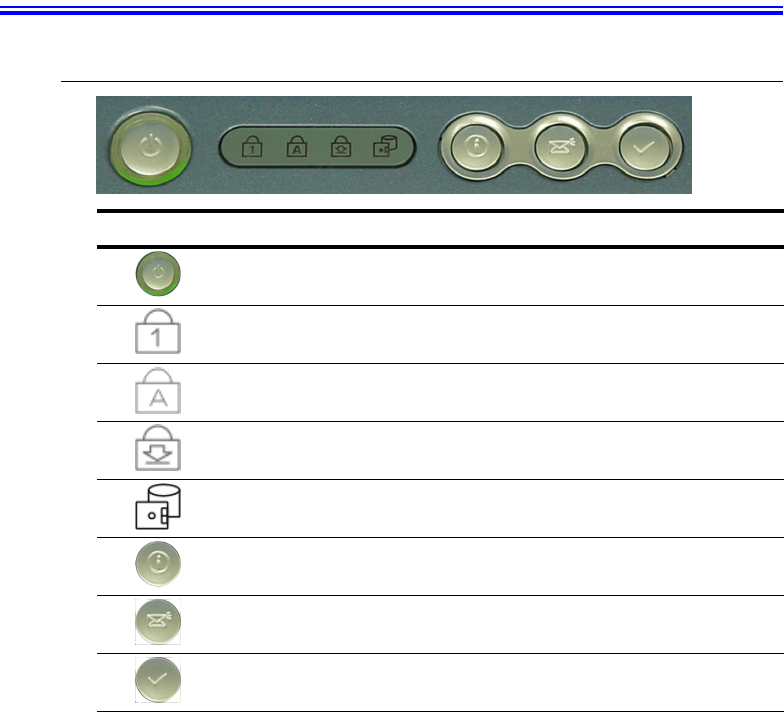
System Status Lights and Buttons
System Top
LED/Button Name Function
Power Button Turns on the computer & Restarts computer from Standby mode.
Green light around the power button is energized when power is on
and de-nergized when in standby or power is off
Num Lock Changes a portion of the keyboard to a numeric keypad.
See “Using the Numeric Keypad” on page 15.
Caps Lock Changes all alpha or letter input into capital letters.
No changes occur to numeric and special keys.
Scroll Lock Scroll lock in some software packages.
Drive Access Using the Disk Drives.
Blinking Green - HDD is being accessed
Blinking Amber - FDD or CD-ROM is being accessed
Internet Button Connects the computer to the internet. The button is programmable,
see “User Defined Buttons (SENS Keyboard)” on page 17.
E-Mail Button Starts your E-Mail program. The button is programmable, see “User
Defined Buttons (SENS Keyboard)” on page 17.
User Button Starts any program you have assigned to the button. The button is
programmable, see “User Defined Buttons (SENS Keyboard)” on
page 17
Matrix II (Windows XP) - English.fm Page 21 Thursday, September 13, 2001 11:42 AM
22 Users Manual
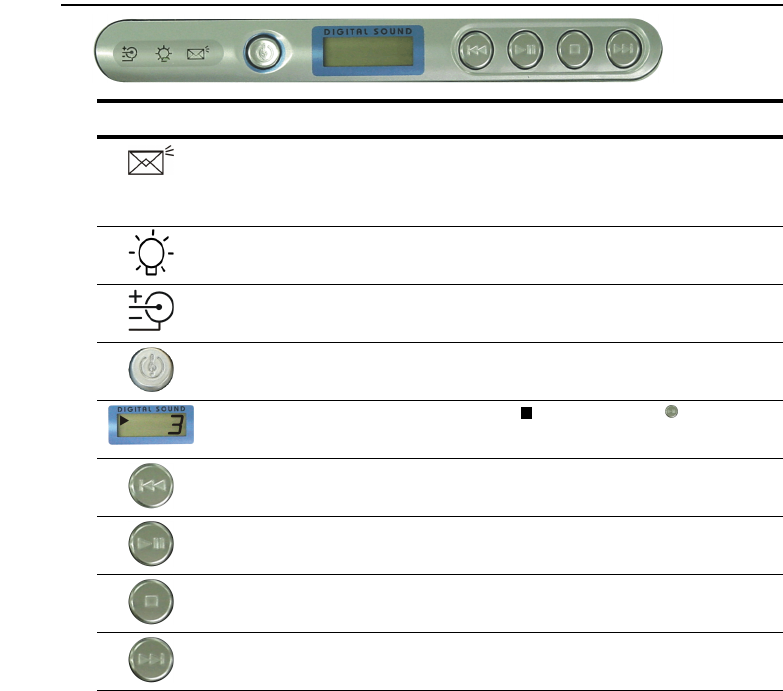
System Bottom
LED/Button Name Function
E-mail Alert The Light comes on when e-mail arrives.
To use this function, you must register an E-mail Account in the
Register E-mail Account window.
To register an E-mail account Select:
Start > All Programs > StartUp > Internet Launcher.
Power Green - System power on.
Blinking - Standby mode.
Battery Status Green - No battery pack installed/battery fully charged.
Amber - Charging.
Audio DJ Power Starts Audio DJ when computer power is off.
Starts Windows Media player when power is on.
Track Display Indicates power on => and track playing => .
Blinks track number when paused.
Previous Track/Song Changes the Audio CD to the previous track/song.
CD Play/Pause Starts & Pauses the Audio CD.
Stop/Eject Stops & Ejects the Audio CD.
Next Track/Song Changes the Audio CD to the next track/song.
Matrix II (Windows XP) - English.fm Page 22 Thursday, September 13, 2001 11:42 AM
Connecting to the Internet 23
Connecting to the Internet
This section explains how to connect you to the internet. For details on how to establish
the connection contact the Internet Service Provider [ISP] or system administrator
[SysAdmin].
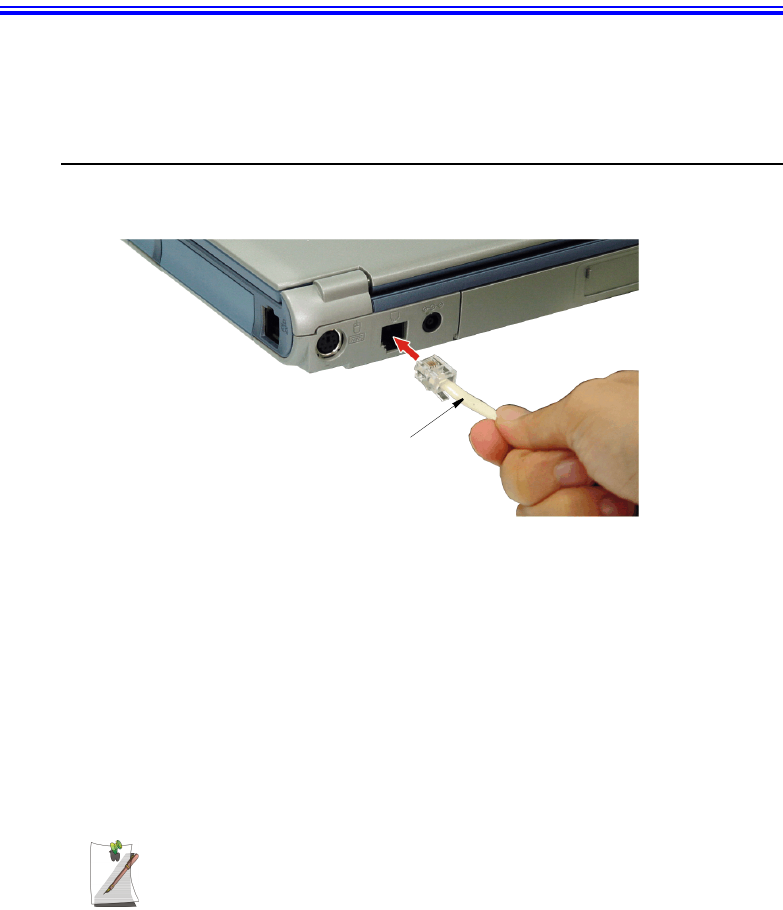
Using the Modem
Install the Modem cable by simply plugging the cable into the slot in the back of the
computer.
1. Contact your Internet Service Provider to obtain information or CD required to
make the connection in your area.
2. After the cable is connected create a “Dialup” connection by clicking
Start > Control Panel > Network and Internet Connections.
3. Click Set up or change your Internet connection > Setup to start the connection
wizard.
4. Follow the instructions in provided in the Make New Connection wizard.
Precautions Before Use
Country Selection
Country Selection:
Because your computer is very mobile you must ensure you select the
country you are calling from is selected correctly, otherwise you may
experience connection problems.
Modem Cable
(Minimum 26 AWG)
Matrix II (Windows XP) - English.fm Page 23 Thursday, September 13, 2001 11:42 AM

24 Users Manual
To change the country selection proceed as follows:
1. Start > Control Panel > Network and Internet Connections.
2. Click Phone and Modem Options.
3. Click on the connection you wish to edit in the Locations: box.
4. Click Edit in the Dialing Rules Tab
5. Select the Country/region you are calling from in the General tab.
6. Click OK to close the "Edit Locations" box.
7. Click OK to close “Phone and Modem Options” box.
Digital Phone Lines:
If you connect the modem to a digital phone line (such as a company
4-wire system), the modem may be damaged.
DOS support
•Windows XP: Does not support pure DOS mode and the modem does not
support a DOS box in Windows. So you cannot use a
communication application which runs under DOS.
Matrix II (Windows XP) - English.fm Page 24 Thursday, September 13, 2001 11:42 AM

Connecting to the Internet 25
Using the Modem on a PBX system
If you use a Windows Communication Program:
1. Click Start > Control Panel > Network and Internet Connections.
2. Click Phone and Modem Options.
3. Click Properties in the Modems tab section.
4. Check off “Wait for dial tone before dialing” check box in the Modem tab
section.
5. Click OK to close the dialog box.
6. Click OK to close “Modem Properties” dialog box.
If you use a simple terminal program (i.e. hyper terminal):
Type the “ATX3&W” or “ATX3” command as an initialization command.
MODEM Notes:
1. In order to use the 56K feature, be sure to check if the standards supported
by the on-line service provider and the modem are identical.
2. If you use a PBX phone system, you can not connect using the 56K mode.
3. Internationally connected calls will be limited to 33.6K (Max.)
Matrix II (Windows XP) - English.fm Page 25 Thursday, September 13, 2001 11:42 AM
26 Users Manual
Using the LAN
You may connect to the network using either a LAN cable or by establishing a wireless
connection if factory option is installed.
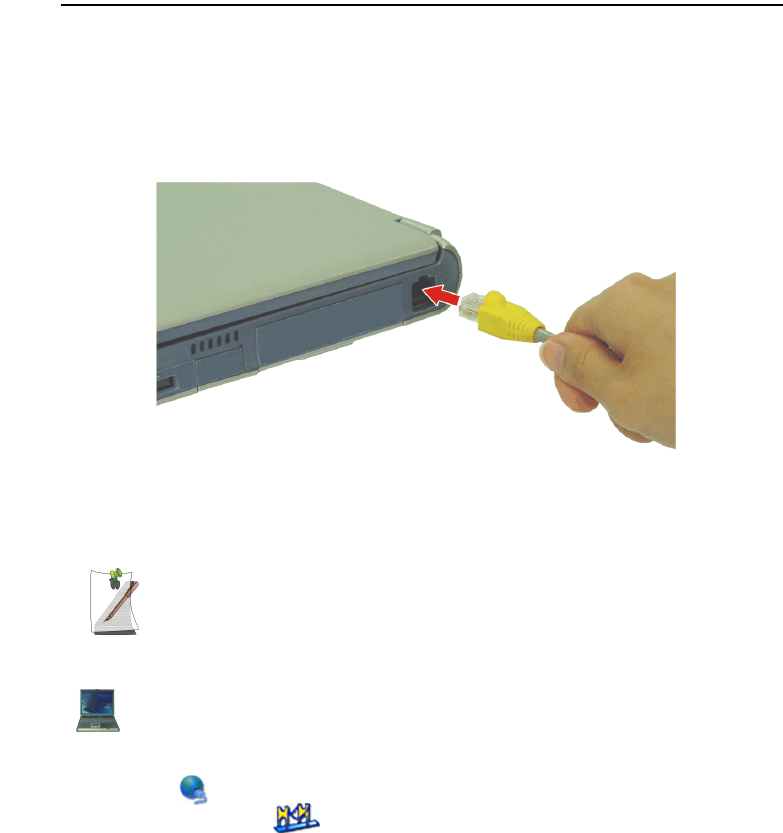
Cable Connection
Install the LAN cable by simply plugging the cable into the slot in the right side of the
computer.
Your computer’s LAN adapter is ready to use for most situations, however if your
system does not have a DHCP server or you wish to personally configure your LAN
connection, proceed as outlined in “Configuring Network Environment” below.
Network Protocols:
You may need to consult your SysAdmin if their network protocols and settings
are required for your LAN environment.
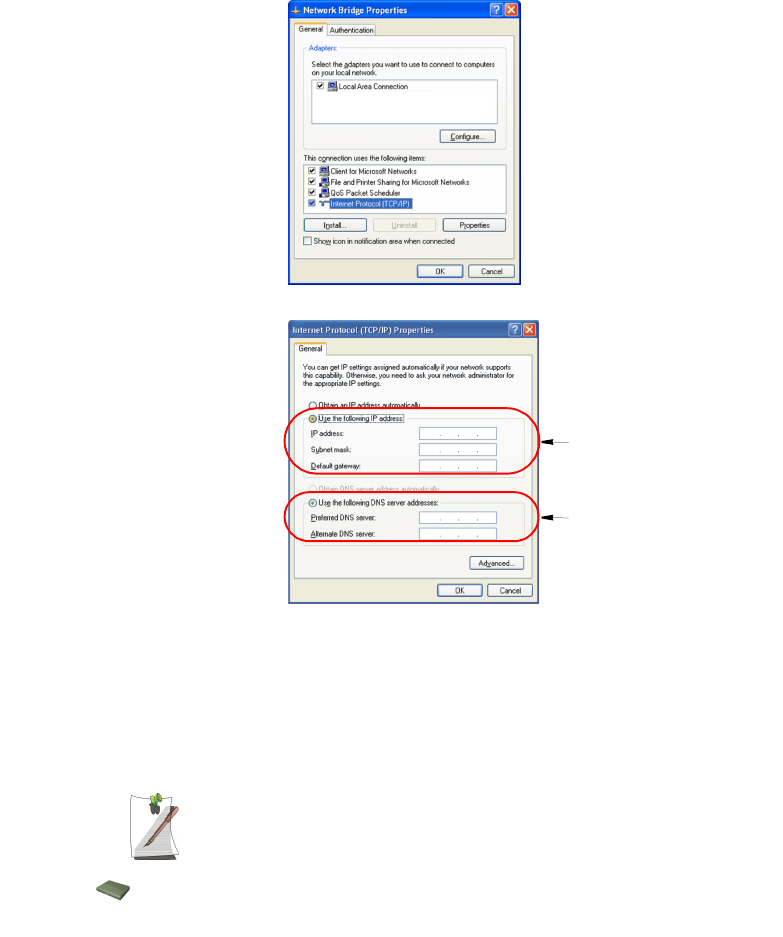
Configuring Network Environment
Configure the Network Adapter as follows:
1. Click Start > Control Panel > Network and Internet Connections
2. Click icon (Network Connections)
3. Double-Click the icon (Labeled Network Bridge)
4. Click Properties
5. Select Internet Protocol (TCP/IP) in the “This connection uses the following
items:” box.
Matrix II (Windows XP) - English.fm Page 26 Thursday, September 13, 2001 11:42 AM
Connecting to the Internet 27
6. Click Properties. The TCP/IP Properties window opens.
7. Click “Use the following IP address” in the General tab
8. In the “Use the following IP address” box, enter your IP address:, subnet mask:
and Default Gateway:.
9. In the “Use the following DNS server addresses” box, Enter your Preferred DNS
server: and Alternate DNS server:.
10. Click OK when you finish the TCP/IP set-up.
If your computer is used on more than one network, enter the applicable
IP setting in the “Alternate Configuration” settings window by clicking on
the Alternate Settings tab.
Step 8
Step 9
Matrix II (Windows XP) - English.fm Page 27 Thursday, September 13, 2001 11:42 AM
28 Users Manual
Bluetooth Connection (Optional)
If this factory option is installed, you can establish wireless communication between
bluetooth communication devices, such as cellular phones, desktop and other notebook
computers. The Bluetooth icon on the Windows taskbar changes color to indicate if the
Bluetooth connection is enabled , unavailable and actively connected .
The Bluetooth option allows several levels of connectivity between Bluetooth devices
as shown using the icons in the table below.
To use the bluetooth option, please follow the help menu provided with the installed
software. To access the program, double click on the bluetooth icon in the Windows
taskbar.
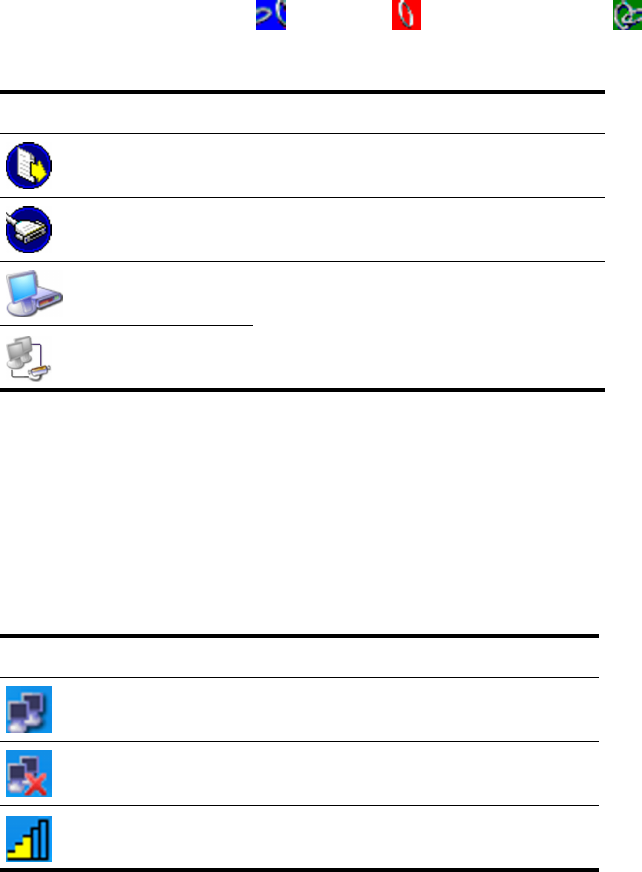
Wireless Connection (Optional)
If this factory option is installed, see the users manual included with the option to setup
and establish your connection. You should also consult your system administrator for
any questions you may have. The table below shows the Windows taskbar icons for the
wireless LAN.
Icon Name Description
Send This level allows you to send data only. You may
NOT receive data or access another computer.
Serial Port
Hyperterminal This level allows you to send and receive data. You
may NOT access another computer.
You may be the Host or the Guest.
Serial Port
Direct Cable - Host This level is basically full duplex mode and allows
transfer and retrieval of files/folders if they are set to
shared. Any files/folders NOT set to shared
CANNOT be accessed.
Serial Port
Direct Cable - Client
Icon Name Description
Connection
Established Displays if connection is available.
Connection
Unavailable Displays if connection is unavailable.
Signal Strength Displays the relative signal strength of the connection.
Matrix II (Windows XP) - English.fm Page 28 Thursday, September 13, 2001 11:42 AM
Using the Flex-Bay 29
Using the Flex-Bay
If your operating system is Windows, you can use the SwapBay Utility to hot-
swap the devices. If you do not use Windows, make sure that the computer’s
power is off before you remove or install any devices.
The Flex-Bay provides an impressive array of secondary
storage devices listed below:
CD-ROM drive:
Shipped with some computers is also an available option.
CD-ROM R/W drive:
Shipped with some computers is also an available option.
DVD-ROM drive:
Shipped with some computers is also an available option.
DVD/CD-RW Combo drive:
Shipped with some computers is also an available option.
Optional secondary hard drive:
Available as an option for your computer.
Superdisk LS-120:
Available as an option for your computer.
Second Battery:
Available as an option for your computer.
Matrix II (Windows XP) - English.fm Page 29 Thursday, September 13, 2001 11:42 AM
30 Users Manual
Swap a Flex-Bay Device - Power On
You can use the Softex Bay Manager utility to hot-swap your devices in the flex-bay.
To start the Softex Bay Manager utility:
1. Click Start > Control Panel > Other Control Panel Options > Softex Bay
Manager.
- or -
2. Double-Click the SwapBay icon in the Windows taskbar.
Device Swap
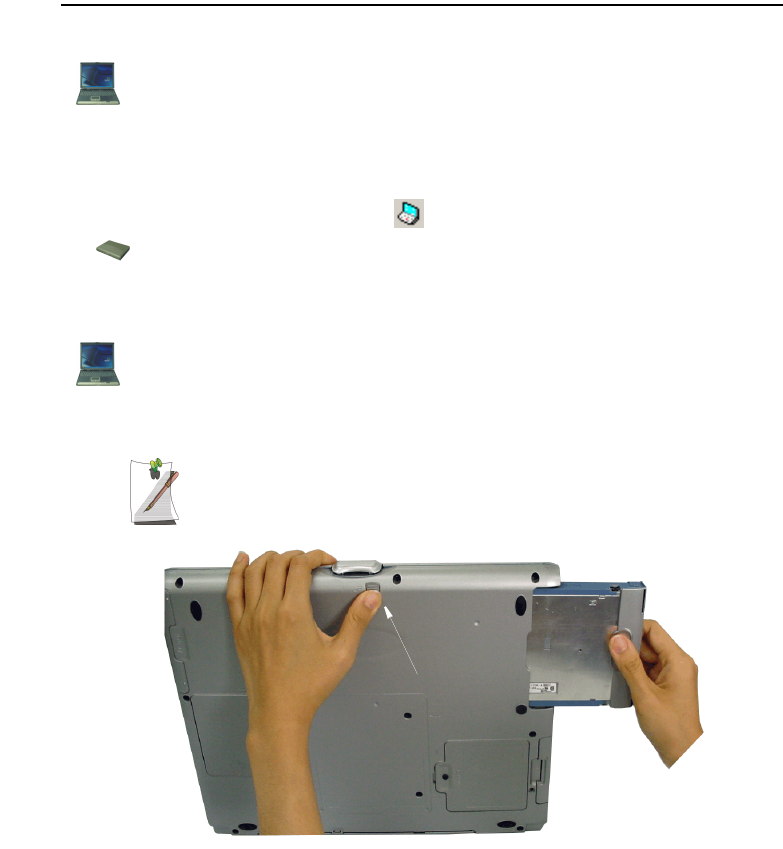
To swap a device with the power on proceed as follows:
1. Start the Softex Bay Manager Utility.
You do not have to turn the computer over or tip it on its side to change
devices. Simply tilt the computer up at the front about 10 cm and locate
the Flex-Bay latch. See Figure below for the location of the Flex-Bay
latch. The computer in the figure is tilted on its side for clarity.
2. Click Remove / Swap. A Device Change popup window stating, “Please wait until
the system processes the device change” appears then another popup window
appears and says, “Please remove or swap your bay device(s) now and press OK.”
3. Tilt the computer up & locate the smart bay latch.
Flex-Bay Latch
Matrix II (Windows XP) - English.fm Page 30 Thursday, September 13, 2001 11:42 AM