Samsung Electronics Co SCHA633 Single-Mode Cellular Phone (CDMA) User Manual 1
Samsung Electronics Co Ltd Single-Mode Cellular Phone (CDMA) Users Manual 1
Contents
- 1. Users Manual 1
- 2. Users Manual 2
Users Manual 1

ELECTRONICS
World Wide Web
http://www.samsungmobile.com
CELLULAR PHONE
SCH-A633
User’s Manual
Printed in Korea
Código No.: GH68-XXXXXA
English. 05/2003.Rev.1.0
Please read this manual before operating your phone, and keep it
for future reference.
Draft version
(2003/05/14)
All phone functions couldn’t be checked
because the software of the current working
sample was unstable. The descriptions in this
manual were borrowed from the other
manuals. The functions will be checked and,
therefore, the contents will be corrected in the
next version.
* Some contents of this manual may differ from your phone
depending upon the software of the phone or your service
provider.

3
Important Safety Precautions .................................................. 7
Unpacking ................................................................................... 9
Your Phone
Phone’s Parts ................................................................................ 10
Display ......................................................................................... 13
Backlight ...................................................................................... 15
Camera ........................................................................................ 15
Getting Started
Using a Battery ............................................................................. 17
Switching the Phone On or Off ....................................................... 20
Using the Soft Keys ........................................................................ 22
Your Phone’s Modes ...................................................................... 23
Call Functions
Making a Call ................................................................................ 26
Emergency Dialling ....................................................................... 27
Redialing the Last Number ............................................................ 28
Making a Call from Phonebook ..................................................... 28
Prepend Dialling ........................................................................... 29
Speed-dialling ............................................................................... 29
Four-digit Dialling ......................................................................... 31
Pause Dialling .............................................................................. 32
Voice Dialling ................................................................................ 34
Adjusting the Volume During a Call ............................................... 36
Answering a Call ............................................................................ 36
Options During a Call ..................................................................... 37
Using Caller ID .............................................................................. 38
Viewing Missed Calls ...................................................................... 38
Call Forwarding ............................................................................. 39
Call Waiting ................................................................................... 39
Three-way Calling .......................................................................... 40
Table of ContentsFCC RF EXPOSURE INFORMATION
In August 1996 the Federal Communications Commission (FCC) of
the United States with its action in Report and Order FCC 96-326
adopted an updated safety standard for human exposure to radio
frequency electromagnetic energy emitted by FCC regulated
transmitters. Those guidelines are consistent with the safety
standards previously set by both U.S. and international standards
bodies. The design of this phone complies with the FCC guidelines
and these international standards.
Use only the supplied antenna or one that is approved.
Unauthorized antennas, modifications, or attachments could impair
call quality, damage the phone, or result in a violation of FCC
regulations.
Do not use the phone with a damaged antenna. If a damaged
antenna comes into contact with the skin, a minor burn may result.
Please contact your local dealer for a replacement antenna.
Body-worn Operation
This device was tested for typical body-worn operations with the back
of the phone kept 1.5 cm. from the body. To maintain compliance
with FCC RF exposure requirements, use only belt-clips, holsters
or similar accessories that maintain at least a 0.59 inch (1.5 cm.) separation
distance, between the user's body and the back of the phone, including
the antenna, whether extended or retracted. The use of belt-clips,
holsters and similar accessories should not contain metallic
components in its assembly. The use of accessories that do not
satisfy these requirements may not comply with FCC RF
exposure requirements, and should be avoided.
Vehicle Mounted External Antenna (optional, if
available.)
A minimum separation distance of 7.9 inches (20cm) must be
maintained between a person and the vehicle mounted external
antenna to satisfy FCC RF exposure requirements.
For more information about RF exposure, please visit the FCC web
site at www.fcc.gov

4 5
Entering Text
Changing the Text Input Mode ........................................................ 42
Using the T9 (English) Mode .......................................................... 43
Using the Alphabet Mode ............................................................... 45
Using the Symbol Mode ................................................................. 47
Using the Number Mode ................................................................ 47
Using the Menus
Accessing a Menu Function by Scrolling .......................................... 48
Accessing a Menu Function by Using Its Shortcut ...............................49
List of Menu Functions ................................................................... 50
Phone Book
Find (Menu 1-1) ........................................................................ 53
Add Entry (Menu 1-2) ............................................................... 55
Groups (Menu 1-3) ................................................................... 59
Memory Status (Menu 1-4)......................................................... 60
Messages
Write (Menu 2-1) ....................................................................... 61
Inbox (Menu 2-2)....................................................................... 64
Outbox (Menu 2-3) .................................................................... 65
Saved (Menu 2-4) ...................................................................... 66
Templates (Menu 2-5)................................................................. 67
Erase Messages (Menu 2-6) ........................................................ 67
Settings (Menu 2-7).................................................................... 68
Voice Mail (Menu 2-8) ................................................................ 70
Call History
Missed (Menu 3-1) ..................................................................... 71
Received (Menu 3-2) ................................................................. 72
Dialled (Menu 3-3) .................................................................... 73
Erase History (Menu 3-4)............................................................ 73
Call Duration (Menu 3-5)............................................................ 74
Sounds
Ringer Tones (Menu 4-1) ........................................................... 75
Ringer Volume (Menu 4-2) ........................................................ 76
Alerts (Menu 4-3) ..................................................................... 77
Key Tone (Menu 4-4) ................................................................ 78
Power On/Off Melody (Menu 4-5) .............................................. 78
Display
Language (Menu 5-1) ............................................................... 79
Service Area (Menu 5-2) ........................................................... 79
Menu Theme (Menu 5-3) .......................................................... 79
Wallpaper (Menu 5-4) ............................................................... 80
Banner (Menu 5-5) .................................................................... 81
Backlight (Menu 5-6) ................................................................ 82
Set Dual Clock (Menu 5-7) ........................................................ 82
Service LED (Menu 5-8) ............................................................. 83
Voice Tools
Voice Dial (Menu 6-1) ............................................................... 84
Voice Memo (Menu 6-2) ............................................................ 87
Answer Machine (Menu 6-3) ....................................................... 89
Organiser
Scheduler (Menu 7-1) ................................................................ 92
Task List (Menu 7-2) ................................................................. 95
Memo Pad (Menu 7-3) .............................................................. 97
Alarm (Menu 7-4) ..................................................................... 98
Calculator (Menu 7-5) ............................................................... 99
World Time (Menu 7-6) ........................................................... 100
Count Down (Menu 7-7) .......................................................... 100
Settings
Call (Menu 8-1) ....................................................................... 102
Phone/System (Menu 8-2) ...................................................... 105
Security (Menu 8-3) ............................................................... 106

7
Important Safety
Precautions
Read these guidelines before using your wireless
phone. Failure to comply with them may be dangerous
or illegal.
Road Safety at All Times
Do not use a hand-held phone while driving; park the
vehicle first.
Switching Off When Refuelling
Do not use the phone at a refuelling point (service
station) or near fuels or chemicals.
Switching Off in Aircraft
Wireless phones can cause interference. Using them
in aircraft is both illegal and dangerous.
Switching Off in Hospitals
Switch your phone off near medical equipment.
Follow any regulations or rules in force.
Interference
All wireless phones may be subject to interference,
which could affect their performance.
Special Regulations
Meet any special regulations in force in any area and
always switch off your phone whenever it is forbidden
to use it, or when it may cause interference or danger
(in a hospital for example).
6
R World
R-Menu (Menu 9-1).................................................................. 110
Multimedia (Menu 9-2).............................................................. 115
Games (Menu 9-3) .................................................................... 116
Reset R-Menu (Menu 9-4)........................................................ 1167
Photos
Camera (Menu 0-1) ................................................................ 118
Photo Album (Menu 0-2) ......................................................... 122
Photo Wallet (Menu 0-3) ......................................................... 123
Settings (Menu 0-4) ................................................................ 125
Health and Safety Information
Precautions When Using Batteries ................................................. 126
Road Safety ................................................................................. 128
Operating Environment................................................................. 130
Electronic Devices ........................................................................ 131
Potentially Explosive Environments................................................ 133
Emergency Calls ........................................................................... 134
Other Important Safety Information.............................................. 135
Care and Maintenance .................................................................. 136
Glossary ...................................................................... 138
Index............................................................................ 141
Quick Reference Card.................................................... 145
8
IImmppoorrttaanntt SSaaffeettyy PPrreeccaauuttiioonnss
9
Sensible Use
Use only in the normal position (held to the ear). Avoid
unnecessary contact with the antenna when the phone
is switched on.
Emergency Call
Ensure the phone is switched on and in service.
Key in the emergency number for your present
location, then press the key. You must deactivate
any unnecessary features before you can make an
emergency call. Give all the necessary information as
accurately as possible. Do not cut off the call until
given permission to do so.
Water Resistance
Your phone is not water-resistance. Keep it dry.
Accessories and Batteries
Use only Samsung-approved accessories and batteries.
Use of unauthorised accessories could damage your
phone and may be dangerous.
Qualified Service
Only qualified service personnel may install or repair
your phone.
For more detailed safety information, see “Health and
Safety Information” on page xx.
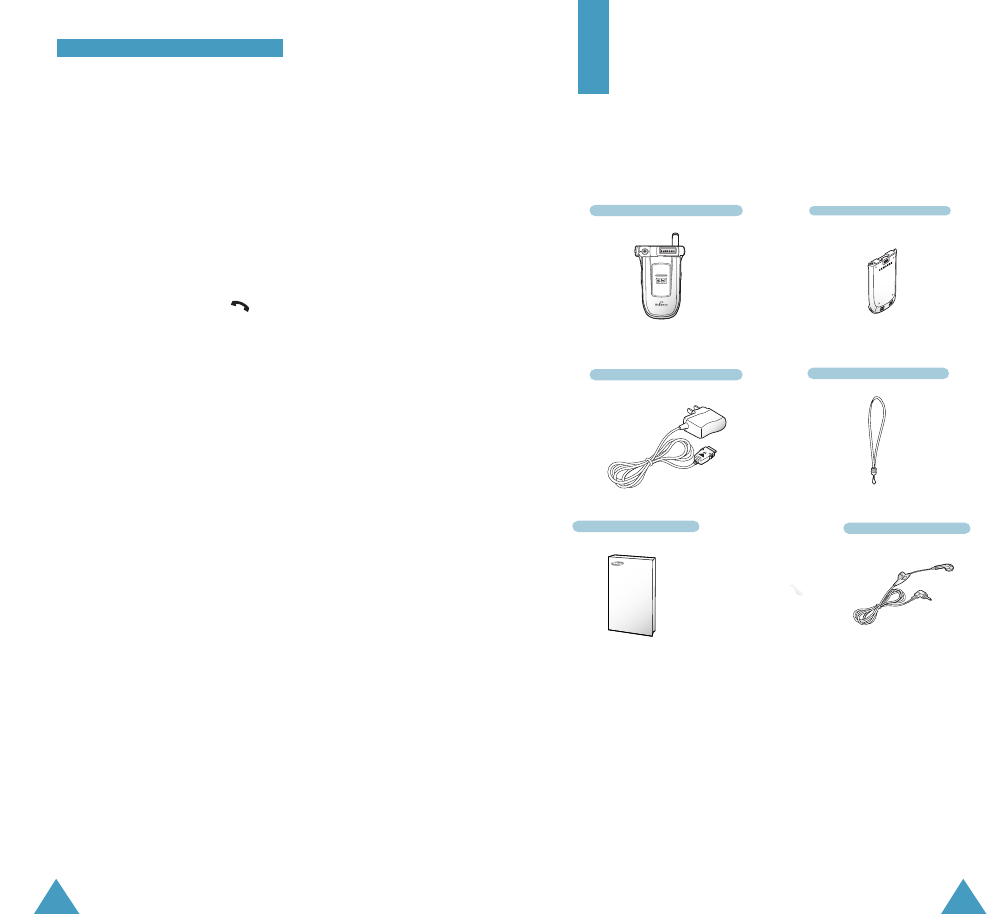
Travel Adapter
Handset Battery
Hand Strap
Unpacking
Your package contains the following items:
In addition, you can obtain the following accessories
for your phone from your local Samsung dealer:
• Ear-microphone
• Travel adapter
• Standard batteries
• Cigarette lighter adapter
• Hands-free car kit
• Data cable
User’s Manual Ear-microphone
11
YYoouurr PPhhoonnee
10
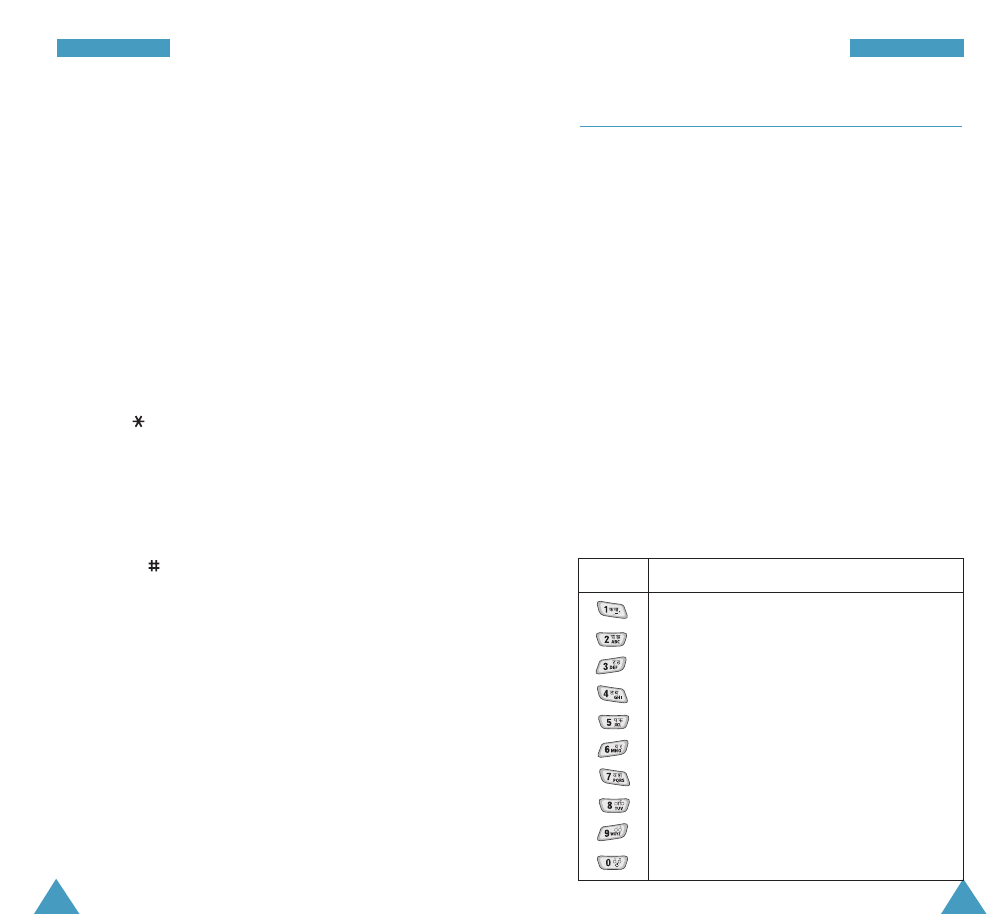
Perform the functions indicated by the
text above them, on the bottom line of
the display.
In Menu Mode, scrolls through the menu
options and Phonebook memory.
In Standby Mode, accesses the
following menus:
• Up: Messages
• Down: Voice Memo
• Left: Scheduler (All)
• Right: Ringer Tones
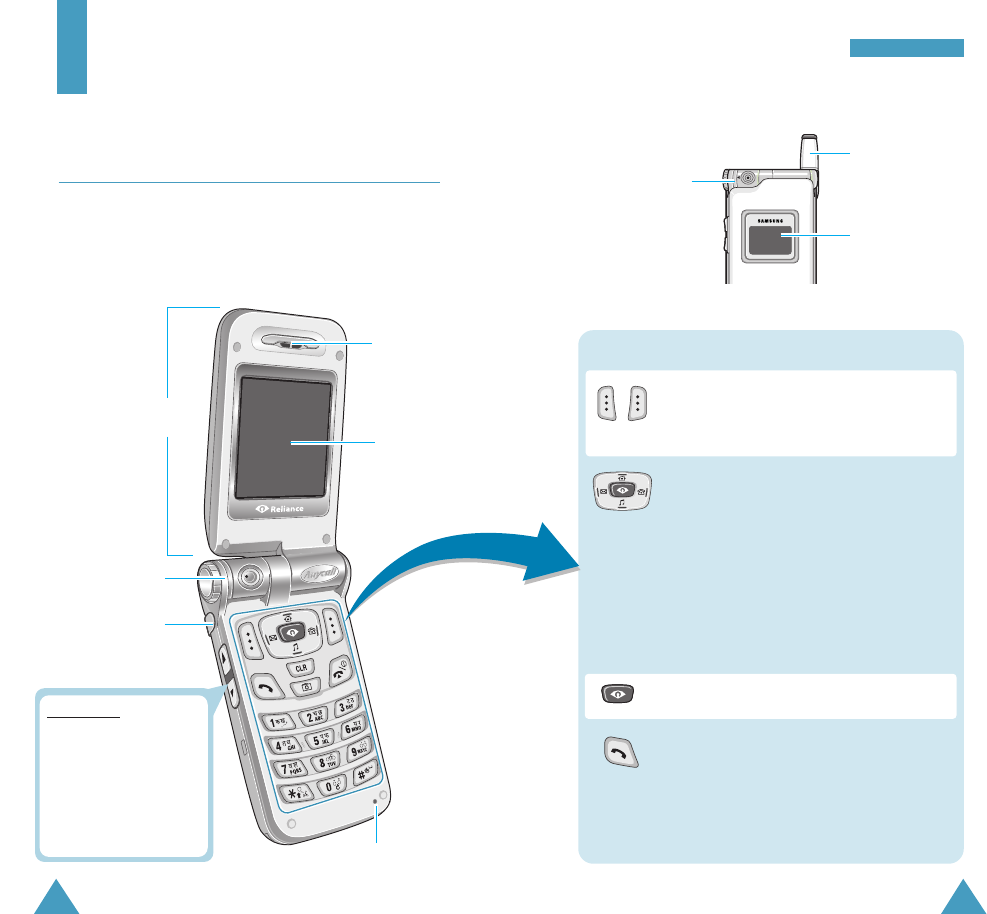
Key(s) Functions
Antenna
Ear-microphone
jack
Microphone
Earpiece
Folder Main
display
Your Phone
Phone’s Parts
The following illustrations shows the main elements of
your phone:
Quickly launches R-World.
External
display
Camera
module
Camera
module
Closed View
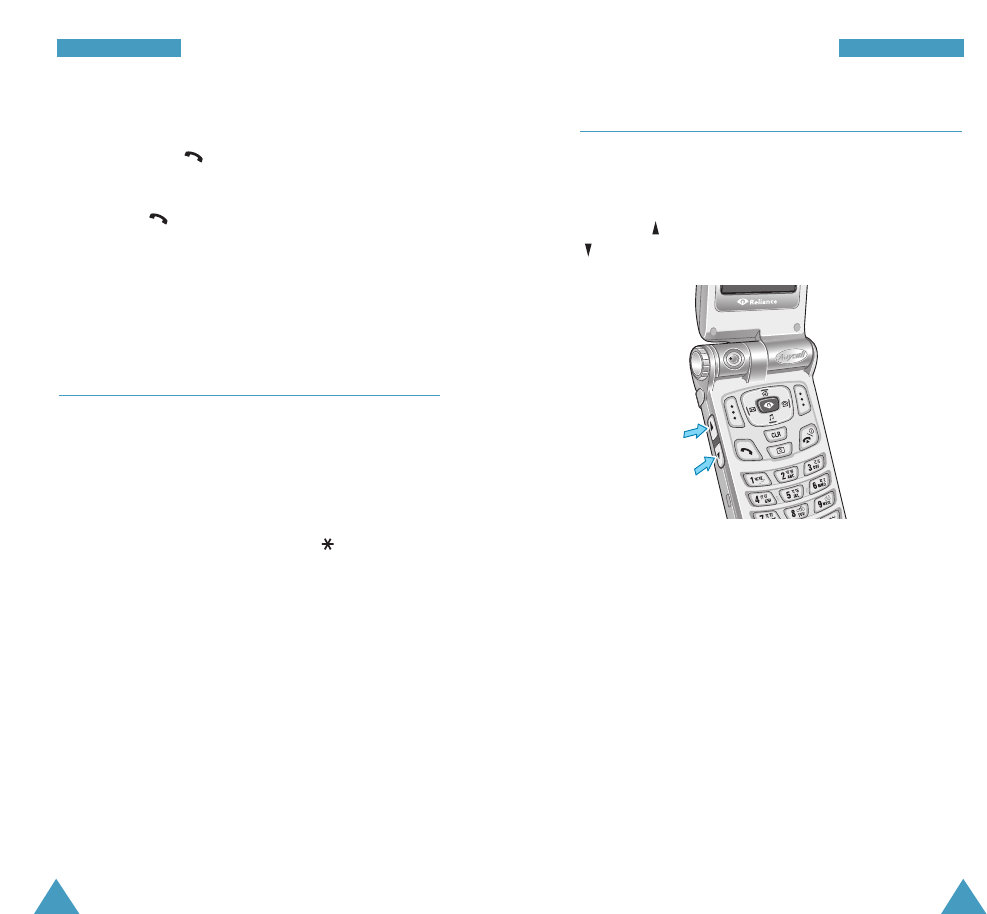
Volume keys
During a call, adjust the
voice volume.
In Standby Mode with the
folder open, adjust the
key tone volume.
In Menu Mode, scroll
through the menu options.
Open View
(soft keys)
(Navigation
keys)
Makes or answers a call.
In Standby Mode, retrieves the last
numbers you dialled or received. Redials
the number of the last call when pressed
twice.
13
YYoouurr PPhhoonnee
12
YYoouurr PPhhoonnee
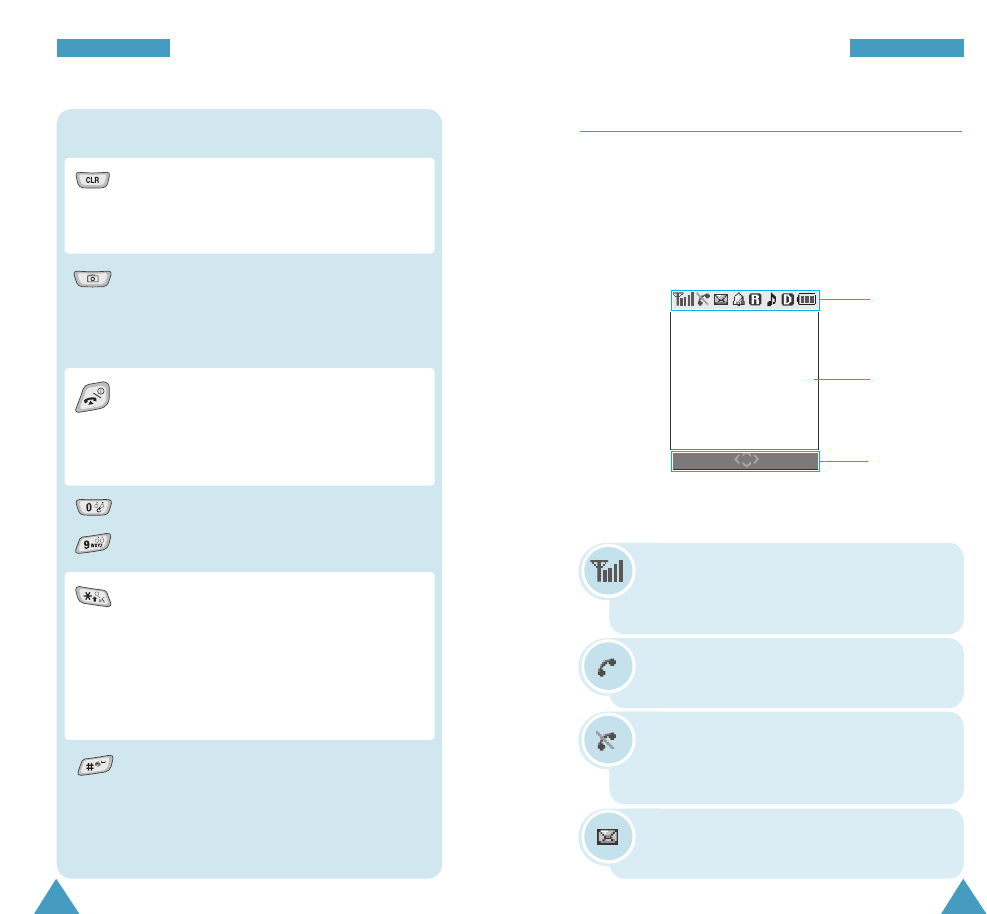
Display
Layout
The display has three areas; an upper line of various
icons, the lower text and graphic area and the last line
containing the soft key indicators.
Icons
Text and
graphic area
Soft key
indicators
Enters numbers, letters and some special
characters.
In Standby Mode, initiates the voice dialling
feature when held down.
While entering text, allows you to change the
case.
Also, use this key for the special star calling
feature.
In Standby Mode, enters or exits the silent
mode when held down.
Also, use this key when you make a call to
an automated system, especially when
using teleservices.
Key(s) Functions (continued)
~
Ends a call. Also switches the phone on and
off when held down.
In Menu Mode, cancels your input and
returns to Standby Mode.
Deletes characters from the display.
In Menu Mode, returns to the previous menu
level.
Menu Find
Quickly enters the Photos menu.
Turns the camera on when held down.
In the capture mode, works as a camera
shutter.
Signal Strength : Shows the received
signal strength. The greater the number of
bars, the better the signal.
Icons
Service: Appears when a call is in
progress.
No Service: Appears when you are
outside a service area. When it appears,
you cannot make or receive calls.
New Message: Appears when a new
message is received.
15
YYoouurr PPhhoonnee
14
YYoouurr PPhhoonnee
External Display
Your phone has an external display on the folder.
When the folder is closed, it indicates that you have
an incoming call or message. It also alerts you when
you have set an alarm at the specified time by turning
its backlight on and displaying the corresponding icon.
Backlight
The display and the keypad are illuminated by a
backlight. When you press any key or open the folder,
the backlight illuminates. It turns off if no key is
pressed within a given period of time, depending on
the Backlight option set in the Display menu.
To specify the length of time for which the backlight is
active, set the Backlight menu (Menu 5-6); see page
xx for further details.
Note: In Standby Mode or Talk Mode, the display
automatically turns off after some time,
depending on your setting in the Backlight
menu to conserve your battery power. Press
any key to turn the display on.
Camera
The camera module on the top left of your phone
allows you to take a picture while on the move.
For further details about the Camera feature, see page
xx.
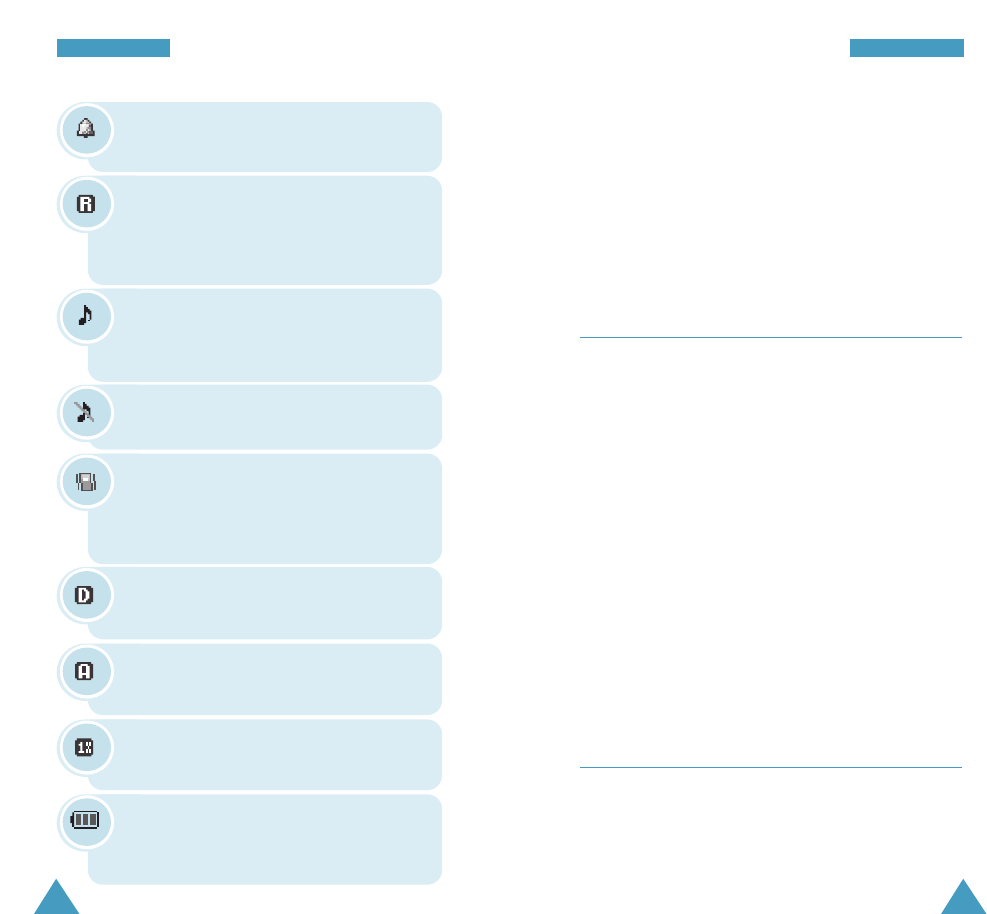
Roaming: Appears when you are out of
your home area and have logged onto a
different network, when travelling in other
countries, for example.
Ringer On: Appears when you set the
ringer volume for calls to one from Level 1
to Level 8 or to 1-Beep.
Ringer Off: Appears when the ringer
volume is turned off.
Digital Mode: Indicates when the phone
is logged onto a digital network.
Analogue Mode: Indicates when the
phone is logged onto an analogue network.
1x Mode: Indicates when the phone is in
the 1x mode.
Battery Status: Shows the level of your
battery. The more bars you see, the more
power you have left.
Alarm: Appears when you set an alarm to
ring at a specified time.
Vibration: Appears when you set the
ringer volume for calls to Vibrate or
High+Vib or when the phone is in the
vibrate mode.
17
GGeettttiinngg SSttaarrtteedd
16
Getting Started
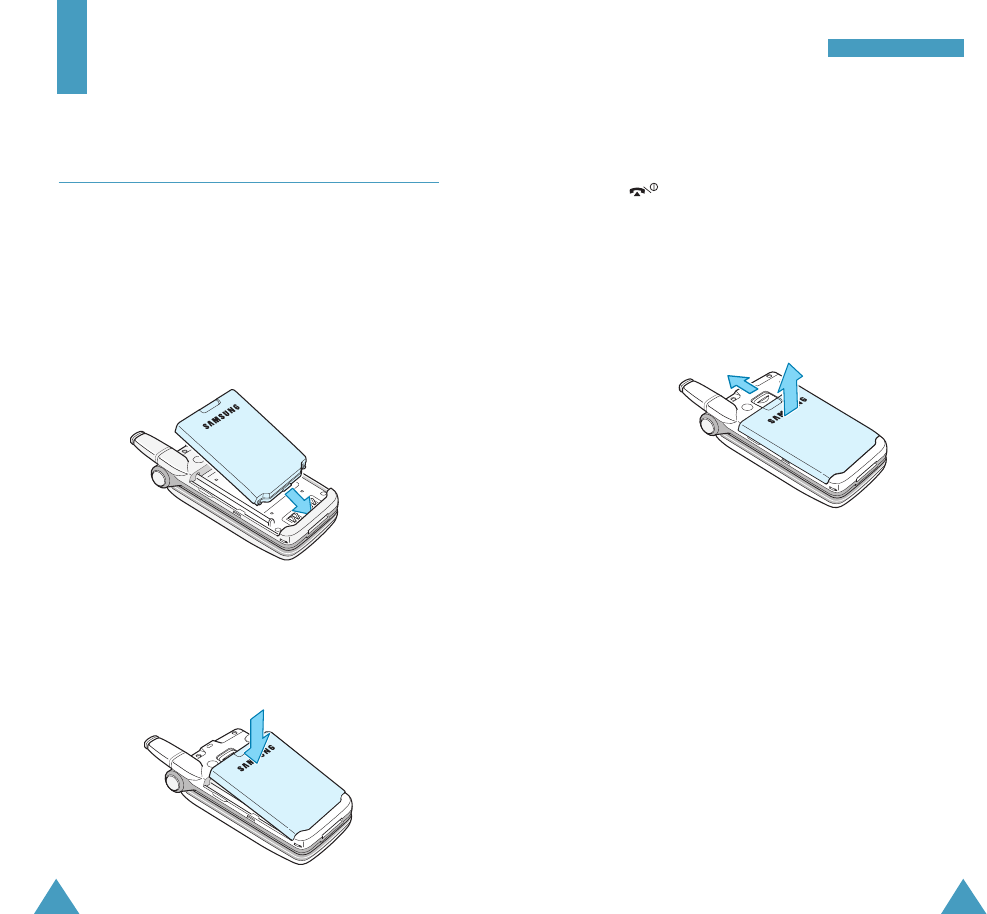
Using a Battery
Your Samsung phone comes packaged with a partially
charged, rechargeable Lithium Ion (Li-ion) battery.
Installing the battery
1. Place the battery back on the phone so that its tabs
match the slots on the phone.
2. Press the battery down until it snaps into place.
Make sure that the battery is correctly installed
before switching on the phone.
Removing the battery
1. If necessary, switch off the phone by holding down
the key until the power-off image displays.
2. To remove the battery:
➀ Pull the catch above the battery toward the top
of the phone and hold it in that position.
➁ Lift the battery away, as shown.
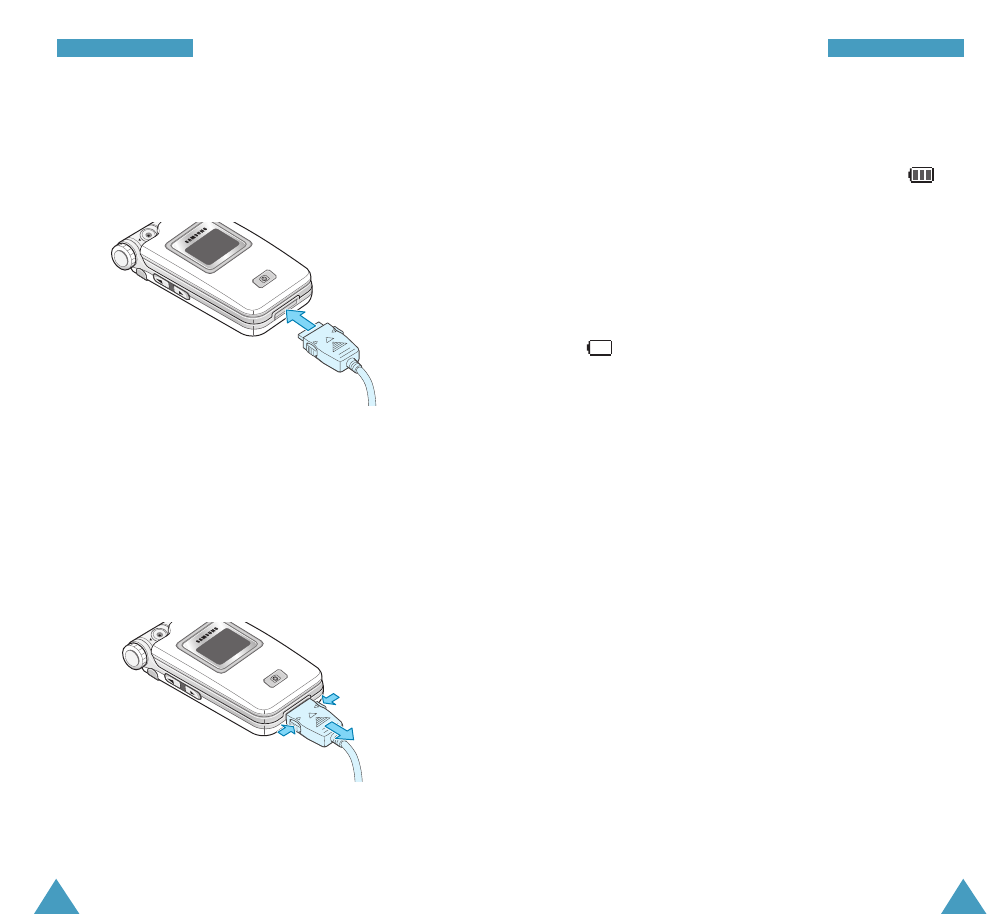
Charging the Battery
The travel adapter is provided with your phone to
allow you to charge your phone’s battery from a
standard AC wall outlet. Use only approved batteries
and chargers.
Note: You need to fully charge the battery before
using your phone for the first time.
You can use your phone while the battery is charging,
but this increases time it will take to charge the
battery. An “empty” standard battery can be fully
charged in approximately 4 hours.
➀
➁
18
GGeettttiinngg SSttaarrtteedd
19
GGeettttiinngg SSttaarrtteedd
To charge the battery:
1. With the battery in position on the phone, plug the
connector form the travel adapter into the jack at
the bottom of the phone.
2. Plug the adapter into a standard wall outlet.
The battery begins charging immediately.
3. When charging is finished, unplug the adapter from
both the power outlet and the phone by pressing the
grey tabs on both sides of the connector (see ➀)
and pulling the connector out (see ➁).
Note: You must unplug the adapter before removing
the battery from the phone during charging;
otherwise, the phone could be damaged.
➀
➀
➁
Low Battery Indicator
You can easily tell if your battery needs to be
recharged by checking the Battery Status icon ( ) at
the upper-right corner of your phone’s display. The
presence of all three bars indicates a full charge, two
bars indicates a smaller charge, and one bar indicates
an even smaller charge.
When the battery charge level becomes low, the
battery sensor blinks an empty Battery Status icon
() and sounds a warning tone. If the battery level
gets too low, the phone automatically turns off. When
this happens, you lose whatever you are doing and
your phone call cuts off. Watch the Battery Status icon
and make sure that your battery is adequately charged.
Battery Talk Time and Standby time
Battery times can vary depending on operating
conditions, usage, signal strength and backlight
setting. Talk time usage will decrease standby time.
• Talk time: xx hours
• Standby time : xx hours
21
GGeettttiinngg SSttaarrtteedd
20
GGeettttiinngg SSttaarrtteedd
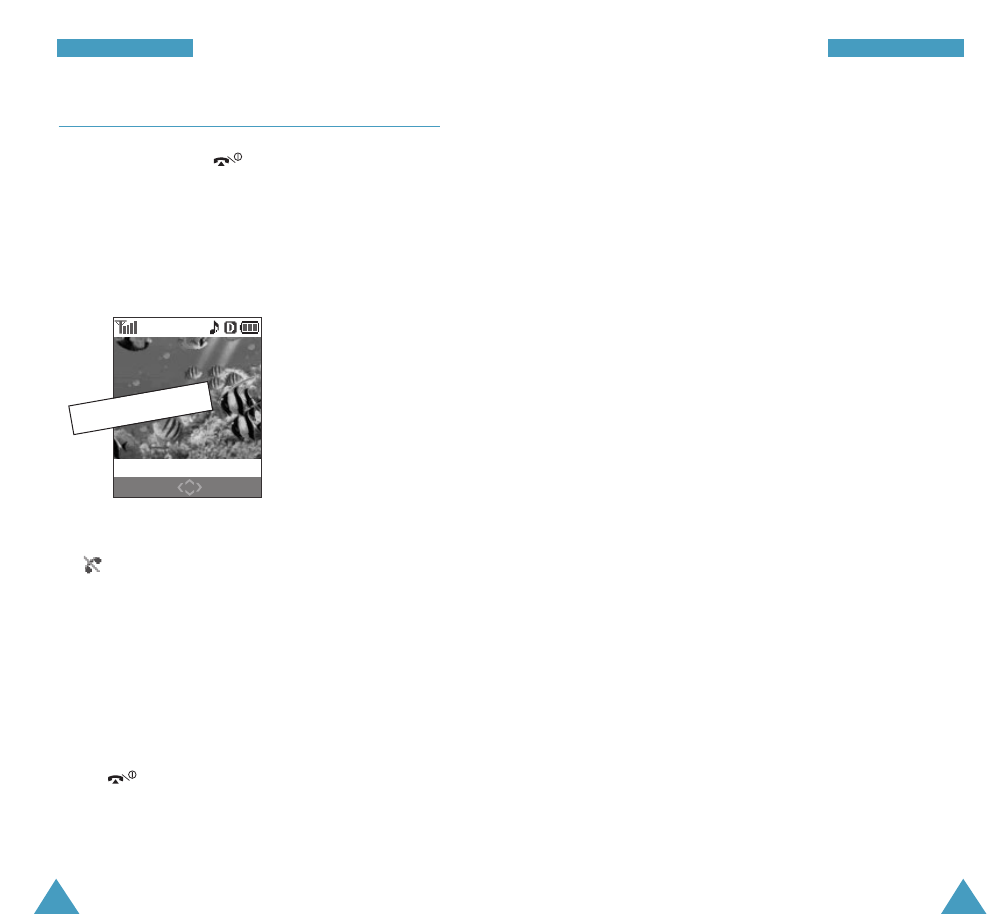
Switching the Phone On or Off
1. Press and hold the key until the power-on
image displays to switch the phone on.
The service light on the phone flashes and an alert
sounds. When the system locates services, the
greeting message displays along with the date and
time. You can now place and receive calls.
If the phone is out of service, the No Service icon
() appears on the display. In this case, you
cannot make and receive calls. You can try again
later when service is available.
Note: You can change the display language. To
change the language, use the Language
menu (Menu 5-1). For further details, see
page xx.
2. When you wish to switch the phone off, hold down
the key more than two seconds.
WARNING!
Do not switch the phone on when mobile phone use
is prohibited or when it may cause interference or
danger.
Note: As with any other radio-transmitting device,
do not touch the antenna unnecessarily when
the phone is switched on. Contact with the
antenna affects the call quality and may cause
the phone to operate at a higher power level
than otherwise needed.
Service Provider
The 13 May 10:30
Menu Find
Position Only
23
GGeettttiinngg SSttaarrtteedd
22
GGeettttiinngg SSttaarrtteedd
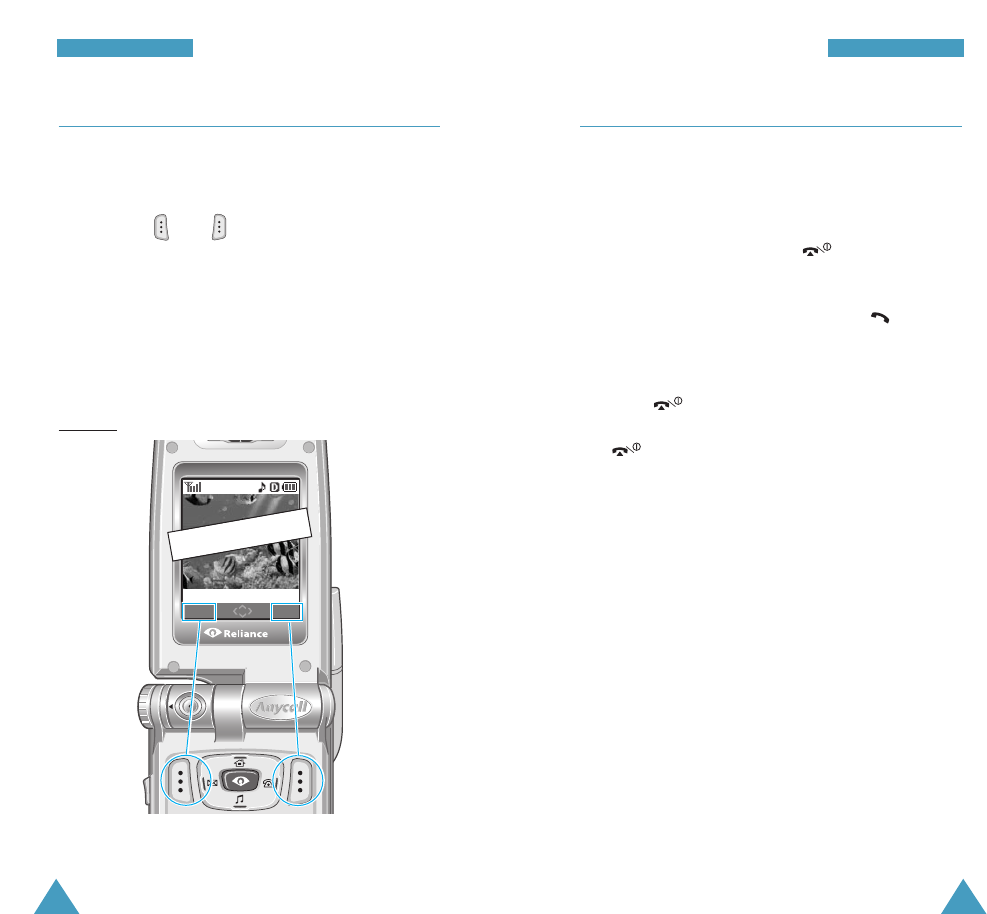
Using the Soft Keys
Your phone offers a set of functions that allow you to
customize your phone. These functions are arranged in
menus and sub-menus, accessed using the two soft
keys marked and . Each menu and sub-menu
allows you to view and alter the settings of a
particular function.
The roles of the soft keys vary according to the
function you are currently using; the label on the
bottom line of the display just above each key
indicates its current role.
Example:
Press the left soft key
to access Menu Mode. Press the right soft key
to find a number in
your Phonebook
Service Provider
The 13 May 10:30
Menu Find
Your Phone’s Modes
Standby Mode
Standby is the most basic state of your phone. The
phone goes into Standby Mode after you turn it on or
whenever you briefly press the key. When your
phone is in Standby Mode, you will typically see the
greeting message and the current date and time. If you
enter a phone number, you can press the key to
dial it or press the Save soft key to save it in the
internal Phonebook.
Press the key at any time to return to Standby
Mode. Be careful; if you are on a call when you press
the key, the call disconnects and the phone
returns to Standby Mode.
Talk Mode
You can place and answer calls only when your phone
is turned on. During a call, the phone is in the talk
mode. While you are in the talk mode, pressing the
Options soft key gives you a list of options. See page
xx for details.
Position Only

25
GGeettttiinngg SSttaarrtteedd
24
GGeettttiinngg SSttaarrtteedd
Power Save Mode
Your phone comes with a Power Save feature that
automatically turns off the display when you don’t use
the phone. While this feature is active, the phone’s
battery charge is conserved.
The display switches off if no key is pressed within
one minute after the backlight turns off. You can press
any key to activate the display. phone to recheck for a
signal, press any key.
Lock Mode
When you lock your phone using the Lock Phone
menu (Menu 8-3-1) in the Settings menu, you cannot
use the phone. In the lock mode, you can receive
messages and calls, but you cannot place an outgoing
call until you unlock the phone. To unlock the phone,
you need to enter the lock code.
For details about locking and unlocking your phone,
see page xx.
Vibrate Mode
Vibrate Mode disables all sounds on the phone. This
feature is best used in situations where the phone
might disturb others, such as in a meeting, at a library
or in a theater. Your phone can be set to the vibrate
mode with a press of a key in Standby Mode.
To enter the silent mode, press and hold the key
until “Change to Vibrate Mode” and the Vibration icon
() appear.
To exit and reactivate the previous sound settings,
press and hold the key until “Cancel Vibrate mode”
appears. The Vibration icon no longer displays.
27
CCaallll FFuunnccttiioonnss
26
Call Functions
Making a Call
In Standby Mode, enter the area code and phone
number and press the key.
Note: If the Auto Redial menu (Menu 8-1-1) have been
enabled, the phone automatically retries to
make the call when the line is busy or the
remote person does not answer. See page xx.
While entering a number, press the Options soft key
to use the following options:
Call: places a call to the number.
Save: allows you to save the number in Phonebook.
Find: allows you to find a number from Phonebook.
Hard Pause: enters a hard pause.
Notes:
• When you enter a number corresponding to a
Phonebook location, the Speed Dial option is
available. For details about speed dialling, see page
xx.
• When you enter four digits, the 4-digit Dial option is
available. For details about four-digit dialling, see
page xx.
Correcting the Number
To clear the Press
last digit displayed CLR key.
whole display CLR key for more than
one second.
Ending a Call
When you want to finish your call, briefly press the
key or close the folder.
If you end the call by pressing the key, the call
time, or the length of the call, displays briefly and the
phone returns to Standby Mode.
Emergency Dialling
You can place emergency calls from your emergency
number list even if your phone is locked.
For more information about emergency numbers, see
page xx.

28
CCaallll FFuunnccttiioonnss
Redialling the Last Number
To redial the last call you made or received, press the
key twice quickly.
Your phone stores the ten numbers each of the last
missed, received and dialled calls. To recall any of
these numbers:
1. In Standby Mode, press the key. The list of the
outgoing calls displays.
2. Press the Left or Right key to scroll to the call type
you want.
Note: When a list is empty, the next available list
displays.
3. Press the Up or Down key until you find the required
name or number.
4. Press the key to dial the number displayed.
Making a Call from Phonebook
You can store the phone numbers called regularly in
the memory, which is called Phonebook. You then
simply recall the number to dial.
For further information about the Phonebook feature,
see page xx.
29
CCaallll FFuunnccttiioonnss
Prepend Dialling
The prepend option lets you add digits, such as area
codes and network feature activation codes, to a
phone number that is in your Phonebook.
To prepend a phone number stored in your phone:
1. Press the Find soft key to access the Phonebook
entries.
2. Press the Up or Down key to scroll to the number
you want and press the Select soft key.
3. Press the Options soft key to access the options.
4. Press the 3key to select the Prepend option.
5. Enter the area code or feature code.
6. Press the key or the Call soft key to dial the
number.
Speed-dialling
Once you have stored phone numbers in the
Phonebook memory, you can dial them easily
whenever you want.
Note: When several numbers are saved in one name
entry, the first number you entered is
automatically specified as a speed dial number.
To change the speed dial number, use Speed
dial of the Phonebook options; see page xx.

31
CCaallll FFuunnccttiioonnss
30
CCaallll FFuunnccttiioonnss
One-Touch Dial
Memory locations 001 through 009 are special one-
touch locations. You can dial the phone numbers
stored in the Phonebook memory from 001 through 009
simply by pressing one key.
Press and hold the third digit of the memory location
containing the number to be dialled.
For example: Location no. 009
Press the 9 key and hold.
The number (and name) stored is displayed, and then
dialled.
Two-Touch Dial
Memory locations 010 through 099 are special two-
touch locations.
Press the second digit briefly, and then hold down the
third digit of the memory location.
For example: Location no. 023
Press the 2 key briefly and hold down the 3
key.
The number (and name) stored is displayed, and then
dialled.
Three-Touch Dial
Memory locations 100 through 250 are special three-
touch locations.
Press the first two digits briefly, and then hold down
the third digit of the memory location.
For example: Location no. 123
Press the 1key and the 2key briefly, then
hold down the 3key.
The number (and name) stored is displayed, and then
dialled.
Four-digit Dialling
You can quickly dial a phone number in Phonebook by
entering its last four consecutive digits. This feature is
convenient if you have the number memorised, but you
have forgotten where the number is stored in your
Phonebook.
1. Enter the last four digits of the phone number you
want to dial.
2. Press the Options soft key and select the 4-digit
Dial option. The phone displays the phone number
matching the four digits.
If the phone found more than one number that
contains those four digits, it displays the first
number. Scroll through the number using the Left or
Right key to select a number.
3. Press the key or the Call soft key to dial it.

33
CCaallll FFuunnccttiioonnss
32
CCaallll FFuunnccttiioonnss
Pause Dialling
When you call an automated system, like banking
services, you are often required to enter a password or
account number. Instead of manually entering the
numbers each time, you can store the numbers in your
Phonebook, separated by special characters which are
called pauses.
Note: Multiple two-second pauses can be entered
to extend the length of a pause. For example,
two consecutive pauses cause a total pause
time of two seconds. However, keep in mind
that pauses count as digits towards the 32
digit dialling maximum.
Storing Pauses in a Phonebook Entry
To store a number in your Phonebook that contains
pauses:
1. Enter the phone number you want to store, such as
the bank’s teleservice phone number.
2. Press the Options soft key to access the options.
3. Press the 4key for Hard Pause. The letter “P”
displays, meaning that a hard pause will occur at
that point in the dialling sequence.
4. Enter the digits that need to follow the pause, such
as your account number.
5. Repeat steps 2 through 4 to add more pauses and
numbers, if necessary.
6. Store the number in your Phonebook as you normally
would by pressing the Save soft key and following
from step 2 on page xx.
Pause Dialling from a Stored Phonebook
Entry
1. Dial the number of the service from Phonebook.
2. Wait for the appropriate prompt from the system
you are calling.
3. When prompted, press the key to send the
DTMF (Dual tone multi-frequency) number that
follows your pause.
“SENDING DTMF” flashes on the display and the
transmitted tone sounds.
4. Repeat from step 2, if necessary.
Manual Pause Dialling
You can enter pauses manually during the dialling
process.
1. Enter the phone number of the service you want to
call, such as a bank’s teleservice phone number.
2. Press the Options soft key to access the options.
3. Press the 4key for Hard Pause. The letter “P”
displays, meaning that a hard pause will occur at
that point in the dialling sequence.
35
CCaallll FFuunnccttiioonnss
34
CCaallll FFuunnccttiioonnss
4. Enter the number to be sent after the pause, such as
credit card number or bank account number, and
then press the key to dial the first number.
5. To transmit the additional number after connecting,
press the key again at the prompt for the
pause.
“SENDING DTMF” flashes on the display and the
transmitted tone sounds.
Voice Dialling
Before using the voice dialling feature, you must
record names and numbers in your phone using the
Voice Dial menu (Menu 6-1). For further details, see
page xx.
1. To place a call, press and hold the key or open
the folder, depending on the Activate By menu
(Menu 6-1-4). See page xx.
2. At a voice prompt, say a name into the microphone.
• If the phone recognises the name, the phone
attempts a connection.
• If the phone does not recognise the name, the
phone sounds an alert and prompts for the name
again .
3. The phone dials the corresponding number.
Adjusting the Volume During a Call
During a call, if you want to adjust the voice volume,
use the Volume keys on the left side of the phone.
Press the key to increase the volume level and the
key to decrease the level.
You can also adjust the keypad tone volume using
these keys in Standby Mode.

37
CCaallll FFuunnccttiioonnss
36
CCaallll FFuunnccttiioonnss
Answering a Call
When somebody calls you, the phone rings and
displays the incoming call animation.
If the caller can be identified, the caller’s phone
number, or name if available in your Phonebook,
displays.
1. To answer a call, press the key.
If the Answer Mode menu (Menu 8-1-2) is set to
Any Key, you can answer a call by pressing any key
except for the key.
When the menu is set to Folder Open, you can
simply open the folder to answer the call.
For details about the Answer Mode menu, see
page xx.
2. To end the call, press the key or simply close
the folder.
Notes:
• You can answer a call while using Phonebook or
menu functions. The current operation stops.
• If you cannot answer incoming calls, you can set the
phone to answer the call by playing a greeting
message and record callers’ messages. For further
details, see page xx.
Options During a Call
Your phone provides you with a number of functions
that you can use during a call.
Press the Options soft key during a call to access the
following options:
Phone Book: allows you to access the Phone Book
menu. For details, see page xx.
Mute/Quit: allows you to switch your phone’s
microphone off, so that the other person cannot hear
you.
Example: You wish to say something to another
person in the room but do not want the other person to
hear you.
Silent/Quit: does not transmit the key tones. It allows
you to press keys without hearing annoying key tones
during a call.
Calls: allows you to access the Call History menu.
For details, see page xx.
Messages: allows you to use the Message feature.
For details, see page xx.
Organiser: allows you to access the Organiser
menu. For details, see page xx.
Cannot be checked with the
current phone!!
39
CCaallll FFuunnccttiioonnss
38
CCaallll FFuunnccttiioonnss
Using Caller ID
This feature tells you who is calling you by displaying
the caller’s number when the phone rings. If the name
and number are stored in your Phonebook, the
corresponding name also displays. If you call someone
who has this feature, your phone number displays on
her/his phone.
Note: Contact Reliance to set up the Caller Line
Identification service.
Viewing Missed Calls
If you fail to answer a call for any reason, the phone
indicates the missed call by displaying a text
notification on the screen. Additionally, if caller
information is available, a missed entry is created.
Press the key to access the missed call list, or
press the key to clear the message and return to
Standby Mode.
To view missed calls, access the Missed menu
(Menu 3-1) on page xx.
Cannot be checked with the
current phone!!
Call Forwarding
When the Call Forwarding menu (Menu 8-1-3) is
enabled, your phone forwards incoming calls to
another phone number, even if your phone turns off.
Activating Call Forwarding does not affect outgoing
calls made from this phone. For further details for
activating Call Forwarding, see page xx.
Call Waiting
You can answer an incoming call while you have a call
in progress, when the Call Waiting menu (Menu
8-1-4) is enabled. See page xx for further details.
When a waiting call is detected, the incoming call
alert sounds, depending on your network, and a text
notification displays.
To answer a waiting call during a call:
1. When you hear a beep telling that you have a
waiting call, press the key. The phone connects
the calling person and places the current call on
hold.
2. Press the key again to switch between the two
calls.
Note: If you do not respond to a Call Waiting
notification, the phone will forward the call to
voice mail server or another number that you
have set up. Contact Reliance for more
information.
Cannot be checked with the
current phone!!

4140
CCaallll FFuunnccttiioonnss
Three-way Calling
This feature enables you to conduct conference calls
with two separate persons at the same time. The
phone records each participant into the Outgoing Calls
Log. Also, You are billed call time for each outgoing
call separately.
Note: Contact Reliance to activate Three-way Calling.
To place a Three-way call:
1. During a conversation, press the key. The phone
places the other person on hold.
2. Enter the phone number for the third person, and
then press the key. The phone dials the third
person.
3. When you are connected to the person, press the
key again to begin your three-way call.
If one of the callers (not you) hangs up, you and
remaining caller stay connected. If you initiated the
call and you hang up first, all three participants are
disconnected.
Cannot be checked with the
current phone!!
Entering Text
At many times when using your phone, you will need
to enter text; for example, when storing a name in
Phonebook, creating your personal greeting or
scheduling events on your calendar. You can enter
alphanumeric characters into your phone using your
phone’s keypad.
Your phone has the following text input modes:
• T9(English):This mode allows you to enter words
with only one key press per letter. Each key on a
keypad has more than one letter - a single press on
the 5key could be J,K or L. The T9 mode
automatically compares your key presses to an
internal linguistic database to determine the correct
word. The T9 mode requires far fewer keystrokes
than the traditional multi-tap method, alphabet
mode.
• Alphabet: This mode allows you to enter letters by
pressing the key labeled with the letter you want to
enter once, twice, or three times until it appears on
the display.
• Symbol:This mode allows you to enter special
characters.
• Number: This mode allows you to enter numbers.
Note: The T9 mode supplies an appropriate language
database as your language setting menu (Menu
5-1).
43
EEnntteerriinngg TTeexxtt
42
EEnntteerriinngg TTeexxtt
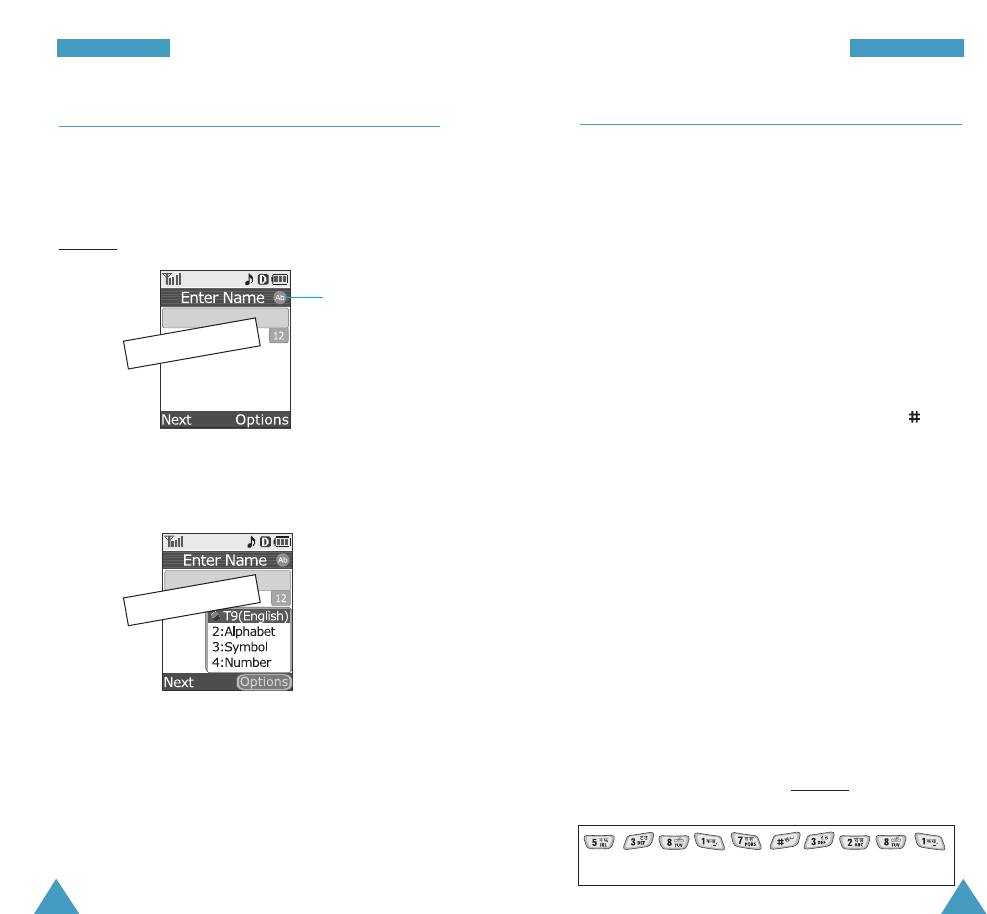
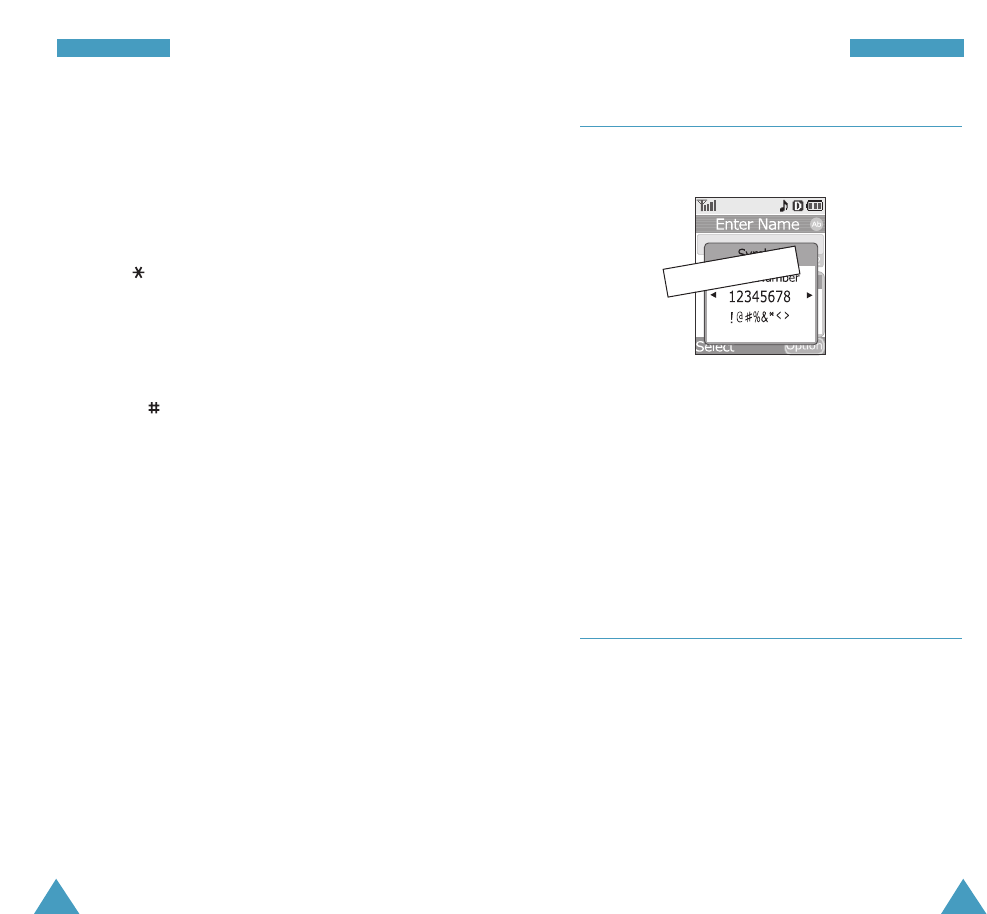
Changing the Text Input Mode
When you are in a field that allows characters entry,
you should notice the text input mode indicator on the
display.
Example: Entering a name for a Phonebook entry
To change to another text input mode:
1. Press the Options soft key.
2. Scroll to the mode by pressing the Up or Down key.
3. To select the highlighted mode, press the Select
soft key. If you want to exit the menu without
changing to a new mode, press the CLR key.
The selected text input mode indicator appears on
the display.
Text input mode
indicator
Using the T9 (English) Mode
To type a word, press keys corresponding to the letters
you need. Remember the following as you are typing:
1. Press alphanumeric keys on the keypad just once
per letter. For example, to enter “Hello,” press the 4,
3, 5, 5and 6keys.
The word you are typing appears on the display. It
may change with each key press.
2. Type to the end of the word before editing or
deleting any keystrokes.
3. Put a space between words by pressing the key.
If the word that appears on the display is not the
word that you desire, press the 0key one or more
times to display alternative word choices for the
keys you have typed. For example, both “of” and
“me” have the sequence of the 6key and 3key. The
phone displays the most commonly used choice
first.
4. Continue entering the next word.
Smart Punctuation
You can enter periods, hyphens, and apostrophes by
pressing the 1key. The T9 mode applies rules of
grammar to insert the correct punctuation. Notice that
the 1key is used twice in this example to display two
punctuation marks:
L e t ‘ s e a t .
Position Only
Position Only
45
EEnntteerriinngg TTeexxtt
44
EEnntteerriinngg TTeexxtt
Including a Number
You can include a number between letters without
exiting the T9 input mode. Press and hold the
corresponding number key.
Changing the Case
Your phone offers three cases:
• T9: initial letter is capitalised.
• T9: all letters are capitalised.
• t9: all letters are lower-cased.
Press the key one or more times to display the
appropriate case indicator on the top right of the
display and begin typing normally.
Other Usages
• Press the key to insert a space.
• To move the cursor to the left or right through your
text, press the Left or Right key.
• Press the CLR key one or more times to delete the
letters one by one to the left. Press and hold the
CLR key to clear the display.
Using the Alphabet Mode
When typing in the alphabet mode, you need to press
the keys labeled with the required letter:
- once for the first letter
- twice for the second letter
- and so on.
This method is called multi-tap typing.
For example, you press the 2key three times to display
the letter “C” and the 5key two times to display the
letter “K.”
The cursor moves to the right when you press a
different key. When entering the same letter twice or a
different letter on the same key, just wait for a few
seconds for the cursor to move to the right
automatically, and then enter the next letter.
Refer to the table below for the list of characters
assigned on each key.
(Caps Lock mode)
. , - ? ! ’ @ : 1
AB C2
DE F 3
GH I 4
JK L5
MN O 6
PQ RS7
TU V8
WX Y Z 9
0
Key Characters in the Order Displayed
47
EEnntteerriinngg TTeexxtt
46
EEnntteerriinngg TTeexxtt
Changing the Case
Your phone offers three cases:
• Ab: initial letter is capitalised.
• AB: all letters are capitalised.
• ab: all letters are lower-cased.
Press the key one or more times to display the
appropriate case indicator, and begin typing normally.
Other Usages
• Press the key to insert a space.
• To move the cursor to the left or right through your
text, press the Left or Right key.
• Press the CLR key one or more times to delete the
letters one by one to the left. Press and hold the
CLR key to clear the display.
You can display more symbols by pressing the Left or
Right key.
Press the number key corresponding to the symbol you
want to enter. The phone automatically switches back
to the text entry mode used just prior to selecting the
symbol mode.
Using the Number Mode
The number mode enables you to enter numbers.
Press the keys corresponding to the digits you want to
enter and manually switch back to the text entry mode
of choice. For details about changing the mode, see
page xx.
Using the Symbol Mode
The symbol mode enables you to enter symbols.
Position Only

49
UUssiinngg tthhee MMeennuuss
48
Using the Menus
Your phone offers a range of functions that allow you
to tailor it to your needs. These functions are arranged
in menus and submenus.
The menus and submenus can be accessed by scrolling
or by using the shortcuts.
Accessing a Menu Function by Scrolling
1. In Standby Mode, press the Menu soft key to
access Menu Mode.
2. Scroll with the Navigation keys to reach the desired
main menu; for example, Display. Press the
Select soft key to enter the menu.
3. If the menu contains any submenus; for example,
Language, find the one you want by scrolling with
the Up or Down key. Press the Select soft key to
enter the submenu.
If the menu you have selected contains submenus,
repeat this step.
4. Scroll with the Up or Down key to find the setting
of your choice.
5. Press the OK or Save soft key to confirm the
chosen setting.
Notes:
• You can return to the previous menu level by
pressing the CLR key or the Back soft key.
• You can exit the menu without changing the menu
settings by pressing the key.
Accessing a Menu Function by Using Its
Shortcut
Menu, submenus and setting options are numbered
and can be quickly accessed by using their shortcut
numbers.
Note: The numbers assigned to each menu function
are indicated on the list on page xx.
1. In Standby Mode, press the Menu soft key to
access Menu Mode.
2. Within three seconds, enter the first digit of the
shortcut number. Repeat this for each digit of the
shortcut number.
Example: Accessing the Language menu
Press the 5and the 1keys.
5selects Display and 1selects Language.
3. Find the setting of your choice by pressing the Up or
Down key.
4. Press the OK or Save soft key to confirm the
chosen setting.

51
UUssiinngg tthhee MMeennuuss
50
UUssiinngg tthhee MMeennuuss
List of Menu Functions
Main menu Main menu 1 Main menu 2
1. Phone Book 1. Find
2. Add Entry 1. Add Number
2. Add Email
3. Add URL
3. Groups
4. Memory Status
2. Messages 1. Write
2. Inbox
3. Outbox
4. Saved
5. Templates
6. Erase Msgs 1. Inbox
2. Outbox
3. Saved
4. All Messages
5. Voice Mail
7. Settings 1. Auto Scroll
2. Msg Reminder
3. New Msg
4. Msg Color Setup
8. Voice Mail
3. Call History 1. Missed
2. Received
3. Dialled
4. Erase History 1. Missed
2. Received
3. Dialled
4. All
5. Call Duration 1. Last Call
2. Total Dialled Call
3. Total Received Call
4. Reset All
5. Life Time
Main menu Main menu 1 Main menu 2
4. Sound 1. Ringer Tones 1. Calls
2. Messages
3. Schedules
2. Ringer Volume 1. Calls
2. Messages
3. Alarm
/Schedules
3. Alerts 1. Service
2. Call Connect
3. Call Disconnect
4. Folder Open
/Closed
4.Key Tone 1. Volume
2. Type
3. Length
5. Power On/Off Melody
5. Display 1. Language
2. Service Area
3. Menu Theme
4. Wallpaper
5. Banner
6. Backlight
7. Set Dual Clock
8. Service LED
6. Voice Tools 1. Voice Dial 1. Record
2. Review
3. Erase All
4. Activate By
2. Voice Memo 1. Record
2. Review
3. Erase All
3. Answer Machine 1. On/Off
2. Voice Messages
3. Settings

5352
UUssiinngg tthhee MMeennuuss
Main menu Main menu 1 Main menu 2
7. Organiser 1. Scheduler 1. Today
2. All
2. Task List
3. Memo Pad
4. Alarm
5. Calculator
6. World Time
7. Count Down
8. Settings 1. Call 1. Auto Redial
2. Answer Mode
3. Call Forwarding
4. Call Waiting
2. Phone/System 1. Set time
2. Set NAM
3. Version
3. Security 1. Lock Mode
2. Change Code
3. Emergency
Numbers
4. Voice Privacy
5. Clear Phone Book
6. Reset Phone
9. R World 1. R-Menu
2. Multimedia 1. Show List
2. Erase List
3. Games 1. Push Push
2. X-Flighter
3. Space War
4. Reset R-Menu
0. Photos 1. Camera
2. Photo Album
3. Photo Wallet
4. Settings 1. Security
2. Camera Settings
Phone Book
Phonebook allows you to store frequently used phone
numbers and the associated names in your personal
directory to make it easy for you to make a call
without having to remember or enter the phone
number. You can store up to 250 entries including
e-mail and URL addresses.
Find Menu 1-1
This option allows you to find an entry in your
Phonebook.
Note:You can access this menu by pressing the
Find soft key in Standby Mode.
1. Press the Left or Right key to scroll to the method
you want to use.
• By Name:Enter the first few letters of the name
you want using the alphabet mode. The Phonebook
entries are listed starting with the first entry
matching your input.
• By Entry:Enter the location number of the
number your want to find, using the numeric keys.
• By Group:Press the Down key and select the
group containing the entry you want to find, using
the Left or Right key. The phone lists all of the
entries in the selected group.
54
PPhhoonnee BBooookk
55
PPhhoonnee BBooookk
2. If necessary, press the Up or Down key to scroll
through the entries.
3. When the entry you want highlights, press the
Select soft key to access the entry. The phone
shows the details about the name.
4. To Press the
place a call to key or the Call
selected number soft key.
use the options Options soft key. For
details about the options,
see below.
When you press the Options soft key in the details
display, the following options are available:
Call: places a call to the number.
Edit: allows you to change the phone number, name,
location number, label and so on.
Prepend: allows you to add digits, such as area
codes, ahead of the selected number before dialing.
See page xx for details.
Erase: erases the selected entry.
Add Entry Menu 1-2
This menu allows you to store a number with a name
in your Phonebook. You can save a person’s numbers,
such as workplace number, mobile number and fax
number, into one entry. A Phonebook entry can contain
up to six numbers, one in each category.
Add Number (Menu 1-2-1)
1. Enter a phone number and press the Save soft key.
2. Press the Select soft key to confirm to add a new
entry. If you are creating an entry for the first time,
skip to step 3.
3. Enter a name and press the Next soft key. For
further details about entering characters, see page
xx.
4. Select an icon to identify the category of the
number to be stored using the Navigation keys and
press the Select soft key.
5. To select an option, scroll to it by pressing the Up or
Down key.
The following options are available:
• Enter Name: allows you to enter a name, if you
didn’t in step 3. For further details about how to
enter text, see page xx.
• Entry: The first available location displays. If
necessary, enter the location number using the
number keys.

56
PPhhoonnee BBooookk
57
PPhhoonnee BBooookk
• Home/Office/Mobile/Pager/Fax/No label:
allows you to store more numbers for each
category.
• Speed dial: allows you to select one of the
stored numbers for speed dialling.
• E-mail: allows you to store an e-mail address.
• URL: allows you to store a URL address.
• Group: allows you to assign an entry to a caller
group. To remove the entry from a group, select
No Group.
• Name Ringer: allows you to select the unique
ringer to be used for alerting you to an incoming
call from the person.
• Birthday: allows you to save the date of the
person’s birthday.
• Secret: allows you to prevent a number from
being displayed when it is accessed or dialled by
unauthorised users. When this option is set to
ON, only people with your phone’s lock code can
view the secret number.
• Image: allows you to select an image to be
displayed for alerting you to an incoming call
from the person.
6. Press the Edit soft key to enter information or use
the Left or Right key to change the setting.
7. When you finish setting the options, press the Save
soft key to store the entry.
After storing, the phone displays the Phonebook entry
number that you just saved and the remaining slots
you can further store phone numbers.
Add Email (Menu 1-2-2)
Using this menu, you can save an e-mail address.
1. Enter an e-mail address and press the Next soft
key.
For further details about entering characters, see
page xx.
2. Enter a name and press the Next soft key.
3. To complete storing the e-mail address, follow the
procedure from step 5 in “Add Number” on page xx.
Add URL (Menu 1-2-3)
Using this menu, you can save a URL address.
1. Enter an URL address and press the Next soft key.
For further details about entering characters, see
page xx.
2. Enter a name and press the Next soft key.
3. To complete storing the URL address, follow the
procedure from step 5 in “Add Number” on page xx.

PPhhoonnee BBooookk
5958
Storing Phone Numbers at Call’s End
To store a phone number at the end of your call:
1. Press the key to end the call. The call time
and the phone number display.
2. To store the phone number, press the Save soft key.
3. To complete storing the number, follow the
procedure from step 2 in “Add Number” on page xx.
Adding a Number into an Existing Entry
1. Enter a number and press the Save soft key.
2. Scroll to the entry where you want to add a number
by pressing the Up or Down key. Press the Select
soft key.
3. To complete storing the number, follow the
procedure from step 4 in “Add Number” on page xx.
PPhhoonneebbooookk
Groups Menu 1-3
This option allows you to change the settings for the
caller groups.
To change a ringer melody indicated when a call
comes in from a member of a group:
1. Press the Up or Down key to scroll to the group you
want to edit.
2. Press the Ringer soft key.
3. Select the ringer category you want by pressing the
Left or Right key and press the Down key.
4. Select the ringer melody you want by pressing the
Up or Down key.
5. Press the Save soft key.
To change the name of a caller group:
1. Press the Up or Down key to scroll to the group you
want to edit.
2. Press the Edit soft key.
3. Press the CLR key to clear the current group name.
4. Enter a new name and press the Save soft key.
For further details about entering characters, see
page xx.

60
PPhhoonnee BBooookk
61
Messages
Your phone can receive voicemail notification, text
messages and pages. It also can send text messages
and pages if Reliance provides this service.
When the phone receives a message, an alert sounds,
a text notification displays along with the name and
phone number of the caller if available. The New
Message icon ( ) remains on the screen until you
read the new text messages, or you listen to the new
voice mail messages.
Messages are received even when your phone is in the
lock mode. However, the screen does not display
information about the message. To access a message,
you must unlock the phone.
If you receive an incoming message during a
conversation, your phone automatically mutes the
ringer. This is to avoid ringing in your ear while you are
trying to converse.
You can quickly enter the Messages menu by
pressing the Up key in Standby Mode.
Write Menu 2-1
You can create a short text message and send it to
other mobile phones.
Note: Message transmission is available only when
your phone is operating in a digital network and
if service is supported by Reliance.
Memory Status Menu 1-4
This option shows you how many Phonebook locations
are used or empty.
After displaying, the phone automatically goes back to
the previous menu level.

63
MMeessssaaggeess
62
MMeessssaaggeess
1. Enter the message contents and press the Next soft
key. For further details about how to enter text, see
page xx.
Press the Options soft key and select Templates to
add a template message.
2. Enter a destination number using the numeric keys.
Pressing the Ph Book soft key allows you to search
your Phonebook for a number. You can retrieve one
of the numbers labelled as “Mobile.”
3. To send the message to multiple destinations, press
the key to insert a space and repeat step 2.
4. When you finish entering destinations, press the
Next soft key.
5. To select an option, press the Up or Down key.
The following options are available:
• Msg: press the Edit soft key to change the
message contents you’ve already entered in step 1.
• Send To: press the Edit soft key to change the
destination phone numbers.
• Settings:press the Edit soft key to change the
message setting. Scroll to an option using the Up
or Down key and change the setting using the Left
or Right key. The following options are available:
- Priority: select the message priority.
- Validity: select how long your message is valid at
the SMS centre while attempts are made to
deliver them to the recipients.
- Send Later: select how long the delivery of the
message will be delayed at the SMS centre, if
you do not want to send it immediately.
- Delivery ACK: turn the delivery acknowledgement
feature on or off. When this is activated, the
network informs you whether or not your message
has been read by the recipients.
- Save Message : set whether or not the phone
saves the message in the Outbox after
transmission. When you select Prompt Save, the
phone will ask if you want to save the message.
Note: The Delivery ACK and Save Message options
can be preset in the New MSG menu (MENU
2-7-3); for details, see page xx.
• Save Msg: press the Save soft key to store the
message contents in the Saved menu for future
use.
6. Repeat step 5 to set the message options.
7. After changing the setting options, press the
key or the Send soft key to send the message.
Note: Closing the folder or pressing the key
before the message is sent stops the
transmission.

65
MMeessssaaggeess
64
MMeessssaaggeess
Inbox Menu 2-2
Your phone can store up to 99 messages total in the
Inbox, Outbox and Saved message box. When the
memory is full, a warning message displays and the
phone rejects additional messages until you erase the
obsolete ones.
When you access the Inbox menu, the message list
appears.
To view a message, press the Up or Down key to scroll
to it and press the Select soft key.
If necessary, press the Up or Down key to scan through
the contents. You can move to the next or previous
message by pressing the Left or Right key.
While viewing the message:
• Press the Forward soft key to send the message.
For more information about sending a message, see
page xx.
• Press the Erase soft key to erase the message from
the Inbox.
• To make a call to the sender’s number of the
message, press the key. Press the key again or
the Call soft key on the callback list to dial the
number, or the Save soft key to save it in
Phonebook.
Cannot be checked with the
current phone.
Outbox Menu 2-3
Your phone can store up to 99 messages total in the
Inbox, Outbox and Send message box.
When you access the Outbox menu, the message list
appears. A red number means that it is an urgent
message.
To review a message, press the Up or Down key to
scroll to it and press the Select soft key.
If necessary, press the Up or Down key to scan through
the contents. You can move to the next or previous
message by pressing the Left or Right key.
While reviewing the message:
• Press the Resend soft key to send the message
again. For more information about sending a
message, see page xx.
• Press the Erase soft key to erase the message from
the Outbox.
• To make a call to the recipient’s number of the
message, press the key. If necessary, select a
number on the callback list and press the key
again or the Call soft key to dial the number, or the
Save soft key to save it in Phonebook.

66
MMeessssaaggeess
67
MMeessssaaggeess
Saved Menu 2-4
Your phone can store draft messages that are yet to be
sent in the Saved message box. If you save the
message contents using the Save Msg menu before
sending it (see page xx), you can access them using
this menu.
While reviewing the message:
• Press the Resend soft key to send the message
again. For more information about sending a
message, see page xx.
• Press the Erase soft key to erase the message from
the Outbox.
• To make a call to the recipient’s number of the
message, press the key. If necessary, select a
number on the callback list and press the key
again or the Call soft key to dial the number, or the
Save soft key to save it in Phonebook.
Templates Menu 2-5
Using this menu, you can preset up to ten message
templates that you use most frequently and use them
when you send a message.
Scroll to the message you want by pressing the Up or
Down key.
• Press the Select soft key to send the message
using the template. For further details about how to
send a message, see page xx.
• Press the Edit soft key to change the message. For
further details about how to enter characters, see
page xx.
Erase Messages Menu 2-6
Using this menu, you can erase all of the messages in
each message box. You can also erase all of the
messages at one time by selecting All Messages.
When a confirming message appears, select Yes and
press the OK soft key.

69
MMeessssaaggeess
68
MMeessssaaggeess
Settings Menu 2-7
In this menu, you can preset several options for using
the messaging feature.
Auto Scroll (Menu 2-7-1)
If a message is too long for the display, the phone
displays it by scrolling the screen automatically. You
can set how often the phone scrolls the message to
the next screen.
If you select Off, you need to scroll to the next screen
manually using the Up or Down key.
Message Reminder (Menu 2-7-2)
When a message is received, the phone alerts you by
sounding the selected ringer. You can set how often
you want to be alerted. Selecting Off means that the
message alert does not sound, but the New Message
icon ( ) appears.
New Message (Menu 2-7-3)
You can set up the default settings of the options for
creating a new message.
The following options are available:
Save Message: allows you to set whether or not you
want the transmitted message to be saved in the
Outbox.
- Do not Save: the phone does not save the message.
- Prompt Save: the phone asks you if you want to save
the message or not.
- Auto Save: the phone automatically saves the
message.
Entry Method: allows you to select the text input
mode between T9 Word (T9 English) and Alphabet.
Delivery Ack: allows you to activate or deactivate
the delivery acknowledgement.
Message Color Setup (Menu 2-7-4)
This menu allows you to change the colour of the text
or background of your outgoing messages.
1. Press the Left or Right key to select a colour for the
message text and press the Down key.
The display shows your colour setting.
2. Press the Left or Right key to select a colour for the
message background.
3. Press the Save soft key to save your setting.

7170
MMeessssaaggeess
Voice Mail Menu 2-8
When you access this menu, the display shows how
many new voice messages you have received.
Press the key to dial your voicemail centre and
listen to the messages. Follow the instructions from
the system.
You can access the following options by pressing the
Options soft key:
Listen: allows you to listen to the voice message. The
phone automatically dials the number of your voice
mail centre.
Clear Icon: clears the New Message icon and resets
the counter for a new voice message, if necessary. The
system resets the counter automatically after you
listen to all of the new messages.
Cannot be checked with the
current phone.
Call History
You can use the Call History menu to:
•view and dial the last calls you dialled, received or
missed.
•erase the numbers in the call log memory.
•view the length of calls.
Note: You can also access the numbers in the three
call type by pressing the key in Standby
Mode.
Missed Menu 3-1
If Caller Line Identification service is available, your
phone keeps a list of the last 10 incoming calls that you
failed to answer. Contact Reliance for more information
about the service.
1. Press the Up or Down key to find a number, or name
if it is saved in Phonebook.
2. Press the Select soft key to confirm the highlighted
number. The missed number, or name if it is saved in
Phonebook, displays along with the date and time
when the call was received.
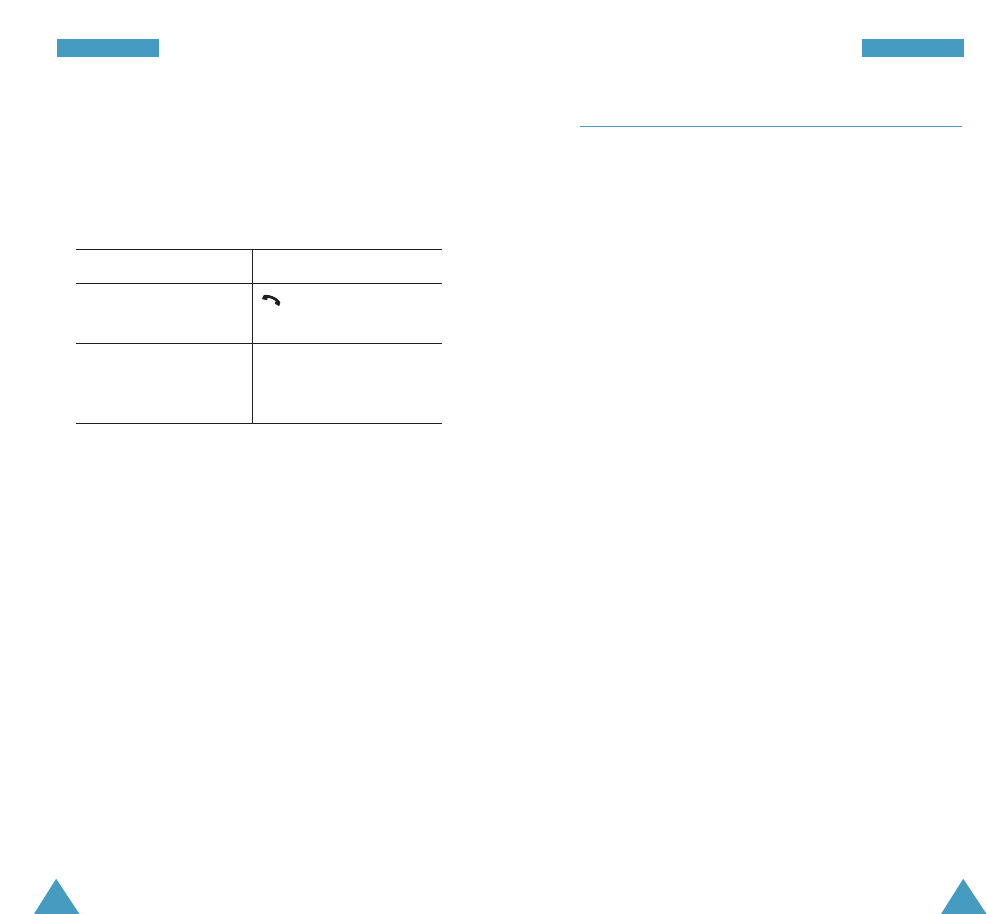
3. To Press the
place a call to key or the Call
the number soft key.
use the options Options soft key. For
details, see the next page.
exit the call log key.

72
CCaallll HHiissttoorryy
73
CCaallll HHiissttoorryy
When you press the Options soft key on the call log
list, the following options are available:
Save: (shown when the number is not stored in your
Phonebook) allows you to save the number in
Phonebook.
Show Entry: (shown when the number is stored in your
Phonebook) shows you the Phonebook location number.
Edit: allows to change the phone number to dial it or
save it in Phonebook.
Erase: erases the selected number.
Send MSG: allows you to send a message to the
number. For details, see page xx.
Received Menu 3-2
This option lets you view up to 10 of the last calls you
received if you are subscribed to the Caller Line
Identification service. Contact Reliance for more
information about this service.
When you access this menu, a list of the calls you
received displays.
For more information about scrolling through the list and
accessing the call log, see “Missed” on page xx.
Dialled Menu 3-3
The phone stores up to 10 of the last calls you dialled.
When you access this menu, a list of the outgoing
calls displays.
When you access this menu, a list of the calls you
dialed displays.
For more information about scrolling through the list
and accessing the call log, see “Missed” on page xx.
Erase History Menu 3-4
You can erase the entries stored in each of the three
call logs or all three logs at once.
When a confirming message displays, select Yes to
erase the selected log or all of the logs. If you want to
cancel the selection, select No. Press the OK soft key
to confirm the selection.