Samsung Electronics Co SCHA770 Dual-Band CDMA Phone User Manual
Samsung Electronics Co Ltd Dual-Band CDMA Phone Users Manual
UserManual.wiki
>
Samsung Electronics Co
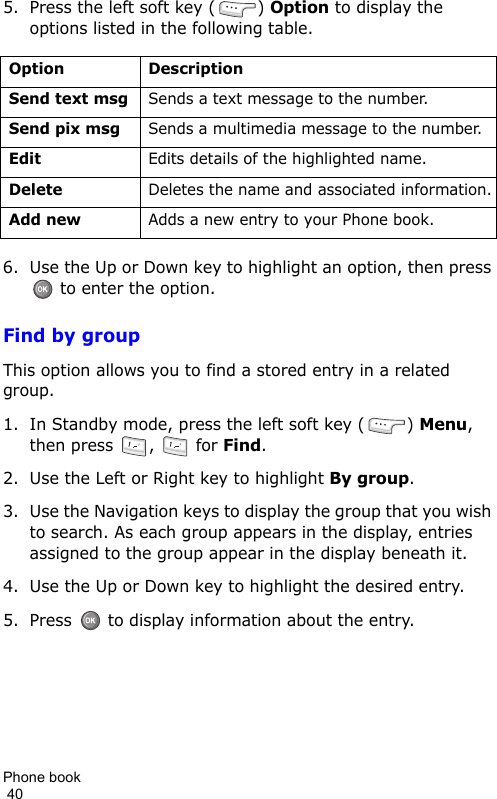
>
SCHA770 User Manual
Users Manual
Navigation menu
Upload a User Manual
Namespaces
Wiki Guide
HTML
PDF
Info
Views
User Manual
Discussion / Help
Navigation


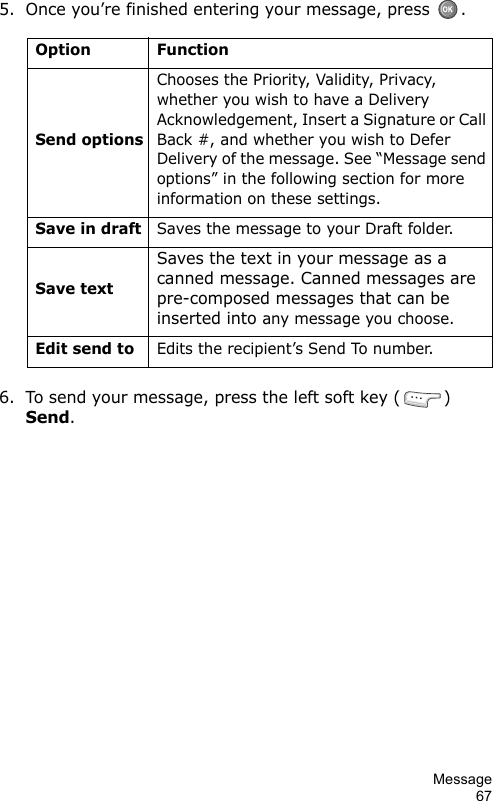
![Recent call57Once your selection is highlighted, you can do the following:• Press to dial the number.• Press to review all available call information (name and phone number [if available] and time/date stamp).• Press , then press the left soft key ( ) Option. A pop up menu with the options listed in the following table appears in the display.• Press the number of the option you wish to enter/ activate, or use the Up or Down key to highlight the option and press .• Press if you wish to exit the Option menu.Option FunctionSaveSaves the number to your Phone book.PrependAdds a prefix to the number.DeleteDeletes the selected call from your received call list.Send messageSends a message to the number.](https://usermanual.wiki/Samsung-Electronics-Co/SCHA770/User-Guide-425315-Page-60.png)

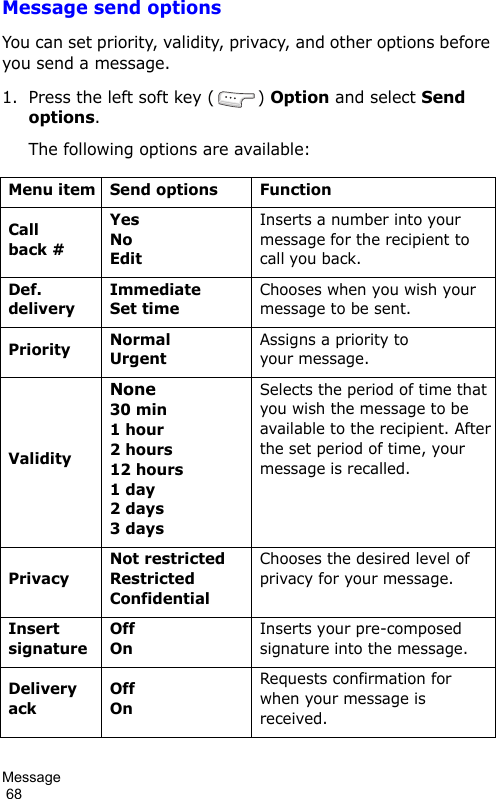
![Mobile web 86Using linksLinks have several purposes, such as jumping to a different page, to a different site, or even initiating a phone call. Links are shown inside of brackets ([ ]). You can normally use the left soft key ( ) to select a link when it is highlighted.Place a call while using mobile webYou may initiate a phone call from Mobile web if the site you are using supports this feature (the phone number may be highlighted). Press the appropriate soft key to call the number. In most cases you can also press to call the number. The Internet connection terminates when you initiate the call. After you end the call, your phone returns to Mobile web. Left soft key Press to activate the command that appears above it in the display. Right soft key Press to activate the command that appears above it in the display. SEND key Press to dial a highlighted number.](https://usermanual.wiki/Samsung-Electronics-Co/SCHA770/User-Guide-425315-Page-89.png)


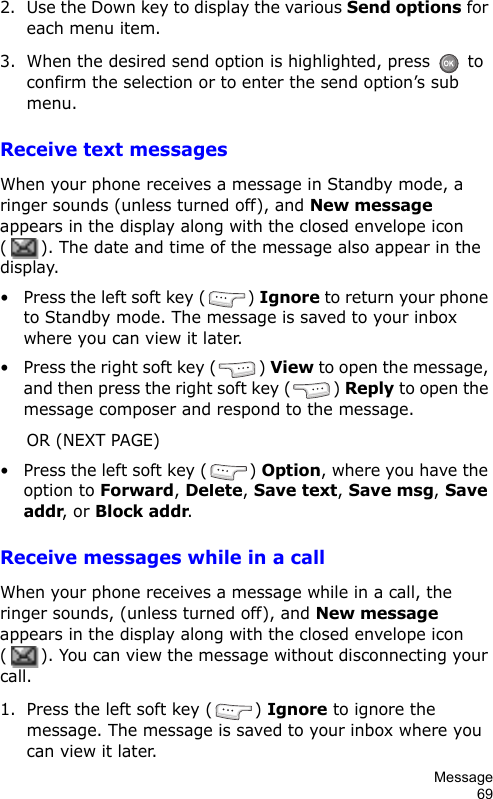
![Planner131To apply day light saving time:1. After selecting the time zone to which you want to apply Day light saving, press the left soft key ( ) Option.2. Select Day light saving by pressing the Up or Down key and press the left soft key ( ) Select.3. Select On by pressing the Navigation keys and press .The Day light saving icon appears on the left of the time.CalculatorYou can perform calculations, including addition, subtraction, multiplication, and division using your phone. 1. In Standby mode, press the left soft key ( ) Menu, then press , for Calculator. The Calculator appears in the display.2. Enter the first number in your equation using the keypad (numbers can be up to nine digits long).Notes:• To delete mistakes or clear the display, press the key. • To include a decimal point or a bracket, press the left soft key () Option and select the symbol you want.• To change the sign for a number to a negative, press the key.3. Use the Navigation keys to set the type of calculation that you wish to perform. Your choices are as follows.4. Use the keypad to enter the second number into your equation. 5. Press to perform the calculation and view the result.• [+] Addition • [x] Multiplication• [-] Subtraction •[÷] Division](https://usermanual.wiki/Samsung-Electronics-Co/SCHA770/User-Guide-425315-Page-134.png)