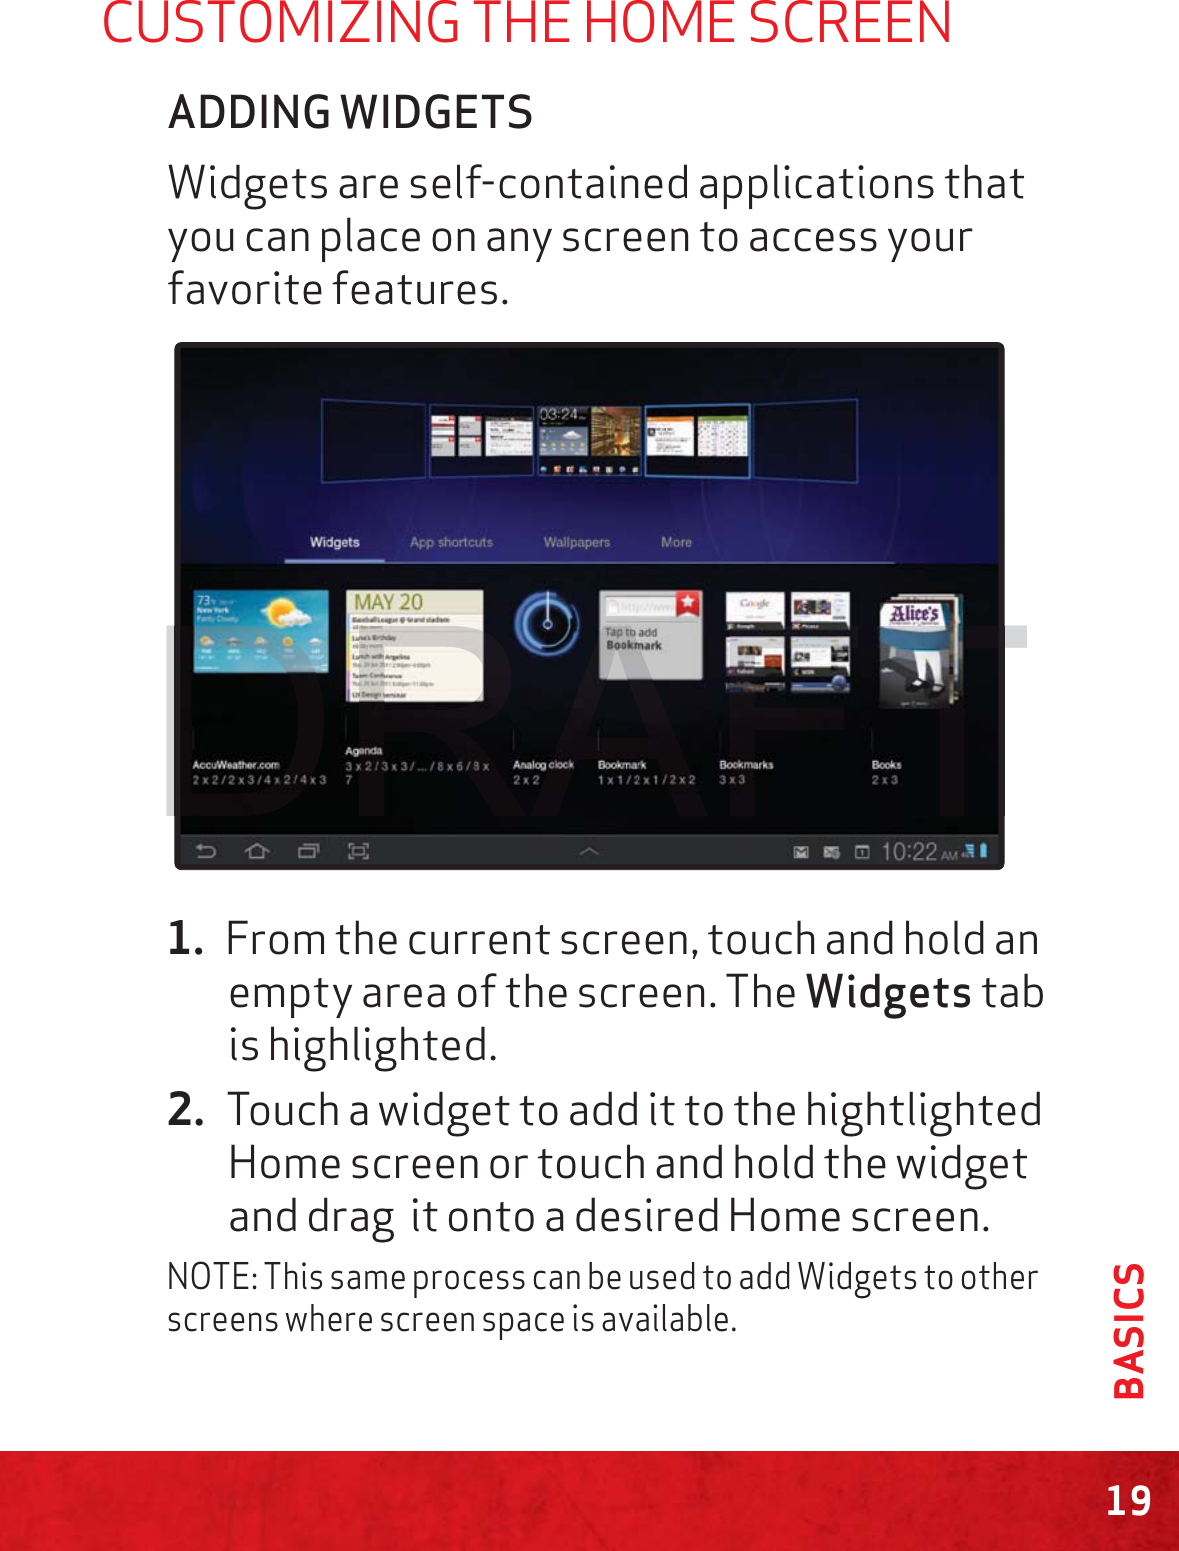
Samsung Electronics Co SCHI815 Tablet PC with Cellular/PCS CDMA, 700 MHz LTE, WLAN and Bluetooth User Manual
Samsung Electronics Co Ltd Tablet PC with Cellular/PCS CDMA, 700 MHz LTE, WLAN and Bluetooth Users Manual
UserManual.wiki
>
Samsung Electronics Co
>
SCHI815 User Manual
Users Manual
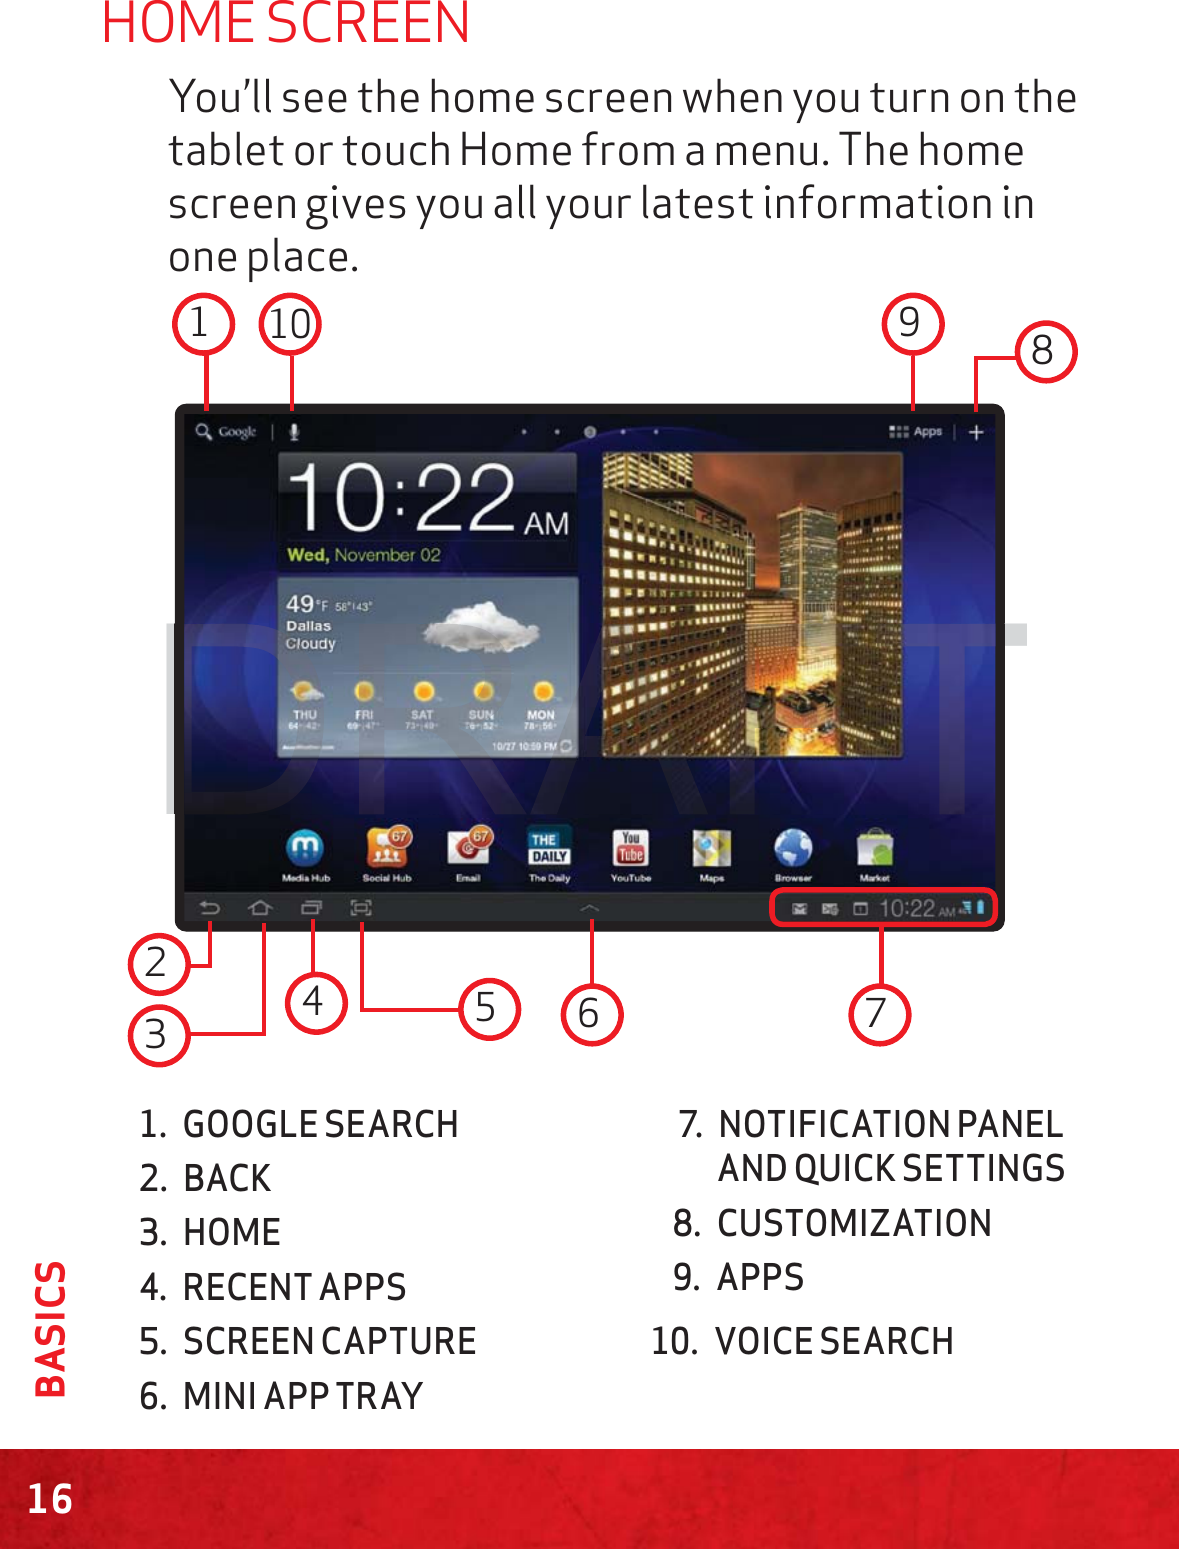
Navigation menu
Upload a User Manual
Namespaces
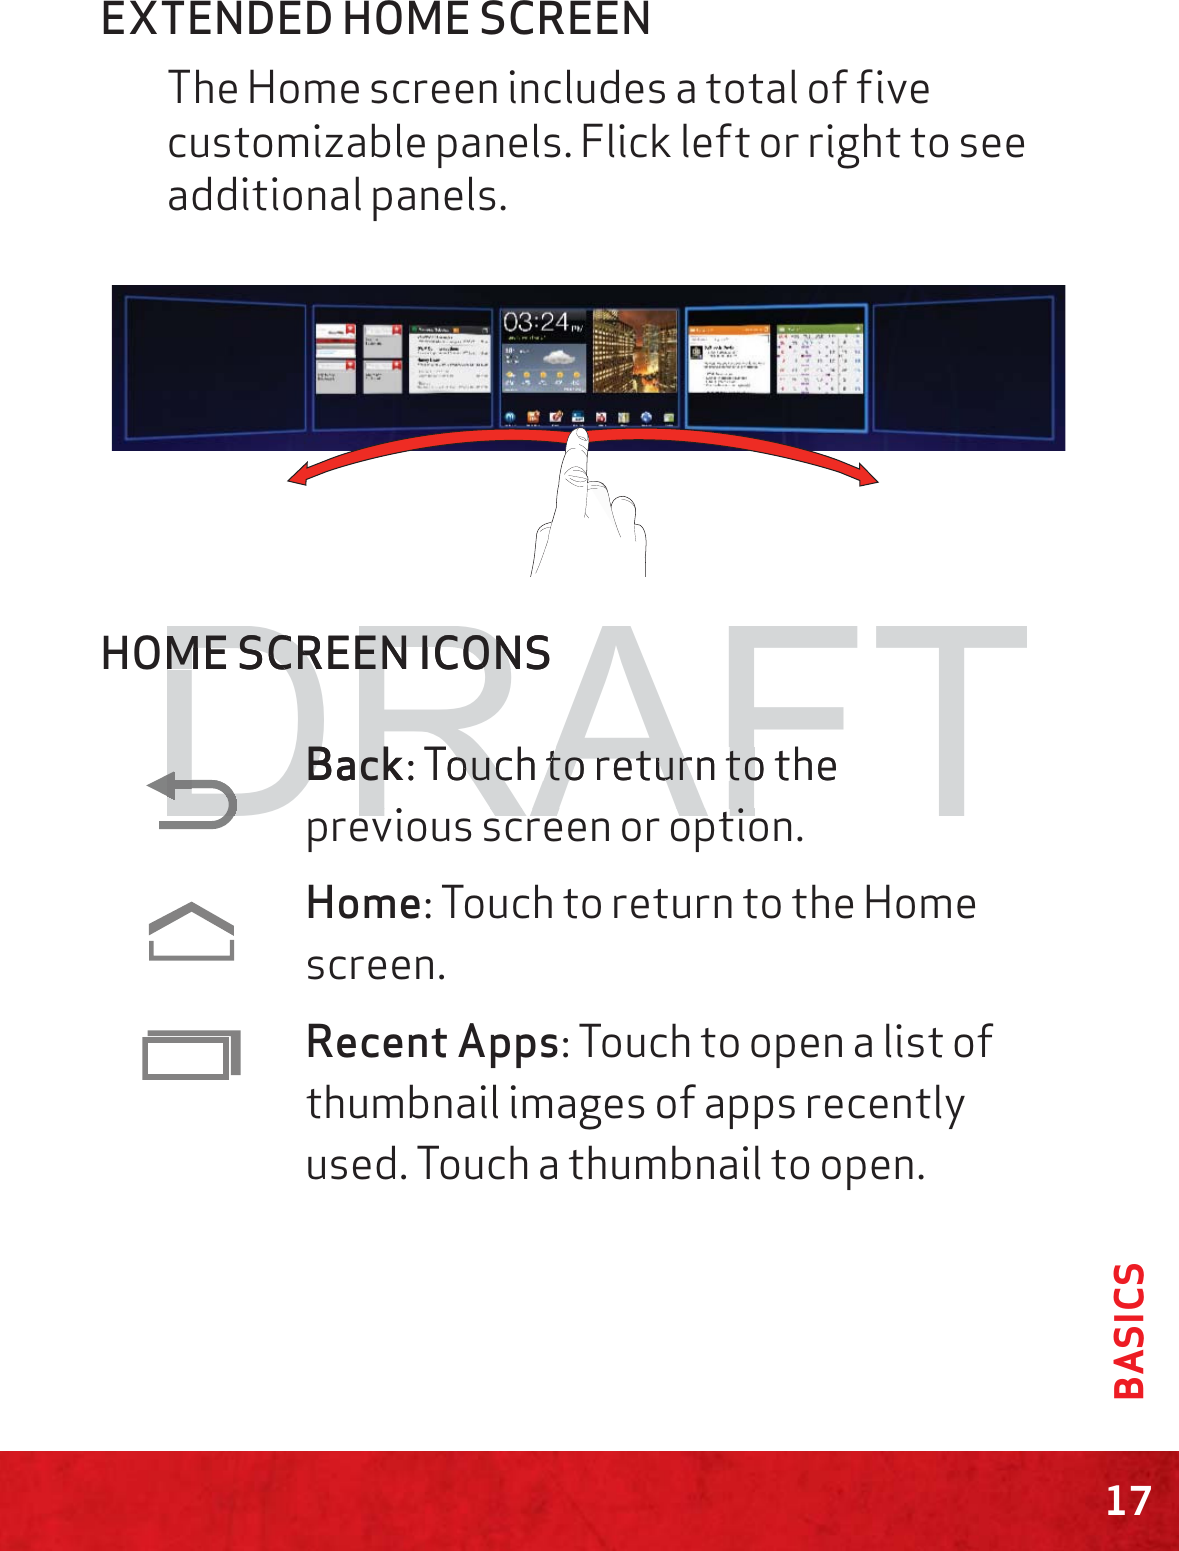
Wiki Guide
HTML
PDF
Info
Views
User Manual
Discussion / Help
Navigation


![Health and safety informationExposure to Radio Frequency (RF) SignalsCertification Information (SAR) <RXUZLUHOHVVGHYLFHLVDUDGLRWUDQVPLWWHUDQGUHFHLYHU,WLVGHVLJQHGDQGPDQXIDFWXUHGQRWWRH[FHHGWKHH[SRVXUHOLPLWVIRUUDGLRIUHTXHQF\5)HQHUJ\VHWE\WKH)HGHUDO&RPPXQLFDWLRQV&RPPLVVLRQ)&&RIWKH86JRYHUQPHQW7KHVH)&&H[SRVXUHOLPLWVDUHGHULYHGIURPWKHUHFRPPHQGDWLRQVRIWZRH[SHUWRUJDQL]DWLRQVWKH1DWLRQDO&RXQVHORQ5DGLDWLRQ3URWHFWLRQDQG0HDVXUHPHQW1&53DQGWKH,QVWLWXWHRI(OHFWULFDODQG(OHFWURQLFV(QJLQHHUV,(((,QERWKFDVHVWKHUHFRPPHQGDWLRQVZHUHGHYHORSHGE\VFLHQWLILFDQGHQJLQHHULQJH[SHUWVGUDZQIURPLQGXVWU\JRYHUQPHQWDQGDFDGHPLDDIWHUH[WHQVLYHUHYLHZVRIWKHVFLHQWLILFOLWHUDWXUHUHODWHGWRWKHELRORJLFDOHIIHFWVRI5)HQHUJ\7KHH[SRVXUHOLPLWVHWE\WKH)&&IRUZLUHOHVVPRELOHGHYLFHHPSOR\VDXQLWRIPHDVXUHPHQWNQRZQDVWKH6SHFLILF$EVRUSWLRQ5DWH6$57KH6$5LVDPHDVXUHRIWKHUDWHRIDEVRUSWLRQRI5)HQHUJ\E\WKHKXPDQERG\H[SUHVVHGLQXQLWVRIZDWWVSHUNLORJUDP:NJ7KH)&&UHTXLUHVZLUHOHVVGHYLFHWRFRPSO\ZLWKDVDIHW\OLPLWRIZDWWVSHUNLORJUDP:NJ7KH)&&H[SRVXUHOLPLWLQFRUSRUDWHVDVXEVWDQWLDOPDUJLQRIVDIHW\WRJLYHDGGLWLRQDOSURWHFWLRQWRWKHSXEOLFDQGWRDFFRXQWIRUDQ\YDULDWLRQVLQPHDVXUHPHQWV6$5WHVWVDUHFRQGXFWHGXVLQJVWDQGDUGRSHUDWLQJSRVLWLRQVDFFHSWHGE\WKH)&&ZLWKWKHGHYLFHWUDQVPLWWLQJDWLWVKLJKHVWFHUWLILHGSRZHUOHYHOLQDOOWHVWHGIUHTXHQF\EDQGV$OWKRXJKWKH6$5LVGHWHUPLQHGDWWKHKLJKHVWFHUWLILHGSRZHUOHYHOWKHDFWXDO6$5OHYHORIWKHGHYLFHZKLOHRSHUDWLQJFDQEHZHOOEHORZWKHPD[LPXPYDOXH7KLVLVEHFDXVHWKHGHYLFHLVGHVLJQHGWRRSHUDWHDWPXOWLSOHSRZHUOHYHOVVRDVWRXVHRQO\WKHSRZHUUHTXLUHGWRUHDFKWKHQHWZRUN,QJHQHUDOWKHFORVHU\RXDUHWRDZLUHOHVVEDVHVWDWLRQDQWHQQDWKHORZHUWKHSRZHURXWSXW%HIRUHDQHZPRGHOGHYLFHLVDYDLODEOHIRUVDOHWRWKHSXEOLFLWPXVWEHWHVWHGDQGFHUWLILHGWRWKH)&&WKDWLWGRHVQRWH[FHHGWKHH[SRVXUHOLPLWHVWDEOLVKHGE\WKH)&&7HVWVIRUHDFKPRGHOGHYLFHDUHSHUIRUPHGLQSRVLWLRQVDQGORFDWLRQVDVUHTXLUHGE\WKH)&& )RUW\SLFDORSHUDWLRQWKLVPRGHOKDVEHHQWHVWHGDQGPHHWVWKH)&&5)H[SRVXUHJXLGHOLQHV1RQFRPSOLDQFHZLWKWKHDERYHUHVWULFWLRQVPD\UHVXOWLQYLRODWLRQRI)&&5)H[SRVXUHJXLGHOLQHV6$5LQIRUPDWLRQRQWKLVDQGRWKHUPRGHOGHYLFHVFDQEHYLHZHGRQOLQHDWKWWSZZZIFFJRYRHWHDIFFLG3OHDVHXVHWKHGHYLFH)&&,'QXPEHUIRU](https://usermanual.wiki/Samsung-Electronics-Co/SCHI815/User-Guide-1589047-Page-56.png)
![7KHXVHRIDQ\XQDXWKRUL]HGDFFHVVRULHVPD\EHGDQJHURXVDQGYRLGWKHGHYLFHZDUUDQW\LIVDLGDFFHVVRULHVFDXVHGDPDJHRUDGHIHFWWRWKHGHYLFH$OWKRXJK\RXUGHYLFHLVTXLWHVWXUG\LWLVDFRPSOH[SLHFHRIHTXLSPHQWDQGFDQEHEURNHQ$YRLGGURSSLQJKLWWLQJEHQGLQJRUVLWWLQJRQLW7KLVGHYLFHLVFDSDEOHRIRSHUDWLQJLQDPRGH)RUDGHYLFHVRSHUDWLQJLQWKHIUHTXHQF\UDQJHRI*+]WKH\DUHUHVWULFWHGIRULQGRRURSHUDWLRQVWRUHGXFHDQ\SRWHQWLDOKDUPIXOLQWHUIHUHQFHIRU0RELOH6DWHOOLWH6HUYLFHV066LQWKH86:,),$FFHVV3RLQWVWKDWDUHFDSDEOHRIDOORZLQJ\RXUGHYLFHWRRSHUDWHLQDPRGH*+]EDQGDUHRSWLPL]HGIRULQGRRUXVHRQO\,I\RXU:,),QHWZRUNLVFDSDEOHRIRSHUDWLQJLQWKLVPRGHSOHDVHUHVWULFW\RXU:,),XVHLQGRRUVWRQRWYLRODWHIHGHUDOUHJXODWLRQVWRSURWHFW0RELOH6DWHOOLWH6HUYLFHV](https://usermanual.wiki/Samsung-Electronics-Co/SCHI815/User-Guide-1589047-Page-58.png)