Samsung Electronics Co SCHN299 Single-Mode Cellular CDMA Phone User Manual
Samsung Electronics Co Ltd Single-Mode Cellular CDMA Phone Users Manual
UserManual.wiki
>
Samsung Electronics Co
>
SCHN299 User Manual
>
Users Manual
Contents
1.
Users Manual
2.
Amendment Users Manual
Users Manual
Navigation menu
Upload a User Manual
Namespaces
Wiki Guide
HTML
PDF
Info
Views
User Manual
Discussion / Help
Navigation

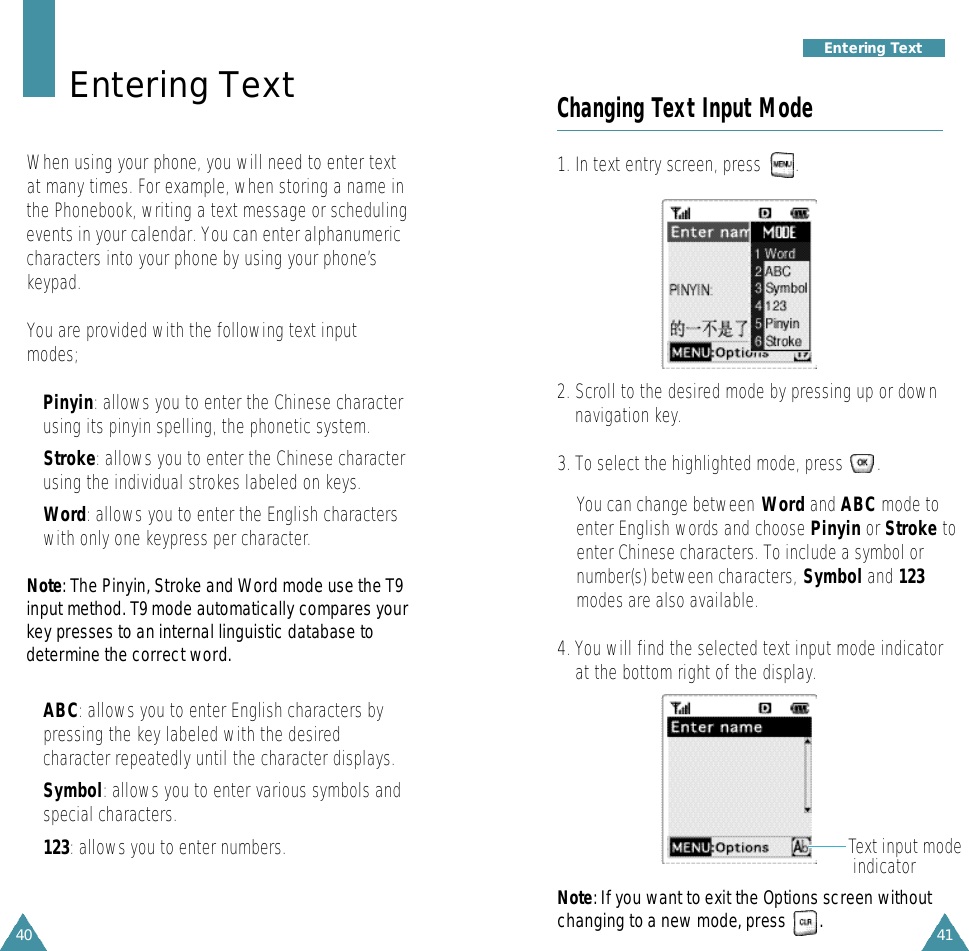
![Smart PunctuationsPeriod, hyphen, and apostrophe are available on .T9 applies rules of grammar to insert the correctpunctuation. Notice that is used twice in this example to display two punctuation marks: 51Entering Text50Entering TextChanging CaseTo shift the case of the next letter(s) that you type,press . There are three shift states: LowerCase, Initial Capital and Capitals Lock.Including a NumberYou can include a number between letters withoutexiting the Word input mode. Press and hold thedesired number key.Scrolling• To move the cursor left or right through your textmessage, press left or right navigation key.• To scroll through alternate word choices for thekeys you have entered, press .Clearing Letters and WordsPress one or more times to clear letters to theleft. Press and hold down the key to erase a word.l e t ‘ s e a t . ABC ModeWhen typing in ABC mode, you should press keylabeled with the required letter:-Once for the first letter-Twice for the second letter-And so on.For example, you press three times quickly to display the letter “C” , two times quickly todisplay the letter “K”. So, this method is calledMulti-tap typing.Refer to the table below for the list of charactersassigned on each key.Characters in the Order Displayed1 . @ , : ? - ; ’ / ( ) ! # % & * <> _ + = ” \ { } $ [ ]A B C 2D E F 3G H I 4J K L 5M N O 6P Q R S 7T U V 8W X Y Z 90KeyList of characters available:(Caps Lock mode)](https://usermanual.wiki/Samsung-Electronics-Co/SCHN299.Users-Manual/User-Guide-176145-Page-26.png)

![74S c h e d u l e r75S c h e d u l e rDate Menu 4-3This feature allows you to specify the date you wantto view so that you can easily go to the day withoutscrolling through the Calendar. Once the date isobtained, you can create, edit and delete events onyour calendar.Enter the desired date using the numeric keys, andpress . When the day you selected ishighlighted, press to access it.To create, edit or erase the events, refer to “Today”on page xx.To Do List Menu 4-4This feature allows you to draw up a list of tasks youneed to do and assign a priority and deadline tothem. You can store up to 20 tasks.Creating a To-Do Item1. Enter the task contents and press .You can enter up to 32 characters in English or 14characters in Chinese. For further information onhow to enter characters, see page xx.2. Enter your deadline using the numeric keys.N o t e: Use the volume keys on the left side of thephone to toggle between AM and PM.3. Select High or Low priority using up or downnavigation key .4. Press to store the task.Adding, Editing and Erasing a To-Do ItemIf tasks are already defined in the To Do List when youselect the To Do List menu option (4-4), the mostlately created task is displayed with the deadline andthe associated priority ([Hi] for high priority or [Lo] forlow priority). Scroll to the desired item by pressingleft or rightnavigation key.The following options are available when you press .Add new: allows you to add a new task.Edit: allows you to edit the selected task. Erase: allows you to erase the selected task. After you select an option, press . Then follow thescreen prompt.Countdown Menu 4-5This menu helps you know how much time it takesyou to do something, or how many months, days,hours and minutes until a specific event. You cancreate up to 5 Countdown timers using this feature.](https://usermanual.wiki/Samsung-Electronics-Co/SCHN299.Users-Manual/User-Guide-176145-Page-38.png)