Samsung Electronics Co SCHN299 Single-Mode Cellular CDMA Phone User Manual
Samsung Electronics Co Ltd Single-Mode Cellular CDMA Phone Users Manual
Contents
- 1. Users Manual
- 2. Amendment Users Manual
Users Manual

SCH-N299 (CDMA 800MHz)
CONFIDENTIAL
AUGUST 13 , 2001
8. USERS MAN UAL

3
SAFETY PRECAUTIONS ............................................................. 7
UNPACKING............................................................................... 9
YOUR PHONE
Phone Layout .............................................................................. 10
Display ....................................................................................... 13
Backlight .................................................................................... 15
Service Light ............................................................................... 15
GETTING STARTED
Installing the UIMCard .................................................................16
Charging a Battery ...................................................................... 18
Switching the Phone On/Off ........................................................ 21
Changing the Display for Standby Mode ...................................... 22
CHV Code .................................................................................... 23
Your Phone’s Mode .......................................................................23
CALL FUNCTIONS
Making a Call ...............................................................................25
Redialing the Last Number ............................................................26
Making a Call from the Phonebook ...............................................27
Prepending Dialing ....................................................................... 27
Speed Dialing ...............................................................................28
Emergency Dialing ........................................................................29
Pause Dialing ...............................................................................30
Voice Dialing ................................................................................33
Adjusting the Volume.....................................................................34
Answering a Call ...........................................................................35
In-Call Options ..............................................................................36
Quick-switching to Silent Mode ......................................................37
Viewing Missed Calls .....................................................................37
Call Waiting ..................................................................................38
Call Forwarding ............................................................................38
Three-Way Calling........................................................................ 39
Table of Contents

54
ENTERING TEXT
Changing Text Input Mode ........................................................... 41
Chinese PY(Pinyin) Mode ............................................................. 42
Chinese Stroke Mode ................................................................... 46
Word Mode ................................................................................. 49
ABC Mode ................................................................................... 51
Symbol Mode .............................................................................. 53
123 Mode ................................................................................... 53
USING THE MENUS
Accessing a Menu Functions by Scrolling ....................................... 54
Accessing a Menu Functions by Using its Shortcut .......................... 55
List of Menu Functions ................................................................. 56
CALLS
Outgoing (MENU 1-1) ............................................................ 60
Incoming (MENU 1-2) ............................................................ 61
Missed (MENU 1-3) ................................................................ 61
Erase Logs (MENU 1-4)............................................................ 61
Air Time (MENU 1-5)............................................................... 62
PHONE BOOK
Find Name (MENU 2-1) ......................................................... 63
Add Entry (MENU 2-2) ........................................................... 64
Find Entry (MENU 2-3) ..........................................................68
Relation Search (MENU 2-4) ..................................................68
Add email (MENU 2-5) ...........................................................69
GAMES .........................................................................70
Scheduler
Today (MENU 4-1) ................................................................. 71
View Month (MENU 4-2) ........................................................ 73
Date (MENU 4-3) .................................................................. 74
To Do List (MENU 4-4) ........................................................... 74
Countdown (MENU 4-5) ......................................................... 75
World Time (MENU 4-6) ........................................................ 77
Calculate (MENU 4-7) ............................................................ 79
Alarm Set (MENU 4-8) ........................................................... 80
SOUNDS
Ringer Volume (MENU 5-1) .................................................... 81
Ringer Type (MENU 5-2) ........................................................ 82
Key Beep (MENU 5-3) ........................................................... 82
Alerts (MENU 5-4) ................................................................. 83
Voice Volume (MENU 5-5) ...................................................... 84
Roam Ringer (MENU 5-7) ...................................................... 84
Power on/off (MENU 5-6) ..................................................... 84
DISPLAY
Backlight (MENU 6-1) ............................................................ 85
Banner (MENU 6-2) ............................................................... 86
Animation (MENU 6-3) ........................................................... 86
My Phone Number (MENU 6-4) .............................................. 87
Language (MENU 6-5) ........................................................... 87
Set Time (MENU 6-6) ............................................................. 88
Auto Hyphenation (MENU 6-7) ............................................... 89
LCD Contrast (MENU 6-8) ....................................................... 89
Version (MENU 6-9)............................................................... 89
VOICE KIT
Voice Dial (MENU 7-1) ........................................................... 90
Voice Memo (MENU 7-2) ....................................................... 95
MESSAGES
New Messages (MENU 8-1)................................................... 102
Inbox (MENU 8-2) ................................................................ 103
Outbox (MENU 8-3).............................................................. 106
MSG Setup (MENU 8-4)......................................................... 107

7
6
SETUP
Auto Retry (MENU 9-1) ....................................................... 109
Auto Answer (MENU 9-2) ..................................................... 109
Answer Mode (MENU 9-3) ................................................... 110
Tone Length (MENU 9-4) ..................................................... 110
Set NAM (MENU 9-5) ........................................................... 111
Roam Option (MENU 9-6) .................................................... 111
Data/Fax (MENU 9-7) ......................................................... 113
Whisper Mode (MENU 9-8) .................................................. 114
Security (MENU 9-9) ........................................................... 115
R-UIM Setup (MENU 9-0) ..................................................... 120
REFERENCE INFORMATION
Using the Batteries .....................................................................121
Safety Information .....................................................................123
Care and Maintenance ...............................................................131
GLOSSARY .................................................................. 133
INDEX.........................................................................136
Safety Precautions
Read these simple guidelines. Failure to comply with
them may be dangerous or illegal. For more detailed
safety information, see “Safety Information” on page
xx.
Road safety comes first
Do not use a hand-held mobile phone while driving;
park the vehicle first. Remember that in some
countries, it is illegal to use a mobile phone while
driving.
Switch off when refuelling
Do not use the phone at a refuelling point (service
station) or near fuels or chemicals.
Switch off on aircraft
Mobile phones can cause interference. Using them
on aircraft is both illegal and dangerous.
Switch off in hospital
Follow any regulations or rules. Switch phone off
near medical equipment.
Respect special regulations
Follow any special regulations in force in any area
and always switch off your phone whenever it is
forbidden to use it, or when it may cause
interference or danger (in a hospital for example).
Interference
All wireless phones may be subject to radio
interference, which may affect their performance.
8
Safety Precautions
9
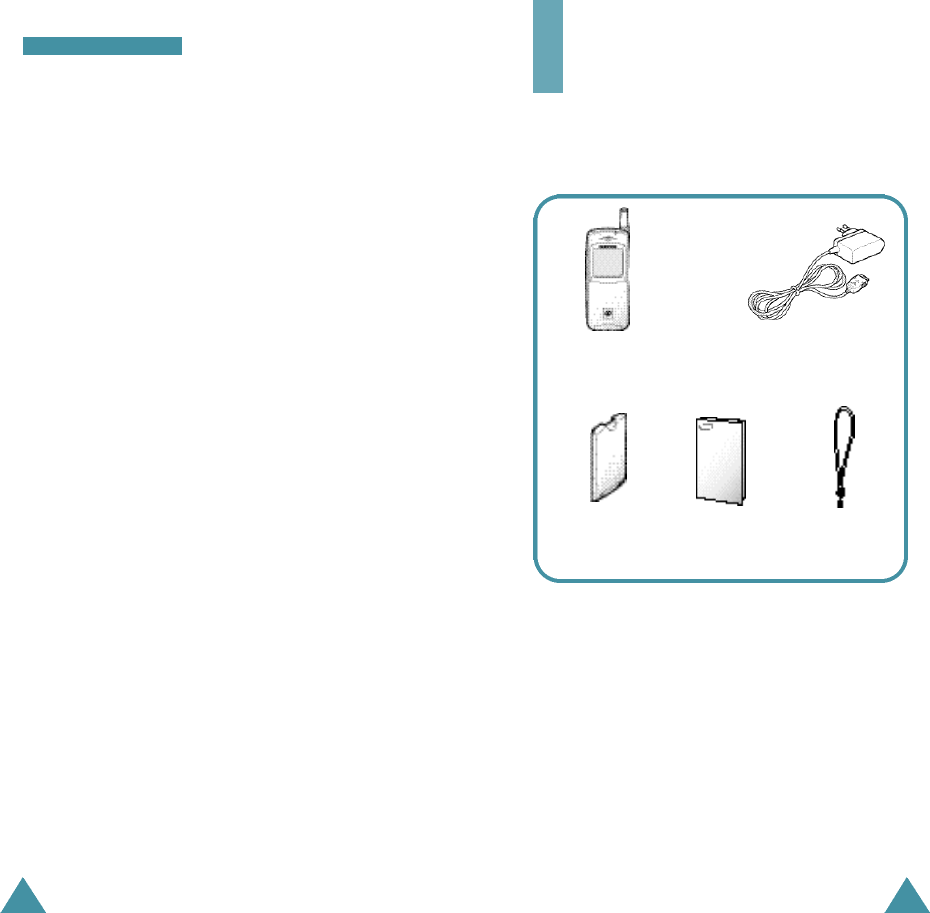
U n p a c k i n g
Your package contains the following items.
Use qualified service
Only qualified service personnel must repair
equipment.
Use sensibly
Use only in the normal position (to ear). Do not touch
the antenna unnecessarily when the phone is
switched on.
Accessories and batteries
Use only SAMSUNG-approved accessories and
batteries.
Radio frequency exposure information
In August 1996, the Federal Communications
Commission (FCC) of the U.S. adopted an updated
safety standard for human exposure to radio
frequency electromagnetic energy emitted by FCC
regulated transmitters. These guidelines are
consistent with the safety standard previously set by
both U.S. and international standards bodies. The
design of this phone complies with the FCC
guidelines and these international standards.
To maintain compliance with FCC RF exposure
guidelines, if you wear a handset on your body, use
the Samsung-supplied or approved carrying case,
holster, or other body-worn accessory.
If you do not use a body-worn accessory, ensure the
antenna is at least (1.0cm) from your body
when transmitting. Use of non-approved accessories
may violate FCC RF exposure guidelines.
In addition, you can obtain the following accessories
for your phone from your local SAMSUNG dealer:
• Ear microphone
•
•
Standard, and Extended Li-Ion batteries
•
•
Phone Travel Adapter
Standard
Battery Owner’s
Manual Hand Strap
1110
Your Phone
Your Phone
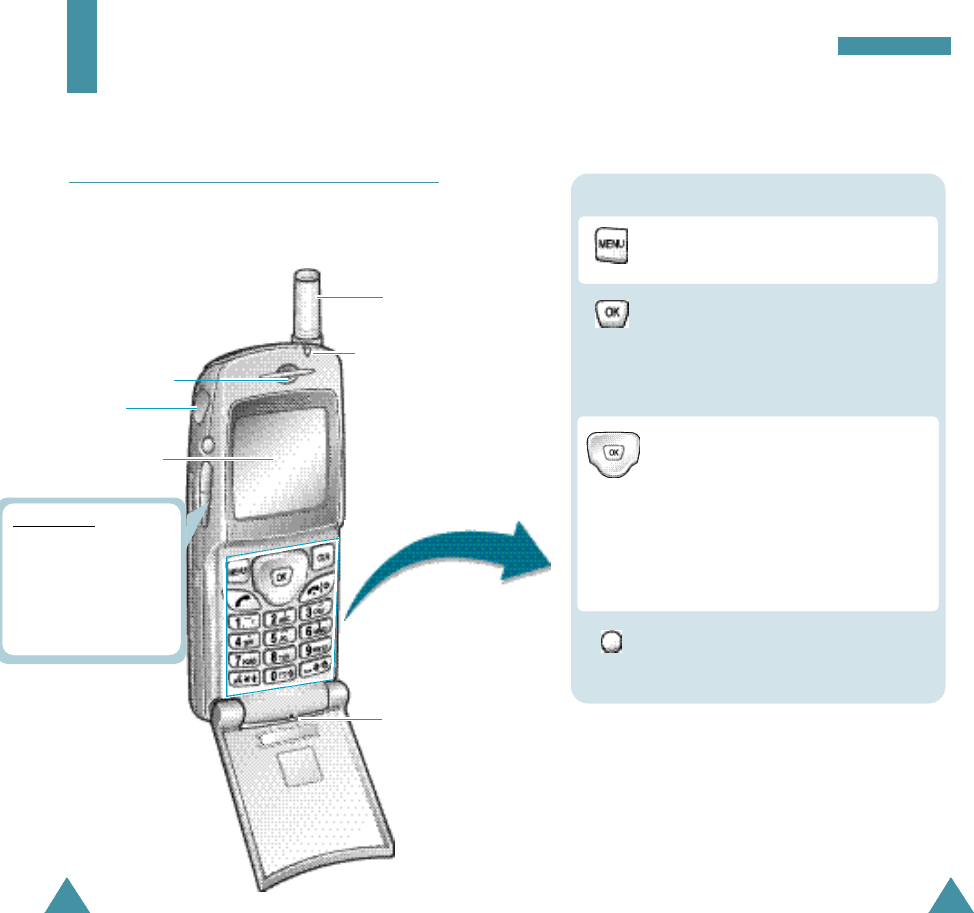
Phone Layout
The following illustration shows the main elements
of your phone.
Microphone
Earpiece
Display
Volume keys
During a call, adjusts the
voice volume.
In Standby mode with
the phone open, adjusts
the call ringer volume.
Enters the menu facility.
In the menu facility, selects a menu function
or stores information that you have entered.
In Standby mode, quickly enters the Voice
Record menu. When pressed and held
down, starts recording a voice memo.
In the menu facility, scrolls through the
menu options.
In Standby mode, ^ allows you to enter
the Game menu and V changes the
item to display on the Standby mode. And
< allows you to enter the Message Kit
menu and > to find a Phonebook entry by
its name.
Key Functions
Antenna
Service Light
Earphone jack
13
Your Phone
12
Your Phone
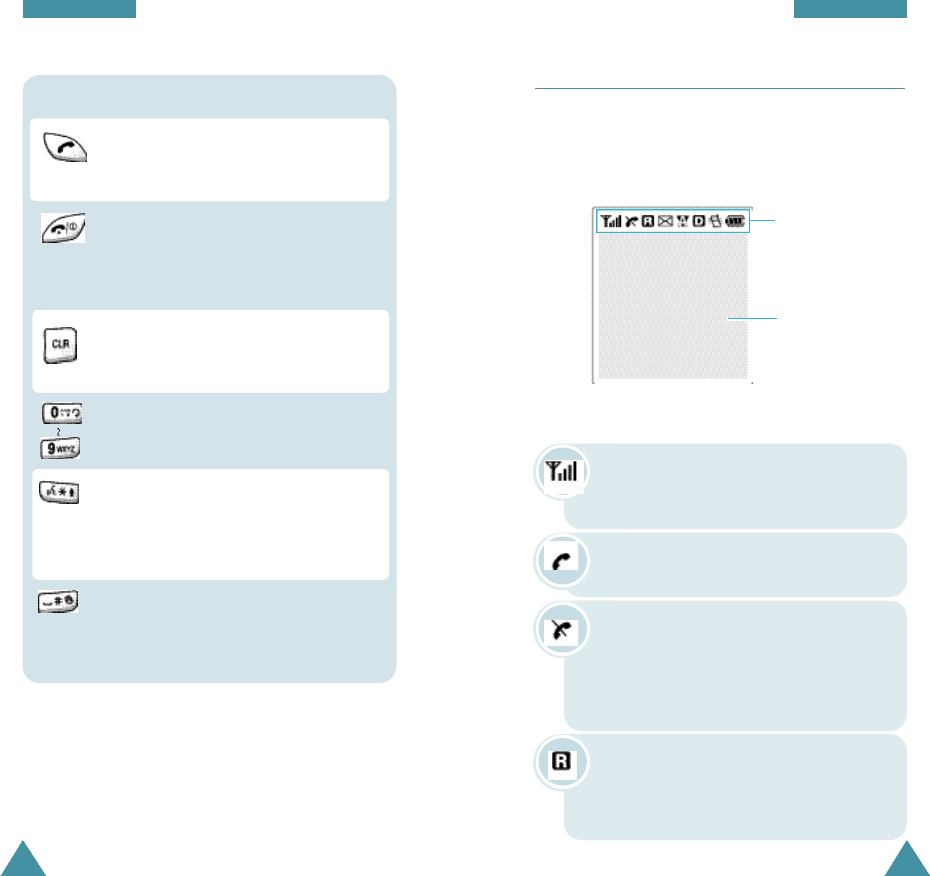
Makes or answers a call.
In Standby mode, recalls the last number
dialed.
Key Functions (continued...)
Ends a call. Also switches the phone on and
off when pressed and held.
In the menu facility, returns to Standby
mode and cancels your input.
In Standby mode, quickly enters the Voice
Dial menu. When pressed and held,
activates voice dialing.
In the text entry mode, # changes the case.
Enters numbers, letters and some special
characters.
Deletes characters from the display.
In the menu facility, returns to the previous
menu level.
Display
The display comprises two areas: an upper line of
static icons, and the lower text and graphic area. The
following icons display at power-on:
Icons
Text and graphic
area
Signal strength : Shows the received
signal strength. The greater the number of
bars, the better the signal strength.
Icons
Service: Appears when a call is in
progress.
No Service: Appears when you are outside
a service area. With it displayed, you cannot
make or receive calls. Wait a little while for
a better signal or move into an open area to
regain the service.
Roaming: Appears when you are out of
your home area and have registered with a
different network (when travelling in other
countries, for example).
In Standby mode, quickly enters/exits the
silent mode.
In the text entry mode, inserts a space.

15
Your Phone
14
Your Phone
Digital mode: Indicates that the phone is
operating in Digital mode.
Analog mode: Indicates that the phone is
operating in Analog mode.
New Message: Indicates that there is a
new message waiting to be checked.
Vibration mode: Appears when the ring
volume for calls is set to Vibrate.
Battery status: Shows the level of your
battery. The more bars you see, the more
power you have left.
Backlight
The display and keypad are illuminated by a
backlight. When you press any key, the backlight
illuminates. It turns off if no key is pressed within a
given period of time, depending on the Backlight
option set in the Display menu.
To specify the length of time the phone waits before
the backlight turns off, set the Backlight menu
option (6-1); see page xx for further details.
Service light
The service light is in the top right-hand of the
phone. It flashes to indicate incoming call or
message. Also, the service light flashes for a few
seconds when you turn on the phone.
Icons (continued...)
Service light
17
Getting Started
16
Getting Started
Installing the UIM Card
When you subscribe to a network, your are provided
with a plug-in UIMcard loaded with your
subscription details (CHV code, available optional
service and so on).
I m p o rt a n t !The plug-in UIM card and its contacts
can be easily damaged by scratches or
bending, so be careful when handling,
i n s e rting or removing the card .
Keep all UIM cards out of the reach of
small childre n .
1. If necessary, switch off the phone by holding down
until the power-off animation begins playing.
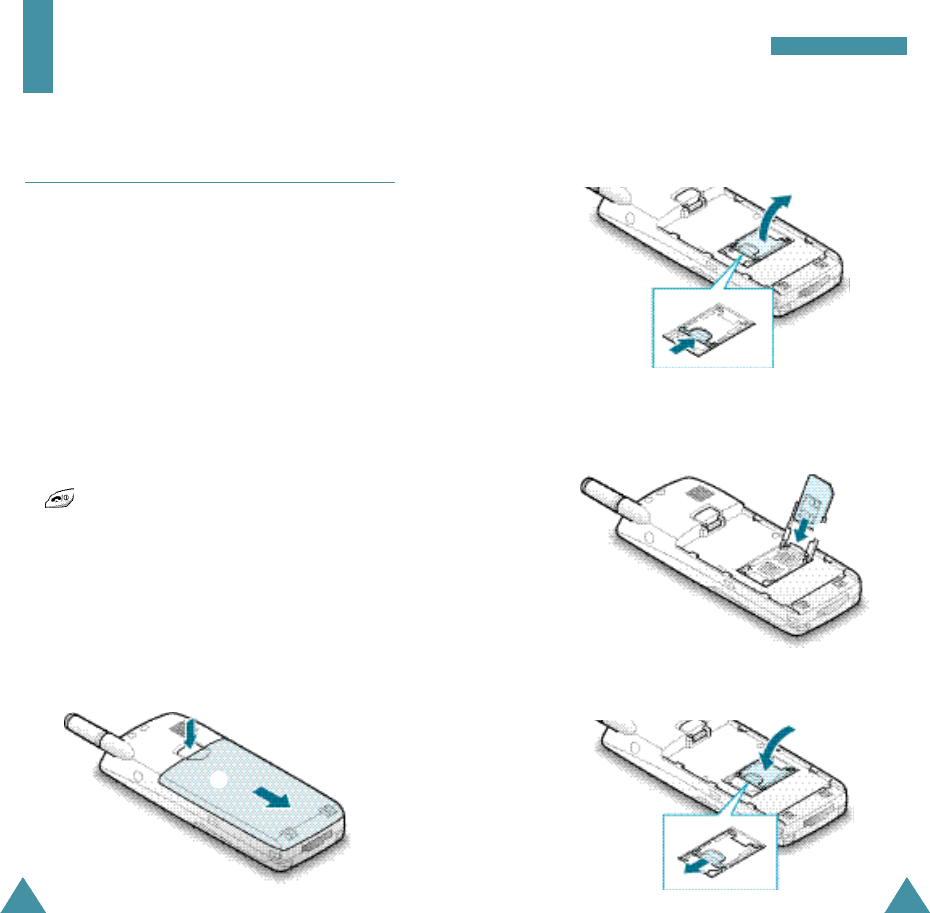
2. Remove the battery. To do so:
➀Press and hold the catch above the battery on
the back of the phone.
➁Slide the battery toward the bottom of the
phone and take it away.
4. Insert the UIM card ensuring that the cut corner is
at the bottom left and the gold contacts of the
card face into the phone. Replace the card holder.
➁
➀
➀
3. Slide the ivory lock in the UIM card holder right
the bottom of the phone to unlock the UIM card
holder and lift it up.
➁
5. Slide the ivory lock left to lock the card holder.

18
Getting Started
19
Getting Started
N o t e :You must fully charge the battery before using
your phone for the first time. The phone can be used
while the battery is charg i n g .
1. With the battery in position on the phone, connect
the lead from the travel adapter to the jack at the
bottom of the phone.
6. Reinstall the battery. To do so:
➀Place the battery so that the tabs on it align to
the notches on the back of the phone.
Charging a Battery
Your phone is powered by a rechargeable Li-ion
battery.
A travel adapter is provided with your phone. Use
only approved batteries . Ask you local SAMSUNG
dealer for further details.
➁Slide the battery toward the top of the phone
until you hear a click.
2. Connect the adapter to a standard AC wall outlet.
3. When charging is finished, disconnect the adapter
from the power outlet and from the phone.
➀
➀
➁
21
Getting Started
20
Getting Started
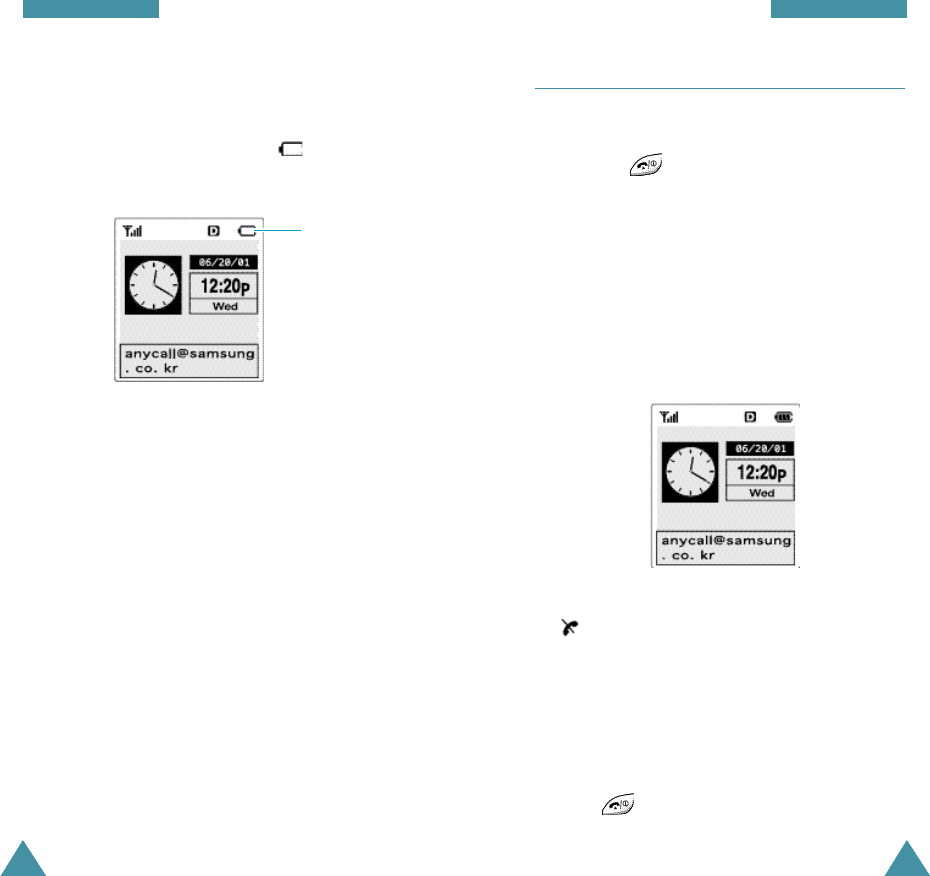
Low Battery Indicator
When the battery charge level gets low, the battery
sensor blinks an empty battery icon at the top
right corner of the display and sounds a tone.
If the battery level gets too low, the phone will turn
off automatically. Unfortunately, if this happen, you’ll
lose whatever you are doing, including dropping your
call. Watch the battery strength icon and make sure
your battery is adequately charged.
Empty battery
icon
Switching the Phone On/Off
1. Open the flip cover.
2. Hold down for more than one second to
switch the phone on.
3. If the phone asks for a CHV code, enter the CHV
code supplied with the UIM card. For further
information on the CHV code, see page xx.
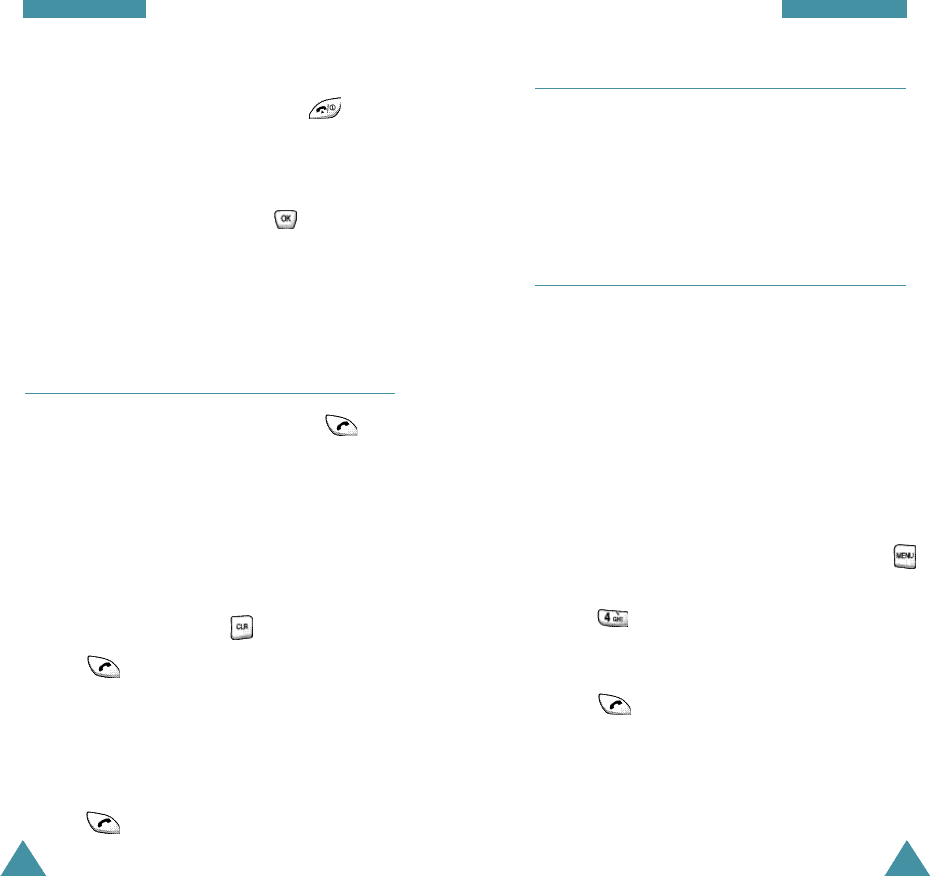
The service light in the top right corner of the
phone flashes, and an alert sounds. When the
system locates services, you can see the following
idle screens on the main display.
If the phone is out of service, the No Service icon
appears in the display. In this case, you
cannot place and receive calls. You can try again
later when service is available.
N o t e : You can change the display language via
the L a n g u a g e menu option (6 - 5 ) .
3. When you wish to switch the phone off, hold
down for more than two seconds.

23
Getting Started
22
Getting Started
WARNING!
Do not switch on the phone when the mobile
phone use is prohibited or when it may cause
interference or danger.
Note: Do not touch the antenna on the phone
unnecessarily when the phone is switched on.
Contact with the antenna affects call quality and
may cause the phone to operate at a higher power
level than otherwise needed.
Changing the Display for Standby
Mode
Your phone provides you with a variety of items to
display in Standby mode. You can change the idle
screen with ease to one of the following items
depending on your preference.
•Clock and calendar: displays a clock with a daily
pad calendar. This is default display.
• World clock: displays two clocks showing the time
in the time zones selected in the World Time
menu option (see page xx).
•Digital clock: displays the digital clock.
• Wallpaper 1 and 2: displays the wallpaper
animations selected in Idle 1 and Idle 2 under the
Animation menu option (see page xx)
respectively.
To change the display in Standby mode, press down
navigation key repeatedly until you find the desired
display.
CHV Code
The CHV code supplied with the UIM card helps you
protect the UIM card against unauthorized use.
When requested the code, key in the appropriate
code (displayed as asterisks for security). If you enter
an incorrect CHV code three times in succession,
your UIM card is blocked. To unblock the card,
contact your service provider.
You can enable or disable the code using the R-UIM
Setup menu option (9-0). For further information on
the CHV code, see page xx.
Your Phone’s Mode
Standby Mode
Standby is the most basic state of your phone. The
phone goes into Standby mode soon after you turn it
on, or whenever you briefly press . When your
phone is in Standby mode, you will typically see the
current date and time. If you enter a phone number,
you can press to dial it, or press to save it
in the internal phone book.
Press at any time to return to Standby mode. Be
careful; if you are on a call when you press , you
will return to Standby mode, but it also disconnects
the call. Press several times or hold it down to
return to Standby mode without ending the call.

2524
Getting Started
Talk Mode
You can place and answer calls only when your
phone is turned on. During a call, the phone is in Talk
mode. While you are in Talk mode, pressing
gives you a list of options referred to as “In-Call
Options.” See page xx for details on the options.
Power Save Mode
Your phone comes with a Power Save feature that
will automatically be activated if your phone is
unable to find a signal after 15 minutes of searching.
While this feature is active, the phone’s battery
charge will conserved. The phone will automatically
recheck for a signal periodically.
To manually force the phone recheck for a signal,
press any key. A message on the display let you
know when your phone is operating in Power Save
Mode.
Lock Mode
When you lock your phone using the Lock Mode
menu option (see page xx), you cannot use the
phone. Even in Lock mode, you can receive messages
and calls, but cannot place an outgoing call until you
unlock the phone.
To unlock the phone, press , and enter the lock
code. The phone returns to Standby mode.
Call Functions
Making a Call
To make a call, proceed the followings:
1. In Standby mode, enter the area code and phone
number.
While entering a phone number, press to
insert a hard or two-second pause or a
hyphenation. For more information on pause
dialing, see page xx.
2. Press . The phone places the call to the
entered phone number.
N o t e : If you have set the time interval for automatic
redialing in the Auto Retry menu option (see page
xx), and nobody answers to you or the line is busy,
the phone automatically retries to make the call.
Correcting the Number
To clear... Then...
The last digit Press .
displayed
The whole display Hold down for more than
one second.
26
Call Functions
27
Call Functions
Ending a Call
When you have finished your call, press .
The call time (length of the call) displays with the
number of the called party. If the number is stored in
your Phonebook, the name is displayed. If there is no
match in Phonebook, you can press and store the
number to the Phonebook. For further information on
storing the number in the Phonebook, see page xx.
Or, simply close the flip cover to end a call.
Redialing the Last Number
To redial the number you dialed last, press
twice.
The phone stores the last 10 numbers dialed so that
you search for the desired number in the Outgoing
call log. To recall any of these numbers, proceed as
follows.
1. If there are any characters on the display, return to
Standby mode by pressing .
2. Press . The list of outgoing calls are
displayed.
3. Press up or down navigation key (or the volume
keys on the left side of the phone) to scan through
the list until you find the required name or number.
4. Press to dial the displayed number.
Making a Call from the Phonebook
You can store the phone numbers called regularly in
memory, called Phonebook. You then simply recall
the number to dial. For further information on
Phonebook, refer to page xx.
Prepend Dialing
The Prepend option lets you add digits such as area
codes and network feature activation codes to a
phone number that is in your Call logs before dialing
it. (The prepended phone number cannot be more
than 10 digits.)
To prepend the phone numbers stored in the Call
logs:
1. Access the desired call log.
2. When the desired phone number displays, press
to access the Options menu.
3. Press to select the Prepend option.
4. Enter the area code or feature code.
5. Press to dial the number.
28
Call Functions
29
Call Functions
Speed Dialing
Once you have stored phone numbers labeled with
Speed Dial in the phonebook memory, you can dial
them easily whenever you want. See below.
One-Touch Dial
Memory locations 01 through 09 are special one-
touch locations. You can dial the phone numbers
stored in the Phonebook memory from 01 through 09
simply by pressing one button.
Press and hold the third digit of the memory location
containing the number to be dialed.
For example: Location no. 009
Press and hold.
The number (and name) stored is displayed, then
dialed.
Two-Touch Dial
Memory locations 10 through 99 are special two-
touch locations.
Press the second digit briefly, then hold down the
third digit of the memory cell.
For example: Location no. 023
Press briefly and hold down .
The number (and name) stored is displayed, then
dialed.
Three-Touch Dial
Memory locations 100 through 350 are special three-
touch locations.
Press the first and the second digit briefly, then hold
down the third digit of the memory cell.
For example: Location no. 123
Press and briefly, then hold
down .
The number (and name) stored is displayed, then
dialed.
Emergency Dialing
You can place calls to hard-coded emergency
numbers (911, *911, and #911) or three specified
number in the emergency number list even if your
phone is locked or all outgoing calls are restricted.
For further information on emergency numbers, refer
to page xx.

30
Call Functions
31
Call Functions
Pause Dialing
When you call automated system, like banking
services, you are often required to enter a password
or account number. Instead of manually entering the
numbers each time, you can store the numbers in
your Phonebook, separated by special characters
called pauses.
There are two kinds of pauses that can be entered on
your phone:
•Hard pause: A hard pause stops the dialing
sequence until you press .
• Two second pause: A two second pause stops the
dialing sequence for two seconds and then
automatically sends the remaining digits.
Note: Multiple two second pauses can be
entered to extend the length of a pause. For
example, two consecutive two second pauses
cause a total pause time of four seconds.
However, keep in mind that pauses count as
digits towards the 32 digit dialing maximum.
Storing Pauses in a Phonebook Entry
To store a number in your Phonebook that contains
pauses:
1. Enter the phone number you want to store (such as
the bank’s teleservice phone number).
2. Press . The Dial options display.
3. Press or to enter the desired pause.
• Press for P pause. The letter “P” displays
in the number, meaning that a hard pause will
occur at that point in the dialing sequence.
• Press for T pause. The letter “T”
displays in the number, meaning that a “Timed”
pause will occur at that point in the dialing
sequence.
4. Enter the digits that need to follow the pause
(such as your account number).
5. Store the number in your Phonebook as you
normally would by pressing and following the
screen prompts.
Pause Dialing from a Stored Phonebook Entry
1. Dial the number from the Phonebook.
2. If you stored the number using a two second
pause(s), your phone transmits the number that
follows the “T” pause two seconds after
connection.
If you stored the number using a hard pause(s),
wait for the appropriate prompt from the number
you are calling (credit card number, back account
number, etc.). When prompted, press to send
the DTMF number that follows your hard pause.
3. “SENDING DTMF” flashes on the display and the
transmitted tone sounds.

33
Call Functions
32
Call Functions
Manual Pause Dialing
You can enter pauses manually using the Dial
options during the dialing process.
1. Enter the phone number of the service you want to
call (such as a bank’s teleservice phone number).
2. Press to display the Dial options.
3. Press for P Pause. The phone displays a
“P” meaning a hard pause. Enter the number to be
sent after the pause and then press . After
connecting, press again to transmit the
additional number.
Press for T Pause. The phone displays “T”
meaning a timed pause. When prompted, enter
the number to be sent after the pause and then
press . The phone transmit the number that
follows the pause two seconds after connection.
Voice Dialing
Before using the Voice dialing feature, you must
record the name and number in your phone using the
Voice Dial menu. For further details, see page xx.
N o t e: You can quickly enter the Voice Dial menu by
p r essing in Standby mode.
1. To place a call, press and hold down, or open
the flip cover, depending on the Set Active menu
option (7-1-3). See page xx.
2. At the voice prompt, say the name into the
microphone.
•If the phone recognizes the name, the phone
attempts a connection.
•If the phone does not recognize the name, the
screen prompts for the name again.
•If the phone is unable to recognize the name
after three attempts, the message Did not
match any voicetag try again is displayed.
Try the call again later, or check the recorded
name.
3. The phone dials the corresponding number.
35
Call Functions
34
Call Functions
Adjusting the Volume
During a call, if you want to adjust the voice volume,
use the volume keys on the left side of the phone.
Press to increase and to decrease the
volume. The illustration on the display shows all
eight levels (the more bars, the louder). No bars
indicates the key beep is turned off.
In Standby mode, you can adjust the ringer volume
for calls using these keys.
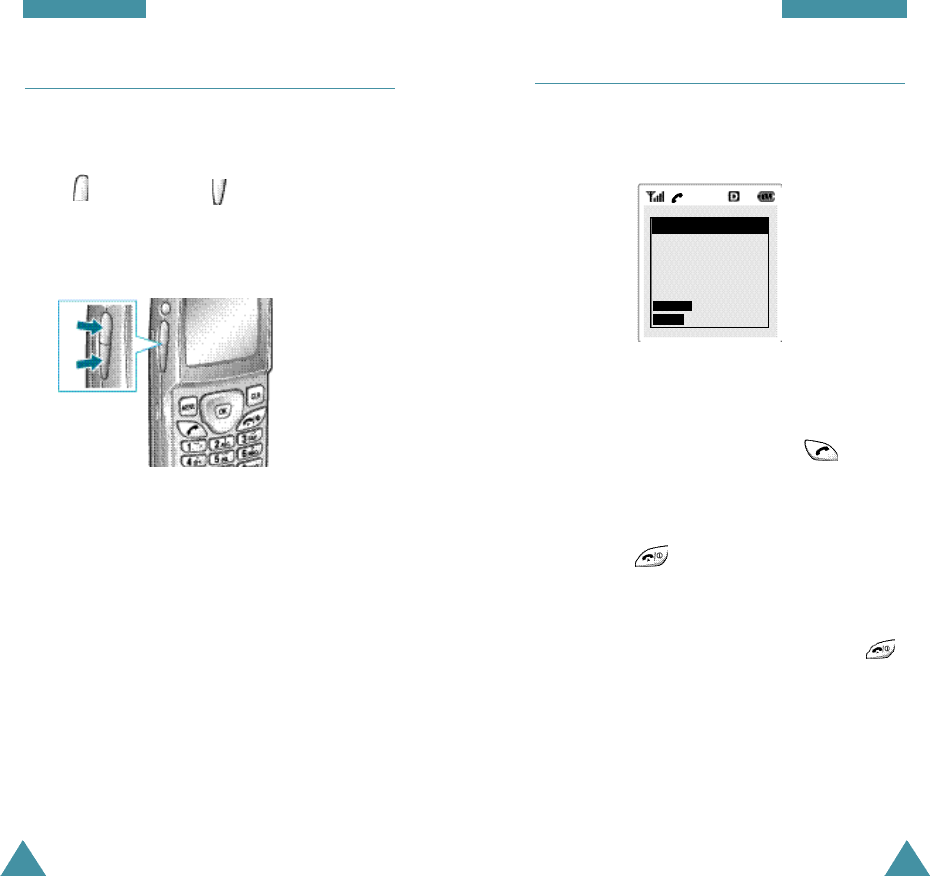
Answering a Call
When somebody calls you, the phone alerts you by
ring, blinking service light and the following screen
on the display.
If the caller can be identified, the caller’s phone
number (or name if stored in your Phonebook) is
displayed.
1. If necessary, open the phone. Press to
answer a call.
If the Answer Mode menu option (9- 3) is set to
any key, you can answer a call by pressing any
key except .
If the menu option is set to flip open, you can
answer a call simply by opening the phone.
2. End the call by closing the phone or pressing .
N o t e s :
• You can answer a call while using the phonebook
or menu features. The current operation will be
i n t e rru p t e d .
• If you cannot answer an incoming call, you can set
the phone to answer the call by the gre e t i n g
message and re c o rd the caller’s message. For
f u r ther information, see page xx.
Incoming
Digital
Call From
Send : Answer
End : Silence
37
Call Functions
36
Call Functions
In-Call Options
Your phone provides a number of functions that you
can use during a call. You may not utilize all of these
functions at all times. Many of the in-call options are
network services.
Press during a call to access the following in-
call options:
Mute/Quit: allows you to switch your phone’s
microphone off, so that the other party cannot hear
you.
Example: You wish to say something to another
person in the room but do not want the other party to
hear you.
Calls : allows you to access the Calls menu. See
page xx.
Phonebook: allows you to access the Phonebook
menu. See page xx.
Silent/Quit: does not transmit the key tones. It
allows you to press keys without hearing annoying
key tones during a call.
Send Tel #: sends DTMF tones of your number.
My Phone #: shows your phone number.
Quick-switching to Silent Mode
Silent mode disables all sounds on the phone. This
feature is best used in situations where the phone
might disturb others, such as a meeting, library,
theater, etc. Your phone can be set to silent mode
with a press of a key.
To enter Silent mode, press and hold down .
Pressing and holding down once again exits
silent mode.
Viewing Missed Calls
If you fail to answer a call for any reason, the phone
indicates a missed call by displaying a text
notification on the screen. Additionally, if caller
information is available, a Missed entry is created,
and the screen displays the phone number of the
most recent missed call.
When the display informs you of the call you missed,
press to call the displayed number, or to
clear the message and return to Standby mode.
To view the list of the missed calls, refer to ‘Missed’
on page xx.
38
Call Functions
39
Call Functions
Call Waiting
You can answer an incoming call while you have a
call in progress, if this service is supported by the
network. Contact your service provider to activate
Call Waiting.
When a waiting call is detected, the incoming call
alert sounds (network dependent) and a text
notification displays. To answer a waiting call:
1. To answer the call, press . The phone
connects the calling party, and places the current
party on hold.
2. Press again to switch between two parties.
Call Forwarding
This feature provides the option of forwarding
incoming calls to another phone number, even while
your phone is off. Activating Call Forwarding does
not affect outgoing calls made from this phone.
Contact your service provider to activate Call
Forwarding.
Three-Way Calling
This feature enables you to conduct conference calls
with two separate parties at the same time. The
phone records only the first party into the Outgoing
Calls Log. But, you are billed airtime for each of the
outgoing calls separately. Contact your service
provider to activate Three-Way Calling.
During a three-way call, if one of the callers hangs
up, you and the remaining caller will stay connected.
If you initiated the call and you hang up first, all
three parties are disconnected.
1. During a conversation, press . The phone
places the other party on hold.
2. Enter the phone number for the third party, and
then press again.
3. When the third party answers, press again
to begin your three-way call.
41
Entering Text
40
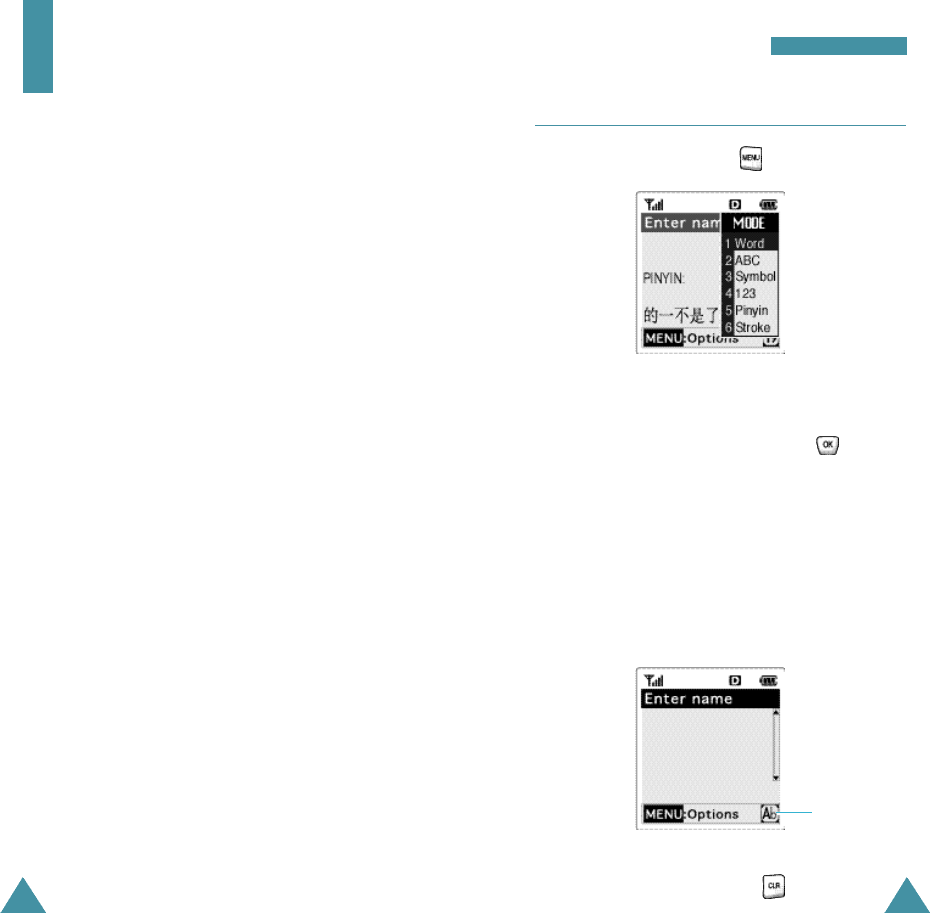
Changing Text Input Mode
1. In text entry screen, press .
2. Scroll to the desired mode by pressing up or down
navigation key.
3. To select the highlighted mode, press .
You can change between Word and ABC mode to
enter English words and choose Pinyin or Stroke to
enter Chinese characters. To include a symbol or
number(s) between characters, Symbol and 123
modes are also available.
4. You will find the selected text input mode indicator
at the bottom right of the display.
N o t e: If you want to exit the Options screen without
changing to a new mode, press .
Entering Text
When using your phone, you will need to enter text
at many times. For example, when storing a name in
the Phonebook, writing a text message or scheduling
events in your calendar. You can enter alphanumeric
characters into your phone by using your phone’s
keypad.
You are provided with the following text input
modes;
•Pinyin: allows you to enter the Chinese character
using its pinyin spelling, the phonetic system.
•Stroke: allows you to enter the Chinese character
using the individual strokes labeled on keys.
•Word: allows you to enter the English characters
with only one keypress per character.
N o t e : The Pinyin, Stroke and Wo rd mode use the T9
input method. T9 mode automatically compares your
key presses to an internal linguistic database to
d e t e rmine the correct word .
•ABC: allows you to enter English characters by
pressing the key labeled with the desired
character repeatedly until the character displays.
•Symbol: allows you to enter various symbols and
special characters.
•123: allows you to enter numbers. Text input mode
indicator
42
Entering Text
43
Entering Text
Chinese Pinyin Mode
Pinyin is a system to mark Chinese pronunciation in
Latin alphabets. With the pinyin input method, you
can enter Chinese characters by keying in the pinyin
string from the phone keypad and the phone
automatically presents the matching alternatives.
This mode allows you to enter Pinyin characters with
only one key press per letter.
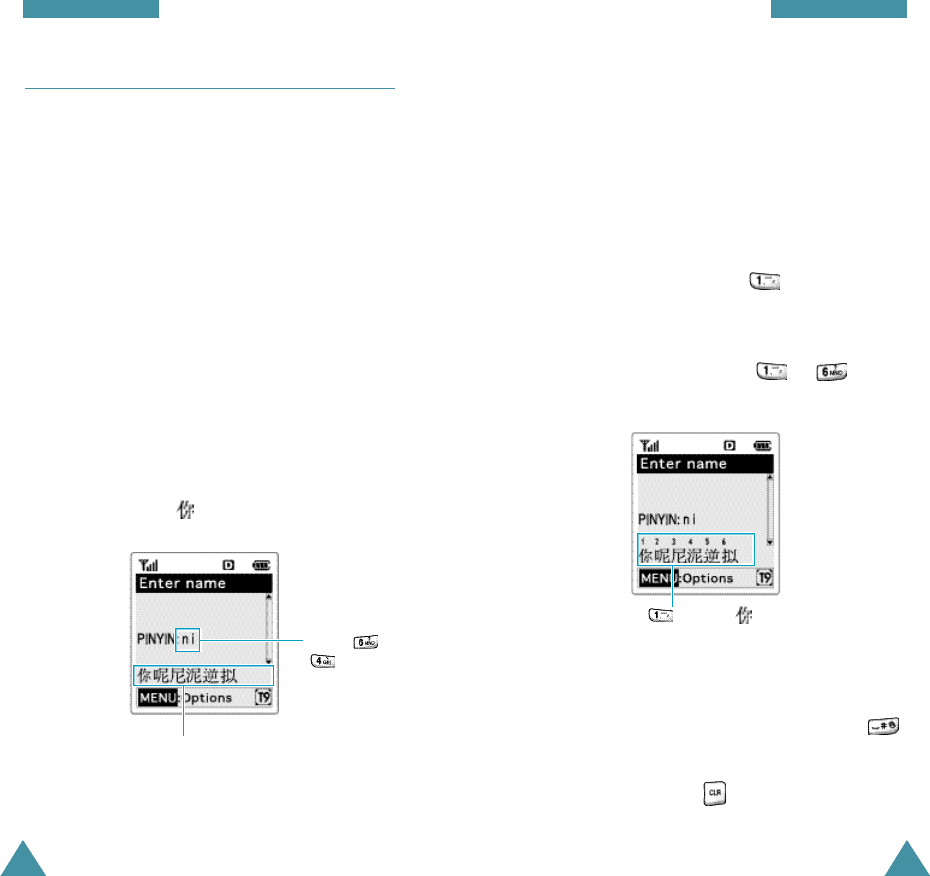
Typing Characters in Pinyin Mode
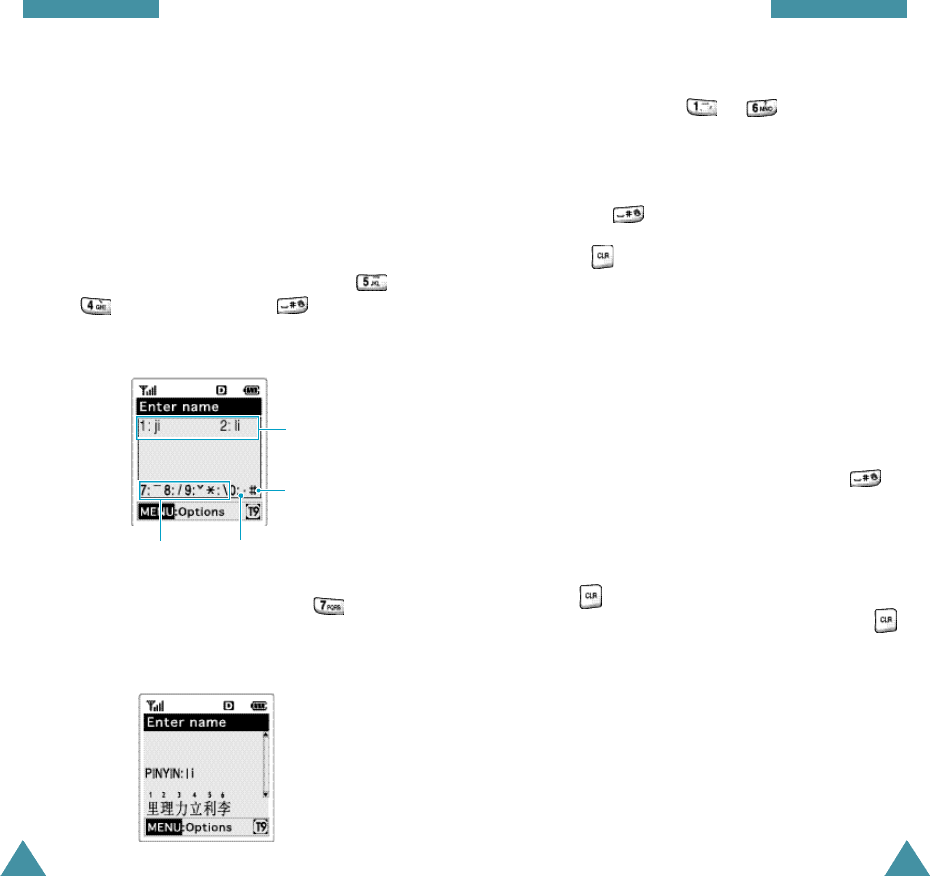
1. Press keys corresponding to the phonetic spelling,
referring to the Roman letters printed on the keys.
Notice that the choices in the Character Selection
Map change.
Example: Typing in Pinyin mode
Press and
to enter ‘ni’.
The Character Selection Map
2. If you cannot find the desired character from the
display, press up or down navigation key to scroll
through choices in the Character Selection map.
When the character you are typing appears in the
Character Selection Map, you may select it,
without completing the Pinyin spelling or entering
the tone for the character.
3. To select a character, press to activate the
Character Selection Map. A number (1 to 6) is
added to the beginning of a corresponding
character. With the Character Selection Map being
activated, a normal press on to
selects the corresponding character.
Press to select with the Character
Selection Map being activated.
N o t e s :
• To insert a space when entering a text, pre s s
when the cursor blinks in the Text Are a .
• To remove the activate character in the Character
Selection Map, press .
45
Entering Text
44
Entering Text
Using Tone Key in Pinyin Mode
Entering the tone of a character you are typing
narrows the number of choices in the Character
Selection Map. Entering the tone for a character is
optional, but it is especially useful if the Pinyin
spelling is similar between characters.
To enter the tone of a character, proceed as follows:
1. Enter the Pinyin spelling. For example, press
and to get ‘li’. Then, press to display
a Tone menu. The display shows alternative Pinyin
spelling and the four tone keys.
2. Press the associated key to correspond to a tone
with the character. For example, press to
associate the first tone. You can also press the
appropriate key to select an alternative Pinyin
spelling.
3. With the Character Selection Map being activated,
a normal press on to selects the
corresponding character.
Notes:
• You may delete a previously entered tone by
p ressing .
• To exit the Tone menu without making a selection,
p ress .
Scrolling
To move the cursor left or right through your text
message, press left or right navigation key.
Inserting a Space
Insert a space between the characters, press in
Text Area.
Clearing Strokes and Characters
Press one or more times to remove strokes to
the left. Once the Pinyin Area is empty, pressing
removes characters from the Text Area.
alternative spelling
Cancels tone input.
four tones light tone
47
Entering Text
46
Entering Text
Chinese Stroke Mode
This mode allows you to enter individual Chinese
strokes, in written order - from top to bottom, and
from left to right.
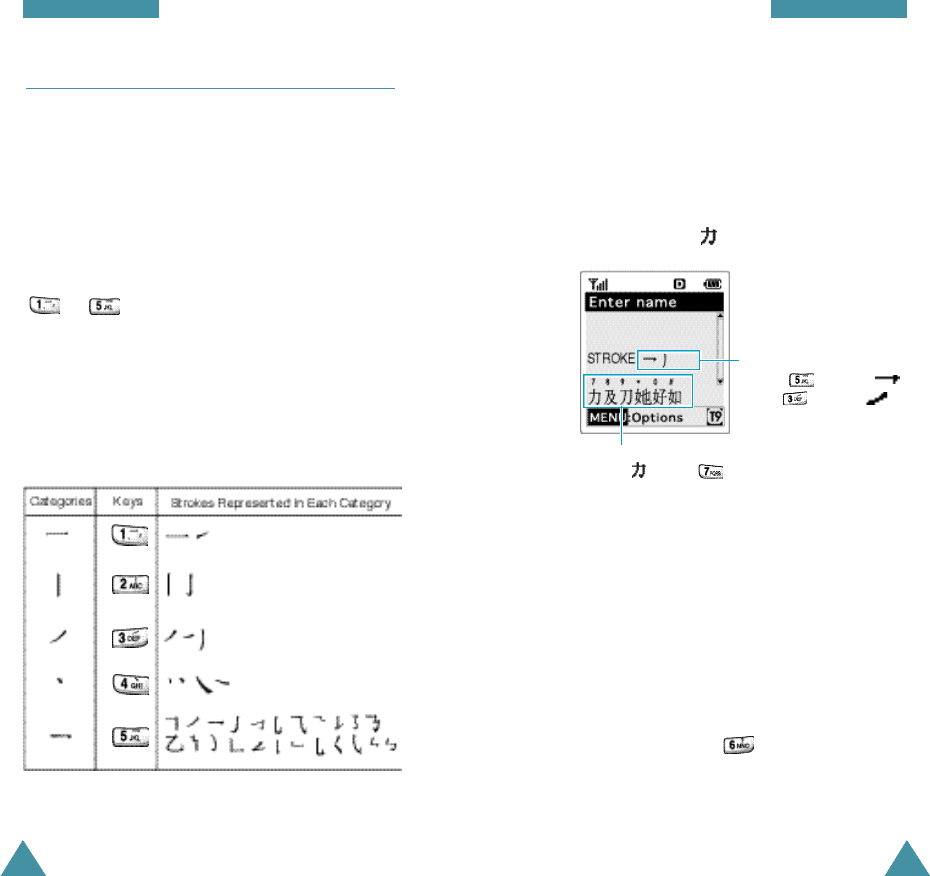
Even though there are many different strokes used to
create Chinese characters, the strokes are classified
into 5 basic categories; heng, shu, pie, dian and zhe.
The basic strokes are printed on the keypad, on keys
to .
To enter a stroke, press the key printed with the
stroke that most closely represents the exact stroke
you desire. The table shows the stroke/key
relationship:
Typing Stokes and Characters in Stroke Mode
1. To type a character, press keys corresponding to its
component strokes. Press keys on the handset in the
order that you would write the strokes, using one
press per desired stroke.
Example: Typing ( ) in Stroke mode
2. The phone displays your strokes in the Key Stroke
Area and offers character choices in the Character
Selection Map. As you enter strokes, notice that
the choices in the Character Selection Map
change.
To scroll through choices in the Character Selection
Map, press the navigation key.
N o t e : If you are uncertain of the order of one or
m o re strokes, press in place of each
questionable stroke. Continue entering stro k e s
until the character is displayed in the
Character Selection Map or until you have
finished the character.
Key Stroke Area.
Press to enter ,
then to enter .
The Character Selection Map.
To select , press .

Word Mode
To type a word, press keys corresponding to the
letters you need. Remember the following as you are
typing:
1. Press keys on the phone just once per desired
letter. For example, to enter ‘hello’, press ,
, , ,.
2. The word you are typing appears in the display. It
may change with each key press.
3. Type to the end of the word before editing or
deleting any keystrokes.
4. Complete each word with a space by pressing
.
If the word that appears in the display is not the
word that you desire, press one or more times
to display alternate word choices for the keys you
have typed. (For example, ‘of’ and ‘me’ both shares
the sequence , . The phone displays the
most commonly used choice first.)
To type words not found in the T9 mode, change the
text input mode to ABC mode.
49
Entering Text
48
Entering Text
3. When the character you are typing appears in the
Character Selection Map, you may select it
without finishing the stroke sequence for the
character. Characters displayed in the Character
Selection Map correspond to keys 7to #on the
keypad. To select a character from the Character
Selection Map and add it to your message, press
the corresponding key to .
Scrolling
To move the cursor left or right through your text
message, press left or right navigation key.
Inserting a Space
Insert a space between the characters, press in
the Text Area.
Clearing Strokes and Characters
Press one or more times to remove strokes to
the left. Once the Stroke Area is empty, pressing
removes characters from the Text Area.
Smart Punctuations
Period, hyphen, and apostrophe are available on .
T9 applies rules of grammar to insert the correct
punctuation. Notice that is used twice in this
example to display two punctuation marks:
51
Entering Text
50
Entering Text
Changing Case
To shift the case of the next letter(s) that you type,
press . There are three shift states: Lower
Case, Initial Capital and Capitals Lock.
Including a Number
You can include a number between letters without
exiting the Word input mode. Press and hold the
desired number key.
Scrolling
• To move the cursor left or right through your text
message, press left or right navigation key.
• To scroll through alternate word choices for the
keys you have entered, press .
Clearing Letters and Words
Press one or more times to clear letters to the
left. Press and hold down the key to erase a word.
l e t ‘ s e a t .
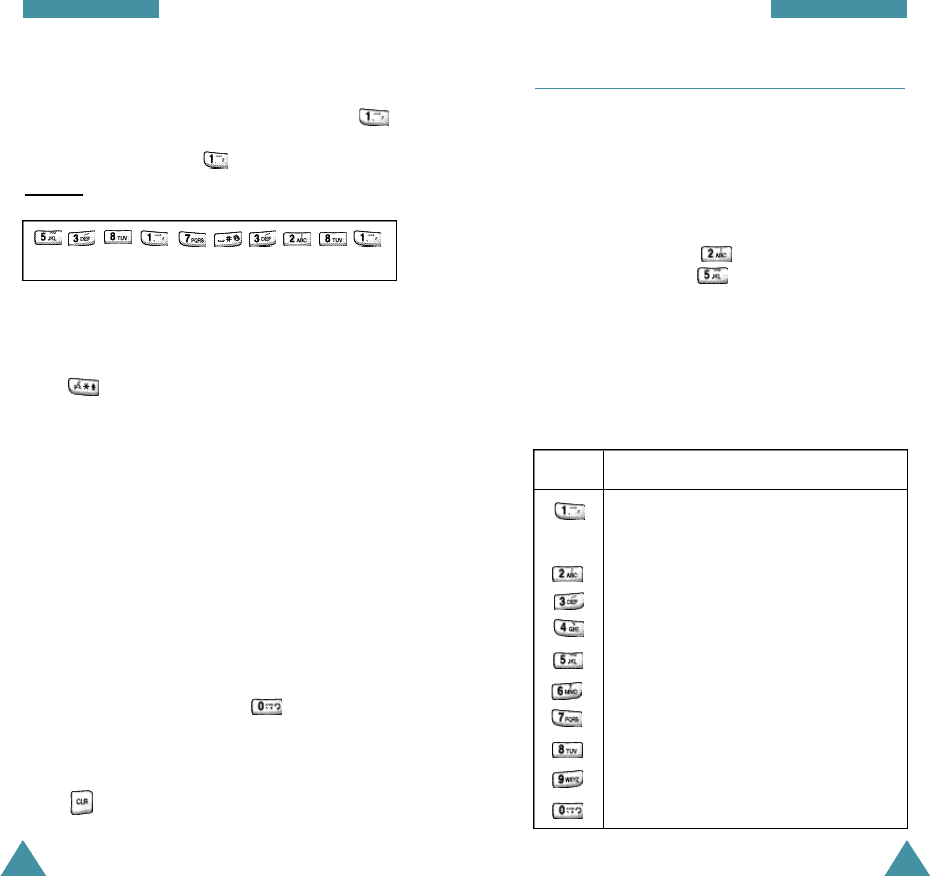
ABC Mode
When typing in ABC mode, you should press key
labeled with the required letter:
-Once for the first letter
-Twice for the second letter
-And so on.
For example, you press three times quickly to
display the letter “C” , two times quickly to
display the letter “K”. So, this method is called
Multi-tap typing.
Refer to the table below for the list of characters
assigned on each key.
Characters in the Order Displayed
1 . @ , : ? - ; ’ / ( ) ! # % & * <
> _ + = ” \ { } $ [ ]
A B C 2
D E F 3
G H I 4
J K L 5
M N O 6
P Q R S 7
T U V 8
W X Y Z 9
0
Key
List of characters available:
(Caps Lock mode)

52
Entering Text
53
Entering Text
The cursor moves to the right when you press a
different key. When entering the same letter twice (or
a different letter on the same key), just wait for a few
seconds for the cursor to move right automatically,
and enter the next letter.
Changing Case
To shift the case of the next letter(s) that you type,
press . There are three shift states: Lower Case,
Initial Capital and Capitals Lock.
Inserting a Space
Press to insert a space between the words.
Scrolling
To move the cursor left or right through your text
message, press left or right navigation key.
Clearing Letters and Words
Press one or more times to clear letters to the
left. Press and hold down the key to erase a words.
Symbol Mode
Symbol mode enables you enter symbols into a text
message.
Press left or right navigation key to display more
symbol sets.
Press keys corresponding to the desired mark, then
the phone automatically switches back to the text
entry mode used just prior to selecting Symbol mode.
123 Mode
123 mode enables you to enter numbers into a text
message. Press keys corresponding to the desired
digits, and manually switch back to the text entry
mode of choice.
54 55
Using the Menus
Using the Menus
The phone offers a range of functions that allows
you to tailor the phone to your needs. These
functions are arranged in menus and submenus.
The menus and submenus can be accessed by
scrolling or using the shortcuts.
Accessing a Menu Functions by
Scrolling
1. In Standby mode, press to access the main
menu facility.
2. Scroll with the navigation keys to reach the
desired main menu, e.g. Sounds. Press to
enter the menu.
3. Find the menu option you want, for example, Key
Beep, by scrolling with up or down navigation
key. Press to enter the menu option.
If the menu you have selected contains submenus,
repeat this step.
4. Scroll with up or down navigation key to find the
setting of your choice.
5. Press to confirm the chosen setting.
N o t e s :
• To re t u rn to the previous menu level, press .
• You can exit the menu without changing the menu
settings by pressing .
Accessing a Menu Functions by Using
its Shortcut
The menu items (menu, submenus and setting
options) are numbered and can be accessed quickly
by using their shortcut number.
1. In Standby mode, press to access the menu
facility.
2. Within three seconds, key in the first digit of the
shortcut number. Repeat this for each digit of the
shortcut number.
Example: Setting Connect tone to On
Press , , and .
5for Sounds,4for Alerts,3for Connect
3. Find the setting of your choice by pressing up or
down navigation key , then press .
N o t e :The numbers assigned to each menu function
a re indicated on the list on page xx.
56
Using the Menus
57
Using the Menus
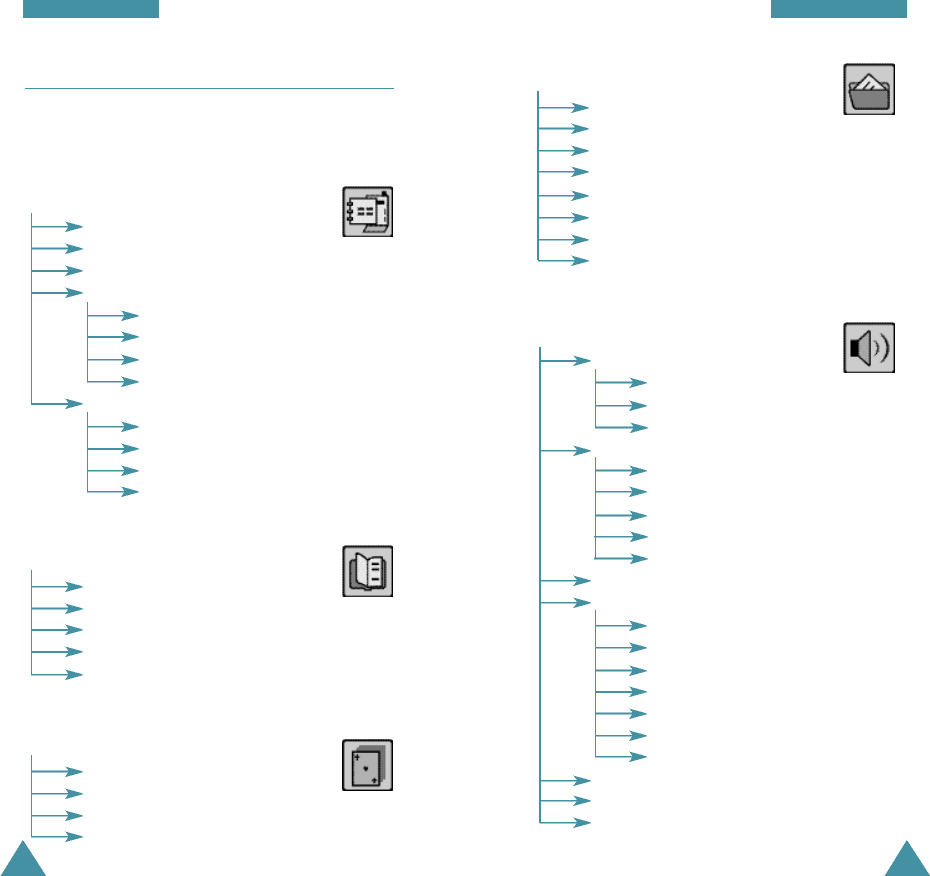
1: Calls1-1: Outgoing
1-2: Incoming
1-3: Missed
1-4: Erase Logs
1-4-1: Outgoing
1-4-2: Incoming
1-4-3: Missed
1-4-4: All
1-5: Air Time
1-5-1 Last Call
1-5-2 Total
1-5-3 Erase Total
1-5-4 Lifetime
2: Phonebook
2-1: Find Name
2-2: Add Entry
2-3: Find Entry
2-4: RelationSrch
2-5: Add email
3: Games
3-1: Push Push
3-2: Fly Ribon
3-3: Puzzle World
3-4: SpiderHunter
List of Menu Functions
The list shows the menu structure available and
indicates the number assigned to each option.
4: Scheduler
4-1: Today
4-2: View Month
4-3: Date
4-4: To Do List
4-5: Countdown
4-6: World Time
4-7: Calculate
4-8: Alarm Set
5: Sounds
5-1: Ringer Vol
5-1-1: Calls
5-1-2: Messages
5-1-3: Alarm
5-2: Ringer Type
5-2-1: Voice Calls
5-2-2: Messages
5-2-3: Alarm
5-2-4: Data/Fax In
5-2-5: Schedule
5-3: Key Beep
5-4: Alerts
5-4-1: Minute Beep
5-4-2: Service
5-4-3: Connect
5-4-4: Disconnect
5-4-5: Fade
5-4-6: Roam
5-4-7: Privacy
5-5: Voice Volume
5-6: Roam Ringer
5-7: Power On/Off
58
Using the Menus
59
Using the Menus
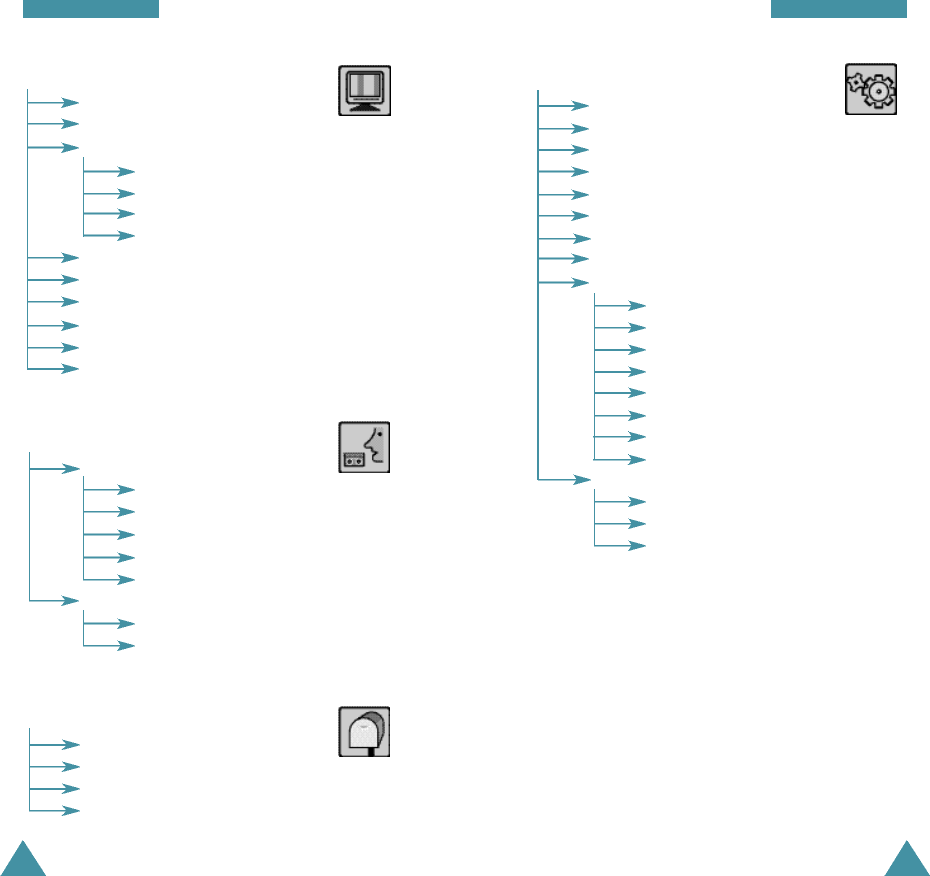
6: Display
6-1: Backlight
6-2: Banner
6-3: Animation
6-3-1: Power On
6-3-2: Power Off
6-3-3: Idle 1
6-3-4: Idle 2
6-4: My Phone#
6-5: Language
6-6: Set Time
6-7: Auto Hyphen
6-8: LCD Contrast
6-9: Version
7: Voice Kit
7-1: Voice Dial
7-1-1: Record
7-1-2: Play/Erase
7-1-3: Set Active
7-1-4: Training
7-1-5: Undo Train
7-2: Voice Memo
7-2-1: Voice Memo
7-2-1: Call Answer
8: Message Kit
8-1: New Message
8-2: Inbox
8-3: Outbox
8-4: MSG Setup
9: Setup
9-1: Auto Retry
9-2: Auto Answer
9-3: Answer Mode
9-4: Tone Length
9-5: Set NAM
9-6: Roam Option
9-7: Data/Fax
9-8: Whisper Mode
9-9: Security
9-9-1: Lock Mode
9-9-2: Restrict
9-9-3: Lock Code
9-9-4: Emergency #
9-9-5: Send PIN
9-9-6: Clear MEM
9-9-7: Reset Phone
9-9-8: Privacy
9-0: R-UIMSetup
9-0-1: Enable PIN
9-0-2: Disable PIN
9-0-3: Change PIN

61
C a l l s
60
Incoming Menu 1-2
This option lets you view the last 10 calls received (if
you are subscribed to the caller ID service). When
you access this menu, the list of the incoming calls is
displayed.
For further information on scrolling through the list
and accessing a call log, see “Outgoing” on page xx.
Missed Menu 1-3
If the caller identification is available (contact your
service provider), your phone keeps a list of 10
incoming calls that you failed to answer.
For further information on scrolling through the list
and accessing a call log, see “Outgoing” on page xx.
Erase Logs Menu 1-4
You can erase the entries stored in each of the three
call logs or all three logs at once.
The following options are available:
Outgoing: The calls you made are erased.
Incoming: The calls you received are erased.
C a l l s
You can use the Calls menu to:
• View and dial the last outgoing or incoming numbers.
•Erase the numbers in the call logs.
• View the duration of calls.
Outgoing Menu 1-1
The phone stores up to 10 outgoing calls you dialed.
When you access this menu, the list of the outgoing
calls is displayed.
1. Press up or down navigation key to find the desired
number
(or name if saved in Phonebook).
2. Press to select the highlighted number.
The dialed number (and name if stored in
Phonebook) is displayed.
3. If you want to access Options,press . The
following options are available:
• Talk: dials the selected number.
• Save:allows you to save the number in the Phone
book.
• Call info: shows the date and time when the call
was made.
• Prepend:allows to add an area code or feature
code to the number before calling the
number.
If you want to place a call to the displayed phone
number, press . To exit the call log, press .

62
C a l l s
63
Missed: The calls you missed are erased.
All:All calls you made, received and missed are
erased.
When a confirming message pops up, press to
erase the log. If you want to cancel the operation,
press .
Air Time Menu 1-5
Your phone records the amount of airtime (or talk
time) used. Using this option, you can view the
number of the calls to or from your phone, and the
airtime for all calls. You can easily erase the airtime
measurement at any time.
The following options are available:
Last Call: shows airtime of the last call.
Total: shows the number of all calls made to or from
your phone and total duration of the calls
since the air time counter was lastly set to
zero by using the Erase Totaloption.
Erase Total: erases the “Total” airtime
measurement and resets the air time
counter.
Lifetime: shows the number and total duration of all
calls made to or from your phone since the
phone was shipped from the factory.
P h o n e b o o k
You can store phone numbers and their
corresponding names in the memories of your UIM
card and the phone. You can store up to 350 entries
in each memory. The UIM card and phone memories,
although physically separate, are used as if they
were a single entity, called the Phonebook.
Find Name Menu 2-1
This option allows you to find an entry by its name.
Note: You can locate Phonebook entries by name
quickly when the phone is in Standby mode. Press
left soft key to access this menu in one step.
1. Press up or down navigation to scroll to the
desired name.
You can also enter the character(s) of the name by
p r essing the associated alphanumeric key(s). The
character(s) appears in the text entry box at the
bottom of the display. Using this method, the phone
s e a rches for the names in the list containing that
character(s), and then displays the first name in
that section of the list.
2. When the desired entry is highlighted, press
to access the entry.
N o t e: If you have stored the several numbers into
d i ff e rent categories under one entry, they are
listed under the name. Press up or down
navigation key to find the number you want.

64
P h o n e b o o k
65
P h o n e b o o k
3. The phone shows the details on the name.
Press to place a call.
With an entry selected, if you press , you can
access the following options:
Talk: dials the number.
Add #:allows you to add a new entry or a number to
an existing entry.
Edit: allows you to edit phone number, name,
location number, label category and so on.
Erase: erases the number.
Name Ring:allows you to designate a unique ring
tone to signal an incoming call from the
number.
Email adr:allows you to store an email address in
the entry.
Add Entry Menu 2-2
This menu allows you to store number with a name
in your Phonebook. You can store up to 350 entries.
Each entry can contain up to 32 digits with an
associated name of up to 12 characters in English or
6 characters in Chinese.
Each entry is divided into 7 categories (Speed Dial,
Home, Office, Mobile, Pager, Fax, and Voice Dial ).
Creating a New Entry
1. Enter a phone number and press .
2. Your phone asks if you want to make a new entry.
Press to confirm.
3. Highlight the desired option you want to customize
by using the navigation key and press . The
following options are available:
•Name: Enter the desired name. You can enter
up to 12 characters in English or 6 characters in
Chinese. For further information on how to enter
text, see page xx.
•Location: The first available location displays.
If necessary, enter the location number using
the number keys, or press up or down
navigation key to scroll to the desired location.
•Storage: Select the memory where the entry is
stored, from Phone and Card.
•Secret: To set the number in secret, select On.
Setting Secret prevents a number from being
displayed when it is accessed by unauthorized
user, or dialed. When you have made the
number secret, only a person with your phone’s
lock code can view the number.

66
P h o n e b o o k
67
P h o n e b o o kP h o n e b o o k
•Category: Select the label for the number. The
available categories are Speed Dial, Home,
Office, Mobile, Pager, Fax, No Label, or Voice
Dial.
N o t e: If you store a number with the label
‘ V oice Dial’, the phone prompts you to re c o rd a
name after you complete customizing all other
options by pressing . For more information on
re c o r ding a name for voice dialing, see page xx.
•Relation: Select the desired one of the four
predefined relation groups, where the entry is
included. Grouping the entries enables you to
locate only the numbers in the desired group.
See page xx.
•Ringtype: Select the unique ring type for the
entry. By selecting different tones, incoming
voice calls which have caller ID can be
distinguished from those that do not.
4. Press to accept the setting for the selected
option.
5. Repeat steps 3 and 4 to customize another option.
6. Press to save the entry.
After storing, the phone displays the phonebook
entry number you saved and the remaining entries
you can further store phone numbers, then
automatically returns to Standby mode.
Storing Phone Numbers at Call End
To store a phone number at your call end:
1. Press to end the call. The call time and the
phone number display.
2. To store the phone number, press .
3. To complete storing the number, follow the
instructions in “Creating a New Entry.”
Adding a Number into an Existing Entry
You can store up to eight numbers per entry by
assigning them to different categories. Note that you
cannot duplicate same categories for one entry. For
example, you can only have one number labeled
‘Mobile’ for the selected entry.
1. In Standby mode, enter a number and press .
2. When your phone asks if you want to make a new
entry, find the desired entry using up or down
navigation key and press .
3. Press up or down navigation key repeatedly to go
to the Category field and press .
4. Find the desired category label using up or down
navigation key and press .
5. Press to store the number.
N o t e : If you have selected the label already used for
another number, the message asking if you want to
o v e r write the number appears along with a warn i n g
tone. Press and select a new one.

69
P h o n e b o o k
68
P h o n e b o o k P h o n e b o o kP h o n e b o o k
Find Entry Menu 2-3
This option allows you to find an entry by its location
number.
1. Enter the location by pressing the numeric keys.
2. When the desired entry displays, press to place a
call.
N o t e: If you have stored the several numbers into
d i ff e r ent categories under one entry, they are listed
under the name. Press up or down navigation key to
find the number you want.
If you press , you can access the options. For further
information on Options, refer to the Find Name menu
on page xx.
Relation Search Menu 2-4
This option allows you to find an entry by its relation
group.
1. Select the group containing the entry you want to find
using up or down navigation key and press .
The phone lists all entries in the selected group.
2. Scan through the list using up or down navigation key
to find the desired entry.
Add email Menu 2-5
This option allows you to store an e-mail address as
a phonebook entry.
1. Enter the e-mail address and press .
For further information on entering text, see page
xx.
N o t e: You can insert .c o mor . n e twhich is often
used for e-mail addresses from the Mode popup
list when pressing .
2. The phone asks if you want to make a new entry.
Press and complete storing the address.
For more information on creating a phonebook
entry, see page xx.

7170
G a m e s
You can enjoy several games using your phone. Your
phone has the following games.
• Push Push
• Fly Ribon
• Puzzle World
• SpiderHunter
1. Press up or down navigation key to scroll to one of
the games and press .
2. Press to start the game.
On the game screen, press to get help on the
game if available. To go back to the game, press
.
To quit the game, press at any time.
N o t e : The key operation may vary depending on the
selected game. Please use the onscreen help.
S c h e d u l e r
The Scheduler feature enables you to:
•Keep track of important dates and events.
•Create a list of things to do.
• Set and count D-Day.
•Check the time in another part of the world.
•Use the phone as a calculator.
• Set the phone to ring at a specified time.
Today Menu 4-1
You can schedule up to 9 events for the current day
indicating each event’s start and end time. You can
be alerted by the Calendar function before an event
is commenced. Events scheduled for future dates
automatically appear on your Today events schedule
on that particular day.
Scheduling an Event
1. Enter your event information and press to
accept your input.
You can enter up to 32 characters in English or 14
characters in Chinese. For further information on
how to enter text, see page xx.
2. Enter the Start time and date using the numeric
keys, and press .
N o t e: Use the volume keys on the left side of the
phone to toggle between AM and PM.

72
S c h e d u l e r
73
S c h e d u l e r
3. Enter the End time and date using the numeric
keys, and press .
4. Select when an alarm will notify you of your event
by pressing up or down navigation key. Selecting
No alarm does not ring the alarm.
5. Press to save your event.
Adding, Editing, or Erasing an Event
If you already scheduled events when you select the
Today menu option (4-1),
the events are displayed.
Press left or right navigation key to select the event
you want to view. If necessary, press up navigation
key to display more contents in the selected
schedule.
The following options are available when you
press .
Add new: allows you to add a new event.
Edit: allows you to edit a selected event.
Erase: allows you to erase a selected events.
After you select an option, press . Then follow the
screen prompt.
View Month Menu 4-2
This option allows you to view the past or future
month as well as the current month in calendar
format. In this option, the current date is highlighted
on the calendar. Days with the scheduled events are
marked with in front of them.
• You can move to the next or the previous day by
pressing left or right navigation key.
• You can move up or down the Calendar by one
week by pressing up or down navigation key .
• To display the next or previous month, use the
volume keys on the left side of the phone.
The following options are available when you press .
View: allows you to view the scheduled events of
the selected day.
Add new: allows you to add a new event on the
selected day.
Creating a New Event
Scroll to the desired date in the calendar using the
navigation keys and volume keys and then press
to confirm the selected date. And schedule a new
event referring “Today” on page xx.
Adding, Editing, or Erasing an Event
When a scheduled event is displayed, press to
access the
Options
.
For further details on the options, refer to “Today” on
page xx.

74
S c h e d u l e r
75
S c h e d u l e r
Date Menu 4-3
This feature allows you to specify the date you want
to view so that you can easily go to the day without
scrolling through the Calendar. Once the date is
obtained, you can create, edit and delete events on
your calendar.
Enter the desired date using the numeric keys, and
press . When the day you selected is
highlighted, press to access it.
To create, edit or erase the events, refer to “Today”
on page xx.
To Do List Menu 4-4
This feature allows you to draw up a list of tasks you
need to do and assign a priority and deadline to
them. You can store up to 20 tasks.
Creating a To-Do Item
1. Enter the task contents and press .
You can enter up to 32 characters in English or 14
characters in Chinese. For further information on
how to enter characters, see page xx.
2. Enter your deadline using the numeric keys.
N o t e: Use the volume keys on the left side of the
phone to toggle between AM and PM.
3. Select High or Low priority using up or down
navigation key .
4. Press to store the task.
Adding, Editing and Erasing a To-Do Item
If tasks are already defined in the To Do List when you
select the To Do List menu option (4-4), the most
lately created task is displayed with the deadline and
the associated priority ([Hi] for high priority or [Lo] for
low priority).
Scroll to the desired item by pressing
left or right
navigation key.
The following options are available when you
press .
Add new: allows you to add a new task.
Edit: allows you to edit the selected task.
Erase: allows you to erase the selected task.
After you select an option, press . Then follow the
screen prompt.
Countdown Menu 4-5
This menu helps you know how much time it takes
you to do something, or how many months, days,
hours and minutes until a specific event. You can
create up to 5 Countdown timers using this feature.

S c h e d u l e r
76
S c h e d u l e r
77
Creating a Countdown Timer
1. Enter a name for your new Countdown timer and
press .
You can enter up to 16 characters in English or 8
characters in Chinese. For further information on
entering text, see page xx.
2. Enter the date and time that you want to count
down from.
Notes:
• Use the volume keys on the left side of the phone
to toggle between AM and PM.
• You can enter the years between 1980 and 2099
for the year.
3. Press to save the item.
Adding, Editing and Erasing a Countdown Ti m e r
If a Countdown timer is already defined when you
select the Countdown menu option (4-5), the defined
Countdown timer is displayed.
If there are more than one items defined in the menu,
scroll to the desired item by pressing up or down
navigation key, and press .
The following options are available when you press .
Add new: allows you to create a new item.
Edit: allows you to edit the item.
Erase: allows you to delete the item.
After you select an option, press . Then follow the
screen prompt.
World Time Menu 4-6
You may want to call a friend in another part of the
world but wondered what time of the day it is there.
To know what time it is, use this menu option.
You can set two world clock; ‘Current’ and ‘Another’
time zones. Use them to find out the time in the two
different parts of the world. For example, set the
‘Current’ to Las Vegas and ‘Another’ to Korea. You
can easily see the time difference between them.
To set the current and another clocks:
1. Press left or right navigation key to highlight
Current.
2. Press up navigation key to highlight the World
Map field.
3. Press left or right navigation key to scroll to the
desired time zone.
The 24 time zones (identified by a major city,
state, region or country in a time zone) are
available.
4. If you want to view more details on the selected
time zone, press up navigation key.
The popup list shows you the other city or country
in the time zone. You can also view the time
zone’s offset from GMT (Greenwich Mean Time)
and the name of the time zone. ‘GMT-10 HST’, for
example, means that the selected time is 10 hours
behind GMT and is Hawaii Standard Time.

5. If you want to identify the time zone by the other
city or country, select desired one from the list and
press .
Otherwise, press to exit the popup list.
6. Press left or right navigation key to highlight
Another.
7. Repeat steps 2 to 4 to set another clock.
The following time zones are available:
79
S c h e d u l e r
78
S c h e d u l e r
Calculate Menu 4-7
Using this feature, you can use the phone as a
calculator. The calculator provides the basic
arithmetic functions: addition, subtraction,
multiplication and division.
Performing a Calculation
1. Enter the first number using the numeric keys.
2. Set the operator for your calculation by pressing
the navigation keys until the required arithmetic
symbol appears: + (add), - (subtract), x (multiply), /
(divide).
3. Enter the second number.
4. To calculate the result, press .
5. Repeat steps 1 to 4 as many times as required.
Each time you change the operator without
pressing , the previous calculation is
performed and the result is displayed as the top
number in the display.
Notes:
• To erase any mistakes and clear the display, press
.
• Use to enter a decimal point and to
change the sign of a number to a negative (-).
• London, UK : Portugal • France : Germany
• Finland : Greece • Moscow : Saudi Arabia
• Oman : U.A.E. • Uzbekistan : Pakistan
• Kyrgyzstan : Tajikistan • Vietnam : Thailand
• China : Hong Kong • Korea : Japan
• Guam : Sidney • Magadan : Solomon Island
• New Zealand : Kamchatka • Midway Islands : Samoa
• Hawaii : Aleutian Island • Alaska
• Los Angeles : S.F. • Denver : Phoenix
• Chicago : Mexico City • New York : Atlanta
• Fredrictown : Venezuela • Rio de Janeiro : Argentina
• Atlantic • Cape Vede : Azores

8180
S c h e d u l e r
Alarm Set Menu 4-8
This option allows you to set the alarm to ring at a
specific time.
To set the alarm, proceed as follows:
1. Select the alarm frequency option by pressing up
or down navigation key and press .
•Daily: the alarm rings every day at the same
time.
•Once: the alarm rings only once and is then
deactivated.
2. Enter the required time when an alarm rings using
the numeric keys.
N o t e : Use the volume keys on the left side of the
phone to toggle between AM and PM.
3. Press to save the setting.
To stop the alarm when it rings, simply open/close
the phone or press any key.
To deactivate the alarm, access the Alarm Set menu
option, select Off in the frequency options and press
.
S o u n d s
You can use the Sounds menu to customize various
sound settings, such as the:
• Ringer volume, type, and tone
• Key beep and voice volume
• Alert sounds and a ringer for the roaming calls
•The ringer which sounds when the phone is
switched on or off
Ringer Volume Menu 5-1
This menu option allows you to adjust the ringer
volume.
Calls:allows you to adjust the ringer volume for the
incoming calls.
N o t e: You can adjust the the volume using
the volume keys on the left side of the phone
in Standby mode.
Messages:allows you to adjust the ringer volume
for the incoming messages.
Alarm:allows you to adjust the ringer volume for an
alarm.
Press up or down navigation key(or volume keys on
the left side of the phone) to adjust the volume. The
illustration shows the volume level (the more bars,
the louder).
Selecting Vibrate switches the phone to vibration
mode. An incoming call vibrates the phone.
Selecting 1-Beep sounds a beep.
Selecting Silent does not sound the ring.

82
S o u n d s
83
S o u n d s
Ringer Type Menu 5-2
This option allows you to set a unique ring for voice
calls, messages, data/fax, alarm, and schedule. Select
a unique ring tone from 10 melodies. As you change it,
it sounds for a few seconds.
Voice Calls:allows you to set a unique ring for
incoming voice calls.
Messages:allows you to have distinctive rings for
voicemail notifications, text messages,
and browser messages respectively.
Alarm:allows you to have a distinctive ring for an
alarm.
Data/Fax In:allows you to be alerted with a
distinctive ring tone when you are faxed
or received a data through the phone
(dependent on the network ).
Schedule:allows you to have a distinctive ring for an
schedule alarm.
Key Beep Menu 5-3
This option allows you to adjust the tone volume that
the keypad generates each time you press a key.
Press up or down navigation key (or volume keys on
the left side of the phone) to adjust the volume. The
illustration shows the volume level (the more bars, the
louder). Selecting Silent turns off the key beep.
Alerts Menu 5-4
Your phone gives audible alerts (beeps) at a specified
time to inform you that certain things have happened.
The alerts only occur in your earpiece so the other
party does not hear them.
The available alerts are:
Minute Beep: With this menu option set to On, the
phone sounds an alert 10 seconds
before each elapsed minute to remind
you of the length of the current call.
Service: With this menu option set to On, the phone
sounds an alert when you exit service area
or when you return to a service area.
Connect: With this menu option set to On, the phone
sounds the connect tone when your call is
connected to the system.
Disconnect:With this menu option set to On, the
phone sounds the disconnect tone when
a call is disconnected.
Fade: With this menu option set to On, the phone
sounds an alert when a dropped call occurs
during conversation in response to a signal
fade.
Roam: With this menu option set to On, the phone
sounds an alert when your phone starts
roaming.
Privacy: With this menu option set to On, the phone
sounds an alert when you loose a private
encrypted CDMA line.

8584
S o u n d s
Voice Volume Menu 5-5
This option enables you to adjust the voice volume of
the earpiece.
Press up or down navigation key to adjust the volume
(or volume keys on the left side of the phone). The
illustration shows the volume level (the more bars,
the louder).
N o t e : You can adjust the volume using the volume
keys on the left side of the phone during a call.
Roam Ringer Menu 5-6
You can set the phone to use a distinctive ring for
incoming roaming calls.
Press up or down navigation key to choose On to use
a distinctive ringer or Off to use a normal ringer.
Power on/off Menu 5-7
This option allows you to turn on or off the phone
sounds when it is switched on and off.
Press up or down navigation key to select On to turn
the sound on or Off to turn it off.
D i s p l a y
The Display feature enables you to:
•Set the length of time for backlight.
•Create your own greeting, and select an
animation to be displayed in Standby mode or
when powered on or off.
•Adjust the screen contrast of both LCD screen.
• View the version of your phone.
Backlight Menu 6-1
You have several options for setting how the LCD
backlight operates. When the flip cover is closed, the
backlight remains off thus conserving battery power.
When the flip cover is open, the length of time that
the backlight remains on can be set as explained
below. Remember that backlight use drains your
battery faster.
The following options are available:
30 (/15/7)seconds: The backlight comes on when
you press a key or receive a call
and switches off 30(/15/7)
seconds after the last key is
pressed.
flip open: The backlight comes on each time you
open the phone.
always off: The backlight is not used.
always on: The backlight remains on while the
phone turns on.

86
D i s p l a y
87
D i s p l a y
Banner Menu 6-2
This option allows you to set a banner message to be
displayed at the bottom of the display in Standby
mode. It can also be used as your ID when sending
an e-mail.
To change the banner:
1. If necessary, press repeatedly to clear off the
old greeting.
2. Enter your banner message up to 32 characters in
English or 14 characters in Chinese by using the
alphanumeric keys. For further information on how
to enter letters, refer to page XX.
3. When entering is completed, press to save
the new banner.
Animation Menu 6-3
Your phone displays animated images in Standby
mode or when it is turned on or off. This setting is
just for fun and grins, so have fun with it.
The following options are available:
Power On: You can select an image to be displayed
when you switch the phone on. 4 images
are available. Also, you can download up
to 4 images from the wireless web.
Power Off: You can select an image to be displayed
when you switch the phone off. 4
images are available. Also, you can
download up to 4 images from the
wireless web.
Idle 1 (/2): You can store an animation to Idle 1 and
Idle 2. These two animations will be
used as one of the items to be displayed
in the Standby mode.
My Phone Number Menu 6-4
This option shows your phone number.
After viewing the number, pressing returns to
Standby mode.
Language Menu 6-5
Sets the language of voice prompts, menus and key-
input.
Select the desired language by pressing up or down
navigation key. The available languages are English,
Chinese.
N o t e : This setting does not affect the Web Bro w s e r.

89
D i s p l a y
88
D i s p l a y
Set Time Menu 6-6
This option allows you to set the current date and
time.
To set the date and time, proceed as follows:
1. Select On by pressing up or down navigation key
and press .
Selecting Off returns to Standby mode.
2. The current time, if set, displays. Enter the current
time and date using the numeric keys.
The month, day, hour and minute must be entered
with 2 digits. The year requires all four digits. And
you must enter the hour in 12-hour format.
N o t e : Use the volume keys on the left side of the
phone to toggle between AM and PM.
3. When entering is completed, press to save the
time and date.
If you enter a wrong time, the phone displays
‘Invalid time’ and prompts you to enter again.
Auto Hyphenation Menu 6-7
With this menu option set to On, your phone
automatically hyphenates numbers when you dial a
number. This hyphenates numbers as follows: 000-
000-0000. Digits following a pause are not
hyphenated.
LCD Contrast Menu 6-8
The menu allows you to adjust the brightness of the
main and front LCD screens.
Press up navigation key to make the screen brighter,
and down navigation key to make the screen darker.
You can also use the volume keys to adjust the
brightness.
Each time you press the key, you will see the
selected status of the LCD.
Version Menu 6-9
This option allows you to view the software and
hardware versions of your phone. This feature is
helpful if you have to call customer care.

91
Voice Kit
90
Voice Kit
In this menu, you can use the phone’s voice features
such as:
• voice dialing
• voice memo
• call answer
Voice Dial Menu 7-1
When your phone is in digital mode, you can call up
to 20 stored entries by speaking the name into the
microphone. Using the Voice dialing option requires
that you first program the phone to recognize the
name of the person you are calling.
N o t e: You can enter quickly this menu by pressing
in Standby mode.
Record
This option allows you to record names and register
numbers for subsequent voice dialing. The phone
provides voice prompts and screen displays to guide
you through the recording process.
1. Say the name you want to program at the prompt.
The phone stores the name as a first sample.
2. Respond to the prompt by repeating the name
after the beep. The phone stores the name as a
second sample, and then prompts you to enter the
phone number.
3. Enter the phone number by pressing the numeric
keys and press .
4. Complete storing the number into Phonebook
referring page xx.
N o t e: You can also program the phone for voice
dialing by accessing the P h o n e b o o k menu. Use A d d
E n t rymenu under P h o n e b o o kto store a phone
n u m b e r, then select Voice Dial f rom the label
c a t e g o ry. For Further details, see page xx.
Tips on Recording Name
• Avoid recording similar names phonetically. If you
record a similar name to the one already in
memory, the phone requests another name.
• Speak clearly and naturally.
•The person who will use the phone should record
the name. The phone does not recognize the name
if the voice sounds differently.
• Avoid too long or too short name. Names with two
to five syllables are recommended.
•If this feature does not work properly, erase the
name, and record with another name.
•It is recommended to practice several times to
obtain best result.
• You can record up to 20 names. If you try to
record more than 20, the phone announces
’Memory is full’.
Play/Erase
This option allows you to check or erase an
individual voice dial entry. A list of the entries
displays.
Press up or down navigation key to scan through the
list and find the desired entry.
Press to play back the recorded name.
Press to access the following options:
Info: shows the Phonebook information on the
selected entry.
Erase: erases the selected entry.
Erase all: erases all entries in the Voice Dial list.
Talk:places a call to the number stored in the
selected entry.
Phonebook:allows you to edit the Phonebook
information on the selected entry.
Play all: plays back all names in the Voice Dial list.
92
Voice Kit
93
Voice Kit
Set Active
Voice Dialing is always active once you have
programmed the phone to accept voice dialing
entries and the associated phone number.
To place a call using Voice Dialing, simply press and
hold in Standby mode and then say the name
into the phone after you hear the prompt.
You can also initiate a Voice Dialing call just by
opening the flip, when you select this option.
* Only: enables Voice Dialing only by pressing and
holding .
* or Flip: enables Voice Dialing by pressing and
holding or by opening the phone.
Training
You can set your phone to get your voice
confirmation before dialing with your voice if there is
similar names phonetically and the phone is
confused which number you want to dial.
To activate this feature, you must train your phone to
recognize the control words Yes and No.

95
Voice Kit
94
Voice Kit
Once the control words are recorded, the phone will
try to get your voice confirm unless you select the
Undo Train menu option (7-5) if the phone is
confused with similar names.
To record control words:
1. The phone will prompt you to say the control word
Yes. Say ‘Yes.’
2. At a confirming prompt, say ‘Yes’ again.
3. The phone will prompt you to say the control word
No. Say ‘No.’
4. At a confirming prompt, say ‘No’ again.
Undo Train
If you do not want to be asked to confirm the name
by the phone when voice dialing, activates this menu
option to cancel the trained control words. Even
though the name you said is confusing with another,
the phone dials the number as it recognizes.
Press to activate this menu.
To deactivate this menu option and you want to set
the phone to ask your confirm before dialing, you
must train the phone again using the Training menu
option (7-4).
Voice Memo Menu 7-2
This menu allows you to:
• record a voice memo to memorize the things you
must remember.
•set the phone to answer an incoming call with a
greeting message and record the caller’s message.
You can record the voice memos and caller’s
messages up to 8 minutes in all.
N o t e: You can quickly enter this menu by pre s s i n g
in Standby mode.
Voice Memo
You can record voice memos. When recording, a
timer displays to show you the elapsed time. When
recording time expires, an alert sounds to indicate
and you can save the memo already recorded by that
time.
Recording a New Memo
1. Press when Record is highlighted.
If there is no recorded memo when you access
this menu option, the phone asks if you want to
record a new memo. Press to start recording.
N o t e: Pressing and holing in Standby mode
begins re c o rding a voice memo immediately.
2. Wait until a prompt beep sounds and record the
voice memo by speaking into the microphone.
While recording, you can pause recording by
pressing left navigation key, and resume by right
navigation key.

97
Voice Kit
96
Voice Kit
3. When recording is completed, press .
4. Press up or down navigation key to select Save
from the list and press .
If you want to play back the memo you have
recorded, select Play.
If you want to discard the currently recorded memo
and re-record a new one, select Record.
If you want to quit saving the recorded memo,
select Quit or press .
5. Enter the title for the memo and press . For
further information on how to enter text, see page
xx.
If you press without entering a title, the
memo is saved labeled with ‘No Title’.
N o t e: When your phone is in analog mode, this
function is not available.
Playing Back or Erasing a Recorded Memo
1. Press up or down navigation key to select
Play/Record, and press .
The list of the recorded memos appears.
2. Press up or down navigation key to scroll to the
desired memo and press to play it back.
While playback, you can pause playing by pressing
left navigatio key , and resume by right navigation
key.
3. If you want to access the following options,
press .
•Info: shows the detailed information on the
memo, such as the title, elapsed time, memory
used for the memo and the time when the
memo was recorded.
•Erase: erases the selected memo.
•Erase All: erases all of the recorded memo.
4. Press to go back to the previous screen or
to return to Standby mode.
Call Answer
Using this menu, in case that you are not able to
answer an incoming call, you can set your phone to
answer calls with the predefined greeting message
that came with the phone or your own message and
record the caller’s message.
Turning on or off Call Answer
1. Press when On/Off is highlighted
2. Select Enable to turn on this feature or Disable
to turn off using up or down navigation key.
3. Press to save the setting.

99
Voice Kit
98
Voice Kit
4. If you turned on Call Answer, the phone shows the
current configuration for the Call Answer feature.
To change them, press right navigation key and
configure the options. See page xx.
If you are satisfied with the current settings, press
.
With this feature enabled, the phone answers the
incoming calls, and the callers can leave you the
message after a greeting message.
N o t e s:
• While re c o r ding the caller’s message, you can
answer the call by pressing .
• When your phone is in analog mode, this function
is not available.
Configuring the Call Answer Options
1. Press up or down navigatio key to scroll to Config,
and press .
2. Press up or down navigation key to scroll to the
desired option, and press .
The following two options are available:
•Greeting: allows you to record your own
greeting message and select the desired
message to be played at an incoming call. For
further information on the greeting message,
see page xx.
•Screening: turns on or off the screening
speaker which allows you to listen to the
caller’s message while the caller is leaving it.
•Wait time: sets the time the phone waits
before answering the call with the greeting
message. You can select one among After 3
sec,After 5 sec, and After 10 sec. Selecting
No ring plays back the message as soon as the
phone receive signal of a call.
3. After setting the options, press to save the
setting.
4. Press to back up one menu level. Or, press
to return to Standby mode.
Recording and Selecting a Greeting Message
You have a predefined greeting message to be
played when a call comes in. Also, you can have one
greeting message recorded as your preference.
To record your own message:
1. Access the Call Answer menu option.
2. Press up or down navigation key to scroll to
Config, and press .
3. When Greeting is highlighted, press .
4. Press up or down navigation key to scroll to
Record and press .

101
Voice Kit
100
Voice Kit
5. Wait until a prompt beep sounds and record the
voice memo by speaking into the microphone.
While recording,you can pause recording by
pressing left navigation key , and resume by right
navigation key.
6. When recording is completed, press . The
phone automatically saves and activates the
message.
7. If you want to play back the currently selected
message, highlight Play and press .
If you want to record a new message, highlight
Record and press . Repeat steps 5 to 6.
N o t e : Each time you re c o rd a message, your
phone automatically overwrites the old message.
If you want to select a greeting message to be
played, highlight Select and press . Select
Mine to use your own message and Default to
use the default message and press .
8. Press to back up one menu level. Or, press
to return to Standby mode.
Listening to the Caller’s Messages
1. Press up or down navigation key to scroll to Inbox
, and press . The list of the recorded memos
appears.
N o t e : If the phone has the caller’s messages
waiting to be checked, it displays the total number
of the messages and the date and time when the
last message was re c o r ded. Pressing takes
you to Inbox.
2. Press up or down navigation key to scroll to the
desired message and press to play it back.
While playback, you can pause playing by
pressing left navigation key , and resume by right
navigation key.
3. If you want to access the following options,
press .
•Info: shows the detailed information on the
memo, such as the caller’s number (if identified),
elapsed time, memory used for the message
and the time when the memo was recorded.
•Erase: erases the selected message.
•Erase All: erases all of the recorded messages.
•Talk: places a call the caller’s number (if
identified).
•Save: stores the caller’s number (if identified)
into your Phonebook.
4. Press to back up one menu level. Or, press
to return to Standby mode.

2. Enter the phone number, and press .
You can recall the phone number from your
Phonebook or enter an e-mail address to send a
web message. Press and select e-mail to
enter e-mail address or Phonebook to recall a
number from Phonebook.
3. If necessary, edit the Call back number to which the
recipient of your message will call back to send you
a reply message and press .
The call back number is set to your phone number
by default.
4. Press to transmit the message.
103
Message Kit
102
Message Kit
Your phone can receive voicemail notification, text
messages, and pages. Also, your phone can send
text messages and pages if your system supplier
provides this service.
Incoming messages are received even when your
phone is in Lock mode. However, the screen will not
display information about the message. To access
the message, or to return a call other than an
emergency or priority number, unlock the phone to
proceed.
If you are on a conversation, and you receive an
incoming message, your phone automatically mutes
the ringer (this is to avoid ringing in your ear while
you are trying to converse).
You can quickly enter the Message menu, press left
navigation key in Standby mode.
New Message Menu 8-1
You can create short text messages to send to other
mobile numbers.
1. Enter the desired message content and press .
You can enter up to 14 characters in Chinese or 32
characters in English. For further information on
how to enter text, see page xx.
Inbox Menu 8-2
Your phone can store up to 95 messages until the
total length of the message exceeds 16 kbytes. This
storage capacity includes all message types: numeric
page, VMN (Voicemail Notification), text and browser
message. If your message memory gets full, the
screen displays a text notification and rejects
additional incoming messages until you erase the
stored messages.
N o t e : When the phone receives a message, an alert
sounds, a text notification with the call back number
and memory used for the message displays.
P ress (or ) to view (or listen to) the
m e s s a g e .

105
Message Kit
104
Message Kit
Voice
Press up or down navigation key to scroll to the
desired of the mails in the list and press . The
phone plays back the voice mail.
Text
Press up or down navigation key to scroll to the
desired one of the messages in the list and press
. The phone displays the message contents. If
necessary, press up or down navigation key to scan
through the contents.
While viewing a message, press to access the
following options.
Call back:places a voice call to the call back
number of the message.
Forward:allows you to send the message to the
other person.
Save addr: allows you to save the sender’s phone
number into your Phonebook. For further
information on storing a number, see
page xx.
Erase: erases the message.
Detail: displays detailed information on the
messages, such as the date and time when
the message was delivered from the sender’s
phone and received by your phone and the
used language. If needed, press up or down
navigation key to scan through the contents.
Reply:allows you to send a reply message to the
sender.
Save cb#:allows you to save the call back number
of the message.
Web
Press up or down navigation key to scroll to the
desired one of the messages in the list and press
. The phone start the Web browser displays the
message contents. If necessary, press up or down
navigation key to scan through the contents.
While viewing a message, press to access the
following options.

107
Message Kit
106
Message Kit
Outbox Menu 8-3
Your phone can store up up to 95 transmitted
messages until the total length of the message
exceeds 16 kbytes. You can review or resend the
messages stored in Outbox, if needed.
When you enter the Outbox menu, you can see the
message list. The marker !next to the message
means that it is urgent.
Press up or down navigation to scroll to the desired
message and press to review the message. The
display shows the date and time when the message
is created, the designated number (and name if
saved in Phonebook) and message contents.
If necessary, press up or down navigation to scan
through the contents.
While reviewing a message, press to access the
following options.
Call: places a voice call to the designated number.
Re-send:allows you to resend the message. For
further information on sending a message,
see page xx.
Save addr:allows to save the designated number
into your Phonebook. For further
information on storing a number, see
page xx.
Erase: erases the message from Outbox.
Detail: displays detailed information on the
message, such as the date and time when
the message is transmitted or created and
the option settings. If needed, press up or
down navigation to display more contents.
MSG Setup OK-4
Using this menu, you can set up the various options
for the message. Also, you can erase all incoming or
outgoing messages.
General
You can set up the following options for incoming
messages.
Scroll Timer: If an incoming message is too long for
the display, the phone displays it by
s c rolling the screen automatically. Yo u
can set the time when the phone
s c rolls to the next screen. Selecting O ff
does not scroll automatically. Yo u
should scroll to next screen manually
u s i n g up or down navigation.
Msg.Remind:When a message is received, the
phone alerts you by the selected ring.
You can set how often you want to be
alerted. Selecting Off does not alerts
you the incoming message, but the
New Message icon will appear.

109108
Message Kit
New Message
You can set up the following options as default
setting when creating a new message. For further
information on the options, see page xx.
Call Back #: You can set the call back number. Your
phone number is preset at factory.
Save Message:allows you to set whether you
want the transmitted message to
be saved in Outbox or not. Select
On to save the message after
transmission or Off not to do.
Entry Method: You can select the text input mode
between Word and Alphabet (ABC).
Delivery Ack:allows you to activate or deactivate
the delivery acknowledgement
feature. When this is activated (set
to Request Ack), the network
informs you whether your message
has been read or not by the recipient.
Select Yes to turn on the feature or
No to turn it off.
Erase
Using this menu option, you can erase all messages
in each of three message boxes; Voice mail box,
Inbox and Outbox.
You can also erase all of the messages at one time.
S e t u p
Many different features of your phone can be
customized to suit your preferences.
Auto Retry Menu 9-1
With this menu option activated, your phone will
automatically retry the call up to 10 times when a
connection fails.
To activate this feature, select how often the phone
will automatically retry the call. 60 Seconds,30
Seconds, and 10 Seconds are available.
Select Off deactivates this feature.
Auto Answer Menu 9-2
With this menu option activated, the phone
automatically answers calls after predefined rings.
This option is useful while driving, for instance.
To activate this feature, select how many times your
phone rings before answering an incoming call. 1
Ring,3 Rings and 5 Rings are available.
With this menu option set to Off, the phone does
not answer an incoming call, and if you do not
answer the call, it is stored in Missed Call log (see
page xx).

110
S e t u p
111
S e t u p
Answer Mode Menu 9-3
This menu option allows you to select how to answer
an incoming call. It is preset to SEND key. The
following options are available:
SEND key:The phone answers only when you press
.
flip open:The phone answers when you open the
phone.
any key:The phone answers when you press any
key except .
Tone Length Menu 9-4
The tone length setting enables you to select
Normal or Long DTMF (dual-tone multi-frequency)
tones. When you use a teleservice (such as your
bank account) and press the keys to enter numbers
into the teleservice, you are sending DTMF tones.
The system used by the bank or other service
determines if you need short or long DTMF tones. If
the service is digital (which most are these days)
normal DTMF will almost always work. However,
some new systems and almost all older (analog)
systems require you to use long DTMF tones. Many
home answering machines require long DTMF tones.
Set NAM Menu 9-5
Your phone can store two NAMs (NAM stands for
Numerical Assignment Module-essentially your
telephone number). This means you can have two
phone number on your phone, and you can quickly
and easily switch your service back and forth
between the two numbers.
When you access this menu, the phone will
immediately reboot and acquire service using the
new NAM setting.
Roam Option Menu 9-6
Your phone allows you to control your phone’s
roaming ability. Roaming is a feature which is only
relevant in areas where there are at least two
cellular service providers having valid roaming
agreements. Roaming allows you to register your
phone on one of the networks, but use the facilities
of the other if your own network is not available.
This system priority feature allows you to program
your phone for optimum operation when within your
home service area or when outside your home
service area.

113
S e t u p
112
S e t u p
You should always check your phone’s display
because it will let you know when you’re outside the
service provider network and whether your phone is
operating in another network.
•your home network : Only the Digital Mode
icon displays.
•Other CDMA networks: The Roaming icon and
the Digital Mode icon display.
•Other Analog network: The Roaming icon and
the Analog Mode icon display.
You have two option which allows you to control the
phone’s roaming ability.
No Roaming: With this setting, you cannot roam. If
your home system is not available,
your call will not be connected and
the No Service indicator is
displayed.
Standard: Your phone automatically search for a
first available one of all types of service
according to the Preferred Roaming List
supplied by the service provider.
Data/Fax Menu 9-7
Your phone is capable of sending and receiving
digital data and fax call when connected to a
computing device (laptop, desktop, handheld,
palmtop, etc.) running Windows NT, Windows 95 or
later. The phone functions just like a typical modem
on your PC, enabling you to use wireless data
involving a wide variety of Windows software
applications.
To use digital data or fax services with your phone,
you will need to obtain digital data/fax kit from your
service provider. This kit will contain the necessary
cables, software, and documentation required for
you to connect and use your phone with your
computing device.
Note: The phone must be on a digital network to
receive or send fax and data.
The following options are available:
Data/Fax Off: Your phone receives voice calls only.
Fax for Powered Off: Your phone receives fax calls
until you power off and back
on the phone.
Fax for Next Call: Your phone receives fax calls for
next 10 minutes.
Data until Powered Off: Your phone receives data
calls until you power off
and back on the phone.
Data for Next Call: Your phone receives data calls
for next 10 minutes.

115
S e t u p
114
S e t u p
Receiving a Fax or Data File
To receive a fax or data, ensure that your phone is
connected to your PC and is powered on, and select
a desired option.
When you receive a fax call, set up the Answer
mode in the Fax program on your PC and click on
Receive and select one of the following:
• Automatic Receive (recommended)
• Manual Receive
Sending a Fax or Data File
When connected to a computing device, your phone
allows wireless fax and data transmissions. Your
computing device software initiates the call to the
destination phone number. The phone functions as a
wireless modem to send the fax or data file to the
number designated by your PC software.
Whisper Mode Menu 9-8
Whisper mode automatically increases the receiving
sensitivity of the microphone to obtain the maximum
quality of a call even when you speak in a softer
voice so that the caller can hear you as if you are
speaking normally.
N o t e : It is not recommended that the ear piece be
used while using Whisper mode. Audio level may
i n c r ease without notice depending on the
s u rrounding conditions.
Select On to use this mode, or Off not to use it.
Security Menu 9-9
Your phone provides you with various security
options, including a user-programmable lock code
and special number features.
To access the Security menu, you must enter the 4-
digit lock code. It is preset to 0000 by default.
Lock Mode
Locking the phone limits use of the phone except an
emergency call.
When the phone is Lock mode, the phone receives
incoming calls and messages.
The following options are available:
Never: the phone remains unlocked.
On Power Up:the phone locks automatically at the
next time your phone turned on.
Now: the phone locks immediately.
Once your phone is locked, you can see the message
‘Locked’ at the bottom of the display.
To place an emergency call in Lock mode, enter the
number and then press . The phone recognizes
the hard-coded emergency numbers or three
programmed emergency numbers (Menu 9-9-4).
To unlock the phone, press and enter the 4-digit
lock code. The phone is immediately unlocked.

117
S e t u p
116
S e t u p
Restrict
This feature allows you to restrict outgoing calls
from your phone except emergency calls by the
hard-coded emergency numbers (911, *911 and #911)
or three programmed emergency numbers (Menu 9-
9-4). Once you restricted the phone, storing a number
is also unavailable.
Select Yes to turn this feature on or No turn it off.
Lock Code
This feature allows you to change your current lock
codeto a new one. The lock code is preset to 0000
at factory.
Enter a new, four-digit lock code and enter the code
once again at a prompt.
N o t e: Your phone does not allow viewing of the lock
code for security reason. So, if you have changed
the lock code, be sure to write down or memorize it.
Emergency Number
Your phone provides the option of storing three
emergency numbers. All these numbers can be
manually dialed at any time even when your phone is
locked.
IMPORTANT NOTICE!
Because of various transmission methods, network
parameters and user settings used to complete a call
from your wireless phone, a connection cannot
always be guaranteed. Therefore, emergency calling
may not be available on all wireless networks at all
times.
DO NOT depend on this phone as a primary method
of dialing 911 or for any other essential or
emergency communications.
Remember to always turn your phone on and check
the adequate signal strength before placing a call.
To store a emergency number:
1. Press up or down navigation key to find the
desired location and press .
2. Enter the desired number and press to save
the number.
Each emergency number can be up to 10 digits
long. The number already stored in the selected
location is automatically deleted when you enter a
new number.
To make an emergency call in Lock mode, simply
enter a programmed number, then press .

119
S e t u p
118
S e t u p
Send PIN
N o t e : Your service provider must enable this feature
and assign you a PIN in order for this feature to
w o r k .
This feature prevents your phone from being used by
unauthorized persons. The feature is only available if
your service provider supports this service and you
have a PIN (Personal Identification Number) assigned
by the system supplier. Contact the service provider
for complete information on this feature.
The following options are available:
Never: The option is not activated.
Prompt:When you make a call, you are asked to
send PIN.
Clear Memory
This menu allows you to erase all data you have
stored in the phone’s memory, such as phonebook
entries, tasks, schedules, call logs and so on.
When a confirmation displays explaining that you
will clear all data in the phone memory, press to
confirm. The phone reboots (turns itself off then on),
then returns to Standby mode.
Or, press to cancel your selection and exit this
menu.
Reset Phone
Resetting the phone returns to all user-selectable
options to the default settings.
When a confirmation displays explaining that you
will reset the phone, press to confirm. The phone
reboots (turns itself off then on), then returns to
Standby mode.
Or, press to cancel your selection and exit this
menu.
Privacy
Used only in digital networks, Voice Privacy encrypts
the voice channel so that people cannot eavesdrop
on your conversation.
The following options are available.
Enhanced: turns this feature on. The phone will
make and receive calls on an encrypted
high security line.
Standard: turns this feature off. The phone will use
a standard line for calls.
Note: This feature may not be available in all are a s .
Contact your service provider for details and
a v a i l a b i l i t y.

121120
S e t u p
R-UIM Setup Menu 9-0
When you subscribe a network, you are provided the
CHV code, which is a password for use of the UIM
card. Using this menu, you can enable the CHV code
to avoid using the card by the unauthorized user.
Also, you can change the code as you want.
The following options are available:
Enable CHV:activates use of the CHV code. With
the code enabled, you must enter your
CHV code each time you switch the
phone on. Consequently, any person
who does not have the code cannot
use your card without your approval.
Disable CHV:deactivates use of the CHV code. Any
person can access the data in your
UIM card.
Change CHV:allows you to change the CHV code as
your preference. Enter a new code up
to 8 digits. Then, enter the new code
again when prompted for
confirmation.
Reference Information
Using the Batteries
Your phone is powered by a re c h a rgeable Li-ion
s t a n d a r d battery.
Precautions When Using Batteries
• Never use any battery that is damaged
in any way.
•Use the battery only for its intended purpose.
• If you use the phone near the network’s base
station, it uses less power; talk and standby times
are greatly affected by the signal strength on the
cellular network and the parameters set by the
network operator.
•Battery charging times depend on the remaining
battery charge and the type of battery used.
The battery can be charged and discharged
hundreds of times, but it will gradually wear out.
When the operation time (talk time and standby
time) is noticeably shorter than normal, it is time
to buy a new battery.
•If left unused, a fully charged battery will
discharge itself over time.

122
Reference Information
123
Reference Information
• Use only Samsung-approved batteries and
re c h a rge your battery only with Samsung-appro v e d.
Do not leave the battery connected for more
than a week, since overcharging may shorten
Its life.
•Extreme temperatures will affect the charging
capacity of your battery: it may require cooling or
warming first.
• Do not leave the battery in hot or cold places, such
as in a car in summer or winter conditions, as you
will reduce the capacity and life-time of the
b a t t e r y. Always try to keep the battery at ro o m
t e m p e r a t u re. A phone with a hot or cold battery
may temporarily not work, even when the battery
is fully charged. Li-ion batteries are part i c u l a r l y
a ffected by temperatures below 0 °C (32 °F).
• Do not short-circuit the battery. Accidental short
circuiting can occur when a metallic object (coin,
clip or pen) causes a direct connection between
the + and - terminals of the battery (metal strips
on the back of the battery), for example when
youcarry a spare battery in a pocket or bag.
Short-circuiting the terminals may damage the
battery or the object causing the short-circuit.
•Dispose of used batteries in accordance with local
regulations. Always recycle. Do not dispose of
batteries in a fire.
Safety Information
Traffic Safety
Do not use a hand-held mobile phone while driving a
vehicle. If using a hand-held phone, park the vehicle
before conversing. Always secure the phone in its
holder, do not place the phone on the passenger seat
or where it can break loose in a collision or sudden
stop.
The use of an alert device to operate a vehicle’s
lights or horn on public roads is not permitted.
Remember, road safety always comes first!
Operating Environment
Remember to follow any special regulations in force
in any area and always switch off your phone
whenever it is forbidden to use it, or when it may
cause interference of danger.
When connecting the phone or any accessory to
another device, read its user’s guide for detailed
safety instructions. Do not connect incompatible
products.
As with other mobile radio transmitting equipment,
users are advised that for the satisfactory operation
of the equipment and for the safety of personnel, it is
recommended that the equipment should only be
used in the normal operating position (held to your
ear with the antenna pointing over your shoulder).

124
Reference Information
125
Reference Information
Electronic Devices
Most modern electronic equipment is shielded from
radio frequency (RF) signals. However, certain
electronic equipment may not be shielded against
the RF signals from your mobile phone.
Pacemakers
Pacemaker manufacturers recommend that a
minimum separation of 6 inches (20 cm) be
maintained between a hand-held mobile phone and a
pacemaker to avoid potential interference with the
pacemaker. These recommendations are consistent
with the independent research by and
recommendations of Wireless Technology Research.
Persons with pacemakers:
•Should always keep the phone more than 6
inches (20 cm) from their pacemaker when the
phone is switched on;
• Should not carry the phone in a breast pocket;
•Should use the ear opposite the pacemaker to
minimize the potential for interference.
•If you have any reason to suspect that
interference is taking place, switch off your
phone immediately.
Hearing Aids
Some digital mobile phones may interfere with some
hearing aids. In the event of such interference, you
may want to consult your service provider.
Other Medical Devices
Operation of any radio transmitting equipment,
including cellular phones, may interfere with the
functionality of inadequately protected medical
devices. Consult a physician or the manufacturer of
the medical device to determine if they are
adequately shielded from external RF energy or if you
have any questions. Switch off your phone in health
care facilities when any regulations posted in these
areas instruct you to do so.
Hospitals or health care facilities may be using
equipment that could be sensitive to external RF
energy.
Vehicles
RF signals may affect improperly installed or
inadequately shielded electronic systems in motor
vehicles (for example, electronic fuel injection
systems, electronic anti-skid (anti-lock) braking
systems, electronic speed control systems, air bag
systems).
Check with the manufacturer or its representative
regarding your vehicle. You should also consult the
manufacturer of any equipment that has been added
to your vehicle.
Posted Facilities
Switch your phone off in any facility where posted
notices so require.

127
Reference Information
126
Reference Information
Potentially Explosive Atmospheres
Switch off your phone when in any area with a
potentially explosive atmosphere and obey all signs
and instructions. Sparks in such areas could cause an
explosion or fire resulting in bodily injury or even
death.
Users are advised to switch off the phone while at a
refueling point (service station). Users are reminded
of the need to observe restrictions on the use of
radio equipment in fuel depots (fuel storage and
distribution areas), chemical plants or where blasting
operations are in progress.
Areas with a potentially explosive atmosphere are
often but not always clearly marked. They include
below deck on boats; chemical transfer or storage
facilities; vehicles using liquefied petroleum gas
(such as propane or butane); areas where the air
contains chemicals or particles, such as grain, dust
or metal powders; and any other area where you
would normally be advised to turn off your vehicle
engine.
Vehicles
Only qualified personnel should service the phone, or
install the phone in a vehicle. Faulty installation or
service may be dangerous and may invalidate any
warranty which may apply to the unit.
Check regularly that all mobile phone equipment on
your vehicle is mounted and operating properly.
Do not store or carry flammable liquids, gases or
explosive materials in the same compartment as the
phone, its parts or accessories.
For vehicles equipped with an air bag, remember that
an air bag inflates with great force. Do not place
objects, including both installed or portable wireless
equipment in the area over the air bag or in the air
bag deployment area. If in-vehicle wireless
equipment is improperly installed and the air bag
inflates, serious injury could result.
Switch off your phone before boarding an aircraft.
The use of mobile phones in an aircraft may be
dangerous to the operation of the aircraft, disrupt the
wireless telephone network and may be illegal.
Failure to observe these instructions may lead to the
suspension or denial of telephone services to the
offender, or legal action, or both.

129
Reference Information
128
Reference Information
Emergency Calls
Important!
This phone, like any mobile phone, operates using
radio signals, wireless and landline networks as well
as user-programmed functions which cannot guarantee
connection in all conditions. Therefore, you should
never rely solely upon any wireless phone for essential
communications (for example, medical emergencies).
Remember, to make or receive any calls the phone
must be switched on and in a service area with
adequate signal strength. Emergency calls may not be
possible on all wireless phone networks or when
certain network services and/or phone features are in
use. Check with local service providers.
To make an emergency call:
1. If the phone is not on, switch it on.
2. Key in the emergency number for your present
location (for example, 911 or other official emergency
number). Emergency numbers vary by location.
3. Press <TALK>
If certain features are in use (keyguard, restrict calls,
etc.), you may first need to turn those features off
before you can make an emergency call. Consult this
document and your local cellular service provider.
When making an emergency call, remember to give all
the necessary information as accurately as possible.
Remember that your phone may be the only means of
communication at the scene of an accident - do not cut
off the call until given permission to do so.
Radio Frequency (RF) Signals
Your mobile phone is a radio transmitter and receiver.
It is designed and manufactured not to exceed the
emission limits for exposure to radio frequency (RF)
energy set by the Federal Communications
Commission of the U.S. Government. These limits are
part of comprehensive guidelines and establish
permitted levels of RF energy for the general
population. Those guidelines are consistent with the
safety standard previously set by both U.S. and
international standards bodies:
•American National Standards Institute (ANSI)
IEEE. C95.1-1992
•National Council on Radiation Protection and
Measurement (NCRP). Report 86
• International Commission on Non-Ionizing
Radiation Protection (ICNIRP) 1996
•Ministry of Health (Canada), Safety Code 6.
The exposure standard for wireless mobile phones
employs a unit of measurement known as the
Specific Absorption Rate, or SAR. The SAR limit set
by the FCC is 1.6W/kg. Tests for SAR are conducted
using standard operating positions specified by the
FCC with the phone transmitting at its highest
certified power level in all tested frequency bands.
Although the SAR is determined at the highest
certified power level, the actual SAR level of the
phone while operation can be well below the
maximum value. This is because the phone is
designed to operate at multiple power levels so as to
use only the power required to reach the network. In
general, the closer you are to a wireless base station
antenna, the lower the power output.

131
Reference Information
130
Reference Information
Before a phone model is available for sale to the
public, it must be tested and certified to the FCC that
it does not exceed the limit established by the
government-adopted requirement for safe exposure.
The tests are performed in positions and locations
(e.g., at the ear and worn on the body) as required by
the FCC for each model. (Body-worn measurements
differ among phone models, depending upon
available accessories and FCC requirements). While
there may be differences between the SAR levels of
various phones and at various positions, they all
meet the government requirement.
For body worn operation, to maintain compliance
with FCC RF exposure guidelines, use only Samsung-
approved accessories. When carrying the phone
while it is on, use the specific Samsung belt-clip that
has been tested for compliance.
Use of non-approved accessories may violate FCC RF
exposure guidelines and should be avoided.
For additional information concerning exposure to
radio frequency signals, see the following websites:
Federal Communications Commission (FCC) RF
Safety program (select “Information on Human
Exposure to RF Fields from Cellular and PCS Radio
Transmitters”):
http://www.fcc.gov/oet/rfsafety
World Health Organization (WHO) International
Commission on Non-ionizing Radiation Protection
(select Qs & As):
http://www.who.int/emf
United Kingdom, National Radiological
Protection Board: http://www.nrpb.org.uk
Cellular Telecommunications Industry
Association (CTIA): http://www.wow-com.com
U.S.Food and Drug Administration (FDA) Center
for Devices and Radiological Health:
http://www.fda.gov/cdrh/consumer/
Care and Maintenance
Your phone is a product of superior design and
craftsmanship and should be treated with care. The
suggestions below will help you to fulfill any
warranty obligations and allow you to enjoy this
product for many years. When using your phone,
battery, OR any accessory:
•Keep it and all its parts and accessories out of
small children’s reach.
• Keep it dry. Precipitation, humidity and liquids
contain minerals that will corrode electronic
circuits.
•Do not use or store it in dusty, dirty areas as its
moving parts can be damaged.

132
Reference Information
133
G l o s s a r y
Airtime -Actual time spent talking on the wireless
phone. Most carriers bill customers based
on how many minutes of airtime they use
each month.
Antenna -A device for transmitting or receiving
signals. The size and shape of antennas
is determined, in part, by the frequency of
the signal they receive. Wireless phones
and the base station must have antennas.
Base Station - The fixed radio transmitter/receiver
that maintains communications with
mobile radio telephones within a
given area. (Typically called a cell or
cell site)
CDMA -(Code Division Multiple Access) A spread-
spectrum approach to digital transmission.
With CDMA, each conversion is digitized
and then tagged with a code. The mobile
phone deciphers only a particular code to
pick the right conversation off the air. The
transmitted signal is just above noise level
across the available bandwidth.
Channel - Communications signals transmit along
paths called channels.
Codec - Compression & Decompression.
Deactivation -The process of rendering a wireless
phone inactive.
•Do not store it in hot areas. High temperatures
can shorten the life of electronic devices, damage
batteries, and warp or melt certain plastics.
•Do not store it in cold areas. When the phone
warms up (to its normal operating temperature),
moisture can form inside the phone, which may
damage the phone’s electronic circuit boards.
•Do not drop, knock or shake it. Rough handling
can break internal circuit boards.
•Do not use harsh chemicals, cleaning solvents, or
strong detergents to clean it. Wipe it with a soft
cloth slightly dampened in a mild soap-and-water
solution.
•Do not paint it. Paint can clog the device’s moving
parts and prevent proper operation.
•Use only the supplied or an approved replacement
antenna. Unauthorized antennas, modifications of
attachments could damage the phone and may
violate regulations governing radio devices.
• If the phone, battery, or any accessory is
not working properly, take it to your nearest
qualified service facility. The personnel there will
assist you, and if necessary, arrange for service.

134
G l o s s a r y
135
G l o s s a r y
DTMF - (Dual-tone Modulated Frequency ) You send
DTMF signals when you enter numbers by
pressing the digit keys.
EVRC - (Enhanced Variable Rate Codec) EVRC is a
new global standard for compressing and
decompressing voice signals. EVRC uses a
lower bit rate (the number of bits sent per
second) than existing CDMA vocoders, while
providing significant improvements in voice
quality. This technology enables your phone
to provide superb voice quality while
benefiting from the ability to process more
cellular voice calls using less bandwidth than
the voice codecs in CDMA networks today.
Frequency -A measure based on time, as one or
more waves per second, in an electrical
or light wave information signal. A
signal’s frequency is stated in cycles-
per-second or Hertz (Hz).
Hands-Free -A feature that permits a driver to use
a wireless phone without lifting or
holding the handset - an important
safety feature for automobiles,
tractors and most other motorized
vehicles.
LCD -(Liquid Crystal Display) Commonly used to
refer to the screen display on the wireless
phone.
LED -(Light Emitting Diode) Commonly used to refer
to a small light on the wireless phone or on
the Desktop . The LED lights on the
phone to indicate an incoming call.
Prepend -The addition of a prefix, such as an area
code, to a phone number.
RF - Radio Frequency
Roaming -The ability to use a wireless phone to
make and receive calls in places outside
of the home service area.
Service Charge -The amount paid each month to
receive wireless service.
Standby Time -The amount of time a fully charged
wireless portable or transportable
phone can be on and idle without
being in use. (See Talk Time)
Talk Time -The length of time a person can talk on
a portable or transportable wireless
phone without recharging the battery.
Vocoder - Voice Coder. A device used to convert
speech into digital signals.
Wireless - Radio-based Systems that allow
transmission of telephone or data signals
through the air without a physical
connection, such as a metal wire
(copper) or fiber optic cable.