Samsung Electronics Co SCHN415 Single-Mode Cellular Phone (CDMA) User Manual SCH N213 FCC

Samsung Electronics Co Ltd Single-Mode Cellular Phone (CDMA) SCH N213 FCC
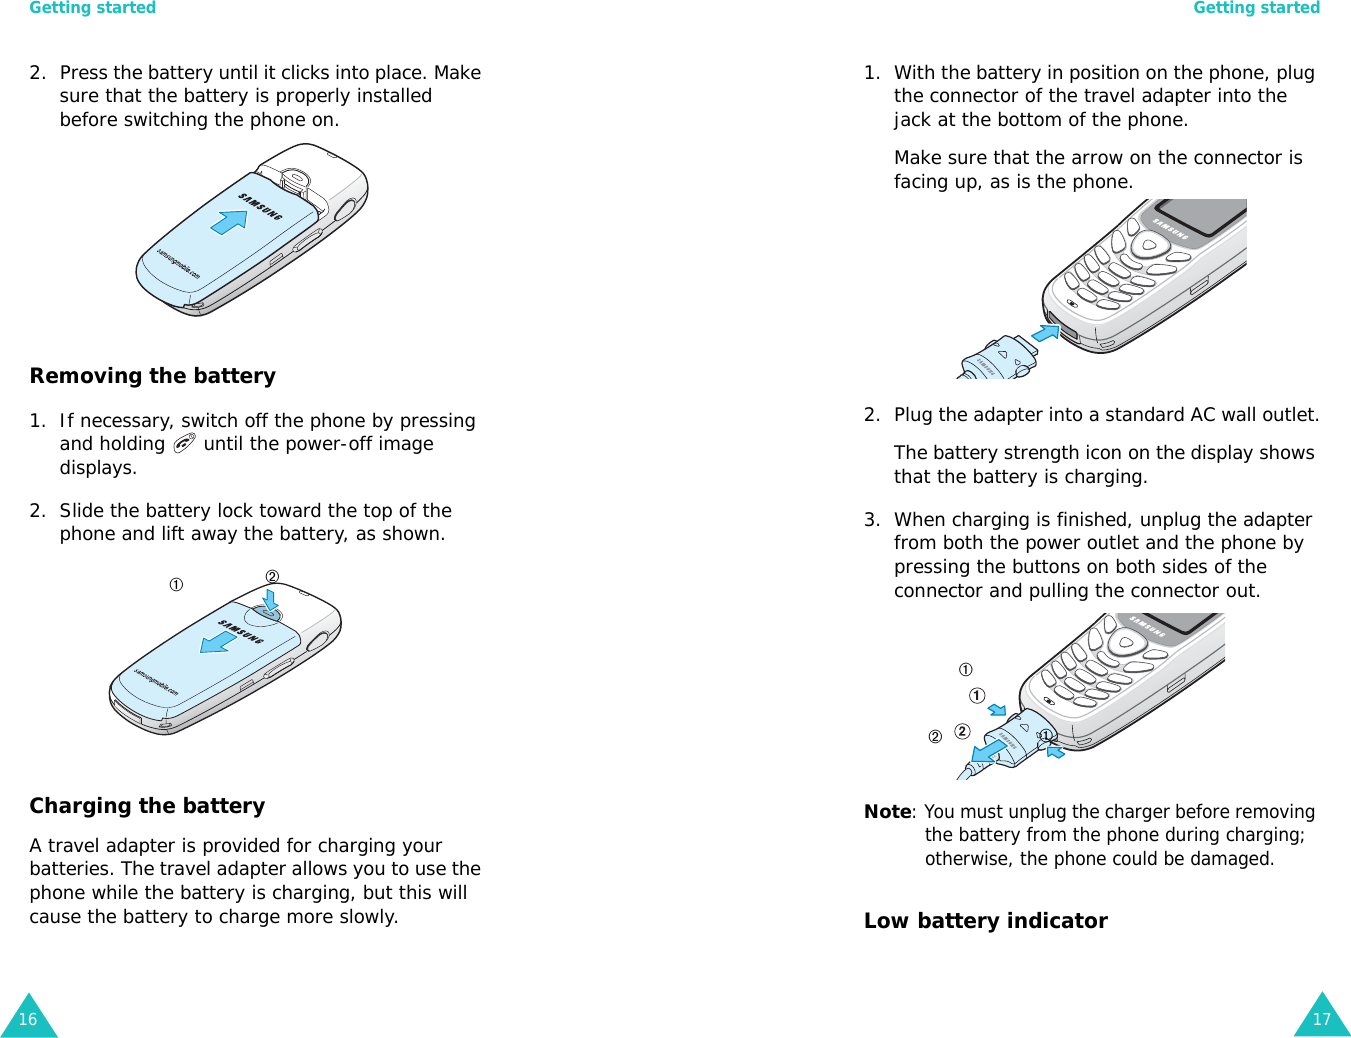
Users Manual

* Some of the contents of this manual may differ from your phone,   depending on the software installed or your service provider.World Wide Webhttp://www.samsungmobile.comPrinted in KOREACode No.: GH68-XXXXXEnglish. 08/2004. Rev.1.0ELECTRONICSPORTABLE CELLULARTELEPHONESCH-N415User’s ManualPlease read this manual before operating your phone, and keep it for future reference.
3Table of contentsImportant safety precautions .......................6Unpacking.....................................................8Your phone ...................................................9Phone layout.......................................................  9Display.............................................................. 12Service light ...................................................... 14Getting started............................................15Using the battery................................................ 15Switching on or off the phone............................... 19Using the soft keys............................................. 20Your phone’s modes............................................ 21Call functions ..............................................23Making a call...................................................... 23Ending a call...................................................... 24Emergency dialing .............................................. 24Using the recent call logs..................................... 25Making a call from Contacts ................................. 25Prepend dialing .................................................. 26Speed dialing..................................................... 264-digit dialing..................................................... 28Pause dialing ..................................................... 28Voice dialing ...................................................... 31Adjusting the volume during a call........................ 33Answering a call................................................. 34Silencing a call ringer.......................................... 35Viewing missed calls ........................................... 35Options during a call........................................... 36Using caller ID ................................................... 37Call forwarding................................................... 37Call waiting........................................................ 38Three-way calling............................................... 39Entering text...............................................40
Table of contents4Changing the text input mode.............................. 41Using T9 (English) mode...................................... 42Using Alphabet mode .......................................... 44Using Symbol mode............................................ 46Using Number mode ........................................... 46Using the menus .........................................48Accessing a menu function by scrolling.................. 48Using shortcuts .................................................. 49List of menu functions......................................... 50Downloads ..................................................54Downloading multimedia files............................... 54Changing the browser settings ............................. 55Viewing help information ..................................... 56WAP............................................................57About the WAP browser....................................... 57Get In WAP  (Menu 2-1)........................................ 58Prompt  (Menu 2-2).............................................. 62Push SL Option  (Menu 2-3)................................... 62Voice Mail ...................................................63Voice Mail  (Menu 3-1).......................................... 63Voice Mail#  (Menu 3-2)........................................ 63Voice Portal ................................................64Voice Portal  (Menu 4-1)....................................... 64Voice Portal#  (Menu 4-2)..................................... 64 Messaging..................................................65Messenger  (Menu 5-1)......................................... 65Chat  (Menu 5-2)................................................. 66Torpedo SMS  (Menu 5-3)..................................... 66E-mail  (Menu 5-4)............................................... 67Torpedo SMS...............................................68New Msg  (Menu 6-1)........................................... 68Voice  (Menu 6-2)................................................ 70Inbox  (Menu 6-3)................................................ 71Sent  (Menu 6-4)................................................. 72Draft  (Menu 6-5)................................................. 73Saved  (Menu 6-6)............................................... 73Table of contents5Web Alert  (Menu 6-7).......................................... 73Erase Msg  (Menu 6-8).......................................... 74Msg Setting  (Menu 6-9)....................................... 74Calls............................................................77Outgoing  (Menu 7-1)........................................... 77Incoming  (Menu 7-2)........................................... 78Missed  (Menu 7-3)............................................... 79Erase History  (Menu 7-4)..................................... 79Air Time  (Menu 7-5)............................................ 80Contacts......................................................81Find  (Menu 8-1).................................................. 81Add New Entry  (Menu 8-2)................................... 84Group Setting  (Menu 8-3)..................................... 87My Phone#  (Menu 8-4)........................................ 88Memory  (Menu 8-5)............................................. 88Other Functions ..........................................89Planner  (Menu 9-1)............................................. 89Display  (Menu 9-2)............................................ 102Sounds  (Menu 9-3)............................................ 105Voice Dial  (Menu 9-4)........................................ 109Setup  (Menu 9-5).............................................. 110Voice command.........................................119Health and safety information...................120Exposure to radio frequency (RF) signals ............. 120Road safety ..................................................... 124Operating environment ..................................... 125Electronic devices............................................. 125Potentially explosive environment....................... 127Emergency calls............................................... 128Other important safety information..................... 129Care and maintenance ...................................... 130Acknowledging special precautions and the FCC and in-dustry canada notice......................................... 131Glossary....................................................150
6Important safety precautionsRead these guidelines before using your wireless phone. Failure to comply with them may be dangerous or illegal.Road safety at all timesDo not use a hand-held phone while driving; park the vehicle first. Switching off when refuellingDo not use the phone at a refuelling point (service station) or near fuels or chemicals.Switching off in an aircraftWireless phones can cause interference. Using them in an aircraft is both illegal and dangerous.Switching off in near all medical equipmentSwitch off your phone near medical equipment. Hospitals and health care facilities may be using equipment that could be sensitive to external RF energy. Follow any regulations or rules in force.InterferenceAll wireless phones may be subject to interference, which could affect their performance.Special regulationsFollow any special regulations in force in any area and always switch off your phone whenever it is forbidden to use it, or when it may cause interference or danger (in a hospital for example).Water resistanceYour phone is not water-resistant. Keep it dry. Important safety precautions7Sensible useUse only in the normal position (held to the ear). Avoid unnecessary contact with the antenna when the phone is switched on.Emergency callKey in the emergency number for your present location, then press  . Give all necessary information as accurately as possible. Do not end the call until given permission to do so.Keeping small children away from your phoneKeep the phone and all its parts including accessories out of reach of small children.Accessories and batteriesUse only Samsung-approved accessories and batteries. Use of any unauthorised accessories could damage your phone and may be dangerous.Use only Samsung-approved batteries and recharge your battery only with Samsung-approved chargers.Qualified serviceOnly qualified service personnel may repair your phone.For more detailed safety information, see “Health and safety information” on page 120.CAUTIONRISK OF EXPLOSION IF A BATTERY IS REPLACED BY AN INCORRECT TYPE.DISPOSE USED BATTERIES ACCORDING TO THE INSTRUCTIONS.
8UnpackingYour package contains the following items. The illustrations below may look different from your phone and accessories:In addition, you can obtain the following accessories for your phone from your local Samsung dealer:Handset BatteryTravel adapter Hand strap• Headset  • Travel adapter• Standard battery • Cigarette lighter adapter• Hands-free car kit • Data cableHeadsetUser’s manual9Your phonePhone layoutThe following illustrations show the main elements of your phone.With the phone openEarpieceDisplayMicrophoneSoft key (left)Send keySoft key (right)Power on/off/Menu exit keyAlphanumeric keysSpecialfunction keysCancel/clearkeyNavigation (Up/Down/Left/Right) keysVolume/menubrowse keysOK key Headset jack
Your phone10TeclaKey(s)Description (soft keys)Performs the functions indicated by the text above them, on the bottom line of the display.(Navigation keys)In Menu mode, scrolls through menu options.In Standby mode, quickly enters favorite menu options directly. For further details about shortcuts, see page 103.In Menu mode, selects the current menu or option or confirms your input.Makes or answers a call.In Standby mode, retrieves the most recent numbers dialed, received, or missed. Redials the last number when pressed and held.Ends a call. Also switches the phone on and off when pressed and held. In Menu mode, cancels your input and returns the display to Standby mode.Deletes characters from the display. In Menu mode, returns the display to the previous menu level.Enters numbers, letters, and some special characters.Your phone11In Standby mode, initiates the Voice Command feature when pressed and held.In the text entry mode, changes case of letters.In Standby mode, quickly enters or exits Silent mode when pressed and held.In the text entry mode, inserts a space.(on the left side of the phone)Adjusts the ringer volume when the phone is ringing and the earpiece volume during a call.In Standby mode, adjusts the key tone volume.Key(s)Description (continued)
Your phone12DisplayLayoutThe display has three areas; the top line of icons, the text and graphic area, and the bottom line of soft key indicators.IconsIcon Description Signal strength: Shows the received signal strength. The greater the number of bars, the better the signal. Service: Appears when a call is in progress.No service: Appears when you are outside a service area. When it displays, you cannot make or receive calls. Wait a little while for a better signal or move into an open area to regain service.IconsText and graphics areaSoft key function indicatorsMenu       ContactsYour phone13New text message: Appears when a new text message received.New voice mail: Appears when a new voice mail is received.New text message and voice mail: Appears when there are new text messages and voice mails received.Alarm mode: Appears when you set an alarm to ring at a specified time.Roaming: Appears when you are out of your home area and have logged onto a different network; for example, when traveling in other countries.Ringer on: Appears when you set the ringer volume for calls to one from Level 1 to Level 8 or to 1-Beep.Ringer off: Appears when you set the ringer volume for calls to Silent.Vibration mode: Appears when the ringer volume for calls is set to Vibrate or High+Vib, or when your phone is in Silent mode.Digital mode: Indicates when the phone is logged onto a digital network.Analog mode: Indicates when the phone is logged onto an analog network.1x mode: Indicates when the phone is in 1x mode. Icon Description (continued)
Your phone14Service lightThe service light on the top right corner of the phone, flashes to indicate an incoming call, message, or alarm and flashes for a few seconds when you turn on or off the phone.It blinks while the battery is charging with the travel adapter; it lights when the battery is fully charged.To make the service light turn on, set the Service LED menu; see page 104 for further details.Battery status: Shows the level of your battery. The more bars you see, the more power you have remaining.Icon Description (continued)15Getting startedUsing the batteryYour phone is powered by a rechargeable Li-ion battery. Use only approved batteries and chargers. Ask your local Samsung dealer for further details.Note: You must fully charge the battery before using your phone for the first time. A discharged battery is fully recharged in approximately 180 minutes for a standard battery.Installing the battery1. Place the battery so that the tabs on the end align with the slots at the bottom of the phone.
Getting started162. Press the battery until it clicks into place. Make sure that the battery is properly installed before switching the phone on.Removing the battery1. If necessary, switch off the phone by pressing and holding   until the power-off image displays.2. Slide the battery lock toward the top of the phone and lift away the battery, as shown.Charging the batteryA travel adapter is provided for charging your batteries. The travel adapter allows you to use the phone while the battery is charging, but this will cause the battery to charge more slowly.➀➁Getting started171. With the battery in position on the phone, plug the connector of the travel adapter into the jack at the bottom of the phone.Make sure that the arrow on the connector is facing up, as is the phone.2. Plug the adapter into a standard AC wall outlet.The battery strength icon on the display shows that the battery is charging.3. When charging is finished, unplug the adapter from both the power outlet and the phone by pressing the buttons on both sides of the connector and pulling the connector out.Note: You must unplug the charger before removing the battery from the phone during charging; otherwise, the phone could be damaged. Low battery indicator➀➀➁
Getting started18When the battery is weak and only a few minutes of talk time remain, a warning tone sounds and a “Low Battery! Recharge Soon” message repeats at regular intervals on the display. In this case, the phone turns off the backlight of the display to conserve battery power. When the battery becomes too weak for the phone to operate, it switches off automatically.Getting started19Switching on or off the phone 1. Open the phone.2. Press and hold   until the power-on image displays to switch on the phone.The service light on the phone flashes and an alert sounds. When the system locates services, the greeting message displays along with the time and date. You can now place and receive calls.If the phone is out of service, the No Service icon ( ) appears on the display. In this case, you cannot place and receive calls. You can try again later when service is available.Note: You can change the display language in the Language menu (Menu 9-5-5). For further details, see page 112.3. When you wish to switch off the phone, press and hold   for more than two seconds until the power-off image displays.WARNING!Do not switch on the phone when mobile phone use is prohibited or when it may cause interference or danger.Note: As with any other radio-transmitting device, do not touch the antenna unnecessarily when the phone is switched on. Contact with the antenna affects the call quality and may cause the phone to operate at a higher power level than otherwise needed.
Getting started20Using the soft keysYour phone offers a set of functions that allows you to customize it. These functions are arranged in menus and submenus, accessed using the two soft keys,   and  . Each menu and submenu allows you to view and alter the settings of a particular function.The roles of the soft keys vary depending on the current function you are using; the labels on the bottom line of the display just above each key indicate their current role.Example:Menu       ContactsVIVO ao VIVO  9:43ATue May 04Press the left soft key to access Menu mode.Press the right soft key to access the Contacts menu.Getting started21Your phone’s modesStandby modeStandby is the most basic state of your phone. The phone goes into Standby mode after you turn it on or whenever you briefly press  . When your phone is in Standby mode, you will typically see the greeting message and the current time and date. If you enter a phone number, you can press  to dial it or press the Save soft key to save it in Contacts. Press   at any time to return to Standby mode. Be careful; if you are on a call when you press  , the call disconnects and the phone returns to Standby mode. Talk modeYou can place and answer calls only when your phone is turned on. During a call, the phone is in Talk mode. While you are in Talk mode, pressing the Menu soft key gives you a list of options. See page 36 for details.Power Save modeYour phone comes with a Power Save feature that is automatically activated if your phone is unable to find a signal after 15 minutes of searching. While this feature is active, the phone’s battery charge is conserved. The phone automatically rechecks for a signal periodically. To manually force the phone to recheck for a signal, press any key.   9:43A Tue    May 04
Getting started22Lock modeWhen you lock your phone using the Lock Phone menu (Menu 9-5-0-1) in the Security menu, you cannot use the phone. In Lock mode, you can receive messages and calls, but you cannot place an outgoing call until you unlock the phone.To unlock the phone, you need to enter the lock code.For details about locking and unlocking your phone, see page 115.Silent modeSilent mode disables all sounds on the phone. This feature is best used in situations where the phone might disturb others, such as in a meeting, in a library, or in a theater. Your phone can be set to Silent mode with a press of a key in Standby mode.In Standby mode, press and hold   until “Enter! Silent mode” and the Vibration icon ( ) display.To exit and reactivate the previous sound settings, press and hold   until “Exit! Silent mode” appears. The Vibration icon no longer displays.Call functions23Call functionsMaking a callIn Standby mode, enter the area code and phone number and press  .Note: When you have activated the Auto Retry menu (Menu 9-5-4), the phone will automatically retry to make the call if no one answers or the line is busy. See page 112 for further details.While entering a number, press the Save soft key or   to save the number in Contacts. Press the Menu soft key to access the following options:4-digit Dial: allows you to use the 4-digit Dialing feature. This option is only available when you enter 4 digits. For details, see page 28.Speed Dial: allows you to use the Speed Dialing feature. This option is only available when you enter a number corresponding to a location in contacts. For details, see page 26.Talk: places a call to the number.Save: saves the number to Contacts.Find: finds a number from Contacts.Hard Pause: enters a hard pause.2sec Pause: enters a 2-second pause.
24Correcting the numberEnding a callWhen you want to end your call, press  . The length of the call displays along with the phone number of the called person. If the number is stored in your Contacts, the name displays. If there is no match, you can press   and store the number in Contacts. For further details about storing the number in Contacts, see page 84.Alternatively, simply close the phone to end a call.Emergency dialingYou can place calls to standard emergency numbers, such as 190, 192, 193, and three specified numbers on the Emergency # list, even if your phone is locked or all of the outgoing calls are restricted.For further details about emergency numbers, see page 117.To clear the Press last digit displayed .whole display  and hold it for more than one second.Call functions25Using the recent call logsThe phone stores up to 30 of the calls you have dialed, received, or missed chronologically. The last call is saved in the first position.To recall any of these numbers:1. If there are any characters on the display, return to Standby mode by pressing  .2. Press  . The list of recent calls displays.The following icons indicate the types of calls:• : Outgoing calls•  : Incoming calls•  : Missed calls3. Press the Navigation keys or the Volume keys on the left side of the phone until you find the number you want.4. Press   to dial the highlighted number.Making a call from ContactsYou can store the phone numbers you called regularly in the phone’s memory, which is called “Contacts”. You then simply recall the number to dial.For further details about the Contacts feature, see page 81.
Call functions26Prepend dialing The Prepend option lets you add digits, such as area codes and network feature activation codes, to a phone number that is in your call logs or Contacts.To prepend a phone number stored in your phone:1. Access a call log in the Call logs list by pressing . Or access Contacts by pressing the Contacts soft key.2. Select the item you want using the Navigation keys and press  .The display shows the details of the number.3. Press the Menu soft key to access the menu pop-up list.4. Press   to select the Prepend option.5. Enter the area code or network feature code.6. Press   to dial the number.Speed dialingOnce you have stored phone numbers in Contacts, you can dial them easily with a few presses of the keys.Note: When several numbers are saved in one name entry, the first number you entered is automatically specified as a speed dial number. To change the speed dial number, use Speed dial of the Contacts options; see page 85.One-touch dialCall functions27Memory locations 001 through 009 are special one-touch locations. You can dial the phone numbers stored in Contacts from 001 through 009 simply by pressing one key. Press and hold the third digit of the memory location. For example: Location no. 009 Press       and hold .The number (and name) stored displays, and then dials.Two-touch dialMemory locations 010 through 099 are special one-touch locations.Press the second digit(s) briefly, then hold down the last digit of the memory location.For example: Location no. 023Press   briefly and hold down .The number (and name) stored displays, and then dials.Three-touch dialMemory locations 100 through 500 are special three-touch locations.Press the first two digit(s) briefly, then hold down the third digit of the memory location.For example: Location no. 123Press         and    briefly, then hold down .The number (and name) stored displays, and then dials.
Call functions284-digit dialingYou can quickly dial a phone number in Contacts by entering its last 4 consecutive digits. This feature is convenient if you have the number memorized, but you have forgotten where the number is stored in your Contacts.1. Enter the last 4 digits of the phone number you want to dial. 2. Press the Menu soft key and select the 4-digit Dial option. The phone displays the phone number that matches the four digits.If the phone found more than one number that contains those four digits, it displays the first number. Scroll through the numbers using   or   to select a number.3. Press   to dial the number.Pause dialingWhen you call an automated system, like a banking service, you are often required to enter a password or account number. Instead of manually entering the numbers each time, you can store the numbers in your Contacts, separated by pauses.There are two kinds of pauses that can be entered on your phone:Call functions29•Hard pause: A hard pause stops the dialing sequence until you press  .•2-sec pause: A 2-second pause stops the dialing sequence for 2 seconds and then automatically sends the remaining digits.Note: Multiple two second pauses can be entered to extend the length of a pause. Keep in mind that pauses count as digits towards the 32 digit dialing maximum.Storing pauses in a Contacts entryTo store a number in your Contacts that contains pauses:1. Enter the phone number you want to store, such as the bank’s teleservice phone number. 2. Press the Menu soft key to access the options. 3. Select the required pause type and press  .• Press   for Hard Pause. The letter “P” displays, meaning that a hard pause will occur at that point in the dialing sequence. • Press   for 2sec Pause. The letter “T” displays, meaning that a 2-second pause will occur at that point in the dialing sequence.
Call functions304. Enter the digits that need to follow the pause, such as your account number.5. Repeat steps 2 through 4 to add more pauses and numbers, if necessary.6. Store the number in your Contacts as you normally would by pressing   or the Save soft key and following from step 2 on page 84.Pause dialing from a stored Contacts entry1. Dial the number of the service from Contacts.2. If you stored the number using a hard pause, wait for the appropriate prompt from the number you are calling. When prompted, press  to send the DTMF (Dual tone multi-frequency) number that follows the pause.If you stored the number using a 2-second pause, your phone transmits the number that follows the “T” pause two seconds after the connection. 3. “Sending DTMF” flashes on the display and the transmitted tone sounds.4. Repeat from step 2, if necessary.Manual pause dialingYou can enter pauses manually during the dialing process.1. Enter the phone number of the service you want to call, such as a bank’s teleservice number.2. Press the Menu soft key to access the options. Call functions313. Select the required pause type and press  .• Press   for Hard Pause. The letter “P” displays, meaning that a hard pause will occur at that point in the dialing sequence. • Press   for 2sec Pause. The letter “T” displays, meaning that a 2-second pause will occur at that point in the dialing sequence.4. Enter the number to be sent after the pause and then press   to dial the first number. 5. For a hard pause, press   again at the prompt to send the additional number after connecting.If you enter the number using a 2-second pause(s), the phone sends the number that follows the pause two seconds after the connection.Voice dialingOnce you have stored a phone number in Contacts, you can dial it simply by saying the associated name or the number.Before using the Voice Dial feature, you first need to program your phone to recognize your voice
Call functions32and pronunciation in the Voice Dial menu (Menu 9-4). For details, see page 109.To begin voice dialing:1. In Standby mode, open the phone or press and hold  , depending on the setting in the Set Active menu (Menu 9-4-3). For details about the menu, see page 109.2. At a prompt, say Name Dial or Digit Dial.3. Say a name or a phone number to the microphone.4. When the phone confirms the name or number you said, say “Yes” to place a call.Alternatively, say “No” to cancel.Call functions33Adjusting the volume during a callDuring a call, if you want to adjust the voice volume, use the Volume keys on the left side of the phone.Press   to increase the volume level and   to decrease the level. The image on the display shows all eight levels; the more bars you see, the higher the level is.In Standby mode, you can also adjust the keypad tone volume using these keys.
Call functions34Answering a callWhen somebody calls you, the phone alerts you by ringing and blinking the service light.If the caller can be identified, the caller’s phone number, or name if stored in your Contacts, displays.There are three ways to answer a call depending on your setting in the Call Answer menu (Menu 9-5-3):To end the call, close the phone or press  .Note: You can answer a call while using Contacts or menu functions. The current operation stops.If you select To answer the call, Any Key open the phone or press any key, except   and the Volume keys.Send Key press  .Folder Open open the phone or press .Call functions35Silencing a call ringerYou can silence the ringer when a call comes in by pressing one of the Volume keys on the left side of the phone. If the phone is open, you can also press .The “Ringer Silenced” message appears and the phone does not ring.Viewing missed callsIf you fail to answer a call for any reason, the phone indicates the missed call by displaying a text notification on the screen. Additionally, if caller information is available, a Missed entry is created and the screen displays the phone number of the last missed call.When the display informs you of the missed call, press   to dial the number, or   to clear the message and return to Standby mode.To view missed calls, access the Missed menu (Menu 7-3). For details, see page 79.
Call functions36Options during a callYour phone provides a number of functions that you can use during a call. As many of these options are network services, you may not be able to use all of them at all times.Press the Menu soft key during a call to access the following options:Contacts: allows you to access the Contacts menu. See page 81 for details.Mute/Quit: allows you to switch your phone’s microphone off, so that the other person on the phone cannot hear you.Example: You wish to say something to a person in the room, but do not want the other person on the phone to hear you.Silent/Quit: does not sound the key tones. It allows you to press keys without hearing annoying key tones during a call. Send Tel#: sends your telephone number to the other person’s phone.Calls: allows you to access the Calls menu. For details, see page 77.Messages: allows you to use the Torpedo SMS menu. For details, see page 68.Planner: allows you to access the Planner menu. For details, see page 89.Voice Privacy: allows you to access the Voice Privacy menu. For details, see page 118.Call functions37Using caller IDThis feature tells you who is calling you by displaying the caller’s number when the phone rings. If the number is stored in your Contacts, the corresponding name is also displayed. If you call someone who has this feature, your phone number displays on her/his phone.Note: Contact your service provider to set up the Caller Line Identification service.Call forwardingThis network feature allows you to forward incoming calls to another phone number, even while your phone is turned off. Activating Call forwarding does not affect outgoing calls made from your phone. Note: Contact your service provider to activate Call forwarding.
Call functions38Call waitingCall Waiting lets you receive a second call during a conversation. Your phone notifies you of a waiting call by beeping and displaying “Call Waiting.” Your network provides you with the option of turning the Call Waiting feature on and off, if you have subscribed to the service. Call Waiting is on by default in the phone. If you choose to have a undisturbed conversation, simply turn off the feature for the current call.Note: Contact your service provider to activate the Call Waiting service.To answer a waiting call during a call:1. When you hear a beep telling that you have a waiting call, press  . The phone connects the calling person and places the current call on hold.2. Press   again to switch between the two calls.Note: If you do not respond to a call waiting notification, the phone will forward the call to the voice mail server or another number that you have set up. Contact your service provider for more information. Call functions39Three-way callingThis feature enables you to conduct conference calls with two separate people at the same time. The phone records both of them into the Outgoing call log and you are billed air time for each of outgoing calls separately. Contact your service provider to activate Three-way calling.To place a Three-way call:1. During a conversation, press  . The phone places the other person on hold.2. Enter the phone number for the third person, and then press  . The phone dials the third person.3. When you are connected to the person, press  again to begin your Three-way call.If one of the callers (not you) hangs up, you and the remaining caller stay connected. If you initiate the call and hang up first, all three participants are disconnected.
40Entering textAt many times when using your phone, you will need to enter text, such as when storing a name in Contacts, creating your personal greeting, or scheduling events on your calendar. You can enter alphanumeric characters into your phone using your phone’s keypad.Your phone has the following text input modes:•T9(English) mode: This mode allows you to enter words with only one keystroke per letter. Each key on the keypad has more than one letter; for example, pressing   can enter J, K, or L. However, T9 mode automatically compares the series of keystrokes you make with an internal linguistic dictionary to determine the most likely word, thus requiring far fewer keystrokes than the traditional Alphabet mode.•Alphabet mode: This mode allows you to enter letters by pressing the key labeled with the letter you want. Press the key once, twice, three or four times until it displays.•Symbol mode: This mode allows you to enter various symbols and punctuation marks.•Number mode: This mode allows you to enter numbers.Note: The T9 mode supplies an appropriate language database as your language setting menu (Menu 9-5-5).Entering text41Changing the text input modeWhen you are in a field that allows characters to be entered, you will notice the text input mode indicator on the display.Example: Entering a name for a Contacts entryTo change to another text input mode:1. Press the Menu soft key. 2. Scroll to the mode you want by pressing the Navigation keys.3. To select the highlighted mode, press  . If you want to exit the menu without changing to a new mode, press  .The selected text input mode indicator appears on the display.Menu                BackText input mode indicator
Entering text42Using T9 (English) modeT9 is a predictive text input mode that allows you to key in any character using single keystrokes. This text input mode is based on a built-in dictionary.To enter a word in T9 mode: 1. Press the keys on the phone just once per desired letter. For example, to enter  “Hello”, press  , , , , and .2. The word that you are typing appears on the display. It may change with each key that you press.3.Type to the end of the word before editing or deleting any keystrokes.4. Put a space between each word by pressing     .If the word doesn’t display correctly, press   repeatedly to display alternative word choices for the keys that you have pressed.Example: Both “of” and “me” use   and . The phone displays the most commonly used choice first.5. Continue entering the next word.Note: To type words not found in T9 mode, you need to change the text input mode to Alphabet mode.Smart punctuationEntering text43Periods, hyphens, and apostrophes are available by pressing  . T9 mode applies rules of grammar to insert the correct punctuation. Notice that   is used twice in this example to display two punctuation marks:Changing the letter caseTo shift case of the next letter(s) that you type, press  . There are three cases:• Initial Capital (T9Word) • Capitals Lock (T9WORD)•Lower Case (T9word)Inserting a spacePress   to insert a space between words.Including a numberYou can include a number between letters without exiting T9 mode. Press and hold the corresponding number key.ScrollingTo move the cursor to the left or right through your text, press   or  .Clearing letters and wordsPress   once or repeatedly to clear letters one by one to the left. Press and hold   to erase all of the letters on the display.                        L     e    t       s          e     a     t    .
Entering text44Using Alphabet modeWhen typing in Alphabet mode, you need to press the keys labeled with the letter you want:- once for the first letter- twice for the second letter- and so onThis method is called multi-tap typing.For example, you press   three times to display the letter “C” and   two times to display the letter “K.” The cursor moves to the right when you press a different key. When entering the same letter twice or a different letter on the same key, just wait for a few seconds for the cursor to move to the right automatically, and then enter the next letter.Refer to the table below for the list of characters assigned on each key.(Caps Lock mode)Key Characters in the Order Displayed.    @    ?    !    -    ,    &    :   ’   1 AB C 2DE F 3GH I 4JKL 5MN O 6PQR S 7TU V 8WX Y Z 90Entering text45Changing the letter caseTo shift case of the next letter(s) that you type, press  . There are three cases: • Initial Capital (Abc)• Capitals Lock (ABC)•Lower Case (abc)Inserting a spacePress   to insert a space between words.Including a numberYou can quickly include a number between letters. Press and hold the corresponding number key.ScrollingTo move the cursor to the left or right through your text message, press   or  .Clearing letters and wordsPress   once or repeatedly to clear letters one by one to the left. Press and hold   to erase all of the letters on the display.
Entering text46Using Symbol modeSymbol mode enables you to enter symbols into your text. Press   or   to display more symbol sets.Press the keys corresponding to the symbol you want, then the phone automatically switches back to the text input mode used just prior to selecting Symbol mode.Using Number modeNumber mode enables you to enter numbers.Press the keys corresponding to the digits you want to enter and manually switch back to the text input mode of choice. For details about changing the mode, see page 41.MENUEntering text47
48Using the menusThis phone offers a range of functions that allow you to tailor the phone to your needs. These functions are arranged in menus and submenus.The menus and submenus can be accessed by scrolling or by using the shortcuts.Accessing a menu function by scrolling1. In Standby mode, press the Menu soft key to access Menu mode. 2. Scroll using the Navigation keys to reach the main menu; for example, Other Functions. Press   to enter the menu.3. If the menu contains any submenus, for example, Setup, find the one you want by scrolling using the Navigation keys. Press   to enter the submenu.If the menu you have selected contains submenus, for example, Language, repeat this step.4. Scroll using the Navigation keys to select the setting of your choice. 5. Press   to confirm the chosen setting. Notes: • You can return to the previous menu level by pressing .• You can exit the menu without changing the menu settings by pressing  .Using the menus49Using shortcutsThe menu items, such as menus, submenus, and setting options, are numbered and can be accessed quickly by using their shortcut numbers. Note: The numbers assigned to each menu function are indicated on the list on page 50.1. In Standby mode, press the Menu soft key to access Menu mode.2. Enter the first digit of the shortcut number. Repeat this for each digit of the shortcut number.Example: Accessing the Language menuPress , , and . selects Other functions,  selects Setup, and  selects Language.3. Scroll using the Navigation keys to select the setting of your choice.4. Press   to confirm the chosen setting.
Using the menus50List of menu functionsThe following list shows the menu structure and indicates the number assigned to each option.1.  Downloads  (see page 54) 2.  WAP  (see page 57)2.1  Get In WAP 2.2  Prompt2.3  Push SL Option3.  Voice Mail  (see page 63) 3.1  Voice Mail3.2  Voice Mail#4.  Voice Portal  (see page 64)4.1  Voice Portal4.2  Voice Portal#5.   Messaging  (see page 65)5.1  Messenger5.1.1  Messenger5.1.2  Messenger #5.2  Chat5.2.1  Chat5.2.2  Chat #5.3  Torpedo SMS5.4  E-mail5.4.1  E-mail5.4.2  E-mail #Using the menus516.  Torpedo SMS  (see page 68)6.1  New Msg6.2  Voice6.3  Inbox6.4  Sent6.5  Draft6.6  Saved6.7  Web Alert6.8  Erase Msg6.8.1  Voice6.8.2  Old Inbox6.8.3  New Inbox6.8.4  Sent6.8.5  Draft6.8.6  Saved6.8.7  All Messages6.9  Msg Setting6.9.1  Scroll Timer6.9.2  Msg Reminder6.9.3  Auto Erase6.9.4  New Msg6.9.5  Canned Msg7.   Calls  (see page 77)7.1  Outgoing7.2  Incoming7.3  Missed7.4  Erase History7.4.1  Outgoing7.4.2  Incoming7.4.3  Missed7.4.4. All Calls7.5  Air Time7.5.1  Last Call7.5.2  Total7.5.3  Life Time7.5.4  Erase Total
Using the menus528.  Contacts  (see page 81) 8.1  Find 8.2  Add New Entry8.3  Group Setting8.4  My Phone#8.5  Memory9.  Other Functions  (see page 89)9.1  Planner9.1.1  Voice Memo9.1.2  Today 9.1.3  Scheduler9.1.4  Task List9.1.5  Memo Pad9.1.6  Alarm9.1.7  Calculator9.1.8  World Time9.1.9  Count Down9.1.0  Set Time9.2  Display 9.2.1  Menu Style9.2.2  Wallpaper9.2.3  Backlight9.2.4  Banner9.2.5  Launch Pad9.2.6  Dual Clock9.2.7  Contrast9.2.8  Service LED9.3  Sounds 9.3.1  Ringer Volume9.3.2  Ringer Type9.3.3  Keytone9.3.4  Alerts9.3.5  Roam Ringer9.3.6  Tone Length9.3.7  Power On/OffUsing the menus539.Other Functions  (continued)9.4  Voice Dial9.4.1  Adapt Digits9.4.2  Reset Digits9.4.3  Set Active9.4.4  Choice List9.4.5  Help9.5  Setup9.5.1  Auto CSP9.5.2  Auto Answer9.5.3  Call Answer9.5.4  Auto Retry9.5.5  Language9.5.6  Select NAM9.5.7  Set System9.5.8  Data/Fax9.5.9  Version9.5.0  Security9.5.0.1  Lock Phone9.5.0.2  Change Lock9.5.0.3  Restriction9.5.0.4  Emergency #9.5.0.5  Erase Contacts9.5.0.6  Reset Phone9.5.0.7  Voice Privacy
54DownloadsThis menu allows you to download various multimedia files from the wireless web.Downloading multimedia files1. Press   when the Download Center icon is selected.The following options are available:• Catalog: allows you to browse and purchase applications.• Search: allows you to search for an application by entering a keyword.• About Download: provides you with the help information about using the Download Center menu.2. Press   when the Catalog option is selected. You are accessed to the associated web site preset by your service provider and you can browse the available applications.Note: When the Airtime warnings option is set to All enabled, a confirmation message appears. Select Yes and press   to access the web.3 .  Se le ct  the  ap pl ica ti on  you  wa n t t o d own lo ad  a nd            follow the instructions on the screen.Downloads55Changing the browser settings1. Select the Settings icon using   or   and press .2. Select a setting option using   or   and press .The following options are available:• Order Apps: allows you to change the order of the downloaded applications.• Move Apps: allows you to move an application to the other folder.• Manage Apps: shows the amount of the memory used for downloaded applications.• Main Menu View: allows you to change the view mode of the main menu screen.• Airtime Warnings: allows you to select whether or not your phone gives you a confirmation message each time you access the web to download applications.• View Log: shows the records of your browsing.3. When you have finished, press   or  .
Downloads56Viewing help information1. Select the Help icon using   or   and press .2. Select a help item by using   or   and press .3. Press   or   to scroll through the information.4. To go back to the main help screen, press   or .57WAPAbout the WAP browserYour phone comes equipped with a WAP (Wireless Application Protocol) browser which makes it possible for you to access the wireless web.The WAP browser allows you to access up-to-the minute information through your phone. Browsing the WAP through your phone is unlike using your computer; site providers have selected only the critical aspects of their sites to present to wireless phone users and they have removed most of the graphics.Each time you start the WAP browser, the phone will connect to the WAP and the Service icon ( - packet service, - circuit service) will appear on the display. Any time this icon is visible on the display, you are connected to the web and will be billed accordingly. Rates will vary according to your service plan.The WAP browser will end the connection after a certain period of network inactivity and will automatically reconnect as necessary. For this reason, you may find that you are billed for several network connections within a single session. This is normal and is designed to minimize your bill.Note: Changing the language (Menu 9-5-5) doesn't affect the display language in the WAP browser.
WAP58Get In WAP  (Menu 2-1)When a new WAP push message comes in, the display shows the Push Message icon (      ).1. Accessing the Get In WAP menu (Menu 2-1) connects your phone to the WAP.2. If a reminder appears depending on your setting in the Prompt menu (Menu 2-2), simply answer the Yes or No by pressing        or      .3. Once you are connected, the home page or the last page you visited displays.The opening page contents may be different according to your WAP service provider. 4. To scroll through the screen, use   or  .Exiting the WAP browserTo exit the WAP browser, simply press   at any time.If the To End or Both option is set in the Prompt menu (Menu 2-2), you will be prompted whether you want to end the browser call. Simply answer the Yes or No by pressing      or      .         Using the WAP browser soft keysAt the bottom of the WAP browser display is a solid bar which contains browser commands.  or   is used to execute the commands. These two keys are called soft keys because their functions change depending on where you are in the WAP browser software.WAP59Navigating the WAP browserWhen you use the WAP browser, some keys on your phone operate differently than when on a normal phone call.Here’s how the keys work in the WAP browser:Up/Down Navigation keys: allow you to scroll up or down to select browser options. You can also use these keys to move the cursor when editing text.Left/Right cursor key: allows you to move the cursor to the left or right in a text entry.End key: allows you to exit the Web Browser and return the phone to Standby mode.Clear/Back key: performs two important functions:• Sends you back in the browser. Pressing it once sends you back one page. Pressing and holding this key sends you back to the home page.• Removes entered text or numbers. When entering text, press this key to clear the last number, letter, or symbol. Press and hold this key to completely clear the input field.Numbered keys 1 ~ 0: If the items on a page are numbered, you can use these keys to select them.Volume keys: allows you to scroll up or down one page.
WAP60Using the browser menusOn the WAP browser, you can access the following options by pressing and holding the Menu soft key:Home: takes you back at any time to the homepage of the WAP service provider.Forward: goes to the previous screen.Bookmarks: allows you to directly load a bookmarked WAP page.Go To URL: allows you to manually enter the URL address of a web page. After entering an address, press the Go soft key.Show URL: displays the URL address of the site where you are currently connected.History: shows the records of your connection to the wireless web.Search: allows you to use the Web Search features of your service provider.Reload: reloads the current WAP page.Snapshots: takes a snapshot for the current web page.Advanced: gives you access the following advanced features:Restart browser: restarts the browser without exiting it.Delete Cookies: deletes all of the cookies and files. A cookie is a piece of user’s information that is entered when you use a web site.WAP61Multimedia: enables or disables auto download of the media objects, such as images or background sound on the current page.Scroll Mode: lets you select the scroll mode to either Block or Smooth, or set the speed for scrolling to the next screen to either Fast, Medium, or Slow.Send Referrer: allows you to set the browser to send HTTP referrer information to the web server each time the browser is launched.Connection Timeout: allows you to set how long the phone keeps connection to the current web page when you don’t use the web page for a specified period. You can select 30secods or 60seconds.Key Press Timeout: allows you to set how long the phone waits after you have pressed a key before moving the cursor right in a text input mode. You can select Fast, Medium, or Slow. If you don’t want to set the timeout, select Off.Security: displays all security-related information, such as Secure Prompt, Authentication, and Current Certificate.About: provides you with information about Openwave and your version of the WAP browser.Entering text in the WAP browserWhen prompted, you can enter letters, numbers or symbols same way as in Phone mode. See page 41 for further details about how to enter characters.
WAP62Prompt  (Menu 2-2)Your phone can give you a prompt to confirm your browser session. You can set the phone to display the prompt or not to display.The following options are available:None: You do not receive a prompt.To Start: You will see the prompt when you enter the browser, but not when you exit it.To End: You will see the prompt only when you exit the browser.Both: You will be prompted when you enter or exit the browser.Push SL Option  (Menu 2-3)This menu allows you to set what happens if a new WAP push message is received from the web server.The following options are available:Permit: The phone automatically receives a new WAP push message from the server without notification.Ask: The phone asks you if you want to access a new WAP push message each time it is arrived.Deny: The phone rejects any WAP push messages.63Voice MailThis menu allows you to access your voice mailbox, if your network supports this service.Voice Mail  (Menu 3-1)Accessing this menu places a call to the voice mail server to allow you to access your voice mailbox.Note: For further information about options during a call, see page 38.Voice Mail#  (Menu 3-2)This menu allows you to view or change the voice mail server number, if necessary.Note: Voice mail is a network feature. Please contact your service provider for further details.
64Voice PortalVoice Portal is a service that enables you to get Voice contents over your mobile phone.Note: Voice Portal is a network feature. Please contact your service provider for further details.Voice Portal  (Menu 4-1)This menu allows you to access your service provider’s voice-activated service. You can get headline news, get information on movies, the weather, finance, traffic, or restaurants in many cities, plus other features; it's similar to the kind of content that's available on a Web portal.1. Access the Voice Portal menu (Menu 4-1).2. Press .You are accessed to the voice service preset by your service provider.3. Follow the voice prompts.Voice Portal#  (Menu 4-2)This menu allows you the view the voice portal service number.65 MessagingIn this menu, you can use various messaging services, such as:• Messenger•Chat• Torpedo SMS (Short Message Service)•E-mailMessenger  (Menu 5-1)You can use the instant messenger service from the WAP browser.Messenger  (Menu 5-1-1)Selecting this menu loads the WAP browser and then gives you access to the messenger service supplied by your service provider.For further details about the service, contact the service provider.Messenger #  (Menu 5-1-2)You can check or change the URL address of the messenger service page.
Messaging66Chat  (Menu 5-2)You can use the chatting service from the WAP browser.Chat  (Menu 5-2-1)Selecting this menu loads the WAP browser and then gives you access to the chatting service supplied by your service provider.For further details about the service, contact the service provider.Chat # (Menu 5-2-2)You can check or change the URL address of the chatting service page.Torpedo SMS  (Menu 5-3)Your phone can receive and send text messages and numeric pages using Short Message Service (SMS). You can also manage voice mails and web alert messages.For details about this menu, see page 68.Messaging67E-mail  (Menu 5-4)You can use the e-mail service from the WAP browser.E-mail  (Menu 5-4-1)Selecting this menu loads the WAP browser and then gives you access to the e-mail service supplied by your service provider.For further details about the service, contact the service provider.E-mail #  (Menu 5-4-2)You can check or change the URL address of the e-mail service page.
68Torpedo SMSYour phone can receive voice mail notifications, text messages, and web messages from your web server. Your phone can also send text messages, if your service provider supports this service.Incoming messages are received even when your phone is in Lock mode. However, the screen does not display information about the message. To access the message, you need to unlock the phone.If you receive an incoming message during a call conversation, your phone sounds an alert tone, depending on your sound settings.New Msg  (Menu 6-1)You can create a short text message and send it to other mobile phones. Note: Message transmission is available only when your phone is operating in a digital network and if service is supported by your service provider.Writing and sending a text message1. Enter a destination number using the numeric keys and press the Next soft key or  .If you press the Menu soft key and select Contacts, you can search Contacts for a number.Torpedo SMS692. To send your message to multiple destination, press   and enter another number. Repeat this step, as needed.3. Enter the message contents. For further details about how to enter text, see page 40.You can use up to 30 canned messages by pressing the Menu soft key and selecting Canned MSG. For details, see page 76.4. When you have finished entering the message, press . 5. To select an option, press   or  . The following options are available: • Send to: Press   to change the destination number. You can also add more destination numbers by pressing  .• Msg: Press   to change the message contents you’ve already entered.• CB #: Press   to change the callback number.• Options: Press   to access the following setting options. Scroll to an option using   or   and change the setting using   or  . - Priority: Select the message priority.- Delivery Ack: Turn the delivery acknowledgement feature on or off. When this is activated, the network informs you whether or not your message has been read by the recipient.
Torpedo SMS70- Message Save: Set whether or not the phone saves the message in the Outbox after sending. When you select Prompt Save, the phone asks if you want to save the message.• Draft: Press   to saves the message in the Draft (Menu 6-5) for later use.6. Repeat step 4 to set the message options.7. After changing the setting options, press   or the Send soft key to send the message. Note: Closing the phone or pressing   before the message is sent stops the transmission.Voice  (Menu 6-2)When you access this menu, the display shows the latest voice mail notification. If there are more than one notification, scroll to the one you want by pressing the Navigation keys.Press the Call soft key to access the voice mail server to listen to the message.Torpedo SMS71Inbox  (Menu 6-3)Your phone can store SMS messages and their corresponding Caller ID in the phone’s memory.When the phone receives a text message, the New Message icon ( ) and a text notification with the call back number appear. Press   to view the message immediately. Alternatively, press   to access the message from the Inbox at a later time.When you access the Inbox menu (Menu 6-3), the list of messages you have received displays. The icons on the left tell you the status of messages:• : Messages that have been opened.• : Messages that have not been opened.• : Urgent messages. The red one means that the message has not been opened and the blue one means that the message has been opened.To view a message, press the Navigation keys to scroll to the message you want and press  . The phone displays the contents. If necessary, press  or   to scan through the message.While viewing a message:•Press the Menu soft key to use the following options:Reply: allows you to send a reply message to the sender.Forward: allows you to forward the message to another person.Delete: deletes the currently selected message from the Inbox.
Torpedo SMS72Talk: places a call to the callback number.Save: allows you to save the sender’s phone number to contacts.Move: allows you to move the message from the Inbox to the Saved box.Extract #’s: allows you to extract phone numbers from the message text.Extract Email: allows you to extract e-mail addresses from the message text.Extract URL: allows you to extract URL addresses from the message text.•Press the Reply soft key to send a reply message to the sender. For further details about sending a message, see page 68.Sent  (Menu 6-4)Your phone can store your outgoing messages. When you access this menu, the list of the messages you have sent appears. The icon on the left tell you the status of messages:• : Messages that have been sent.• : Messages that your phone couldn’t send.• : Messages that is waiting to be sent.To view a message, press the Navigation keys to scroll to the message you want and press  . If necessary, press   or   to scan through the message. You can move to the next or previous message by pressing   or  .While reviewing a message:Torpedo SMS73•Press the Menu soft key to access the following options:Resend: allows you to resend the message.Delete: deletes the message from the Outbox.•Press the Resend soft key to resend the currently selected message. For further details about sending a message, see page 68.Draft  (Menu 6-5)After creating a text message, you can store it in this message box to be sent at a later time.For further details about viewing a message, see “Sent” on page 72.Saved  (Menu 6-6)In this menu, you can view the message you have sent from the Inbox to this message box.For further details about viewing a message, see “Sent” on page 72.Web Alert  (Menu 6-7)When you receive a new web message from the web server, your phone alerts you and the following options display: View: allows you to access the Web Inbox to display the web message.Clear: exits the notification. Select this option if you do not wish to read the message at this time. You can press  .
Torpedo SMS74To select an option, scroll to it and press  . If you select Clear, the message is stored in the Web Alerts menu.When you access the Web Alert menu (Menu 6-7), a list of the received web message displays. Press   or   to scroll to the message you want to view and press  . The phone starts the WAP browser and displays the message contents. If necessary, press   or   to scan through the contents.Erase Msg  (Menu 6-8)Using this menu, you can erase all of the messages in each message box. You can also erase all of the messages at one time by selecting All Messages.When a confirmation message appears, select Yes and press  .Msg Setting  (Menu 6-9)In this menu, you can preset several options for receiving or sending messages.Scroll Timer  (Menu 6-9-1)If an incoming message is too long for the display, the phone displays it by scrolling the screen automatically. You can set the time interval the phone scrolls to the next screen from 1 to 5 seconds. When you select Off, you need to manually scroll to the next screen using the Navigation keys.Torpedo SMS75Msg Reminder  (Menu 6-9-2)When a new message is received, the phone alerts you by sounding the selected ringer. You can set how often this will happen.The following options are available:Off: The phone alerts you just once at the time of its receipt.Once: The phone alerts you just once when you receive an incoming message.Every 2 min: The phone alerts you every 2 minutes until you open the message.Auto Erase  (Menu 6-9-3)You can set whether or not the phone will automatically erase the oldest message when the phone’s memory is full and a new message is received.The following options are available:On: The phone automatically erases the oldest message to receive a new message when the phone’s memory is full.Off: The phone displays a warning message when the phone’s memory is full. Any new incoming messages will be unable to be saved.New Msg  (Menu 6-9-4)You can set up the following options as default settings when creating a new message. The following options are available:
Torpedo SMS76Callback #: allows you to set the call back number. It is preset to your phone number at the factory.Save Message: allows you to set whether or not sent messages are saved in the Sent box. Do Not Save: The phone does not save the message.Prompt Save: The phone asks you whether or not you want to save the message.Auto Save: The phone automatically saves the message.Entry Method: allows you to select the text input mode between T9 Word (T9 English) and Alphabet.Delivery Ack: allows you to activate or deactivate the delivery acknowledgement. When this option is activated, the network informs you when your message is delivered to the recipient.Canned Msg  (Menu 6-9-5)This menu allows you to edit 10 canned messages and make up to 20 new canned messages. You can use the messages when writing a message.1. Select an empty location or the message you want to change using   or  .2. Press the Edit soft key.3. Clear the existing message using  , if necessary, and enter a new message.For further details about entering characters, see page 41.4. Press the Save soft key or   to save the message.
77CallsYou can use the Calls menu to:• view and dial the most recent outgoing, incoming, or missed numbers. • erase the numbers in the call log memory.• view the duration of calls.Outgoing  (Menu 7-1)The phone stores up to 10 of the most recent numbers you have dialed. When you access this menu, a list of the outgoing calls displays.1. Press the Navigation keys to find a number or name, if it is saved in Contacts.2. Press   to confirm the highlighted number. The dialed number or name, if it is saved in Contacts, displays along with the time and date the call was made.3.To Pressplace a call to the selected number .use the menu options the Menu soft key. For details, see the next page.view other calls the Navigation keys.return to Standby mode  .
Calls78When you press the Menu soft key on the call log screen, the following options are available:Talk: dials the number.Save: (shown when the number is not stored in Contacts) allows you to save the number in Contacts.Show Entry: (shown when the number is stored in contacts) displays the phone number and memory location number.Prepend: allows you to add an area code or feature code to the number before dialing the number. See page 26 .Erase: allows you to erase the selected number.Send Msg: allows you to send messages to the phone number.Incoming  (Menu 7-2)This menu lets you view up to 10 of the most recent calls you have received if you are subscribed to the Caller Line Identification service. Contact your service provider for further details about this service. When you access this menu, a list of the incoming calls displays.For more information about scrolling through the list and accessing the call logs, see “Outgoing” on page 77.Calls79Missed  (Menu 7-3)If Caller Line Identification is available, your phone keeps a list of the most recent 10 incoming calls that you have failed to answer. Contact your service provider for the availability.For more information about scrolling through the list and accessing the call log, see “Outgoing” on page 77.Erase History  (Menu 7-4)In this menu, you can erase the entries stored in each of the 3 call logs; outgoing, incoming, and missed calls. You can also erase all of your call log entries at one time by selecting All Calls.When a confirmation message displays, select Yes to erase the logs. If you want to cancel the selection, select No. Press   to confirm the selection.
Calls80Air Time  (Menu 7-5)Your phone records the amount of air time, or talk time used. Using this option, you can view the number of the calls to or from your phone, and the air time for all of the calls. You can easily erase the air time record at any time, except Life Time. This menu is convenient for estimating your usage.Note: This feature is not intended to be used for billing purposes.The following options are available:Last Call: shows the time of the last call.Total: shows the number of all calls you have made or received and the total duration of the calls since the air time counter was last set to zero by using the Erase Total option.Life Time: shows the number and total duration of all calls you have made or received from your phone since the phone was shipped from the factory.Erase Total: erases the last call time and total call time and resets the air time counter.81Contacts Contacts allows you to store frequently used phone numbers and the associated names in your personal directory to make it easy for you to make a call without having to remember or enter the phone number. You can store up to 500 entries including E-mail and URL addresses.Find  (Menu 8-1)This menu allows you to find an entry using a person’s name, entry number, or group name in your Contacts.To change the finding method, press   or   until the option you want displays; By Name, By Entry, or By Group.Note: You can quickly access this menu by pressing the Contacts soft key in Standby mode.Finding an entry by nameWhen you select this method, all of the Contacts entries appear in alphabetical order.1. If necessary, press   or   to scroll to By Name.2. If necessary, press   to highlight the name input box.3. Enter the first few letters of the name you want to find.
Contacts824. If necessary, press   or   to scroll through the entries. 5. When an entry highlights:• Press   to place a call to the entry’s speed dial number.• Press   or right soft key to select the entry. Information about the entry displays. Move to each item by pressing   or  .Press the Menu soft key to access one of the following options: - Talk: dials the number labeled as speed-dial number.- Edit: allows you to change the selected item. - Prepend: allows you to add digits, such as area codes, ahead of the selected number before dialing. see page 26.- Erase: erases the entry. If you select one of numbers for the entry, only the number is erased.• Press   to return to the previous screen.• Press   to exit the menu.Contacts83Finding an entry by entry numberWhen you select this method, the whole list of all of the Contacts entries appears in numeric order. 1. Press   or   to scroll to By Entry.2. Press   to highlight the number input box.3. Enter the location number of the entry you want to find.4. Follow the procedure from step 4 on page 82.Finding an entry by groupWhen you select this method, a list of the Contacts entries in a group appears.1. Press   or   to scroll to By Group.2. Press   to move the group selection field. 3. Press   or   to select the group you want.Each time you select a group, a list of the associated entries displays.4. Follow the procedure from step 4 on page 82.
Contacts84Add New Entry  (Menu 8-2)This menu allows you to add a new entry to your Contacts.A name can contain up to 6 numbers in different categories; Home, Work, Mobile, Pager, Fax and No label. You can save only one number with a name in the phone’s memory.To add a new entry:1. Enter a phone number and press  .For further details about entering characters, see page 31.2. When Add New Entry highlights, press  .3. Select an icon to identify the category of the number to be stored using the Navigation keys and press  .4. Enter a name and press  .For further details about entering characters, see page 40.5. To select an option, scroll to it by pressing   or . The following options are available:• Name: allows you to enter a name in this step if one has not already been entered. • Entry: The first available location displays. If necessary, enter the entry number using the number keys.Contacts85• Home/Work/Mobile/Pager/Fax/No label: allows you to store more numbers for each category. • Speed dial: allows you to select one of the stored numbers to be used for speed dialing.• E-mail: allows you to store an e-mail address.• URL: allows you to store a URL address.• Group: allows you to assign the entry to a caller group. To remove the entry from a group, select No Group.• Caller Ringer: allows you to select the unique ringer to be used for alerting you to an incoming call from the person.• Birthday: allows you to save the date of the person’s birthday.• Secret: allows you to prevent a number from being displayed when it is accessed or dialed by unauthorized users. When this option is set to Secret-ON, only people with your phone’s lock code can view the secret number.• Image: allows you to select an image to be used for alerting you to an incoming call from the person.6. If necessary, press the Edit soft key and enter information or use   or   to change the setting.7. When you have finished, press  .8. When a confirmation message displays, select Yes and press  .After storing, the phone displays the memory status of Contacts for a few seconds.
Contacts86Storing a phone number from Standby mode1. In Standby mode, enter a number you want to save.2. Press the Save soft key or  .3. To complete storing the number, follow the procedure from step 2 in “Add New Entry” on page 84.Adding a number into an existing entryYou can store up to 6 numbers for a name saved in the phone’s memory by assigning them to the different types.1. After accessing the Add New entry menu (Menu 8-2), enter a number and press  .2. Scroll to the entry to which you want to add the number by pressing   or  .3. Press . 4. To complete storing the number, follow the procedure from step 3 in “Add New Entry” on  page 84.Contacts87Group Setting  (Menu 8-3)This menu allows you to change the settings for the caller groups.To change the name of a caller group:1. On the Group Edit list, select the group you want to edit using   or  .2. Press the Menu soft key or  .3. Select the Rename option and press  .4. Clear the old name using  .5. Enter the name you want and press  .To change the ringer melody of a caller group:1. On the Group Edit list, select the group you want to edit using   or  .2. Press the Menu soft key or  .3. Select the Ringer option and press  .4. Select the ringer category you want using   or  and press  .5. Select the ringer you want using   or  .6. Press   to save.
Contacts88My Phone#  (Menu 8-4)This menu shows your phone number.After viewing, press   to return to the previous screen.Memory  (Menu 8-5)This menu shows you how many Contacts locations are used or empty.After viewing, press   to return to the previous screen.89Other FunctionsPlanner  (Menu 9-1)The Planner feature enables you to:• record voice memos.• keep track of important dates and events.• create a list of things to do and memos.• set an alarm to ring at a specified time.• use the phone as a calculator.• check the current time in another part of the world.• count down to a specific day.• set the current time and date.Voice Memo  (Menu 9-1-1)This menu allows you to record voice memos. Recording a voice memoYou can record up to 10 voice memos of up to 1 minutes.1. Select Record and press  .2. Record a memo by speaking into the microphone.When you are recording, a timer displays to show you the elapsed time.
Other Functions90You can pause by pressing the Pause soft key and then resume by pressing the Resume soft key.3. Press   to end recording. The voice memo automatically saves.After recording the voice memo, you can access the following options by pressing the Menu soft key:Re-record: allows you to discard the current memo and record another one.Erase: allows you to erase the current memo.Edit Caption: allows you to change the name of the memo.Information: allows you to show information about the memo.Reviewing a voice memo1. Select Review and press  .The list of voice memos appears.2. Scroll to the memo you want and press  .The phone plays the memo.Erasing all of the voice memos1. Select Erase All and press  .2. When a confirmation message appears, press the Yes soft key.3.To Press thepauseMenu soft key.resumeMenu soft key again.finishOK soft key.Other Functions91Today  (Menu 9-1-2)You can schedule up to 9 events for the current day, indicating each event’s starting and ending time. You can even have your phone's calendar alert you before an event commences. Events scheduled for future dates automatically appear on your Today schedule on that day.Scheduling a new event1. Enter your event contents and press  .For further details about entering characters, see page 40.2. Enter the starting time and date using the numeric keys.Notes:• You need to enter the time in 12-hour format. Press the 2 key for A (AM) or the 7 key for P (PM).• You can move through the input fields using the Navigation keys.3. Enter the ending time and date using the number keys.4. Select when an alarm alerts you to the event, by pressing   or  . When you select No Alarm, the phone does not ring the alarm.5. Press   to store your event.
Other Functions92Viewing your today’s scheduleThe list of the events stored on the current day displays when you select the Today menu (Menu 9-1-2). While viewing the event list, press the Navigation keys to scroll to an event and:• Press   to view the event information. To view the Start time and End time settings, use   or . You can move to the previous or next event by pressing   or  .While viewing the event, press the Menu soft key to access the following options:Edit: allows you to edit the currently selected event.Erase: allows you to erase the currently selected event. Add New: allows you to add a new event.•Press the Menu soft key to access the following options:Add New: allows you to add a new event.Erase: allows you to erase the currently selected event. Erase All: allows you to erase all of events.Scheduler  (Menu 9-1-3)This menu allows you to view the current month, as well as past or future months in calendar format.On the calendar, the current day is indicated by a colored box and the selected day is underlined. Days with scheduled events are indicated by a box inside the calendar day.Other Functions93Selecting a day on the calendar• You can move to the next or the previous by pressing   or  .   • You can move up or down the calendar by week by pressing   or  . • You can view the next or previous month by using the Volume keys on the left side of the phone.On the calendar, press the Menu soft key to access the following options: View: allows you to view scheduled events of the selected day.Add New: allows you to add a new event for the selected day. Erase All: allows you to erase all of events.Jump to date: allows you to directly go to the specific date you want.Scheduling an eventYou can schedule up to 9 events for one day and 70 events total.1. Select a day on the calendar, referring to “Selecting a day on the calendar” on page 93 and press  . 2. Enter your event information and press  .For further details about entering letters, see page 40.3. Enter the starting time and date using the numeric keys.
Other Functions94Notes:• You need to enter the time in 12-hour format. Press the 2 key for A (AM) or the 7 key for P (PM).• You can move through the input fields using the Navigation keys.4. Enter the ending time and date using the number keys.5. Select when an alarm alerts you to your event, by pressing   or  . When you select No Alarm, the phone does not ring the alarm.6. Press   to store your event.Viewing your scheduleDays with scheduled events are indicated by a blue box on the calendar when you access the Scheduler menu (Menu 9-1-3). Select one of them and press  . The list of the events displays. While viewing the event list, press the Navigation keys to scroll to an event and:• Press   to the event information. To view the Start time and End time settings, use   or . You can move to the previous or next event by pressing  or .While viewing the event, press the Menu soft key to access the following options:Other Functions95Edit: allows you to edit the currently selected event.Erase: allows you to erase the currently selected event. Add New: allows you to add a new event.•Press the Menu soft key to access the following options:Add New: allows you to add a new event.Erase: allows you to erase the currently selected event. Erase All: allows you to erase all of events.Task List  (Menu 9-1-4)This feature allows you to enter a list of tasks you need to be done and assign both priority and a deadline to them. You can store up to 9 tasks.Creating a new task1. Enter the task contents and press  .For further details about how to enter characters, see page 40.2. Enter the time and date by which the task needs to be done by using the numeric keys.Notes:• You need to enter the time in 12-hour format. Press the 2 key for A (AM) or the 7 key for P (PM).• You can move through the input fields using the Navigation keys.3. Select a priority level, either High or Low, using   or   and then press  .
Other Functions96Viewing a taskThe list of the tasks displays when you access the Task List menu (Menu 9-1-4). While viewing the task list, press the Navigation keys to scroll to a task and:• Press   to view details. You can move to the previous or next task by pressing the Navigation keys.While viewing the task, press the Menu soft key to access the following options:Edit: allows you to edit the currently selected task. Erase: allows you to erase the currently selected task. Add New: allows you to add a new task.•Press the Menu soft key to access the following options:Add New: allows you to add a new task.Erase: allows you to erase the currently selected task. Erase All: allows you to erase all of tasks.Other Functions97Memo Pad  (Menu 9-1-5)This feature allows you to make memos of important things you need to remember. Writing a new memo1. Enter what you need to remember. For further details about how to enter characters, see page 40.2. Press   to save the memo.Viewing a memoThe list of your memos displays when you access the Memo Pad menu (Menu 9-1-5).While viewing the memo list, press the Navigation keys to scroll to a memo and:• Press   to view details. You can move to the previous or next task by pressing the Navigation keys.While viewing the memo, press the Menu soft key to access the following options:Edit: allows you to edit the currently selected memo. Erase: allows you to erase the currently selected memo. Add New: allows you to add a new memo.•Press the Menu soft key to access the following options:Add New: allows you to add a new memo.Erase: allows you to erase the currently selected memo. Erase All: allows you to erase all of memos.
Other Functions98Alarm  (Menu 9-1-6)This menu allows you to set the alarm to ring at a specified time.To set an alarm:1. Select an alarm, Alarm #1 through Alarm #3, and press  .2. Select On by pressing   or  .3. Press   and enter the time for the alarm to ring by using the numeric keys.Notes:• You need to enter the time in 12-hour format. Press the 2 key for A (AM) or the 7 key for P (PM).• You can move through the input fields using the Navigation keys.4. Select an alarm melody by pressing   or  .5. Press   and select an alarm frequency option, either Daily, Once, Mon to Fri, or Sat & Sun, by pressing   or  .6. Press   to save the alarm setting.To stop the alarm when it rings, open and close the phone or press any key.To deactivate an alarm setting, access the Alarm menu and select Off. Press  ..Other Functions99Calculator  (Menu 9-1-7)Using this feature, you can use the phone as a calculator. The calculator provides you with the basic arithmetic functions; addition, subtraction, multiplication, and division. To perform a calculator:1. Enter the first number on the first line using the numeric keys. Note: Use   to enter a decimal point and   to change the sign of a number to a negative (-).2. Enter the operation for your calculation by pressing the Navigation keys, according to the graphic on the display; + (add), - (subtract), x (multiply), ÷ (divide). 3. Enter the second number. 4. To view the result, press   or the Cal. soft key.5. Repeat steps 2 and 4 as many times as required.World Time  (Menu 9-1-8)You can use this menu to find out what time it is in another part of the world.Select the city corresponding to your time zone by pressing the Navigation keys once or repeatedly. The local time and date display.To turn the DST (Daylight Saving Time) setting on:
Other Functions1001. After selecting the time zone you want to apply the DST, press the Menu soft key.2. When DST Setting highlights, press  .3. Select On and press  . The DST icon appears between the time and the date.To cancel the setting, select Off.Count Down  (Menu 9-1-9)This menu helps you know how much time it takes for you to do something, or how many days, hours, and minutes until a specific day arrives. You can create up to 9 counters using this menu.Creating a countdown timer1. Enter a name for your Countdown timer and press .For further details about entering text, see page 40.2. Enter the time and date you want to count down from.Notes:• You need to enter the time in 12-hour format. Press   for AM or   for PM.• You can move through the input fields using the Navigation keys.• You can enter a year between 1900 and 2099.3. Press   to store the timer.Viewing a countdown timerThe list of the countdown timer displays when you access the Count Down menu (Menu 9-1-9).Other Functions101While viewing the counter list, press the Navigation keys to scroll to a counter and:• Press   to view details. You can move to the previous or next counter using the Navigation keys.While viewing a timer, press the Menu soft key to access the following options:Edit: allows you to edit the currently selected counter. Erase: allows you to erase the currently selected counter. Add New: allows you to add a new counter.•Press the Menu soft key to access the following options.Add New: allows you to add a new counter.Erase: allows you to erase the currently selected counter. Erase All: allows you to erase all of counters.Set Time  (Menu 9-1-0)To display the correct time and date on the idle screen or to use the Planner features, such as Today, Scheduler, Task List, Count Down, Alarm, and World Time, you need to set the current time and date using this menu.Enter the time and date using the numeric keys.The minute, hour, month, and day each must be entered using 2 digits and the year requires all 4 digits. You need to enter the hour in 12-hour format. To select AM or PM, press the 2 key for A (AM) or the 7 key for P (PM).
Other Functions102Display  (Menu 9-2)In this menu, you can customize various settings for the display, the lights, and menu shortcuts.Menu Style  (Menu 9-2-1)This menu allows you to select the menu display style. You can choose either Icon or Nature.Wallpaper  (Menu 9-2-2)You can select the background image (wallpaper) to be displayed in Standby mode. The following image categories are available:Embedded Images: allows you to select one of default images.Note: When you select Dual Clock, the phone displays the analog clocks for the two time zones selected in the Dual Clock menu (Menu 9-2-6). See page 104.My Images: allows you to select one of the images downloaded from the wireless web.Backlight  (Menu 9-2-3)In this menu, you can select the length of time the backlight is on. The backlight turns on when you press a key, when you open the phone, or when you receive a call or message, and remains on for the specified length of time.The following options are available:Main Display: you can specific the length of time backlight of the main display turns on.Keypad: you can specify the length of time the backlight of keypad turns on.Pwr Save Mode: you can select whether or not the phone use backlight.Other Functions103Banner  (Menu 9-2-4)This menu allows you to set a banner message to be displayed at the bottom of the display in Standby mode. 1. If necessary, press and hold   to clear the characters.2. Enter a new banner message. For further details about how to enter characters, see page 40.3. When you have finished entering the message, press  or the Save soft key.Launch Pad  (Menu 9-2-5)The Navigation keys can be used as shortcut keys. In Standby mode, they allow you to access specific menu directly. Using this menu, you can change the shortcut assignments of the keys.To assign a shortcut to a key:1. Select the key to be used as a shortcut key by pressing   or  , and then press  .2. Select the menu to be assigned to the key by pressing the Navigation keys.3. Press   to save the selection.Note: This Launch Pad menu can’t be used by pressing the Navigation keys during a call.
Other Functions104Dual Clock  (Menu 9-2-6)You can choose two time zones to be displayed when you select Dual Clock for the wallpaper image (Menu 9-2-2); for details, see page 102. To select time zones for the dual clock:1. When Location highlights, press  .2. Select the time zone for the left clock by pressing   or   and press the Down key.3. Select the time zone for the right clock by pressing  or .4. Press   to confirm the selection. To apply the daylight saving time:1. When Location highlights, press   or   to display DST and Press  .2. Select On to use the daylight saving time for the left clock. Otherwise, select Off. 3. Press   and repeat step 2 for the right clock. 4. Press   to confirm the selection.Contrast  (Menu 9-2-7)This option allows you to see the LCD screen better in different lighting conditions. Scroll through the contrast settings to make the screenService LED  (Menu 9-2-8)The service light on the front of the phone, blinks to indicate the service status. In this menu, you can activate or deactivate the feature of the service light.Other Functions105Sounds  (Menu 9-3)You can use the Sounds menu to customize various sound settings, such as the:• ringer volume and type.• key tone and alert sounds.• tones that sound while using the phone’s functions.Ringer Volume  (Menu 9-3-1)This menu allows you to adjust the ringer volume for the following the items: Calls: allows you to adjust the ringer volume for incoming calls.Messages: allows you to adjust the ringer volume for incoming messages.Alarm/Schedule: allows you to adjust the ringer volume for alarm settings and scheduler alarm.Press the Navigation keys to adjust the volume level or select a ringer type. The following options are available:Silent: the phone does not sound a ringer.Vibrate: the phone switches to Vibration mode. An incoming call vibrates the phone.1-Beep: the phone sounds a beep.Level 1 ~ 8: adjust the volume level. The graphic shows the volume level; more bars, the louder the volume.High+Vib: the phone rings in the highest volume level and then vibrates.
Other Functions106Notes: • The options available may vary, depending on the selected ringer item.• When “Emergency call only” appears after you end an emergency call, the ringer volume for calls and messages is automatically set to Level 4.Ringer Type  (Menu 9-3-2)This menu allows you to set the unique ringer melodies for incoming calls, messages, and schedule settings: To select a ringer type:1. Select the item you want and press  .The following items are available:• Voice Calls: allows you to set a unique ringer for incoming calls. • Messages: allows you to have a distinctive ringer for incoming voice mail, numeric page, and text messages independently.• Data/Fax In: allows you to be alerted with a distinctive ringer when you receive data or fax calls through the phone. This feature may not be available depending on your network.• Schedule: allows you to have a distinctive ring for alarm settings.2. If you select the Messages menu, select the message type you want and press  .3. Select the ringer category you want using   or   and press  .4. Select the melody you want using   or   and press   to save it. Other Functions107Keytone  (Menu 9-3-3)Using this menu, you can set up the keypad tone that the phone sounds when you press a key.The following options are available:Type: allows you to select a tone that the phone sounds when you press a key. Choose one of DTMF, Harmony, Chord and Piano.Volume: allows you to adjust the volume of the keypad tone using the Navigation keys or the Volume keys on the left side of the phone.Alerts  (Menu 9-3-4)Your phone gives audible alerts (beeps) at a specified time to inform you that certain things have happened. The alerts only occur in your earpiece so that the other person does not hear them. The following alerts are available:Minute Beep: When this option is set to On, the phone sounds an alert 10 seconds before each elapsed minute to remind you of the length of the current call.Service Alert: When this option is set to On, the phone sounds an alert when you exit a service area or when you return to a service area. Connect: When this option is set to On, the phone sounds the connect tone when your call is connected to the system.Disconnect: When this option is set to On, the phone sounds the disconnect tone when a call is disconnected.
Other Functions108Fade: When this option is set to On, the phone sounds an alert when a dropped call occurs during conversation in response to a signal fade.Roam: When this option is set to On, the phone sounds an alert when your phone starts roaming.Roam Ringer  (Menu 9-3-5)You can set the phone to sound a distinctive ring when your phone start roaming. Choose Distinctive to use a distinctive ringer or Normal to use a normal ringer. Tone Length  (Menu 9-3-6)This menu enables you to select Short or Long DTMF (dual-tone multi-frequency) tones. DTMF tones are sent by your phone to access teleservices, such as a bank account. The system used by the bank or other service determines if you need short or long DTMF tones. If the service is digital, as most are, short DTMF tones will almost always work. Power On/Off  (Menu 9-3-7)You can turn on or off the tone that the phone sounds when it is switched on or off.Choose On to use the power on/off sound or Off not to use it.Other Functions109Voice Dial  (Menu 9-4)Once you have stored a phone number with a name in Contacts (see page 84), you only need to say the associated name or the number into the microphone to dial the number. For more information about voice dialing, see page 31.In the Voice Dial menu, you can configure your phone to recognize your voice command.Adapt Digits  (Menu 9-4-1)This menu allows you to adapt your phone to recognize your voice and pronunciation for each digit.Follow the voice prompts to adapt the phone.Reset Digits  (Menu 9-4-2)This menu allows you to reset the adaptation you performed using the Adapt Digits menu.Set Active  (Menu 9-4-3)In this menu, you can set how you want to initiate voice dialing. The following options available:[*] Only: enables voice dialing only by pressing and holding  . This is the default setting.[*]/Folder: enables voice dialing by pressing and holding   or by opening the phone.[*]/EarMic: enables voice dialing by pressing and holding   or the button on the headset, if connected to the phone.
Other Functions110Choice List  (Menu 9-4-4)In this menu, you can set the phone display the list of the best choices for your voice command, when you use the Digit Dial, Name Dial, or Contacts commands.Help  (Menu 9-4-5)Selecting this menu opens the screen that gives you help for using the Voice Dial menu. Setup  (Menu 9-5) Many different features of your phone can be customized to suit your preferences.Auto CSP  (Menu 9-5-1)This menu allows the phone to automatically add the CSP (Carrier Selection Code) of your long-distance call service to the entered number when making a call.On/Off This menu allows you to enable or disable the Auto CSP feature.Select Enable to activate this feature or Disable to deactivate it.Code SettingThis menu allows you to set the 2-digit carrier code to be added to the phone number.Other Functions111Notes: • Before setting the carrier code, you should enable the On/Off menu first.• The code is added only when the phone number has 6, 7, 10, or 11 digits and starts with 0XX, for example, 012 or 015.Auto Answer  (Menu 9-5-2)This feature works only when the phone is connected to the headset or an optional hand-free car kit. With this menu activated, the phone automatically answers calls after a specified time. This feature is useful while driving, for instance. To activate this feature, set how long the phone waits before answering an incoming call. Select one from After 1 sec, After 3 sec, or After 5 sec. To deactivate this feature, select Off.Call Answer  (Menu 9-5-3)This menu allows you to select how to answer an incoming call. The following options are available:Any Key: The phone answers when you press any key except for  , and Volume keys. When the phone is closed, you can answer the call by opening the phone.Send Key: The phone answers only when you press . Folder Open: The phone answers when you open the phone. If the phone is already open, press  .
Other Functions112Auto Retry  (Menu 9-5-4)When this menu is activated, your phone automatically redials the number up to 10 times when a connection fails.To activate this feature, select how often the phone will automatically retry the call; 10 seconds, 30 seconds, and 60 seconds are available.To deactivate this feature, select Off.Depending on your location, the number of times your phone automatically redials the number may vary.Language  (Menu 9-5-5)This menu allows you to change the language of voice prompts, menu display, and key input.You can choose either English, Spanish, or Portuguese. Select NAM  (Menu 9-5-6)NAM stands for numerical assignment module, essentially your phone number. Your phone can have two NAMs. This means that you can have two phone numbers for using your phone and can quickly and easily switch your service back and forth between the two numbers.If you change the NAM, the phone turns off by itself and back on and acquires service using the new NAM setting.Other Functions113Set System  (Menu 9-5-7)The system selection feature which is only relevant in areas where there are at least two cellular service providers having valid roaming agreements. Roaming allows you to register your phone on one of the networks, but use the facilities of the other if your own network is not available. This system priority feature allows you to program your phone for optimum operation within or outside your home service area.You should always check your phone’s display because it will let you know when you’re outside the service provider network and whether your phone is operating in another network; the roaming icon ( ) appears.You have the following options which allows you to control the phone’s roaming ability:Home Only: You cannot roam. When your home system is not available, your call is not be connected and the No Service icon ( ) displays. In some service areas, an operator may come on line asking you how you would like to pay for the call.Standard: This option allows you to be provided the best system automatically.
Other Functions114Data/Fax  (Menu 9-5-8)Your phone is capable of sending and receiving digital data and fax call when connected to a computing device (laptop, desktop, handheld, palmtop, etc.) running Windows 95, Windows 98, Windows NT or later versions. The phone functions just like a typical modem on your PC, enabling you to use wireless data involving a wide variety of Windows software applications.To use digital data or fax services with your phone, you will need to obtain a digital data/fax kit from your service provider. This kit contains the necessary cables, software, and user’s guide required for you to connect and use your phone with your computing device.Note: The phone must be on a digital network to receive or send faxes and data.The following options are available:Voice Call Only: Your phone receives voice calls only.Fax in Only: Your phone receives fax calls only.Data in Only: Your phone receives data calls only.Receiving a fax or data fileTo receive a fax or data, ensure that your phone is connected to your PC and is powered on. Select one of the Data/Fax options.When you receive a fax call, set up the Answer mode in the fax program on your PC and click on Receive and select one of the following options:• Automatic receive (recommended)• Manual receiveOther Functions115Sending a fax or data fileWhen connected to a computing device, your phone allows wireless fax and data transmissions. Your computing device software initiates the call to the destination phone number. The phone functions as a wireless modem to send the fax or data file to the number designated by your PC software.Version  (Menu 9-5-9) This menu allows you to view the software and hardware versions of your phone. This feature is helpful if you need to the call customer care. Security  (Menu 9-5-0)Your phone provides you with various security options, including a user-programmable lock code and special number features. To access the Security menu, you must enter the 4-digit lock code. It is preset to “0000” at the factory.Lock PhoneIn this menu, you can lock your phone from being used by unauthorised people.When the phone is locked, you cannot dial numbers, except for making an emergency call, or access menu options. The phone can receive incoming calls and messages, even though the phone is in Lock mode.
Other Functions116The following options are available:Unlocked: The phone remains unlocked.On Power-up: The phone locks automatically the next time you turn on phone.Lock Now: The phone locks immediately.To place an emergency call in Lock mode, enter a programmed number and then press  . The phone recognizes three standard emergency numbers stored in the Emergency # menu (Menu 9-5-0-4); see page 117.To unlock the phone, press one of the soft keys, Volume keys, Navigation keys,  , or   and then enter the 4-digit lock code. The phone is immediately unlocked.Change LockThis feature allows you to change your current lock code to a new one. The lock code is preset to “0000” at the factory.Enter a new, 4-digit lock code and press  . Enter it again to confirm your change and press  .Note: Your phone does not allow viewing of the lock code for security reasons. Be sure to write the lock code down or memorize it if you have changed.RestrictionThis feature allows you to restrict all of the outgoing calls.Select On to restrict the calls, or Off to deactivate the restriction.Other Functions117Emergency #Your phone provides you with the option of storing three emergency numbers. All of these numbers can be manually dialed at any time even if your phone is locked or outgoing calls are restricted. IMPORTANT NOTICE! Emergency calling may not be available on all wireless networks at all times. A connection cannot always be guaranteed, due to various transmission methods, network parameters and user settings used to complete a call from your wireless phone.DO NOT depend on this phone as a primary method of dialing 190 or for any other essential or emergency communications.Remember to always turn your phone on and check for the adequate signal strength before placing a call.To store an emergency number:1. Press   or   to select a location and press .2. If necessary, press and hold   to clear the old number.3. Enter the new number you want.Each emergency number can be up to 32 digits long. 4. Press   to store the number.To make an emergency call in Lock mode, simply enter a programed number, and then press  .
Other Functions118Erase ContactsThis feature allows you to clear all of the entries in Contacts. When a confirmation message displays, select Yes and press  .Reset PhoneResetting the phone cancels all of your selection in the user-selectable setting options and returns them to the factory default settings except for the Contacts entries and SMS messages.When a confirmation message displays, select Yes and press  . The phone reboots, turning itself off and back on, and returns to Standby mode.Voice PrivacyUsed only in digital networks, Voice Privacy encrypts the voice channel so that people cannot eavesdrop on your conversation.The following options are available.Standard: The phone uses a standard line for calls.Enhanced: The phone makes and receive calls on an encrypted high security line.Note: This feature may not be available in all areas. Contact your service provider for details and availability.119Voice commandYour phone performs some functions or access specific menus by your voice command. You only need to say the command into the microphone. You can:• dial a number by saying an associated name (Name Dial) or the number (Digit Dial).• record a voice memo (Voice Memo).• open the Contacts list (Contacts).•access the Voice Mail menu and the Voice Portal menu.To use the voice command feature:1. In Standby mode, press and hold  .2. At a voice prompt followed by a short beep, say a command you want.
120Health and safety informationExposure to radio frequency (RF) signalsYour wireless phone is a radio transmitter and receiver. It is designed and manufactured not to exceed the emission limits for exposure to radio frequency (RF) energy set by the Federal Communications Commission (FCC) of the U.S. Government. These limits are part of comprehensive guidelines and establish permitted levels of RF energy for the general population. The guidelines are based on the safety standards that were developed by independent scientific organizations through periodic and through evaluation of scientific studies.The standards include a substantial safety margin designed to assure the safety of all persons, regardless of age and health.The exposure standard for wireless phones employs a unit of measurement known as Specific Absorption Rate (SAR). The SAR limit set by the FCC is 1.6W/kg.** In the U.S. and Canada, the SAR limit for mobile phones used by the public is 1.6 watts/kg (W/kg) averaged over one gram of tissue. The standard incorporates a substantial margin of safety to give additional protection for the public and to account for any variations in measurements.Health and safety information121SAR tests are conducted using standard operating positions specified by the FCC with the phone transmitting at its highest certified power level in all tested frequency bands. Although the SAR is determined at the highest certified power level, the actual SAR level of the phone while operating can be well below the maximum value. This is because the phone is designed to operate at multiple power levels so as to use only the power required to reach the network. In general, the closer you are to a wireless base station antenna, the lower the power output of the phone.Before a new model phone is available for sale to the public, it must be tested and certified to the FCC that it does not exceed the limit established by the government-adopted requirement for safe exposure. The tests are performed in positions and locations (e.g., at the ear and worn on the body) as required by the FCC for each model. While there may be differences between the SAR levels of various phones and at various positions, they all meet the government requirement.The FCC has granted an Equipment Authorization for this model phone with all reported SAR levels evaluated as in compliance with the FCC RF exposure guidelines. SAR information on this model phone is on file with the FCC and can be found under the Display Grant section of http://www.fcc.gov/oet/fccid after searching on FCC ID printed in the label on the phone.FCC certification information for this model phone is attached separation paper.
Health and safety information122For body operation SAR compliance for body-worn operating configurations    is limited to the specific belt-clip/holster supplied or approved by SAMSUNG, if available.  The use of  accessories that do not satisfy these requirements may not comply with FCC RF exposure compliance  and should be avoided. Non-compliance with the above conditions may violate FCC RF exposure guidelines.For more Information concerning exposure to radio frequency signals, see the following websites:Federal Communications Commission (FCC) http://www.fcc.gov/oet/rfsafetyCellular Telecommunications Industry Association (CTIA): http://www.wow-com.comU.S.Food and Drug Administration (FDA) http://www.fda.gov/cdrh/consumerWorld Health Organization (WHO) http://www.who.int/peh-emf/enHealth and safety information123Precautions when using batteries• Never use any charger or battery that is damaged in any way.• Use the battery only for its intended purpose.• If you use the phone near the network’s base station, it uses less power; talk and standby time are greatly affected by the signal strength on the cellular network and the parameters set by the network operator.• Battery charging time depends on the remaining battery charge, the type of battery, and the charger used. The battery can be charged and discharged hundreds of times, but it will gradually wear out. When the operation time (talk time and standby time) is noticeably shorter than normal, it is time to buy a new battery.• If left unused, a fully charged battery will discharge itself over time.• Use only Samsung-approved batteries and recharge your battery only with Samsung-approved chargers. When a charger is not in use, disconnect it from the power source. Do not leave the battery connected to a charger for more than a week, since overcharging may shorten its life.• Extreme temperatures will affect the charging capacity of your battery: it may require cooling or warming first.
Health and safety information124• Do not leave the battery in hot or cold places, such as in a car in summer or winter conditions, as you will reduce the capacity and lifetime of the battery. Always try to keep the battery at room temperature. A phone with a hot or cold battery may temporarily not work, even when the battery is fully charged. Li-ion batteries are particularly affected by temperatures below 0 °C (32 °F).• Do not short-circuit the battery. Accidental short- circuiting can occur when a metallic object (coin, clip or pen) causes a direct connection between the + and – terminals of the battery (metal strips on the battery), for example when you carry a spare battery in a pocket or bag. Short-circuiting the terminals may damage the battery or the object causing the short-circuiting.• Dispose of used batteries in accordance with local regulations. Always recycle. Do not dispose of batteries in a fire.Road safetyYour wireless phone gives you the powerful ability to communicate by voice, almost anywhere, anytime. But an important responsibility accompanies the benefits of wireless phones, one that every user must uphold.When driving a car, driving is your first responsibility. When using your wireless phone behind the wheel of a car, make sure that you are following the special regulations in a given area or country.Health and safety information125Operating environmentRemember to follow any special regulations in force in any area and always switch your phone off whenever it is forbidden to use it, or when it may cause interference or danger.When connecting the phone or any accessory to another device, read its user’s guide for detailed safety instructions. Do not connect incompatible products.As with other mobile radio transmitting equipment, users are advised that for the satisfactory operation of the equipment and for the safety of personnel, it is recommended that the equipment should only be used in the normal operating position (held to your ear with the antenna pointing over your shoulder).Electronic devicesMost modern electronic equipment is shielded from radio frequency (RF) signals. However, certain electronic equipment may not be shielded against the RF signals from your wireless phone. Consult the manufacturer to discuss alternatives.PacemakersPacemaker manufacturers recommend that a minimum distance of 15 cm (6 inches) be maintained between a wireless phone and a pacemaker to avoid potential interference with the pacemaker. These recommendations are consistent with the independent research and
Health and safety information126recommendations of Wireless Technology Research.Persons with pacemakers:• Should always keep the phone more than 15 cm (6 inches) from their pacemaker when the phone is switched on• Should not carry the phone in a breast pocket• Should use the ear opposite the pacemaker to minimize potential interferenceIf you have any reason to suspect that interference is taking place, switch your phone off immediately.Hearing aidsSome digital wireless phones may interfere with some hearing aids. In the event of such interference, you may wish to consult your hearing aid manufacturer to discuss alternatives.Other medical devicesIf you use any other personal medical devices, consult the manufacturer of your device to determine if it is adequately shielded from external RF energy. Your physician may be able to assist you in obtaining this information. Switch your phone off in health care facilities when any regulations posted in these areas instruct you to do so. Hospitals or health care facilities may be using equipment that could be sensitive to external RF energy.Health and safety information127VehiclesRF signals may affect improperly installed or inadequately shielded electronic systems in motor vehicles. Check with the manufacturer or its representative regarding your vehicle.You should also consult the manufacturer of any equipment that has been added to your vehicle.Posted facilitiesSwitch your phone off in any facility where posted notices require you to do so.Potentially explosive environmentSwitch your phone off when in any area with a potentially explosive atmosphere and obey all signs and instructions. Sparks in such areas could cause an explosion or fire resulting in bodily injury or even death.Users are advised to switch the phone off while at a refueling point (service station). Users are reminded of the need to observe restrictions on the use of radio equipment in fuel depots (fuel storage and distribution areas), chemical plants or where blasting operations are in progress.Areas with a potentially explosive atmosphere are often but not always clearly marked. They include the areas below decks on boats, chemical transfer or storage facilities, vehicles using liquefied petroleum gas (such as propane or butane), areas where the air contains chemicals or particles, such as grain, dust or metal powders, and any other area where you would normally be advised to turn off your vehicle engine.
Health and safety information128Emergency callsThis phone, like any wireless phone, operates using radio signals, wireless and landline networks as well as user-programed functions, which cannot guarantee connection in all conditions. Therefore, you should never rely solely on any wireless phone for essential communications (medical emergencies, for example).Remember, to make or receive any calls the phone must be switched on and in a service area with adequate signal strength. Emergency calls may not be possible on all wireless phone networks or when certain network services and/or phone features are in use. Check with local service providers.To make an emergency call:1. If the phone is not on, switch it on.2. Key in the emergency number for your present location. Emergency numbers vary by location.3. Press .If certain features are in use (call barring, for example), you may first need to deactivate those features before you can make an emergency call. Consult this document and your local cellular service provider.When making an emergency call, remember to give all the necessary information as accurately as possible. Remember that your phone may be the only means of communication at the scene of an accident; do not end the call until given permission to do so.Health and safety information129Other important safety information• Only qualified personnel should service the phone or install the phone in a vehicle. Faulty installation or service may be dangerous and may invalidate any warranty applicable to the device.• Check regularly that all wireless phone equipment in your vehicle is mounted and operating properly.• Do not store or carry flammable liquids, gases or explosive materials in the same compartment as the phone, its parts or accessories.• For vehicles equipped with an air bag, remember that an air bag inflates with great force. Do not place objects, including both installed or portable wireless equipment in the area over the air bag or in the air bag deployment area. If wireless equipment is improperly installed and the air bag inflates, serious injury could result.• Switch your phone off before boarding an aircraft. The use of wireless phones in an aircraft may be dangerous to the operation of the aircraft, and is illegal.• Failure to observe these instructions may lead to the suspension or denial of telephone services to the offender, or legal action, or both.
Health and safety information130Care and maintenanceYour phone is a product of superior design and craftsmanship and should be treated with care. The suggestions below will help you fulfill any warranty obligations and allow you to enjoy this product for many years. • Keep the phone and all its parts and accessories out of the reach of small children’s.• Keep the phone dry. Precipitation, humidity and liquids contain minerals that will corrode electronic circuits.• Do not use the phone with a wet hand. Doing so may cause an electric shock to you or damage to the phone. • Do not use or store the phone in dusty, dirty areas, as its moving parts may be damaged.• Do not store the phone in hot areas. High temperatures can shorten the life of electronic devices, damage batteries, and warp or melt certain plastics.• Do not store the phone in cold areas. When the phone warms up to its normal operating temperature, moisture can form inside the phone, which may damage the phone’s electronic circuit boards.• Do not drop, knock or shake the phone. Rough handling can break internal circuit boards.• Do not use harsh chemicals, cleaning solvents or strong detergents to clean the phone. Wipe it with a soft cloth slightly dampened in a mild soap-and-water solution.Health and safety information131• Do not paint the phone. Paint can clog the device’s moving parts and prevent proper operation.• Do not put the phone in or on heating devices, such as a microwave oven, a stove or a radiator. The phone may explode when overheated.• Use only the supplied or an approved replacement antenna. Unauthorized antennas or modified accessories may damage the phone and violate regulations governing radio devices.• If the phone, battery, charger or any accessory is not working properly, take it to your nearest qualified service facility. The personnel there will assist you, and if necessary, arrange for service.Acknowledging special precautions and the FCC and industry canada noticeCautionsModifications not expressly approved by the party responsible for compliance could void the user's authority to operate the equipment.FCC compliance informationThis device complies with Part 15 of FCC Rules.Operation is subject to the following two conditions:(1) This device may not cause harmful interference.
Health and safety information132(2) This device must accept any interference received. Including interference that may cause undesired operation.Information to userThis equipment has been tested and found to comply with the limits for a Class B digital device, pursuant to part 15 of the FCC Rules. These limits are designed to provide reasonable protection against harmful interference in a residential installation. This equipment generates, uses and can radiate radio frequency energy and, if not installed and used in accordance with the instructions, may cause harmful interference to radio communications. However, there is no guarantee that interference will not occur in a particular installation. If this equipment does cause harmful interference to radio or television reception, which can be determined by turning the equipment off and on, the user is encouraged to try to correct the interference by one or more of the following measures:• Reorient or relocate the receiving antenna.• Increase the separation between the equipment and receiver.• Connect the equipment into an outlet on a circuit different from that to which the receiver is connected.• Consult the dealer or an experienced radio/ TV technician for help.Health and safety information133Appendix A: CERTIFICATION INFORMATION (SAR)THIS MODEL PHONE MEETS THE GOVERNMENT ’S REQUIREMENTS FOR EXPOSURE TO RADIO WAVES. Your wireless phone is a radio transmitter and receiver. It is designed and manufactured not to exceed the emission limits for exposure to radio frequency (RF) energy set by the Federal Communications Commission of the U.S. Government. These limits are part of comprehensive guidelines and establish permitted levels of RF energy for the general population. The guidelines are based on safety standards that were developed by independent scientific organizations through periodic and thorough evaluation of scientific studies. The standards include a substantial safety margin designed to assure the safety of all persons, regardless of age and health.The exposure standard for wireless mobile phones employs a unit of measurement known as the Specific Absorption Rate(SAR). The SAR limit set by the FCC is 1.6 W/kg. SAR Tests are conducted using standard operating positions accepted by the FCC with the phone transmitting at its highest certified power level in all tested frequency bands. Although the SAR is determined at the highest certified power level, the actual SAR level of the phone while operating can be well below the maximum value. This is because the phone is designed to operate at multiple power levels so as to use only the power required to reach the network. In general, the closer you are to a wireless base station antenna, the lower the power output.Before a new model phone is available for sale to the public, it must be tested and certified to the
Health and safety information134FCC that it does not exceed the limit established by the government-adopted requirement for safe exposure. The tests are performed in positions and locations (e.g.,at the ear and worn on the body) as required by the FCC for each model. The highest SAR values for this model phone as reported to the FCC are Head:1.31W/Kg, Body- worn:1.06W/Kg.    The FCC has granted an Equipment Authorization for this model phone with all reported SAR levels evaluated as in compliance with the FCC RF exposure guidelines. SAR information on this model phone is on file with the FCC and can be found under the Display Grant section of http://www.fcc.gov/oet/fccid after searching on FCC ID A3LSCHN415.Health and safety information135Appendix B: GUIDE TO SAFE AND RESPONSIBLE WIRELESS PHONE USE             Cellular Telecommunications & Internet                                                         Association“Safety is the most important call you will ever make.”A Guide to Safe and Responsible Wireless Phone UseTENS OF MILLIONS OF PEOPLE IN THE U.S. TODAY TAKE ADVANTAGE OF THE UNIQUE COMBINATION OF CONVENIENCE, SAFETY AND VALUE DELIVERED BY THE WIRELESS TELEPHONE. QUITE SIMPLY, THE WIRELESS PHONE GIVES PEOPLE THE POWERFUL ABILITY TO COMMUNICATE BY VOICE-ALMOST ANYWHERE, ANYTIME-WITH THE BOSS, WITH A CLIENT, WITH THE KIDS, WITH EMERGENCY PERSONNEL OR EVEN WITH THE POLICE. EACH YEAR, AMERICANS MAKE BILLIONS OF CALLS FROM THEIR WIRELESS PHONES, AND THE NUMBERS ARE RAPIDLY GROWING.But an important responsibility accompanies those benefits, one that every wireless phone user must uphold. When driving a car, driving is your first responsibility. A wireless phone can be an invaluable tool, but good judgment must be exercised at all times while driving a motor vehicle-whether on the phone or not.The basic lessons are ones we all learned as teenagers. Driving requires alertness, caution and courtesy. It requires a heavy dose of basic common sense-keep your head up, keep your eyes on the road, check your mirrors frequently and watch out for other drivers. It requires
Health and safety information136obeying all traffic signs and signals and staying within the speed limit. It means using seatbelts and requiring other passengers to do the same.But with wireless phone use, driving safely means a little more. This brochure is a call to wireless phone users everywhere to make safety their first priority when behind the wheel of a car. Wireless telecommunications is keeping us in touch, simplifying our lives, protecting us in emergencies and providing opportunities to help others in need. When it comes to the use of wireless phones, safety is your most important call.Wireless Phone “Safety Tips”Below are safety tips to follow while driving and using a wireless phone which should be easy to remember.1. Get to know your wireless phone and its features such as speed dial and redial. Carefully read your instruction manual and learn to take advantage of valuable features most phones offer, including automatic redial and memory. Also, work to memorize the phone keypad so you can use the speed dial function without taking your attention off the road.2. When available, use a hands free device. A number of hands free wireless phone accessories are readily available today. Whether you choose an installed mounted device for your wireless phone or a speaker phone accessory, take advantage of these devices if available to you.3. Position your wireless phone within easy reach. Make sure you place your wireless phone within easy reach and where you can grab it without removing your eyes from the road. If you get an Health and safety information137incoming call at an inconvenient time, if possible, let your voice mail answer it for you.4. Suspend conversations during hazardous driving conditions or situations. Let the person you are speaking with know you are driving; if necessary, suspend the call in heavy traffic or hazardous weather conditions. Rain, sleet, snow and ice can be hazardous, but so is heavy traffic. As a driver, your first responsibility is to pay attention to the road.5. Do not take notes or look up phone numbers while driving. If you are reading an address book or business card, or writing a °×to do°± list while driving a car, you are not watching where you are going. It’scommon sense. Don°Øt get caught in a dangerous situation because you are reading or writing and not paying attention to the road or nearby vehicles. 6. Dial sensibly and assess the traffic; if possible, place calls when you are not moving or before pulling into traffic. Try to plan your calls before you begin your trip or attempt to coincide your calls with times you may be stopped at a stop sign, red light or otherwise stationary. But if you need to dial while driving, follow this simple tip-dial only a few numbers, check the road and your mirrors, then continue.7. Do not engage in stressful or emotional conversations that may be distracting. Stressful or emotional conversations and driving do not mix-they are distracting and even dangerous when you are behind the wheel of a car. Make people you are talking with aware you are driving and if necessary, suspend conversations which have the potential to divert your attention from the road.
Health and safety information1388. Use your wireless phone to call for help. Your wireless phone is one of the greatest tools you can own to protect yourself and your family in dangerous situationswith your phone at your side, help is only three numbers away. Dial 9-1-1 or other local emergency number in the case of fire, traffic accident, road hazard or medical emergency. Remember, it is a free call on your wireless phone!9. Use your wireless phone to help others in emergencies. Your wireless phone provides you a perfect opportunity to be a “Good Samaritan” in your community. If you see an auto accident, crime in progress or other serious emergency where lives are in danger, call 9-1-1 or other local emergency number, as you would want others to do for you.10. Call roadside assistance or a special wireless nonemergency assistance number when necessary. Certain situations you encounter while driving may require attention, but are not urgent enough to merit a call for emergency services. But you still can use your wireless phone to lend a hand. If you see a broken-down vehicle posing no serious hazard, a broken traffic signal, a minor traffic accident where no one appears injured or a vehicle you know to be stolen, call roadside assistance or other special nonemergency wireless number. Careless, distracted individuals and people driving irresponsibly represent a hazard to everyone on the road.Since 1984, the Cellular Telecommunications Industry Association and the wireless industry have conducted educational outreach to inform wireless phone users of their responsibilities as safe drivers and good citizens. As we approach a Health and safety information139new century, more and more of us will take advantage of the benefits of wireless telephones. And, as we take to the roads, we all have aresponsibility to drive safely.“The wireless industry reminds you to use your phone safely when driving”Cellular Telecommunications & Internet Association. For more information, please call 1-888-901-SAFE. For updates: http://www.wowcom.com/consumer/issues/driving/articles.cfm?ID=85
Health and safety information140Appendix C: Consumer Update on Wireless PhonesU.S. Food and Drug Administration1. What kinds of phones are the subject of this update?The term wireless phone refers here to hand-held wireless phones with built-in antennas, often called cell, mobile, or PCS phones. These types of wireless phones can expose the user to measurable radiofrequency energy (RF) because of the short distance between the phone and the user s head. These RF exposures are limited by Federal Communications Commission safety guidelines that were developed with the advice of FDA and other federal health and safety agencies. When the phone is located at greater distances from the user, the exposure to RF is drastically lower because a person°Øs RF exposure decreases rapidly with increasing distance from the source. The socalled “cordless phones,” which have a base unit connected to the telephone wiring in a house, typically operate at far lower power levels, and thus produce RF exposures well within the FCC’s compliance limits.2. Do wireless phones pose a health hazard?The available scientific evidence does not show that any health problems are associated with using wireless phones. There is no proof, however, that wireless phones are absolutely safe. Wireless phones emit low levels of radiofrequency energy (RF) in the microwave range while being used. They also emit very low levels of RF when in the stand-by mode. Whereas high levels of RF can produce health effects (by heating tissue), exposure to low level RF that does not produce Health and safety information141heating effects causes no known adverse health effects. Many studies of low level RF exposures have not found any biological effects. Some studies have suggested that some biological effects may occur, but such findings have not been confirmed by additional research. In some cases, other researchers have had difficulty in reproducing those studies, or in determining the reasons for inconsistent results.3. What is FDA’s role concerning the safety of wireless phones?Under the law, FDA does not review the safety of radiation-emitting consumer products such as wireless phones before they can be sold, as it does with new drugs or medical devices. However, the agency has authority to take action if wireless phones are shown to emit radiofrequency energy (RF) at a level that is hazardous to the user. In such a case, FDA could require the manufacturers of wireless phones to notify users of the health hazard and to repair, replace or recall the phones so that the hazard no longer exists. Although the existing scientific data do not justify FDA regulatory actions, FDA has urged the wireless phone industry to take a number of steps, including the following:Support needed research into possible biologicaleffects of RF of the type emitted by wireless phones; Design wireless phones in a way that minimizes any RF exposure to the user that is not necessary for device function; and Cooperate in providing users of wireless phones with the best possible information on possible effects of wireless phone use on human health.
Health and safety information142FDA belongs to an interagency working group of the federal agencies that have responsibility for different aspects of RF safety to ensure coordinated efforts at the federal level. The following agencies belong to this working group: National Institute for Occupational Safety and Health Environmental Protection Agency FederalCommunications Commission Occupational Safety and Health Administration National Telecommunications and Information AdministrationThe National Institutes of Health participates insome interagency working group activities, as well. FDA shares regulatory responsibilities for wireless phones with the Federal Communications Commission (FCC). All phones that are sold in the United States must comply with FCC safety guidelines that limit RF exposure. FCC relies on FDA and other health agencies for safety questions about wireless phones.FCC also regulates the base stations that the wireless phone networks rely upon. While these base stations operate at higher power than do the wireless phones themselves, the RF exposures that people get from these base stations are typically thousands of times lower than those they can get from wireless phones. Base stations are thus not the primary subject of the safety questions discussed in this document.4. What is FDA doing to find out more about the possible health effects of wireless phone RF?FDA is working with the U.S. National Toxicology Program and with groups of investigators around the world to ensure that high priority animal studies are conducted to address important Health and safety information143questions about the effects of exposure to radiofrequency energy (RF).FDA has been a leading participant in the World Health Organization International Electromagnetic Fields (EMF) Project since its inception in 1996. An influential result of this work has been the development of a detailed agenda of research needs that has driven the establishment of new research programs around the world. The Project has also helped develop a series of public information documents on EMF issues.FDA and the Cellular Telecommunications & Internet Association (CTIA) have a formal Cooperative Research and Development Agreement (CRADA) to do research on wireless phone safety. FDA provides the scientific oversight, obtaining input from experts in government, industry, and academic  organizations. CTIA-funded research is conducted through contracts to independent investigators. The initial research will include both laboratory studies and studies of wireless phone users. The CRADA will also include a broad assessment of additional research needs in the context of the latest research developments around the world.5. What steps can I take to reduce my exposure to radiofrequency energy from my wireless phone?If there is a risk from these products.and at this point we do not know that there is.it is probably very small. But if you are concerned about avoiding even potential risks, you can take a few simple steps to minimize your exposure to radiofrequency energy (RF). Since time is a key factor in how much exposure a person receives, reducing the amount of time spent using a wireless phone will reduce RF exposure.
Health and safety information144If you must conduct extended conversations by wireless phone every day, you could place more distance between your body and the source of the RF, since the exposure level drops off dramatically with distance. For example, you could use a headset and carry the wireless phone away from your body or use a wireless phone connected to a remote antenna Again, the scientific data do not demonstrate that wireless phones are harmful. But if you are concerned about the RF exposure from these products, you can use measures like those described above to reduce your RF exposure from wireless phone use.6. What about children using wireless phones? The scientific evidence does not show a danger to users of wireless phones, including children and teenagers. If you want to take steps to lower exposure to radiofrequency energy (RF), the measures described above would apply to children and teenagers using wireless phones. Reducing the time of wireless phone use and increasing the distance between the user and the RF source will reduce RF exposure. Some groups sponsored by other national governments have advised that children be discouraged from using wireless phones at all. For example, the government in the United Kingdom distributed leaflets containing such a recommendation in December 2000. They noted that no evidence exists that using a wireless phone causes brain tumors or other ill effects. Their recommendation to limit wireless phone use by children was strictly precautionary; it was not based on scientific evidence that any health hazard exists.7. Do hands-free kits for wireless phones reduce risks from exposure to RF emissions?Health and safety information145Since there are no known risks from exposure to RF emissions from wireless phones, there is no reason to believe that hands-free kits reduce risks. Handsfree kits can be used with wireless phones for convenience and comfort. These systems reduce the absorption of RF energy in the head because the phone, which is the source of the RF emissions, will not be placed against the head. On the other hand, if the phone is mounted against the waist or other part of the body during use, then that part of the body will absorb more RF energy. Wireless phones marketed in the U.S. are required to meet safety requirements regardless of whether they are used against the head or against the body. Either configuration should result in compliance with the safety limit.8. Do wireless phone accessories that claim to shield the head from RF radiation work?Since there are no known risks from exposure to RF emissions from wireless phones, there is no reason to believe that accessories that claim to shield the head from those emissions reduce risks. Some products that claim to shield the user from RF absorption use special phone cases, while others involve nothing more than a metallic accessory attached to the phone. Studies have shown that these products generally do not work as advertised. Unlike “hand-free” kits, these so-called “shields”may interfere with proper operation of the phone. The phone may be forced to boost its power to compensate, leading to an increase in RF absorption. In February 2002, the Federal trade Commission (FTC) charged two companies that sold devices that claimed to protect wireless phone users from radiation with making false and unsubstantiated claims.
Health and safety information146According to FTC, these defendants lacked a reasonable basis to substantiate their claim.9. What about wireless phone interference with medical equipment?Radiofrequency energy (RF) from wireless phones can interact with some electronic devices. For this reason, FDA helped develop a detailed test method to measure electromagnetic interference (EMI) of implanted cardiac pacemakers and defibrillators from wireless telephones. This test method is now part of a standard sponsored by the Association for the Advancement of Medical instrumentation (AAMI). The final draft, a joint effort by FDA, medical device manufacturers, and many other groups, was completed in late 2000. This standard will allow manufacturers to ensure that cardiac pacemakers and defibrillators are safe from wireless phone EMI.FDA has tested hearing aids for interference from handheld wireless phones and helped develop avoluntary standard sponsored by the Institute of Electrical and Electronic Engineers (IEEE). This standard specifies test methods and performance requirements for hearing aids and wireless phones so that that no interference occurs when a person uses a compatible phone and a compatible hearing aid at the same time. This standard was approved by the IEEE in 2000. FDA continues to monitor the use of wireless phones for possible interactions with other medical devices. Should harmful interference be found to occur, FDA will conduct testing to assess the interference and work to resolve the problem.10. What are the results of the research done already?Health and safety information147The research done thus far has produced conflicting results, and many studies have suffered from flaws in their research methods. Animal experiments investigating the effects of radiofrequency energy (RF) exposures characteristic of wireless phones have yielded conflicting results that often cannot be repeated in other laboratories. A few animal studies, however, have suggested that low levels of RF could accelerate the development of cancer in laboratory animals. However, many of the studies that showed increased tumor development used animals that had been genetically engineered or treated with cancercausing chemicals so as to be pre-disposed to develop cancer in the absence of RF exposure. Other studies exposed the animals to RF for up to 22 hours per day. These conditions are not similar to the conditions under which people use wireless phones, so we don t know with certainty what the results of such studies mean for human health.Three large epidemiology studies have been published since December 2000. Between them, the studies investigated any possible association between the use of wireless phones and primary brain cancer, glioma, meningioma, or acoustic neuroma, tumors of the brain or salivary gland, leukemia, or other cancers. None of the studies demonstrated the existence of any harmful health effects from wireless phone RF exposures. However, none of the studies can answer questions about long-term exposures, since the average period of phone use in these studies was around three years.11. What research is needed to decide whether RF exposure from wireless phones poses a health risk?
Health and safety information148A combination of laboratory studies and epidemiological studies of people actually using wireless phones would provide some of the data that are needed. Lifetime animal exposure studies could be completed in a few years. However, very large numbers of animals would be needed to provide reliable proof of a cancer promoting effect if one exists. Epidemiological studies can provide data that is directly applicable to human populations, but 10 or more years follow-up may be needed to provide answers about some health effects, such as cancer. This is because the interval between the time of exposure to a cancer-causing agent and the time tumors develop - if they do - may be many, many years. The interpretation of epidemiological studiesis hampered by difficulties in measuring actual RF exposure during day-to-day use of wireless phones. Many factors affect this measurement, such as the angle at which the phone is held, or which model of phone is used.12. Which other federal agencies have responsibilities related to potential RF health effects?Additional information on the safety of RF exposures from various sources can be obtained from the following organizations.FCC RF Safety Program: http://www.fcc.gov/oet/rfsafety/Environmental Protection Agency (EPA):http://www.epa.gov/radiation/Occupational Safety and Health Administration’s(OSHA):http://www.oshaslc.Health and safety information149gov/SLTC/radiofrequencyradiation/index.htmlNational Institute for Occupational Safety and Health (NIOSH):http://www.cdc.gov/niosh/emfpg.htmlWorld health Organization (WHO):http://www.who.int/peh-emf/International Commission on Non-Ionizing Radiation Protection:http://www.icnirp.deNational Radiation Protection Board (UK):http://www.nrpb.org.ukUpdated 4/3/2002: US Food and Drug Administrationhttp://www.fda.gov/cellphones
150GlossaryAirtime - Actual time spent talking on the wireless phone. Most carriers bill customers based on how many minutes of airtime they use each month.Antenna - A device for transmitting or receiving signals. The size and shape of antennas is determined, in part, by the frequency of the signal they receive. Wireless phones and the base station must have antennas.Base station - The fixed radio transmitter/receiver that maintains communications with mobile radio telephones within a given area. (Typically called a cell or cell site)CDMA - (Code Division Multiple Access) A spread-spectrum approach to digital transmission. With CDMA, each conversion is digitized and then tagged with a code. The mobile phone deciphers only a particular code to pick the right conversation off the air. The transmitted signal is just above noise level across the available bandwidth.Channel - Communications signals transmit along paths called channels.Codec - Compression & Decompression.Deactivation - The process of rendering a wireless phone inactive. DTMF - (Dual-tone Multi-Frequency) You send DTMF signals when you enter numbers by pressing the digit keys.Glossary151EVRC - (Enhanced Variable Rate Codec) EVRC is a new global standard for compressing and decompressing voice signals. EVRC uses a lower bit rate (the number of bits sent per second) than existing CDMA vocoders, while providing significant improvements in voice quality. This technology enables your phone to provide superb voice quality while benefiting from the ability to process more cellular voice calls using less bandwidth than the voice codecs in CDMA networks today.Frequency - A measure based on time, as one or more waves per second, in an electrical or light wave information signal. A signal’s frequency is stated in cycles-per-second or Hertz (Hz).Hands-free - A feature that permits a driver to use a wireless phone without lifting or holding the handset - an important safety feature for automobiles, tractors and most other motorized vehicles.LCD - (Liquid Crystal Display) Commonly used to refer to the screen display on the wireless phone.LED - (Light Emitting Diode) Commonly used to refer to a small light on the wireless phone or on the Desktop Charger. The LED lights on the phone to indicate an incoming call. The lights on the charger indicate that battery charging is taking place.Prepend - The addition of a prefix, such as an area code, to a phone number.RF - Radio FrequencyRoaming - The ability to use a wireless phone to make and receive calls in places outside of the home service area.
Glossary152Service charge - The amount paid each month to receive wireless service.Soft keys - Two keys   and   on the phone, the purpose of which:• varies according to the function that you are currently using.• is indicated on the bottom line of the display just above the corresponding key.Standby time - The amount of time a fully charged wireless portable or transportable phone can be on and idle without being in use. (See Talk time.)Talk time - The length of time a person can talk on a portable or transportable wireless phone without recharging the battery.Vocoder - Voice coder. A device used to convert speech into digital signals.Wireless - Radio-based Systems that allow transmission of telephone or data signals through the air without a physical connection, such as a metal wire (copper) or fiber optic cable.

Navigation menu