Samsung Electronics Co SCHR830 Multi-Band CDMA/ LTE Phone with WLAN, Bluetooth and RFID User Manual r830
Samsung Electronics Co Ltd Multi-Band CDMA/ LTE Phone with WLAN, Bluetooth and RFID r830
Contents
- 1. Users Manual 1
- 2. Users Manual 2
Users Manual 2


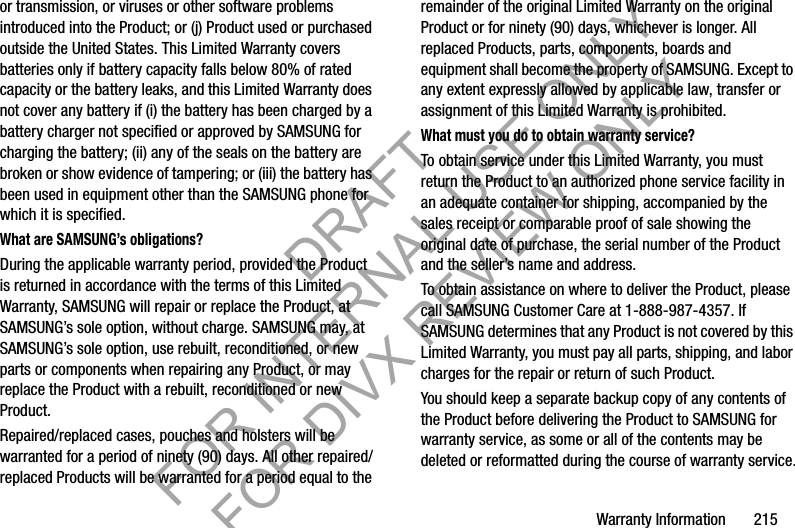
![Settings 151Viewing data usage by app or process1. From the Settings screen, under Wireless and network, touch Data usage. The Data usage screen appears. 2. Scroll down the page to see the top three processes or apps using mobile data service. Touch a process or app to see data usage for the process or app, and to configure specific settings. More Wireless and Network SettingsAirplane modeWhen airplane mode is enabled, all your phone’s wireless connections are disabled, and you cannot make or receive calls [except for Emergency (E911) calls] or messages. You can, however, make Wi-Fi and Bluetooth connections. While in airplane mode, you can use other features of your phone, such as playing music, watching videos, or using other applications. 1. From the Settings screen, under Wireless and network, touch More settings. The Wireless and network menu appears. 2. Touch Airplane mode to enable or disable airplane mode. When enabled, a check mark appears in the check box.DRAFT FOR INTERNAL USE ONLY FOR DIVX REVIEW ONLY](https://usermanual.wiki/Samsung-Electronics-Co/SCHR830.Users-Manual-2/User-Guide-1819531-Page-39.png)


![Health and Safety Information 213• Reduce risk of repetitive motion injuries. When you repetitively perform actions, such as pressing keys, drawing characters on a touch screen with your fingers, or playing games, you may experience occasional discomfort in your hands, neck, shoulders, or other parts of your body. When using your device for extended periods, hold the device with a relaxed grip, press the keys lightly, and take frequent breaks. If you continue to have discomfort during or after such use, stop use and see a physician.• If your device has a camera flash or light, do not use the flash or light close to the eyes of people or pets. [122011]DRAFT FOR INTERNAL USE ONLY FOR DIVX REVIEW ONLY](https://usermanual.wiki/Samsung-Electronics-Co/SCHR830.Users-Manual-2/User-Guide-1819531-Page-101.png)
![Warranty Information 219Samsung Telecommunications America, LLC1301 E. Lookout DriveRichardson, Texas 75082Phone: 1-800-SAMSUNGPhone: 1-888-987-HELP (4357)©2012 Samsung Telecommunications America, LLC. All rights reserved.No reproduction in whole or in part allowed without prior written approval. Specifications and availability subject to change without notice. [111611]End User License Agreement for SoftwareIMPORTANT. READ CAREFULLY: This End User License Agreement (“EULA”) is a legal agreement between you (either an individual or a single entity) and Samsung Electronics Co., Ltd. for software owned by Samsung Electronics Co., Ltd. and its affiliated companies and its third party suppliers and licensors that accompanies this EULA, which includes computer software and may include associated media, printed materials, “online” or electronic documentation (“Software”). BY CLICKING THE “I ACCEPT” BUTTON (OR IF YOU BYPASS OR OTHERWISE DISABLE THE “I ACCEPT”, AND STILL INSTALL, COPY, DOWNLOAD, ACCESS OR OTHERWISE USE THE SOFTWARE), YOU AGREE TO BE BOUND BY THE TERMS OF THIS EULA. IF YOU DO NOT ACCEPT THE TERMS IN THIS EULA, YOU MUST CLICK THE “DECLINE” BUTTON, AND DISCONTINUE USE OF THE SOFTWARE.1. GRANT OF LICENSE. Samsung grants you the following rights provided that you comply with all terms and conditions of this EULA: You may install, use, access, display and run one copy of the Software on the local hard disk(s) or other permanent storage media of one computer and use the Software on a single computer or a mobile device at a time, and you may not make the Software available over a network where it could be used by multiple computers at the same time. You may make one copy of the Software in machine-readable form for backup purposes only; provided that the backup copy must include all copyright or other proprietary notices contained on the original.2. RESERVATION OF RIGHTS AND OWNERSHIP. Samsung reserves all rights not expressly granted to you in this EULA. The Software is protected by copyright and other intellectual DRAFT FOR INTERNAL USE ONLY FOR DIVX REVIEW ONLY](https://usermanual.wiki/Samsung-Electronics-Co/SCHR830.Users-Manual-2/User-Guide-1819531-Page-107.png)