Samsung Electronics Co SCHW379 Tri-Mode Dual-Band PCS Phone (GSM/ CDMA) User Manual
Samsung Electronics Co Ltd Tri-Mode Dual-Band PCS Phone (GSM/ CDMA) Users Manual
UserManual.wiki
>
Samsung Electronics Co
>
SCHW379 User Manual
Users Manual
Navigation menu
Upload a User Manual
Namespaces
Wiki Guide
HTML
PDF
Info
Views
User Manual
Discussion / Help
Navigation

![Important safety precautions1InterferenceAll wireless phones may be subject to interference, which could affect their performance.Be aware of special regulationsMeet any special regulations in force in any area and always switch off your phone whenever it is forbidden to use it, or when it may cause interference or danger.Water resistanceYour phone is not water-resistant. Keep it dry. Sensible useUse only in the normal position (held to the ear). Avoid unnecessary contact with the antenna when the phone is switched on.Emergency callsKey in the emergency number for your present location, then press []. Keep your phone away from small children Keep the phone and all its parts, including accessories, out of the reach of small children.Accessories and batteriesUse only Samsung-approved accessories and batteries. Use of any unauthorised accessories could damage your phone and may be dangerous.Use of authorised softwareUse only Samsung-authoriesed software. The use of any unauthoriesed software could damage your phone.Qualified serviceOnly qualified service personnel may repair your phone.For more detailed safety information, see "Health and safety information" on page 84.• The phone could explode if the battery is replaced with an incorrect type.• Dispose of the used batteries according to the manufacturer’s instructions.](https://usermanual.wiki/Samsung-Electronics-Co/SCHW379/User-Guide-618729-Page-4.png)
![2About this GuideThis User’s Guide provides you with condensed information about how to use your phone. To quickly learn the basics for your phone, please refer to “Get started” and “Step outside the phone.”In this guide, the following instruction icons appear:Indicates that you need to pay careful attention to the subsequent information regarding safety or phone features.Indicates that you can get more information on the referenced page. →Indicates that you need to press the Navigation keys to scroll to the specified option and then select it.[ ] Indicates a key on the phone. For example, [].< > Indicates a soft key, whose function is displayed on the phone screen. For example, <Menu>.•GSM and CDMA networkSwitch back and forth between GSM and CDMA networks, anytime anywhere.Special features of your phone• Camera and camcorderUse the camera module on your phone to take a photo or record a video.•MP3 playerPlay MP3 music files using your phone as an MP3 player.](https://usermanual.wiki/Samsung-Electronics-Co/SCHW379/User-Guide-618729-Page-5.png)
![6UnpackMake sure you have each itemGet startedFirst steps to operating your phoneSIM/UIM card informationWhen you subscribe to a cellular network, you receive a plug-in SIM (Subscriber Identity Module) or UIM (User Identity Module) card loaded with your subscription details, such as your PIN, and available optional services.Phone Travel ChargerBatteries User’s ManualThe items supplied with your phone and the accessories available at your Samsung dealer may vary, depending on your country or service provider.Install and charge the phone Remove the battery.If the phone is already on, first turn it off by holding [ ]. Insert the card.Make sure that the gold-coloured contacts on the card face down into the phone. Install the battery. Plug the travel charger into the phone. Plug the charger into a standard AC wall outlet.The LED on the charger indicates the charging progress.• Red: the battery is being charged.• Green: the battery is completely charged.• Orange: the battery is not correctly plugged in or is operating at a too high or too low. When the phone is completely charged (green charger LED), unplug the charger from the power outlet.1 23 456](https://usermanual.wiki/Samsung-Electronics-Co/SCHW379/User-Guide-618729-Page-9.png)
![7Low battery indicatorWhen the battery is low:• a warning tone sounds,• the battery low message displays, and• the empty battery icon blinks.If the battery level becomes too low, the phone automatically turns off. Recharge your battery. When the battery is fully discharged, the phone will not turn on even if the travel charger is connected. The battery must charge for a short time.Power on or off Remove the charger from the phone.7Power onDo not turn on the phone when mobile phone use is prohibited.1. Open the phone.2. Press and hold [] to turn on the phone.3. Select a GSM or CDMA network.4. If necessary, enter the PIN and press <OK>.Power off1. Open the phone.2. Press and hold [].](https://usermanual.wiki/Samsung-Electronics-Co/SCHW379/User-Guide-618729-Page-10.png)
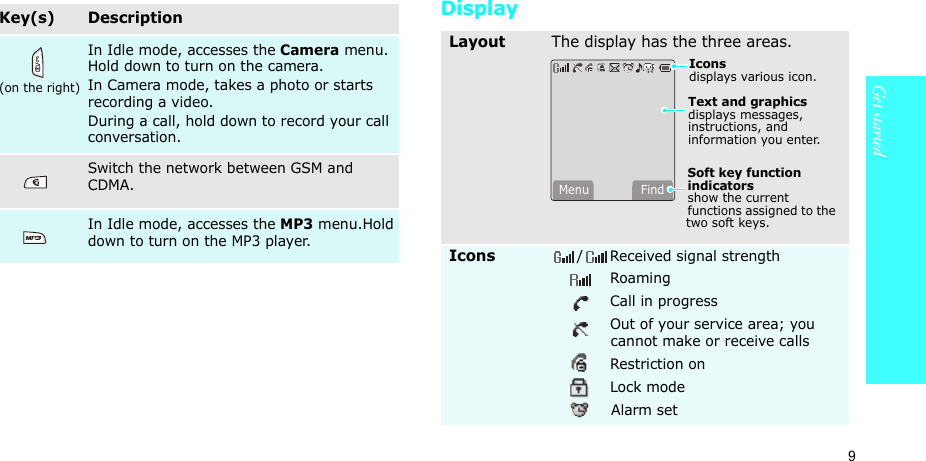
![8Get startedKeys and displayKey(s) DescriptionPerform the functions indicated on the bottom line of the display.In Idle mode, access the following menus directly.•[Up]: Voice dialing•[Down]: U-Magic •[Left]: U-Mail; Message when held down• [Right]: CalendarIn Menu mode, scroll through menu options.In Idle mode, accesses the Uni menu.Makes or answers a call.In Idle mode, retrieves the recent numbers dialled, missed, or received.Deletes characters from the display.In Menu mode, returns to the previous menu level.Key(s) DescriptionEnds a call. Hold down to switch the phone on and off. In Menu mode, cancels input and returns the phone to Idle mode.Enter numbers, letters, and some special characters.Enter special characters.In Idle mode, hold [] down to activate or deactivate Silent mode. Hold [ ] down to access Voice calls of Ringer.(on the left)Adjust the phone volume.In Idle mode, with the phone open, adjust the keypad and alert tone volume. With the phone closed, hold down to turn on the backlight.In Menu mode, scroll through menu options.](https://usermanual.wiki/Samsung-Electronics-Co/SCHW379/User-Guide-618729-Page-11.png)
![11Get startedSelect an option1. Press the appropriate soft key.2. Press the Navigation keys to move to the next or previous option.3. Press <Select>, <OK>, or <Save> to confirm the function displayed or option highlighted.4. To exit, choose either of the following methods:• Press [C] to move up one level.• Press [] to return to Idle mode.Use shortcutsPress the number key corresponding to the option you want.Access favourite featuresYou can set up a menu of your own using your favourite menu items, which can then be accessed by specific number keys.p. 17](https://usermanual.wiki/Samsung-Electronics-Co/SCHW379/User-Guide-618729-Page-14.png)
![12Get startedCustomise your phone1. In Idle mode, press <Menu>and select Display → 语言 /Language.2. Select a language.1. In Idle mode, press <Menu> and select Sounds → Ringer.2. Press [Down] and press [Left] or [Right] to scroll to a ringer category.3. Press [Up] or [Down] to scroll to a ringer melody.4. Press <Play> to listen to a melody.5. When you find the melody you want, press <Save>.Display languageCall ringer melodyYou can set a wallpaper for the idle screen.1. In Idle mode, press <Menu> and select Display → Image box → Wallpaper.2. Select an image category.3. Select an image.1. In Idle mode, press <Menu> and select Display → Banner.2. Press and hold [C] to clear the default banner.3. Enter your own banner message and press <OK>.You can switch the phone to Silent mode to avoid disturbing other people.Press and hold [ ] in Idle mode.Idle mode WallpaperIdle mode BannerSilent mode](https://usermanual.wiki/Samsung-Electronics-Co/SCHW379/User-Guide-618729-Page-15.png)
![13Get startedSwitch networksMake/Answer callsYou can protect the phone against unauthorised use with a phone lock code. 1. In Idle mode, press <Menu> and select Settings → Security.2. Enter the default lock code, “00000000” and press <OK>.3. Select Change lock.4. Enter a new 4- to 8-digit lock code and press <OK>.5. Enter the new code again and press <OK>.6. Select Phone lock.7. Select Once or On .Phone lockYou can easily and quickly switch back and forth between GSM and CDMA networks.1. Press [ ] in Idle mode.2. Select a network.1. Enter an area code and phone number.2. Press [ ].3. To end the call, press [].1. When the phone is ringing, press [ ].2. To end the call, press [].Select a networkMake a callAnswer a call](https://usermanual.wiki/Samsung-Electronics-Co/SCHW379/User-Guide-618729-Page-16.png)
![14Step outside the phoneStep outside the phone Begin with your camera, music, WAP, and other special featuresUse cameraPress [ / ].Adjust the volume during a call1. Open the phone.2. In Idle mode, press and hold [ ] to turn on the camera.3. Rotate the camera module and aim the lens at the subject to adjust the image.4. Press <Capture> to take a photo.5. Press <Save>. Take a photo](https://usermanual.wiki/Samsung-Electronics-Co/SCHW379/User-Guide-618729-Page-17.png)
![15Play MP3s1. In Idle mode, press [ ] and select My album.2. Select Single or Multi.3. Scroll to a photo and press <Expand>.1. In Idle mode, press and hold [ ] to turn on the camera.2. Press [1] to select the video cam icon ( ).3. Press < > to start recording.4. Press < > to stop recording. 5. Press <Save>. 1. In Idle mode, press [ ] and select My album.2. Select Video cam.3. Scroll to a video and press <Play>.View a photoRecord a videoPlay a videoUse these methods:• Copy directly from a computer. p. 691. In Idle mode, press <Menu> and select Entertainment → MP3 → MP3 files.2. Press <Options> and select Add to play list.3. Press <Check> to check the files you want to add.4. Press <Add>.5. Press <Play> to play music.Copy MP3 files to the phoneCreate the play list](https://usermanual.wiki/Samsung-Electronics-Co/SCHW379/User-Guide-618729-Page-18.png)
![16Step outside the phoneBrowse the webUsing a built-in WAP (Wireless Access Protocol) browser, you can get easy access to the wireless web to receive a variety of up-to-the-minute information and services and to enjoy downloads of web contents.1. In Idle mode, press [ ]and select MP3 player.2. Press[ ].3. During playback, use the following keys:• [ ]: pauses or resumes playback.• [Up]: changes the repeat mode.• [Down]: opens the play list.• [Left]: moves backward.• [Right]: moves forward.• [ / ]: adjusts the volume.•<Options>: opens the option list.•<A-B>: sets a section in a file to play the section repeatedly.Play MP3 music1. In Idle mode, press [].2. Select Wap.• To scroll through browser items, press [Up] or [Down]. • To select an item, press<OK> <✓>.• To return to the previous page, press [C].• To return to the homepage, hold down [C].• To access browser options, press []or <Menu> and select Menu.Launch the browserNavigate the web](https://usermanual.wiki/Samsung-Electronics-Co/SCHW379/User-Guide-618729-Page-19.png)
![17Step outside the phoneUse PhonebookTo the phone’s memory:1. In Idle mode, enter a phone number and press <Save>.2. Enter a name and press <OK>.3. Press [Left] or [Right] and select a number type.4. Specify the contact information: Storage, Mobile, Home, Office, Pager, Fax, Image, E-Mail1, E-Mail2, URL, Group, Ringer, and ETC.5. Press <Save> to save the entry.To a car ds:1. In Idle mode, enter a phone number and press <Save>.2. Enter a name and press <OK>.3. Scroll to a card.4. Press <Save> to save the entry.Add an entry1. In Idle mode, press <Find>.2. Select an entry.3. Select a number and press [ ] to dial, or <Options> to access options.1. In Idle mode, press <Menu> and select Phonebook → Name card → Name card book → My name card.vcf.2. Press <Options> and select Edit.3. Specify your contact information.4. Press <Save> to save the name card.Find an entryCreate your name card](https://usermanual.wiki/Samsung-Electronics-Co/SCHW379/User-Guide-618729-Page-20.png)
![18Step outside the phone1. In Idle mode, press <Menu> and select Message → New message.2. Enter the message text and press <OK>.3. Press <Save>.4. Enter destination numbers.5. Press <OK> to send the message.When a notification appears:Press <Select>. The message displays.From the Inbox:1. In Idle mode, press <Menu> and select Message → Inbox→ Text→ the message storage.2. Select a message.Send a text message View a text messageWhen a notification appears:1. Press [ ]. The phone dials the voicemail center.2. Follow the instructions from the system.From the Inbox:1. In Idle mode, press <Menu> and select Message → Inbox → Voice.2. Follow the instructions from the system.Access voice mails](https://usermanual.wiki/Samsung-Electronics-Co/SCHW379/User-Guide-618729-Page-21.png)
![21Enter textPinyin, Stroke, ABC, T9 Word, 123, and Symbol modeYou can enter text for some features such as messaging, Phonebook, or Organiser, using Pinyin and Stroke modes for Chinese, and T9 Word and ABC mode for English. You can also use 123 mode and Symbol mode.Changing the text input modeExample: Writing a text message1. In the text entry screen, press <Mode>. 2. Select the mode you want.Using Chinese pinyin modePinyin is a system to enter Chinese words by spelling them phonetically (how they sound) using the Latin alphabet. With the Pinyin input method, you can enter Chinese characters by keying in the Pinyin string using the phone’s keypad.Entering characters in Pinyin mode1. Press the keys corresponding to the phonetic spelling, referring to the letters printed on the keys.Example: To enter “ ,” press [6] and [4] to enter “ni.”2. press [Left] or [Right] to select alternative pinyins for the keys you have pressed.3. If you cannot find the character you want from the display, press [Up] or [Down] to scroll through the word choices.4. Press [1] to activate the character selection field. A number, from 1 to 6, is added to each character.5. Press the number key corresponding to the character you want.Text input modeindicatorMessageMode OK](https://usermanual.wiki/Samsung-Electronics-Co/SCHW379/User-Guide-618729-Page-24.png)
![22Enter textUsing the tonesYou can enter another character by assigning a tone for the selected pinyin. Entering a tone for a character is optional, but it is especially useful if the pinyin spelling is similar for several characters.1. Press the keys corresponding to the pinyin of the letter you need. 2. If necessary, press [Left] or [Right] to select the pinyin. 3. Press [ ] for tones.4. If you cannot find the character you want from the display, press [Up] or [Down] to scroll through word choices.5. Press a key, [1] to [6], corresponding to the character.Rapid character entryTo enter the word “zhong guo ( )”, enter the first character using the following keystrokes; [9], [4], [6], [6], [1], and [1]. You do not have to complete the Pinyin spelling to include “guo ( ).” The character displays automatically.Tips for using Pinyin mode• Press [ ] to insert a space between characters.• Press [Left] or [Right] to move the cursor.• Press [C] to clear letters one by one press and hold [C] to clear the entire display.Using Chinese Stroke modeThis mode allows you to enter individual Chinese strokes, in written order, from top to bottom, and from left to right. The Chinese strokes are classified into five basic categories; heng, shu, pie, dian, and zhe. The basic strokes are printed on keys [1] to [5] on the keypad. Refer to the following table:Category Keys Strokes represented in each category](https://usermanual.wiki/Samsung-Electronics-Co/SCHW379/User-Guide-618729-Page-25.png)
![Enter text 23Entering strokes and characters in Stroke mode1. Press the keys that correspond to a character’s component strokes. Press keys in the order that you would write the strokes, using one press per stroke.Example: To enter “ ,” press [5] to enter “ “ and [3] to enter “ .”2. Press [Up] or [Down] to scroll through the choices.3. To select a character and add it to your message, press the corresponding key, [7] to [ ].Rapid character entryTry entering the characters “zhong guo ( )” using the following keystrokes: [2], [8], and [7]. Even though “guo ( )” is a twelve stroke character, your phone allows you to enter the complete pair in only three key presses.Tips for using Stroke mode• Press [Left] or [Right] to move the cursor.• Press [C] to clear letters one by one. Press and hold [C] to clear the entire display. Using 123 mode123 mode enables you to enter numbers. Press the keys corresponding to the digits you want.Using Symbol modeSymbol mode enables you to enter symbols. 1. Press [Left] or [Right] to display more symbol sets.2. Press the key corresponding to the symbol you want.If you are uncertain of the stroke order, press [6] in place of each questionable stroke. Continue entering strokes until the character displays or until you finish the character.](https://usermanual.wiki/Samsung-Electronics-Co/SCHW379/User-Guide-618729-Page-26.png)
![24Enter textUsing ABC modePress the appropriate key until the character you want appears on the screen.Tips for using ABC mode• To enter the same letter twice or to enter a different letter on the same key, wait for the cursor to move to the right automatically, or press [Right]. Then, enter the next letter.•Press [] to insert a space.• Press [ ] to change case. Lower case (abc), Initial capital (Abc), and Capital lock (ABC) are available.• Press [Left] or [Right] to move the cursor. • Press [C] to delete characters one by one. Press and hold [C] to clear the entire display.Using T9 word modeT9 is a predictive text input mode that allows you to key in any character using single keystrokes.Entering a word in T9 mode1. Press [2] to [9] to start entering a word. Press each key once for each letter. Example: Press [4], [3], [5], [5], and [6] to enter Hello. Key Characters in order displayedUpper case Lower case1. @ - _ / : ~ ? , 1 ; ’ ( ) ! # % & * < > + = “ \ { } $ [ ]2A B C 2 a b c 23D E F 3 d e f 34G H I 4 g h i 45 J K L 5 j k l 56M N O 6 m n o 67P Q R S 7 p q r s 78T U V 8 t u v 89W X Y Z 9 w x y z 900](https://usermanual.wiki/Samsung-Electronics-Co/SCHW379/User-Guide-618729-Page-27.png)
![25T9 predicts the word that you are typing, and it may change with each key that you press.2. Enter the whole word before editing or deleting the characters.3. When the word displays correctly, go to step 4. Otherwise, press [0] to display alternative word choices for the keys that you have pressed. For example, Of and Me use [6] and [3].4. Press [] to insert a space and enter the next word.Tips for using T9 mode•Press [1] to enter periods or apostrophes automatically.•Press [] to change case. Lower case (T9word), Initial capital (T9Word), and Capital lock (T9WORD) are available.• Press [Left] or [Right] to move the cursor. •Press [C] to delete characters one by one. Press and hold [C] to clear the entire display.Call functionsAdvanced calling featuresMaking a call1. In Idle mode, enter the area code and phone number.2. Press [ ].Making an international call (in GSM network)1. In Idle mode, press and hold [0]. The + character appears.2. Enter the country code, area code, and phone number, then press [ ].Redialling recent numbers1. In Idle mode, press [ ] to display the list of recent numbers.2. Scroll to the number you want and press [ ].• Press [C] to clear the last digit or press and hold [C] to clear the whole display.• Press <Pause> to enter a pause between numbers.](https://usermanual.wiki/Samsung-Electronics-Co/SCHW379/User-Guide-618729-Page-28.png)
![26Call functionsMaking a call from PhonebookOnce you have stored a number in Phonebook, you can dial the number by selecting it from Phonebook.p. 41You can also use the speed dial feature to assign number keys to your most frequently called numbers. p. 43Voice diallingOnce you have stored numbers with Chinese names in Phonebook, you can dial them by saying the associated names.You can customise the voice dial settings to set the phone to recognise your commands better.p. 721. In Idle mode, press and hold [Up].2. At a voice prompt, say a name into the microphone.3. If the phone finds and confirms a wrong name, say “No.”When you hear what you said, say “Yes.”4. Say a number type, if the name has more than one number.Ending a callClose the phone or press [ ].Answering a callWhen you receive an incoming call, the phone rings and displays the incoming call image. Press [ ] to answer the call.Tips for answering a call• Depending on the setting in the Answer mode menu, you can press any key, except for [ ], soft keys, and [ / ], or just open the phone to answer a call.p. 81• Press <Reject> or [ ], or hold down [ / ] to reject a call. • Press <Silence> or [ / ], or close the phone to mute the ringer.](https://usermanual.wiki/Samsung-Electronics-Co/SCHW379/User-Guide-618729-Page-29.png)
![Call functions 27Viewing missed callsIf you have missed calls, the screen displays the number of the calls and the phone number of the last call. Press [ ] to dial the displayed number.Using the headsetUse the headset to make or answer calls without holding the phone. Connect the headset to the jack on the left side of the phone. The buttons on the headset work as listed below:Options during a callYou can access a number of functions during a call.Adjusting the volume during a callUse [ / ] to adjust the earpiece volume during a call.Press [ ] to increase the volume and [ ] to decrease the volume.Recording a conversationYou can record your call conversation to access it from the Voice memo list.p. 731. Press [ ] to start recording.2. Press <Stop> to end recording.Answering a second callIf you have subscribed to call waiting, you can answer another call during a call.1. Press [ ] to answer a second call. The first caller is placed on hold and you are connected with the second caller.2. Press [ ] again to switch between the calls.To Pressredial the last call the button twice.answer a call and hold the button.end a call and hold the button.](https://usermanual.wiki/Samsung-Electronics-Co/SCHW379/User-Guide-618729-Page-30.png)
![28Call functionsMaking a three-way callIf you have activated three-way calling service, you can have a conversation with two people simultaneously.1. During a call, press [ ] and make another call. The first caller is placed on hold.2. Press [ ] to begin the three-way call.Using In-call optionsPress <Options> during a call to access the following options:•Mute/Quit: switch off your phone’s microphone, so that the other person on the phone cannot hear you. •Calls: access the Calls menu.p. 39•Phonebook: access the Phonebook menu.p. 41•Silent/Quit: mute the DTMF (Dual-Tone Multi-Frequency) tones of the keys. This allows you to press keys without hearing annoying key tones during a call.•Send my #: send your phone number to the calling person or to automated services.•DTMF length: manipulate the audible DTMF (Dual-Tone Multi-Frequency) tones.•Noise cancellation: activate the noise cancellation feature, which masks noise from your surroundings so that the other person on the phone can hear you more clearly. You can also press [Up].](https://usermanual.wiki/Samsung-Electronics-Co/SCHW379/User-Guide-618729-Page-31.png)
![29Menu functionsAll menu options listedWeb browserYour phone comes equipped with a WAP (Wireless Application Protocol) browser which makes it possible for you to access the Wireless Web. Using the web browser, you can access updated information and a wide variety of media content, such as wallpapers, ringtones, and music files.Launching the web browserPressing [ ] in Idle mode launches the web browser and accesses the homepage of your service provider.Navigating websitesUsing browser menu optionsWhile navigating the websites, you can use various options. To access the Browser Menu list, press [ ] and select Menu.•Home: go back at any time to your startup homepage.•History: display the records of your connection to the Wireless Web.•Bookmarks: display the Bookmarks list.•PUSH Message: display the web push messages received from the server.•Reload: refresh the current web page with updated information.To Pressscroll through browser items the Navigation keys.scroll by one page [ / ].select an item < > or <OK>.return to the previous screen [C] or <Cancel>.return to the homepage [C] and hold.To Press](https://usermanual.wiki/Samsung-Electronics-Co/SCHW379/User-Guide-618729-Page-32.png)

![Menu functions uni37•Others: access the website preset by your service provider to manage your Mail service.•View Mail Settings: check the current mail settings.•About: check the software version and copyright information of your Mail service.U-MagicUse this menu to download use various Brew applications.Downloading an application1. When the MobileShop icon is highlighted, press [].•Catalog: browse and purchase items.•Search: search for an application by entering a keyword.•Help: get the help information for using the MobileShop menu.2. Press [ ] when the Catalog option is highlighted. You are accessed to the associated web site preset by your service provider and you can browse the available applications.3. Select the application you want and follow the onscreen instructions to download it.Changing the browser settings1. Select the Settings icon.2. Select a setting option.•Order Apps: change the order of the downloaded applications.•Move Apps: move an application to the other folder.•Manage Apps: check the amount of the memory used for downloaded applications.•Main Menu View: change the view mode of the main menu screen.•Screen Savers: activate the Screen Saver application, if downloaded.•View Log: view the records of your browsing.Viewing help information1. Select the Help icon.](https://usermanual.wiki/Samsung-Electronics-Co/SCHW379/User-Guide-618729-Page-40.png)
![38Menu functions2. Select a help item.3. Scroll through help information.4. Press [ ] to go back to the main help screen.U-MapUse this menu to access a location service based on GPS positioning technology. With this service, you can easily find friends, gas stations, restaurants, and other locations.For further details, contact your service provider.U-InfoThis menu is available only when you use a UTK UIM card that provides additional services. For further details, see your UTK UIM card instructions.Music streetUse this menu to access the various audio services supported by your service provider. For details, contact your service provider.•Send music: send a music file with a short voice message through an ARS service (Automatic response service).•Listen msg: check messages you have received.•Mini music: access the music files you have listened to.•Help: access the help screen for using the Music street feature.BookmarksYou can add and manage the URLs of the web pages you access frequently. You can also manage URLs you have bookmarked while navigating the Internet.Adding a new bookmark1. Press <Menu> and select New Bookmark, press <>.2. Enter a name for a URL and press [Down].3. Enter the URL address.4. Press [Down] to move to highlight the Save line.5. To save the bookmark, press < >.6. To return to the bookmark list, press <OK>.](https://usermanual.wiki/Samsung-Electronics-Co/SCHW379/User-Guide-618729-Page-41.png)
![Menu functions Calls (Menu 1)39Accessing a bookmarked pageScroll to a bookmark and press <Go>.Using bookmark optionsFrom the bookmark list, press <Menu> to access the following options:•Details: access the bookmark properties.•Delete: delete the selected bookmark.•New Bookmark: add a new bookmark.•New Folder: add a new bookmark folder.•Move: move the selected bookmark to the position you want.•Move to folder: move the bookmark to another folder.•Set As Homepage: set the bookmark to homepage. •Delete all: delete all bookmarks.•Hotkeys: assign a hot key (1 to 9) for nine of your most frequently accessed bookmarks.•Cancel: exist the Bookmarks menu.Calls (Menu 1)Use the Calls menu to access call logs, view the duration of calls, and set options for call functions.To access this menu, press <Menu> in Idle mode and select calls.Missed (Menu 1-1)This menu displays the most recently received calls that you did not answer.Accessing a call record1. Select a call.2. Press [ ] to dial the number, or <Options> to access the call record options.Using call record optionsPress <Menu> on the call list or <Options> on the detail view to access the following options:•Talk: dial the currently selected number.•Save: save the number to Phonebook.•Edit: edit the number to dial or save it.](https://usermanual.wiki/Samsung-Electronics-Co/SCHW379/User-Guide-618729-Page-42.png)
![Menu functions Phonebook (Menu 2)41•Set max cost: enter the maximum cost limit that you authorise for your calls.•Price/Unit: set the cost of one unit; this price per unit is applied when calculating the cost of your calls.Area code (Menu 1-6)Use this menu to find and retrieve area and country codes to quickly and easily dial phone numbers.1. Select a call type, Domestic or International.2. Select the area code you want from the code list and press <Dial>.3. When the area code of the selected city appears on the Dialling mode screen, enter the rest of the phone number you want.4. Press <Save> to save the number to Phonebook, or [ ] to dial it. Call reject (Menu 1-7)Use this menu to make a list of the phone numbers from which you don’t want to accept calls.Phonebook (Menu 2)You can store phone numbers and their corresponding names in your card and the phone’s memory. The card and phone’s memory, although physically separate, are used as if they were a single entity, called Phonebook. To access this menu, press <Menu> in Idle mode and select Phonebook.Find (Menu 2-1)Use this menu to find an entry using a person’s name, group name, or memory location.You can quickly access this menu by pressing <Find> in Idle mode.](https://usermanual.wiki/Samsung-Electronics-Co/SCHW379/User-Guide-618729-Page-44.png)
![42Menu functionsFinding an entry1. Press [Left] or [Right] to select a search method.2. Enter the first few letters of the name you want or select a caller group or memory.3. Scroll to the name you want. 4. Press [ ] to place a call to the entry’s default number, which is the mobile number or the first saved one. Alternatively, press <OK> to access the entry. Using Phonebook optionsWhile viewing the Phonebook list, press <Options> to access the following options:•Edit: edit the contact information for the entry.•Erase: erase the entry.•Add new: add a new entry to Phonebook.•To vCard: save the entry as a name card so that you can send it using the Mail service.While viewing details of an entry, press <Options> to use one of the following options: •Send msg.: send a text message.•Talk: dial the selected number.•Edit: change the selected item. •Copy: copy the selected number to another memory location.•Speed dial: assign a speed-dial location number to the currently selected number.•Erase: erase the entry. If you select a number, only the number is erased.Add (Menu 2-2)Use this menu to add a new entry to Phonebook.In the phone’s memory, a name can contain up to 5 numbers in different categories: Mobile, Home, Office, Pager, and Fax. You can save only one number with a name in the card’s memory.1. Enter a name and press <OK>.2. Press [Left] or [Right] to select a memory.3. Move to the next field(s).](https://usermanual.wiki/Samsung-Electronics-Co/SCHW379/User-Guide-618729-Page-45.png)
![Menu functions Phonebook (Menu 2)434. If you have selected Card 1/2, enter a phone number.If you have selected Phone, change the settings or enter more information.•Mobile/Home/Office/Pager/Fax: add a number for each category.•Image: press <Edit> and assign one of the photos you took using the camera or the default icons as a caller ID image.•E-mail1/2: press <Edit> and enter an e-mail address.•URL: press <Edit> and enter an URL address.•Group: select one of the default relationship groups, where the entry is to be added.•Ringer: press <Edit> and select a unique ringer melody for the entry.•ETC: press <Edit> and add a memo about the entry.5. When you have finished, press <Save> to save the entry. Group settings (Menu 2-3)Use this menu to set up a caller group list. Adding a new group1. When highlights, press <Add>.2. Enter a name for the group and press <Next>.3. Press [Left] or [Right] to scroll to a ringer category.4. Select a ringer melody.Managing a groupPress <Menu> to access the following options:•New: add a new group.•Edit: change the properties of the selected group.•Erase: erase the selected group(s).Speed dial (Menu 2-4)Once you have stored phone numbers in Phonebook, you can set up to 98 (2 ~ 99) speed-dial entries and then dial them easily by pressing the associated one or two number keys.](https://usermanual.wiki/Samsung-Electronics-Co/SCHW379/User-Guide-618729-Page-46.png)
![44Menu functionsSetting up speed-dial entries1. Press [Left] or [Right] to select All or Empty.2. Enter the location number you want or scroll to the desired number.Entering a number lists all of the location numbers containing the entered number.3. Press <Add>.4. Select a phone number from the Phonebook list.5. Select a number from the entry, if it has more than one number.Editing speed-dial entries1. Press [Left] or [Right] to select Stored.2. Enter the location number you want or scroll to the number.3. Press <Options> to access the following options:•Replace number: assign a different number to the location.•Delete: clear the speed dial setting for the location.•Delete all: clear the settings for all keys.Dialling speed dial entriesPress and hold the appropriate number key in Idle mode.Name card (Menu 2-5)Use this menu to create your name card and send it to other phones using the Mail service. You can also send a Phonebook entry in name card format.Send card (Menu 2-5-1)You can send a name card from the Name card book, which stores your name card and the name cards you have saved, or an entry from Phonebook as a name card.1. Select Name card book or Phonebook.2. Select the name card or Phonebook entry you want to send.3. Press <Send>.The phone switches to the New Mail screen, allowing you to create a new e-mail.4. Follow the procedure in “New Mail.”p. 31](https://usermanual.wiki/Samsung-Electronics-Co/SCHW379/User-Guide-618729-Page-47.png)
![46Menu functionsCopying Phonebook entries1. Press [Left] or [Right] to scroll to the memory you want.2. Press <Check> to check the entries you want to copy.3. Press <Options> and select Copy.4. Select the memory to which you want to copy the entries.5. Press <Yes> to confirm the copy.Erasing Phonebook entries1. Press [Left] or [Right] to scroll to the memory you want.2. Press <Check> to check the entries you want to erase.3. Press <Options> and select Erase.4. Press <Yes> to confirm the deletion.Camera (Menu 3)Using the camera module built into your phone, you can take photos of people or events while on the move. You can also record videos by using your phone as a camcorder.Via the Camera menu, you can take photos, record videos, and access your photos and video clips.To access this menu, press <Menu> in Idle mode and select Camera, or press [ ].Take photo (Menu 3-1)Use this menu to take a single photo, a series of photos, or record a video. The camera produces JPEG photos and MPEG4 video clips.• Do not take photos of people without their permission.• Do not take photos in a place where cameras are not allowed.• Do not take photos in a place where you may interfere with another person’s privacy.](https://usermanual.wiki/Samsung-Electronics-Co/SCHW379/User-Guide-618729-Page-49.png)
![Menu functions Camera (Menu 3)47Taking a Photo1. Access the Take photo menu or press and hold [ ] in Idle mode.The camera turns on and the image to be captured displays.2. Press [1] to select the camera mode until the mode icon you want appears:• Single ( ): take a photo.• Serial ( ): take a serial of action stills.• Divided ( ): take several stills and saves them in one frame. Multiple stills will be saved as a single image.• Video cam ( ): record a video clip.p. 49• Mail( ): take a photo for adding to an e-mail. After taking a photo, press <Send> to send the photo as part of an e-mail.p. 313. Adjust the image by aiming the camera at the subject.• When you press <Option>, you can use the camera options.next section• You can change the image settings by using the keypad.p. 484. Press <Capture> or [ ] to take the photo.When you are taking serial or divided shot images, the camera takes photos successively.5. Press <Save> to save the photo.The phone saves the photo(s) in the My album folder and returns to Capture mode.Using options in Capture modeWhen you press <Option> in Capture mode, the following options are available for the current shot:•Capture mode: change the camera mode.•Resolution: select an image resolution.•Quality: select an image quality setting.•Flash: turn the flash on or off.When you take a photo in direct sunlight or in bright conditions, shadows may appear on the photo.Some camera options vary, depending on the camera mode you have selected.](https://usermanual.wiki/Samsung-Electronics-Co/SCHW379/User-Guide-618729-Page-50.png)
![48Menu functions•White balance: adjust the colour balance of the photo. You can make your photo appear warmer or cooler.•Fun frames: add a decorated frame to the photo.•Photo effect: change the colour tone or apply a special effect to the photo. •No. of shots: select the number of shots for Serial or Divided mode.•Shutter mode: set whether the phone takes shots automatically or you must press the shutter, [ ], for each shot in Serial or Divided mode.•Self timer: set a time delay before the phone takes a photo.•My album: display the photos and videos saved in the My album folder.•Preview mode: select the default preview mode. Crop view: the phone shows the image on the full screen. The left and right parts of the image to be captured is cropped.Actual ratio: the phone shows the image in actual ratio.Using the keys in Capture modeYou can use the keys to customise your camera settings when you are in Capture mode.Key FunctionLeft/Right zooms in or out. (unavailable for 1280*960,1024*768 resolution)Up/Down changes the image brightness.1changes the camera mode.2changes an image resolution.3changes an image quality.4turns the flash on or off.5changes the white balance.](https://usermanual.wiki/Samsung-Electronics-Co/SCHW379/User-Guide-618729-Page-51.png)
![Menu functions Camera (Menu 3)49Recording a video1. Access the Take photo menu.2. Press [1] to select the Video cam icon( ) and switch to Record mode.3. Adjust the image by aiming the camera at the subject.• When you press <Option>, you can use the camera options.next section• You can change the image settings by using the keypad.p. 504. Press < > or [ ] to start recording.To pause recording, press< > and then press <> to resume.5. When you are finished, press < > or [ ].Otherwise, the phone will automatically stop when the recording time expires.6. Press <Save> to save the video clip.The phone saves the video clips in the My album folder and returns to Record mode.Using the options in Record modeWhen you press <Option> in Record mode, the following options are available for the current shot:•Capture mode: change the camera mode.•Resolution: select an image resolution.•Quality: select an image quality setting.•Flash: turn the flash on or off.•Voice recording: record audio with a video.•White balance: adjust the colour balance of the video. You can make your video clip appear warmer or cooler.•Self timer: set a time delay before the phone starts recording.•Video effect: change the colour tone or apply a special effect to the video clip. •My album: display the video clips and photos saved in the My album folder.](https://usermanual.wiki/Samsung-Electronics-Co/SCHW379/User-Guide-618729-Page-52.png)
![Menu functions Display (Menu 4)53Settings (Menu 3-4)Use this menu to change the default settings for the options when using the camera.•Shutter sound: select a sound for the shutter, [].•Reset: reset your camera settings to their default status.•Album lock: lock the photo album so that no one can view your photos without your permission.•Preview mode: select the default preview mode:Crop view: the phone shows the image on the full screen. The left and right parts of the image to be captured is cropped.Actual ratio: the phone shows the image in actual ratio.Display (Menu 4)The Display menu enables you to change various settings for the display and the lights. To access this menu, press <Menu> in Idle mode and select Display.Image box (Menu 4-1)Use this menu to change the background image to be displayed in Idle mode or when the phone is turned on or off.1. Select the item for which you want to change the image.•Opening: select an image to be displayed when the phone turns on.•Closing: select an image to be displayed when the phone turns off.•Wallpaper: select an image to be displayed in Idle mode.2. Select the image category you want.3. Select the image you want.](https://usermanual.wiki/Samsung-Electronics-Co/SCHW379/User-Guide-618729-Page-56.png)
![54Menu functionsBanner (Menu 4-2)Use this menu to set a banner message to be displayed at the bottom of the display in Idle mode. Backlight (Menu 4-3)Use this menu to select the length of time the backlight remains on.Menu style (Menu 4-4)Use this menu to select the menu display style.Set time (Menu 4-5)Use this menu to set the current time and date or set up the time zones for the Dual Clock wallpaper. Main clock (Menu 4-5-1)You can set the current time and date. Enter the time in 24-hour format and the date in the following order: day, month, and year. Dual clock (Menu 4-5-2)You can choose two time zones to be displayed when you select Dual clock for the wallpaper image.1. Press [Left] or [Right] to select the time zone for the upper clock and press [Down].2. Press [Left] or [Right] to select the time zone for the lower clock.3. Press <Save>.External clock (Menu 4-6)Use this menu to change the type of clock to be displayed on the external display in Idle mode.语言 /Language (Menu 4-7)Use this menu to change the language of the display.Dialing font (Menu 4-8)Use this menu to select a colour type for the digits to be displayed when you enter a phone number for dialling.You can apply daylight savings time for each clock. When a clock highlights, press <DST on>.](https://usermanual.wiki/Samsung-Electronics-Co/SCHW379/User-Guide-618729-Page-57.png)
![Menu functions Message (Menu 5)55Message (Menu 5)Use the Message menu to send or receive text messages. You can also use the voicemail and web alert features. To access this menu, press <Menu> in Idle mode and select Message, or press and hold [Left].New message (Menu 5-1)Use this menu to create text messages and send them to multiple mobile phones.1. Enter the message text and press <OK>. 2. Press [Down] to change the following options:•Priority: set the priority level of the message.•Ack: activate or deactivate the delivery acknowledgement feature. When this feature is activated, the network informs you whether your message is delivered to the recipient or not. •Save: select one of the following saving options:Save&Send: save a copy of the message and then send the message.Send only: send the message. The message will be deleted after sending.Save only: save the message so that it can be sent later.3. Press <Save>.4. Enter a phone number. To send the message to multiple destinations, press [Down] and enter additional numbers. 5. When you have finished, press <OK> to send or save the message. Inbox (Menu 5-2)Use this menu to access messages you have received.Viewing a message at the time of its receiptWhen the phone receives a text message, the phone sounds a message alert and displays a text notification. Press <Select> to view the message immediately.](https://usermanual.wiki/Samsung-Electronics-Co/SCHW379/User-Guide-618729-Page-58.png)
![56Menu functionsViewing a message in Inbox1. Select Text from Inbox. A list of the received messages displays.Icons displayed on the list indicate the message’s status:• : Messages received from a GSM network• : Messages received from a CDMA network2. Select the message storage you want by pressing [Left] or [Right].3. Select the message you want.Using message optionsWhile viewing a message or the message list, press <Options> to access the following options:•Erase: erase the currently selected message from your Inbox.•Reply: send a reply to the sender.•Forward: send the message to other people.•Call/Save : make a call to the sender’s phone number or save the number to Phonebook.•Copy: copy the message to a card or phone’s memory.•Move: move the message to a card or phone’s memory.Accessing voicemail messagesWhen you receive a voice mail message, a text notification displays. Press <Select>, and the phone dials the voicemail centre. Then follow the voice prompts from the system to listen to the message.You can also check your voicemail messages by accessing Voice in the Inbox menu. Accessing Web alertsWhen you select Web alert in the Inbox menu, the phone accesses your Alert Inbox on the wireless web, so that you can view a message from your WAP server.• A red icon with ! means that the message is urgent.• and mean that the message is saved on the cards. means that the message is saved in the phone’s memory.In a GSM network, you can press and hold [1] in Idle mode to access the voicemail centre.](https://usermanual.wiki/Samsung-Electronics-Co/SCHW379/User-Guide-618729-Page-59.png)
![Menu functions Message (Menu 5)57Outbox (Menu 5-3)Use this menu to access messages you have sent or tried to send.Viewing sent text messagesWhen you access the Outbox menu, a list of sent or saved messages appears. Icons displayed on the list indicate the messages’ status:• : Messages that have been successfully delivered in a CDMA network.• : Messages that have been successfully delivered in a GSM network.• : Messages that the phone has failed to send in a CDMA network.• : Messages that the phone has failed to send in a GSM network.1. Press [Left] or [Right] to select the message storage you want.2. Select the message you want.Using message optionsWhile viewing a message or the message list, press <Options> to access the following options:•Erase: erase the currently selected message.•Resend: send the message to the recipient again.•Forward: forward the message to other people.•Call/Save: make a call to the recipient’s numbers or save the recipient’s numbers in Phonebook.•Copy: copy the message to a card or phone’s memory.•Move: move the message to a card or phone’s memory.Msg setup (Menu 5-4)Use this menu to customise the settings of various options for receiving or sending messages.•Scroll timer: set the time interval in which the phone scrolls to a following screen, 1 through 5 seconds. When this option is set to Off, you can • A red icon means that the message is urgent.• and mean that the message is saved on the cards. means that the message is saved in the phone’s memory.](https://usermanual.wiki/Samsung-Electronics-Co/SCHW379/User-Guide-618729-Page-60.png)
![58Menu functionsmanually scroll to the next screen using [Up] or [Down].•Msg. reminder: set how often the phone reminds you of new messages.•Alert on call: set whether or not the phone informs you when you receive a new message during a call.•Canned msg.: preset sentences to use when composing a new message.•CDMA settings: customise the settings for your outgoing messages in a CDMA network.Priority: set the priority level of messages. Delivery ack: activate or deactivate the delivery acknowledgement feature. When this is activated, the network informs you whether your message is delivered to the recipient or not. •GSM settings: customise the settings for your outgoing messages in a GSM network.Service centre: set the number of your message centre.Validity period: set the length of time your messages are stored in the message centre.Message type: set the default message type.Reply path: allow the recipient to reply to you through your message centre. Delivery report: set the network to inform you when your message has been delivered. Voice mail center: set the number of your voicemail centre. Please contact your service provider for further details.Msg wallpaper (Menu 5-5)Use this menu to set a background image of your outgoing messages. Memory info (Menu 5-6)This menu displays how many messages are stored in the cards and the phone’s memory.](https://usermanual.wiki/Samsung-Electronics-Co/SCHW379/User-Guide-618729-Page-61.png)
![Menu functions Sounds (Menu 6)59Sounds (Menu 6)The Sounds menu allows you to customise various sound settings. To access this menu, press <Menu> in Idle mode and select Sounds.Ringer (Menu 6-1)Use this menu to set the ringer for calls, messages, alarms, and schedule alarms separately.Ringer vol./Type (Menu 6-2)Use this menu to adjust the ringer volume for voice calls, messages, alarms, and schedule alarms. You can also set the ringer type for voice calls.•Level 1~5:Select one of the volume levels.•Ringer only: the phone sounds the ringer melody selected in the Ringer menu.•Silent: the phone neither vibrates nor rings.•1 beep: the phone sounds a beep.•Vibration: the phone vibrates.•Vib. & ringer: the phone vibrates and rings at the same time.•Vib. then ringer: the phone vibrates and then rings.•Ringer then vib.: the phone rings and then vibrates.Key tone (Menu 6-3)Use this menu to select the type of tones that the phone sounds each time you press a key. Alert (Menu 6-4)Use this menu to set up various alert sounds on your phone.Function alert (Menu 6-4-1)Use this menu to set up audible alerts (beeps) at a specified time to inform you that certain things have happened.•Themes: select an alert tone.You can play a sound by pressing <Play> in Silent mode.You can adjust the key tone volume using [ / ] in Idle mode.](https://usermanual.wiki/Samsung-Electronics-Co/SCHW379/User-Guide-618729-Page-62.png)
![60Menu functions•Alert on/off: turn each alert on or off.Select/Saving: set the phone to sound an alert when you save your selection or change a menu function.Cancel/Warning: set the phone to sound an alert when you cancel your selection or change when a confirmation message appears. Folder: set the phone to sound an alert when you open or close the phone.Connect: set the phone to sound a connect tone when your call is connected to the system.Disconnect: set the phone to sound a disconnect tone when a call is disconnected by the other person.Power On/Off: set the phone to sound an alert when you turn on or off the phone.Exit silent mode: set the phone to sound an alert when you exit Silent mode.Call time alert: set the phone to sound an alert every minute during an outgoing call.Hour alert (Menu 6-4-2)You can set your phone to sound an alert every hour on the hour.1. Select On and press [Down].2. Enter the time period for the phone to sound the hour alert and press [Down]. 3. Select an alert type and press <Save>.](https://usermanual.wiki/Samsung-Electronics-Co/SCHW379/User-Guide-618729-Page-63.png)
![Menu functions Entertainment (Menu 7)61Entertainment (Menu 7)Using the Entertainment menu, you can play games using your phone, enjoy karaoke video files and MP3 files, and chat with your friends or family using the Samsung messenger. You can also access media content downloaded from the Internet.To access this menu, press <Menu> in Idle mode and select Entertainment.Games (Menu 7-1)You can enjoy fun games on your phone.Starting a game1. Select the game you want. 2. Press any key except for [ ].3. If necessary, select a game mode.The phone displays the following options; options vary depending on the selected game:•Continue: restart the game you last played.•New Game: start a new game.•Score Board/high score: check the high score table.•Help/instruction: give you the information about how to play the game.•key info: display information about the keys you can use in a game.4. Select New Game.For further information about games, refer to the help option.](https://usermanual.wiki/Samsung-Electronics-Co/SCHW379/User-Guide-618729-Page-64.png)
![62Menu functionsMP3 (Menu 7-2)Use this menu to enjoy music. MP3 player (Menu 7-2-1)You can play MP3 music files. First you need to save MP3 files in your phone’s memory.Downloading MP3 filesTo download MP3 files to the phone, use the following methods:• Connect the phone to a computer and copy to the phone.p. 69Creating the play list Before playing MP3 music files, you need to add them to the play list.1. Access the MP3 files menu.2. Press <Options> and select Add to play list.3. Press <Check> to select the files you want.4. Press <Add>.5. To play the music files, press <Play>.Playing MP3 music filesTo play MP3 music files from the MP3 Player screen, press [ ] from the MP3 player screen.During playback, use the following keys:Key FunctionPlays or pauses a music file.Up Changes the repeat mode.• No icon: plays all files once in order.• : repeats all of the files.• : repeats the current file.• : plays the files at random.Down Opens the play list.Left • Skips to the previous file if pressed within 3 seconds after playback has started.• Restarts playback if pressed 3 seconds after playback has started. Moves backward in a file when held down.Right • Skips to the next file.• Moves forward in a file when held down.](https://usermanual.wiki/Samsung-Electronics-Co/SCHW379/User-Guide-618729-Page-65.png)

![68Menu functionscan be alerted by the Calendar function before an event commences. When you access this menu, today’s date is automatically selected and the date in lunar calendar reckoning displays at the bottom. On the calendar, press <Options> to access the following options:•View: access the events stored for the selected day.•Add new: add a new event to the selected day.•Erase events: erase scheduled events individually. •Erase all: erase all of the events in the calendar.•Jump to date: enter the date you want to access.•View festivals: set up the list of national or personal anniversaries and festivals. Scheduling an event You can schedule up to 9 events for one day and 20 events total.1. Select a day from the calendar.2. Enter your event information and press <OK>.3. Enter the time.4. Enter the date, if necessary.5. Select an alarm option.6. Press <Save> to save your event.Viewing your scheduleDays with scheduled events are indicated with the squares at the corners of the date cell. 1. Select one of days with scheduled events. The list of events for that day displays. 2. Select an event.While viewing an event, press <Options> to access the following options:Press [Right] in Idle mode to quickly access this menu.To move to the next or previous month, press [/].](https://usermanual.wiki/Samsung-Electronics-Co/SCHW379/User-Guide-618729-Page-71.png)
![Menu functions Utilities (Menu 8)69•Add new: add a new event.•Edit: edit the selected event. •Erase: erase the selected event. •Erase all: erase all events.Alarm (Menu 8-2)Use this menu to set the alarms to ring at a specific time.Setting an alarm1. Select Alarm 1 or Alarm 2.2. Scroll to an alarm frequency option and press [Down].3. Enter the time for the alarm to ring and press [Down].4. Scroll to an alarm interval option for repeating the alarm and press [Down].5. Press <Edit>.6. Press [Left] or [Right] and select a melody category.7. Select an alarm melody.8. Press <Save> to save the alarm.Stopping an alarmTo stop an alarm when it rings, press any key. Pressing <End> or [ ] will cancel the alarm repetition, if a repeating option has been set.Deactivating an alarm1. On the Alarm list, select the alarm you want to deactivate. 2. Select Off from the Set line.User memory (Menu 8-3)Use this menu to connect the phone to a PC, as you would use an external memory disk drive and access the file directory of your phone’s memory.Connect to PC (Menu 8-3-1)Use this menu to connect your phone to a computer.1. Connect a USB cable to the jack at the bottom of the phone and the USB port of the computer.2. Access the Connect to PC menu.3. Enter the lock code and press <OK>.Your phone switches to Memory Disk mode.](https://usermanual.wiki/Samsung-Electronics-Co/SCHW379/User-Guide-618729-Page-72.png)
![Menu functions Utilities (Menu 8)71•Assign: set the selected photo as your wallpaper, opening or closing image, or Phonebook caller image.•Set wallpaper: set the selected video as your wallpaper.Memory info (Menu 8-3-3)This menu shows the memory status of each folder in the phone.Format (Menu 8-3-4)Use this menu to erase files stored in the File manager folder. Mini dictionary (Menu 8-4)Your phone provides you with an English-Chinese and Chinese-English dictionary.1. Press <Mode> and enter the Chinese or English word you want.2. Press <OK/Select>.The displays shows the pronunciation of the word you entered and the corresponding English or Chinese words.Calculator (Menu 8-5)Use this menu to use the phone as a calculator. The calculator provides basic arithmetic functions: addition, subtraction, multiplication, and division. 1. Enter the first number.2. Select the operation for your calculation by pressing the Navigation keys according to the illustration on the display.3. Enter the second number. 4. To get the result, press <=>. Today (Menu 8-6)Use this menu to schedule new events for the current day. Events scheduled for future dates automatically appear on your Today display for that particular day. Schedule and access events as you would in the calendar.p. 67Use [] to enter a decimal point and [] to change the sign of a number to a negative (-).You can reset the calculator by pressing <C>.](https://usermanual.wiki/Samsung-Electronics-Co/SCHW379/User-Guide-618729-Page-74.png)
![72Menu functionsTo do list (Menu 8-7)Use this menu to enter up a list of tasks you need to do.Creating a task1. Enter the task content and press <OK>.2. Enter the time by which your task needs to be done.3. Enter the date by which your task needs to be done.4. Select !High or Low priority.5. Press <Save> to save the task.Viewing a task Select the task you want to view from the task list.While viewing a task, press <Options> to use the following options:•Add new: add a new task.•Edit: edit the selected task.•Erase: erase the selected task.•Erase all: erase all tasks. Voice tools (Menu 8-8)Use this menu to configure the voice dial settings and record voice memos.Voice dialing (Menu 8-8-1)The voice dialling feature allows you to make phone calls by saying the name of an entry in Phonebook. p. 26The phone uses an independent voice recognition system. This system is able to recognise the speech of any speaker. Use this menu to change the settings for voice dialling so that your phone recognises commands better.Configuring voice dial settingsIn the Configure menu, you can customise various settings for using the voice dialling feature. •Set active: set how you want to initiate voice dialling.Auto: the phone automatically switches to voice dialling mode when you open the phone.Manual: you need to press and hold [Up] to dial a number by your voice command.](https://usermanual.wiki/Samsung-Electronics-Co/SCHW379/User-Guide-618729-Page-75.png)
![Menu functions Utilities (Menu 8)73•Select sex: programme a gender for the user to make recognition easier.•Result display: set how many entries the phone displays as a result of the recognition after searching for the best match for your voice command.•Earmic setup: set the phone to activate Voice dialling mode when you press the button on the headset.•Message vol: adjust the volume of the voice prompts that guide you through the procedure for voice dialling.•Storage: select the default memory for voice dialling. When you initiate the mode, the phone recognises only the entries in the selected memory.•Dialect: You can set the phone to recognize Mandarin or Cantonese.Editing voice dial namesOnce you have stored Chinese names with numbers in Phonebook, they are automatically registered as voice dial entries.In the Edit name menu, you can cancel or set the voice dial setting for each name. 1. Press [Up] or [Down] to scroll to the name you want.2. Press [ ] to check the names.3. Repeat steps 1 and 2 for other entries.4. To save the setting, press the right soft key.Voice memo (Menu 8-8-2)You can record and review voice memos.Recording a voice memoWhen there is no voice memo recorded, selecting the Voice memo menu initiates recording. When using the headset, the voice dialling feature may not work properly in noisy environments. You can change the list format by pressing [ ]. Each time you press the key, the list shows registered names, unregistered names, and then all of the selectable entries.](https://usermanual.wiki/Samsung-Electronics-Co/SCHW379/User-Guide-618729-Page-76.png)
![76Menu functionsSettings (Menu 9)Many different features of your phone can be customised to suit your preferences.CDMA net services (Menu 9-1)Use this menu to access network services.Call forward (Menu 9-1-1)This CDMA network service allows incoming calls to be forwarded to another number. Contact your service provider to check this service’s availability.To set forwarding options:1. Select a type of call forwarding.•Busy: calls are forwarded if your line is busy.•No answer: calls are forwarded if you do not answer the phone.•Busy/No answer: calls are forwarded if your line is busy or you do not answer.•Unconditional: all incoming calls are forwarded.2. Select Enable. To deactivate, select Disable.3. Enter the phone number to which calls are forwarded and press <Send>.Call waiting (Menu 9-1-2)This CDMA network feature alerts you of incoming calls while you are on the phone.When this feature is enabled, you can respond to an incoming call by pressing [ ] while you are on the phone. This puts the first caller on hold and answers the second call.GSM net services (Menu 9-2)Use this menu to access network services. Please contact your service provider to check their availability and subscribe to them, if you wish.Call diverting (Menu 9-2-1)This network service reroutes incoming calls to a phone number that you specify.1. Select a call diverting option:•Divert always: divert all calls.•Busy: divert calls when you are on another call.](https://usermanual.wiki/Samsung-Electronics-Co/SCHW379/User-Guide-618729-Page-79.png)
![Menu functions Settings (Menu 9)79Phone lock (Menu 9-3-1)Use this menu to lock your phone.•Off: deactivate lock mode.•Once: lock the phone just one time. Once the lock code is entered, the phone unlocks.•On: lock the phone. Each time turning on the phone, you need to enter the lock code to use the phone.In Lock mode, you cannot use the phone’s menu function and dial numbers, except for making an emergency call.To unlock the phone, press <Unlock>, enter the lock code, and press <OK>.Change lock (Menu 9-3-2)Use this menu to change your current lock code to a new one. The lock code is preset to 00000000 at the factory.1. Enter a new 4- to 8-digit lock code and press <OK>.2. Enter the code once again and press <OK>. Emergency # (Menu 9-3-3)Your phone provides the option of storing three emergency numbers. All of these numbers can be manually dialled at any time, even if your phone is locked or all outgoing calls are restricted.Storing an emergency number1. Select a location.2. Press [C] to clear the existing number.3. Enter a number and press <Save> to save the number. Making an emergency call in Lock modeEnter one of the programmed emergency numbers and press [ ]. Voice privacy (Menu 9-3-4)Used only in digital networks, Voice Privacy encrypts the voice channel so that people cannot eavesdrop on your conversation. Use this menu to enable or disable Voice privacy.119, 110, and 120 will remain as emergency numbers, even if you change them on the emergency number list.](https://usermanual.wiki/Samsung-Electronics-Co/SCHW379/User-Guide-618729-Page-82.png)
![Menu functions Settings (Menu 9)81Card slot 1/2 setup (Menu 9-3-9/0)Use this menu to access the security options for the currently used card.•PIN check: activate the PIN check feature. You must enter the PIN assigned to your card each time you switch on the phone.•Change PIN: change the PIN of your card to a new one, provided that the PIN check feature is enabled.•FDN mode: activate FDN (Fixed Dialling Number) mode, in which you can dial only the numbers stored on the card.•Change PIN2: Change the PIN2 of your card to a new one.Network selection (Menu 9-4)In this menu, you can quickly switch between GSM and CDMA networks. •Card1: switch to the network corresponding to the card inserted in the slot 1.•Card2: switch to the network corresponding to the card inserted in the slot 2.•Setting: set how to select a network type the next time the phone turns on. The following options are available:Default: the phone automatically selects a network in the order of the card slots.Menu type: the phone displays a menu window to allow you to select a network manually.Answer mode (Menu 9-5)Use this menu to select how to answer an incoming call.•By send key: the phone answers only when you press [ ].•By folder open: the phone answers when you open the phone. If the phone is already open, press [ ].•By any key: the phone answers when you press any key, except for [ ], [ / ], and the soft keys.Not all SIM cards have a PIN2. If your SIM card does not, FDN mode and Change PIN2 do not display.You can quickly switch the network by pressing [ ] in Idle mode.](https://usermanual.wiki/Samsung-Electronics-Co/SCHW379/User-Guide-618729-Page-84.png)
![Solve problems 83“No service,” “Network failure,” or “Not done” displays• The network connection has been lost. You may be in a weak signal area. Move and try again.• You are trying to access an option for which you have no subscription with your service provider. Contact the service provider for further details.You have entered a number but it was not dialled• Be sure that you have pressed [ ].• Be sure you have accessed the right cellular network.• Be sure that you have not restricted outgoing calls.Your correspondent cannot reach you• Be sure your phone is switched on. ([ ] pressed for more than one second.)• Be sure you are accessing the correct cellular network.• Be sure that you have not restricted outgoing calls.Your correspondent cannot hear you speaking• Be sure you have switched off the microphone.• Be sure you are holding the phone close enough to your mouth. The microphone is located at the bottom of the phone.The phone starts beeping and “Battery low” flashes on the display• Your battery is insufficiently charged. Recharge the battery.The audio quality of the call is poor• Check the signal strength indicator on the display ( or ). The number of bars indicates the signal strength from strong to weak.• Try moving the phone slightly or moving closer to a window if you are in a building.No number is dialled when you re-call a Phonebook• Use the Phonebook Search feature to ensure the number has been stored correctly.• Re-store the number, if necessary.](https://usermanual.wiki/Samsung-Electronics-Co/SCHW379/User-Guide-618729-Page-86.png)