Samsung Electronics Co SCX4200 Multi Function Printer User Manual 4200 EN
Samsung Electronics Co Ltd Multi Function Printer 4200 EN
UserManual.wiki
>
Samsung Electronics Co
>
SCX4200 User Manual
>
Users Manual 1
Contents
1.
Users Manual 1
2.
Users Manual 2
Users Manual 1
Navigation menu
Upload a User Manual
Namespaces
Wiki Guide
HTML
PDF
Info
Views
User Manual
Discussion / Help
Navigation


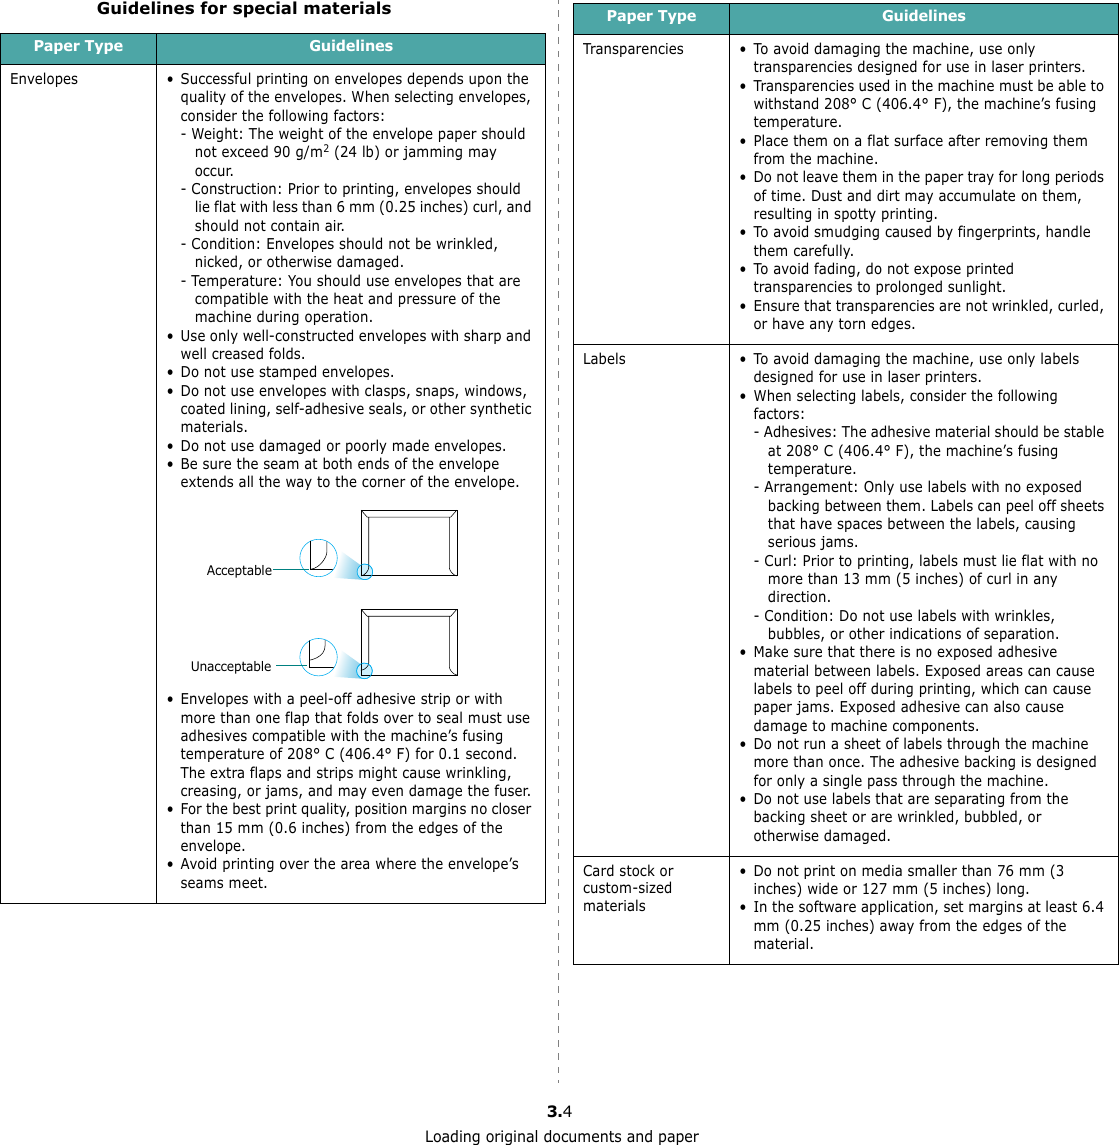
![Maintenance8.46Close the front cover. Make sure that the cover is securely closed.Replacing the toner cartridgeWhen the toner cartridge is completely empty:•The warning message, Toner Empty or [Toner Empty] Replace Toner displays on the control panel. • The Smart Panel program window appears on the computer telling you that the toner cartridge is empty.•The Status LED lights red. At this stage, the toner cartridge needs to be replaced. For order information for toner cartridges, see page 7.1.NOTE: This feature does not work for the [Toner Empty] Replace Toner message.7Pull the toner cartridge out.8Remove the new toner cartridge from its bag.9Remove the paper protecting the toner cartridge.10Roll the toner cartridge 5 or 6 items to distribute the toner evenly inside the toner cartridge.Thoroughly rolling the toner cartridge will assure maximum copies per toner cartridge.NOTE: If toner gets on your clothing, wipe it off with a dry cloth and wash clothing in cold water. Hot water sets toner into fabric.CAUTION: Do not touch the green underside of the toner cartridge. Use the handle on the toner cartridge to avoid touching this area. 11Hold the toner cartridge by the handle and slowly insert the toner cartridge into the opening in the machine. 12Tabs on the sides of the toner cartridge and corresponding grooves within the machine will guide the toner cartridge into the correct position until it locks into place completely.13Close the front cover. Make sure that the cover is securely closed.](https://usermanual.wiki/Samsung-Electronics-Co/SCX4200.Users-Manual-1/User-Guide-610977-Page-38.png)
![Troubleshooting9.19TroubleshootingThis chapter gives helpful information for what to do if you encounter an error.This chapter includes:• Clearing paper jams• Understanding the Status LED• Understanding display messages• Solving other problemsClearing paper jamsWhen a paper jam occurs, Paper Jam appears on the display. Refer to the table below to locate and clear the paper jam.To avoid tearing the paper, pull out the jammed paper gently and slowly. Follow the instructions in the following sections to clear the jam. In the paper input tray1Open and close the front cover. The jammed paper automatically exits the machine.If the paper does not exit, continue to step 2.2Pull the paper input tray out. Message Location of Jam Go to[Paper Jam 0]Open/Close DoorIn the paper input tray below andpage 9.1[Paper Jam 1] Open/Close DoorIn the fuser area or around the toner cartridgeIn the manual feederpage 9.2[Paper Jam 2] Check InsideIn the paper exit area page 9.23Remove the jammed paper by gently pulling it straight out.If there is any resistance and the paper does not move when you pull, or if you cannot see the paper in this area, check the fuser area around the toner cartridge. See page 9.2. 4Insert the paper input tray into the machine until it snaps into place.5Open and close the front cover to resume printing.In the manual feeder1If the paper is not feeding properly, pull the paper out of the machine.2To resume printing, open and close the front cover.](https://usermanual.wiki/Samsung-Electronics-Co/SCX4200.Users-Manual-1/User-Guide-610977-Page-40.png)
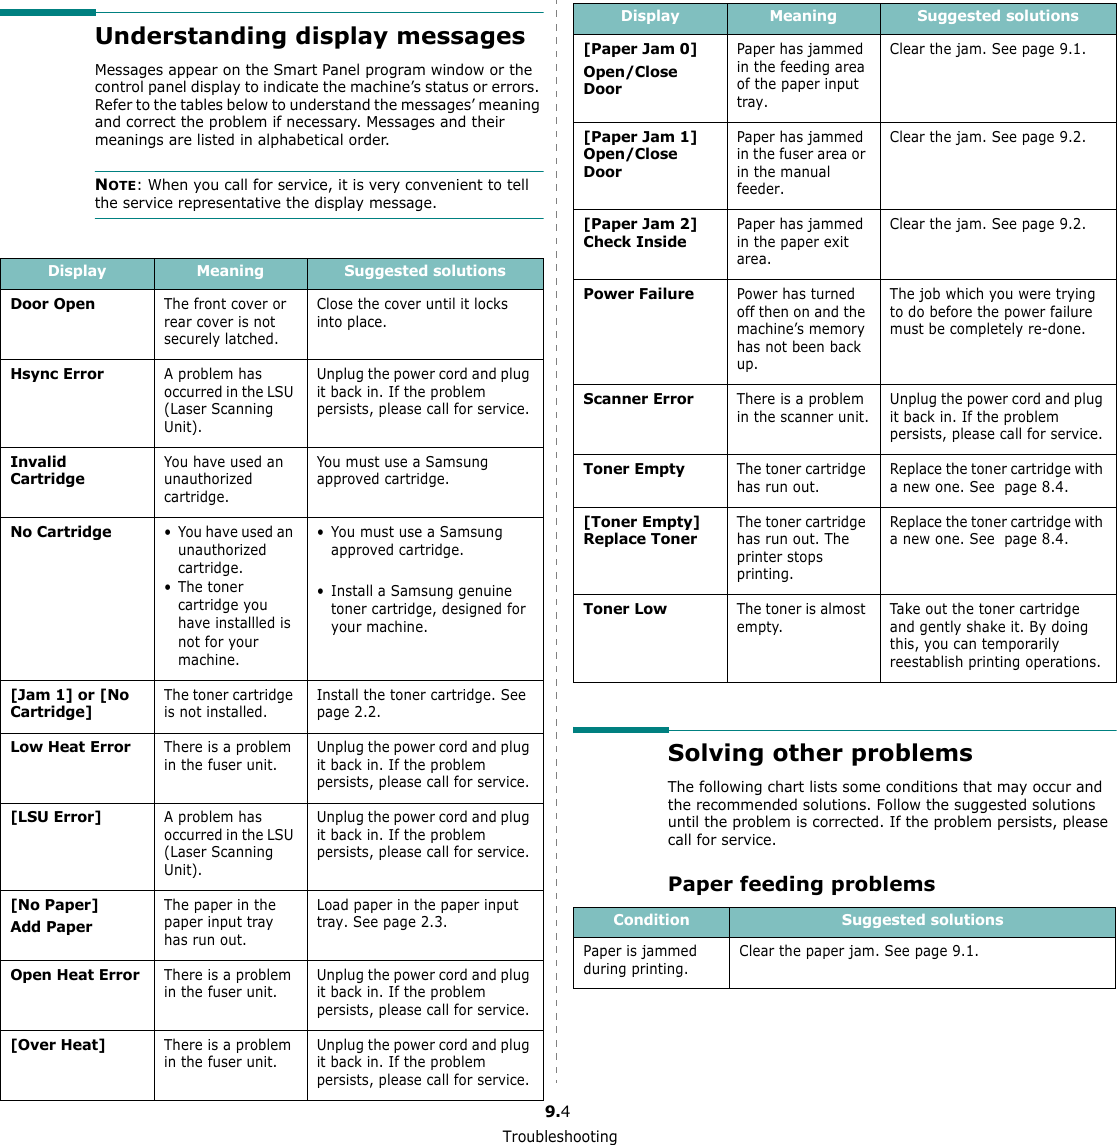
![Troubleshooting9.4Understanding display messagesMessages appear on the Smart Panel program window or the control panel display to indicate the machine’s status or errors. Refer to the tables below to understand the messages’ meaning and correct the problem if necessary. Messages and their meanings are listed in alphabetical order.NOTE: When you call for service, it is very convenient to tell the service representative the display message.Display Meaning Suggested solutionsDoor OpenThe front cover or rear cover is not securely latched.Close the cover until it locks into place.Hsync ErrorA problem has occurred in the LSU (Laser Scanning Unit).Unplug the power cord and plug it back in. If the problem persists, please call for service.Invalid CartridgeYou have used an unauthorized cartridge.You must use a Samsung approved cartridge.No Cartridge• You have used an unauthorized cartridge.• The toner cartridge you have installled is not for your machine.• You must use a Samsung approved cartridge.• Install a Samsung genuine toner cartridge, designed for your machine.[Jam 1] or [No Cartridge]The toner cartridge is not installed.Install the toner cartridge. See page 2.2.Low Heat ErrorThere is a problem in the fuser unit.Unplug the power cord and plug it back in. If the problem persists, please call for service.[LSU Error]A problem has occurred in the LSU (Laser Scanning Unit).Unplug the power cord and plug it back in. If the problem persists, please call for service.[No Paper]Add PaperThe paper in the paper input tray has run out.Load paper in the paper input tray. See page 2.3.Open Heat ErrorThere is a problem in the fuser unit.Unplug the power cord and plug it back in. If the problem persists, please call for service.[Over Heat]There is a problem in the fuser unit.Unplug the power cord and plug it back in. If the problem persists, please call for service.Solving other problemsThe following chart lists some conditions that may occur and the recommended solutions. Follow the suggested solutions until the problem is corrected. If the problem persists, please call for service.Paper feeding problems[Paper Jam 0]Open/Close DoorPaper has jammed in the feeding area of the paper input tray.Clear the jam. See page 9.1.[Paper Jam 1] Open/Close DoorPaper has jammed in the fuser area or in the manual feeder.Clear the jam. See page 9.2.[Paper Jam 2] Check InsidePaper has jammed in the paper exit area.Clear the jam. See page 9.2.Power FailurePower has turned off then on and the machine’s memory has not been back up.The job which you were trying to do before the power failure must be completely re-done.Scanner ErrorThere is a problem in the scanner unit.Unplug the power cord and plug it back in. If the problem persists, please call for service.Toner EmptyThe toner cartridge has run out. Replace the toner cartridge with a new one. See page 8.4.[Toner Empty] Replace TonerThe toner cartridge has run out. The printer stops printing.Replace the toner cartridge with a new one. See page 8.4.Toner LowThe toner is almost empty.Take out the toner cartridge and gently shake it. By doing this, you can temporarily reestablish printing operations.Display Meaning Suggested solutionsCondition Suggested solutionsPaper is jammed during printing.Clear the paper jam. See page 9.1.](https://usermanual.wiki/Samsung-Electronics-Co/SCX4200.Users-Manual-1/User-Guide-610977-Page-43.png)