Samsung Electronics Co SCX4725FN Multi Function Printer User Manual SCX 4725 User
Samsung Electronics Co Ltd Multi Function Printer SCX 4725 User
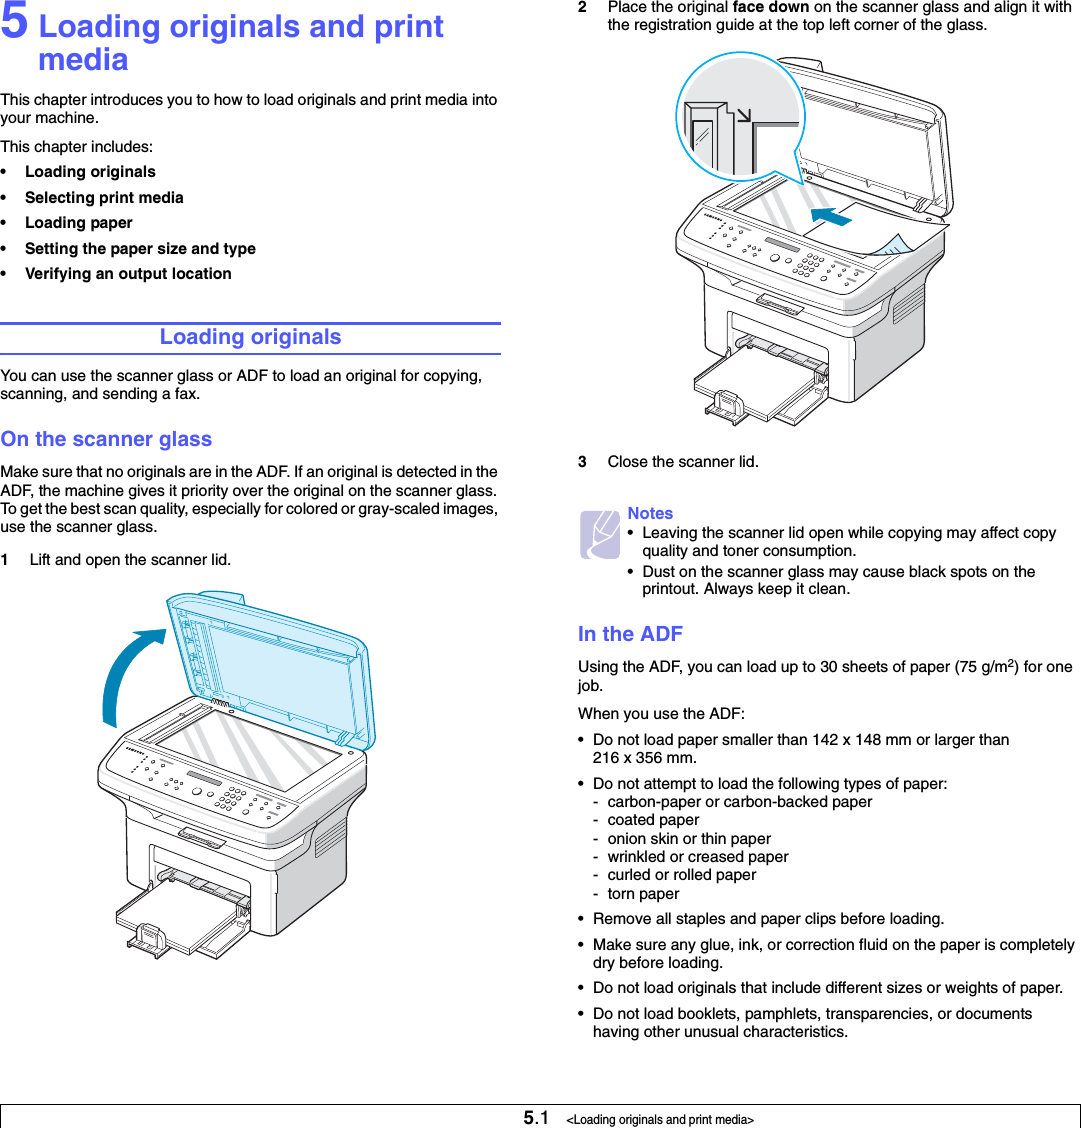
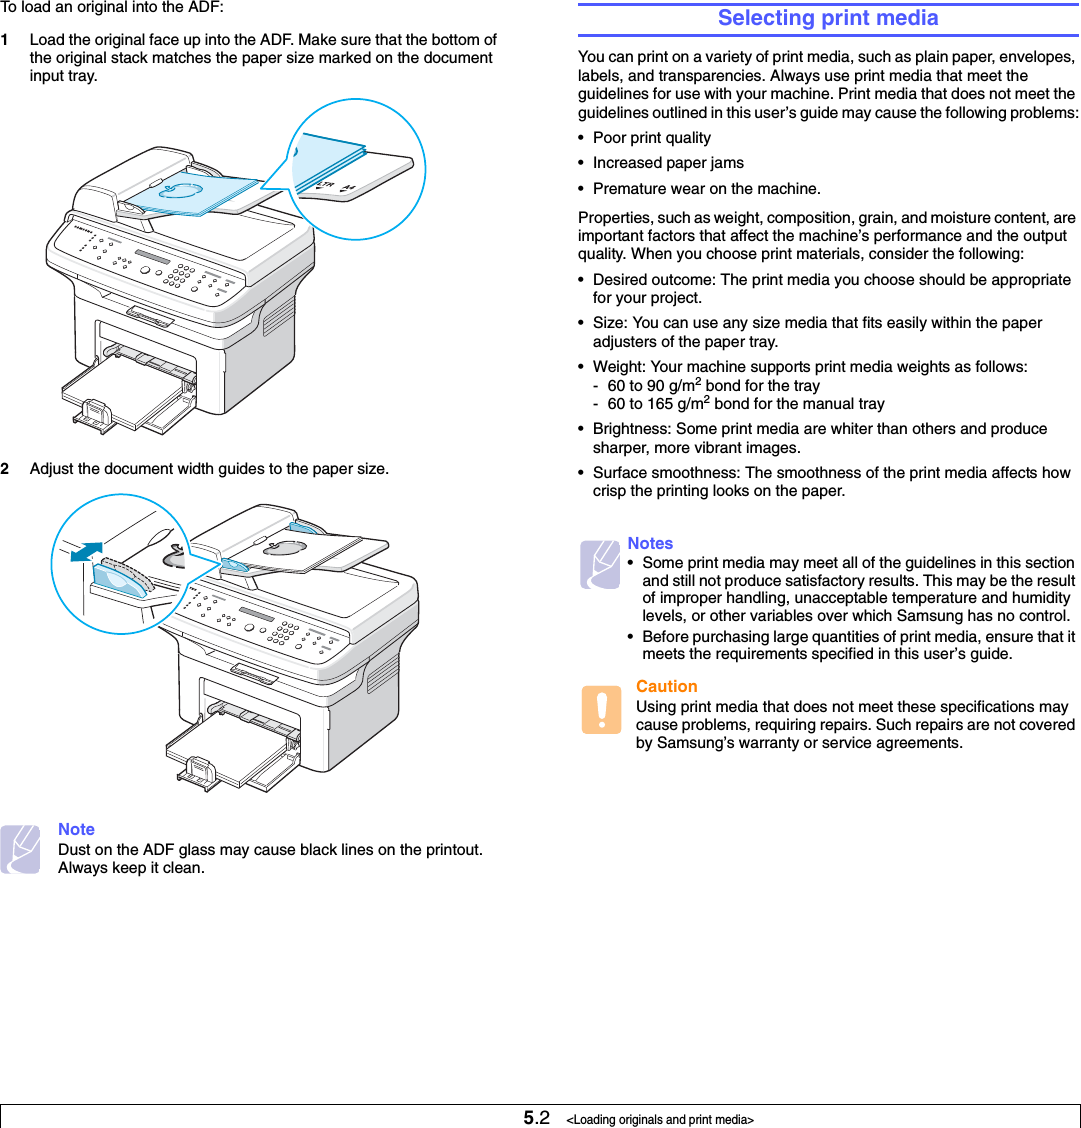
UserManual.wiki
>
Samsung Electronics Co
>
SCX4725FN User Manual
Users Manual
Navigation menu
Upload a User Manual
Namespaces
Wiki Guide
HTML
PDF
Info
Views
User Manual
Discussion / Help
Navigation
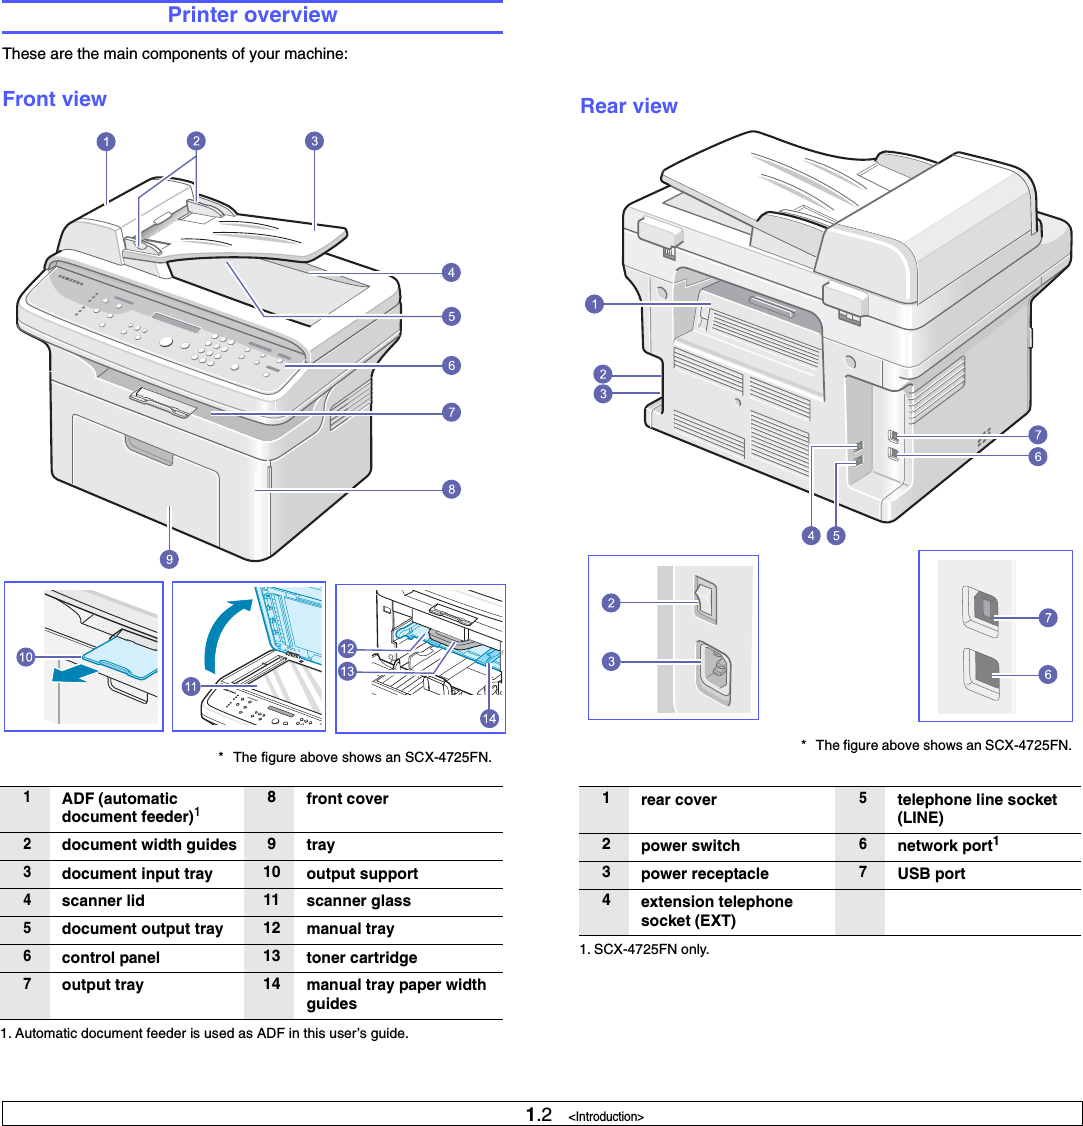
![1.1 <Introduction>1 IntroductionThank you for purchasing this Samsung multifunctional product. Your machine provides printing, copying, scanning, and faxing functions.This chapter includes:• Special features• Printer overview• Finding more information• Selecting a locationSpecial featuresYour new machine is equipped with special features that improve print quality. You can:Print with excellent quality and speed• You can print with a resolution of up to 1200 dpi [Best].See the Software Section.• Your machine prints A4-sized paper at up to 24 ppm1and letter-sized paper at up to 24 ppm.Handle paper flexibly•The manual tray supports letterhead, envelopes, labels, transparencies, custom-sized media, postcards, and heavy paper. The manual tray holds 1 sheet of paper.•The 250-sheet tray supports plain paper in various sizes. Create professional documents•Print Watermarks. You can customize your documents with words, such as “Confidential”. See the Software Section.•Print Posters. The text and pictures of each page of your document are magnified and printed across the sheet of paper and can then be taped together to form a poster. See the Software Section.Save time and money • You can print multiple pages on one single sheet of paper to save paper.• You can use preprinted forms and letterhead with plain paper. See the Software Section.• This machine automatically conserves electricity by substantially reducing power consumption when not in use.250Print in various environments• You can print with Windows 98/Me/2000/XP(32/64bitP/2003(32/64bitP.• Your machine is compatible with a variety of Linux systems.• Your machine is compatible with a variety of Macintosh systems (SCX-4725FN only).• Zoran IPS Emulation* compatible with PostScript 3 (PS) enables PS printing (SCX-4725FN only). * Zoran IPS Emulation compatible with PostScript 3 • © Copyright 1995-2005, Zoran Corporation. All rights reserved. Zoran, the Zoran logo, IPS/PS3, and OneImage are trademarks of Zoran Corporation.* 136 PS3 fontsContains UFST and MicroType from Monotype Imaging Inc.Machine featuresThe table below lists a general overview of features supported by your machine.(I: Installed, NA: Not Available)Features SCX-4725F SCX-4725FNIEEE 1284 Parallel NA NAUSB 2.0 I IPostScript Emulation NA INetwork Interface(Ethernet 10/100 Base TX)NA I Duplex Printing11. Printing on both sides of paper.NA NAMacintosh Driver NA I1. pages per minute](https://usermanual.wiki/Samsung-Electronics-Co/SCX4725FN/User-Guide-694925-Page-10.png)

![9.4 <Faxing>Receiving automatically in Fax mode Your machine is preset to Fax mode at the factory. When you receive a fax, the machine answers the call on a specified number of rings and automatically receives the fax. To change the number of rings, see page 10.1.Receiving manually in Tel mode You can receive a fax call by pressing On Hook Dial and then pressing Start when you hear a fax tone from the remote machine.The machine begins receiving a fax and returns to Standby mode when the reception is completed.Receiving manually using an extension telephoneThis features works best when you are using an extension telephone connected to the EXT socket on the back of your machine. You can receive a fax from someone you are talking to on the extension telephone without going to the fax machine.When you receive a call on the extension phone and hear fax tones, press the keys 9 on the extension phone. The machine receives the fax.Press the buttons slowly in sequence. If you still hear the fax tone from the remote machine, try pressing 9 once again.9 is the remote receive code preset at the factory. The first and the last asterisks are fixed, but you can change the middle number to whatever you wish. For details about changing the code, see page 10.1.Receiving automatically in Ans/Fax mode To use this mode, you must attach an answering machine to the EXT socket on the back of your machine. If the caller leaves a message, the answering machine stores the message as it would normally. If your machine detects a fax tone on the line, it automatically starts to receive the fax.Notes• If you have set your machine to Ans/Fax mode and your answering machine is switched off, or no answering machine is connected to EXT socket, your machine automatically goes into Fax mode after a predefined number of rings.• If your answering machine has a user-selectable ring counter, set the machine to answer incoming calls within 1 ring. • If you are in Tel mode (manual reception) when the answering machine is connected to your machine, you must switch off the answering machine, or the outgoing message from the answering machine will interrupt your phone conversation.Receiving faxes using DRPD modeDistinctive Ring is a telephone company service which enables an user to use a single telephone line to answer several different telephone numbers. The particular number someone uses to call you is identified by different ringing patterns, which consist of various combinations of long and short ringing sounds. This feature is often used by answering services who answer telephones for many different clients and need to know which number someone is calling in on to properly answer the phone.Using the Distinctive Ring Pattern Detection (DRPD) feature, your fax machine can learn the ring pattern you designate to be answered by the fax machine. Unless you change it, this ringing pattern will continue to be recognized and answered as a fax call, and all other ringing patterns will be forwarded to the extension telephone or answering machine plugged into the EXT socket. You can easily suspend or change DRPD at any time.Before using the DRPD option, Distinctive Ring service must be installed on your telephone line by the telephone company. To set up DRPD, you will need another telephone line at your location, or someone available to dial your fax number from outside. To set up the DRPD mode:1Press Menu until Fax Setup appears on the top line of the display.2Press the Scroll buttons until DRPD Mode appears and press Enter.3Press the Scroll buttons until Set appears and press Enter.Waiting Ring appears on the display.4Call your fax number from another telephone. It is not necessary to place the call from a fax machine. 5When your machine begins to ring, do not answer the call. The machine requires several rings to learn the pattern.When the machine completes learning, the display shows End DRPD [Setup].If the DRPD setup fails, DRPD Ring Error appears. Press Enterwhen DRPD Mode appears and start over from step 3.6Press Stop/Clear to return to Standby mode.When the DRPD feature is set up, the DRPD option is available for the receiving mode setting. To receive faxes in DRPD mode, you need to set the menu to DRPD.Notes• DRPD must be set up again if you re-assign your fax number, or connect the machine to another telephone line.• After DRPD has been set up, call your fax number again to verify that the machine answers with a fax tone. Then have a call placed to a different number assigned to that same line to be sure the call is forwarded to the extension telephone or answering machine plugged into the EXT socket.](https://usermanual.wiki/Samsung-Electronics-Co/SCX4725FN/User-Guide-694925-Page-39.png)


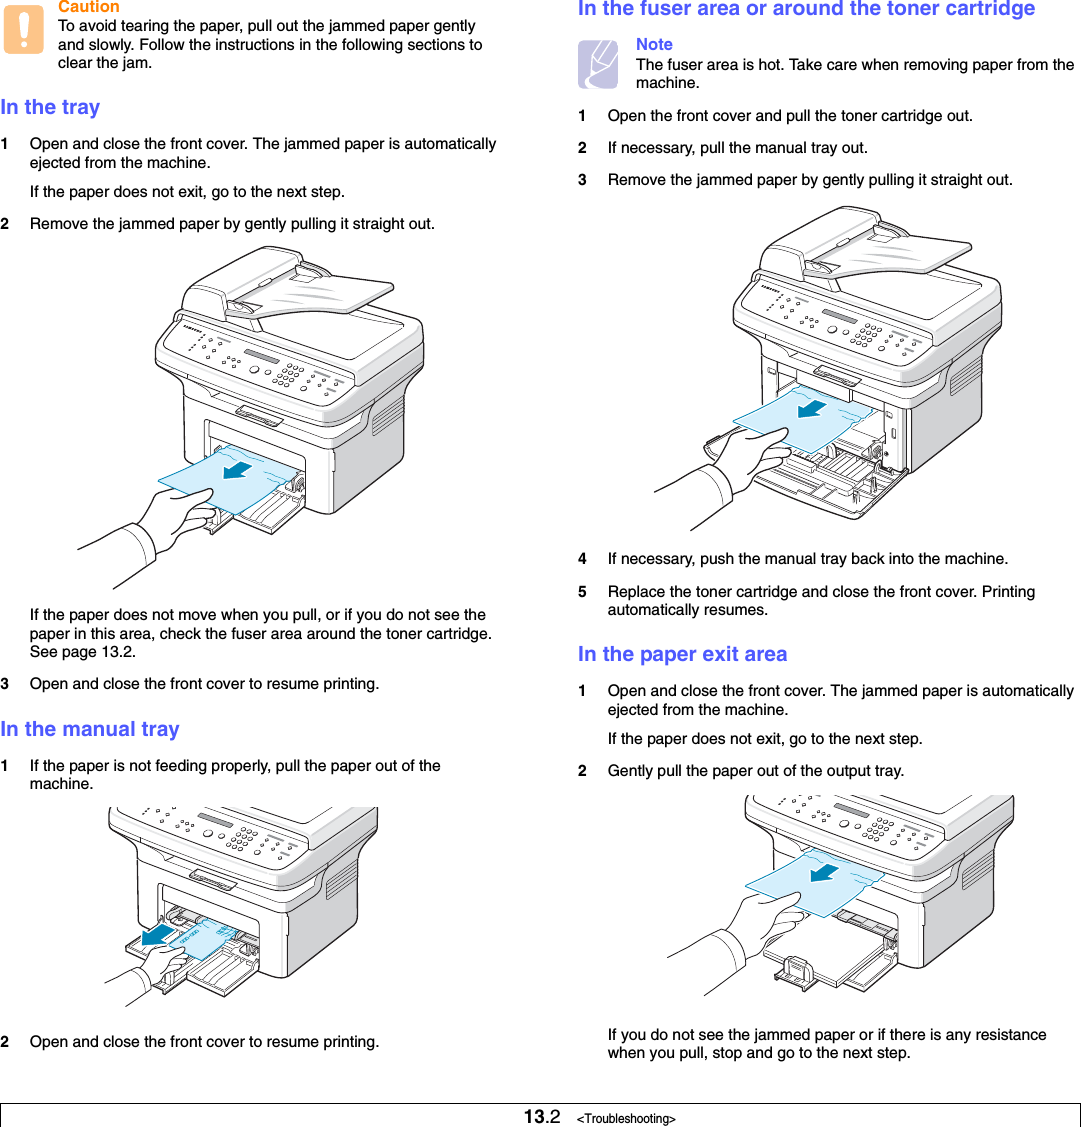
![13.1 <Troubleshooting>13 TroubleshootingThis chapter gives helpful information for what to do if you encounter an error.This chapter includes:• Clearing document jams• Clearing paper jams• Understanding display messages• Toner cartridge-related messages• Solving other problemsClearing document jamsWhen an original jams while passing through the ADF, Document Jamappears on the display.Input Misfeed1Remove any remaining pages from the ADF.2Open the ADF cover.3Pull the jammed paper gently out of the ADF.1ADF cover1NoteIf you do not see the paper in this area, refer to Exit Misfeed. See the next section.4Close the ADF cover. Then load the removed pages, if any, back into the ADF.NoteTo prevent document jams, use the scanner glass for thick, thin, or mixed paper-type originals.Exit Misfeed1Remove any remaining pages from the ADF.2Open the ADF cover.3Pull the jammed paper gently out of the document output tray.4Close the ADF cover. Then load the removed pages, if any, back into the ADF.Clearing paper jamsWhen a paper jam occurs, Paper Jam appears on the display. Refer to the table below to locate and clear the paper jam.Message Location of jam Go to[Paper Jam 0] Open/Close DoorIn the paper feed area (tray or manual tray)the next section and page 13.2[Paper Jam 1]Open/Close DoorIn the fuser area or around the toner cartridgepage 13.2[Paper Jam 2]Check InsideIn the paper exit area page 13.2](https://usermanual.wiki/Samsung-Electronics-Co/SCX4725FN/User-Guide-694925-Page-55.png)
![13.3 <Troubleshooting>3Open the rear cover.4Pull the jammed paper out.CautionInside of the machine is very hot. Take care when removing paper from the machine.5Close the rear cover. Printing automatically resumes.Tips for avoiding paper jamsBy selecting the correct media types, most paper jams can be avoided. When a paper jam occurs, follow the steps outlined on page 13.1. • Follow the procedures on page 5.5. Ensure that the adjustable guides are positioned correctly.• Do not overload the tray.• Do not remove paper from the tray while your machine is printing.• Flex, fan, and straighten paper before loading. • Do not use creased, damp, or highly curled paper.• Do not mix paper types in a tray.• Use only recommended print media. See page 5.7.• Ensure that the recommended print side of print media is facing up in the tray or manual tray.Understanding display messagesMessages appear on the Smart Panel program window or the control panel display to indicate the machine’s status or errors. Refer to the tables below to understand the messages’ meaning and correct the problem if necessary. Messages and their meanings are listed in alphabetical order.NoteWhen you call for service, it is very convenient to tell the service representative the display message.Message Meaning Suggested solutions[COMM. Error] The machine has a communication problem.Ask the sender to try again.[Front or Rear][Cover Open]The front cover or rear cover is not securely latched.Close the cover until it locks into place.[Hsync Error] There is a serious problem in your machine.Turn the machine off and back on. If the problem persists, please call for service.[Incompatible] The machine has received a fax from which is registered as a junk fax.The received fax data will be deleted.Reconfirm junk fax setup, see page 10.2.[Line Error] Your machine cannot connect with the receiving fax machine or has lost contact because of a problem with the phone line.Try again. If the problem persists, wait an hour or so for the line to clear and try again.Or, turn the ECM mode on. See page 10.2.](https://usermanual.wiki/Samsung-Electronics-Co/SCX4725FN/User-Guide-694925-Page-57.png)
![13.4 <Troubleshooting>[Low Heat Error] There is a problem in the fuser unit.Unplug the power cord and plug it back in. If the problem persists, please call for service.[LSU Error] A problem has occurred in the LSU (Laser Scanning Unit).Unplug the power cord and plug it back in. If the problem persists, please call for service.[No Answer] The receiving fax machine has not answered after several redial attempts.Try again. Make sure that the receiving machine is operational.[No Paper]Add PaperThe paper in the tray has run out.Load paper in the tray. See page 5.5.[Over Heat] There is a problem in the fuser unit.Unplug the power cord and plug it back in. If the problem persists, please call for service.Open Heat Error There is a problem in the fuser unit.Unplug the power cord and plug it back in. If the problem persists, please call for service.[Paper Jam 0]Open/Close DoorPaper has jammed in the feeding area of the tray.Clear the jam. See page 13.2 and page 13.2.[Paper Jam 1]Open/Close DoorPaper has jammed in the fuser area.Clear the jam. See page 13.2.[Paper Jam 2]Check InsidePaper has jammed in the paper exit area.Clear the jam. See page 13.2.[Stop Pressed] Stop/Clear has been pressed during a fax transmission.Try again.Add Paper &Press StartYou have selected Manual Feeder for Source in the printer properties.Load a sheet of paper into the manual tray and press Start to start feeding.If you have multiple pages to be printed, this message appears again. Load the next sheet and press Start.Message Meaning Suggested solutionsCancel?1:Yes 2:NoYour machine’s memory has become full while trying to store an original into memory.To cancel the fax job, press 1 to select Yes.If you want to send those pages that have been successfully stored, press 2 to select No. You should send the remaining pages later, when memory is available.Document Jam The loaded original has jammed in the ADF.Clear the jam. See page 13.1.Enter Again You entered an unavailable data.Enter the correct data again.Group Not AvailableYou have tried to select a group dial number where only a single location number can be used.Use a speed dial number or dial a number manually using the number keypad.Line Busy The receiving fax machine did not answer or the line is already engaged.Try again after a few minutes.Load Document You have attempted to set up a copy or fax operation with no document loaded into the ADF.Load a document into the ADF and try again.Memory Dial Full The fax jobs queue in the memory is full.Cancel unnecessary fax jobs in the memory.Memory Full The memory is full. Delete unnecessary fax jobs and retransmit after more memory becomes available. Alternatively, split the transmission into more than one operation.Not Assigned The speed dial number you tried to use has no number assigned to it.Enter the number manually using the number keypad.Operation Not AssignedYou are in the Add Page/Cancel Joboperation, but there are no jobs stored.Check the display to see if there are any scheduled jobs.Message Meaning Suggested solutions](https://usermanual.wiki/Samsung-Electronics-Co/SCX4725FN/User-Guide-694925-Page-58.png)

![Installing Printer Software in Windows63Click Next.• If necessary, select a language from the drop-down list.•View User’s Guide: Allows you to view the User’s Guide. If your computer doesn’t have Adobe Acrobat, click on this option and it will automatically install Adobe Acrobat Reader for you.4Select Custom installation. Click Next.5Select your printer and click Next.NOTE: If your printer is not already connected to the computer, the following window will appear.• After connecting the printer, click Next.• If you don’t want to connect the printer at this time, click Next, and No on the following screen. Then the installation will start and a test page will not be printed at the end of the installation.• The installation window that appears in this User’s Guide may differ depending on the printer and interface in use.6Select the components to be installed and click Next.NOTE: You can change the desired installation folder by clicking [Browse].](https://usermanual.wiki/Samsung-Electronics-Co/SCX4725FN/User-Guide-694925-Page-79.png)
![Installing Printer Software in Windows85The list of printers available on the network appears. Select the printer you want to install from the list and then click Next.• If you do not see your printer on the list, click Update to refresh the list, or select Add TCP/IP Port to add your printer to the network. To add the printer to the network, enter the port name and the IP address for the printer.To verify your printer’s IP address or the MAC address, print a Network Configuration page.• To find a shared network printer (UNC Path), select Shared Printer [UNC] and enter the shared name manually or find a shared printer by clicking the Browsebutton.NOTE: To search the network printer, the firewall disabled.6After the installation is finished, a window appears asking you to print a test page and to register yourself as a user of Samsung Printers in order to receive information from Samsung. If you so desire, select the corresponding checkbox(es) and click Finish.Otherwise, just click Finish.NOTE: After setup is complete, if your printer driver doesn’t work properly, reinstall the printer driver. See “Reinstalling Printer Software” on page 10.Custom InstallationYou can choose individual components to install and set a specific IP address.1Make sure that the printer is connected to your network and powered on. For details about connecting to the network, see the supplied printer’s User’s Guide.2Insert the supplied CD-ROM into your CD-ROM drive.The CD-ROM should automatically run, and an installation window appears.If the installation window does not appear, click Start and then Run. Type X:\Setup.exe, replacing “X” with the letter which represents your drive and click OK.3Click Next.• If necessary, select a language from the drop-down list.•View User’s Guide: Allows you to view the User’s Guide. If your computer doesn’t have Adobe Acrobat, click on this option and it will automatically install Adobe Acrobat Reader for you.](https://usermanual.wiki/Samsung-Electronics-Co/SCX4725FN/User-Guide-694925-Page-81.png)
![Installing Printer Software in Windows94Select Custom installation. Click Next.5The list of printers available on the network appears. Select the printer you want to install from the list and then click Next.• If you do not see your printer on the list, click Update to refresh the list, or select Add TCP/IP Port to add your printer to the network. To add the printer to the network, enter the port name and the IP address for the printer.To verify your printer’s IP address or the MAC address, print a Network Configuration page.• To find a shared network printer (UNC Path), select Shared Printer [UNC] and enter the shared name manually or find a shared printer by clicking the Browsebutton.NOTE: To search the network printer, the firewall disabled.TIP: If you want to set a specific IP address on a specific network printer, click the Set IP Address button. The Set IP Address window appears. Do as follows:a. Select a printer to be set with a specific IP address from the list.b. Configure an IP address, subnet mask, and gateway for the printer manually and click Configure to set the specific IP address for the network printer.c. Click Next.6Select the components to be installed. After selecting the components, the following window appears. You can also change the printer name, set the printer to be shared on the network, set the printer as the default printer, and change the port name of each printer. Click Next.To install this software on a server, select the Setting up this printer on a server checkbox.](https://usermanual.wiki/Samsung-Electronics-Co/SCX4725FN/User-Guide-694925-Page-82.png)
![Installing Printer Software in Windows107After the installation is finished, a window appears asking you to print a test page and to register yourself as a user of Samsung Printers in order to receive information from Samsung. If you so desire, select the corresponding checkbox(es) and click Finish.Otherwise, just click Finish.NOTE: After setup is complete, if your printer driver doesn’t work properly, reinstall the printer driver. See “Reinstalling Printer Software” on page 10.Reinstalling Printer SoftwareYou can reinstall the software if installation fails.1Start Windows.2From the Start menu select Programs or All Programsoyour printer driver name oMaintenance.3Select Repair and click Next.4The list of printers available on the network appears. Select the printer you want to install from the list and then click Next.• If you do not see your printer on the list, click Update to refresh the list, or select Add TCP/IP Port to add your printer to the network. To add the printer to the network, enter the port name and the IP address for the printer.• To find a shared network printer (UNC Path), select Shared Printer [UNC] and enter the shared name manually or find a shared printer by clicking the Browsebutton.You will see a component list so that you can reinstall any item individually.](https://usermanual.wiki/Samsung-Electronics-Co/SCX4725FN/User-Guide-694925-Page-83.png)
![Using Your Printer in Linux298Using Your Printer in LinuxYou can use your machine in a Linux environment. This chapter includes:• Getting Started• Installing the Unified Linux Driver• Using the Unified Driver Configurator• Configuring Printer Properties• Printing a Document• Scanning a DocumentGetting StartedThe supplied CD-ROM provides you with Samsung’s Unified Linux Driver package for using your machine with a Linux computer.Samsung’s Unified Linux Driver package contains printer and scanner drivers, providing the ability to print documents and scan images. The package also delivers powerful applications for configuring your machine and further processing of the scanned documents.After the driver is installed on your Linux system, the driver package allows you to monitor a number of machine devices via fast ECP parallel ports and USB simultaneously. The acquired documents can then be edited, printed on the same local or network machine devices, sent by e-mail, uploaded to an FTP site, or transferred to an external OCR system.The Unified Linux Driver package is supplied with a smart and flexible installation program. You don't need to search for additional components that might be necessary for the Unified Linux Driver software: all required packages will be carried onto your system and installed automatically; this is possible on a wide set of the most popular Linux clones.Installing the Unified Linux DriverInstalling the Unified Linux Driver1Make sure that you connect your machine to your computer. Turn both the computer and the machine on.2When the Administrator Login window appears, type in root in the Login field and enter the system password.NOTE: You must log in as a super user (root) to install the printer software. If you are not a super user, ask your system administrator.3Insert the printer software CD-ROM. The CD-ROM will automatically run.If the CD-ROM does not automatically run, click the icon at the bottom of the desktop. When the Terminal screen appears, type in:If the CD-ROM is secondary master and the location to mount is /mnt/cdrom,[root@localhost root]#mount -t iso9660 /dev/hdc /mnt/cdrom[root@localhost root]#cd /mnt/cdrom/Linux[root@localhost root]#./install.sh NOTE: The installation program runs automatically if you have an autorun software package installed and configured.4When the welcome screen appears, click Next.](https://usermanual.wiki/Samsung-Electronics-Co/SCX4725FN/User-Guide-694925-Page-102.png)
![Using Your Printer in Linux305When the installation is complete, click Finish.The installation program has added the Unified Driver Configurator desktop icon and Samsung Unified Driver group to the system menu for your convenience. If you have any difficulties, consult the onscreen help that is available through your system menu or can otherwise be called from the driver package windows applications, such as Unified Driver Configurator or Image Manager.Uninstalling the Unified Linux Driver1When the Administrator Login window appears, type in root in the Login field and enter the system password.NOTE: You must log in as a super user (root) to install the printer software. If you are not a super user, ask your system administrator.2Insert the printer software CD-ROM. The CD-ROM will automatically run.If the CD-ROM does not automatically run, click the icon at the bottom of the desktop. When the Terminal screen appears, type in:If the CD-ROM is secondary master and the location to mount is /mnt/cdrom,[root@localhost root]#mount -t iso9660 /dev/hdc /mnt/cdrom[root@localhost root]#cd /mnt/cdrom/Linux[root@localhost root]#./uninstall.sh NOTE: The installation program runs automatically if you have an autorun software package installed and configured.3Click Uninstall.4Click Next.5Click Finish.](https://usermanual.wiki/Samsung-Electronics-Co/SCX4725FN/User-Guide-694925-Page-103.png)