Samsung Electronics Co SD616 DVD-ROM Drive User Manual users manual
Samsung Electronics Co Ltd DVD-ROM Drive users manual
users manual
1
DVD-ROM DRIVE
SD-616
http://www.samsungelectronics.com
User's Guide
BG68-00285A Rev:00
Safety Precautions
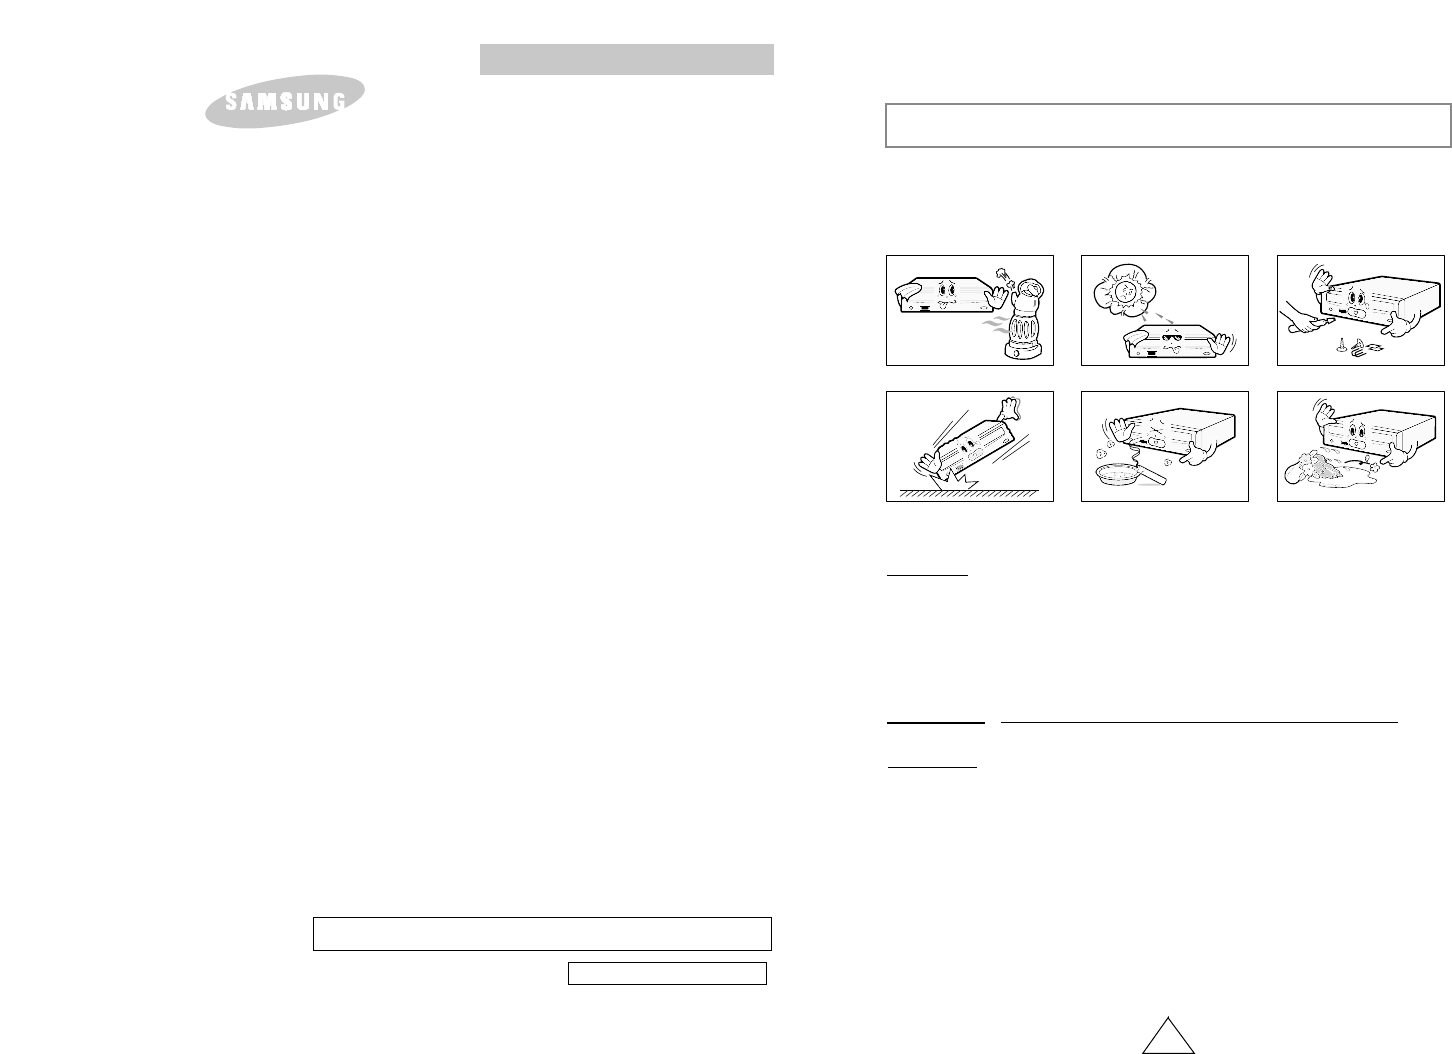
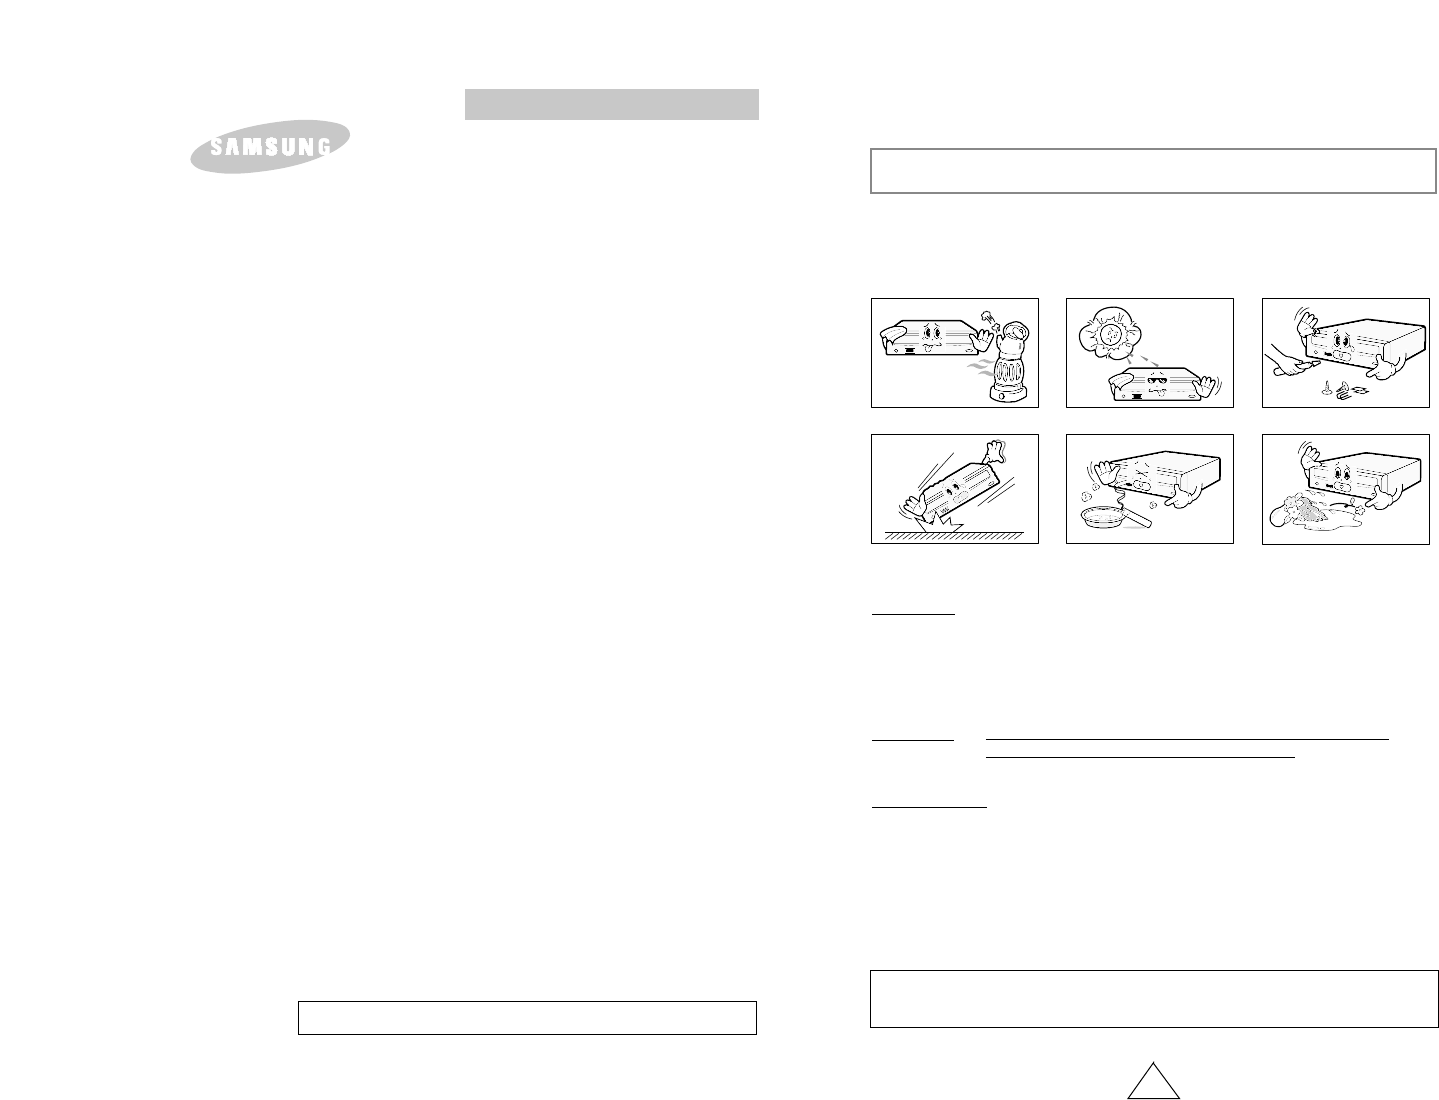
The following diagrams illustrate the precautions to be taken when using
your DVD-ROM drive.
You must not use the drive in any manner other than that specified in this guide.
Avoid exposing your eyes or skin to direct or scattered radiation.
CAUTION Do not attempt to repair the DVD-ROM drive yourself. Contact
your dealer or local SAMSUNG representative for all repairs.
If you make any adjustments or perform any operations other
than those specified in this guide, you run the risk of exposure to
hazardous radiation.
WARRANTY Please refer to the Samsung limited warranty statements.
Precautions 1.To reduce the risk of fire or electric shock, do not expose
this appliance to rain or moisture.
2. Always check each disc for cracks before using it. If there are
cracks on the surfaces, especially around the border of the cen-
ter hole, we recommend that you make a copy of the disc
immediately and then stop using it. If you continue using the
disc, it will probably develop more cracks and eventually cause
irreparable damage.
3. Do not use poor quality discs:
●From unknown sources
● Without any copyright
●Scratched or damaged in any way
Your DVD-ROM Drive
2 3
COMPACT
12 3 4 56
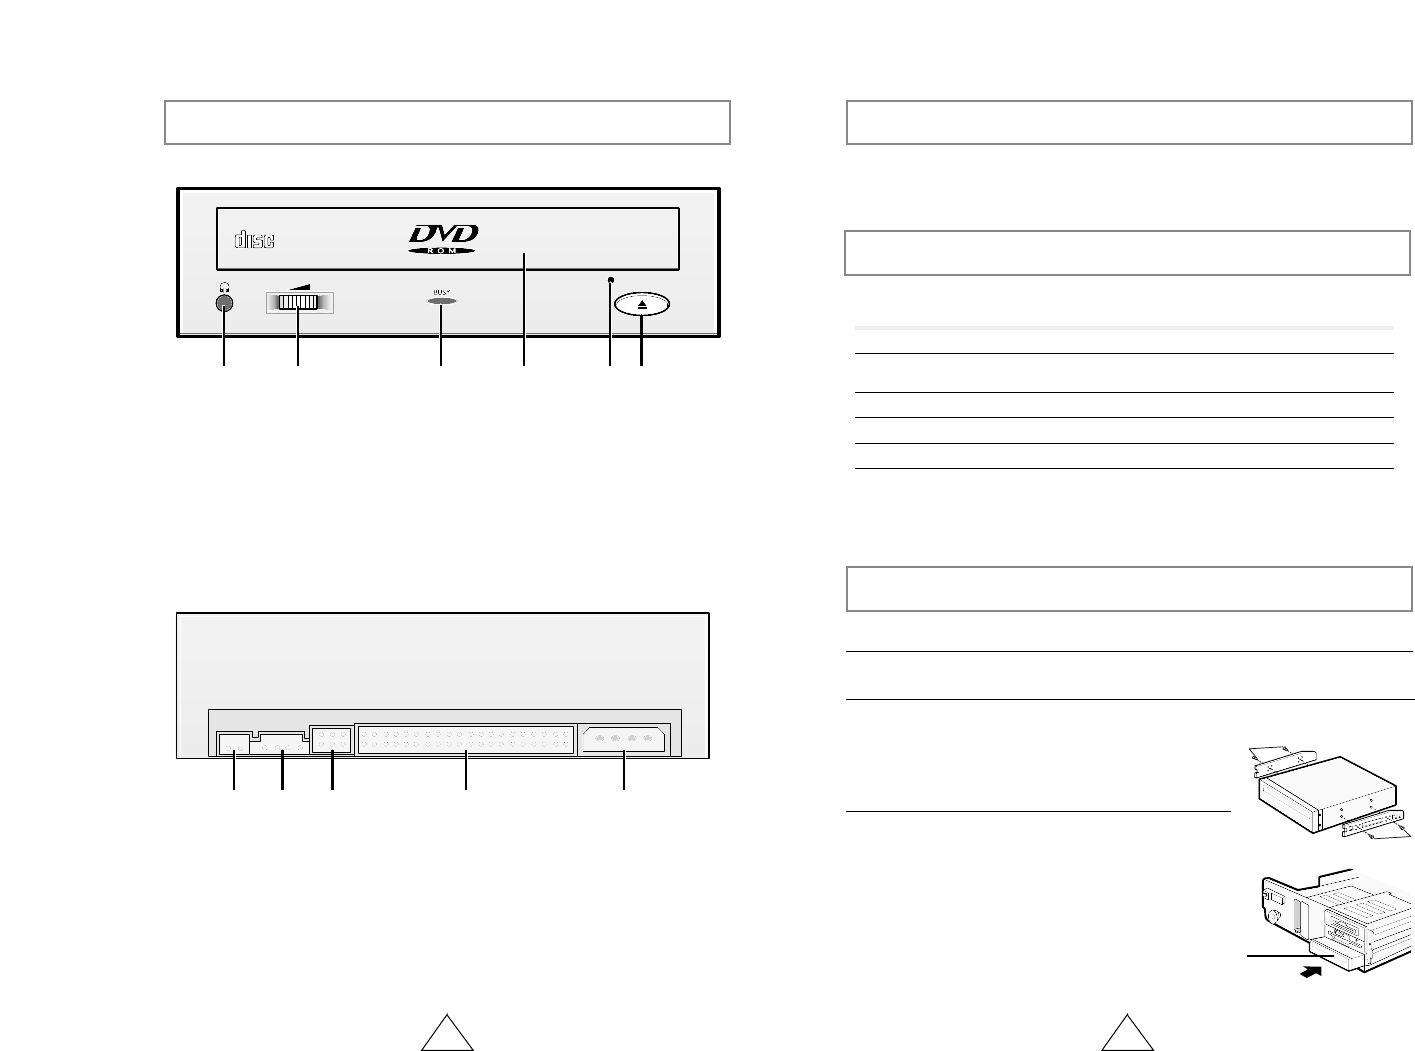
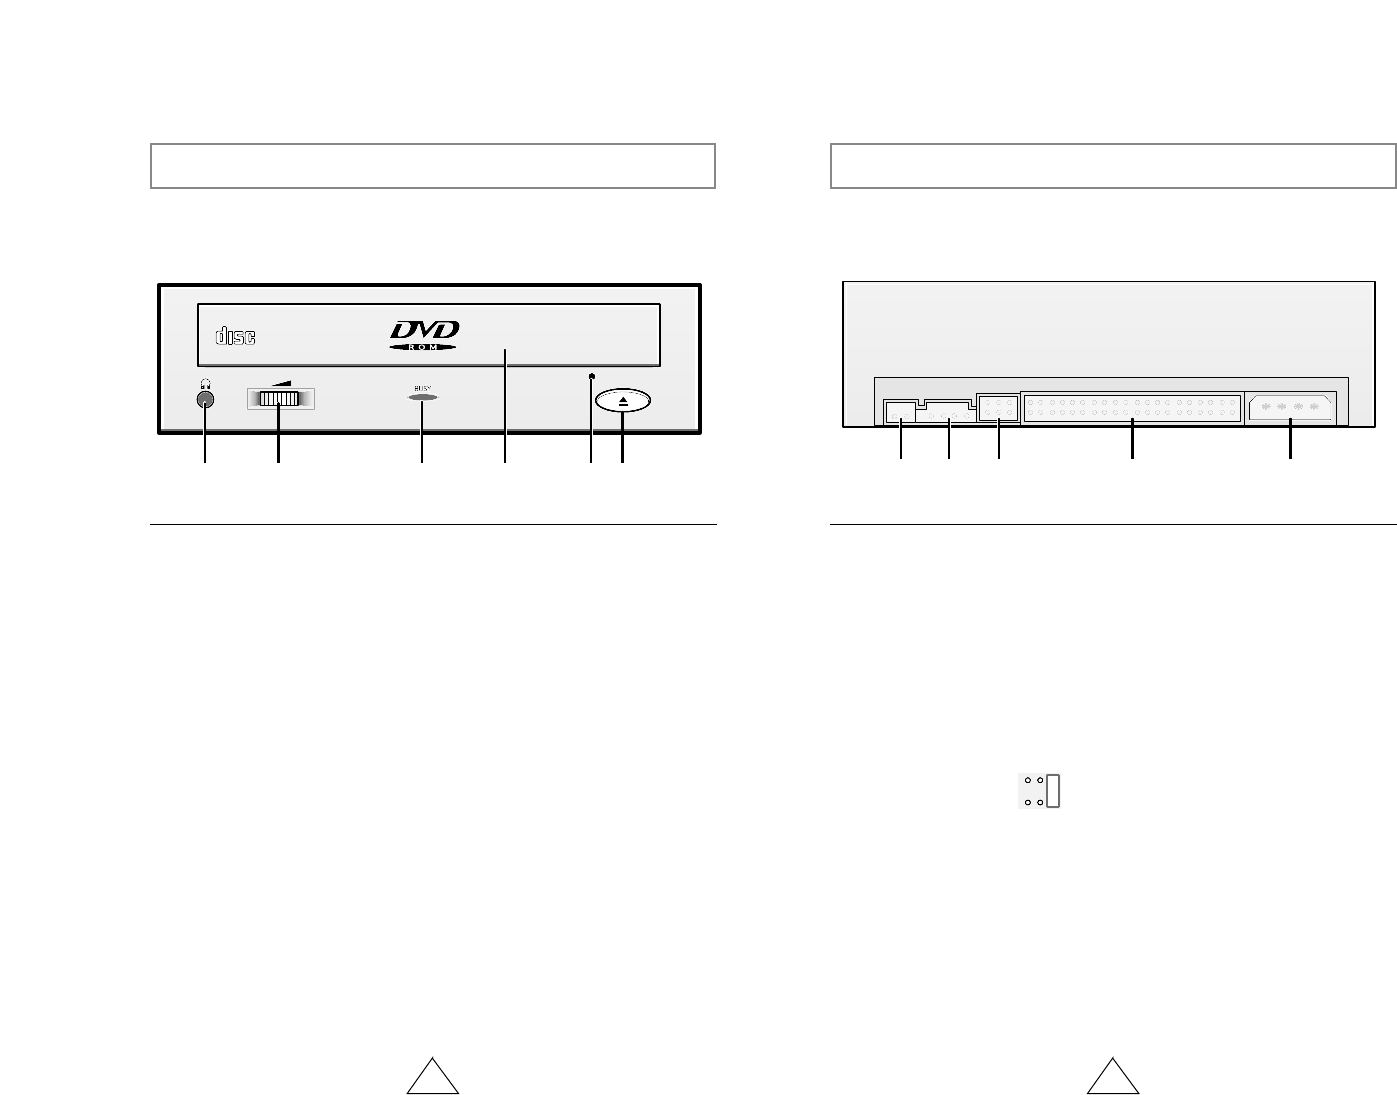
1. Connector for stereo headphones with a 3.6 mm stereo mini-jack
2. Headphone volume control
3. Indicator light (when it is green, a disc is being read)
4. Disc compartment (the compartment opens and closes automatically
when you press the Eject button)
5. Emergency eject hole (if the compartment does not open when you
press the Eject button, power off the computer, insert a pin or unfolded
paper clip in the hole and push firmly)
6. Eject button
213 4 5
Before you install the DVD-ROM drive, we strongly recommend that you
check that your setup meets the system requirements listed below.
System Requirements
Upgrading the Firmware Flash Memory
To install your DVD-ROM drive in the PC, proceed as follows.
Installing the DVD-ROM Drive
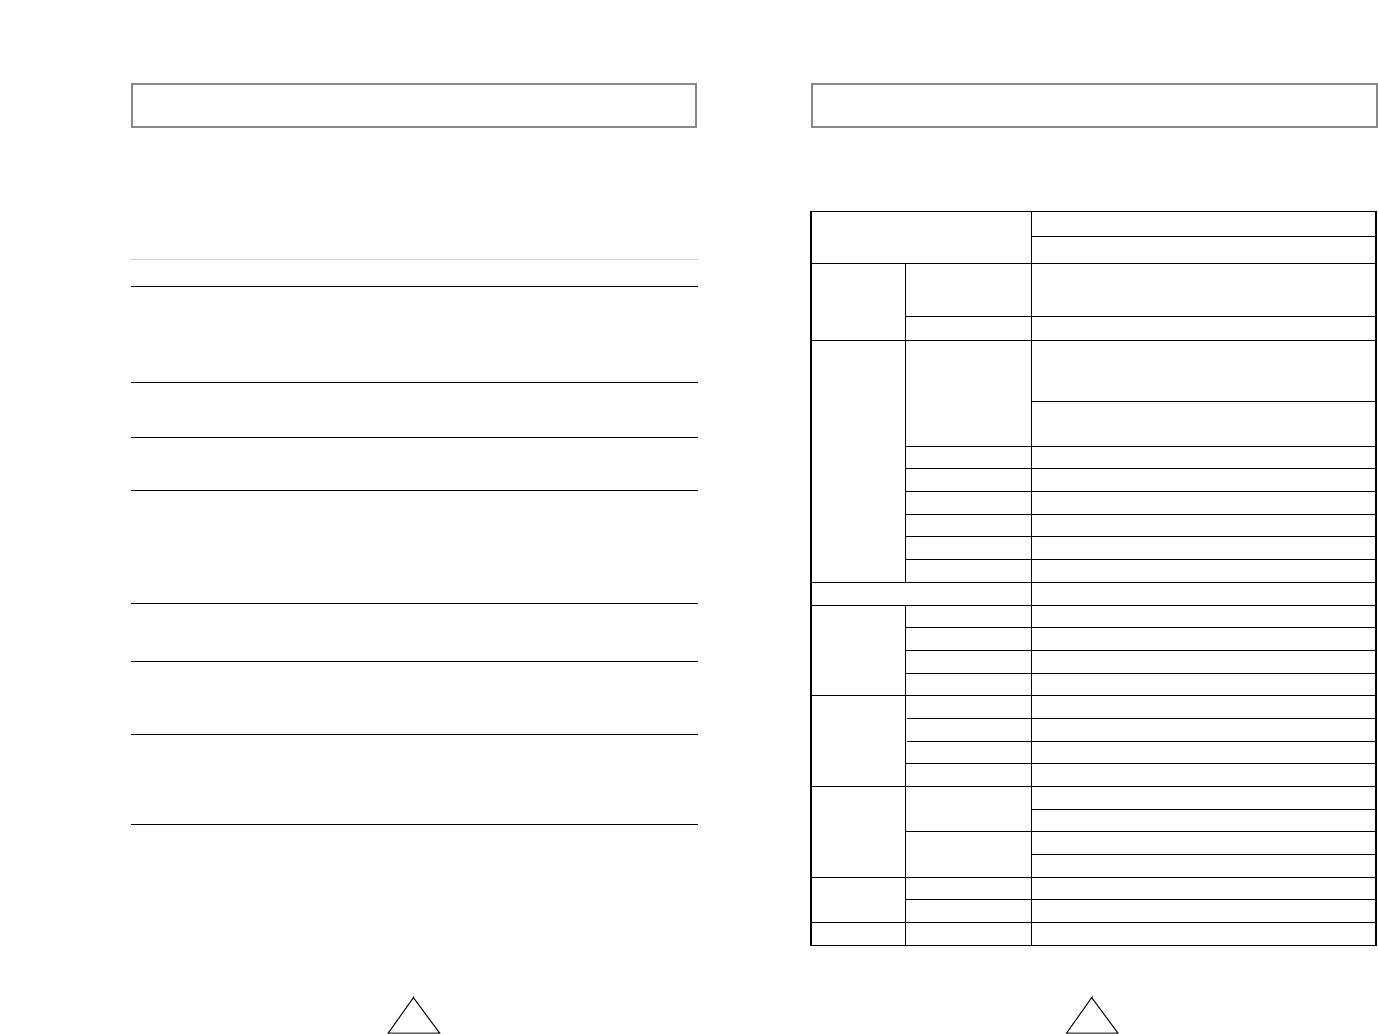
1Make sure that the PC is powered off and disconnected from any power source.
2If necessary, attach a horizontal bracket to both sides of the drive.
3Remove the cover from a free expansion slot and
install the DVD-ROM drive, as shown in the illustration.
Item Description
Computer Intel Pentium III (or higher), 64 MB of RAM (or higher)
with an IDE interface
Free expansion unit 5.25 inch
Disk space 100 MB minimum
Windows version Windows 95 OSR2 / 98 or Windows NT 4.0 (or higher)
Playback of DVD Video PC with Window95 OSR2
DVD-Video playback software or appropriate hardware
(MPEG2 card etc.)
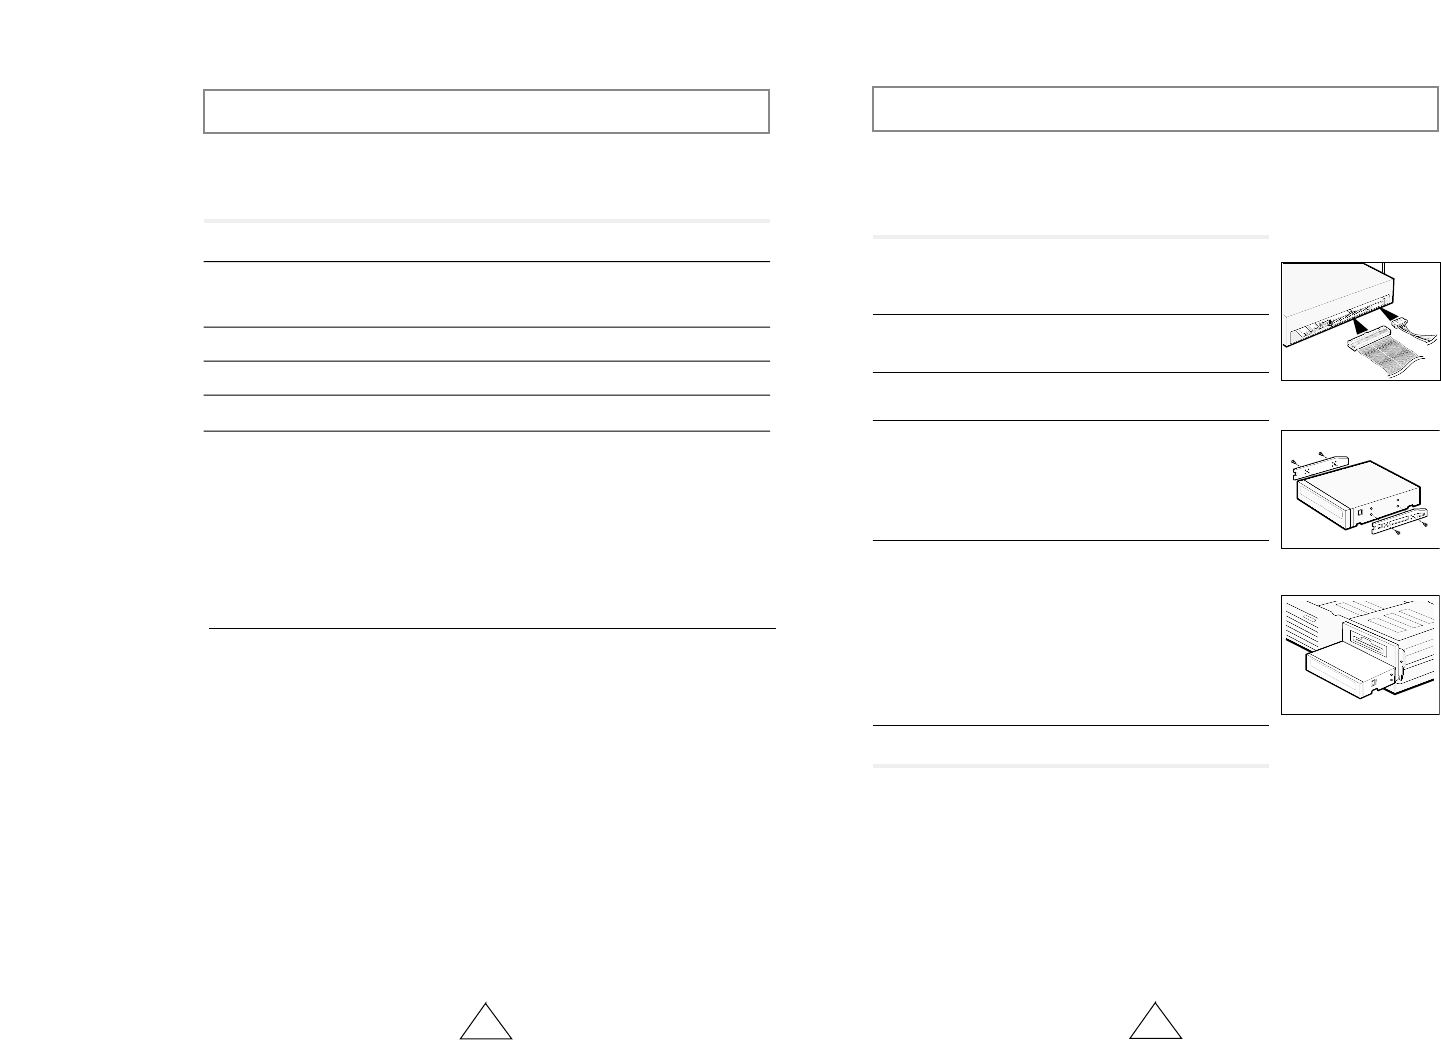
1. Two-pin digital audio output terminal for use with a sound or MPEG
card supporting digital audio features
2. Four-pin sound output terminal for use with a sound card (refer to the
sound card documentation for further details)
3. Master/slave select terminal
4. Forty-pin host IDE interface connector
5. Four-pin power terminal
The product firmware can be upgraded by downloading the updated file from the
following Web site:
http://www.samsungelectronics.com
●Use of the brackets depends on your computer
model; you can purchase these accessories
separately from your computer dealer.
●If you have no free expansion slot, install the
drive in place of the diskette drive.
DVD-ROM drive
4
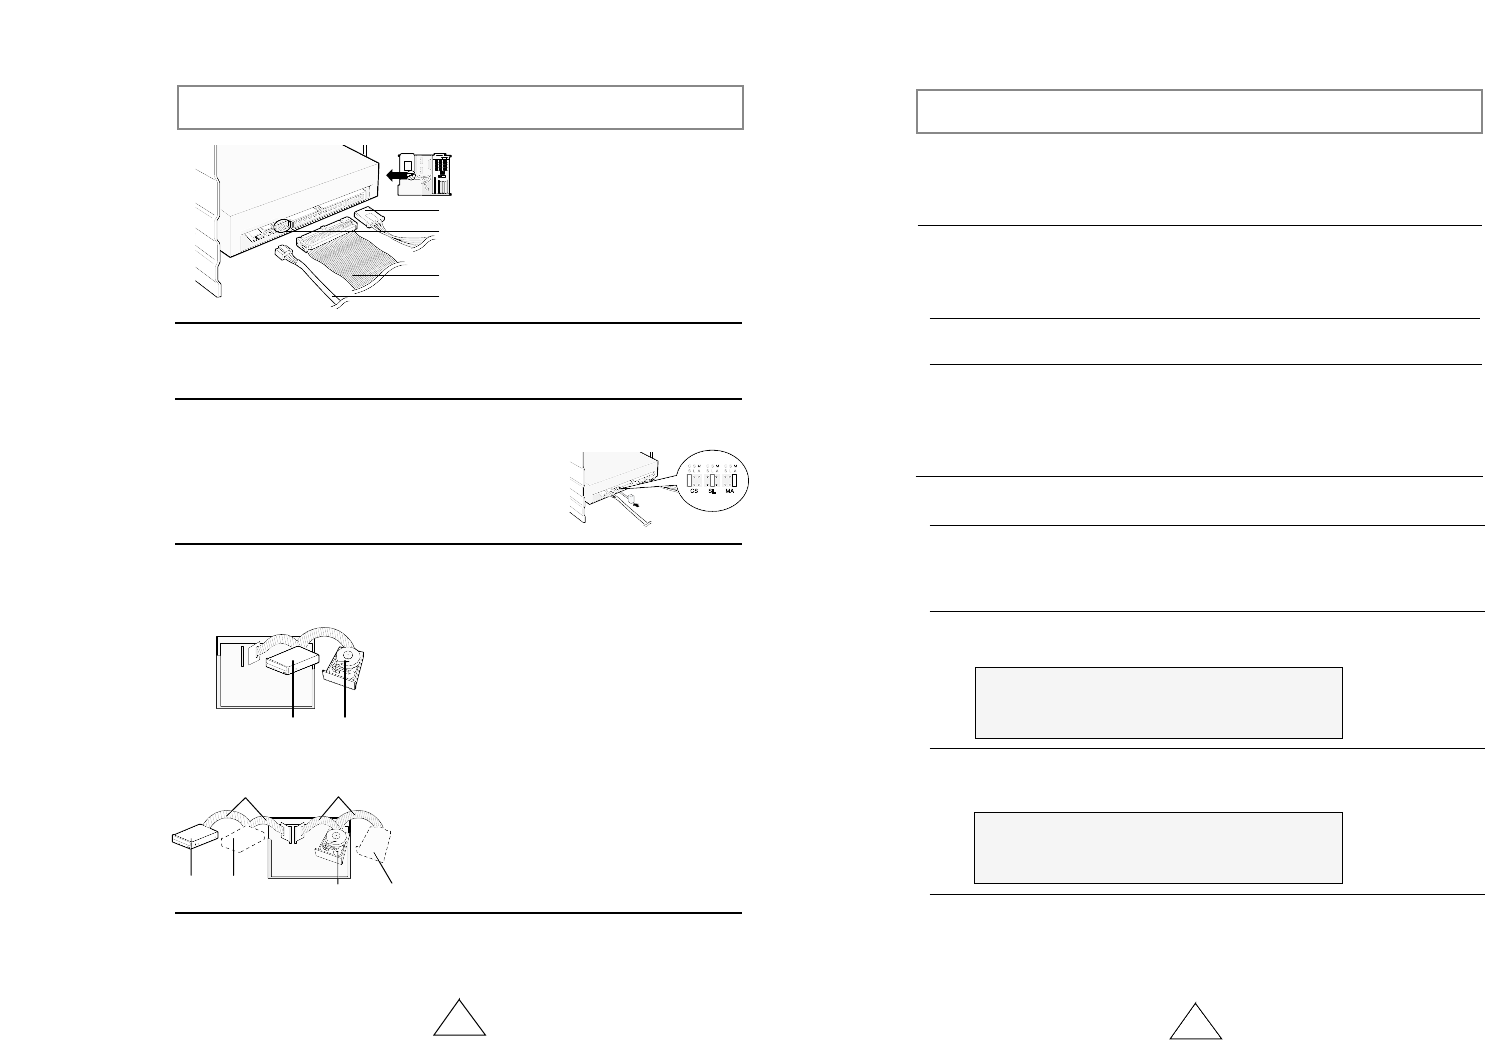
Connecting the Cables
1. Power cable
2. Master/slave select terminal
3. IDE cable
4. Audio cable
1Connecting the power cable
The 4-pin power cable from the internal power unit of your computer must be
connected to the power terminal on the rear of the DVD-ROM drive.
2Installing a jumper on the master/slave select terminal
Install the jumper in the correct position on the terminal:
MA to use the device in the master mode
SL to use the device in the slave mode
CS to control the device via a CSEL host interface signal
See Step 3 for further details.
3Connecting the IDE cable
Two configurations are possible.
●The DVD-ROM drive is the only IDE device in addition to the hard disk.
4Connecting the audio cable from a sound card
Connect the 4-pin audio cable between the sound output terminal on the DVD-
ROM drive and the audio input terminal on the sound card.
Install the jumper in the SL position (Slave).
Connect the 40-pin flat IDE cable from the IDE port
on the mother board, first to the DVD-ROM drive
and then to the hard disk.
Install the jumper in the MA position (Master).
Connect the 40-pin flat IDE cable from a second
IDE port on the mother board directly to
the DVD-ROM drive or first to another additional
IDE drive and then to the DVD-ROM drive.
IDE port
Mother board
DVD-ROM
(SL) Hard disk
(MA)
●You already have an additional IDE device installed in your computer.
Mother
board
Second IDE cable
DVD-ROM
(MA) CD-ROM
(SL) Hard disk
(SL) Hard disk
(MA)
First IDE cable
5
Setting Up the Device Driver
◆
Automatic Setup
◆
Manual Setup
LAST DRIVE = Z
- - - - - - - - - - - - - - - - - - - - - - - - - - - - - - - - - - - -
- - - - - - - - - - - - - - - - - - - - - - - - - - - - - - - - - - - -
DEVICE = C :\SAMSUNG\SSCDROM.SYS /D : SSCD000 /V
- - - - - - - - - - - - - - - - - - - - - - - - - - - - - - - - - - - -
- - - - - - - - - - - - - - - - - - - - - - - - - - - - - - - - - - - -
C :\SAMSUNG\MSCDEX /D:SSCD000
1Insert the setup diskette in the diskette drive and change the directory to A:,
where A: is the diskette drive.
To do so, type A: after the C:\ prompt and press [Enter].
2Type CDSETUP and press [Enter].
3Reboot the computer.
1Make the C:\SAMSUNG directory.
2Copy the files from the diskette to the C:\SAMSUNG directory.
To do so, type COPY A:*.*C:\SAMSUNG after the C:\ prompt and press
[Enter].
3Edit the CONFIG.SYS file.
Add the DEVICE=C:\SAMSUNG\SSCDROM.SYS \D:SSCD000 /V entry.
4Edit the AUTOEXEC.BAT file.
Add the C:\SAMSUNG\MSCDEX /D:SSCD000 entry.
5Reboot the computer.

6 7
Installing the Device Driver
Using the DVD-ROM Drive
Storing and Cleaning Your Discs
No additional device driver is needed for Windows 95/98/NT, as the default
Windows device driver is used.
You can check that the DVD-ROM drive has
been correctly detected by Windows. To do so, proceed as follows.
1Double-click on the My Computer icon on your desktop.
2Double-click on the Control Panel folder.
3Double-click on the System icon.
4Click on the Device Manager tab.
5Expand the CD-ROM branch.
The SAMSUNG DVD-ROM SD - *** device name is displayed.
The SAMSUNG device driver enables discs in the DVD-ROM drive to be read but
not recorded in an MS-DOS environment; the driver is located in the D driver folder
on the CD record utility disc.
DVD Region Protection Coding (RPC):
The RPC feature is supported on DVD players and is used with DVD-video
discs (such as movies). Currently, the motion picture industry has divided the
world into different regions or zones that correspond to the regional markets
into which the motion picture industry releases movies. Simply put, RPC codes
are placed on movies marketed throughout the world, based on the region of
the world in which they are being sold. These RPC codes help control and pre-
vent pirating of new movies into other motion picture regions prior to their true
release dates within those markets.
The SD-610/612 DVD-ROM drive supports RPC phase II. In the RPC-2
mode, the local code can be changed by users. RPC-2 is selected by
default for the SD-610/612 DVD-ROM drive. You can change the region
code up to five times via an MPEG application.
Please contact your dealer or local SAMSUNG representative if you
wish to change the local code more than five times.
To play audio or video CDs in your DVD-ROM drive, proceed as follows.
1Push the power button and boot the computer.
2After booting the computer, open the disc
compartment by pressing the Eject button.
3Insert the disc (CD/DVD) with the label on the
disc facing upwards and close the disc
compartment by pressing the Eject button.
The indicator light comes on.
4Play the disc (CD/DVD).
1Do not place a disc in direct sunlight.
2Store a disc vertically in a well-ventilated and
stable location.
3Do not write or attach a label on a disc.
4Do not drop a disc or place heavy objects on it.
5Do not touch the surface of a disc; hold it by
the edges.
6To clean a disc, polish lightly from the inside
of the disc to the outside with a soft cotton cloth.
7Do not leave the disc compartment open
when you are not using it.
Playing Audio CDs
Run the CD player supplied with Windows or your sound card. You can listen to
the CD by connecting headphones to the appropriate connector. If you have
installed the appropriate player, such as Microsoft Windows Media Player, you can
adjust the volume using the headphone volume control on the drive front panel.
Playing Video CDs
Set up and run the SOFT MPEG program.
To ensure a long service life for your discs and drive, follow the precautions
below when storing and cleaning your discs.
8 9
Solving Technical Problems
SAMSUNG continually strives to improve its products. Both the design specifications and
these user instructions are thus subject to change without notice.
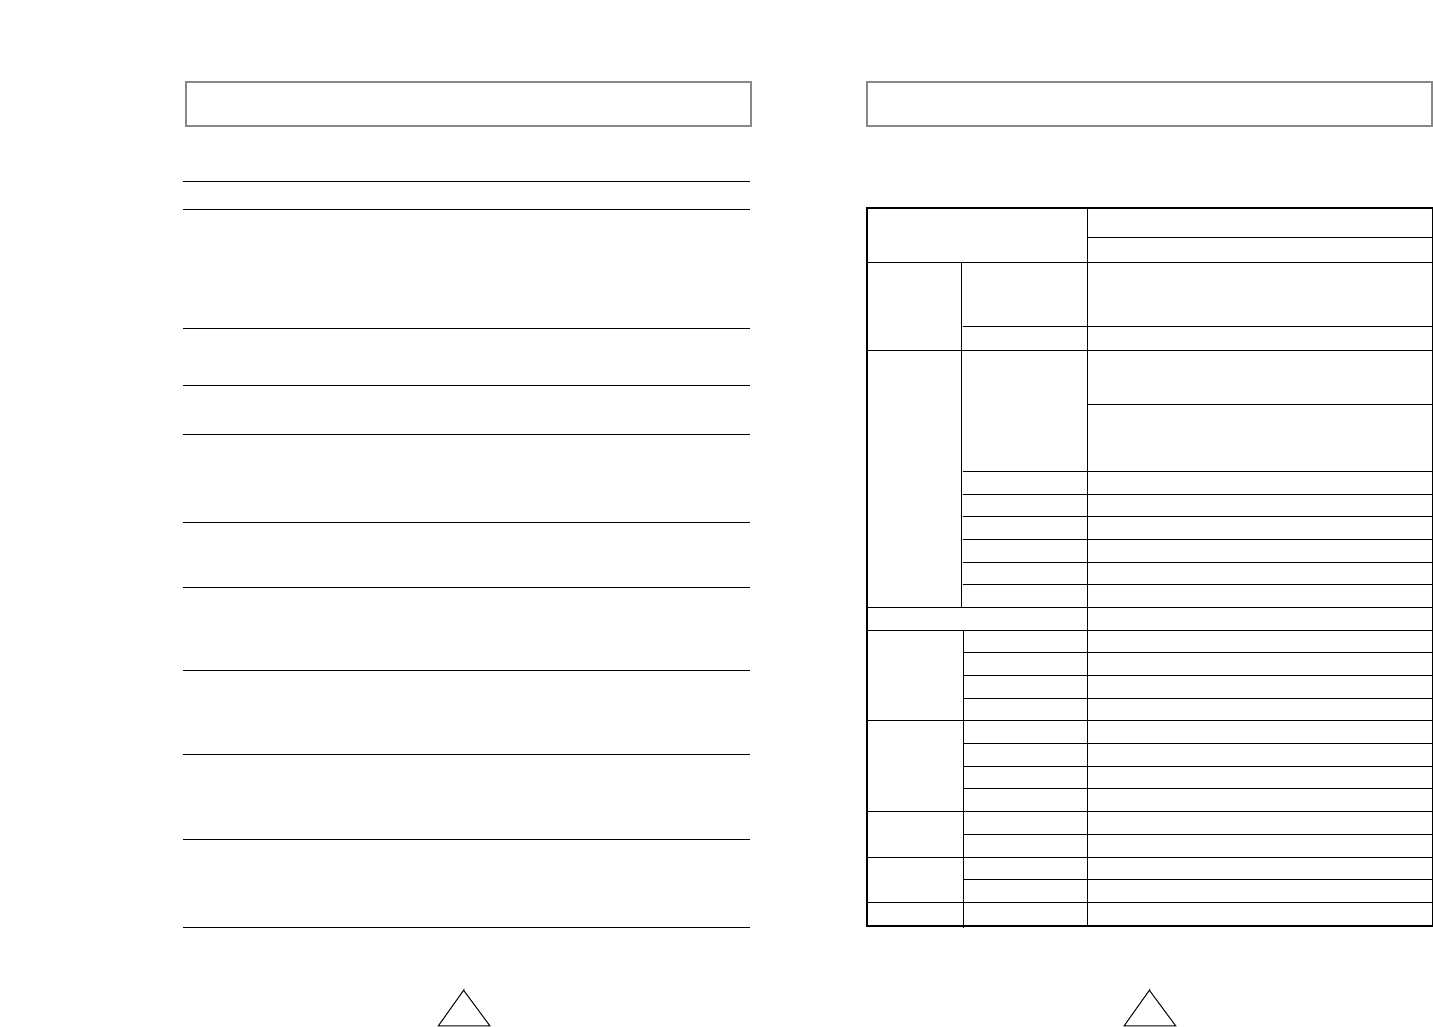
Technical Specifications
Problem Meaning / Solution
The DVD-ROM drive is not
detected by the computer.
◆Check that the power, audio and IDE cables are correct-
ly connected to the computer.
◆Change the IDE cable and reconnect it to the computer.
Preferably, connect a second IDE cable to the DVD-ROM
drive in master mode; see page 7 for further details.
◆Check the position of the jumper in the master/slave
select terminal.
◆Reinstall the device driver or update it with the latest
version by downloading it from the Samsung Web site.
◆This case may occur when there is a Windows instal-
lation problem; reinstall Windows.
◆Check whether the audio cable is correctly connected
to the sound output terminal on the DVD-ROM drive
and the sound card CD-IN terminal.
◆Check that the sound card is operational.
◆Adjust the volume control.
◆Install the latest version of the device driver.
◆Check whether the CD is of good quality and clean it,
if necessary.
◆Check that the power cable is correctly connected.
◆Power off and disconnect the PC. Insert a pin or
unfolded paper clip in the emergency hole and push
firmly until the disc compartment opens.
◆Adjust the size of the replay screen.
◆After checking the display resolution, adjust it, if nec-
essary.
◆The computer may not recognize the disc if you start
playback too quickly after inserting the disc.
Open and close the disc compartment and try again.
◆Clean the disc and try again.
◆The interface mode of the sound card is AT-BUS.
You must therefore connect the DVD-ROM drive to
the IDE port on the PC mother board, rather than to
the sound card, or install an IDE-compatible sound
card.
After installing the DVD-ROM
drive, the PC gets slower.
The DVD-ROM drive is not
recognized by MS-DOS.
The DVD-ROM drive is not
detected by Windows.
No sound is heard from an
audio CD.
A CD is not read or is read
too slowly.
The disc compartment will not
open.
When the MPEG software plays a
Video CD, the pictures are not regu-
lar and the running speed is too slow.
The Disc is not in message is
displayed even though a disc
has been inserted.
The DVD-ROM drive is not
detected after it is connected
to a sound card.
Sustained :
Max. 21,600KB/sec (16X) / Max. 7,200KB/sec (48X)
DISC
ERROR RATE
REAR PANEL
FRONT PANEL
OPERATING
ENVIRONMENT
GENERAL
RELIABILITY
DRIVE
PERFORMANCE
Disc diameter
Disc types supported
Data transfer rate
Access time(1/3stroke)
Data buffer capacity
Laser
Slide mechanism
Spindle motor
Loading mechanism
Eject button
Indicator(LED)
Headphone output
Volume control
Dimensions
Net weight
Operation
Storage
Required power
Interface connector
Audio output
Jumper block
MTBF
DVD-ROM, DVD-VIDEO, CD-DA(Audio), CD-ROM,
CD-ROM XA, CD-Plus, CD-Extra, Photo-CD(Single,Multi-session),
Video CD ready, Enhanced CD, CD-I/FMV, CD-R,CD-RW
12cm or 8cm
PIO Mode 4 : 16.6MB/sec
Multiword DMA mode 2 : 16.6MB/sec
UDMA mode 2 : 33MB/sec
512KB
Semiconductor Laser
Stepping motor
Brushless motor
Tray. DC motor(Soft Eject). Horizontal/Vertical
Auto eject or Auto inject
BUSY
Stereo mini-jack(
Ø3.6mm)
0.60V±20%(rms) 33Ω
Wheel knob
+5VDC : 2.0A, +12VDC : 1.0A (rms)
ATAPI
Line out 0.70V ±20%(rms) : 47KΩ
Device configuration jumper
Temperature : 5 ~ 45°C, Humidity : 8 ~ 80%
Temperature : -20 ~ 55°C, Humidity : 5 ~ 85%
148,2(W) x 42(H) x 202(D)mm
880g
125,000 POH(Duty 20%)
10-15 / MODE1:10-12, MODE2:10-9
110ms / 90ms(Typical)
ITEM SD - 616
DVD / CD
* In case of the PC without UDMA, it may have a different DVD data transmission rate.
1
DVD-ROM LAUFWERK
SD-616
Bedienungsanleitung
Sicherheitshinweise
Die folgenden Abbildungen veranschaulichen die Vorsichtsmaßnahmen, die bei der
Benutzung des DVD-ROM-Laufwerks getroffen werden müsen.
Das Laufwerk darf auf keine andere Weise benutzt werden als in diesem Handbuch beschrieben.
Wasser und Feuchtigkeit vom Gerät fernhalten, da sonst Gefahr durch
elektrische Schläge besteht bzw. Geräteschäden auftreten können.
ACHTUNG Versuchen Sie nicht, das DVD-ROM-Laufwerk selbst zu reparieren.
Wenden Sie sich bei allen eventuellen Reparaturen an Ihren Händler
oder Ihre SAMSUNG-Vertretung vor Ort.
GARANTIE Garantie-Reparaturen müssen von Samsung-Fachhändlern oder
Samsung-Vertragswerkstätten ausgeführt werden.
Vorsichtsmaßnahme
1. Vor dem Gebrauch von Discs sollte man diese auf Sprünge kontrolieren.
Fall ein Sprung vorhanden ist (besonders am Rande des Zentralloches),
empfehlen wir dringend, eine Kopie der CD zu erstellen.
Bei weiterem Benutzen der CD, können zusätzliche Sprünge auftreten,
die die CD zerstören und dadurch auch das Laufwerk.
2. Bei Benutzung von Discs achten Sie bitte auf gute Quallität.
Es finden sich immer wieder Produkte, die illegal hergestellt werden,
verkratzt oder beschädigt sind.
* Beim Starten (SPIN-UP) und beim Anhalten(STOP) entsteht ein Reibungsgeräusch.
Dieses ist kein fehlerhaftes Geräusch sondern auf das ABS(Auto Balance Systeme)
zurückzuführen.
http://www.samsungelectronics.com
Vorderseite des DVD-ROM-Laufwerks
Rückseite des DVD-ROM-Laufwerks
2 3
1 Kopfhöreranschluß
An diese Buchse können Sie einen Stereo-Kopfhörer mit 3,6 mm-Klinkenstecker
anschließen.
2 Lautstärkeregler
Mit diesem Regler wird die Lautstärke des Kopfhörers eingestellt.
☛ Der Kopfhörer-Anschluß und die Lautstärke-Einstelltasten sind nur funktionsfähig,
☛ wenn die erforderlichen Software-Utilities installiert wurden. Sie können zum Beispiel
☛ den Microsoft WINDOWS Media Player benutzen.
3 LED
Sie leuchtet, wenn auf einer DVD/CD Disc ein Zugriff erfolgt.
4 Discschublade
Die Discschublade öffnet und schließt sich automatisch, wenn die Taste Open/Close
gedrückt wird.
5 Notöffnung
Wenn sich die Schublade nach dem Drücken der Taste Open/Close nicht öffnet,
stecken Sie einen kleinen Metallstiff (z.B. von einer aufgebogenen Büroklammer)
in dieses Loch, um die Schublade zu öffnen.
6 Stop(Open/Close)-Taste
Drücken Sie diese Taste während der CD-ROM-Wiedergabe, um die CD zu stoppen.
Bei gestoppter bzw. nicht eingelegter CD drücken Sie diese Taste, um die CD-ROM-
Schublade zu öffnen bzw. zu schließen.
213 4 5
1 Digitaler Audioanschluß
Über diesen Anschluß können Sie eine Karte die einen digitalen Ausgang besitzt
an das Laufwerk anschließen (z.B. manche Sound- oder MPEC-Karten).
2 Audio-Ausgangsanschluß
Über diesen 4poligen Steckverbinder kann das Laufwerk mit einer Sound-Karte
verbunden werden.
➢Diese Funktion wird in der vorliegenden Anleitung nicht ausführlich beschrieben.
Sehen Sie in der Dokumentation für das Audio-Zubehör nach.
3 Jumper für Geräte-Konfiguration
Normalerweise sieht die vorgegebene Konfiguration wie folgt aus:
☛Überprüfen Sie, daß die vorliegende Einstellung der abgebildeten Einstellung entspricht.
Wenn dies nicht der Fall ist, einfach den Jumper entfernen und in die richtige Stellung
bringen.
4 Host IDE-Schnittstellen- Anschluß
Schließen Sie das 40polige Flachbandkabel von der IDE-Schnittstelle an diesen
Eingangs-/Ausgangs-Schnittstellen-Anschluß an.
5 Stromversorgungsanschluß
Der Stromversorgungsanschluß ist ein vieradriger Stecker.
C
SS
LM
A
COMPACT
12 3 4 56
Betrifft... Beschreibung
Art des Computers Intel Pentium III, RAM 64MB(oder mehr)
mit einer IDE Schnittstelle (oder ein 100%
IBM-kompatibler Computer)
5,25 ZollFreie Erweiterungseinheit
Freier Speicherplatz auf Festplatte mindestens 100 MB
Windows-Version ab 95 OSR2 / 98
Abspielen vom DVD Video PC mit Window95 OSR2 / 98, DVD-Video
Abspielsoftware und passende Hardware.
4
Bevor Sie das DVD-ROM Laufwerk einbauen, sollten Sie sich unbedingt vergewissern,
daß Ihr Computer die nachstehenden System-Anforderungen erfüllt.
System-Anforderungen
◆
Regionale Codierung (RPC: Region Protection Code)
Regionschutzcode (RPC) von DVD Discs: Diese Besonderheit wird vom DVD
Abspielgeräten unterstützt und wird für die DVD Video Discs (z.B. Filme) benötigt.
Die weltweite Filmindustrie hat die Welt in verschiedenen Regionen aufgeteilt. Diese
Regionen oder Zonen beziehen sich auf die regionalen Filmmärkte in die Filme verkauft
werden sollen. Durch einsetzen eines RPC Codes auf der CD kann diese nur in den
freigegebenen Regionen, mit Abspielgeräte dieses Codes, abgespielt werden.
Der RPC Code soll vor Piraterie von neuen Filmen vorbeugen.
Das DVD Laufwerk SD-610/612 unterstützt RPC der Phase II. RPC 2 läßt die Änderungen
des Regionalcodes durch den Benutzer zu. Das DVD SD-610/612 Laufwerk hat RPC 2
als Standard. Der Regionalcode wird in der MPEG Software eingestellt und kann
bis zu fünft mal von Benutzer verändert werden.
5
Bauen Sie das DVD-ROM Laufwerk in horizontaler Lage in den Computer ein. Achten Sie
dabei darauf, daß sich die Taste Open/Close auf der rechten Seite befindet.
1Den Computer ausschalten. Nicht vergessen, die Einstellung des
Konfigurations-Jumpers auf der Rückseite des DVD-ROM
Laufwerks zu überprüfen.
2Die Abdeckung vom PC (Zentraleinheit des Computers)
abnehmen.
3Die Blende für die 5,25-Zoll-Einheit, in der das DVD-ROM
Laufwerk installiert werden soll, entfernen.
4Das IDE Schnittstellenkabel und die Stromversorgungskabel im
Computer an das DVD-ROM Laufwerk anschließen.
☛Die Steckverbinder sind so beschaffen, daß sie nur in einer
Stellung passen. Üben Sie keine Kraft aus, wenn sie nicht zu
passen scheinen.
5Das DVD-ROM Laufwerk in die Einheit einbauen und mit den
Befestigungsschrauben (empfohlen werden Standardschrauben
M3x6x4) befestigen.
☛◆Je nach PC-Modell müssen eventuell Führungsschienen
an dem Laufwerk angebracht werden, damit das Laufwerk
gut fixiert wird.
◆Wenn Schrauben verwendet werden, die länger sind als die
empfohlene Standardgröße, kann das Laufwerk beschädigt
werden.
66Die Abdeckung wieder am PC anbringen.
Einbauen des DVD-ROM Laufwerks
Zum Einbauen des Laufwerks ist folgendermaßen vorzugehen:

6 7
Installieren der Treibersoftware
◆
Automatische Installation
Für WINDOWS 95/98/NT wird kein zusätzlicher Gerätetreiber benötigt.
Es wird der im WINDOWS mitgelieferte Gerätetreiber genutzt.
1
Die 3,5" SETUP Diskette ins FDD einführen und dann auf das A: Laufwerk
wechseln.
Wenn im Display [A:\] erscheint, [CDSETUP] eingeben und die
EINGABE Taste drücken. Die Treiber werden automatisch geladen.
●Das 3,5" FDD wird als A: Laufwerk betrachtet.
[C:\ A:] eingeben und EINGABE Taste drücken.
2
Nach der Installation den Computer neu starten.
3
◆
Manuelles Installieren
1
Einen neuen Ordner anlegen [C:\SAMSUNG].
[SSCDROM.SYS] in diesen Ordner kopieren.
●[C:\ COPY A:*.*C:\SAMSUNG] eingeben und dann EINGABE Taste drücken.
2
[CONFIG.SYS] Datei bearbeiten.
●
DEVICE=C:\SAMSUNG\SSCDROM.SYS /D:SSCD000 /V eingeben.
3
[AUTOEXEC.BAT] Datei bearbeiten.
●C:\SAMSUNG\MSCDEX /D:SSCD000 eingeben.
4
Neustarten des Computer.
5
LAST DRIVE = Z
- - - - - - - - - - - - - - - - - - - - - - - - - - - - - - - - - - - -
- - - - - - - - - - - - - - - - - - - - - - - - - - - - - - - - - - - -
DEVICE = C :\SAMSUNG\SSCDROM.SYS /D : SSCD000 /V
- - - - - - - - - - - - - - - - - - - - - - - - - - - - - - - - - - - -
C :\SAMSUNG\MSCDEX /D:SSCD000
- - - - - - - - - - - - - - - - - - - - - - - - - - - - - - - - - - - -
- - - - - - - - - - - - - - - - - - - - - - - - - - - - - - - - - - - -
Anweisung für den Gebrauch/Lagerung und Pflege von CDs
Dies ist eine Anmerkung zur Vermeidung von Schäden an Ihren CDs.
Bitte beachten Sie die folgenden Hinweise.
1
❈
Bei Berührung der Discoberfläche oder bei Flecken- oder Staubbedeckung der
Disc kann eine Funktionsstörung auftauchen.
Gebrauchsanweisung
1
Discaufbewahrung
2
Discpflegemethode
3
Starten des Computers.
2
Nach dem hochfahren des PCs, drücken Sie
dieTaste zum Öffnen/Schließen der
Disc-Schublade.
3
Nach dem Einschieben der Disc(CD/DVD)
drücken Sie die Taste zum Öffnen/Schließen.
4
Die Disc wird abgespielt.
Spielen die Audio CDs
* Starten Sie das CD-Wiedergabeprogramm, das mit der Soundkarte geliefert wurde.
Oder starten Sie das CD-Wiedergabeprogramm von WINDOWS.
* Durch Einstecken des Kopfhörers in den Kopfhöreranschluß können
Sie Musik hören.
Spielen die Video CDs
* Stellen Sie ein und führen Sie das SOFT MPEG Programm aus.
* damit die Disc-Schublade sich schließt.
1
Nicht unter direkten Sonnenstrahleneinfluß
aufbewahren.
1
Die Discoberfläche
nicht berühren sondern
nur am Discrand
anfassen.
2
Mit einem weichen Tuch
die Disc von innen
nach außen zum
Rande leicht abwischen.
2
Auf einen temperierten und ebenen Platz
legen.
3
Kein Kratzer, keine Aufkleber...usw. auf
der Disc
4
Die Disc nicht zu stark pressen oder fallen
lassen.
Technische Daten
9
Dauerleistung :
Max. 21.600KB/sec (16X) / Max. 7.200KB/sec (48X)
CD
FEHLERRATE
RÜCKSEITE
BEDIENFELD
VORDERSEITE
UMGEBUNGS-
BEDINGUNGEN
ALLGEMEINES
LEISTUNGS-
DATEN
CD - Durchmesser
CD - Typen
Datenübertragungs-
rate
Zugriffszeit(1/3 Strob)
Datenpufferkapazität
Laser
Bewegungsmechanismus
Spindelmotor
Lademechanismus
Open/Close-Taste
LED-Anzeige
Kopfhörer-AnschluB
Lautstärkeregler
Gerätebetrieb
Lagerung
Leistungsaufnahme
Schnittstellen-Anschluß
Audio-Ansgang
Jumper-Block
Abmessungen (BxHxT)
Nettogewichtt
ZUVERLÄSSIGKEIT
MTBF
DVD-ROM, DVD-VIDEO, CD-DA(Audio). CD-ROM. CD-ROM XA.
CD-Plus. CD-Extra. Photo-CD(Single/Multi-session), Video CD
ready. Enhanced CD. CD-I/FMV, CD-R, CD-RW
8 oder 12cm
PIO Mode 4 : 16,6MB/sec. Multiword DMA mode 2 : 16,6MB/sec
UDMA mode 2 : 33MB/sec
110ms / 90ms(Typisch)
512KB
Halbleiter Laser
Getriebemotor
Stromrichter motor
Disc-Schublade. Horizontal/Stehend
Automatischer Einzug/Auswurf
Rändelrad
leuchtet bei Betrieb
Stereoklinkenstecker(Ø3,6mm) 0,60V±20%(vrms)33Ω
+5V Gleichspannung, 2,0A, +12V Gleichspannung,1,0A (
rms
)
ATAPI
Line out 0,70V ±20%(vrms) : 47KΩ
Jumper für Geräte-Konfigurierung
Temperatur : 5 ~ 45°C
Luftfeuchtigkeit : 8 ~ 80% (nicht kondensierend)
Luftfeuchtigkeit : 5 ~ 85% (nicht kondensierend)
Temperatur : -20 ~ 55°C
148,2(W) x 42(H) x 202mm (Einschliesslich front bezel)
880g
125.000 POH(Auslastung 20%)
10-15 / Modus1:10-12, Modus2:10-9
Betrifft... DVD / CD
SAMSUNG ist dauernd bestrebt, ihre Erzeugnisse zu verbessern. Dadurch ändern sich Design
und Bedienungsanweisungen jederzeit ohne vorherige Ankündigung.
8
Falls Probleme auftreten
☛Beim Starten (SPIN-UP) und beim Anhalten(STOP) entsteht ein
Reibungsgeräusch Dieses ist kein fehlerhaftes Geräusch sondern auf das
ABS(Auto Balance Systeme) zurückzuführen.
Problem Ursache/Abhilfe
Das DVD-ROM Laufwerk wird
nicht erkannt.
Nach dem Einbau des DVD-ROM
Laufwerkes verlangsamt sich die
Geschwindigkeit des PCs.
◆Überprüfen der Strom-, Audio- und IDE Kabel.
◆Auswechseln des IDE Kabels ( Möglichst am
anderen IDE Port verbinden ).
◆Überprüfen der Master/Slave Einstellung
Das DVD-ROM Laufwerk wird
unter DOS nicht erkannt. ◆Den DOS-Treiber wieder neu installieren oder
eine neue Version des Treibers von der Samsung
Homepage herunter laden und installieren.
Das DVD-ROM Laufwerk wird
unter WINDOWS nicht erkannt. ◆Dieses kann auftreten bei einer fehlerhaften
WINDOWS Installation. Dann sollte WINDOWS
neu installiert werden.
Kein Klang aus der Audio CD ◆Überprüfen des Audiokabels, ob es richtig mit
dem DVD-ROM Laufwerk (Audioausgang) und
der Soundkarte (CD IN ) angeschlossen ist.
◆Überprüfen der Funktionalität der Soundkarte
◆Lautstärke verändern durch den Soundregler.
Die CD wird nicht erkannt und
die Geschwindigkeit
verlangsamt sich.
◆Installieren der neuesten Version des Treibers
( z.B. aus dem Internet ).
◆Überprüfen der CD. Gegebenenfalls reinigen.
Beim Benutzen von S/W MPEC
treten ständige Unterbrechungen
der Video CD Wiedergabe auf,
und die Geschwindigkeit
verlangsamt sich.
◆Verkleinern der Wiedergabebildfläche auf dem
Bildschirm.
◆Überprüfen der Auflösungsstufe des Bildschirms.
Gegebenenfalls die Auflösungsstufe in der
Systemsteuerung von WINDOW verändern.
Anzeige " keine CD vorhanden"
trotz eingelegter Disc. ◆Wenn die Starttaste zu schnell gedrückt wird, kann der
Computer die Disc nicht erkennen.
In diesem Fall öffnen und schließen der
Schublade und erneut versuchen.
◆Reinigen der CD und erneut versuchen.
Der CD Schublade öffnet sich
nicht. ◆Überprüfen der Strom zufuhr, ob das Stromkabel,
richtig angeschlossen ist.
◆Einen kleinen Stift (z.B. Büroklammer) in die Notöffnung
stecken und stark drücken. Die Schublade öffnet sich.
* Bei PCs ohne Unterstützung von UDMA , kann die Datenübertragungsrate abweichen.
SD -616