Samsung Electronics Co SGHI688 PCS GSM/EDGE Phone with Bluetooth User Manual SGH i688
Samsung Electronics Co Ltd PCS GSM/EDGE Phone with Bluetooth SGH i688
Users Manual

Some of the contents in this manual may differ from your device depending on the software of
the device or your service provider.
World Wide Web
http://www.samsungmobile.com
Code No.:GH68-xxxxxA
English. 01/2008. Rev. 1.0

SGH-i688
user manual
Draft 01
2008. 01. 24
SW version: i688ZCHA1
(PHONE, PDA)
Using this manual
This user manual has been specially
designed to guide you through the
functions and features of your device. To
get started quickly, refer to Introduce
your device and Basic functions.
Instructional icons
Before you start, familiarise yourself with
the icons you will see in this manual:
For any topics not covered in this
guide, please refer to the
Help
embedded in the Windows Mobile
®
6
Professional operating system.
Warning—situations that could
cause injury to yourself or
others
Caution—situations that could
cause damage to your phone
or other equipment
Note—notes, usage tips, or
additional information
X
Refer to—pages with related
information; for example:
X
p. 12 (represents “see page
12”)
→
Followed by—the order of
options or menus you must
select to perform a step; for
example: Tap
Start
→
Programs
→
Camera
(represents
Start
, followed by
Programs
, followed by
Camera
)
[ ]
Square brackets—phone keys;
for example: [ ] (represents
the Power key)
< >
Angled brackets—softkeys that
control different functions at
each screen; for example:
<
OK
> (represents the
OK
softkey)

Copyrights and trademarks
Rights to all technologies and products
that comprise this device are the
property of their respective owners:
• This product includes
software licensed from
MS, an affiliate of the
Microsoft Corporation.
Microsoft and software bearing the
Microsoft name are registered
trademarks of the Microsoft
Corporation. Before using this product,
refer to the MICROSOFT SOFTWARE
LICENSE TERMS FOR WINDOWS
MOBILE 6 SOFTWARE Agreement at
the back of this manual for information
about rights and restrictions.
• Java™ is a trademark of
Sun Microsystems, Inc.
•Bluetooth
®
is a registered trademark
of the Bluetooth SIG, Inc.
worldwide—Bluetooth QD ID:
BXXXXXX
2
Contents
Using this manual .......................... 1
Safety and usage information .......... 4
Introduce your device .............. 10
Unpack ....................................... 10
Device layout .............................. 11
Assemble and prepare
your device............................... 15
Insert the SIM card and battery ..... 15
Charge the battery ....................... 16
Insert a memory card (optional) .... 17
Basic functions ......................... 18
Switch the device on or off ............ 18
Adjust the system and call volumes 19
Enter text ................................... 19
Create a sketch ............................23
Customise the Today screen ..........24
Search your device .......................25
Communication......................... 26
Calls ...........................................26
Push-to-Talk (PTT) .......................29
Messaging ...................................30
Media........................................ 33
Mini Player ..................................33
Camera .......................................34
Contents Manager ........................36
PhotoSlides .................................38
muveeShow .................................39
FM Radio .....................................41
3
Contents
Personal Productivity ............... 43
Contacts ..................................... 43
Alarms ....................................... 45
Calendar ..................................... 46
BCR ........................................... 47
Office Mobile ............................... 49
File Explorer ................................ 50
Notes ......................................... 50
Tasks ......................................... 51
Additional programs ................. 53
Games ....................................... 53
Java ........................................... 53
WordPower ................................. 53
Assisted-GPS ............................... 54
Zoomer ...................................... 55
Web .......................................... 56
Windows Live ...............................56
Windows Live Messenger ...............56
mINFO2008 .................................58
Olympic Communication
Management Service (OCM) ...........58
Connectivity ............................. 59
Bluetooth ....................................59
ActiveSync ..................................61
Troubleshooting ....................... 65
MICROSOFT SOFTWARE LICENSE
TERMS FOR WINDOWS MOBILE 6
SOFTWARE Agreement ............. 70

4
Safety and usage
information
Comply with the following precautions to
avoid dangerous or illegal situations and
ensure peak performance of your device.
Safety warnings
Keep your device away from small
children and pets
Keep your device and all accessories out
of the reach of small children or animals.
Small parts may cause choking or serious
injury if swallowed.
Protect your hearing
Install mobile devices and
equipment with caution
Ensure that any mobile devices or related
equipment installed in your vehicle are
securely mounted. Avoid placing your
device and accessories near or in an air
bag deployment area. Improperly
installed wireless equipment can cause
serious injury when air bags inflate
rapidly.
Handle and dispose of batteries and
chargers with care
• Use only Samsung-approved batteries
and chargers specifically designed for
your device. Incompatible batteries
and chargers can cause serious injuries
or damage to your device.
• Never dispose of batteries in a fire.
Follow all local regulations when
disposing of used batteries.
Listening to a headset at high
volumes can damage your
hearing. Use only the minimum
volume setting necessary to hear
your conversation or music.
5
Safety and usage information
• Never place batteries or phones on or
in heating devices, such as microwave
ovens, stoves, or radiators. Batteries
may explode when overheated.
Avoid interference with pacemakers
Maintain a minimum of 15 cm (6 inches)
between mobile devices and pacemakers
to avoid potential interference, as
recommended by manufacturers and the
independent research group, Wireless
Technology Research. If you have any
reason to suspect that your device is
interfering with a pacemaker or other
medical equipment, turn off the device
immediately and contact the
manufacturer of the pacemaker or
medical equipment for guidance.
Turn off the device in potentially
explosive environments
Do not use your device at refuelling
points (service stations) or near fuels or
chemicals. Turn off your device whenever
directed by warning signs or instructions.
Your device could cause explosions or fire
in and around fuel or chemical storage
and transfer areas or blasting areas. Do
not store or carry flammable liquids,
gases, or explosive materials in the same
compartment as the device, its parts, or
accessories.
Reduce the risk of repetitive motion
injuries
When sending text messages or playing
games on your device, hold the device
with a relaxed grip, press the keys lightly,
use special features that reduce the
number of keys you have to press (such
as templates and predictive text), and
take frequent breaks.

Safety and usage information
6
Safety precautions
Drive safely at all times
Avoid using your device while driving and
obey all regulations that restrict the use
of mobile devices while driving. Use
hands-free accessories to increase your
safety when possible.
Follow all safety warnings and
regulations
Comply with any regulations that restrict
the use of a mobile device in a certain
area.
Use only Samsung-approved
accessories
Using incompatible accessories may
damage your device or cause injury.
Turn off the device near medical
equipment
Your device can interfere with medical
equipment in hospitals or health care
facilities. Follow all regulations, posted
warnings, and directions from medical
personnel.
Turn off the device or disable the
wireless functions when in an
aircraft
Your device can cause interference with
aircraft equipment. Follow all airline
regulations and turn off your device or
switch to a mode that disables the
wireless functions when directed by the
airline personnel.
7
Safety and usage information
Protect batteries and chargers from
damage
• Avoid exposing batteries to very cold or
very hot temperatures (below 0° C/32°
F or above 45° C/115° F). Extreme
temperatures can reduce the charging
capacity and life of your batteries.
• Prevent batteries from contacting
metal objects, as this can create a
connection between the + and -
terminals of your batteries and lead to
temporary or permanent battery
damage.
• Never use a damaged charger or
battery.
Handle your device carefully and
sensibly
• Do not allow your device to get wet—
liquids can cause serious damage. Do
not handle your device with wet hands.
Water damage to your device can void
your manufacturer’s warranty.
• Avoid using or storing your device in
dusty, dirty areas to prevent damage
to moving parts.
• Your device is made of complex
electronics—protect it from impacts
and rough handling to avoid serious
damage.
• Do not paint your device, as paint can
clog moving parts and prevent proper
operation.
• Avoid using the device’s camera flash
or light close to the eyes of children or
animals.
Safety and usage information
8
• Your device and memory cards may be
damaged by exposure to magnetic
fields. Do not use carrying cases or
accessories with magnetic closures or
allow your device to come in contact
with magnetic fields for extended
periods of time.
Avoid interference with other
electronic equipment
Your device emits radio frequency (RF)
signals that may interfere with
unshielded or improperly shielded
electronic equipment, such as
pacemakers, hearing aids, and medical
equipment in homes or vehicles. Consult
the manufacturers of your electronic
equipment to solve any interference
problems you experience.
Important usage information
Use your device in the normal
position
Avoid contact with your device’s internal
antenna.
Allow only qualified personnel to
service your device
Allowing unqualified personnel to service
your device may result in damage to your
device and will void your warranty.
Ensure maximum battery and
charger life
• Avoid charging batteries for more than
a week, as overcharging may shorten
battery life.
• Over time, unused batteries will
discharge and must be recharged
before use.
9
Safety and usage information
• Disconnect chargers from power
sources when not in use.
• Use batteries only for their intended
purpose.
Handle SIM cards and memory cards
with care
• Do not remove a card while the device
is transferring or accessing
information, as this could result in loss
of data and/or damage to the card or
device.
• Protect cards from strong shocks,
static electricity, and electrical noise
from other equipment.
• Frequent writing and erasing will
shorten the life span of memory cards.
• Do not touch gold-coloured contacts or
terminals with your fingers or metal
objects. If dirty, wipe the card with a
soft cloth.
Ensure access to emergency services
Emergency calls from your device may
not be possible in some areas or
circumstances. Before travelling in
remote or undeveloped areas, plan an
alternate method of contacting
emergency services personnel.
Specific Absorption Rate (SAR)
certification information
Y
our wireless phone is a radio transmitter
and receiver. It is designed and
manufactured not to exceed the exposure
limits for radio frequency (RF) energy set by
the Federal Communications Commission
(FCC) of the U.S. government. These FCC
exposure limits are derived from the
recommendations of two expert
organizations, the National Counsel on
Radiation Protection and Measurement
(NCRP) and the Institute of Electrical and
Electronics Engineers (IEEE). In both cases,
the recommendations were developed by
scientific and engineering experts drawn
Safety and usage information
10
from industry, government, and academia
after extensive reviews of the scientific
literature related to the biological effects of
RF energy.
The exposure limit set by the FCC for
wireless mobile phones employs a unit of
measurement known as the Specific
Absorption Rate (SAR). The SAR is a
measure of the rate of absorption of RF
energy by the human body expressed in
units of watts per kilogram (W/kg). The FCC
requires wireless phones to comply with a
safety limit of 1.6 watts per kilogram (1.6
W/kg). The FCC exposure limit incorporates
a substantial margin of safety to give
additional protection to the public and to
account for any variations in
measurements.
SAR tests are conducted using standard
operating positions accepted by the FCC
with the phone transmitting at its highest
certified power level in all tested frequency
bands. Although the SAR is determined at
the highest certified power level, the actual
SAR level of the phone while operating can
be well below the maximum value. This is
because the phone is designed to operate at
multiple power levels so as to use only the
power required to reach the network. In
general, the closer you are to a wireless
base station antenna, the lower the power
output.
Before a new model phone is available for
sale to the public, it must be tested and
certified to the FCC that it does not exceed
the exposure limit established by the FCC.
Tests for each model phone are performed
in positions and locations (e.g. at the ear
and worn on the body) as required by the
FCC.
The highest SAR values for this model
phone as reported to the FCC are:
GSM 1900 Mode(Part 24)
• Head: 0.966 W/Kg.
• Body-worn: 0.997 W/Kg.
For body worn operation, this model phone
has been tested and meets the FCC RF
exposure guidelines whenused with a
11
Safety and usage information
Samsung accessory designated for this
product or when used with an accessory
that contains no metal and that positions
the handset a minimum of 1.5 cm from the
body.
Non-compliance with the above restrictions
may result in violation of FCC RF exposure
guidelines. SAR information on this and
other model phones can be viewed on-line
at www.fcc.gov/oet/fccid. This site uses the
phone FCC ID number, A3LSGHI688.
Sometimes it may be necessary to remove
the battery pack to find the number. Once
you have the FCC ID number for a particular
phone, follow the instructions on the
website and it should provide values for
typical or maximum SAR for a particular
phone. Additional product specific SAR
information can also be obtained at
www.fcc.gov/cgb/sar
.
FCC Notice and Cautions
FCC Notice
• This device complies with Part 15 of
the FCC Rules. Operation is subject to
the following two conditions: (1) this
device may not cause harmful
interference, and (2) this device must
accept any interference received,
including interference that may cause
undesired operation.
• This equipment has been tested and
found to comply with the limits for a
Class B digital device, pursuant to part
15 of the FCC Rules. These limits are
designed to provide reasonable
protection against harmful interference
in a residential installation.This
equipment generates, uses and can
radiate radio frequency energy and,if not
installed and used in accordance with
the instructions, may cause harmful
interference to radio communications.

Safety and usage information
12
The phone may cause TV or radio interference if
used in close proximity to receiving equipment.
The FCC can require you to stop using the
phone if such interference cannot be eliminated.
Vehicles using liquefied petroleum gas
(such as propane or butane) must comply
with the National Fire Protection Standard
(NFPA-58). For a copy of this standard,
contact the National Fire Protection
Association, One Battery march Park,
Quincy, MA 02269, Attn: Publication Sales
Division.
Cautions
Changes or modifications made in the
radio phone, not expressly approved by
Samsung, will void the user’s authority to
operate the equipment.
Only use approved batteries, antennas
andchargers.
The use of any unauthorized accessories
may be dangerous and void the phone
warranty if said accessories cause
damage or a defect to the phone.
Although your phone is quite sturdy, it is
a complex piece of equipment and can be
broken. Avoid dropping, hitting, bending
or sitting on it.
However, there is no guarantee
that interference will not occur in a
particular installation. If this
equipment does cause harmful
interference to radio or television
reception, which can be determined
by turning the equipment off and
on, the user is encouraged to try to
correct the interference by one or
more of the following measures:
-Reorient or relocate the receiving
antenna.
-Increase the separation between
the equipment and receiver.
-Connect the equipment into an
outlet on a circuit different from
that to which the receiver is
conected.
-Consult the dealer or an
experienced radio/TV technician for help
10
1
Introduce your device
Learn about your device’s parts,
accessories, keys, and icons.
Unpack
Your package contains the following
items:
•Handset
• Battery
• Travel adapter
(charger)
•CD-ROM
1
• Extra stylus pen
• PC data cable
In addition, you can obtain the following
accessories for your device from your
local Samsung dealer:
•PC link CD
• Desktop charger
• Headset
• Memory card (microSD)
• Car charger/adapter
• Simple hands-free car kit
1 The CD-ROM contains Microsoft ActiveSync software,
add-on software, and other applications.
The items supplied with your device
and the accessories available at your
Samsung dealer may vary, depending
on your region or service provider.
11
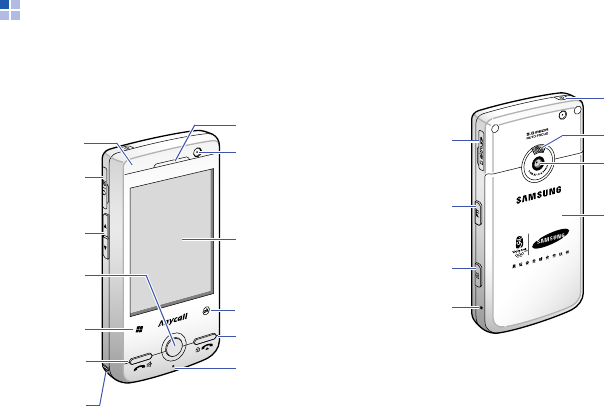
Introduce your device
Device layout
Front view
Rear view
Volume key Touch screen
Centre key
End/Phone
lock key
Mouthpiece
Cancel key
Earpiece
Multi-function
jack
Start key
LED indicator
Send/
Speakerphone
key
Camera lens
Stylus slot
and pen
Flash
Battery
cover
Camera key
Memory card
slot
PTT key
Reset button
Camera
lens
Power key
Introduce your device
12
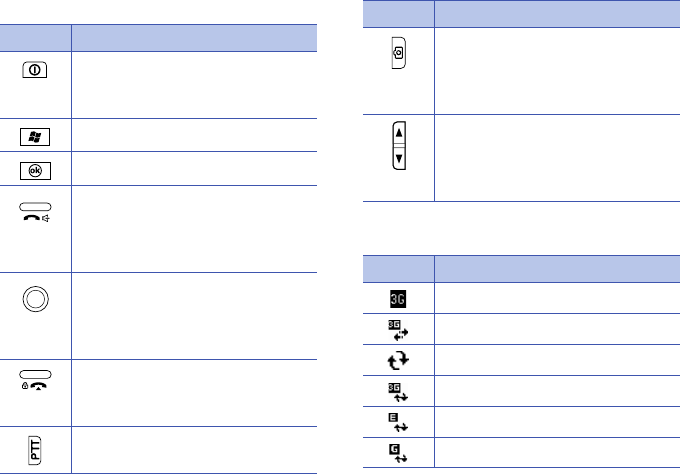
Keys
Icons
Key Description
Turn the device on or off
(press and hold); Activate or
deactivate Sleep mode
Open the Start menu
Return to the previous screen
Open the dialling screen;
make or answer a call;
Activate the speakerphone
during a call (press and hold)
Scroll through lists or menus;
Move the cursor up, down,
left, or right; Press to confirm
your selection
End a call; Return to the
Today screen; Lock the
device (press and hold)
Open the PTT screen (press
and hold)
Turn on the camera (press
and hold); In Camera mode,
take a photo or record a
video
Adjust the volume; during a
call, adjust voice volume;
During an incoming call,
mute the call ringer
Icon Description
UMTS network available
UMTS connected
ActiveSync in progress
ActiveSync over 3G in use
ActiveSync over EDGE in use
ActiveSync over GPRS in use
Key Description
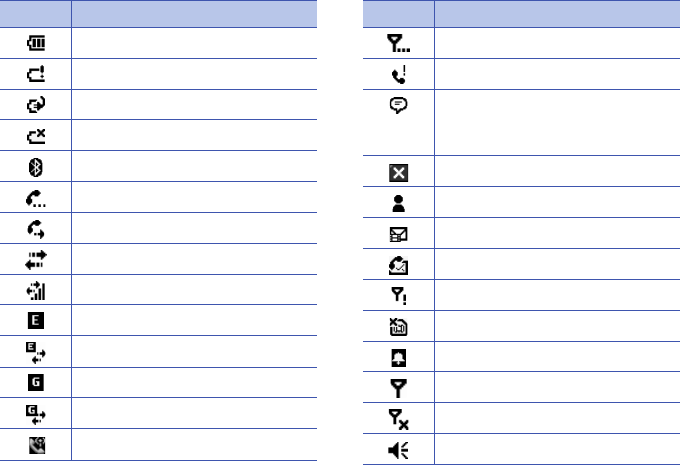
13
Introduce your device
Battery level
Low battery
Battery charging
No battery
Bluetooth activated
Call on hold
Calls are forwarded
Connected to a PC
Data call in progress
EDGE available
EDGE connected
GPRS available
GPRS connected
Internet calling
Icon Description
Searching for a signal
Missed call
More status icons are
available (tap the icon to see
them)
New email or text message
New instant message
New multimedia message
New voicemail message
No signal
No SIM
Pending alarm
Radio connected
Radio off
Ringer on
Icon Description
Introduce your device
14
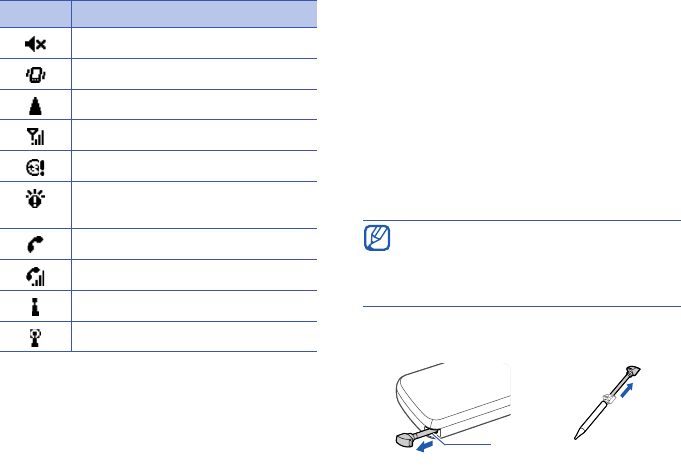
Stylus and touch screen
With the built-in stylus you can perform
the following actions on your device’s
touch screen:
Tap
: Touch the screen once with the
stylus to select commands or launch
applications.
Tap-and-hold
: Tap and hold the stylus
on an item to see a list of available
actions. Tap the action you want to
perform on the pop-up menu.
Drag
: Tap-and-hold the stylus pen on a
scroll bar or text and then drag the stylus
to move the bar or select text.
A special slot for storing the stylus is
included on the back of your device.
Ringer off
Ringer set to vibrate
Roaming
Signal strength
Sync error
Urgent notification (tap the
icon to see the message)
Voice call
Voice call in progress
Wi-Fi activated
Wi-Fi data call in progress
Icon Description
To avoid scratching your device’s
screen, do not use pens, pencils, or
other sharp objects to tap or write on
the screen.
Stylus slot
15
2
Assemble and prepare your device
Get started by assembling and setting up
your device for its first use.
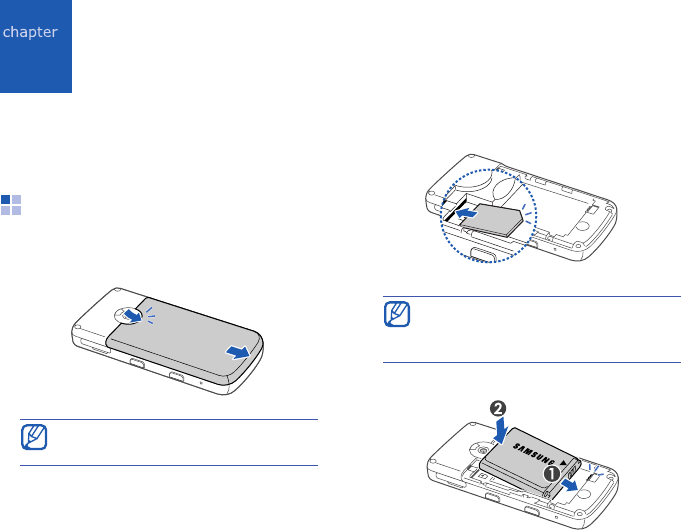
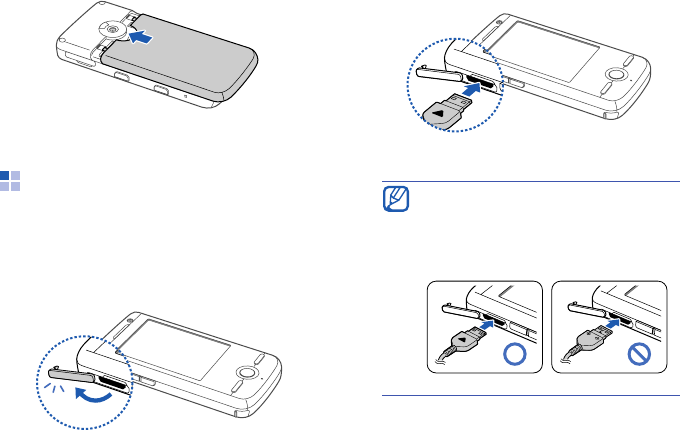
Insert the SIM card and
battery
1. Remove the battery cover.
2. Insert the SIM card.
3. Insert the battery.
If the phone is on, press and hold
the Power key to turn it off.
Place the card in the phone with the
gold-coloured contacts facing
down.
Assemble and prepare your device
16
4. Replace the battery cover.
Charge the battery
Before using the phone for the first time,
you must charge the battery.
1. Open the cover to the multifunction
jack on the side of the phone.
2. Plug the small end of the travel
adapter into the jack.
Improperly connecting the adapter
can cause serious damage to the
device. Any damages by misuse are
not covered by the warranty.
With the triangle facing the
front of your phone
17
Assemble and prepare your device
3. Plug the large end of the travel
adapter into a power outlet.
4. When the battery is fully charged (the
icon is no longer moving), unplug the
travel adapter from the power outlet.
5. Unplug the travel adapter from the
device.
6. Close the cover to the multifunction
jack.
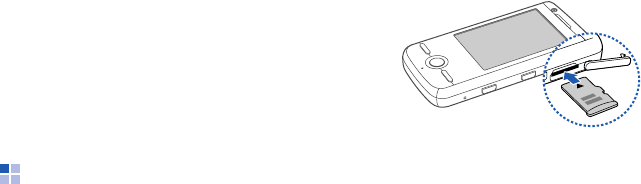
Insert a memory card
(optional)
By inserting a memory card, you can
store multimedia files and messages or
backup your important information. Your
phone accepts microSD
TM
memory cards
up to xx GB (depending on memory card
manufacturer and type).
1. Open the cover to the memory card
slot on the side of the device.
2. Insert a memory card with the label
side facing up.
3. Push the card in the slot until it locks
in place.
To remove the memory card, push it
gently until it disengages from the
device, and then pull the card out of the
slot.
18
3
Basic functions
Learn how to perform basic operations
and use the main features of your device.
Switch the device on or
off
To switch the device on,
1. Press and hold [ ].
2. Enter your PIN (if necessary) and tap
.
To switch the device off, repeat step 1
above.
Disable wireless functions
By disabling your device’s wireless
functions, you can use non-network
services in areas where wireless devices
are prohibited, such as aeroplanes and
hospitals.
To disable wireless functions,
1. From the Today screen, tap to
open.
2. Tap
Phone
.
Your device will show on the Today
screen.
To enable wireless functions, repeat steps
1 and 2 above.
19
Basic functions
Adjust the system and
call volumes
To adjust the system volume (for keys
and applications), tap and drag the
slider for the system volume ( ) or
press the Volume key while using an
application.
To adjust the call volume, tap and
drag the slider for the call volume ( ) or
press the Volume key during a call.
Enter text
With your device’s touch screen and
stylus, you can type or write text and
create drawings in notes, documents,
and messages.
Change the text input method
When you tap a text field, your device
will show an input panel at the bottom of
the screen. You can tap the arrow next to
the input panel and choose one of the
following input methods for entering
text:
• Keyboard ( )
• Letter recognizer ( )
• Block recognizer ( )
• Transcriber ( )
You can tap the input panel icon at any
time to show or hide the input panel.
Change the default text input
method
1. From any text field, tap the arrow next
to the input panel icon.
2. Tap
Options...
Basic functions
20
3. From the
Input Method
tab, choose
an input method.
4. Tap .
Enter text with Keyboard
1. Change the text input method to
Keyboard
(see "Change the text input
method,"
X
19).
2. Tap to show the input panel.
3. Tap characters to enter your text.
To switch to numbers and symbols, tap
123
. To access special characters, tap
áü
.
Enter text with Letter Recognizer
Use the stylus to write individual letters
and numbers on the touch screen.
1. Change the text input method to
Letter Recognizer
(see "Change the
text input method,"
X
19).
2. Tap to show the input panel.
3. Write each character in the writing
area at the bottom of the screen:
• Write upper-case characters in the
ABC
column on the left side of the
writing area.
• Write lower-case letters in the
abc
column in the middle of the writing
area.
• Write numbers and symbols in the
123
column on the right side of the
writing area.
You can also set options for some
input methods.
21
Basic functions
To view demonstrations of how to write
characters, tap
. Other functions are
shown below:
Enter text with Block Recognizer
Use the stylus to write individual letters
and numbers in text in the Palm Grafitti
style.
1. Change the text input method to
Block Recognizer
(see "Change the
text input method,"
X
19).
2. Tap to show the input panel.
3. Write each character in the writing
area at the bottom of the screen:
• Write letters on the left side of the
writing area.
• Write numbers on the right of the
writing area.
Clear (backspace)
Insert symbols
Return
Move the cursor
Insert a space
Drag the stylus upward to change
case (
ABC
,
Abc
, or
abc
). Tap
once on the screen to enter
symbols (
123
or
abc
will change
to .
Basic functions
22
To view demonstrations of how to write
characters, tap
. Other functions are
shown below:
Enter text with Transcriber
With Transcriber, you can write anywhere
on the screen. Unlike Letter Recognizer
or Block Recognizer, you can use cursive
(joined-up) handwriting to write
complete words.
1. Change the text input method to
Transcriber
(see "Change the text
input method,"
X
19).
2. Tap to show the input panel.
3. Write legibly anywhere on the screen.
4. Pause and allow Transcriber to convert
your writing to text.
You can access the following tools from
the Transcriber toolbar:
Clear (backspace)
Move the cursor
Insert a space
Insert symbols
Start a new line
Tap To
Change Transcriber options
View demonstrations of how to
write characters
Open the list of punctuation
marks, symbols, and numbers
Change the input mode to
A
,
a
,
or
123
23
Basic functions
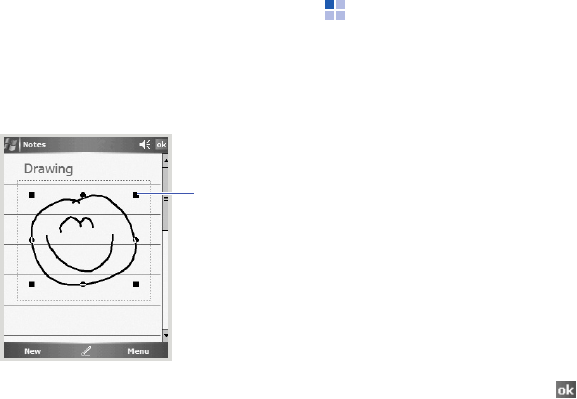
Create a sketch
With Notes, you can create and capture
sketches.
1. From the Today screen, tap
Start
→
Notes
.
2. Tap
Menu
→
Draw
.
3. Make a stroke that crosses at least
three ruled lines to start a drawing
frame.
4. Continue your sketch with strokes that
enter or touching the frame and they
will become part of the drawing.
5. Sketches that do not cross three ruled
lines will be treated as writing.
Insert a space
Start a new line
Move the cursor to the left
Move the cursor to the right
Clear your input
Open the Help application
Tap To
Basic functions
24
To edit a sketch, tap and hold the stylus
pen on the sketch frame until the
selection handles appear. You can then
tap and hold the handles to drag and
resize the drawing or tap
Menu
to access
other options.
Customise the Today
screen
Learn to change themes and background
images, customise your clock, and add or
remove items from the Today screen.
Change your theme or
background image
1. From the Today screen, tap
Start
→
Settings
.
2. On the
Personal
tab, tap
Today
.
3. On the
Appearance
tab, tap a theme
or tap
Use this picture as the
background
→
Browse
to locate a
background image.
4. When you are finished, tap .
Selection
handle
25
Basic functions
Add or remove items on the
Today screen
1. From the Today screen, tap
Start
→
Settings
.
2. On the
Personal
tab, tap
Today
.
3. On the
Items
tab, tap the check boxes
next to each item to add or remove
items.
4. Tap an item’s name and then tap
Move Up
or
Move Down
to arrange
items.
5. When you are finished, tap .
Search your device
1. From the Today screen, tap
Start
→
Programs
→
Search
.
2. Enter part of a file or folder name in
the
Search for
field.
3. Tap
Search
.
To open an item in the
Results
list, tap
the item’s name.
You can restrict your search by
selecting a data type from the
Type
drop-down list.
26
4
Communication
Your device allows you to send and
receive many types of calls and
messages over cellular networks and the
internet.
Calls
Learn to use your device’s call functions.
Make a call
1. Press [ ].
2. Tap the number keys to enter a phone
number.
3. Tap
Talk
or press [ ].
4. To end the call, tap
End
or press
[].
Answer a call
1. Press [ ].
2. To end the call, tap
End
or press
[].
Reject a call
Ta p
Ignore
or press [ ].
To make a video call, tap
Video
Call
.
When you reject a call, the caller will
hear a busy tone.
27
Communication
Call an international number
1. Press [ ].
2. Tap and hold
0
to insert the +
character (this replaces the
international access code).
3. Tap the number keys to enter the
complete number you want to dial
(country code, area code, and phone
number), and then tap
Talk
or press
[].
4. To end the call, tap
End
or press
[].
Make a call from the contact list
1. From the Today screen, tap
Start
→
Contacts
.
2. Scroll to a contact and tap the
contact’s name.
3. Tap the number you want to dial.
4. To end the call, tap
End
or press
[].
Insert a pause
When calling automated systems, you
can enter a pause between the phone
number and another set of numbers. To
insert an automatic pause, tap .
To search for a contact, tap the
Enter a name...
field and enter a
few letters of the contact’s name.

Communication
28
Make a call from Call History
1. Press [ ].
2. Tap
Call History
.
3. Tap
Menu
→
Filter
→
a call type to
show only one type of calls (optional).
4. Scroll to a contact and tap the
contact’s name.
5. Tap the number you want to call.
6. To end the call, tap
End
or press
[].
Forward calls
1. From the Today screen, tap
Start
→
Settings
→
Phone
.
2. From the
Services
tab, tap
Call
Forwarding
→
Get Settings...
3. Tap a forwarding option and enter a
phone number.
4. Tap .
Bar (block) calls
1. From the Today screen, tap
Start
→
Settings
→
Phone
.
2. From the
Services
tab, tap
Call
Barring
→
Get Settings...
3. Tap the type of calls you want to bar.
4. Tap .

29
Communication
Push-to-Talk (PTT)
Push-To-Talk (PTT) technology is a two-
way radio style communication service
over a cellular network. It provides real-
time, direct voice contact with your
friends, family, and co-workers at the
push of a button. Learn to use the PTT
feature.
Add a new contact
1. From the Today screen, tap
Start
→
Programs
→
PTT
or press [ ].
2. Tap
Add
→ New contact.
3. Enter contact information.
4. When you are finished entering
information, tap
OK
to save the
contact card.
Make a PTT call
1. Press [ ].
2. Tap the number keys to enter a phone
number.
You can also select a number in
Contacts or the call record, or select a
contact or group in the contact list.
3. Press [ ] to make a call.
4. Press and hold [ ] to speak and
then release it to hear the other
person.
5. To end the call, press [].

Communication
30
Messaging
Learn to use messaging functions. For
instructions on entering text, see "Enter
text,"
X
19.
Send a text or multimedia
message
1. From the Today screen, tap
Start
→
Messaging
→
Messaging
.
2. Tap
Menu
→
New
.
3. Enter a destination number or tap
Menu
→
Add recipients
to select a
contact.
4. Tap the stylus in the message body.
5. Enter your message text.
For sending as a text message, skip to
step8. For adding a message subject
and attaching multimedia, continue
with step6.
6. Tap the subject field and enter a
message subject. Tap
Yes
before
entering the subject.
7. Tap an attachment icon to add a file to
the message:
• : attach a picture
• : attach a music file
• : attach a video
• : capture and attach a photo
• : record and attach a voice memo
8. When you are finished, tap
Send
.
Send an email message
1. From the Today screen, tap
Start
→
Messaging
.
2. Tap the name of an email account.
3. Tap
Menu
→
New
.

31
Communication
4. Enter the recipient’s address in the
To
field or tap
Menu
→
Add recipient
to
select a contact.
5. Tap the subject field and enter a
message subject.
6. Tap and hold the stylus in the message
body.
7. Enter your message text.
8. To add an attachment, tap
Menu
→
Insert
→
an attachment type.
9. When you are finished, tap
Send
.
Retrieve email from a web server
Before you retrieve email from an
internet service provider or VPN
connection, you must create an email
account.
To retrieve messages from your Outlook
account, see "Synchronise your data,"
X
63.
1. From the Today screen, tap
Start
→
Messaging
.
2. Tap the name of an email account.
3. Tap
Menu
→
Send Receive
.
View messages
You can access message folders for all
your messaging accounts (email, SMS,
and MMS) in one location.
The
Bc
and
Bcc
fields are located
above the
From
field.

Communication
32
To view messages,
1. From the Today screen, tap
Start
→
Messaging
.
2. Tap
Messaging
or the name of an
email account.
The Inbox for the account you selected
will open.
While viewing message folders, you
can switch message folders or
accounts by using the drop-down
menu at the top left of the screen.
33
5
Media
Learn to use the Mini Player, Camera,
Contents Manager, and PhotoSlides,
muveeShow, and FM radio. To learn
about your device’s other media
functions, refer to the Windows Mobile
Help.
Mini Player
Mini Player allows you to listen to music
files while you work with other programs.
Before you can use Mini Player, you must
add files to your device by downloading
them from the internet, transferring
them from a memory card, or syncing the
device to your PC.
To launch Mini Player, tap
Start
→
Programs
→
Mini Player
.
Use the following controls to operate the
Mini Player:
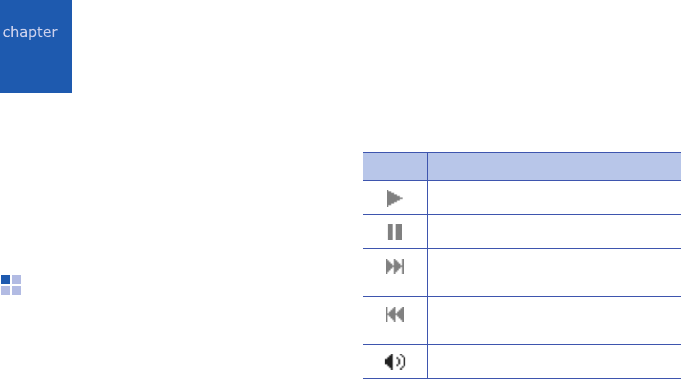
Icon Function
Play
Pause
Skip forward; scan forward (tap
and hold)
Skip backward; scan backward
(tap and hold)
Mute

Media
34
Camera
Your device allows you to take digital
photos (jpg format) or record videos
(mp4 format).
Capture a photo
1. Tap
Start
→
Programs
→
Camera
or
press and hold [ ].
2. Rotate the device 90° counter-
clockwise to the landscape orientation.
3. Aim the lens at the subject and make
adjustments:
• Scroll right or left to adjust the
brightness
• Scroll up or down to zoom
4. Press [ ] or the Centre key to capture
the image.
5. Tap to save the image and return
to the view finder, or press the Centre
key to send the image as a multimedia
message.
View a photo
1. Tap
Start
→
Programs
→
Contents
Manager
.
2. Tap the drop-down menu in the top left
of the screen and select
My Device
.
3. In the list of folders, tap
My
Documents
→
My Pictures
.
4. Tap a photo name or thumbnail to
open it.
You cannot launch Mini Player while
using the Camera.
35
Media
Adjust Camera settings
From the viewfinder, tap the screen to
show the following icons. Tap an icon,
and then tap a setting.
Record a video
1. Tap
Start
→
Programs
→
Camera
or
press and hold [ ].
2. Rotate the device 90° counter-
clockwise to the landscape orientation.
3. Tap
→
Camcorder
.
4. Aim the lens at the subject and make
adjustments:
• Scroll right or left to adjust the
brightness
• Scroll up or down to zoom
5. Press [ ] or the Centre key to begin
recording.
6. When you are finished, press the
Centre key to stop recording.
7. Tap to save the video and return to
the viewfinder.
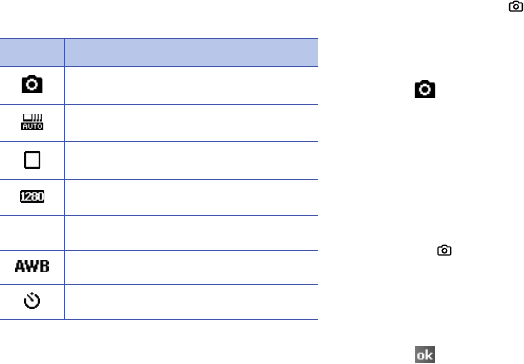
Icon Function
Mode (switch to camcorder)
Scene mode
Shot mode
Picture size
Flash
White balance
Timer
Media
36
Play a video
1. Tap
Start
→
Programs
→
Contents
Manager
.
2. In the list of folders, tap
My
Documents
→
My Videos
.
3. Tap a video name or thumbnail to open
it.
Adjust Camcorder settings
From the viewfinder, tap the screen to
show the following icons. Tap an icon,
and then tap a setting.
Contents Manager
With Contents Manager, you can view and
access all the files and folders on your
device.
View a photo
1. From the Today screen, tap
Start
→
Programs
→
Contents Manager
.
2. Tap the drop-down menu in the top left
of the screen and select
My Device
.
3. In the list of folders, tap
My
Documents
→
My Pictures
.
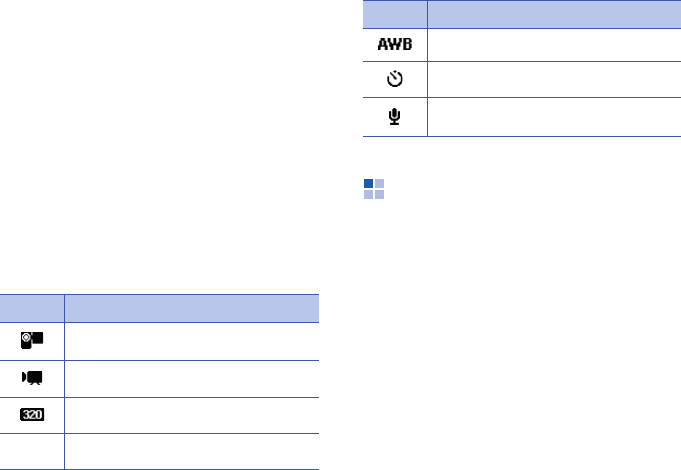
Icon Function
Mode (switch to camera)
Video mode
Video size
Flash
White balance
Timer
Audio
Icon Function

37
Media
4. Tap a photo name or thumbnail to
open it.
While viewing photos, you can perform
the following functions:
• To scroll through your photos, tap
or .
• To edit the picture, tap
Menu
→
Edit
image
.
• To set a photo as a background or
caller ID image, tap
Menu
→
Set as
→
an option.
• To send the photo, tap
Menu
→
Send
→
a sending option.
• To view your photos as a slideshow, tap
Menu
→
Play Slide Show
.
Play a video
1. From the Today screen, tap
Start
→
Programs
→
Contents Manager
.
2. Tap the drop-down menu in the top left
of the screen and select
My Device
.
3. In the list of folders, tap
My
Documents
→
My Videos
.
4. Tap a video name or thumbnail to open
it.
Open documents
1. From the Today screen, tap
Start
→
Programs
→
Contents Manager
.
2. Locate and open the folder where the
document is stored.
3. Tap and hold the document name or
thumbnail image to open it. (for
devices with keypad, Scroll to a
document name or thumbnail and
press the Centre key to open it)

Media
38
Send a file
1. From the Today screen, tap
Start
→
Programs
→
Contents Manager
.
2. Locate and open the folder where the
file is stored.
3. Tap
Menu
→
Send
→
an option to send
the file:
• To send as a multimedia message,
select
as MMS
X
30
• To send as an email message, select
as E-mail
X
30
• To send via the Bluetooth wireless
feature, select
via Bluetooth
X
59
PhotoSlides
PhotoSlides allows you to create photo
albums, edit photos, and view slideshows
with background music.
Create a photo album
1. From the Today screen, tap
Start
→
Programs
→
PhotoSlides
.
2. Tap
Menu
→
Create album
.
3. Enter an album name, set the creation
date, and tap
OK
.
4. Locate a photo in another album and
tap
Menu
→
Edit
→
Copy
.
5. Tap the name of your new album, and
then tap
Menu
→
Edit
→
Paste
.
Edit photos
1. From the Photo Slides screen, tap a
thumbnail twice to open the photo.
2. Tap
Menu
→
an editing option:
•
Rotate Left
(90° counter-clockwise)
•
Rotate Right
(90° clockwise)
39
Media
•
Crop
•
Effect
(Original, Black & White,
Sepia, or Enhance)
3. To save your changes, tap .
View slideshows with
background music
1. From the PhotoSlides screen, tap a
photo album.
2. Tap
Menu
→
Slide show
.
3. During a slideshow, tap the screen to
display the following controls:
To adjust the volume during a slideshow,
scroll up or down.
muveeShow
muveeShow allows you to create photo
movies, or muvee, on your device.
Create a muvee
1. From the Today screen, tap
Start
→
Programs
→
muveeShow
→
New
Project
.
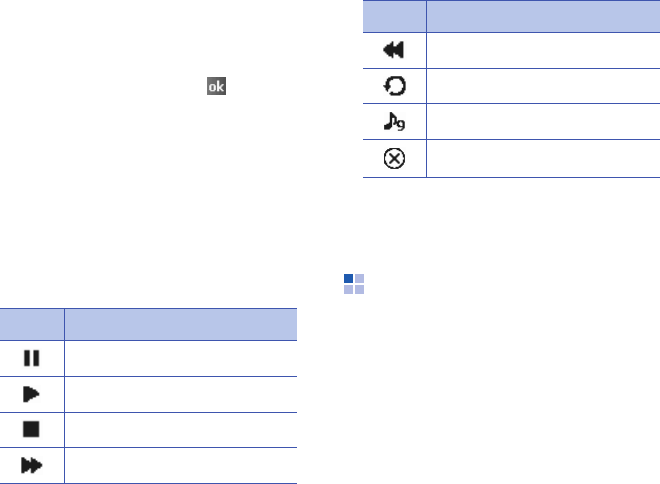
Icon Function
Pause
Play
Stop
Skip to next photo
Skip to previous photo
Rotate photo
Change background music
Quit slideshow
Icon Function
Media
40
2. Tap an empty thumbnail.
3. Locate and open a folder and select
photos.
4. Tap
Next
to select a style.
5. Scroll left or right to change the style.
Each style contains a set of visual
effects and background music, which
are applied to your pictures to create
your muvee.
6. If necessary, tap
User defined music
→
Browser
→
a music track to select
the background music.
7. Tap
Next
to automatically create and
preview your muvee.
8. When you are satisfied, tap
Next
.
9. Change the settings for saving the
muvee and tap
Save
.
The muvee is saved in the
My
Documents
folder.
Open a muvee
1. From the Today screen, tap
Start
→
Programs
→
muveeShow
→
Open
Project
.
2. Select the muvee you want.

41
Media
FM Radio
You can listen to your favourite stations
with the FM radio.
Listen to the FM radio
1. Plug a headset into the multifunction
jack.
2. From the Today screen, tap
Start
→
FM Radio
.
3. Scroll left or right to scan through
available radio stations.
4. To adjust the volume level, press the
Volume key.
To switch sound output to the
loudspeaker, tap
Menu
→
Speaker
on
.
To record the radio on the device, tap
REC
.
Set up your favourite radio
station list
Once you have set up a station list, you
can access the stations by scrolling left or
right from the radio screen.
Save radio stations by automatic
tuning
1. From the radio screen, tap
Channels
to access the station list.
Media
42
2. Tap
Menu
→
Self-tuning
(this will
replace any existing stations).
3. When you are finished, press
<
Done
>.
Save a radio station manually
1. From the radio screen, scroll to the
radio station you want.
2. Tap
Menu
→
Add to Presets
.
3. Enter a description of the station and
tap
Done
.
43
6
Personal Productivity
Learn to use Contacts, Alarms, Calendar,
BCR, Office Mobile, File Explorer, Notes,
and Tasks.
Contacts
Learn to use contact cards and groups to
store personal information, such as
names, phone numbers, and addresses.
Create a new Outlook contact
1. From the Today screen, tap
Start
→
Contacts
→
New
→
Outlook Contact
.
2. Enter contact information.
3. When you are finished entering
information, tap to save the
contact card.
Create a new SIM contact
1. From the Today screen, tap
Start
→
Contacts
→
New
→
SIM Contact
.
2. Enter contact information.
3. When you are finished entering
information, tap to save the
contact card.
Search for a contact card
1. From the Today screen, tap
Start
→
Contacts
.
2. Tap the
Enter a name...
field and
enter a few letter of the contact’s
name.
As you enter letters, the screen will
show contacts that match your input.
3. Tap the contact’s name to open the
contact card.

Personal Productivity
44
Copy or move contact cards
You can copy your contact cards from
your device to your SIM card and vice
versa. When you copy an Outlook contact
to your SIM card, you can only store the
contact’s name and phone number. To
retain all the contact information, sync
your Outlook contacts with a PC (see
"Synchronise your data,"
X
63).
To copy an Outlook contact to your SIM
card,
1. From the Today screen, tap
Start
→
Contacts
.
2. Tap a contact’s name to open the
contact card.
3. Tap
Menu
→
Save to SIM
.
4. Tap .
To copy a SIM contact to your device,
1. From the Today screen, tap
Start
→
Contacts
.
2. Tap a contact’s name to open the
contact card. (for devices with keypad,
Scroll to a contact and press the
Center key to open it)
3. Tap
Menu
→
Save to Contacts
.
4. Tap .
Assign a speed dial number to a
contact card
1. From the Today screen, tap
Start
→
Contacts
.
2. Tap a contact’s name to open the
contact card.
3. Tap
Menu
→
Add to Speed Dial...
45
Personal Productivity
4. Select a phone number with the
Number
drop-down.
5. Tap the up or down arrows next to the
Location
field to set a speed dial
number.
6. When you are finished, tap .
Assign an image or ringtone to a
contact card
1. From the Today screen, tap
Start
→
Contacts
.
2. Tap a contact’s name to open the
contact card. (for devices with keypad,
Scroll to a contact and press the
Center key to open it)
3. Tap
Menu
→
Edit
.
4. To assign an image, tap the
Picture
field, select an image and tap .
5. To assign a ringtone, tap the
Ring
tone
field and select a ringtone.
6. When you are finished, tap .
Alarms
Learn to set and control alarms for
important events.
Set a new alarm
1. From the Today screen, tap
Start
→
Programs
→
Alarms
.
2. Tap an empty alarm.
3. Set alarm details.
4. When you are finished, tap
Done
.

Personal Productivity
46
Stop an alarm
When the alarm sounds,
• Tap to stop an alarm without
snooze.
•Tap
Dismiss
to stop an alarm with
snooze or tap
Snooze
to silence the
alarm for the snooze period.
Calendar
Use Calendar to keep track of
appointments, birthdays, or other events.
Create a calendar event
1. From the Today screen, tap
Start
→
Calendar
.
2. Tap
Menu
→
New Appointment
.
3. Complete the fields and adjust the
settings for your event.
4. When you are finished, tap .
Change the calendar view
1. From the Today screen, tap
Start
→
Calendar
.
2. Tap
Menu
→
View
→
a view type.
Stop an event alarm
When the alarm sound for a calendar
event you set previously, tap
Dismiss
.

47
Personal Productivity
BCR
BCR allows you to quickly create new
contacts from business cards. You can
capture a photo of a business card and
then extract the contact information to
Outlook.
Capture and convert an image of
a single business card
1. Place the business card on a flat, well-
lit surface.
2. From the Today screen, tap
Start
→
Programs
→
BCR
.
3. Position the device over the business
card, so that the green frame on the
viewfinder aligns with the edges of the
business card.
4. Press [ ] to capture the image.
5. Edit any contact details that were not
converted correctly, and then tap
Save
.
6. Tap to confirm.
Capture and convert images of
multiple business cards
If you have multiple business cards to
convert, you can capture images of each
of them and then convert them to
contacts all at once.
As you align the frame in the
viewfinder with the edges of the
business card, they will change
from green to yellow. If you can
align all four edges of the frame at
once, BCR will automatically
capture the image.

Personal Productivity
48
1. From the Today screen, tap
Start
→
Programs
→
BCR
.
2. Tap
Menu
→
Multi-shot
.
3. Place a business card on a flat, well-lit
surface.
4. Position the device over the business
card, so that the green frame on the
viewfinder aligns with the edges of the
business card.
5. Press [ ] to capture the image.
6. Tap
More
.
7. Repeat steps 3-6 as necessary to
capture additional images.
8. When you are finished capturing
images, tap
Load Image
.
9. Tap the check box on each thumbnail
you want to convert.
10.Tap
Recognise
.
11.Edit any contact details that were not
converted correctly, and then tap
Save
.
12.Tap to confirm.
13.Repeat steps 10-11 until you have
saved all the contacts.
As you align the frame in the
viewfinder with the edges of the
business card, they will change
from green to yellow. If you can
align all four edges of the frame at
once, BCR will automatically
capture the image.

49
Personal Productivity
Office Mobile
With Office Mobile, you can create and
edit Excel workbooks and Word
documents or open and view PowerPoint
slideshows. Your device supports files
created with Office 97 and newer
versions.
Create and edit an Excel
workbook
1. From the Today screen, tap
Start
→
Office Mobile
→
Excel Mobile
.
2. Tap a cell to select it.
3. Enter values or text with the input
panel, and then tap .
4. Repeat steps 2-3 as necessary.
5. To format cells, tap
Menu
→
Edit
,
Insert
,
Format
, or
Tools
.
6. To save the workbook, tap .
For more details, refer to the online help.
Create and edit a Word
document
1. From the Today screen, tap
Start
→
Office Mobile
→
Word Mobile
.
2. Create your document with the input
panel.
3. To change the font or paragraph
format, tap
Menu
→
Format
→
Font
or
Paragraph
.
4. To save the workbook, tap .
For more details, refer to the online help.

Personal Productivity
50
Open and view a PowerPoint
slideshow
1. From the Today screen, tap
Start
→
Office Mobile
→
PowerPoint Mobile
.
2. Tap the drop-down menu in the top left
of the PowerPoint screen to locate a
PowerPoint file.
3. Tap the filename to launch the
slideshow.
4. To advance the slides, tap the screen.
5. To go back to the previous slide, tap
→
Previous
.
6. To end the slideshow, tap
→
End
Show
.
File Explorer
With File Explorer, you can browse all the
files and folders on your device. From the
Today screen, tap
Start
→
Programs
→
File Explorer
.
To move to a higher-level folder, tap
Up
.
Ta p
Menu
to rename, delete, or edit your
files and folders.
Notes
Use Notes to create memos, sketches,
and recordings.
Create a note
1. From the Today screen, tap
Start
→
Programs
→
Notes
.
2. Tap
New
.
51
Personal Productivity
3. Create your note.
4. When you are finished, tap .
Send a note
1. From the Today screen, tap
Start
→
Programs
→
Notes
.
2. Tap and hold the name of a note you
want to send or create a new note.
3. Tap a sending method (multimedia
message, email, or Bluetooth).
• Multimedia: Tap
Send via MMS
• Email: Tap
Send via E-mail
• Bluetooth: Tap
Beam File...
For more details on sending multimedia
and email messages, see "Messaging,"
X
30. For more details on sending files via
Bluetooth, see "Bluetooth,"
X
59.
Tasks
With Tasks, you can create to-do lists and
reminders.
Create a task
1. From the Today screen, tap
Start
→
Programs
→
Tasks
.
2. Tap
Menu
→
New Task
.
3. Enter details for the task.
4. When you are finished, tap .
To set a reminder for the task, tap
the
Due
field and set a due date.
Tap t he
Reminder
field, select
Remind me
, and then specify the
time and date of the reminder.
Personal Productivity
52
Mark a task as completed
When you have completed a task, return
to the Tasks screen (tap
Start
→
Programs
→
Tasks
) and tap the check
box next to the task name. Once you
have marked a task completed, you will
no longer receive any scheduled
reminders for that task.

53
7
Additional programs
Learn to use Games, Java, PowerWord,
Assisted-GPS, and Zoomer.
Games
Play fun games, such as Bubble Breaker
and Solitaire. You can also download and
play new Java games.
From the Today screen, tap
Start
→
Programs
→
Games
.
Java
Java is a folder where downloaded games
are stored.
From the Today screen, tap
Start
→
Programs
→
Java
.
PowerWord
Learn to look up definitions and capture
words from other programs to add to
your dictionaries.
Look up a word
1. From the Today screen, tap
Start
→
Programs
→
PowerWord
.
2. Enter a word in the input field.
3. Select a word or phrase from the left
side of the screen.
• To look up a related word, double-tap
the word.
• To listen to a pronunciation, tap
or
Speak
.
• To add the word to you word list, tap
Options
→
Add to NewWord
.

Additional programs
54
Capture words and add them to
your dictionary
Start by setting a shortcut key to use
when capturing words:
1. From the Today screen, tap
Programs
→
PowerWord
→
Options
→
Word-
capture Setting
.
2. Select a key in
Hot key Settings
.
3. Tap
OK
.
After you have set the shortcut key,
1. Open
Notes
,
Tasks
,
Word Mobile
,
OneNote Mobile
, or
Excel Mobile
.
2. Highlight a word with your stylus.
3. Press the shortcut key you set for
capturing words.
4. When you are finished, close the pop-
up window or tap
Options
→
Back to
Application
to return to the program
you were using.
View your word list
From the Today screen, tap
Programs
→
PowerWord
→
Options
→
Open
NewWord
. To delete a word, highlight
the word and then tap
Delete
. To clear
the word list, tap
Delete all
.
Assisted-GPS
Assisted-GPS (A-GPS) helps improve the
performance of GPS receivers by
providing them with data that they would
ordinarily have to download from the GPS
satellites. With A-GPS data, GPS
receivers can operate faster and more
reliably.
55
Additional programs
Before you use A-GSP, first set the GPS
ports for receiving GPS data on the
External GPS. From the Today screen, tap
Start
→
Settings
→
System
tab
→
External GPS
.
1. From the Today screen, tap
Start
→
Settings
.
2. From the
System
tab, tap
A-GPS
→
Enable
.
3. Set the number of times (in seconds)
your device refreshes the A-GPS data.
4. If you want to sync the current time
with A-GPS, tap the check box next to
Time auto-synchromizes with
A-GPS
.
5. When you are finished, tap .
Zoomer
With Zoomer, you can zoom in or out on
the screen to view your documents or
messages.
1. From the Today screen, tap
Start
→
Programs
→
Zoomer
.
When the program launches, a
magnifying glass appears and the
screen automatically zooms in.
2. Press the Volume key to zoom in or
out.
3. Drag the stylus to scroll through the
screen.
When you run Zoomer for the first
time, tap
Yes
and assign a shortcut
for Zoomer to a key, or tap
No
to
skip the assignment process.

56
8
Web
Learn to use Windows Live and Windows
Live Messenger. Also, learn how to access
mINFO2008 and the OCM service. For
information about connecting to the
internet and working with Internet
Explorer, refer to the MS Windows Mobile
Help on your device and the online help.
Windows Live
With Windows Live, you can stay in touch
with friends and access information on
the internet quickly.
To launch Windows Live from the Today
screen,
1. Tap
Start
→
Programs
→
Windows
Live
.
2. Tap
Sign in to Windows Live
.
3. Enter your login ID and password.
4. Tap
Sign in
.
Windows Live
Messenger
With Windows Live Messenger, you can
remain available to other users and stay
up-to-date with your email without a
constant connection to the internet.
When a new message arrives or you want
to access internet services, the
connection will be restored.
57
Web
Set up Messenger and sign in
1. Sign in to Windows Live (see the
previous section).
2. Scroll left or right with the navigation
key to select your login status.
3. Tap
Sign in
.
4. Follow the on screen instructions to
complete the setup.
Chat with Messenger
1. From the Messenger screen, locate
and tap a contact’s name, and then
tap
Send IM
.
2. Enter a message in the text field at the
bottom of the screen, and then tap
Send
.
3. While chatting, you can perform the
following actions:
• Insert emoticons: tap
Menu
→
Add
emoticon
• Invite a contact to chat: tap
Menu
→
Options
→
Add participant
• Transfer a file: tap
Menu
→
Send
→
a
file type
→
a file
• Record and send a voice clip: tap
Voice clip
, record your voice clip,
and then tap
Send
• Switch between contact list and chat:
scroll left or right with the navigation
key
4. To end the chat, tap
Menu
→
End
conversation
.

Web
58
mINFO2008
With mINFO2008, you can access
multimedia services that provide you
with various Olympic news. stay informed
of current Olympic information, such as,
the torch relay route, game schedules,
local weather, and medal standings. This
service is available only if supported by
your service provider.
1. From the Today screen, tap
Start
→
Programs
→
mINFO2008
.
2. Tap
Yes
.
Olympic Communication
Management Service
(OCM)
With the OCM service, you can stay
connected with other users through
group messages, emails, and an instant
messenger. This service is available only
if supported by your service provider.
1. From the Today screen, tap
Start
→
Programs
→
OCM
.
2. Tap
Yes
.
3. Enter your login ID and password.
4. Tap
Login
.

59
9
Connectivity
Learn to transfer data to and from your
device via the Bluetooth wireless feature
and synchronise your device to a PC with
ActiveSync. For details on connecting to
the internet or a virtual private network
(VPN), refer to the Windows Mobile Help
on your device.
Bluetooth
You can connect with other Bluetooth-
enabled wireless devices over a distance
of 10 metres (30 feet). Walls or other
obstacles between devices may block or
impair the wireless connection.
Turn on the Bluetooth wireless
feature
1. From the Today screen, tap
Start
→
Settings
.
2. From the
Connections
tab, tap
Bluetooth
.
3. From the
Mode
tab, tap the check box
next to
Turn on Bluetooth
.
4. To allow other devices to find and
connect to your device, tap the check
box next to
Make this device visible
to other devices
.
5. Tap .

Connectivity
60
Search for and pair with a
Bluetooth-enabled device
1. From the Today screen, tap
Start
→
Settings
.
2. From the
Connections
tab, tap
Bluetooth
.
3. From the
Devices
tab, tap
Add new
device
.
Your device will search for and display
the list of Bluetooth-enabled devices.
4. Tap a device name, and then tap
Next
. (for devices with keypad, Scroll
to a device and press Next)
5. Enter the 1- to 13-digit Bluetooth PIN
and tap
Next
.
6. If necessary, change the display name
for the other device and select the
services you want.
7. Tap
Finish
.
Send data via the Bluetooth
wireless feature
1. Locate an item or file to send.
2. Tap
Menu
→
Send
→
via Bluetooth
or
Menu
→
Beam File
.
3. Tap a device from the list.
To pair with another Bluetooth-
enabled device, both devices must
use the same passcode. Headsets
or hands-free car kits may use a
fixed passcode, such as
0000
.

61
Connectivity
Receive data via the Bluetooth
wireless feature
1. From the Today screen, tap
Start
→
Settings
.
2. From the
Connections
tab, tap
Beam
.
3. Tap the check box next to
Receive all
incoming beams
.
4. When prompted to allow incoming
data, tap
Yes
.
Set up a Bluetooth COM port
When you have many files to send, you
can establish a Bluetooth COM port.
1. From the Today screen, tap
Start
→
Settings
.
2. From the
Connections
tab, tap
Bluetooth
.
3. From the
COM Ports
tab, tap
New
Outgoing Port
or
New Incoming
Port
.
4. For outgoing ports, tap the name of a
device, and then tap
Next
.
5. Select a COM port.
6. Tap the check box next to
Secure
Connection
to create a secure
connection between the devices.
7. Tap
Finish
.
ActiveSync
With ActiveSync, you can synchronise
your device with a PC and back up and
restore your data.

Connectivity
62
Install ActiveSync on your PC
Before you can sync your data, you must
install ActiveSync, either from the
supplied CD-ROM or the Microsoft web
site (http://www.microsoft.com).
To install ActiveSync from the supplied
CD-ROM,
1. Insert the CD-ROM into your PC.
2. Follow the onscreen instructions to
complete the setup.
3. When installation is complete, follow
the onscreen instructions in the
Synchronisation Setup Wizard to
connect your device to the PC and
create a data sharing partnership.
Connect your device to a PC with
the PC data cable
1. From the Today screen, tap
Start
→
Settings
.
2. From the
Connections
tab, tap
USB
to PC
.
3. Connect one end of the PC data cable
to the multi-function jack on your
device and the other end to the USB
port on your PC.
You can also connect the device to a
PC via the Bluetooth wireless feature.
See "Search for and pair with a
Bluetooth-enabled device,"
X
60.
63
Connectivity
Synchronise your data
When you connect your device to a PC,
ActiveSync should begin synchronising
your data automatically. You can begin
the synchronisation manually by tapping
Sync
. To stop a synchronisation in
progress, tap
Stop
.
You can also manually find and copy files
from your device to a PC and vice versa—
from the Microsoft ActiveSync window,
tap
Explore
.
For more details on synchronising your
data, refer to the ActiveSync Help.
Configure an Exchange server
1. From the Today screen, tap
Start
→
Programs
→
ActiveSync
.
2. Tap
Menu
→
Configure Server
.
3. Enter a server address.
4. To establish a secure connection, tap
the check box next to
This server
requires an encrypted (SSL)
connection
.
5. Tap
Next
.
6. Select the types of data to
synchronise.
7. When you are finished, tap
Finish
.

Connectivity
64
Change the synchronisation
schedule
If you routinely synchronise your data via
an Exchange server, you can configure
settings for both peak and off-peak
schedules.
To change the synchornisation schedules,
1. Tap
Menu
→
Schedule
.
2. Set the following options:
•
Peak times
: set the frequency of
synchronisations during peak hours
•
Off-peak times
: set the frequency
of synchronisations during non-peak
hours
•
Use above settings when
roaming
: set to use the
synchronisation schedules even
when roaming
•
Send outgoing items
immediately
: set to synchronise
each time you send an outgoing
email
3. When you are finished, tap .

65
10
Troubleshooting
If you have trouble with your device, try
these procedures before you contact a
service professional.
Contacting a service center
If you have attempted the
troubleshooting solution and are still
having problems with your device, make
a note of the following information and
contact your local dealer or Samsung
after-sales service:
• Model number(s) of your device
• Serial number(s) of your device
• A clear description of the problem
When contacting Samsung, use the
contact phone numbers, web addresses,
or postal addresses for your region of
residence.
When you try to turn on your device,
the following messages may appear:
Message Try this to solve the
problem:
The SIM card
is missing.
Ensure that the SIM card
is installed correctly.
Enter PIN. When using the device for
the first time or when the
PIN requirement is
enabled, you must enter
the PIN supplied with the
SIM card. To disable this
feature, tap
Start
→
Settings
→
Personal
tab
→
Phone
→
Phone
tab,
and then clear the
Require PIN when
phone is used
check
box.

Troubleshooting
66
Your device does not show a signal
(no bars next to the network icon)
• If you just turned on the device, wait
about 2 minutes for your device to find
the network and receive a signal.
• You may not be able to receive a signal
in tunnels or elevators. Move to an
open area.
• You may be between service areas. You
should receive a signal when you enter
a service area.
You forgot a security, PIN, or PUK
code
If you forget or lose this or another code,
contact the seller or your service
provider.
Your display shows white lines
The display may show white lines if you
have turned the device on after a long
period of disuse or if you removed the
battery without first turning off the
device. The display should correct itself in
a short time.
You enter a number, but the call is
not dialled
• Ensure that you have pressed the Dial
key: [ ].
• Ensure that you have accessed the
right cellular network.
SIM card
blocked.
Your SIM card is blocked,
usually as a result of
entering your PIN
incorrectly several times.
You must enter the PUK
supplied by your service
provider.
Message Try this to solve the
problem:
67
Troubleshooting
• Ensure that you have not set call
barring for the phone number.
You select a contact to call, but the
call is not dialled
• Ensure that the correct number is
stored in the contact information.
• Re-enter and save the number, if
necessary.
Another caller cannot hear you
speaking
• Ensure that you are not blocking the
built-in microphone.
• Move the built-in microphone closer to
your mouth.
• If using a headset, ensure that it is
properly connected.
The sound quality of a call is poor
• Ensure that you are not blocking
internal antenna on top of the device.
• When you are in areas with weak
signals, you may lose reception. Move
to another area and try again.
The battery does not charge properly
or sometimes your device turns itself
off while charging
• Disconnect the device from the
charger, remove and reinstall the
battery, and try charging again.
• The battery terminals may be dirty.
Wipe both gold-coloured contacts with
a clean, soft cloth and try charging the
battery again.
• If the battery no longer charges
completely, dispose of the old battery
properly and replace it with a new
battery.
Troubleshooting
68
Your device is hot to the touch
When you use several applications at
once, your device requires more power
and may heat up. This is normal and
should not affect your device’s lifespan or
performance.
Your device cannot connect to the
internet
• Ensure you have entered valid settings
for your internet service provider.
• Ensure you have activated the wireless
connection to your mobile service
provider and that the signal is not
obstructed.
• Ensure that you have entered the
correct user name and password.
You cannot find and pair with
another Bluetooth-enabled device
• Ensure that both devices have
activated the Bluetooth wireless
feature.
• Ensure that the distance between the
devices is not more than 10 metres
and that they are not separated by
walls or other obstacles.
• Ensure that the settings for each
device allow them to be visible to other
devices.
• Ensure that both devices are
compatible with Bluetooth wireless
technology.
• Ensure that the correct PIN has been
entered on both devices.
69
Troubleshooting
You cannot listen to music on a
remote Bluetooth headset
• Ensure that your device is connected to
the headset.
• Ensure that the music format you are
trying to listen to is supported by the
headset.
• Ensure that the distance between the
headset and device is not more than 10
metres and that they are not separated
by walls or other obstacles.

70
11
MICROSOFT SOFTWARE LICENSE TERMS FOR
WINDOWS MOBILE 6 SOFTWARE Agreement
These license terms are an agreement
between you and Samsung Electronics
Inc. ("Company"). Please read them.
They apply to the software included on
this device. The software also includes
any separate media on which you
received the software.
The software on this device includes
software licensed by Company from
Microsoft Corporation or its affiliate.
The terms also apply to any
•updates,
• supplements,
• Internet-based services, and
• support services
for this software, unless other terms
accompany those items. If so, those
terms apply.
As described below, using some
features also operates as your
consent to the transmission of
certain standard computer
information for Internet-based
services.
By using the software, including use
on this device, you accept these
terms. If you do not accept them, do
not use the device or software.
Instead, contact Company to
determine its return policy for a
refund or credit.
WARNING
: If the software contains
voice operated technologies, then
operating this software requires user
attention. Diverting attention away from
the road while driving can possibly cause
an accident or other serious
consequence.
Even occasional, short diversions of
71
MICROSOFT SOFTWARE LICENSE TERMS FOR WINDOWS MOBILE 6 SOFTWARE Agreement
attention can be dangerous if your
attention is diverted away from your
driving task at a critical time. Company
and Microsoft make no representations,
warranties or other determinations that
ANY use of this software is legal, safe, or
in any manner recommended or intended
while driving or otherwise operating a
motor vehicle.
If you comply with these license
terms, you have the rights below.
1.
USE RIGHTS.
You may use the software on the device
with which you acquired the software.
2.
ADDITIONAL LICENSING
REQUIREMENTS AND/OR USE
RIGHTS.
a.
Specific Use.
Company designed
this device for a specific use. You
may only use the software for that
use.
b.
Included Microsoft Programs
and Additional Required
Licenses.
Except as provided
below, these license terms apply to
all Microsoft programs included with
the software. If the license terms
with any of those programs give you
other rights that do not expressly
conflict with these license terms,
you also have those rights.
i. This agreement does not grant
you any rights with respect to the
Windows Mobile Device Center,
Microsoft ActiveSync or Microsoft
Outlook 2007 Trial which are
subject to the licenses
accompanying those items.
c.
Speech Recognition.
If the
software includes speech
recognition component(s), you
understand that speech recognition
is an inherently statistical process
and that recognition errors are
MICROSOFT SOFTWARE LICENSE TERMS FOR WINDOWS MOBILE 6 SOFTWARE Agreement
72
inherent in the process. Neither
Company nor Microsoft or their
suppliers shall be liable for any
damages arising out of errors in the
speech recognition process.
d.
Phone Functionality.
If the device
software includes phone
functionality, all or certain portions
of the device software may be
inoperable if you do not have and
maintain a service account with a
wireless telecommunication carrier
("Mobile Operator"), or if the Mobile
Operator's network is not operating
or configured to operate with the
device.
3.
SCOPE OF LICENSE.
The software is
licensed, not sold. This agreement only
gives you some rights to use the
software. Company and Microsoft
reserve all other rights. Unless
applicable law gives you more rights
despite this limitation, you may use
the software only as expressly
permitted in this agreement. In doing
so, you must comply with any
technical limitations in the software
that allow you to use it only in certain
ways. You may not:
• work around any technical limitations
in the software;
• reverse engineer, decompile or
disassemble the software;
• make more copies of the software
than specified in this agreement;
• publish the software for others to
copy;
• rent, lease or lend the software; or
• use the software for commercial
software hosting services.

73
MICROSOFT SOFTWARE LICENSE TERMS FOR WINDOWS MOBILE 6 SOFTWARE Agreement
Except as expressly provided in this
agreement, rights to access the
software on this device do not give you
any right to implement Microsoft
patents or other Microsoft intellectual
property in software or devices that
access this device.
You may use remote access
technologies in the software such as
Remote Desktop Mobile to access the
software remotely from a computer or
server. You are responsible for
obtaining any licenses required for use
of the protocols to access other
software.
4.
INTERNET-BASED SERVICES.
Microsoft provides Internet-based
services with the software. Microsoft
may change or cancel them at any
time.
a.
Consent for Internet-Based
Services.
The software features
described below connect to
Microsoft or service provider
computer systems over the
Internet. In some cases, you will
not receive a separate notice when
they connect. You may switch off
some of these features or not use
them. For more information about
these features, visit http://
go.microsoft.com/fwlink/
?LinkId=81931.
By using these features, you
consent to the transmission of this
information.
Microsoft does not use
the information to identify or contact
you.
Device Information. The following
features use Internet protocols, which
send to the appropriate systems
device information, such as your
Internet protocol address, the type of
MICROSOFT SOFTWARE LICENSE TERMS FOR WINDOWS MOBILE 6 SOFTWARE Agreement
74
operating system, browser and name
and version of the software you are
using, and the language code of the
device where you installed the
software. Microsoft uses this
information to make the Internet-
based services available to you.
•
Windows Mobile Update
Feature.
The Windows Mobile
Update feature provides you the
ability to obtain and install
software updates on your device if
updates are available. You may
choose not to use this feature.
Company and/or your Mobile
Operator may not support this
feature or an update for your
device.
•
Windows Media Digital Rights
Management.
Content owners
use Windows Media digital rights
management technology
(WMDRM) to protect their
intellectual property, including
copyrights. This software and
third party software use WMDRM
to play and copy WMDRM-
protected content. If the software
fails to protect the content,
content owners may ask Microsoft
to revoke the software's ability to
use WMDRM to play or copy
protected content. Revocation
does not affect other content.
When you download licenses for
protected content, you agree that
Microsoft may include a revocation
list with the licenses. Content
owners may require you to
upgrade WMDRM to access their
content. Microsoft software that
includes WMDRM will ask for your
consent prior to the upgrade. If
you decline an upgrade, you will
not be able to access content that
requires the upgrade.
75
MICROSOFT SOFTWARE LICENSE TERMS FOR WINDOWS MOBILE 6 SOFTWARE Agreement
b.
Misuse of Internet-based
Services.
You may not use these
services in any way that could harm
them or impair anyone else's use of
them. You may not use the services
to try to gain unauthorized access to
any service, data, account or
network by any means.
5.
NOTICES ABOUT THE MPEG-4
VISUAL STANDARD.
The software
may include MPEG-4 visual decoding
technology. This technology is a format
for data compression of video
information. MPEG LA, L.L.C. requires
this notice:
USE OF THIS PRODUCT IN ANY
MANNER THAT COMPLIES WITH THE
MPEG 4 VISUAL STANDARD IS
PROHIBITED, EXCEPT FOR USE
DIRECTLY RELATED TO (A) DATA OR
INFORMATION (i) GENERATED BY AND
OBTAINED WITHOUT CHARGE FROM A
CONSUMER NOT THEREBY ENGAGED
IN A BUSINESS ENTERPRISE, AND (ii)
FOR PERSONAL USE ONLY; AND (B)
OTHER USES SPECIFICALLY AND
SEPARATELY LICENSED BY MPEG LA,
L.L.C.
If you have questions about the MPEG-
4 visual standard, please contact
MPEG LA, L.L.C., 250 Steele Street,
Suite 300, Denver, CO 80206;
www.mpegla.com.
6.
DIGITAL CERTIFICATES.
The
software uses digital certificates in
X.509 format. These digital certificates
are used for authentication.
7.
CONNECTIVITY SOFTWARE.
Your
device package may include Windows
Mobile Device Center or Microsoft
ActiveSync software. If it is included,
then you may install and use it in
accordance with the license terms that
MICROSOFT SOFTWARE LICENSE TERMS FOR WINDOWS MOBILE 6 SOFTWARE Agreement
76
are provided with it. If no license
terms are provided, then you may
install and use only one (1) copy of the
software on a single computer.
8.
NETWORK ACCESS.
If you are using
a network, such as an employer
network, the network administrator
may limit features or functionality on
your device.
9.
PRODUCT SUPPORT.
Contact
Company for support options. Refer to
the support number provided with the
device.
10.
LINKS TO THIRD PARTY
WEBSITES.
If the software provides
links to third party websites, those
links are provided to you only as a
convenience, and the inclusion of any
link does not imply an endorsement of
the third party website by Microsoft.
11.
BACKUP COPY.
You may make one
backup copy of the software. You may
use it only to reinstall the software on
the device.
12.
PROOF OF LICENSE.
If you acquired
the software on the device, or on a
disc or other media, a genuine
Certificate of Authenticity label with a
genuine copy of the software identifies
licensed software. To be valid, this
label must be affixed to the device, or
included on or in Company's software
packaging. If you receive the label
separately, it is not valid. You should
keep the label on the device or
packaging to prove that you are
licensed to use the software. To
identify genuine Microsoft software,
see http://www.howtotell.com.
77
MICROSOFT SOFTWARE LICENSE TERMS FOR WINDOWS MOBILE 6 SOFTWARE Agreement
13.
TRANSFER TO A THIRD PARTY.
You may transfer the software only
with the device, the Certificate of
Authenticity label, and these license
terms directly to a third party. Before
the transfer, that party must agree
that these license terms apply to the
transfer and use of the software. You
may not retain any copies of the
software including the backup copy.
14.
NOT FAULT TOLERANT.
The
software is not fault tolerant. Company
installed the software on the device
and is responsible for how it operates
on the device.
15.
RESTRICTED USE.
The Microsoft
software was designed for systems
that do not require fail-safe
performance. You may not use the
Microsoft software in any device or
system in which a malfunction of the
software would result in foreseeable
risk of injury or death to any person.
This includes operation of nuclear
facilities, aircraft navigation or
communication systems and air traffic
control.
16.
NO WARRANTIES FOR THE
SOFTWARE.
The software is provided
"as is". You bear all risks of using it.
Microsoft gives no express warranties,
guarantees or conditions. Any
warranties you receive regarding the
device or the software do not originate
from, and are not binding on, Microsoft
or its affiliates. When allowed by your
local laws, Company and Microsoft
exclude implied warranties of
merchantability, fitness for a particular
purpose and non-infringement.
MICROSOFT SOFTWARE LICENSE TERMS FOR WINDOWS MOBILE 6 SOFTWARE Agreement
78
17.
LIABILITY LIMITATIONS.
You can
recover from Microsoft and its affiliates
only direct damages up to fifty U.S.
Dollars (U.S. $50.00), or equivalent in
local currency. You cannot recover any
other damages, including
consequential, lost profits, special,
indirect or incidental damages.
This limitation applies to:
• anything related to the software,
services, content (including code) on
third party internet sites, or third
party programs, and
• claims for breach of contract, breach
of warranty, guarantee or condition,
strict liability, negligence, or other
tort to the extent permitted by
applicable law.
It also applies even if Microsoft should
have been aware of the possibility of
the damages. The above limitation
may not apply to you because your
country may not allow the exclusion or
limitation of incidental, consequential
or other damages.
18.
EXPORT RESTRICTIONS.
The
software is subject to United States
export laws and regulations. You must
comply with all domestic and
international export laws and
regulations that apply to the software.
These laws include restrictions on
destinations, end users and end use.
For additional information, see
www.microsoft.com/exporting.