Samsung Electronics Co SGHP735 Single-Band PCS GSM Phone User Manual
Samsung Electronics Co Ltd Single-Band PCS GSM Phone Users Manual
UserManual.wiki
>
Samsung Electronics Co
>
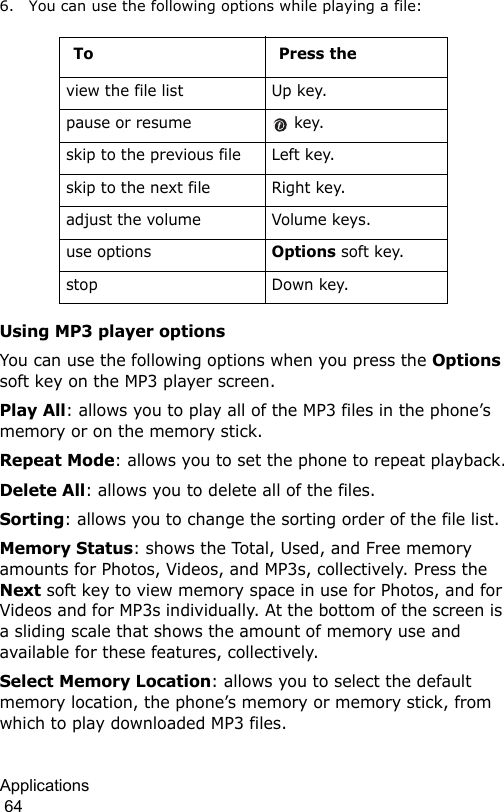
SGHP735 User Manual
Users Manual
Navigation menu
Upload a User Manual
Namespaces
Wiki Guide
HTML
PDF
Info
Views
User Manual
Discussion / Help
Navigation


![STANDARD LIMITED WARRANTY 179This Limited Warranty allocates risk of Product failure between Purchaser and SAMSUNG, and SAMSUNG’s Product pricing reflects this allocation of risk and the limitations of liability contained in this Limited Warranty. The agents, employees, distributors, and dealers of SAMSUNG are not authorized to make modifications to this Limited Warranty, or make additional warranties binding on SAMSUNG. Accordingly, additional statements such as dealer advertising or presentation, whether oral or written, do not constitute warranties by SAMSUNG and should not be relied upon.Samsung Telecommunications America, L.P.1301 East Lookout DriveRichardson, Texas 75082Phone: 1-800-SAMSUNGPhone: 1-888-987-HELP (4357) ©2004 Samsung Telecommunications America. All rights reserved.No reproduction in whole or in part allowed without prior written approval.Specifications and availability subject to change without notice. [080802]](https://usermanual.wiki/Samsung-Electronics-Co/SGHP735/User-Guide-449222-Page-182.png)