Samsung Electronics Co SLC430 Printer User Manual Part 3
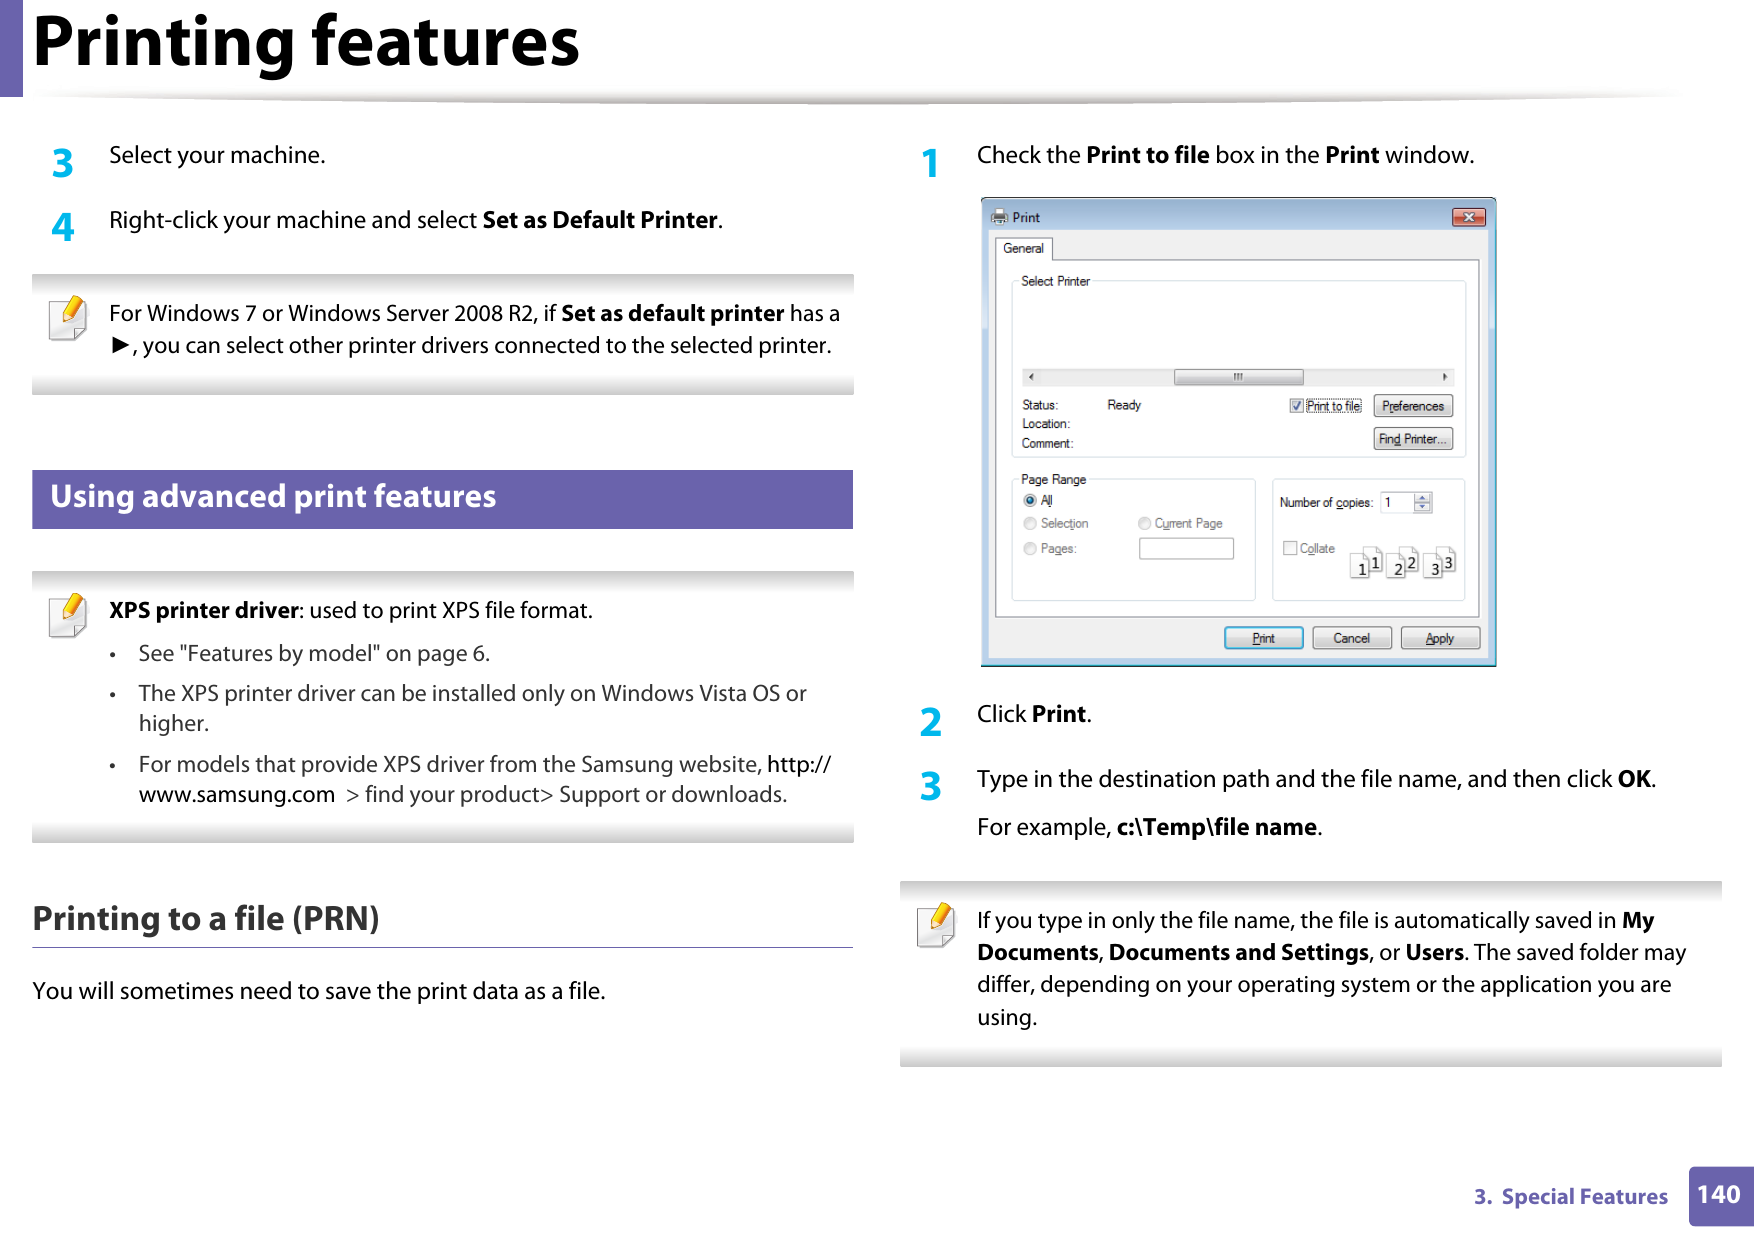
Samsung Electronics Co Ltd Printer Users Manual Part 3
UserManual.wiki
>
Samsung Electronics Co
>
SLC430 User Manual
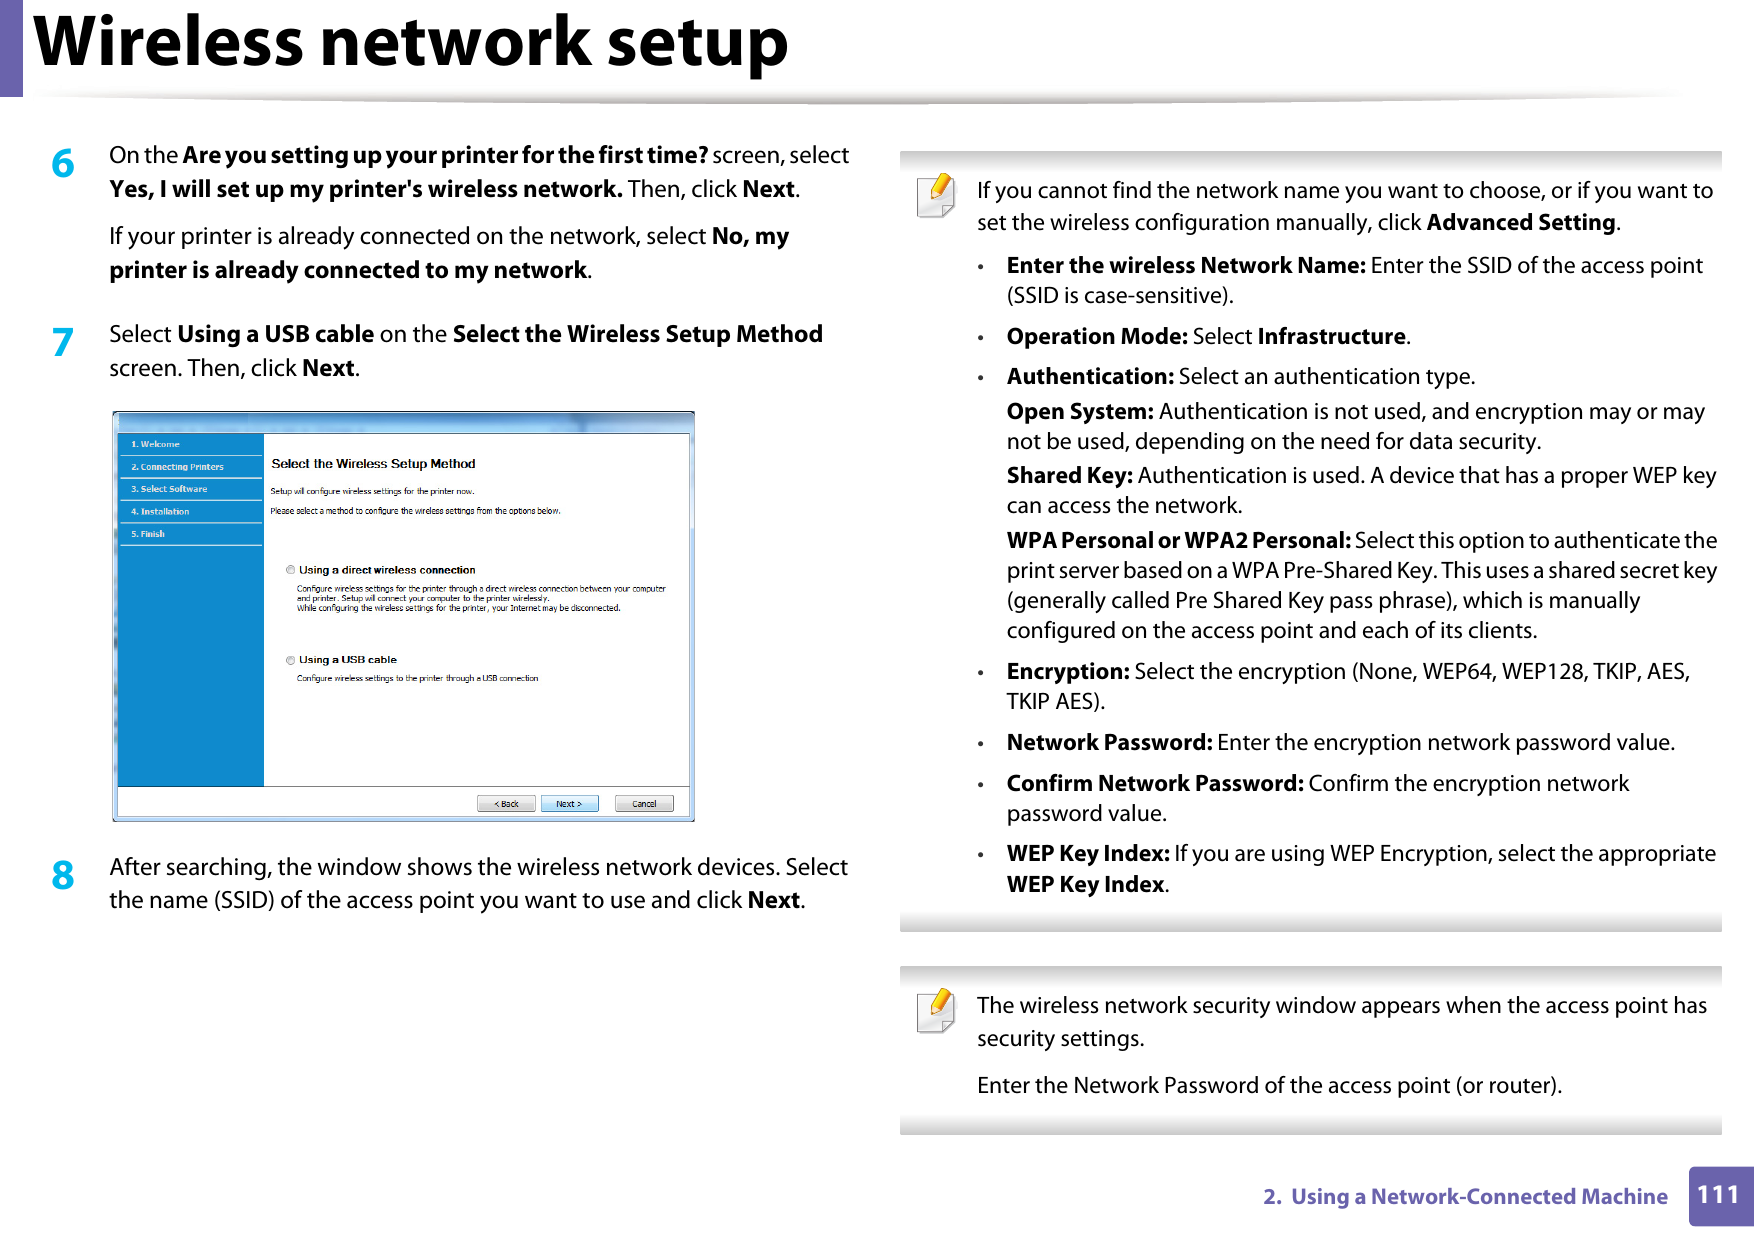
>
Users Manual Part 3
Contents
1.
Users Manual Part 1
2.
Users Manual Part 2
3.
Users Manual Part 3
Users Manual Part 3
Navigation menu
Upload a User Manual
Namespaces
Wiki Guide
HTML
PDF
Info
Views
User Manual
Discussion / Help
Navigation
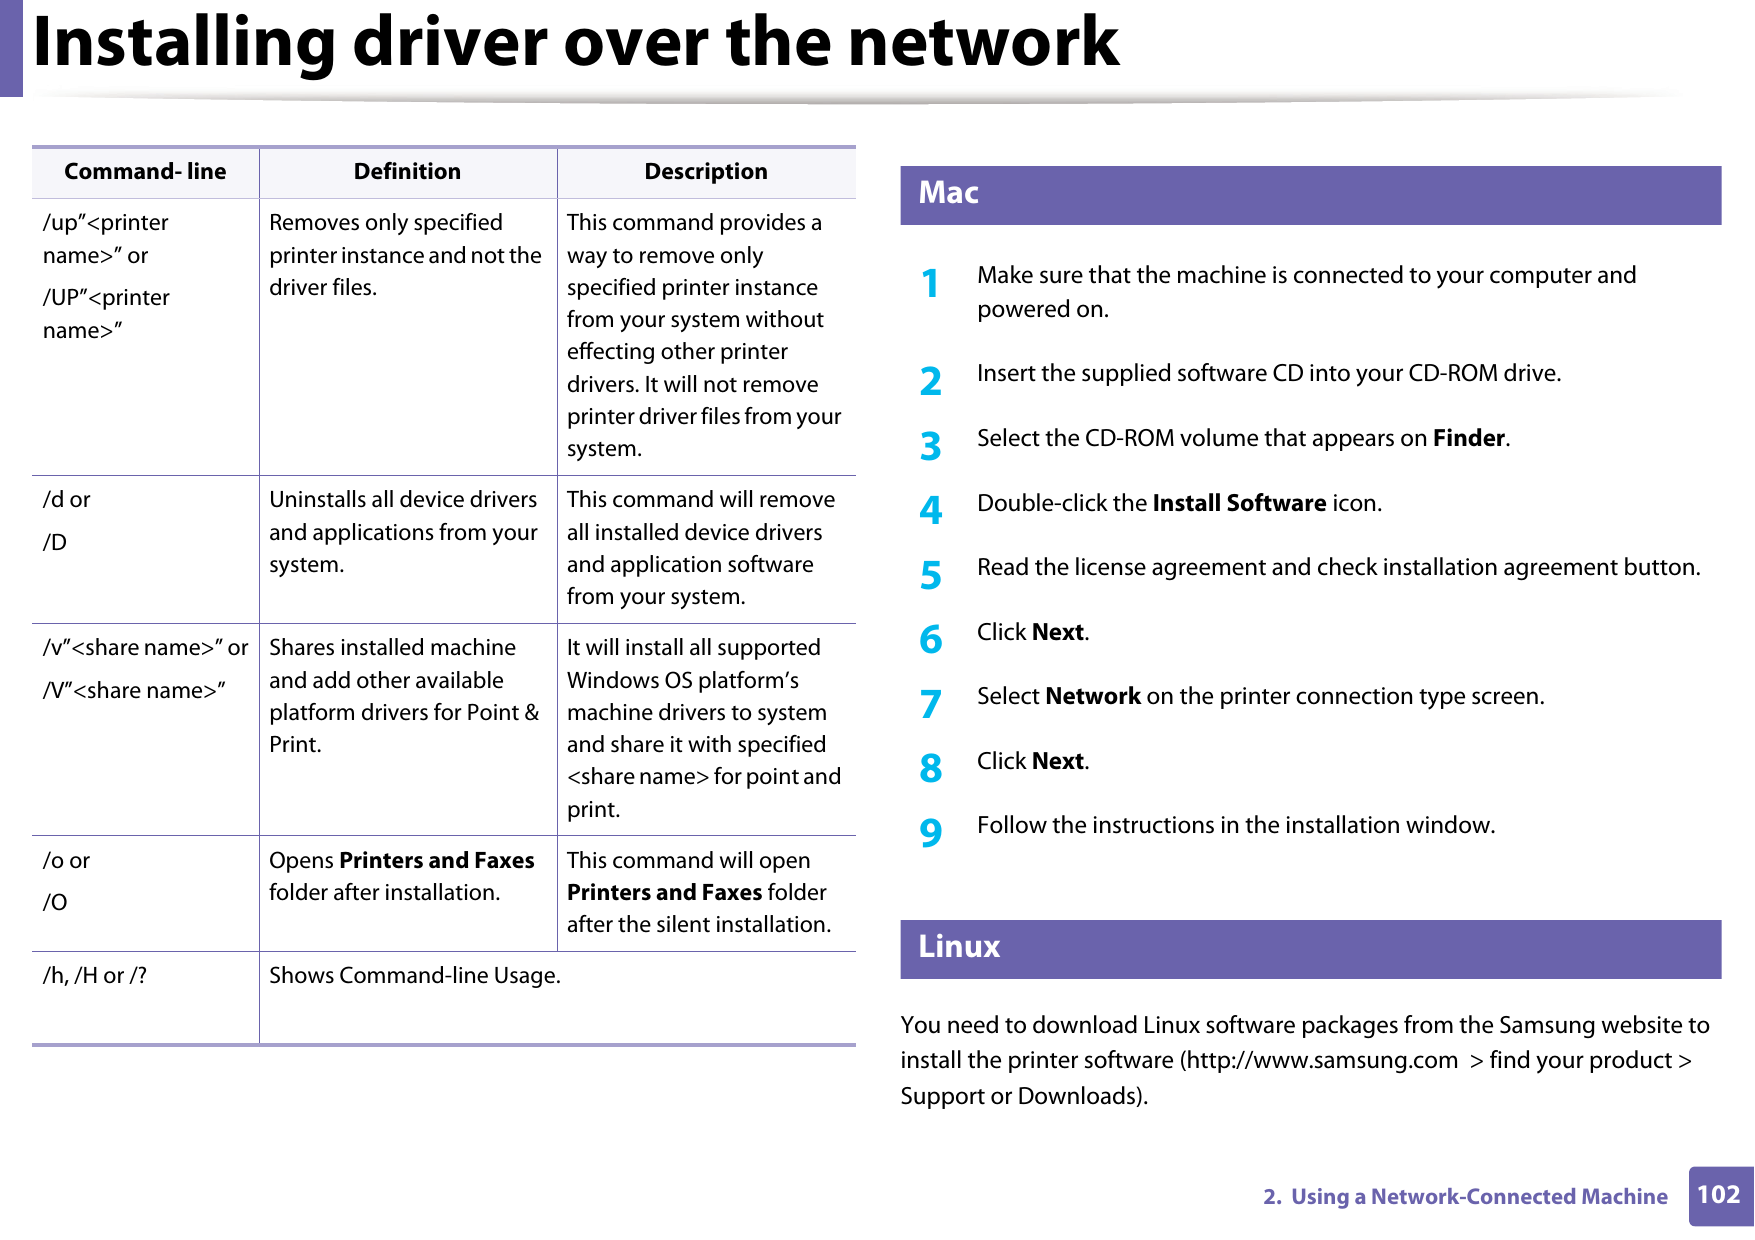
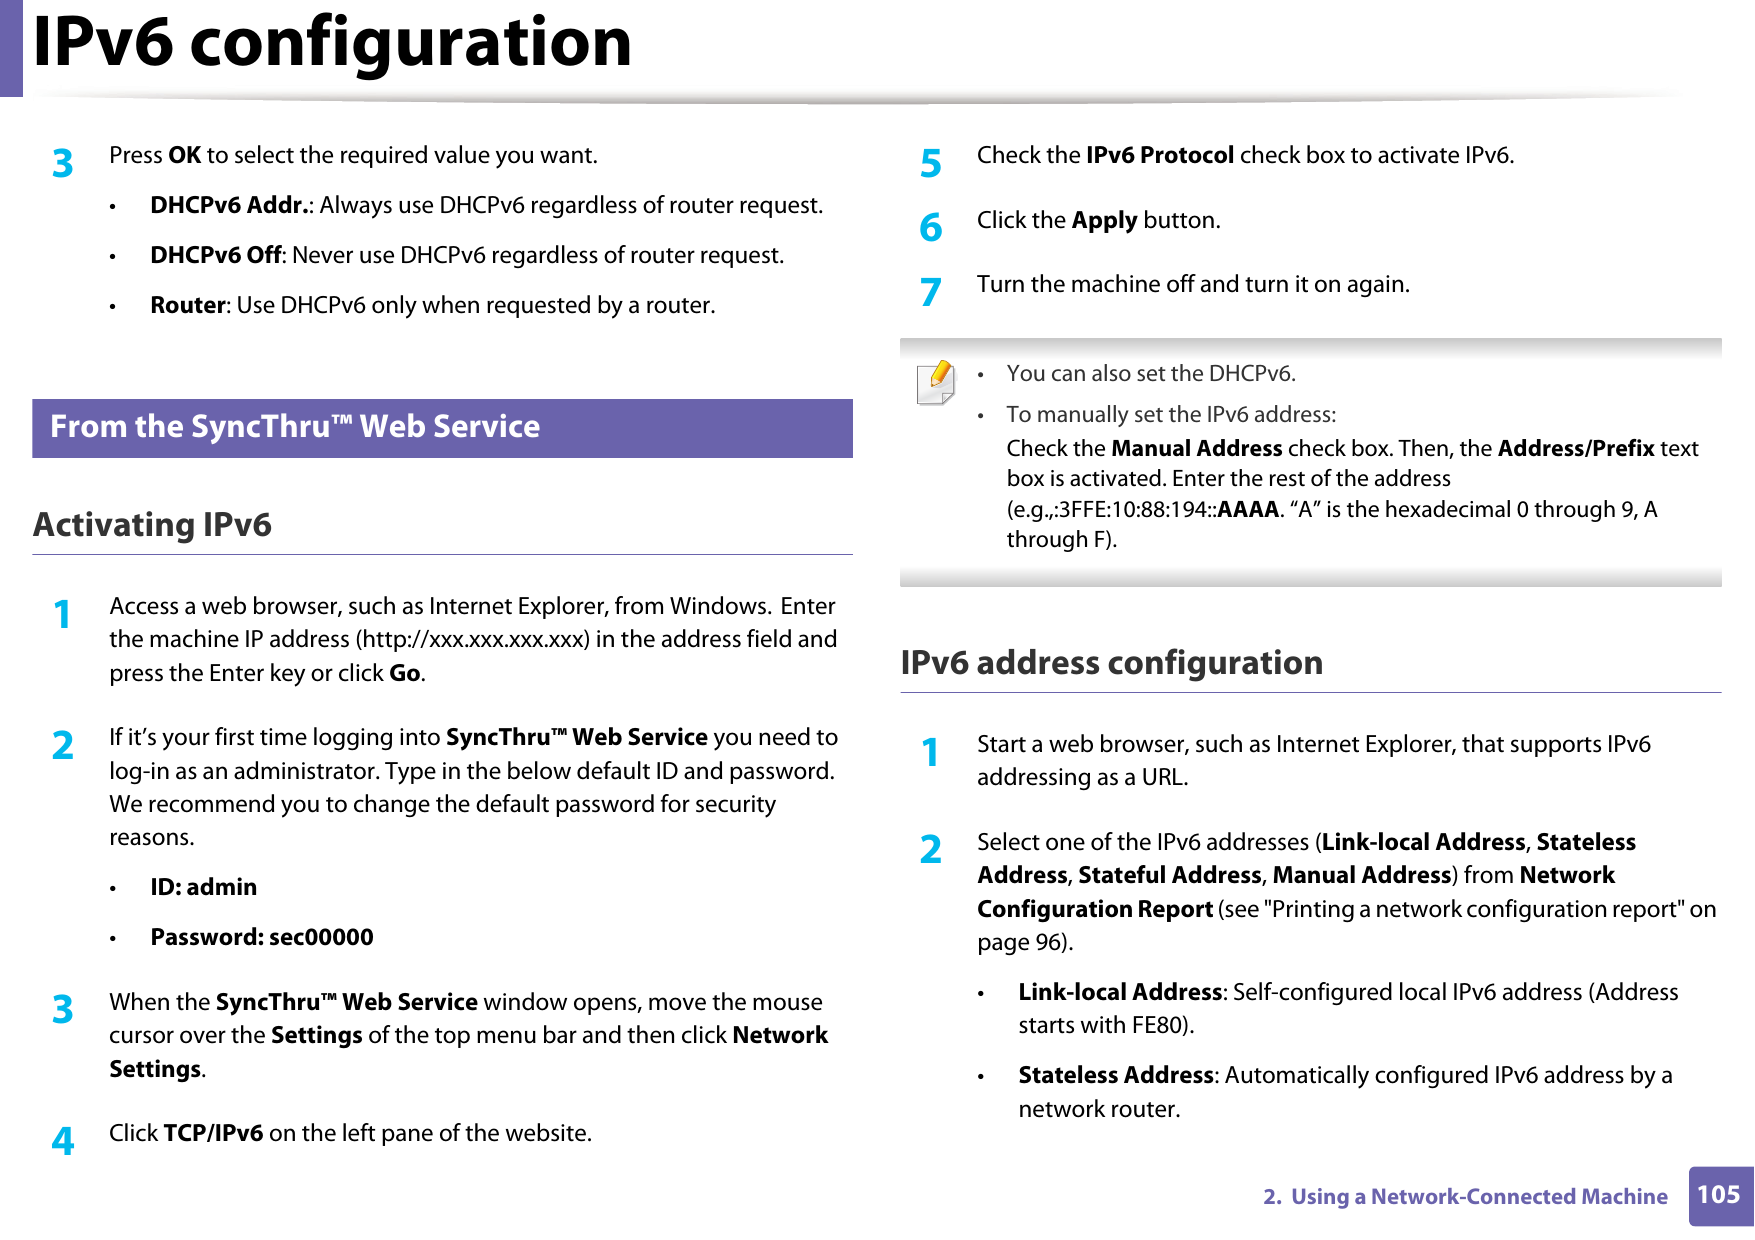
![IPv6 configuration1062. Using a Network-Connected Machine•Stateful Address: IPv6 address configured by a DHCPv6 server.•Manual Address: Manually configured IPv6 address by a user.3 Enter the IPv6 addresses (e.g.,: http://[FE80::215:99FF:FE66:7701]). Address must be enclosed in '[ ]' brackets.](https://usermanual.wiki/Samsung-Electronics-Co/SLC430.Users-Manual-Part-3/User-Guide-2698207-Page-6.png)


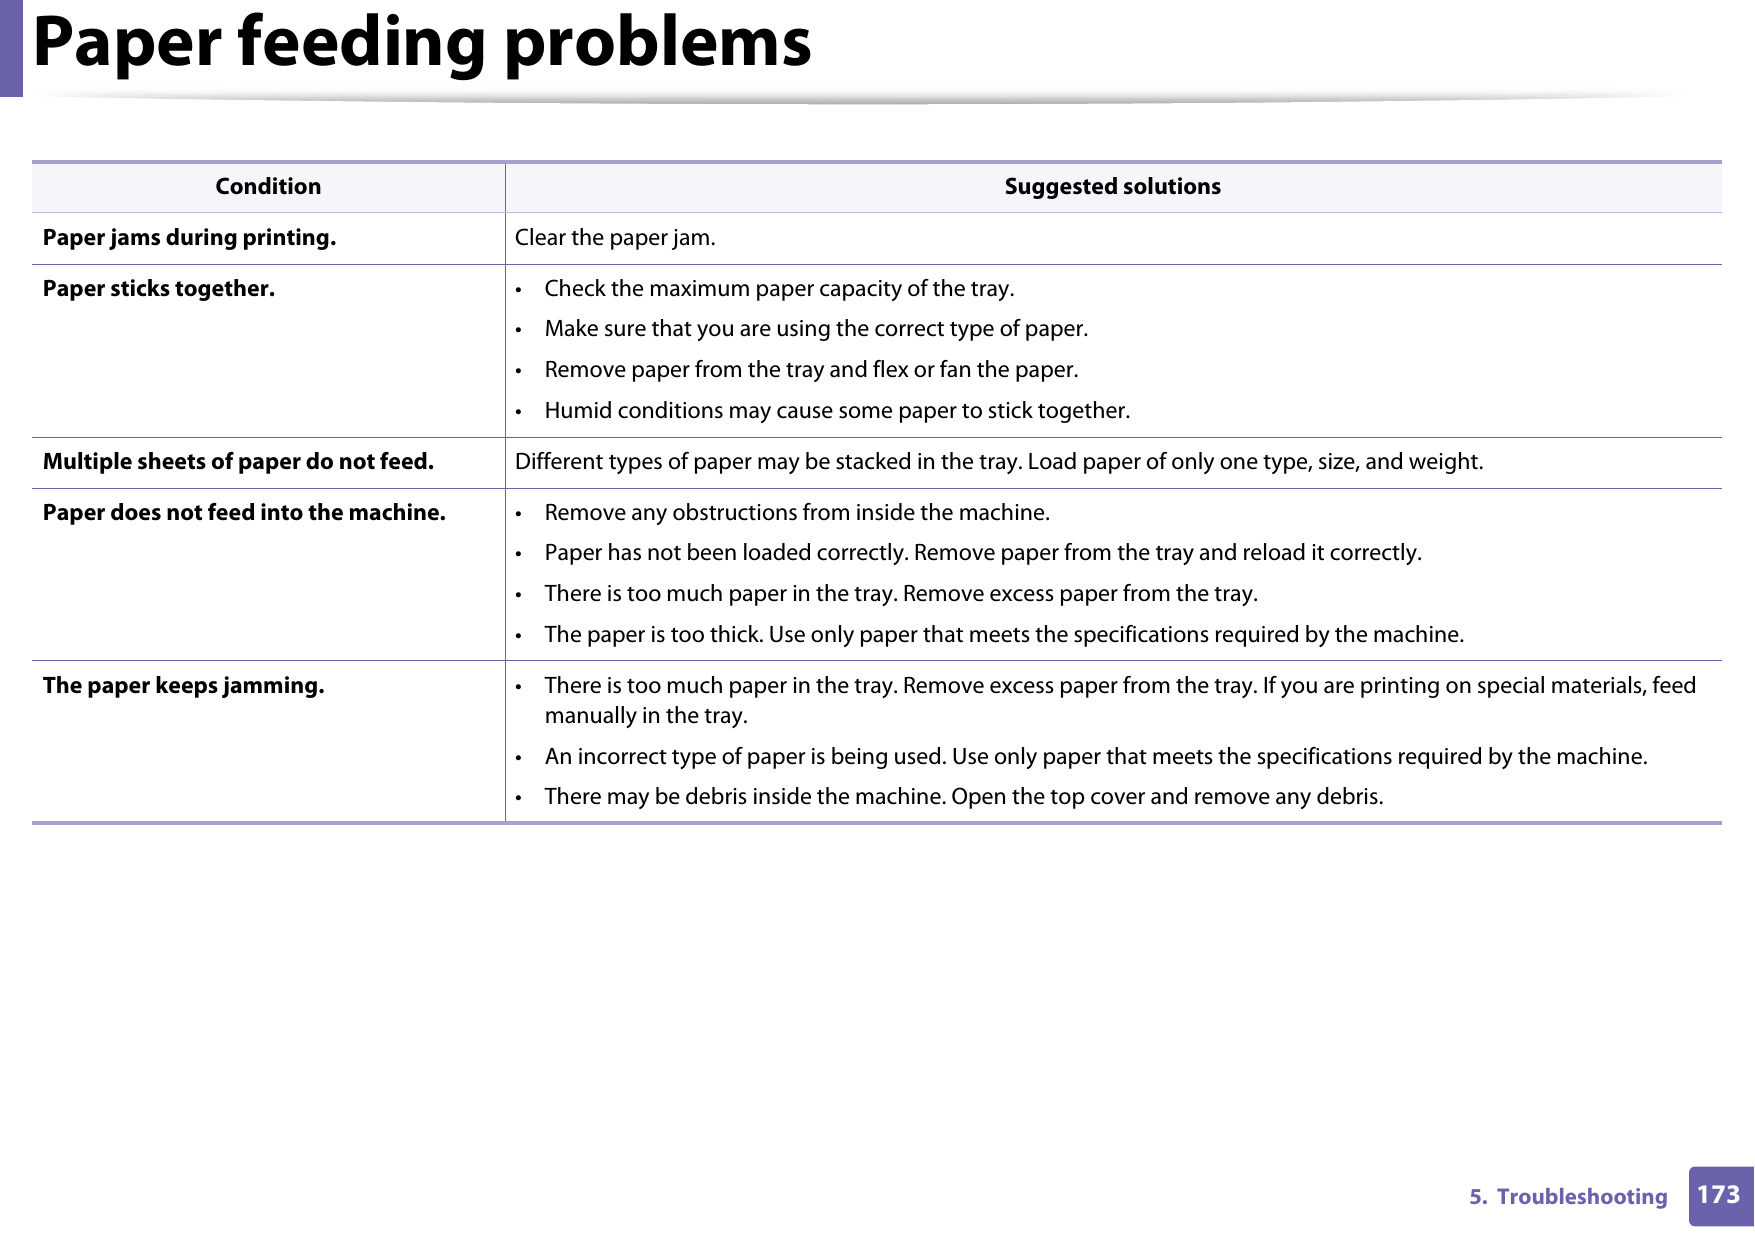
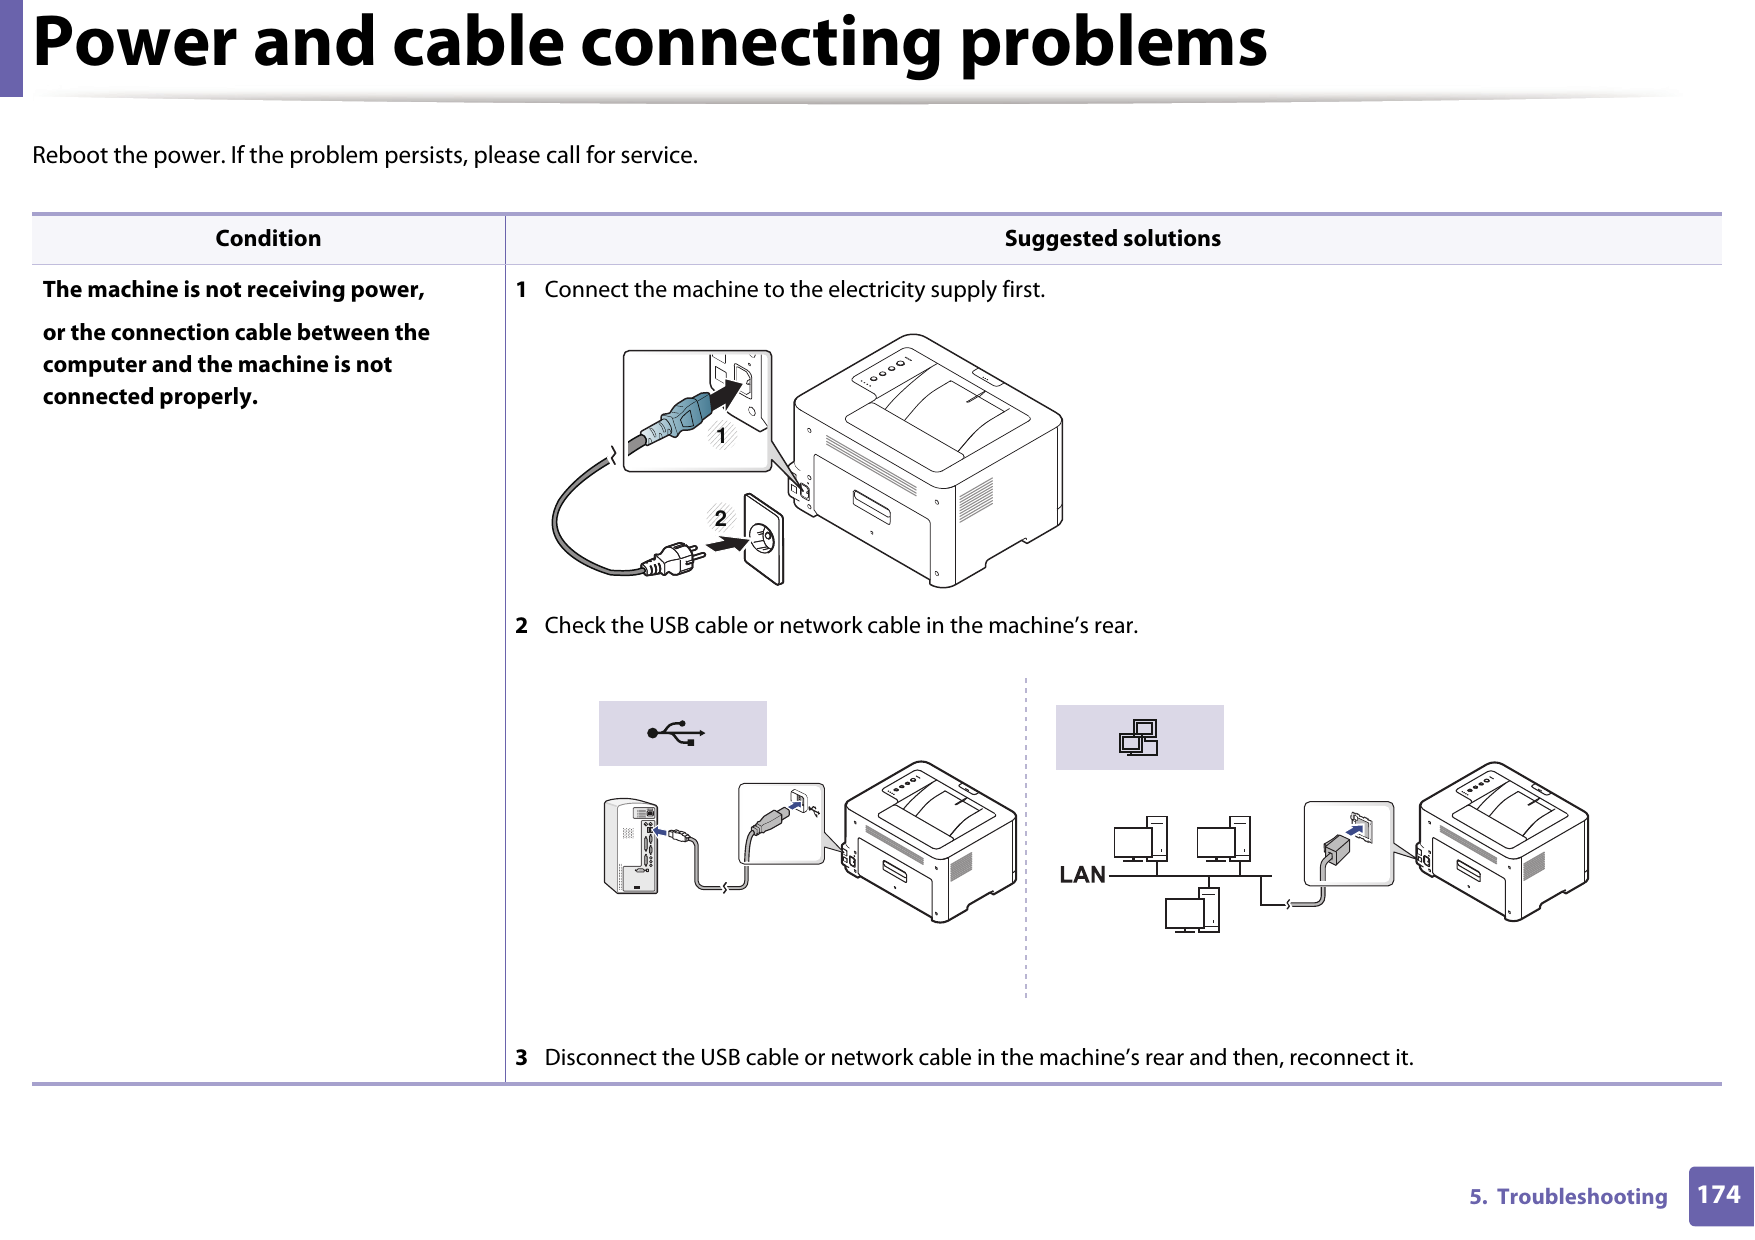
![Printing problems1785. TroubleshootingBefore printing, the machine emits vapor near the output tray.Using damp/wet paper can cause vapor [white smoke] during printing.This is not a problem, just keep printing. If you are bothered by the smoke [vapor], then replace the paper with fresh paper from an unopened ream.The machine does not print special-sized paper, such as billing paper.Paper size and paper size setting do not match. Set the correct paper size in the Custom in Paper tab in Printing Preferences (see "Opening Printing Preferences" on page 36).The printed billing paper is curled.The paper type setting does not match. Change the printer option and try again. Go to Printing Preferences, click Paper tab, and set type to Thick (see "Opening Printing Preferences" on page 36).Condition Possible cause Suggested solutions](https://usermanual.wiki/Samsung-Electronics-Co/SLC430.Users-Manual-Part-3/User-Guide-2698207-Page-78.png)
![190 Contact SAMSUNG worldwideContact SAMSUNG worldwideIf you have any comments or questions regarding Samsung products, contact the Samsung customer care center.Country/Region Customer Care Center WebSiteALGERIA 021 36 11 00 www.samsung.com/n_africa/supportARGENTINE 0800-555-SAMSUNG (0800-555-7267) www.samsung.com/ar/supportARMENIA 0-800-05-555 www.samsung.com/supportAUSTRALIA 1300 362 603 www.samsung.com/au/supportAUSTRIA0800-SAMSUNG (0800-7267864)[Only for Premium HA] 0800-366661[Only for Dealers] 0810-112233www.samsung.com/at/supportAZERBAIJAN 0-88-555-55-55 www.samsung.com/supportBAHRAIN8000-GSAM (8000-4726) www.samsung.com/ae/support (English)www.samsung.com/ae_ar/support (Arabic)BELARUS 810-800-500-55-500 www.samsung.com/supportBANGLADESH 09612300300 www.samsung.com/in/supportBELGIUM02-201-24-18 www.samsung.com/be/support (Dutch)www.samsung.com/be_fr/support (French)BOLIVIA 800-10-7260[HHP] 4828210www.samsung.com/cl/supportBOSNIA 055 233 999 www.samsung.com/supportBOTSWANA 8007260000 www.samsung.com/supportBRAZIL0800-124-421 (Demais cidades e regiões)4004-0000 (Capitais e grandes centros)www.samsung.com/br/supportBULGARIA 800 111 31 , Безплатна телефонна линияwww.samsung.com/bg/supportBURUNDI 200 www.samsung.com/supportCAMEROON 7095- 0077 www.samsung.com/africa_fr/supportCountry/Region Customer Care Center WebSite](https://usermanual.wiki/Samsung-Electronics-Co/SLC430.Users-Manual-Part-3/User-Guide-2698207-Page-90.png)
![Contact SAMSUNG worldwide191 Contact SAMSUNG worldwideCANADA1-800-SAMSUNG (726-7864) www.samsung.com/ca/support(English)www.samsung.com/ca_fr/support (French)CHILE 800-SAMSUNG (726-7864)[HHP] 02-24828200www.samsung.com/cl/supportCHINA 400-810-5858 www.samsung.com/cn/supportCOLOMBIABogotá 600 12 72Gratis desde cualquier parte del país 01 8000 112 112 ó desde su celular #SAM(726)www.samsung.com/co/supportCOSTA RICA0-800-507-7267 00-800-1-SAMSUNG (726-7864)www.samsung.com/latin/support (Spanish)www.samsung.com/latin_en/support (English)CROATIA 072 726 786 www.samsung.com/hr/supportCote D’ Ivoire 8000 0077 www.samsung.com/africa_fr/supportCountry/Region Customer Care Center WebSiteCYPRUS 8009 4000 only from landline, toll freewww.samsung.com/gr/supportCZECH 800-SAMSUNG (800-726786) www.samsung.com/cz/supportDENMARK 70 70 19 70 www.samsung.com/dk/supportDOMINICAN REPUBLIC1-800-751-2676 www.samsung.com/latin/support (Spanish)www.samsung.com/latin_en/support (English)DRC 499999 www.samsung.com/supportECUADOR1-800-10-72671-800-SAMSUNG (72-6786)www.samsung.com/latin/support (Spanish)www.samsung.com/latin_en/support(English)EGYPT 08000-726786416580www.samsung.com/eg/supportCountry/Region Customer Care Center WebSite](https://usermanual.wiki/Samsung-Electronics-Co/SLC430.Users-Manual-Part-3/User-Guide-2698207-Page-91.png)
![Contact SAMSUNG worldwide192 Contact SAMSUNG worldwideEIRE 0818 717100 www.samsung.com/ie/supportEL SALVADOR800-6225800-0726-7864www.samsung.com/latin/support (Spanish)www.samsung.com/latin_en/support (English)ESTONIA 800-7267 www.samsung.com/ee/supportFINLAND 030-6227 515 www.samsung.com/fi/supportFRANCE 01 48 63 00 00 www.samsung.com/fr/supportGERMANY0180 6 SAMSUNG bzw. 0180 6 7267864* [HHP] 0180 6 M SAMSUNG bzw.0180 6 67267864* (*0,20 €/Anruf aus dem dt. Festnetz, aus dem Mobilfunk max. 0,60 €/Anruf)www.samsung.com/de/supportGEORGIA 0-800-555-555 www.samsung.com/supportCountry/Region Customer Care Center WebSiteGHANA 0800-100770302-200077www.samsung.com/africa_en/supportGREECE80111-SAMSUNG (80111 726 7864) only from land line(+30) 210 6897691 from mobile and land linewww.samsung.com/gr/supportGUATEMALA1-800-299-00131-800-299-0033www.samsung.com/latin/support (Spanish)www.samsung.com/latin_en/support (English)HONDURAS800-2791-9267 800-2791-9111www.samsung.com/latin/support (Spanish)www.samsung.com/latin_en/support (English)HONG KONG(852) 3698 4698 www.samsung.com/hk/support (Chinese)www.samsung.com/hk_en/support (English)Country/Region Customer Care Center WebSite](https://usermanual.wiki/Samsung-Electronics-Co/SLC430.Users-Manual-Part-3/User-Guide-2698207-Page-92.png)
![Contact SAMSUNG worldwide193 Contact SAMSUNG worldwideHUNGARY 0680SAMSUNG (0680-726-786)0680PREMIUM (0680-773-648)www.samsung.com/hu/supportINDIA 1800 3000 8282 - Toll Free1800 266 8282 - Toll Freewww.samsung.com/in/supportINDONESIA 021-5699777708001128888www.samsung.com/id/supportIRAN 021-8255 [CE]021-42132 [HHP]www.samsung.com/iran/supportITALIA800-SAMSUNG (800.7267864)[HHP] 800.Msamsung (800.67267864)www.samsung.com/it/supportJAMAICA1-800-234-72671-800-SAMSUNG (726-7864)www.samsung.com/latin_en/support (English)JAPAN 0120-363-905 www.samsung.com/jp/supportJORDAN0800-2227306 5777444www.samsung.com/levant/support (English)KAZAKHSTAN 8-10-800-500-55-500 (GSM:7799, VIP care 7700)www.samsung.com/supportCountry/Region Customer Care Center WebSiteKENYA 0800 545 545 www.samsung.com/supportKUWAIT183-CALL (183-2255) www.samsung.com/ae/support (English)www.samsung.com/ae_ar/support (Arabic)KYRGYZSTAN 00-800-500-55-500 www.samsung.com/kz_ru/supportLATVIA 8000-7267 www.samsung.com/lv/supportLITHUANIA 8-800-77777 www.samsung.com/lt/supportLUXEMBURG 261 03 710 www.samsung.com/supportMACAU 0800 333 www.samsung.com/supportMACEDONIA 023 207 777MALAYSIA1800-88-9999603-77137477 (Overseas contact)www.samsung.com/my/supportMAURITIUS 23052574020 www.samsung.com/supportCountry/Region Customer Care Center WebSite](https://usermanual.wiki/Samsung-Electronics-Co/SLC430.Users-Manual-Part-3/User-Guide-2698207-Page-93.png)
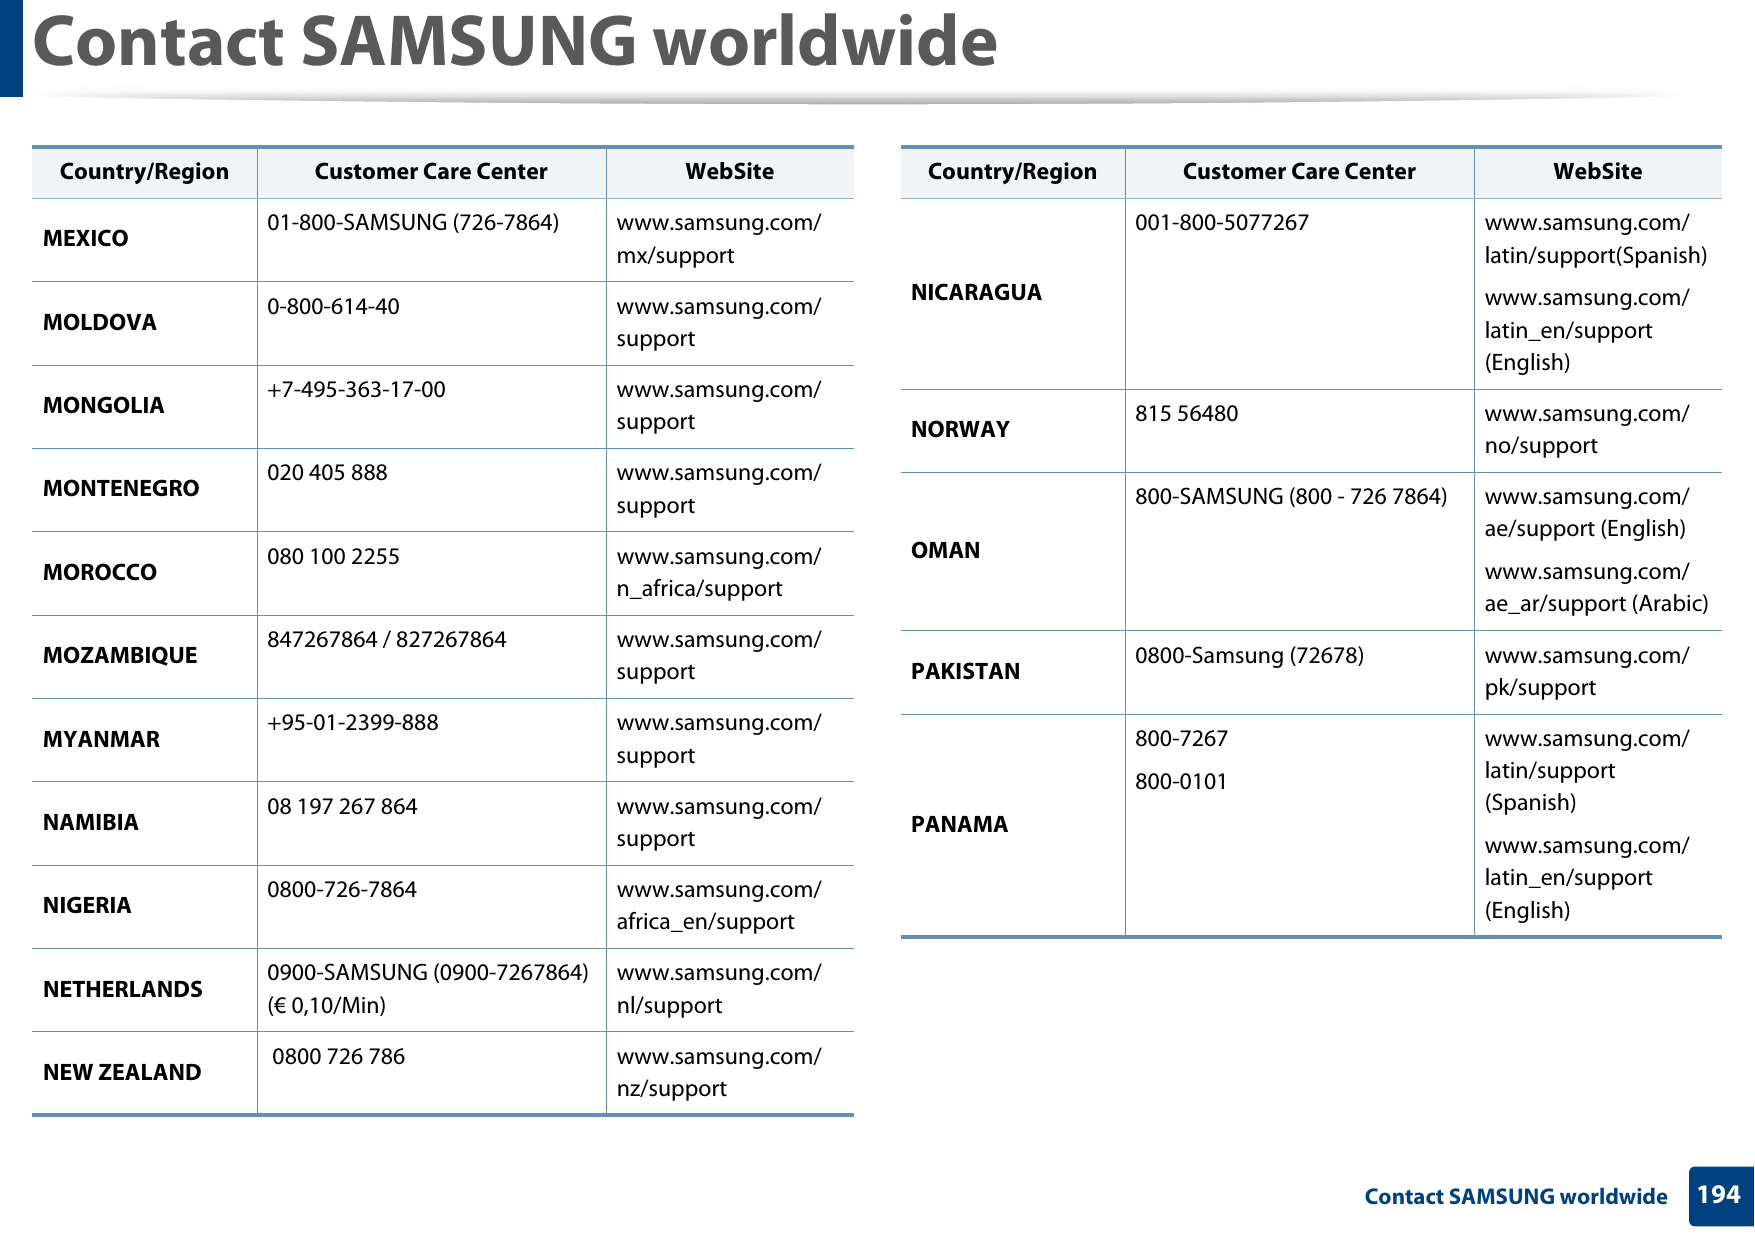
![Contact SAMSUNG worldwide195 Contact SAMSUNG worldwidePARAGUAY009-800-542-0001 www.samsung.com/latin/support (Spanish)www.samsung.com/latin_en/support (English)PERU 0800-777-08 www.samsung.com/pe/supportPHILIPPINES1-800-10-7267864 [PLDT]1-800-8-7267864 [Globe landline and Mobile]02-4222111 [Other landline]www.samsung.com/ph/supportPOLAND801-172-678* lub +48 22 607-93-33 *[HHP] 801-672-678* lub +48 22 607-93-33** (koszt połączenia według taryfy operatora)www.samsung.com/pl/supportPORTUGAL 808 20 7267 www.samsung.com/pt/supportCountry/Region Customer Care Center WebSitePUERTO RICO1-800-682-3180 www.samsung.com/latin/support (Spanish)www.samsung.com/latin_en/support (English)QATAR800-CALL (800-2255) www.samsung.com/ae/support (English)www.samsung.com/ae_ar/support (Arabic)REUNION 262508869 www.samsung.com/supportRWANDA 9999 www.samsung.com/supportROMANIA08008 726 78 64 (08008 SAMSUNG )Apel GRATUITwww.samsung.com/ro/supportRUSSIA 8-800-555-55-55 (VIP care 8-800-555-55-88)www.samsung.com/ru/supportSAUDI ARABIA8002474357 www.samsung.com/sa/supportwww.samsung.com/sa_en/support (English)/Country/Region Customer Care Center WebSite](https://usermanual.wiki/Samsung-Electronics-Co/SLC430.Users-Manual-Part-3/User-Guide-2698207-Page-95.png)
![Contact SAMSUNG worldwide196 Contact SAMSUNG worldwideSENEGAL 800-00-0077 www.samsung.com/africa_fr/supportSERBIA 011 321 6899 www.samsung.com/rs/supportSINGAPORE 1800-SAMSUNG (726-7864) www.samsung.com/sg/supportSLOVENIA 080 697 267 (brezplačna številka) 090 726 786 (0,39 EUR/min)www.samsung.com/rs/siSLOVAKIA 0800 - SAMSUNG(0800-726 786) www.samsung.com/sk/supportSOUTH AFRICA 0860 SAMSUNG (726 7864) www.samsung.com/supportSPAIN 0034902172678[HHP] 0034902167267www.samsung.com/es/supportSRI LANKA 94117540540 www.samsung.com/supportSUDAN 1969 www.samsung.com/supportSWEDEN 0771 726 7864 (0771-SAMSUNG) www.samsung.com/se/supportCountry/Region Customer Care Center WebSiteSWITZERLAND0800 726 78 64 (0800-SAMSUNG) www.samsung.com/ch/support (German)www.samsung.com/ch_fr/support (French)SYRIA18252273 www.samsung.com/levant/support (English)TADJIKISTAN 8-10-800-500-55-500 www.samsung.com/supportTAIWAN 0800-329999 www.samsung.com/tw/supportTANZANIA 0800 755 7550685 889 900www.samsung.com/supportTHAILAND 0-2689-3232,1800-29-3232www.samsung.com/th/supportTRINIDAD & TOBAGO1-800-SAMSUNG (726-7864) www.samsung.com/latin/support (Spanish)www.samsung.com/latin_en/support (English)TURKEY 444 77 11 www.samsung.com/tr/supportCountry/Region Customer Care Center WebSite](https://usermanual.wiki/Samsung-Electronics-Co/SLC430.Users-Manual-Part-3/User-Guide-2698207-Page-96.png)
![Contact SAMSUNG worldwide197 Contact SAMSUNG worldwideTUNISIA 80-1000-12 www.samsung.com/n_africa/supportU.A.E800-SAMSUNG (800 -726 7864) www.samsung.com/ae/support (English)www.samsung.com/ae_ar/support (Arabic)UK 0330 SAMSUNG (7267864) www.samsung.com/uk/supportU.S.A-Consummer Electonics1-800-SAMSUNG (726-7864) www.samsung.com/us/supportU.S.A(Mobile Phones)1-800-SAMSUNG (72-6786)[HHP] 1-888-987-HELP(4357)www.samsung.com/us/supportUGANDA 0800 300 300 www.samsung.com/supportUKRAINE0-800-502-000 www.samsung.com/ua/support (Ukrainian)www.samsung.com/ua_ru/support (Russian)Country/Region Customer Care Center WebSiteURUGUAY000- 405-437-33 www.samsung.com/latin/support(Spanish)www.samsung.com/latin_en/support(English)UZBEKISTAN 8-10-800-500-55-500 (GSM: 7799)www.samsung.com/supportVENEZUELA 0-800-SAMSUNG (726-7864) www.samsung.com/ve/supportVIETNAM 1800 588 889 www.samsung.com/vn/supportZAMBIA 0211 350370 www.samsung.com/supportCountry/Region Customer Care Center WebSite](https://usermanual.wiki/Samsung-Electronics-Co/SLC430.Users-Manual-Part-3/User-Guide-2698207-Page-97.png)