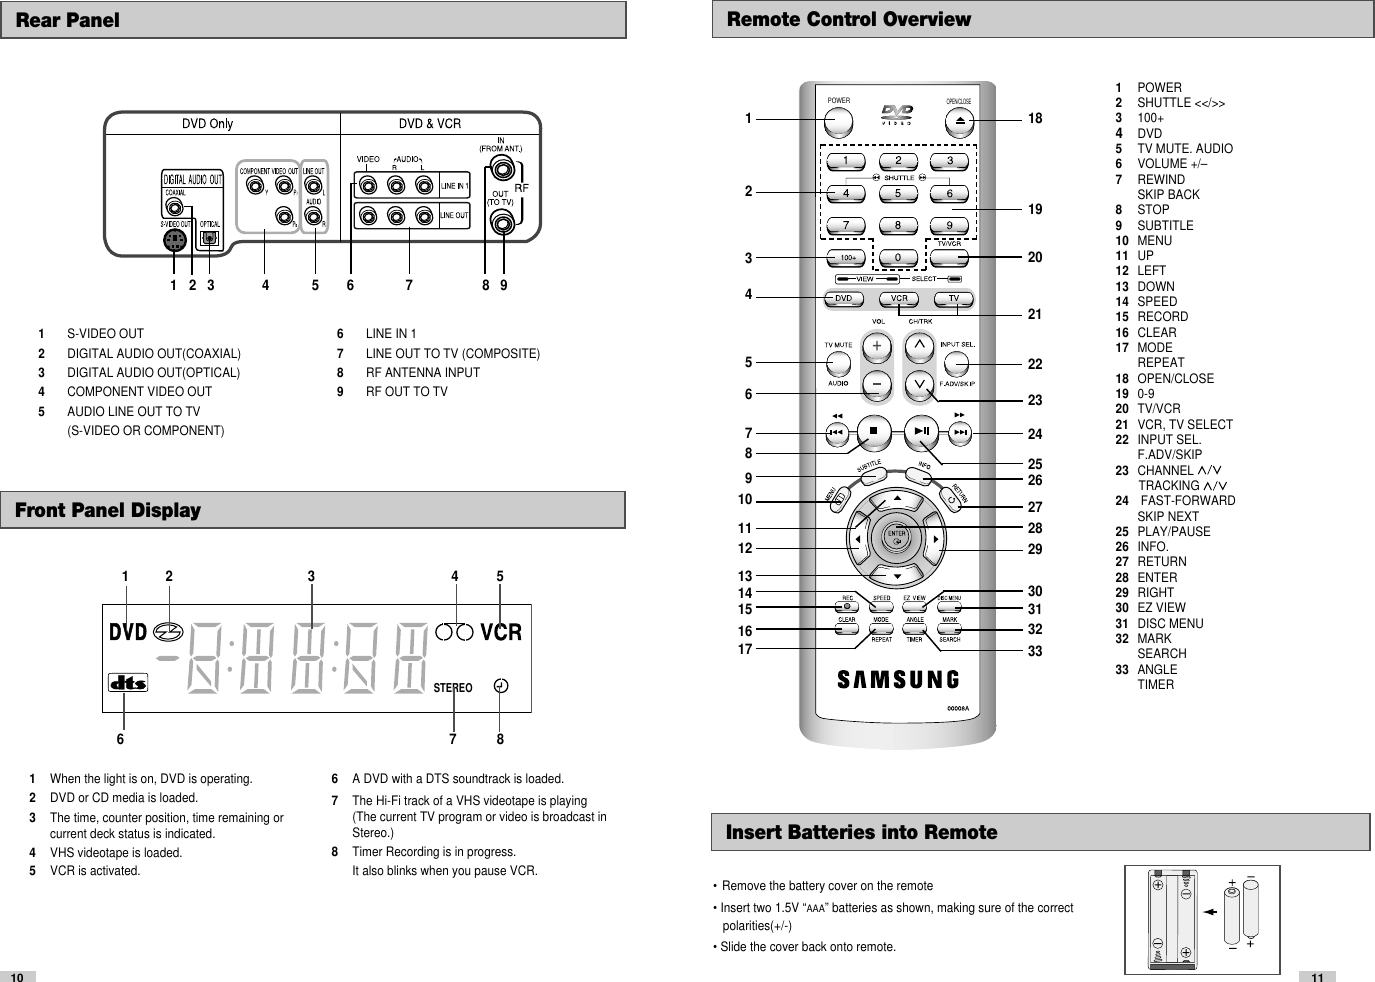
Samsung Electronics Co SLIMCOMBO Video Cassette Recorder/ DVD Player User Manual
Samsung Electronics Co Ltd Video Cassette Recorder/ DVD Player Users Manual
UserManual.wiki
>
Samsung Electronics Co
>
SLIMCOMBO User Manual
Users Manual
Navigation menu
Upload a User Manual
Namespaces
Wiki Guide
HTML
PDF
Info
Views
User Manual
Discussion / Help
Navigation
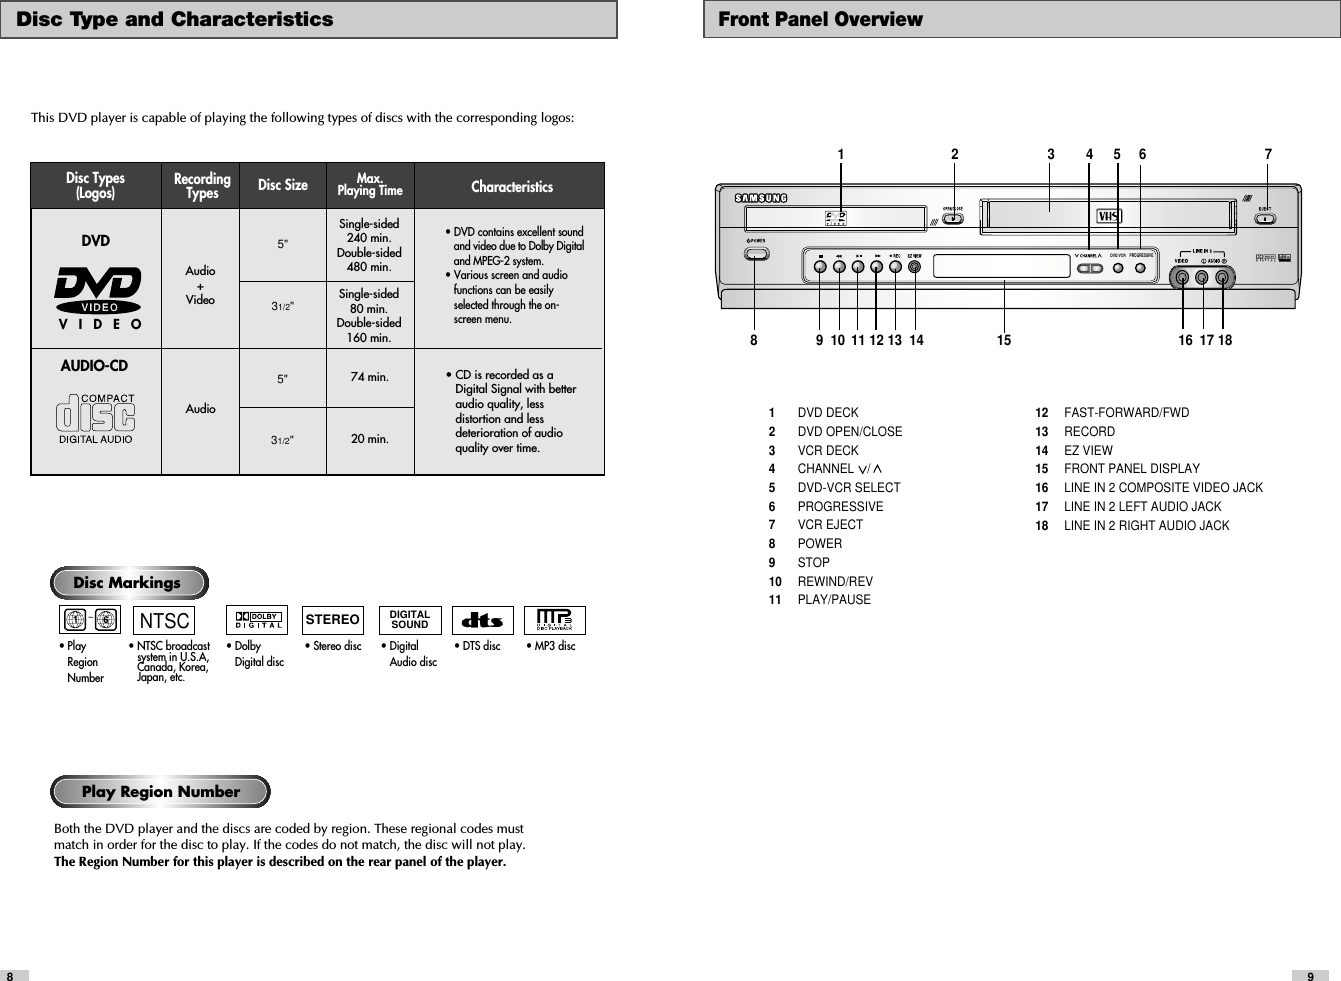
![2322Front Panel DimmerYou can set the Front Panel Display to be bright all the time, dimall the time, or dim during power off.1 Open “ MENU”With the DVD in Stop or Play mode, press the MENU button.2 Select “SETUP”Using the UP/DOWN buttons, move the selection bar to “SETUP”then press ENTER to select.3 Set “Front Display”Move the selection bar to “Front Display,” then press right to selectfrom the following options:•Auto – Front Panel Display will dim automatically during power off.•Bright – Front Panel Display will be bright all the time.•Dim – Front Panel Display will be dim all the time.Language : EnglishFront Display : AutoAuto Power Off : Off Front Display : AutoAuto Power Off : Off Language : EnglishLanguage : EnglishFront Display : AutoAuto Power Off : Off Channel Add/DeleteUse this feature if Auto Channel Search missed a channel that youwould like to add, or added a channel you wish to remove.1 Open “MENU”With the DVD in Stop or Play mode, press the MENU button.2 Select “SETUP”Using the UP/DOWN buttons, move the selection bar to “SETUP”then press ENTER to select.3 Select “Channel”Using the UP/DOWN buttons, move the selection bar to “Channel”,then press ENTER to select.4 Select “Channel Add/Delete” Move the selection bar to “Channel Add/Delete,” then pressENTER to select.5 Select Channel to add/deleteUse the CH / buttons to tune in the channel number you wishto add or remove.6 Select “Channel Add/Delete”Press right to add or press left to remove the channel fromyour channel list.•Repeat steps 4 and 5 to add or remove additional channels. 411Ant./Cable : AntennaRF Output CH : 3CHAuto Channel MemoryChannel Add/DeleteCHANNEL ADD/DELETESelect channel : [ 02]and press [❿] to ADDpress [➛] to DELETERETURN CH ❷AutoBrightDim2Language : EnglishFront Display : AutoAuto Power Off : Off Language : EnglishFront Display : AutoAuto Power Off : Off Front Display : AutoAuto Power Off : Off Language : English](https://usermanual.wiki/Samsung-Electronics-Co/SLIMCOMBO/User-Guide-329708-Page-13.png)


![5352If you want your videotapes to play automatically when you insertthem, turn on Auto Play.NOTE: Only tapes that are missing the Record Safety Tab will play automatically when inserted.1 Open the “MENU”With the DVD in Stop or Play mode, press the MENU button.2 Select “VCR”Using the Up/Down buttons, move the selection bar to “VCR” then press ENTER to select.3 Select “Tape Length”Press the RIGHT button to select the video cassette length. This information is usually printed on the tape box. The menu cycles through: T120, T160 or T180. Once the type of cassette is set, the VCR can display the amount of time remaining on the tape when you press the INFO. button.4 Select “Auto Play”Move the selection bar to “Auto Play,” then press right to selectfrom the following options: •On - The VCR will automatically begin playing a video tape when it is inserted, as long as the safety tab of the cassette has been removed.•Off - Auto play is disabled.5 Select “Auto Repeat”Move the selection bar to “ Auto Repeat” sets the VCR to play a tape repeatedly [unless a tape control is activated (stop, fast forward or rewind)].Auto PlayS-VHS PlaybackThe DVD-VCR allows you to playback high quality S-VHS tapes.1 Insert a S-VHS TapeInsert an S-VHS tape into the VCR deck.2 Start PlaybackPress Play/Pause on the remote control to begin playback of the S-VHS tape.nnnOffOnOnOffT120T160T180The Tracking adjustment removes the white lines that sometimesappear during playback because of slight differences in recordingdecks. The TRK button will automatically align the recorded trackswith the playback heads to solve this problem. You may also settracking manually.1 Adjust Tracking ManuallyDuring playback, press the CH/TRK or CH/TRK buttons toremove white lines from the picture.11While a videotape is playing, you can enjoy a variety of specialplayback features, including Still, Frame Advance, Skip, Repeat, andmore. Press the Play button again to resume normal playback.1 StillFrom Play mode, press Play/Pause to still a single frame.2 Frame AdvanceFrom still mode, press F.ADV/SKIP to advance to the next frame. 3 Cue/ReviewFrom Play mode, press F.Forward (❿❿) or Rewind (➛➛) tocue/review at two speeds:•Picture Search — Press and release to advance the tapeforward or backward at 5 times normal speed.•Jet Search — Press and hold to advance the tape forward orbackward at 7 times normal speed.4 SkipFrom Play mode, press F.ADV/SKIP to cue ahead exactly 30seconds. Press Skip repeatedly up to 4 times to cue ahead 2minutes.5 Repeat•From Play mode, press Repeat to review the last 5 seconds oftape (SP mode).•From Play mode, press Repeat to review the last 15 seconds of tape (SLP mode).6 ShuttleFrom Play mode, Shuttle >> gradually increases the cue speedfrom Double-Speed playback to Picture Search to Jet Search.Shuttle << gradually slows down the tape, then goes into Slowmode, Still mode, Reverse Picture Search and Reverse Jet Search.Special VCR Playback FeaturesPress the INFO. button to see thecurrent status of the VCR deck, as wellas the tape counter position andrecord speed.33PLAY0:00:00 SPTracking](https://usermanual.wiki/Samsung-Electronics-Co/SLIMCOMBO/User-Guide-329708-Page-29.png)
![59Language : EnglishFront Display : AutoAuto Power Off : Off ForwardReverse Function (VCR)1 Open “MENU”With the DVD in Stop or Play mode, press the MENU button.2 Select “FUNCTION”Use the Up/Down buttons to highlight “FUNCTION”, then press theENTER button.3 Select “VCR Function”Using the UP/DOWN buttons to highlight “VCR Function”, thenpress ENTER to select.4 Select “Go to ( 0: 00: 00)”Highlight “Go to ( 0: 00: 00 )”, then press the ENTER button.- End SearchHighlight “End Search”, then press the ENTER button.- Forward Intro ScanHighlight “Forward Intro Scan”, then press the ENTER button.- Reverse Intro ScanHighlight “Reverse Intro Scan”, then press the ENTER button.58How to Set a Timer RecordingInsert a blank videotape into the VCR deck. Be sure to leave theRecord Safety Tab intact.With the Timer Recording function, you can program up to 7events at a time to record up to a month in advance. Set the TV to channel 3 or 4. To Begin Setting the Timer Recording,• Turn on your DVD-VCR, and• Turn on your TV.1 Open “MENU”Press the MENU button or the TIMER button while the DVD is in Stop or Play mode.2 Select “Program”Use the UP/DOWN buttons to highlight “PROGRAM”, then press the ENTER button.3 Select Channel Number Use the Right and UP/DOWN buttons to set the channel. Press the RIGHT button to move to the next setting.4 Set “Time/Date/Speed”Repeat Step 3 above to set start time, end time, date and record speed. Date can be set for one time, daily or weekly recording. See below.5 Save “Timer Recording” Press the RETURN button to finish setting the timer recording.Stop the VCR or turn the power off. The timer indicator light willcome on the VCR. Then the VCR will automatically turn on andbegin recording at the time you set. To stop the timer recording,press the POWER button or press the STOP button two times.6 Auto Speed Select If the length of the videotape is not long enough for a timer recording in the SP mode, set the recording tape speed to “AUTO”. Recording will start in the SP mode. If the length is not long enough, the tape speed will automatically change from SP mode to SLP mode.7 Daily/Weekly Date ProgrammingWeekly [SUN’S~SAT’S]: Use this to record TV programs on the same channel at the same time every week.Daily [MO - FR] : Use this to record TV programs on the same channel at the same time every day Monday through Friday. If you want to setthe timer program,press the ENTER keyTimer ProgramNo Ch Start End Date Speed::::::::::::::1234567Language : EnglishFront Display : AutoAuto Power Off : Off](https://usermanual.wiki/Samsung-Electronics-Co/SLIMCOMBO/User-Guide-329708-Page-32.png)