Samsung Electronics Co SLS-BU10A0 uFemto User Manual A3LSLS BU10A0 Part2 Quick Start Guide
Samsung Electronics Co Ltd uFemto A3LSLS BU10A0 Part2 Quick Start Guide
Contents
- 1. A3LSLS-BU10A0_User Manual_Part1_Rev.1
- 2. A3LSLS-BU10A0_User Manual_Part2_Quick Start Guide
A3LSLS-BU10A0_User Manual_Part2_Quick Start Guide
NE for Enterprise QSG.indd 1-6
6/12/2014 9:39:45
AM
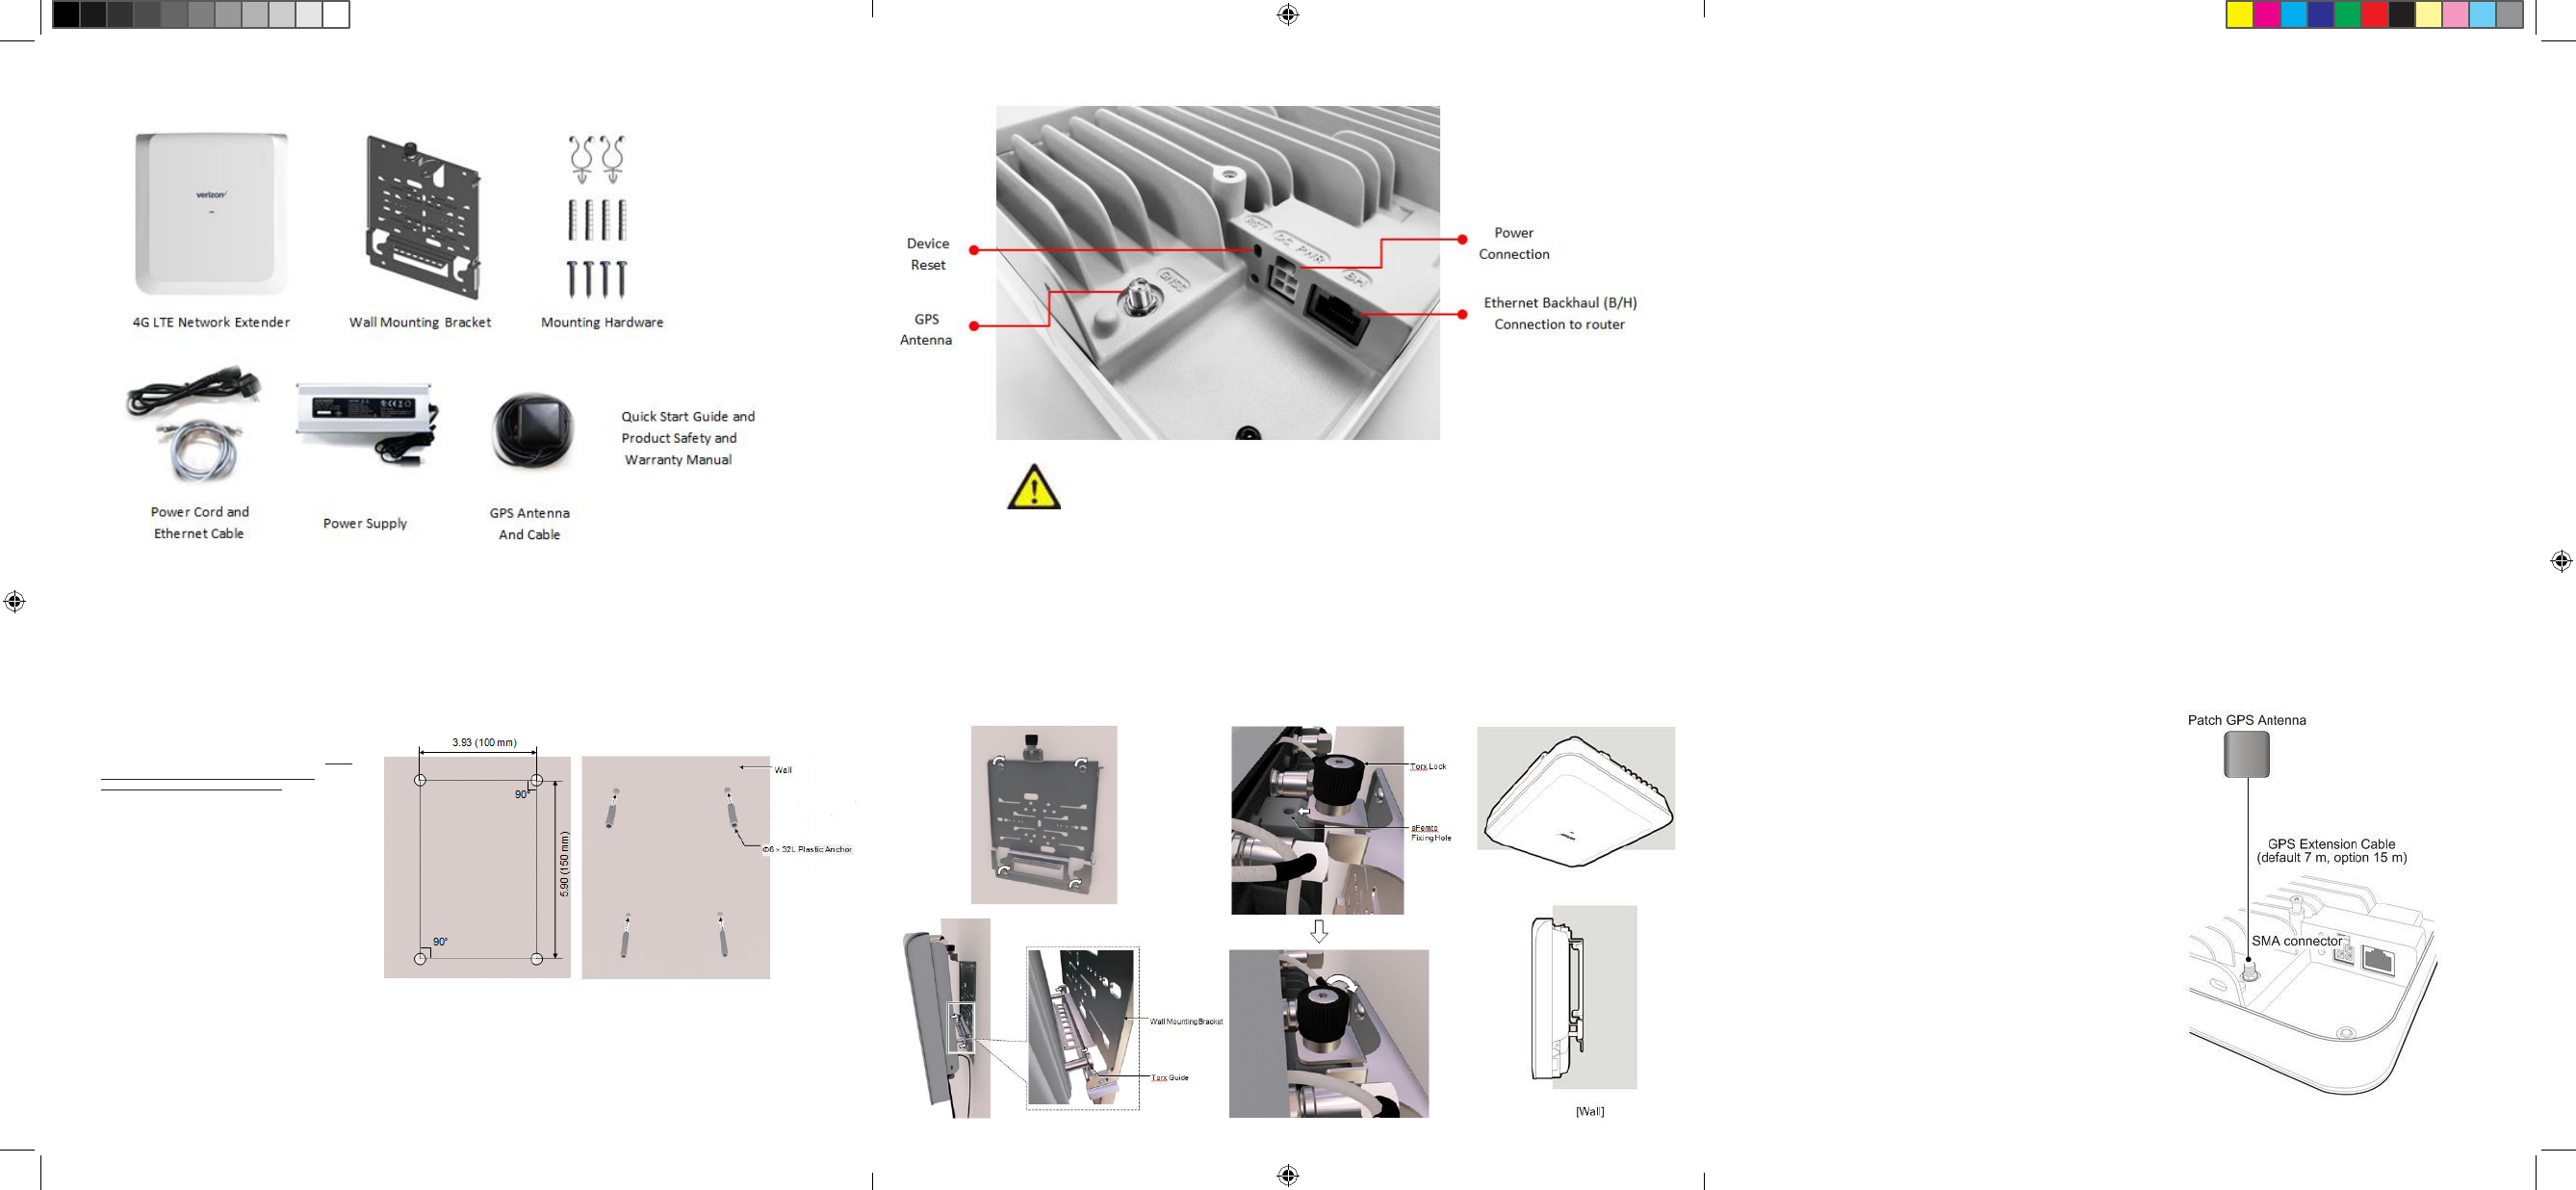
Product Contents
Your 4G LTE Network Extender for Enterprise contains the following components:
Mounting Procedure
The package contains screws and anchors for drywall mounting. Installation on
alternate surfaces will require the purchase of the appropriate anchors and
hardware.
Mounting Steps:
1. Determine the mounting
location and verify that no
wires, pipes, etc., are at the
point of mounting.
2. Use the wall mounting bracket
to act as a template to mark
anchor holes on the wall.
3. Drill holes into drywall
and push in the supplied
plastic drywall anchors.
Installation on surfaces other
than drywall may require
different anchoring hardware
which can be purchased at your
local hardware store.
Connection Overview
For general safety and precautions, see Product Safety and
Warranty and Warranty Manual.
Mounting Procedure
4. Align the mounting bracket with the wall anchors and attach using the supplied
screws.
5. Slide the Network Extender with mounting bracket into the wall mounting bracket.
6. Align the fixing hole and the torx lock of mounting bracket then Fasten the torx
lock of the mounting bracket using a torx driver
Prerequisites
Ethernet and Backhaul (B/H) Requirements
For optimum performance regarding backhaul bandwidth requirements and specific
firewall settings, please refer to the online 4G LTE Network Extender for
Enterprise User Guide found at
http://support.verizonwireless.com/clc/devices/index.html?p=SLS-B102&m
GPS Signal
The Network Extender requires Strong GPS signal from the provided indoor GPS
antenna. For installation other than with the provided GPS antenna, please refer
to the online 4G LTE Network Extender for Enterprise User Guide.
Placement
The Network Extender can be installed: vertically or horizontally on a wall, floor, or
ceiling.
Place unit at least 10 feet away from products which generate electromagnetic radiation
(e.g., microwave oven).
1. Identify a location for the Network Extender, central to users, but no more than
21 feet from an exterior window or wall to allow for a strong GPS signal.
2. Identify a power source for the Network Extender.
3. Follow device mounting, installation and power up steps.
4. For more detailed placement instructions, please see the 4G Network Extender
Installation Manual.
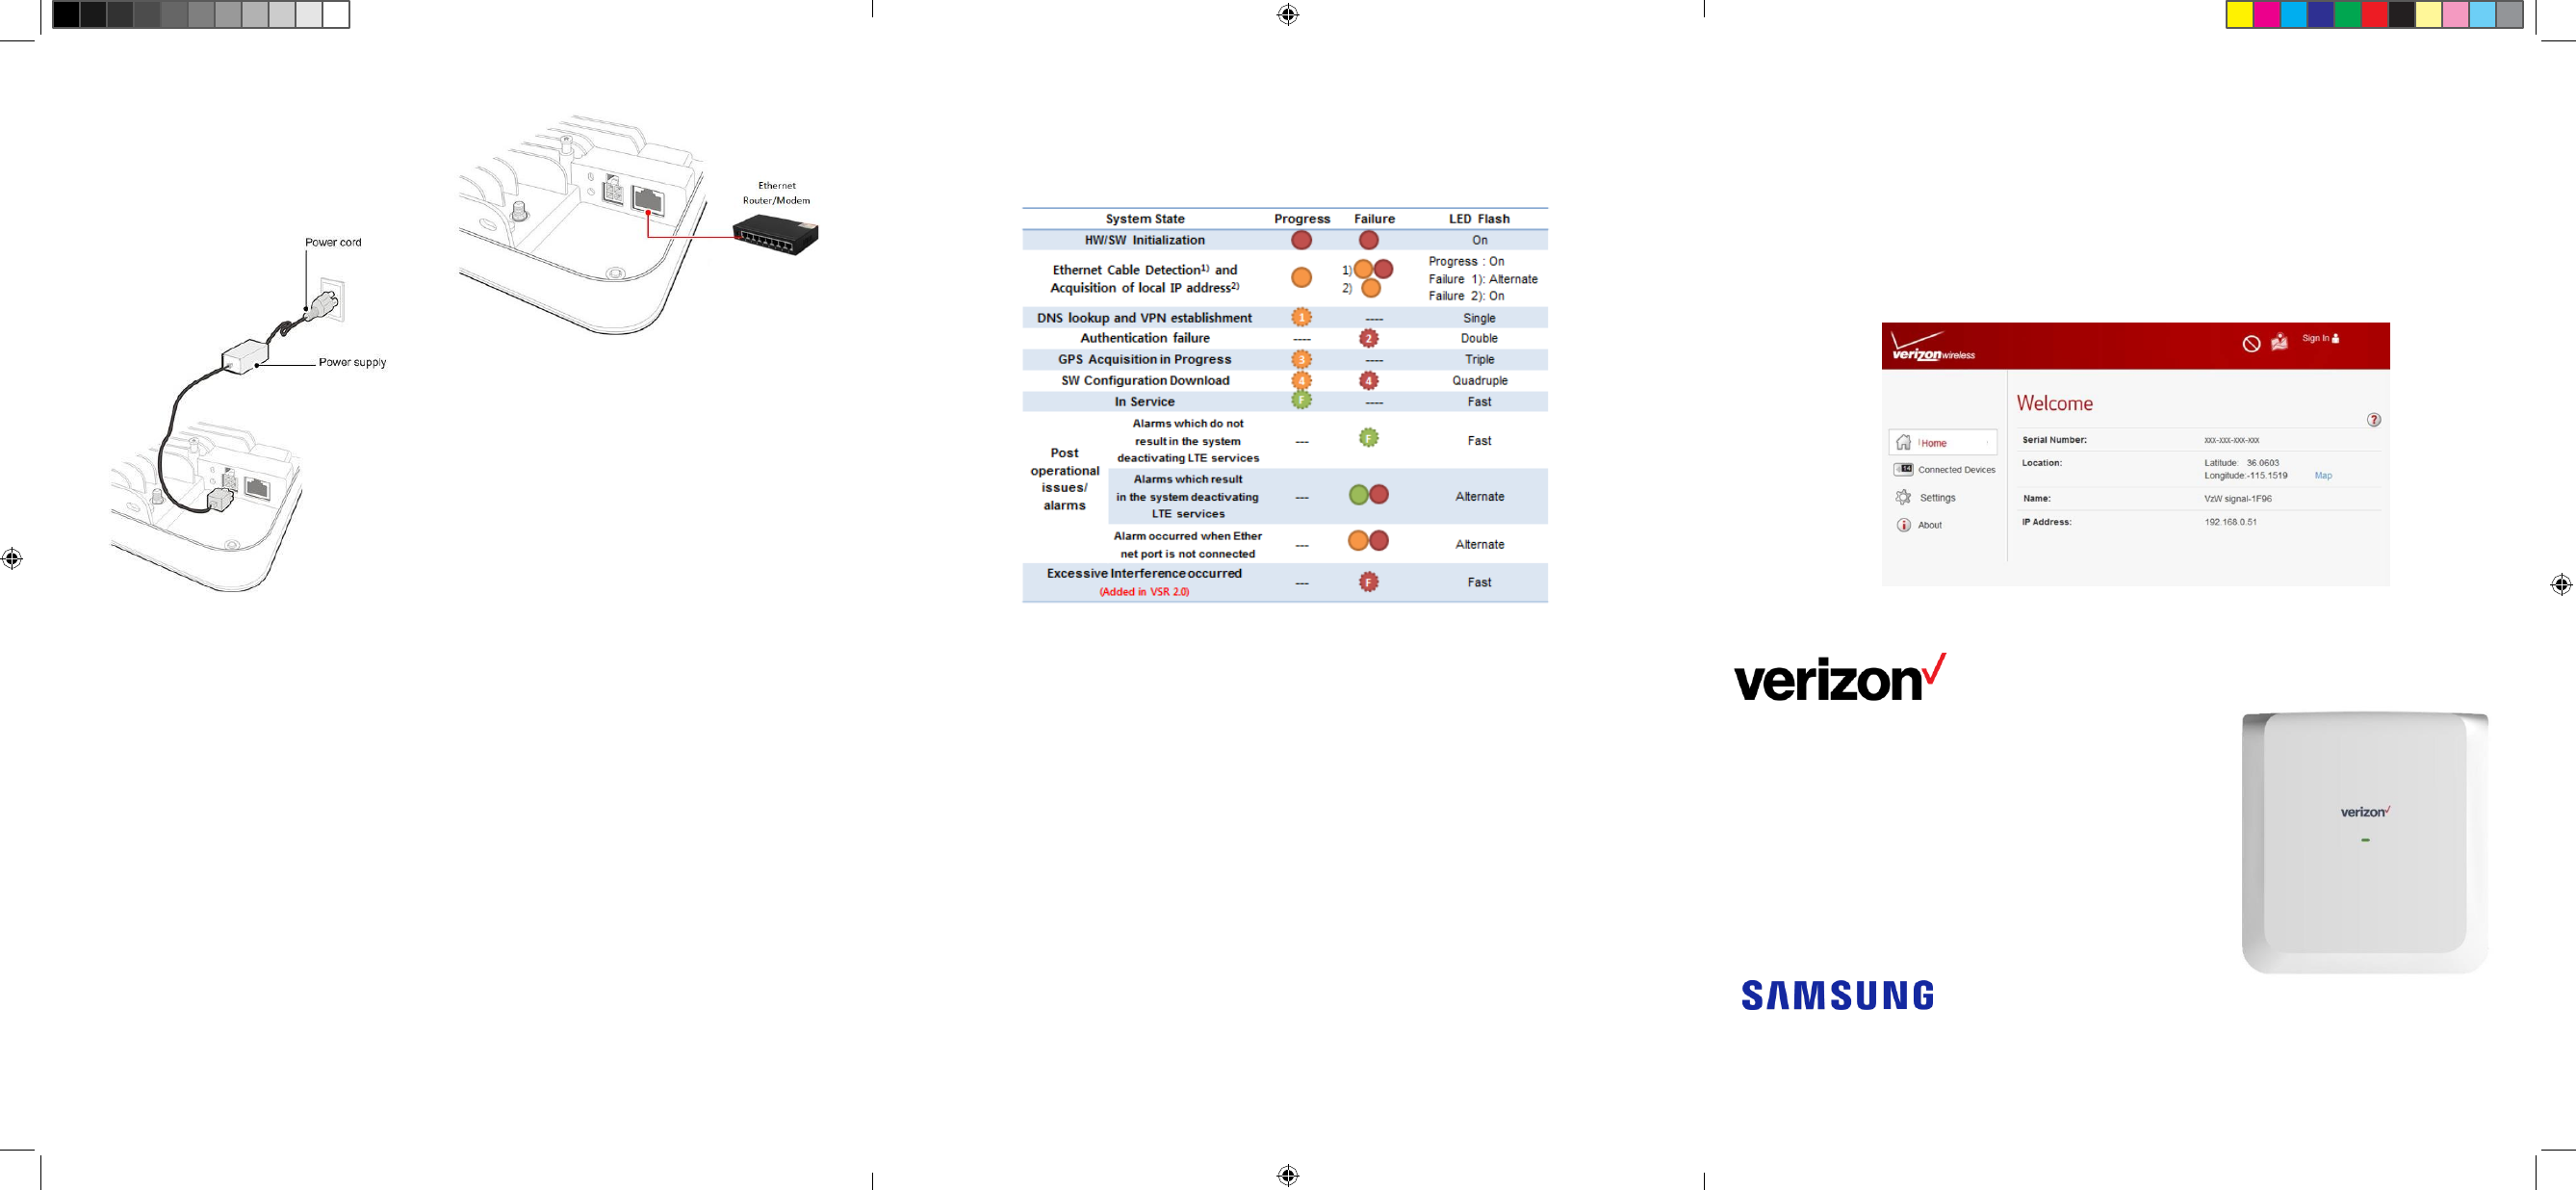
Connecting GPS Antenna, Ethernet and Power Cable
1. Gently remove protective covers for the power, Ethernet ports.
2. Connect the GPS antenna cable (indoor use only) to the GPS port of the Network Extender.
Note:
The GPS antenna must stay connected to
the Network Extender at all times for
operation. The initial GPS fix can take
up to 60 minutes and may require an
external outdoor GPS antenna(not
supplied).
[Ceiling]
NE for Enterprise QSG.indd 7-12
6/12/2014 9:39:46
AM
Connecting GPS Antenna, Ethernet and Power cable (Continued) Power on Automated Accessing Advanced Settings
3. Attach the supplied Ethernet cable from
your router or modem LAN port to the
Network Extender B/H port for network
connectivity.
4. Attach the power cable for the
Network Extender. Automatic power
up will begin.
POWER ON
At Startup, the Network Extender will
conduct self-configuration. This may
take between 30-60 minutes the first
time the Network Extender is turns on.
The following Status LED sequence will occur. Upon successful setup, the LED will
blink green.
Note: If the LED fails to turn green after one hour or is slower blinking orange
(1 pulse per 3 seconds), consult the troubleshooting section in the online 4G LTE
Network Extender for Enterprise User Guide.
To access advanced settings and manage the Network Extender, you can Sign In to the
web interface by following the steps below:
1. Use a computer connected to the same LAN as the Network Extender
2. Open a web browser and enter the IP address of the Network Extender
http://<ip address of network extender>
3. Sign In using the default admin password: enterpriseFemtØ
For more detailed information on changing the TCP/IPv4 settings of the Laptop.
Please see the 4G LTE Network Extender for Enterprise User Guide
Optional Accessories Troubleshooting
Outdoor GPS antenna
Antennae extension cables
Power over Ethernet (POE) Injectors and Switches
See the 4G LTE Network Extender for Enterprise User Guide for full details.
For a full list of optional accessories, please see the 4G LTE Network
Extender for Enterprise Installation Guide.
No GPS Signal
A triple red blinking LED indicates no GPS signal. Check the About Network
Extender page in the Advanced Settings web interface, on the tabs for “Status and
Alerts” or “GPS” to see the status of the GPS constellation.
Is my wireless device connected to the Network Extender?
Using the web interface, sign in and check the Connected Devices panel for
indication of connected users.
Cannot reach Network Extender GUI or locked out of device.
Press the RESET button for 10 seconds to reset the system to factory default
settings.
Port Down
In the event of an alternative red/yellow LED, please check the Advanced
Settings web interface on the tab for “Status and alerts”. Follow the
appropriate steps in the 4G LTE Network Extender for Enterprise User Guide
Where to go for help.
For complete installation and operation information, please see the online 4G LTE
Network Extender for Enterprise User Guide
athttp://support.verizonwireless.com/NetworkExtender.
Call Customer Care toll Free at 800-922-0204 or *611 from your Verizon Wireless
mobile phone.
© 2017 Verizon Wireless. All rights reserved. Verizon Wireless is a trademark of Verizon Trademark Services LLC.
Verizon Wireless
4G LTE Network
Extender for
Enterprise
Quick Start Guide
SLS-BUxxx
EPXX-XXXXX Revision 1.0