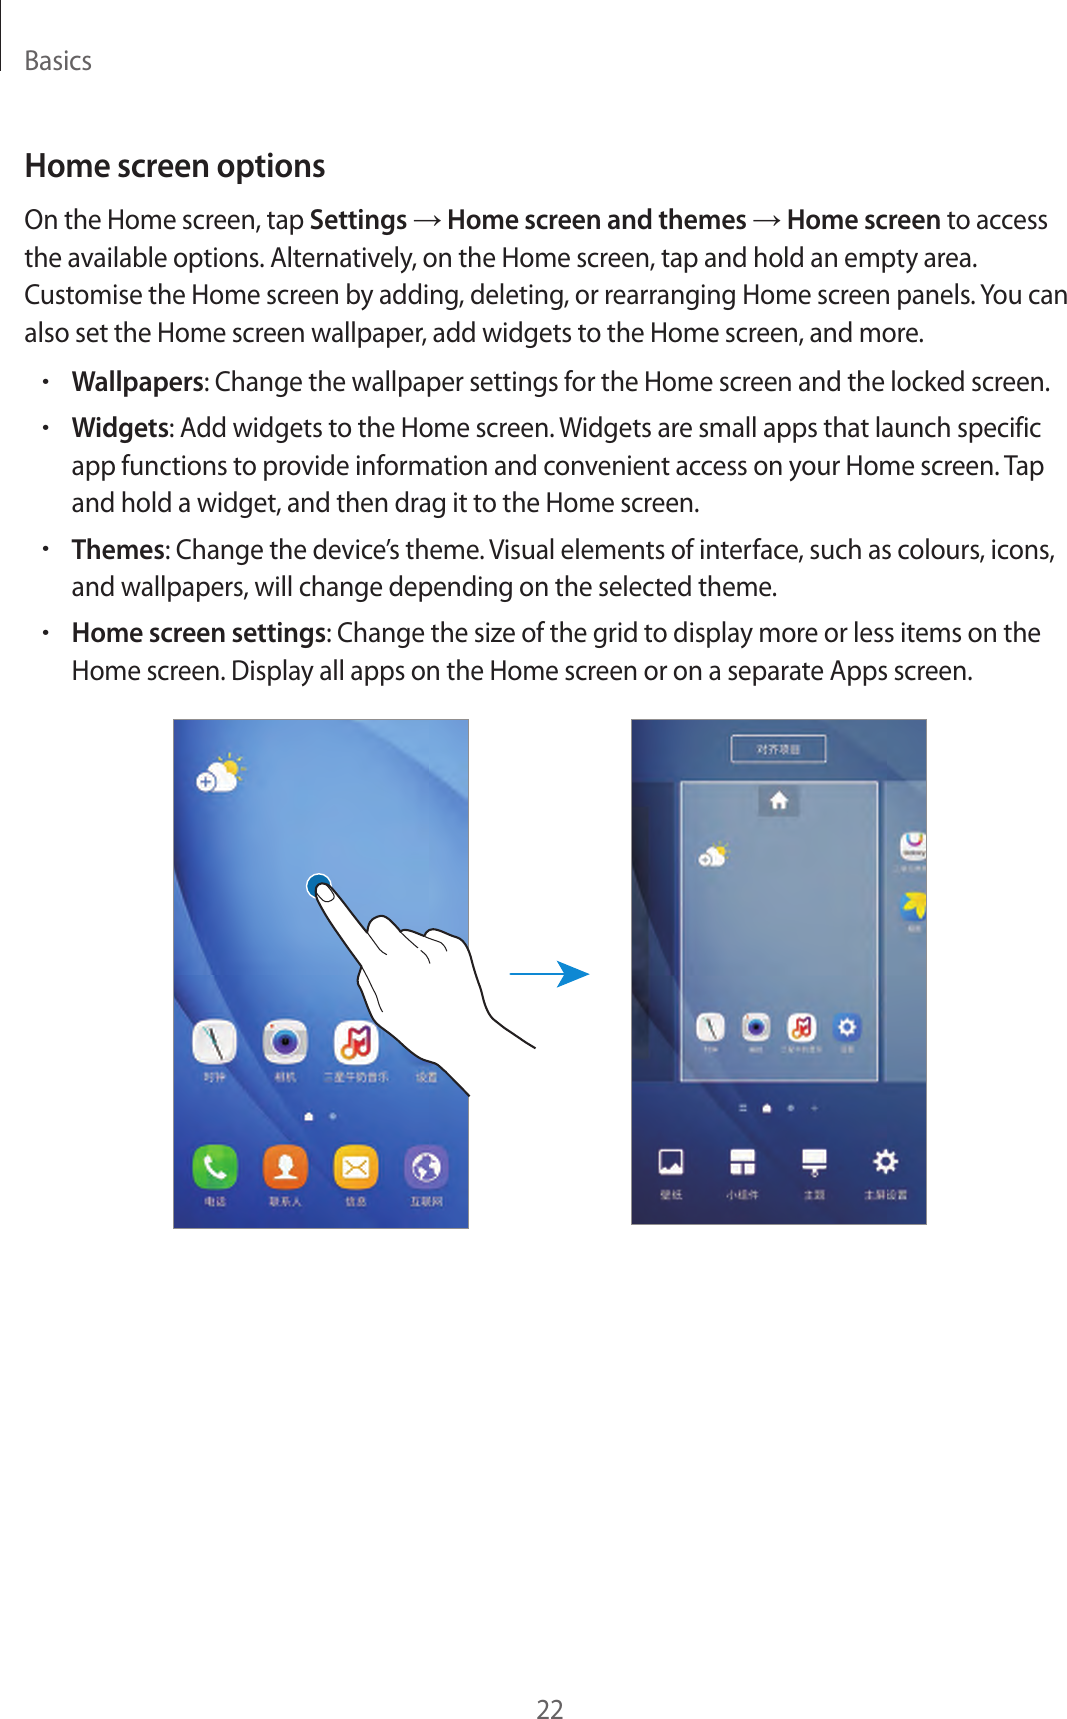
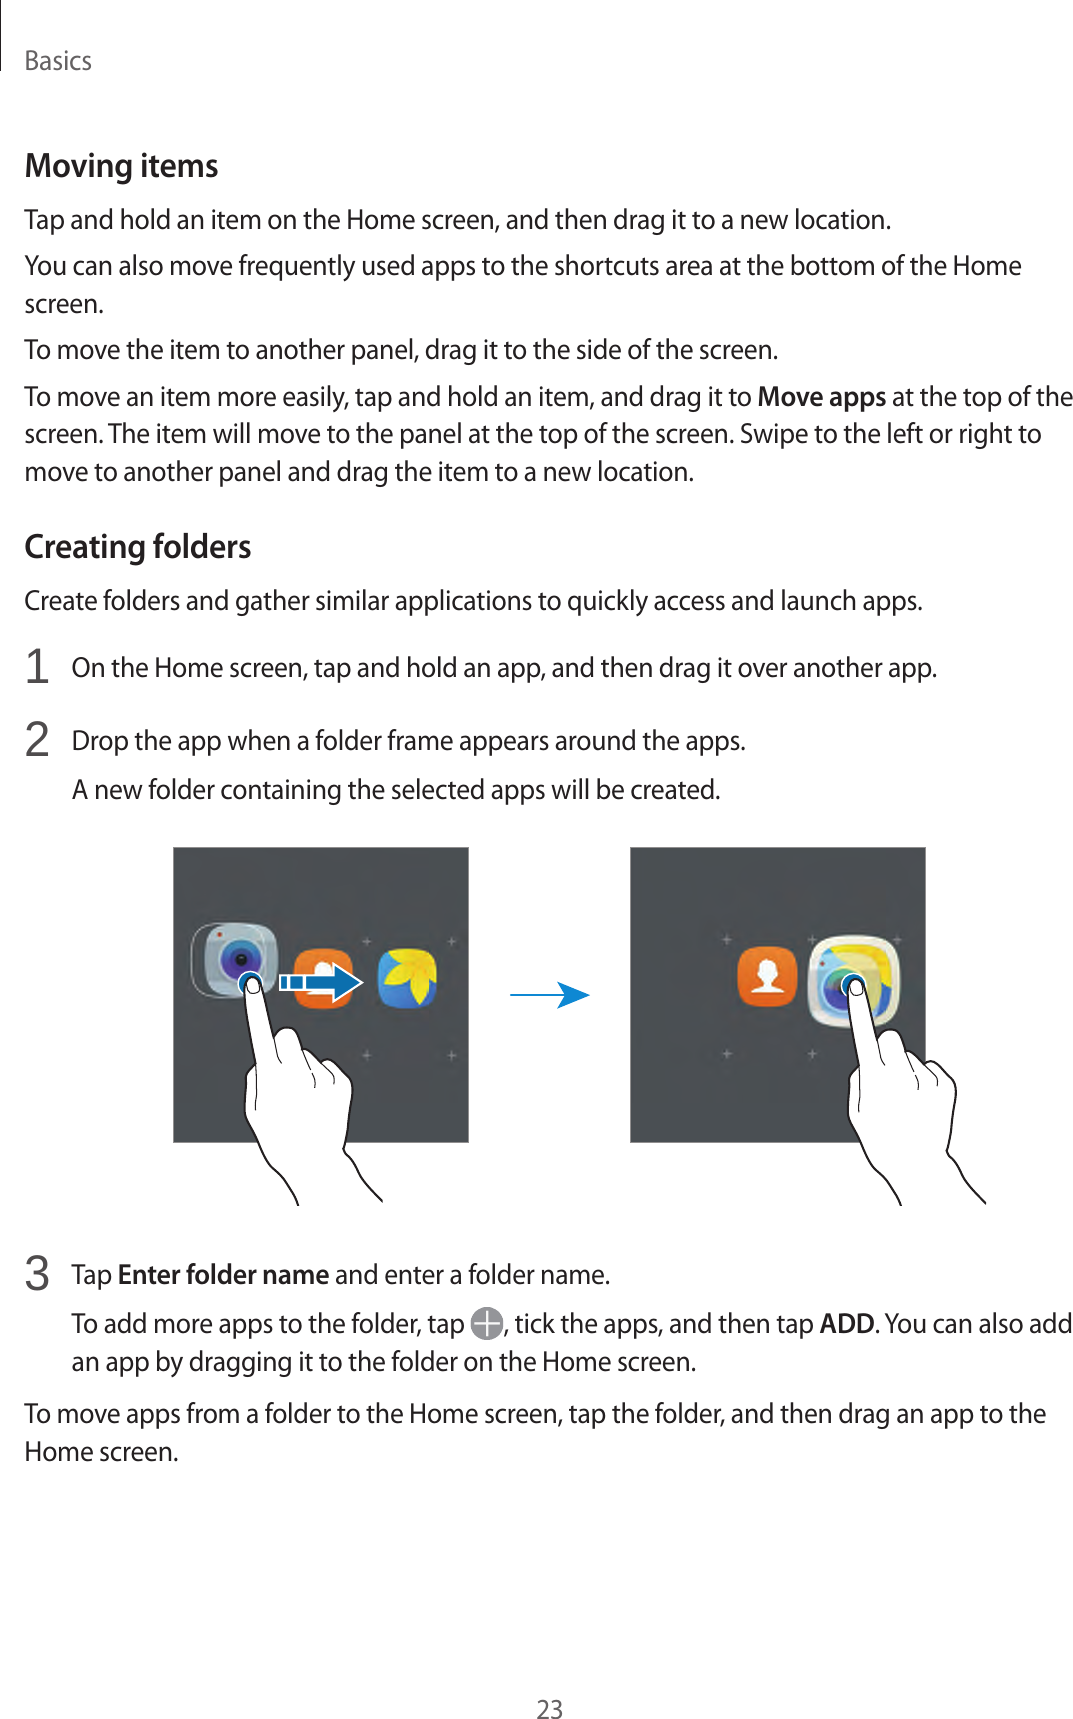
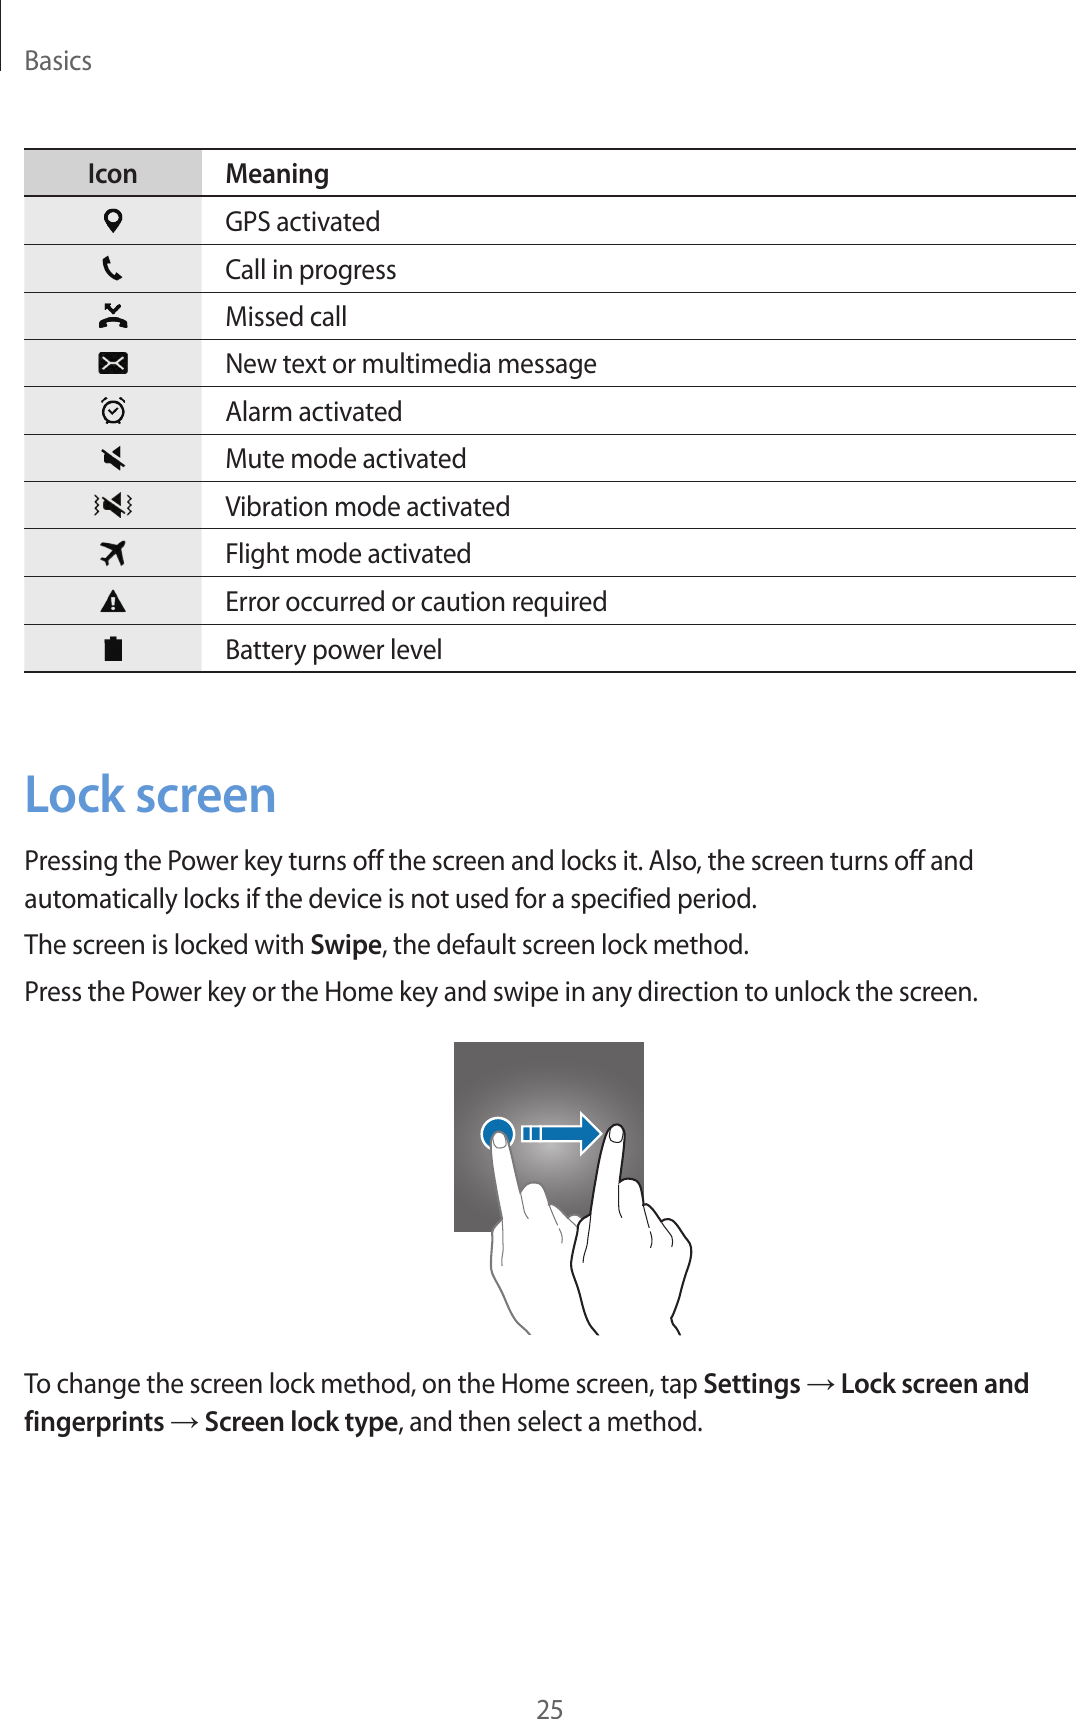
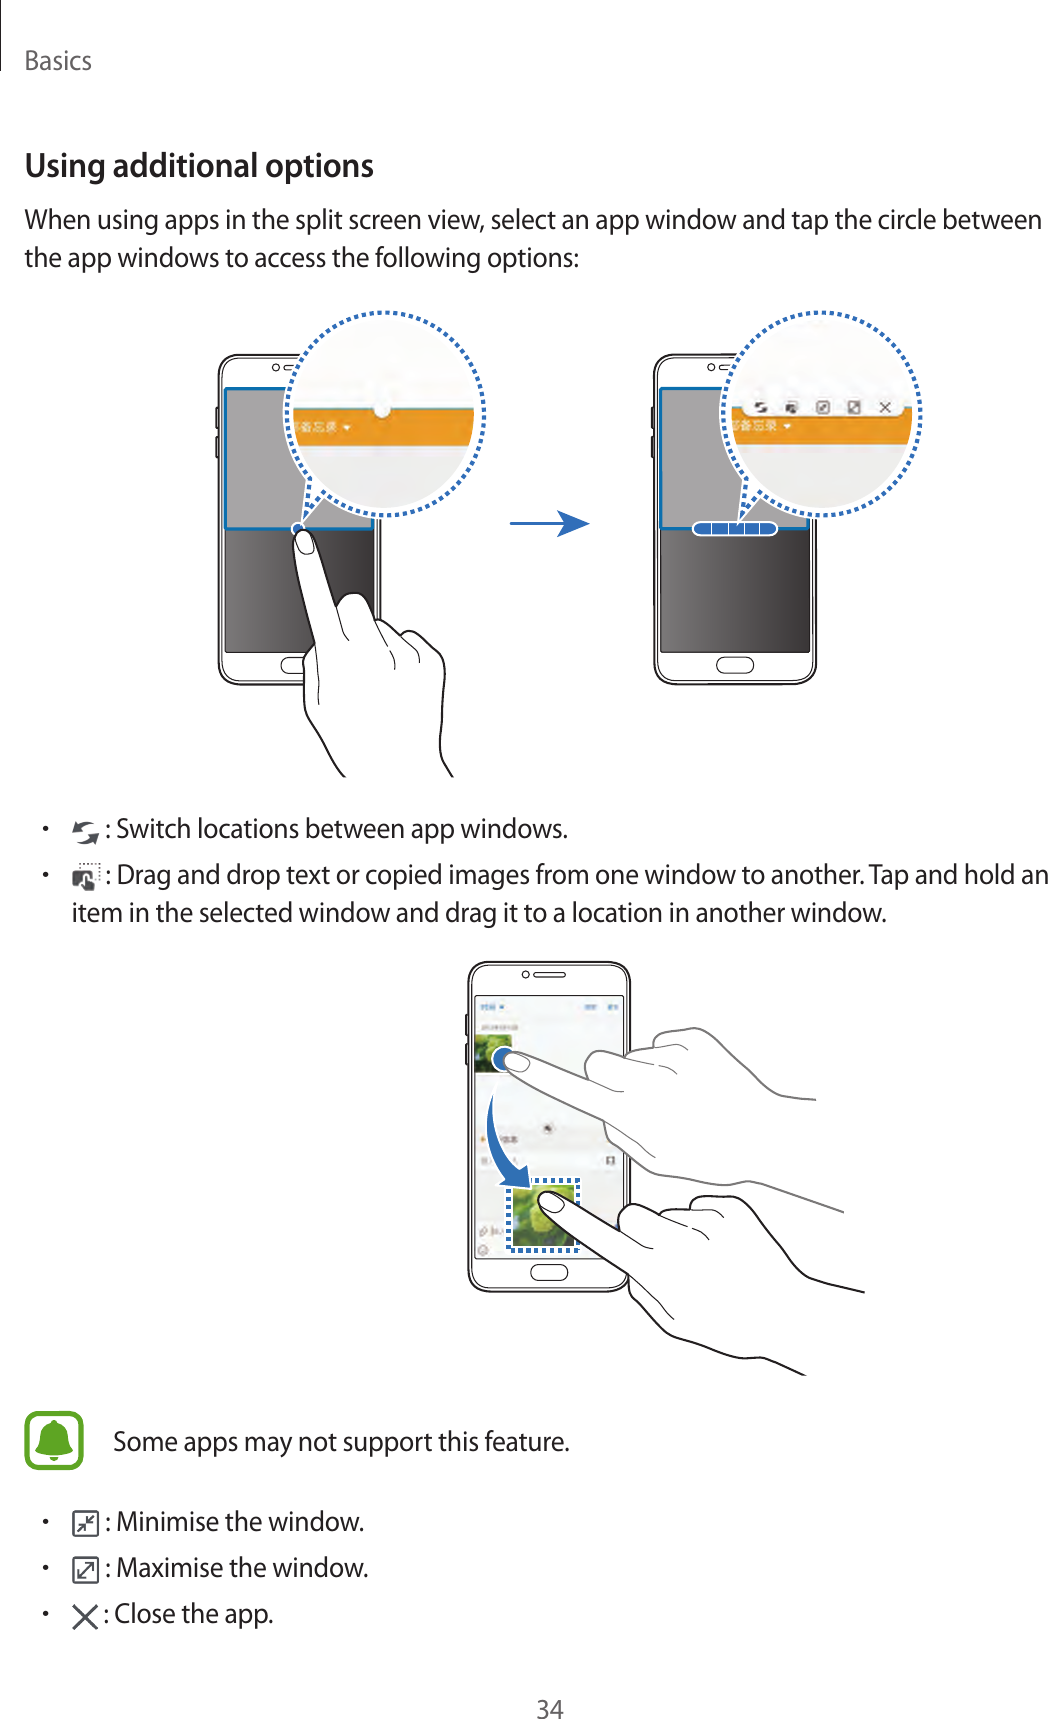
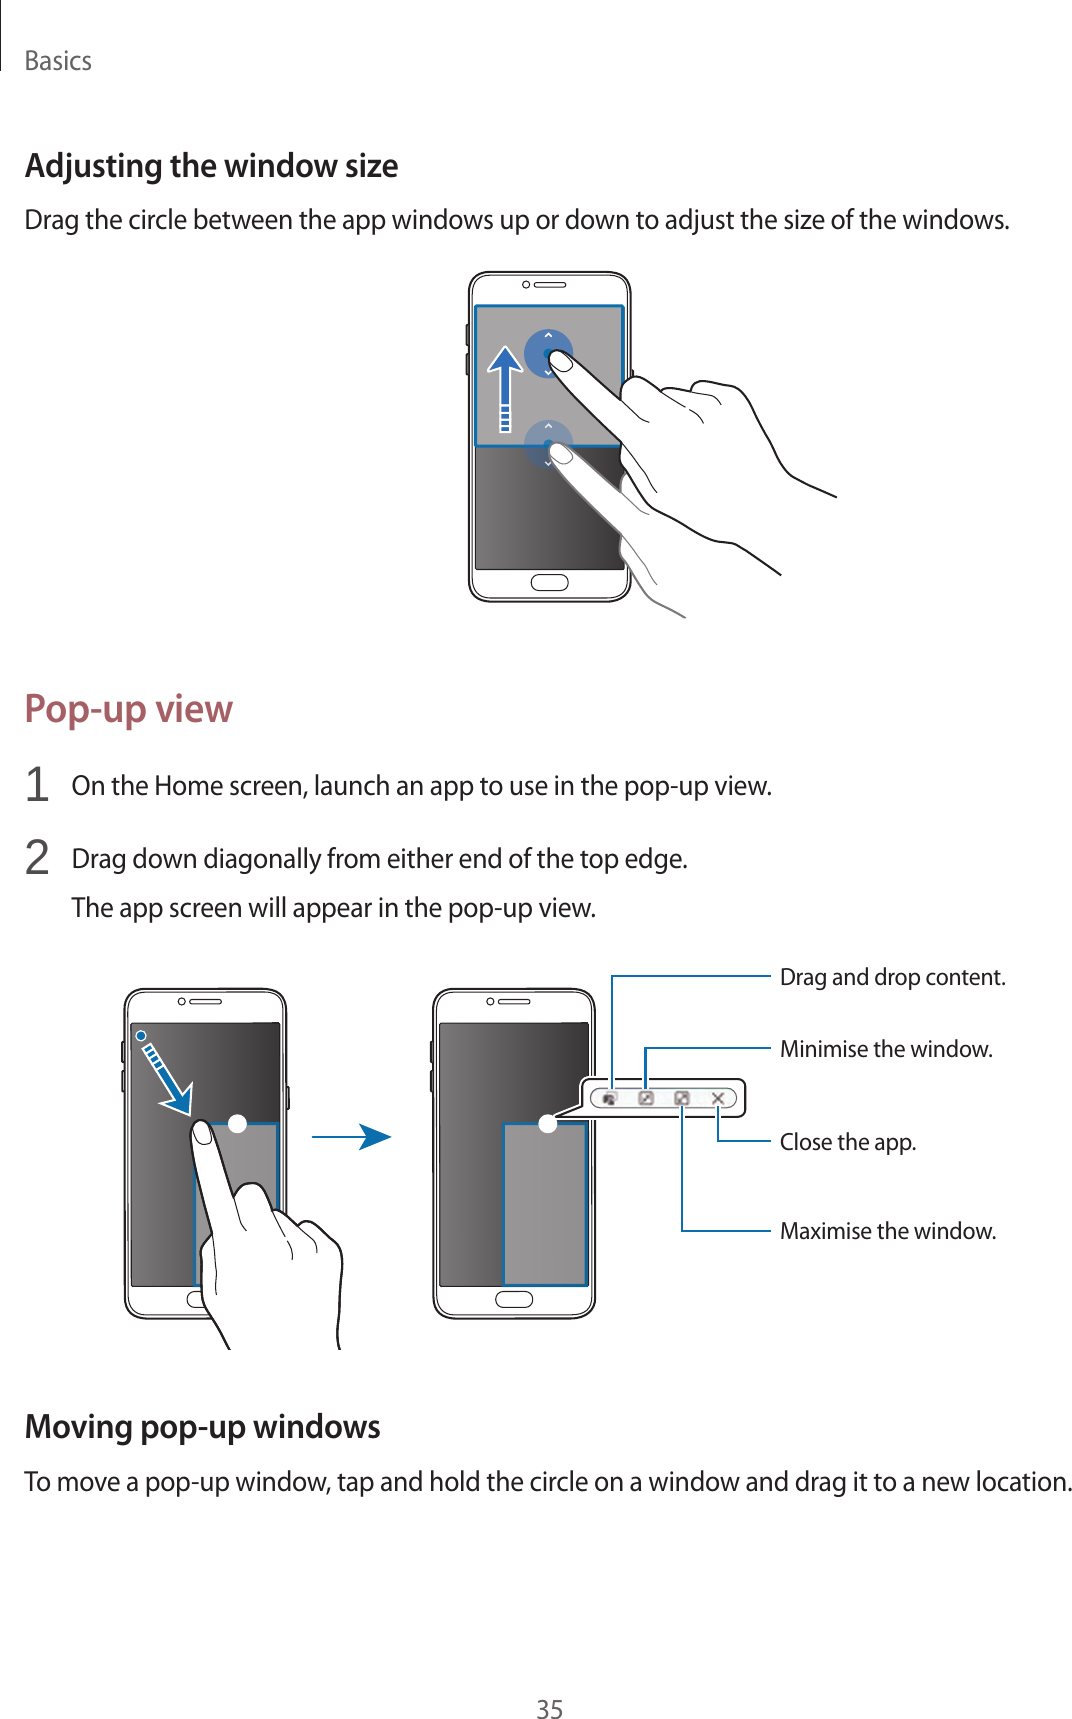
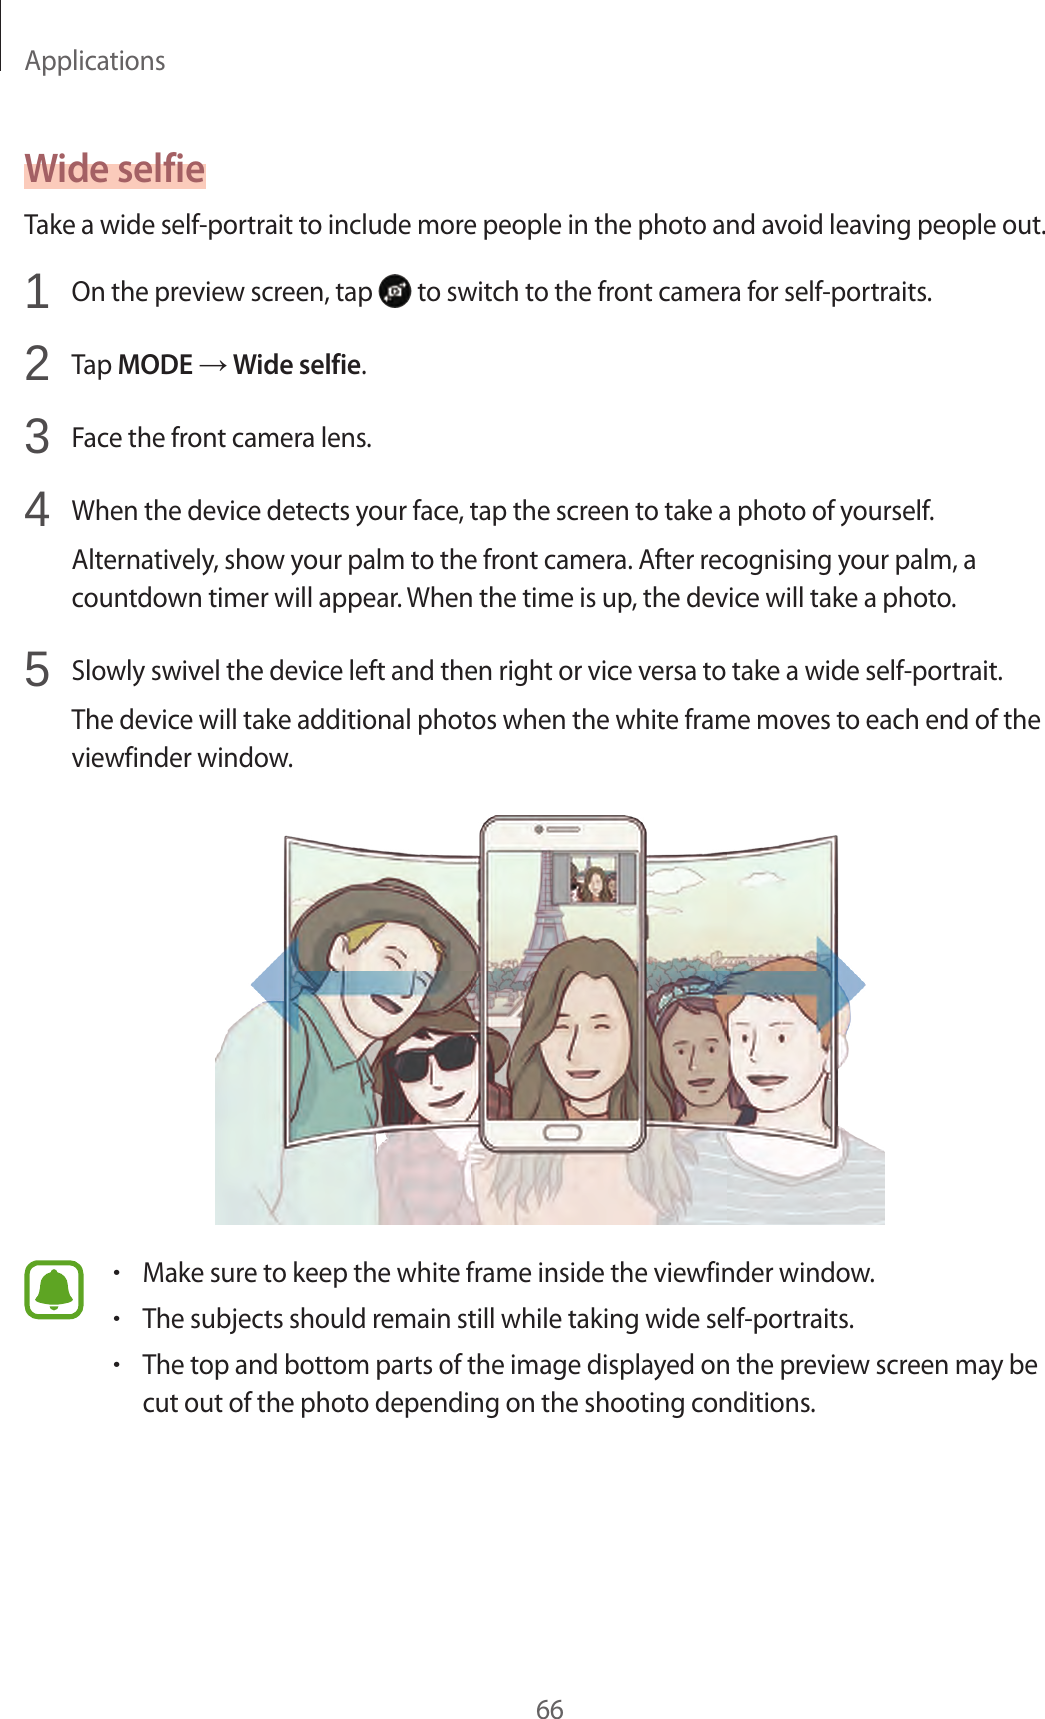
Samsung Electronics Co SMC7000 Mobile Phone User Manual A3LSMC7000 User manaul rev 1 1

Samsung Electronics Co Ltd Mobile Phone A3LSMC7000 User manaul rev 1 1

Contents

A3LSMC7000_User manaul_rev.1 (1)

SM-C5000www.samsung.com/cnUser ManualEnglish (CHN). 05/2016. Rev.1.0
2Table of ContentsBasics4  Read me first5  Package contents6  Device layout8 Battery12  SIM or USIM card (nano-SIM card)16  Memory card (microSD card)18  Turning the device on and off19 Touchscreen21  Home screen25  Lock screen26  Notification panel28  Entering text31  Screen capture32  Opening apps32  Multi window36  Samsung account37  Transferring data from your previous device40  Device and data management42  Quick connect44  Sharing features45  Emergency modeApplications46  Installing or uninstalling apps47 Phone51 Contacts53 Messages56 Internet58 Email59 Camera69 Gallery72  Smart Manager74  Samsung Pay77  盖乐世空间78  Game Launcher81  S Planner82  S Health85  S Voice86  S Assistant87  Samsung Milk Music89  Samsung Video89  Voice Recorder91  My Files92 Memo93 Clock94 Calculator95 Radio95  Theme store
Table of Contents3Settings96 Introduction96 WLAN98 Bluetooth100  SIM card manager100  More connection settings107  Sounds and vibrations107 Notifications108 Display109  Advanced features110 Applications110 Wallpaper110  Home screen and themes112  Lock screen and fingerprints115  Privacy and security118 Accessibility119 Accounts120  Backup and reset120  Language and input121  Battery and storage122  Date and time122  About deviceAppendix123 Troubleshooting129 Notices
4BasicsRead me firstPlease read this manual before using the device to ensure safe and proper use.•Descriptions are based on the device’s default settings.•Content (high quality content) that requires high CPU and RAM usage will affect the overall performance of the device. Apps related to the content may not work properly depending on the device’s specifications and the environment that it is used in.•Samsung is not liable for performance issues caused by apps supplied by providers other than Samsung.•Samsung is not liable for performance issues or incompatibilities caused by edited registry settings or modified operating system software. Attempting to customise the operating system may cause the device or apps to work improperly.•Software, sound sources, wallpapers, images, and other media provided with this device are licensed for limited use. Extracting and using these materials for commercial or other purposes is an infringement of copyright laws. Users are entirely responsible for illegal use of media.•You may incur additional charges for data services, such as messaging, uploading and downloading, auto-syncing, or using location services depending on your data plan. For large data transfers, it is recommended to use the Wi-Fi feature.•If you have questions about an app provided with the device, contact a Samsung Service Centre. For user-installed apps, contact service providers.•Modifying the device’s operating system or installing softwares from unofficial sources may result in device malfunctions and data corruption or loss. These actions are violations of your Samsung licence agreement and will void your warranty.•Depending on the region or model, some devices are required to receive approval from the Federal Communications Commission (FCC). If your device is approved by the FCC, you can view the FCC ID of the device. To view the FCC ID, tap Settings → About device → Battery info.
Basics5Instructional iconsWarning: situations that could cause injury to yourself or othersCaution: situations that could cause damage to your device or other equipmentNotice: notes, usage tips, or additional informationPackage contentsCheck the product box for the following items:•Device•Quick start guide•The items supplied with the device and any available accessories may vary depending on the region or service provider.•The supplied items are designed only for this device and may not be compatible with other devices.•You can purchase additional accessories from your local Samsung retailer. Make sure they are compatible with the device before purchase.•Use only Samsung-approved accessories. Using unapproved accessories may cause the performance problems and malfunctions that are not covered by the warranty.•Availability of all accessories is subject to change depending entirely on manufacturing companies. For more information about available accessories, refer to the Samsung website.
Basics6Device layoutMicrophone Loud speakerBack keyMultipurpose jackProximity sensorReceiverPower keySIM card / Memory card trayTouchscreenRecents keyHeadset jackHome key (Fingerprint recognition sensor)Front cameraMicrophoneVolume keyNFC antennaRear cameraMain antennaFlashGPS antenna
Basics7•Connectivity problems and battery drain may occur in the following situations:–If you attach metallic stickers on the antenna area of the device–If you attach a device cover made with metallic material to the device–If you cover the device’s antenna area with your hands or other objects while using certain features, such as calls or the mobile data connection•Using a Samsung-approved screen protector is recommended. Unapproved screen protectors may cause the sensors to malfunction.•Do not allow water to contact the touchscreen. The touchscreen may malfunction in humid conditions or when exposed to water.KeysKey FunctionPower•Press and hold to turn the device on or off.•Press to turn on or lock the screen.Recents•Tap to open the list of recent apps.•Tap and hold to launch the split screen view.Home•Press to turn on the screen while the screen is locked.•Press to return to the Home screen.•Press and hold to launch a preset app.Back•Tap to return to the previous screen.•Tap and hold to access additional options for the current screen.Volume•Press to adjust the device volume.
Basics8BatteryCharging the batteryCharge the battery before using it for the first time or when it has been unused for extended periods.Use only Samsung-approved chargers, batteries, and cables. Unapproved chargers or cables can cause the battery to explode or damage the device.1  Connect the USB cable to the USB power adaptor, and then plug the end of the USB cable into the multipurpose jack.Connecting the charger improperly may cause serious damage to the device. Any damage caused by misuse is not covered by the warranty.2  Plug the USB power adaptor into an electric socket.
Basics93  After fully charging, disconnect the device from the charger. First unplug the charger from the device, and then unplug it from the electric socket.To save energy, unplug the charger when not in use. The charger does not have a power switch, so you must unplug the charger from the electric socket when not in use to avoid wasting power. The charger should remain close to the electric socket and easily accessible while charging.Viewing the remaining charging timeWhile charging, open the Home screen and tap Settings → Battery and storage → Battery.The actual charging time may vary depending on the status of your device and the charging conditions. The remaining charging time may not be displayed when you charge the device in very cold or very hot conditions.Reducing the battery consumptionYour device provides various options that help you conserve battery power.•Optimise the device using the Smart manager.•When you are not using the device, switch to sleep mode by pressing the Power key.•Activate power saving mode.•Close unnecessary apps.•Deactivate the Bluetooth feature when not in use.•Deactivate the Wi-Fi feature when not in use.•Deactivate auto-syncing of apps that need to be synced, such as emails.•Decrease the backlight time.•Decrease the screen brightness.
Basics10Battery charging tips and precautions•When the battery power is low, the battery icon appears empty.•If the battery is completely discharged, the device cannot be turned on immediately when the charger is connected. Allow a depleted battery to charge for a few minutes before turning on the device.•If you use multiple apps at once, network apps, or apps that need a connection to another device, the battery will drain quickly. To avoid losing power during a data transfer, always use these apps after fully charging the battery.•Using a power source other than the charger, such as a computer, may result in a slower charging speed due to a lower electric current.•The device can be used while it is charging, but it may take longer to fully charge the battery.•If the device receives an unstable power supply while charging, the touchscreen may not function. If this happens, unplug the charger from the device.•While charging, the device and the charger may heat up. This is normal and should not affect the device’s lifespan or performance. If the battery gets hotter than usual, the charger may stop charging.•If you charge the device while the multipurpose jack is wet, the device may be damaged. Thoroughly dry the multipurpose jack before charging the device.•If the device is not charging properly, take the device and the charger to a Samsung Service Centre.Fast chargingThe device has a built-in fast charging feature. You can use this feature to charge the battery more quickly while the device or its screen is turned off.About Fast charging•Fast charging uses battery charging technology that charges the battery faster by increasing the charging power. The device supports Samsung’s Adaptive fast charging feature.•To use Fast charging on your device, connect it to a battery charger that supports Adaptive fast charging.
Basics11Increasing the charging speedTo increase the charging speed, turn the device or its screen off when you charge the battery.•While charging the battery when the device is turned off, the   icon appears on the screen.•You cannot use the fast charging feature when the screen is turned on. Turn off the screen to increase the charging speed.If the fast charging feature is not activated, on the Home screen, tap Settings → Battery and storage → Battery, and then tap the Fast cable charging switch to activate it.If the device heats up or the ambient air temperature rises, the charging speed may decrease automatically. This is a normal operating condition to prevent damage to the device.Power saving modeSave the battery power by limiting the device’s functions.On the Home screen, tap Settings → Battery and storage → Battery → Power saving mode, and then tap the switch to activate it.To automatically activate power saving mode when the remaining battery power reaches the preset level, tap Start power saving and select an option.Ultra power saving modeUse this mode to extend the device’s battery power. In ultra power saving mode, the device performs the following:•Displays colours on the screen as grey tones.•Restricts the available apps to essential and selected apps only.•Deactivates the mobile data connection when the screen turns off.•Deactivates the Wi-Fi and Bluetooth features.On the Home screen, tap Settings → Battery and storage → Battery → Ultra power saving mode, and then tap the switch to activate it.To deactivate ultra power saving mode, tap MORE → Turn off Ultra power saving mode.The usage time left shows the time remaining before the battery power runs out. Usage time left may vary depending on your device settings and operating conditions.
Basics12SIM or USIM card (nano-SIM card)Installing the SIM or USIM cardInsert the SIM or USIM card provided by the mobile telephone service provider.Use caution not to lose or let others use the SIM or USIM card. Samsung is not responsible for any damages or inconveniences caused by lost or stolen cards.•In some areas, data transfer speeds may be slower if two SIM cards are inserted in the device than when one SIM card is inserted.•Some LTE services may not be available depending on the service provider. For more information about service availability, contact your service provider.1234
Basics131  Insert the ejection pin into the hole on the tray to loosen the tray.Ensure that the ejection pin is perpendicular to the hole. Otherwise, the device may be damaged.2  Pull out the tray gently from the tray slot.3  Place the SIM or USIM card on the tray with the gold-coloured contacts facing downwards.Place the primary SIM or USIM card on the tray 1 ( 1 ) and the secondary SIM or USIM card on the tray 2 ( 2 ).12Tray 2Tray 1•The phone cannot support two CDMA cards at the same time in China.•When you insert the China Telecom (CTC) card and your other service provider’s SIM card on your device, the CTC card will automatically connect to a 4G network and the other SIM card will connect to a 2G network. If you use your other SIM card for the 4G network, your CTC card will connect to a 2G network.4  Insert the tray back into the tray slot.Carefully insert the tray to prevent the SIM cards from leaving or falling out of the tray.
Basics14Correct card installationNano-SIM card Nano-SIM cardNano-SIM cardmicroSD card•Use only a nano-SIM card.•You cannot insert a nano-SIM card and a microSD card in tray 2 at the same time.Removing the SIM or USIM card1  Insert the ejection pin into the hole on the tray to loosen the tray.2  Pull out the tray gently from the tray slot.3  Remove the SIM or USIM card.4  Insert the tray back into the tray slot.
Basics15Using dual SIM or USIM cardsIf you insert two SIM or USIM cards, you can have two phone numbers or service providers for a single device.Activating SIM or USIM cardsOn the Home screen, tap Settings → SIM card manager. Select a SIM or USIM card and tap the switch to activate it.If both cards are activated, you can receive calls and messages on each card. However, if you are on a call using one card, the other card cannot be used to receive new calls. These situations apply to voice calls only.Customising SIM or USIM cardsOn the Home screen, tap Settings → SIM card manager and select a SIM or USIM card to access the following options:•Icon: Change the icon of the SIM or USIM card.•Name: Change the display name of the SIM or USIM card.•Network mode: Select a network type to use with the SIM or USIM card.Setting preferred SIM or USIM cardsWhen two cards are activated, you can assign voice calls, messaging, and data services to specific cards.On the Home screen, tap Settings → SIM card manager and set the feature preferences for your cards in Preferred SIM card.
Basics16Memory card (microSD card)Installing a memory cardYour device accepts memory cards with maximum capacities of 128 GB. Depending on the memory card manufacturer and type, some memory cards may not be compatible with your device.•Some memory cards may not be fully compatible with the device. Using an incompatible card may damage the device or the memory card, or corrupt the data stored in it.•Use caution to insert the memory card right-side up.•The device supports the FAT and the exFAT file systems for memory cards. When inserting a card formatted in a different file system, the device asks to reformat the memory card.•Frequent writing and erasing of data shortens the lifespan of memory cards.•When inserting a memory card into the device, the memory card’s file directory appears in the My Files → SD card folder.1 2 3 4
Basics171  Insert the ejection pin into the hole on the tray to loosen the tray.Ensure that the ejection pin is perpendicular to the hole. Otherwise, the device may be damaged.2  Pull out the tray gently from the tray slot.When you remove the tray from the device, the mobile data connection will be disabled.3  Place a memory card on the tray 2 with the gold-coloured contacts facing downwards.Tray 2Tray 14  Insert the tray back into the tray slot.Removing the memory cardBefore removing the memory card, first unmount it for safe removal.On the Home screen, tap Settings → Battery and storage → Storage → SD card → Unmount.1  Insert the ejection pin into the hole on the tray to loosen the tray.2  Pull out the tray gently from the tray slot.3  Remove the memory card.4  Insert the tray back into the tray slot.Do not remove the memory card while the device is transferring or accessing information. Doing so can cause data to be lost or corrupted or damage to the memory card or device. Samsung is not responsible for losses that result from the misuse of damaged memory cards, including the loss of data.
Basics18Formatting the memory cardA memory card formatted on a computer may not be compatible with the device. Format the memory card on the device.On the Home screen, tap Settings → Battery and storage → Storage → SD card → Format → FORMAT.Before formatting the memory card, remember to make backup copies of all important data stored in the memory card. The manufacturer’s warranty does not cover loss of data resulting from user actions.Turning the device on and offPress and hold the Power key for a few seconds to turn on the device.When you turn on your device for the first time or after performing a data reset, follow the on-screen instructions to set up your device.To turn off the device, press and hold the Power key, and then tap Power off.Follow all posted warnings and directions from authorised personnel in areas where the use of wireless devices is restricted, such as aeroplanes and hospitals.Restarting the deviceIf your device is frozen and unresponsive, press and hold the Power key and the Volume Down key simultaneously for more than 7 seconds to restart it.Power keyVolume Down key
Basics19Touchscreen•Do not allow the touchscreen to come into contact with other electrical devices. Electrostatic discharges can cause the touchscreen to malfunction.•To avoid damaging the touchscreen, do not tap it with anything sharp or apply excessive pressure to it with your fingertips.•The device may not recognise touch inputs close to the edges of the screen, which are outside of the touch input area.•It is recommended to use fingers when you use the touchscreen.TappingTo open an app, to select a menu item, to press an on-screen button, or to enter a character using the keyboard on the screen, tap it with your finger.Tapping and holdingTap and hold an item or the screen for more than 2 seconds to access available options.
Basics20DraggingTo move an item, tap and hold it and drag it to the target position.Double-tappingDouble-tap on a webpage or image to zoom in. Double-tap again to return.SwipingSwipe to the left or right on the Home screen to view other panels. Swipe upwards or downwards to scroll through a webpage or a list of items, such as contacts.
Basics21Spreading and pinchingSpread two fingers apart on a webpage, map, or image to zoom in a part. Pinch to zoom out.Home screenHome screenThe Home screen is the starting point for accessing all of the device’s features. It displays widgets, icons for all apps, and more.To view other panels, swipe to the left or right.A widgetScreen indicatorsFavourite appsAn app
Basics22Home screen optionsOn the Home screen, tap Settings → Home screen and themes → Home screen to access the available options. Alternatively, on the Home screen, tap and hold an empty area. Customise the Home screen by adding, deleting, or rearranging Home screen panels. You can also set the Home screen wallpaper, add widgets to the Home screen, and more.•Wallpapers: Change the wallpaper settings for the Home screen and the locked screen.•Widgets: Add widgets to the Home screen. Widgets are small apps that launch specific app functions to provide information and convenient access on your Home screen. Tap and hold a widget, and then drag it to the Home screen.•Themes: Change the device’s theme. Visual elements of interface, such as colours, icons, and wallpapers, will change depending on the selected theme.•Home screen settings: Change the size of the grid to display more or less items on the Home screen. Display all apps on the Home screen or on a separate Apps screen.
Basics23Moving itemsTap and hold an item on the Home screen, and then drag it to a new location.You can also move frequently used apps to the shortcuts area at the bottom of the Home screen.To move the item to another panel, drag it to the side of the screen.To move an item more easily, tap and hold an item, and drag it to Move apps at the top of the screen. The item will move to the panel at the top of the screen. Swipe to the left or right to move to another panel and drag the item to a new location.Creating foldersCreate folders and gather similar applications to quickly access and launch apps.1  On the Home screen, tap and hold an app, and then drag it over another app.2  Drop the app when a folder frame appears around the apps.A new folder containing the selected apps will be created.3  Tap Enter folder name and enter a folder name.To add more apps to the folder, tap  , tick the apps, and then tap ADD. You can also add an app by dragging it to the folder on the Home screen.To move apps from a folder to the Home screen, tap the folder, and then drag an app to the Home screen.
Basics24Managing panelsOn the Home screen, tap and hold an empty area to add, move, or remove a panel.To add a panel, swipe to the left, and then tap  .To move a panel, tap and hold a panel preview, and then drag it to a new location.To remove a panel, tap and hold a panel preview, and then drag it to Remove at the top of the screen.To set a panel as the main Home screen, tap  .Aligning itemsYou can organise items on the Home screen when they are scattered on the screen.On the Home screen, tap and hold an empty area, and then tap ALIGN ITEMS. Your icons will be aligned and straightened.Indicator iconsIndicator icons appear on the status bar at the top of the screen. The icons listed in the table below are most common.The status bar may not appear at the top of the screen in some apps. To display the status bar, drag down from the top of the screen.Icon MeaningNo signal /  Signal strength /  Currently accessing SIM or USIM card /  Roaming (outside of normal service area)GPRS network connectedEDGE network connectedUMTS network connectedHSDPA network connectedHSPA+ network connected /  LTE network connected (LTE-enabled models)Wi-Fi connectedBluetooth feature activated
Basics25Icon MeaningGPS activatedCall in progressMissed callNew text or multimedia messageAlarm activatedMute mode activatedVibration mode activatedFlight mode activatedError occurred or caution requiredBattery power levelLock screenPressing the Power key turns off the screen and locks it. Also, the screen turns off and automatically locks if the device is not used for a specified period.The screen is locked with Swipe, the default screen lock method.Press the Power key or the Home key and swipe in any direction to unlock the screen.To change the screen lock method, on the Home screen, tap Settings → Lock screen and fingerprints → Screen lock type, and then select a method.
Basics26When you set a pattern, PIN, password, or fingerprint for the screen lock method, you can protect your personal information by preventing others from accessing your device. After setting the screen lock method, the device will require an unlock code whenever unlocking it.•Swipe: Swipe in any direction on the screen to unlock it.•Pattern: Draw a pattern with four or more dots to unlock the screen.•PIN: Enter a PIN with at least four numbers to unlock the screen.•Password: Enter a password with at least four characters, numbers, or symbols to unlock the screen.•None: Do not set a screen lock method.•Fingerprints: Register your fingerprints to unlock the screen. Refer to Fingerprint recognition for more information.•If the unlock code is forgotten, take the device to a Samsung Service Centre to reset it.•You can set your device to perform a factory data reset if you enter the unlock code incorrectly several times in a row and reach the attempt limit. On the Home screen, tap Settings → Lock screen and fingerprints → Secure lock settings and tap the Auto factory reset switch to activate it.Notification panelUsing the notification panelWhen you receive new notifications, such as messages or missed calls, indicator icons appear on the status bar. To see more information about the icons, open the notification panel and view the details.To open the notification panel, drag the status bar downwards. To close the notification panel, swipe upwards on the screen.
Basics27You can use the following functions on the notification panel.Tap a notification and perform various actions. Clear all notifications.Adjust the brightness and view the current data usage.Launch Settings.Access the notification settings.Quick setting buttonsSIM and USIM card feature preferences. Tap to access the SIM card manager.Using quick setting buttonsTap quick setting buttons to activate some features. Swipe to the left or right on the buttons area, or swipe downwards on the screen to view more buttons. To view more detailed settings, tap and hold a button.To rearrange buttons, swipe downwards on the screen and tap EDIT. Then, tap and hold a button and drag it to another location.S FinderSearch for a wide variety of content with a keyword.Searching for content on the deviceOpen the notification panel, swipe downwards on the screen and tap S Finder.Enter a keyword in the search field or tap   and say a keyword.To get more refined results, tap Filter under the search field, and then select filter details.Setting search categoriesYou can set search categories to search for content in specific search fields.Tap MORE → Select search locations and select categories.
Basics28Entering textKeyboard layoutA keyboard appears automatically when you enter text to send messages, create memos, and more.Text entry is not supported in some languages. To enter text, you must change the input language to one of the supported languages.Break to the next line.Delete a preceding character.Enter symbols.Enter numbers. Change the input language.Enter a space.Hide the keyboard.Additional keyboard functionsChanging the input languageTap the input language key to switch between the input languages. Tap   → Add input languages, and then select the languages to use. Changing the keyboard layoutTap   , select a language under Languages and types, and then select a keyboard layout to use.
Basics29Additional keyboard functions• : Add an item from the clipboard.• → PY. QWERTY: Switch to qwerty pinyin mode.• → PINYIN 3 x 4: Switch to 3x4 pinyin mode. To enter a character, tap the corresponding key repeatedly until the desired character appears.• → SHUANGPIN: Switch to shuangpin mode. To view the character input map, open the Home screen and tap Settings → Language and input → Samsung keyboard → Chinese input options → ShuangPin keyboard.• → WUBI: Switch to wubi mode.• → STROKE: Switch to stroke mode. Tap stroke keys to enter a character. Tap   when you are unsure about which stroke to enter.• → HALF-SCREEN HANDWRITING or FULL-SCREEN HANDWRITING: Switch to handwriting mode.This feature may not be available depending on the region or service provider.• : Enter text by voice.Start or pause entering text by voice.Change the input language.Delete a preceding character.• : Enter emoticons.• : Enter kaomojis.• : Open the text editing panel.• : Change the keyboard settings.
Basics30Copying and pasting1  Tap and hold over text.2  Drag   or   to select the desired text, or tap Select all to select all text.3  Tap Copy or Cut.The selected text is copied to the clipboard.4  Tap and hold where the text is to be inserted and tap Paste.To paste text that you have previously copied, tap Clipboard and select the text.DictionaryLook up definitions for words while using certain features, such as when browsing webpages.1  Tap and hold over a word that you want to look up.If the word you want to look up is not selected, drag   or   to select the desired text.2  Tap Dictionary on the options list.If a dictionary is not preinstalled on the device, tap Manage dictionaries →  next to a dictionary to download it.3  View the definition in the dictionary pop-up window.To switch to the full screen view, tap  . Tap the definition on the screen to view more definitions. In the detailed view, tap   to add the word to your favourite words list or tap Search Web to use the word as a search term.
Basics31Screen captureCapture a screenshot while using the device.Capturing screenshotsPress and hold the Home key and the Power key simultaneously. You can view captured images in Gallery.You can also capture screenshots by swiping your hand to the left or right across the screen. If this feature is not activated, open the Home screen, tap Settings → Advanced features → Palm swipe to capture and tap the switch to activate it.It is not possible to capture a screenshot while using some apps and features.Smart captureYou can capture the current screen and scrollable area. You can also immediately crop and share the captured screen.If this feature is not activated, open the Home screen, tap Settings → Advanced features → Smart capture, tap the switch to activate it, and then capture a screenshot. On the screen you are capturing, use one of the following options:•Capture more: Capture more content that continues across multiple screens, such as a web page. The screen will automatically scroll down and more content will be captured.•Share: Share the screenshot.•Crop: Crop a portion from the screenshot.
Basics32Opening appsOn the Home screen, select an app icon to open it.To open an app from the list of recently used apps, tap   and select a recent app window.Closing an appTap   and drag a recent app window to the left or right to close it. To close all running apps, tap CLOSE ALL.You can lock running apps to prevent them from closing. Tap   to lock the app.Multi windowIntroductionMulti window lets you run two apps at the same time in the split screen view. You can also run multiple apps at the same time in the pop-up view.Some apps may not support this feature.Split screen view Pop-up view
Basics33Split screen view1  Tap   to open the list of recently used apps.2  Swipe upwards or downwards and tap   on a recent app window.The selected app will launch in the upper window.3  Swipe to the left or right to select another app to launch.You can also launch the split screen view by tapping and holding  .
Basics34Using additional optionsWhen using apps in the split screen view, select an app window and tap the circle between the app windows to access the following options:• : Switch locations between app windows.• : Drag and drop text or copied images from one window to another. Tap and hold an item in the selected window and drag it to a location in another window.Some apps may not support this feature.• : Minimise the window.• : Maximise the window.• : Close the app.
Basics35Adjusting the window sizeDrag the circle between the app windows up or down to adjust the size of the windows.Pop-up view1  On the Home screen, launch an app to use in the pop-up view.2  Drag down diagonally from either end of the top edge.The app screen will appear in the pop-up view.Minimise the window.Close the app.Maximise the window.Drag and drop content.Moving pop-up windowsTo move a pop-up window, tap and hold the circle on a window and drag it to a new location.
Basics36Samsung accountIntroductionYour Samsung account is an integrated account service that allows you to use a variety of Samsung services provided by mobile devices, TVs, and the Samsung website. Once your Samsung account has been registered, you can use apps provided by Samsung, without signing in to your account.Create your Samsung account with your email address.To check the list of services that can be used with your Samsung account, visit account.samsung.com. For more information on Samsung accounts, open the Home screen and tap Settings → Accounts → Samsung account → Help.Registering your Samsung accountRegistering a new Samsung accountIf you do not have a Samsung account, you should create one.1  On the Home screen, tap Settings → Accounts → Add account.2  Tap Samsung account → CREATE ACCOUNT.3  Follow the on-screen instructions to complete creating your account.Registering an existing Samsung accountIf you already have a Samsung account, register it to the device.1  On the Home screen, tap Settings → Accounts → Add account.2  Tap Samsung account.3  Enter your email address and password, and then tap SIGN IN.If you forget your account information, tap Forgot your ID or password? You can find your account information when you enter the required information and security code displayed that is on the screen.
Basics37Removing your Samsung accountWhen you remove your registered Samsung account from the device, your data, such as contacts or events, will also be removed.1  On the Home screen, tap Settings → Accounts.2  Tap Samsung account and tap the account to remove.3  Tap MORE → Remove account → REMOVE ACCOUNT.4  Enter your Samsung account password and tap CONFIRM.5  Tap REMOVE ACCOUNT.Transferring data from your previous deviceYou can transfer data from a previous device to your device via Samsung Smart Switch.The following versions of Samsung Smart Switch are available.•Mobile version: Transfer data between mobile devices. You can download the app from Galaxy Apps.•Computer version: Transfer data between your device and a computer. You can download the app from www.samsung.com/cn/smartswitch.•Samsung Smart Switch is not supported on some devices or computers.•Limitations apply. Visit www.samsung.com/cn/smartswitch for details. Samsung takes copyright seriously. Only transfer content that you own or have the right to transfer.
Basics38Transferring data via a USB connectionYou can connect your previous device to your device with the USB connector and a USB cable to easily and quickly transfer data without installing an app in the previous device.1  Plug the USB connector into the multipurpose jack of your device.2  Connect your device and the previous device using the USB cable.USB connectorUSB cable12Your devicePrevious device3  When the app selection pop-up window appears, tap Smart Switch → START.Your device will recognise the previous device and a list of data you can transfer will appear.4  Follow the on-screen instructions to transfer data from the previous device.Do not disconnect the USB cable or USB connector from the device when you are transferring files. Doing so may cause data loss or device damage.Transferring data with the USB connector increases the battery power consumption. Ensure that the battery is fully charged before transferring data. If the battery power is low, data transfer may be interrupted.
Basics39Transferring data data wirelesslyTransfer data from your previous device to your device.1  On both devices, download and install Smart Switch from Galaxy Apps.2  Place the devices near each other.3  Launch Smart Switch on both devices.4  On your device, select the previous device type from the list and tap START.5  Follow the on-screen instructions to transfer data from your previous device.Transferring backup data from a computerBack up data from your previous device to a computer and import the data to your device.1  On the computer, visit www.samsung.com/cn/smartswitch to download Smart Switch.2  On the computer, launch Smart Switch.If your previous device is not a Samsung device, back up data to a computer using a program provided by the device’s manufacturer. Then, skip to the fifth step.
Basics403  Connect your previous device to the computer using the USB cable.4  On the computer, follow the on-screen instructions to back up data from the device. Then, disconnect your previous device from the computer.5  Connect your device to the computer using the USB cable.6  On the computer, follow the on-screen instructions to transfer data to your device.Device and data managementConnecting the device to a computer for data transferMove audio, video, image, or other types of files from the device to the computer, or vice versa.Do not disconnect the USB cable from the device when you are transferring files. Doing so may cause data loss or device damage.The devices may not connect properly if they are connected via a USB hub. Directly connect the device to the computer’s USB port.1  Connect the device to the computer using the USB cable.2  Open the notification panel, and then tap Transferring media files via USB → Transferring media files.If the computer cannot recognise your device, tap Transferring images.3  Tap ALLOW to permit the computer to access your device’s data.When the computer recognises your device, the device will appear in My PC.4  Transfer files between your device and the computer.
Basics41Updating the deviceThe device can be updated to the latest software.The device supports only authorised operating system updates. Do not update an unauthorised operating system. Doing so may make your personal information vulnerable to leakage or theft.Updating over the airThe device can be directly updated to the latest software by the firmware over-the-air (FOTA) service.On the Home screen, tap Settings → About device → Download updates manually.When you tap the Download updates automatically switch to activate it, updates will be downloaded when the device is connected to a Wi-Fi network.Updating with Smart SwitchConnect the device to a computer and update the device to the latest software.1  On the computer, visit www.samsung.com/cn/smartswitch to download and install Smart Switch.2  On the computer, launch Smart Switch.3  Connect the device to the computer using a USB cable.4  If a software update is available, follow the on-screen instructions to update the device.•Do not turn off the computer or disconnect the USB cable while the device is updating.•While updating the device, do not connect other media devices to the computer. Doing so may interfere with the update process. Before updating, disconnect all other media devices from the computer.
Basics42Backing up and restoring dataKeep your personal information, app data, and settings safe on your device. You can back up your sensitive information to a backup account and access it later. You must sign in to your Samsung account to back up or restore data. Refer to Samsung account and Accounts for more information.Using a Samsung accountOn the Home screen, tap Settings → Backup and reset → Back up my data for the Samsung account, tap the switches next to the items you want to back up to activate them, and then tap BACK UP NOW.To set the device to automatically back up data, tap the Auto back up switch to activate it.To restore data using a Samsung account, tap Restore. Current data will be deleted from the device to restore the selected items.Performing a data resetDelete all settings and data on the device. Before performing a factory data reset, ensure you back up all important data stored on the device. Refer to Backing up and restoring data for more information.On the Home screen, tap Settings → Backup and reset → Factory data reset → RESET DEVICE → DELETE ALL. The device automatically restarts.Quick connectIntroductionQuickly search for and connect with nearby devices, such as Bluetooth headsets, using the Quick connect feature.•If the device you want to connect does not support the Quick connect feature, activate its Wi-Fi Direct or Bluetooth feature before launching Quick connect on your device.•Connection methods may vary depending on the type of connected devices or the shared content.
Basics43Connecting to other devices1  Open the notification panel and tap Quick connect.The Wi-Fi and Bluetooth features are activated automatically.If Quick connect is not visible on the notification panel, swipe downwards on the screen, tap EDIT, and then tap the Quick connect switch to activate it.2  Tap Scan for nearby devices.If there is no previously connected device, the device will automatically search for nearby devices.3  Select a device from the list and connect to it by following the on-screen instructions.The next steps may vary depending on the connected device.To change your device’s visibility setting, tap MORE → Set device visibility, and then select an option.Sharing contentShare content with the connected devices.1  Open the notification panel and tap Quick connect.2  Tap Scan for nearby devices.3  Select a device from the list of detected devices.4  Tap Share content and select a media category.5  Follow the on-screen instructions to send content to the connected device.The next steps may vary depending on the selected media category.
Basics44Sharing featuresShare content by using various sharing options. The following actions are an example of sharing images.You may incur additional charges when sharing files via the mobile network.1  Tap Gallery on the Home screen.2  Select an image.3  Tap Share and select a sharing method, such as Bluetooth and email.You can also use the following options:•Simple sharing: Share content with your contacts. To use this feature, your phone number must be verified.•This feature may not be available depending on the region or service provider.•If the recipients have not verified their phone numbers or if their devices do not support the feature, a link to the files will be sent to them via text message. The link will expire after a certain period.•View content on: View your device’s displayed content on a larger screen via a wireless connection.•Nearby sharing: Share content with nearby devices via Wi-Fi Direct, Bluetooth, and more.•Print: Print content using the printer plug-ins installed on the device.4  Follow the on-screen instructions to share the image with others.When the image is sent to the recipients’ devices, a notification will appear on their devices. Tap the notification to view or download the image.
Basics45Emergency modeEmergency mode changes the screen to grey tones to reduce battery consumption. Some apps and functions will be restricted. In emergency mode, you can make an emergency call, send your current location information to others, sound an emergency alarm, and more.Press and hold the Power key, and then tap Emergency mode.Add more apps to use.Make an emergency call.Remaining battery power and usage time leftTurn on the flash.Make a call.Send your current location information in a message.Browse the Internet.Access additional options.Sound alarms.•Emergency calls cannot be made if a SIM/UIM card is not installed, your device cannot connect to a network, or no network is available.•The usage time left shows the time remaining before the battery power runs out. Usage time left may vary depending on your device settings and operating conditions.Deactivating emergency modeTo deactivate emergency mode, tap MORE → Turn off Emergency mode. Alternatively, press and hold the Power key, and then tap Emergency mode.
46ApplicationsInstalling or uninstalling appsGalaxy AppsPurchase and download apps. You can download apps that are specialised for Samsung Galaxy devices.Tap Galaxy Apps on the Home screen.This app may not be available depending on the region or service provider.Installing appsBrowse apps by category or tap SEARCH to search for a keyword.Select an app to view information about it. To download free apps, tap INSTALL. To purchase and download apps where charges apply, tap the price and follow the on-screen instructions.To change the auto update settings, tap MORE → Settings → Auto update apps, and then select an option.Managing appsUninstalling or disabling appsOn the Home screen, tap and hold an app, and then drag it to Turn off or Uninstall at the top of the screen. Alternatively, on the Home screen, tap Settings → Applications → Application manager, select an app, and then tap DISABLE or UNINSTALL.•DISABLE: Disable selected default apps that cannot be uninstalled from the device.•UNINSTALL: Uninstall downloaded apps.Enabling appsOn the Home screen, tap Settings → Applications → Application manager →   → Disabled, select an app, and then tap ENABLE.
Applications47Setting app permissionsFor some apps to operate properly, they may need permission to access or use information on your device. When you open an app, a pop-up window may appear and request access to certain features or information. Tap ALLOW on the pop-up window to grant permissions to the app.To view your app permission settings, open the Home screen and tap Settings → Applications → Application manager. Select an app and tap Permissions. You can view the app’s permissions list and change its permissions.To view or change app permission settings by permission category, open the Home screen, tap Settings → Privacy and security → App permissions. Select an item and tap the switches next to apps to grant permissions.If you do not grant permissions to apps, the basic features of the apps may not function properly.PhoneIntroductionMake or answer voice calls.Making calls1  Tap Phone on the Home screen.2  Enter a phone number.If the keypad does not appear on the screen, tap   to open the keypad.
Applications483  Tap   or   to make a voice call.Yellow Pages search resultsPreview the phone number.Hide the keypad.Delete a preceding character.Access additional options.Using speed dialSet speed dial numbers to quickly make calls.To set a number to speed dial, tap MORE → Speed dial, select a speed dial number, and then select a contact.To make a call, tap and hold a speed dial number on the keypad. For speed dial numbers 10 and up, tap the first digit(s) of the number, and then tap and hold the last digit.For example, if you set the number 123 as a speed dial number, tap 1, tap 2, and then tap and hold 3.Making calls from the locked screenOn the locked screen, drag   outside the large circle.Making calls from call logs or contacts listTap LOG or CONTACTS, and then swipe to the right on a contact or a phone number to make a call.
Applications49Making calls using Yellow PagesYou can easily search for businesses and then call them using the call ID data provided by Yellow Pages.Tap YELLOW PAGES and enter numbers or characters in the search field. The device automatically displays the businesses identified in the search. Select a business to call.Making an international call1  Tap   to open the keypad if the keypad does not appear on the screen.2  Tap and hold 0 until the + sign appears.3  Enter the country code, area code, and phone number, and then tap   or  .Receiving callsAnswering a callWhen a call comes in, drag   outside the large circle.Rejecting a callWhen a call comes in, drag   outside the large circle.To send a message when rejecting an incoming call, drag the reject message bar upwards.To create various rejection messages, open the Home screen, tap Phone → MORE → Settings → Call blocking → Call-reject messages, enter a message, and then tap  .Missed callsIf a call is missed, the   icon appears on the status bar. Open the notification panel to view the list of missed calls. Alternatively, on the Home screen, tap Phone → LOG to view missed calls.
Applications50Blocking phone numbersBlock calls from specific numbers added to your block list.1  On the Home screen, tap Phone → MORE → Settings → Call blocking → Black list.2  Tap BLACK LIST →  .3  Tap Add from Contacts/Phone log to select contacts, and then tap DONE.To manually enter a number, tap Add manually, and then enter a phone number.When blocked numbers try to contact you, you will not receive notifications. The calls will be logged in the call log.You can also block incoming calls from people that do not show their caller ID. Tap BLACK LIST → SETTINGS and tap the Block anonymous calls switch to activate the feature.Options during callsDuring a voice callThe following actions are available:Access additional options.Switch to a Bluetooth headset if it is connected to the device.Turn off the microphone so that the other party cannot hear you.Open or close the keypad.Activate or deactivate the speakerphone.End the current call.Record a call conversation.Increase the volume.When using the speakerphone, speak into the microphone at the top of the device and keep the device away from your ears.
Applications51ContactsIntroductionCreate new contacts or manage contacts on the device.Adding contactsCreating contacts manually1  Tap Contacts on the Home screen.2  Tap   and select a storage location.3  Enter contact information.• : Add an image.• /   : Add or delete a contact field.4  Tap SAVE.To add a phone number to the contacts list from the keypad, open the Home screen and tap Phone. If the keypad does not appear on the screen, tap   to open the keypad. Enter the number and tap Add to Contacts.To add a phone number to the contacts list from received calls, open the Home screen and tap Phone → LOG → a contact.Importing contactsImport contacts from storage services to your device.On the Home screen, tap Contacts → MORE → Settings → Import/Export contacts → IMPORT and select an import option.
Applications52Searching for contactsOn the Home screen, tap Contacts.Use one of the following search methods:•Scroll up or down the contacts list.•Drag a finger along the index at the right side of the contacts list to scroll through it quickly.•Tap the search field at the top of the contacts list and enter search criteria.Once a contact is selected, take one of the following actions:• : Add to favourite contacts.• : Make a voice call.• : Make an IP call.• : Compose a message.• : Compose an email.Sharing profileShare your profile information, such as your photo and status message, with others using the profile sharing feature.•This feature may not be available depending on the region or service provider.•This feature is only available for contacts who have activated the profile sharing feature on their device.On the Home screen, tap Contacts → your profile → Profile sharing, and then tap the switch to activate it. To use this feature, your phone number must be verified. You can view your contacts’ updated profile information in Contacts.To set additional items to share, tap Shared profile info and select items.To set a contact group to share your profile with, tap Share with and select an option.
Applications53Sharing contactsYou can share contacts with others by using various sharing options.1  Tap Contacts on the Home screen.2  Tap MORE → Share.3  Tick contacts and tap SHARE.4  Select a sharing method.MessagesIntroductionSend and view messages by conversation.Sending messagesYou may incur additional charges for sending messages when you are roaming.1  Tap Messages on the Home screen.2  Tap  .
Applications543  Add recipients and enter a message.Access additional options.Enter a message.Select contacts from the contacts list.Enter emoticons.Enter recipients.Attach files. Send the message.4  Tap   or   to send the message.Viewing messagesMessages are grouped into message threads by contact.You may incur additional charges for receiving messages when you are roaming.1  Tap Messages on the Home screen.2  On the messages list, select a contact.3  View your conversation.Blocking unwanted messagesBlock messages from specific numbers or messages that contain phrases added to your block list.1  Tap Messages on the Home screen.2  Tap MORE → Settings → Block messages.3  Tap Black list.To add phrases to block, tap Blocked phrases.
Applications554  Tap BLACK LIST →  .5  Tap Add from Contacts/Phone log to select contacts, and then tap DONE.To manually enter a number, tap Add manually, and then enter a phone number.When you receive messages from the blocked numbers or messages including blocked phrases, you will not be notified. To view blocked messages, tap MORE → Settings → Block messages → Blocked messages.Setting the message notificationYou can change notification sound, display options, and more.1  Tap Messages on the Home screen.2  Tap MORE → Settings → Notifications, and then tap the switch to activate it.3  Change the notification settings.•Notification sound: Change the notification sound.•Vibrations: Set the device to vibrate when you receive messages.•Pop-up display: Set the device to display messages in pop-up windows.•Preview message: Set the device to display message content on the locked screen and in pop-up windows.Setting a message reminderYou can set an alert at an interval to let you know that you have unchecked notifications. If this feature is not activated, open the Home screen, tap Settings → Accessibility → Notification reminder, and then tap the switch to activate it. Then, tap the Messages switch to activate it.
Applications56InternetIntroductionBrowse the Internet to search for information and bookmark your favourite webpages to access them conveniently.Browsing webpages1  Tap Internet on the Home screen.2  Tap the address field.3  Enter the web address or a keyword, and then tap Go.To view the toolbars, drag your finger downwards slightly on the screen.Open the homepage.Move to the previously visited page.Open the browser's tab manager.Access additional options.Refresh the current webpage.View your bookmarks, saved webpages, and recent browsing history.
Applications57Using secret modeIn secret mode, you can separately save and manage open tabs, bookmarks, and saved pages. You can lock secret mode using a password and your fingerprint.Activating secret modeIn the toolbar at the bottom of the screen, tap Tabs → TURN ON SECRET. If you are using this feature for the first time, set whether to use a password for secret mode.In secret mode, you cannot use some features, such as screen capture.In secret mode, the device will change the colour of the toolbars.Changing security settingsYou can change your password or the lock method.Tap MORE → Settings → Privacy → Secret mode security → Change password. To set your registered fingerprint as the lock method along with the password, tap the Fingerprints switch to activate it. Refer to Fingerprint recognition for more information about using your fingerprints.Deactivating secret modeIn the toolbar at the bottom of the screen, tap Tabs → TURN OFF SECRET.
Applications58EmailSetting up email accountsSet up an email account when opening Email for the first time.1  Tap 实用工具 → Email on the Home screen.2  Select an email service, enter the email address and password, and then tap SIGN IN.To manually register a company email account, tap MANUAL SETUP.3  Follow the on-screen instructions to complete the setup.To set up another email account, tap MORE → Settings → Add account.If you have more than one email account, you can set one as the default account. Tap MORE → Settings → MORE → Set default account.Sending emails1  Tap   to compose an email.2  Add recipients and enter an email text.3  Tap SEND to send the mail.Reading emailsWhen Email is open, the device will automatically retrieve new emails. To manually retrieve emails, swipe downwards on the screen.Tap an email on the screen to read it.If email syncing is disabled, new emails cannot be retrieved. To enable email syncing, tap MORE → Settings → your account name, and then tap the Sync account switch to activate it.
Applications59CameraIntroductionTake photos and record videos using various modes and settings.Basic shootingYou can take photos or record videos. View your photos and videos in Gallery.Tap Camera on the Home screen.Camera etiquette•Do not take photos or record videos of other people without their permission.•Do not take photos or record videos where legally prohibited.•Do not take photos or record videos in places where you may violate other people’s privacy.Taking photos or recording videos1  Tap the image on the preview screen where the camera should focus.2  Tap   to take a photo or tap   to record a video.•Spread two fingers apart on the screen to zoom in, and pinch to zoom out.•To adjust the brightness of photos or videos, tap the screen. When the adjustment bar appears, drag the adjustment bar towards   or  .•To capture an image from the video while recording, tap Capture.•To change the focus while recording a video, tap where you want to focus. To focus on the centre of the screen, tap  .
Applications60Camera settingsHide or show the setting icons.Quick settingsRecord a video.Take a photo.Switch between the front and rear cameras.Shooting modesPreview thumbnailCurrent modeOn the preview screen, swipe to the right to access the list of shooting modes. Or, swipe to the left to view photos and videos you have captured.•The preview screen may vary depending on the shooting mode and which camera is being used.•The camera automatically shuts off when unused.•Make sure that the lens is clean. Otherwise, the device may not work properly in some modes that require high resolutions.•The front camera features a wide-angle lens. Minor distortion may occur in wide-angle photos and does not indicate device performance problems.Launching Camera on the locked screenTo quickly take photos, launch Camera on the locked screen.On the locked screen, drag   outside the large circle.•This feature may not be available depending on the region or service provider.•Some camera features are not available when you launch Camera from the locked screen while the security features are activated.
Applications61Launching Camera quicklyPress the Home key twice quickly to launch Camera.Some camera features are not available when you launch Camera from the locked screen or when the screen is turned off while the security features are activated.Locking the focus and exposureStrong light/dark contrast and the subject being outside the auto focus area may make it difficult to achieve an appropriate exposure. Lock the focus or exposure and then take a photo. Tap and hold the area to focus, the AF/AE frame will appear on the area and the focus and exposure setting will be locked. The setting remains locked even after you take a photo.This feature is only available in some shooting modes.Customising shooting modesOn the preview screen, tap MODE and select a mode.To view information for each mode, tap INFO.To rearrange modes, tap MORE → Edit, tap and hold a mode icon, and then drag it to a new location.To add mode shortcuts to the Home screen, tap MORE → Add shortcut on Home screen.Auto modeAuto mode allows the camera to evaluate the surroundings and determine the ideal mode for the photo.On the preview screen, tap MODE → Auto.
Applications62Pro modeTake photos while manually adjusting various shooting options, such as exposure value and ISO value.On the preview screen, tap MODE → Pro. Select options and customise the settings, and then tap   to take a photo.• : Select an appropriate white balance, so images have a true-to-life colour range.• : Select an ISO value. This controls camera light sensitivity. Low values are for stationary or brightly lit objects. Higher values are for fast-moving or poorly lit objects. However, higher ISO settings can result in noise in photos.• : Change the exposure value. This determines how much light the camera’s sensor receives. For low-light situations, use a higher exposure.Beauty faceTake a photo with lightened faces for gentler images.On the preview screen, tap MODE → Beauty face.PanoramaTake a series of photos horizontally or vertically and then stitch them together to create a wide scene.On the preview screen, tap MODE → Panorama.To get the best shots using panorama mode, follow these tips:•Move the camera slowly in one direction.•Keep the image within the frame on the camera’s viewfinder. If the preview image is out of the guide frame or you do not move the device, the device will automatically stop taking photos.•Avoid taking photos of indistinct backgrounds, such as an empty sky or a plain wall.
Applications63Continuous shotTake a series of photos of moving subjects.On the preview screen, tap MODE → Continuous shot. Tap and hold   to take several photos continuously.FoodTake photos of food with more vibrant colours.1  On the preview screen, tap MODE → Food.2  Tap the screen and drag the circular frame over the area to highlight.The area outside the circular frame will be blurred.To resize the circular frame, drag a corner of the frame.3  Tap   and drag the adjustment bar to adjust the colour tone.4  Tap   to take a photo.
Applications64HDR (Rich tone)Take photos with rich colours and reproduce details even in bright and dark areas.On the preview screen, tap MODE → HDR (Rich tone).Without effect With effectNightTake a photo in low-light conditions, without using the flash.On the preview screen, tap MODE → Night.Anti-fogTake a photo or video in misty conditions.On the preview screen, tap MODE → Anti-fog.SelfieTake self-portraits with the front camera. You can preview various beauty effects on the screen.1  On the preview screen, tap   to switch to the front camera for self-portraits.2  Tap MODE → Selfie.
Applications653  Face the front camera lens.4  When the device detects your face, tap the screen to take a photo of yourself.Alternatively, show your palm to the front camera. After recognising your palm, a countdown timer will appear. When the time is up, the device will take a photo.Using the selfie flashWhen taking self-portraits with the front camera in low-light situations, the touchscreen can serve as a flash.On the preview screen, tap   repeatedly until you reach On. When you take a photo, the touchscreen will flash.Applying beauty effectsYou can modify facial features, such as your skin tone or face shape, before taking self-portraits.This feature is available only in Selfie mode.1  On the preview screen, tap  .2  Select the options below to apply beauty effects to your face on the preview screen and take a photo of yourself.•Skin Tone: Make your skin appear brighter and clearer.•Slim Face: Adjust the face shape and make your face appear slimmer.•Large Eyes: Make your eyes appear bigger.
Applications66Wide selfieTake a wide self-portrait to include more people in the photo and avoid leaving people out.1  On the preview screen, tap   to switch to the front camera for self-portraits.2  Tap MODE → Wide selfie.3  Face the front camera lens.4  When the device detects your face, tap the screen to take a photo of yourself.Alternatively, show your palm to the front camera. After recognising your palm, a countdown timer will appear. When the time is up, the device will take a photo.5  Slowly swivel the device left and then right or vice versa to take a wide self-portrait.The device will take additional photos when the white frame moves to each end of the viewfinder window.•Make sure to keep the white frame inside the viewfinder window.•The subjects should remain still while taking wide self-portraits.•The top and bottom parts of the image displayed on the preview screen may be cut out of the photo depending on the shooting conditions.
Applications67Downloading modesDownload more shooting modes from Galaxy Apps.On the preview screen, tap MODE → DOWNLOAD.Some downloaded shooting modes do not have access to every feature.Camera settingsQuick settingsOn the preview screen, use the following quick settings.The available options may vary depending on the shooting mode and which camera is being used.• : Select a sticker or filter effect to use when taking photos or recording videos. Tap Filter to apply a filter effect or Stickers to add a sticker. To set whether to display certain effects on the list or rearrange the order of effects, tap Manage. To download more effects, tap Download.• : Select a metering method. This determines how light values are calculated. Center-weighted uses the light in the centre portion of the shot to calculate the exposure of the shot. Spot uses the light in a concentrated centre area of the shot to calculate the exposure of the shot. Matrix averages the entire scene.• : Select the length of the delay before the camera automatically takes a photo.• : Activate or deactivate the flash.• : Select a resolution for photos. Using a higher resolution will result in higher quality photos, but they will take up more memory.The resolution of a photo may be affected by lighting conditions when taking photos with the front camera.• : Adjust the colour tone.• : Focus on a subject inside the circular frame and blur the image outside the frame.• : Adjust the slide bar to take clearer photos in foggy conditions.
Applications68Camera settingsOn the preview screen, tap  .The available options may vary depending on the shooting mode and which camera is being used.•Video size (rear) / Video size (front): Select a resolution for videos. Using a higher resolution will result in higher quality videos, but they will take up more memory.•Save pictures as previewed: Invert the image to create a mirror-image of the original scene, when taking photos with the front camera.•Grid lines: Display viewfinder guides to help composition when selecting subjects.•Location tags: Attach a GPS location tag to the photo.•GPS signal strength may decrease in locations where the signal is obstructed, such as between buildings or in low-lying areas, or in poor weather conditions.•Your location may appear on your photos when you upload them to the Internet. To avoid this, deactivate the location tag setting.•Shooting methods (front): Select shooting options to use.•Review pictures: Set the device to show photos after capturing them.•Quick launch: Set the device to launch the camera by pressing the Home key twice quickly.•Storage location: Select the memory location for storage.•Volume keys function: Set the device to use the Volume key to control the shutter or zoom function.•Shutter sound: Enable or disable the shutter sound.•Detect QR codes: Enable or disable the QR code reader.•Reset settings: Reset the camera settings.
Applications69GalleryIntroductionView and manage photos and videos stored in the device.Viewing images1  Tap Gallery on the Home screen.2  Select an image.Access additional options.Move to the previous screen.Share the image with others. Delete the image.Modify the image.Add the image to favourites.To hide or show the menus, tap the screen.
Applications70Viewing videos1  Tap Gallery on the Home screen.2  Select a video to play. Video files show the   icon on the preview thumbnail.Change screen ratio.Rewind or fast-forward by dragging the bar.Display your videos.Skip to the previous video. Tap and hold to rewind.Skip to the next video. Tap and hold to fast-forward.Access additional options.Switch to the pop-up video player.Pause and resume playback.Adjust the volume.Drag your finger up or down on the left side of the playback screen to adjust the brightness, or drag your finger up or down on the right side of the playback screen to adjust the volume.To rewind or fast-forward, swipe to the left or right on the playback screen.Deleting images or videosDeleting an image or a videoSelect an image or a video and tap Delete at the bottom of the screen.Deleting multiple images and videos1  On the main Gallery screen, tap and hold an image or a video to delete.2  Tick the images or videos to delete.3  Tap DELETE.
Applications71Sharing images or videosSelect an image or a video, tap Share at the bottom of the screen, and then select a sharing method.Sharing event albumsView photos and videos by time and location. You can share event albums with your contacts.1  On the main Gallery screen, tap   → Event.You can view photos and videos sorted by event.To manually create event albums, tap   and select photos or videos to add.2  Select an event album to share.3  Tap   and select contacts.When your contacts accept the share request, the event album will be shared and more photos and videos can be added to the event album by your contacts.•To use this feature, your phone number must be verified.•You may incur additional charges when sharing files via the mobile network.•If the recipients have not verified their phone numbers or if their devices do not support the feature, a link to the files will be sent to them via text message. Link recipients may not be able to use some features. The link will expire after a certain period.
Applications72Smart ManagerThe Smart manager provides an overview of the status of your device’s battery, storage, RAM, and system security. You can also automatically optimise the device with a tap of your finger.Using the quick optimisation featureOn the Home screen, tap Smart Manager → TAP TO OPTIMIZE.The quick optimisation feature improves device performance through the following actions.•Clearing some memory.•Deleting unnecessary files and closing apps running in the background.•Scanning for malware.
Applications73BATTERYOn the Home screen, tap Smart Manager → BATTERY.Check the remaining battery power and time to use the device. For devices with low battery levels, conserve battery power by activating power saving features.•The usage time left shows the time remaining before the battery power runs out. Usage time left may vary depending on your device settings and operating conditions.•You cannot receive notifications from apps that use power saving mode.You can set the device to charge the battery more quickly. Tap the Fast cable charging switch to activate it.RAMOn the Home screen, tap Smart Manager → RAM.To speed up your device by reducing the amount of RAM you are using, tap END ALL to close all background apps.STORAGECheck the status of the used and available memory.On the Home screen, tap Smart Manager → STORAGE.Managing the memoryTo delete residual files, such as cache, tap DELETE. To delete files or uninstall apps that you do not use any more, select an option under User data and perform the desired action.DATA USAGECheck the device’s data usage amount. You can customise the settings for the limitation.On the Home screen, tap Smart Manager → DATA USAGE.
Applications74DEVICE SECURITYCheck the device’s security status. This feature scans your device for malware.On the Home screen, tap Smart Manager → DEVICE SECURITY.BLOCKED LOGSReject calls or messages from specified phone numbers or reject messages containing specified text.On the Home screen, tap Smart Manager → BLOCKED LOGS.APPLICATION PERMISSIONSSpecify functions to use for each app.On the Home screen, tap Smart Manager → APPLICATION PERMISSIONS.NOTIFICATION & APP LOCKSet a lock method to prevent others from accessing selected apps and change the notification settings for each app. You can also set display options for notifications.On the Home screen, tap Smart Manager → NOTIFICATION & APP LOCK.Samsung PayIntroductionRegister frequently used cards to Samsung Pay, a mobile payment service, to make payments quickly and securely. Samsung Pay supports magnetic secure transmission (MST) as well as near field communication (NFC) to allow payment through standard credit card readers.You can view more information, such as cards that support this feature at www.samsung.com/samsungpay. Alternatively, open the Home screen and tap Samsung Pay → More → Help.•Your device only supports Samsung Pay payments made via NFC.•This app’s availability and supported features may vary depending on the region or service provider.•The procedures for the initial setup and card registration may vary depending on the region or service provider.
Applications75Before you start•To use this feature, you must sign in to your Samsung account and register your fingerprints. For more information, refer to Samsung account and Fingerprint recognition.•To make payments with Samsung Pay, the device may be required a connection to a Wi-Fi or mobile network depending on the region.Setting up Samsung PayWhen running this app for the first time or restart it after performing a data reset, follow the on-screen instructions to complete the initial setup.1  On the Home screen, tap Samsung Pay.2  Sign in to your Samsung account.3  Read and agree to the terms and conditions.4  Create a PIN to use when making payments.5  Register a PIN or your fingerprint to use when making payments.This PIN will be used to verify various actions in Samsung Pay, such as making payments and unlocking the app.
Applications76Registering cardsYou can easily register cards by capturing their images with the camera.You can check the cards that support this feature from the Samsung Pay website (www.samsung.com/samsungpay).On the Home screen, tap Samsung Pay → Add and follow the on-screen instructions to complete your card registration.Making payments1  Tap and hold a card image at the bottom of the screen and drag it upwards.Alternatively, tap Samsung Pay on the Home screen.2  On the cards list, swipe to the left or right and select a card to use.
Applications773  Place your finger on the Home key to scan your fingerprint.Alternatively, enter the payment PIN you set when setting up the Samsung Pay.4  Touch the back of your device to the card reader.When the card reader recognises the card information, the payment will be processed.Payments may not be processed depending on your network connection.Cancelling paymentsYou can cancel payments by visiting the place where you made them.On the cards list, swipe to the left or right to select the card you used. Follow the on-screen instructions to complete payment cancellation.Changing the Samsung Pay settingsOn the Samsung Pay screen, tap More → Settings. Select the screen where the card image will appear to activate Samsung Pay on the Home screen or locked screen, or when the screen is turned off.盖乐世空间盖乐世空间 provides support services for customers, such as device problem diagnosis, service centre search, and remote servicing. You can also ask our consultants one-on-one questions and send error reports for unusual device performance.
Applications78Game LauncherIntroductionGame Launcher gathers your games downloaded from Galaxy Apps or another apps store into one place for easy access. You can set the device to game mode to play games more easily.Access the Game Launcher settings.A list of downloaded gamesMute and hide most of notifications during games. Only some notifications including incoming calls will be displayed.Reduce the battery usage for playing games.Turn on or off the Game Tools icon.View game videos.View a list of the most popular games for Galaxy users.
Applications79Using Game Launcher1  On the Home screen, tap Settings → Advanced features → Games → Game Launcher and tap the switch to activate it.Game Launcher will be added to the Home screen.When you deactivate the feature, Game Launcher will be removed from the Home screen.2  On the Home screen, tap Game Launcher.3  Tap a game from the games list.Games downloaded from Galaxy Apps or another apps store will be automatically shown on the game launcher screen. If you cannot see your games, tap Tap here to add unlisted games.Removing a game from Game LauncherTap and hold a game and drag it to Remove at the top of the screen.Activating game power saving modeWhen you activate game power saving mode, the device will lower games’ resolution and frame rate to reduce battery consumption.On the Home screen, tap Game Launcher → Save power during game. Select one of the following options:•Off: Power saving mode is not used.•Save power: Decrease battery power consumption by lowering the resolution and frame rate.•Save maximum power: Dramatically decrease the battery power consumption by lowering the resolution and frame rate.Battery power efficiency may vary by game.
Applications80Using Game ToolsYou can set the Game Tools icon to be displayed as a floating icon on game screens.On the Home screen, tap Settings → Advanced features → Games → Game Tools and tap the switch to activate it.While playing a game, tap   to display the game tools.To move the icon, tap   and drag it to a new location.To remove the icon from the current game screen, tap and hold   and drag it to Remove at the top of the screen.Capture screenshots.Record your game session.Minimise the game screen.Lock the Recents and Back keys during games.Access the Game Tools settings.Mute and hide most of notifications during games. Only some notifications including incoming calls will be displayed.Game Tools iconBlocking notifications during gamesTap   →  to mute notification sounds and display only notifications for incoming calls and emergency alerts, so that you can enjoy your games without being disturbed. If you receive an incoming call, a small notification will appear at the top of the screen.
Applications81S PlannerIntroductionManage your schedule by entering upcoming events or tasks in your planner.Creating events1  Tap S Planner on the Home screen.2  Tap   or double-tap a date.If the date already has saved events or tasks in it, tap the date and tap  .3  Enter event details.Select a calendar to use or sync with.Attach a map showing the location of the event.Enter the location of the event.Enter a title.Set a start and end date for the event.Add more details.Set an alarm.4  Tap SAVE to save the event.
Applications82Creating tasks1  Tap S Planner on the Home screen.2  Tap   → Tasks.3  Enter task details and tap TODAY or TOMORROW to set a due date.To add more details, tap  .4  Tap SAVE to save the task.Syncing events and tasks with your accountsOn the Home screen, tap Settings → Accounts, select an account service, and then tap the Sync Calendar switch to sync events and tasks with the account.To add accounts to sync with, open the Home screen and tap S Planner → MORE → Manage calendars → Add account. Then, select an account to sync with and sign in. When an account is added, it will appear on the list.S HealthIntroductionS Health helps you manage your wellness and fitness. Set fitness goals, check your progress, and keep track of your overall wellness and fitness.Starting S HealthWhen running this app for the first time or restart it after performing a data reset, follow the on-screen instructions to complete the setup.1  Tap Samsung → S Health on the Home screen.2  Follow the on-screen instructions to complete the setup.
Applications83Using S HealthYou can view the key information from S Health menus and trackers to monitor your wellness and fitness.Tap Samsung → S Health on the Home screen.TrackersGoals and programmesTo add trackers, goals, or programmes to the S Health screen, tap MORE → Manage items, and then select items under the TRACKERS, GOALS, or PROGRAMS tab.•GOALS: Set your daily fitness goals and view your progress.•PROGRAMS: Use customisable exercise programmes.•TRACKERS: Monitor your activities, food intake, and body measurements.To access more information about S Health functions, tap MORE → Settings → Help.
Applications84Additional information•S Health is intended for fitness and wellness purposes only and is not intended for use in the diagnosis of disease or other conditions, or in the cure, mitigation, treatment, or prevention of disease.•The available functions, features and addable applications for S Health may vary from country to country due to different local laws and regulations. You should check the features and applications available in your specific region before use.•S Health applications and its service can be changed or discontinued without prior notice.•The purpose for data collection is limited to providing the service that you have requested, including providing additional information to enhance your wellness, sync data, data analysis and statistics or to develop and provide better services. (But if you sign in to your Samsung account from S Health, your data may be saved on the server for data backup purposes.) Personal information may be stored until the completion of such purposes. You can delete personal data stored by S Health by using the Reset data option in the Settings menu. To delete any data you have shared with social networks or transferred to storage devices, you must delete them separately.•You may share and/or sync your data with additional Samsung services or compatible third party services that you select, as well as with any of your other connected devices. Access to S Health information by such additional services or third party devices will only be permitted with your express approval.•You assume full responsibility for the inappropriate use of data shared on social networks or transmitted to others. Use caution when sharing your personal data with others.•If the device is connected to measuring devices, verify the communication protocol to confirm proper operation. If you use a wireless connection, such as Bluetooth, the device may be affected by electronic interference from other devices. Avoid using the device near other devices that transmit radio waves.•Please read Terms and Conditions and Privacy Policy of S Health carefully before using it.
Applications85S VoiceIntroductionPerform various tasks simply by speaking.Setting a wake-up commandYou can launch S Voice using your own wake-up command.When launching S Voice for the first time, tap START and set your own wake-up command.To change the wake-up command, open the Home screen and tap Samsung → S Voice. Then, tap   → Voice wake-up → Change wake-up command → START, and then follow the on-screen instructions.To set the device to launch S Voice using the wake-up command while the device is locked, tap   and tap the Wake up in secured lock switch to activate it.Using S Voice1  Say the preset wake-up command.Alternatively, on the Home screen, tap Samsung → S Voice.When S Voice is launched, the device begins voice recognition.This app may not be available depending on the region or service provider.View examples of voice commands.S Voice settings2  Say a voice command.If the device recognises the command, the device will perform the corresponding action. To repeat a voice command or say a different command, tap   or say the preset wake-up command.This app will close automatically if the device is not used for a specified period.
Applications86Tips for better voice recognition•Speak clearly.•Speak in quiet places.•Do not use offensive or slang words.•Avoid speaking in dialectal accents.The device may not recognise your commands or may perform unwanted commands depending on your surroundings or how you speak.Setting the languageOn the Home screen, tap Samsung → S Voice →   → Language, and then select a language.The selected language is applied to S Voice only, not to the language displayed on the device.S AssistantS Assistant helps you to organise your daily schedule. You can use recommended services and remember events by receiving reminder cards. You can also use convenient assistant services to do things, like make hotel reservations or track deliveries.Tap Samsung → S Assistant on the Home screen.You can set up your profile to receive more specific reminder cards. Tap MY PAGE → Profile and customise settings, such as your favourite places, sleep time, and work time.Creating custom reminders1  On the S Assistant screen, tap REMINDERS →  .2  Enter reminder details.3  Tap SAVE to save the reminder.You will receive the reminder card at the time you set.
Applications87Viewing reminder cardsWhen you receive reminder cards, a card notification will appear on the notification panel.1  Open the notification panel and select a card notification.2  Swipe upwards or downwards on the card to view its information and recommended actions.Using assistant servicesYou can use convenient assistant services to do things, like making hotel reservations or tracking deliveries.On the S Assistant screen, tap LIFE SERVICES and select a service to use.Samsung Milk MusicListen to music stored on your device and stream online music from Samsung Milk, the music service provided by Samsung.Tap Samsung Milk Music on the Home screen.Tap one of the following options:•MY MUSIC: Listen to music stored on your device.•RECOMMENDED: Listen to recommended online music.•RADIO STATIONS: Listen to music from online radio stations.
Applications88Playing musicTap MY MUSIC or RECOMMENDED, select a category, and then select a song to play.Tap the album image at the bottom of the screen to open the music player screen.Open the playlist.Skip to the next song. Tap and hold to fast-forward.Activate the UHQ (Ultra High Quality) Upscaler feature.Pause and resume playback.Access additional options.Download the current song (only for recommended songs).Skip to the previous song. Tap and hold to rewind.Change the repeat mode or turn on shuffle.Set the file as your favourite song.U品原音Use the UHQ (Ultra High quality) Upscaler feature to improve the sound to UHQA (Ultra High Quality Audio) and get a sound closer to the original sound.Connect a headset to the device. While playing music, tap   to activate it.Sound quality may vary depending on the connected headset.

Navigation menu