Samsung Electronics Co SMG360T Multi-band GSM/EDGE/UMTS/LTE Phone with WLAN and Bluetooth User Manual part 1 150508
Samsung Electronics Co Ltd Multi-band GSM/EDGE/UMTS/LTE Phone with WLAN and Bluetooth part 1 150508
Contents
- 1. Users Manual 1
- 2. Users Manual 2
Users Manual 1
SMARTPHONE
User Manual
Please read this manual before operating your device
and keep it for future reference.
DRAFT
FT
RTPHONTPHON
User ManuaUser Ma
Please read this manual beforese read this manual before
and keep it for futand keep it for fut
T
FT
F
FT
FT
T
T

i
Legal Notices TMO_SM-G360T_ENG_UM_XXX_TN_050415_R0
Legal Notices
Warning: This product contains chemicals
known to the State of California to cause
cancer and reproductive toxicity. For more
information, please call 1-800-SAMSUNG
(726-7864).
Intellectual Property
All Intellectual Property, as defined below,
owned by or which is otherwise the
property of Samsung or its respective
suppliers relating to the SAMSUNG Phone,
including but not limited to, accessories,
parts, or software relating there to (the
“Phone System”), is proprietary to
Samsung and protected under federal
laws, state laws, and international treaty
provisions. Intellectual Property includes,
but is not limited to, inventions (patentable
or unpatentable), patents, trade secrets,
copyrights, software, computer programs,
and related documentation and other
works of authorship. You may not infringe
or otherwise violate the rights secured by
the Intellectual Property. Moreover, you
agree that you will not (and will not attempt
to) modify, prepare derivative works of,
reverse engineer, decompile, disassemble,
or otherwise attempt to create source
code from the software. No title to or
ownership in the Intellectual Property is
transferred to you. All applicable rights of
the Intellectual Property shall remain with
SAMSUNG and its suppliers.
Open Source Software
Some software components of this product
incorporate source code covered under
GNU General Public License (GPL), GNU
Lesser GeneralPublic License (LGPL),
OpenSSL License, BSD License and
other open source licenses. Toobtain
the source code covered under the
opensource licenses, please visit:
http://opensource.samsung.com.
DRAFT
ve
G Phone, e,
cessories, esso
here to (the here to (the
rietary to rietar
ed under federal ed under federal
d international treaty ternational treaty
ectual Property includes, operty in
ed to, inventions (patentable ed to, inventions (pat
able), patents, trade secrets,able), patents, trade secre
ts, software, computer prograts, software, computer progra
d documentation and othd documentation and
horship. You may nohorship. You may
olate the rightsolate the rights
operty. Moperty. M
ot (a
ot (
oftware. Noftwar
the Intellectual the Inte
d to you. All applicable
d to you. All a
lectual Property shall rema
lectual Property s
SUNG and its suppliers.SUNG and its suppliers
Open Source SoftwareOpen Source
Some software componme softw
incorporate source corate
GNU General PublGNU General P
Lesser GeneralLesser General
OpenSSL LicOpenSSL Li
other opeot
the sou
openo
htht

ii
Legal Notices
Disclaimer of Warranties;
Exclusion of Liability
EXCEPT AS SET FORTH IN THE
EXPRESS WARRANTY CONTAINED
ON THE WARRANTY PAGE ENCLOSED
WITH THE PRODUCT, THE PURCHASER
TAKES THE PRODUCT “AS IS”, AND
SAMSUNG MAKES NO EXPRESS OR
IMPLIED WARRANTY OF ANY KIND
WHATSOEVER WITH RESPECT TO THE
PRODUCT, INCLUDING BUT NOT LIMITED
TO THE MERCHANTABILITY OF THE
PRODUCT OR ITS FITNESS FOR ANY
PARTICULAR PURPOSE OR USE; THE
DESIGN, CONDITION OR QUALITY OF
THE PRODUCT; THE PERFORMANCE OF
THE PRODUCT; THE WORKMANSHIP OF
THE PRODUCT OR THE COMPONENTS
CONTAINED THEREIN; OR COMPLIANCE
OF THE PRODUCT WITH THE
REQUIREMENTS OF ANY LAW, RULE,
SPECIFICATION OR CONTRACT
PERTAINING THERETO. NOTHING
CONTAINED IN THE INSTRUCTION
MANUAL SHALL BE CONSTRUED TO
CREATE AN EXPRESS OR IMPLIED
WARRANTY OF ANY KIND WHATSOEVER
WITH RESPECT TO THE PRODUCT. IN
ADDITION, SAMSUNG SHALL NOT BE
LIABLE FOR ANY DAMAGES OF ANY
KIND RESULTING FROM THE PURCHASE
OR USE OF THE PRODUCT OR ARISING
FROM THE BREACH OF THE EXPRESS
WARRANTY, INCLUDING INCIDENTAL,
SPECIAL OR CONSEQUENTIAL
DAMAGES, OR LOSS OF ANTICIPATED
PROFITS OR BENEFITS.
Modification of Software
SAMSUNG IS NOT LIABLE FOR
PERFORMANCE ISSUES OR
INCOMPATIBILITIES CAUSED BY YOUR
EDITING OF REGISTRY SETTINGS, OR
YOUR MODIFICATION OF OPERATING
SYSTEM SOFTWARE.
USING CUSTOM OPERATING SYSTEM
SOFTWARE MAY CAUSE YOUR
DEVICE AND APPLICATIONS TO WORK
IMPROPERLY. YOUR CARRIER MAY NOT
PERMIT USERS TO DOWNLOAD CERTAIN
SOFTWARE, SUCH AS CUSTOM OS.
Samsung KNOX™
Samsung Knox™ is Samsung’s security
platform and is a mark for a Samsung
device tested for security with enterprise
use in mind. Additional licensing fee may
be required. For more information about
Knox, please refer to:
www.samsung.com/us/knox. [030115]
DRAFT
OF
NCE OF F
NSHIP OF
MPONENTS MPONEN
R COMPLIANCE R COMPLIAN
H THE H TH
F ANY LAW, RULE, ANY LAW, RULE,
OR CONTRACT NTRACT
HERETO. NOTHING HERETO. NOTHING
IN THE INSTRUCTION IN THE INSTRUCTION
SHALL BE CONSTRUED TO SHALL BE CONSTRUED TO
AN EXPRESS OR IMPLIEDAN EXPRESS OR IMP
Y OF ANY KIND WHATY OF ANY KIND WH
T TO THE PRODT TO THE PRO
SUNG SHASUNG SHA
AMAAMA
FT
of Softwaof So
S NOT LIABLE FOS NOT LI
MANCE ISSUES OR ANCE ISSUES
MPATIBILITIES CAUSED BY Y
MPATIBILITIES CAUS
TING OF REGISTRY SETTING
TING OF REGISTRY SETT
YOUR MODIFICATION OF OPYOUR MODIFICATION OF OP
SYSTEM SOFTWARE. SYSTEM SOFT
USING CUSTOM OPERNG CU
SOFTWARE MAY CAWARE
DEVICE AND APPDEVICE AND A
IMPROPERLY. IMPROPERLY.
PERMIT USPERMIT US
SOFTWAS
SaS

iii
Legal Notices
Samsung Electronics
America (SEA), Inc
Address:
85 Challenger Road
Ridgefield Park,
New Jersey 07660
Phone:
1-800-SAMSUNG (726-7864)
Internet Address:
www.samsung.com
©2015 Samsung Electronics America, Inc.
Samsung, Galaxy, Galaxy Note, S Pen,
Multiwindow, and SHealth are registered
trademarks of SamsungElectronics Co.,
Ltd.
Do you have questions about your
Samsung Mobile Device?
For 24 hour information and assistance,
we offer a new FAQ/ARS System
(Automated Response System) at:
www.samsung.com/us/support
The actual available capacity of the
internal memory is less than the specified
capacity because the operating system
and default applications occupy part of
the memory. The available capacity may
change when you upgrade the device.
Nuance®, VSuite™, T9® Text Input, and the
Nuance logo are trademarks or registered
trademarks of Nuance Communications,
Inc., or its affiliates in the United States
and/or other countries.
ACCESS® and NetFront™ are trademarks
or registered trademarks of ACCESS Co.,
Ltd. in Japan and other countries.
The Bluetooth® word mark, figure mark
(stylized “B Design”), and combination
mark (Bluetooth word mark and “B
Design”) are registered trademarks and
are wholly owned by the Bluetooth SIG.
microSD™ and the microSD logo are
Trademarks of the SD Card Association.
Openwave® is a registered Trademark of
Openwave,Inc.
Google, the Google logo, Android, the
Android logo, Google Play, Gmail, Google
Mail, Google Maps, Google Music, Google
Hangouts, Picasa, Play Newsstand,
YouTube, and other marks are trademarks
of Google Inc.
Wi-Fi is a registered trademark of the
WirelessFidelity Alliance, Inc.
DRAFT
D
nc. nc.
n,
istered d
nics Co.,
tions about your tions about y
le Device? Device?
ormation and assistance, ormation and assis
ew FAQ/ARS System ew FAQ/ARS System
ed Response System) at: ed Response System) at:
msung.com/us/supportmsung.com/us/suppor
gpp
vailable capacity of vailable capacity o
y is less than ty is less than
the operthe oper
ons
ons
iesies
NetFrontNetFr
™
a
d trademarks of ACd tradema
pan and other countries
an and other
luetoothlueto
®
word mark, figure m
mark, fi
ylized “B Design”), and comb
ylized “B Design”), and com
mark (Bluetooth word mark amark (Bluetooth word mark a
Design”) are registered traDesign”) are re
are wholly owned by thewholly o
microSDD
™™
and the m and
Trademarks of thTrademarks of t
OpenwaveOpenwave
®®
i
OpenwaveO
GooglG
AndA

iv
Legal Notices
Online Legal Information
The online version of the Health/Safety
and Warranty guide for your device can be
found at:
English:
www.samsung.com/us/Legal/Phone-
HSGuide
Spanish:
www.samsung.com/us/Legal/Phone-
HSGuide-SP
DRAFT

v
Table of Contents
Table of Contents
Getting Started ......................................1
Front View ...................................................2
Back View ...................................................4
Assemble Your Device .............................6
Set Up Your Device ................................ 10
Set Up Accounts on Your Device ....... 12
Know Your Device ............................ 13
Home Screen .......................................... 14
Status Bar ................................................ 19
Navigation, Motions, and Gestures ..... 21
Notification Panel ................................... 23
Enter Text ................................................. 25
Calling ...................................................... 27
Make and Answer Calls ........................ 28
Applications .......................................... 34
Apps Screen............................................ 35
Google Applications .............................. 39
T-Mobile Applications ............................ 43
Calculator ................................................. 44
Calendar ................................................... 45
Camera and Video ................................. 47
Clock ......................................................... 51
Contacts ................................................... 53
Email ......................................................... 59
GALAXY Apps ......................................... 61
Gallery ...................................................... 62
Internet ..................................................... 64
Memo ........................................................ 66
Messages ................................................. 67
MyFiles .................................................... 71
Video Player ............................................ 74
Voice Recorder ....................................... 76
Settings ................................................... 77
Wi-Fi and Wi-Fi Direct ............................ 78
Bluetooth .................................................. 82
Airplane Mode ......................................... 85
Data Usage .............................................. 86
Location Services .................................. 87
Printing ..................................................... 89
More Networks ....................................... 90
Sound Settings ....................................... 91
Display Settings ...................................... 93
Lock Screen ............................................ 96
Call Settings ............................................ 98
Application Manager .............................. 99
Accounts ................................................ 102
DRAFT
1414
....
199
res
.....
21
.............................
23
............................................
25
..........................................................
2727
er Calls
..................................
28
onsons
.................................................................
3
creencreen
............................................
pplicationspplica
........................
plicationsplicatio
.................
..........................
.
.
........................
..........................................
Y AppsApps
..............................
........
ryry
..............................................
.................................
ternetterne
.......................................
........
MemoMem
...........................................
MessagesMessages
........................
MyFilesFiles
.....................
Video PlayerPlayer
......
Voice RecordeVoice Recorde
SettingsSettings
Wi-Fi
Bl

vi
Table of Contents
Backup and Reset ................................ 104
Accessibility .......................................... 105
Language and Input Settings............. 107
Date and Time Settings ....................... 111
Ultra Power Saving Mode ................... 112
Battery .................................................... 113
Storage ................................................... 114
Security .................................................. 117
About Your Device ............................... 120
DRAFT

Getting Started
Learn about your mobile
device hardware, assembly
procedures, and how to
get started using your new
device.
DRAFT
T
T
2
Getting Started Front View
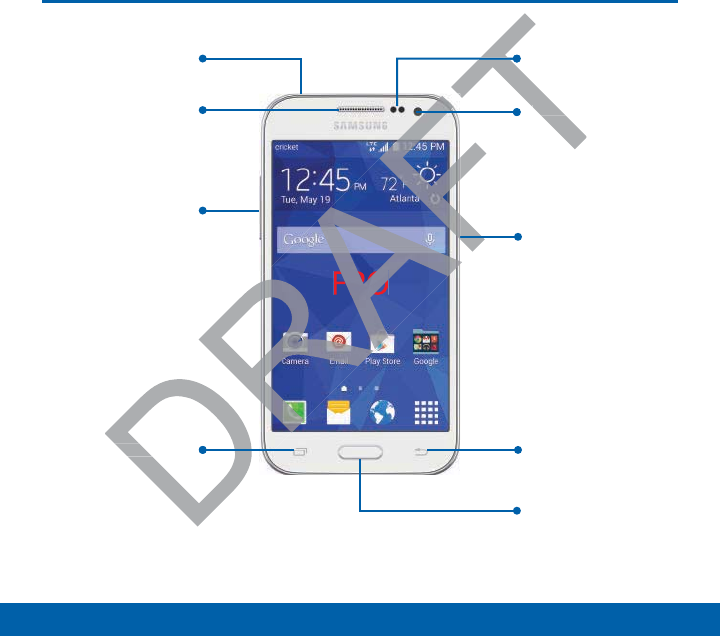
Front View
FPO
Headset jack
Earpiece
Volume key
Power/Lock key
Back key
Home key
Front camera
Proximity sensors
Recent key
FP
O
AF
FT
FT
D
D
T
T
Front camera
Front
Proxim
Recent keyRecen

3
Getting Started Front View
Front Features
• Back: Tap to return to the previous
screen, or to close a dialog box, menu,
or keyboard.
• Earpiece: Listen to a call.
• Front camera: Take self-portraits and
record videos of yourself.
• Headset jack: Connect an optional
headset (notincluded).
• Home key: Tap to return to the Home
screen.
• Proximity sensors: Detects the
presence of objects near the device.
• Recent: Tap to display recent apps
or touch and hold for home screen
options.
• Power/Lock key: Press and hold to
turn the device on or off. Press to lock
or wake up the screen. Press and hold
to turn the device off or restart it, or
for quick access to Airplane Mode,
Emergency Mode, and to Mute, Vibrate,
and Sound modes.
• Volume key: Press to adjust the volume
of your device’s sounds and audio.
ce.
ck keyck key
: Press a
device on or off. Pre
device on
ke up the screen. Press a
ke up the screen
turn the device off or restart i
turn the device off or r
for quick access to Airplane M
for quick access to Airplane
Emergency Mode, and to MEmergency Mode, and to M
and Sound modes.and Sound
•
Volume keyolume
: Press t
of your device’s sour de
4
Getting Started Back View
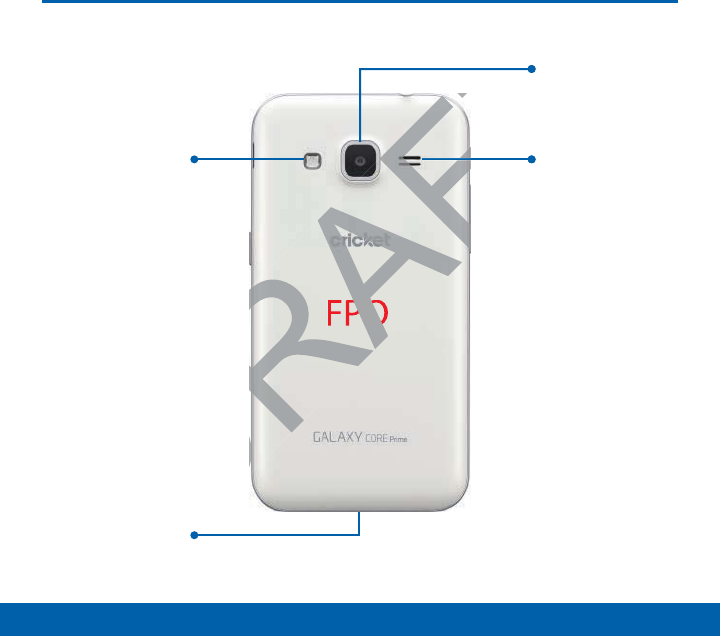
Back View
FPO
Flash
Camera
Speaker
USB charger/
Accessory port
DRAFT
PO
T
T
FT
FT
Camer
Spea

Back Features
• Camera: Take pictures and record
videos.
• Flash: Illuminate subjects in low-light
environments when taking a photo or
recording video.
• Speaker: Plays music and other
sounds.
• USB charger/Accessory port: Connect
the Charger/USB cable (included),
and other optional accessories (not
included).
5
Getting Started Back View
DRAFT
/Accesso/Acce
r/USB cable (ir/USB
er optional accessor
er optional a
ded).ded).
6
Getting Started Assemble Your Device
Assemble Your Device
This section helps you to
assemble your device.
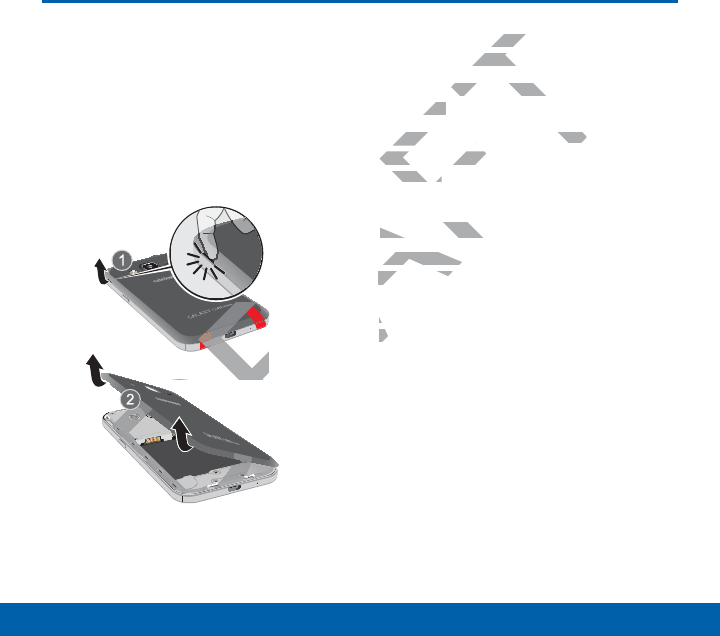
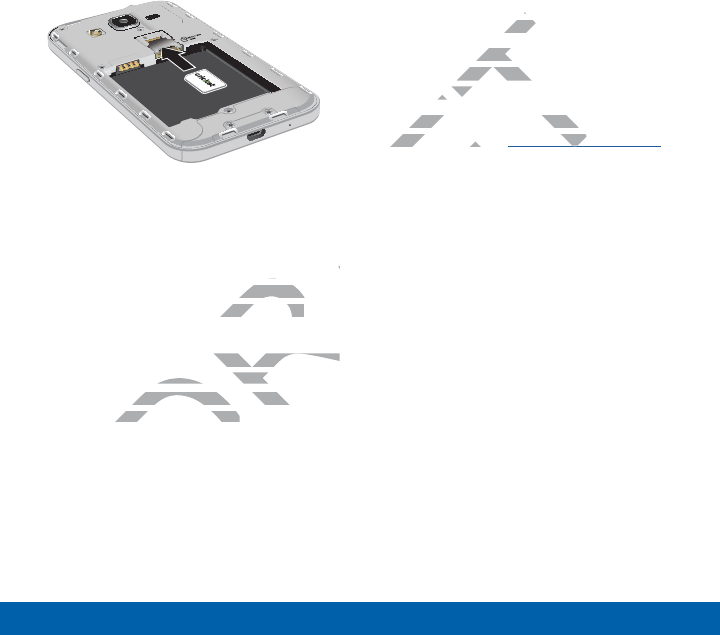
Remove the Back Cover
FPO
1. Remove the back cover using the slot
near the top of your phone.
2. Lift the cover up and to the right of the
phone.
Warning: Do not bend or twist the back
cover excessively. Doing so may damage
the cover.
Install the SIM Card
When you subscribe to a cellular network,
you are provided with a plug-in SIM card.
During activation, your SIM card will be
loaded with your subscription details, such
as your PIN, available optional services,
and other features.
Warning: Please be careful when handling
the SIM card to avoid damaging it. Keep all
SIM cards out of reach of small children.
Note: The SIM card slot is located below the
micro SD card slot.
DR
DR
DR
DR
DR
D
DR
DR
D
DR
D
D
D
D
D
D
D
D
D
D
D
D
D
D
D
D
D
D
D
D
D
D
D
D
D
D
D
D
D
D
D
D
D
D
D
D
D
D
D
D
D
D
D
D
D
D
D
D
D
D
D
D
D
D
D
DRAFT
R
R
R
R
D
D
D
D
D
D
D
DR
D
D
D
D
D
D
D
D
D
D
D
D
D
D
D
D
D
DR
D
D
D
D
D
D
D
D
D
D
D
D
FT
POPO
O
O
O
O
O
back coverback c
op of your phoneop of yo
e cover up and to the rig
e cover up and
one.one.
arningarnin
: Do not bend or twist t
not bend or twist
cover excessively. Doing so mcover excessivel
the cover.e cover.
Install the SIInstall the S
When you subWhen you su
you are proyou are pro
During a
loadel
as as
7
Getting Started Assemble Your Device
FPO
ŹCarefully slide the SIM card into the
SIM card slot.
Make sure that the card’s gold contacts
face into the device and that the angled
corner of the card is positioned as
shown.
Caution: If the card is not inserted correctly,
the device will not detect the SIM card.
Re-orient the card and place it back into the
slot if the SIM is notdetected.
Install a Memory Card
You can install an optional microSD or
microSDHC memory card (not included) to
expand available memory space.
Note: A memory card can be installed at
any time; it is not necessary to install it prior
to using the device.
For more information on installing a
memory card, see Install a Memory Card.
DRAFT
e
old contacts d contacts
that the angled that the an
ositioned as ositioned as
d is not inserted correctly, t inserted correctly,
ot detect the SIM card. ot detect the SIM
card and place it back into thecard and place it back i
SIM is notdetected.SIM is notdetected.
FT
FT
memormemo
ory card can beory ca
is not necessary to in
is not neces
the device. the de
more information on installing
more information on insta
emory card, see emory card, s
Install a Mem
a Me
8
Getting Started Assemble Your Device
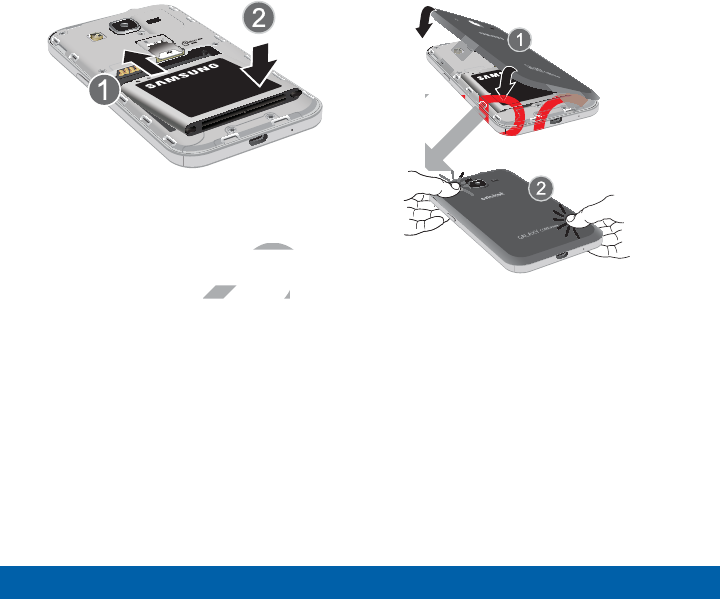
Install the Battery
FPO
1. Insert the battery into the opening on
the back of the phone, making sure the
connectors align.
2. Gently press down to secure the
battery.
Replace the Back Cover
FPO
1. Place the back cover onto the back of
the phone and press down.
2. Press along the edge of the back cover
until you have a secure seal.
DRAFT
ning on
king sure the king su
to secure the to secure the
AF
AF
AF
AF
AF
AF
AF
AF
AF
AF
A
A
A
A
A
AF
AF
AF
F
F
AF
AF
AF
AF
AF
AF
F
F
F
F
F
F
AF
AF
AF
AF
AF
AF
AF
AF
F
F
AF
AF
F
F
F
F
F
F
FT
FT
FT
FT
FT
FT
FT
FT
FT
FT
FT
T
T
T
T
T
FT
FT
F
FT
FT
FT
F
F
F
FT
FT
FT
FT
FT
FT
FT
FT
FT
FT
FT
FT
FT
FT
FT
FT
T
FT
T
T
T
T
T
T
T
T
T
FT
FT
T
T
T
T
T
T
FT
FT
FT
T
FT
FT
T
T
T
T
T
T
T
T
FPOFP
F
P
P
O
O
O
O
O
O
O
O
O
O
O

9
Getting Started Assemble Your Device
Charge the Battery
Your device is powered by a rechargeable,
standard Li-Ion battery. A Wall/USB
Charger (charging head and USB cable) is
included with the device for charging the
battery from any standard outlet.
The battery comes partially charged. A
fully discharged battery requires up to
four hours of charge time. You can use the
device while charging.
Caution: Use only Samsung-approved
charging devices and batteries. Samsung
accessories are designed to maximize
battery life. Using other accessories may
invalidate your warranty and may cause
damage.
FPO
1. Insert the USB cable into the port.
2. Connect the USB cable to the charging
head, and then plug the charging head
into a standard outlet.
3. When charging is complete, unplug
the charging head from the outlet and
remove the USB cable from the device.
Caution: Failure to unplug the wall charger
before you remove the battery, can cause
damage to the device.
may
ause
FT
FT
FT
FT
FT
FT
FT
T
T
T
T
T
T
T
T
T
T
F
FP
1.1
Insert the USB t the U
2.2.
Connect theConnect the
head, anhead, an
into a
3.3
W

10
Getting Started Set Up Your Device
Set Up Your Device
Turn Your Device On or Off
Turn the Device On
ŹPress and hold the Power/Lock key
until the device vibrates and starts up.
Turn the Device Off
1. Press and hold the Power/Lock key
until the Device options menu displays.
2. Tap Power off.
Welcome Screen
The first time you turn your device on, the
Welcome Screen displays. It will guide
you through the basics of setting up your
device.
Follow the prompts to choose a default
language, connect to a Wi-Fi network, set
up accounts, choose location services,
learn about your device’s features, and
more.
DRAFT
lays.ys.
ScreenScre
e you turn your dev
e you turn
Screen displays. It will g
Screen display
rough the basics of setting u
rough the basics of s
ce.ce.
Follow the prompts to choosFollow the prom
language, connect to a Wnguage, con
up accounts, choose loccoun
learn about your devbout y
more.mor

11
Getting Started Set Up Your Device
Secure Your Device
Use your device’s screen lock features to
secure your device.
Lock the Device
By default, the device locks automatically
when the screen times out.
ŹTo lock the device, press the Power/
Lock key.
Unlock the Device
The default Screen lock on your device is
Swipe.
ŹTo unlock your device, press the
Power/Lock key or Home key, and
then touch and drag your finger across
the screen.
Set Up a Secure Screen Lock
The default Screen lock is Swipe,
which offers no security. To choose
a more secure screen lock, see
Set a Screen Lock.
D
e is is
the
ee
key, and key, an
our finger across our finger acr
ure Screen Lockre Screen Lo
Screen lock is Swipe, Screen lock is Swipe,
rs no security. To choose rs no security. To choose
ecure screen lock, see ecure screen lock, se
en Locken Loc
.

12
Getting Started Set Up Accounts on Your Device
Set Up Accounts on Your Device
Google Account
Your new device uses your Google
Account to fully utilize its Android features,
including Gmail, GoogleHangouts, and the
Google Play Store.
When you turn on your device for the first
time, set up your existing Google Account,
or create a new GoogleAccount.
– or –
To create a new Google Account or set up
your Google Account on your device at
any time, use Accounts settings. Formore
information,
see Accounts.
ŹFrom a Home screen, tap Apps
> Settings> Accounts > Add
account > Google.
Samsung Account
Create a Samsung account, for access
to Samsung content and apps on your
device.
When you turn on your device for the
first time, set up your existing Samsung
account, or create a new Samsung
account.
– or –
To create a new Samsung account or
set up your Samsung account on your
device at any time, use Accounts settings.
Formore information,
see Accounts.
ŹFrom a Home screen, tap Apps
> Settings> Accounts > Add
account > Samsungaccount.
DRAFT
or set up p
evice at
ngs. Formore ngs. Form
creen, tap , tap
DR
DR
DR
DR
R
R
R
R
DR
DR
DR
DR
R
R
R
R
Apps Apps
s
>
AccountsAccounts
> >
Add A
GoogleGoogle
..
FT
AccountAcco
msung account, fo
msung ac
ung content and apps on
ung content and
. .
hen you turn on your device f
hen you turn on your device
first time, set up your existingfirst time, set up
account, or create a new ccount, or c
account.ount.
– or –
To create a newTo create a new
set up your set up your
device at d
Formo
seese

Know Your Device
Learn some of the key
features of your mobile
device, including the screens
and icons, as well as how to
navigate the device and enter
text using the keyboard.
Warning: Please note that a touch screen
responds best to a light touch from the pad
of your finger or a non-metallic stylus. Using
excessive force or a metallic object when
pressing on the touch screen may damage
the tempered glass surface and void the
warranty.
DRAFT
nter er
d.
FT
T
T
ngng
: Please note that a touch sc
: Please note that a
onds best to a light touch from
onds best to a light touch fro
f your finger or a non-metallic f your finger or a non-metallic
excessive force or a metallic xcessive force
pressing on the touch scrsing on t
the tempered glass surmpered
warranty.wa

14
Know Your Device Home Screen
Home Screen
FPO
Home screen indicator
Primary app shortcuts Apps screen
Status Bar
Notification icons
Widget
Status icons
DRAFT
DRAFT
FT
FT
T
T
D
D
DR
T
shortcuts short
Status Bar
Sta
Status

15
Know Your Device Home Screen
Home Screen Features
• App folder: For your convenience,
there are several applications that are
grouped into folders on the main Home
screen.
• Apps screen: Allows quick access to all
of your applications.
• Home screen indicator: Indicates
which Homescreen is presently
displayed.
• Notification icons: Display new
messages and emails, notifications,
available software updates, and so on.
• Primary app shortcuts: Shortcuts to
your favorite applications.
• Status Bar: Displays device status
icons (right) and notification icons (left).
• Status icons: Display information about
the device, such as the network signal
strength, battery level, the time, and so
on.
• Widget: Self-contained application
that runs on the Home screen (not
shortcuts).
DRAFT
on.n.
isplays display
) and notificat) and
iconsicons
: Display informa
Displa
device, such as the network
device, such as the
rength, battery level, the time
rength, battery level, the
on.on.
••
WidgetWidget
: Self-contained a: Self
that runs on the Homethat runs
shortcuts). ortcut

16
Know Your Device Home Screen
The Home screen is the
starting point for using your
device.
Customize your Home
screen by adding application
shortcuts, widgets, folders,
andusing wallpapers.
Manage Home Screens
Your device comes with multiple Home
screens to hold apps and widgets. You
can rearrange the Home screens in a
different order.
1. From a Home screen, pinch the screen.
– or –
Touch and hold an empty space on the
screen.
2. Use these options to manage screens:
• Add a screen: Scroll to the end of
the screens, and then tap Add.
• Remove a screen: Touch and hold
on a screen, and then drag it to
Remove.
• Set a screen as the main Home
screen: Tap Main Home
screen at the top of a screen. This
screen displays when you press the
Home Key.
• Change the order of screens:
Touch and hold on a screen, and
then drag to a new position.
DRAFT
Home
gets. You gets. Y
reens in a reens in a
een, pinch the screen.en, pinch the screen.
nd hold an empty space on thnd hold an empty space o
n.n.
screenscree
:
een, and then een, a
oveove
. .
et a screen as the main H
et a screen as the
screenscre
: Tap
FT
Main Hom
Main
screen s
at the top of a sc
at the top of a sc
screen displays when en dis
Home Key.Home K
•
Change the orChang
Touch and huch an
then dragthen drag

17
Know Your Device Home Screen
App Shortcuts
You can use app shortcuts to launch an
app from any Home screen.
Add a Shortcut to a Home Screen
1. From a Home screen, tap Apps.
2. Touch and hold an app shortcut, drag it
to a Home screen, and then release it.
Remove a Shortcut
1. Touch and hold an app shortcut.
2. Drag the app shortcut to Remove
and
release it.
Note: Removing a shortcut does not delete
the app, it just removes the shortcut from
the Home screen.
Widgets
Widgets are self-contained apps that run
on a Homescreen. There are all kinds
of widgets, including links to a specific
contact, Internet bookmarks, Gmail and
email accounts, and manyothers.
Add a Widget to a Home Screen
1. Touch and hold an empty space on the
screen, and then tap Widgets.
2. Touch and hold a widget, drag it to a
Homescreen, and then release it.
Remove a Widget
1. From a Home screen, touch and hold
a widget.
2. Drag the widget to Remove and
releaseit.
Note: Removing a widget does not delete
the widget, it just removes the widget from
the Home screen.
DRAFT
ove
does not delete does not de
he shortcut from he shortcut from
ng linkng lin
et bookmarket boo
nts, and manyothnts, and
a Widget to a Home Sc
a Widget to a Hom
Touch and hold an empty sp
Touch and hold an empty s
screen, and then tap screen, and
Wid
2.
Touch and hold a widTouch an
Homescreen, andmesc
Remove a WRemove a W
1.1.
From a a
a wid
2.2
D

18
Know Your Device Home Screen
Folders
Place folders on a Home screen to
organize items.
Add a Folder to a Home Screen
1. From a Home screen, touch and hold
an app shortcut.
2. Drag the shortcut onto Create
folder and release.
3. Enter a folder name.
4. Tap Add to place additional apps in
the folder.
5. Tap Done. A folder is created with the
shortcut(s) inside.
Using Folders
1. Tap a folder to open it and access the
shortcuts inside.
2. To add shortcuts to an existing folder,
touch and hold the shortcut, and then
drag it onto the folder and release.
3. To delete a folder, touch and hold the
folder until it detaches, and then drag it
to Remove and release.
Change the Wallpaper
Change the look of the Home and Lock
screens with wallpaper. You can display a
favorite picture or choose from preloaded
wallpapers.
1. From a Home screen, pinch the screen.
– or –
Touch and hold an empty space on the
screen.
2. Tap Wallpapers to customize your
screen.
For more details, see Wallpaper
DRAFT
in in
with the
pen it and access the it and access the
de.
hortcuts to an existing folder, hortcuts to an existing fo
and hold the shortcut, and theand hold the shortcut, and th
t onto the folder and releast onto the folder and releas
a folder, touch and a folder, touch an
detaches, andetaches, an
and releaand rele
chooschoo
Home screen, pinch
Home scree
––
Touch and hold an empty sp
Touch and hold an empty s
screen.sc
2.
Tap Tap
WallpapersWallp
to cu
screen. reen.
For more detaFor more det
19
Know Your Device Status Bar
Status Bar
The Status Bar at the top of
the Home screen provides
device information (such
as network status, battery
charge, and time) on the
right side and notification
alerts on the left.
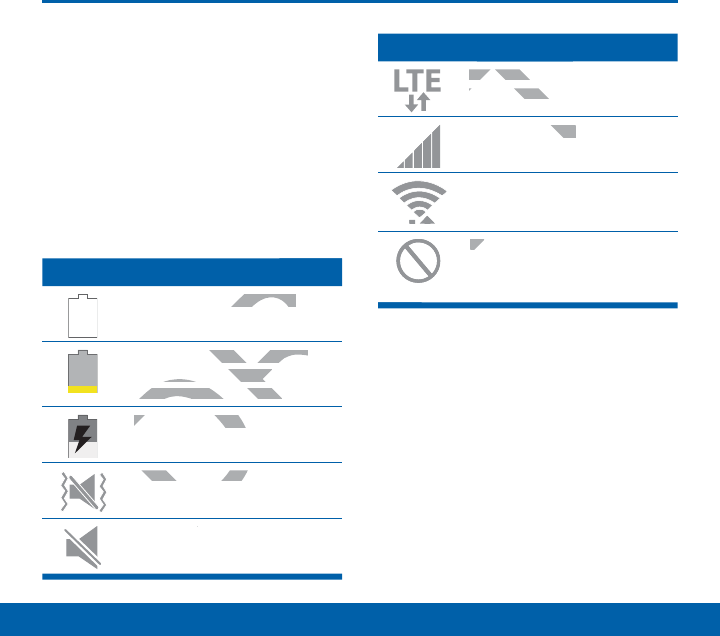
Status Icons
Battery is fully charged.
Battery is low. The yellow
area turns red as the charge
level becomes critical.
Battery is charging.
Vibrate mode is enabled.
Mute mode is enabled.
Status Icons
The device is connected to a
4G LTE wireless network.
Signal strength.
Wi-Fi is active.
No wireless network is
available.
DRAFT
RA
RA
DR
D
D
y charged.y charged.
y is low. The yellow ow. The yellow
a turns red as the charge a turns red as the
evel becomes critical.evel becomes critical
Battery is charging.Battery is chargi
Vibrate mode is eVibrate mode is e
d
d
AFT
FT
FT
AFT
AFT
AF
AF
The device is con
The devic
4G LTE wireless netw
4G LTE wire
F
F
F
F
F
Signal strength.ngth.
AF
AF
AF
AF
AF
AF
AF
AF
AF
AF
AF
Wi
-
Fi is act
AF
NoNo
20
Know Your Device Status Bar
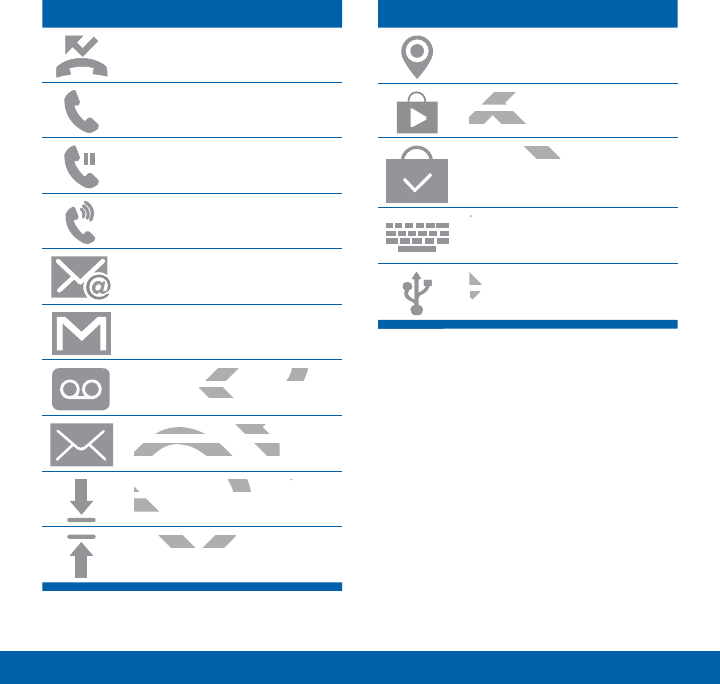
1RWL¿FDWLRQ,FRQV
Missed call.
Call in progress.
Call is on hold.
Call is using speakerphone.
New email has arrived.
New Gmail has arrived.
New voicemail message has
been received.
New text or multimedia
message has arrived.
Download of a file or app is
in progress.
File is being uploaded or
sent.
1RWL¿FDWLRQ,FRQV
Location service (GPS) is
active.
App updates are available
from the Google Play Store.
App updates are complete.
Keyboard is in use.
Connected to a computer
using a USBcable.
DRAFT
A
A
RA
DR
D
DR
D
ived.
mail message has mail message h
ceived.eived.
w text or multimedia w text or multime
message has arrived.message has arrived.
Download of a file or apDownload of a file or ap
in progress.in p
is being upis being up
A
T
T
T
FT
FT
AF
AF
pp updates app up
from the Google P
from the
F
F
F
F
App updates are com
dates
AF
AF
AF
AF
AF
AF
AF
AF
AF
AF
AF
AF
AF
AF
AF
AF
AF
AF
Keyboard is iK
AF
ConnCo
usus

21
Know Your Device Navigation, Motions, and Gestures
Navigation, Motions, and Gestures
Touchscreen Navigation
Tap
Lightly tap items to select or launch them.
• Tap the onscreen keyboard to enter
characters ortext.
• Tap an item to select it.
• Tap an app icon to launch the
application.
Touch and Hold
Activate onscreen items by a touch and
hold gesture. For example:
• Touch and hold a widget on the Home
screen to move it.
• Touch and hold a field to display a
pop-up menu of options.
Swipe or Slide
To swipe, lightly drag your finger vertically
or horizontally across the screen.
• Swipe the screen to unlock the device.
• Swipe the screen to scroll through the
Homescreens or menu options.
Drag
To drag, touch and hold on an item, and
then move it to a new location.
• Drag an app shortcut to add it to a
Home screen.
• Drag a widget to place it in a new
location on a Homescreen.
DRAFT
y a touch and y a touch and
ple: ple:
a widget on the Home dget on the Home
e it.
d hold a field to display a d hold a field to display
menu of options.menu of options.
dede
ghtly drag your fing
ghtly drag
ntally across the screen
tally across th
wipe the screen to unlock the
wipe the screen to unloc
Swipe the screen to scroll tSwipe the screen to scroll t
Homescreens or menu oHomescree
Drag
To drag, touch anTo drag, touch a
then move it tothen move it to
••
Drag an
Hom
••
D

22
Know Your Device Navigation, Motions, and Gestures
Pinch and Spread
Pinch the screen using your thumb and
forefinger or spread by moving your
fingers apart.
• Pinch or spread the screen to zoom
in or out while viewing a picture or a
webpage.
• Pinch or spread the screen to zoom in
or out while taking a picture.
DRAFT
23
Know Your Device Notification Panel
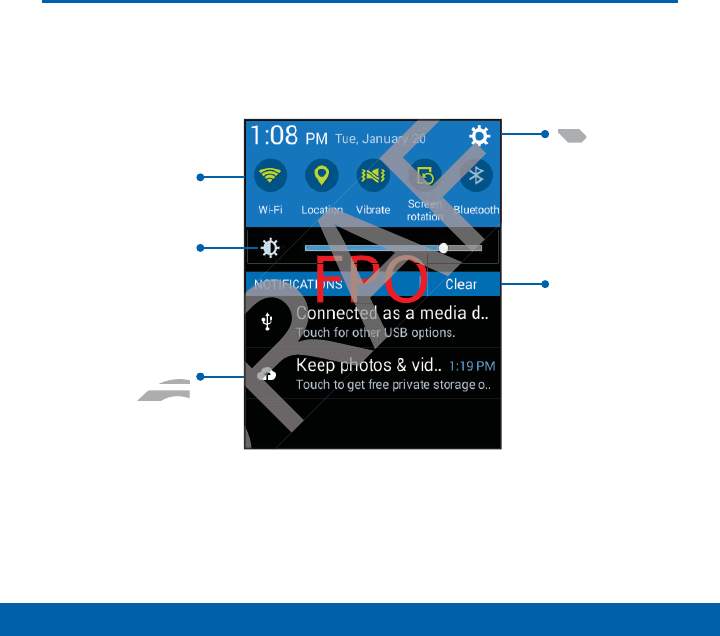
Notification Panel
FPO
Quick settings
Adjust screen
brightness
Settings
Clear all
notifications
Tap notification
to launch app or
view detail
DRAFT
DRAFT
DR
DR
FT
T
Settin
Setti
on
pp or pp or
w detailw detail

24
Know Your Device Notification Panel
Notification icons on the
Status Bar display calendar
events, device status, and
more. For details, open the
Notification Panel.
View the Notification Panel
1. Swipe down on the Status Bar to
display the Notification Panel.
2. Scroll down the list to see notification
details.
• Tap an item to open it.
• To clear a single notification, drag
the notification left or right. Tap
Clear to clear all notifications.
3. To close the Notification Panel, swipe
upward from the bottom of the screen
or tap Back.
Quick Settings
In addition to notifications, the Notification
Panel also provides quick access to
device functions such as Wi-Fi, allowing
you to quickly turn them on or off.
To view additional Quick settings:
ŹSwipe left or right across the visible
icons.
Notification Panel Settings
To customize the Notification Panel:
ŹFrom a Home screen, tap Apps >
Settings>Display > Notification
panel.
For more information, see
Notification Panel.
DRAFT
on n
fication, drag fication, dra
or right. Tap or right. Tap
ll notifications. notifications.
otification Panel, swipe on Panel,
m the bottom of the screen m the bottom of the
D
BackBac
.
A
qq
uch asuch a
urn them onurn th
additional Quick settin
dditional Quic
wipe left or right across the vis
wipe left or right across
cons.cons
Notification Paneotificat
To customize the To customize
ŹŹ
From a HomFrom a Hom
A
A
A
A
A
A
A
A
A
SettinSettin
panel
For mF
NoN
25
Know Your Device Enter Text
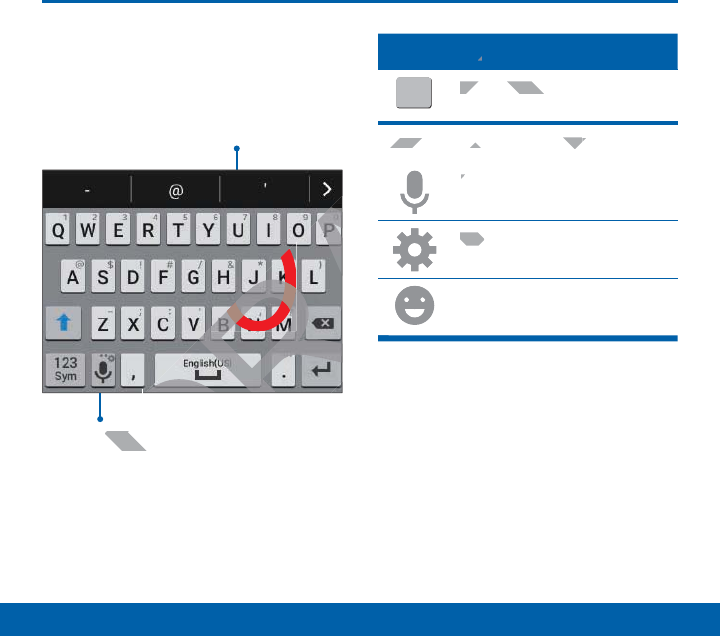
Enter Text
Use the SamsungKeyboard
Type your text input using a QWERTY
keyboard.
Predictive Text
FPO
Special Keys
123
Sym
Tap to insert numbers and
symbols.
Touch and hold the Options key to:
Use Google Voice Typing.
Access keyboard settings.
Insert emoticons.
Predictive Text
Predictive text suggest words matching
your text entries, and, optionally,
completes common words automatically.
Predictive text can learn your personal
writing style from your contacts,
messages, email, and social networking
sites — improving its accuracy of predicting
your text entries.
Options key
DRAFT
DRA
D
AFT
T
AF
AF
A
F
FT
s
F
Tap to insert numbers
Tap to insert
symbols.
Touch and hold the Touch and ho
Optionsons
AF
AF
Use Google VU
AF
AcceAcc
A
A
A
A
ns keyns ke
26
Know Your Device Enter Text
Configure the Samsung Keyboard
To customize the Samsung Keyboard:
1. From a Home screen, tap Apps >
Settings> Language and input.
2. Tap Settings next to Samsung
keyboard for options.
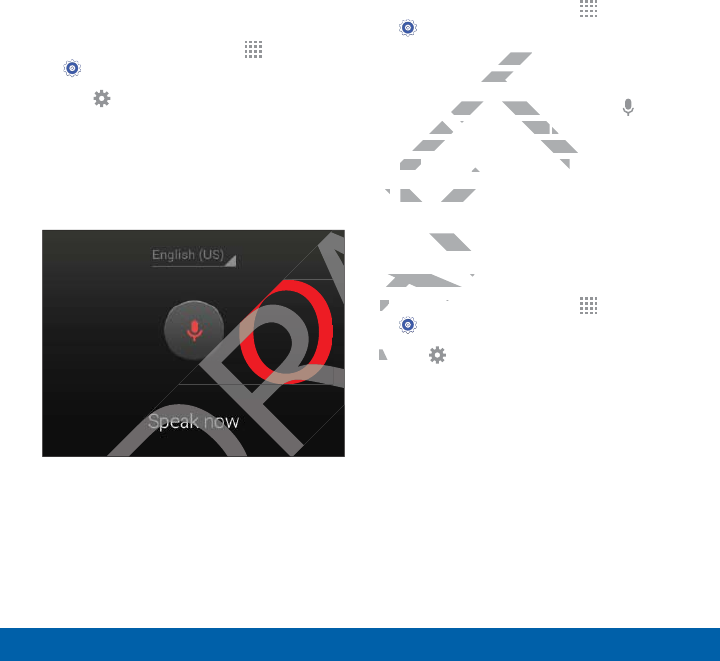
Use Google Voice Typing
Instead of typing, speak your text input.
FPO
To enable Google Voice Typing:
1. From a Home screen, tap Apps >
Settings > Language and input.
2. Tap the checkbox next to Google voice
typing to enable this feature.
3. On the Samsung Keyboard, tap
Google Voice Typing. You may need to
touch and hold the Options key (left of
the Space key) to find it.
4. Speak your text.
Configure Google Voice Typing
To customize Google Voice Typing:
1. From a Home screen, tap Apps >
Settings> Language and input.
2. Tap Settings next to Google voice
typing for options.
DRAFT
DRA
kbox nexkbox n
nable this feanable
Samsung Keyboard, ta
Samsung Key
ogle Voice Typingogle Voice Typing
. You may
. Y
uch and hold the uch a
Options
Option
ke
the the
Space
key) to find it. key) to find it.
4.4
Speak your text.Speak your
Configure Googgure G
To customize To customize
1.1.
From a
A
A
A
A
A
A
A
A
A
S
2.2

Make telephone calls using a
variety of calling features and
services.
Calling
DRAFT
T
T
28
Calling Make and Answer Calls
Make and Answer Calls
Learn how to make or
answer a call. Explore
features and functionality
associated with making or
answering a call.
Make a Call
1. From a Home screen, tap Phone.
2. Enter a number and tap Dial.
Quickly Dial a Number from
YourContactList
1. From a Home screen, tap Apps >
Contacts.
2. While viewing your contact list, swipe
your finger across a contact to the right
call the contact.
Dial a Recent Number
All incoming, outgoing, and missed calls
are recorded in the Call log. If the number
or caller is listed in your contacts list, the
associated name is also displayed.
1. From a Home screen, tap Phone.
2. Tap the Logs tab. A list of recent calls
is displayed.
3. Tap a contact, and then tap Call.
End a Call
ŹWhen you are ready to end your call,
tap End.
hone
.
R
R
R
DialDial
..
mber from mber from
st
me screen, tap me screen, tap
DR
DR
DR
DR
DR
DR
DR
DR
DR
DR
DR
DR
DR
DR
DR
DR
Apps A
>
ctscts
..
viewing your contact list, swviewing your contact list, sw
ger across a contact to ger across a contac
ntact.ntact.
t Numbet Nu
, outgoing, and mis
, outgoing
ded in the Call log. If the
ed in the Call
er is listed in your contacts l
er is listed in your co
ociated name is also displaye
ociated name is also displa
1.1.
From a Home screen, tapFrom a Home screen, tap
2.
Tap the Tap the
Logs L
tab. A l
is displayed.displa
3.3.
Tap a contact,Tap a contac
End a E
ŹŹ
W

29
Calling Make and Answer Calls
Answer a Call
When a call is received the phone rings
and displays the caller’s phone number, or
name if stored in the contacts list.
• Touch and drag Answer in any
direction to answer the call.
• Touch and drag Reject in any
direction to reject the call and send
it to your voicemail.
Multitask While on a Call
If you exit the call screen and return to a
Home screen, your active call is indicated
by an icon on the Status bar, and a
thumbnail on the screen.
This lets you continue with your current
call and do something else, such as
access the contacts list, view a recent
email, locate a picture, and so on.
To end a call from any application:
ŹSwipe the Status bar downward to
reveal the Notification panel, and then
tap End.
Options During a Call
Your phone provides a number of functions
that you can use during a call.
Adjust the Call Volume
ŹPress the Volume Key to increase or
decrease the volume.
– or –
Quickly add more volume to the
incoming audio by tapping
Moreoptions > Extra volume.
Listen with the Speaker or
BluetoothHeadset
Listen to the call using the speaker
or through a Bluetoothheadset (not
included).
ŹTap Speaker to hear the caller using
the speaker.
– or –
Tap Bluetooth to use a Bluetooth
headset (notincluded).
DRAFT
o a a
dicated d
d a
h your current h your curren
else, such as else, such as
list, view a recent st, view a recent
cture, and so on.d so on.
all from any application:all from any application:
e the Status bar downward toe the Status bar downward to
he Notification panel, anhe Notification pane
Call VolumeCall V
he he
Volume KeyVolume K
to inc
ease the volume.ease the volume.
– or –– or –
Quickly add more volumeQuickly add
incoming audio by tapincoming a
Moreoptionsoreo
>
Ext
Listen with thListen with th
BluetoothBluetooth
Listen to
or thro
incin
30
Calling Make and Answer Calls
Place a New Call While on a Call
If your service plan supports this feature,
you can make another call while a call is
in progress.
1. From the active call, tap Add call to
dial the second call. The first call is
displayed as a thumbnail.
2. Dial the new number and tap Dial.
• Tap Swap to switch between the two
calls.
• Tap Merge to hear both callers at
once (multiconferencing).
Call Waiting
If your service plan supports this feature,
you can answer an incoming call while you
have a call in progress. You are notified of
an incoming call by a call waiting tone.
To answer a new call while you have a
call in progress:
1. Slide Answer in any direction to
answer the new call.
2. Tap an option:
• Putting [caller] on hold to place
the previous caller on hold while you
answer the new incoming call.
• Ending call with [caller] to end the
previous call and answer the new
call.
3. Tap the previous On hold number
entry and select Swap to switch
between the two calls. This places the
new caller on hold and activates the
previous call.
DRAFT
gress. Ygress
ll by a call wll by a
r a new call while you
r a new call w
progress:progr
Slide Slide
FT
FT
FT
Answer
in any direc
ny dire
answer the new call. answer the n
2.
Tap an option:Tap an op
•
Putting [callerPuttin
the previousprevio
answer thanswer th
•
Endinndin
pre
33

31
Calling Make and Answer Calls
Call Log
The numbers of the calls you have dialed,
received, or missed are stored in the Call
log.
1. From a Home screen, tap Phone.
2. Tap the Logs tab. A list of recent
calls is displayed. If the caller is in
your contacts list, the caller’s name is
displayed.
Save a Recent Call to Your
Contacts List
1. From a Home screen, tap Phone >
Logs tab.
2. Tap the call that contains the
information that you want to save to
your contacts list.
3. Tap Create contact.
– or –
If you want to replace the number for an
existing contact, tap Update existing.
Delete a Call from the Call Log
1. From a Home screen, tap Phone >
Logs tab.
2. Touch and hold the call you want to
delete from the Call log.
3. Tap Delete.
Make a Call Using
SpeedDial
You can assign a shortcut number to a
contact for speed dialing their default
number.
To make a call using Speed Dial:
1. From a Home screen, tap Phone >
Keypad.
2. Touch and hold the speed dial number.
If the speed dial number is more than
1 digit long, enter the first digits, then
hold the last digit.
one
> >
the the
ant to save to ant to save to
tact
.
want to replace the number fowant to replace the number f
ng contact, tap ng con
Update exisdat
ld the cald the
m the Call log.m the C
DeleteDele
.
Make a Call Using Make a Call Using
SpeedDialSpeedDia
You can assign a shorcan as
contact for speed dfor sp
number.numb
To make a To make a
1.
From
K
22
32
Calling Make and Answer Calls
Create a Speed Dial
1. From a Home screen, tap Apps >
Contacts.
2. Tap Moreoptions > Speed dial. The
Speed dial screen displays showing the
numbers 1 through 100. Number 1 is
reserved for voicemail.
3. Tap an unused number. A list of
contacts displays.
4. Tap a contact to assign to the number.
Theselected contact displays in the
speed dial number box.
• To remove a Speed Dial number
assignment Tap Remove.
Make an Emergency Call
The Emergency calling mode makes
redialing an emergency number a one-tap
process.
Note: This mode can drain your battery
power more rapidly than normal calling
mode.
Make an Emergency Call without
a SIMCard
Without a SIM card, you can only make an
emergency call with the phone; normal cell
phone service is not available.
1. From the Lock screen, tap Emergency
call.
2. Enter 911 and tap Dial.
3. Complete your call. During this type
of call, you will have access to the
Speaker mode, Keypad, and End Call
features.
4. Tap Endcall.
Make an Emergency Call with a
SIM Card
1. From a Home screen, tap Phone.
2. Enter the emergency number (example:
911), then tap Dial.
DRAFT
ber
e
.
ency Callency Call
ng mode makes g mode makes
gency number a one-tap number a one-tap
mode can drain your battery mode can drain your battery
ore rapidly than normal callingore rapidly than normal calling
ergency Cergency C
pp
ur call. Duur call
will have acce will h
r mode, Keypad, and
r mode, Key
res.res.
Tap Tap
F
F
F
F
F
F
F
F
F
F
Endcall
.
Make an Emergency Make an Em
SIM CardM Card
1.1
From a Home sa Hom
2.2.
Enter the eEnter the e
911), the911) the
33
Calling Make and Answer Calls
Call Settings
To access the Call settings menu:
ŹFrom a Home screen, tap Phone >
Moreoptions > Settings > Call.
– or –
From a Home screen, tap Apps >
Settings> Call.
DRAFT

Applications
The Apps screen displays all
applications installed on your
device, both preloaded apps
and apps you download and
install yourself.
Learn how to change the way
apps appear, organize apps
into folders, and uninstall or
disable apps.
DRAFT
T
T
e the way e the w
anize apps anize apps
d uninstall or uninstall or
s.

35
Applications Apps Screen
Apps Screen
The Apps screen shows all
preloaded apps and apps
that you downloaded. You
can uninstall, disable, or hide
apps from view.
Shortcuts to apps can be placed on any of
the Home screens. For more information,
see Add a Shortcut to a Home Screen.
Access Applications
1. From a Home screen, tap Apps.
2. Tap an application’s icon to launch it.
3. To return to the main Home screen,
press the Home key.
Download and Install
NewApps
Find new apps to download and install on
your device:
• Google Play Store: Download new
apps from the Google Play Store. Visit
play.google.com/store/apps to learn
more.
• GALAXY Apps: View and download
Samsung apps that are optimized for
use with GALAXY devices. Visit apps.
samsung.com to learn more.
DRAFT
A
of of
on, n,
en
.
nsns
, tap , tap
R
R
R
R
R
R
R
R
R
R
R
R
R
R
R
R
Appsps
..
on’s icon to launch it.icon to launch it.
the main Home screen, the main Home sc
HomeHome
key. key.
AF
A
and Insand
ppspps
w apps to download and in
w apps to downloa
device:devic
F
F
F
F
Google Play Storele P
: DowDow
apps from the Google Papps from th
play.google.com/storeplay.goog
yg
more.re.
••
AF
AF
AF
AF
AF
AF
AF
AF
AF
AF
AF
AF
GALAXY ApLAXY
Samsung apSamsung ap
use with Guse with G
samsu
36
Applications Apps Screen
Uninstall or Disable Apps
You can uninstall or disable apps you
download and install.
• Preloaded apps cannot be uninstalled.
• Apps that are disabled are turned off
and hidden from view.
1. From a Home screen, tap Apps.
2. Tap More options > Uninstall/
disable apps. Apps that can be
uninstalled show Delete on their
icon.
3. Tap Delete and follow the prompts
to either uninstall or disable the app.
Organize Your Apps
The Apps icons can be organized in
folders and listed alphabetically or in your
own custom order.
Change the Order Apps Are
Listed
1. From a Home screen, tap Apps.
2. Tap More options > View as.
3. Tap an option:
• Custom: Allows you to touch and
hold apps to rearrange them.
• Alphabetical order: Application
icons are arranged in alphabetical
order.
DRAFT
pts ts
app.
he Order Apps A
he Order
From a Home screen, tap From a Home screen, tap
T
T
T
T
T
T
T
T
T
T
T
T
T
T
T
A
2.2.
Tap Ta
F
F
F
F
More optionsore o
>
Vie
3.
Tap an option:Tap an op
•
CustomCustom
: Allow
hold apps t apps
••
AlphabAlphab
icons
or

37
Applications Apps Screen
Hide and Show Apps
Hide Apps from View
You can hide (rather than uninstall or
disable) any apps you do not want to see
on the Apps screen.
1. From a Home screen, tap Apps.
2. Tap More options > Hide apps.
3. Tap apps to hide, and then tap Done.
Show Hidden Apps
You can unhide apps you have hidden and
put them back on the Apps screen.
1. From a Home screen, tap Apps.
2. Tap More options > Show hidden
apps.
3. Tap apps to unhide, and then tap Done.
Apps Screen Options
1. From a Home screen, tap Apps.
2. Tap More options for these options:
• Edit: Touch and hold an app icon
then drag it to:
-App info to view information about
this app.
-Turn off/Uninstall to remove the
app. (Preloaded apps cannot be
uninstalled.)
• View as: Choose how apps are
listed.
• Downloaded applications: View
only the apps that you downloaded.
• Uninstall/disable apps: Uninstall
an app that you downloaded to
your device, or disable a preloaded
app (preloaded apps cannot be
uninstalled). Touch Delete to
remove or disable the selected app.
• Hide apps: Hide apps from the Apps
screen.
DRAFT
en and and
n.
R
R
R
R
R
R
AppsApp
.
Show hidden Show hidden
hide, and then tap and then tap
DoneDone
.
tionstions
ouch and hold anouch an
drag it to:drag it to:
--
App info Ap
to view informatio
ew inf
this app.
-
Turn off/UninstallTurn o
app. (Preloadedapp
uninstalled.)unin
••
View asView as
: C: C
listed.listed.
•
Do

38
Applications Apps Screen
• Show disabled apps: Display
disabled apps.
• Show hidden apps: Display hidden
apps.
Note: Options vary depending on the type
of app being edited.
DRAFT
39
Applications Google Applications
Google Applications
Enjoy these applications from
Google.
Note: Certain applications require a Google
account. Visit google.com to learn more.
Chrome
Use Google Chrome to browse
the Internet and bring your
open tabs, bookmarks and
address bar data from your
computer to your mobile
device.
Visit
google.com/chrome/browser to
learn more.
Drive
Open, view, rename, and share
your Google Docs and files.
Visit drive.google.com to learn
more.
Gmail
Send and receive email with
Gmail, Google’s web-based
email service.
Visit gmail.com to learn more.
DRAFT
R
wse se
ur
and
om your om you
r mobile r mobile
com/chrome/browserrome/brow
to
more.more.
FT
veve
Open, view, rename,
Open, view
your Google Docs and
your Google D
Visit
drive.google.com
oogle.c
g
to
more.
AF
AF
AF
AF
AF
AF
AF
AF
AF
AF
AF
AF
AF
AF
AF
AF
AF
AF
AF
AF
AF
AF
AF
AF
AF
AF
AF
AF
AF
AF
AF
AF
AF
AF
AF
AF
AF
AF
AF
AF
AF
AF
AF
AF
AF
AF
AF
AF
AF
AF
AF
AF
AF
AF
AF
AF
AF
AF
AF
AF
AF
AF
AF
AF
AF
AF
AF
AF
AF
AF
AF
AF
AF
AF
AF
AF
AF
AF
AF
AF
AF
AF
AF
AF
AF
AF
AF
AF
AF
AF
AF
AF
AF
AF
AF
AF
AF
AF
AF
AF
AF
AF
AF
AF
AF
AF
AF
AF
AF
AF
AF
AF
AF
AF
AF
AF
AF
AF
AF
AF
AF
AF
AF
AF
AF
AF
AF
AF
AF
AF
AF
AF
AF
AF
AF
AF
AF
AF
AF
AF
AF
AF
AF
AF
AF
AF
AF
AF
AF
AF
AF
AF
AF
AF
AF
AF
AF
AF
AF
AF
AF
AF
AF
AF
AF
AF
AF
AF
AF
AF
AF
AF
AF
AF
AF
AF
AF
AF
AF
AF
AF
AF
AF
AF
AF
AF
AF
AF
AF
AF
AF
AF
AF
AF
AF
AF
AF
AF
AF
AF
AF
AF
AF
AF
AF
AF
AF
AF
AF
AF
AF
AF
AF
AF
AF
AF
AF
AF
AF
AF
AF
AF
AF
AF
AF
AF
AF
AF
AF
AF
AF
AF
AF
AF
AF
AF
AF
AF
AF
AF
AF
AF
AF
AF
AF
AF
AF
AF
AF
AF
AF
AF
AF
AF
AF
AF
AF
AF
AF
AF
AF
AF
AF
AF
AF
AF
AF
AF
AF
AF
AF
AF
AF
AF
AF
AF
AF
AF
AF
AF
AF
AF
AF
AF
AF
AF
AF
AF
AF
AF
AF
AF
AF
AF
AF
AF
AF
AF
AF
AF
AF
AF
AF
AF
AF
AF
AF
AF
AF
AF
AF
AF
AF
AF
AF
AF
AF
AF
AF
AF
AF
AF
AF
AF
AF
AF
AF
AF
AF
AF
AF
AF
AF
AF
AF
AF
AF
AF
AF
AF
AF
AF
AF
AF
AF
AF
AF
AF
AF
AF
AF
AF
AF
AF
AF
AF
AF
AF
AF
AF
AF
AF
AF
AF
AF
AF
AF
AF
AF
AF
AF
AF
AF
AF
AF
AF
AF
AF
AF
AF
AF
AF
AF
AF
AF
AF
AF
AF
AF
AF
AF
AF
GmailG
Send anSen
GmailGmai
emem
40
Applications Google Applications
Google
Search not only the Internet,
but also the apps and contents
of your device.
Google Now
Google Now works in the
background to collect
information you regularly
look up and organize it into
convenient cards that appear
when you need them.
Visit google.com/landing/now
to learn more.
ŹPress and hold the Home
key.
Note: When Google Now is
enabled, you can also access it
by touching Google.
Google Settings
Quickly and easily change
Google app settings to suit
your preferences.
Note: You must be signed in
to the application you want to
configure. For example, sign
in to Google+ to configure
Google+ settings.
Google+
Stay connected and share with
Google+. Chat with friends and
family, post photos, and see
what others are sharing.
Visit google.com/mobile/+ to
learn more.
Hangouts
Hangouts is an online place
to meet friends and family,
share photos, and host video
calls. Conversation logs are
automatically saved to a Chats
area in your Gmail account.
DRAFT
A
oww
e
Home
oogle Now is oogle Now is
u can also access it u can also access it
hing
DR
DR
GoogleGoogle
.
pp
eferencefere
ee
: You must be: You
o the application you
o the applic
configure. For example,
configure. For e
in to Google+ to configure
in to Google+ to c
Google+ settings.gs.
AF
AF
AF
Google+G
Stay conSta
GoogleGoog
famfam
ww
41
Applications Google Applications
Maps
Use Google Maps to find your
current location, get directions,
and other location-based
information.
Note: You must enable location
services to use Maps. Please
see Location Services.
Photos
This application automatically
backs up your photos and
videos to your Google+
account.
Play Books
With Google Play Books,
you can find millions of free
e-books and hundreds of
thousands more to buy in the
eBookstore.
Visit
play.google.com/store/books to
learn more.
Play Games
Discover hundreds of games
for download and purchase
through the Google Play Store.
Play Movies & TV
Watch movies and TV shows
purchased from Google Play.
You can stream them instantly,
or download them for viewing
when you are not connected to
the Internet. You can also view
videos saved on your device.
Play Music
With Google Play Music, you
can play music and audio files
on your device.
Play Newsstand
Subscribe to your favorite
magazines to read on your
device at your leisure.
DRAFT
AFT
ksks
le Play Books, e Play Books,
n find millions of free illions of fr
oks and hundreds of oks and hundreds
ousands more to buy in the ousands more to buy in
eBookstore.eBoo
Visit Visit
ay.google.com/storeay.google.com/sto
gg
more.more
the Gthe G
F
F
F
F
F
F
F
F
F
F
F
F
F
F
F
F
F
F
F
F
F
F
F
F
Play Movies & T
Play Movi
Watch movies and TV sh
Watch movies and
purchased from Goog
m Goo
You can stream theYou can stream the
or download theor d
when you arew
the Interneth
videos svideo
A
A
A
A
A
A
A
A
A
A
A
A
A
A
A
A
A
A
A
A
A
A
A
A
A
A
A
A
A
A
A
A
A
A
A
A
A
A
A
A
A
A
A
A
A
A
A
A
A
A
A
A
A
A
A
A
A
A
A
A
A
A
A
A
A
A
A
A
A
A
A
A
A
A
A
A
A
A
A
A
A
A
A
A
A
A
A
A
A
A
A
A
A
A
A
A
A
A
A
A
A
A
A
A
A
A
A
A
A
A
A
A
A
A
A
A
A
A
A
A
A
A
A
A
A
A
A
A
A
A
A
A
A
A
A
A
A
A
A
A
A
A
A
A
A
A
A
A
A
A
A
A
A
A
A
A
A
A
A
A
A
A
A
A
A
A
A
A
A
A
A
A
A
A
A
A
A
A
A
A
A
A
A
A
A
A
A
A
A
A
A
A
A
A
A
A
A
A
A
A
A
A
A
A
A
A
A
A
A
A
A
A
A
A
A
A
A
A
A
A
A
A
A
A
A
A
A
A
A
A
A
A
A
A
A
A
A
A
A
A
A
A
A
A
A
A
A
A
A
A
A
A
A
A
A
A
A
A
A
A
A
A
A
A
A
A
A
A
A
A
A
A
A
A
A
A
A
A
A
A
A
A
A
A
A
A
A
A
A
A
A
A
A
A
A
A
A
A
A
A
A
A
A
A
A
A
A
A
A
A
A
A
A
A
A
A
A
A
A
A
A
A
A
A
A
A
A
A
A
A
A
A
A
A
A
A
A
A
A
A
A
A
A
A
A
A
A
A
A
A
A
A
A
A
A
A
A
A
A
A
A
A
A
A
A
A
A
A
A
A
A
A
A
A
A
A
A
A
A
A
A
A
A
A
A
A
A
A
A
A
A
A
A
A
A
A
A
A
A
A
A
A
A
A
A
A
A
A
A
A
A
A
A
A
A
A
A
A
A
A
A
A
A
A
A
A
A
A
A
A
A
A
A
A
A
A
A
A
A
A
A
A
A
A
A
A
A
A
A
A
A
A
A
A
A
A
A
A
A
A
A
A
A
A
A
A
A
A
A
A
A
A
A
A
A
A
A
A
A
A
A
A
A
A
A
A
A
A
A
A
A
A
A
A
A
A
A
A
A
A
A
A
A
A
A
A
A
A
A
A
A
A
A
A
A
A
A
A
A
A
A
A
A
A
A
A
A
A
A
A
A
A
A
A
A
A
A
A
A
A
A
A
A
A
A
A
A
A
A
A
A
A
A
A
A
A
A
A
A
A
A
A
A
A
A
A
A
A
A
A
A
A
A
A
A
A
A
A
A
A
A
A
A
A
A
A
A
A
A
A
A
A
A
A
A
A
A
A
A
A
A
A
A
A
A
A
A
A
A
A
A
A
A
A
A
A
A
A
A
A
A
A
A
A
A
A
A
A
A
A
A
A
A
A
A
A
A
A
A
A
A
A
A
A
A
A
A
A
A
A
A
A
A
A
A
A
A
A
A
A
A
A
A
A
A
A
A
A
A
A
A
A
A
A
A
A
A
A
A
A
A
A
A
A
A
A
A
A
A
A
A
A
A
A
A
A
A
A
A
A
A
A
A
A
A
A
A
A
A
A
A
A
A
A
A
A
A
A
A
A
A
A
A
A
A
A
A
A
A
A
A
A
A
A
A
A
A
A
A
A
A
A
A
A
A
A
A
A
A
A
A
A
A
A
A
A
A
A
A
A
A
A
A
A
A
A
A
A
A
A
A
A
A
A
A
A
A
A
A
A
A
A
A
A
A
A
A
A
A
A
A
A
A
A
A
A
A
A
A
A
A
A
A
A
A
A
A
A
A
A
A
A
A
A
A
A
A
A
A
A
A
A
A
A
A
A
A
A
A
A
A
A
A
A
A
A
A
A
A
A
A
A
A
A
A
A
A
A
A
A
A
A
A
A
A
A
A
A
A
A
A
A
A
A
A
A
A
A
A
A
A
A
A
A
A
A
A
A
A
A
A
A
A
A
A
A
A
A
A
A
A
A
A
A
A
A
A
A
A
A
A
A
A
A
A
A
A
A
A
A
A
A
A
A
A
A
A
A
A
A
A
A
A
A
A
A
A
A
A
A
A
A
A
A
A
A
A
A
A
A
A
A
A
A
A
A
A
A
A
A
A
A
A
A
A
A
A
A
A
A
A
A
A
A
A
A
A
A
A
A
A
A
A
A
A
A
A
A
A
A
A
A
A
A
A
A
A
A
A
A
A
A
A
A
A
A
A
A
A
A
A
A
A
A
A
A
A
A
A
A
A
A
A
A
A
A
A
A
A
A
A
A
A
A
A
A
A
A
A
A
A
A
A
A
A
A
A
A
A
A
A
A
A
A
A
A
A
A
A
A
A
A
A
A
A
A
A
A
A
A
A
A
A
A
A
A
A
A
A
A
A
A
A
A
A
A
A
A
A
A
A
A
A
A
A
A
A
A
A
A
A
A
A
A
A
A
A
A
A
A
A
A
A
A
A
A
A
A
A
A
A
A
A
A
A
A
A
A
A
A
A
A
A
A
A
A
A
A
A
A
A
A
A
A
A
A
A
A
A
A
A
A
A
A
A
A
A
A
A
A
A
A
A
A
A
A
A
A
A
A
A
A
A
A
A
A
A
A
A
A
A
A
A
A
A
A
A
A
A
A
A
A
A
A
A
A
A
A
A
A
A
A
A
A
A
A
A
A
A
A
A
A
A
A
A
A
A
A
A
A
A
A
A
A
A
A
A
A
A
A
A
A
A
A
A
A
A
A
A
A
A
A
A
A
A
A
A
A
A
A
A
A
A
A
A
A
A
A
A
A
A
A
A
A
A
A
A
A
A
A
A
A
A
A
A
A
A
A
A
A
A
A
A
A
A
A
A
A
A
A
A
A
A
A
A
A
A
A
A
A
A
A
A
A
A
A
A
A
A
A
A
A
A
A
A
A
A
A
A
A
A
A
A
A
A
A
A
A
A
A
A
A
A
A
A
A
A
A
A
A
A
A
A
A
A
A
A
A
A
A
A
A
A
A
A
A
A
A
A
A
A
A
A
A
A
A
A
A
A
A
A
A
A
A
A
A
A
A
A
A
A
A
A
A
A
A
A
A
A
A
A
A
A
A
A
A
A
A
A
A
A
A
A
A
A
A
A
A
A
A
A
A
A
A
A
A
A
A
A
A
A
A
A
A
A
A
A
A
A
A
A
A
A
A
A
A
A
A
A
A
A
A
A
A
A
A
A
A
A
A
A
A
A
A
A
A
A
A
A
A
A
A
A
A
A
A
A
A
A
A
A
A
A
A
A
A
A
A
A
A
A
A
A
A
A
A
A
A
A
A
A
A
A
A
A
A
A
A
A
A
A
A
A
A
A
A
A
A
A
A
A
A
A
A
A
A
A
A
A
A
A
A
A
A
A
A
A
A
A
A
A
A
A
A
A
A
A
A
A
A
A
A
A
A
A
A
A
A
A
A
A
A
A
A
A
A
A
A
A
A
A
A
A
A
A
A
A
A
A
A
A
A
A
A
A
A
A
A
A
A
A
A
A
A
A
A
A
A
A
A
A
A
A
A
A
A
A
A
A
A
A
A
A
A
A
A
A
A
A
A
A
A
A
A
A
A
A
A
A
A
A
A
A
A
A
A
A
A
A
A
A
A
A
A
A
A
A
A
A
A
A
A
A
A
A
A
A
A
A
A
A
A
A
A
A
A
A
A
A
A
A
A
A
A
A
A
A
A
A
A
A
A
A
A
A
A
A
A
A
A
A
A
A
A
A
A
A
A
A
A
A
A
A
A
A
A
A
A
A
A
A
A
A
A
A
A
A
A
A
A
A
A
A
A
A
A
A
A
A
A
A
A
A
A
A
A
A
A
A
A
A
A
A
A
A
A
A
A
A
A
A
A
A
A
A
A
A
A
A
A
A
A
A
A
A
A
A
A
A
A
A
A
A
A
A
A
A
A
A
A
A
A
A
A
A
A
A
A
A
A
A
A
A
A
A
A
42
Applications Google Applications
Play Store
Find new apps, movies and
TV shows, music, books,
magazines, and games in
Google Play Store.
Voice Search
Use voice commands to search
the web with Google.
YouTube
View and upload YouTube
videos right from your device.
DRAFT
device.
43
Applications T-Mobile Applications
T-Mobile Applications
Enjoy these applications from
T-Mobile.
Note: Certain applications require a data
plan or paid subscription. Visit t-mobile.com
to learn more, or contact your service
provider for additional information.
T-Mobile My Account
This application provides you
online access to account
information such as your
current activity, billing
information, service plans,
downloads, and more.
T-Mobile Name ID
This application lets you
modify onscreen Caller ID
information. Name ID identifies
unknown callers by Name, City,
and State.
T-Mobile TV
This application brings you live
TV and Video on Demand.
Note: A data plan is required
to use this feature. Charges
may apply. Please contact your
service provider for further
details.
Visual Voicemail
This application allows you
to easily manage your inbox
without ever dialing into your
voicemail.
Mobile HotSpot
This application allows you to
use your phone as a Mobile
HotSpot.
DRAFT
ountnt
des you
count count
as your as your
y, billing y, bill
, service plans, service plans,
ds, and more.nd more.
T-Mobile Name IDT-Mobile Name ID
This application lets youThis application lets
odify onscreen Calleodify onscreen Ca
mation. Name mation. Name
n callersn callers
obile TVobil
his application brin
his applic
TV and Video on Dema
TV and Video
Note
: A data plan is req
a plan
to use this feature. Ch
use this feature. C
may apply. Please may a
service providerser
details.
AF
AF
AF
A
A
A
A
A
A
A
A
VisVis
44
Applications Calculator
Calculator
The Calculator provides
basic and advanced
arithmetic functions.
Basic Operation
1. From a Home screen, tap Apps >
Calculator.
2. Enter the first number using the
numeric keys.
3. Tap the appropriate arithmetic function
key.
4. Enter the next number.
5. To view the result, tap the Equals
key.
Additional Functions
To clear the results:
ŹTap Clear.
To copy all or part of the calculation to
the clipboard:
ŹTouch and hold an entry in the
displayfield.
Scientific Calculator
A scientific calculator with advanced
arithmetic functions is also available in the
Calculator app.
If screen rotation is enabled:
Ź Turn the device landscape to use the
scientific calculator, and portrait to use
the simple calculator.
If screen rotation is not enabled:
ŹTap Moreoptions > Scientific
calculator.
• To return to the simple calculator
tap Moreoptions > Simple
calculator.
DRAFT
hmetic function hmetic func
mber.ber.
esult, tap the esult, tap the
DR
DR
DR
DR
Equals
nal Functionsnal Functions
ults:ults:
part of thepart o
d:d:
and hold an entry in th
and hold an e
playfield.play
Scientific CalculatoScientific C
A scientific calculator wcientific
arithmetic functions isetic fu
Calculator app. Calculator app
If screen rotIf screen ro
ŹŹ
Turn
sci
t

45
Applications Calendar
Calendar
Manage your events and
tasks.
Create an Event or Task
1. From a Home screen, tap Apps >
Calendar.
2. Tap Add and select one of the
following:
• Add event: Enter an event with an
optional repeat setting.
• Add task: Enter a task with an
optional priority setting.
3. Enter details for the event or task, and
then tapSave.
Delete an Event or Task
1. From a Home screen, tap Apps >
Calendar.
2. Tap to view an event or task, and tap
again to view the details.
3. Tap Delete.
– or –
To delete multiple events or tasks, tap
Moreoptions > Delete, select events
or tasks,and then tap Done.
DRAFT
with an
ask with an ask with an
setting.settin
r the event or task, and vent or task, and
vee
..
Event orEven
Home screen, tap Home scre
T
T
T
T
T
T
lendarenda
.
ap to view an event or task, an
ap to view an event or ta
again to view the details.again to view the details.
3.3.
Tap Ta
AF
DeleteDelet
.
– or –– or –
To delete multiplelete m
AF
AF
AF
AF
MoreoptioMoreoptio
or tasks,anor tasks,an

46
Applications Calendar
Share Events
1. From a Home screen, tap Apps >
Calendar.
2. Tap to view an event or task, and tap
again to view the details.
3. Tap Share via, select a sharing
method, and follow the prompts.
Calendar Settings
These settings allow you to modify settings
associated with using the Calendar.
1. From a Home screen, tap Apps >
Calendar.
2. Tap More options > Settings.
3. Tap an option and follow the prompts.
>
ingsings
..
ow the prompts.ow the promp
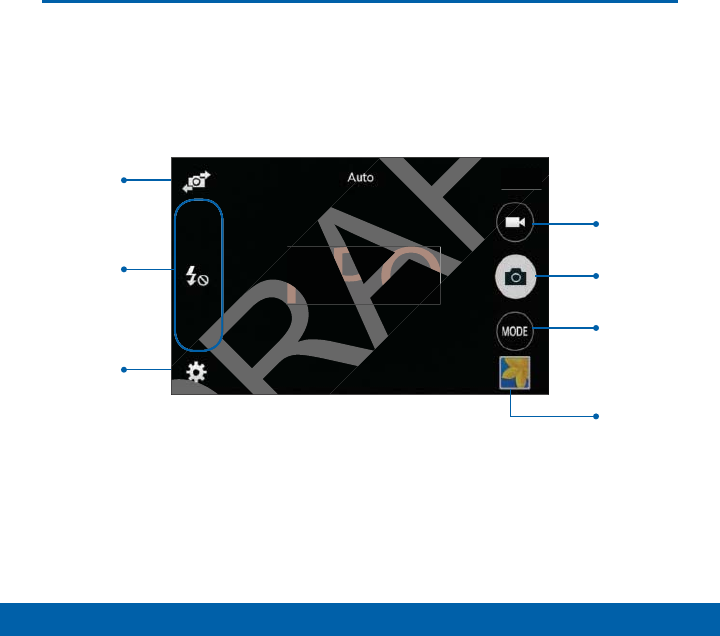
47
Applications Camera and Video
Camera and Video
FPO
Camera
settings
Selfie
Change
shooting
mode
Take a picture
Record video
View pictures
and videosin
theGallery
Shortcuts
menu
DRAFT
DRAFT
FT
FPO
D
R

48
Applications Camera and Video
Take Pictures
Take pictures with your device’s front or
back camera, or combine shots with Dual
mode.
1. From a Home screen, tap Apps >
Camera.
2. Using the display screen as a
viewfinder, compose your shot by
aiming the camera at the subject.
While composing your picture, use the
onscreen options or these gestures:
• Touch the screen with two fingers
and pinch or spread them on the
screen to zoom in and out.
• Tap the screen to focus on the area
you touched.
3. Tap to take the picture.
Note: You can also press the Volume key
up or down to take a photo. The Volume
key can be reassigned to act as the video
record key or as a zoom key.
Shooting Mode
Several photo effects are available. Some
modes are not available when taking self-
portraits.
1. From a Home screen, tap Apps >
Camera.
2. Tap MODE to display the following
options:
• Auto: Allow the camera to evaluate
the surroundings and determine the
ideal mode for the picture.
• Beauty face: Take a photo with
lightened faces for gentler images.
• Panorama: Take a photo composed
of many photos strung together.
• Best photo: Take a series of
pictures, and then select the best to
save.
• Continuous shot: Take pictures
continuously by pressing and
holding the Camera button.
• Sports: Take clearer pictures of fast
moving subjects.
DRAFT
he
on the area on the
cture. cture
press the s the
Volume Volume
key key
ke a photo. The Volume e a photo. The Vo
assigned to act as the video assigned to act as the
or as a zoom key.or as a zoom key.
me screen, tapme sc
eraera
.
MODEMO
to display the follow
play th
options:option
••
Auto
: Allow the cameraAllow the camera
the surroundings anthe surro
ideal mode for theideal
•
Beauty faceeauty
:
lightened flightened
••
PanoraPanora
of m
•

49
Applications Camera and Video
Camera Settings
1. From a Home screen, tap Apps >
Camera.
2. Tap Settings. Available options vary
depending on the camera/recording
mode used.
• Picture size: Select a resolution.
Use higher resolution for higher
quality. Higher resolution pictures
take up more memory.
• ISO: Select an ISO value. This
controls camera light sensitivity. It is
measured in film-camera equivalents.
Low values are for stationary or
brightly-lit objects. Higher values are
for fast-moving or poorly-lit objects.
• Metering modes: Select a metering
method. This determines how light
values are calculated. Center-
weighted measures background
light in the center of the scene. Spot
measures the light value at a specific
location. Matrix averages the entire
scene.
• Tap to take pics: Tap the image on
the preview screen to take photos.
• Video size: Select a resolution. Use
higher resolution for higher quality.
Higher resolution videos take up
more memory.
• Recording mode: Select Normal,
Limit for email, or Fast motion mode.
• Effects: Add special graphical
effects.
• Flash: Activate or deactivate the
flash.
• Timer: Take time-delayed pictures
or videos.
• Location tags: Attach a GPS
location tag to the photo.
• Saved as flipped: Automatically
save photos to your Gallery flipped.
(Available only on the Front camera.)
• Storage location: Select the
memory location for storage.
• White balance: Select an
appropriate white balance, so images
have a true-to-life color range. The
settings are designed for specific
lighting situations. These settings are
similar to the heat range for white-
balance exposure in professional
cameras.
DRAFT
is is
alents. nts.
y or
r values are
ly-lit objects.ly-lit obje
Select a metering Select a meter
etermines how light ermines how light
lculated. Center-ted. Center-
measures background measures backgro
the center of the scene. Spotthe center of the scene
sures the light value at a specsures the light value at a spe
ation. Matrix averages the eation. Matrix averages the e
ee
ke picske pic
: Tap thTap th
screen toscreen to
g modeg mo
: Se
or email, or Fast mor email,
ectsects
: Add special graphic
: Add specia
effects.effect
••
FlashF
: Activate or deactiActivate or deacti
flash..
•
TimerTime
: Take time-
or videos.or vide
••
Location tLocation
locationlocatio
•
Sav

50
Applications Camera and Video
• Exposure value: Change the
exposure value. This determines
how much light the camera’s sensor
receives. For low light situations, use
a higher exposure.
• Grid lines: Display viewfinder grid
lines to help composition when
selecting subjects.
• Shutter sound: Turn the shutter
sound on or off.
• The Volume key: Use the Volume
key as the camera key, the record
key, or as a zoom key.
• Reset settings: Reset the camera
settings.
DRAFT
amera

51
Applications Clock
Clock
The Clock app offers features
for keeping track of time and
setting alarms.
1. From a Home screen, tap Apps >
Clock.
2. Tap a tab to use a feature:
• Alarm: This feature allows you to set
an alarm to ring at a specific time.
• World clock: View the time of
day or night in other parts of the
world. World Clock displays time in
hundreds of different cities, within all
24 time zones around the world.
• Stopwatch: You can use this option
to measure intervals of time.
• Timer: You can use this option to set
a countdown timer. Use a timer to
count down to an event based on a
preset time length (hours, minutes,
and seconds).
Create an Alarm
Create an alarm event. You can set one-
time or recurring alarms, and choose
options for how to be notified.
1. From a Home screen, tap Apps >
Clock.
2. Tap Create alarm for options:
• Time: Set a time for the alarm.
• Repeat: When enabled, the alarm
repeats every week.
• Alarm type: Choose whether the
alarm will use Melody, Vibration, or
Vibration and melody to alert you.
• Alarm tone: If you have chosen
an alarm type that includes sound,
choose a sound to play for the alarm.
• Volume: If you have chosen an alarm
type that includes sound, drag the
slider to set the volume of the alarm.
DRAFT
o set set
time.
e of
arts of the arts of the
displays time in displays time
rent cities, within all rent cities, withi
around the world.ound the world.
h
: You can use this option : You can use th
ure intervals of time.ure intervals of time.
erer
: You can use this option to: You can use this option t
ountdown timer. Use a timeountdown timer. Use
down to an event basdown to an event b
me length (hourme length (hour
s).s).
armarm
arm event. You caarm even
ecurring alarms, and cho
curring alarms
s for how to be notified.s for how to be notifie
From a Home screen, tap From a Home screen, tap
T
T
T
T
T
T
T
T
T
T
F
F
F
F
F
Clockk
..
2.
Tap Tap
AF
Create alarmC
•
Timeime
: Set a tim: S
••
RepeatRepeat
: W: W
repeatsrepeat
•
Ala

52
Applications Clock
• Snooze: Allow snoozing, and set
interval and repeat values for the
alarm while snoozing.
• Smart alarm: When on, the alarm
will start playing a tone at a low
volume at an interval before the
alarm time, and slowly increase
in volume. Choose a time interval
and a tone to use with smart alarm.
Available when you have chosen an
alarm type that includes sound.
• Name: Enter a name for the alarm.
3. Tap Save.
Delete an Alarm
1. From a Home screen, tap Apps >
Clock.
2. Touch and hold an alarm, and then tap
Delete.
DRAFT
R
R
R
R
R
R
R
R
R
R
R
R
R
Apps Apps
>
alarm, and then tap alarm, and then tap
53
Applications Contacts
Contacts
Store and manage your
contacts with the Contacts
app, which can be
synchronized with a variety
of your existing personal
accounts, including Google,
Email, Facebook, and your
Samsung account.
For more information on connecting with
and managing your accounts through your
device, see Accounts.
Manage Contacts
Access your list of contacts by using the
Contacts app, which is a shortcut to the
Contacts tab. To access your Contacts list:
ŹFrom a Home screen, tap Apps >
Contacts.
Find a Contact
You can search for a contact, or scroll the
list to find one by name.
1. From a Home screen, tap Apps >
Contacts.
2. Tap the Search field, and then enter
characters to find contacts that match.
necting with necting w
nts through your nts through y
ontactsonta
r list of contacts by
r list of co
app, which is a shortcut
app, which is a
acts tab. To access your Con
acts tab. To access your
ŹŹ
From a Home screen, tap From a Home screen, tap
T
T
T
AF
F
AF
AF
F
F
Contactsntact
.
Find a Contacta Con
You can search You can search
list to find oneist to find on
1.1
From a
A
A
A
A
A
A
C
2.2.
54
Applications Contacts
Add a Contact
Use the following procedure to add a new
contact.
1. From a Home screen, tap Apps >
Contacts.
2. Tap Create contact, and then tap
contact fields to enter information.
• Choose a storage account for the
contact. You can store the contact
on the device, your SIM card, or
sync it with an account.
• Tap Contact photo to assign a
picture to the new contact.
• Enter a name, phone number, assign
the contact to a group, and choose
a default ringtone. Tap Addanother
field to add additional contact
information.
-Tap Add new to enter
additional entries.
-Tap Delete to remove an entry.
-Tap Expand for additional
fields.
-Tap Label to choose a label
for the field.
3. Tap Save.
Edit a Contact
When editing a contact, you can tap a
field and change or delete the information,
or you can add additional fields to the
contact’s list of information.
1. From a Home screen, tap Apps >
Contacts.
2. Tap the contact to display it, and then
tap Edit.
3. Tap any of the fields to add, change, or
delete information.
4. Tap Save.
Share a Name Card
When you share a name card, the
contact’s information is sent as a vCard file
(.vcf). You can share a vCard via Bluetooth
or Wi-Fi Direct, attach it to a message, or
save it to a storage location.
1. From a Home screen, tap Apps >
Contacts.
2. Tap a contact to display it, and then tap
Moreoptions > Share name card.
3. Choose a sharing method and follow
the prompts.
DRAFT
a a
ber, assign n
and choose and cho
ap ap
Addanother Addanot
onal contact onal contact
Add new
to enter o enter
onal entries.onal entries
ap ap
D
Delete
to remove an eno remove an e
ap ap
D
D
Expand
for additioad
ss
D
LabelLabel
to c to c
ditionaditio
informationinform
Home screen, tap Home scree
T
T
T
T
T
T
ontactsontac
.
ap the contact to display it, a
ap the contact to display
tap tap
F
Editt
..
3.
Tap any of the fields to Tap any of
delete information.delete in
4.
Tap
SaveSave
..
Share a NShare a N
When yoW
contac
(.vc(.v
55
Applications Contacts
Link Contacts
When you have contacts from various
sources (Gmail, Facebook, and so on),
you may have multiple similar entries for
a single contact. Contacts lets you link
multiple entries into a single contact.
1. From a Home screen, tap Apps >
Contacts.
2. Tap the contact to display it, and then
tap Linked contact.
3. Tap Link another contact, and then
select contacts to link to the original
contact.
4. Tap DONE.
Unlink Contacts
1. From a Home screen, tap Apps >
Contacts.
2. Tap the contact to display it, and then
tap Linked contact.
3. Tap Separate beside each contact
to unlink it from the main contact.
Delete Contacts
You can delete a single contact, or choose
multiple contacts to delete.
1. From a Home screen, tap Apps >
Contacts.
2. Touch and hold on a contact to select
it. You can also tap other contacts
or tap the checkbox at the top of the
screen to select all.
3. Tap Delete.
DRAFT
en, tap en, ta
R
R
R
R
R
R
R
R
R
R
R
R
R
R
R
R
Appspps
>
tact to display it, and then tact to display it, a
nked contactnked contact
..
D
SeparateSe
beside each conde each con
k it from the main contak it from the main co
AFT
screen, scree
tsts
..
and hold on a contact
and hold on a
ou can also tap other contac
ou can also tap othe
r tap the checkbox at the top
r tap the checkbox at the
screen to select all.screen to se
3.
Tap Tap
AF
DeleteDe
.

56
Applications Contacts
Favorites
When you mark contacts as favorites, they
are easily accessible from other apps.
Favorites display together on the Favorites
tab in Contacts.
Mark Contacts as Favorites
1. From a Home screen, tap Apps >
Contacts.
2. Tap a contact to display it, and then
tap AddtoFavorites (the star turns
gold ).
Remove Contacts from Favorites
1. From a Home screen, tap Apps >
Contacts.
2. Tap the Favorites tab, and then touch
and hold on a contact to select it. You
can also tap other contacts or tap the
selected checkbox at the top of the
screen to select all.
3. Tap Delete.
Create a Shortcut to a Favorite
You can create a shortcut to a favorite
on the home screen, to access their
information directly from the home screen.
1. From a Home screen, tap Apps >
Contacts.
2. Tap the Favorites tab, and then touch
and hold on a contact to select it.
3. Tap Moreoptions > Add shortcut
to homescreen. The new shortcut
displays in an empty area of the home
screen.
DRAFT
orites
R
R
R
R
R
R
AppsApp
>
ab, and then touch ab, and then tou
ntact to select it. You act to select it. You
ther contacts ortacts or
tap the t
eckbox at the top of the eckbox at the top o
o select all.o select all.
D
FT
DeleteDele
.
y fromy from
me screen, tapme sc
actsacts
.
the the
FavoritesF
tab, and then
tab, a
nd hold on a contact to selec
nd hold on a contact to s
3.3.
Tap Ta
F
F
F
F
Moreoptionsoreo
>
Adddd
to homescreento homesc
. The n
displays in an emptydisplays
screen.een.

57
Applications Contacts
Groups
You can use groups to organize your
contacts. Your device comes with
preloaded groups, and you can create
your own. You might create a group for
your family, for coworkers, or a team.
Groups make it easy to find contacts, and
you can send messages to the members
of a group.
Create a Group
1. From a Home screen, tap Apps >
Contacts.
2. Tap Groups, and then tap
Create group.
3. Tap fields to enter information about the
group:
• Tap Create group in < location > to
choose where to save the group. You
can save it to a specific account,
to the device memory, or to all
accounts.
• Tap Group name to enter a name for
the new group.
• Tap Group ringtone to add a
ringtone for the group.
4. Tap Add member and select contact(s)
to add to the new group, and then tap
Done.
5. Tap Save.
Rename a Group
1. From a Home screen, tap Apps >
Contacts.
2. Tap Groups, and then tap a group.
3. Tap Moreoptions > Edit group and
enter a new name.
4. Tap Save.
Add Contacts to a Group
1. From a Home screen, tap Apps >
Contacts.
2. Tap Groups, and then tap a group.
3. Tap Add member, and then tap the
contact(s) you want to add.
4. Tap Done.
DRAFT
ation about the ation abou
oup in <up in <
locaa
tiontion
> >
to to
re to save the group. You ave the group. You
it to a specific account, it to a specific acc
device memory, or to all device memory, or to all
ounts.ounts
Group name Group
to enter a nente
w group.w grou
ringtoneringtone
to to
he grohe gro
a Groupa Group
m a Home screen, tap m a Home screen, t
T
T
T
T
T
T
T
T
T
T
T
T
T
T
T
T
Ap
F
ContactsCon
.
2.2.
Tap Tap
F
F
GroupsGrou
, and then en
3.
Tap Tap
AF
AF
AF
AF
MoreoptionsMor
>
enter a new name.nter a
4.4.
Tap
Saveave
..
Add ContAdd Cont
1.
From
A
A
58
Applications Contacts
Delete a Group
Preset groups, such as Family, cannot be
deleted.
1. From a Home screen, tap Apps >
Contacts.
2. Tap Groups.
3. Tap Moreoptions > Select.
4. Tap groups to select them or tap the
selected checkbox at the top of the
screen to select all, and then tap
Delete.
5. Tap Group only to only delete the
group or tap Groups and members to
delete the groups and the contacts in
the groups.
Contact Settings
These settings allow you to modify settings
associated with using the Contacts app.
1. From a Home screen, tap Apps >
Contacts.
2. Tap Moreoptions > Settings >
Contacts.
3. Tap an option and follow the onscreen
instructions.
DRAFT
mbers
to o
ontacts in
FT
gg
screen, tscree
tsts
..
MoreoptionsMoreoptions
>
Setting
tactstact
.
Tap an option and follow the
Tap an option and follow th
instructions.instructions.

59
Applications Email
Email
Use the Email app to view
and manage all your email
accounts in one application.
To access Email:
ŹFrom a Home screen, tap Apps >
Email.
Configure Email Accounts
You can configure Email for most accounts
in just a few steps.
1. From a Home screen, tap Apps >
Email.
2. Follow the onscreen instructions to set
up your email account.
– or –
For additional accounts, tap More
options> Settings > Manage
accounts. Then tap Addaccount.
The device communicates with the
appropriate server to set up your account
and synchronize your email. When
complete, your email appears in the Inbox
for the account.
Note: To configure email account settings at
any time, tap More options > Settings.
Tap Manageaccounts and then tap the
account to display Account settings.
Refresh Your Email Account
Refresh your account to update your email
accounts.
1. From a Home screen, tap Apps >
Email.
2. Tap Refresh.
DRAFT
unts
most accounts most acc
en, tap en, tap
R
R
R
R
R
R
R
R
R
R
R
R
R
R
R
R
Apps pps
>
nscreen instructions to set nscreen instructio
mail account.mail account.
tional accounts, tap tional accounts, tap
D
D
D
SettingsSetting
>
ManaMan
en tap en tap
D
AA
municatesmunic
erver to set up yerver to
ronize your email. Wh
ronize your e
e, your email appears in th
e, your email appe
e account.e acc
oteote
: To configure email accou: To configure email accou
any time, tap any time, tap
FT
FT
FT
FT
More option
Tap p
ManageaccountsManage
a
account to display Accunt to d
Refresh YoRefresh Yo
Refresh yoRe
accoun
1.1.

60
Applications Email
Manage Your Email Accounts
You can view email you receive for all
accounts on the Combined view screen or
you can view email accounts individually.
1. From a Home screen, tap Apps >
Email.
2. Tap Menu at the top left of the
screen to select:
• Combined view: View all email in a
combined inbox.
• <Account Name>: View email for
only this account.
Delete Email Accounts
To delete an Email account:
1. From a Home screen, tap Apps >
Email.
2. Tap More options > Settings >
Manageaccounts.
3. Tap More options > Remove
account.
4. Tap the accounts you want to remove,
and then tap Done.
Email Settings
These settings allow you to modify settings
associated with using the Email app.
1. From a Home screen, tap Apps >
Email.
2. Tap Moreoptions > Settings.
3. Under General settings, tap an option
and follow the onscreen instructions.
4. To configure settings for each account,
tap Manageaccounts, and then tap
the account to configure.
DRAFT
tss
unt:unt:
en, tap en, ta
R
R
R
R
R
R
R
R
R
R
R
R
R
R
R
R
Apps Apps
>>
e optionse options
> >
Settingsttings
>
accountsacco
.
More optionsMore
>
Remove Rem
tt
ounts you wanounts you wan
oneone
..
FT
gg
screen, tscree
MoreoptionsMoreoptions
>
Setting
der der
General settingsGeneral settings
, tap an
,
and follow the onscreen inst
and follow the onscreen ins
4.4.
To configure settings forTo configure
tap tap
ManageaccountMana
the account to cone acco
61
Applications GALAXY Apps
GALAXY Apps
Samsung GALAXY Apps is a
free storefront that provides
a quick and easy way to find
and download apps that are
compatible with your Galaxy
device.
To access the Samsung GALAXY Apps
website:
ŹFrom a Home screen, tap Apps >
GALAXYApps.
Note: A Samsung account is required to
purchase and download apps.
Galaxy Apps
Your phone comes with the Galaxy App
Milk Music already on your device.
Milk Music
Exclusive to Galaxy owners, Milk MusicTM
is a radio service that gives you more of
the music you love, curated by top DJs
and industry pros and all for free.
ŹFrom a Home screen, tap Apps >
MilkMusic.
DRAFT
Apps
R
R
R
R
R
R
R
R
R
R
AppsApps
>
FT
ount is required to ount is required to
load apps.apps.
psps
comes with the Ga
comes wi
ic already on your device
ic already on yo
lk Musiclk M
Exclusive to Galaxy owners,Exclusive to Ga
is a radio service that giva radio ser
the music you love, cumusic y
and industry pros austry p
ŹŹ
From a HomFrom a Hom
A
MilkMMilkM
62
Applications Gallery
Gallery
View, edit, and manage
pictures and videos.
View Images and Videos
Launching Gallery displays available
folders. When another application, such as
Email, saves an image, a Download folder
is automatically created to contain the
image. Likewise, capturing a screenshot
automatically creates a Screenshots folder.
1. From a Home screen, tap Apps >
Gallery.
2. Tap Menu, and then tap Album, All,
or Locations to choose the way items
display.
• Tap Menu > Album, and then
tap Newalbum to create a
newalbum.
• Tap an album to open it.
• Tap an image or video to view it in
fullscreen. Scroll left or right to view
the next or previous image or video.
Zoom In and Out
Use one of the following methods to zoom
in or out on an image:
• Double-tap anywhere on the screen to
zoom in or zoom out.
• Spread two fingers apart on any place
to zoom in. Pinch the screen to zoom
out.
Play Videos
1. From a Home screen, tap Apps >
Gallery.
2. Tap a folder to open it.
3. Tap a video to view it.
er er
e
nshot
hots folder.r.
p p
R
R
R
R
R
R
R
R
R
R
R
R
R
R
R
AppsApps
>
then tap hen ta
Albumbum
, ,
AllAll
, ,
o choose the way items se the way items
D
D
MenuMe
>
Albumlbum
, and then , and then
D
D
NewalbumN
to create a o create a
album.album
lbum to open it.lbum to open it
e or videe or vide
oll
oll
OutOut
the following metho
the followi
on an image:n an image:
ouble-tap anywhere on the sc
ouble-tap anywhere on t
zoom in or zoom out.zoom
••
Spread two fingers apartSpread two fi
to zoom in. Pinch the to zoom in
out.t
Play VideoPlay Video
1.1.
From a
A
A
A
A
A
A
A
A
A
A
A
A
A
A
G
2.2
T

63
Applications Gallery
Edit Images
ŹWhile viewing an image, tap
Moreoptions:
• Slideshow: Start a slideshow with
the images and videos in the current
folder.
• Print: Print the image via a USB or
Wi-Fi connection. Some printers may
not be compatible with the device.
• Rename: Rename the file.
• Rotate left: Rotate the photo
counter-clockwise.
• Rotate right: Rotate the photo
clockwise.
• Crop: Resize the frame to crop the
image.
• Set as: Set the image as wallpaper
or as a contact’s photo.
• Details: View details about the
image.
For more advanced editing options:
ŹTap Edit to open Photo Editor.
Delete Images
1. From a Home screen, tap Apps >
Gallery.
2. Tap an album and/or folder.
3. Tap More options > Select item,
select images, and then tap Delete.
– or –
When viewing a single image, tap
Delete.
Share Images
Use one of the following methods:
1. From a Home screen, tap Apps >
Gallery.
2. Tap a folder to open it.
3. In a folder, tap Moreoptions >
Select item, select images, and then
tap Share via to send them to
others or share them via social network
services.
– or –
When viewing a single image, tap
Sharevia to send it to others or share
it via social network services.
DRAFT
to
e to crop the e to crop t
image as wallpaper mage as wallpaper
act’s photo.hoto.
View details about the View details about t
e.e.
advanced editing optioadvanced editing o
itit
to open Photo E to open Photo
and/or foand/
ore optionsore option
>
Sele
images, and then tap
mages, and th
T
or –or –
When viewing a single imagWhen viewing a single ima
AF
Deleteete
..
Share ImagesShare Ima
Use one of the Use one of the
1.1.
From a a
A
A
A
A
A
A
A
A
A
A
A
A
A
A
G
2.2
T

64
Applications Internet
Internet
Access to the Internet with a
fully featured web browser.
Access the Internet
ŹFrom a Home screen, tap Apps >
Internet.
Command Keys
The following command keys are available:
• Back or Back key to return to
the previous page.
• Forward to go forward to a recent
page.
• Home to display your Internet Home
screen.
• Refresh to reload the current page.
View a Web Site
To view a web site:
ŹTap the address field, enter the web
address, and then tap Go.
To share the current web page:
ŹTap More options > Share via.
To zoom in or out:
ŹTap the screen twice or pinch the
screen to zoom out and stretch the
screen to zoom in.
DRAFT
re available:
ey to return to ey to return
o forward to a recent forward to a recent
o display your Internet Homeo display your Interne
freshfresh
to reload the current e current
b Siteb Sit
web site:web site:
the address field, enter the
the address field, en
address, and then tap address, and then tap
GoGo
..
To share the current web To share the c
Ź
Tap ap
AF
AF
AF
AF
AF
AF
More optionsMo
To zoom in or ouTo zoom in or o
ŹŹ
Tap the scTap the s
screen
scree

65
Applications Internet
Browser Tabs
Use tabs to view multiple web pages at the
same time.
To open a new tab:
ŹTap Tab Manager and tap Add.
To close a tab:
ŹTap Tab Manager and tap
Close.
Bookmarks
To bookmark the current web page:
ŹTap Bookmarks > Add
bookmark.
To open a bookmarked web page:
ŹTap Bookmarks and tap an entry.
History
To view a list of recently visited web
pages:
ŹTap Bookmarks > History.
Incognito Tabs
Pages viewed with incognito tabs do not
appear within your browser history or
search history, and leave no traces (such
as cookies) on your device.
Incognito tabs display Incognito on
their tab in the Window manager.
Note: Any downloaded files will remain on
your device after you close the incognito
tab.
To open a window in incognito mode:
ŹTap Moreoptions > New incognito
tab.
Internet Settings
These settings allow you to modify settings
associated with using the Internet app.
1. From a Home screen, tap Apps >
Internet.
2. Tap Moreoptions > Settings.
3. Tap an option and follow the onscreen
instructions.
DRAFT
age:
d d
ked web page:ed web page:
arks
and tap an entry.d tap an e
yy
st of recently visitedst of recently visit
rksrks
> >
HiHi
d leaved leav
your deviceyour
abs display abs display
T
T
T
Incog
in the Window manager.
in the Window m
ee
: Any downloaded files will rem
: Any downloaded files w
our device after you close the
our device after you close the
tab.tab.
To open a window in pen a
ŹŹ
Tap
AF
AF
AF
AF
AF
AF
MoreoptMore
tabtab
..
Intern
TheTh
aa

66
Applications Memo
Memo
Use the Memo app to write
and save notes on your
device.
Compose a Memo
1. Tap Apps > Memo.
2. Tap Create memo, type a memo.
• To change the category, tap the
Category icon.
• To insert an image into the memo,
tap the Image icon.
• To use your voice to insert text into
the memo, tap the Voice icon.
3. When finished creating your memo, tap
Save.
Manage Memos
1. Tap Apps > Memo.
2. Tap a memo thumbnail to open it.
• To edit a memo, tap the content of
the memo.
3. Tap Moreoptions > Select, and
choose an option:
• To delete memos, select memos, and
tap Delete.
• To send a memo to others, select a
memo, and tap Share via.
• Select memos and tap
Moreoptions to Move to a different
category or Print.
DRAFT
mo.
p the
A
RA
RA
A
RA
RA
nto the memo, nto the memo
icon.icon.
oice to insert text into to insert text into
tap the p
DR
DR
DR
DR
DR
DR
DR
DR
VoiceVoice
icon.i
shed creating your memo, tapshed creating your mem
T
emosemo
AppsApps
> >
T
T
T
T
T
T
T
Memo
.
a memo thumbnail to open
a memo thumbnail
••
To edit a memo, tap the co
To edit a memo, tap the c
the memo.emo
3.
Tap Tap
AF
AF
AF
AF
Moreoptions Mor
>
choose an option:hoose
AF
•
To delete medelete
tap tap
AF
DeDe
•
To seose
me
•

67
Applications Messages
Messages
Learn how to send and
receive different messages
using the default Messaging
app on your phone.
Types of Messages
Your default Messaging app provides the
following message types:
• Text Messages (SMS)
• Multimedia Messages (MMS)
The Short Message Service (SMS) lets
you send and receive text messages to
and from other mobile phones or email
addresses. To use this feature, you
may need to subscribe to your service
provider’s message service.
The Multimedia Messaging Service (MMS)
lets you send and receive multimedia
messages (such as picture, video, and
audio messages) to and from other mobile
phones or email addresses. To use this
feature, you may need to subscribe to your
service provider’s multimedia message
service.
Messaging icons are displayed at the top
of the screen and indicate when messages
are received and their type.
DRAFT
the e
MMS) MMS)
rvice (SMS) lets rvice (SMS) lets
e text messages to text messages to
obile phones or email ones or e
use this feature, you use this feature, yo
o subscribe to your service o subscribe to your servic
s message service.s message service.
MessagingMessa
and receive muand re
(such as picture, vide
(such as pic
essages) to and from othe
essages) to and f
es or email addresses. To use
es or email addresses.
ature, you may need to subsc
ature, you may need to subs
service provider’s multimediaservice provider’s multimedia
service.ervice
Messaging icons are daging
of the screen and iof the screen
are received andare received an

68
Applications Messages
Create and Send Messages
This section describes how to create a
send a message using the Messaging app.
1. From a Home screen, tap Messages
> Compose.
2. Tap the Enter recipients field to
manually enter a recipient or tap
Add Recipient to select a recipient
from your Contacts. You can also
select the recipient based on Groups,
Favorites, or Logs.
• If adding a recipient from your
Contacts, tap the contact to place
a check mark then tap Done.
The contact will be placed in the
recipients field.
• Enter additional recipients by
separating each entry with a
semicolon (;) and then using the
previous procedure. More recipients
can be added at any time before the
message is sent.
• For the Groups option, tap a Group
and then tap the contacts to place
a check mark then tap Done.
The contacts will be placed in the
recipients field.
3. Tap the Enter message field and enter
a message.
4. Tap Send.
Note: If you exit a message before you send
it, the message is automatically saved as a
draft.
DRAFT
ace
.
d in the
cipients by cipien
entry with a entry with a
and then using the then using the
rocedure. More recipients ocedure. More re
added at any time before the added at any time bef
sage is sent.sage is
the Groups option, tap a G the Groups option, ta
hen tap the contacts then tap the contact
mark then tap mark then tap
DD
ts will be pts will be p
dd
T
a messagea mes
e is automaticale is au

69
Applications Messages
View New Messages
When you receive a new message, a new
message icon appears on the Status Bar.
To view the message:
1. Open the Notification Panel and select
the message.
– or –
From a Home screen, tap Apps >
Messages, and then tap the new
message to view it.
2. To play a multimedia message (audio or
video), tap Play.
3. To scroll through the list of messages,
tap the screen and scroll up or down
the page.
Delete Messages
To delete messages, follow these steps:
1. From a Home screen, tap Apps >
Messages.
2. Tap More options > Select.
3. Tap each message you want to delete.
4. Tap Delete.
Message Search
1. You can search through your messages
by using the Message Search feature.
2. From a Home screen, tap Apps >
Messages.
3. Tap Search.
4. Enter a word or phrase to search
for, and then tap Search on the
keyboard
Messages Settings
Configure the settings for text messages,
multimedia messages, push messages,
and so on.
ŹFrom a Home screen, tap Apps
> Messages > More options >
Settings.
DRAFT
io or o or
messages,
up or down up or dow
sages
essages, follow these stepsessages, follow these s
a Home screen, tap a Home screen, tap
DR
DR
DR
DR
DR
DR
DR
DR
D
D
D
D
DR
DR
DR
DR
Appspps
ssagesssage
.
e optionse optio
>
SeleSele
age youage you
screen, tscre
gesges
..
SearchSea
.
nter a word or phrase to searc
nter a word or phrase to
for, and then tap for, and the
FT
Search
earch
keyboardkeyboard
Messages Setsage
Configure the seConfigure the s
multimedia memultimedia m
and so on.and so on.
Ź
From
>
70
Applications Messages
Emergency Alerts
This device is designed to receive wireless
emergency alerts from the Commercial
Mobile Alerting System (CMAS) which may
also be known as the Personal Localized
Alerting Network (PLAN). For more
information, please contact your wireless
provider.
Emergency Alerts allows customers to
receive geographically-targeted messages.
Alert messages are provided by the US
Department of Homeland Security and will
alert customers of imminent threats to their
safety within their area. There is no charge
for receiving an Emergency Alert message.
There are three types of Emergency Alerts:
• Alerts issued by the President
• Alerts involving imminent threats to
safety of life (Extreme and Severe)
• AMBER Alerts (missing child alert)
Users may choose not to receive Imminent
Threats (Extreme and Severe) and AMBER
Alerts. Alerts issued by the President
cannot be disabled.
To disable Imminent Threats and AMBER
Alerts, follow the instructions below:
1. From a Home screen, tap Apps >
Messages.
2. Tap More options > Settings >
Emergencyalerts.
3. Tap Emergency alerts.
4. All alerts are enabled by default (check
mark showing). Tap an alert option to
disable it.
DRAFT
eir eir
harge rge
message.ge.
gency Alerts:ency Alerts:
esidentesiden
inent threats to inent threats to
reme and Severe)me and Severe)
s (missing child alert)s (missing child a
hoose not to receive Imminenhoose not to receive Im
Extreme and Severe) and AMBExtreme and Severe) and AM
erts issued by the Presidenerts issued by the Pre
disabled. disable
FT
e optionse opti
>
Se
ncyalertsncyalerts
.
Emergency alertsEmergency alerts
.
All alerts are enabled by defa
All alerts are enabled by de
mark showing). Tap an alemark showing). Tap an ale
disable it.disable it.

71
Applications MyFiles
MyFiles
Access files stored on your
device, including images,
videos, songs, and sound
clips.
View Files
Files stored in the device are organized
into the following groups:
• QUICK SEARCH: Files are grouped into
the following categories:
Recent files: View recently saved
files.
Images: View image files.
Videos: View video files.
Audio: View audio files.
Documents: View document files.
Downloaded apps: View
downloaded apps.
• DOWNLOAD HISTORY
Download History: View all apps
and files that have been downloaded
to the device.
• SHORTCUTS: Contains shortcuts to
files or folders that you have added.
This option only appears if you have
added shortcuts to the MyFiles main
screen.
• LOCAL STORAGE: View folders and
files in their storage locations.
Device storage: View folders
and files located on the device.
SD card: View folders and files
located on the memory card (if
installed).
• CLOUD STORAGE: Contains shortcuts
to FTP servers or other cloud storage
locations that you have added. This
option only appears if you have added
shortcuts to the MyFiles main screen.
DRAFT
ed
grouped into rouped into
View recently saved View recently s
View image files.mage files
osos
: View video files.: View video files.
AudioAudio
: View audio files.udio fi
DocumentsDocu
: View documew do
wnloaded appswnloaded apps
: V: V
ed apps.ed apps.
HISTORYHIST
wnload Historywnload H
: V
files that have been d
files that have
o the device.o th
SHORTCUTSSHOR
: Contains short
ns sho
files or folders that you havfiles or folders that you hav
This option only appearThis option
added shortcuts to thadded sh
screen. een.
••
LOCAL STORALOCAL STO
files in theirfiles in their
A
A
A
DD
an

72
Applications MyFiles
To view files in My Files:
1. From a Home screen, tap Apps >
MyFiles.
2. Tap a category to view the relevant files
or folders.
3. Tap a file or folder to open it.
File Options
On the main My Files screen, the following
options are available:
• Search: Search for a file or folder.
• Tap More options for these options:
• Add shortcut: Add a shortcut on the
My Files main screen to any folder.
• Storage usage: View memory
information for your device and
memory card (ifinstalled).
• Settings: Change the settings for
viewing files.
Category Options
After tapping on a category, the following
options are available:
• Home: Return to the main My Files
screen.
• Search: Search for a file in the
selected category.
• Tap More options to find the following
options:
• Select: Select files or folders.
• Create folder: Add a folder (Local
storageonly).
• Sort by: Change the sort order of
the files.
• Add shortcut: Add a shortcut to
the folder on a Home screen (Local
storage only).
• Settings: Change the settings for
viewing files.
DRAFT
..
tions::
cut on the e
o any folder.o any fold
ew memory ew memory
our device and our device and
(ifinstalled).nstalled).
Change the settings for Change the settin
g files.g files.
turn to thturn t
rchrch
: Search for a file i
: Search f
cted category.cted category.
Tap Tap
F
F
F
F
More options
to find th
o find
options:opt
••
SelectSelect
: Select files o:
•
Create folderCrea
: A
storageorage
only)
••
Sort bySort by
:C:C
the filethe file
•
Ad

73
Applications MyFiles
Options for Selected Files
and Folders
ŹTap More options > Select, select a
file or folder, and then use one of these
functions:
Share via: Send files to others or
share them.
Delete: Delete files or folders.
ŹTap More options for additional
options:
• Move: Move files or folders to
another folder.
• Copy: Copy files or folders to
another folder
• Rename: Rename a file or folder.
This option only appears when just
one file or folder is selected.
• Add shortcut: Add a shortcut to a
file or folder to the My Files main
screen or Home screen.
• Zip: Create a zip folder containing
the selected files. This option only
appears in Local Storage categories.
A selected zip folder has the
additional options of Extract and
Extract to current folder.
• Details: View details of the selected
file(s) or folder(s).
DRAFT
s to
r folders to r folde
name a file or folder. a file or folder.
on only appears when just n only appears wh
e or folder is selected.e or folder is selected.
d shortcutd sho
: Add a shortcut toa shortcut to
or folder to the My Files mor folder to the My Fi
T
or Home screen.or Home screen.
p fop fo
options ooption
to current folto cu
ailsails
: View details of the
: View deta
e(s) or folder(s).e(s) or folder(s).
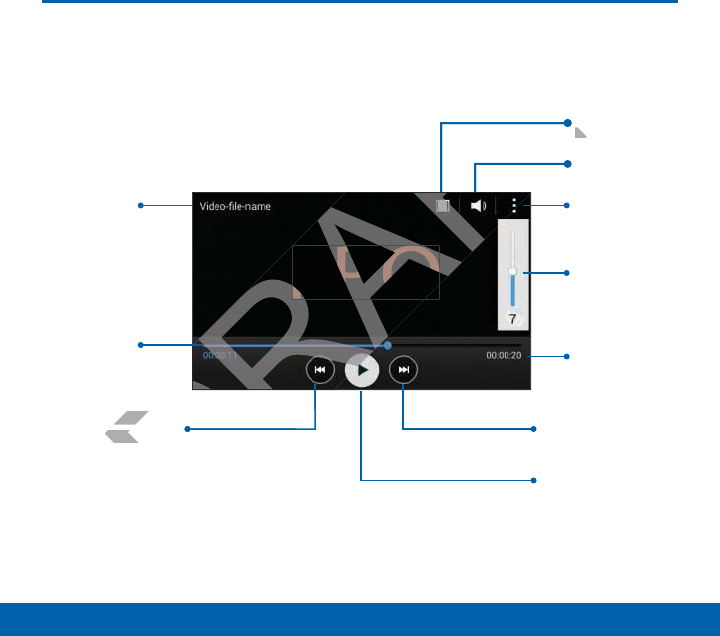
74
Applications Video Player
Video Player
FPO
Volume
Volume
More options
Video file
name
Length of
video
Rewind video or go
toprevious video
Scan forward or
gotonext video
Pause/Play
Change screen
ratio
Elapsed
play time
DRAFT
DRAF
FPO
DRAF
DRAF
R
FT
AFT
T
DR
D
deo or go deo o
vious videovious
Chang
ratio
ra

75
Applications Video Player
Play and manage videos
stored on your device.
To access video:
1. From a Home screen, tap Apps >
Video.
2. Scroll through the videos stored on
your device. After a few seconds,
each video thumbnail begins playing a
preview of the clip.
3. Tap a video to view it.
76
Applications Voice Recorder
Voice Recorder
Record voice memos and
notes.
Create a Voice Recording
ŹFrom a Home screen, tap Apps >
VoiceRecorder.
• Tap Record to record an audio
file.
• Tap Stop to stop recording. The
file is automatically saved.
• Tap Pause to pause the recording
of an audio file.
• Tap Cancel to cancel the
recording of an audio file.
View Recordings
ŹFrom a Home screen, tap Apps >
VoiceRecorder.
• Tap List to display a list of
recordings.
• Tap More options:
-Select: Choose desired
recordings.
-Settings: Configure Voice
Recorder.
o o
ding. The
ed.ed.
ause the recording ause the recor
el
to cancel the cancel the
of an audio file.of an audio file.
ordingsording
Home screen, tap Home scre
T
T
T
ceRecorderceRecorder
..
Tap Tap
FT
FT
FT
FT
FT
FT
List
to display a list
isplay
recordings.recording
••
Tap
AFT
FT
FT
AFT
More optionsMo
:
--
SelectSe
: Choos
recordings.reco
--
Settingtting
RecoRec
Settings
Configure your device’s
connections and settings,
add accounts, and customize
the home screen, apps, and
features.
• Some options use an ON/OFF button to
turn the option on (
ON
) or off
(
OFF
).
• For some options, you must tap a field,
such as Email address, to display and
set options.
• Some options are enabled or disabled
by tapping a checkbox. When
enabled, a check mark displays. Tap the
check mark to remove it and disable the
option.
Access Settings
ŹFrom a Home screen, tap Apps >
Settings.
– or –
From a Home screen, drag down from
the Status Bar to display the Notification
Panel, and then tap Settings.
DRAFT
T
T
F
button to
) or off) or off
ou must tap a field, ou must tap a field,
ddresss
, to display and , to display and
ons are enabled or disabled ons are enabled or disab
ing a ing a
D
D
checkbox. When box. When
d, a check mark displays. Td, a check mark displ
rk to remove it and dirk to remove it and
ess Settingsess Settings
From a Home screen, tap From a Home screen, tap
T
T
T
T
T
T
T
T
T
T
F
F
F
F
F
F
F
F
F
Settingsngs
.
– or –or –
From a Home scra Hom
the Status Barthe Status Ba
Panel, and tPanel, and

78
Settings Wi-Fi and Wi-Fi Direct
Wi-Fi and Wi-Fi Direct
Wi-Fi is a term used for
certain types of Wireless
Local Area Networks
(WLAN). Wi-Fi communication
requires access to a Wireless
Access Point (WAP).
Wi-Fi Direct creates a direct
connection between two or
more devices using Wi-Fi.
Turn Wi-Fi On or Off
Turning Wi-Fi on makes your device able
to discover and connect to compatible
in-range WAPs.
1. From a Home screen, tap Apps >
Settings.
2. Tap Wi-Fi, and then tap ON/OFF to turn
Wi-Fi on or off.
Scan and Connect to a Wi-Fi
Network
1. From a Home screen, tap Apps >
Settings.
2. Tap Wi-Fi, and then tap ON/OFF to turn
Wi-Fi on.
3. When Wi-Fi is first turned on, your
device will automatically scan for
available networks and display them.
4. Tap the network you want to connect to.
• When you select an open network,
you are automatically connected
to the network. Otherwise, enter a
password to connect.
• To manually scan for networks, tap
Moreoptions > Scan.
DRAFT
rect
two or
ng Wi-Fi. ng Wi-Fi.
On or OffOff
on makes your device able on makes your device
r and connect to compatible r and connect to compatible
WAPs.WAPs
ome screen, tap ome screen, tap
D
D
D
D
D
D
D
D
D
D
D
D
D
hen tahen ta
ConnecCon
kk
m a Home screen, tap m a Home screen, t
T
T
T
T
T
T
T
T
T
T
T
T
T
T
T
T
Ap
SettingsSett
.
2.2.
Tap Tap
Wi-Fi
, and then tap , an
ONON
Wi-Fi on.Wi-Fi on.
3.
When Wi-Fi is first tWhen W
device will automce will
available netwavailable net
4.4.
Tap the nTap the n
•
Wh
79
Settings Wi-Fi and Wi-Fi Direct
Manually Connect to a
Wi-FiNetwork
1. From a Home screen, tap Apps >
Settings.
2. Tap Wi-Fi, and then tap ON/OFF to turn
Wi-Fi on.
3. Tap Add Wi-Fi network.
4. Enter information about the Wi-Fi
network:
• Tap Network SSID to enter the name
of the Wi-Fi network.
• Tap the Security field and select
a security option and enter your
password.
• Tap Show advanced options if you
need to add advanced options such
as Proxy settings, or IPsettings.
5. Tap Connect to store the new
information and connect to your target
WAP.
Wi-Fi Status Indicators
These Status bar icons show your current
Wi-Fi connection status:
Displays when Wi-Fi is
connected, active, and
communicating with a Wireless
Access Point (WAP).
A Wi-Fi access point is
available, but your device is
not connected to it. It may
also display if there is a
communication issue with the
target Wireless Access Point
(WAP).
DRAFT
e
ect
r your
d optionsd options
if you if y
anced options such anced options s
ngs, or IPsettings.s, or IPsettings.
to store the new o store the new
n and connect to your target n and connect to your
ays when Ways w
onnected, active,onnecte
communicating with a
communicat
Access Point (WAP).
Access Point (W
F
F
F
F
F
F
A Wi-Fi access point i
ss poi
available, but your vailable, but your
not connected tonot
also display ifa
communica
target Wtarg
(WAP(WAP

80
Settings Wi-Fi and Wi-Fi Direct
Wi-Fi Settings
The Wi-Fi settings menu allows you to set
up many of your device’s advanced Wi-Fi
services.
1. From a Home screen, tap Apps >
Settings.
2. Tap Wi-Fi, and then tap ON/OFF to turn
Wi-Fi on.
3. Tap Smart network switch to
automatically switch between Wi-Fi and
mobile networks to maintain a stable
Internet connection.
4. Tap Moreoptions for options:
• Scan: Start another scan for nearby
Wi-Fi networks.
• Wi-Fi Direct: Configure a Wi-Fi Direct
connection with a nearby device.
• Advanced:
-Network notification: Receive a
notification when new Wireless
Access Points (WAPs) are
available.
-Keep Wi-Fi on during sleep:
Specify when to disconnect from
Wi-Fi.
-Always allow scanning: Allow
Google location service and other
apps to scan for networks, even
when Wi-Fi is turned off.
-Install certificates: Install
authentication certificates.
-MAC address: View your device’s
MAC address, which is required
when connecting to some secured
networks (not configurable).
-IP address: View your device’s IP
address (not configurable).
• WPS push button: Set up a
connection to a WPS (Wi-Fi
Protected Setup) router or other
equipment.
• WPS PIN entry: View the PIN
used by your device to set up a
PIN-secured connection to a Wi-Fi
router or other equipment (not
configurable).
DRAFT
for nearby
gure a Wigure
-
Fi Direct Fi D
a nearby device. a nearby device.
ork notificationork notification
: Receive a : Rec
tification when new Wireless tification when new Wireles
Access Points (WAPs) are Access Points (WAPs)
ailable.ailable
Wi-Fi on duringWi-Fi on during
when to diswhen to dis
is is
certificatecertifi
entication certificenticatio
MAC addressMAC address
: View your
: V
MAC address, which is req
MAC address, whic
when connecting to som
when connecting to so
networks (not configuworks (not configu
--
IP addressIP ad
: View
address (not cad
•
WPS push bPS pus
connectioconnectio
ProtectProtec
equi
•
W

81
Settings Wi-Fi and Wi-Fi Direct
Wi-Fi Direct
Wi-Fi Direct allows direct device-to-device
connections via Wi-Fi, without having to
connect to a Wi-Fi network.
1. From a Home screen, tap Apps >
Settings.
2. Tap Wi-Fi, and then tap ON/OFF to turn
Wi-Fi on. Wi-Fi must be on to configure
settings.
3. Tap Moreoptions > Wi-Fi Direct.
Your device automatically scans for
nearby Wi-Fi Direct devices, or you can
tap Scan to start scanning.
4. After scanning for devices, select a
device, and then follow the prompts to
complete the connection.
• Tap Moreoptions > Multi connect
to scan for devices that support multi
connect. Select the devices and
follow the prompts to establish the
connections.
• To rename your device (as seen by
other devices), tap Moreoptions >
Renamedevice.
Wi-Fi Direct Status Indicator
When your device is connected to another
device using Wi-Fi Direct, displays in
the Status Bar.
DRAFT
an an
lect a
prompts to promp
n.n.
ons ons
>>
Multi connect Multi con
vices that support multi es that support multi
lect the devices and devices a
e prompts to establish the e prompts to establi
ctions.ctions
rename your device (as seerename your device (as see
r devices), tap r devic
D
D
D
D
MoreoMo
edeviceedev
.
82
Settings Bluetooth
Bluetooth
Bluetooth is a short-range
communications technology
that allows you to connect
wirelessly to a number of
Bluetooth devices, such as
headsets and hands-free
car Bluetooth systems,
and Bluetooth-enabled
computers, printers, and
wireless devices.
Note: The Bluetooth communication range
is approximately 30 feet.
Turn Bluetooth On or Off
1. From a Home screen, tap Apps >
Settings.
2. Tap Bluetooth, and then tap ON/OFF
to turn Bluetooth on or off.
Make Your Device Visible to
Other BluetoothDevices
When you make your device visible, other
Bluetooth can find it in a scan and initiate
pairing. You can choose the length of time
your device remains visible.
1. From a Home screen, tap Apps >
Settings.
2. Tap Bluetooth, and then tap ON/OFF
to turn Bluetooth on.
3. Tap Bluetooth > Moreoptions >
Visibilitytimeout.
4. Select a time period for your device to
remain visible after you turn on visibility.
DRAFT
and and
communication range mmunication range
0 feet.
luetooth On or Offluetooth On or Off
Home screen, tap Home screen, tap
D
D
D
D
D
D
D
D
D
D
D
D
D
D
D
D
Ap
gsgs
..
hh
, and then, and then
on oon o
DeviceDev
luetoothDevi
luetooth
ou make your device visible
ou make your devi
ooth can find it in a scan and
ooth can find it in a sca
airing. You can choose the len
airing. You can choose the le
your device remains visible.your device rem
1.
From a Home screenFrom a H
AF
AF
AF
AF
AF
AF
AF
AF
AF
SettingsSetti
.
2.2.
Tap Ta
Bluetoothuetoo
to turn Blueto turn Blue
3.3.
Tap
Blu
Visib
4.4.

83
Settings Bluetooth
Scan for Bluetooth Devices
When you want to pair with another
Bluetooth device, you can scan for nearby
devices that are visible.
1. From a Home screen, tap Apps >
Settings.
2. Tap Bluetooth, and then tap ON/OFF
to turn on Bluetooth.
3. When Bluetooth is first turned on, it
scans for nearby Bluetooth devices and
displays them.
• To manually perform a new scan, tap
Scan.
Pair Bluetooth Devices
The Bluetooth pairing process allows you
to establish trusted connections between
your device and another Bluetooth device.
Pairing between two Bluetooth devices
is a one-time process. Once a pairing
is created, the devices will continue to
recognize their partnership and exchange
information without having to re-enter a
passcode.
1. From a Home screen, tap Apps >
Settings.
2. Tap Bluetooth, and then tap ON/OFF
to turn on Bluetooth.
3. Make sure that the target device is
discoverable, so that your device can
find it. Refer to the instructions that
came with the device to find out how to
set it to discoverable mode.
4. Tap Scan. Your device will start to scan
for Bluetooth devices within range.
5. When you see the name of the target
device displayed in the Bluetooth
devices section, tap the name. Your
device then automatically tries to pair
with the target device. If automatic
pairing fails, enter the passcode
supplied with the target device.
Note: Due to different specifications and
features of other Bluetooth-compatible
devices, display and operations may be
different, and functions such as transfer
or exchange may not be possible with all
Bluetooth compatible devices.
DRAFT
, tap tap
cesces
rocess allows you rocess allows y
onnections between nnections between
nother Bluetooth device. Bluetooth device.
en two Bluetooth devices en two Bluetooth dev
me process. Once a pairing me process. Once a pairing
d, the devices will continue tod, the devices will continue to
their partnership and exctheir partnership an
without having to re-without having to r
reen, reen,
FT
evicevic
verable mverab
. Your device will. Your d
etooth devices within ra
etooth devices
hen you see the name of the
hen you see the name
device displayed in the Bluet
device displayed in the Blue
devices section, tap the ndevices section, tap the n
device then automaticadevice then
with the target devicwith the
pairing fails, enterring fa
supplied with tsupplied wit
NoteNote
: Due to : Due to
features of features of
devices,
differed
or or

84
Settings Bluetooth
Delete a Paired Device (Unpairing)
When you unpair from a Bluetooth device,
the two devices will no longer recognize
each other. To connect again, you’d need
to pair the devices.
1. Verify your Bluetooth is active.
2. From the Bluetooth settings page, tap
Settings next to the previously
paired device, and then tap Unpair to
delete the paired device.
Review Files Received via
Bluetooth
When you receive files from another device
via Bluetooth, you can access them from
Bluetooth settings.
1. From a Home screen, tap Apps >
Settings.
2. Tap Bluetooth > Moreoptions >
Received files.
Bluetooth Status Indicators
When Bluetooth is turnedon, displays in
the Status Bar.
DRAFT
other device ther device
ss them from ss them fro
een, tap en, ta
R
R
R
R
R
R
R
R
R
R
R
R
R
R
R
R
AppsApps
> >
oth oth
> >
D
D
D
D
Moreoptions Moreoption
>
d filesd files
.
h Status Indicatorsh Status Indicato
h is turnedon, h is turnedon,

85
Settings Airplane Mode
Airplane Mode
Airplane mode disconnects
your device from all networks
and turns off connectivity
features, such as phone calls
and Wi-Fi.
While in airplane mode, you
can use other features, such
as playing music, watching
videos, and other online
applications.
Turn Airplane Mode
OnorOff
1. From a Home screen, tap Apps >
Settings.
2. Tap the checkbox next to Airplane
mode to enable or disable the option.
Note: You can also control Airplane mode
from the Device options menu. Press and
hold the Power/Lock key, and then tap
Airplane mode.
DRAFT
u u
such h
tching c
online online
ane Modane M
OffOff
m a Home screen, tap m a Home screen, t
T
T
T
T
T
T
T
T
T
T
T
T
T
T
T
T
Ap
SettingsSett
.
2.2.
Tap theTap
checkboxhec
next to to
x
modemo
to enable or disato en
Note
: You can also con: You
from the Device optioe Devic
hold the hold
Power/Lower/
Airplane modAirplane mod

86
Settings Data Usage
Data Usage
Monitor your mobile data
usage.
Note: Your service provider may account for
data usage differently.
1. From a Home screen, tap Apps >
Settings > Datausage for options:
• Mobile data: Enable mobile data.
You can also control Mobile Data at
the Notification panel.
• Set mobile data limit: Disable your
mobile data connection when the
specified limit is reached. Drag the
red limit line to set the data usage
limit.
• Data usage cycle: Tap the menu,
and then choose a time period for
data usage. Data usage for the
period displays on the graph, along
with usage by application below.
2. Tap More options:
• Data roaming: Enable data roaming
on your device.
• Restrict background data: Restrict
some apps and services from
working unless you are connected to
a Wi-Fi network.
• Auto sync data: Set your accounts
to automatically sync.
• Show Wi-Fi usage: Display a Wi-Fi
tab that shows Wi-Fi usage.
• Mobile hotspots: Select Wi-Fi
networks that are mobile hotspots.
You can restrict apps from using
these networks, and you can
configure apps to warn you before
using these networks for large
downloads.
DRAFT
ta at at
Disable your Disable
on when the on when the
ached. Drag the ached. Drag th
set the data usage et the data usage
age cyclege cycle
: Tap the menu,: Tap the m
en choose a time period for en choose a time period
a usage. Data usage for the a usage. Data usage for the
iod displays on the graph, iod displays on the g
sage by application bsage by application
FT
optionsoptio
:
roamingroaming
: Enable da
: E
your device.your device.
Restrict background data
Restrict background d
:
some apps and services
some apps and services
working unless you areing u
a Wi-Fi network.a Wi-Fi
•
Auto sync dataAuto s
to automaticaautom
••
Show WShow W
tab thab th
•
M

87
Settings Location Services
Location Services
Some apps, such as Google
maps, may require one or
more location services be
turned on for full functionality.
Locating Method
1. From a Home screen, tap Apps >
Settings > Location.
2. Tap ON/OFF to turn on Location
services.
3. Tap Mode to select how your location is
determined:
• High accuracy: Use GPS, Wi-Fi, and
mobile networks.
• Power saving: Use Wi-Fi and mobile
networks (no GPS).
• GPS only: Use GPS only.
Recent Location Requests
Apps that have requested your location are
listed under Recent location requests.
1. From a Home screen, tap Apps >
Settings > Location.
2. Tap ON/OFF to turn on Location
services.
3. Tap an entry to view the app’s settings.
DRAFT
>
ation atio
how your location is how your locati
racyacy
: Use GPS, Wi-Fi, and : Use GPS, W
networks.networks.
wer savingwer sa
: Use Wi-Fi and moe Wi-Fi and mo
works (no GPS).works
nlynly
: Use GPS only.: Use GPS only
cation Rcatio
ave requested your
ave reques
der Recent location requ
der Recent loca
om a Home screen, tap om a Home screen, tap
T
T
T
T
T
T
T
T
T
T
T
T
T
T
T
T
A
F
F
F
F
F
F
F
F
F
SettingsSettings
>
Locationn
..
2.2
Tap Tap
ON/OFFN/OF
to turn on
services.services.
3.
Tap an entry to van ent

88
Settings Location Services
Location Reporting
Google uses Location Reporting to store
and use your device’s most recent location
data. Google apps, such as Google Maps,
can use this data to improve your search
results based on places that you have
visited.
1. From a Home screen, tap Apps >
Settings > Location.
2. Tap ON/OFF to turn on Location
services.
3. Tap Google Location Reporting for
options:
• Location Reporting: Allow Google
apps to use your device’s most
recent location data.
• Location History: Allow Google to
store a history of your location data.
Tap DELETELOCATION HISTORY
to permanently delete your location
history.
DRAFT
Google
’s most s mos
yy
: Allow Google to : Allow Google
of your location data. f your location data.
ELOCATION HISTORY TION HIS
nently delete your location nently delete your l
y.y.
89
Settings Printing
Printing
Print images and documents
to Samsung printers and
other compatible printers
(notincluded).
1. From a Home screen, tap Apps >
Settings > Printing.
2. Tap Add printer and choose a print
service.
DRAFT
t

90
Settings More Networks
More Networks
The More Networks settings
allow you to configure a
variety of communication
settings for your device.
Default Messaging App
If you have multiple messaging apps
installed, you can select which app should
be your default messaging app.
1. From a Home screen, tap Apps >
Settings.
2. Tap More networks > Default
Messaging App to select a default.
Mobile Networks
Control your device’s access to networks
and mobile data service.
1. From a Home screen, tap Apps >
Settings.
2. Tap More networks > Mobile networks
for options:
• Mobile data: Allow your device to
connect to a mobile data network.
• Data Roaming: Allow your device
to connect to data services while
roaming. Significantly higher charges
may result.
• Access Point Names: Select the
Access Point Name (APN) to use for
mobile connection to the Internet.
• Network operators: Choose
available and preferred networks.
DRAFT
p should ld
p p
R
R
R
R
R
R
R
R
R
R
R
R
R
R
R
AppsApps
>
ks s
> >
Default Default
p
to select a default.lect a defau
workswor
r device’s access t
r device’s
le data service.e data service
om a Home screen, tap om a Home screen, tap
T
T
T
T
T
T
T
T
T
T
T
T
T
T
T
T
A
F
F
F
F
F
F
F
F
F
SettingsSettings
.
2.2
Tap Tap
More networksore n
>
M
for options:for option
•
Mobile dataobile
:A
connect to nect to
••
Data RData R
to co
ro

91
Settings Sound Settings
Sound Settings
Configure the sounds and
vibrations used to indicate
notifications, screen touches,
and other activities.
Adjust the Volume
Set the system volume level, and
set default volume for call ringtones,
notifications, and other audio.
Tip: You can also set System volume from
the home screen by pressing the Volume
key.
1. From a Home screen, tap Apps >
Settings.
2. Tap Sound > Volume, and then drag
the sliders to set the default volume for:
• Ringtone
• Music, video, games and other media
• Notifications
• System
Select a Default Ringtone
Choose from preset ringtones or add your
own.
1. From a Home screen, tap Apps >
Settings.
2. Tap Sound > Ringtones.
3. Tap a ringtone to hear a preview, and
then tap Done to set it as your default
ringtone.
– or –
Tap Add to use an audio file as a
ringtone.
DRAFT
s,
volume from volume fro
ing the ing th
Volume lum
creen, tap tap
DR
DR
DR
DR
DR
DR
DR
DR
DR
DR
DR
DR
R
R
R
R
AppsApps
> >
nd nd
>>
VolumeVolume
, and then drag , and then dr
ders to set the default volumders to set the default volum
oneone
eo, games aneo, games an
efault Riefau
m preset ringtones
m preset ri
om a Home screen, tap om a Home screen, tap
T
T
T
T
T
T
T
T
T
T
T
T
T
T
T
T
A
F
F
F
F
F
F
F
F
F
SettingsSettings
.
2.2
Tap Tap
Sound ound
>
Ringtones
3.
Tap a ringtone to heap a ri
then tap tap
DoneD
to
ringtone.ringtone.
– or –– or –
Tap
A
rin

92
Settings Sound Settings
Change the Notification
Sound
Choose a sound for notifications, such as
for new messages and event reminders.
1. From a Home screen, tap Apps >
Settings.
2. Tap Sound > Notifications.
3. Tap a sound to preview it, and then
tap Done to set it as your default
notification sound.
Vibrate When Ringing
Your device can vibrate in addition to
ringing when you receive a call.
1. From a Home screen, tap Apps >
Settings.
2. Tap Sound > Vibrate when ringing to
turn the feature on.
Play Tones When Entering a
Phone Number
Play tone when the dialing keypad is
tapped.
1. From a Home screen, tap Apps >
Settings.
2. Tap Sound > Dialing keypad tone to
turn the feature on.
Play Tones When Touching
or Tapping theScreen
Play tones when you touch or tap the
screen to make selections.
1. From a Home screen, tap Apps >
Settings.
2. Tap Sound > Touch sounds to turn the
feature on.
Set the Screen Lock Sound
Play a sound when you unlock the screen.
1. From a Home screen, tap Apps >
Settings.
2. Tap Sound > Screen lock sound to
turn the feature on.
DRAFT
on to
all.all.
tap tap
R
R
R
R
R
R
R
R
R
R
R
R
R
R
R
R
Appsps
>
ibrate when ringingwhen ring
to to
ureure
on.on.
diadia
ome screen, tap ome scre
T
tingstings
.
p p
Sound Sou
>
Dialing keypad to
ng key
turn the featureturn t
on.
Play Tones Whenay Ton
or Tapping theor Tappin
Play tones whenPlay tones when
screen to mascreen to ma
1.1
From
A
A
A
A
A
A
A
A
A
2.2.
93
Settings Display Settings
Display Settings
Configure the appearance of
your phone’s display through
Display Settings.
Wallpaper
You can display a favorite picture or
choose from preloaded wallpapers.
1. From a Home screen, tap Apps >
Settings > Display.
2. Tap Wallpaper.
3. Tap Home screen, Lock screen, or
Homeandlock screen.
4. Tap a image to preview it, and then tap
Setaswallpaper.
• Tap From Gallery to use other
images on your phone as wallpaper.
Notification Panel
Customize which Quicksetting buttons
appear on the Notification Panel. You
can also customize which apps have
notifications appear on the Notification
Panel.
ŹFrom a Home screen, tap Apps >
Settings > Display >Notification
panel.
The following options are available:
• Application notifications: Tap each
application to configure notification
settings.
• Quick Setting Buttons: Tap and
drag quick settings buttons, which
appear in a row at the top of the
Notification Panel, to reorder them.
To use the default layout, tap Reset.
DRAFT
pps
>
ock screenock screen
, or , o
creenreen
..
to preview it, and then tap o preview it, and
llpaperllpaper
..
From Gallery From
to use other o use other
ges on your phone as wallges on your phone as
n Paneln Pa
which Quicksetting
which Quic
n the Notification Panel.
n the Notificatio
so customize which apps hav
so customize which a
fications appear on the Notifi
fications appear on the No
Panel.Panel.
ŹŹ
From a Home screen, tFrom a Ho
AF
AF
AF
AF
AF
AF
AF
AF
AF
SettingsSett
>
Displ
panelel
..
The followingThe following
•
Applicpplic
app

94
Settings Display Settings
Adjust the Screen Brightness
Adjust the screen brightness to suit your
surroundings or personal preference. You
may also want to adjust screen brightness
to conserve battery power.
1. From a Home screen, tap Apps >
Settings > Display > Brightness.
2. Drag the Brightness level slider to the
desired setting.
Note: You can also adjust Brightness from
the Notification Panel. Drag down the Status
Bar from the top of the screen to find the
Brightness options.
Automatically Rotate the
Screen
Use the front camera to rotate the screen
based on the orientation of your face.
1. From a Home screen, tap Apps >
Settings.
2. Tap Display.
3. Tap the checkbox by Auto rotate
screen to turn the feature on.
Set the Screen Timeout
Delay
Choose how long the display screen
remains lit after you tap the screen or
press any key.
1. From a Home screen, tap Apps >
Settings.
2. Tap Display > Screen timeout, and
then choose a time period.
DRAFT
e the e the
to rotate the screen o rotate the screen
ntation of your face.of your face.
me screen, tap me screen, t
DR
DR
DR
DR
DR
DR
DR
DR
DR
DR
DR
DR
DR
DR
DR
DR
AppsAp
>
ngsngs
..
isplayisplay
.
heckbox by heckb
Auto routo
rn the featurern the feature
he dhe d
you tap thyou ta
a Home screen, tap Home screen
T
T
T
T
T
T
T
T
T
T
T
T
T
SettingsSettin
.
Tap Tap
Display D
>
Screen timeo
time
then choose a time periodthen choose a time period

95
Settings Display Settings
Daydream (Screen Saver)
The Daydream setting controls what the
screen displays when the device is docked
(dock not included), or while charging. You
can choose to display colors, or display
photos stored on your device.
1. From a Home screen, tap Apps >
Settings.
2. Tap Display > Daydream. Tap ON/
OFF to turn Daydream on. Configure
options:
• Colors: Tap the selector to display a
changing screen of colors.
• Google Photos: Display pictures
from your Google Photos account.
Tap Settings for options.
• Photo Frame: Display pictures in
a photo frame. Tap Settings for
options.
• Photo Table: Display pictures in
a photo table. Tap Settings for
options.
3. Tap Preview to see a demonstration of
Daydream.
Change the Font Style and
Size
You can set the font style and size for all
text that displays on the screen.
1. From a Home screen, tap Apps >
Settings > Display.
2. Tap Font style to change the font style.
• Tap Download to find new fonts.
3. Tap Font size to adjust the size of the
text on the phone.
DRAFT
y a y a
ctures
s account. s acco
ptions.ptions.
splay pictures in splay pictures in
Tap ap
R
Settingstings
for for
ableable
: Display pictures in : Display pictures
oto table. Tap oto table. Tap
DR
T
Settings Settings
for
tions.tions.
viewview
to see a demonst to see a demo
t styt sty
on the son th
ome screen, tap ome scre
T
tingstings
>
DisplayDispla
.
p p
Font styleFon
to change the fo
hange
••
Tap T
Downloadwn
to find ned ne
3.
Tap Tap
Font sizeont s
to adjust
text on the phone.ext on t

96
Settings Lock Screen
Lock Screen
Choose a method for
unlocking your screen.
Different Screen Locks have
different levels of security
and options.
Set a Screen Lock
1. From a Home screen, tap Apps >
Settings.
2. Tap Lock Screen
3. Tap Screen lock to select a screen
lock and level of security:
• None: Never use a Lock screen.
• Swipe: Swipe the screen to unlock
it. This option provides no security.
• Pattern: A screen unlock pattern is
a tap gesture you create and use
to unlock your device. This option
provides medium security.
• PIN: Select a PIN to use for
unlocking the screen. This option
provides medium to high security.
• Password: Create a password for
unlocking the screen. This option
provides high security.
Screen Lock Options
Swipe Only
• Unlock effect: Set the visual effect
used when unlocking the screen.
• Help text: Show help information on
unlocking the screen on the Lock
screen.
Pattern Only
• Make pattern visible: Display the
pattern as your draw it.
Pattern, PIN, and Password
• Secured lock time: Set the length
of time to pass before locking the
screen.
DRAFT
Apps
>
o select a screen select a screen
f security:urity:
ver use a Lock screen. ver use a Lock sc
ee
: Swipe the screen to unloc: Swipe the screen to unlo
This option provides no secuThis option provides no secu
rnrn
: A screen unlock p: A screen unlock
sture you createsture you create
our deviceour device
um sum s
t a PIN to t a PI
ng the screen. Tng the
des medium to high s
des medium
PasswordPassw
: Create a passwor
ate a p
unlocking the screen. This
unlocking the screen. Th
provides high security.provides high security.
Screen Lock Optionreen Lo
Swipe Onlype On
••
Unlock effck eff
used whused w
•
Help
u

97
Settings Lock Screen
All Screen Locks
• Dual clock: Display both local and
home times on your Lock screen
when roaming.
• Show date: Display the date on the
Lockscreen.
• Camera shortcut: Display a Camera
shortcut on the Lock screen.
• Owner Information: Show owner
information on the Lock screen.
DRAFT

98
Settings Call Settings
Call Settings
Configure options for calling
with your phone.
To access Call settings:
1. From a Home screen, tap Apps >
Settings > Call.
2. Tap any of the settings below to
configure them:
• Set up call rejection messages:
Create or edit messages to reject
incoming calls.
• Answering/ending calls:
Configure your phone to answer
calls by pressing the Home key
and end calls by pressing the
Power/Lock key.
• Additional settings: Configure TTY
mode and hearing aid options.
• Ringtones and keypad tones:
Select or create your default
ringtone, set the phone to vibrate
when ringing, and play a tone when
the dialing keypad is tapped.
• Noise reduction: Suppress
background noise during calls.
• Voicemail service: Select your
voicemail service. Your carrier is
selected by default.
• Voicemail settings: Configure your
voicemail.
DRAFT
ages
:
to reject
g callsg call
:
phone to answer phone to answer
sing the he
Home Home
key key
alls by pressing the alls by pressing t
Lock Lock
key.key.
ditional settingsditional settings
: Configure T: Configure T
de and hearing aid optionsde and hearing aid op
nes and keypad tones and keypad
T
create your dcreate your d
the phothe pho
nd
nd
keypad iskeyp
reductionreductio
: Suppr
ckground noise during c
kground noise
Voicemail serviceVoicemail service
: Select yo
: Se
voicemail service. Your ca
voicemail service. Your c
selected by default.ted b
••
Voicemail settingsVoicem
voicemail.voice

99
Settings Application Manager
Application Manager
You can download and
install new applications on
your device. Use Application
manager settings to manage
your downloaded and
preloaded applications.
Warning: Because this device can be
configured with system software not
provided by or supported by Google or any
other company, end-users operate these
devices at their own risk.
Memory Usage
See how memory is being used by
Downloaded or Running applications.
1. From a Home screen, tap Apps>
Settings > Applicationmanager.
2. Swipe across the screen to display
DOWNLOADED, SD CARD, RUNNING,
or ALL to display memory usage for
that category of applications.
The graph on the DOWNLOADED tab
shows used and free device memory.
The graph on the RUNNING tab shows
used and free RAM.
DRAFT
ogle or any
erate these erate thes
sagesage
emory is being used
emory is b
ded or Running applicati
ded or Running
om a Home screen, tap om a Home screen, tap
T
T
T
T
T
T
T
T
T
T
T
T
T
T
T
T
A
F
F
F
F
F
F
F
F
F
SettingsSettings
>
Applicationm
tion
2.2
Swipe across the screeSwipe acros
DOWNLOADED, SD CDOWNLO
or ALL to display mALL to
that category ofatego
The graph oThe graph o
shows ushows u
The g
u

100
Settings Application Manager
Downloaded
Displays apps you have downloaded onto
your device.
1. From a Home screen, tap Apps>
Settings > Applicationmanager.
2. Tap DOWNLOADED to view a list of all
the downloaded applications on your
device.
• To switch the order of the
DOWNLOADED list, tap More
options > Sort by size or Sort by
name.
• To reset all of your application
preferences, tap More options >
Reset app preferences.
• Tap an application to view and
update information about the
application, including memory usage,
default settings, and permissions.
The following options are displayed:
-Force stop: Stop an app that is
misbehaving. Restart your device
if stopping an app, process, or
service causes your device to
stop working correctly.
-Install/Uninstall updates: Delete
the application from the device or
uninstall updates made to apps
that cannot be deleted.
-Move to SD card: Move this app
to your microSD card.
-Clear data: Clear application data
from memory.
-Clear cache: Clear an
application’s temporary memory
storage.
-Clear defaults: Clear an
application’s customization.
-Permissions: View information
about the application’s access to
your device and data.
DRAFT
ptions
>
o view and o view and
n about the n abo
cluding memory usage, uding memory usage,
ngs, and permissions. d permissi
wing options are displayed:wing options are di
rce stoprce s
: Stop an app that istop an app that
misbehaving. Restart your demisbehaving. Restart your de
stopping an app, processtopping an app, pro
ce causes your dece causes your d
orking correctorking correct
T
nstallnstall
ory.ory.
cachecach
: Clear
plication’s temporar
plication’s t
storage.storag
--
Clear defaultsC
: Clear an
: Clea
application’s customiza
cation’s customiz
-
Permissionsermi
: View
about the applicabo
your device ayou

101
Settings Application Manager
SD Card
Displays apps you have downloaded onto
your memory card (not included).
1. From a Home screen, tap Apps>
Settings > Applicationmanager.
2. Tap SD CARD to view a list of all the
downloaded applications on your SD
card.
• To switch the order of the SD CARD
list, tap More options > Sort by
size or Sort by name.
• To reset your application
preferences, tap More options >
Reset app preferences.
Note: When you reset app preferences, you
will not lose any app data.
3. Tap an application to view and update
information about the application,
including memory usage, default
settings, and permissions.
Running Services
View and control services running on your
device.
1. From a Home screen, tap Apps>
Settings > Applicationmanager.
2. Tap RUNNING to view a list of running
services.
All the applications that are currently
running on the device display.
3. Tap Show cached processes to
display all the cached processes that
are running. Tap Showservices in use
to switch back.
4. Tap one of the applications to view
application information.
• Stop: Stops the application from
running on the device. This is
usually done prior to uninstalling the
application. (Not all services can
be stopped. Stopping services may
have undesirable consequences on
the application or Android System.)
• Report: Report failure and other
application information.
Note: Options vary by application.
DRAFT
ons
>
eferences, you eferences
to view and update to view and update
ut the application, e application,
mory usage, default ory usage, defau
nd permissions.nd permissio
screen, tscree
ss
> >
ApplicatioAp
UNNING NNIN
to view a list of
to view
ices.ices
All the applications that are c
All the applications that are
running on the device disrunning on the device dis
3.
Tap Tap
Show cached prShow
display all the cachsplay a
are running. Tapunning
to switch bacto switch bac
4.4.
Tap one Tap one
applic
•
102
Settings Accounts
Accounts
Set up and manage
accounts, including your
Google Account, Samsung
account, email, and social
networking accounts.
Depending on the account,
you can choose to
synchronize your calendar,
contacts, and other types of
content.
Add an Account
1. From a Home screen, tap Apps >
Settings.
2. Tap Accounts > Add account.
3. Tap one of the account types.
4. Follow the prompts to enter your
credentials and set up the account.
Synchronize Accounts
1. From a Home screen, tap Apps >
Settings.
2. Tap Accounts > (account type).
3. Tap an account to view the sync
settings for that account.
• Check individual data items to sync.
DRAFT
t,
endar, eda
er types of er types
countcoun
Home screen, tap Home scre
T
T
T
ttingsttings
.
ap ap
AccountsAc
>
Add account
d acc
3.3.
Tap one of the account typTap one of the account typ
4.
Follow the prompts to Follow the
credentials and setredent
SynchroniSynchroni
1.1.
From a
A
A
A
A
A
A
A
A
A
S
2.2.

103
Settings Accounts
Account Settings
Each account has its own set of settings.
In addition, you can configure common
settings for all accounts of the same type.
Note: Account settings and available
features vary between account types and
service providers. Contact your service
provider for more information on your
account’s settings.
1. From a Home screen, tap Apps >
Settings.
2. Tap Accounts > (account type).
3. Tap an account to configure that
account’s settings.
• Tap Settings or other available
options to configure common
settings for all accounts of this type.
Delete an Account
1. From a Home screen, tap Apps >
Settings.
2. Tap Accounts > (account type).
3. Tap the account, and then tap
Moreoptions > Removeaccount.
DRAFT
available available
common common
counts of this type.counts of this ty
AccountAccou
Home screen, tap Home screen, tap
DR
DR
DR
DR
DR
DR
DR
DR
DR
DR
DR
DR
DR
DR
DR
DR
AppsApps
>
ettingsetting
.
ountsounts
> (account typent ty
ount, and thenount, and then
RemovRemov

104
Settings Backup and Reset
Backup and Reset
Back up your data to Google
servers. You can also reset
your device to its factory
defaults.
Backup and Restore
Enable backup of your information to
Google servers.
1. From a Home screen, tap Apps >
Settings.
2. Tap Backup and reset for options:
• Back up my data: Enable back up
of application data, Wi-Fi passwords,
and other settings to Google servers.
• Backup account: Select a Google
account to be used as your backup
account.
• Automatic restore: Enable
automatic restoration of settings
from Google servers. When enabled,
backed-up settings are restored
when you reinstall an application.
Factory Data Reset
Return your device to its factory defaults.
Warning: This action permanently erases
ALL data from the device, including Google
or other account settings, system and
application data and settings, downloaded
applications, as well as your music, photos,
videos, and other files.
1. From a Home screen, tap Apps >
Settings.
2. Tap Backup and reset > Factory data
reset.
3. Tap Reset device and follow the
prompts to perform the reset.
DRAFT
R
R
R
Appsp
>
setset
for options: for options:
data
: Enable back up : Enable back up
on data, Wi-Fi passwords, n data, Wi-Fi pa
er settings to Google servers.er settings to Google
kup accountkup a
: Select a GoogSelect a Goog
count to be used as your bacount to be used as yo
unt.unt.
restorerest
:
tic restoration otic rest
Google servers. Whe
Google serv
acked-up settings are resto
acked-up settings
when you reinstall an applica
when you reinstall an a
Factory Data ReseFactory Da
Return your device to rn you
Warning: Warning:
This actiThis
ALL data from thALL data from th
or other accoor other acco
applicationap
applicat
videov

105
Settings Accessibility
Accessibility
Accessibility services are
special features that make
using the device easier for
those with certain physical
disabilities.
Note: You can download additional
accessibility applications from the Google
Play Store.
1. From a Home screen, tap Apps >
Settings.
2. Tap Accessibility for options:
MORE SETTINGS
• Direct access: Press the Home key
three times to open the accessibility
options screen.
• Answering/ending calls: Select the
methods you can use to answer and
end a call.
• Single tap mode: Tap to stop or
snooze alarms, calendar events, and
timer alerts, and accept or reject
incoming calls.
SERVICES
Additional accessibility apps may be
downloaded from the Google Play
Store. Certain accessibility services
you install may be configured here.
VISION
• TalkBack: Speak feedback aloud to
help blind and low-vision users.
-TalkBack can collect all of the
text you enter, except passwords,
including personal data and credit
card numbers. It may also log your
user interface interactions with the
device.
• Speak passwords: Read the
characters aloud as you enter your
passwords.
• Font size: Set the font size.
• Negative colors: Reverse the
display of onscreen colors from
White text on a Black background to
Black text on a White background.
DRAFT
gle e
R
Apps
>
options:optio
S
ess
: Press the s the
HomeHo
key
mes to open the accessibility mes to open the acce
ns screen. ns scr
swering/ending callsswering/ending calls
: Sele
ods you can use to ansods you can use to
all.all.
modemode
: Ta: Ta
ca
ca
accessibility apaccess
aded from the Google
aded from the
e. Certain accessibility serv
e. Certain accessib
ou install may be configured h
ou install may be configu
VISIONVIS
••
TalkBackTalkBac
: Speak fee
help blind and lowhelp b
-
TalkBack cTalkB
text you xt you
includinclud
caca

106
Settings Accessibility
• Magnification gestures: Use
exaggerated gestures such as
triple-tapping, double pinching, and
dragging two fingers across the
screen.
• Notification reminder: Play a
beep when a notification for a call,
message, and so on, has been
missed.
• Accessibility shortcut: Quickly
enable accessibility features in two
quick steps. Tap ON/OFF to turn the
feature on.
• Text-to-speech options: Set
your preferred TTS engine and
options. For more information, see
Text-To-Speech Options.
HEARING
• Flash notification: Set your camera
light to blink whenever you receive a
notification.
• Turn off all sounds: For privacy, turn
off all notifications and audio.
• Google subtitles (CC): Use Google
subtitles with multimedia files when
available. Tap Google subtitles (CC)
for options.
• Samsung subtitles (CC): Use
Samsung subtitles with multimedia
files when available Tap Samsung
subtitles (CC) for options.
• Mono audio: Switch audio from
stereo to mono for use with one
earphone.
• Sound balance: Use the slider to
set the Left and Right balance when
using a stereo device.
DEXTERITY
• Press and hold delay: Select a time
interval for this tap gesture.
INTERACTION
• Interaction control: Customize the
way you interact with applications
and settings on your phone.
DRAFT
R
and
ation, see
nsns
..
ionon
: Set your camera : Set your camera
whenever you receive a ever you receive a
n.n.
off all soundsoff all sounds
: For privacy, tu: For privacy
all notifications and audio.all notifications and audio.
le subtitles (CC)le subtitles (CC)
: Use:
with multimedia with multimedia
ap Google ap Google
forfor
diodio
: Switch : S
to mono for use to mono
phone. hone
Sound balanceSoun
: Use the slid
: Use
set the Left and Right bala
set the Left and Right ba
using a stereo device.a stereo device.
DEXTERITYDEXTERIT
•
Press and hold Press
interval for thiterval
INTERACTIOINTERACTIO
•
InteraIntera
way
a

107
Settings Language and Input Settings
Language and Input Settings
Configure your device’s
language and input settings.
Set Your Default Language
1. From a Home screen, tap Apps >
Settings.
2. Tap Language and input > Language.
3. Select a language from the list.
Select Your Default Keyboard
orInput Method
1. From a Home screen, tap Apps >
Settings.
2. Tap Language and input > Default.
3. Select a keyboard.
Note: Additional keyboards can be
downloaded from the Google Play Store.
DRAFT
gege
..
ur Defaulur De
t Methodt Method
m a Home screen, tap m a Home screen, t
T
T
T
T
T
T
T
T
T
T
T
T
T
T
T
T
Ap
SettingsSett
.
2.2.
Tap Tap
Language and inputguage and input
>
3.
Select a keyboard.Select a k
Note
: Additional keybAdditio
downloaded from tdownloaded fro

108
Settings Language and Input Settings
Samsung Keyboard Settings
Configure options for using the Samsung
keyboard.
1. From a Home screen, tap Apps >
Settings.
2. Tap Language and input.
3. Tap Settings next to Samsung
keyboard for options:
• English (US): Choose a keyboard
layout.
• Select input languages: Choose
which languages are available on
the keyboard. To switch between
languages, slide the space bar
sideways.
• Predictive text: Allow Predictive text
to suggest words matching your text
entries, and, optionally, complete
common words automatically.
Predictive text can learn your
personal writing style from your
contacts, messages, Gmail, and
social networking sites — improving
its accuracy of predicting your text
entries.
• Additional keyboard settings provide
assistance with capitalization,
punctuation, and much more.
Google Voice Typing
Settings
Speak rather than type your text entries
using Google Voice Typing.
1. From a Home screen, tap Apps >
Settings.
2. Tap Language and input.
3. Tap Settings next to Google voice
typing for options:
• Choose input languages: Select
languages for Google voice typing.
• Block offensive words: Hide words
many people find offensive are in
results of Google voice searches.
Offensive words are replaced in
results with a placeholder (####).
• Offline speech recognition:
Download and install speech
recognition engines, allowing you to
use voice input while not connected
to the network.
DRAFT
on
ween
e bar
ow Predictive text ow Predictive
s matching your text s matching your text
optionally, complete nally, complete
words automatically. ords automatical
ve text can learn your ve text can learn your
onal writing style from your onal writing style from your
ntacts, messages, Gmail, andntacts, messages, Gmail, and
al networking sitesal networking sites
——
imp
uracy of predicting uracy of predictin
boarboar
ypeype
ice Typingice Ty
ome screen, tap ome scre
T
tingstings
.
p p
Language and inputLanguage and input
.
..
Tap Tap
F
Settings etti
next to Goo Go
typing for options:typing for op
•
Choose input lanChoo
languages for anguag
••
Block offeBlock offe
many pemany p
resulul
Off

109
Settings Language and Input Settings
Voice Search
Use Google voice recognition to perform
Google searches using spoken commands.
To perform a voice search, tap in the
Google search bar or widget. Or say “Ok
Google” to launch a Google search (if the
hotword detection option is enabled).
1. From a Home screen, tap Apps >
Settings.
2. Tap Language and input > Voice
search for options:
• Language: Choose a language.
• Speech output: Select a mode for
speech output.
• “Ok Google” Detection to launch
a Google search whenever you say
“OkGoogle.”
• Additional options include offline
speech recognition, blocking
offensive words, and use with a
headset.
Text-To-Speech Options
Configure your Text-To-Speech (TTS)
options. TTS is used for various
accessibility features, such as TalkBack.
For more information, see Accessibility.
1. From a Home screen, tap Apps >
Settings.
2. Tap Language and input > Text-to-
speech options for options:
• Choose either the Samsung or
Goggle text-to-speech engine. Tap
Settings next to each TTS engine
for options.
• Speech rate: Set the speed at which
the text is spoken.
• Listen to an example: Play a sample
of speech synthesis (available if
voice data is installed).
• Default language status: Display
the default language in use.
DRAFT
de for
on on
to launch to launc
henever you say henever you s
ptions include offline nclude offl
ecognition, blocking ecognition, blockin
ve words, and use with a ve words, and use with
dset.dset.
T
res, sures, s
mation, see mation
A
Home screen, tap Home scree
T
T
T
T
T
T
ettingsetting
.
Tap Tap
Language and inputLanguage and input
>
Te
speech optionsspeech opt
for options
tions
••
Choose either the SChoose
Goggle textGogg
-
to
-
sp
AF
Settings Set
ne
for options.option
••
SpeechSpeec
the teete
•
L
110
Settings Language and Input Settings
Mouse/Trackpad Settings
Configure settings for using an optional
mouse or trackpad (not included).
1. From a Home screen, tap Apps >
Settings.
2. Tap Language and input > Pointer
speed to set the speed of the pointer.
DRAFT

111
Settings Date and Time Settings
Date and Time Settings
By default, your device
receives date and time
information from the wireless
network.
When you are outside
network coverage, you may
want to set date and time
information manually using
the date and time settings.
1. From a Home screen, tap Apps >
Settings.
2. Tap Date and time.
3. Set the date, time, time zone, time
format, and date format.
y y
e
using us
settings.settings.
een, tap en, tap
R
R
R
R
R
R
R
R
R
R
R
R
R
R
R
R
AppsApps
> >
and timeand time
..
e date, time, time zone, time e date, time, time zone, time
, and date format., and
112
Settings Ultra Power Saving Mode
Ultra Power Saving Mode
Conserve battery power by
automatically adjusting the
screen brightness, limiting
the performance of the CPU,
and other power reduction
activities.
Ultra power saving mode
saves even more battery
power by using a gray scale
theme on the Home screen
and limiting the number of
usable apps.
1. From a Home screen, tap Apps
> Settings > Ultra power saving
mode.
2. Tap ON/OFF to turn the feature on.
3. Read the information on the page that
appears and tap Turn on to activate
Ultra power saving mode.
4. Tap the Add icons to add more apps
to the Home screen.
5. To turn off Ultra power saving mode, tap
Moreoptions > Turn off Ultra power
saving mode > Turn off.
DRAFT
e
tery ey
gray scale gray sca
Home screen Home scree
the number of number of
pps.pps.
e screen, tae scre
ngsngs
> >
Ultra pow U
p p
ON/OFF ON/
to turn the feature
rn the
Read the information on the
Read the information on the
appears and tap appears and
Turn on
Ultra power saving moUltra pow
4.
Tap the the
AF
Add
ic
to the Home scHome
5.5.
To turn off To turn off
A
A
A
A
Morere
savin

113
Settings Battery
Battery
View how battery power is
used for device activities.
1. From a Home screen, tap Apps >
Settings.
2. Tap Battery > Show battery
percentage to display the battery
charge percentage next to the battery
icon on the Status Bar.
Battery Chart
The battery level displays as a percentage.
The amount of time the battery has been
used also displays.
ŹTap the Battery chart to see History
details.
Apps and OS Usage
Battery usage displays in percentages per
application.
1. Tap Screen, Wi-Fi, Android System,
Cellstandby, Android OS, or an app to
view how they are affecting battery use.
2. Tap Refresh to update the listing.
Note: Other applications may be running
that affect battery use.
DRAFT
as a percentage. as a percent
battery has been battery has bee
ery charty
to see History o see H
OS UsagOS U
ge displays in perc
ge display
on.on.
ap ap
ScreenSc
,
Wi-Fi
,
Android Sy
Andro
CellstandbyCellstandb
,
Android
OSOS
view how they are affectinview how the
2.
Tap Tap
AF
RefreshR
to up
Note
: Other applicatOther a
that affect battery that affect batter

114
Settings Storage
Storage
View the device memory and
usage, or mount, unmount,
or format an optional
memory card (not included).
Device Memory
View and manage the memory used by the
device.
1. From a Home screen, tap Apps >
Settings.
2. Tap Storage.
• The DEVICE MEMORY displays Total
space and Available space.
• The amounts of memory used by
Applications, Pictures and videos,
Audio, Downloads, Cached data,
and Miscellaneous files are also
displayed.
To increase available memory:
1. Tap Cached data to clear all cached
data for all apps.
2. Tap Miscellaneous files, select
unnecessaryfiles (or tap Select all),
andthentap Delete.
Memory Card (SD Card)
Once an optional memory card (not
included) has been installed in your
device, the card memory displays as Total
space and Available space.
Install a Memory Card
You can use an optional microSD or
microSDHC card (not included) to add
additional memory space to your device.
Note: The micro SD card slot is above the
SIM card slot.
DRAFT
y the the
R
R
R
Appsp
>
MEMORYMORY
displays Total splays Total
Available space.vailable space.
mounts of memory used by mounts of memory used
lications, Pictures and videoslications, Pictures and video
dio, Downloads, Cached dadio, Downloads, Cach
Miscellaneous files areMiscellaneous files a
dd
ailable meailable
ed data ed data
to clear
or all apps.r all apps.
p p
Miscellaneous filesMiscellaneous files
, select
,
unnecessaryfiles (or tap unnecessaryfiles (or tap
Se
S
FT
andthentap andthentap
FT
Delete
.
Memory Card mory
Once an optionaOnce an option
included) has ncluded) has
device, the device, the
space an
InIn
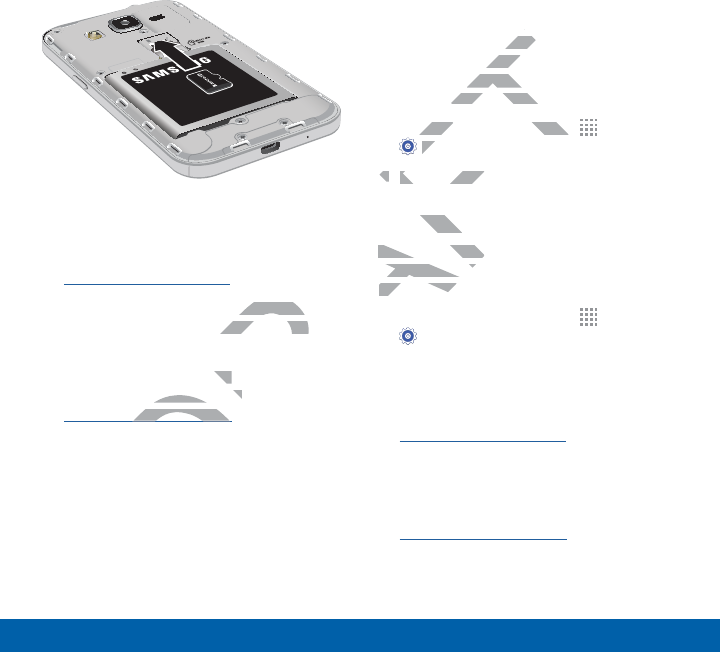
115
Settings Storage
FPO
1. Remove the back cover.
For more information, see
Remove the Back Cover.
2. With the gold contacts facing down,
carefully slide the memory card into
the slot.
3. Replace the back cover.
For more information, see
Replace the Back Cover.
Mount a Memory Card
When you install an optional memory card,
it is automatically mounted (connected to
the device) and prepared for use. However,
should you unmount the card without
removing it from the device, you will need
to mount it before it can be accessed.
1. From a Home screen, tap Apps >
Settings.
2. Tap Storage > Mount SD card.
Remove a Memory Card
Warning: To prevent damage to information
stored on the memory card, unmount the
card before removing it from the device.
1. From a Home screen, tap Apps >
Settings.
2. Tap Storage > Unmount SD card.
3. Remove the back cover.
For more information, see
Remove the Back Cover.
4. Carefully slide the card out.
5. Replace the back cover.
For more information, see
Replace the Back Cover.
DRAFT
cing down, cing down
mory card into mory card into
ck cover. ver.
ormation, see ormation, see
he Back Coverhe Back Cover
.
epareepar
mount the camount
rom the device, yorom the d
t before it can be acce
t before it can
om a Home screen, tap om a Home screen, tap
T
T
T
T
T
T
T
T
T
T
T
T
T
T
T
T
Ap
F
F
F
F
F
F
F
F
F
A
SettingsSe
.
2.2.
Tap Ta
Storageorage
>
Mount SD
Remove a Memoove a
Warning: Warn
To prevTo pre
stored on the mtored on the m
card before card before
1.
From
A
A
A
A
A
A
A
A
22

116
Settings Storage
Format a Memory Card
Warning: When formatting an SD card,
you should backup your music and photo
files that are stored on the card because
formatting the SD card deletes all the stored
data.
1. From a Home screen, tap Apps >
Settings.
2. Tap Storage > Format SD card and
follow the prompts.
DRAFT

117
Settings Security
Security
Secure your device and
protect your data with
Security settings.
Device Administration
Manage your device administrators and
application installation privileges.
1. From a Home screen, tap Apps >
Settings.
2. Tap Security for options:
• Device administrators: Add or
remove device administrators.
• Unknown sources: Enable
installation of applications that are
not from the Google Play Store.
• Verify apps: Block or warn before
installing apps that may cause harm.
Warning: Enabling installation of third-party
applications can cause your device and
personal data to be more vulnerable to
attacks by unknown sources.
Encrypt Your Data
Require a numeric PIN or password to
decrypt your device each time you power
it on or encrypt the data on a memory card
(not included) each time it is connected.
1. From a Home screen, tap Apps >
Settings.
2. Tap Security for options:
• Tap Encrypt device and follow the
prompts to encrypt all data on your
device.
• Tap Encrypt external SD card to
encrypt data on a memory card (not
included).
DRAFT
pps
>
atorsators
: Add or or
administrators.dministrators.
sources
: Enable Enable
on of applications that are on of applications tha
om the Google Play Store.om the Google Play Store.
rify appsrify ap
: Block or warn ber wa
ing apps that may cauing apps that may c
ing installationing installation
ause youause you
ore
ore
our Dataour D
umeric PIN or pass
umeric PIN
your device each time yo
your device eac
r encrypt the data on a mem
r encrypt the data on
t included) each time it is con
t included) each time it is c
1.1.
From a Home screen, tapFrom a Home
AF
AF
AF
AF
AF
AF
AF
AF
AF
SettingsSetting
.
2.
Tap p
SecuritySec
for o
••
Tap
EncrypEncry
prompts prompts
deviceevice
•
Ta

118
Settings Security
Set Up or Change Your
SIMCard Lock
Use this option to set up your password
when one is first required or change your
current password.
1. From a Home screen, tap Apps >
Settings.
2. Tap Security > Set up SIM card lock
and follow the prompts.
Prevent Others From
Reactivating Your Device
Stop others from reactivating your device
after it has been reset.
1. From a Home screen, tap Apps >
Settings.
2. Tap Security > Reactivation lock to
enable the feature.
View Passwords
Display password characters briefly as you
type them.
1. From a Home screen, tap Apps >
Settings.
2. Tap Security > Make passwords
visible to turn the feature on.
Credential Storage
Manage your security certificates. If a
certificate authority (CA) certificate gets
compromised or for some other reason
you do not trust it, you can disable or
remove it.
1. From a Home screen, tap Apps >
Settings.
2. Tap Security for options:
• Storage type: Select a storage
location for credential contents.
• Trusted credentials: Display
certificates in your device’s ROM
and other certificates you have
DRAFT
e
ur device
tap tap
R
R
R
R
R
R
R
R
R
R
R
R
R
R
R
R
Appsps
>
Reactivation lockivation lock
to
eature.ature.
screen, tscree
ss
..
ecurity curit
>
Make passwo
Make
ble ble
to turn the featureto turn the featu
on.
Credential StorageCredential
Manage your security cenage you
certificate authority (Ccate a
compromised or focompromised o
you do not trustyou do not trust
remove it.remove it.
1.1
From
A
A
A
A
A
A
A
A
A
2.2.

119
Settings Security
installed.
• Install from phone storage: Install a
new certificate from storage.
• Clear credentials: Erase the
credential contents from the device
and reset the password.
DRAFT

120
Settings About Your Device
About Your Device
View information about your
device, including status,
legal information, hardware
and software versions, and a
tutorial.
1. From a Home screen, tap Apps >
Settings.
2. Tap About device, and then tap items
for more details:
• Software update: Check for and
install available software updates.
• Status: View the status of the
battery, network, and other
information about your device.
• Legal information: View your
device’s open source licenses and
Google legal information.
• Device name: View and change your
device’s name.
• Additional device information
includes the Model number, Android
version, Build number, and more.
Software Update
Use Software update to update your
device’s software.
1. From a Home screen, tap Apps >
Settings.
2. Tap About device > Software update.
3. Follow the prompts to check for
available software updates to download
and install.
DRAFT
p items
eck for and eck for and
ftware updates.ftware updates
he status of the status of the
work, and other d other
on about your device.on about your devic
al informational information
: View your : View your
vice’s open source licenses vice’s open source licenses
gle legal information.gle legal information
meme
: View : V
name. name
itional device informatio
tional device
ncludes the Model number, A
ncludes the Model n
version, Build number, and
version, Build number, a
Software UpdateSoftware
Use Software updateoftwar
device’s software.device’s softwa
1..
From a HomFrom a Hom
A
A
A
A
A
A
A
A
A
SettiSetti
2.
Tap
3.3