Samsung Electronics Co SMG892U Multi-band GSM/EDGE/CDMA/UMTS/LTE Phone with Bluetooth, WLAN, RFID and ANT+ User Manual 1
Samsung Electronics Co Ltd Multi-band GSM/EDGE/CDMA/UMTS/LTE Phone with Bluetooth, WLAN, RFID and ANT+ Users Manual 1
Contents
- 1. Users Manual 1
- 2. Users Manual 2
Users Manual 1


![77AppsManage the InboxThere are several tools available from the Inbox screen.1. From a Home screen, swipe up to access Apps. 2. Tap Email.• Tap a message to read and reply or forward it.• Tap Search to search for key words in your emailinbox.• Tap Edit for additional message options.• Tap Sort by to customize how messages display.View Multiple Email AccountsView email you receive for multiple accounts, or you can view email accounts individually.1. From a Home screen, swipe up to access Apps. 2. Tap Email.3. Tap Mailbox at the top left of the screen to choose a different view:• [Account name]: View email for only one email account.• All accounts: View all email in a combined inbox.](https://usermanual.wiki/Samsung-Electronics-Co/SMG892U.Users-Manual-1/User-Guide-3612919-Page-84.png)


![Settings 184Synchronize AccountsYou can synchronize your calendar, contacts, and other types of accounts.1. From a Home screen, swipe up to access Apps.2. Tap Settings > Cloud and accounts > Accounts > [Accounttype].3. Tap an account to view the sync settings for that account.4. Tap individual data items to sync.5. Tap Moreoptions > Sync now to synchronize the account.Account SettingsEach account has its own set of settings. In addition, you can configure common settings for all accounts of the same type.Account settings and available features vary between account types and service providers. Contact your service provider for more information on your account’s settings.1. From a Home screen, swipe up to access Apps.2. Tap Settings > Cloud and accounts > Accounts > [Accounttype].3. Tap an account to configure that account’s sync settings.4. Tap other available options for the account type.](https://usermanual.wiki/Samsung-Electronics-Co/SMG892U.Users-Manual-1/User-Guide-3612919-Page-191.png)
![Settings 185Remove an AccountYou can remove accounts from your device.1. From a Home screen, swipe up to access Apps.2. Tap Settings > Cloud and accounts > Accounts > [Accounttype].3. Tap the account and then tap Moreoptions > Removeaccount.Backup and RestoreBack up your data to your Samsung or Google Accounts.Samsung AccountEnable backup of your information to your Samsung account.1. From a Home screen, swipe up to access Apps.2. Tap Settings > Cloud and accounts > Backupand restore for options:• Backup settings: Configure your Samsung account to back up your data.• Restore: Use your Samsung account to restore your backupdata.](https://usermanual.wiki/Samsung-Electronics-Co/SMG892U.Users-Manual-1/User-Guide-3612919-Page-192.png)
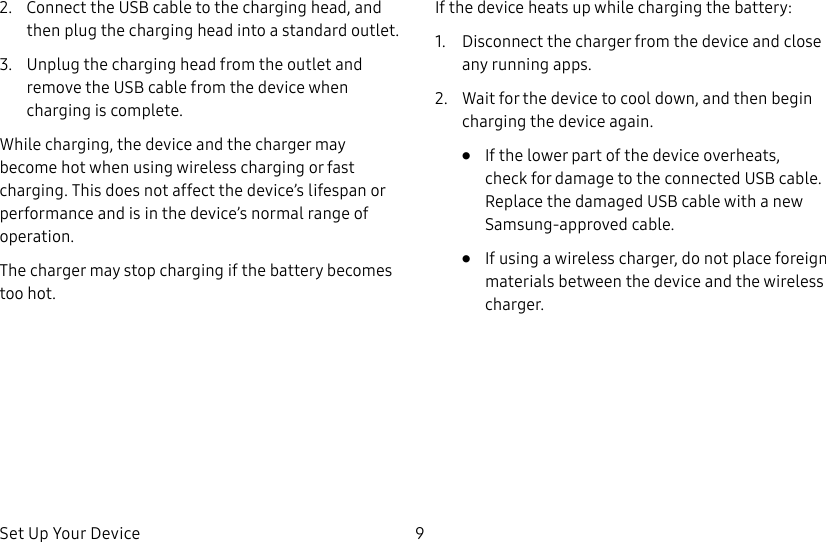
![202LegalModification of SoftwareSamsung is not liable for performance issues or incompatibilities caused by your editing of registry settings, or your modification of Operating System (OS) software. Using custom OS software may cause your device and applications to work improperly. Your carrier may not permit users to download certain software, such as custom OS.Samsung KnoxSamsung Knox is Samsung’s security platform and is a mark for a Samsung device tested for security with enterprise use in mind. Additional licensing fee may be required. For more information about Knox, please refer to: samsung.com/us/knoxMaintaining Water and Dust ResistanceCAUTION! To avoid electric shock and damage to your device, do not charge device while it is wet or in an area where it could get wet. Do not handle device, charger or cords with wet hands while charging.This device is rated IP68 using the Ingress Protection rating system. Your device has been tested in a controlled environment and shown to be water and dust resistant in certain circumstances (meets requirements of classification IP68 as described by the international standard IEC 60529 – Degrees of Protection provided by Enclosures [IP Code]; test conditions: 15-35°C, 86-106 kPa, 5.0 feet, for 30 minutes). Despite this classification, your device is not impervious to water damage in any situation. It is important that all compartments are closed tightly.](https://usermanual.wiki/Samsung-Electronics-Co/SMG892U.Users-Manual-1/User-Guide-3612919-Page-209.png)
![15Section 4: Health & Safety InformationThis section outlines important safety precautions associated with using your device. The terms “mobile device” or “cell phone” are used in this section to refer to your device. Read this information before using your mobile device.Caution! To avoid electric shock and damage to your device, do not charge device while it is wet or in an area where it could get wet. Do not handle device, charger or cords with wet hands while charging.Maintaining Dust and Water ResistanceThis device is rated IP68 using the Ingress Protection rating system. The device has been tested in a controlled environment and shown to be water and dust resistant in certain circumstances (meets requirements of classication IP68 as described by the international standard IEC 60529 - Degrees of Protection provided by Enclosures [IP Code]; test conditions: 15-35°C, 86-106 kPa, 5.0 feet, for 30 minutes). Despite this classication, the device is not impervious to water damage in any situation. It is important that all compartments are closed tightly.](https://usermanual.wiki/Samsung-Electronics-Co/SMG892U.Users-Manual-1/User-Guide-3612919-Page-227.png)
![21meets FCC SAR guidelines. The FCC has granted an Equipment Authorization for this device with all reported SAR levels evaluated as in compliance with the FCC RF exposure guidelines.SAR values for body-worn operations are measured when used with an accessory that contains no metal and that positions the device a minimum of 1.5 cm from the body.The FCC safety limit for body-worn SAR is 1.6 watts per kilogram (1.6 W/kg).This device has FCC ID: A3LSMG892U and [Model Number: SM-G892U]. The FCC ID is also printed somewhere on the mobile device. Depending on the device, you may need to remove the battery to nd the FCC ID.SAR information for this and other devices can be found on the FCC website at: www.fcc.gov/oet/ea/Follow the instructions on the website to use the FCC ID to nd SAR values for the device. SAR information for this device can also be found on Samsung’s website at: www.samsung.com/sar FCC Part 15 Information and Notices](https://usermanual.wiki/Samsung-Electronics-Co/SMG892U.Users-Manual-1/User-Guide-3612919-Page-233.png)